
Kubernetes supports nodes that run Microsoft Windows.
Kubernetes supports worker nodes
running either Linux or Microsoft Windows.
🛇 This item links to a third party project or product that is not part of Kubernetes itself. More information
The CNCF and its parent the Linux Foundation take a vendor-neutral approach
towards compatibility. It is possible to join your Windows server
as a worker node to a Kubernetes cluster.
You can install and set up kubectl on Windows
no matter what operating system you use within your cluster.
If you are using Windows nodes, you can read:
- Networking On Windows
- Windows Storage In Kubernetes
- Resource Management for Windows Nodes
- Configure RunAsUserName for Windows Pods and Containers
- Create A Windows HostProcess Pod
- Configure Group Managed Service Accounts for Windows Pods and Containers
- Security For Windows Nodes
- Windows Debugging Tips
- Guide for Scheduling Windows Containers in Kubernetes
or, for an overview, read:
- Windows containers in Kubernetes
- Guide for Running Windows Containers in Kubernetes
Items on this page refer to third party products or projects that provide functionality required by Kubernetes. The Kubernetes project authors aren’t responsible for those third-party products or projects. See the CNCF website guidelines for more details.
You should read the content guide before proposing a change that adds an extra third-party link.
Observe the following prerequisites prior to using Kubernetes on Windows Server
nodes.
-
Install MKE.
-
Create a single-node, linux-only cluster.
Note
Running Kubernetes on Windows Server nodes is only supported on MKE 3.3.0
and later. If you want to run Kubernetes on Windows Server nodes on a
cluster that is currently running an earlier version of MKE than 3.3.0, you
must perform a fresh install of MKE 3.3.0 or later.
Add Windows Server nodes
-
Log in to the MKE web UI.
-
In the left-side navigation panel, navigate to
Shared Resources > Nodes and click Add Node. -
Under NODE TYPE, select Windows. Windows Server
nodes can only be workers. -
Optional. Specify custom listen and advertise addresses by using the
relevant slider. -
Copy the command generated at the bottom of the Add Node page,
which includes thejoin-token.Example command:
docker swarm join \
--token SWMTKN-1-2is7c14ff43tq1g61ubc5egvisgilh6m8qxm6dndjzgov9qjme-4388n8bpyqivzudz4fidqm7ey \
172.31.2.154:2377
-
Add your Windows Server node to the MKE cluster by running the
docker swarm join command copied in the previous step.
Validate your cluster
To validate your cluster using the MKE web UI:
-
Log in to the MKE web UI.
-
In the left-side navigation panel, navigate to Nodes.
A green circle indicates a healthy node state. All nodes should be
green. -
Change each node orchestrator to Kubernetes:
-
Click on the node.
-
In the upper-right corner, click the slider icon.
-
In the Role section of the Details tab, select
Kubernetes under ORCHESTRATOR TYPE. -
Click Save.
-
Repeat the above steps for each node.
-
To validate your cluster using the command line:
-
View the status of all the nodes in your cluster:
Your nodes should all have a status value of
Ready, as in the
following example:NAME STATUS ROLES AGE VERSION user-135716-win-0 Ready <none> 2m16s v1.17.2 user-7d985f-ubuntu-0 Ready master 4m55s v1.17.2-docker-d-2 user-135716-win-1 Ready <none> 1m12s v1.17.2
-
Change each node orchestrator to Kubernetes:
docker node update <node name> --label-add com.docker.ucp.orchestrator.kubernetes=true
-
Repeat the last step for each node.
-
Deploy a workload on your cluster to
verify that everything works as expected.
Troubleshoot
If you cannot join your Windows Server node to the cluster, confirm that the
correct processes are running on the node.
-
Verify that the
calico-nodeprocess is operational:PS C:\> Get-Process calico-node
Example output:
Handles  NPM(K)    PM(K)      WS(K)     CPU(s)     Id  SI ProcessName
-------  ------    -----      -----     ------     --  -- -----------
    276      17    33284      40948      39.89   8132   0 calico-node
-
Verify that the
kubeletprocess is operational:PS C:\> Get-Process kubelet
Example output:
Handles  NPM(K)    PM(K)      WS(K)     CPU(s)     Id  SI ProcessName
-------  ------    -----      -----     ------     --  -- -----------
    524      23    47332      73380     828.50   6520   0 kubelet
-
Verify that the
kube-proxyprocess is operational:PS C:\> Get-Process kube-proxy
Example output:
Handles  NPM(K)    PM(K)      WS(K)     CPU(s)     Id  SI ProcessName
-------  ------    -----      -----     ------     --  -- -----------
    322      19    25464      33488      21.00   7852   0 kube-proxy
-
If any of the process verifications indicate a problem, review the container
logs that bootstrap the Kubernetes components on the Windows node:docker container logs (docker container ls --filter name=ucp-kubelet-win -q) docker container logs (docker container ls --filter name=ucp-kube-proxy -q) docker container logs (docker container ls --filter name=ucp-tigera-node-win -q) docker container logs (docker container ls --filter name=ucp-tigera-felix-win -q)
Deploy a workload on Windows Server
The following procedure deploys a complete web application on IIS servers as
Kubernetes Services. The example workload includes an MSSQL database and a
load balancer. The procedure includes the following tasks:
-
Namespace creation
-
Pod and deployment scheduling
-
Kubernetes Service provisioning
-
Application workload deployment
-
Pod, Node, and Service configuration
-
Download and configure the client bundle.
-
Create the following namespace file:
demo-namespace.yaml
apiVersion: v1
kind: Namespace
metadata:
  name: demo
-
Create a namespace:
kubectl create -f demo-namespace.yaml
-
Create the following Windows web server file:
win-webserver.yaml
apiVersion: v1
kind: Service
metadata:
  name: win-webserver
  labels:
    app: win-webserver
  namespace: demo
spec:
  ports:
  - port: 80
    targetPort: 80
  selector:
    app: win-webserver
  type: NodePort
---
apiVersion: apps/v1
kind: Deployment
metadata:
  name: win-webserver
  labels:
    app: win-webserver
  namespace: demo
spec:
  replicas: 2
  selector:
    matchLabels:
      app: win-webserver
  template:
    metadata:
      labels:
        app: win-webserver
    spec:
      affinity:
        podAntiAffinity:
          requiredDuringSchedulingIgnoredDuringExecution:
          - labelSelector:
              matchExpressions:
              - key: app
                operator: In
                values:
                  - win-webserver
            topologyKey: "kubernetes.io/hostname"
      containers:
      - name: windowswebserver
        image: mcr.microsoft.com/windows/servercore:ltsc2019
        command:
        - powershell.exe
        - -command
        - "<#code used from https://gist.github.com/wagnerandrade/5424431#> ; $$listener = New-Object System.Net.HttpListener ; $$listener.Prefixes.Add('http://*:80/') ; $$listener.Start() ; $$callerCounts = @{} ; Write-Host('Listening at http://*:80/') ; while ($$listener.IsListening) { ;$$context = $$listener.GetContext() ;$$requestUrl = $$context.Request.Url ;$$clientIP = $$context.Request.RemoteEndPoint.Address ;$$response = $$context.Response ;Write-Host '' ;Write-Host('> {0}' -f $$requestUrl) ;  ;$$count = 1 ;$$k=$$callerCounts.Get_Item($$clientIP) ;if ($$k -ne $$null) { $$count += $$k } ;$$callerCounts.Set_Item($$clientIP, $$count) ;$$ip=(Get-NetAdapter | Get-NetIpAddress); $$header='<html><body><H1>Windows Container Web Server</H1>' ;$$callerCountsString='' ;$$callerCounts.Keys | % { $$callerCountsString+='<p>IP {0} callerCount {1} ' -f $$ip[1].IPAddress,$$callerCounts.Item($$_) } ;$$footer='</body></html>' ;$$content='{0}{1}{2}' -f $$header,$$callerCountsString,$$footer ;Write-Output $$content ;$$buffer = [System.Text.Encoding]::UTF8.GetBytes($$content) ;$$response.ContentLength64 = $$buffer.Length ;$$response.OutputStream.Write($$buffer, 0, $$buffer.Length) ;$$response.Close() ;$$responseStatus = $$response.StatusCode ;Write-Host('< {0}' -f $$responseStatus)  } ; "
      nodeSelector:
        kubernetes.io/os: windows
Note
If the Windows nodes in your MKE cluster are Windows Server 2022, edit
the image tag in the win-webserver.yaml file fromltsc2019to
ltsc2022. -
Create the web service:
kubectl create -f win-webserver.yaml
Expected output:
service/win-webserver created
deployment.apps/win-webserver created
-
Verify creation of the Kubernetes Service:
kubectl get service --namespace demo
Expected output:
NAME            TYPE       CLUSTER-IP    EXTERNAL-IP   PORT(S)        AGE
win-webserver   NodePort   10.96.29.12   <none>        80:35048/TCP   12m
-
Review the pods deployed on your Windows Server worker nodes with
inter-pod affinity and anti-affinity.Note
After creating the web service, it may take several minutes for the pods
to enter a ready state.kubectl get pod --namespace demo
Expected output:
NAME                            READY   STATUS    RESTARTS   AGE
win-webserver-8c5678c68-qggzh   1/1     Running   0          6m21s
win-webserver-8c5678c68-v8p84   1/1     Running   0          6m21s
-
Review the detailed status of pods deployed:
kubectl describe pod win-webserver-8c5678c68-qggzh --namespace demo
-
From a kubectl client, access the web service using node-to-pod
communication across the network:kubectl get pods --namespace demo -o wide
Example output:
NAME                            READY   STATUS    RESTARTS   AGE   IP              NODE              NOMINATED NODE   READINESS GATES
win-webserver-8c5678c68-qggzh   1/1     Running   0          16m   192.168.77.68   user-135716-win-1 <none>           <none>
win-webserver-8c5678c68-v8p84   1/1     Running   0          16m   192.168.4.206   user-135716-win-0 <none>           <none>
-
SSH into the master node:
ssh -o ServerAliveInterval=15 root@<master-node>
-
Use
curlto access the web service by way of theCLUSTER-IPlisted
for thewin-webserverservice.Example output:
<html><body><H1>Windows Container Web Server</H1><p>IP 192.168.77.68 callerCount 1 </body></html>
-
Run the
curlcommand a second time. You can see the second request
load-balanced to a different pod:Example output:
<html><body><H1>Windows Container Web Server</H1><p>IP 192.168.4.206 callerCount 1 </body></html>
-
From a kubectl client, access the web service using pod-to-pod communication
across the network:kubectl get service --namespace demo
Expample output:
NAME            TYPE       CLUSTER-IP    EXTERNAL-IP   PORT(S)        AGE
win-webserver   NodePort   10.96.29.12   <none>        80:35048/TCP   12m
-
Review the pod status:
kubectl get pods --namespace demo -o wide
Example output:
NAME                            READY   STATUS    RESTARTS   AGE   IP              NODE              NOMINATED NODE   READINESS GATES
win-webserver-8c5678c68-qggzh   1/1     Running   0          16m   192.168.77.68   user-135716-win-1 <none>           <none>
win-webserver-8c5678c68-v8p84   1/1     Running   0          16m   192.168.4.206   user-135716-win-0 <none>           <none>
-
Exec into the web service:
kubectl exec -it win-webserver-8c5678c68-qggzh --namespace demo cmd
Example output:
Microsoft Windows [Version 10.0.17763.1098]
(c) 2018 Microsoft Corporation. All rights reserved.
-
Use
curlto access the web service:Example output:
<html><body><H1>Windows Container Web Server</H1><p>IP 192.168.77.68
callerCount 1 <p>IP 192.168.77.68 callerCount 1 </body></html>
Edit This Page
Note: These instructions were recently updated based on Windows Server platform enhancements and the Kubernetes v1.9 release
Kubernetes version 1.5 introduced Alpha support for Windows Server
Containers based on the Windows Server 2016 operating system. With the
release of Windows Server version 1709 and using Kubernetes v1.9 users
are able to deploy a Kubernetes cluster either on-premises or in a
private/public cloud using a number of different network topologies
and CNI plugins. Some key feature improvements for Windows Server
Containers on Kubernetes include:
- Improved support for pods! Shared network namespace (compartment) with multiple Windows Server containers (shared kernel)
- Reduced network complexity by using a single network endpoint per pod
- Kernel-Based load-balancing using the Virtual Filtering Platform (VFP) Hyper-v Switch Extension (analogous to Linux iptables)
- Container Runtime Interface (CRI) pod and node level statistics
- Support for kubeadm commands to add Windows Server nodes to a Kubernetes environment
The Kubernetes control plane (API Server, Scheduler, Controller Manager, etc) continue to run on Linux, while the kubelet and kube-proxy can be run on Windows Server 2016 or later
Note: Windows Server Containers on Kubernetes is a Beta feature in Kubernetes v1.9
Get Windows Binaries
We recommend using the release binaries that can be found at https://github.com/kubernetes/kubernetes/releases/latest. Under the CHANGELOG you can find the Node Binaries link for Windows-amd64, which will include kubeadm, kubectl, kubelet and kube-proxy.
If you wish to build the code yourself, please refer to detailed build instructions here.
Prerequisites
In Kubernetes version 1.9 or later, Windows Server Containers for Kubernetes are supported using the following:
- Kubernetes control plane running on existing Linux infrastructure (version 1.9 or later).
- Kubenet network plugin setup on the Linux nodes.
- Windows Server 2016 RTM or later. Windows Server version 1709 or later is preferred; it unlocks key capabilities like shared network namespace.
- Docker Version 17.06.1-ee-2 or later for Windows Server nodes (Linux nodes and Kubernetes control plane can run any Kubernetes supported Docker Version).
Networking
There are several supported network configurations with Kubernetes v1.9 on Windows, including both Layer-3 routed and overlay topologies using third-party network plugins.
- Upstream L3 Routing — IP routes configured in upstream ToR
- Host-Gateway — IP routes configured on each host
- Open vSwitch (OVS) & Open Virtual Network (OVN) with Overlay — overlay networks (supports STT and Geneve tunneling types)
- [Future — In Review] Overlay — VXLAN or IP-in-IP encapsulation using Flannel
- [Future] Layer-3 Routing with BGP (Calico)
The selection of which network configuration and topology to deploy depends on the physical network topology and a user’s ability to configure routes, performance concerns with encapsulation, and requirement to integrate with third-party network plugins.
Future CNI Plugins
An additional two CNI plugins [win-l2bridge (host-gateway) and win-overlay (vxlan)] are in PR review. These two CNI plugins, when ready, can either be used directly or with Flannel.
Linux
The above networking approaches are already supported on Linux using a bridge interface, which essentially creates a private network local to the node. Similar to the Windows side, routes to all other pod CIDRs must be created in order to send packets via the “public” NIC.
Windows
Windows supports the CNI network model and uses plugins to interface with the Windows Host Networking Service (HNS) to configure host networking and policy. At the time of this writing, the only publicly available CNI plugin from Microsoft is built from a private repo and available here wincni.exe. It uses an l2bridge network created through the Windows Host Networking Service (HNS) by an administrator using HNS PowerShell commands on each node as documented in the Windows Host Setup section below. Source code for the future CNI plugins will be made available publicly.
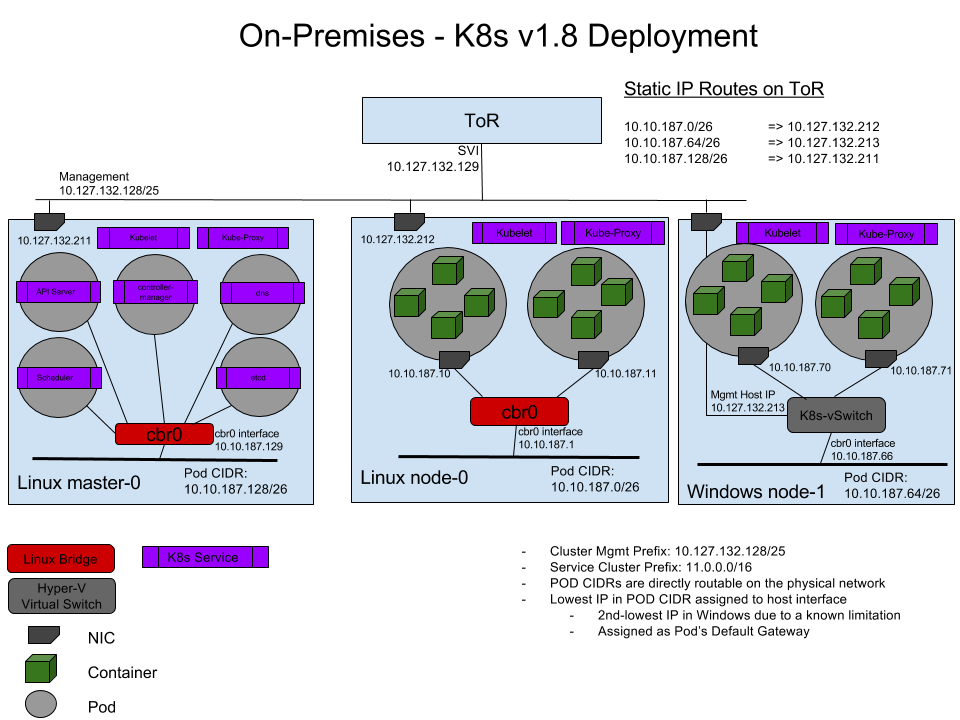
Upstream L3 Routing Topology
In this topology, networking is achieved using L3 routing with static IP routes configured in an upstream Top of Rack (ToR) switch/router. Each cluster node is connected to the management network with a host IP. Additionally, each node uses a local ‘l2bridge’ network with a pod CIDR assigned. All pods on a given worker node will be connected to the pod CIDR subnet (‘l2bridge’ network). In order to enable network communication between pods running on different nodes, the upstream router has static routes configured with pod CIDR prefix => Host IP.
The following example diagram illustrates the Windows Server networking setup for Kubernetes using Upstream L3 Routing Setup:
Host-Gateway Topology
This topology is similar to the Upstream L3 Routing topology with the only difference being that static IP routes are configured directly on each cluster node and not in the upstream ToR. Each node uses a local ‘l2bridge’ network with a pod CIDR assigned as before and has routing table entries for all other pod CIDR subnets assigned to the remote cluster nodes.
Using OVN with OVS
The following diagram gives a general overview of the architecture and interaction between components:
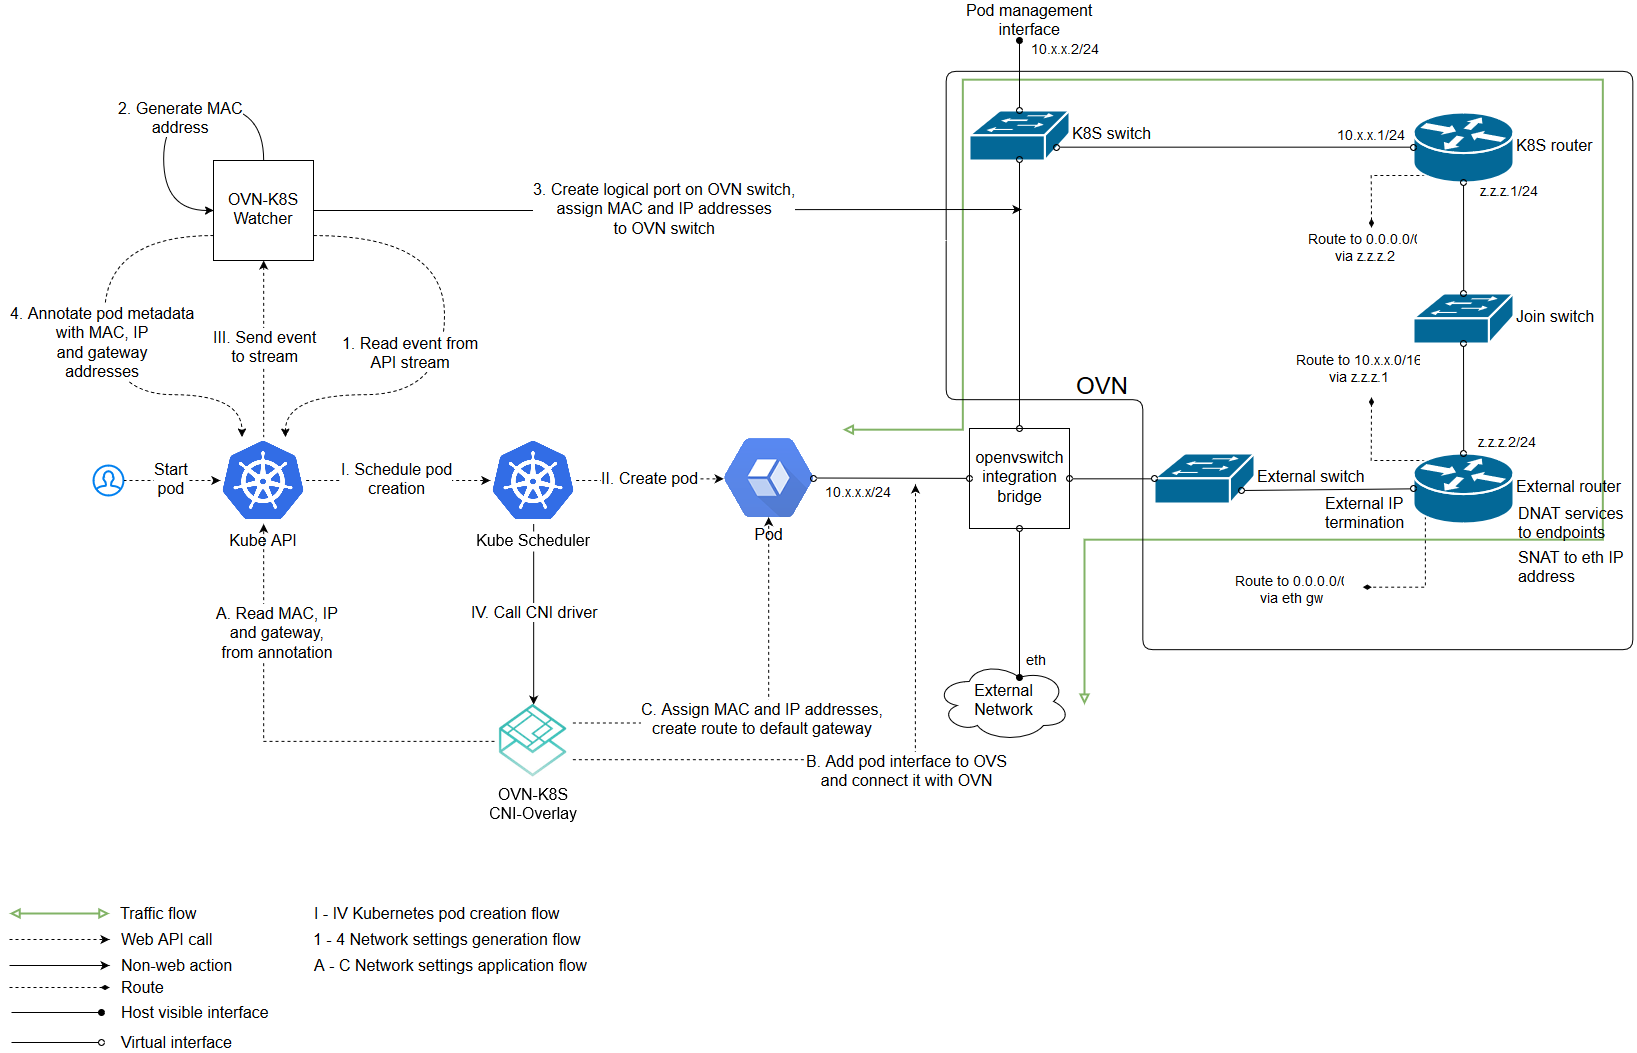
(The above image is from https://github.com/openvswitch/ovn-kubernetes#overlay-mode-architecture-diagram)
Due to its architecture, OVN has a central component which stores your networking intent in a database. Other components i.e. kube-apiserver, kube-controller-manager, kube-scheduler etc. can be deployed on that central node as well.
Setting up Windows Server Containers on Kubernetes
To run Windows Server Containers on Kubernetes, you’ll need to set up both your host machines and the Kubernetes node components for Windows. Depending on your network topology, routes may need to be set up for pod communication on different nodes.
Host Setup
For 1. Upstream L3 Routing Topology and 2. Host-Gateway Topology
Linux Host Setup
- Linux hosts should be setup according to their respective distro documentation and the requirements of the Kubernetes version you will be using.
- Configure Linux Master node using steps here
- [Optional] CNI network plugin installed.
Windows Host Setup
- Windows Server container host running the required Windows Server and Docker versions. Follow the setup instructions outlined by this help topic: https://docs.microsoft.com/en-us/virtualization/windowscontainers/quick-start/quick-start-windows-server.
- Get Windows Binaries kubelet.exe, kube-proxy.exe, and kubectl.exe using instructions
- Copy Node spec file (kube config) from Linux master node with X.509 keys
- Create the HNS Network, ensure the correct CNI network config, and start kubelet.exe using this script start-kubelet.ps1
- Start kube-proxy using this script start-kubeproxy.ps1
- [Only required for #2 Host-Gateway mode] Add static routes on Windows host using this script AddRoutes.ps1
More detailed instructions can be found here.
Windows CNI Config Example
Today, Windows CNI plugin is based on wincni.exe code with the following example, configuration file. This is based on the ToR example diagram shown above, specifying the configuration to apply to Windows node-1. Of special interest is Windows node-1 pod CIDR (10.10.187.64/26) and the associated gateway of cbr0 (10.10.187.66). The exception list is specifying the Service CIDR (11.0.0.0/8), Cluster CIDR (10.10.0.0/16), and Management (or Host) CIDR (10.127.132.128/25).
Note: this file assumes that a user previous created ‘l2bridge’ host networks on each Windows node using <Verb>-HNSNetwork cmdlets as shown in the start-kubelet.ps1 and start-kubeproxy.ps1 scripts linked above
{
    "cniVersion": "0.2.0",
    "name": "l2bridge",
    "type": "wincni.exe",
    "master": "Ethernet",
    "ipam": {
        "environment": "azure",
        "subnet": "10.10.187.64/26",
        "routes": [{
            "GW": "10.10.187.66"
        }]
    },
    "dns": {
        "Nameservers": [
            "11.0.0.10"
        ]
    },
    "AdditionalArgs": [{
            "Name": "EndpointPolicy",
            "Value": {
                "Type": "OutBoundNAT",
                "ExceptionList": [
                    "11.0.0.0/8",
                    "10.10.0.0/16",
                    "10.127.132.128/25"
                ]
            }
        },
        {
            "Name": "EndpointPolicy",
            "Value": {
                "Type": "ROUTE",
                "DestinationPrefix": "11.0.0.0/8",
                "NeedEncap": true
            }
        },
        {
            "Name": "EndpointPolicy",
            "Value": {
                "Type": "ROUTE",
                "DestinationPrefix": "10.127.132.213/32",
                "NeedEncap": true
            }
        }
    ]
}
DNS configurations
DNS configurations for Windows containers are set by CNI plugins which support dns capabilities. To enable dns capabilities, the following options should be included in the CNI configuration file:
{
    ...
    "capabilities": {"dns": true},
}
The following DNS options from kubelet will be passed to CNI plugins:
- servers: List of DNS servers.
- searches: List of DNS search domains.
- options: List of DNS options.
e.g.
"dns" {
  "servers": ["10.0.0.10"],
  "searches": ["default.svc.cluster.local","svc.cluster.local","cluster.local"],
  "options": []
}
For 3. Open vSwitch (OVS) & Open Virtual Network (OVN) with Overlay
Note: Fully automated setup via Ansible playbooks is available.
For manual setup, continue the following steps.
Linux Host Setup
Setting up the central node and the components needed is out of scope of this document. You can read these instructions for that.
Adding a Linux minion is also out of scope and you can read it here: Linux minion.
Windows Host Setup
Adding a Windows minion requires you to install OVS and OVN binaries. Windows Server container host running the required Windows Server and Docker versions. Follow the setup instructions outlined by this help topic. This type of deployment is supported starting with Windows Server 2016 RTM.
Compiling OVS and generating the installer will not be treated in this document. For a step by step instruction please visit this link.
For a prebuilt certified installer please visit this link and download the latest version of it.
The following guide uses the prebuilt certified installer.
Installing OVS can be done either via the GUI dialogs or unattended. Adding a Windows host to your setup requires you to have OVN Host together with the default installation features. Below is the dialog image on what needs to be installed:
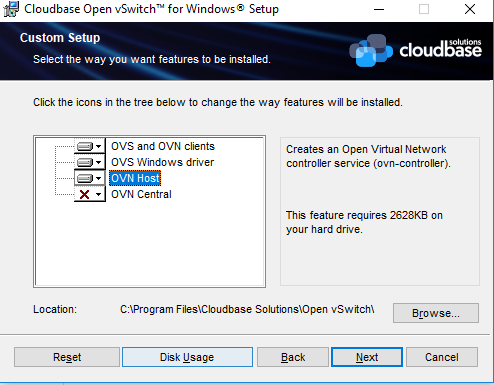
For an unattended installation please use the following command:
cmd /c 'msiexec /i openvswitch.msi ADDLOCAL="OpenvSwitchCLI,OpenvSwitchDriver,OVNHost" /qn'
The installer propagates new environment variables. Please open a new command shell or logoff/logon to ensure the environment variables are refreshed.
For overlay, OVS on Windows requires a transparent docker network to function properly. Please use the following to create a transparent docker network which will be used by OVS. From powershell:
docker network create -d transparent --gateway $GATEWAY_IP --subnet $SUBNET `
    -o com.docker.network.windowsshim.interface="$INTERFACE_ALIAS" external
Where $SUBNET is the minion subnet which will be used to spawn pods on (the one which will be used by kubernetes), $GATEWAY_IP is the first IP of the $SUBNET and $INTERFACE_ALIAS is the interface used for creating the overlay tunnels (must have connectivity with the rests of the OVN hosts).
Example:
docker network create -d transparent --gateway 10.0.1.1 --subnet 10.0.1.0/24 `
    -o com.docker.network.windowsshim.interface="Ethernet0" external
After creating the docker network please run the next commands from powershell. (creates an OVS bridge, adds the interface under the bridge and enables the OVS forwarding switch extension)
$a = Get-NetAdapter | where Name -Match HNSTransparent
Rename-NetAdapter $a[0].Name -NewName HNSTransparent
Stop-Service ovs-vswitchd -force; Disable-VMSwitchExtension "Cloudbase Open vSwitch Extension";
ovs-vsctl --no-wait del-br br-ex
ovs-vsctl --no-wait --may-exist add-br br-ex
ovs-vsctl --no-wait add-port br-ex HNSTransparent -- set interface HNSTransparent type=internal
ovs-vsctl --no-wait add-port br-ex $INTERFACE_ALIAS
Enable-VMSwitchExtension "Cloudbase Open vSwitch Extension"; sleep 2; Restart-Service ovs-vswitchd
Besides of the above, setting up a Windows host is the same as the Linux host. Follow the steps from here.
Windows CNI Setup
Today, Windows OVN&OVS CNI plugin is based on ovn_cni.exe which can be downloaded from here. A sample of CNI config file is the following:
{
    "name": "net",
    "type": "ovn_cni.exe",
    "bridge": "br-int",
    "isGateway": "true",
    "ipMasq": "false",
    "ipam": {
         "type": "host-local",
         "subnet": "$SUBNET"
         }
}
Where $SUBNET is the subnet that was used in the previous docker network create command.
For a complete guide on Google Cloud Platform (GCP), namely Google Compute Engine (GCE) visit this.
For a complete guide on Amazon Web Services (AWS) visit this.
Starting the Cluster
To start your cluster, you’ll need to start both the Linux-based Kubernetes control plane, and the Windows Server-based Kubernetes node components (kubelet and kube-proxy). For the OVS & OVN only the kubelet is required.
Starting the Linux-based Control Plane
Use your preferred method to start Kubernetes cluster on Linux. Please note that Cluster CIDR might need to be updated.
Support for kubeadm join
If your cluster has been created by kubeadm,
and your networking is setup correctly using one of the methods listed above (networking is setup outside of kubeadm), you can use kubeadm to add a Windows node to your cluster. At a high level, you first have to initialize the master with kubeadm (Linux), then set up the CNI based networking (outside of kubeadm), and finally start joining Windows or Linux worker nodes to the cluster. For additional documentation and reference material, visit the kubeadm link above.
The kubeadm binary can be found at Kubernetes Releases, inside the node binaries archive. Adding a Windows node is not any different than adding a Linux node:
kubeadm.exe join --token <token> <master-ip>:<master-port> --discovery-token-ca-cert-hash sha256:<hash>
See joining-your-nodes for more details.
Supported Features
The examples listed below assume running Windows nodes on Windows Server 1709. If you are running Windows Server 2016, the examples will need the image updated to specify image: microsoft/windowsservercore:ltsc2016. This is due to the requirement for container images to match the host operating system version when using process isolation. Not specifying a tag will implicitly use the :latest tag which can lead to surprising behaviors. Please consult with https://hub.docker.com/r/microsoft/windowsservercore/ for additional information on Windows Server Core image tagging.
Scheduling Pods on Windows
Because your cluster has both Linux and Windows nodes, you must explicitly set the nodeSelector constraint to be able to schedule pods to Windows nodes. You must set nodeSelector with the label beta.kubernetes.io/os to the value windows; see the following example:
|
|
|---|
|
Note: This example assumes you are running on Windows Server 1709, so uses the image tag to support that. If you are on a different version, you will need to update the tag. For example, if on Windows Server 2016, update to use
"image": "microsoft/iis"which will default to that OS version.
Secrets and ConfigMaps
Secrets and ConfigMaps can be utilized in Windows Server Containers, but must be used as environment variables. See limitations section below for additional details.
Examples:
Windows pod with secrets mapped to environment variables
|
|
|---|
|
Windows Pod with configMap values mapped to environment variables
|
|
|---|
|
Volumes
Some supported Volume Mounts are local, emptyDir, hostPath. One thing to remember is that paths must either be escaped, or use forward slashes, for example mountPath: "C:\\etc\\foo" or mountPath: "C:/etc/foo".
Persistent Volume Claims are supported for supported volume types.
Examples:
Windows pod with a hostPath volume
|
|
|---|
|
Windows pod with multiple emptyDir volumes
|
|
|---|
|
DaemonSets
DaemonSets are supported
|
|
|---|
|
Metrics
Windows Stats use a hybrid model: pod and container level stats come from CRI (via dockershim), while node level stats come from the “winstats” package that exports cadvisor like data structures using windows specific perf counters from the node.
Container Resources
Container resources (CPU and memory) could be set now for windows containers in v1.10.
|
|
|---|
|
Hyper-V Containers
Hyper-V containers are supported as experimental in v1.10. To create a Hyper-V container, kubelet should be started with feature gates HyperVContainer=true and Pod should include annotation experimental.windows.kubernetes.io/isolation-type=hyperv.
|
|
|---|
|
Kubelet and kube-proxy can now run as Windows services
Starting with kubernetes v1.11, kubelet and kube-proxy can run as Windows services.
This means that you can now register them as Windows services via sc command. More details about how to create Windows services with sc can be found here.
Examples:
To create the service:
PS > sc.exe create <component_name> binPath= "<path_to_binary> --windows-service <other_args>"
CMD > sc create <component_name> binPath= "<path_to_binary> --windows-service <other_args>"
Please note that if the arguments contain spaces, it must be escaped. Example:
PS > sc.exe create kubelet binPath= "C:\kubelet.exe --windows-service --hostname-override 'minion' <other_args>"
CMD > sc create kubelet binPath= "C:\kubelet.exe --windows-service --hostname-override 'minion' <other_args>"
To start the service:
PS > Start-Service kubelet; Start-Service kube-proxy
CMD > net start kubelet && net start kube-proxy
To stop the service:
PS > Stop-Service kubelet (-Force); Stop-Service kube-proxy (-Force)
CMD > net stop kubelet && net stop kube-proxy
To query the service:
PS > Get-Service kubelet; Get-Service kube-proxy;
CMD > sc.exe queryex kubelet && sc qc kubelet && sc.exe queryex kube-proxy && sc.exe qc kube-proxy
Known Limitations for Windows Server Containers with v1.9
Some of these limitations will be addressed by the community in future releases of Kubernetes:
- Shared network namespace (compartment) with multiple Windows Server containers (shared kernel) per pod is only supported on Windows Server 1709 or later
- Using Secrets and ConfigMaps as volume mounts is not supported
- Mount propagation is not supported on Windows
- The StatefulSet functionality for stateful applications is not supported
- Horizontal Pod Autoscaling for Windows Server Container pods has not been verified to work end-to-end
- Hyper-V isolated containers are not supported.
- Windows container OS must match the Host OS. If it does not, the pod will get stuck in a crash loop.
- Under the networking models of L3 or Host GW, Kubernetes Services are inaccessible to Windows nodes due to a Windows issue. This is not an issue if using OVN/OVS for networking.
- Windows kubelet.exe may fail to start when running on Windows Server under VMware Fusion issue 57110
- Flannel and Weavenet are not yet supported
- Some .Net Core applications expect environment variables with a colon (
:) in the name. Kubernetes currently does not allow this. Replace colon (:) with double underscore (__) as documented here. - As cgroups are not supported on windows, kubelet.exe should be started with the following additional arguments
--cgroups-per-qos=false --enforce-node-allocatable=""issue 61716
Next steps and resources
- Support for Windows is in Beta as of v1.9 and your feedback is welcome. For information on getting involved, please head to SIG-Windows
- Troubleshooting and Common Problems: Link
Feedback
Was this page helpful?
Thanks for the feedback. If you have a specific, answerable question about how to use Kubernetes,
ask it on Stack Overflow. Open
an issue in the GitHub repo if you want to report a problem or
suggest an improvement.
Many Windows Server Administrators are being confronted with application modernization. Often new applications are architected on PaaS-architecture (platform-as-a-service) or microservices architectures based on containers. These workloads often need a Kubernetes cluster which orchestrates the containerized application and workload. In this blog post we are going to have a look at how you can install and run a Kubernetes cluster on Windows Server with support for Linux and Windows Containers. For this we are going to use the Azure Kubernetes Service (AKS) hybrid deployment options running on Windows Server which you can test 60 days for free or run it even at no additional cost if you have Windows Server Software Assurance and running it on your existing hardware.
Overview
Before we get into the how, I also want to give you some background as well.
What is Kubernetes?
Kubernetes, also known as K8s, is an open-source system for automating deployment, scaling, and management of containerized applications.
Where can I run Kubernetes?
Kubernetes is open source giving you the freedom to take advantage of on-premises, hybrid, or public cloud infrastructure, letting you effortlessly move workloads to where it matters to you. Cloud providers such as Microsoft Azure, offer you also managed Kubernetes solutions and services, such as the Azure Kubernetes Service (AKS).
What is AKS (Azure Kubernetes Service)?
Azure Kubernetes Service (AKS) simplifies deploying a managed Kubernetes cluster in Azure by offloading the operational overhead to Azure. As a hosted Kubernetes service, Azure handles critical tasks, like health monitoring and maintenance.
What are AKS hybrid deployment options?
AKS hybrid deployment options simplify managing, deploying, and maintaining a Kubernetes cluster on-premises, making it quicker to get started hosting Linux and Windows containers in your datacenter. These options are designed to provide you with a similar experience of running AKS in Azure but on-premises on Windows Server or Azure Stack HCI.
As a hosted Kubernetes service, AKS hybrid handles critical day-to-day management, such as easy upgrades and automatic certificate rotations so you can focus on running and developing containerized workloads. AKS hybrid also natively connects to Azure Arc, so you have a single Azure control plane to manage all your AKS clusters running anywhere – on Azure and on-premises.
You can create an AKS cluster using:
- PowerShell
- Windows Admin Center
- The Azure CLI (preview)
- The Azure portal (preview)
- Azure Resource Manager templates (preview)
When you deploy an AKS cluster, you can choose default options that configure the Kubernetes control plane nodes and Kubernetes cluster settings for you. We offer the flexibility to configure advanced settings like Azure Active Directory (Azure AD), monitoring, and other features during and after the deployment process.
With AKS hybrid, you can connect your AKS clusters to Azure Arc while creating the cluster. Once connected to Azure Arc-enabled Kubernetes, you can access your AKS clusters running on-premises via the Azure portal and deploy management services such as GitOps, Azure Monitor, and Azure Policy. For more information about Azure Arc-enabled Kubernetes, see the Azure Arc overview.
Depending on your hardware class, compute availability and your Kubernetes adoption process, we offer multiple AKS hybrid deployment options to get started:
| AKS hybrid deployment option | Host OS | Minimum compute requirement | Failover clustering support | AKS cluster management tools | Azure Arc integration |
|---|---|---|---|---|---|
| AKS on Windows Server | Windows Server 2019 Windows Server 2022 |
Memory: 30GB per node CPU cores: 16 per node Disk Space: 128 GB per node |
Single node OR 2-8 node failover cluster |
Local PowerShell Windows Admin Center |
Manual Azure Arc integration |
| AKS on Azure Stack HCI | Azure Stack HCI 21H2 | Memory: 30GB per node CPU cores: 16 per node Disk Space: 128 GB per node |
Single node OR 2-8 node Azure Stack HCI cluster |
Local PowerShell Windows Admin Center |
Manual Azure Arc integration |
| AKS cluster provisioning from Azure (PREVIEW) | Windows Server 2019 Windows Server 2022 Azure Stack HCI 21H2 |
Memory: 32GB per node CPU cores: 16 per node Disk Space: 128 GB per node |
Single node OR 2 node cluster |
Azure Portal Azure CLI Azure Resource Manager templates |
Automatic Azure Arc integration |
| AKS on Windows IOT (PREVIEW) | Windows 10/11 IoT Enterprise Windows 10/11 Enterprise Windows 10/11 Pro Windows Server 2019/2022 |
Free memory: > 2GB CPU cores: 2 Clock speed: 1.8 GHz Free disk Space: 14 GB |
No | Local PowerShell | Manual Azure Arc integration |
Can I run production workloads on it?
Yes, AKS hybrid is supported by Microsoft.
What does it cost? And can I try it for free? What hardware do I need?
Azure Kubernetes Service (AKS) is a subscription-based Kubernetes offering that can be run on Azure Stack HCI or Windows Server Hyper-V clusters. You can download and install AKS on your existing hardware whether in your own on-premises data center or on the edge. The pricing is based on usage and requires an Azure subscription, which you can obtain for free. The billing unit is a virtual core or vCPU. All initial AKS deployments include a free 60-day evaluation period, at the end of which a pay-as-you-go rate per vCPU (of running worker nodes) per day will be applied.
For users with Windows Server Software Assurance, Azure Hybrid benefits may apply, hence reducing or eliminating the Windows Server license fees.
Install and run Kubernetes (K8s) on Windows Server
Let’s have a look at how you can install and run Kubernetes (K8s) in Windows Server (it can also be installed on Azure Stack HCI). With our AKS hybrid deployment options, we can install Kubernetes on a single-node Windows Server or Windows Server Failover Cluster which provides high availability. In this video tutorial we are using the AKS on Windows Server deployment option which is generally available and not only supports single-node but also failover clustering.
Perquisites for Azure Kubernetes Service (AKS) on Windows Server
- Windows Server 2019 or Windows Server 2022
- Memory: 30GB per node
- CPU cores: 16 per node
- Disk Space: 128 GB per node
- Management tools
- Local PowerShell
- Windows Admin Center (for the demo we are going to use the Windows Admin Center UI)
To read more about the requirements, check out the official documentation on Microsoft Learn.
Steps to install Kubernetes on Windows Server in addition to the video:
- Install Windows Server with Windows Server 2019 or Windows Server 2022
- Download and Install Windows Admin Center
- Open up Windows Admin Center and navigate to the Azure Kubernetes Service extension.
- Run through the setup as showing in the video
Conclusion installing Kubernetes on Windows Server
There are many different ways to install Kubernetes. With our AKS hybrid deployment options and AKS on Windows Server, you get a simple and supported way to set up Kubernetes on Windows Server. This even has some more benefits such as the Azure integration with Azure Arc and easy managed updates for your Kubernetes clusters.
Tags: AKS, Azure, Azure Kubernetes Service, Azure Stack HCI, Cloud, Container, Hyper-V, K8s, Kubernetes, Microsoft, Microsoft Azure, PowerShell, Virtualization, Windows Server Last modified: December 11, 2022
Kubernetes (k8s) is an open-source, cloud-native, container orchestration and management platform. It’s the go-to way to automate the deployment, scaling, and maintenance of containerised applications across different nodes.
From service discovery to auto-restarts, and from resource allocation tracking to compute utilisation and scaling; a well-configured k8s cluster can manage a lot on its own.
Windows Server 2019 is the only Windows-based operating system that supports Kubernetes installation. Unfortunately, for Kubernetes to run on Windows, it still requires a Linux master.
Since the support is relatively new, pay special attention to the steps below.
What is a Kubernetes Cluster?
A Kubernetes cluster consists of a Master and at least one to several worker node(s). The Master is the virtual machine (VM) that administers all activities on your cluster.
A node is a VM that serves as a worker machine in your k8s cluster to host running applications. We strongly recommend you only use VMs aka Cloud Servers to run Kubernetes, not system containers aka VPS, as these can cause issues with k8s.
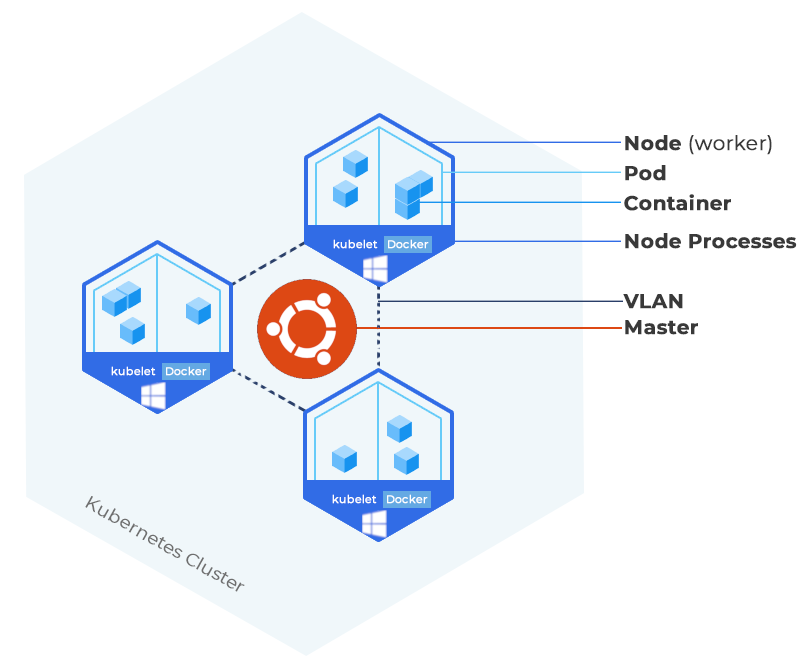
HOSTAFRICA Kubernetes Cluster Diagram – Ubuntu Master and Windows Server workers
A node is comprised of the Kubelet, a container runtime, and the kube-proxy. The k8s installation’s three core modules: Kubelet, kubeadm, and kubectl are agents that control the node and communicate with the Kubernetes Master.
Once they have been installed and other configurations done, you will be able to create your first k8s cluster. You can manage this cluster from the command line on your kubemaster node.
Every Kubernetes instance runs on top of a container runtime, which is software responsible for managing container operations.
Containers in this case are not virtualised servers but rather a solution that packages code and dependencies to run a single application (service) in an isolated (containerised) environment, essentially disassociating applications from the host machine.
The most popular and recommended one is Docker, and it’s the one we will use for the purpose of this guide. However, if you want to install a different underlying container runtime, you can harness the power of the Container Runtime Interface and use basically any runtime you want.
Kubernetes groups containers into pods, its most basic operational unit, which are basically just groups of containers running on the same node. Pods are connected over a network and share storage resources.
In order to connect your nodes or VMs and make them private, make sure to choose a hosting company who provides a Virtual Local Area Network (VLAN) with their VMs. We offer a VLAN add-on to our Cloud Servers for R200 per month.
Prerequisites
- Multiple Windows Server 2019 VMs (Windows Cloud Servers) to house the worker nodes.
- A Linux VM (for this article we will use an Ubuntu VM for the Master node)
- Docker or any other container runtime.
- User with
sudoorrootprivileges on every server.
Got CentOS VMs? Learn How to install Kubernetes and deploy a cluster with Docker on CentOS 7
Got Ubuntu VMs? Learn How to install Kubernetes and deploy a cluster with Docker on Ubuntu 18
How to install Kubernetes on Windows Server 2019 (worker node only)
Step 1. Install Docker on all VMs
Use our guide How to install Docker on Ubuntu 18 for your Ubuntu Master VM.
Then follow our guide How to install Docker on Windows Server 2019 for all your Windows worker VMs.
Step 2. Start Docker Service
If you haven’t already, make sure that the Docker service is installed. Open a PowerShell and enter the following command:
Start-Service docker
Step 3. Pull and tag an Image used by Kubernetes
Once docker is up and running, we need to pull and tag an image used by Kubernetes. Use the following commands:
docker image pull mcr.microsoft.com/windows/nanoserver:1809
docker image tag mcr.microsoft.com/windows/nanoserver:1809 microsoft/nanoserver:latest
Step 4. Download and extract Kubernetes binaries
Next up, we need to fetch, extract, and save the Kubernetes binaries. Use the following commands:
mkdir C:\k
cd C:\k
$ProgressPreference='SilentlyContinue'
iwr -outf kubernetes-node-windows-amd64.tar.gz "https://dl.k8s.io/v1.15.1/kubernetes-node-windows-amd64.tar.gz"
tar -xkf kubernetes-node-windows-amd64.tar.gz -C C:\k
mv C:\k\kubernetes\node\bin\*.exe C:\k

Step 5. Set up binaries and install
Use the following snippet of code which will install and move the required files and binaries.
$NetworkMode="overlay"

$ClusterCIDR="10.244.0.0/16"

$KubeDnsServiceIP="10.96.0.10"

$ServiceCIDR="10.96.0.0/12"

$InterfaceName="Ethernet"

$LogDir="C:\k`logs"


$BaseDir = "c:\k"

$NetworkMode = $NetworkMode.ToLower()

$NetworkName = "vxlan0"

$GithubSDNRepository = 'Microsoft/SDN'


$helper = "c:\k\helper.psm1"

if (!(Test-Path $helper))

{

    Start-BitsTransfer "https://raw.githubusercontent.com/$GithubSDNRepository/master/Kubernetes/windows/helper.psm1" -Destination c:\k\helper.psm1

}

ipmo $helper


$install = "c:\k\install.ps1"

if (!(Test-Path $install))

{

    Start-BitsTransfer "https://raw.githubusercontent.com/$GithubSDNRepository/master/Kubernetes/windows/install.ps1" -Destination c:\k\install.ps1

}
powershell $install -NetworkMode "$NetworkMode" -clusterCIDR "$ClusterCIDR" -KubeDnsServiceIP "$KubeDnsServiceIP" -serviceCIDR "$ServiceCIDR" -InterfaceName "'$InterfaceName'" -LogDir "$LogDir"
You should see the following output:

How to add a Windows based Kubernetes Node to a Linux Cluster
Since the Kubernetes control plane still has components that are Linux-specific, it’s not possible for us to build an all-Windows Kubernetes cluster – yet. However, we will share the steps to add a Windows-based Kubernetes worker node to an existing Kubernetes cluster with an Ubuntu 18.09 master. Follow these steps:
Part 1. Set up the Ubuntu 18.09 Kubernetes Master node
Use our guide How to install Kubernetes and deploy a cluster with Docker on Ubuntu 18 and follow all the steps related to setting up the Master node. The worker nodes will be installed in the steps below.
Part 2. Configure and add Windows Kubernetes Node to the Cluster
Step 1. Copy Config File from Kubernetes Master
On your Ubuntu 18.09 VM, enter the following command and copy the output value
cat $HOME/.kube/config
Now, move over to the Windows VM and enter the following command to create a config file in the C:\k folder:
notepad C:\k\config
Paste the contents in the notepad, save and exit.
Please make sure that you are not saving the file with a .txt extension. If necessary, change the extension from PowerShell using this command: ren config.txt config

Step 2. Register node
Now that we have installed most of the Kubernetes binaries, we can proceed with registering the node. Run the following three commands:
powershell $BaseDir\start-kubelet.ps1 -RegisterOnly -NetworkMode $NetworkMode
ipmo C:\k\hns.psm1
RegisterNode
Step 3. Start Kubernetes services and join cluster
Copy the snippet below to start Kubernetes services on the Windows VM and add the Windows VM to the Ubuntu 18.09 cluster:
You have to replace “102.130.119.93” with the IP of your machine. You can get that using the ipconfig command
$KubeletSvc="kubelet"

$KubeProxySvc="kube-proxy"

$FlanneldSvc="flanneld2"

$Hostname=$(hostname).ToLower()


iwr -outf nssm.zip https://nssm.cc/ci/nssm-2.24-101-g897c7ad.zip

Expand-Archive nssm.zip

mv C:\k\nssm\nssm-2.24-101-g897c7ad\win64\*.exe C:\k


# register & start flanneld

.\nssm.exe install $FlanneldSvc C:\flannel\flanneld.exe

.\nssm.exe set $FlanneldSvc AppParameters --kubeconfig-file=c:\k\config --iface=102.130.119.93 --ip-masq=1 --kube-subnet-mgr=1

.\nssm.exe set $FlanneldSvc AppEnvironmentExtra NODE_NAME=$Hostname

.\nssm.exe set $FlanneldSvc AppDirectory C:\flannel

.\nssm.exe start $FlanneldSvc


# register & start kubelet

.\nssm.exe install $KubeletSvc C:\k\kubelet.exe

.\nssm.exe set $KubeletSvc AppParameters --hostname-override=$Hostname --v=6 --pod-infra-container-image=mcr.microsoft.com/k8s/core/pause:1.0.0 --resolv-conf=""  --enable-debugging-handlers --cluster-dns=$KubeDnsServiceIP --cluster-domain=cluster.local --kubeconfig=c:\k\config --hairpin-mode=promiscuous-bridge --image-pull-progress-deadline=20m --cgroups-per-qos=false  --log-dir=$LogDir --logtostderr=false --enforce-node-allocatable="" --network-plugin=cni --cni-bin-dir=c:\k\cni --cni-conf-dir=c:\k\cni\config

.\nssm.exe set $KubeletSvc AppDirectory C:\k

.\nssm.exe start $KubeletSvc


# register & start kube-proxy

.\nssm.exe install $KubeProxySvc C:\k\kube-proxy.exe

.\nssm.exe set $KubeProxySvc AppDirectory c:\k

GetSourceVip -ipAddress 102.130.119.93 -NetworkName $NetworkName

$sourceVipJSON = Get-Content sourceVip.json | ConvertFrom-Json

$sourceVip = $sourceVipJSON.ip4.ip.Split("/")[0]

.\nssm.exe set $KubeProxySvc AppParameters --v=4 --proxy-mode=kernelspace --feature-gates="WinOverlay=true" --hostname-override=$Hostname --kubeconfig=c:\k\config --network-name=vxlan0 --source-vip=$sourceVip --enable-dsr=false --cluster-cidr=$ClusterCIDR --log-dir=$LogDir --logtostderr=false

.\nssm.exe set $KubeProxySvc DependOnService $KubeletSvc

.\nssm.exe start $KubeProxySvc
To verify that you have successfully started kubelet and kubeproxy services on your Windows node, use the following command:
Get-Service kube*
You should see an output like this:

Now when you run kubectl get nodes on your Ubuntu 18.09 master node, you should see a new Windows node added:

To set the role for your worker node, use the following command:
sudo kubectl label node w-node1 node-role.kubernetes.io/worker=worker

Now you’re all set up.
Happy Hosting!