
Before you begin
You must use a kubectl version that is within one minor version difference of
your cluster. For example, a v1.33 client can communicate
with v1.32, v1.33,
and v1.34 control planes.
Using the latest compatible version of kubectl helps avoid unforeseen issues.
Install kubectl on Windows
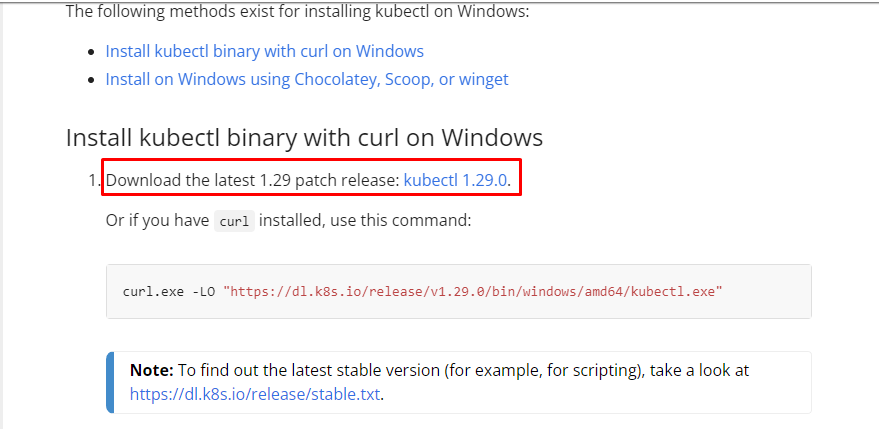
The following methods exist for installing kubectl on Windows:
- Install kubectl binary on Windows (via direct download or curl)
- Install on Windows using Chocolatey, Scoop, or winget
Install kubectl binary on Windows (via direct download or curl)
-
You have two options for installing kubectl on your Windows device
-
Direct download:
Download the latest 1.33 patch release binary directly for your specific architecture by visiting the Kubernetes release page. Be sure to select the correct binary for your architecture (e.g., amd64, arm64, etc.).
-
Using curl:
If you have
curlinstalled, use this command:curl.exe -LO "https://dl.k8s.io/release/v1.33.0/bin/windows/amd64/kubectl.exe"
-
-
Validate the binary (optional)
Download the
kubectlchecksum file:curl.exe -LO "https://dl.k8s.io/v1.33.0/bin/windows/amd64/kubectl.exe.sha256"Validate the
kubectlbinary against the checksum file:-
Using Command Prompt to manually compare
CertUtil‘s output to the checksum file downloaded:CertUtil -hashfile kubectl.exe SHA256 type kubectl.exe.sha256 -
Using PowerShell to automate the verification using the
-eqoperator to
get aTrueorFalseresult:$(Get-FileHash -Algorithm SHA256 .\kubectl.exe).Hash -eq $(Get-Content .\kubectl.exe.sha256)
-
-
Append or prepend the
kubectlbinary folder to yourPATHenvironment variable. -
Test to ensure the version of
kubectlis the same as downloaded:Or use this for detailed view of version:
kubectl version --client --output=yaml
Install on Windows using Chocolatey, Scoop, or winget
-
To install kubectl on Windows you can use either Chocolatey
package manager, Scoop command-line installer, or
winget package manager.- choco
- scoop
- winget
choco install kubernetes-cliwinget install -e --id Kubernetes.kubectl -
Test to ensure the version you installed is up-to-date:
-
Navigate to your home directory:
# If you're using cmd.exe, run: cd %USERPROFILE% cd ~ -
Create the
.kubedirectory: -
Change to the
.kubedirectory you just created: -
Configure kubectl to use a remote Kubernetes cluster:
New-Item config -type file
Verify kubectl configuration
In order for kubectl to find and access a Kubernetes cluster, it needs a
kubeconfig file,
which is created automatically when you create a cluster using
kube-up.sh
or successfully deploy a Minikube cluster.
By default, kubectl configuration is located at ~/.kube/config.
Check that kubectl is properly configured by getting the cluster state:
If you see a URL response, kubectl is correctly configured to access your cluster.
If you see a message similar to the following, kubectl is not configured correctly
or is not able to connect to a Kubernetes cluster.
The connection to the server <server-name:port> was refused - did you specify the right host or port?
For example, if you are intending to run a Kubernetes cluster on your laptop (locally),
you will need a tool like Minikube to be installed first and then re-run the commands stated above.
If kubectl cluster-info returns the url response but you can’t access your cluster,
to check whether it is configured properly, use:
kubectl cluster-info dump
Troubleshooting the ‘No Auth Provider Found’ error message
In Kubernetes 1.26, kubectl removed the built-in authentication for the following cloud
providers’ managed Kubernetes offerings. These providers have released kubectl plugins
to provide the cloud-specific authentication. For instructions, refer to the following provider documentation:
- Azure AKS: kubelogin plugin
- Google Kubernetes Engine: gke-gcloud-auth-plugin
(There could also be other reasons to see the same error message, unrelated to that change.)
Optional kubectl configurations and plugins
Enable shell autocompletion
kubectl provides autocompletion support for Bash, Zsh, Fish, and PowerShell,
which can save you a lot of typing.
Below are the procedures to set up autocompletion for PowerShell.
The kubectl completion script for PowerShell can be generated with the command kubectl completion powershell.
To do so in all your shell sessions, add the following line to your $PROFILE file:
kubectl completion powershell | Out-String | Invoke-Expression
This command will regenerate the auto-completion script on every PowerShell start up. You can also add the generated script directly to your $PROFILE file.
To add the generated script to your $PROFILE file, run the following line in your powershell prompt:
kubectl completion powershell >> $PROFILE
After reloading your shell, kubectl autocompletion should be working.
Install kubectl convert plugin
A plugin for Kubernetes command-line tool kubectl, which allows you to convert manifests between different API
versions. This can be particularly helpful to migrate manifests to a non-deprecated api version with newer Kubernetes release.
For more info, visit migrate to non deprecated apis
-
Download the latest release with the command:
curl.exe -LO "https://dl.k8s.io/release/v1.33.0/bin/windows/amd64/kubectl-convert.exe" -
Validate the binary (optional).
Download the
kubectl-convertchecksum file:curl.exe -LO "https://dl.k8s.io/v1.33.0/bin/windows/amd64/kubectl-convert.exe.sha256"Validate the
kubectl-convertbinary against the checksum file:-
Using Command Prompt to manually compare
CertUtil‘s output to the checksum file downloaded:CertUtil -hashfile kubectl-convert.exe SHA256 type kubectl-convert.exe.sha256 -
Using PowerShell to automate the verification using the
-eqoperator to get
aTrueorFalseresult:$($(CertUtil -hashfile .\kubectl-convert.exe SHA256)[1] -replace " ", "") -eq $(type .\kubectl-convert.exe.sha256)
-
-
Append or prepend the
kubectl-convertbinary folder to yourPATHenvironment variable. -
Verify the plugin is successfully installed.
If you do not see an error, it means the plugin is successfully installed.
-
After installing the plugin, clean up the installation files:
del kubectl-convert.exe
del kubectl-convert.exe.sha256
What’s next
- Install Minikube
- See the getting started guides for more about creating clusters.
- Learn how to launch and expose your application.
- If you need access to a cluster you didn’t create, see the
Sharing Cluster Access document. - Read the kubectl reference docs
Введение
Если вы когда-либо работали с кластерами Kubernetes, то знаете, что kubectl — самый незаменимый и, пожалуй, популярный инструмент для работы с кластерами. В этой статье мы разберем, как установить и настроить kubectl для комфортной и эффективной работы с k8s.
Что такое kubectl
Kubectl — это консольная утилита, которую авторы Kubernetes предоставляют для работы с объектами кластера. С помощью этой утилиты вы можете оценивать состояние кластера, разворачивать приложения и сервисы, управлять ресурсами кластера, смотреть логи. Это неполный список возможностей утилиты: чтобы перечислить все, понадобится отдельная статья.
Компоненты Kubernetes
Строго говоря, kubectl — ничто иное, как клиент Kubernetes API, главного механизма взаимодействия человека с кластером. Kubernetes API — это HTTP REST API, а значит, любое действие с кластером можно выполнить при помощи стандартных HTTP-запросов. Так, например, мы можем создать ресурс ReplicaSet, описанный в файле replicaset.yml двумя способами:
- командой:
kubectl create -f replicaset.yaml- HTTP-запросом к API кластера.
POST 10.0.0.10/apis/apps/v1/namespaces/{namespace}/replicasetsОба способа помогут обратиться к API кластера. Но чтобы использовать kubectl, не придется читать документацию API и искать нужную конечную точку для запроса.
Что происходит внутри кластера?
Kubernetes состоит из большого количества независимых компонентов, распределенных по узлам кластера и выполняющих отдельные задачи. Компоненты могут находиться как на одном узле кластера, так и распределены по нескольким узлам.
Самые важные компоненты Kubernetes
- хранилище (как правило, etcd), которое содержит определение всех ресурсов кластера;
- API-сервер — основной элемент управления кластером, предоставляет API для работы с кластером и хранилищем;
- менеджер или диспетчер контроллеров — компонент, который запускает процессы контроллера. Kube-controller-manager следит за тем, чтобы в кластере были запущены нужные контроллеры (узла, репликации, учетных записей и токенов и другие);
- планировщик отслеживает поды без узла и выбирает узел, на котором они впоследствии будут работать;
- Kubelet — агент, который есть на каждом узле кластера. Кублет следит за тем, чтобы запустились все контейнеры, которые должны быть запущены.
Что происходит внутри кластера
- После выполнения команды kubectl create -f replicaset.yaml со стороны API-сервера kubernetes определение ресурса ReplicaSet сохраняется в хранилище.
- В диспетчере контроллеров запускается контроллер ресурса ReplicaSet. Он проверяет, есть ли в хранилище определения подов для ресурса. Так как в нашем примере создание ресурса выполняется впервые, определения подов в хранилище еще нет.
- Контроллер создает определение пода для каждой реплики, они также сохраняются в хранилище.
- Запускается планировщик. Он проверяет, есть ли поды, не назначенные на конкретные ноды.
- Планировщик распределяет поды по нодам и записывает выбранную ноду в определения подов в хранилище.
- На рабочей ноде кластера запускается kubelet. Он считывает определения подов из хранилища и запускает их на рабочей ноде.
Установка kubectl
Разработчики рекомендуют использовать последнюю версию утилиты и регулярно ее обновлять. Это поможет избежать проблем с совместимостью kubectl с кластером, к которому производится подключение. Узнать последнюю актуальную версию утилиты вы можете из файла.
Установка kubectl в linux
Установку в операционных системах на базе ядра linux можно произвести несколькими способами.
Установка kubectl c помощью curl
Для установки средствами curl потребуется выполнить команду:
curl -LO https://storage.googleapis.com/kubernetes-release/release/`curl -s https://storage.googleapis.com/kubernetes-release/release/stable.txt`/bin/linux/amd64/kubectlПосле этого необходимо сделать файл исполняемым и переместить его в директорию из переменной PATH:
chmod +x ./kubectl && sudo mv ./kubectl /usr/local/bin/kubectlПосле этого вы можете проверить версию установленной утилиты, выполнив команду:
kubectl version --client
Установка kubectl c помощью встроенного пакетного менеджера
Kubectl также можно установить, используя встроенные в ОС пакетные менеджеры.
Для установки в операционных системах RHEL, Fedora и CentOS потребуется выполнить команды:
sudo cat <<EOF > /etc/yum.repos.d/kubernetes.repo
[kubernetes]
name=Kubernetes
baseurl=https://packages.cloud.google.com/yum/repos/kubernetes-el7-x86_64
enabled=1
gpgcheck=1
repo_gpgcheck=1
gpgkey=https://packages.cloud.google.com/yum/doc/yum-key.gpg https://packages.cloud.google.com/yum/doc/rpm-package-key.gpg
EOF
sudo yum install -y kubectl
После этого можем проверить, что все установилось корректно. Выполняем команду:
kubectl version --clientТеперь проверим установку с помощью встроенного пакетного менеджера в Debian-like операционных системах: Debian, Ubuntu, а также Linux Mint и HypriotOS.
Для установки выполните следующие команды:
sudo apt-get update && sudo apt-get install -y apt-transport-https
curl -s https://packages.cloud.google.com/apt/doc/apt-key.gpg | sudo apt-key add -
echo "deb https://apt.kubernetes.io/ kubernetes-xenial main" | sudo tee -a /etc/apt/sources.list.d/kubernetes.list
sudo apt-get update
sudo apt-get install -y kubectl
Проверяем, все ли установилось как надо:
kubectl version --client
Установка при помощи стороннего менеджера
Также kubectl можно установить с помощью snap и homebrew.
Для установки через snap, необходимо выполнить команду:
snap install kubectl --classickubectl versionДля установки через homebrew, в свою очередь, это будут команды:
brew install kubectl
kubectl version
Установка kubectl в MacOS
У пользователей MacOS установка kubectl тоже не вызовет трудностей. Установить утилиту можно несколькими способами. Рассмотрим их подробнее.
Установка бинарного файла kubectl в MacOS средствами curl
Для установки при помощи curl вам необходимо выполнить несколько действий:
- загрузить последнюю версию kubectl,
curl -LO "https://storage.googleapis.com/kubernetes-release/release/$(curl -s https://storage.googleapis.com/kubernetes-release/release/stable.txt)/bin/darwin/amd64/kubectl"- сделать загруженный файл исполняемым и переместить его в директорию PATH;
chmod +x ./kubectl && sudo mv ./kubectl /usr/local/bin/kubectl- проверить, все ли работает корректно и установлена ли последняя версия утилиты.
kubectl version --clientУстановка с помощью Homebrew или Macports в MacOS
С помощью этих пакетных менеджеров установить kubectl еще легче.
- Если вы используете Homebrew, выполните одну из двух команд:
brew install kubernetes-cliили
brew install kubectl- Для установки через Macports выполните следующие команды:
sudo port selfupdate
sudo port install kubectl
Проверяем, корректно ли установлена утилита:
kubectl version --clientУстановка kubectl в Windows
Установка kubectl с помощью curl в Windows
На момент написания этой статьи актуальная версия kubectl — v1.25.0. Вы можете скачать её или воспользоваться утилитой curl:
curl -LO https://storage.googleapis.com/kubernetes-release/release/v1.25.0/bin/windows/amd64/kubectl.exeПосле скачивания переместите .exe файл в папку из переменной PATH.
Теперь можно проверять, все ли установилось корректно:
kubectl version --clientУстановка из PSGallery при помощи PowerShell
Если при работе с PowerShell вы используете PowerShell Gallery, вы можете установить kubectl, выполнив эти команды:
    Install-Script -Name install-kubectl -Scope CurrentUser -Force
install-kubectl.ps1 [-DownloadLocation <path>]
Проверяем, что все прошло как надо и утилита установилась правильно:
kubectl version --client
Дополнительно отметим, что этими же командами можно обновить уже установленную ранее утилиту kubectl.
Установка с помощью пакетных менеджеров Chocolatey и Scoop
Если для установки программных пакетов вы используете пакетные менеджеры Chocolatey или Scoop, вы можете установить kubectl с их помощью.
Команда для установки с помощью Chocolatey будет выглядеть так:
choco install kubernetes-cliДля установки с помощью scoop выполните команду:
scoop install kubectlПосле этого проверяем, что kubectl установлен:
kubectl version --clientДалее необходимо перейти в вашу домашнюю директорию:
cd %USERPROFILE%После этого вам нужно создать папку «.kube» и перейти в нее:
mkdir .kube
cd .kube
Потом настраиваем kubectl для доступа к вашему кластеру:
New-Item config -type fileПроверка конфигурации kubectl
Чтобы подключиться к вашему кластеру, понадобится файл kubeconfig, который создается при разворачивании кластера скриптом kube-up.sh или при создании кластера средствами minikube. Директорией по умолчанию для файла kubeconfig будет ~/.kube/config.
Убедиться в том, что kubectl был сконфигурирован корректно, можно, выполнив команду:
kubectl cluster-infoЕсли все настроено корректно, ответ kubectl будет содержать сообщение вида:
Kubernetes control plane is running at https://10.0.0.33:8443
KubeDNS is running at https://10.0.0.33:8443/api/v1/namespaces/kube-system/services/kube-dns:dns/proxy
Если настройка kubectl была произведена с ошибками, вы получите такое сообщение:
The connection to the server <server-name:port> was refused - did you specify the right host or port?Настройка и эффективное использование kubectl
Для более комфортной работы с утилитой kubectl мы рекомендуем провести небольшой «апгрейд» инструмента и добавить несколько полезных и приятных доработок.
Включение автодополнения команд в оболочке shell
Kubectl поддерживает автодополнение ввода практически «из коробки», поэтому первым логичным шагом будет включение автодополнения команд.
Автодополнение kubectl в bash
Скрипт, который выполняет автодополнение команд kubectl в командной оболочке bash, можно получить, написав команду:
kubectl completion bash
Но будет недостаточно выполнить только одну команду. Далее потребуется установить пакет bash-completion, который поможет включить автодополнение в командной оболочке. Сделать это можно командой:
apt-get install bash-completion
После установки пакета выполните команду:
type _init_completion
Если команда была выполнена без ошибок, то все установилось правильно. В ином случае вам необходимо добавить строчку в файл ~/.bashrc, чтобы подключить установленный пакет к командной оболочке:
echo 'source /usr/share/bash-completion/bash_completion' >> ~/.bashrc
После завершения настройки bash-completion можно приступать к настройке автодополнения ввода kubectl. Чтобы скрипт автодополнения выполнялся во всех сессиях терминала, вам необходимо выполнить одно из нескольких действий:
- добавить строку, которая запускает скрипт автодополнения ввода в файл конфигурации bash;
echo 'source <(kubectl completion bash)' >>~/.bashrc
- добавить скрипт дополнения в директорию с конфигурационными файлами утилиты bash-completion;
kubectl completion bash >/etc/bash_completion.d/kubectl
После этого можно перезапускать командную оболочку.
Автодополнение kubectl в bash на MacOS
По умолчанию в macOS используется bash версии 3.2, с которым автопродление не будет корректно работать. Для корректной работы автопродления в macOS необходимо сменить оболочку (например, мы рекомендуем использовать zsh) или выполнить обновление bash до версии 4.1 или новее. Если у вас установлен Bash версии 4.1 или новее, инструкция ниже будет актуальна.
Первым делом вам необходимо установить инструмент bash-completion v2, используя ваш пакетный менеджер. Для Homebrew команда будет выглядеть так:
brew install bash-completion@2
После завершения установки bash-completion, добавьте в файл ~/.bashrc следующий код:
    export BASH_COMPLETION_COMPAT_DIR="/usr/local/etc/bash_completion.d"
[[ -r "/usr/local/etc/profile.d/bash_completion.sh" ]] && . "/usr/local/etc/profile.d/bash_completion.sh"
После этого перезапустите командную оболочку и выполните команду:
type _init_completion
Ее корректное выполнение поможет убедиться, что все установилось правильно.
После завершения настройки bash-completion можно приступать к настройке автодополнения ввода kubectl. Чтобы скрипт автодополнения выполнялся во всех сессиях терминала, вам необходимо:
- добавить строку, которая запускает скрипт автодополнения ввода в файл конфигурации bash;
echo 'source <(kubectl completion bash)' >>~/.bashrc
- добавить скрипт дополнения в директорию с конфигурационными файлами утилиты bash-completion.
kubectl completion bash >/etc/bash_completion.d/kubectl
После этого можно перезапускать командную оболочку.
Автодополнение kubectl в zsh
Для организации автодополнения в оболочке zsh не потребуется устанавливать дополнительных программ и утилит, как это нужно делать при использовании Bash. Достаточно выполнить команду:
echo 'source <(kubectl completion zsh)' >>~/.zshrcПосле выполнения команды и перезагрузки оболочки вы можете столкнуться с ошибкой такого вида:
complete:13: command not found: compdefВ таком случае в файл ~/.zshrc нужно будет добавить следующие строки:
autoload -Uz compinit
compinit
Быстрый просмотр спецификаций ресурсов в терминале
При создании YAML-файла, который определяет ресурсы, важно понимать значение каждого заполняемого поля. Основная часть информации содержится в документации к API Kubernetes, доступной на официальном сайте проекта. Постоянно переключаться с браузера на терминал и обратно не слишком удобно. Такого же мнения придерживаются и разработчики Kubernetes, поэтому в утилиту kubectl была добавлена возможность просмотра спецификаций по ресурсам.
Команда для вызова спецификаций имеет следующий вид:
kubectl explain resource[.field].Если вы не до конца понимаете, какой именно ресурс вам нужен, можно выполнить команду, чтобы отобразить полный список:
kubectl api-resourcesМожем видеть, что, например, ресурс endpoints имеет сокращение «ep». Это значит, что команды ниже будут равнозначны:
kubectl explain epkubectl explain EndpointsИспользование пользовательского формата вывода столбцов
В стандартном виде при выполнении команды kubectl get pods в ответ мы получаем следующий вывод:
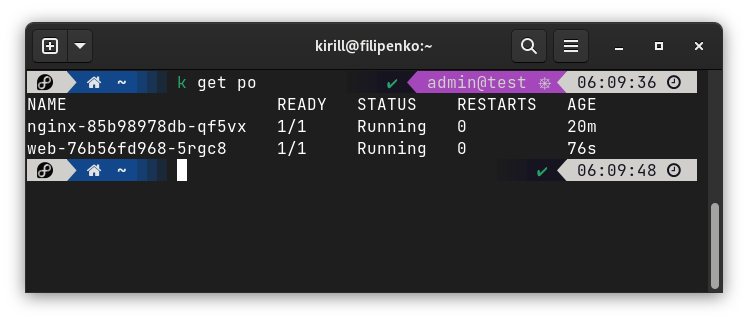
При всем удобстве такого формата он малоинформативен, так как содержит всего несколько полей из полного определения ресурса. Если вам необходимо больше информации, можно использовать настраиваемый формат вывода столбцов. С его помощью вы можете указывать, какие именно данные нужно получить. Вывести отдельным столбцом можно любое поле. Делается это с помощью ключа -o и опции вида:
-o custom-columns=<spec>Также для фильтра можно использовать готовый файл:
-o custom-columns-file=template.txtВы можете задать выводимым столбцам собственные имена:
kubectl get pods -o custom-columns='Selectel:metadata.name'
Selectel
nginx-85b98978db-qf5vx
web-76b56fd968-5rgc8
Давайте немного подробнее разберем выражения, которые используются для выборки.
Для организации пользовательского вывода столбцов в утилите kubectl используются выражения JSONPath — это специальный язык, созданный для выборки данных из документов в формате JSON. Учитывая этот факт, выбор одного поля, как в примере выше — самый простой метод использования JSONPath. Давайте рассмотрим все возможности, которые предоставлены разработчиками в рамках kubectl.
- Выбрать все элементы списка.
kubectl get pods -o custom-columns='DATA:spec.containers[*].image'
- Выбрать конкретный элемент из списка.
kubectl get pods -o custom-columns='DATA:spec.containers[0].image'
- Выбрать все элементы списка, попадающие под заданный фильтр.
kubectl get pods -o custom-columns='DATA:spec.containers[?(@.image!="nginx")].image'
- Выбрать все поля по указанному пути.
kubectl get pods -o custom-columns='DATA:metadata.*'
- Выбрать все поля с указанным именем, вне зависимости от их расположения.
kubectl get pods -o custom-columns='DATA:..image'
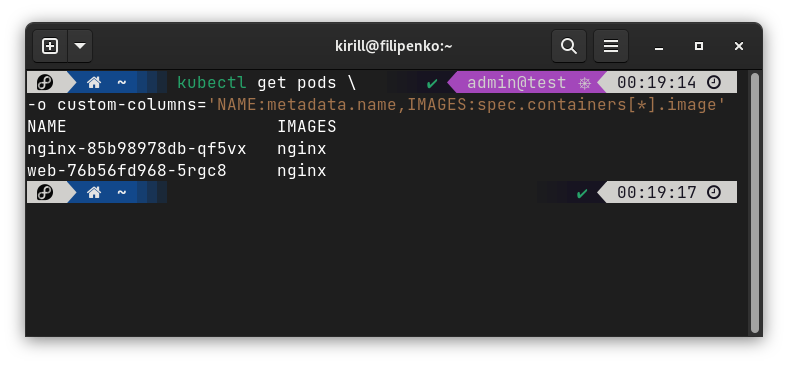
Например, вы можете вывести таблицу, в которой будет отображаться список подов и контейнеры, развернутые в них. Для этого выполните команду:
kubectl get pods -o custom-columns='NAME:metadata.name,IMAGES:spec.containers[*].image'
Вывод будет следующий:
Легкое переключение между кластерами и пространствами имен
Kubectl был создан, чтобы упростить взаимодействие API с Kubernetes. Выполняя запрос к различным эндпоинтам, утилита проверяет файл kubeconfig, получая из него все необходимые для соединения параметры. Если вы работаете сразу с несколькими кластерами, в вашем kubeconfig будут содержаться параметры для подключения сразу к нескольким кластерам. Также, вероятно, у вас будет несколько файлов Kubeconfig — по одному файлу на кластер. В этом случае вы можете запускать kubectl с ключом —kubeconfig и выбирать необходимый файл, указывая его имя.
Файл kubeconfig
Файл kubeconfig содержит в себе определенное количество контекстов для различных кластеров:
- Cluster — элемент, указывающий на URL API сервера вашего кластера;
- User — учетные данные, с помощью которых происходит аутентификация в кластере;
- Namespace — пространство имен, которое используется внутри кластера.
Как правило, для каждого из кластеров используется несколько файлов kubeconfig. В каждом файле может быть несколько контекстов с разными пользователями и пространствами имен. Вне зависимости от количества контекстов, один из них всегда будет текущим. Для подключения к другому контексту всегда нужно переключить контекст в файле kubeconfig. Чтобы менять пространства имен, нужно изменить элемент namespace файла kubeconfig.
Использование kubectx и kubens
Kubectx и kubens — две самые популярные утилиты для смены контекста и пространства имен при работе с кластерами kubernetes. Для их установки вы можете использовать команды:
sudo git clone https://github.com/ahmetb/kubectx /opt/kubectx
sudo ln -s /opt/kubectx/kubectx /usr/local/bin/kubectx
sudo ln -s /opt/kubectx/kubens /usr/local/bin/kubens
Также для установки может использоваться специальный пакетный менеджер Krew. В таком случае установите пакетный менеджер (инструкция по установке есть на странице проекта) и введите команды:
kubectl krew install ctx
kubectl krew install ns
Примеры использования утилит из GitHub проекта
Kubens:

Kubectx:

Использование алиасов командной оболочки
Чтобы изменить контекст или неймспейс, вам не потребуются дополнения или сторонние скрипты: можно использовать встроенные инструменты kubectl. Например, команда kubectl config поможет отредактировать файлы kubeconfig. Встроенные команды могут быть длинными и не слишком удобными, поэтому рекомендуем создавать алиасы командной оболочки, чтобы работать с kubectl было удобнее.
Приведенные ниже примеры алиасов используют стороннюю утилиту fzf, с помощью которой созданные алиасы могут совершать поиск по наименованиям.
Наши примеры алиасов выглядят так:
# Получить текущий контекст
alias krc='kubectl config current-context'
# Список всех контекстов
alias klc='kubectl config get-contexts -o name | sed "s/^/  /;\|^ $(krc)$|s/ /*/"'
# Изменить текущий контекст
alias kcc='kubectl config use-context "$(klc | fzf -e | sed "s/^..//")"'

# Получить текущий неймспейс
alias krn='kubectl config get-contexts --no-headers "$(krc)" | awk "{print \$5}" | sed "s/^$/default/"'
# Список всех доступных неймспейсов
alias kln='kubectl get -o name ns | sed "s|^.*/|  |;\|^ $(krn)$|s/ /*/"'
# Изменить текущий неймспейс
alias kcn='kubectl config set-context --current --namespace "$(kln | fzf -e | sed "s/^..//")"'
Сокращение ввода автоалиасами
Еще один способ ускорить работу с kubectl — настройка и использование автоалиасов для команд. Самый популярный проект на GitHub с готовыми алиасами содержит больше 1 200 сокращений для разных вариаций многоступенчатых команд kubectl. Может показаться, что ориентироваться в таком количестве сокращений еще сложнее, чем в самой утилите. Но участники проекта вывели систему сокращений алиасов.
- k=kubectl
- sys= —namespace kube-system
Команды:
- g=get
- d=describe
- rm=delete
- a:apply -f
- ak:apply -k
- k:kustomize
- ex: exec -i -t
- lo: logs -f
Ресурсы кластера
- po=pod, dep=deployment, ing=ingress, svc=service, cm=configmap, sec=secret, ns=namespace, no=node
Флаги для команд:
- output format: oyaml, ojson, owide
- all: —all или —all-namespaces в зависимости от вводимой команды
- sl: —show-labels
- w=-w/—watch
Флаги, имеющие значение (например, название неймспейса):
- n=-n/—namespace
- f=-f/—filename
- l=-l/—selector
Например, команда kubectl get pods -o yaml в виде алиаса будет выглядеть как kgpooyaml.
Также вы можете использовать некоторые из алиасов вне сложных конструкций. К примеру, команда kg pods будет возвращать таблицу с подами, аналогично командам kgpo и kubectl get pods.
Включение автодополнения алиасов kubectl
Без автодополнения алиасы теряют свой смысл, так как, учитывая многослойную структуры команд kubectl, работа с утилитой становится крайне неудобной. Если вы используете оболочку Zsh, никакой дополнительной настройки после добавления алиасов не потребуется. В случае с Bash придется устанавливать дополнительную утилиту complete-alias, чтобы автодополнение работало корректно. Это обусловлено тем, что при попытке дополнить вводимую команду Bash, в отличие от Zsh, ссылается не на команду, а на сам алиас.
Для работы complete-alias потребуется установить bash-completion, затем выполнить команду git clone, а дальше — указать путь к файлу complete_alias в файле .bashrc вашего пользователя.
Здесь необходимо включить автодополнение для всех установленных алиасов kubectl, созданных в текущей оболочке:
for _a in $(sed '/^alias /!d;s/^alias //;s/=.*$//' ~/.kubectl_aliases);
do
  complete -F _complete_alias "$_a"
done
Команда сработает, только если kubectl-aliases был установлен в ~/.kubectl-aliases.
После этого добавьте код в файл .bashrc, чтобы автодополнение алиасов работало для других сессий терминала.
Расширение функционала kubectl при помощи плагинов
В версии 1.12 kubectl начал поддерживать механику работы с плагинами. Плагины расширяют и без того огромный функционал утилиты kubectl и сильно упрощают работу.
Установка плагинов
Плагины для утилиты kubectl — это исполняемые файлы со стандартным названием вида kubectl-x, где вместо X будет название плагина.
Для установки плагина стандартным способом достаточно поместить исполняемый файл с плагином в директорию из переменной PATH. Чтобы просмотреть список всех установленных у вас плагинов, нужно выполнить команду:
kubectl plugin listПоиск и установка плагинов с помощью Krew
Krew — открытый проект, цель которого максимально упростить поиск и установку плагинов для kubectl. Krew преподносится как пакетный менеджер для плагинов kubectl и вполне оправдывает это звание: с помощью него можно найти, установить и обновить плагины. При этом сам Krew — плагин для kubectl. Установить его можно по подробной инструкции.
Самые важные команды Krew
- найти плагин:
kubectl krew search <запрос> - вывести информацию о плагине:
kubectl krew info <плагин> - установить плагин:
kubectl krew install <плагин> - обновить плагины:
kubectl krew upgrade- вывести список плагинов, установленных с помощью Crew:
kubectl krew list- удалить плагины:
kubectl krew remove <плагин>Поиск плагинов в других местах
Krew — не единственное место, где можно найти плагины для kubectl. Многие из них доступны на GitHub.
Написание собственных плагинов
Если вы не смогли найти нужный плагин, можно попробовать написать свой собственный. Это может быть файл на любом языке, например, Bash, Python или Go. Чтобы написать более сложный плагин kubectl, можете использовать официальные клиентские библиотеки Kubernetes.
После создания файла, дайте ему название в формате kubectl-x и переместите в директорию из переменной PATH.
Заключение
В статье мы познакомились с таким инструментом как kubectl, разобрали механизмы его работы, а также провели его установку на примере разных ОС. Дополнительно описали способы улучшить опыт использования инструмента, сделать его комфортнее и проще.
Table of contents
- Pre-requisites
- Step 1: Install kubectl
- Step 2: Install Minikube
- Step 3: Setup connections for Minikube
- Some issues while installing Kubernetes
- Wrapping up
Pre-requisites
-
Windows 10 Enterprise, Pro, or Education.
Windows 10 Home will not be compatible with Docker Desktop and Kubernetes, just because Virtual Machine Platform and Hyper-V functionality is not provided on Windows 10 Home.
-
Enable Virtual Machine Platform and WSL 2.
Go to this page: Install WSL 2 and configure it on Windows 10 and do the same steps.
-
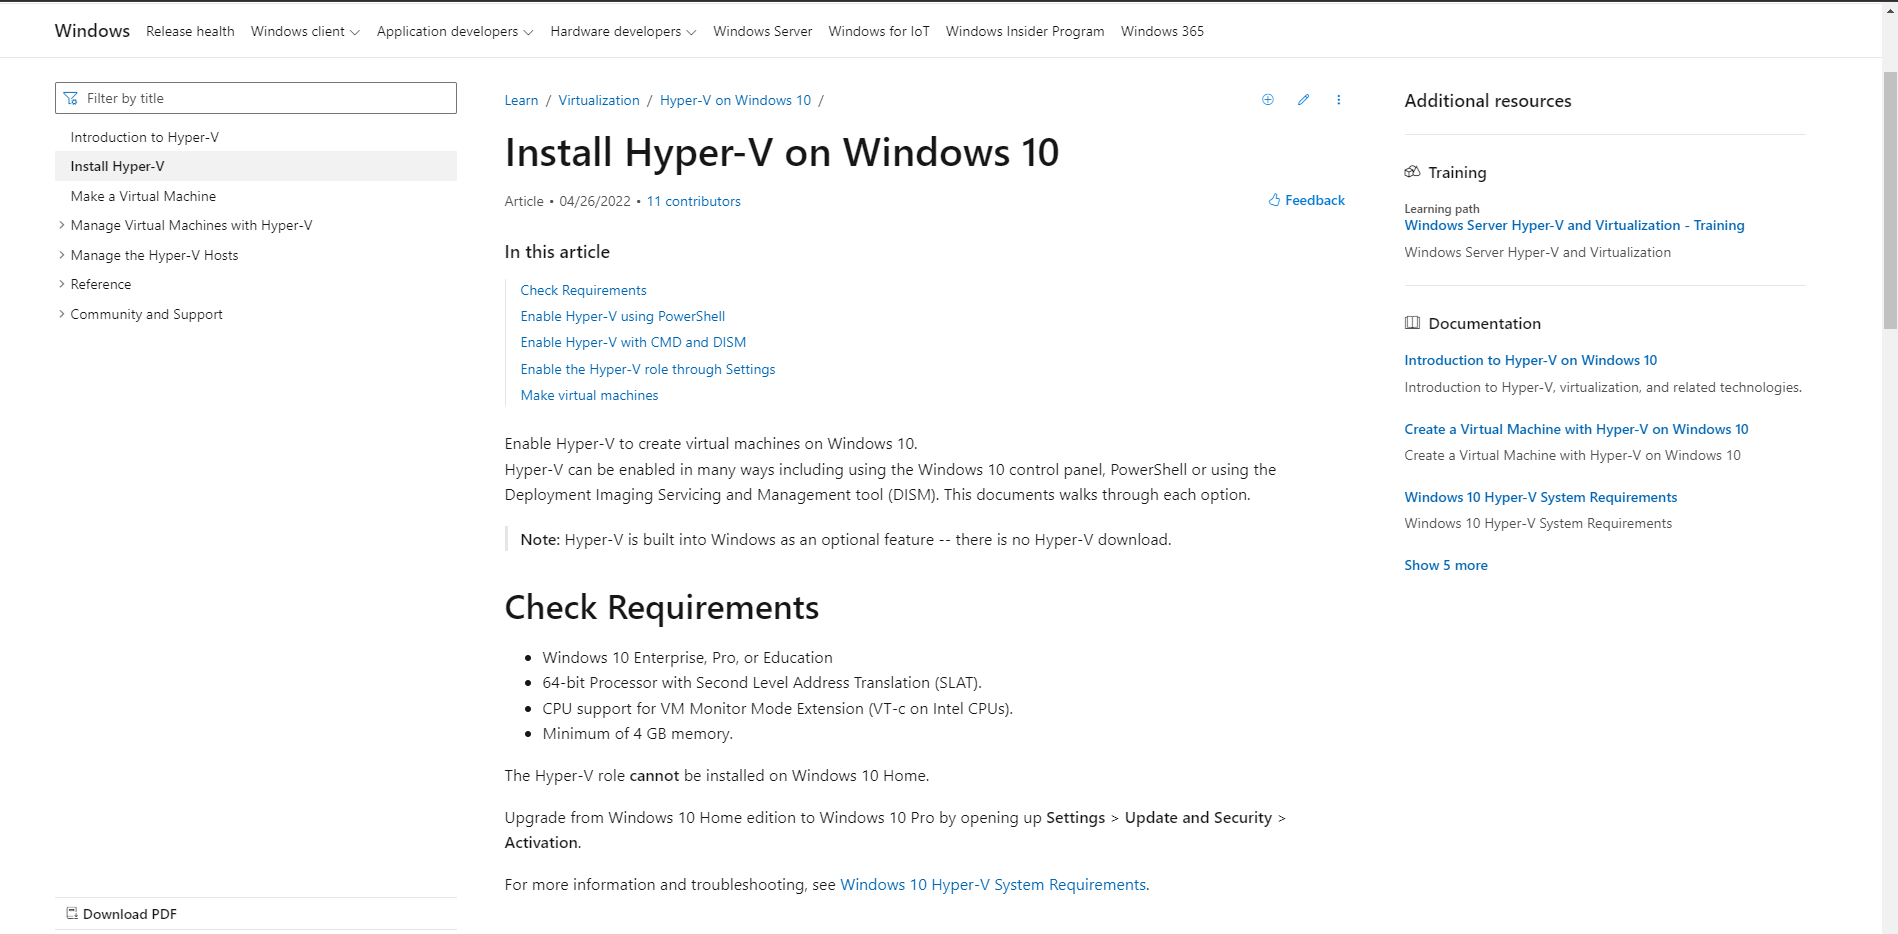
Enable Hyper-V.
Follow the instructions to enable Hyper-V on this page: Install Hyper-V on Windows 10.

-
Installed Docker Desktop.
In this item, we can refer to the following article: Understanding about Docker.
Step 1: Install kubectl
-
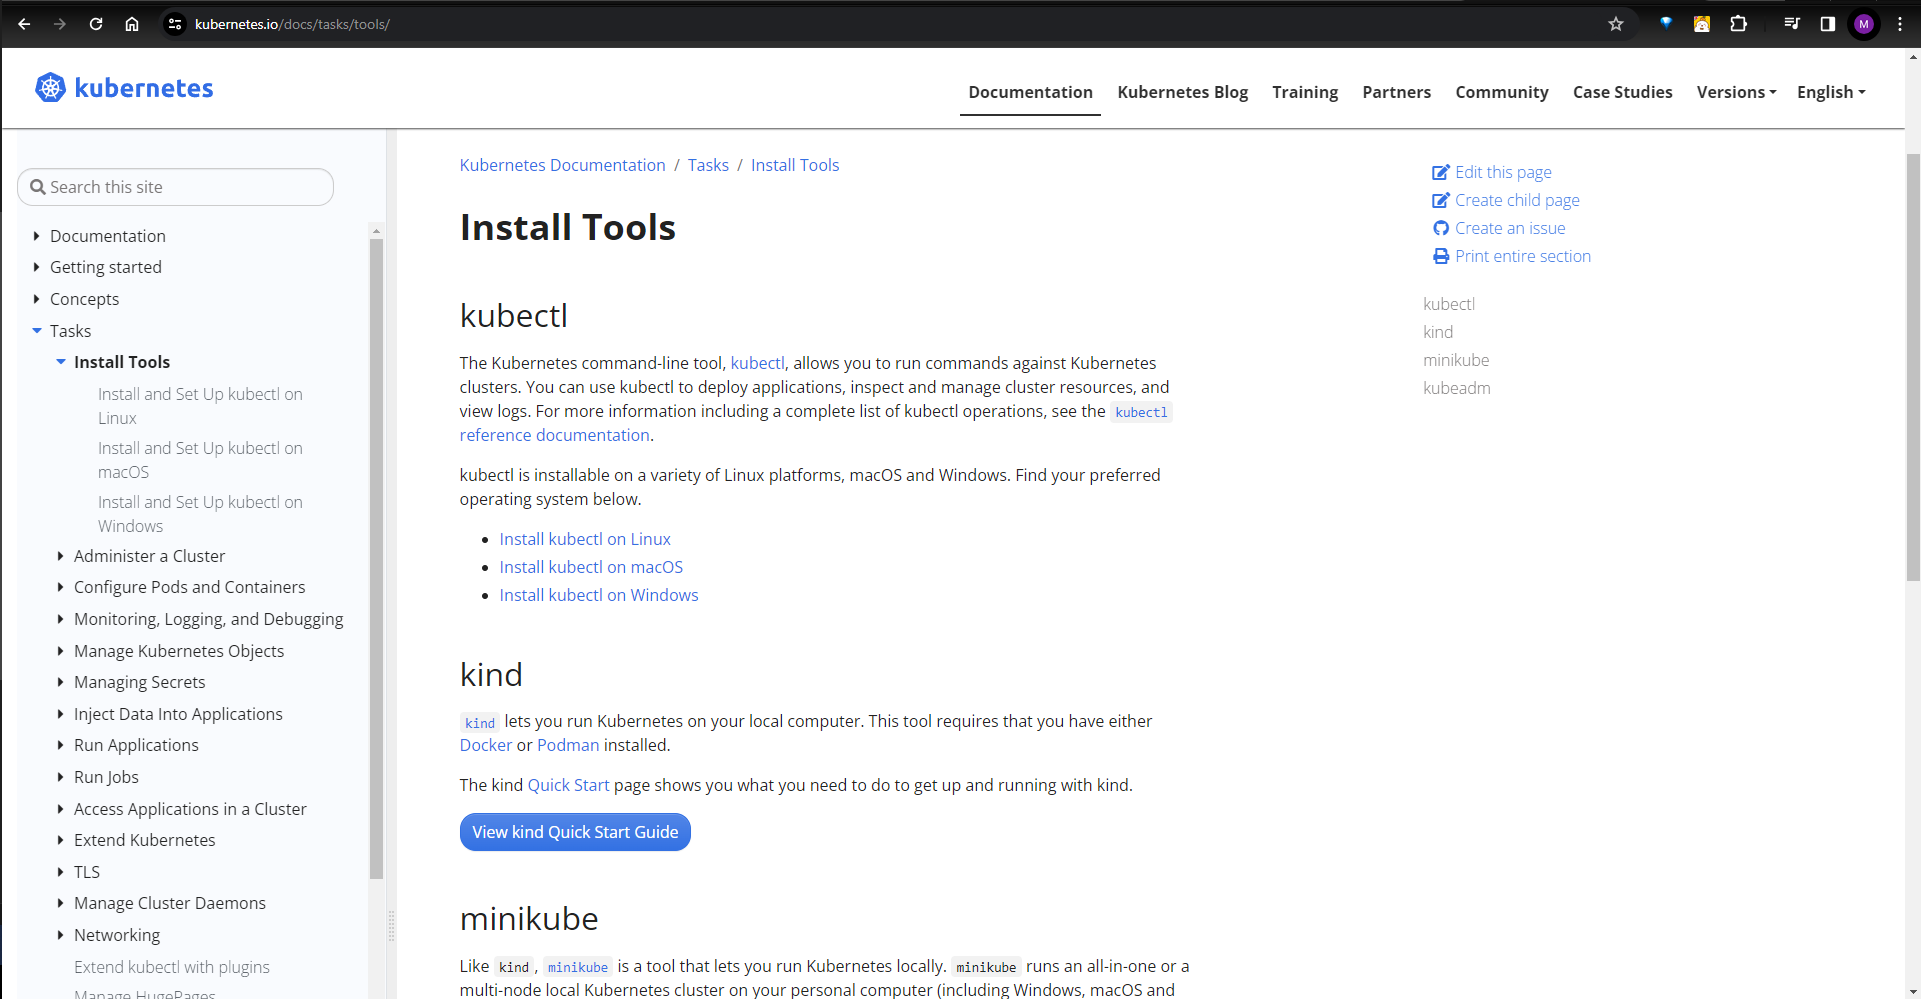
Firstly, go to the following page of Kubernetes: https://kubernetes.io/docs/tasks/tools/.
-
Then, select Install kubectl on Windows item.
In this step, we will follow Install kubectl binary curl on Windows section.
-
Download the kubectl with version — 1.29.0.
Then, we have:
-
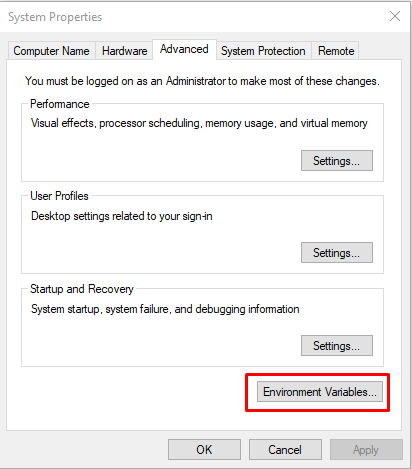
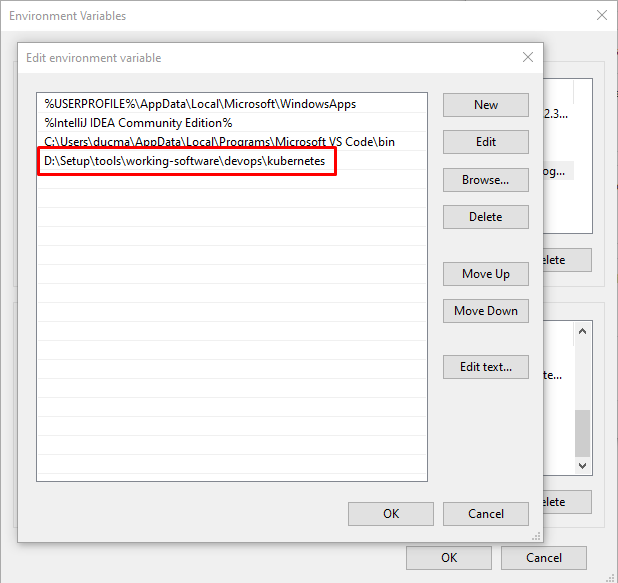
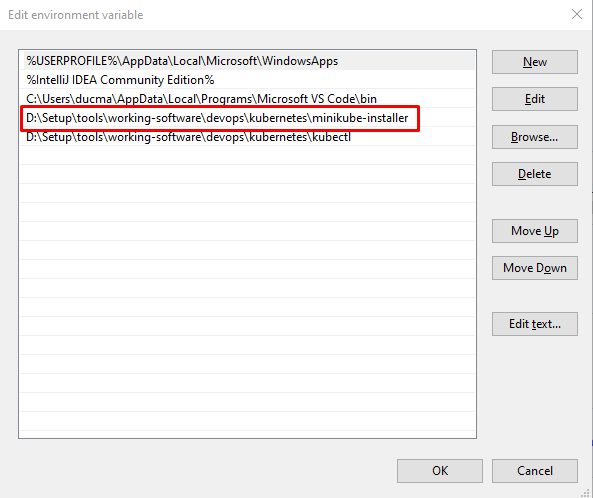
Next step is that we will add the path of kubectl to the Environment Variables of Windows.
Before doing this, we need to take care the note of Kubentes about kubectl of Docker Desktop for Windows like the below image.
Then, start to setup PATH of kubectl for Environment Variables.
Choose the Path of User Variables section. And add our path of kubectl executable file into it.
Click OK button.
-
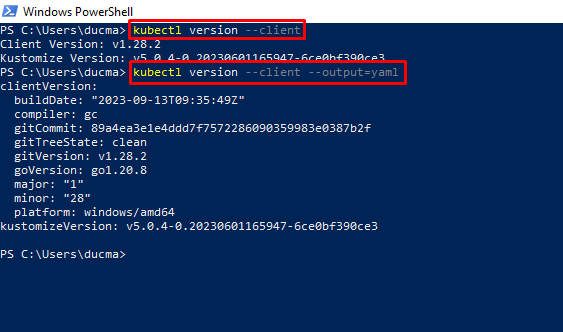
Verify the kubectl file is installed correctly or not by using cmd or powershell.
  kubectl version --client

  kubectl version --client --output=yaml
So, we installed kubectl successfully.
-

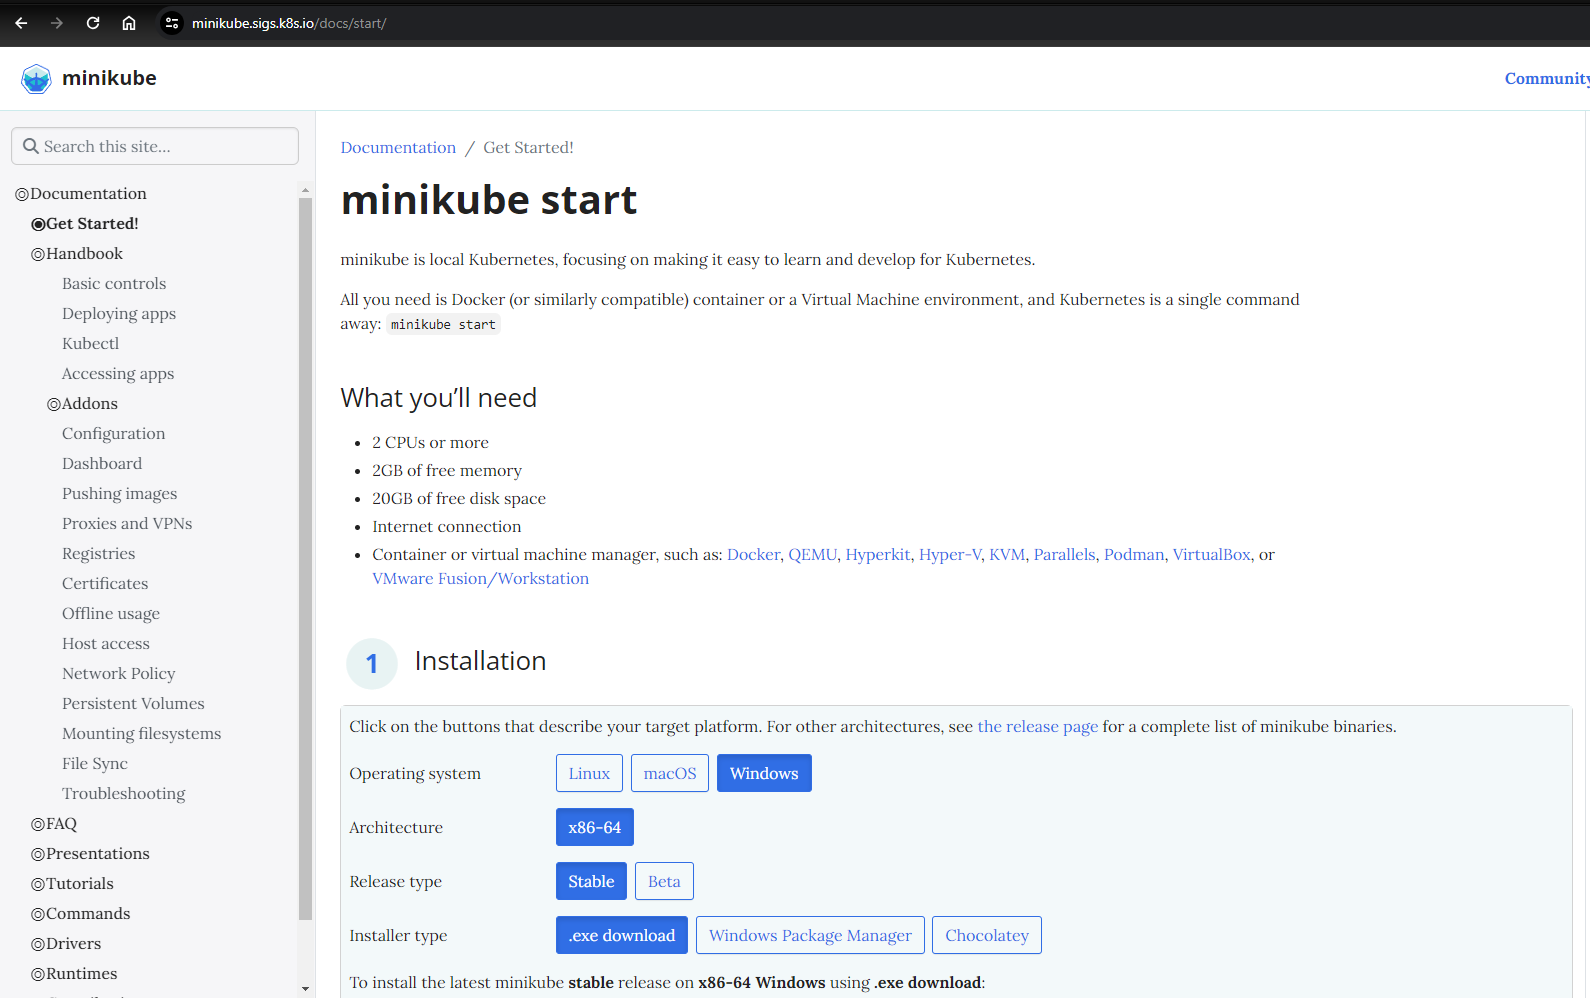
Step 2: Install Minikube
-
Go to the Installation section of the following page: https://minikube.sigs.k8s.io/docs/start/.
-
Download the executable file of Minikube.
-
Add the path of Minikube to the Path of User Variables on Windows 10.
-
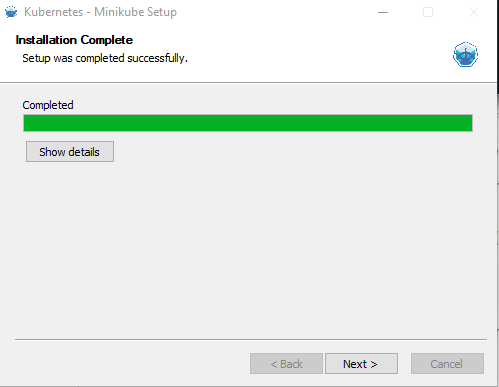
Install that executable file of Minikube like the below image.
-
Testing the Minikube.
Run the following commands:
minikube startminikube start --vm-driver="hyperv" --hyperv-virtual-switch="minikube"
But we also run into the following issue:
To solve this issue, we will go to the next step: Step 3: Setup connections for Minikube.

Step 3: Setup connections for Minikube
-
Setup Hyper-V Manager.
-
Go to the Hyper-V Manager by searching it on Windows’s Start.
Then, we have:
-
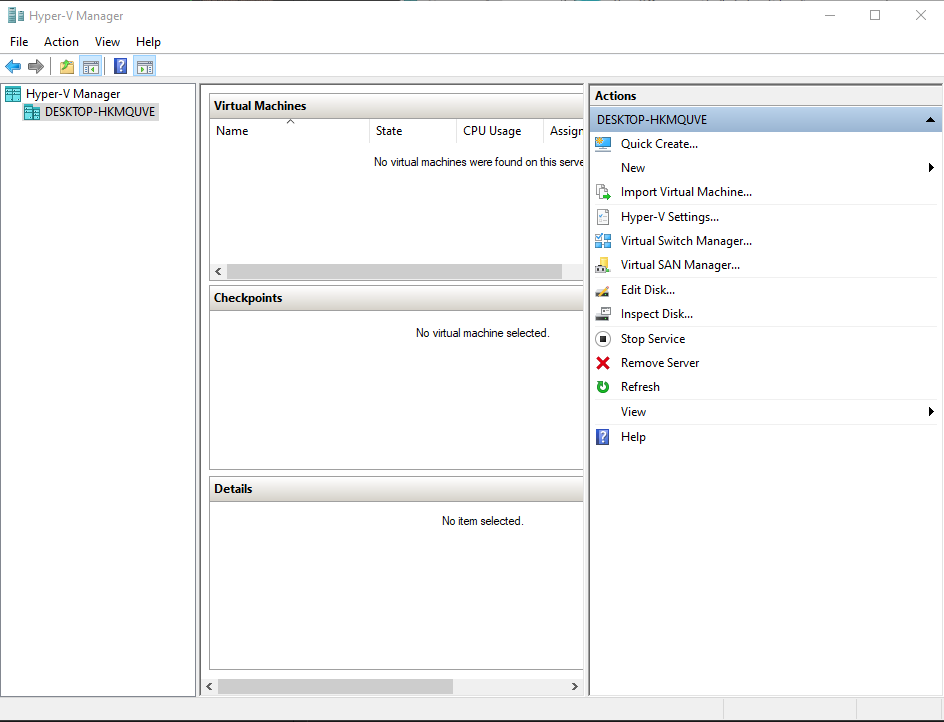
Select the DESKTOP-HKLMQUVE item under Hyper-V Manager.
-
Select Virtual Switch Manager on the left side of Actions dialog.
-
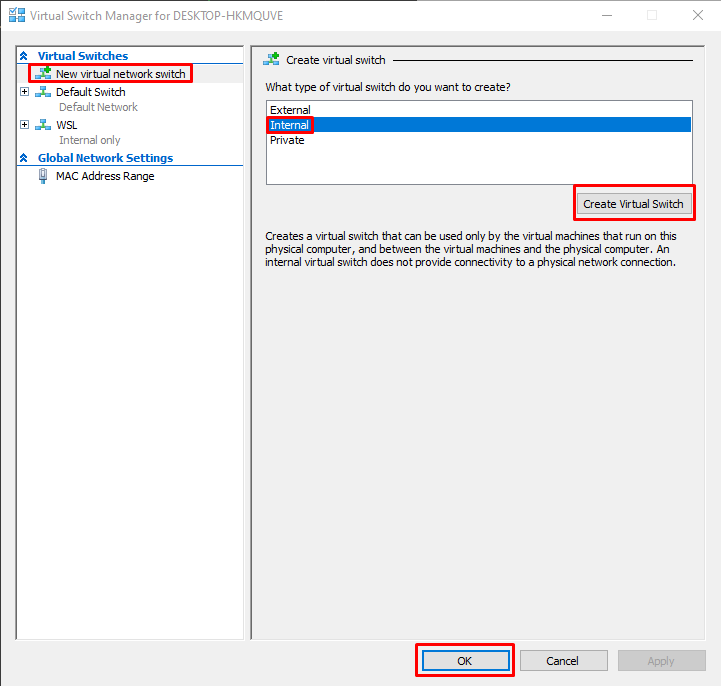
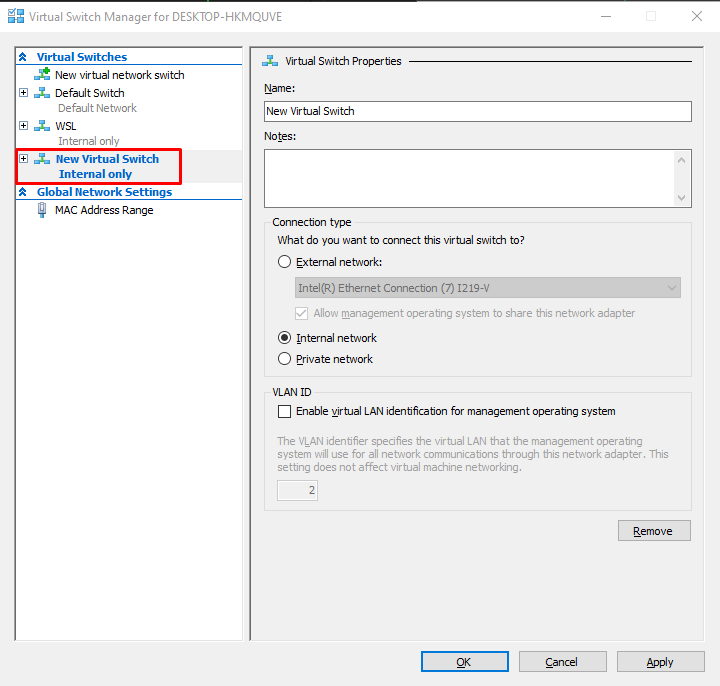
Choose the New virtual network switch item under Virtual Switches.
Then, choose Internal for the question: What type of virtual switch do you want to create?
Click Create Virtual Switch button. Then, we have:
-
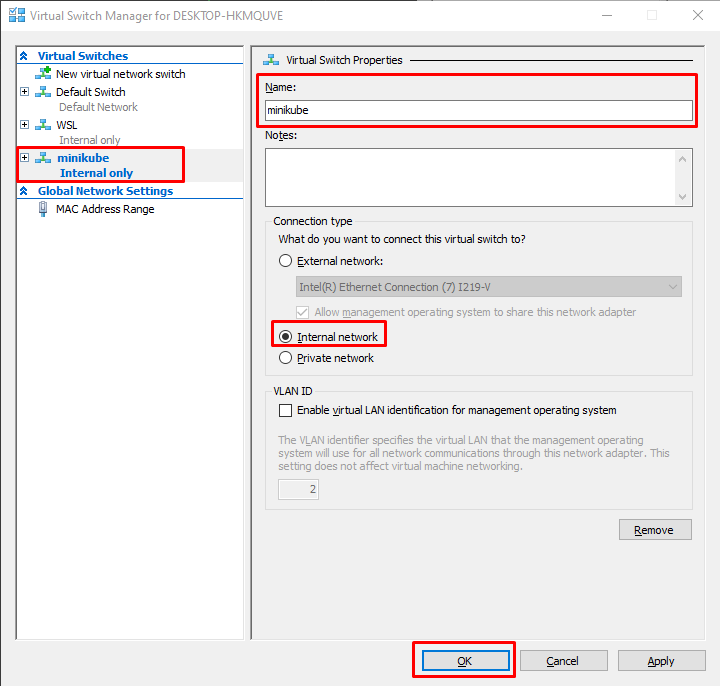
Setup the New Virtual Switch Internal Only.
Change the Name field to minikube. Then, choose the Internal network.
Click OK button.
-
-
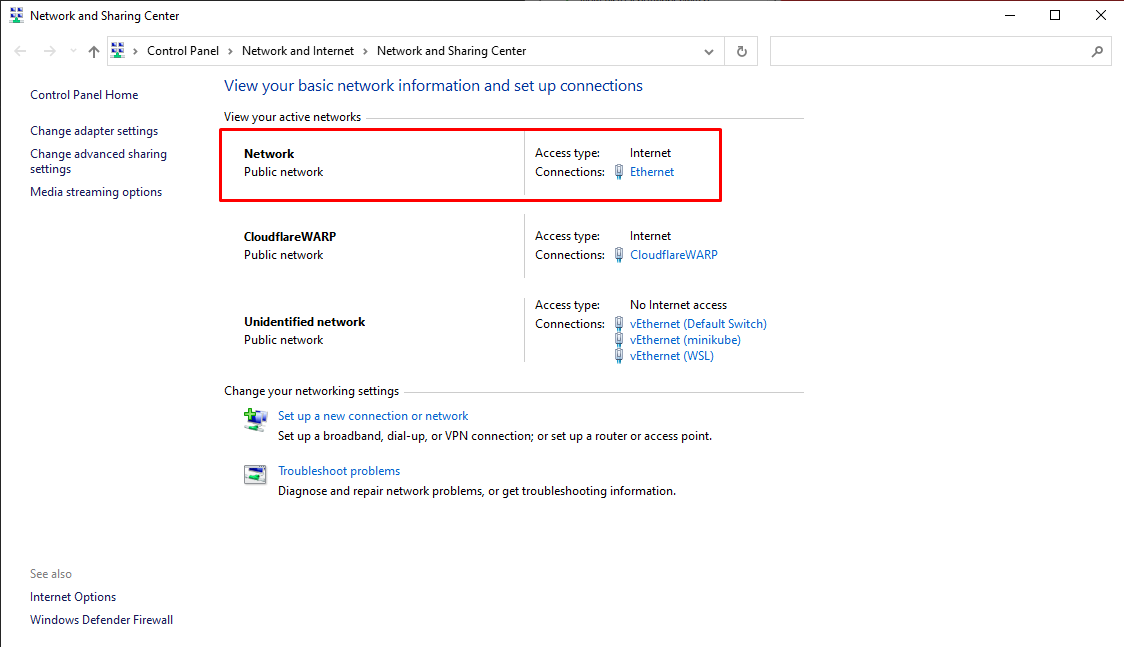
Setup Networks on Windows 10.
-
Go to the Network and Sharing Center dialog.
-
Choose the Ethernet in Connections.
-
Click Properties button on this dialog, and go to the Sharing tab.
-
Choose a checkbox Allow other network users to connect through this computer’s internet connection. Then, Choose the Home networking connection with vEthernet (minikube) option.
Click OK button.
-
-
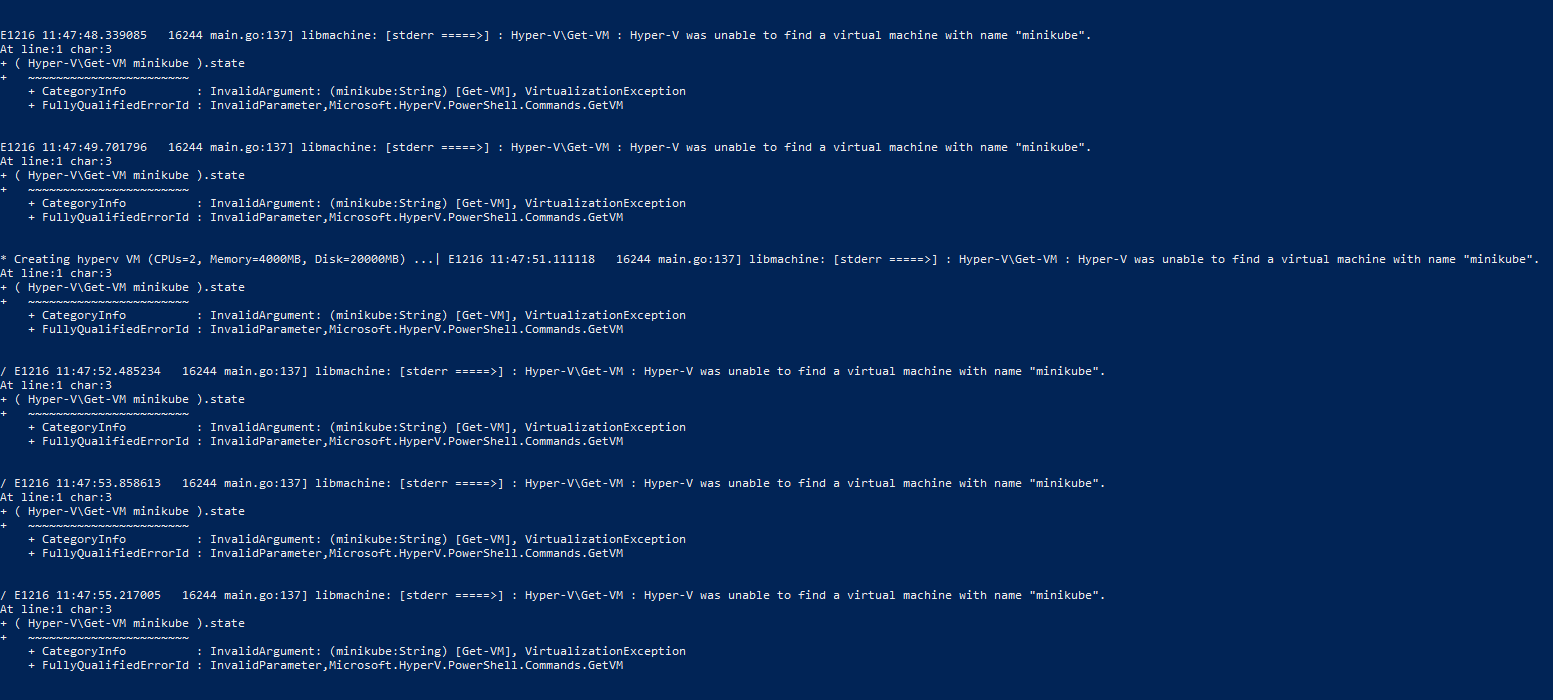
Verify minikube again.
Run the following commands:
minikube start --vm-driver="hyperv" --hyperv-virtual-switch="minikube"
We still run into the issue with the message: “Hyper-V was unable to find a virtual machine with name “minikube”.”.
Below are some solutions for the above issue:
-
First way.
Due to the fact that we use the VPN of CloudFlare, it cause this issue. Run the below commands:
  minikube delete --all

  minikube start --driver=hyperv --force
Then, we have:
-
Second way.
When running the following command by using external virtual switch:
minikube start --hyperv-use-external-switchIt works.

Some issues while installing Kubernetes
-
When running
minikube start, we will run into the following error: “Unable to resolve the current Docker CLI context “default””.Try to update your active context of docker which Minikube will pick up.
docker context use default
Wrapping up
A kubectl is the official Kubernetes command-line tool, used to run commands on Kubernetes clusters.
As the kubectl is distributed as a standalone binary it can be easily downloaded from official sources and installed on Windows.
In this post I will show how to download and install the latest stable version of the kubectl on Windows through a graphical user interface (GUI), or using a command-line prompt (CMD) or PowerShell.
Cool Tip: Install Minikube on Windows! Read More →
Download the kubectl executable for Windows:
- https://dl.k8s.io/release/v1.27.3/bin/windows/amd64/kubectl.exe
Replace a version in the URL above with the latest stable one.
Open a user’s home folder by typing %USERPROFILE% in the address bar of a “File Explorer”:

In the user’s home create a bin folder and move the kubectl there:

Start the environment variables editor – press the ⊞ Win keybutton to open the “Start” menu, type in envi and click on “Edit environment variables for your account”.
The environment variables editor can also be launched with the following command from the CMD or PowerShell:
C:\> rundll32 sysdm.cpl,EditEnvironmentVariables
Add the bin folder to a Path environment variable:

Install Kubectl on Windows using CMD or PowerShell
Alternatively the kubectl can be installed on Windows from the CMD or PowerShell using the commands below.
To download the latest stable version of the kubectl for Windows, execute the commands below either from the CMD or PowerShell:
C:\> for /F %I in ('curl -L https://dl.k8s.io/release/stable.txt') do set KUBECTL_VERSION=%I
C:\> curl -LO "https://dl.k8s.io/release/%KUBECTL_VERSION%/bin/windows/amd64/kubectl.exe"
Create a %USERPROFILE%\bin folder, add it to the current user’s %PATH% and move the kubectl executable there:
C:\> mkdir "%USERPROFILE%\bin"
C:\> setx path "%PATH%;%USERPROFILE%\bin"
C:\> move kubectl.exe "%USERPROFILE%\bin"
To verify the kubectl installation – open the new CMD or PowerShell window and execute the following commands:
C:\> where.exe kubectl
- sample output -
C:\Users\%USERNAME%\bin\kubectl.exe

C:\> kubectl version --client -o json
- sample output -
{
  "clientVersion": {
    "major": "1",
    "minor": "27",
    "gitVersion": "v1.27.4",
    "gitCommit": "fa3d7990104d7c1f16943a67f11b154b71f6a132",
    "gitTreeState": "clean",
    "buildDate": "2023-07-19T12:20:54Z",
    "goVersion": "go1.20.6",
    "compiler": "gc",
    "platform": "windows/amd64"
  },
  "kustomizeVersion": "v5.0.1"
}
Was it useful? Share this post with the world!
I have been working with Kubernetes quite a bit lately playing around with the lab environment and learning the ins and outs of connecting to and working with K8s clusters. The kubectl command (sometimes pronounced “coob cuttle”) is the de facto command that you will use to interact with your Kubernetes clusters. I mainly use a Windows workstation as my daily driver for most other things, so getting kubectl up and running on my Windows box was the end-goal. There were a few little details along the way, but ultimately, this wasn’t too difficult. In this post, I will walk you throgh how to install kubectl on Windows and create kubeconfig file.
What is kubectl?
The kubectl command is the command that allows you as a Kubernetes administrator to control and manage Kubernetes clusters. Much of the administration you will do with the Kubernetes cluster will be done with kubectl. To configure your kubectl command-line tool, you use a file located in your $HOME directory that is known as the kubeconfig file. In this file the kubectl command is pointed to your Kubernetes cluster and other context information that allows you to manage the cluster.
To install kubectl on Windows and create the kubeconfig file, it will generally involve the following steps:
- Create a folder to contain your Kubernetes tools
- Add the folder location to the Windows PATH environment variable
- Download the kubectl command
- Create the .kube directory
- Create the Windows kubectl kubeconfig file
- Change the API version listed in the kubeconfig file
- Verify connectivity to the Kubernetes cluster
1. Create a folder to contain your Kubernetes tools
I like to create a folder that will house the tools used for Kubernetes. Many of these tools are self-contained executables that you can run from any directory. Examples include kubectl and helm. I like to create a directory called “KubeTools” which house all the tools I use for interacting with Kubernetes. This way, you just add one folder to your Windows PATH variable and you are good to go for any Kubernetes tool you place in the folder.

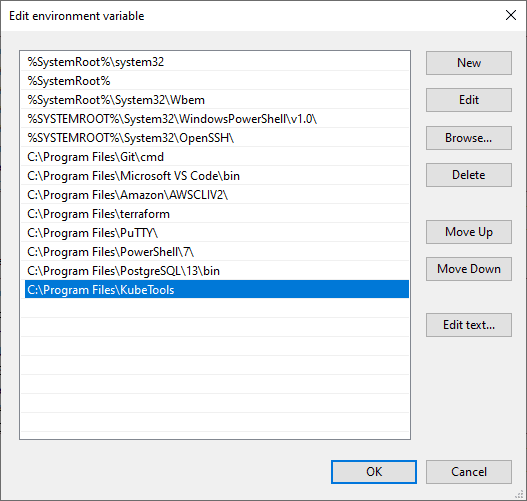
2. Add the folder location to the Windows PATH environment variable
After you have created the folder, add the folder to the Windows PATH environment variable. This makes it so you don’t have to navigate to the literal path of kubectl to run the command. You can simply type in the kubectl command from any command line context.
***As a note*** Docker Desktop for Windows adds its own version of kubectl to the Windows PATH. If you have installed Docker Desktop, you may need to place your PATH entry before the one added by the Docker Desktop installer or remove the Docker Desktop’s kubectl.
3. Download the kubectl command
After you have the folder in place and the directory in the PATH statement, you can download the kubectl command to your directory. To do you that, you run the CURL command below. Yes curl works in Windows 10.
curl -LO https://dl.k8s.io/release/v1.21.0/bin/windows/amd64/kubectl.exe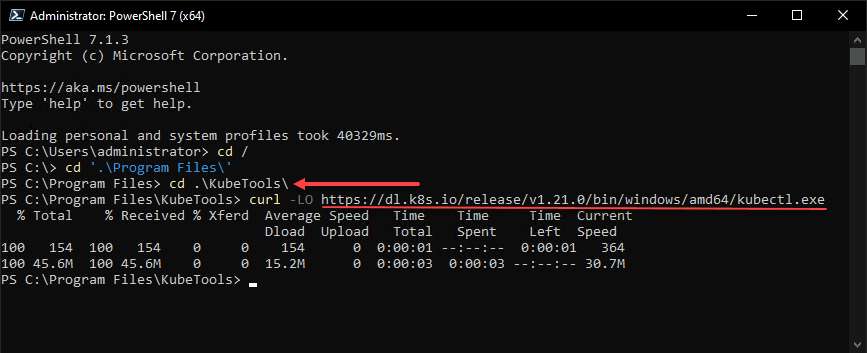
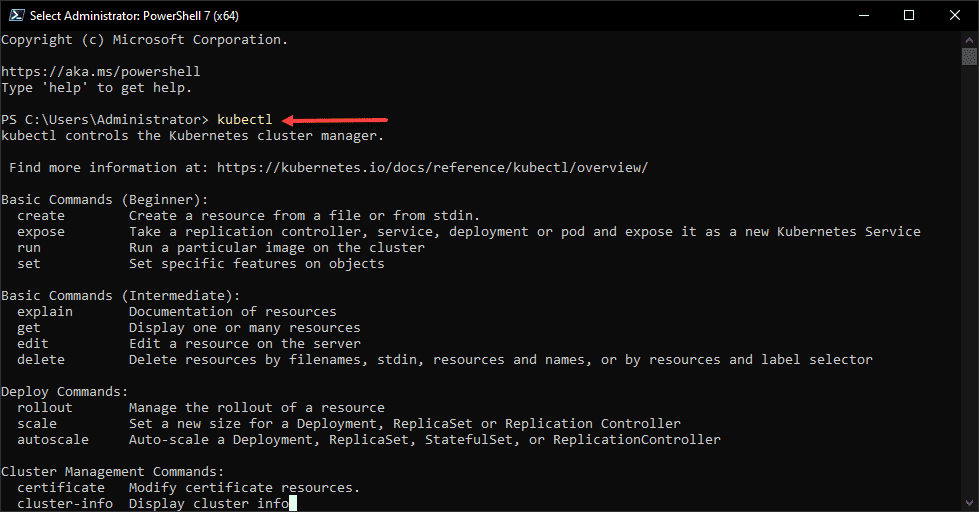
After you have configured the PATH statement and downloaded the kubectl command, run the kubectl command to verify you see the return from the command with the available parameters. This verifies the PATH statement is working as expected.
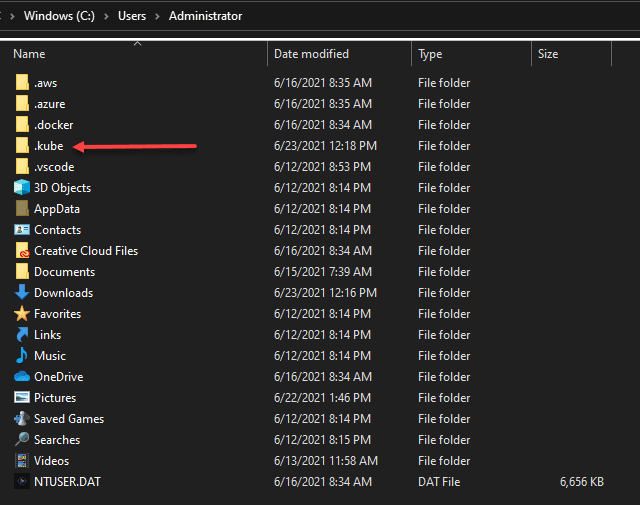
4. Create the .kube directory
Now that we have the kubectl utility downloaded and the Windows PATH statement in place to run the command from any command-line context, we need to create the directory the command looks to for the configuration. Kubectl looks at the path:
$HOME/.kubeFor Windows, this is the root of your %USERPROFILE% directory of the user that will be running the kubectl command. All you need to do is create the “.kube” directory in this directory.
5. Create the Windows kubectl kubeconfig file
Since the .kube directory is created, we now need to create the kubeconfig file that is needed for the kubectl command. The kubeconfig file contains the configuration needed to tell kubectl how to connect to the Kubernetes cluster. An easy way to “create” this file is simply copy the file that is generated on your Kubernetes hosts using the kubeadm command.
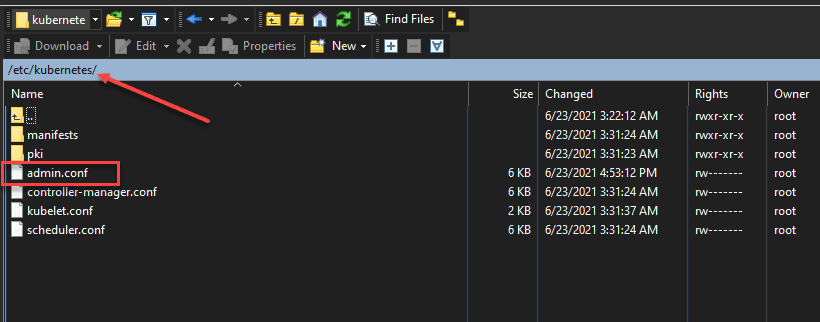
If you haven’t created your Kubernetes Lab environment as of yet, take a look at my post: Kubernetes Home Lab Setup Step-by-Step where I show how to build a Kubernetes lab environment using three Ubuntu VMs running in a vSphere 7.0 Update 2a environment. In that post, you will see how to configure your Kubernetes lab environment. After you have used kubeadm to create the cluster, you will have a valid kubeconfig file that can be copied to your Windows workstation to connect to your Kubernetes cluster. Where is this kubeconfig file located?
/etc/kubernetes/admin.confCopy this admin.conf file down to your %userprofile%/.kube directory that was created above. Rename the file to simply “config” with no extension.
6. Change the API version listed in the kubeconfig file
One little issue I ran into after copying down the kubeconfig file to the %userprofile%/.kube directory was the API version listed in the file errored out. Below is the error received.
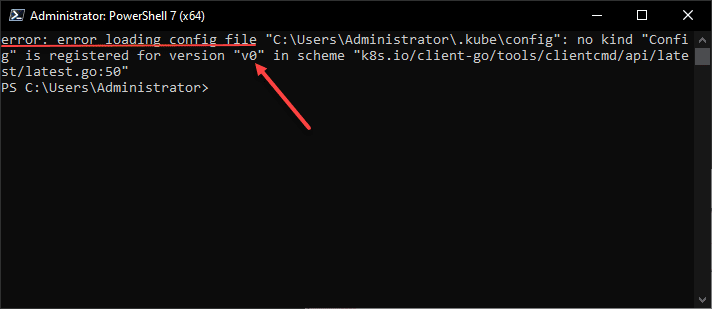
In looking at the kubeconfig file, it was indeed set to apiVersion: v0. I simply changed this to v1 and it resolved the issue.
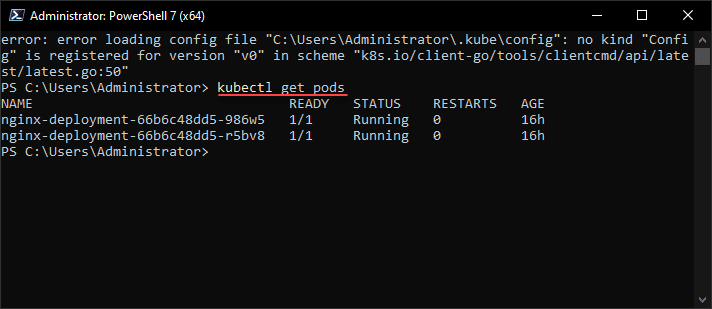
7. Verify connectivity to the Kubernetes cluster
The last step is verifying connectivity to the Kubernetes cluster. After changing the API version in the kubeconfig file to v1, as you can see below, after getting the error we can now connect to the Kubernetes cluster and get pods.
Concluding
Hopefully this walkthrough of how to install kubectl on Windows and create Kubeconfig file will help any who need to setup their Windows workstation for working with a Kubernetes cluster. The process is fairly straightforward after you copy the files needed into the proper location and configure your Windows PATH variable. The only real flaky thing I saw was the API version in the kubeconfig file copied from the Linux server to the Windows host. After changing the API version to v1 everything started working.
Brandon Lee is the Senior Writer, Engineer and owner at Virtualizationhowto.com, and a 7-time VMware vExpert, with over two decades of experience in Information Technology. Having worked for numerous Fortune 500 companies as well as in various industries, He has extensive experience in various IT segments and is a strong advocate for open source technologies. Brandon holds many industry certifications, loves the outdoors and spending time with family. Also, he goes through the effort of testing and troubleshooting issues, so you don’t have to.