

— Ой, у меня ничего не работает, помогите!
— Не переживайте, сейчас всё исправим. Назовите имя компьютера…
(классика жанра из звонков в техподдержку)
Хорошо, если у вас есть инструмент а-ля BgInfo или ваши пользователи знают про шорткат Windows+Pause/Break и умеют его нажимать. Встречаются даже редкие экземпляры, которые успели выучить имя своей машины. Но часто у звонящего вдобавок к его основной проблеме появляется вторая: узнать имя/IP-адрес компьютера. И нередко на решение этой второй проблемы уходит куда больше времени, чем первой (а надо было всего лишь обои поменять или вернуть пропавший ярлык :).
А ведь намного приятнее услышать что-то вроде:
— Татьяна Сергеевна, не беспокойтесь, уже подключаюсь…
А надо для этого не так уж и много.
Специалисту техподдержки достаточно лишь выучить наизусть имена машин и помнить, кто за какой работает.
Перед описанием решения, которым мы пользуемся сейчас, я кратко рассмотрю другие варианты, чтобы
раскритиковать их в пух и прах
объяснить свой выбор.
- BgInfo, Desktop Info и им подобные. Если много денег, есть и платные. Суть в том, что на десктоп выводится техническая информация: имя машины, IP-адрес, логин и т.д. В Desktop Info можно даже графики производительности запилить на половину экрана.
Не устраивает то, что для того же Bginfo, например, пользователю нужно сворачивать окна, чтобы увидеть нужные данные. Еще мы с коллегами не раз наблюдали у BgInfo характерный артефакт, когда новый текст выводится поверх старого.
Некоторых пользователей раздражает тот факт, что админырисуют пугающее 192.168.0.123 на мордочке растянувшегося на рабочем столе котикапортят эстетику фоновой картинки, и, разумеется, это жутко демотивирует и напрочь убивает рабочий настрой. - Ярлык а-ля «Кто я» (не пытайтесь добавить ему знак вопроса в конце :). Классический ярлык на рабочем столе, за которым прячется аккуратный или не очень скрипт, выводящий нужную информацию в виде диалогового окна. Иногда вместо ярлыка на рабочий стол кладут сам скрипт, что ИМХО моветон.
Недостаток в том, что для запуска ярлыка, как и в первом случае, нужно сворачивать все открытые окна (баловней судьбы, у которых на рабочей машине открыто единственное окно с пасьянсом, в расчет не берём). Кстати, а ваши пользователи знают, куда нужно тыкнуть, чтобы свернуть все окна?Правильно, пальцем в глаз админу.
Также кэп подсказывает, что у обоих описанных выше способов основной недостаток в том, что в получении информации участвует пользователь,
который может быть подслеповат, глуп и вообще соврать.
Вариант с повышением компьютерной грамотности, когда все знают, где в Windows смотреть имя своей машины, рассматривать не буду: дело благородное, но очень трудное. А если в компании текучка кадров, то и вовсе гиблое. Что там говорить, в большинстве случаев и логин-то свой не помнят.
Душу излил, а теперь к делу.
За основу была взята идея хабровчанина mittel из этой статьи.
Суть задумки в том, что при входе пользователя в Windows логон-скрипт заносит нужную информацию (время и имя машины) в определенный атрибут учётной записи пользователя. А при выходе из системы отрабатывает аналогичный логофф-скрипт.
Сама идея мне понравилась, а вот в реализации кое-что не устроило.
- Групповая политика, в которой прописаны логон- и логофф-скрипты для пользователей, применяется ко всему домену, поэтому скрипты будут отрабатывать на любой машине, на которую логинятся пользователи. Если у вас наряду с рабочими станциями используются терминальные решения (например, Microsoft RDS или продукты Citrix), такой подход будет неудобным.
- Данные заносятся в атрибут Department учетной записи пользователя, на который у рядового пользователя есть доступ только на чтение. Помимо атрибута учётной записи пользователя, скрипт также вносит изменения в атрибут Department учётной записи компьютера, который по умолчанию пользователи также менять не могут. Поэтому чтобы решение работало, автор предлагает изменить стандартые настройки безопасности для объектов AD.
- Формат даты зависит от настроек локализации на конечной машине, поэтому с одной машины можем получить 10 ноября 2018 14:53, а с другой 11/10/18 2:53 p.m.
Для устранения этих недостатков было сделано следующее.
- GPO линкуется не к домену, а к OU с машинами (я разделяю пользователей и машины по разным OU и другим советую). При этом для loopback policy processing mode выставлен режим merge.
- Скрипт будет заносить данные только в учетную запись пользователя в атрибут Info, который пользователь может менять самостоятельно для своей учётной записи.
- Изменен кусок кода, генерирующий значение атрибута
Теперь скрипты выглядят так:
SaveLogonInfoToAdUserAttrib.vbs
On Error Resume Next
Set wshShell = CreateObject("WScript.Shell")
strComputerName = wshShell.ExpandEnvironmentStrings("%COMPUTERNAME%")
Set adsinfo = CreateObject("ADSystemInfo")
Set oUser = GetObject("LDAP://" & adsinfo.UserName)
strMonth = Month(Now())
If Len(strMonth) < 2 then
  strMonth = "0" & strMonth
End If
strDay = Day(Now())
If Len(strDay) < 2 then
  strDay = "0" & strDay
End If
strTime = FormatDateTime(Now(),vbLongTime)
If Len(strTime) < 8 then
  strTime = "0" & strTime
End If
strTimeStamp = Year(Now()) & "/" & strMonth & "/" & strDay & " " & strTime
oUser.put "info", strTimeStamp & " <logon>" & " @ " & strComputerName
oUser.Setinfo
SaveLogoffInfoToAdUserAttrib.vbs
On Error Resume Next
Set wshShell = CreateObject("WScript.Shell")
strComputerName = wshShell.ExpandEnvironmentStrings("%COMPUTERNAME%")
Set adsinfo = CreateObject("ADSystemInfo")
Set oUser = GetObject("LDAP://" & adsinfo.UserName)
strMonth = Month(Now())
If Len(strMonth) < 2 then
  strMonth = "0" & strMonth
End If
strDay = Day(Now())
If Len(strDay) < 2 then
  strDay = "0" & strDay
End If
strTime = FormatDateTime(Now(),vbLongTime)
If Len(strTime) < 8 then
  strTime = "0" & strTime
End If
strTimeStamp = Year(Now()) & "/" & strMonth & "/" & strDay & " " & strTime
oUser.put "info", strTimeStamp & " <logoff>" & " @ " & strComputerName
oUser.Setinfo
Кто первым найдет все отличия между логон- и логофф-скриптом, тому плюс в карму. 
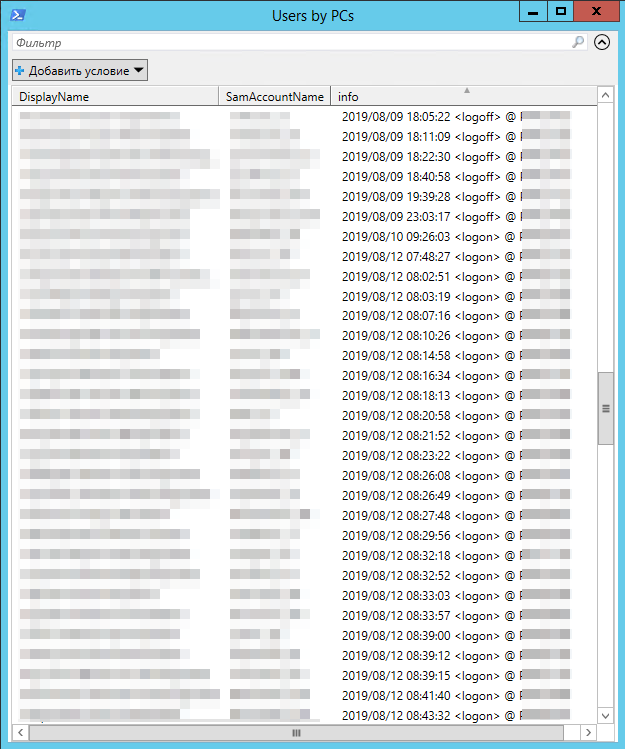
Также для получения наглядной информации создан такой небольшой PS-скрипт:
Get-UsersByPCsInfo.ps1
$OU = "OU=MyUsers,DC=mydomain,DC=com"
Get-ADUser -SearchBase $OU -Properties * -Filter * | Select-Object DisplayName, SamAccountName, info | Sort DisplayName | Out-GridView -Title "Информация по логонам" -Wait
Итого всё настраивается на раз-два-три:
- создаем GPO с нужными настройками и линкуем его к подразделению с рабочими станциями пользователей:

- идем пить чай (если AD с большим количеством пользователей, то чая нужно много
- запускам PS-скрипт и получаем результат:
В верхней части окна есть удобный фильтр, в котором можно отбирать данные по значениям одного или нескольких полей. Клик по столбцам таблицы сортирует записи по значениям соответствующих полей.

Можно красиво «упаковать» наше решение.

Для этого добавим ярлык для запуска скрипта специалистам техподдержки, у которого в поле «объект» будет что-то такое:
powershell.exe -NoLogo -ExecutionPolicy Bypass -File "\\server\share\Scripts\Get-UsersByPCsInfo.ps1"
Если сотрудников техподдержки много, то можно раздать ярлык с помощью GPP.
Несколько замечаний напоследок.
- На машине, откуда запускается PS-скрипт, должен быть установлен модуль Active Directory для PowerShell (для этого достаточно добавить средства администрирования AD в компонентах Windows).
- бОльшую часть атрибутов своей учётной записи пользователь по умолчанию редактировать не может. Учитывайте это, если решите использовать атрибут, отличный от Info.
- Проинформируйте всех причастных коллег о том, какой атрибут будете использовать. Например, тот же Info используется для интерактивного добавления заметок к ящику пользователя в админке Exchange Server и кто-то легко может его затереть, либо опечалился, когда добавленную им информацию затрет ваш скрипт.
- Если у вас несколько сайтов Active Directory, то делайте поправку на задержки репликации. Например, если вы хотите получить актуальную информацию о пользователях с AD-сайта A, а запускаете скрипт с машины из AD-сайта B, то можно сделать так:
Get-ADUser -Server DCfromSiteA -SearchBase $OU -Properties * -Filter * | Select-Object DisplayName, SamAccountName, info | Sort DisplayName | Out-GridView -Title "Информация по логонам" -Wait
DCfromSiteA — имя контроллера домена сайта A (по умолчанию командлет Get-AdUser подключается к ближайшему контроллеру домена)

Источник картинок
Буду признателен, если вы пройдете короткий опрос ниже.
Только зарегистрированные пользователи могут участвовать в опросе. Войдите, пожалуйста.
Чем пользуетесь?
27.22% bginfo, Desktop info etc. (бесплатное ПО)49
0.56% платные аналоги bginfo1
6.67% сделаю так, как в статье12
3.89% не актуально, т.к. использую VDI/RDS etc.7
21.11% пока не использую ничего, но задумываюсь38
28.89% мне не нужно собирать такие данные52
11.67% другое (поделитесь в комментариях)21
Проголосовали 180 пользователей. Воздержались 50 пользователей.
In Windows 11, there are several ways to check who is currently logged into the Windows or who you are logged in as locally. If you are on a shared network and want to check who is logged in to another Windows 11 computer remotely, there are several command lines you can use to query who is currently logged into that particular computer.
The remote method is especially useful when there are several people who often remotely login to a shared computer. If you try to login to a shared computer while someone else is already logged on, you will be given the option to continue or force the other user to logout or disconnect. Thus, it would be nice to remotely check who is currently logged into the shared computer first, before trying to login.
Also see: How to Restrict User Access to a Folder or Drive in Windows 11
Check who is logged in on Windows 11 using Command Prompt
Locally
- Search for Command Prompt via Start and open it.
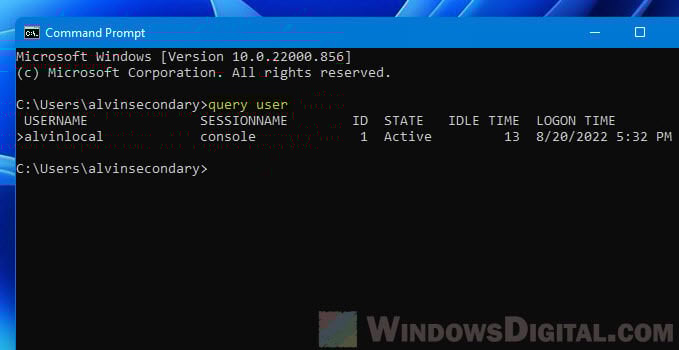
- In the Command Prompt window, enter the following command to query who is currently logged in.
query user
- The user who is logged in will be shown under USERNAME along with other information such as logon time.

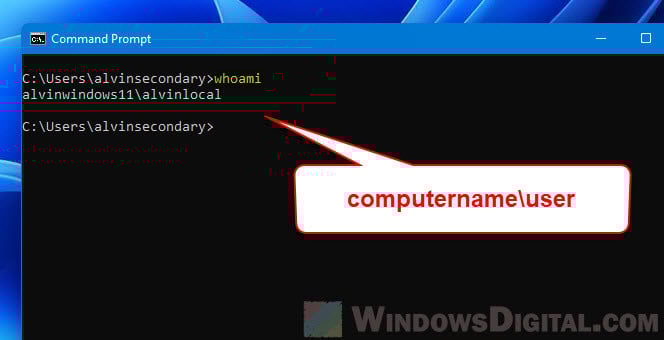
Alternatively, you can use the “whoami” command instead to check who you are logged in as in Windows 11. In Command Prompt, enter the following command to check “who am I logged in as” in the local computer (or the computer you remotely logged on to).
whoami
Remotely
- Search for and open Command Prompt via Start menu.
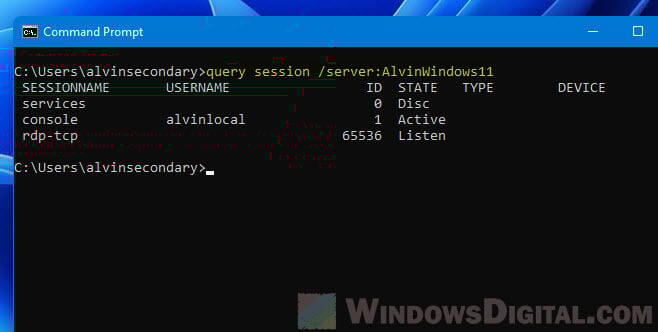
- In Command Prompt, enter the following command to query who is logged in on a Windows 11 remote computer. Replace the ComputerName with the actual computer name of the PC you want to check.
query session /server:ComputerName
You can also use query user instead of query session.
query user /server:ComputerName
- Command prompt will then shows details about the user who is currently logged into the remote computer.

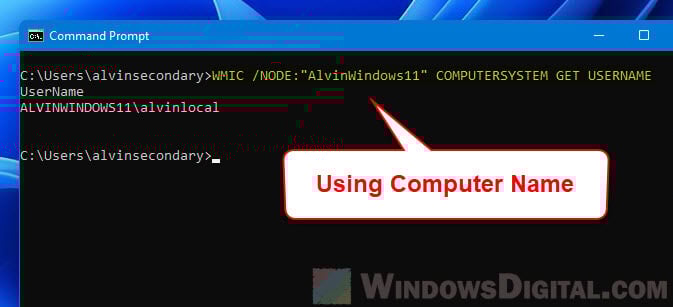
In addition, you can also use the WMIC command line to check who is logged in on Windows 11 remotely. In the command prompt window, enter the following command. Replace the ComputerName with the actual computer name of the remote computer you are querying.
WMIC /NODE:"ComputerName" COMPUTERSYSTEM GET USERNAME
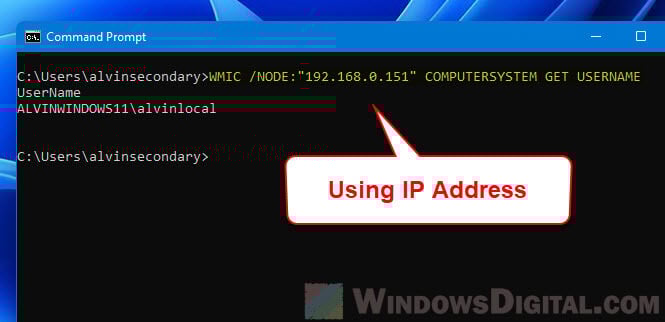
Alternatively, you can use the IP address of the remote computer instead of the computer name for this command to query who is logged in.
WMIC /NODE:"IPaddress" COMPUTERSYSTEM GET USERNAME
What to do if you encounter RPC or other error
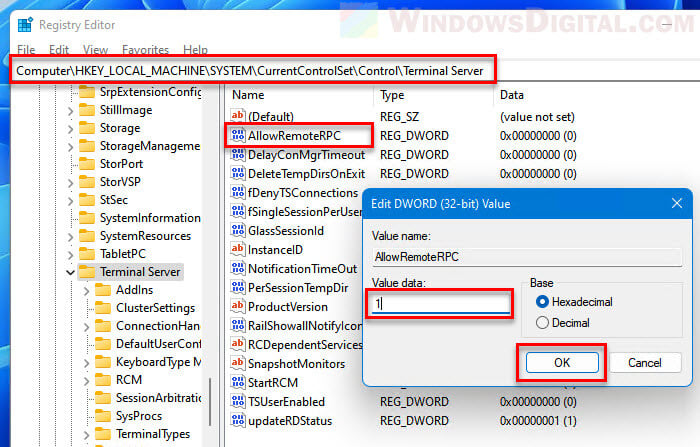
If you encounter RPC error such as “The RPC service is unavailable” error while querying who is logged in on Windows 11, try to set the following registry value on the remote computer.
- Search for Registry Editor via Start and open it.
- Navigate to the following registry key.
HKEY_LOCAL_MACHINE\SYSTEM\CurrentControlSet\Control\Terminal Server
- Next, double-click AllowRemoteRPC.
- In the Value data field, enter “1” and then click OK to save the changes.
- Close Registry Editor and restart the remote computer for the changes to take effect.
Check who am I logged in as via Task Manager or Start menu
If you only want to find out who you are logged in as on a Windows 11 local computer or a computer you remotely logged in to, you can quickly do so via the Task Manager or the Start menu.
To open Task Manager in Windows 11, right-click the Start icon on the taskbar and then select Task Manager. Alternatively, you can press Ctrl + Alt + Del to open the lock screen and then select Task Manager to open it.
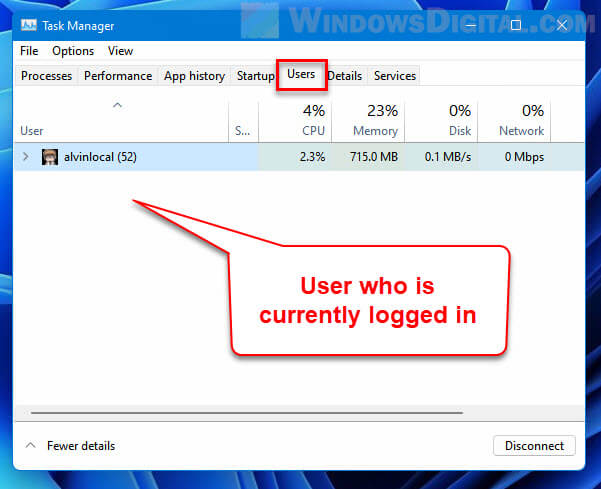
Next, in the Task Manager window, select the Users tab. From there, you can see which user is currently logged into the Windows 11 computer.
Another method to find out who is logged into Windows 11 is by simply opening the Start menu. Click the Start icon to open the Start menu. The currently logged in user will be shown at the bottom left corner of the Start menu.
При расследовании различных инцидентов администратору необходимо получить информацию кто и когда заходил на определенный компьютер Windows. Историю входов пользователя в доменной сети можно получить из журналов контроллеров домена. Но иногда проще получить информацию непосредсвенно из логов компьютера. В этой статье мы покажем, как получить и проанализировать историю входа пользователей на компьютер/сервер Windows. Такая статистика поможет вам ответить на вопрос “Как в Windows проверить кто и когда использовал этот компьютере”.
Содержание:
- Настройка политики аудита входа пользователей в Windows
- Поиск событий входа пользователей в журнале событий Windows
- Анализ событий входа пользователей в Windows с помощью PowerShell
Настройка политики аудита входа пользователей в Windows
Сначала нужно включить политик аудита входа пользователей. На отдельностоящем компьютере для настройки параметров локальной групповой политики используется оснастка gpedit.msc. Если вы хотите включить политику для компьютеров в домене Active Directorty, нужно использовать редактор доменных GPO (
gpmc.msc
).
- Запустите консоль GPMC, создайте новую GPO и назначьте ее на Organizational Units (OU) с компьютерами и / или серверами, для которых вы хотите включить политику аудита событий входа;
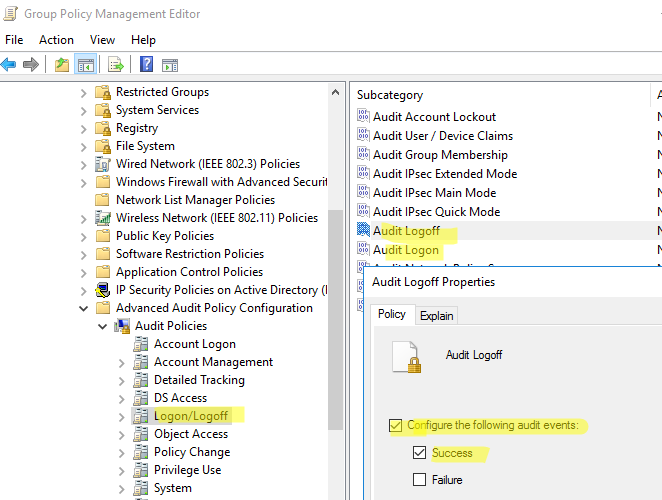
- Откройте объект GPO и перейдите в раздел Computer Configuration -> Policies -> Windows Settings -> Security Settings –> Advanced Audit Policy Configuration -> Audit Policies -> Logon/Logoff;
- Включите две политики аудита Audit Logon и Audit Logoff. Это позволит отслеживать как события входа, так и события выхода пользователей. Если вы хотите отслеживать только успешные события входа, включите в настройках политик только опцию Success;
- Закройте редактор GPO и обновите настройки политик на клиентах.
Поиск событий входа пользователей в журнале событий Windows
После того как вы включили политики аудита входа, при каждом входе пользователя в Windows в журнале Event Viewer будет появляться запись о входе. Посмотрим, как она выглядит.
- Откройте оснастку Event Viewer (
eventvwr.msc
); - Разверните секцию Windows Logs и выберите журнал Security;
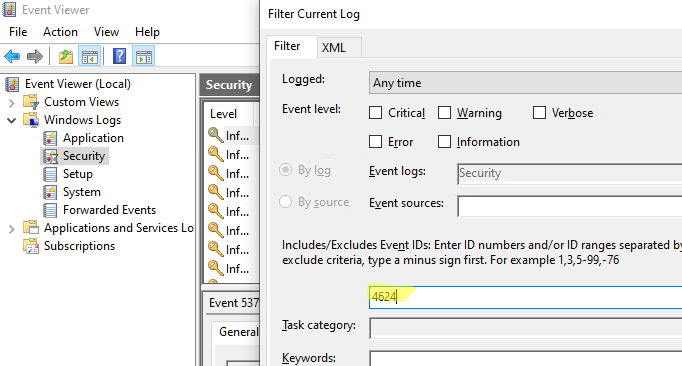
- Щелкните по нему правой клавишей и выберите пункт Filter Current Log;
- В поле укажите ID события 4624 и нажмите OK;
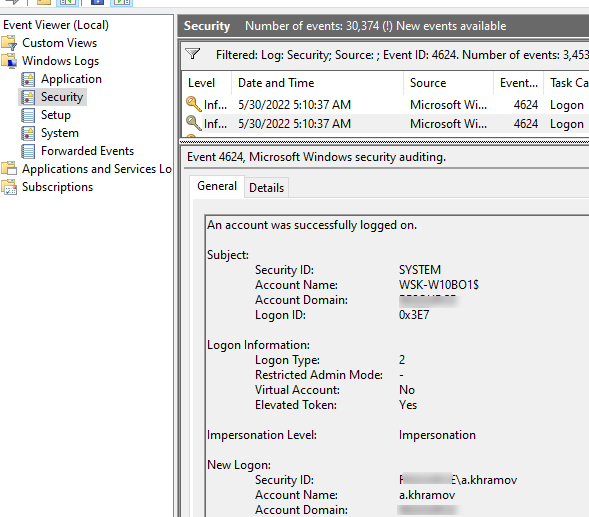
- В окне события останутся только события входа пользователей, системных служб с описанием
An account was successfully logged on
; - В описании события указано имя и домен пользователя, вошедшего в систему:
New Logon:
Security ID: WINITPRO\a.khramov
Account Name: a.khramov
Account Domain: WINITPRO
Ниже перечислены другие полезные EventID:
| Event ID | Описание |
| 4624 | A successful account logon event |
| 4625 | An account failed to log on |
| 4648 | A logon was attempted using explicit credentials |
| 4634 | An account was logged off |
| 4647 | User initiated logoff |
Если полистать журнал событий, можно заметить, что в нем присутствуют не только события входа пользователей на компьютер. Здесь также будут события сетевого доступа к этому компьютеру (при открытии по сети общих файлов или печати на сетевых принтерах), запуске различных служб и заданий планировщика и т.д. Т.е. очень много лишний событий, которые не относятся ко входу локального пользователя. Чтобы выбрать только события интерактивного входа пользователя на консоль компьютера, нужно дополнительно сделать выборку по значению параметра Logon Type. В таблице ниже перечислены коды Logon Type.
| Код Logon Type | Описание |
|---|---|
| 0 | System |
| 2 | Interactive |
| 3 | Network |
| 4 | Batch |
| 5 | Service |
| 6 | Proxy |
| 7 | Unlock |
| 8 | NetworkCleartext |
| 9 | NewCredentials |
| 10 | RemoteInteractive |
| 11 | CachedInteractive |
| 12 | CachedRemoteInteractive |
| 13 | CachedUnlock |
При удаленном подключении к рабочему столу компьютера по RDP, в журнале событий появится записи с Logon Type 10 или 3. Подробнее об анализе RDP логов в Windows.
В соответствии с этой таблицей событие локального входа пользователя на компьютер должно содержать Logon Type: 2.
Для фильтрации события входа по содержать Logon Type лучше использовать PowerShell.
Анализ событий входа пользователей в Windows с помощью PowerShell
Допустим, наша задача получить информацию о том, какие пользователи входили на этот компьютер за последнее время. Нам интересует именно события интерактивного входа (через консоль) с
LogonType =2
. Для выбора события из журналов Event Viewer мы воспользуемся командлетом Get-WinEvent.
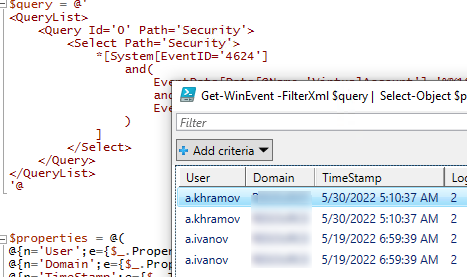
Следующий PowerShell скрипт выведет история входа пользователей на текущий компьютер и представит ее в виде графической таблицы Out-GridView.
$query = @'
<QueryList>
<Query Id='0' Path='Security'>
<Select Path='Security'>
*[System[EventID='4624']
and(
EventData[Data[@Name='VirtualAccount']='%%1843']
and
EventData[Data[@Name='LogonType']='2']
)
]
</Select>
</Query>
</QueryList>
'@
$properties = @(
@{n='User';e={$_.Properties[5].Value}},
@{n='Domain';e={$_.Properties[6].Value}},
@{n='TimeStamp';e={$_.TimeCreated}}
@{n='LogonType';e={$_.Properties[8].Value}}
)
Get-WinEvent -FilterXml $query | Select-Object $properties|Out-GridView
Если нужно выбрать события входа за последние несколько дней, можно добавить pipe с таким условием:
|Where-Object {$_.TimeStamp -gt '5/10/22'}
Командлет Get-WinEvent позволяет получить информацию с удаленных компьютеров. Например, чтобы получить историю входов с двух компьютеров, выполните следующий скрипт:
'msk-comp1', 'msk-comp2' |
ForEach-Object {
Get-WinEvent -ComputerName $_ -FilterXml $query | Select-Object $properties
}
Если протокол RPC закрыт между компьютерами, вы можете получить данные с удаленных компьютеров с помощью PowerShell Remoting командлета Invoke-Command:
Invoke-Command -ComputerName 'msk-comp1', 'msk-comp2' {Get-WinEvent -FilterXml $query | Select-Object $properties}
Quick Tips
- The quickest method to view all users currently logged in to Windows is through the Start menu.
- You can also use command-line tools on Windows to view a list of users who are currently logged in.
The simplest and quickest method to view all the users who are currently logged in to Windows is through the Start menu. So, let’s start with that.
Step 1: Click the Start icon or press the Windows key to open the Start menu.
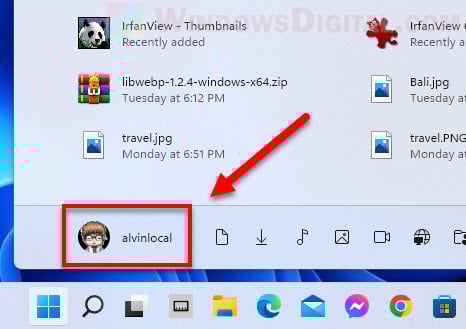
Step 2: Click on your profile picture at the bottom. You should see the Signed in tag under the user accounts that are currently active on your computer.

Apart from the above, the Start menu also lets you sign out or switch between user accounts on Windows.
Method 2: Use the Task Manager
Task Manager is a useful utility on Windows that lets you manage startup apps, monitor system processes, and force-close unresponsive apps and programs. However, did you know that you can also use it to see a list of signed-in users on Windows? We’ll show you how.
Step 1: Press the Ctrl + Shift + Esc keyboard shortcut to open the Task Manager quickly.
Step 2: In the Task Manager window, select the Users tab from the left sidebar. You should see all signed-in users under the Users column in the right pane.

Method 3: Use the Query User Command
Not a fan of GUI? No problem. You can also use a command-line tool like Command Prompt or Windows PowerShell to see who is currently logged in on a local or remote computer. This method also shows the exact time they logged in.
It’s important to note that the “query user” command is not available in Windows Home. It is only available on Windows Pro and Enterprise editions. If you are unsure, you can find out which edition your PC runs using the winver command. If your PC is running Windows Home, you must use one of the other methods in this guide.
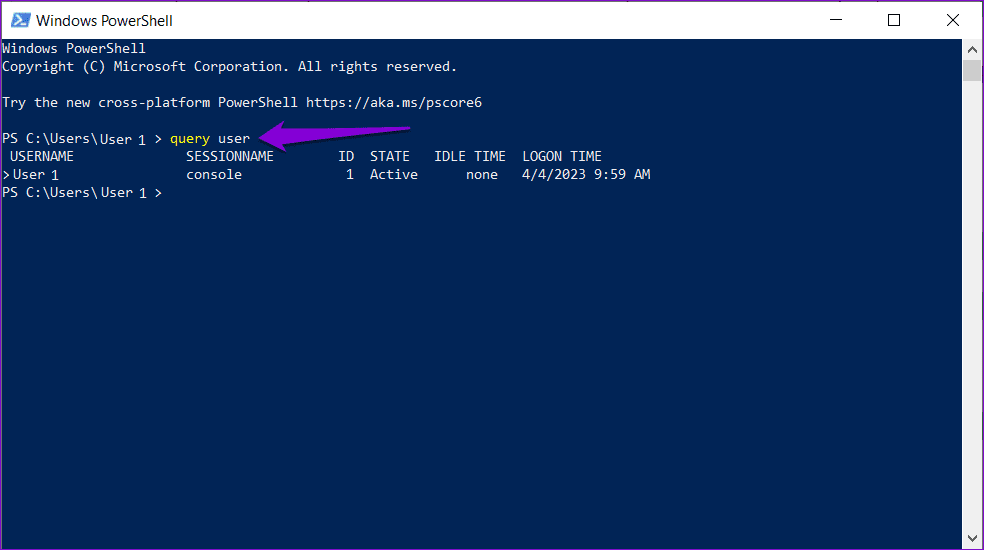
Step 1: Press the Windows key + S keyboard shortcut to access the search menu. Type powershell in the search box and select the first result that appears.

Step 2: In the console, type query user and press Enter to view all the signed-in users.
If you want to see who is logged into a remote computer, type in the following command and press Enter.
query user /server:computername
Make sure you replace computername in the above command with the actual name of the computer you are querying. You can use the same commands mentioned above in Command Prompt as well.
Method 4: Use the WMIC Utility
Windows Management Instrumentation Command (WMIC) is a powerful tool that can help you manage a variety of Windows features, including user accounts. Here’s how you can use WMIC to determine who is currently logged into your Windows computer.
Step 1: Press the Windows key + R to open the Run dialog box. Type cmd in the text box and press Enter.
Step 2: Type the following command in the console and press Enter.
WMIC /NODE:"ComputerName" COMPUTERSYSTEM GET USERNAME
Replace ComputerName with the actual computer name of the system you are querying. Alternatively, you can also replace ComputerName with the IP address of the system.

Step 3: Once you run the above command, you should see a list of active users under the UserName column.

Was this helpful?
Thanks for your feedback!
The article above may contain affiliate links which help support Guiding Tech. The content remains unbiased and authentic and will never affect our editorial integrity.
If you want to find all the Signed in Users in Windows 11 or Windows 10, here is how you can do that. It is possible to find the name of all signed in users on your computer with the help of Start Menu, Command Prompt, and Task Manager. You can follow any of the methods as per your requirements.

Let’s assume that you have changed something in the Registry Editor, and you need to restart your computer to get the change. If your computer has only one user, you can simply restart it. However, if you have multiple users and you use all those users’ accounts for different purposes, it might be complicated for you. Many people often use different user accounts to do different tasks or for different members of the family. If you do the same, you need to save the work in those user accounts to retain all the data after the restart. That is why you need to know about the signed-in users’ names.
How to find all Signed in Users using Start Menu
To find all Signed-in Users in Windows 11/10 using Start Menu, follow these steps:
- Press the Windows key or click the Start Menu button
- Click on the profile picture.
- Find the username with Signed in tag.
First, you need to open the Start Menu on your computer. For that, you can either press the Windows key on your keyboard or click on the Start Menu button visible on the Taskbar.
Once the Start Menu is opened, you need to click on your profile picture or name. Here you can find all the users. You need to find the usernames with Signed in tag.
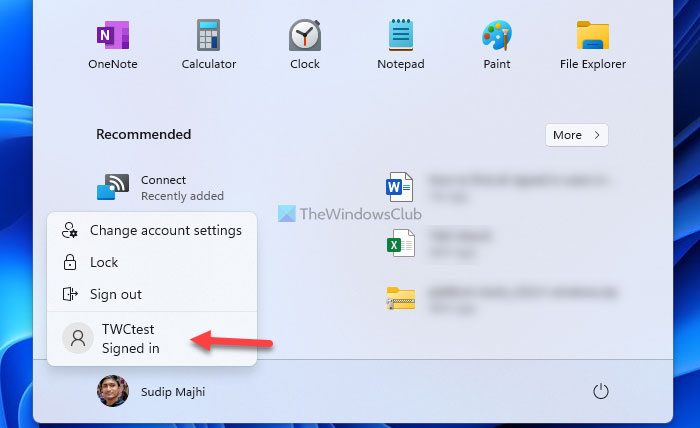
Those accounts are currently signed in to your computer.
For your information, you can do the same thing with the help of Command Prompt, Windows PowerShell, or Windows Terminal. You can open any of these utilities and use the same command to get the job done. However, for this example, we are going to use the traditional Command Prompt.
Read: How to list all Users in Windows 11
Find out who is logged in using Command Prompt
To find all signed-in users using Command Prompt, follow these steps:
- Search for cmd in the Taskbar search box.
- Click on the search result.
- Enter this command: query user
- Find the list of users.
Let’s check out more about these steps.
First, you need to open the Command Prompt. For that, you can search for cmd in the Taskbar search box and click on the individual search result.
Then enter this command:
query user
It lists down all the signed in users on the prompt.
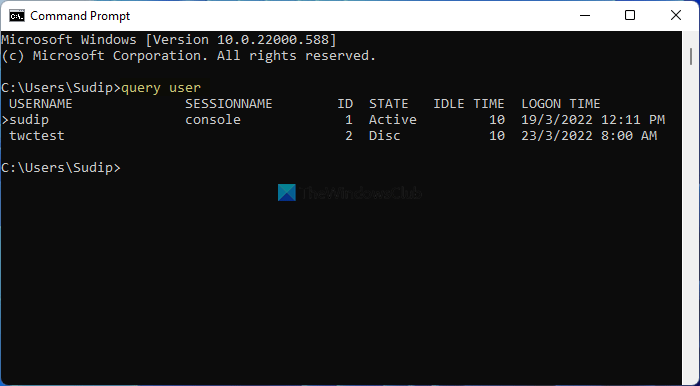
You can check the USERNAME column for this purpose. Also, it displays the current user account using an arrow (>).
How to see all signed-in users in Windows using Task Manager
To see all signed in users in Windows 11/10 using Task Manager, follow these steps:
- Press Ctrl+Shift+Escto open Task Manager.
- Switch to the Users tab.
- Find the signed in users.
Let’s delve into these steps in detail.
Like Command Prompt and the Start Menu methods, you can use the Task Manager to see all the signed in users on Windows 11/10.
For that, press Ctrl+Shift+Esc to open the Task Manager on your computer. Then, switch to the Users tab.
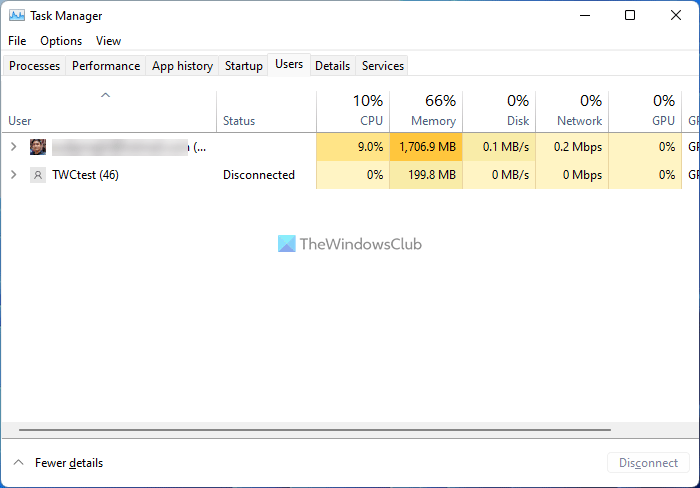
Here you can find all the signed-in users.
How can I see what users are logged in?
To see what users are logged in to Windows 11/10, you can follow any of the above-mentioned guides. It is possible to see the list using Task Manager, Start Menu, and Command Prompt. In the Command Prompt, enter this command: query user.
How do I see all users on my computer?
To see users on your computer, you can get the help of Windows PowerShell. For that, you can open the PowerShell or the PowerShell instance in Windows Terminal. Then, enter this command: net user. It lists down all the users on your screen.
Read: How to create a new User Account or Profile in Windows 11/10.