
Все способы:
- Основные настройки
- Изменение цвета
- Настройка прозрачности
- Перемещение
- Изменение размера
- Решение проблем с работоспособностью
- Вопросы и ответы: 0
Панель задач в операционных системах Windows является одной из самых важных стандартных составляющих. Благодаря ей происходит быстрый переход по запущенным приложениям, а также выполняется запуск фоновых программ, значки которых отображаются в правом нижнем углу. Иногда пользователи сталкиваются с задачей настройки этой панели, поскольку она находится на виду всегда, а персонализация позволяет сделать взаимодействие с ОС еще более комфортным. Сегодня мы детально обсудим тему конфигурации этого компонента в Windows 10.
Основные настройки
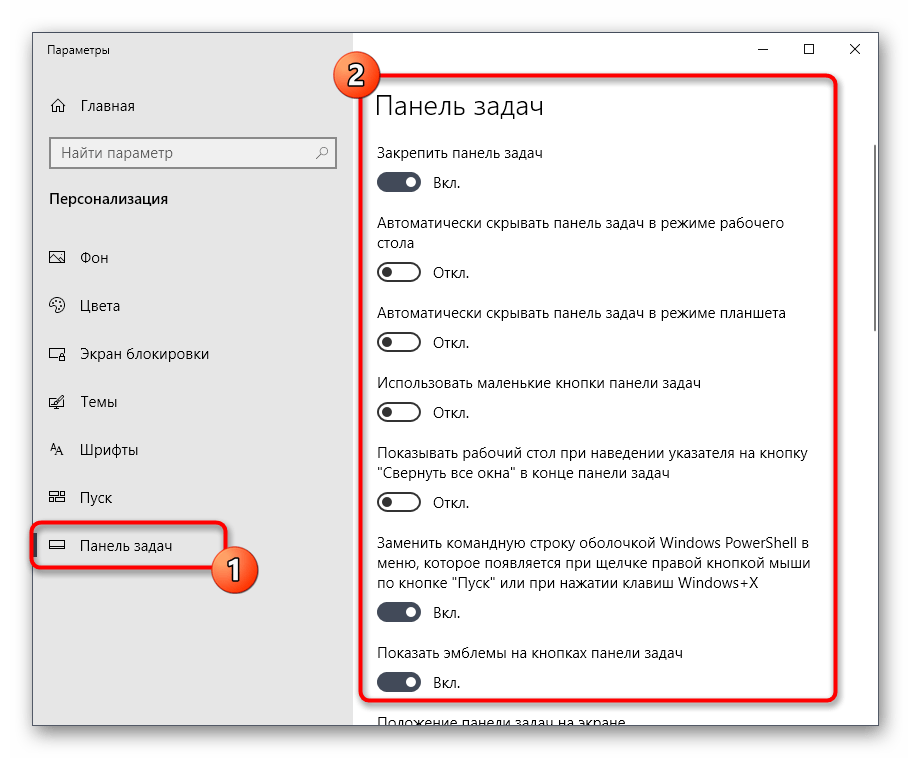
Если вы обратитесь к разделу «Персонализация», перейдя к нему через меню Параметры, то заметьте, что для редактирования панели задач там отведена целая категория. В ней вы можете закрепить строку, настроить ее автоматическое скрытие, выбрать отображаемые значки и поработать с другими настройками. Этой теме посвящена отдельная статья на нашем сайте, где автор в максимально развернутом виде описывает каждый доступный пункт и показывает на примере, что меняется при редактировании конкретных параметров. Данный материал позволит вам более детально изучить все присутствующие в Параметрах пункты и понять, какие из них следует поменять. Перейти к этой статье можно, кликнув по ссылке ниже.
Подробнее: Настройка панели задач через меню «Персонализация» в Windows 10
Изменение цвета
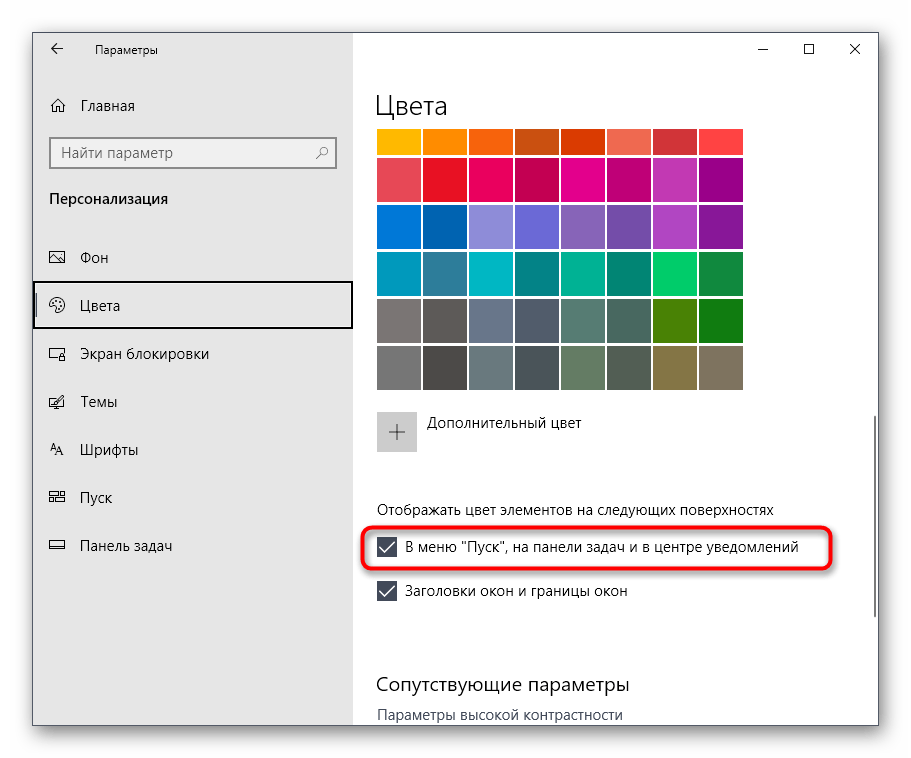
Внешний вид панели задач — одна из тех настроек, которая интересует большинство пользователей, поскольку на ней часто сосредоточено внимание и хочется, чтобы сама строка выглядела красиво. Существует целый ряд доступных методов настройки цвета этого компонента. Каждый из них подразумевает выполнение разного алгоритма действий, например, можно установить тему для всей оболочки, выбрать цвет через меню «Персонализация» или вручную изменить параметр реестра, чтобы после перезагрузки ОС все настройки вступили в силу. Вы сами вправе выбрать оптимальный метод, отталкиваясь от личных предпочтений, а разобраться в этом поможет другое руководство на нашем сайте далее.
Подробнее: Изменение цвета панели задач в Windows 10
Настройка прозрачности
Многим известно, что в Windows 7 была встроенная функция, позволяющая быстро настроить прозрачность элементов интерфейса. К сожалению, в следующих версиях операционных систем разработчики отказались от этой опции и теперь все желающие создать такой внешний вид сталкиваются с определенными проблемами. Справиться с этой задачей можно при помощи сторонних средств или задействовав имеющиеся стандартные параметры, указав определенные настройки цвета. Конечно, встроенное средство не сделает эффект таким, как специальная утилита, загруженная с официального магазина, однако она способна удовлетворить потребности ряда юзеров.
Подробнее: Как сделать прозрачной панель задач в Windows 10
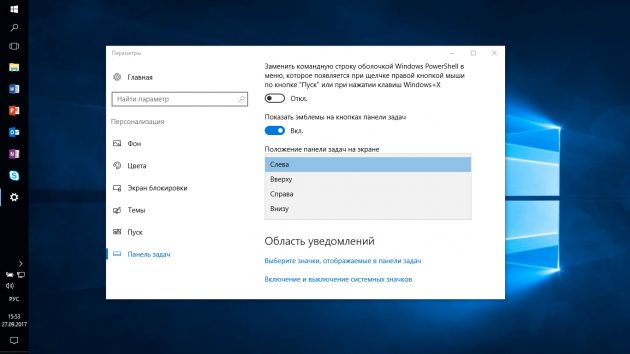
Перемещение
Стандартное расположение панели задач на рабочем столе — нахождение внизу экрана. Большинство пользователей привыкли к такому положению и не желают его изменять, однако есть и такие, кто хочет, например, поместить панель влево или наверх. Если отключить параметр «Закрепить панель задач», то вы сможете самостоятельно переместить строку в удобную сторону экрана. После этого останется только снова активировать эту опцию, чтобы в будущем случайно не изменить положение.
Подробнее: Изменить расположение панели задач в Windows 10
Изменение размера
По умолчанию панель задач в Виндовс 10 имеет стандартный размер, который разработчики выбрали самостоятельно. Однако такой масштаб устраивает далеко не всех пользователей. У кого-то открытые значки просто не вмещаются в строку, а кто-то случайно увеличил размер и теперь не может вернуть его в обычное состояние. В таких ситуациях мы тоже советуем изучить отдельный материал от другого нашего автора, где на примере уменьшения размера расписано выполнение этой цели.

Подробнее: Изменение размера панели задач в Windows 10
Решение проблем с работоспособностью
Аспект исправления неполадок с работой рассматриваемой панели не относится к ее настройке, однако с подобными ситуациями сталкиваются многие пользователи, поэтому мы решили рассказать об этом в рамках сегодняшней статьи. На нашем сайте уже имеется отдельные материалы, в которых детально описывается решение большинства проблем. Если вам не повезло столкнуться с такими трудностями, перейдите по одной из указанных ниже ссылок, чтобы разобраться с этой ситуацией и приступить к полноценной конфигурации панели задач.
Подробнее:
Исправление неполадок панели задач в Windows 10
Только что мы разобрали основные аспекты настройки панели задач в Windows 10, на которые стоит обратить внимание обычному пользователю. Вам осталось только следовать приведенным инструкциям, чтобы справиться с этой задачей. Если вы заинтересованы в еще большем изменении внешнего вида операционной системы, советуем присмотреться и к меню «Пуск», о чем детально написано в материале по ссылке далее.
Подробнее: Настройка внешнего вида меню «Пуск» в Windows 10
Наша группа в TelegramПолезные советы и помощь
The Windows taskbar is an essential component of the Windows operating system, acting as a versatile platform for multitasking and quick access to applications and system notifications. The taskbar allows you to pin your favorite apps for easy access, view open applications, and manage system notifications. It also includes the Start menu, search bar, and system tray, making it a central hub for navigating and controlling various aspects of the system.
Customization is a key feature of the Windows taskbar, allowing you to tailor it to your preferences. You can align taskbar icons to the center or to the side, pin or unpin apps, and show or hide system tray icons. These customization options make the taskbar not only a functional tool but also a personalized control center that enhances user productivity and experience.
This article describes how to customize the taskbar so that you can make the most out of its features. Whether you want to change the alignment of the icons, manage which apps appear, or adjust the visibility of system tray icons, you’ll find step-by-step instructions to help you personalize your taskbar to suit your workflow and preferences.
Configure the taskbar layout

The Windows taskbar consists of various components, each serving a unique purpose:
|
1. Widgets |
2. Start |
3. Search |
4. Task view |
5. Applications |
6. System tray |
While some components can be customized or removed to suit your preferences, others are essential for the proper functioning of Windows and cannot be removed. Expand each section to learn more about each component or area of the taskbar and discover how you can personalize the taskbar to better suit your needs.
Widgets are interactive elements that display dynamic content and provide quick access to various apps and features. They are designed to help you staying informed and organized by presenting personalized information at a glance.
To open the widgets board, you can:
-
Hover over, or select, the Widgets button on the taskbar
-
Press the Windows key + W
-
Swipe from the side of the screen, if the taskbar is aligned to the center

To show or hide Widgets from the taskbar:
-
Right-click on the taskbar and select Taskbar settings , or use the following shortcut:
Taskbar
-
Under Taskbar items, toggle the Widgets switch to On or Off
To learn more about Widgets, see Stay Up to Date With Widgets in Windows.
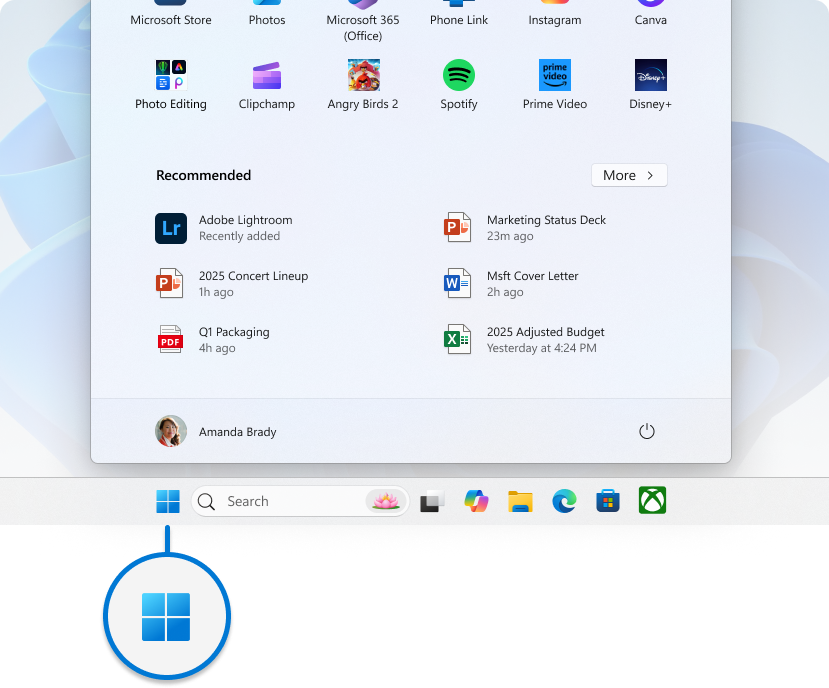
The Start menu is a central hub that provides quick access to your apps, settings, and files. The Start menu is divided into several sections, including Pinned, All, and Recommended apps, allowing you to easily find and launch your most-used applications and recent files. It’s designed to be intuitive and customizable, helping you to efficiently navigate your system and personalize your Windows experience.
Additionally, the Start menu includes user account options, allowing you to sign in, sign out, lock your device, or switch user accounts.
To open the Start menu, you can:
-
Select the Start button on the taskbar
-
Press the Windows key on your keyboard
-
Swipe from the bottom of the screen
While you can’t remove the Start menu from the taskbar, you can change its position to be aligned on the side instead of being centered. For more information, see Change the taskbar alignment.
To learn more about the Start menu, see Customize the Windows Start menu.
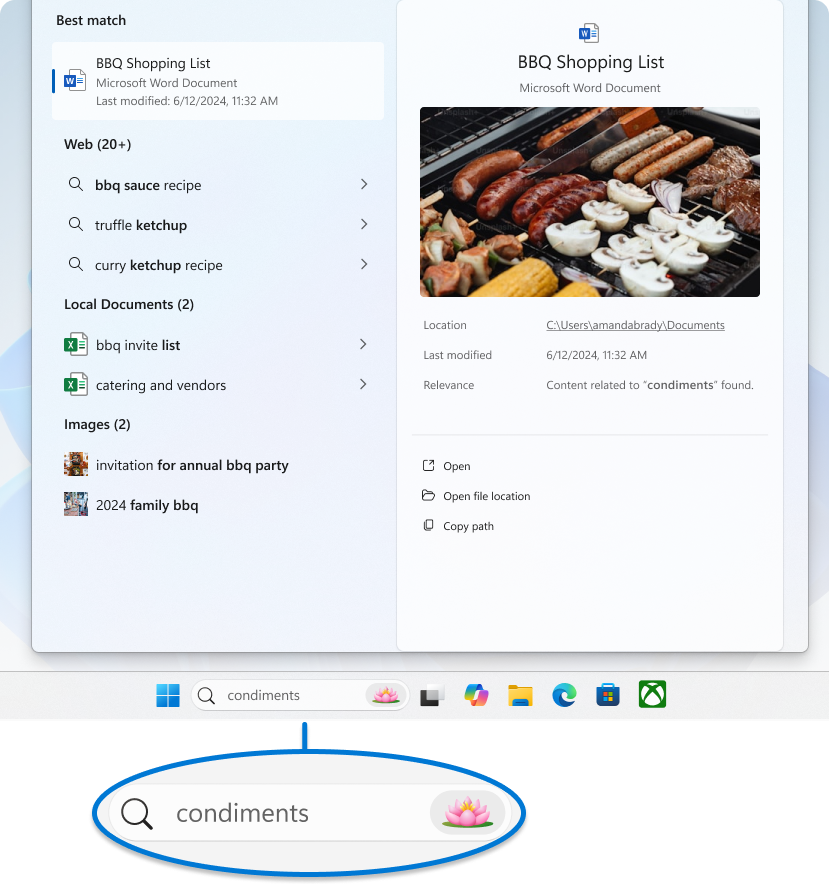
Windows Search is a powerful feature that allows you to find files, applications, settings, and even web results directly from your desktop. The search box, conveniently located on the taskbar, provides a seamless way to access this functionality. Additionally, Windows Search integrates web search capabilities from Microsoft Bing, enabling you to get search results without opening a browser.
To open the Search, you can:
To start a search using Windows Search you can:
-
Use the Search box on the taskbar: select the search box located on the taskbar and start typing your query. This will bring up a list of relevant results, including files, applications, settings, and web results powered by Microsoft Bing
-
Press the Windows key + S to open the search box
-
Start Menu Search: you can also start a search by opening the Start menu and then typing your query directly
To configure Search on the taskbar:
-
Right-click on the taskbar and select Taskbar settings , or use the following shortcut:
Taskbar
-
Under Taskbar items, use the dropdown menu to configure the search area. You can choose from the following options:
-
Search box: Displays a full text box to enter your search
-
Search icon and label: Shows a search icon along with the label «Search«
-
Search icon only: Displays only the search icon
-
Hide: Removes the search feature from the taskbar
To learn more, see Search for anything, anywhere.
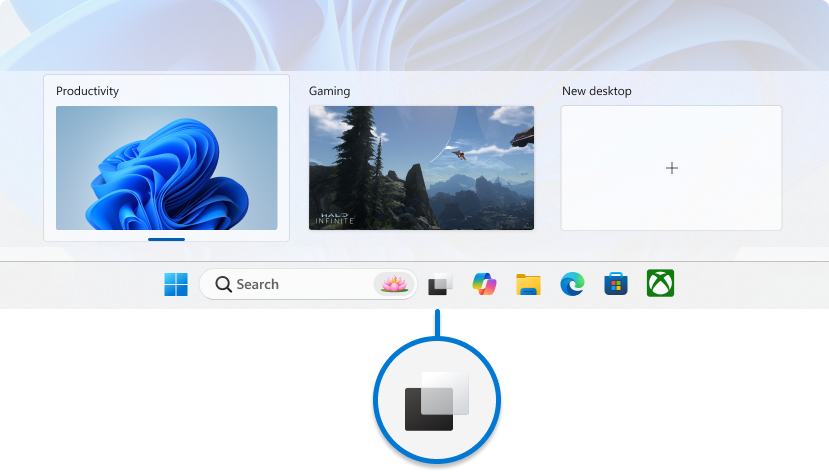
The task view button on the taskbar is designed to enhance your multitasking experience in Windows. It allows you to quickly access and manage all your open windows and multiple desktops. When you open task view, a thumbnail view of all your active applications is displayed, making it easy to switch between tasks or close unnecessary windows. Additionally, task view enables you to create and manage multiple desktops, providing a clutter-free workspace tailored to different projects or activities. This feature is particularly useful when you need to organize your workflow efficiently and maintain focus on specific tasks.
To open task view, you can:
-
Select the task view button on the taskbar
-
Press the Windows key + Tab
To show or hide the task view button from the taskbar:
-
Right-click on the taskbar and select Taskbar settings , or use the following shortcut:
Taskbar
-
Under Taskbar items, toggle the Task view switch to On or Off
To learn more, see How to Multitask in Windows and Configure Multiple Desktops in Windows.
The area of the taskbar used for apps in Windows is designed to provide quick access and management of your applications. You can pin your favorite apps to the taskbar or unpin unused apps. Additionally, you can rearrange the icons by selecting and dragging them to your preferred order.
Running apps are displayed on the taskbar with a line under the icon to indicate they are open. The currently active app is highlighted with the Windows accent color, making it easy to identify which app is in use. This setup allows for efficient multitasking and quick navigation between your applications.

Pin an app to the taskbar
There are different ways to pin apps to the taskbar. For example:
-
In the Search box on the taskbar, type the name of the app you want to pin to the taskbar. Right-click on the app, then select Pin to taskbar
-
If the app is already open, right-click on the icon on the taskbar, then select Pin to taskbar
Unpin an app from the taskbar
To unpin an app, right-click on the pinned icon on the taskbar, then select Unpin from taskbar .
Rearrange the apps on the taskbar
Whenever you want to change the order of app buttons on the taskbar, drag the app’s icon from its current position to a different one.
Tip: Each app on the taskbar offers a jump list, which allows you to quickly perform certain tasks like opening a recent file or accessing frequently used features. To access the jump list, simply right-click on the app icon. If you want to control the display of jump lists, go to Settings > Personalization > Start and toggle the option for Show recently opened items in Jump Lists on Start or the taskbar.
System tray
The system tray area on the taskbar includes various buttons and elements that provide quick access to system functions and notifications. You can customize each part of the system tray to suit your preferences.
The taskbar’s system tray displays icons for background apps, making it easy to monitor and interact with them. You can customize which apps and system tools, like the pen menu, touch keyboard, and virtual touchpad, are visible to keep your taskbar organized and focused on what’s important. Additionally, the system tray features dynamic privacy indicators that show real-time information about location, microphone, and camera access, giving you transparency and control over your privacy settings.

To customize the system tray area:
-
Right-click on the taskbar and select Taskbar settings , or use the following shortcut:
Taskbar
-
Under System tray icons, choose the icons you want to appear in the system tray. The options are Pen Menu, Touch keyboard, and Virtual Touchpad
-
Under Other system tray icons, select if you want to enable the hidden icon menu (also referred to as overflow area), and which icons can appear in the system tray
To rearrange the icons in the system tray area, you can drag and drop them. You can move icons that are currently visible in the system tray as well as those in the overflow area . To make an icon visible, drag it from the overflow area to the system tray. Conversely, to hide an icon, drag it from the system tray back to the overflow area.
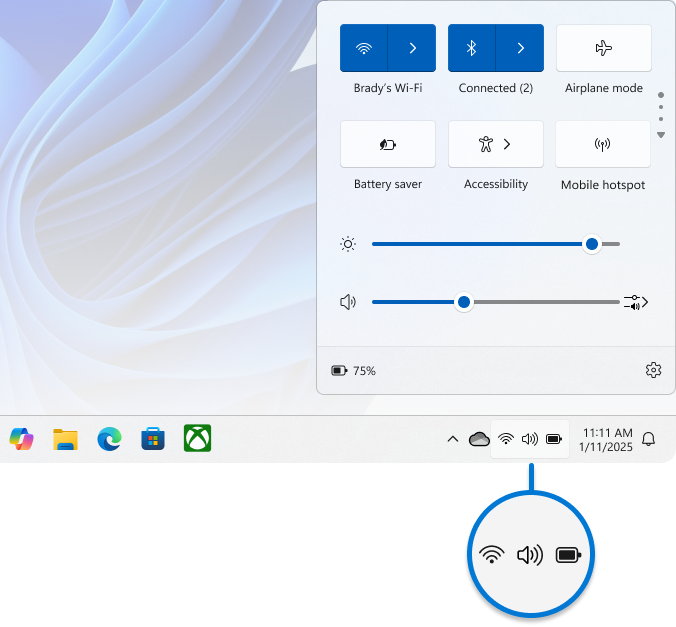
Quick Settings provides a convenient way to access and modify frequently used settings without navigating through menus. For example, you can quickly adjust the volume, change screen brightness, switch Wi-Fi networks, or turn on accessibility tools.
The Quick Settings area is comprised of:
-
Network icon: This icon represents your Wi-Fi or Ethernet connection
-
Volume icon: This icon represents the sound settings
-
Battery icon: This icon represents the battery status on laptops and tablets
To open Quick Settings, you can:
-
Select the Quick Settings area on the taskbar
-
Press the Windows key + A
-
Swipe from the bottom of the Quick Settings area
While you can’t remove Quick Settings from the taskbar, you can customize it by moving and arranging the elements to suit your preferences.
Tip: If you Right-click on one of the Quick Settings area icons, you can quickly access settings or diagnostics options.
The calendar and notification area provides a convenient way to access the calendar, where you can start a focus session, and the notification center. The notification center displays alerts and notifications about incoming emails, updates, and other system activities.
To open the calendar and notification center flyout, you can:
-
Select the clock or the notification bell icon on the taskbar
-
Press the Windows key + N
-
Swipe from the side of the screen
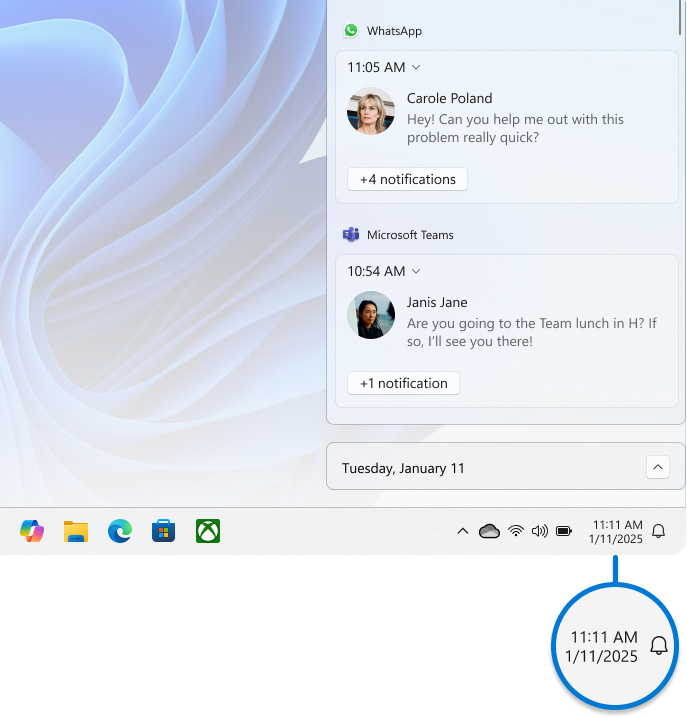
To show or hide the time and date from the taskbar:
-
Right-click on the clock on the taskbar, and select Adjust date and time, or use the following shortcut:
Date & time
-
Toggle the Show time and date in the System tray switch to On or Off
-
If set to On, you can show seconds alongside hours and minutes in your system tray clock by checking the option Show seconds in system tray clock (uses more power)
To learn more, see How To Use Focus in Windows and Notifications and Do Not Disturb in Windows.
Change the taskbar color
You can modify the color of the taskbar by changing the Windows color mode or by configuring accent colors.

To learn more, see Personalize Your Colors in Windows.
Configure the taskbar behaviors
In addition to customizing the layout of the taskbar, you can change various behaviors to enhance your user experience. These behaviors include how the taskbar responds to different actions, such as automatically hiding when not in use, displaying badges on taskbar buttons, and managing system notifications. By adjusting these settings, you can create a more efficient and personalized workflow that suits your specific needs. Expand each section to learn more.
Typically, the taskbar icons are centered, but you can also align them to the side of the taskbar.
-
Right-click on the taskbar and select Taskbar settings , or use the following shortcut:
Taskbar
-
Expand Taskbar behaviors and select your desired option for Taskbar alignment
Note: The taskbar settings allow you to align taskbar icons in the center or on the left. There are no settings for moving a taskbar to the top or to the side of the screen. The taskbar is positioned at the bottom of the screen.
A badge on a taskbar button is an alert to let you know that some activity is happening, or needs to happen, with that app.

For example, a bell badge on the Clock app alerts you about an active alarm that will notify you at the time you set.
To modify the taskbar’s behavior:
-
Right-click on the taskbar and select Taskbar settings , or use the following shortcut:
Taskbar
-
Expand Taskbar behaviors, and check or uncheck the option Show badges on taskbar apps
This option controls whether the icons of apps on the taskbar flash to get your attention when they need it. This typically happens when an app opens minimized or behind another window and requires your interaction. By default, an app icon flashes several times and stays highlighted until you select it or open the app.
To modify the taskbar’s behavior:
-
Right-click on the taskbar and select Taskbar settings , or use the following shortcut:
Taskbar
-
Expand Taskbar behaviors, and check or uncheck the option Show flashing on taskbar apps
This option is designed to enhance productivity and improve the process of sharing information during online meetings, particularly when using Microsoft Teams. When you are in a meeting call through Microsoft Teams, you can hover over the apps running on your taskbar, and you will be prompted with a button that allows you to share your window with the meeting attendees. This eliminates the need to switch back and forth between applications, ensuring a seamless and uninterrupted meeting experience. To stop sharing, you can hover over the window again and select Stop Sharing or choose another window to share.
To modify the taskbar’s behavior:
-
Right-click on the taskbar and select Taskbar settings , or use the following shortcut:
Taskbar
-
Expand Taskbar behaviors, and check or uncheck the option Share any window from my taskbar
This option allows you to display the taskbar on multiple monitors. When the option is enabled, the taskbar appears on all connected displays, providing easy access to your pinned apps, Start menu, and system tray on each screen. This can be useful if you want a consistent taskbar experience across all displays.
To modify the taskbar’s behavior:
-
Right-click on the taskbar and select Taskbar settings , or use the following shortcut:
Taskbar
-
Expand Taskbar behaviors, and check or uncheck the option Show my taskbar on all displays
You can hide the taskbar both in desktop mode and tablet mode. Press and hold (or right-click) any empty space on the taskbar, select Taskbar settings, select Taskbar behaviors, and select Automatically hide the taskbar.
To see the taskbar after it’s hidden, hover your mouse over, or touch, the bottom edge of your screen.
To modify the taskbar’s behavior:
-
Right-click on the taskbar and select Taskbar settings , or use the following shortcut:
Taskbar
-
Expand Taskbar behaviors, and check or uncheck the option Automatically hide the taskbar
Note: This setting is only available on 2-in-1 devices with tablet functionality.
When you disconnect or fold back the keyboard on your 2-in-1 device, you’ll now see the tablet-optimized taskbar. This taskbar has two states: collapsed and expanded. In the collapsed state, the taskbar is minimized so you can focus on your task, but you can still see critical status icons like the time or battery level. When you need to use the taskbar, swipe up from the bottom to see the expanded state that has a touch-friendly design with larger icons. When you launch an app, the taskbar will automatically collapse again.
To turn the tablet-optimized taskbar on or off:
-
Right-click on the taskbar and select Taskbar settings , or use the following shortcut:
Taskbar
-
To turn off the tablet-optimized taskbar, uncheck the box next to Optimize taskbar for touch interactions when this device is used as a tablet. To turn it back on again, recheck the box
This small area on the side of the taskbar is useful for quickly accessing the desktop by minimizing all open windows. Simply select this area to get to the desktop. Select it again to restore the open windows to their previous state.

To configure this area:
-
Right-click on the taskbar and select Taskbar settings , or use the following shortcut:
Taskbar
-
Expand the section Taskbar behaviors, then enable or disable the option Select the far corner of the taskbar to show the desktop
How to get a sexy, streamlined taskbar.
Sarah is a freelance writer and CNET How To blogger. Her main focus is Windows, but she also covers everything from mobile tech to video games to DIY hardware projects. She likes to press buttons and see what happens, so don’t let her near any control panels.
We were all excited to get the Start menu back in Windows 10, and we wasted no time in customizing it to the best of our abilities.
But what about the poor, neglected taskbar, who never left us in the first place? Here’s how to make the taskbar look pretty and work for you.
Add some shortcuts
Enlarge Image
Smaller taskbar buttons
Enlarge Image
Are the buttons on your taskbar unnecessarily large? Make them smaller by right-clicking on the taskbar, clicking Settings, and turning on Use small taskbar buttons. Checking this option will also remove the date from your taskbar clock.
Clean up the System Tray
Enlarge Image
The System Tray is the part of the taskbar where all those pesky notification icons and useless things like clocks show up. Good news — you can get rid of all of these icons, including the built-in system icons like the clock, volume and network icons.
Enlarge Image
To start cleaning it up, right-click the taskbar and click Settings to open the Taskbar settings menu. Under Notification area, click Select which icons appear in the taskbar. Here, you can either choose to always show all program icons in the taskbar, or you can turn icons on/off individually.
Enlarge Image
To turn off system icons, such as the clock, volume control, or the action center, click Turn system icons on or off. You can toggle off just about everything, including the power, location and Windows Ink Workspace icons.
Get rid of Cortana
Enlarge Image
Cortana is sweet and all, but her search icon takes up valuable taskbar real estate. Right-click the taskbar, hover over Search and click Hidden to remove Cortana’s button from the taskbar completely.
Get rid of the Task View button
Enlarge Image
Task View is a new Windows 10 feature that lets you see and use virtual desktops. The Task View button is a small button on the taskbar that lets you quickly access these desktops. To get rid of it, right-click the taskbar and click Show Task View button to toggle it off.
Taskbar buttons, your way
Enlarge Image
If your taskbar is looking cluttered — because you love having 64 Firefox windows open at once — maybe it’s time to customize your taskbar buttons. Right-click the taskbar and click Settings. Under Combine taskbar buttons, click the dropdown menu and choose your flavor: Always, hide labels (this will combine one program’s windows into one taskbar button); When taskbar is full (this will only combine a program’s windows into one taskbar button when there’s no more room on the taskbar); or Never.
If you have multiple displays, you can choose separate options for how the taskbar on your main display is presented (versus the taskbars on your secondary displays).
Hide it
Enlarge Image
If you hate the way the taskbar looks, you can set it to automatically hide whenever it’s not in use (move your mouse over the taskbar area to see it again). Do this by right-clicking the taskbar, clicking Settings, and turning on Automatically hide the taskbar in desktop mode.
Lock it
If you love the way the taskbar looks, and you don’t want to accidentally resize or move it with your clumsy mouse handling, you can lock it in place. To do this, right-click the taskbar and check Lock all taskbars from the menu that pops up.
Add toolbars
In Windows 10, you can add toolbars, as well as folders, to the taskbar. There are three toolbars already created for you: Address, Links, and Desktop. The Address toolbar is an address box — type a URL into it and hit Enter, and your default web browser will open that page. The Links and Desktop toolbars are just folders — the Links toolbar lets you see all the files in your Links folder; the Desktop toolbar lets you see all the files on your desktop.
Enlarge Image
To add a toolbar, right-click the taskbar, hover over Toolbars, and then check the toolbars you want to add.
You also have the option to add a New toolbar, which is essentially just a folder that you’ll be able to quickly access from your taskbar. Click New toolbar… and navigate to the folder you want to add. Click Select Folder and your new toolbar will appear on the taskbar.
Change the color and transparency
To change the color and transparency of your taskbar, open the Settings menu and go to Personalization > Colors. Scroll to the bottom of the screen and make sure Show color on Start, taskbar, action center, and title bar is turned on. Choose the color you want to use and your taskbar will change to reflect your choice.
Enlarge Image
To make the taskbar transparent, scroll down to the bottom of the screen and turn on Make Start, taskbar, and action center transparent.
Editors’ note, August 12, 2016: This article was originally published February 11, 2016, and was updated to reflect changes made in the Windows 10 Anniversary Update.
По умолчанию, панель задач Windows 10 предоставляет пользователю некоторые возможности настройки оформления, такие как мелкие или обычные значки, выбор цвета и некоторые другие. Однако, в некоторых случаях этого может оказаться недостаточно. Например, частый вопрос: как разместить значки по центру или сделать панель задач прозрачной, бывают и другие задачи. Одна из простых бесплатных программ, позволяющие сделать это — TaskbarX (ранее называлась FalconX).
В этом обзоре подробно о возможностях настройки оформления панели задач в TaskbarX, доступных функциях и особенностях использования программы.
Загрузка и установка
Программа TaskbarX доступна в магазине Microsoft Store, но является платной. Однако, если использовать официальный сайт разработчика — https://chrisandriessen.nl/taskbarx мы можем скачать программу в виде ZIP-архива (portable-версию) полностью бесплатно. Также, в бесплатном виде она доступна на GitHub автора.
Портативная версия программы не требует какой-либо установки на компьютере: достаточно распаковать архив с файлами программы в удобное вам расположение на компьютере и приступить к использованию.
Использование TaskbarX для изменения оформления панели задач
В папке с распакованной программой вы найдете два основных исполняемых файла — TaskbarX, запускающий саму программу и TaskbarX Configurator для настройки того, как именно будет выглядеть ваша панель задач.
Для того, чтобы приступить, достаточно запустить TaskbarX (при этом значки на панели задач будут расположены по центру между крайними левыми системными элементами панели задач и значками в трее Windows 10), после этого — запустить TaskbarX Configurator для того, чтобы настроить оформление.

Доступные настройки в TaskbarX Configurator (для того, чтобы увидеть эффект от сделанных изменений, достаточно нажать кнопку «Apply»):
- Style — стиль оформления панели задач. Можно включить прозрачную панель задач, выбрать другие варианты оформления: градиент, полупрозрачная, с размытием фона. Здесь же можно задать параметры цвета и уровень прозрачности панели задач (не применяется для выбора пункта «Transparent» с полностью прозрачной панелью задач). Отметка «Switch back to Default on maximized window» включает стандартный вид панели задач при разворачивании окна на весь экран.
- Animation — стиль и время анимации при появлении новых значков на панели задач (при запуске какой-либо программы).
- Position — сдвиг значков панели задач относительно автоматически рассчитанного центра. Под Primary Taskbar здесь понимается панель задач на первом мониторе, под Secondary — на втором и последующих. Пункт Skip Resolution позволяет отключить размещение значков по центру для выбранного разрешения экрана. Здесь же можно полностью отключить размещение значков по центру (пункт «Don’t Center Taskbar»).
- Taskschedule — нажав кнопку «Create» на этом экране вы создадите задание планировщика заданий Windows 10, которое будет автоматически запускать TaskbarX при входе в систему.
- Extra — дополнительные настройки. Позволяют включить размещение по центру только для одного монитора, скрыть область уведомлений и кнопку Пуск на панели задач, включить отображение иконки TaskbarX в области уведомлений. Пункт «Pause looper when fullscreen app is running» отключает перерисовку панели задач в полноэкранных программах (может быть полезно в играх, если панель задач появляется поверх игры).
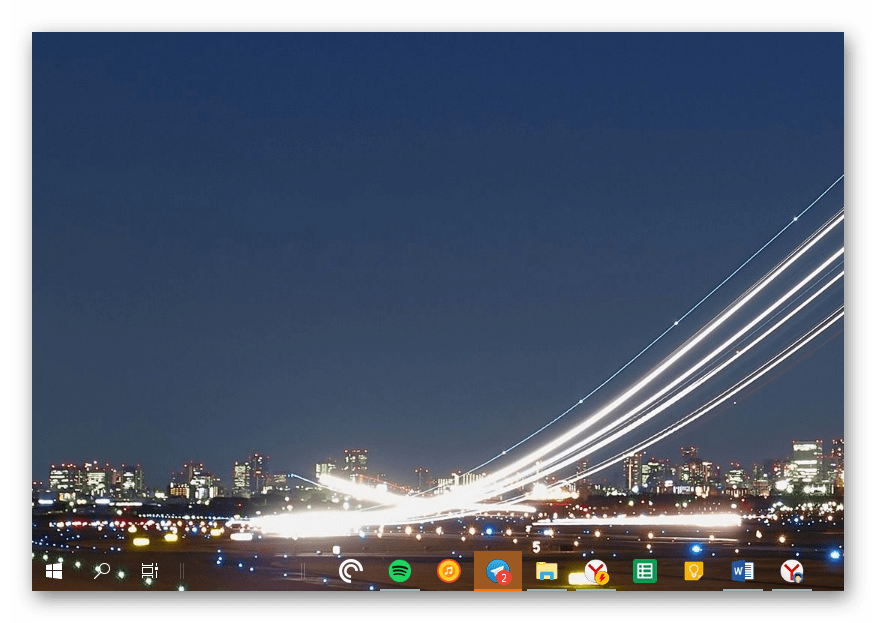
Для того, чтобы убрать другие элементы панели задач (не отраженные в разделе Extra), например, поиск или кнопку представления задач, используйте системные средства: просто нажмите правой кнопкой мыши по элементу, отключите отображение ненужной кнопки или строки поиска (как убрать поиск с панели задач Windows 10). На изображении ниже — пример результата после использования TaskbarX и средств системы для настройки панели задач.

Разобраться сравнительно не сложно, а работает это не только для панели задач, размещенной внизу экрана, но и для других её расположений. Возможно, также будет интересной статья Оформление меню Пуск в Windows 10.
Несколько очевидных и не очень действий, которые помогут настроить вашу панель задач.
Панель задач Windows менялась от версии к версии, но её назначение оставалось неизменным: запуск программ и переключение между ними. Эта панель используется постоянно, поэтому неплохо было бы настроить её под свои нужды.
Выбираем место для панели задач
С первых версий Windows повелось, что панель задач в системе расположена снизу. Видимо, тогда не могли предугадать появление широкоформатных мониторов. Сейчас на огромных экранах широкая панель задач занимает лишнее место. Поэтому её лучше разместить вертикально.
Если ваша панель задач откреплена, вы можете перетащить её к нужному углу экрана. Или просто укажите положение панели задач, щёлкнув по ней правой кнопкой и выбрав «Параметры».
Размещаем значки по центру

Разместив значки по центру, вы придадите панели задач сходство с Dock. Это полезно, если вы привыкли работать с Mac. Кроме того, это просто красиво.
Чтобы переместить значки в центр:
- Открепите панель задач. Для этого щёлкните по ней правой кнопкой мыши и снимите отметку «Закрепить панель задач». Затем снова щёлкните по панели задач и в пункте меню «Панели» выберите «Ссылки». Перетащите значки к центру.
- Щёлкните по меню «Ссылки» правой кнопкой мыши и снимите отметки рядом с пунктами «Показывать подписи» и «Показывать заголовок».
Чтобы вернуть значки в привычное положение, просто уберите «Ссылки» с панели задач.
Отключаем панель задач на дополнительных мониторах
Если вы используете несколько мониторов, можно отключить панель задач на всех, кроме основного. Зайдите в настройки дисплеев и отключите опцию «Показывать панель задач на всех мониторах».
Настраиваем специфические значки в трее
Вы легко можете настроить отображаемые в трее значки без дополнительного ПО. Просто перетаскивайте их на значок-стрелку, за которой скрываются лишние иконки, чтобы спрятать их. Ещё вы можете зайти в «Параметры» и выбрать, какие значки отображать.
Скрываем панель задач
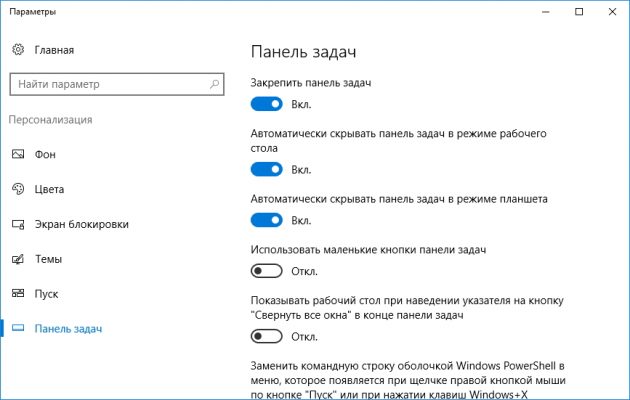
Если Windows 10 установлена на ноутбуке с небольшим экраном, стоит настроить автоскрытие панели задач, чтобы она не занимала лишнее место.
Зайдите в настройки и включите параметр «Автоматически скрывать панель задач». Теперь она будет скрываться, пока вы не подведёте курсор к краю экрана.
Настраиваем списки

Списками в Windows 10 называются меню, появляющиеся при щелчке правой кнопкой мыши по значку на панели задач. В них отображаются недавно открывавшиеся документы, места и некоторые часто используемые действия.
Добавлять в списки файлы можно простым перетаскиванием, перенеся папку на значок «Проводник» или документ на значок Microsoft Word. Или можно закрепить уже имеющиеся в списке иконки, щёлкнув по значку-булавке рядом с ними.
Вы можете увеличить количество отображаемых в списках пунктов через редактор реестра Windows. Введите в поиске regedit, откройте редактор реестра и перейдите по адресу
HKEY_CURRENT_USERSOFTWAREMicrosoftWindowsCurrentVersionExplorerAdvanced
Здесь вы можете найти параметр DWORD JumpListItems_Maximum. Если такого параметра нет, создайте его.
Затем измените параметр, введя нужное число и установив отметку «Десятичное». Перезапустите систему. Теперь в списках будет отображаться столько файлов, сколько вы захотите.
Добавляем папки на панель задач
Закреплять на панели задач значки простым перетаскиванием легко. А что насчёт папок? Обычно они закрепляются в выпадающем списке «Проводника». Но вы можете добавлять для конкретных папок отдельные значки.
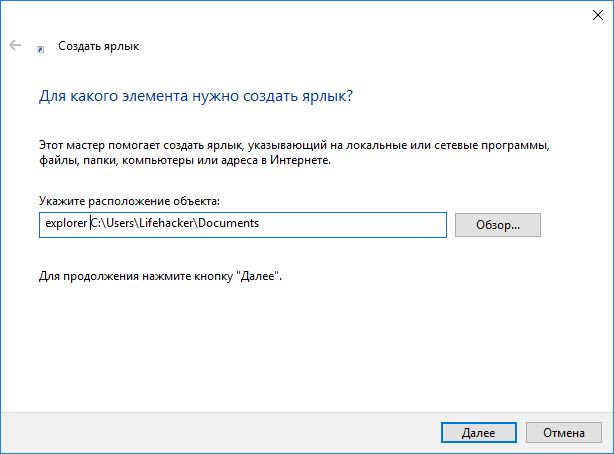
Создайте ярлык к нужной папке и введите explorer и пробел перед адресом папки. Вы можете изменить значок, если хотите. Затем просто перетащите ярлык на панель задач.
Так вы сможете держать на панели задач часто используемые папки и не искать их в выпадающих списках.
Управляем приложениями с панели задач

Многие приложения, например медиапроигрыватели, поддерживают управление с панели задач. Просто закрепите значок приложения на панели, наведите на него курсор, тогда вы сможете переключать файлы в плейлисте или ставить воспроизведение на паузу, когда окно проигрывателя свёрнуто.
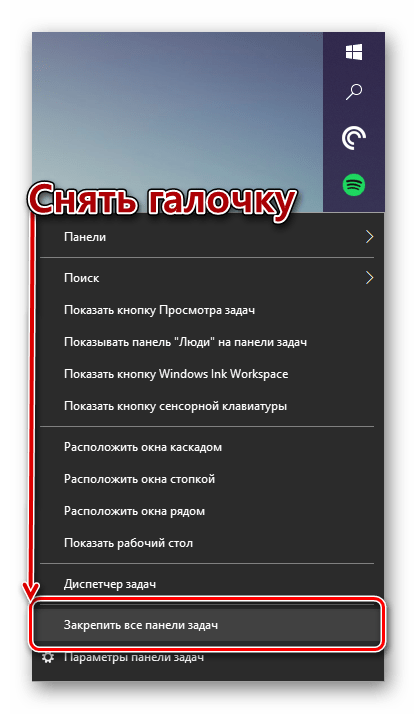
Убираем ненужное
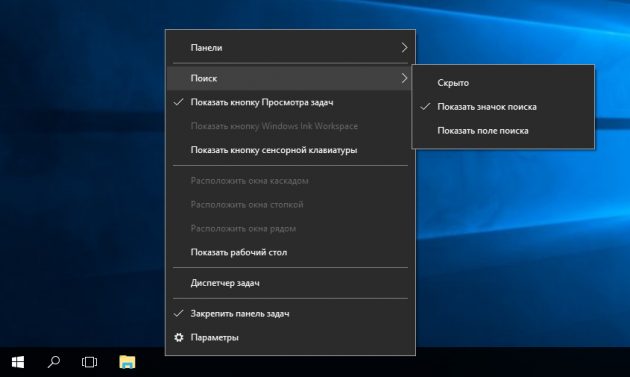
Так ли нужны вам все эти кнопки? «Показать все окна» можно, просто нажав Win + Tab. А поиск можно начать, открыв «Пуск» и набрав на клавиатуре поисковый запрос.
Щёлкните правой кнопкой мыши по панели задач и в контекстном меню снимите отметки с «Показать все окна» и «Показать поиск».
Изменяем размер панели и значков
Открепив панель задач, вы можете изменить её размер простым перетягиванием. Затем можно снова закрепить её. Это полезно, если вы хотите разместить действительно много значков.
Ещё вы можете включить опцию «Использовать маленькие значки» в настройках панели задач. Тогда она будет занимать ещё меньше места.
Возвращаем привычный вид
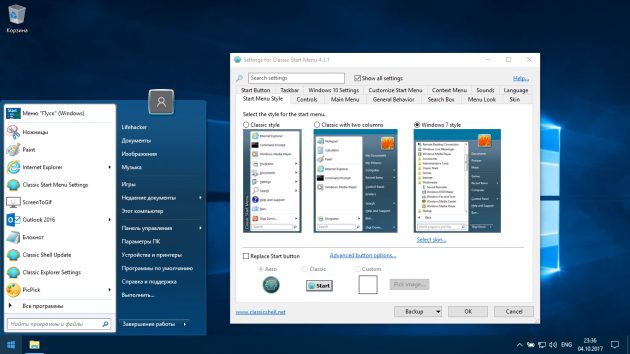
Если вы чувствуете, что все эти нововведения от Microsoft не для вас, можно вернуть панели задач классический вид при помощи Classic Shell. Это бесплатное приложение с открытым исходным кодом, которое может настроить вид вашего «Проводника», панели задач и меню «Пуск».
Загрузить Classic Shell →
У вас есть свои рекомендации по настройке панели задач? Делитесь в комментариях!