
По умолчанию, все операционные системы семейства Windows автоматически получают и обновляют корневые сертификаты с сайта Microsoft. Компания MSFT в рамках программы корневых сертификатов Microsoft Trusted Root Certificate Program, ведет и публикует в своем онлайн хранилище сертификаты для клиентов и устройств Windows. Если проверяемый сертификат в своей цепочке сертификации относится к корневому CA, который участвует в этой программе, Windows автоматически скачает с узла Microsoft Update и добавит такой корневой сертификат в доверенные на вашем компьютере.
Windows запрашивает обновление списка корневых сертификатов (certificate trust lists — CTL) один раз в неделю. Если в Windows отсутствует прямой доступ к каталогу Windows Update, то система не сможет обновить корневые сертификаты, соответственно у пользователя могут быть проблемы с открытием сайтов (SSL сертификаты которых подписаны недоверенными CA, см. статью об ошибке в Chrome Этот сайт не может обеспечить безопасное соединение), либо с установкой запуском подписанных приложений или скриптов.
В этой статье попробуем разобраться, как в Windows вручную обновить список корневых сертификатов в TrustedRootCA в изолированных сетях, или компьютерах/серверах без прямого подключения к Интернету.
Содержание:
- Управление корневыми сертификатами в Windows 10 и 11
- Включить/отключить автоматическое обновление корневых сертификатов в Windows
- Ручное обновление корневых сертификатов в Windows 10 и 11
- Список корневых сертификатов в формате STL
- Обновление корневых сертификатов в Windows с помощью GPO в изолированных средах
- Обновление корневых сертификатов в Windows 7
- Утилита rootsupd.exe для обновления сертификатов в Windows XP
Примечание. Если ваши компьютеры выходят в Интернет через прокси-сервер, для автоматического обновления корневых сертификатов Microsoft рекомендует открыть прямой доступ (bypass) к веб-узлам Microsoft. Но это не всегда возможно/применимо.
Управление корневыми сертификатами в Windows 10 и 11
Как посмотреть список корневых сертификатов на устройстве Windows?
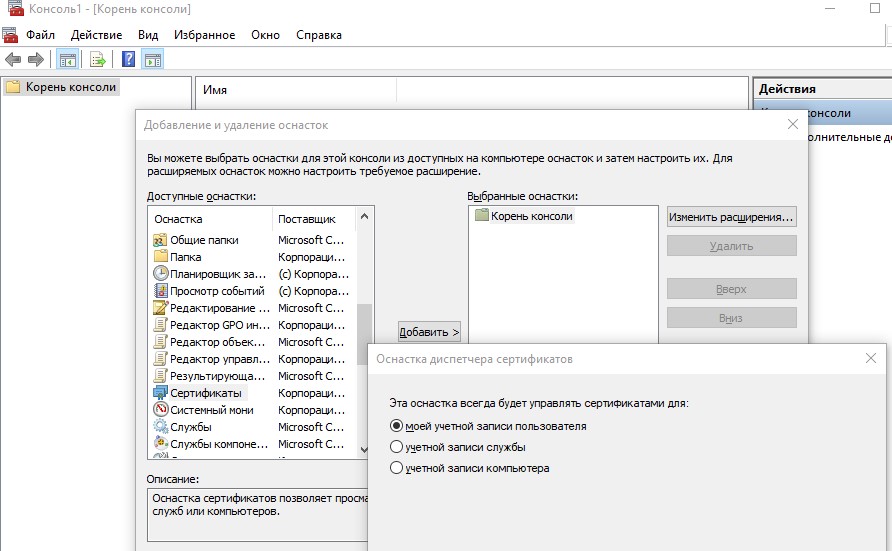
- Чтобы открыть хранилище корневых сертификатов компьютера в Windows /Windows Server, запустите консоль
mmc.exe
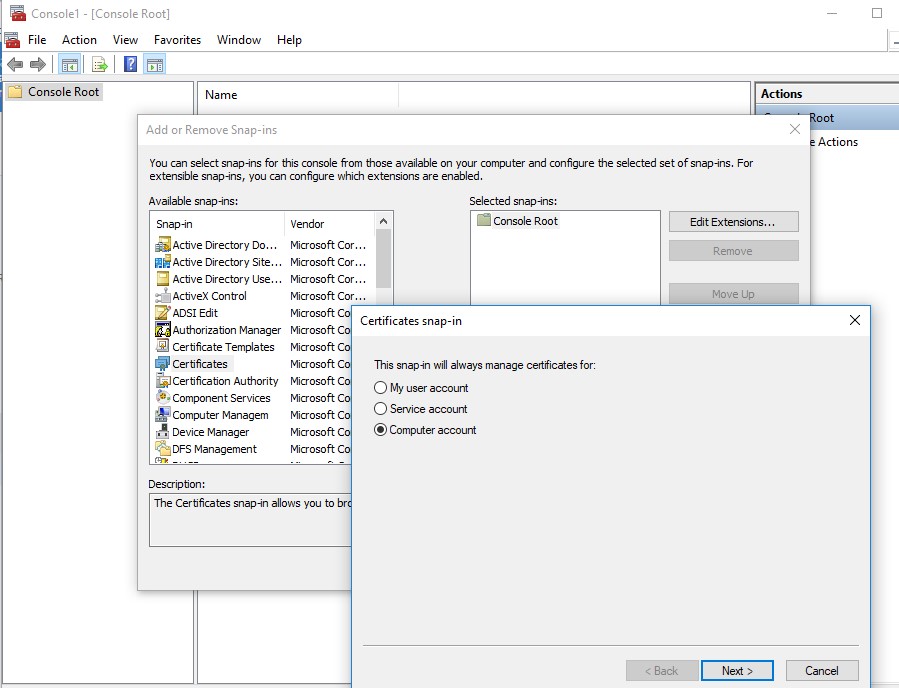
; - Нажмите Файл (File) -> Добавить или удалить оснастку (Add/Remove Snap-in), в списке оснасток выберите Сертификаты (Certificates) -> Добавить (Add);
- В диалоговом окне выберите что вы хотите управлять сертификатами учетной записи компьютера (Computer account);

- Далее -> Ok -> Ok;
- Разверните Certificates (Сертификаты) -> Trusted Root Certification Authorities Store (Доверенные корневые сертификаты). В этом списке содержится список доверенных корневых сертификатов вашего компьютера.
Вы можете вывести список доверенных корневых сертификатов на вашем компьютере со сроками их действия с помощью PowerShell:
Get-Childitem cert:\LocalMachine\root |format-list
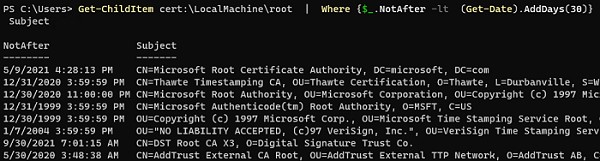
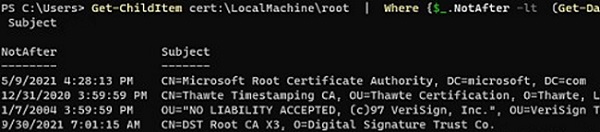
Можно вывести список истекших сертификатов, или которые истекут в ближайшие 30 дней:
Get-ChildItem cert:\LocalMachine\root| Where {$_.NotAfter -lt (Get-Date).AddDays(30)} |select NotAfter, Subject
В целях безопасности рекомендует периодически проверять хранилище доверенных сертификатов на наличие поддельных сертификатов с помощью утилиты Sigcheck. Утилита позволяет сравнить список сертификатов, установленных на компьютере со списком корневых сертификатов на сайте Microsoft (можно скачать офлайн файл с актуальными сертификатами authrootstl.cab).
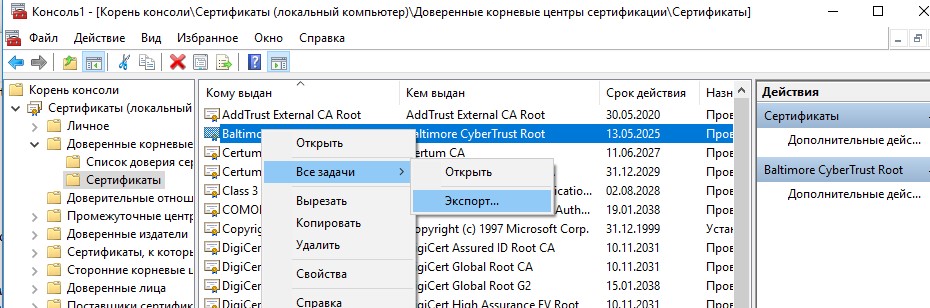
Вы можете вручную перенести файл корневого сертификата с одного компьютера на другой с помощью функцию Экспорта/Импорта.
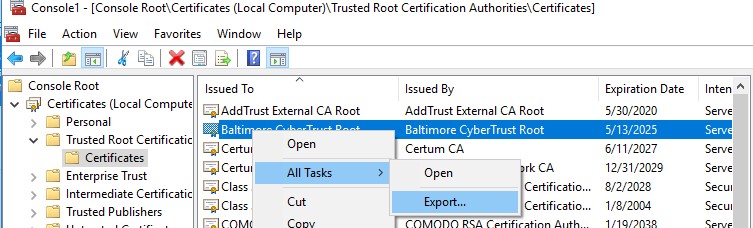
- Вы можете экспортировать любой сертификат .CER в файл, щелкнув по нему и выбрав “Все задачи” -> “Экспорт”;

- Затем с помощью команды Импорт можно импортировать этот сертификат на другом компьютере.


Включить/отключить автоматическое обновление корневых сертификатов в Windows
Как мы уже упомянули, Windows по умолчанию сама обновляет корневые сертификаты. Вы можете включить или отключить обновление сертификатов в Windows через GPO или реестр.
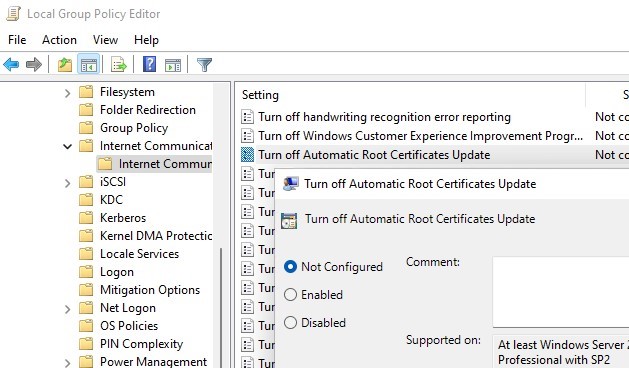
Откройте локальный редактор групповой политики (gpedit.msc) и перейдите в раздел Computer Configuration -> Administrative Templates -> System -> Internet Communication Management -> Internet Communication.
Параметр Turn off Automatic Root Certificates Update в этом разделе позволяет отключить автоматическое обновление корневых сертификатов через сайт Windows Update. По умолчанию это политика не настроена и Windows всегда пытается автоматически обновлять корневые сертификаты.

Если эта политика не настроена, а сертификаты не обновляются автоматически, проверьте не включен ли вручную параметр реестра, отвечающий за эту настройку. Проверьте значение параметра реестра с помощью PowerShell:
Get-ItemProperty -Path 'HKLM:\Software\Policies\Microsoft\SystemCertificates\AuthRoot' -Name DisableRootAutoUpdate
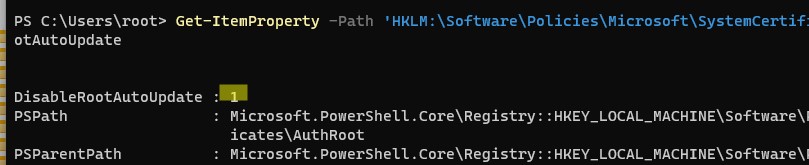
Если команда вернет, что значение ключа
DisableRootAutoUpdate=1
, значит на вашем компьютере отключено обновление корневых сертификатов. Чтобы включить его, измените значение параметра на 0.
Ручное обновление корневых сертификатов в Windows 10 и 11
Утилита управления и работы с сертификатами Certutil (появилась в Windows 10, для Windows 7 доступна в виде отдельного обновления), позволяет скачать с узлов Windows Update и сохранить в SST файл актуальный список корневых сертификатов.
Для генерации SST файла, на компьютере Windows 10/11 с доступом в Интернет, выполните с правами администратора команду:
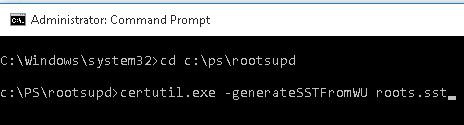
certutil.exe -generateSSTFromWU c:\PS\roots.sst
Updated SST file.
CertUtil: -generateSSTFromWU command completed successfully.

В результате в целевом каталоге появится файл SST, содержащий актуальный список сертификатов. Дважды щелкните по нему для открытия. Данный файл представляет собой контейнер, содержащий доверенные корневые сертификаты.
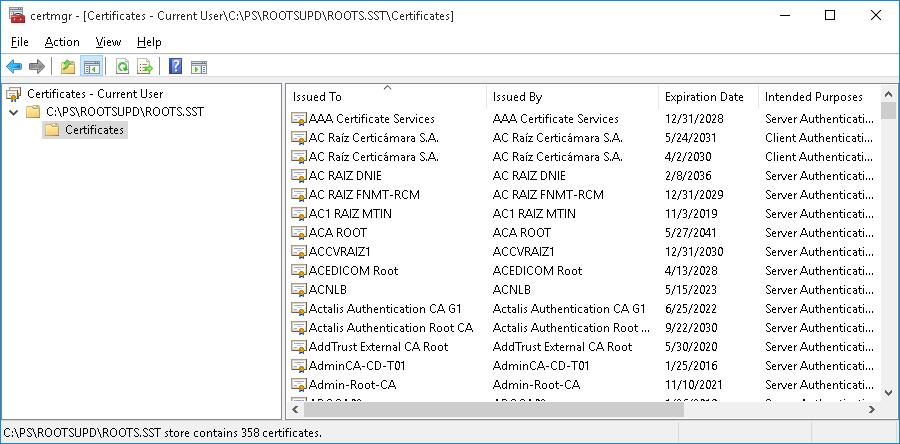
В указанном каталоге появится файл SST, содержащий актуальный список сертификатов. Данный файл представляет собой контейнер, содержащий доверенные корневые сертификаты. Дважды щелкните по нему.
В открывшейся
mmc
консоли вы можете экспортировать любой из полученных сертификатов. В моем случае, список сертификатов содержал 436 элементов. Естественно, экспортировать сертификаты и устанавливать по одному не рационально.
Для установки всех сертификатов из SST файла и добавления их в список корневых сертификатов компьютера можно воспользоваться командами PowerShell:
$sstStore = ( Get-ChildItem -Path C:\ps\rootsupd\roots.sst )
$sstStore | Import-Certificate -CertStoreLocation Cert:\LocalMachine\Root
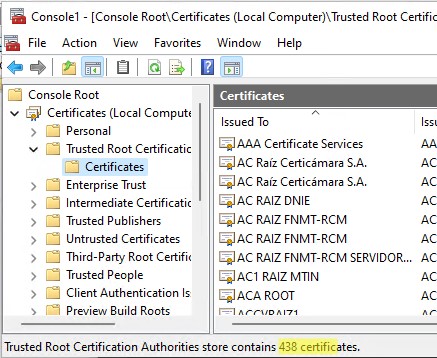
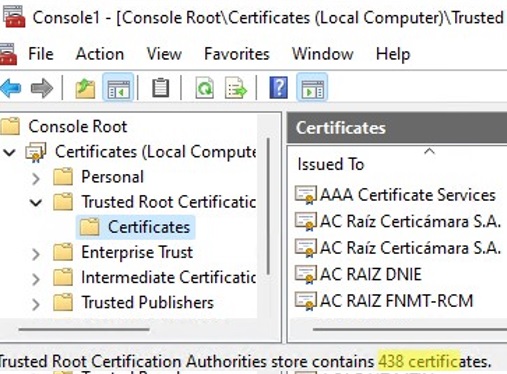
Запустите оснастку certmgr.msc и убедитесь, что все сертификаты были добавлены в хранилище Trusted Root Certification Authority. В нашем примере на Windows 11 количество корневых сертификатов увеличилось с 34 до 438.
Чистая копия Windows после установки содержит в корневом хранилище лишь небольшое количество сертификатов. Если компьютер подключен к интернету, остальные корневые сертификаты будут устанавливаться автоматически (по требованию), если ваше устройство попытается получить доступ к HTTPS сайту/SSL сертификату, в чей цепочке доверия есть отпечаток из CTL Microsoft. Поэтому как правило, нет необходимости добавлять в свое локальное хранилище сразу все сертификаты, доверенные Microsoft.
Список корневых сертификатов в формате STL
Есть еще один способ получения списка сертификатов с сайта Microsoft. Для этого нужно скачать файл http://ctldl.windowsupdate.com/msdownload/update/v3/static/trustedr/en/authrootstl.cab (обновляется дважды в месяц).С помощью любого архиватора (или проводника Windows) распакуйте содержимое архива authrootstl.cab. Он содержит один файл authroot.stl.

Файл authroot.stl представляет собой контейнер со списком отпечатков (thumbprint) доверенных сертификатов Microsoft в формате Certification Trust List.
Данный файл можно установить в системе с помощью утилиты certutil:
certutil -enterprise -f -v -AddStore "Root" "C:\PS\authroot.stl"

Root "Trusted Root Certification Authorities"
CTL 0 added to store.
CertUtil: -addstore command completed successfully.
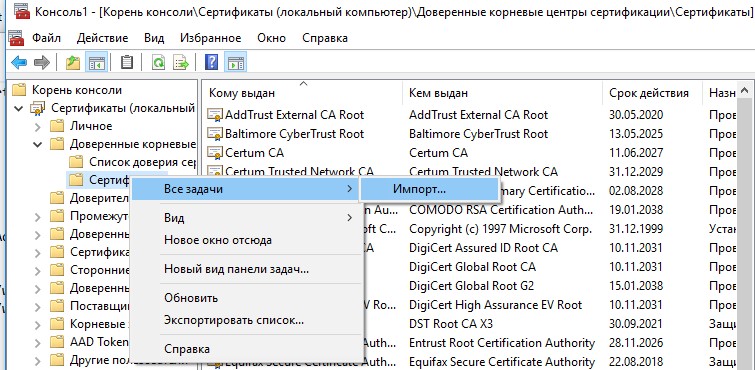
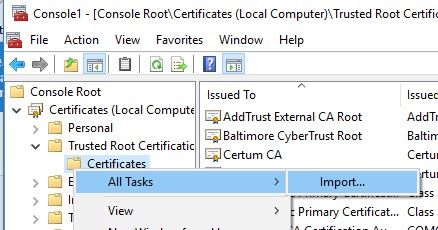
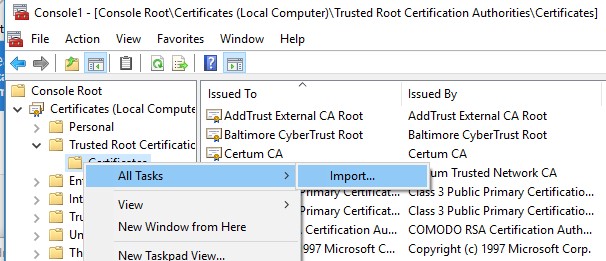
Также вы можете импортировать сертификаты из консоли управления сертификатами (Trust Root CertificationAuthorities –>Certificates -> All Tasks > Import). Укажите путь к вашему STL файлу сертификатами.
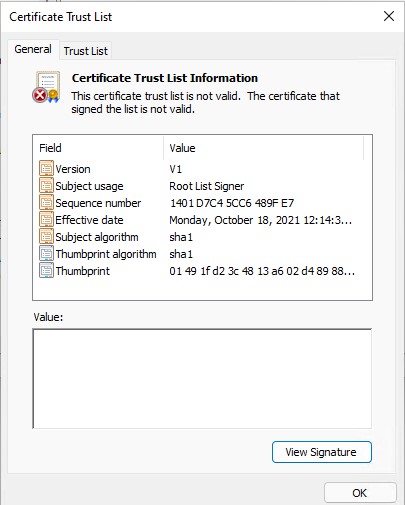
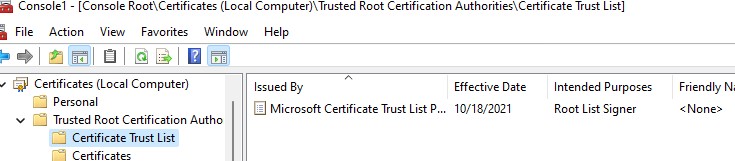
После выполнения команды, в консоли управления сертификатами (
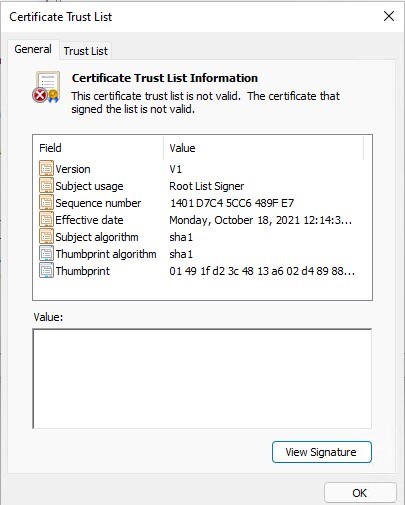
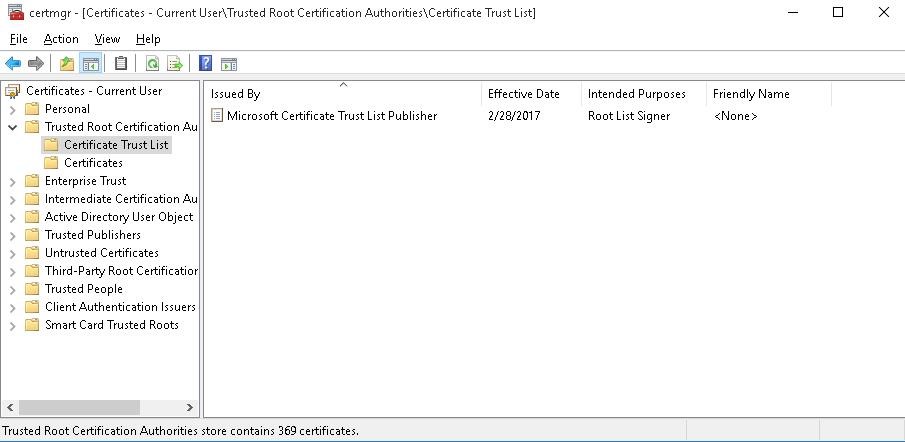
certmgr.msc
) в контейнере Trusted Root Certification Authorities (Доверенные корневые сертификаты) появится новый раздел с именем Certificate Trust List (Список доверия сертификатов).
Аналогичным образом можно скачать и установить список с отозванными сертификатами, которые были исключены из программы Root Certificate Program. для этого, скачайте файл disallowedcertstl.cab (http://ctldl.windowsupdate.com/msdownload/update/v3/static/trustedr/en/disallowedcertstl.cab), распакуйте его и добавьте в раздел Untrusted Certificates командой:
certutil -enterprise -f -v -AddStore disallowed "C:\PS\disallowedcert.stl "
Обновление корневых сертификатов в Windows с помощью GPO в изолированных средах
Если у вас возникла задача регулярного обновления корневых сертификатов в изолированном от Интернета домене Active Directory, есть несколько более сложная схема обновления локальных хранилищ сертификатов на компьютерах домена с помощью групповых политик. В изолированных сетях Windows вы можете настроить обновление корневых сертификатов на компьютерах пользователей несколькими способами.
Первый способ предполагает, что вы регулярно вручную скачиваете и копируете в вашу изолированную сеть файл с корневыми сертификатами, полученный так:
certutil.exe –generateSSTFromWU roots.sst
Затем сертификаты из данного файла можно установить через SCCM или PowerShell логон скрипт в GPO:
$sstStore = ( Get-ChildItem -Path \\dc01\SYSVOL\winitpro.ru\rootcert\roots.sst )
$sstStore | Import-Certificate -CertStoreLocation Cert:\LocalMachine\Root
Второй способ предполагает получение актуальных корневых сертификатов с помощью команды:
Certutil -syncWithWU -f \\dc01\SYSVOL\winitpro.ru\rootcert\
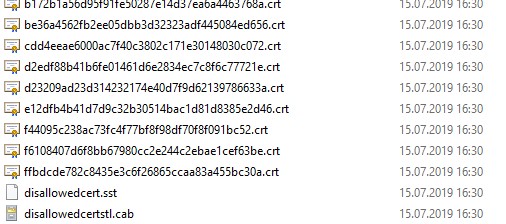
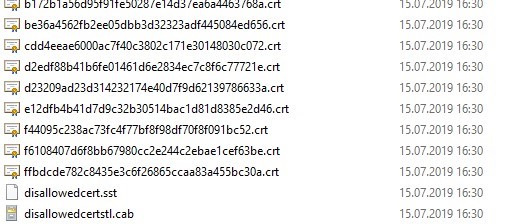
В указанном сетевом каталоге появится ряд файлов корневых сертификатов (CRT) и в том числе файлы (authrootstl.cab, disallowedcertstl.cab, disallowedcert.sst, thumbprint.crt).
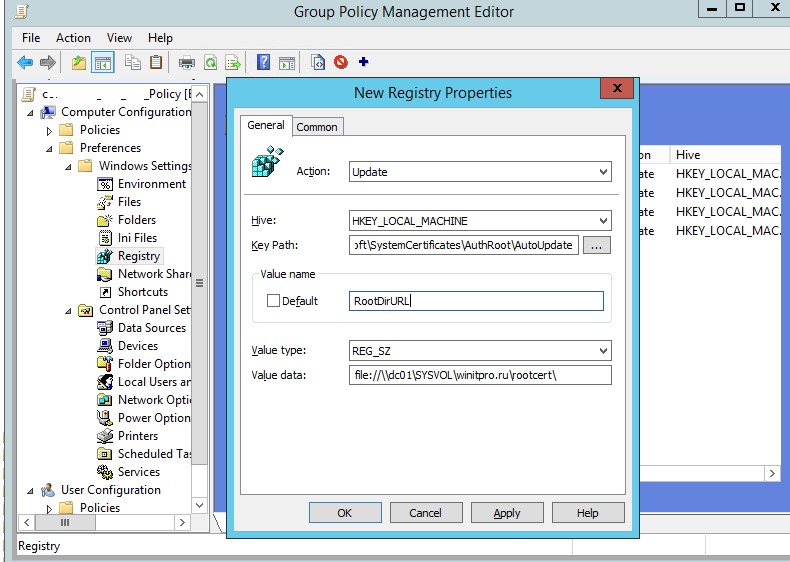
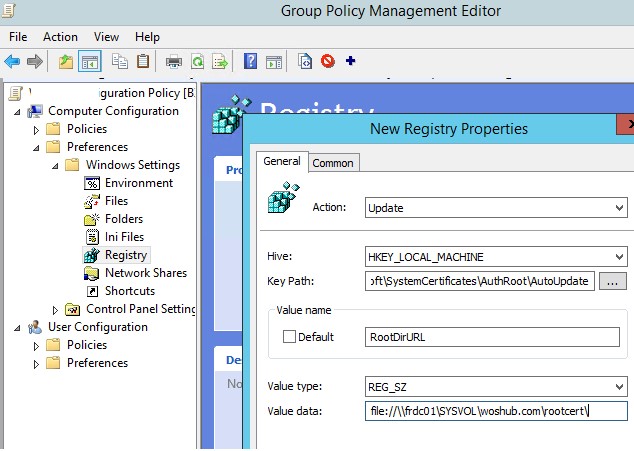
Затем с помощью GPP нужно изменить значение параметра реестра RootDirURL в ветке HKLM\Software\Microsoft\SystemCertificates\AuthRoot\AutoUpdate. Этот параметр должен указывать на сетевую папку, из которой клиентам нужно получать новые корневые сертификаты. Перейдите в секцию редактора GPO Computer Configuration -> Preferences -> Windows Settings -> Registry. И создайте новый параметр реестра со значениями:
Action: Update
Hive: HKLM
Key path: Software\Microsoft\SystemCertificates\AuthRoot\AutoUpdate
Value name: RootDirURL
Type: REG_SZ
Value data: file://\\dc01\SYSVOL\winitpro.ru\rootcert\
Осталось назначить эту политику на компьютеры и после обновления настроек GPO на клиенте проверить появление новых корневых сертификатов в хранилище.
Политика Turn off Automatic Root Certificates Update в разделе Computer Configuration -> Administrative Templates -> System -> Internet Communication Management -> Internet Communication settings должна быть выключена или не настроена.
Обновление корневых сертификатов в Windows 7
Несмотря на то, что Windows 7 уже снята с поддержки, есть много пользователей и компаний, в которых она еще используется.
После установки чистой Windows 7 из образа вы может столкнуться, что многие современные программы и инструменты на ней не работают из-за того, что они подписаны с помощью новых сертификатов. В частности, были жалобы, что в Windows 7 64 без обновления сертификатов не удается установить .Net Framework 4.8. или
vs_Community.exe с ошибкой:
installer manifest failed signature validation
Чтобы обновить корневые сертификаты в Windows 7, нужно скачать и установить MSU обновление: KB2813430.
После этого вы можете использовать утилиту certutil для генерации SST файла с сертификатами (на этом или на другом компьютере):
certutil.exe -generateSSTFromWU c:\ps\roots.sst
Теперь можно импортировать сертификаты в доверенные:
MMC -> add snap-in -> certificates -> computer account > local computer. Перейдите в раздел Trusted root certification authority, выберите All Tasks -> Import, найдите ваш SST файл (в типе файлов выберите Microsoft Serialized Certificate Store — *.sst) -> Open -> Place all certificates in the following store -> Trusted Root Certification Authorities
Утилита rootsupd.exe для обновления сертификатов в Windows XP
В Windows XP для обновления корневых сертификатов использовалась утилита rootsupd.exe. В этой утилита содержится список корневых и отозванных сертификатов, зашитых в которой регулярно обновлялся. Сама утилита распространялась в виде отдельного обновления KB931125 (Update for Root Certificates).
- Скачайте утилиту rootsupd.exe, перейдя по ссылке (по состоянию на 15.07.2019 ссылка не работает, возможно в Microsoft решили убрать ее из общего доступа. На данный момент вы можете скачать утилиту с сайта kaspersky.com — http://media.kaspersky.com/utilities/CorporateUtilities/rootsupd.zip);
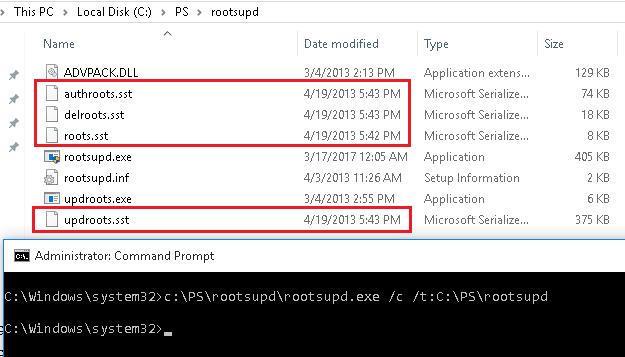
- Для установки корневых сертификатов Windows, достаточно запустить файл rootsupd.exe. Но мы попробуем более внимательно рассмотреть его содержимое, распаковав его с помощью команды:
rootsupd.exe /c /t:C:\PS\rootsupd
- Сертификаты содержатся в SST файлах: authroots.sst, delroot.sst и т.п. Для удаления/установки сертификатов можно воспользоваться командами:
updroots.exe authroots.sst
updroots.exe -d delroots.sst
Но, как вы видите, дата создания этих файлов 4 апреля 2013 (почти за год до окончания официальной поддержки Windows XP). Таким образом, с этого времени утилита не обновлялась и не может быть использована для установки актуальных сертификатов. Однако нам чуть позже понадобится файл updroots.exe.
Была информация, что утилиту updroots.exe нежелательно использовать в современных билдах Windows 10 1803+, т.к. она может сломать корневой сертификат Microsoft Root Certificate Authority.
В этой статье мы рассмотрели несколько способов обновления корневых сертификатов на компьютерах Windows, изолированных от Интернета.
На ОС Windows 7 — Windows 10 требуется время от времени обновлять корневые центры сертификации.
Замечание
Корневые сертификаты — опорные столбы для других, промежуточных сертификатов центров выпуска сертификатов, для удостоверяющих центров и в конечном итоге для сайтов. Без них цепочка доверия не работает и шифрование https не работает. В связи с тем, что необходимо обеспечивать безопасность, получать корневые сертификаты можно лишь из проверенных источников (нельзя загружать никакие файлы для сертификатов с Яндекс Диска, сторонних сайтов и т.п.).
1. Получение корневых сертификатов с сайта Windows Update
Для загрузки корневых сертификатов есть утилита certutil.exe, которую нужно запустить с ключом -generateSSTFromWU и именем выходного файла, например: c:\certs\roots.sst
certutil.exe -generateSSTFromWU c:\certs\roots.sstГде certs — каталог, который необходимо создать.
Описание всех ключей команды можно прочесть в файле spisok.txt:
- spisok-win1251.txt
- spisok-linux.txt
Описание ключа программы certutil.exe:
-generateSSTFromWU — Создание SST в Центре обновления Windows
Здесь SST — актуальные доверенные корневые центры сертификации в файле типа SST.
Источник: updating trusted root certificates in windows 10
Выполнение команды certutil.exe -generateSSTFromWU c:\certs\roots.sst занимает минуты 3-4:

2. Экспорт корневых сертификатов в файл p7b
Полученный SST-файл открывается двойным щелчком мыши.

В котором можно отсортировать сертификаты по сроку действия, выделать действующие сертификаты и нажать правую кнопку мыши — Экспорт.
2.1 Начало мастера экспорта сертификатов:

2.2 Выбор типа выходного файла. Я поставил точку против p7b — транспортный контейнер, в котором все сертификаты в одном файле (так называемый bundle).

2.3 Выбираем выходной каталог и имя файла с расширением p7b для экспорта

2.4 Продолжение работы мастера — кнопка «Далее»

2.5 Сообщение об успешном завершении экспорта: «Экспорт успешно завершен».
3. Импорт корневых сертификатов из файла p7b в систему
3.1 В Проводнике щелкнуть по получившемуся файлу p7b правой кнопкой мыши — «Импортировать»

Увеличил фрагмент экрана:

3.2 Начало мастера импорта сертификатов

Далее
3.3 Соглашаемся с автоматическим выбором хранилища — далее.

3.4 Последний шаг мастера импорта сертификатов в систему:

3.5 Сообщение о завершении импорта сертификатов в систему: «Импорт успешно завершен».
Корневые сертификаты обновлены.
Замечание: вместо способа с промежуточным p7b файлом, можно использовать оснастку сертификатов и напрямую импортировать файл SST:
Запустите MMC -> добавить оснастку -> сертификаты -> учетная запись компьютера> локальный компьютер.
Щелкните правой кнопкой мыши Доверенные корневые центры сертификации, Все задачи -> Импорт, найдите файл SST
(в типе файла выберите Microsoft Serialized Certificate Store — *.sst) -> Открыть
-> Поместить все сертификаты в следующее хранилище -> Доверенные корневые центры сертификации.
4. Загрузка и установка корневого сертификата Минцифры (Министерства цифрового развития, связи и массовых коммуникаций Российской Федерации)
4.1 Скачать сертификат с сайта
https://gosuslugi.ru/tls
4.2 Установить его таким же способом — правой кнопкой мыши — установить.
Для верности можно выбрать, куда импортировать — в раздел «Доверенные корневые центры».
5. Другие источники сертификатов — сайт Казначейства
Сайт Федерального Казначейства:
корневые сертификаты
6. Способ получения действующих и отозванных сертификатов в виде CAB-файлов
- Список действующих корневых сертификатов — http://ctldl.windowsupdate.com/ … authrootstl.cab
- Список отозванных корневых сертификатов — http://ctldl.windowsupdate.com/ … disallowedcertstl.cab
Распаковать файл при помощи архиватора 7ZIP (7zip.org), например, в папку C:\PS
Установка:
-
действующие корневые центры — импорт из файла
authroot.stlcertutil -enterprise -f -v -AddStore «Root» «C:\PS\authroot.stl»
-
отозванные корневые центры — импорт из файла
disallowedcert.stlcertutil -enterprise -f -v -AddStore disallowed «C:\PS\disallowedcert.stl»
Related publications
Обновлено:
Опубликовано:
Актуальные системы семейства Windows, подключенные к Интернету, могут автоматически обновлять корневые сертификаты. В противном случае, обновление необходимо выполнять вручную. Если это не делать, мы можем столкнуться с рядом проблем:
- Не открываются или выдают предупреждение безопасности некоторые (или все) сайты, работающие по https.
- Некорректная работа отдельных приложений (например, антивирусных систем).
- Ошибки при подключении по удаленному рабочему столу.
Это пример ошибок, который не претендует на свою полному. Чаще всего, проблемы встречаются на системах, снятых с обслуживания компанией Microsoft (Windows XP, 7, а также Server 2003, 2008).
Пакет обновлений Windows
Экспорт актуальных сертификатов
Импорт сертификатов
Решение возможных проблем
Обновление сертификатов
Обновление доверенных корневых сертификатов выполняется во время обновления операционной системы. Если последнее включено, то нашего участия не требуется, иначе, можно установить обновление вручную. Пример такого пакета — KB931125 (ссылка).
Однако, если операционная система устарела, разработчик прекращает выпуск обновлений, и мы не можем воспользоваться средствами обновления системы. В таком случае, необходимо сделать выгрузку корневых сертификатов на актуальной системе и перенести их на устаревший.
Получение актуальных сертификатов
Для начала, выгрузим сертификаты на компьютере с актуальной версией Windows (10) и подключением к сети Интернет.
Создадим каталог, в который будет выгружен файл с корневыми сертификатами, например, C:\CA (папка CA на диске C).
Открываем командную строку от администратора и вводим команду:
certutil.exe -generateSSTFromWU C:\CA\roots.sst
* где C:\CA — каталог, который мы создали; roots.sst — файл, в который будут выгружены сертификаты.
** если мы получили ошибку Не удается найти указанный файл. 0x80070002, то необходимо убедиться, что каталог CA создан (в нашем примере в корне диска С).
*** необхоидимо убедиться, что каталог, в который мы сохраняем файл roots.sst чистый (в нем нет данного файла).
В папке C:\CA мы должны увидеть файл roots.sst.
Установка/обновление корневых сертификатов
Полученный на предыдущем этапе файл переносим на компьютер, где необходимо обновить доверенные корневые сертификаты, например, также в папку C:\CA. Скачиваем утилиту rootsupd и распаковываем ее в этот же каталог.
Открываем командную строку от администратора и вводим команду:
C:\CA\rootsupd.exe /c /t:C:\CA
* где C:\CA — папка, в которую мы перенесли корневые сертификаты.
В появившемся окне Roots Update:
… выбираем No, чтобы не переписывать наш файл roots.sst.
В папке C:\CA должны появится новые файлы, в том числе, утилита updroots. Вводим теперь команду:
C:\CA\updroots.exe C:\CA\roots.sst
Готово.
Возможные ошибки
Рассмотрим некоторые ошибки, с которыми можно столкнуться.
1. Ошибка 0x5
При вводе команды updroots мы можем получить ошибку:
Error: Save encoded certificate to store failed => 0x5 (5)
Failed
Причина: утилита вносит изменения в систему и ей необходимы права. Данная ошибка, как правило, возникает при нехватке привилегий.
Решение: даже, если мы работает под учетной записью, входящей в группу администраторов, необходимо запускать командную строку от администратора. Для этого можно найти в поиске командную консоль, кликнуть по ней правой кнопкой мыши и выбрать запуск от администратора.
2. Ошибка 0x80070002
При попытке выгрузить корневые сертификаты с помощью команды certutil.exe -generateSSTFromWU мы можем получить ошибку:
Не удается найти указанный файл. 0x80070002 (WIN32: 2 ERROR_FILE_NOT_FOUND) — C:\CA\roots.sst
CertUtil: -generateSSTFromWU команда НЕ ВЫПОЛНЕНА: 0x80070002 (WIN32: 2 ERROR_FILE_NOT_FOUND)
CertUtil: Не удается найти указанный файл.
Причина: мы пытаемся выгрузить данные в каталог, которого не существует.
Решение: в нашем примере выгрузка идет в папку C:\CA. Значит нужно убедиться в наличие данного каталога и, при необходимости, создать его.
All Windows versions have a built-in feature for automatically updating root certificates from the Microsoft websites. MSFT, as part of the Microsoft Trusted Root Certificate Program, maintains and publishes a list of trusted certificates for clients and Windows devices in its online repository. If the verified certificate in its certification chain refers to the root CA that participates in this program, the system will automatically download this root certificate from the Windows Update servers and add it to the trusted ones.
Windows updates a trusted root certificate list (CTL) once a week. If Windows doesn’t have direct access to the Windows Update, the system won’t be able to update the root certificates. So a user may have some troubles when browsing websites (which SSL certificates are signed by an untrusted CA – see the article about the “Chrome SSL error: This site can’t provide a secure connection”), or with installing/running signed scripts and apps.
In this article, we’ll try to find out how to manually update the list of root certificates in TrustedRootCA in disconnected (isolated) networks or computers/servers without direct Internet access.
Contents:
- Managing Trusted Root Certificates in Windows 10 and 11
- How to Disable/Enable Automatic Root Certificates Update in Windows?
- Certutil: Download Trusted Root Certificates from Windows Update
- Certificate Trust List (STL) in Windows
- Updating Trusted Root Certificates via GPO in an Isolated Environment
- How to Update Trusted Root Certificates in Windows 7?
- Updating Root Certificates on Windows XP Using the Rootsupd.exe Tool
Note. If your computers access the Internet through a proxy server, Microsoft recommends that you open direct access (bypass) to Microsoft Web sites to automatically renew root certificates. However, it isn’t always possible or applicable due to corporate restrictions.
Managing Trusted Root Certificates in Windows 10 and 11
How to see the list of trusted root certificates on a Windows computer?
- To open the root certificate store of a computer running Windows 11/10/8.1/7 or Windows Server 2022/2019/2016, run the mmc.exe console;
- Select File -> Add/Remove Snap-in, select Certificates (certmgr) in the list of snap-ins -> Add;
- Select that you want to manage certificates of local Computer account;

- Next -> OK -> OK;
- Expand the Certificates node -> Trusted Root Certification Authorities Store. This section contains the list of trusted root certificates on your computer.
In the mmc console, you can view information about any certificate or remove it from trusted ones.
You can also get a list of trusted root certificates with their expiration dates using PowerShell:
Get-Childitem cert:\LocalMachine\root |format-list
You can list the expired certificates, or which expire in the next 60 days:
Get-ChildItem cert:\LocalMachine\root|Where {$_.NotAfter -lt (Get-Date).AddDays(60)}|select NotAfter, Subject
For security reasons, it’s recommended that you periodically check the certificate trust store on your computer for suspicious and revoked certificates using the Sigcheck tool. This tool allows you to compare the list of certificates installed on the computer with the list of root certificates on the Microsoft website (you can download an offline file with up-to-date certificates authrootstl.cab).
You can manually transfer the root certificate file between Windows computers using the Export/Import options.
- You can export any certificate to a .CER file by clicking on it and selecting All Tasks -> Export;

- You can import this certificate on another computer using the option All Tasks -> Import.

How to Disable/Enable Automatic Root Certificates Update in Windows?
As we mentioned, Windows automatically updates root certificates. You can enable or disable certificate renewal in Windows through a GPO or the registry.
Open the Local Group Policy Editor (gpedit.msc) and go to Computer Configuration -> Administrative Templates -> System -> Internet Communication Management -> Internet Communication.
The Turn off Automatic Root Certificates Update option in this section allows you to disable automatic updating of root certificates through the Windows Update sites. By default, this policy is not configured and Windows always tries to automatically renew root certificates.
If this GPO option is not configured and the root certificates are not automatically renewed, check if this setting is manually enabled in the registry. Check the value of the registry parameter using PowerShell:
Get-ItemProperty -Path 'HKLM:\Software\Policies\Microsoft\SystemCertificates\AuthRoot' -Name DisableRootAutoUpdate
If the command returns that the value of the DisableRootAutoUpdate registry parameter is 1, then the updating of root certificates is disabled on your computer. To enable it, change the parameter value to 0.
Certutil: Download Trusted Root Certificates from Windows Update
Certutil.exe CLI tool can be used to manage certificates (introduced in Windows 10, for Windows 7 is available as a separate update). It can be used to download an up-to-date list of root certificates from Windows Update and save it to an SST file.
To generate an SST file on a computer running Windows 10 or 11 and having direct access to the Internet, open the elevated command prompt and run the command:
certutil.exe -generateSSTFromWU C:\PS\roots.sst
Updated SST file.
CertUtil: -generateSSTFromWU command completed successfully.
As a result, an SST file containing an up-to-date list of root certificates will appear in the target directory. Double-click to open it. This file is a container containing trusted root certificates.
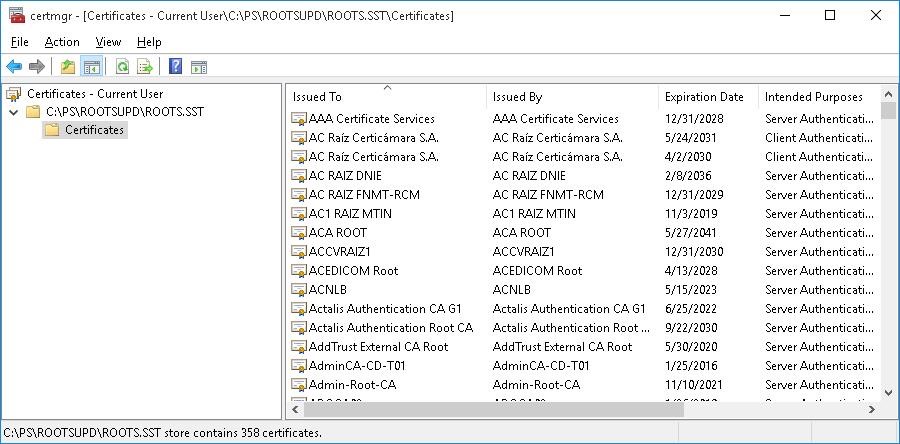
As you can see, a familiar Certificate Management snap-in opens, from which you can export any of the certificates you have got. In my case, there have been 358 items in the list of certificates. Obviously, it is not rational to export the certificates and install them one by one.
Tip. The certutil -syncWithWU command can be used to generate individual certificate files. The certificates obtained in this way can be deployed to Windows devices using GPO.
You can use PowerShell script to install all certificates from the SST file and add them to the list of trusted root certificates on a computer:
$sstStore = ( Get-ChildItem -Path C:\ps\rootsupd\roots.sst )
 $sstStore | Import-Certificate -CertStoreLocation Cert:\LocalMachine\Root
Run the certmgr.msc snap-in and make sure that all certificates have been added to the Trusted Root Certification Authority. In my example on Windows 11, the number of root certificates increased from 34 to 438.
A clean copy of Windows after installation contains only a small number of certificates in the root store. If the computer is connected to the Internet, the rest of the root certificates will be installed automatically (on demand) if your device access an HTTPS site or SSL certificate that has a fingerprint from Microsoft CTL in its trust chain. Therefore, as a rule, there is no need to immediately add all certificates that Microsoft trusts to the local certification store.
Certificate Trust List (STL) in Windows
A Certificate Trust List (CTL) is simply a list of data (such as certificate hashes) that is signed by a trusted party (by Microsoft in this case). The Windows client periodically downloads from Windows Update this CTL, which stores the hashes of all trusted root CAs. It should be understood that this CTL doesn’t contain the certificates themselves, only their hashes and attributes (for example, Friendly Name). Windows devices can download a trusted certificate from Certificate Trust List on demand.
You can manually download and install the CTL file. To do it, download the file http://ctldl.windowsupdate.com/msdownload/update/v3/static/trustedr/en/authrootstl.cab (updated twice a month). Using any archiver (or even Windows Explorer), unpack the contents of the authrootstl.cab archive. It contains a single authroot.stl file.

The Authroot.stl file is a container with a list of trusted certificate thumbprints in Certificate Trust List format.
You can install this CTL file to a Trusted Root Certificate Authority using the certutil command:
certutil -enterprise -f -v -AddStore "Root" "C:\PS\authroot.stl"

root "Trusted Root Certification Authorities"
CTL 0 added to store.
CertUtil: -addstore command completed successfully.
You can also import certificates using the certificate management console (Trust Root Certification Authorities -> Certificates -> All Tasks -> Import). Specify the path to your STL file with certificate thumbprints.
After you have run the command, a new section Certificate Trust List appears in Trusted Root Certification Authorities container of the Certificate Manager console (certmgr.msc).
In the same way, you can download and install the list of the revoked (disallowed) certificates that have been removed from the Root Certificate Program. To do it, download the disallowedcertstl.cab file (http://ctldl.windowsupdate.com/msdownload/update/v3/static/trustedr/en/disallowedcertstl.cab), extract it, and add it to the Untrusted Certificates store with the command:
certutil -enterprise -f -v -AddStore disallowed "C:\PS\disallowedcert.stl"
Updating Trusted Root Certificates via GPO in an Isolated Environment
If you have the task of regularly updating root certificates in an Internet-isolated Active Directory domain, there is a slightly more complicated scheme for updating local certificate stores on domain-joined computers using Group Policies. You can configure root certificate updates on user computers in the disconnected Windows networks in several ways.
The first way assumes that you regularly manually download and copy a file with root certificates to your isolated network. You can download the file with current Microsoft root certificates as follows:
certutil.exe –generateSSTFromWU roots.sst
Then the root certificates from this file can be deployed via SCCM or PowerShell Startup script in GPO:
$sstStore = (Get-ChildItem -Path \\fr-dc01\SYSVOL\woshub.com\rootcert\roots.sst )
 $sstStore | Import-Certificate -CertStoreLocation Cert:\LocalMachine\Root
The second way is to download the actual Microsoft root certificates using the command:
Certutil -syncWithWU -f \\fr-dc01\SYSVOL\woshub.com\rootcert\
A number of root certificate files (CRT file format) will appear in the specified shared network folder (including files authrootstl.cab, disallowedcertstl.cab, disallowedcert.sst, thumbprint.crt).
Then use the Group Policy Preferences to change the value of the registry parameter RootDirURL under HKLM\Software\Microsoft\SystemCertificates\AuthRoot\AutoUpdate. This parameter should point to the shared network folder from which your Windows computers will receive new root certificates. Run the domain GPMC.msc console, create a new GPO, switch to the edit policy mode, and expand the section Computer Configuration -> Preferences -> Windows Settings -> Registry. Create a new registry property with the following settings:
- Action: Update
- Hive: HKLM
- Key path: Software\Microsoft\SystemCertificates\AuthRoot\AutoUpdate
- Value name: RootDirURL
- Type: REG_SZ
- Value data: file://\\fr-dc01\SYSVOL\woshub.com\rootcert\
It remains to link this policy on a computer`s OU and after updating GPO settings on the client, check for new root certificates in the certstore.
The GPO parameter Turn off Automatic Root Certificates Update under Computer Configuration -> Administrative Templates -> System -> Internet Communication Management -> Internet Communication settings should be disabled or not configured.
How to Update Trusted Root Certificates in Windows 7?
Despite the fact that Windows 7 is now is at the End of Support phase, many users and companies still use it.
After installing a clean Windows 7 image, you may find that many modern programs and tools do not work on it as they are signed with new certificates. In particular, there have been complaints that .Net Framework 4.8 or Microsoft Visual Studio (vs_Community.exe) cannot be installed on Windows 7 SP1 x64 without updating root certificates.
The installer manifest failed signature validation.
Or
NET Framework has not been installed because a certificate chain could not be built to a trusted root authority.
To update root certificates in Windows 7, you must first download and install MSU update KB2813430 (https://support.microsoft.com/en-us/topic/an-update-is-available-that-enables-administrators-to-update-trusted-and-disallowed-ctls-in-disconnected-environments-in-windows-0c51c702-fdcc-f6be-7089-4585fad729d6)
After that, you can use the certutil to generate an SST file with root certificates (on current or another computer):
certutil.exe -generateSSTFromWU c:\ps\roots.sst
Now you can import certificates into trusted ones:
Run MMC -> add snap-in -> certificates -> computer account > local computer. Right click Trusted root certification authority, All Tasks -> Import, find your SST file (in the file type select Microsoft Serialized Certificate Store — *.sst) -> Open -> Place all certificates in the following store -> Trusted Root Certification Authorities.
Updating Root Certificates on Windows XP Using the Rootsupd.exe Tool
In Windows XP, the rootsupd.exe utility was used to update the computer`s root certificates. The list of root and revoked certificates in it was regularly updated. The tool was distributed as a separate update KB931125 (Update for Root Certificates). Let’s see if we can use it now.
- Download the rootsupd.exe utility using the following link http://download.windowsupdate.com/msdownload/update/v3/static/trustedr/en/rootsupd.exe. At the moment (January 2021) the link doesn’t work, Microsoft decided to remove it from the public. Today you can download the rootsupd.exe from the Kaspersky website — http://media.kaspersky.com/utilities/CorporateUtilities/rootsupd.zip;
- To install the Windows root certificates, just run the rootsupd.exe file. But we will try to examine its contents more carefully. Extract the certificates from the executable file with the command:
rootsupd.exe /c /t: C:\PS\rootsupd
- Certificates are stored in SST files, like authroots.sst, delroot.sst, etc. To remove or install certificates, you can use the following commands:
updroots.exe authroots.sst
 updroots.exe -d delroots.sst
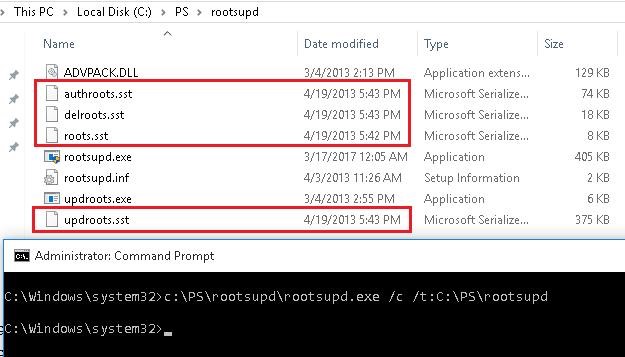
However, as you can see, these certificate files were created on April 4, 2013 (almost a year before the end of official support for Windows XP). Thus, since then the tool has not been updated and cannot be used to install up-to-date certificates.
But you can use cerutil tool in Windows 10/11 to download root.sst, copy that file in Windows XP and install the certificate using updroots.exe:
updroots.exe c:\temp\roots.sst
There is information that the updroots.exe tool is not recommended for use in modern builds of Windows 10 1803+ and Windows 11, as it can break the Microsoft root CA on a device.
In this article, we looked at several ways to update trusted root certificates on Windows network computers that are isolated from the Internet (disconnected environment).
Root Certificates are embedded within our operating system all around. These are also known as Trusted Root Certificates, created by the Certificate Authority (CA), accrediting that a website or software is who they claim they are. It is more like a digital certificate of authentication
By default, Windows 11 updates its root certificate over the internet through Windows Update at least once a week through a Trusted Root Certificate List (CTL). However, if your device is not connected to the internet, certificates will likely expire over time, thus causing certain scripts and applications to not function properly, or experience problems while browsing the internet.
Let us help you avoid this problem by showing you how to update your system’s Root Certificates.
Before we begin, let us guide you on how to see and manage the Root Certificates on Windows 11 and find out which certificates are expired or about to expire.
Table of Contents
View trusted root certificates using the Certificate MMC
Windows comes with various Management Consoles that are used for managing different aspects of the operating system. One of these consoles is the Certificate Management Console.
This is a convenient way to view and manage Root Certificates if you prefer the Graphical User Interface (GUI). Otherwise, you can also obtain the relevant information through Windows PowerShell, which we have discussed in the next section.
Follow the steps below to launch the Certificate Management Console:
- Start by typing in mmc.exe in Run to launch Microsoft Management Console.
- From the top menu, click File and then click Add/remove snap-in.

- From the pop-up window, select Certificates under “Available Snap-ins” and then click Add.
- In the next window, select Computer account and click Next.
- Leave the default setting on the next page and click Finish.
- Back in the Add/Remove Snap-in window, click OK.
- Now, on the console, navigate to the following using the left pane:
Certificates (Local Computer) >> Trusted Root Certification Authorities >> Certificates


Here, you can view all the active and expired Root Certificates on your machine in the middle pane. It also states CA under the “Issued by” column, as well as the expiry date in another column.
View trusted root certificates using Windows PowerShell
Another way to obtain the information on the Root Certificates is through PowerShell. Run the following command in Windows PowerShell with administrative privileges to obtain the details:
Get-Childitem cert:\LocalMachine\root |format-list
As you may notice, this command provides the details on all Root Certificates, which may be a bit overwhelming for some. If you want the details on the expired certificates, use the following command:
Get-ChildItem cert:\LocalMachine\root | Where {$_.NotAfter -lt (Get-Date).AddDays(40)}
Now that you know how to manage the Root Certificates, let us update them.
Update root certificates from a remote computer
One way to update the Root Certificate(s) is to copy a valid certificate from another computer that is already installed, and then re-install it on your device. The process is simple as Windows is already equipped to export and import Root Certificates. However, to do this, make sure that both the source and the destination operating systems are the same.
We have divided this method into “Exporting a Root Certificate” and “Importing a Root Certificate” for your convenience.
Export Root Certificates
You need to begin by identifying the certificate that you need to update. Once done, follow the steps below to export the certificate:
- Open the Certificate Management Console on the source computer (as discussed earlier in this post).
- From there, right-click on the certificate that you want to move to another device, expand All Tasks from the context menu, and then click Export.
- The Certificate Export Wizard will now be open. On the welcome screen, click Next.
- Click Next on the next screen while leaving the default settings.
- On the next screen, click Browse and save the .cer file with a name of your choice, then click Next.
- On the final screen, confirm the settings and click Finish. Then click Ok on the confirmation dialog box.


You will now see the exported .cer file at the destination you chose in step 5. Copy this file onto a USB flash drive and plug it into the target system for the Root Certificate to be installed.
Import Root Certificates
Now paste the .cer file from the flash drive to anywhere with the OS and follow the steps below to import it.
- Open the Certificate Management Console on the source computer and navigate to the Certificates folder from the left pane.
- Right-click Certificates, expand All Tasks, and click Import from the context menu.
- On the welcome screen of Certificate Import Wizard, click Next.
- Click Browse on the next screen and select the .cer file which has been exported from another computer, then click Next.
- Now select “Automatically select the certificate store based on the type of certificate” and click Next.
- On the final screen of the wizard, click Finish.


The certificate will now be updated on your computer which you can see through the Certificate Management Console.
Another way to install this exported certificate is directly through the .cer file. Double-click the .cer file to launch it. From the certificate, click Install Certificate.

The Certificate Import Wizard will now be launched. From there, select Local Machine as the Store Location and then click Next.

The remaining steps for importing the certificate are the same as we had discussed above.
From an SST File
Serialized Certificate Store Format (SST) files are certificates created directly from a CA. An SST file contains certificates used to authenticate the identities of websites, apps, and programs.
The SST file can be downloaded on demand from Microsoft using Windows Update so you may have all the latest certificates at once.
Let us show you how to download the file, and then discuss different methods to install it.
Download Latest Root Certificates for Windows
Downloading the latest SST file with the latest Root Certificates is easy. Begin by creating a new folder using File Explorer where the SST file will be stored. Then, launch the Command prompt with administrative privileges and navigate to the empty folder you have created using the command below.
cd /d "PathToFolder"This is where the SST file will be downloaded. Replace PathToFolder with the complete path of the empty folder, as in the example below.

Now run the following command to download the latest certificates in an SST file:
certutil.exe -generateSSTFromWU roots.sst
You will now find that the SST file has been downloaded. This file contains all the latest Root Certificates. You can now install them all at once, or one-by-one (only the ones that are required).
Install All Certificates using SST File
Once you open the downloaded roots.sst file, you will see that it holds many certificates. In our case, it holds 436 files. These can all be installed instantly using Windows PowerShell. Here is how:
- Open PowerShell with administrative privileges.
- Now run the following command while replacing CertPath with the complete path to the downloaded SST file:
$sstStore = ( Get-ChildItem -Path <em>CertPath</em>\roots.sst) - Next, paste the following command to import all the certificates on your PC:
$sstStore | Import-Certificate -CertStoreLocation Cert:\LocalMachine\Root

You will now find that the certificates have been imported to your machine from the downloaded SST file. You can verify this through the Certificate Management Console.
Install Individual Root Certificates using SST File
Another method to install the Root Certificates from an SST file is one-by-one. This may take a while, but the method can only be used when you wish to install specific certificates.
To do so, run the SST file by double-clicking on it. It will open in an identical console to MMC. From there, you can export a certificate and then import it on the local machine using the method we have already discussed above.
Alternatively, you can also double-click on the certificate and install it directly.

From an STL File
Serialized Certificate Trust List (STL) files also contain Root Certificates, but the file formatting is different than an SST file. Microsoft maintains an STL file you can download to obtain the latest Root Certificates for your Windows. The STL is updated twice a month.
Download Latest STL File
Once downloaded, extract its content using a third-party compression/decompression tool. The extracted folder should now contain only one STL file. You may then proceed to import the file using Command Line Interface (CLI).
Launch the Command Prompt with administrative privileges and navigate to the extracted folder using the Change Directory command:
cd /d "PathToExtracted"Replace PathToExtracted with the complete path to the extracted folder, as in the following example:

Now paste the following command to import the certificates within the STL file.
certutil -addstore -f root authroot.stl
You can now confirm that the latest certificates have been installed using the Certificate Management Console.
Final Thoughts
Although it may not seem like it, a Root Certificate is essential for your daily work on a PC, as it is making authorization handshakes and trust with other components in the background while you continue with your work.
However, once a certificate has expired, it can be safely deleted, as it is no longer valid. That said, we recommend that you install a new, valid certificate in its place before removing the old one.