
We’ve talked about Windows Server Backup feature in a previous article posted on Poweradmin blog. I’ve shown you how to install this feature and how to create and schedule Windows Server backups using the backup console. In this article I want to show you how to achieve similar results by using a Powershell script. I will try to describe each line so you can understand the logic behind it. Note that I use Windows PowerShell Integrated Scripting Environment (ISE) to create Windows scripts.
#We will start by creating a new Windows Backup(WB) policy object:
$backupPolicy = New-WBPolicy
#We will add the System State and the Bare Metal Recovery options to our new policy:
Add-WBSystemState -Policy $backupPolicy
Add-WBBareMetalRecovery -Policy $backupPolicy
#We’ll need to set a location on where the backups will be stored, I will use a local disk attached to my server. The Get-WBDisk cmdlet displays all disks attached to the server so I’ve used the $disk[1] to specify the needed partition.
$disk = Get-WBDisk
Write-Host $disk
$backupTarget = New-WBBackupTarget -Disk $disk[1]
Add-WBBackupTarget -Policy $backupPolicy -Target $backupTarget
The script will display the backup destination disk information:
#We’ll set the Vss Full Backup option to our policy:
Set-WBVssBackupOption -Policy $backupPolicy -VssFullBackup
#The backup schedule can be configured using the Set-WBSchedule cmdlet. I’ve set the task to run everyday at 9 am:
Set-WBSchedule -Policy $backupPolicy -Schedule 09:00
#Normally, we would not be allowed to run a one-time only backup this is why we’ll have to force our policy by executing the following command:
Set-WBPolicy -force -policy $backupPolicy
#All that’s left to do is to start the backup process:
Start-WBBackup -Policy $backupPolicy
The backup will now start, Windows Powershell ISE will display a status of the backup process. You will be prompted once the the operation is completed.
You can also use the Windows Backup Console to verify the status of the backup operation. Note that the scheduled task will be configured as specified in the script (everyday at 9 am full VSS backup)
That’s about it for this script folks, hope you will enjoy it when automatizing Windows Server backup tasks. You can further develop the script to run backups for multiple machines at the same time. Note that you can also use a network share as the backup destination. Wish you all the best and stay tuned for the following articles from IT training day.
Резервное копирование папок, файлов, файловой базы данных 1С
Часто в работе системных администраторов требуется делать регулярно резервное копирование каких-то директорий, файлов. Например файловой базы данных 1С или папок профилей пользователей. Самое простое решение для выполнения подобных задач это выполнение скрипта по расписанию для резервирования данных.
Рассмотрим скрипт powershell для резервного копирования файловых данных частями.
В шапке скрипта находятся основные параметры, которые обязательно нужно настроить под вашу задачу. Скрипт может укладывать архив в двух режимах. первый режим когда весь каталог добавляется а одни архив. Второй когда создаются для каждой дочерней директории свой архив. второй режим удобен когда в папке хранятся профили пользователей или разные базы данных 1С
Настройки
# ========== Глобальные настройки скрипта ==========
    # Режим укладки архивов
    #[int32]$psOperationMode = 0 # Укладываем всё в один архив
    [int32]$psOperationMode = 1 # Укладываем каждую директорию в свой  архив

    # Консоль архиватор 7zip
    [string]$ps7zip = "C:\Program Files\7-Zip\7z.exe"

    # Настройки почты
    [string]$psSMTPServer = "smpt.mail.ru" # SMTP сервер
    [int32]$psSMTPPort = 587 # Порт
    [string]$psSMTPUser = "LOGIN" # Логин
    [string]$psSMTPPass = "PASSWORD" # Пароль
    [string]$psMailFrom = "backup@3dlan.ru" # Отправитель
    [string]$psMailTO = "administrator@3dlan.ru" # Получатель

    # Настройки папок
    [string]$psDays = "-90" # Глубина архива в днях
    [string]$psBackupFolder = "D:\ps_backup\backup\" # Складываем архив
    [string]$psSourceFolder = "D:\server\users\" # Исходная директория подлежащая архивированию
    [string]$psBackupLOG = "D:\ps_backup\log\" # ЛОГ
# ====================================================
Функции располагающиеся ниже предназначены для создания или удаления необходимых директорий резервного копирования. Настройки которых находятся в шапке скрипта.
Создание новых и удаление старых директорий
[string]$psDateFolder = Get-Date -DisplayHint Date -Format d.MM.yyyy # Получаем текущую дату в формате 01.12.1999

$psFolderList = Get-ChildItem -Path $psSourceFolder # Список суб папок и фалов из папки источника

function createFolder { # Создаём новый каталог
    param(
        [Parameter (Mandatory=$true, Position=1)] [string]$backupFolder,
        [Parameter (Mandatory=$true, Position=2)] [string]$newFolder
    )

    if(!(Test-Path $backupFolder$newFolder)) {
            New-Item -Path $backupFolder -Name $newFolder -ItemType directory
    }
}

function removeFolder { # Удаляем старый архив
    param(
        [Parameter (Mandatory=$true, Position=1)] [string]$backupFolder,
        [Parameter (Mandatory=$true, Position=2)] [string]$backupDays
    )
    $removeDateFolder = (Get-date).AddDays($backupDays)

    # Удаляем старые файлы превышающие $psDays дней
    Get-ChildItem -Path $backupFolder | `
        Where-Object { $_.LastWriteTime -lt $removeDateFolder } | `
        Remove-Item -Recurse
}
Это основной алгоритм создания архивной копии директорий и файлов. В зависимости от режима работы скрипта (psOperationMode = 0 или 1) скрипт упаковывает данные в 7z архив с максимальным сжатием (-t7z -ssw -mx9). Пишет лог в директорию которая указана в конфигурации скрипта. В итоге получаем каталог с архивами, каталог с лог из 7z и глобальный log файл.
Резервное копирование
Function Format-FileSize() {
    Param ([int64]$size)
        If ($size -gt 1TB) {[string]::Format("{0:0.00} TB", $size / 1TB)}
        ElseIf ($size -gt 1GB) {[string]::Format("{0:0.00} GB", $size / 1GB)}
        ElseIf ($size -gt 1MB) {[string]::Format("{0:0.00} MB", $size / 1MB)}
        ElseIf ($size -gt 1KB) {[string]::Format("{0:0.00} kB", $size / 1KB)}
        ElseIf ($size -gt 0) {[string]::Format("{0:0.00} B", $size)}
        Else {""}
}

[string]$tmpGlobalLOG = ""
[string]$psSystemDate = Get-Date

createFolder $psBackupLOG $psDateFolder
$tmpGlobalLOG = "Start: $psSystemDate Files:" + $psFolderList.Name.Count  >> $psBackupLOG\log.txt

if($psOperationMode -eq 0) {
    & $ps7zip a -t7z -ssw -mx9 -r0 $psBackupFolder$psDateFolder.7z $psSourceFolder >> $psBackupLOG$psDateFolder\$psDateFolder.txt
    $tmpFileSize = Format-FileSize (Get-ChildItem "$psBackupFolder$psDateFolder.7z" -Recurse -File | Measure-Object -Property Length -Sum).sum
}

for($i = 0; $i -lt $psFolderList.Name.Count; $i++) {
    if($psFolderList.Name -is [array]) { $tmpFileName = $psFolderList.Name[$i] } else { $tmpFileName = $psFolderList.Name }

    if($psOperationMode -eq 1) {
        createFolder $psBackupFolder $psDateFolder
        & $ps7zip a -t7z -ssw -mx9 -r0 $psBackupFolder$psDateFolder\$tmpFileName.7z $psSourceFolder$tmpFileName >> $psBackupLOG$psDateFolder\$psDateFolder.txt
    }

    $psSystemDate = Get-Date
    $tmpNum = $i + 1
    $tmpGlobalLOG = "    №$tmpNum $tmpFileName    $psSystemDate"  >> $psBackupLOG\log.txt
    $tmpHTMLList += "<li>" + $tmpFileName + "</li>"
}

$psSystemDate = Get-Date
if($psOperationMode -eq 0) {
    $tmpGlobalLOG = "End: $psSystemDate File: $tmpFile Size: $tmpFileSize"  >> $psBackupLOG\log.txt
} elseif($psOperationMode -eq 1) {
    $tmpFileSize = Format-FileSize (Get-ChildItem "$psBackupFolder$psDateFolder" -Recurse -File | Measure-Object -Property Length -Sum).sum
    $tmpGlobalLOG = "End: $psSystemDate File: $tmpFile Size: $tmpFileSize"  >> $psBackupLOG\log.txt
}

$tmpGlobalLOG = " "  >> $psBackupLOG\log.txt

SendMail $psSMTPServer $psSMTPPort $psSMTPUser $psSMTPPass $psMailFrom $psMailTO $tmpHTMLList
removeFolder $psBackupFolder $psDays
Remove-Variable -Name * -Force -ErrorAction SilentlyContinue
Данная функция отправляет почтовое уведомление администратору (SendMail $psSMTPServer $psSMTPPort $psSMTPUser $psSMTPPass $psMailFrom $psMailTO $tmpHTMLList)
Отправка письма
function SendMail { # Отправка письма
    param(
        [Parameter (Mandatory=$true, Position=1)] [string]$SMTPServer,
        [Parameter (Mandatory=$true, Position=2)] [int32]$SMTPPort,
        [Parameter (Mandatory=$true, Position=3)] [string]$SMTPUser,
        [Parameter (Mandatory=$true, Position=4)] [string]$SMTPPass,
        [Parameter (Mandatory=$true, Position=5)] [string]$MailFrom,
        [Parameter (Mandatory=$true, Position=6)] [string]$MailTO,
        [Parameter (Mandatory=$true, Position=7)] [string]$content
    )

    $MailSubject = "Резервное копирование $psDateFolder" # Тема
    $MailTitle = "<p>Резервное копирование директории $psSourceFolder</p><p>Архив $psBackupFolder</p><p>Лог $psBackupLOG</p><hr>"
    $Maillist = "<ul>$content</ul>"

    $mes = New-Object System.Net.Mail.MailMessage
    $mes.From = $MailFrom
    $mes.To.Add($MailTO)
    $mes.Subject = $MailSubject
    $mes.IsBodyHTML = $true
    $mes.Body = $MailTitle + ' ' + $Maillist

    $SMTP = New-Object Net.Mail.SmtpClient($SMTPServer, $SMTPPort)
    $SMTP.EnableSSL = $true
    $SMTP.Credentials = New-Object System.Net.NetworkCredential($SMTPUser, $SMTPPass);
    $SMTP.Send($mes)
}
Итак предлагаю рассмотреть скрипт powershell для резервного копирования файловых данных целиком
Полный листинг скрипта для резервного копирования
# ========== Глобальные настройки скрипта ==========
# Режим укладки архивов
#[int32]$psOperationMode = 0 # Укладываем всё в один архив
[int32]$psOperationMode = 1 # Укладываем каждую директорию в свой архив
# Консоль архиватор 7zip
[string]$ps7zip = "C:\Program Files\7-Zip\7z.exe"
# Настройки почты
[string]$psSMTPServer = "smpt.mail.ru" # SMTP сервер
[int32]$psSMTPPort = 587 # Порт
[string]$psSMTPUser = "LOGIN" # Логин
[string]$psSMTPPass = "PASSWORD" # Пароль
[string]$psMailFrom = "backup@3dlan.ru" # Отправитель
[string]$psMailTO = "administrator@3dlan.ru" # Получатель
# Настройки папок
[string]$psDays = "-90" # Глубина архива в днях
[string]$psBackupFolder = "D:\ps_backup\backup\" # Складываем архив
[string]$psSourceFolder = "D:\server\users\" # Исходная директория подлежащая архивированию
[string]$psBackupLOG = "D:\ps_backup\log\" # ЛОГ
# ====================================================
[string]$psDateFolder = Get-Date -DisplayHint Date -Format d.MM.yyyy # Получаем текущую дату в формате 01.12.1999
$psFolderList = Get-ChildItem -Path $psSourceFolder # Список суб папок и фалов из папки источника
function SendMail { # Отправка письма
param(
[Parameter (Mandatory=$true, Position=1)] [string]$SMTPServer,
[Parameter (Mandatory=$true, Position=2)] [int32]$SMTPPort,
[Parameter (Mandatory=$true, Position=3)] [string]$SMTPUser,
[Parameter (Mandatory=$true, Position=4)] [string]$SMTPPass,
[Parameter (Mandatory=$true, Position=5)] [string]$MailFrom,
[Parameter (Mandatory=$true, Position=6)] [string]$MailTO,
[Parameter (Mandatory=$true, Position=7)] [string]$content
)
$MailSubject = "Резервное копирование $psDateFolder" # Тема
$MailTitle = "<p>Резервное копирование директории $psSourceFolder</p><p>Архив $psBackupFolder</p><p>Лог $psBackupLOG</p><hr>"
$Maillist = "<ul>$content</ul>"
$mes = New-Object System.Net.Mail.MailMessage
$mes.From = $MailFrom
$mes.To.Add($MailTO)
$mes.Subject = $MailSubject
$mes.IsBodyHTML = $true
$mes.Body = $MailTitle + ' ' + $Maillist
$SMTP = New-Object Net.Mail.SmtpClient($SMTPServer, $SMTPPort)
$SMTP.EnableSSL = $true
$SMTP.Credentials = New-Object System.Net.NetworkCredential($SMTPUser, $SMTPPass);
$SMTP.Send($mes)
}
function createFolder { # Создём новый каталог
param(
[Parameter (Mandatory=$true, Position=1)] [string]$backupFolder,
[Parameter (Mandatory=$true, Position=2)] [string]$newFolder
)
if(!(Test-Path $backupFolder$newFolder)) {
New-Item -Path $backupFolder -Name $newFolder -ItemType directory
}
}
function removeFolder { # Удаляем старый архив
param(
[Parameter (Mandatory=$true, Position=1)] [string]$backupFolder,
[Parameter (Mandatory=$true, Position=2)] [string]$backupDays
)
$removeDateFolder = (Get-date).AddDays($backupDays)
# Удаляем старые файлы превышающие $psDays дней
Get-ChildItem -Path $backupFolder | `
Where-Object { $_.LastWriteTime -lt $removeDateFolder } | `
Remove-Item -Recurse
}
Function Format-FileSize() {
Param ([int64]$size)
If ($size -gt 1TB) {[string]::Format("{0:0.00} TB", $size / 1TB)}
ElseIf ($size -gt 1GB) {[string]::Format("{0:0.00} GB", $size / 1GB)}
ElseIf ($size -gt 1MB) {[string]::Format("{0:0.00} MB", $size / 1MB)}
ElseIf ($size -gt 1KB) {[string]::Format("{0:0.00} kB", $size / 1KB)}
ElseIf ($size -gt 0) {[string]::Format("{0:0.00} B", $size)}
Else {""}
}
[string]$tmpGlobalLOG = ""
[string]$psSystemDate = Get-Date
createFolder $psBackupLOG $psDateFolder
$tmpGlobalLOG = "Start: $psSystemDate Files:" + $psFolderList.Name.Count >> $psBackupLOG\log.txt
if($psOperationMode -eq 0) {
& $ps7zip a -t7z -ssw -mx9 -r0 $psBackupFolder$psDateFolder.7z $psSourceFolder >> $psBackupLOG$psDateFolder\$psDateFolder.txt
$tmpFileSize = Format-FileSize (Get-ChildItem "$psBackupFolder$psDateFolder.7z" -Recurse -File | Measure-Object -Property Length -Sum).sum
}
for($i = 0; $i -lt $psFolderList.Name.Count; $i++) {
if($psFolderList.Name -is [array]) { $tmpFileName = $psFolderList.Name[$i] } else { $tmpFileName = $psFolderList.Name }
if($psOperationMode -eq 1) {
createFolder $psBackupFolder $psDateFolder
& $ps7zip a -t7z -ssw -mx9 -r0 $psBackupFolder$psDateFolder\$tmpFileName.7z $psSourceFolder$tmpFileName >> $psBackupLOG$psDateFolder\$psDateFolder.txt
}
$psSystemDate = Get-Date
$tmpNum = $i + 1
$tmpGlobalLOG = " №$tmpNum $tmpFileName $psSystemDate" >> $psBackupLOG\log.txt
$tmpHTMLList += "<li>" + $tmpFileName + "</li>"
}
$psSystemDate = Get-Date
if($psOperationMode -eq 0) {
$tmpGlobalLOG = "End: $psSystemDate File: $tmpFile Size: $tmpFileSize" >> $psBackupLOG\log.txt
} elseif($psOperationMode -eq 1) {
$tmpFileSize = Format-FileSize (Get-ChildItem "$psBackupFolder$psDateFolder" -Recurse -File | Measure-Object -Property Length -Sum).sum
$tmpGlobalLOG = "End: $psSystemDate File: $tmpFile Size: $tmpFileSize" >> $psBackupLOG\log.txt
}
$tmpGlobalLOG = " " >> $psBackupLOG\log.txt
SendMail $psSMTPServer $psSMTPPort $psSMTPUser $psSMTPPass $psMailFrom $psMailTO $tmpHTMLList
removeFolder $psBackupFolder $psDays
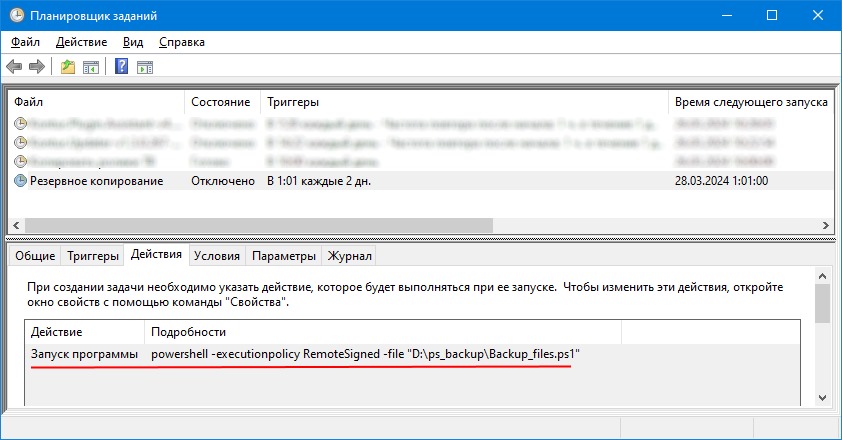
Remove-Variable -Name * -Force -ErrorAction SilentlyContinueТеперь осталось создать задание в планировщике задач
Introduction
The ESD file is a new thing within Windows 10 OS, that Microsoft is pushing out. ESD (Electronic Software Download) files used when installing software upgrades, they are not to be opened manually (unless you’re converting them). Instead, Windows uses them internally during the update process. The problem is that a lot of users using WDS to push out their images. Install.esd and install.wim are archives containing compressed operating system files, and they can include several Windows editions (Professional, Education, Enterprise etc.). During the installation of Windows, all files are unpacked from the install.wim / esd image to the system drive of the computer. Microsoft distributes the last upgrades of Windows 10 builds in the install.esd format. In addition, recently in all distributions of Windows 8.1, Windows 10, instead of the install.wim file, install.esd is located.
1 – Open your File Explorer, Go to Windows 10 ISO image then Go to Sources, find install.esd

2 – Open PowerShell as Administrator

3 – Each edition of the OS is stored in the file install.esd and has assigned a serial number – an index (index 1, 2, 3, 4 etc), which can be viewed using the DISM tool. You can get information about your ESD file using the following command:
dism /Get-WimInfo /WimFile:D:\sources\install.esd


4 – Note Index: for the version you want to use:
Eg: Number is 8
Index: 8
Name: Windows 10 Education
Description: Windows 10 Pro
Size : 16,001,108,691 bytes

5 – Find index number that you need (we are choosing Index 8 because it is a Windows 10 Pro version).

6 – Convert to WIM, But be sure to use the correct Source Index number
dism /export-image /SourceImageFile:D:\sources\install.esd /SourceIndex:8 /DestinationImageFile:c:\install.wim /Compress:max /CheckIntegrity


7 – Image exporting is started and this process can take a long time. once ESD conversion is completed, you can copy your new WIM image file and then go to Windows 10 original folder, then to Sources and replace install.esd file.


Good luck! Just give it try – I’m sure you’ll love it as well. If you have any comments or questions on feel free to contact me.
That’s all for now. 🙂
Over the last month or two I have been looking into a way to automate different kinds of backups, including RavenDB, SQL Server and files backups such as IIS logs. Originally I was backing up RavenDB using a batch file but decided to change this and instead use Windows PowerShell, a command and scripting language from Microsoft. The goal was to create a suite of PowerShell reusable scripts which can be run on any server to backup RavenDB, and then move the backup files to a centralized location.
RavenDB is a document-oriented database build from the ground up on the .NET platform.
I had no previous knowledge of PowerShell before I embarked on this project. This article focuses on how I went about it, the tools I have come across and hopefully show just how easy it can be to get up and running with PowerShell. I’ll cover the basics in this article and leave you with something hopefully you can look at, learn from and then go off, and create your own set of reusable PowerShell scripts.
We will discuss some theory behind the scripts shown in this article using which you should be able to apply what you’ll learn to other areas just as easily.
This article is published from the DotNetCurry .NET Magazine – A Free High Quality Digital Magazine for .NET professionals published once every two months. Subscribe to this eMagazine for Free and get access to hundreds of free tutorials from experts
Why Powershell?
Why would you want to learn PowerShell you may ask? Well it’s always good to learn a new skill. PowerShell is more than just a scripting language, and you can do a number of things quickly which ultimately improves the productivity of administrators and power users alike. For eg: using Powershell script, you can check all the certificate’s expiry dates on servers or how much disk space is available on your servers or simplify the management of data stores using its provider model, and so on.
Powershell works with Windows commands and applications, and it has been designed to leverage what you already know, making it easier for you to learn it.
Editorial Note: For those interested, you may also want to read Using PowerShell in SharePoint 2013 for a good introduction to Powershell by Praveen and how to use Powershell in SharePoint 2013.
PowerShell 101
Make sure PowerShell is installed on your machine. Go to the PowerShell page at www.microsoft.com/powershell and click on the download link to install it. To get started with Powershell, there are 2 ways to write your scripts. On my windows machine, I click Start and then type PowerShell, in the list I can see the following:-

- Windows Powershell is a PowerShell command prompt, think of this as a command prompt on steroids.
- Windows PowerShell ISE is the PowerShell Integrated Scripting Environment. This environment will allow you to debug scripts that you write. This is the option I tend to start off with, so I can get Intellisense and use the documentation help, when writing my scripts. You should choose this option, especially if you’re a beginner like I was. I always run the ISE (integrated Scripting Environment) as an Administrator and you can do this by right clicking on the menu option above and select run as Administrator.
From here onwards, I will be using the Windows PowerShell ISE and running as an Administrator. You can tell your running as an Administrator if you look at the top left hand side of the bar as shown here. It displays “Administrator: Windows PowerShell ISE”.

On the right hand side, we can see a list of available commands we can use. On the left hand side at the top, we have the script pane where we will write our script and debug them and the bottom pane is a PowerShell window where we can see our output, as well as execute commands, if we want to.
I tend to close the right hand side as it gives me a little more screen estate to work with. Using the PowerShell ISE, we can set breakpoints and step through our scripts, just like you would in Visual Studio when debugging some C# code.
Let’s Get Scripting
Ok let’s dive right in and write our first script. This script will show how to backup a local instance of a RavenDB test database. No real knowledge of RavenDB is required for this, and the reason for this is that to backup RavenDB, we run a program called Smuggler – which is an exe that we run to do the job.
From the RavenDB help, we can Export our data using this command:-
Raven.Smuggler out http://localhost:8080 NorthWind.dump.raven
Basically what we have done here is run Raven.Smuggler.exe using the out parameter, passing it the url for our RavenDB instance and also supplying a filename to export to. This command will export all indexes, documents and attachments from the local RavenDB instance to a file named NorthWind.dump.raven.
We will create a function just like we would in C# . Our script will initially look like the following:

We have a very simple function declaration with a comment at the top informing us of what the function will do. This simple function will just backup the Employees database I have running on my local instance of RavenDB on my PC. To execute the function, we call it on line 21 as Backup-RavenbDB.
We can add breakpoints and debug this function in the same manner as you would in Visual Studio — highlight a line, press F9 to add a break point and then to call and step through the function, here is what to do:-
- Highlight the entire function (lines 5-18) and then click on the icon to the right of the green play button (green icon with white background) – this is the run selection button.
- Let’s add a break point to line 8. Put the cursor on line 8 and hit F9, this will add our breakpoint and the entire line will be highlighted in brown.
- Now to debug our function, click on the function call on line 21 and then press F5 (Run/Continue). You’ll now see line 8 with the breakpoint being hit and we can now step through the code by pressing F10. (You can also use the Debug menu if you wish)
Below we can see the script debugging in action. Line 8 has our breakpoint and the debugging of our script has begun:-

Points of Interest
& is the way to run a command (like execute an exe), so this is the same as writing the following:-
powershell.exe $ravenSmugglerEXE out $ravenUrl $BackupFilename
Parameters in powershell start with the dollar sign $, so we are storing the URL to Raven in the variable $ravenURL
File Backups
Another example of using PowerShell scripts would be backing up files in a folder. Let’s assume we are running IIS and our websites is logging to a specific folder, which we want to back up. To accomplish this is very easy using PowerShell, so let’s take a look at how we can go about this.
The complete function is listed below:-
function Backup-IISLogs() {
Param(
# Source location folder for logs we wish to backup
[parameter(Mandatory = $true)]
[ValidateNotNullOrEmpty()]
[string]$IISLogsDir
)
# This function will backup IIS log Files
# Import the Powershell Community Extensions add-on for (using Write-Zip cmdLet)
# can be downloaded from here:- http://pscx.codeplex.com/
Import-Module PSCX
# Name our zip file
$zipFileName = "IIS_LOGS_$(Get-Date -f yyyy-MM-dd)" + '.zip'
# Email settings
$sendEmailSMPTServer = 'my.mail.server.com'
$sendEmailFrom = 'logbackups@gregorsuttie.com'
$sendEmailTo = 'gregor@gregosuttie.com'
$subjectSuccess = 'IIS logs backed up successfully'
$bodySuccess = 'The IIS logs were backed up successfully'
$subjectFailure = 'IIS logs failed to backup'
$bodyFailure = 'The IIS logs failed to backup'
try
{
# Sets the current working location to the specified location
Set-Location $IISLogsDir
# Loop through all the files (not folders) in the folder and add them to a zip file
Invoke-Command -ScriptBlock { Get-ChildItem $IISLogsDir -Recurse -File | where-object { -not ($_.psiscontainer)} |
Write-Zip -OutputPath $zipFileName
} -ArgumentList $zipFileName
# Check for errors
if ($?)
{
# Send an email with success message
Send-Mail -smtpServer $sendEmailSMPTServer -from $sendEmailFrom -to $sendEmailTo -subject $subjectSuccess -body $bodySuccess
}
else
{
# Send an email with failure message
Send-Mail -smtpServer $sendEmailSMPTServer -from $sendEmailFrom -to $sendEmailTo -subject $subjectFailure -body $bodyFailure
}
}
# Catch exceptions
catch {
Write-Host "System.Exception on:- $(Get-date) - $($Error[0].Exception.Message)"
}
finally
{
Write-Host "Backup-IISLogs finished at:- $(Get-date)"
}
}
#region Send-Mail
function Send-Mail{
param($smtpServer,$from,$to,$subject,$body)
$smtp = new-object system.net.mail.smtpClient($SmtpServer)
$mail = new-object System.Net.Mail.MailMessage
$mail.from = $from
$mail.to.add($to)
$mail.subject = $subject
$mail.body = $body
$smtp.send($mail)
}
#endregion
# Test our function using  a supplied directory
$sourceDir = 'C:\inetpub\logs\logfiles'
Backup-IISLogs $sourceDir
In the script we just saw, we start off with one parameter called $IISLogsDir. We have marked the parameter as mandatory and we have validation to make sure the parameter cannot be Null or Empty by using:
ValidateNotNullOrEmpty.
Param(
# Source location folder for logs we wish to backup
[parameter(Mandatory = $true)]
[ValidateNotNullOrEmpty()]
[string]$IISLogsDir
)
The next thing we do in the script is to import a module – this is a pre-written PowerShell module written by the PowerShell Community and has a lot of great content.
Import-Module PSCX
To read more on the PowerShell Community Extensions, head over to http://pscx.codeplex.com. We are using the Write-Zip commandlet which yes, you guessed it right, creates a zip file.
Next we define some variables and then begin the real work. Notice we place the next part of code within a try-catch-finally block just like C# has.
try
{
…
}
# Catch exceptions
catch {
Write-Host «System.Exception on:- $(Get-date) — $($Error[0].Exception.Message)»
}
finally
{
Write-Host «Backup-IISLogs finished at:- $(Get-date)»
}
}
We invoke a command which isn’t strictly necessary but will still work and then check for any errors with the last line of code that executed. Lastly we send an email with a success or failure message. The script is basic but enough to give you something to look at and to whet your appetite.
function Send-Mail{
param($smtpServer,$from,$to,$subject,$body)
…
}
The screenshot here shows the output to the screen after I have run the function we created:-

We have run the script and we can see an error occurred due to the mail server setting being incorrect – change this to a real SMTP server and the script will run and backup our folder as a zip file and then email the success message.
Copying Files
Once we have our backups created, we may need to copy these to a backup server. To begin with, I looked into using the Background Intelligent Transfer Service also known as BITS http://en.wikipedia.org/wiki/Background_Intelligent_Transfer_Service. The reason for looking into this was to have the ability to copy files from the SQL Server to a centralized backup server and if the copying of the backup file was interrupted for any reason, then file transfer would resume, surviving a server reboot for example.
BITS is a windows service which runs on XP and later operating systems, so I had to have the service started initially and to if everything worked well without interruptions, files would be transferred using job. If the server was rebooted during transfer, they would resume after the server restarted. Great!
BITS worked well but I did run into some issues with permissions as a result of trying to copy files inside a PowerShell session. So I looked for a different option. A colleague suggested using Robocopy http://en.wikipedia.org/wiki/Robocopy instead and having seen many an example of PowerShell scripts refer to this tool, I looked into it a bit further.
Robocopy actually comes with Windows Vista and later operating systems, something I did not know and it turns out, is pretty awesome. If you need to transfer files, I recommend you look into this further. This tool also has the ability to copy files with a resume option similar to BITS and can copy files and folder structures with permissions applied to them. If you haven’t checked out Robocopy, then go to your command prompt and simply type:-
Robocopy /?
Copying files using RoboCopy it’s as simple as:-
RoboCopy c:\inetpub\logs\logFiles c:\backups *.log /Z
which is basically RoboCopy
It’s very simple to use this tool and there are a number of good reference websites out there covering how to use it.
And that pretty much sums up a good use case of PowerShell if you are getting started with it!
Help with PowerShell
If you’re new to PowerShell like I was until recently, then the best way to learn PowerShell is actually not to use Google – instead PowerShell has inbuilt help which is exceptionally useful. The best way to learn is to investigate further, so let’s have a look at how the help works and how to go about using it. But just before that, a quick bit of information which will make a lot more sense.
PowerShell uses something called commandlet’s and there are a huge number of them already written. As an example at the PowerShell prompt type:-
Get-Help *process*
This will list all of the commandlet’s which refer to processes. Commandlet’s are usually very well named and as you can see from the list below, you can guess what most of them do:-

We can then get help on each commandlet in the following manner —

Whilst using the in-built help, we also have some very helpful options, at the bottom of the help screen. It basically says the following:-
Remarks
To see examples, type “get-help Start-Process –examples”
For more information, type: “get-help Start-Process –detailed”
For Technical Information, type: “get-help Start-Process –full”
For Online help, type: “get-help Start-Process –online”
This information is available for every commandlet and even if you create your own, you can create the exact same level of help and support, very easily indeed.
This blog entry will show you how to go about this:-
http://blogs.technet.com/b/heyscriptingguy/archive/2010/01/07/hey-scripting-guy-january-7-2010.aspx
Where can I get some more help?
PowerShell has a huge number of good resources, some of which I have listed below. Just remember some of the articles cover different versions of PowerShell. I used PowerShell 3 in this article, PowerShell 4 is out and PowerShell 5 is due to be released very soon.
In my honest opinion, try to avoid using Google to search for PowerShell scripts, as you will learn far more experimenting within PowerShell itself, using the help, which is excellent. Here are some resources I referred to.
http://powershell.org – Resources, Q& A and more
http://poshcode.org – PowerShell Code Repository
http://blogs.technet.com/b/heyscriptingguy/ — Scripting Guy Blog
Summary
Due to the nature of the Noun-Verb naming of commandlets in PowerShell and once you’ve tried a couple of commandlets, you soon see how easy it is to do things with PowerShell.
If you have any old batch files running out in the wild, try writing a PowerShell script which you can replace the batch file with, and you’ll learn just how easy PowerShell is to pick up. The help within PowerShell is superb and very easy to use, it give you examples on every commandlet as well as full documentation on all of the switches and parameters. There are a number of great resources out there for learning more, and last but not least, learning PowerShell is fun and quite powerful. You can achieve quite a lot with very few lines of code.
PowerShell is fun, it’s always adding more and more, you can do a lot quickly and it’s worth learning, oh and it’s not something that will go away anytime soon, as far as I know the Azure Portal runs using PowerShell and you can download the scripts to create Virtual Machines and lots more so go check out PowerShell I think you’ll be pleasantly surprised.
This article has been editorially reviewed by Suprotim Agarwal.

C# and .NET have been around for a very long time, but their constant growth means there’s always more to learn.
We at DotNetCurry are very excited to announce The Absolutely Awesome Book on C# and .NET. This is a 500 pages concise technical eBook available in PDF, ePub (iPad), and Mobi (Kindle).
Organized around concepts, this Book aims to provide a concise, yet solid foundation in C# and .NET, covering C# 6.0, C# 7.0 and .NET Core, with chapters on the latest .NET Core 3.0, .NET Standard and C# 8.0 (final release) too. Use these concepts to deepen your existing knowledge of C# and .NET, to have a solid grasp of the latest in C# and .NET OR to crack your next .NET Interview.
Click here to Explore the Table of Contents or Download Sample Chapters!
Gregor Suttie is a developer who has been working on mostly Microsoft technologies for the past 14 years, he is 35 and from near Glasgow, Scotland. You can Follow him on twitter @gsuttie and read his articles at bit.ly/z8oUjM
Потребовалось на повершеле написать скрипт резервного копирования файлов которые сделаны сегодня и вчера.
Для копирования есть функция — Copy-Item
Copy-Item "Что-то" -Destination "Куда-то" -forceВместо «куда-то» можно использовать переменную с папкой, например:
$path_new = "F:\backup\" #папка в которую копируем
$path = "\\FileServer\backup\" # папка из которой копируют, лежит на файл сервере
тогда скрипт будет как-то так:
Copy-Item "Что-то" -Destination $path_new -force #Копируем что-то в папку $path_newнапример, всё содержимое папки $path в папку $path_new
Copy-Item $path -Destination $path_new -force #Копируем всё содержимое папки $path в папку $path_new«Что-то» это файлы в определенной папке, созданные вчера. То есть файлы у которых дата создания отличается от сегодня на один день.
Определим дату с которой мы будем считать файлы
$date = (Get-Date).AddDays(-1) #определение в переменную даты минус сколько-то от текущей, в наем случае минус 1Теперь получим список всех файлов, в папке дата и время которых больше вчерашней даты.
есть особенность, что до версии powershell3, нужно писать так
$file_copy = Get-ChildItem -Path $path | Where-Object {$_.CreationTime -gT $date2} #определяем все файлы которые нужно скопировать
После версии powershell3, нужно писать так
$file_copy = Get-ChildItem -Path $path | Where-Object -Property CreationTime -gT $date #определяем все файлы которые нужно скопироватьУ меня установлена старая версия, поэтому я пишу скрипт по-старому
Get-ChildItem -Path $path | Where-Object {$_.CreationTime -gT $date} | Copy-Item -Destination $path_new -force #Копируем все файлы которые старше даты и времени $date из папки $path в папку $path_newЕще не хватает записи логов, чтобы понимать что и когда копировалось.
В статье «Используем лог-файлы в скриптах powershell» приводится скрипт который можно использовать:
$Logfile = $path_new+"log.txt" # определяем где лог-файл

function WriteLog                #функиця записи в лог-файл
{
Param ([string]$LogString)
$Stamp = (Get-Date).toString("yyyy/MM/dd HH:mm:ss")
$LogMessage = "$Stamp $LogString"
Add-content $LogFile -value $LogMessage
}
Функция WriteLog — дописывает лог-файл, тем что в нее передали, например список файлов.
Соберем скрипт полностью:
$path_new = "F:\backup\" #папка в которую копируем

$Logfile = $path_new+"log.txt" # определяем где лог-файл
function WriteLog                #функиця записи в лог-файл
{
Param ([string]$LogString)

$Stamp = (Get-Date).toString("yyyy/MM/dd HH:mm:ss")
$LogMessage = "$Stamp $LogString"
Add-content $LogFile -value $LogMessage
}

$path = "\\FileServer\backup\" # папка из которой копируют
WriteLog "$path копирование начато"
$date = (Get-Date).AddDays(-1) #определение в переменную даты минус сколько-то от текущей
$file_copy = Get-ChildItem -Path $path | Where-Object {$_.CreationTime -gT $date} #определяем список файлов, для копирования и записи в лог-файл
WriteLog "$file_copy"
Get-ChildItem -Path $path | Where-Object {$_.CreationTime -gT $date} | Copy-Item -Destination $path_new -force #копирование файлов с текущей датой и временем старше -1
WriteLog "$path копирование закончено"
По логу можно посмотреть дату и время начала каждой операции. Это полезно, если скрипт запускается по расписанию.