
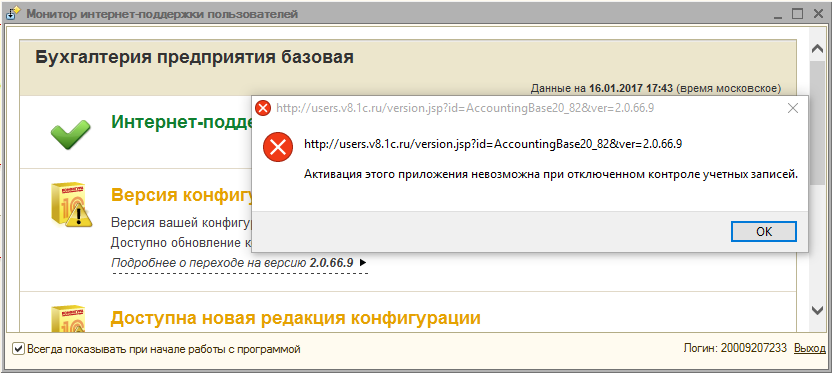
Достаточно часто наши клиеты сталкиваются с проблемой запуска приложений в Windows 10 из-за отключенного контроля учетных записей. После обновления системы до Windows 10 невозможно открыть браузер Microsoft Edge. Возникают проблемы с активацией приложений: система выдает сообщение «Активация этого приложения невозможна при отключенном контроле учетных записей».
Компонент операционной системы «Контроль учётных записей пользователей» запрашивает подтверждение действий программы, требующих прав администратора, в целях защиты от несанкционированного использования компьютера. Окно с запросом появляется на рабочем столе, чтобы предотвратить «нажатие» кнопки разрешения самой программой. Запросы выдаются при попытке изменения системного времени, установки программ, редактирования реестра, изменения меню…
Как включить контроль учетных записей?
Один из способов включения контроля учетных записей – через Панель управления.
Правой кнопкой по меню Пуск ->Панель Управления ->Учетные Записи ->Изменить параметры контроля учетных записей.


При этом не всегда получается изменить контроль, при изменении уровня контроля и нажатия «ОК», выбор не сохраняется и остается на «Никогда не уведомлять».
Есть другой способ включения контроля учетных записей
Правой кнопкой по меню Пуск ->Выполнить.
В строке «Открыть» вводим secpol.msc, кнопка «ОК».
Выбираем Локальные политики -> Параметры безопасности.
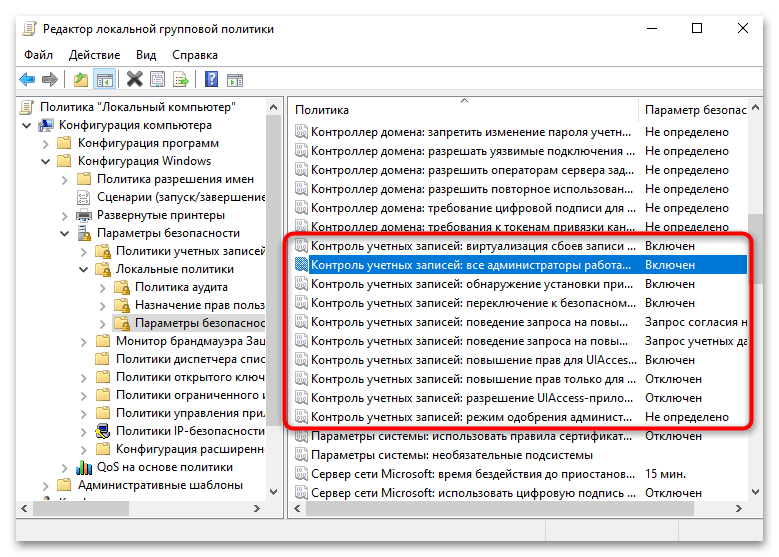
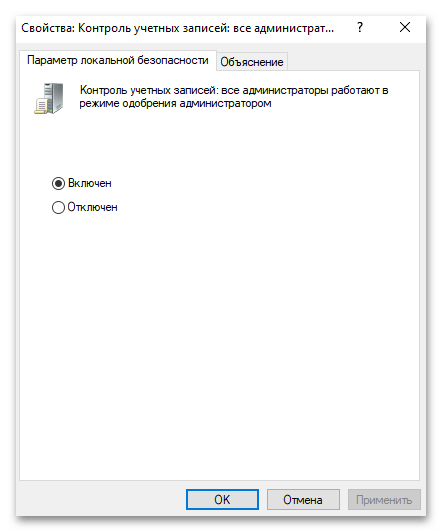
Находим в правой части среди списка «Контроль учетных записей: все администраторы работают в режиме одобрения администратором». Кликаем на эту запись.
Выбираем — Включён. «ОК».
Перезагружаем компьютер.


Все способы:
- Способ 1: Настройка в «Панели управления»
- Способ 2: Редактирование реестра
- Способ 3: Использование консольной команды
- Способ 4: Управление локальной групповой политикой
- Способ 5: Использование Winaero Tweaker
- Вопросы и ответы: 0
Способ 1: Настройка в «Панели управления»
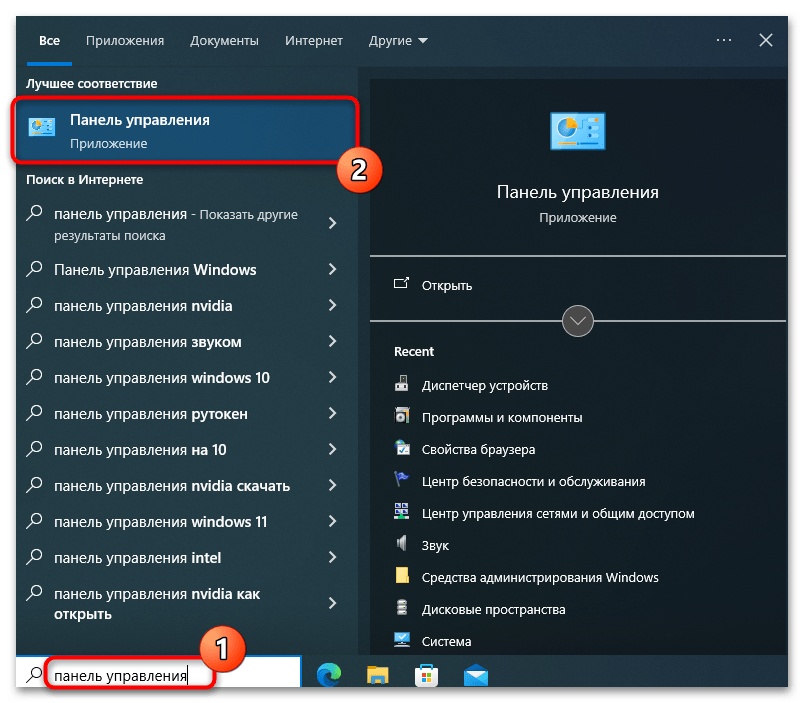
Самый простой метод активации контроля учетных записей в Windows 10, который будет актуален для большинства пользователей, — поиск нужной настройки в «Панели управления». Предстоит воспользоваться только одним параметром, установив его в нужное значение. После перезагрузки компьютера контроль учетных записей будет включен и эта функция станет активно работать, позволяя реализовать задуманное.
- Откройте «Пуск», отыщите «Панель управления» и нажмите по найденному соответствию, чтобы перейти к новому окну.
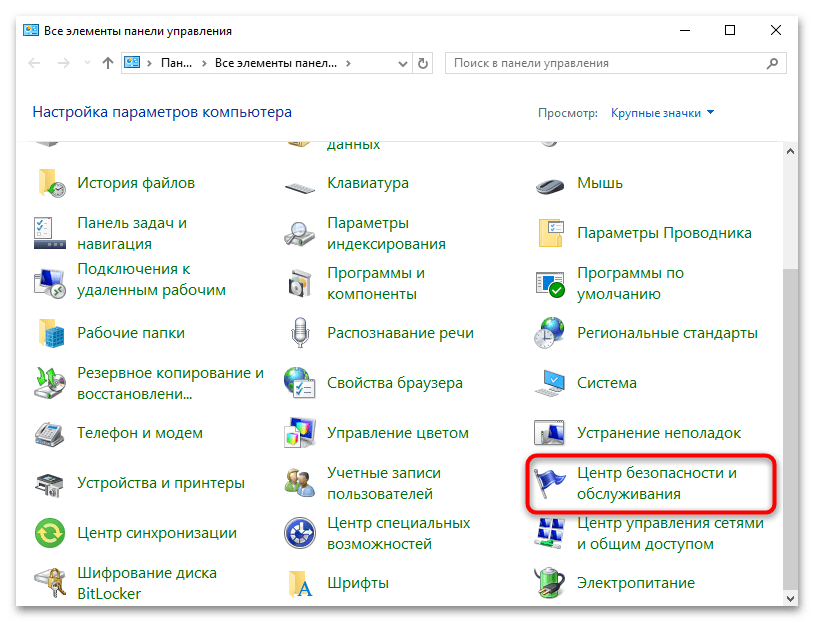
- В нем в режиме просмотра значков отыщите «Центр безопасности и обслуживания», затем дважды кликните по надписи.
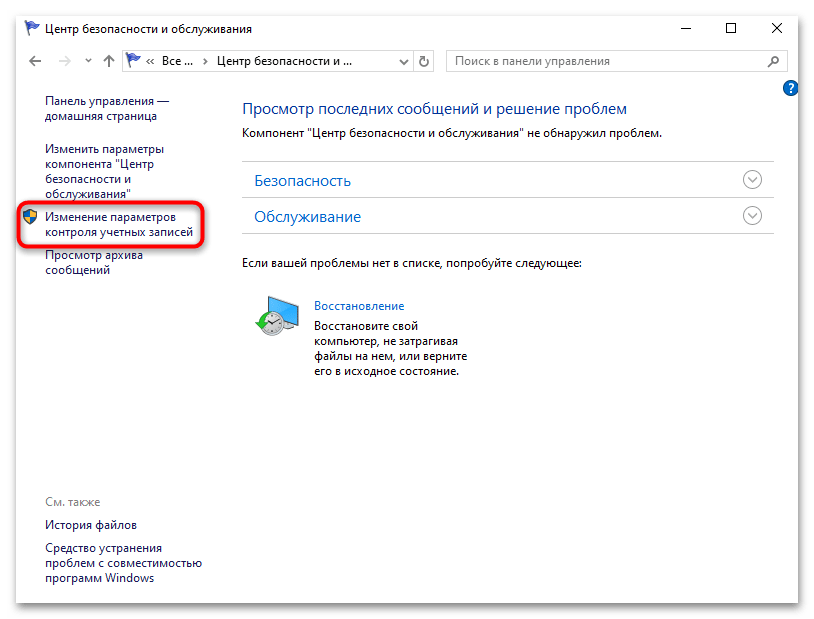
- В этом разделе с настройками интересует ссылка «Изменение параметров контроля учетных записей», которая находится слева.
- Она переносит вас в окно с соответствующими настройками, где один-единственный ползунок следует передвинуть вверх для включения контроля учетных записей. Обязательно нажмите «ОК».
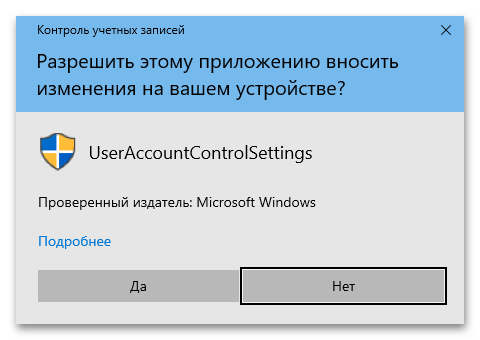
- Подтвердите это действие в появившемся окне контроля учетных записей, если такое будет, и перезагрузите операционную систему, чтобы все изменения вступили в силу.
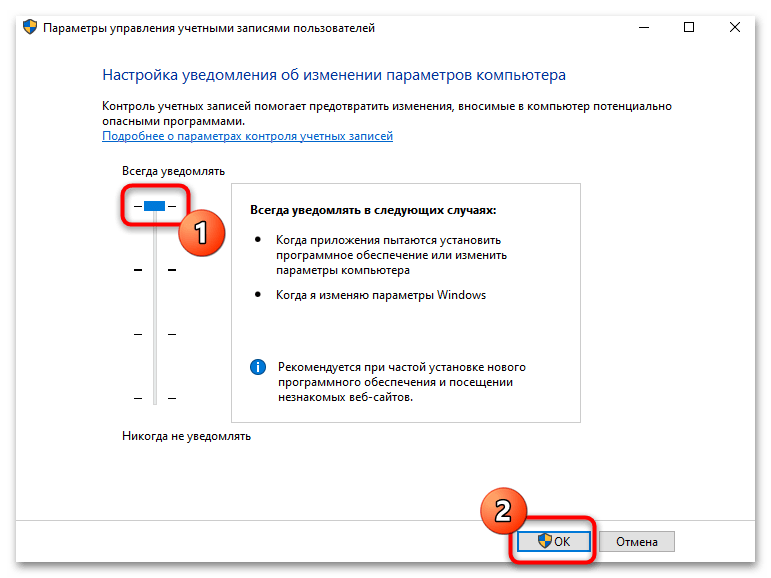
Вы можете заметить, что упомянутый переключатель имеет несколько значений. Каждое из них устанавливает свой уровень контроля учетных записей, а справа появляется справка об уведомлениях при изменениях. Можете проверить несколько режимов работы, чтобы решить, какой из них подходит вам больше всего.
Способ 2: Редактирование реестра
Некоторые пользователи сталкиваются с ситуацией, когда после перезагрузки компьютера функция контроля учетных записей сбрасывается и снова становится отключенной. Чаще всего это связано с тем, что настройка в графическом интерфейсе по каким-то причинам не влияет на параметр в реестре, который и отвечает за UAC. Тогда его понадобится проверить вручную и установить нужное для включения значение.
- Через «Пуск» отыщите «Редактор реестра» и запустите данное классическое приложение.
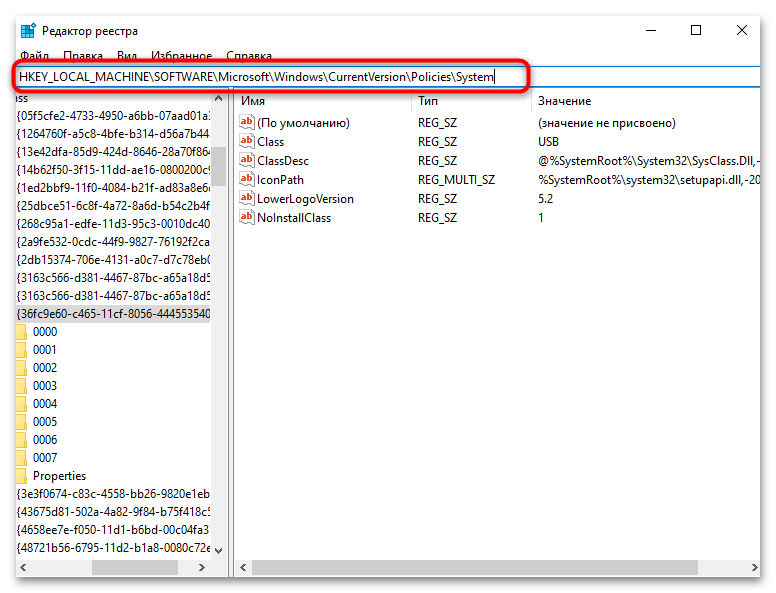
- Вверху вставьте адрес
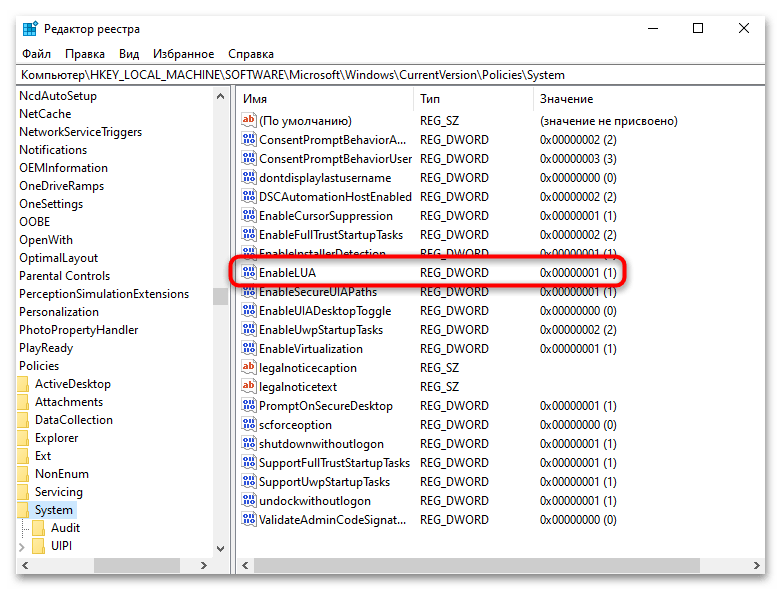
HKEY_LOCAL_MACHINE\SOFTWARE\Microsoft\Windows\CurrentVersion\Policies\Systemи перейдите по нему, нажав по клавише Enter. - Справа отыщите параметр с названием «EnableLUA» и нажмите по нему дважды для открытия окна редактирования свойств.
- Установите значение «1», подтвердите изменения и обязательно перезагрузите ПК, поскольку изменения вступают в силу только в новом сеансе.

Способ 3: Использование консольной команды
Такого же результата, который был показан в предыдущем методе, можно добиться немного другим путем. Он подразумевает использование «PowerShell» и ввод команды, которая создаст новый параметр для UAC или отредактирует значение уже существующего, чтобы контроль учетных записей перешел в активное состояние. Весь процесс реализации данного метода выглядит следующим образом:
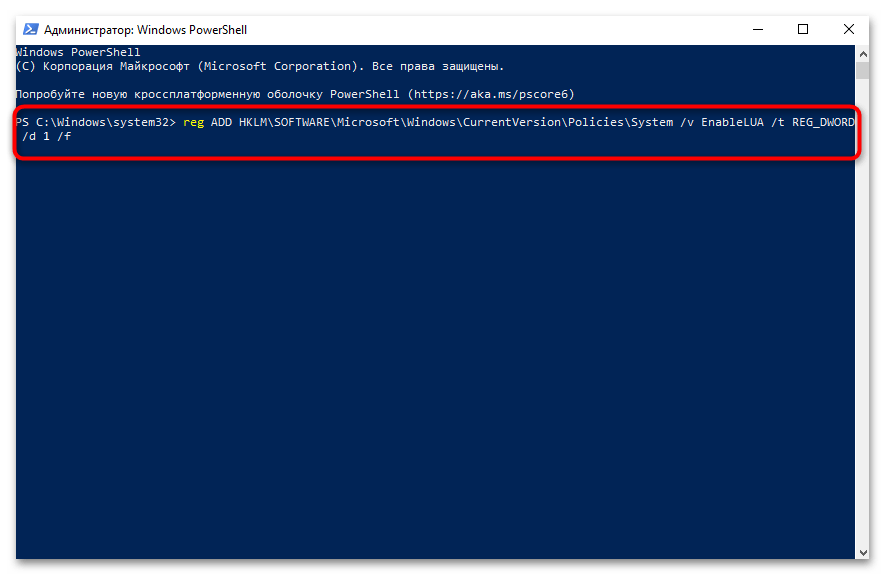
- Щелкните правой кнопкой мыши по «Пуску» и из появившегося контекстного меню выберите пункт «Windows PowerShell (администратор)».
- Вставьте команду
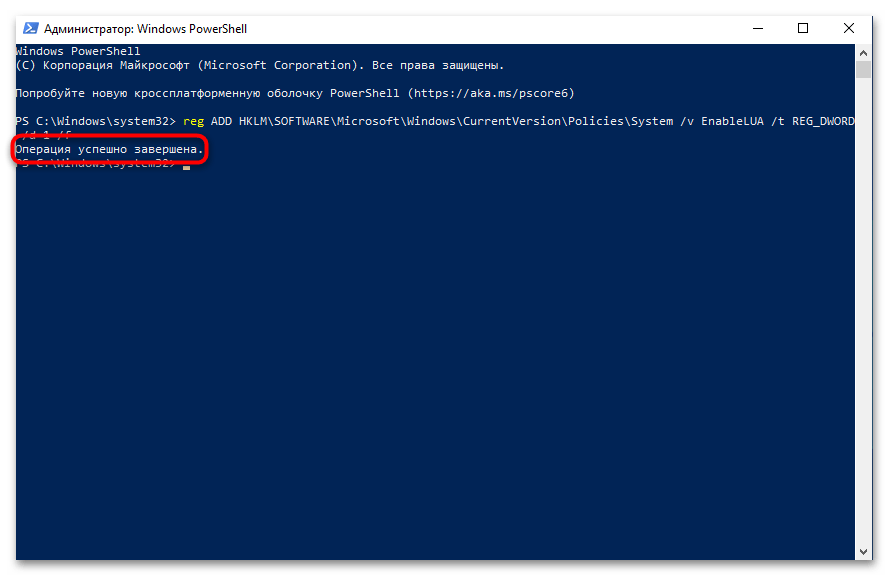
reg ADD HKLM\SOFTWARE\Microsoft\Windows\CurrentVersion\Policies\System /v EnableLUA /t REG_DWORD /d 1 /fи нажмите Enter для ее применения. - Вы должны увидеть уведомление «Операция успешно завершена». Это значит, что Windows 10 можно перезагружать и смотреть, удалось ли достичь поставленной задачи.
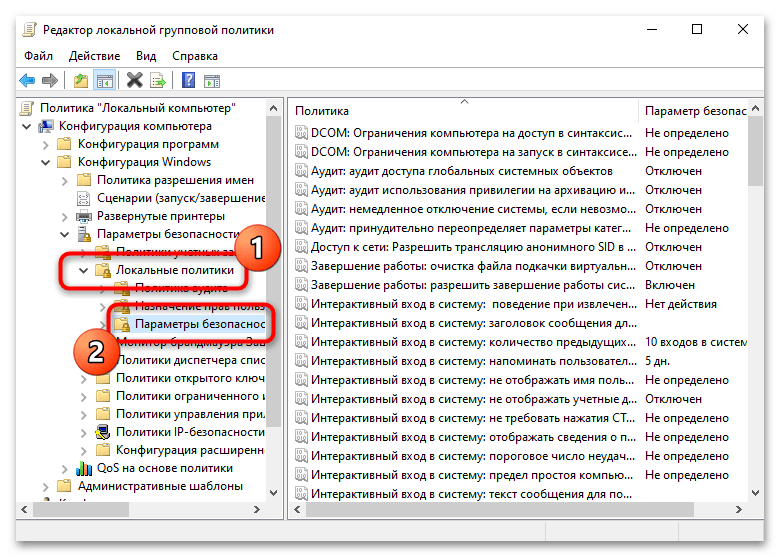
Способ 4: Управление локальной групповой политикой
Следующий метод подойдет только обладателям Windows 10 Pro, поскольку в Home «Редактор локальной групповой политики», необходимый для внесения изменений, попросту отсутствует и не может быть установлен. В нем находится несколько политик, значения которых нас интересуют, если речь идет об активации UAC. Каждую из них можно проверить вручную и решить, какую включить, а какую оставить в отключенном состоянии.
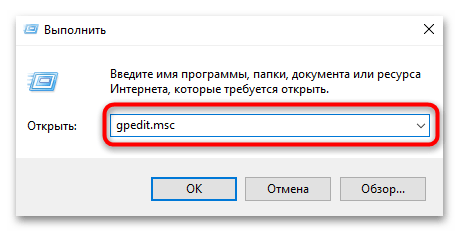
- Через контекстное меню «Пуска» вызовите утилиту «Выполнить». Если удобно, вместо этого можно использовать стандартную горячую клавишу Win + R.
- В окне утилиты введите команду
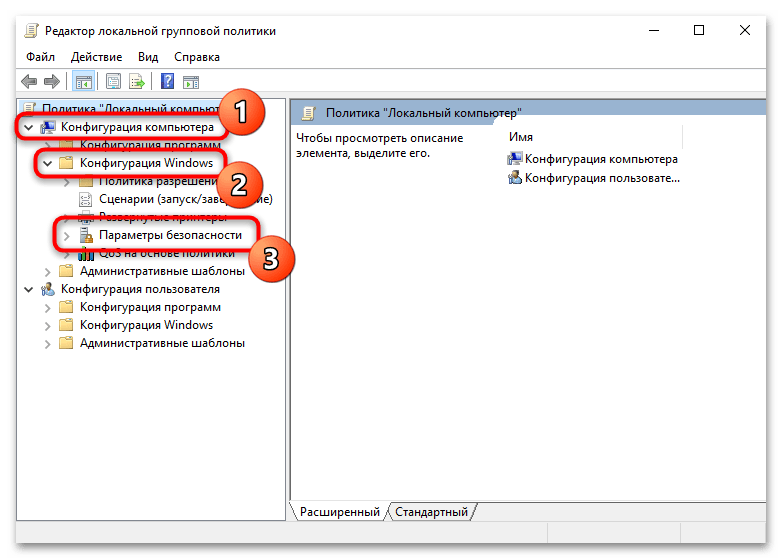
gpedit.mscи нажмите Enter, чтобы открыть «Редактор локальной групповой политики». - Разверните ветку «Конфигурация компьютера», затем выберите «Конфигурация Windows» > «Параметры безопасности».
- В этом разделе вам нужен каталог «Локальные политики», а в нем — папка «Параметры безопасности».
- Прокрутите список политик вниз и отыщите целый блок, связанный с контролем учетных записей.
- Дважды кликните по интересующей политике, чтобы открыть ее «Свойства». Вы увидите краткое описание, а также сможете изменить значение, чтобы включить этот элемент контроля учетных записей.
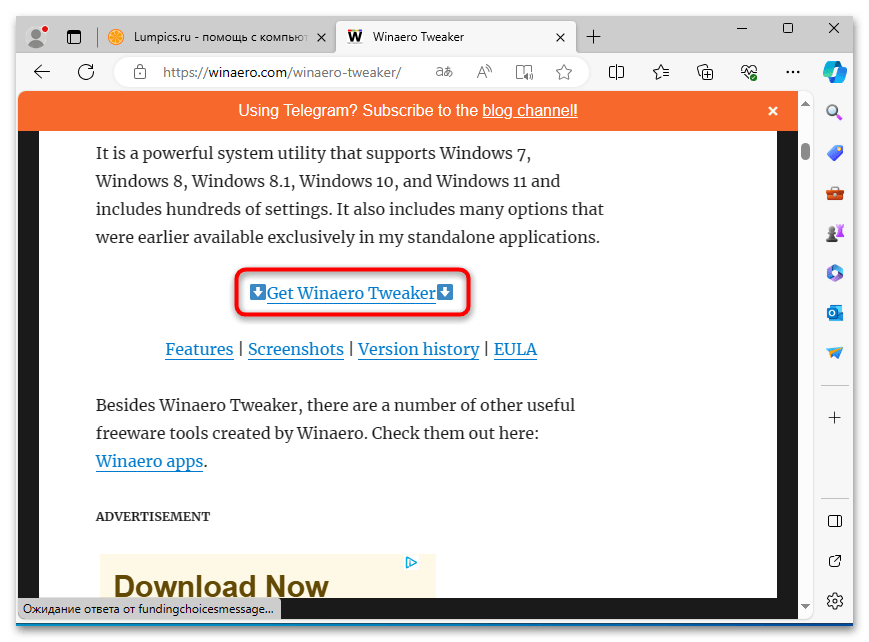
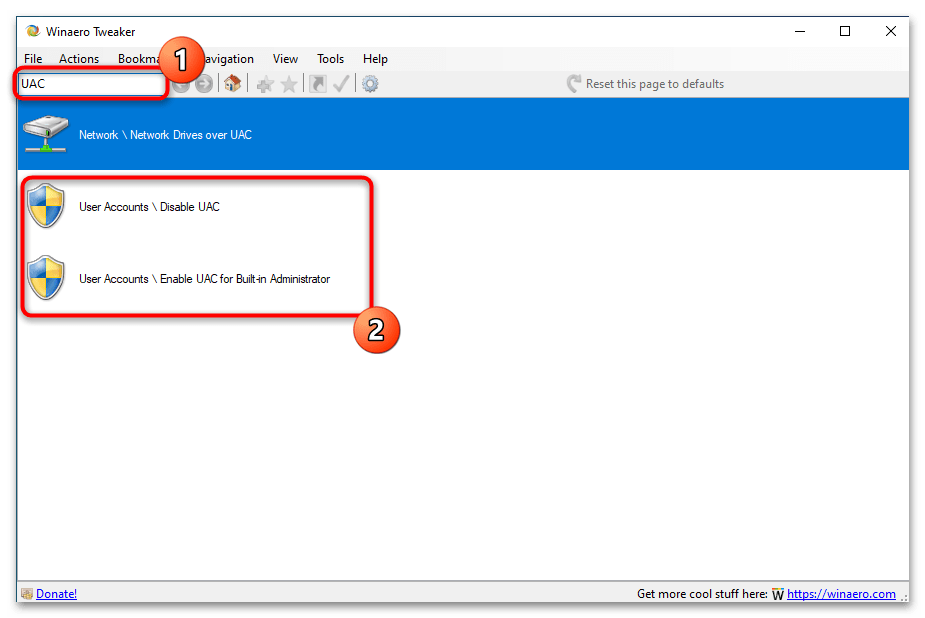
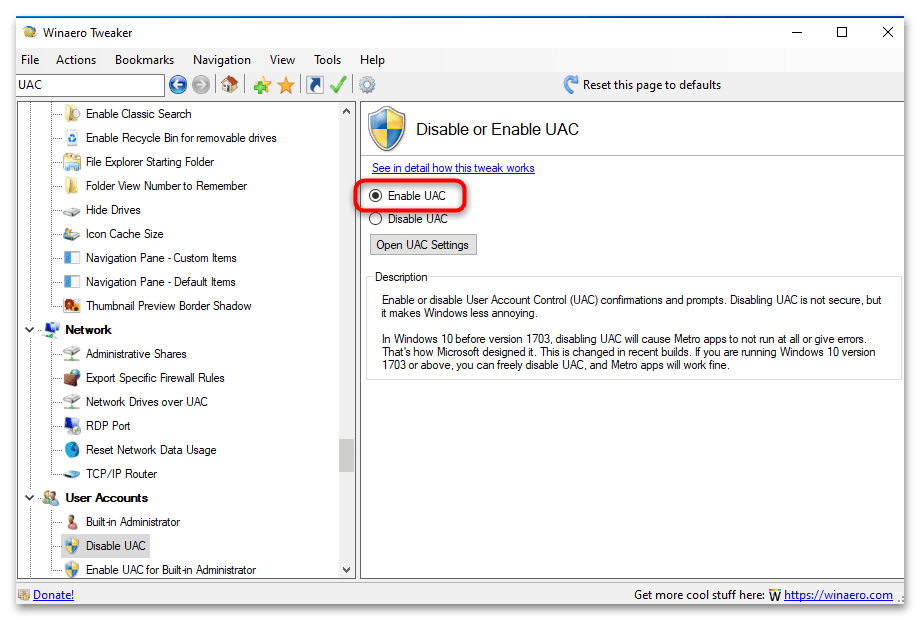
Способ 5: Использование Winaero Tweaker
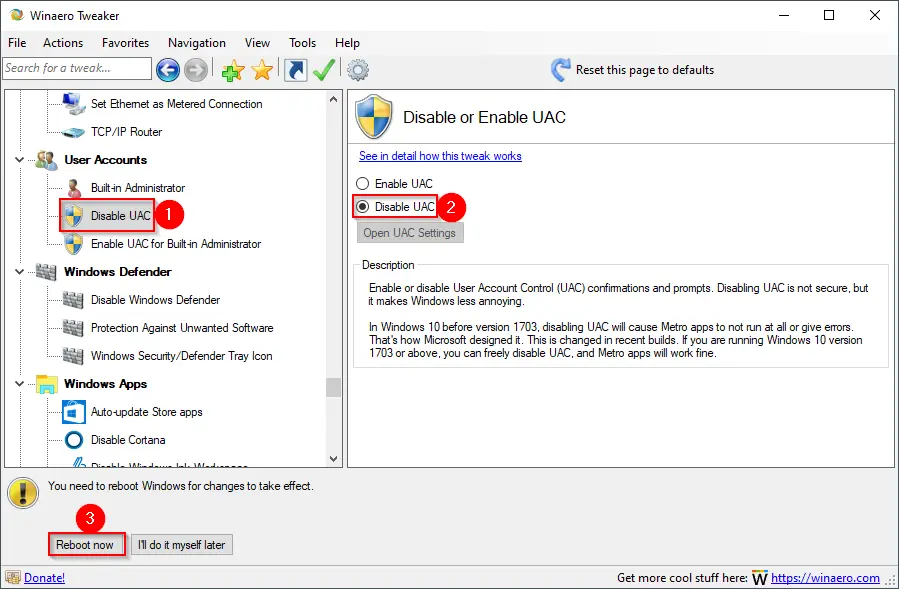
Стороннее приложение Winaero Tweaker позволяет быстро и удобно управлять системными настройками без лишних хлопот. Если говорить о включении контроля учетных записей, то данный софт лучше использовать в тех случаях, когда он и применялся для предварительного отключения функций. В других ситуациях он может быть полезен, если вы хотите временами включать и отключать UAC и желаете сэкономить на этом немного времени.
Скачать Winaero Tweaker с официального сайта
- На официальном сайте найдите ссылку на скачивание Winaero Tweaker и запустите из полученного архива установщик. Выберите место для программы, завершите инсталляцию и выполните первый запуск.
- Проще всего будет воспользоваться поиском по параметрам, введя там «UAC». Вы найдете две настройки: классический контроль учетных записей и «UAC for Built-in Administrator». Второй параметр при включении активирует для встроенной учетной записи администратора такие же уведомления контроля, которые появляются и у обычных пользователей или администраторов.
- Выбрав параметр, активируйте контроль учетных записей, поставив маркер возле пункта «Enable UAC».
- После настройки не забудьте нажать «Reboot now», чтобы сохранить изменения и перезагрузить ПК для их применения.

Наша группа в TelegramПолезные советы и помощь
Applies ToWindows 11 Windows 10
User Account Control (UAC) is designed to prevent unauthorized changes to Windows.
When an action requires administrator-level permissions, UAC prompts you to approve or deny the change. This helps protect your Windows device from malicious software and unauthorized modifications.
You can change the UAC behavior by opening the Control Panel > System and Security > Change User Account Control settings.
Move the slider to your desired level of notification and select OK to save your changes.
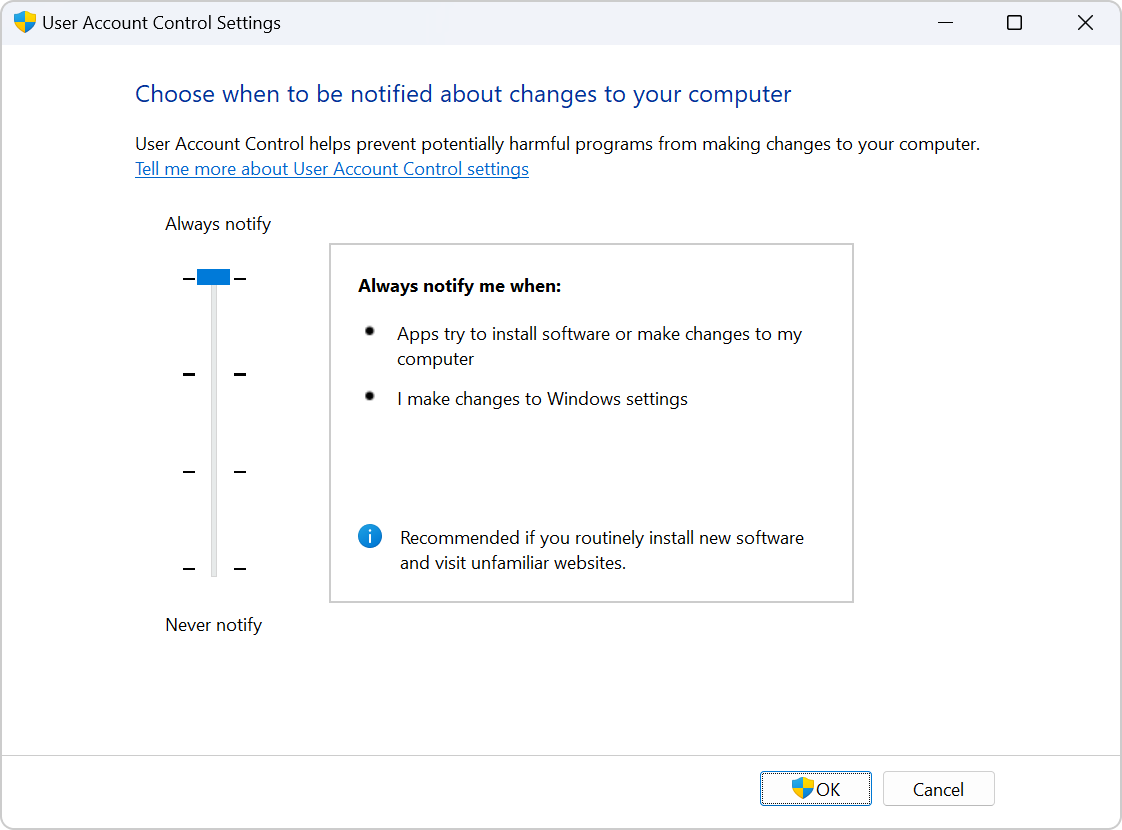
Expand the following sections to learn more about each UAC option:
-
Notify you when programs try to install software or make changes to your device
-
Notify you when you make changes to Windows settings
-
Freeze other tasks until you respond
Note: This option is recommended if you routinely install new software or visit unfamiliar websites.
-
Notify you when programs try to install software or make changes to your computer
-
Not notify you when you make changes to Windows settings
-
Freeze other tasks until you respond
Note: This option is recommended if you routinely install new software or visit unfamiliar websites, but you don’t want to be notified when you make changes to Windows settings.
-
Notify you when programs try to install software or make changes to your device
-
Not notify you when you make changes to Windows settings
-
Not freeze other tasks or wait for a response
Note: This option is only recommended if it takes a long time to dim the desktop on your computer. Otherwise, it’s recommended to choose one of the options above.
-
Not notify you when programs try to install software or make changes to your device
-
Not notify you when you make changes to Windows settings
-
Not freeze other tasks or wait for a response
Caution: This option isn’t recommended due to security concerns.
Need more help?
Want more options?
Explore subscription benefits, browse training courses, learn how to secure your device, and more.
Enabling User Account Control (UAC) in Windows 10 is a straightforward process that can enhance your computer’s security. By following these steps, you will be able to activate UAC and manage how Windows asks for permission before allowing changes to your system.
Enabling UAC in Windows 10 will help protect your computer from unauthorized changes. The steps below will guide you through the process, ensuring that your system becomes more secure.
Step 1: Open the Control Panel
First, open the Control Panel from the Start menu.
To do this, click the Windows icon in the bottom-left corner of your screen, type «Control Panel,» and select it from the search results.
Step 2: Go to User Accounts
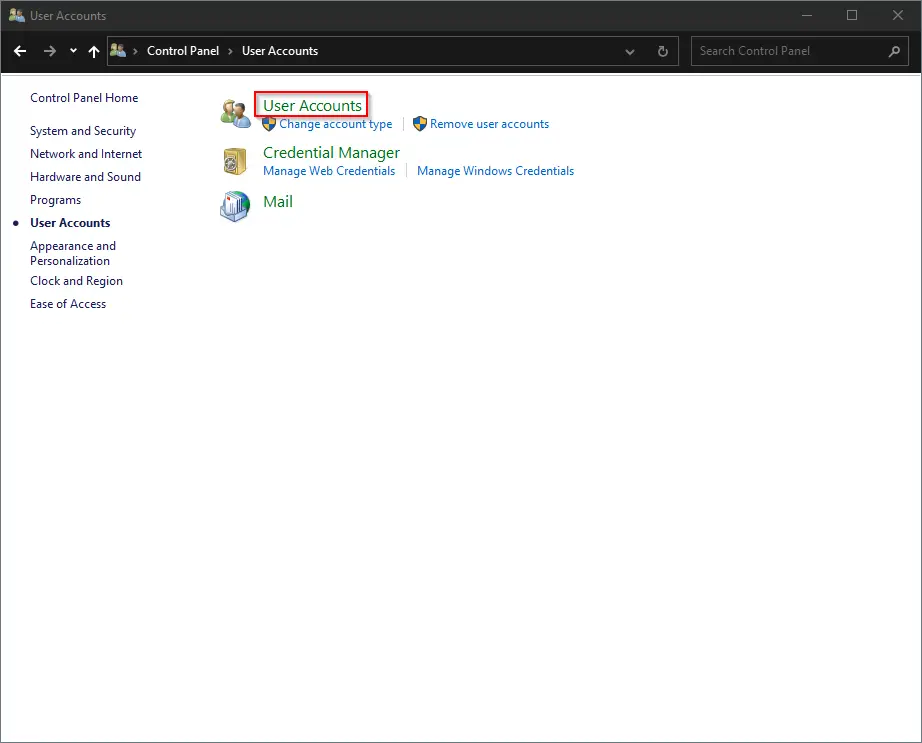
Next, navigate to the User Accounts section in the Control Panel.
Once you are in the Control Panel, locate and click on «User Accounts.» This is where you will manage various user-related settings, including UAC.
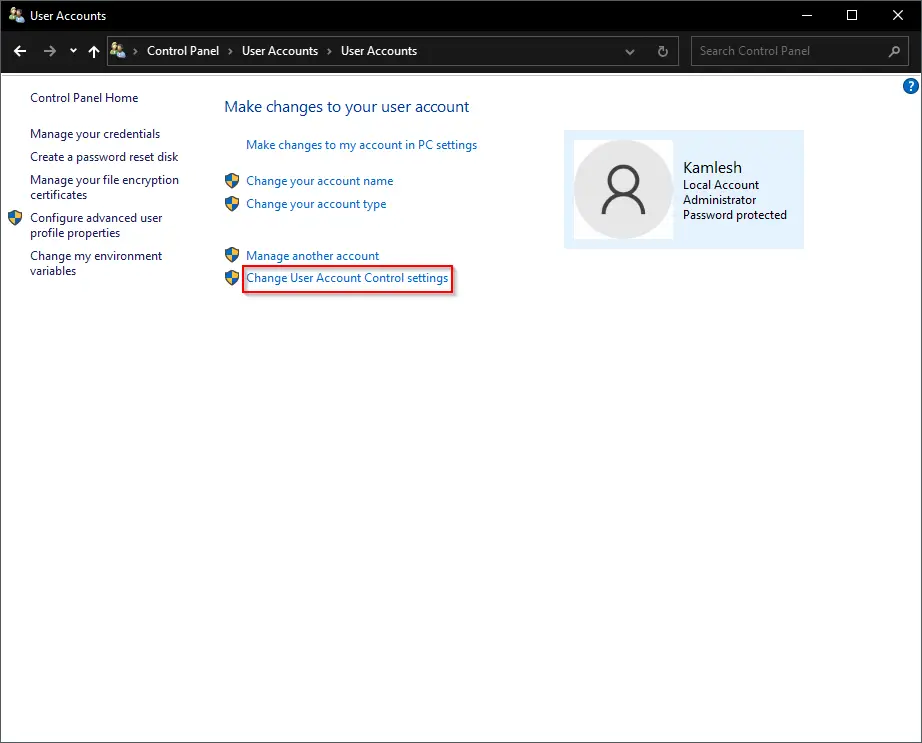
Step 3: Click on “Change User Account Control settings”
Now, click on the “Change User Account Control settings” link.
This link will open a new window where you can adjust the UAC settings for your computer.
Step 4: Adjust the UAC Slider
Drag the slider to the desired level of security.
The UAC settings window has a slider with four levels of security, ranging from «Always notify» to «Never notify.» Choose the level that best fits your security needs.
Step 5: Click OK
Finally, click OK to save your settings.
After adjusting the slider, click the OK button. You may be prompted to confirm your choice by entering an administrator password or clicking Yes.
Once you complete these steps, Windows will apply the new UAC settings, and your computer will be more secure against unauthorized changes.
Tips for How to Enable UAC Windows 10
- Always choose a UAC level that prompts you for confirmation. This can prevent accidental or malicious changes to your system.
- If you are unsure which level to choose, the default setting is a good balance between security and convenience.
- Regularly check your UAC settings to ensure they have not been altered without your knowledge.
- Inform other users of your computer about the importance of UAC and how to respond to its prompts.
- Keep your Windows operating system and all software up to date to maximize security alongside UAC.
Frequently Asked Questions
What is User Account Control (UAC)?
UAC is a security feature in Windows that helps prevent unauthorized changes to your operating system by prompting for permission or an administrator password.
Why should I enable UAC?
Enabling UAC helps protect your computer from malicious software and accidental changes that could harm your system.
How do I know which UAC level to choose?
The default level is usually sufficient for most users, but you can adjust it based on how often you want to be notified about changes.
Can I turn off UAC entirely?
Yes, you can set the slider to «Never notify,» but this is not recommended as it reduces your computer’s security.
Will enabling UAC affect my daily computer use?
Enabling UAC may result in occasional prompts asking for permission to make changes, but it significantly enhances system security.
Summary
- Open the Control Panel.
- Go to User Accounts.
- Click on “Change User Account Control settings.”
- Adjust the UAC Slider.
- Click OK.
Conclusion
Enabling User Account Control (UAC) in Windows 10 is a crucial step towards maintaining a secure and well-protected computer system. With UAC activated, your computer will prompt you before allowing significant changes, thus preventing unauthorized access and potential harm. Although it might seem a bit annoying to receive these prompts now and then, the added security layer is well worth it. Plus, you can always adjust the frequency of these notifications to suit your comfort level.
If you’re serious about keeping your system safe, make sure to regularly update your UAC settings and keep your Windows operating system up to date. The combination of these measures will create a robust defense against potential security threats.
By taking these simple steps, you can ensure that your computer remains secure without sacrificing too much convenience. So, don’t delay—enable UAC on your Windows 10 system today and enjoy peace of mind knowing that your data and settings are more secure.
Matt Jacobs has been working as an IT consultant for small businesses since receiving his Master’s degree in 2003. While he still does some consulting work, his primary focus now is on creating technology support content for SupportYourTech.com.
His work can be found on many websites and focuses on topics such as Microsoft Office, Apple devices, Android devices, Photoshop, and more.
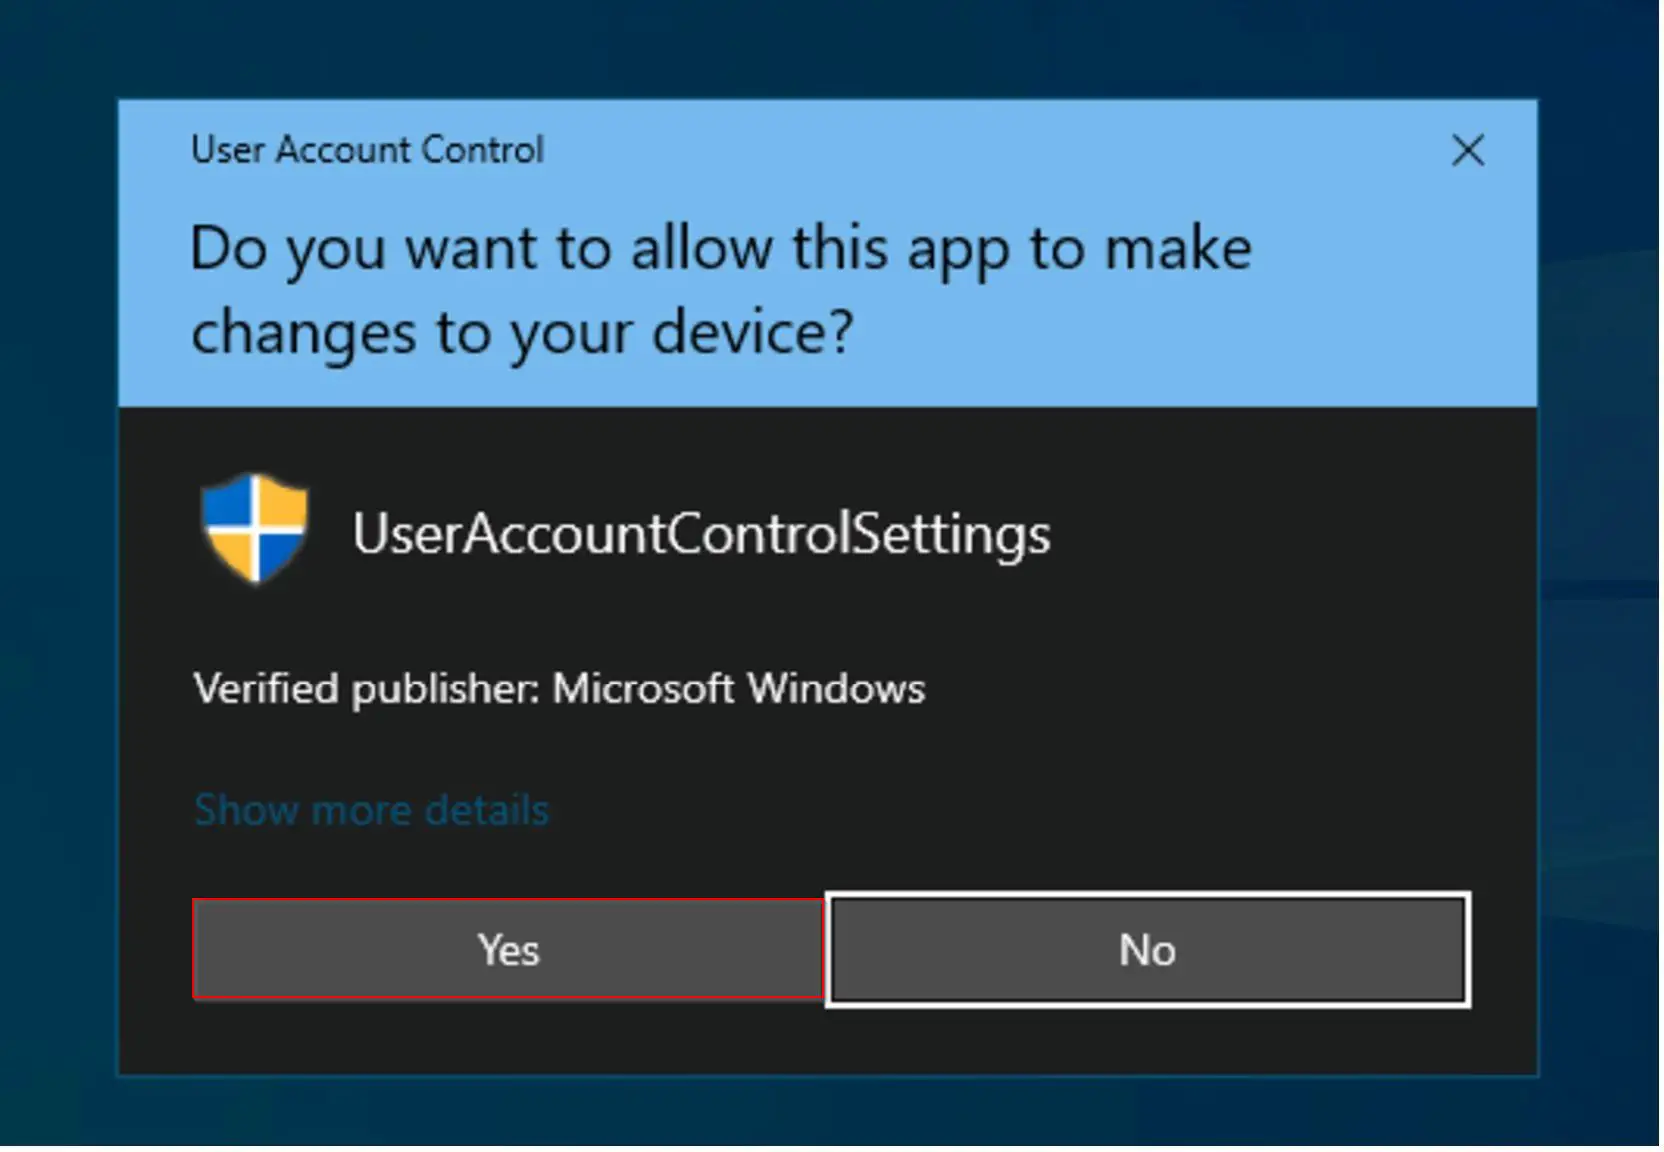
How do I enable UAC prompt? How do I change user account control settings? User Account Control or UAC is a part of the Windows security system which prevents programs or application from making unwanted changes on your PC. When a program tries to change system-related parts of the Windows Registry or file system, Windows 10 shows a pop-up UAC confirmation dialog. When the user confirms by clicking the Yes button, the application can make the changes on your Windows PC.
UAC is really a helpful feature to secure your PC from threats. This way, the UAC dialog provides a special security environment for your user account by limiting the access rights. It can elevate a particular process to full access rights when necessary. However, many Windows users do not want to see these UAC prompts and prefer to use Windows 10 with the classic security model, i.e., just like Windows XP and earlier.
If you are one of those Windows 10 users who dislike the User Account Control prompt and want to eliminate the pop-up UAC dialog, this article will guide you to do so.
As of now, there are at least three ways through which you can enable or disable the UAC prompt on Windows 10. These are the following:-
- Using Control Panel
- Via Registry Editor
- Through Winaero Tweaker
How to Turn On or Turn Off User Account Control (UAC) Prompt in Windows 10 using Control Panel?
Step 1. Open Control Panel. Set the “View by” to Category and then click the User Accounts.
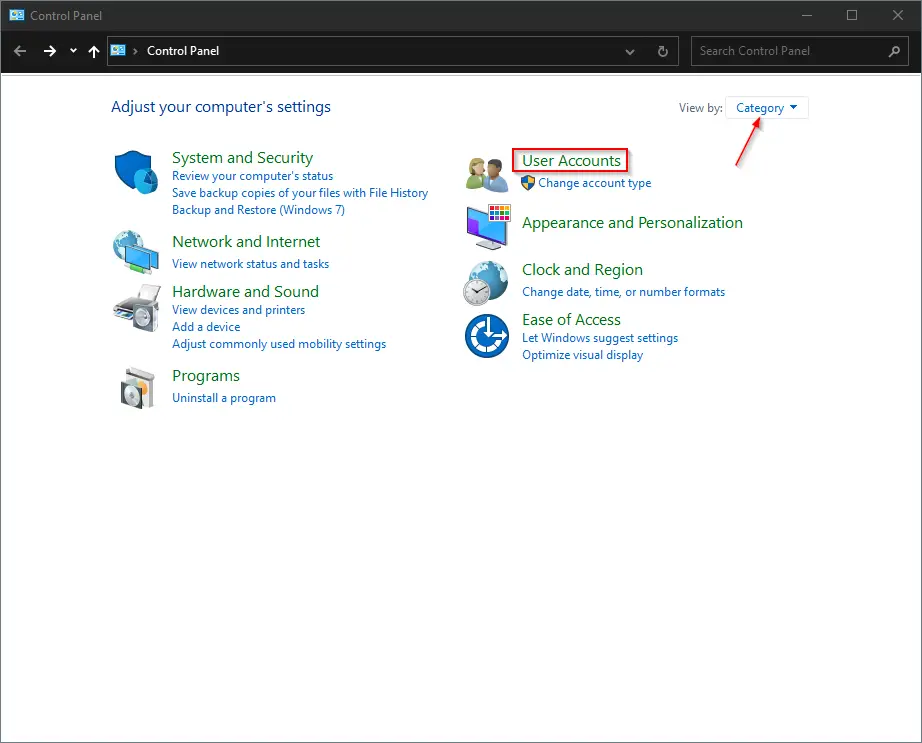
Step 2. In the next window that opens, again click the “User Accounts” option.
Step 3. Next, click the link “Change User Account Control settings.”
Step 4. In the User Account Control Settings dialog that opens, move the slider to the bottom (Never Notify).
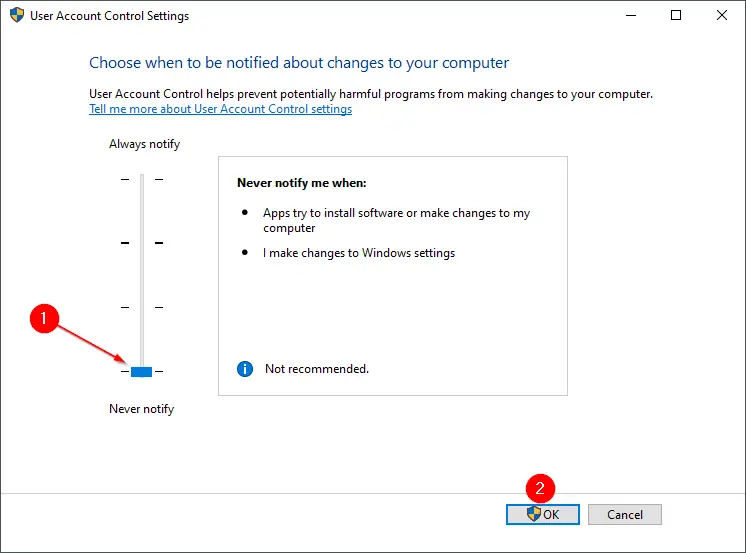
Step 5. A User Account Control (UAC) dialog will appear. Click the Yes button to continue.
Once you complete the above steps, User Account Control (UAC) prompt is disabled on your Windows 10. Now
If you want to enable it again, repeat the above steps, and in step 4, raise the level of security by dragging the slider upward.
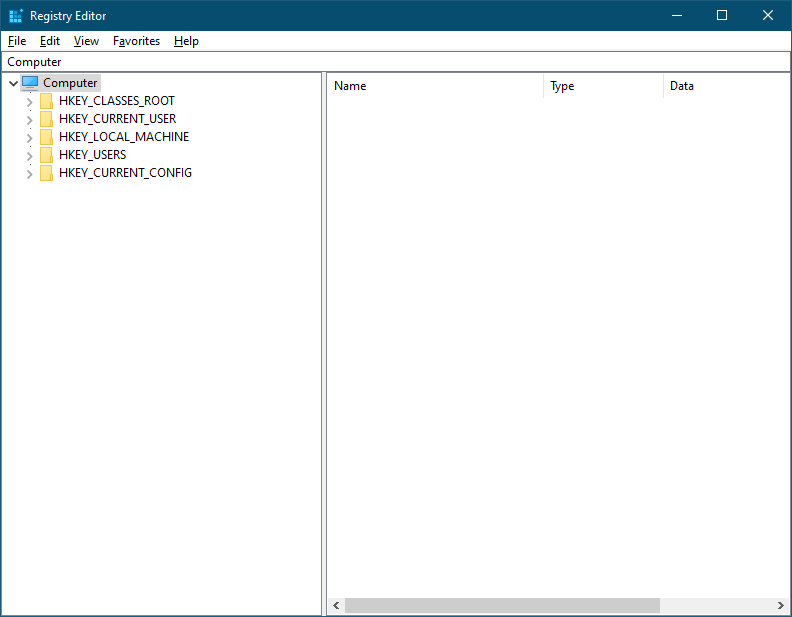
How to Enable or Disable User Account Control (UAC) Prompt in Windows 10 via Registry Editor?
Step 1. Open the Registry Editor.
Step 2. In the left side pane of the Registry Editor, navigate to the following key:-
HKEY_LOCAL_MACHINE\SOFTWARE\Microsoft\Windows\CurrentVersion\Policies\System
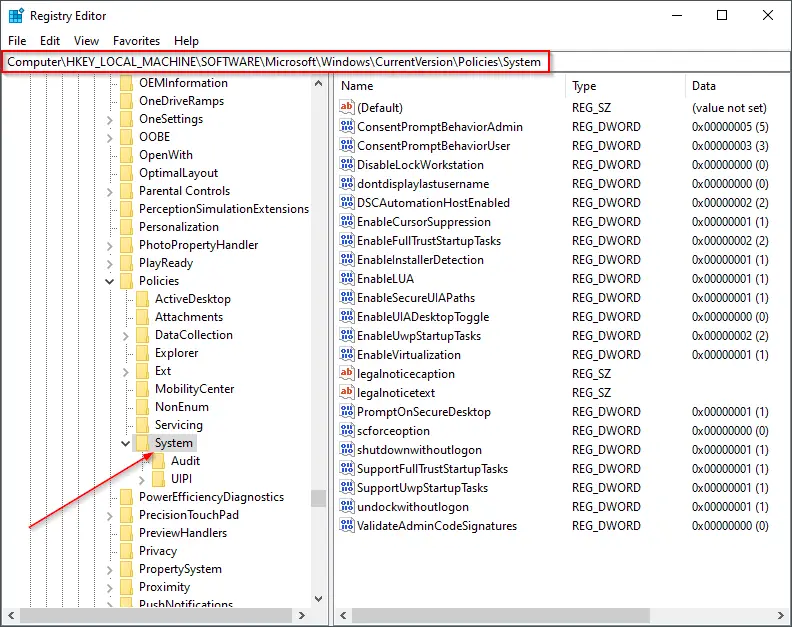
Step 3. In the right pane, look for EnableLUA and double-click on it to modify the value. Set its Value data to 0 to disable the UAC prompt.
Step 4. Click OK.
After executing the above registry steps, now User Account Control dialog will completely disappear.
If you would like to enable the UAC prompt again on your Windows 10 PC, repeat the above steps, and in step 3 above, set the Value data to 1.
How to Allow or Disallow User Account Control (UAC) Prompt in Windows 10 using Winaero Tweaker?
Winaero Tweaker is a free application that comes with several features to customize Windows 10. You can also use this tool to allow or disallow UAC prompts.
Simply download Winaero Tweaker and open in portable mode. It will extract all files in the “C” drive in WinaeroTweaker folder. Double-click on the executable file to launch this tool. In the left side pane, scroll down to the User Accounts section and then click the “Disable UAC” option. On the right side pane, select the radio button Disable UAC. Finally, click the Reboot now button to disable UAC prompt on your Windows 10 PC.
That’s all!!!