
Build and customize web forms with your brand and colors in less than 2 minutes with 123FormBuilder.
Build powerful online forms that are aesthetically pleasing, extensively customizable, and easy to use to collect leads, payments, and other data without coding skills!
Create a Beautiful Form Design for Every Purpose
Crafting captivating forms has never been more effortless than with 123FormBuilder! Picture this: a tool that simplifies form creation and empowers you to design stunning, purpose-driven forms tailored to your unique needs.
With 123FormBuilder, you dive into a world where creativity meets functionality. Seamlessly bring your vision to life, whether it’s a sleek contact form, an engaging survey, or a powerful registration page.
Our intuitive interface and array of customization options spotlight your creativity, ensuring each form reflects your brand’s identity and captivates your audience from the first glance.
Elevate your forms to a new level of elegance and effectiveness—every form you envision, impeccably designed, effortlessly achieved, with 123FormBuilder.

Everything is Customizable
Tired of jotting down form ideas you can’t translate into pixels? Our free online form designer listens to you and provides all the features you need to create beautiful online custom forms.
With 123FormBuilder, what you see is what you get. And you get an endless array of form customization options that make your life easier, more colorful, and always in line with your brand. Change form themes to represent your branding, and add colors, fonts, and images in tune with your visual identity.
Every inch and pixel of our forms are customizable, and you can adjust everything to perfection:
- Padding
- Style
- Fonts
- Field size
- Background
- Checkboxes
- Corners
They are ALL customizable, so your creativity is the only limit to creating gorgeous forms. Our form designer gives you the tool, you bring the skills — and voila, you’ve got beautiful custom forms!
Get Started Now

Online Custom Forms that Speak to Humans
Regardless of your use case, your forms need to say something that will make them attractive for users to fill in all those fields. Surveys, quizzes, Likert scales, lead magnet forms — they all need a little sparkle to entice responders.
Aside from beautiful form design options, 123FormBuilder also provides you with form and field customization options that make the entire user experience more human:
- Conditional logic that helps you display only fields that are relevant to every user
- Formatting your form to display one question per page, like in an actual normal person-to-person conversation
- Customizable email notifications to help you make the conversation go on
Everything you need to create forms with a soul is available thanks to 123FormBuilder. And it takes mere minutes to set up.

Actionable and Enticing Buttons
Transforming mundane online forms into interactive experiences has always been challenging! Picture this: actionable and enticing buttons that captivate attention and inspire action. At 123FormBuilder, we understand the power of these buttons—they’re not just clickable elements but catalysts for engagement.
Use buttons that guide users through your form and enhance their experience. Vibrant call-to-action buttons inspire immediate response, while intuitive navigation buttons make it easy for users to move around. Each button should be visually appealing, strategically placed, and designed to encourage interaction and drive conversions.
Experience the difference in engagement and response rates as your forms become irresistible invitations to engage, all powered by the transformative allure of 123FormBuilder’s actionable and enticing buttons.

Field Type For Every Need
With 123FormBuilder, you can make any online form you could ever imagine. You have access to all the field types you need. Take them and use them to create meaningful data collection forms.
Name, Email, Address, Phone Number, Multiple-Choice, Single-Choice, Drop Down fields — everything you need in one intuitive, smooth, and painless Dashboard.
And it’s all drag and drop so that you can build your online forms in minutes, in just three simple steps:
- Drag the fields you need into the form and drop them there
- Customize them to fit your brand and message
- Publish the form and let submissions flow

Ready-Made Form Designer Themes
Do you need an online form to match your branding? Look no further than 123FormBuilder! When you’re in a pinch, grab one of the 3,000+ form templates we offer and use one of our ready-made form designer themes.
Creating beautiful and professional-looking forms has never been easier. With our color themes and form designs tailored for busy professionals, you can achieve a stunning form quickly.

CSS & HTML Styling for the Little Details
Are you looking to create highly customized and detailed forms that perfectly align with your brand’s visual identity and messaging?
With the 123 form designer, you can take your form designs to the next level using CSS and HTML styling. While it’s not mandatory to use these features, they offer an excellent opportunity for you to ensure that every pixel and element on your form is consistent with your brand’s style.
From color schemes and typography to button styles and layout, you can tweak every form aspect and make it match your brand. So, if you’re willing to push your design skills further, the 123 form designer provides you with all the tools you need to create highly polished and branded forms that will impress your audience.

Mobile-Responsive Custom Forms
Unlock the potential of seamless accessibility and unparalleled user experience with our mobile-responsive custom forms at 123FormBuilder.
Picture this: your forms flawlessly adapt to any device, whether a smartphone, tablet, or desktop, ensuring a consistent and optimized experience for every user.
Embrace the power of mobility as your custom forms effortlessly adjust to different screen sizes, eliminating the frustration of zooming or scrolling and guaranteeing easy interaction on the go.
Beyond convenience, mobile-responsive forms expand your reach, capturing user data across various platforms and devices.

Connect Your Attractive Forms with Anything
Our online forms are pretty and smart! They are a complete package that comes with more than 80 integrations.
What this means, in short, is that you can connect your forms with any tool you might use. Mailchimp, Google Drive, Dropbox, Wix, Shopify, and payment processors like PayPal — we have them all.
If by any chance you can’t find your favorite tools in our list of integrations, remember you can always use Zapier to link your form data and your favorite third-party apps and software.

Collect Data Beautifully & Securely
123FormBuilder believes that securely collecting data is of utmost importance. We have made safety the center of our business model to ensure our customers and their form respondents are shielded from digital harm.
We are:
- GDPR friendly 100% (we have servers in the EU if you need them)
- HIPAA compliant (that means the US healthcare system trusts us)
- ISO 9001 and ISO 27001 compliant (we are regularly audited for our security compliance measures)
- CAPTCHA-friendly (we made it a field you can drag and drop)
- Anti-spamming aficionados (you can take all the security measures to make sure you aren’t flooded with spam responses)
- Code-free. You can use the form designer to design eye-catching forms without coding experience.

How it works
Build your custom online form using our form designer in three steps:
Create
Log into your 123FormBuilder account (or sign up first), pick a template, or build an online form from scratch.
Customize
Customize the look and feel of your online form by dragging and dropping the desired fields on the form.
Publish
Add any integration you want, publish your form, distribute it online, and wait for submissions.
Get Started
Frequently asked questions
What is a Form Designer?
How do I make my forms look professional?
What is Form Designer in Visual Basic?
How do I design a form?
Create beautiful online forms using our online form designer. Start your 123FormBuilder journey today!
Schedule a Demo
This is a tutorial on how to use WinFormsGen’s generated code.
Free WinForms Code Generator
WinFormsGen Express is a free Windows Form (Winforms) code generator software you can download absolutely free and with absolutely no catches. WinFormsGen Express generates WinForms, Code Behind, Middle-Tier code, and Data Tier Code (with empty spots where you can enter your own code) by reading your MS SQL Database. It generates a WinForms application (so you know that all generated code works) in One Click.
What you will need
Now that I’m done with my marketing spiel let’s get on with the tutorial.
You will need the following things for this tutorial:
- Northwind Database
- Microsoft SQL Server
- You will need an Admin username/password or enough rights in the MS SQL Server. A blank username/password will not work.
- WinFormsGen Express
Tutorial
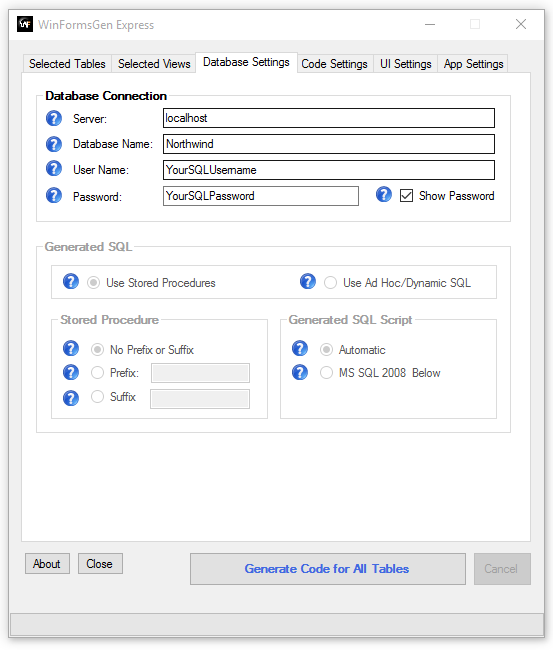
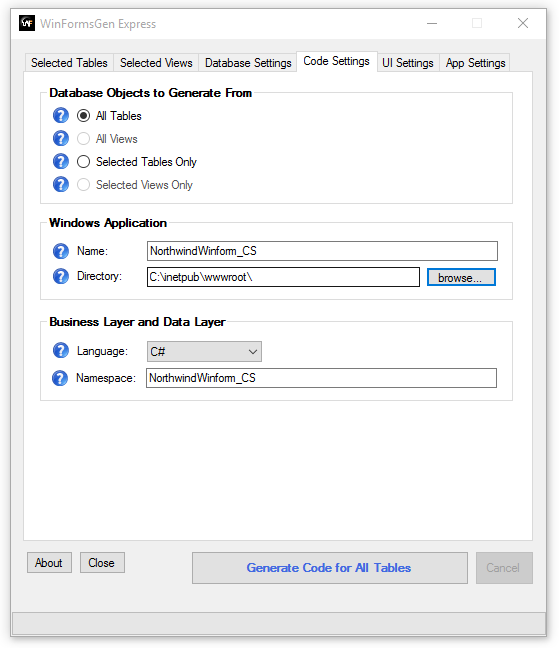
3. Open WinFormsGen Express and enter the following information shown in the snapshots below. Note:Use your database’s username and password instead of the one shown below.
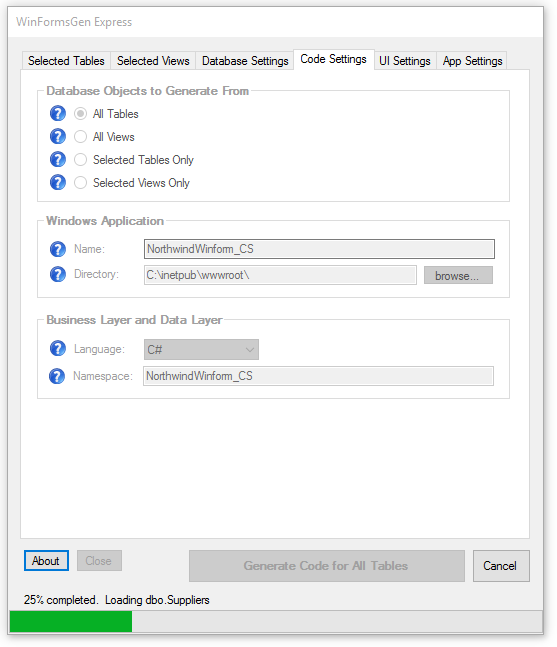
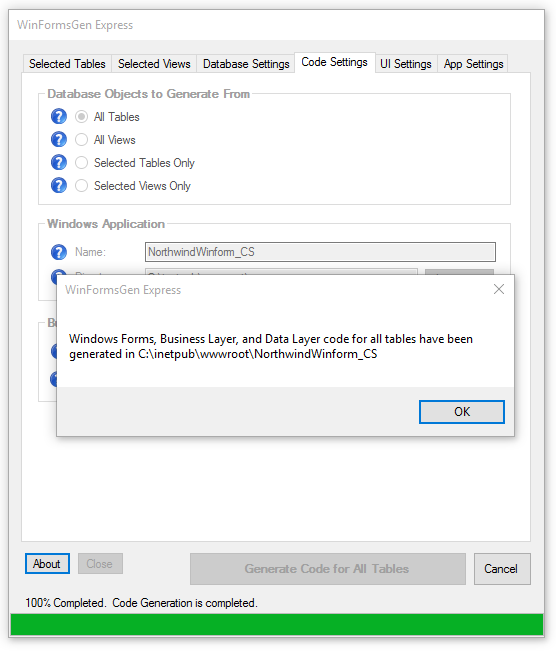
4. Click the «Generate Code for All Tables» button. WinFormsGen Express will start generating code and you will see a message once code generation is done.
5. Open Visual Studio 2013/2015, and then open the newly created Windows Form Project.

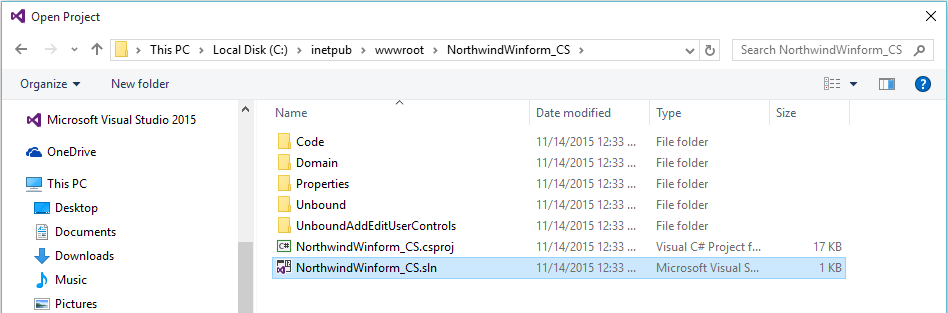
6. The Visual Studio Solution Explorer window shows all the generated WinForms and other objects.
7. Run the project by pressing F5.
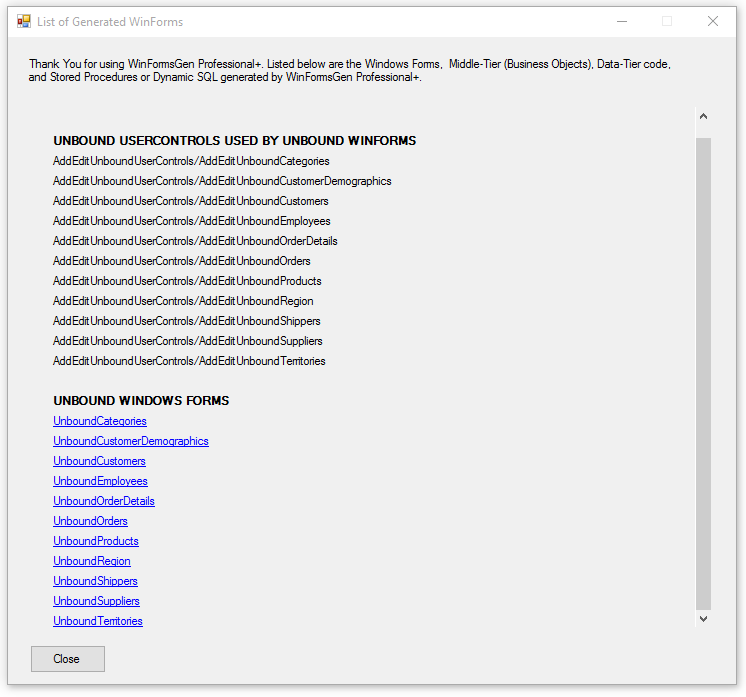
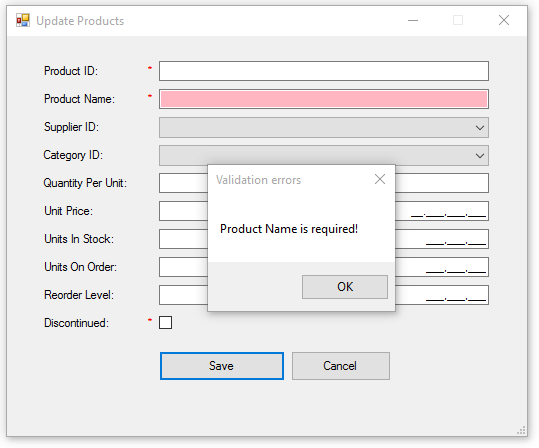
8. Click on one of the links, e.g. the UnboundProducts. You will notice that each field in the Products table are shown here. Foreign keys are also shown as a Combo Box control. There’s also validation, for example Product Name here is a required field. Note: WinFormsGen Express generates Unbound (winforms that are not bound to a database) winforms only.
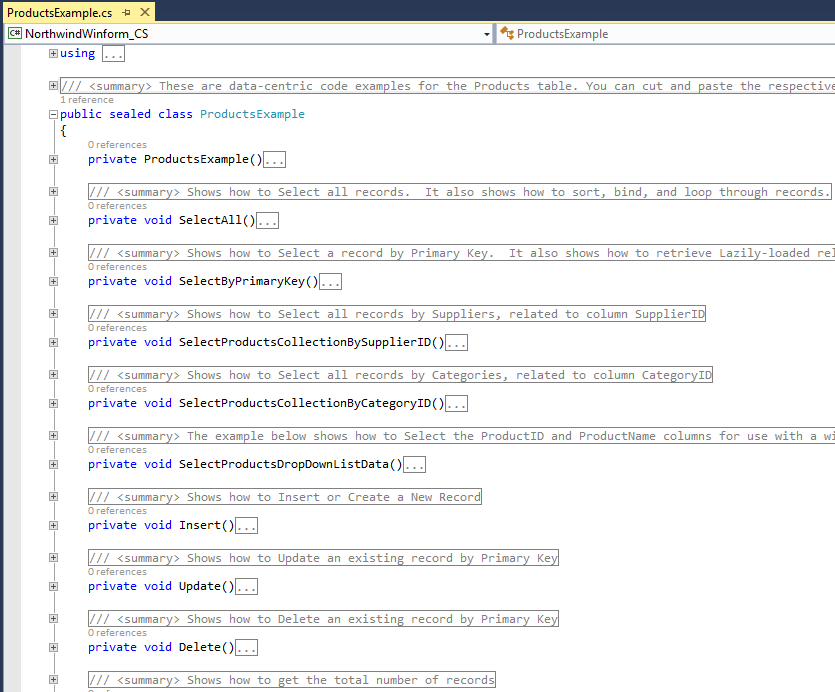
9. What you’ve seen so far are the generated WinForms and their respective Code Behind. WinFormsGen Express also generated the Middle Tier and Data Tier codes. Close the win form and then go back to Visual Studio. The Middle-Tier (Business Objects) and Data-Tier (Data Layer) code is located in the Code folder. WinFormsGen Express also generated example code for each CRUD (create, retrieve, update, delete) operation it generated. Easily enough you can find all these code in the Example folder under the Code folder. Each table in your database should have a Class file.
10. Since WinFormsGen Express does not generate code that binds the Windows Form to the database, let’s bind the WinForm to the database by adding logic to the UnboundProducts Class (.cs) file. Open the Class ProductsExample.cs (.vb) under the Example folder and then copy the code from the Insert method to the Code Behind file Products.aspx.cs (.vb) BtnAddRecord_Click event.
Note: We will use a Layering approach (3-tier, n-tier), so, the WinForm (Presentation Layer/Front End) will access the Products.cs (.vb) (Middle-Tier), and then the Product.cs will access theProductsDataLayer.cs (Data-tier) code. The Data Layer code would then access our database (MS SQL).
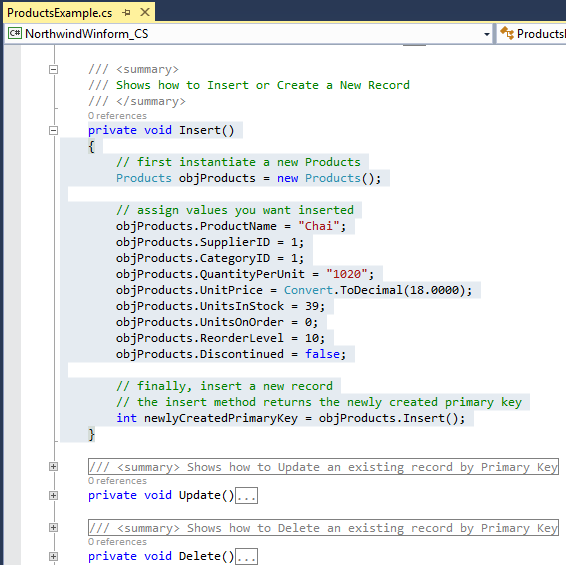
Products Example Class
Products Example Insert Method. Copy Insert method code shown below.
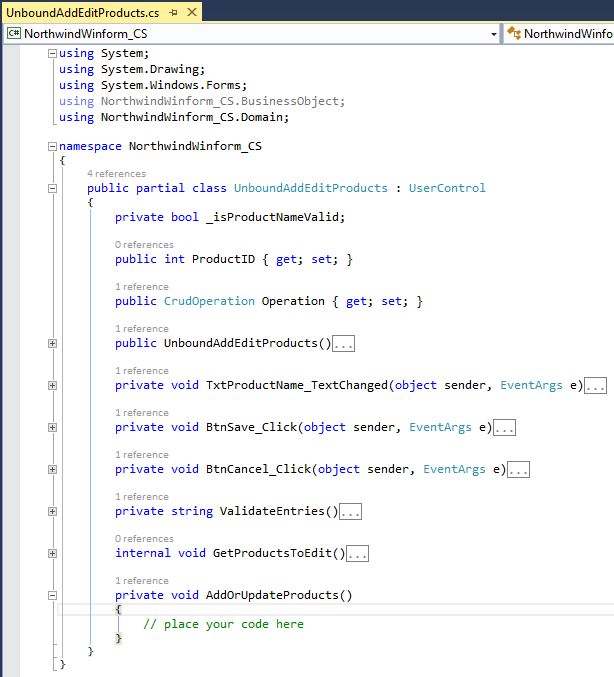
Products Unbound UserControl (UnboundAddEditProducts.cs). Here’s how this winform looks before copying the insert method code. Note: We’re using a usercontrol here because the same usercontrol can be used by the Add or Update Win Form. Copy the Insert method code where it says «place your code here».
Products Unbound WinForm Code (UnboundAddEditProducts.cs) after copying Insert code from the ProductsExample class
    private void AddOrUpdateProducts()
    {
        // first instantiate a new Products
        Products objProducts = new Products();

        // assign values you want inserted
        objProducts.ProductName = "Chai";
        objProducts.SupplierID = 1;
        objProducts.CategoryID = 1;
        objProducts.QuantityPerUnit = "1020";
        objProducts.UnitPrice = Convert.ToDecimal(18.0000);
        objProducts.UnitsInStock = 39;
        objProducts.UnitsOnOrder = 0;
        objProducts.ReorderLevel = 10;
        objProducts.Discontinued = false;

        // finally, insert a new record
        // the insert method returns the newly created primary key
        int newlyCreatedPrimaryKey = objProducts.Insert();
    }
11. Change the constant values to the respective WinForm Control’s values. Note: Supplier ID andCategory ID Combo Box have no values, make sure to add items to these controls. The code shown below is just quick and dirty, you will need to check for nulls or empty string before you convert the control’s values, but you already know that.
    private void AddOrUpdateProducts()
    {
        // first instantiate a new Products
        Products objProducts = new Products();

        objProducts.ProductName = TxtProductName.Text.ToString();
        objProducts.SupplierID = Convert.ToInt32(CbxSupplierID.SelectedValue.ToString());
        objProducts.CategoryID = Convert.ToInt32(CbxCategoryID.SelectedValue.ToString());
        objProducts.QuantityPerUnit = TxtQuantityPerUnit.Text.ToString();
        objProducts.UnitPrice = Convert.ToDecimal(MtbUnitPrice.Text.Trim().Replace(",", "").Replace(" ", ""));
        objProducts.UnitsInStock = Convert.ToInt16(MtbUnitsInStock.Text.Trim().Replace(",", "").Replace(" ", ""));
        objProducts.UnitsOnOrder = Convert.ToInt16(MtbUnitsOnOrder.Text.Trim().Replace(",", "").Replace(" ", ""));
        objProducts.ReorderLevel = Convert.ToInt16(MtbReorderLevel.Text.Trim().Replace(",", "").Replace(" ", ""));
        objProducts.Discontinued = CbxDiscontinued.Checked;

        // finally, insert a new record
        // the insert method returns the newly created primary key
        int newlyCreatedPrimaryKey = objProducts.Insert();
    }
12. The code below accesses the ProductsDataLayerBase.cs (Data Layer) through the Middle Tier object.
BtnSave_Click Event (WinForm/Presentation Tier) Calls the Middle Tier Insert() Method
// finally, insert a new record
// the insert method returns the newly created primary key
int newlyCreatedPrimaryKey = objProducts.Insert();
ProductBase.cs (Middle-Tier/Business Object) Calls the Data Layer Insert() Method
public int Insert()
{
    Products objProducts = (Products)this;
    return ProductsDataLayer.Insert(objProducts);
}
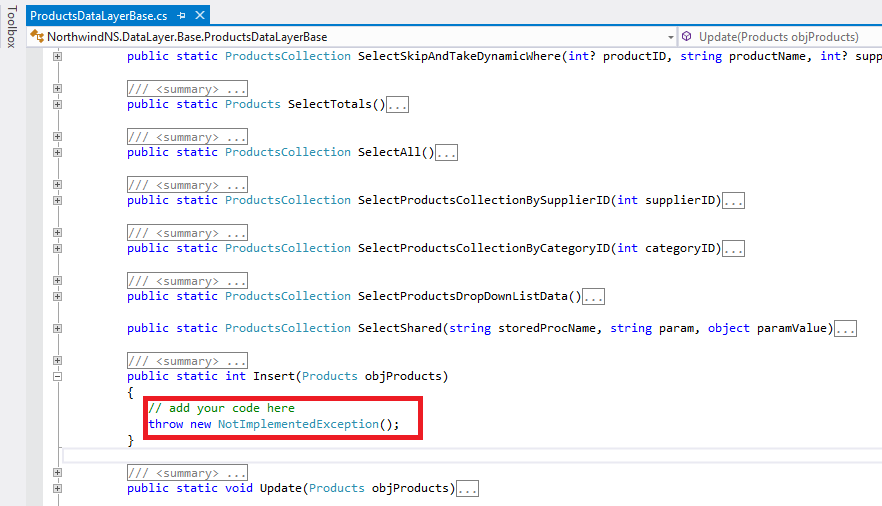
public static int Insert(Products objProducts)
{
    // add your code here
    throw new NotImplementedException();
}
13. You still need to add code in the ProductDataLayerBase.cs Insert method which will insert your passed values to the database.
Assign the Middle Tier values passed by the UI tier to whatever objects you have. Your objects could be an Entity Framework, or whatever you wish to use that will interact with your database. Or you can just buy the WinFormsGen Professional Plus so that you don’t even need to worry about the datayer, it should generate this part as well as the respective Stored Procedures (sorry for the marketing spiel).
public static int Insert(Products objProducts)
{
    // add your code here instantiate your own object

    // add your code here
    // assign values to your own object
    YourCodeToSaveValueToDbaseHere.Whatever = objProducts.ProductName;
    YourCodeToSaveValueToDbaseHere.Whatever = objProducts.SupplierID;
    YourCodeToSaveValueToDbaseHere.Whatever = objProducts.CategoryID;
    YourCodeToSaveValueToDbaseHere.Whatever = objProducts.QuantityPerUnit;
    YourCodeToSaveValueToDbaseHere.Whatever = objProducts.UnitPrice;
    YourCodeToSaveValueToDbaseHere.Whatever = objProducts.UnitsInStock;
    YourCodeToSaveValueToDbaseHere.Whatever = objProducts.UnitsOnOrder;
    YourCodeToSaveValueToDbaseHere.Whatever = objProducts.ReorderLevel;
    YourCodeToSaveValueToDbaseHere.Whatever = objProducts.Discontinued;

    // add your code here to insert to database
}
Last Words:
As programmers we develop for one project until we’re done or get pulled to another project. This means using the same database over and over again, adding more tables or fields to existing tables and/or views, or updating them. The «One Click» feature becomes really handy the next time you generate code for the same database, all you have to do is click the «Generate Code for All Tables» button when working on the same database, and that’s it. WinFormsGen Express is absolutely free, no need to register, no pop-ups asking you to buy the Professional Plus edition, no marketing/unsolicited emails whatsoever, yup — it’s absolutely free.
As always, the code and the article are provided «As Is», there is absolutely no warranties. Use at your own risk.
Happy Coding!!!
Original Article: https://www.junnark.com/Blog/Detail/free-windows-form-code-generator-winformsgen-express-tutorial1
The Windows Form Designer is only supported on Windows.
Create a PowerShell script by clicking File \ New File, entering the name of the file with a .PS1 extension. This will be the script that is used to launch your form.
To open the designer press Ctrl+Shift+P and then type Show Windows Forms Designer . The PowerShell Pro Tools: Show Forms Designer command should be show. Click or press enter.
You can also open a form by clicking the Show Windows Forms Designer button in the tool bar of a PS1 file.
Working with the Designer
The designer is very much like the standard Visual Studio designer. The design surface on the left allows you to modify your form. You can resize and delete controls from the bottom.
On the right right it provides a toolbox with controls that can be selected and placed on the form. The add a new control, click the control you’d like to place and then click the design surface of where you would like to place the control.
Below the toolbox is the properties dialog. You can select a control and modify its properties within this control.
On the bottom of the designer is a status bar. It displays the file that is being modified by the designer. An asterisk will be shown when the form is modified.
To implement an event handler, double click on the control you’d like to add the event handler to. It will automatically generate the event handler code in Visual Studio Code.
Event handlers can also be generated by clicking the event handler tab in the property pane.
To create a new event handler, type the name of the handler in the text box next to the event handler. Once you press enter and then save the form, with Ctrl+s or the Save button, the event handler will be generated in the code file.


Первое приложение с .NET CLI
Последнее обновление: 25.11.2023
Для создания графических интерфейсов с помощью платформы .NET применяются разные технологии — Window Forms, WPF, UWP.
Однако наиболее простой и удобной платформой до сих пор остается Window Forms или сокращенно WinForms. Данное руководство ставит своей целью дать понимание принципов создания графических интерфейсов с помощью технологии WinForms
и работы основных элементов управления.
Создадим первое приложение на C# и Windows Forms. Что нам для этого потребуется? Прежде всего необходим текстовый редактор для написания кода программы.
Можно взять любой понравившийся текстовый редактор, например, Visual Studio Code
Также для компиляции и запуска программы нам потребуется .NET SDK. Для его установки перейдем на официальный сайт по ссылке
.NET SDK
После установки .NET SDK для первого проекта определим какую-нибудь папку. Например, в моем случае это будет папка C:\dotnet\winforms\helloapp.
Откроем терминал/командную строку и перейдем к созданной папке проекта с помощью команды cd
cd C:\dotnet\winforms\helloapp
В данном случае мы для создания и запуска проекта мы будем использовать встроенную инфраструктуру .NET CLI, которая устанавливается вместе с .NET SDK.
Для создания проекта в .NET CLI применяется команда dotnet new, после которой указывается тип проWindows Formsекта. Для создания проекта
Windows Forms применяется шаблон — winforms. Поэтому введем в терминале команду dotnet new winforms
C:\Users\eugen>cd C:\dotnet\winforms\helloapp

C:\dotnet\winforms\helloapp>dotnet new winforms
Шаблон "Приложение Windows Forms" успешно создан.

Идет обработка действий после создания...
Восстановление C:\dotnet\winforms\helloapp\helloapp.csproj:
  Определение проектов для восстановления...
  Восстановлен C:\dotnet\winforms\helloapp\helloapp.csproj (за 1,04 sec).
Восстановление выполнено.


C:\dotnet\winforms\helloapp>
После выполнения этой команды у нас будет создан следующий проект:
Структура проекта Windows Forms
Рассмотрим базовую структуру простейшего стандартного проекта Windows Forms:
-
helloapp.csproj: стандартный файл проекта C#, который соответствует назанию проекта (по умолчанию названию каталога) и описывает все его настройки.
-
helloapp.csproj.user: дополнительный файл проекта C#, который хранит специфичные для текущего пользователя настройки.
-
Form1.cs: содержит класс формы, которая по умолчанию запускается при старте приложения
-
Form1.Designer.cs: он содержит определение компонентов формы, добавленных
на форму в графическом дизайнере (графический дизайнер Windows Forms на данный момент официально доступен только в Visual Studio) -
Program.cs: определяет класс Program, который запускается при старте приложения и запускает форму Form1
Например, посмотрим на содержимое файла helloapp.csproj
<Project Sdk="Microsoft.NET.Sdk">

  <PropertyGroup>
    <OutputType>WinExe</OutputType>
    <TargetFramework>net8.0-windows</TargetFramework>
    <Nullable>enable</Nullable>
    <UseWindowsForms>true</UseWindowsForms>
    <ImplicitUsings>enable</ImplicitUsings>
  </PropertyGroup>

</Project>
Для компиляции приложения Windows Forms указаны следующие настройки:
-
OutputType: определяет выходной тип проекта. Должен иметь значение WinExe — то есть выполняемое приложение с
расширением exe под Windows -
TargetFramework: определяет применяемую для компиляции версию фреймворка .NET. Поскольку при создании проекта
была выбрана версия .NET 8, а сам проект зависит от компонентов Windows, то здесь должно быть значение net7.0-windows -
Nullable: подключает в проект функционалность ссылочных nullable-типов
-
UseWindowsForms: указывает, будет ли проект использовать Windows Forms (для этого устанавливается значение
true) -
ImplicitUsings: подключает в проект функциональность неявно подключаемых глобальных пространств имен
Запуск проекта
Проект по умолчанию не представляет какой-то грандиозной функциональности, тем не менее этот проект мы уже можем запустить. Итак, запустим проект. Для этого выполним команду
dotnet run
C:\dotnet\winforms\helloapp>dotnet run
При запуске запускается графическая форма, код которой определяет класс Form1:
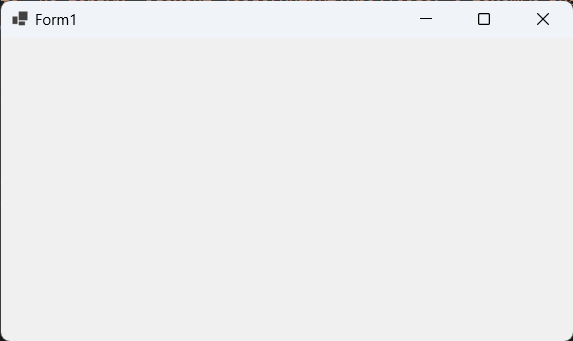
Запуск приложения
Файл Program.cs определяет точку входа в приложение:
namespace helloapp;

static class Program
{
    [STAThread]
    static void Main()
    {
        ApplicationConfiguration.Initialize();
        Application.Run(new Form1());
    }
}
Метод Main снабжен атрибутом [STAThread]. Этот атрибут, грубого говоря,
необходим для корректной работы компонентов Windows. В самом методе сначала вызывается метод
ApplicationConfiguration.Initialize()
который устанавливает некоторую базовую конфигурацию приложения
Затем вызывается метод
Application.Run(new Form1());
в который передается объект отображаемой по умолчанию на экране формы.
То есть, когда мы запустим приложение, сработает метод Main, в котором будет вызван метод Application.Run(new Form1()),
благодаря чему мы увидим форму Form1 на экране.
Определение формы
Теперь посмотрим на определение формы и немного изменим его. Для этого откроем файл Form1.cs в текстовом редакторе. По умолчанию он выглядит следующим образом:
namespace helloapp;

public partial class Form1 : Form
{
    public Form1()
    {
        InitializeComponent();
    }
}
Класс формы — Form1 представляет графическую форму — фактически то окно, которое мы увидим на экране при запуске проекта.
Этот класс определяется как частичный (с модификатором partial) и наследуется от встроенного класса Form,
который содержит базовую функциональность форм.
В самом классе Form1 определен по умолчанию только конструктор, где вызывается метод InitializeComponent(), который выполняет инициализацию компонентов формы из файла дизайнера
Form1.Designer.cs. По сути именно код этого файла передается выше через вызов InitializeComponent()
Теперь изменим его код следующим образом:
namespace helloapp;

public partial class Form1 : Form
{
    public Form1()
    {
        InitializeComponent();
        // определяем кнопку
        Button button = new Button();
        // текст кнопки
        button.Text ="Click";
        // положение кнопки
        button.Location = new Point(50, 50);
        // размер кнопки
        button.Size = new Size { Width = 80, Height = 30 };
        // обработчик нажатия кнопки
        button.Click += (o, e) => MessageBox.Show("Hello METANIT.COM!");
        // добавление кнопки на форму
        this.Controls.Add(button);
    }
}
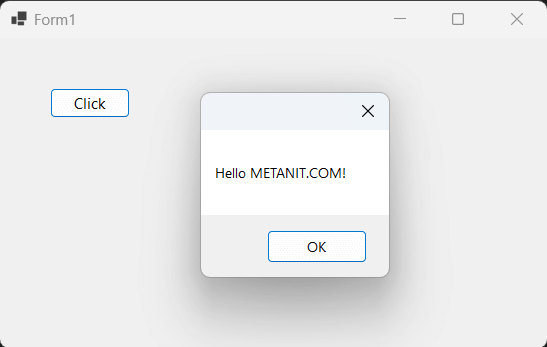
В данном случае на форму добавляется кнопка, и у нее настраиваются различные свойства, как текст, положение на форме, размер, а также обработчик нажатия.
Заново запустим проект, и нам отобразится та же форма, которая теперь будет содержать кнопку. И по нажатию на кнопку появится маленькое окно с сообщением.
Время чтения: 5 минут
Windows Forms — интерфейс программирования приложений, отвечающий за графический интерфейс пользователя. Он является частью .Net Framework и создан для того, чтобы упростить взаимодействие пользователя с элементами Win API. Причём не просто упростить, а буквально полностью скрыть низкоуровневое взаимодействие с графическими элементами путём создания набора базовых компонентов и классов. При этом используемые классы не привязаны к языку разработки, благодаря чему данный проект может использоваться как на родном для Microsoft C#, так и на других языках, например, C++, VB Net и F#. Но не смотря на свою кроссплатформенность в мире языков программирования, Windows Forms проекты легко создаются на C#, однако при попытке создания проекта на C++ возникает множество проблем.
Шаг 0. А вдруг получится сразу?
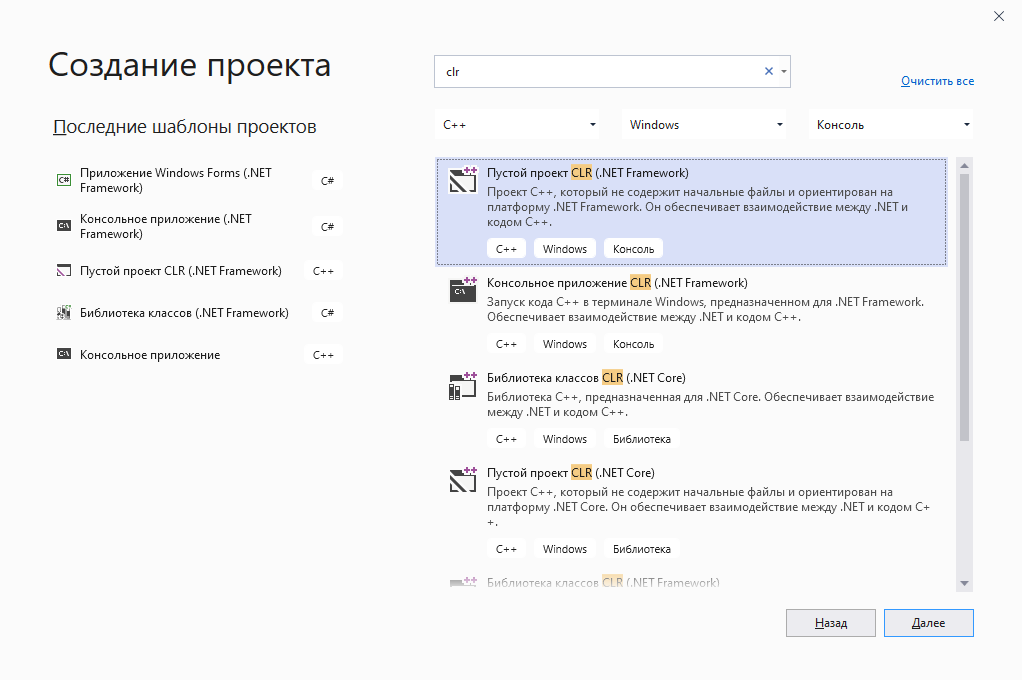
В настоящее время IDE, поддерживающих Windows forms, не так много — буквально одна только Visual Studio, более известная как просто «студия». Поэтому будем рассматривать создание и решение проблем именно в этой среде разработки. Первым шагом запустим студию, начнём создавать новый проект и попытаемся найти Windows forms проект для C++:
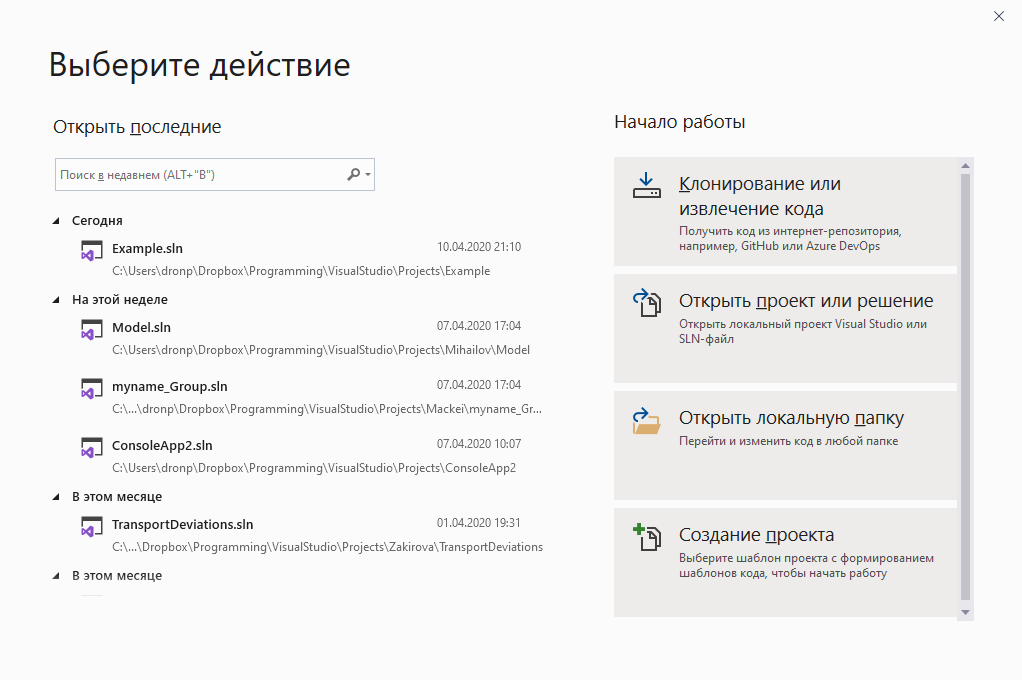
Создаём новый проект в студии
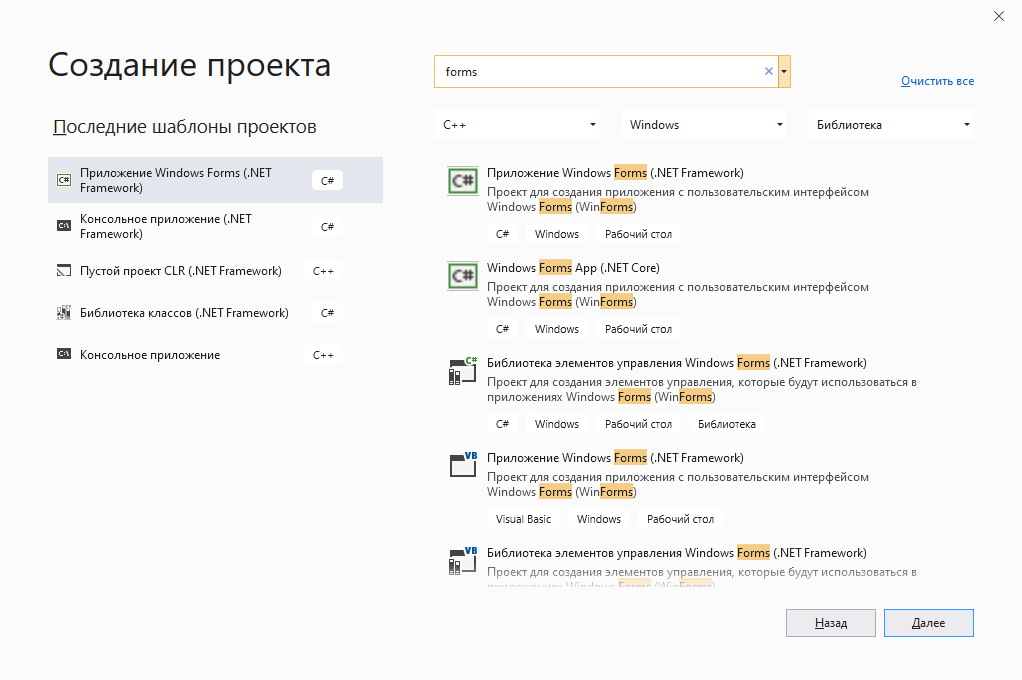
Ищем Winfows Forms для C++
Если у вас более старая версия Visual Studio, то интерфейс будет выглядеть немного иначе, однако данная функциональность будет той же. Также не исключено, что у Вас может быть данный тип проекта для C++ (на некоторых версиях формы для C++ были доступны сразу после установки IDE). Если же у Вас, как и у нас поиск не дал нужных результатов, то переходим к следующему шагу.
Шаг 1. Создание CLR проекта
Поскольку непосредственно Windows Forms проекта у нас не оказалось, мы обхитрим студию и создадим пустой CLR проект на С++. Для этого в том же окне поиска необходимо найти и выбрать Новый CLR проект, ввести имя (если нужно, то поменять директорию расположения проекта) и немного подождать, пока студия сделает свою работу.
Ищем пустой CLR проект (.Net Framework)
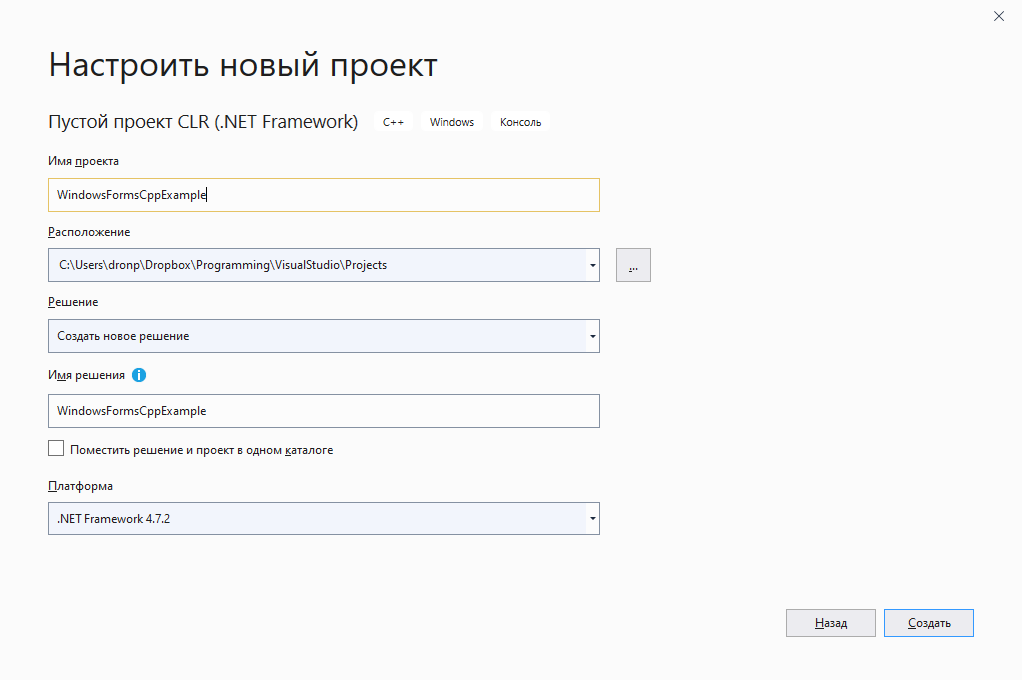
Создаём новый пустой CLR проект
В результате Visual Stido создаст новый C++ CLR проект, который будет выглядеть примерно так:
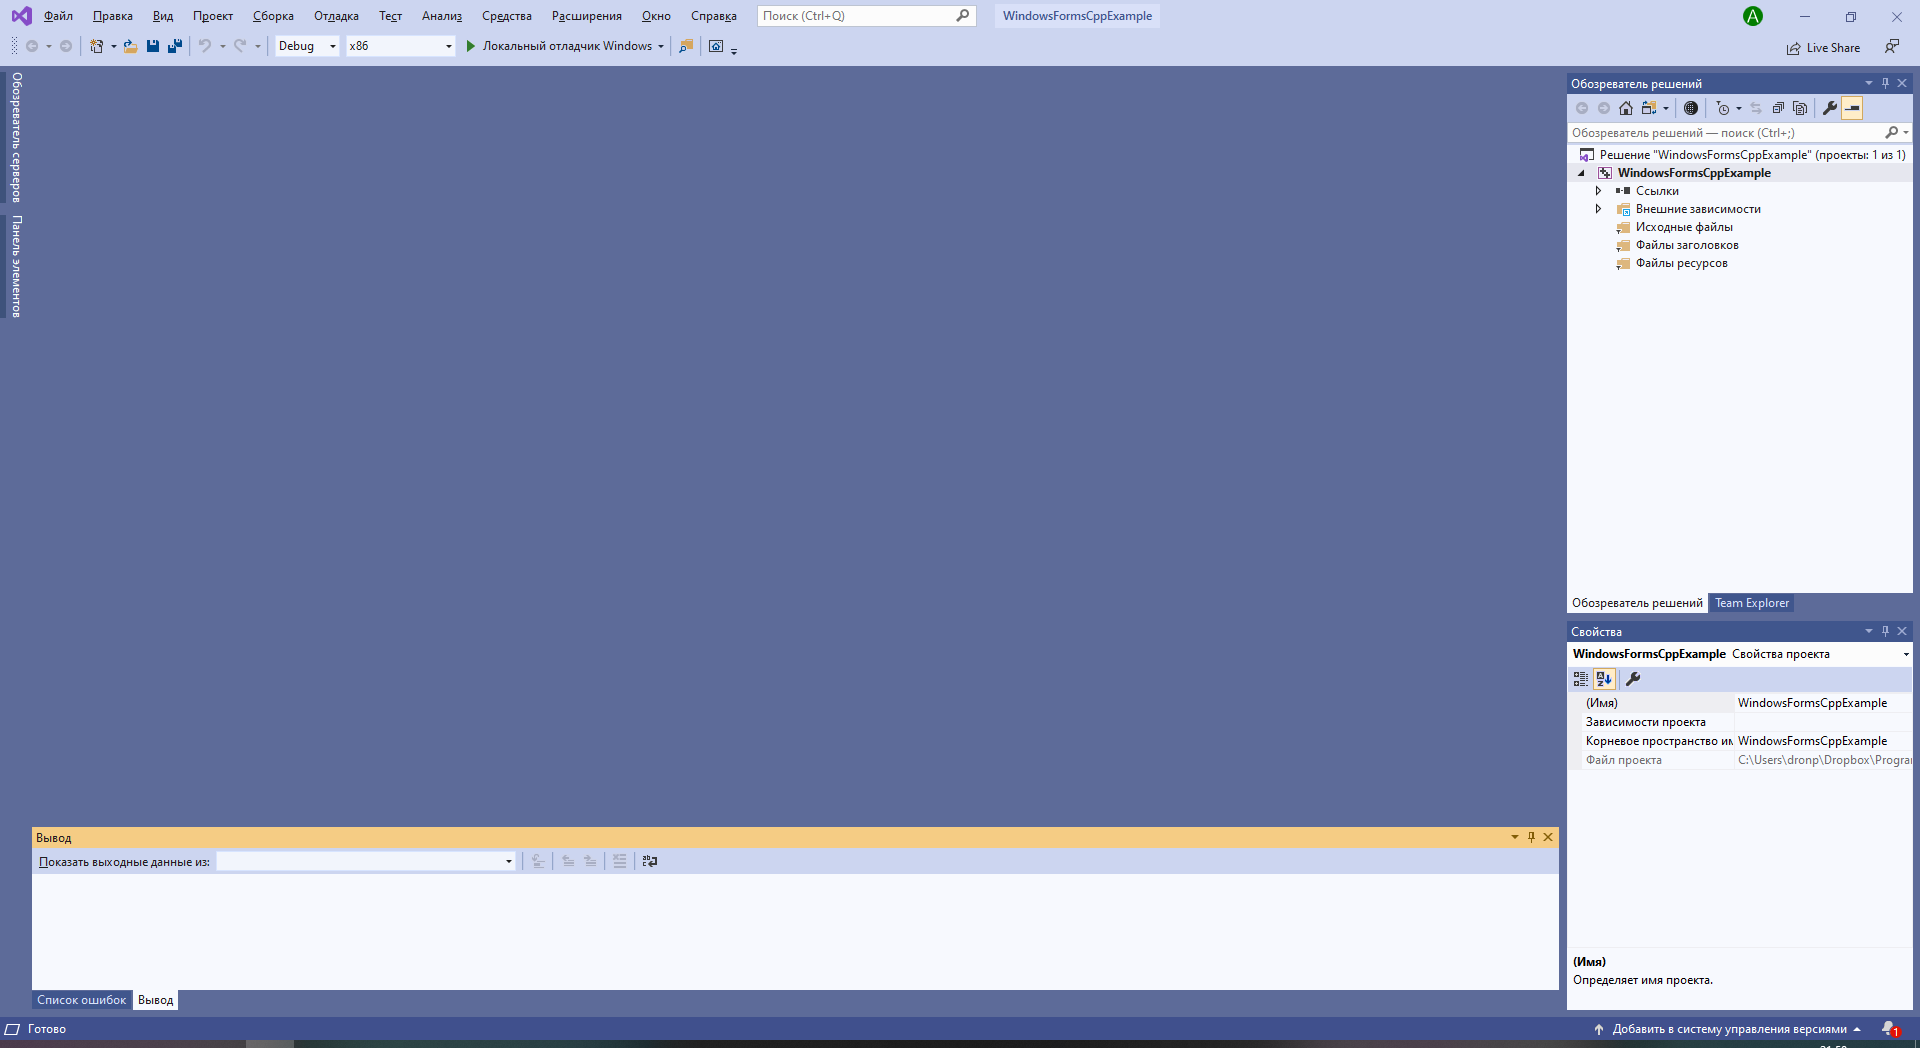
Результат создания нового CLR проекта
Шаг 2. Добавить форму
Чтобы сделать CLR проект проектом Windows Forms, нужно просто добавить в него форму. Для этого в верхнем меню нужно выбрать Проект — Добавить новый элемент и в появившемся окне выбрать категорию Visual C++ — UI и затем выбрать Форма Windows Forms.
Проект -> Добавить новый элемент

Visual C++ -> UI -> Форма Windows Forms
После данной операции нас ждёт разочарование в виде ошибки Исключение из HRESULT: 0x8000000A:
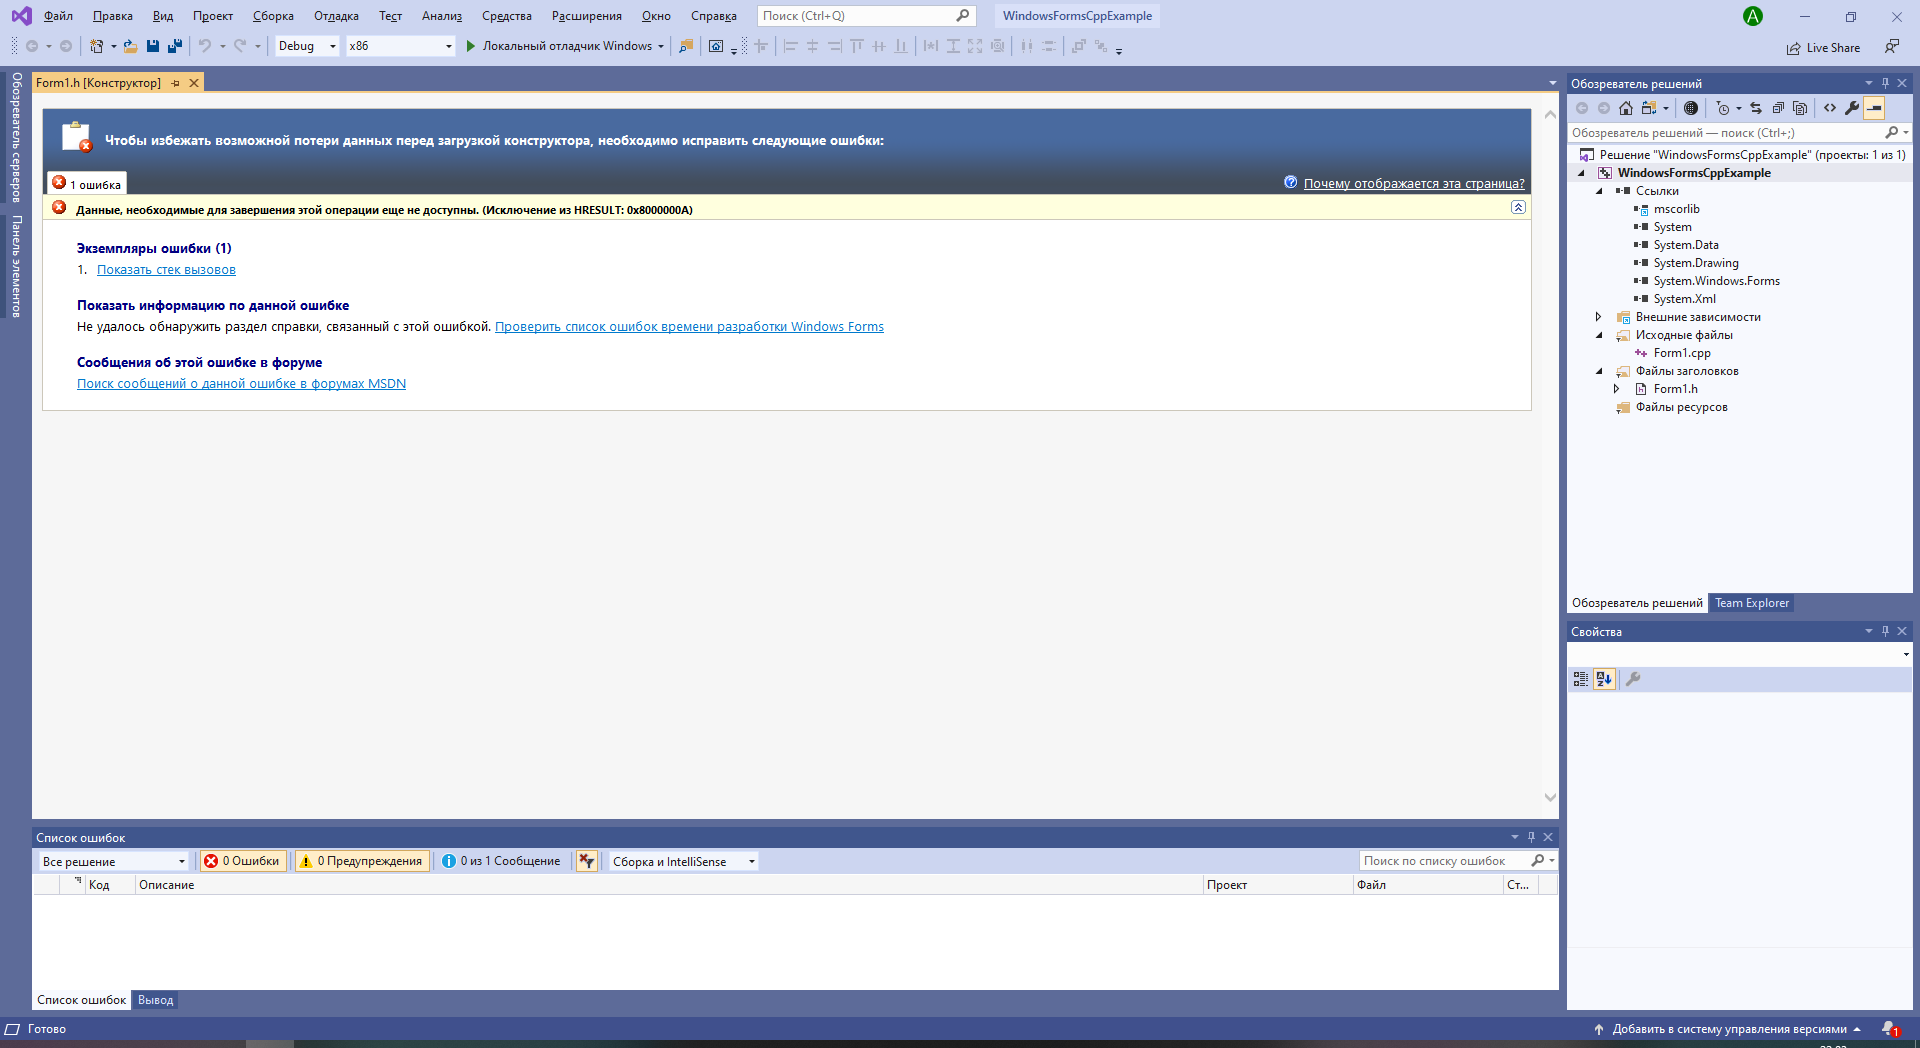
Вместо формы получили ошибку
Шаг 3. Исправляем появившуюся ошибку
Данная ошибка появляется из-за того, что для создания окна формы приложению необходима основная программа, создающая форму и переключающая управление на неё, однако после добавления новой формы файл Form1.cpp предсказуемо создаётся пустым. Поэтому необходимо добавить основную программу в файл с формой:
#include "Form1.h"

#include <Windows.h>

using namespace имя_вашего_проекта;

int WINAPI WinMain(HINSTANCE, HINSTANCE, LPSTR, int) {
    Application::EnableVisualStyles();
    Application::SetCompatibleTextRenderingDefault(false);
    Application::Run(gcnew Form1);
    return 0;
}
В результате код файла Form1.cpp будет выглядеть следующим образом:
Добавление основной программы к форме
Шаг 4. Переоткрыть проект
Всё, что теперь осталось сделать — это закрыть текущее решение, а затем открыть его снова. Для этого можно закрыть саму студию, а можно выбрать в верхнем меню Файл — Закрыть решение, после чего в появившемся окне выбрать только что созданный проект и открыть его заново.
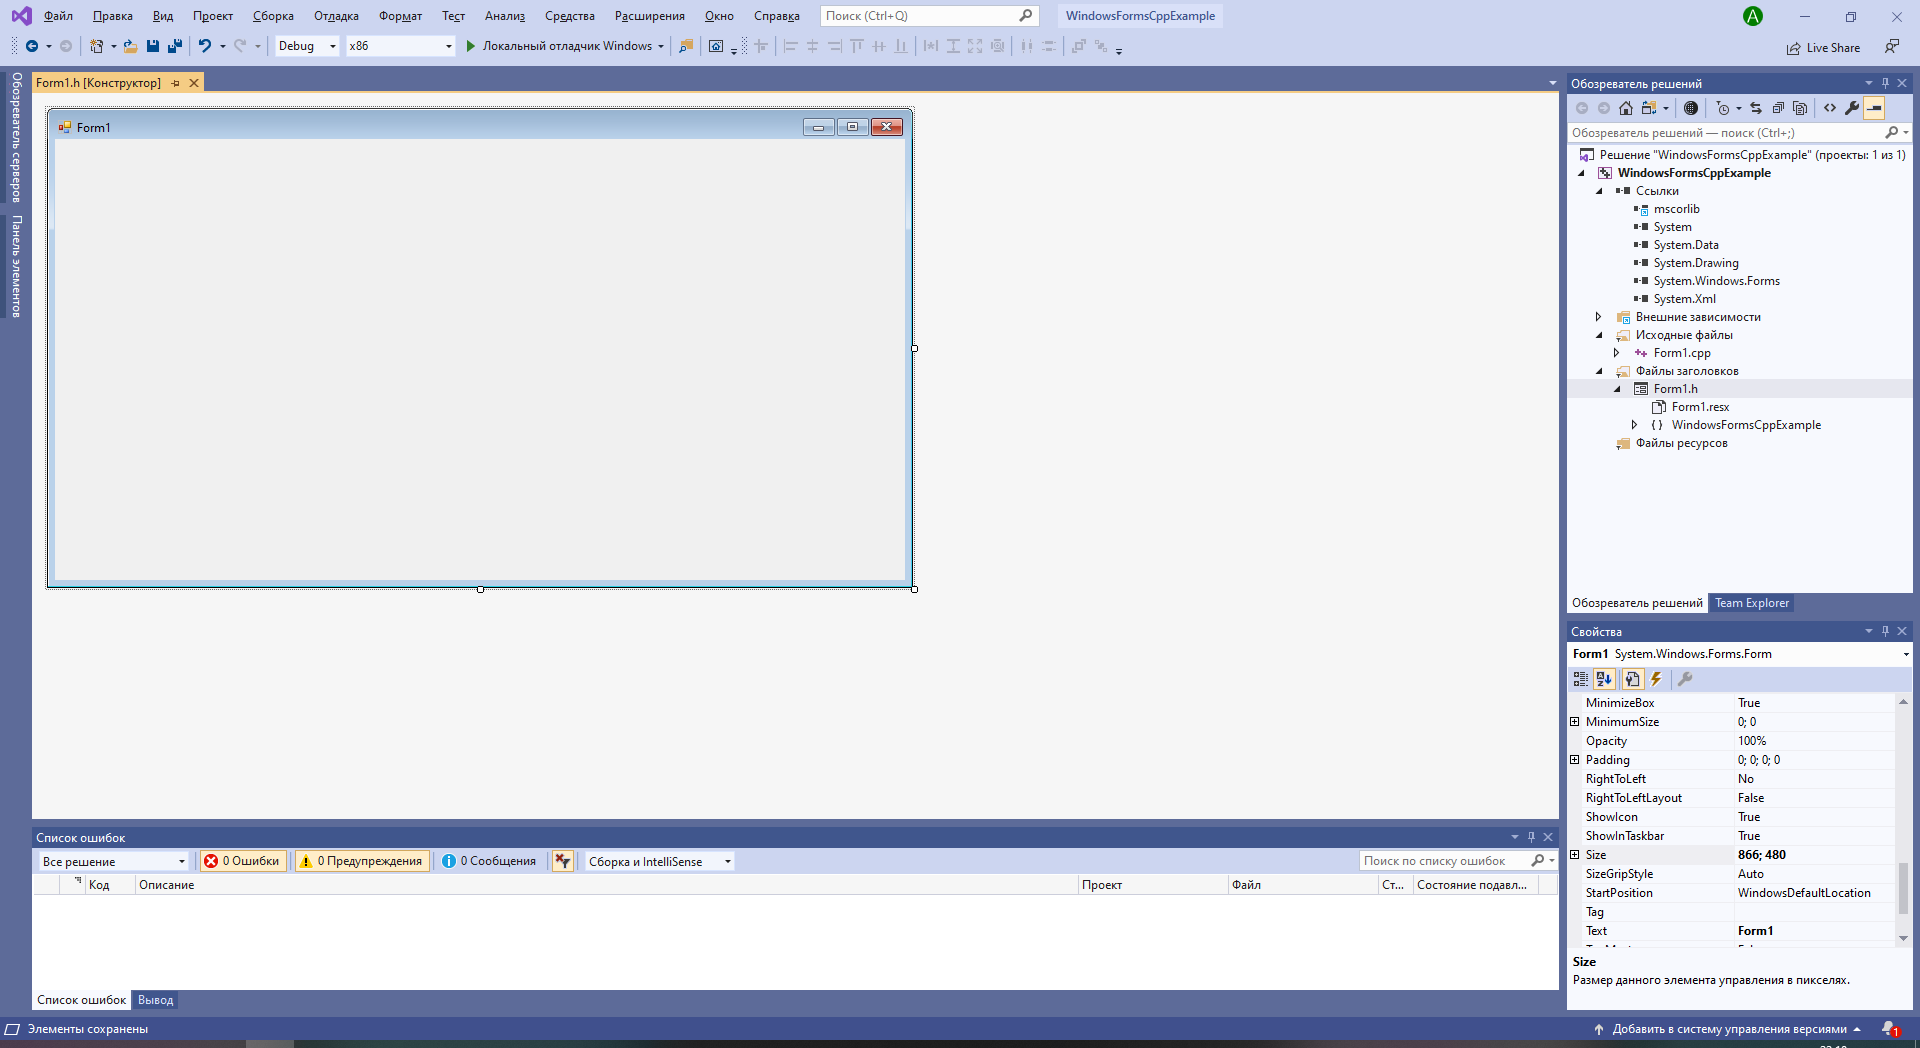
Форма создалась, можно добавлять компоненты
Благодаря добавленному коду основной программы, студия сможет создать форму и на экране появится изображение формы, на которую можно будет добавлять компоненты, задавать их свойства, а также свойства самой формы.
Программист, сооснователь programforyou.ru, в постоянном поиске новых задач и алгоритмов
Языки программирования: Python, C, C++, Pascal, C#, Javascript
Выпускник МГУ им. М.В. Ломоносова