
Создание дополнительных пользователей на сервере — важная практика для обеспечения безопасности, управления ресурсами и поддержания порядка в сетевой среде. В нашей статье рассмотрим способы создания учётных записей с правами на подключение к удалённому рабочему столу в операционной системе Windows Server 2016.
Данное действие может быть необходимо по нескольким причинам:
- Отдельные учётные записи для пользователей позволяют администраторам более точно управлять доступом к ресурсам сервера. Каждый пользователь может иметь собственные права доступа и разрешения на файлы, папки, службы и другие ресурсы.
- Когда каждый пользователь имеет свою собственную учётную запись, становится легче отслеживать его действия. Это может быть полезно для анализа аудита, мониторинга безопасности и выявления проблем в работе сервера.
- Создание дополнительных учётных записей позволяет разделить обязанности среди пользователей и администраторов. Данная процедура необходима для обеспечения безопасности, а также для снижения риска ошибок или злоумышленных действий.
- Если происходит инцидент безопасности или нарушение, наличие дополнительных пользователей облегчает выявление и устранение уязвимостей, позволяя определить учётные записи, вовлеченные в инцидент.
Создание учётной записи
Первый способ
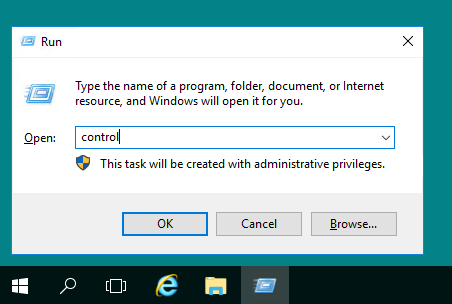
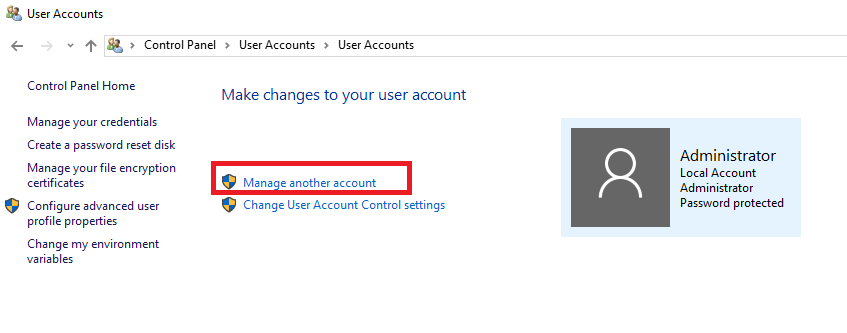
Для того, чтобы создать учётную запись в Windows Server, откройте Control Panel, для чего используйте комбинацию клавиш Win R, где наберите control.
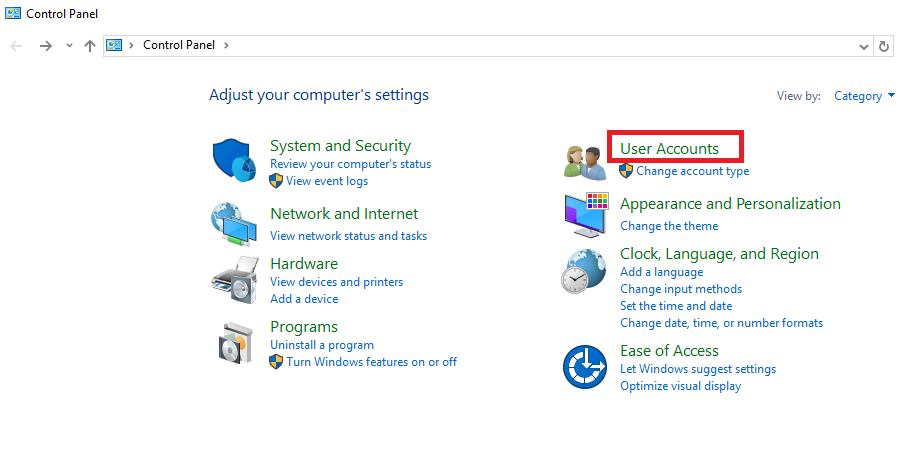
В открывшейся панели перейдите в раздел User Accounts.
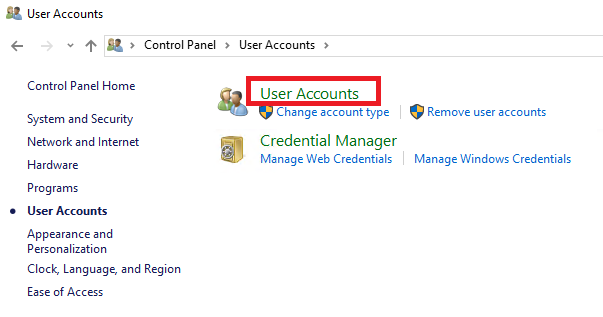
Затем ещё раз нажмите на User Accounts.
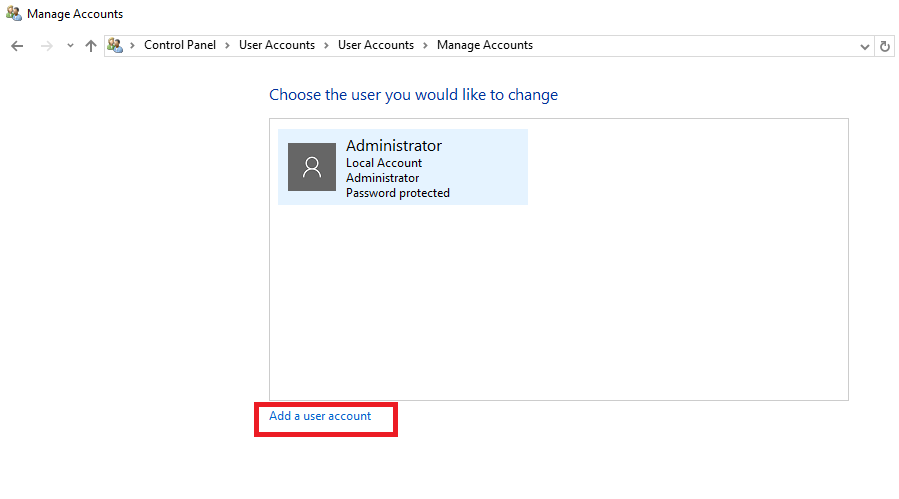
В данном разделе перейдите в Manage another account.
Здесь нажмите на Add a user account.
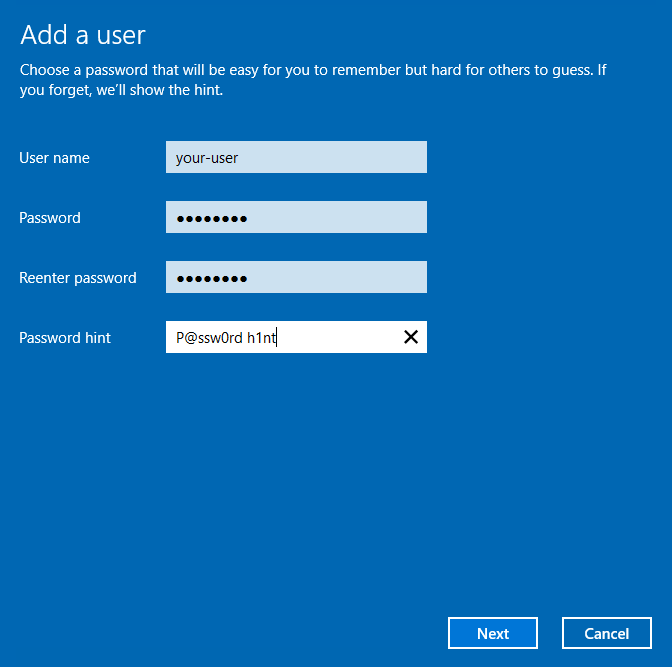
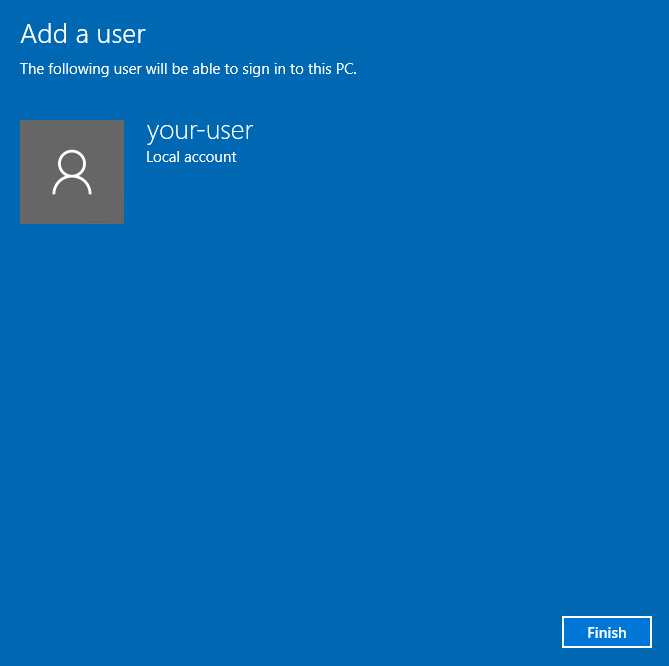
В данной форме внесите в соответствующие поля имя учётной записи, пароль и подсказку на случай, если пользователь забудет свой пароль. После чего нажмите Next.
Для завершения процесса создания пользователя нажмите Finish.
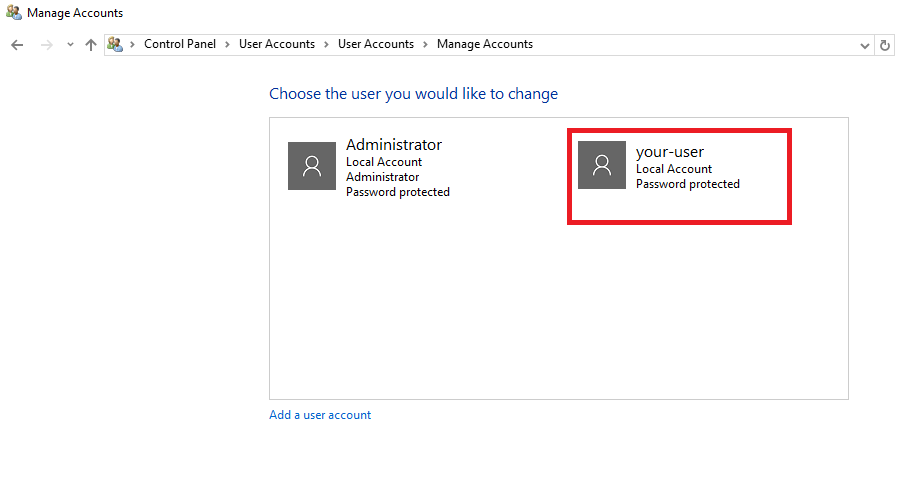
Таким образом, в списке пользователей вашего сервера появится ещё одна только что добавленная учётная запись.
Второй способ
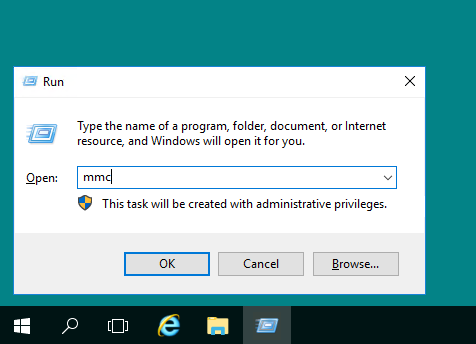
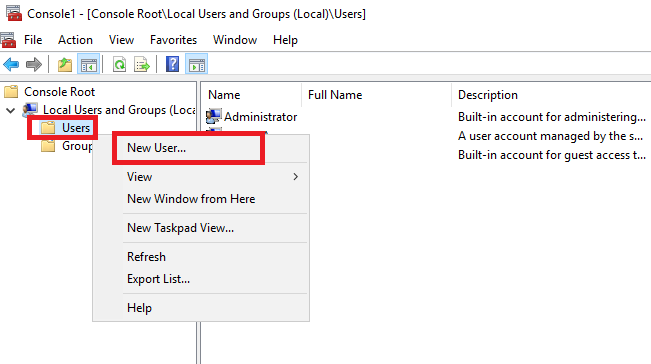
Ещё одним способом добавления в систему нового пользователя является использование консоли управления. Для её запуска используйте комбинацию клавиш Win R, где в открывшем окошке наберите mmc и нажмите ОК.
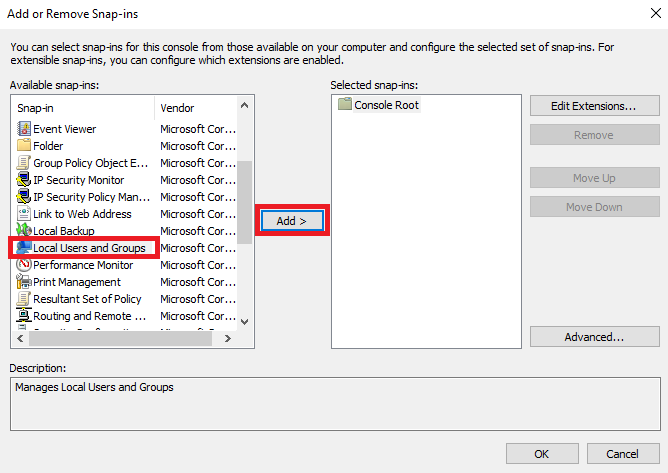
В окне консоли перейдите File → Add/Remove Snap-in...
В правой части окна найдите и выделите оснастку Local Users and Groups, после чего нажмите Add.
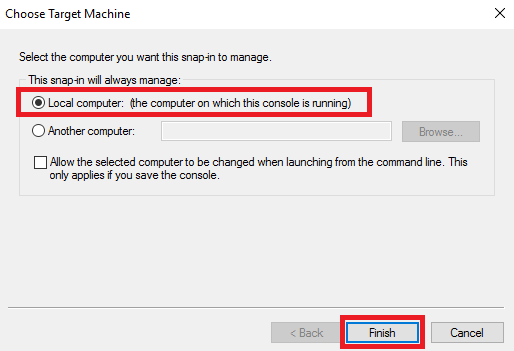
Далее, в окне выбора целевой машины укажите Local computer и нажмите Finish.
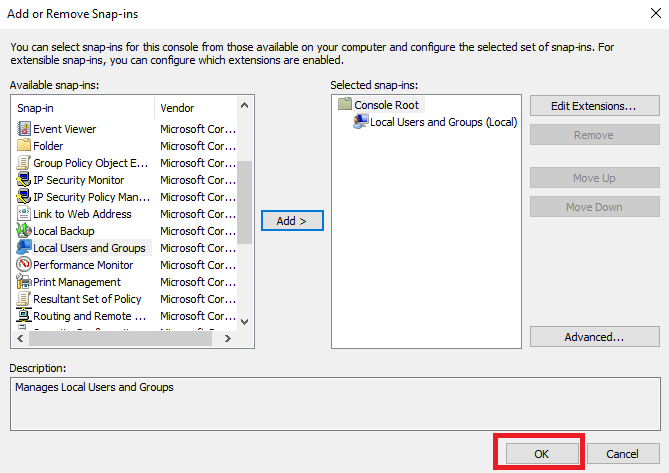
Для завершения процесса добавления оснастки нажмите ОК.
Теперь в консоли управления раскройте ветку добавленной оснастки, нажмите правую кнопку мыши на строке Users и в открывшемся контекстном меню выберите New User...
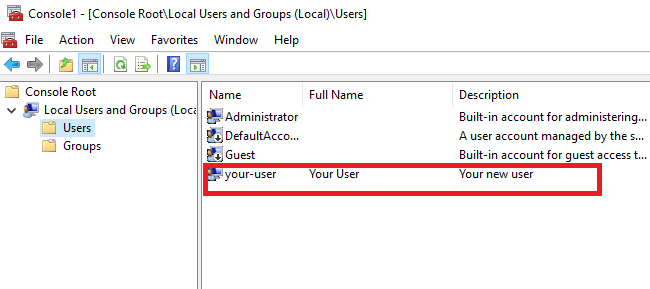
Далее, заполните поля, соответствующие названию создаваемой учётной записи, полному имени и описанию. В строках ниже введите пароль и его подтверждение, а также, активируйте необходимые опции. Чтобы завершить создание учётной записи, нажмите Create.
В итоге новая учётная запись появится в списке пользователей вашего сервера.
Присвоение прав на подключение к удалённому рабочему столу
Первый способ
Для того, чтобы дать пользователю подключаться к вашему серверу по RDP, необходимо присвоить ему соответствующие полномочия. Чтобы это осуществить, в консоли управления перейдите в оснастку Local Users and Groups, далее выделите ветку Users, где найдите нужную учётную запись. На строке данного пользователя нажмите правую кнопку мыши и в контекстном меню выберите Properties.
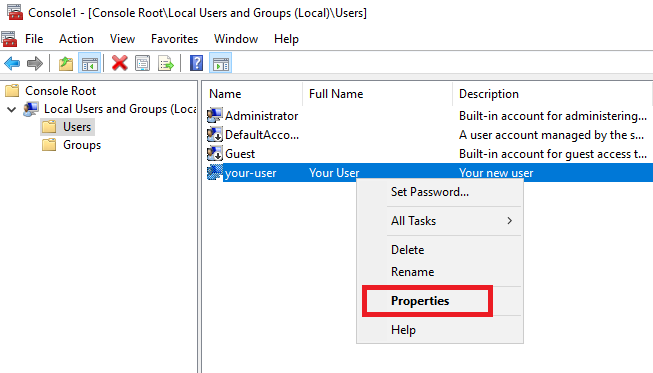
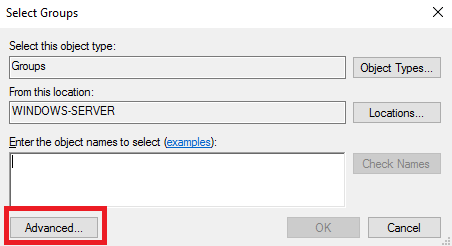
В открывшемся окне перейдите во вкладку Member Of и нажмите Add...
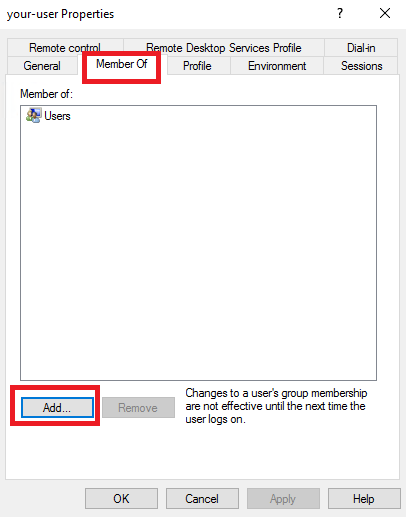
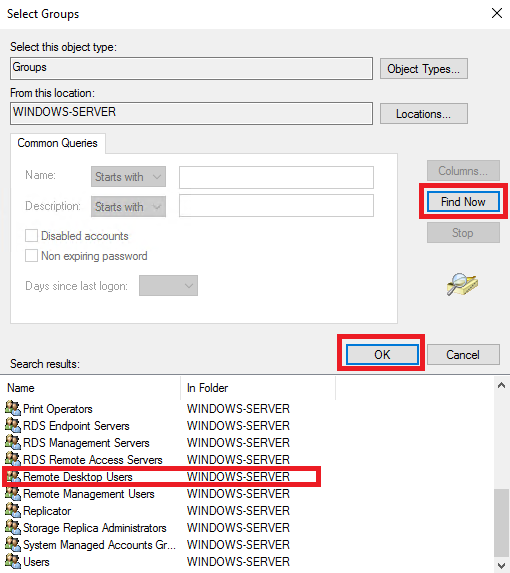
Далее, в окне Select Groups нажмите Advanced...
Затем нажмите Find Now, выберите Remote Desktop Users и подтвердите свой выбор кнопкой ОК.
Название выбранной группы появится в окне Enter the object name to select. Если это так, нажмите ОК.
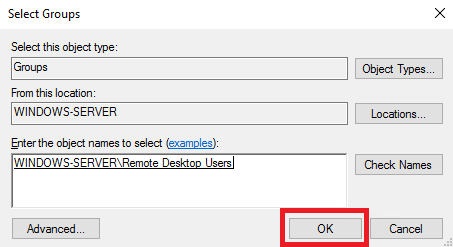
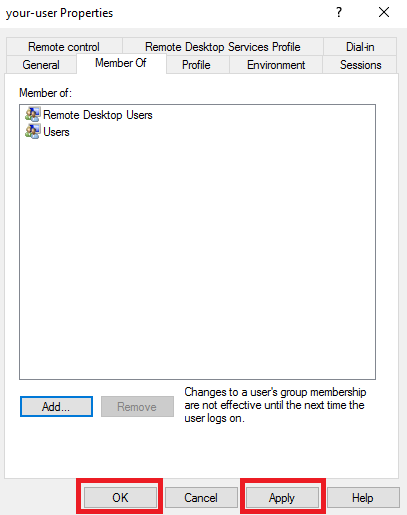
Для сохранения внесённых изменений нажмите Apply и закройте окно кнопкой OK.
Второй способ
Добавить созданному пользователю права на подключение к удалённому рабочему столу вашего сервера можно ещё одним способом. Чтобы это сделать, нужно добавить требуемую учётную запись в список пользователей, имеющих разрешение на подключение по RDP.
Итак, откройте Control Panel и перейдите System and Security → System. Затем нажмите Change settings. В окне System Properties откройте вкладку Remote и нажмите Select Users в разделе Remote Desktop.
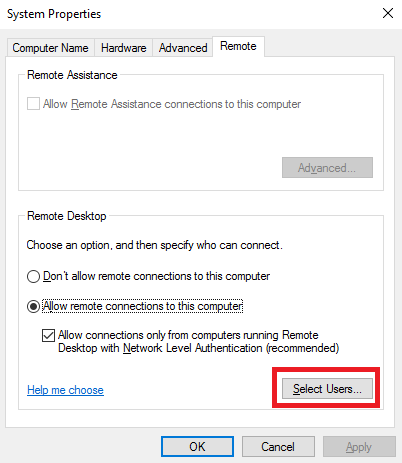
В открывшемся окне нажмите кнопку Add...
Затем в поле Enter the object names to select введите имя необходимой учётной записи и нажмите кнопку Check Names. Если вы набрали имя пользователя корректно, система найдёт его. После чего нажмите ОК.
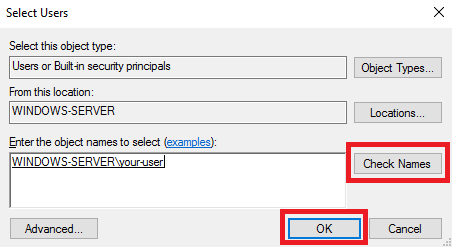
В результате в списке Remote Desktop Users должен появиться ваш пользователь. Для сохранения изменений нажмите ОК.
Чтобы закрыть окно System Properties, нажмите ОК.

Таким образом, новая учётная запись теперь имеет полномочия для подключения к удалённому рабочему столу вашего виртуального сервера. То, как это сделать, подробно описано описано в посвящённой данному вопросу статье нашего справочника.
После того как Вы установили Windows Server 2012, 2016 или 2019 на VDS, там доступна только учётная запись Administrator.
Но когда на сервере необходимо работать нескольким пользователям, и одновременно, тогда необходимо добавить дополнительного пользователя, или пользователей. Так же, в данном случае, необходимо учесть, что бы на сервере был установлен терминальный сервер, и необходимое количество лицензий для RDP соединения. Как установить и настроить сервер терминалов, Вы можете увидеть в этой статье.
Для того что бы добавить второго пользователя, подключитесь к серверу со своими учетными данными Administrator. Потом перейдите в Computer Management. Это можно сделать, кликнув правой мышкой по меню Start, и в контекстном меню выбрать Computer Management.
Или нажмите комбинацию Win+R и в окне Run введите команду compmgmt.msc и нажмите OK.
Теперь в окне Computer Management переходим в Local Users and Groups => Users и в верхнем Action меню выбираем New User.
В открывшемся окне New User необходимо прописать имя пользователя, в графе User Name которое Вы будете использовать для входа на сервер. В пункте Full Name можно прописать полное имя, которое будет видно на экране приветствия. В поле Description можно ничего не писать.
В поле Password и подтверждение пароля, введите пароль который будете использовать для данного пользователя.
Чекбокс User must change password at next logon можете снять, если не нужно будет изменять пароль при первом подключении пользователя.
Чекбокс User cannot change password оставляем, что бы пользователь не смог изменять пароль.
Чекбокс Password never expires оставляем так же если нет необходимости в смене пароля. Account is disabled включает/отключает возможность подключения/входа пользователя на сервер. Снимаем галочку.
Чтобы создать пользователя, нажимаем Create.
Теперь для созданного пользователя, необходимо предоставить необходимые права, на подключение к серверу. Чтобы это сделать, нужно кликнуть правой кнопкой мыши и выбрать пункт Properties.
Чтобы созданному пользователю разрешить доступ по RDP к данному серверу, на вкладке Remote control необходимо установить соответствующие разрешения, как показано на иллюстрации ниже.
Но для того чтобы пользователю дать права Администратора, его необходимо добавить в соответствующую группу. На вкладке Member of
нажимаем Add… и в окне выбора группы выбираем Advanced… затем кнопку Find Now в окне подбора групп. Выбираем группу Administrators и нажимаем Ок.
Теперь, таким же образом, Вы можете создавать нужное количество пользователей на своем сервере.
Те же действия, только через Power Shell
Создадим пользователя User2, с описанием Manager и паролем QWErty1! (Не создавайте такие легкие пароли!!!)
$PASSWORD= ConvertTo-SecureString –AsPlainText -Force -String QWErty1!; New-LocalUser -Name "User2" -Description "Manager" -Password $PASSWORDСоответственно, вместо User2 используйте имя своего пользователя, и пароль не меньше 12 символов.
Теперь добавим данного пользователя в нужную нам группу.
Add-LocalGroupMember -Group "Remote Desktop Users" -Member "User2"В группу Remote Desktop Users
Чтобы добавить в группу Administrators используем следующую команду:
Add-LocalGroupMember -Group "Administrators" -Member "User2"The Active Directory Users and Computers (ADUC) is used to manage your Active Directory. It’s installed by default on a domain controller, but you can also install ADUC on other servers and computers as well.
ADUC is part of the Remote Server Administration Tools (RSAT), which allows you to easily install the required management console with only a few clicks. This allows you to manage your Active Directory from your own Windows 11 workstation for example.
In this article
In this article, we will look at how to install Active Directory Users and Computers on other servers and install ADUC with the help of the RSAT tools on Windows 10 and 11. We will also look at some of the basic features and I have a time saver tips for you!
When you install a domain controller, the Active Directory Users and Computers console is added by default. But you probably don’t want to give all your helpdesk technicians access to the domain controller to only create a new user or reset a password for example.
We can install the ADUC console on any domain member server and Windows 10 or 11 machine. When using Windows 10 or 11, you will need to make sure that you are using the Professional or Enterprise edition. The home version is of course not supported because you can’t join it to a domain.
To install the Active Directory Users and Computers console, we are going to add the RSAT feature, which stands for Remote Server Administration Tool. RSAT exists out of 27 tools in total, but we are going to install only the following tools:
- Active Directory Users and Computers (ADUC) – To manage and create user and computer objects in the Active Directory
- PowerShell Active Directory Module – Allow you to use PowerShell to manage your Active Directory
- Active Directory Domains and Trusts – Create and manage trusts between domains and forests
- Active Directory Sites and Services – Used to manage sites and services
- ADSI Edit – Allows you to modify AD Objects on attribute level
- Active Directory Administrative Center – View the history of PowerShell commands that are used to manage the AD. Configure password policies and view AD Trash
Active Directory Users and Computers on Windows 11
You can also use Windows 10 or 11 to manage your Active Directory. This way you don’t need to sign in on the Domain Controller every time you need to create or modify a user object for example.
To manage your Active Directory from Windows 11, you will need to install ADUC with the help of the RSAT tools. Just like on a server, this is a feature that we can easily add.
Time needed: 5 minutes
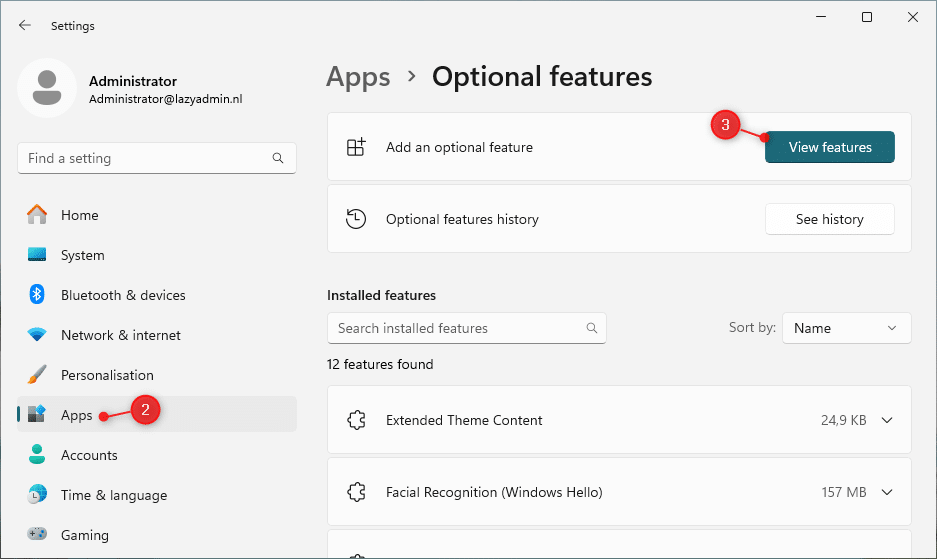
- Open Windows Settings
Right-click on Start and open the Settings
- Go to Apps and choose Optional Features
- Click on View Features

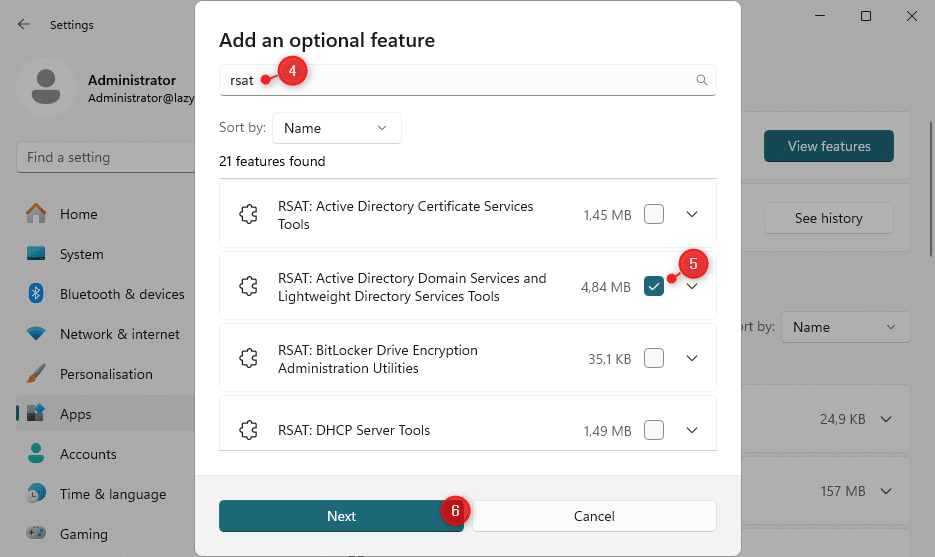
- Search for RSAT
- Select RSAT: Active Directory Domain Services and Lightweight…

- Click on Next and Install to install the feature
After you have installed the RSAT feature, you will find the Active Directory Users and Computers console in your Windows 11 start menu.
Using PowerShell
We can also install the RSAT tools with the help of PowerShell. The advantage of using PowerShell is that you can easily add the tools to remote servers, without the need to of logging in on each device.
To install the ADUC tools on Windows 11 with PowerShell, you can use the following command:
Add-WindowsCapability -Online -Name Rsat.ActiveDirectory.DS-LDS.Tools~~~~0.0.1.0
You can verify the installation with:
Get-WindowsCapability -Name "Rsat.ActiveDirectory*" -Online | Select-Object -Property DisplayName, State

# Result
DisplayName                                                                         State
-----------                                                                         -----
RSAT: Active Directory Domain Services and Lightweight Directory Services Tools Installed
To install the ADUC tools on Windows Server with PowerShell, you can use the following PowerShell command:
Install-WindowsFeature RSAT-AD-PowerShell
Install ADUC on Windows Server
To add the ADUC console to a Windows Server we are going to use the Server Manager.
- Open the Server Manager (you can find it in Start or on the taskbar)
- Click on Manage > Add Roles and Features
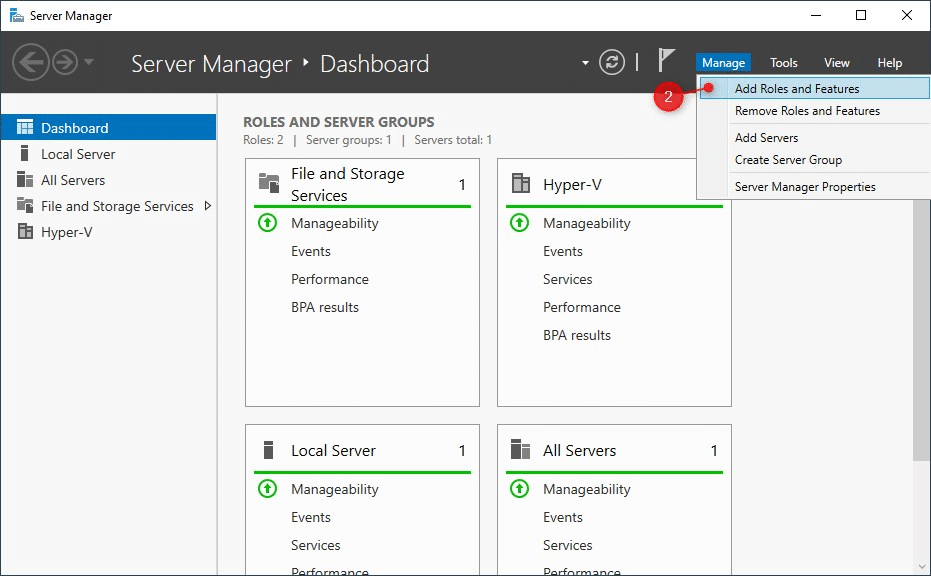
- Click Next (4x)until you are at Features
- Expand the Remote Server Administration Tools
- Expand Role Administration Tools and AD DS and AD LDS Tools
- Select AD DS Tools and I recommend installing the Active Directory module for PowerShell as well
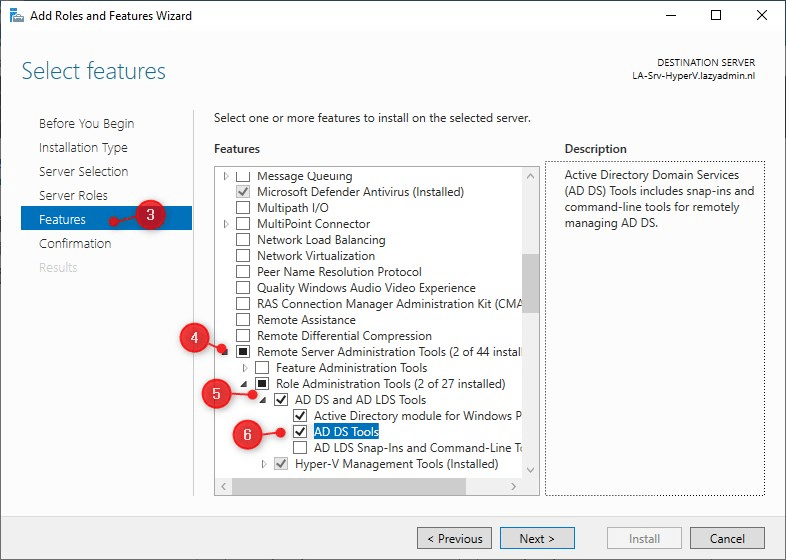
- Click and Install to install the ADUC tool.
It will take a minute or two to install the new feature. When it’s completed, you can find the Active Directory User and Computers console in the start menu under Windows Administrative Tools.
Enable Active Directory Recycle Bin
The Active Directory also has a recycle bin, but it’s disabled by default. This means that when you delete an object (user for example), you are unable to easily restore it. Therefore I recommend that you enable the Active Directory Recycle Bin as well.
Using Active Directory User and Computers
The ADUC is mainly used to create and manage user accounts, computer objects, group membership and reset passwords. In small environments, all these tasks are often performed by a single IT member, but the larger the environment, the more you want to work with limited roles and delegation.
Let’s take a look at how to perform some of these tasks in the ADUC.
Creating User Account
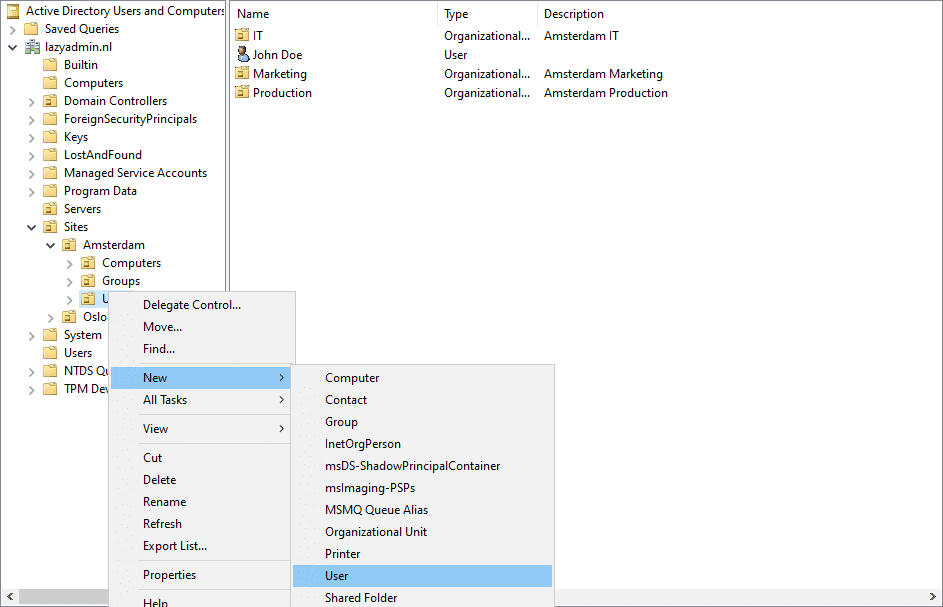
Creating a new user is one of the common tasks that you can do within the Active Directory Users and Computers. First, navigate to the OU or container where you want to create the new user account.
- Right-click on the container or organizational unit (OU), and choose New > User
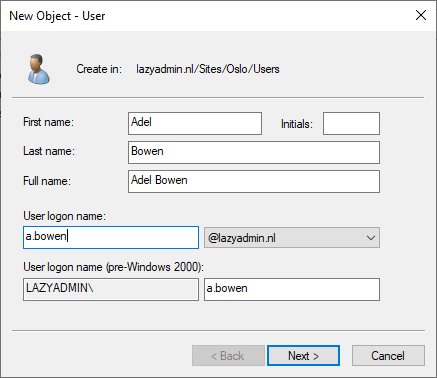
- Enter all the details in the New Object – User dialog, like the name, and logon name.
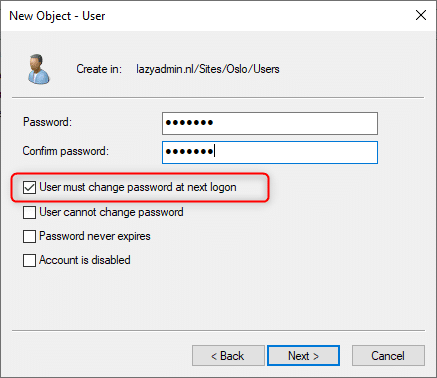
- On the next screen, enter a password. The best practice is to set a temporary password, and enable “User must change password at next logon”. This way the user can configure a strong password that only he or she knows.
- Click Next and Finish to create the user.
The user account is now created, but you are often not finished yet. If you open the newly created user object, you will see that you can enter more information about the user, like contact details and job title.
You will also often need to make the user a member of specific groups so the user has access to all the required resources.
An easier way to create a new user is often to copy an existing user. This way all the group memberships are copied, and also the address details from the company, for example, are copied to the new user.
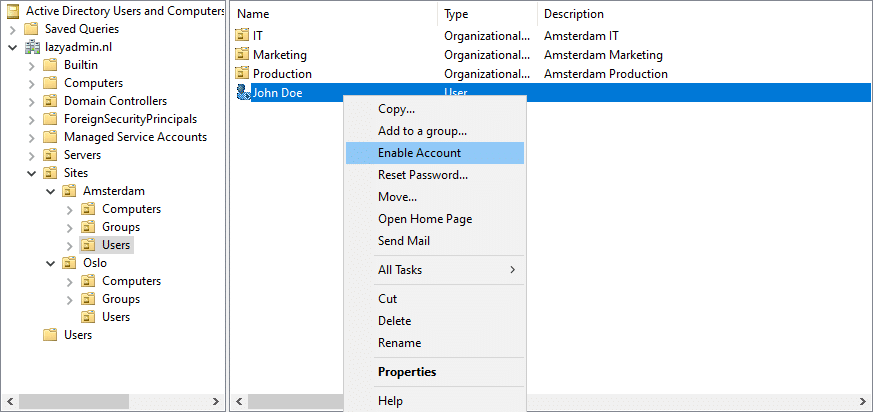
Reset, Enable, and Disable Accounts
When a user enters a password wrong more than 5 times, the account can get blocked by the Active Directory. We can simply enable the account, or disable it, by opening the context menu of the user object in the ADUC.
- Right-click on the user
- Choose Enable Account
The same method can also be used to disable an account or reset a password. With the latter, you will need to enter a new temporary password for the user.
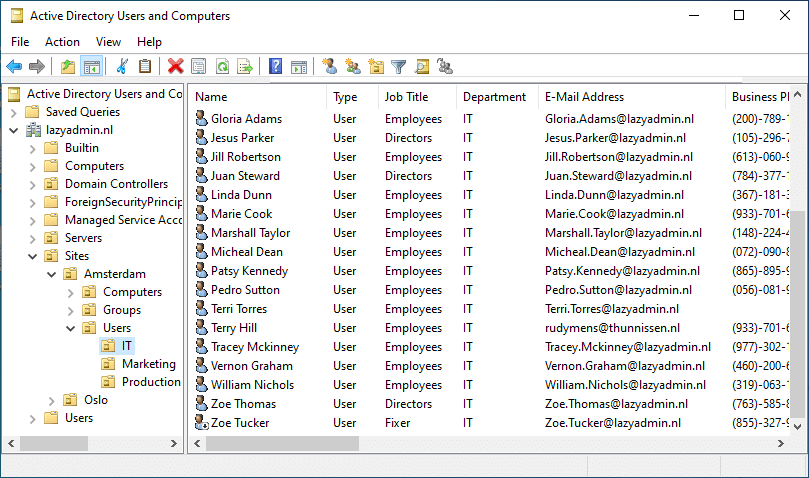
Adding Collums
By default, the Active Directory Users and Computers will only show the name of the user, object type, and description. It can, however, be useful to add more columns to the overview. For example, you can show the department, job title, or phone number of the user in the overview.
This way you don’t have to open every use if you just want to check or verify some of the information.
To change the column, click on View > Add/Remove Columns and select the columns that you want to include.
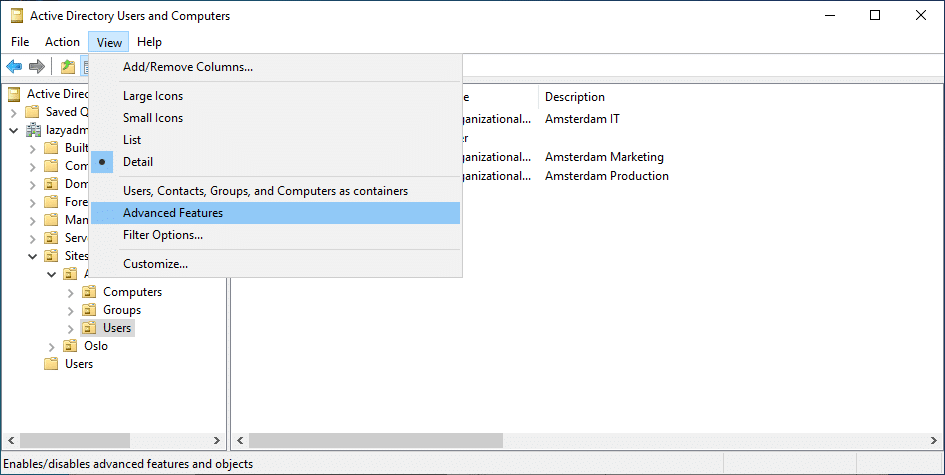
Showing Advanced Properties
By default, the ADUC will show you the basic containers and properties of objects. For most cases, this will be enough, but in some occasions, you will need to modify specific attributes. For example, when you need to set the proxyAddresses attribute.
To view all properties and containers, you will need to enable the Advanced Features in ADUC. Click on View > Advanced Features to enable it.
Setting Up Delegated Access
Delegated access allows you to give permission to users or groups to manage a specific set of users, computers, groups, or other objects in the Active Directory.
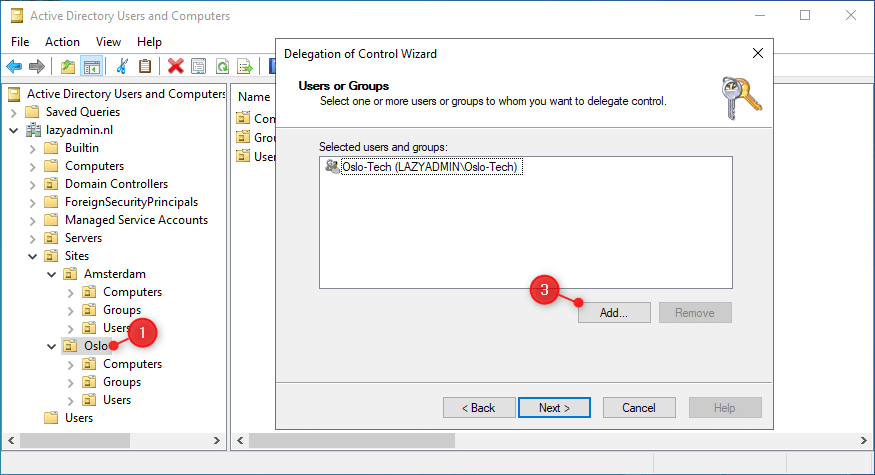
For example, we have two sites in our Active Directory, Amsterdam and Olso. We only want to give the IT guys in Oslo access to the AD objects of Oslo.
- Right-click on the OU where you want to give delegated access on
- Choose Delegated Control
- Click Next, Add the user(s) or security group to which you want to give access, and click Next
- Select the permissions that you want to give, for example, only reset user passwords, or full access to create and delete accounts. You can also create custom tasks if needed.
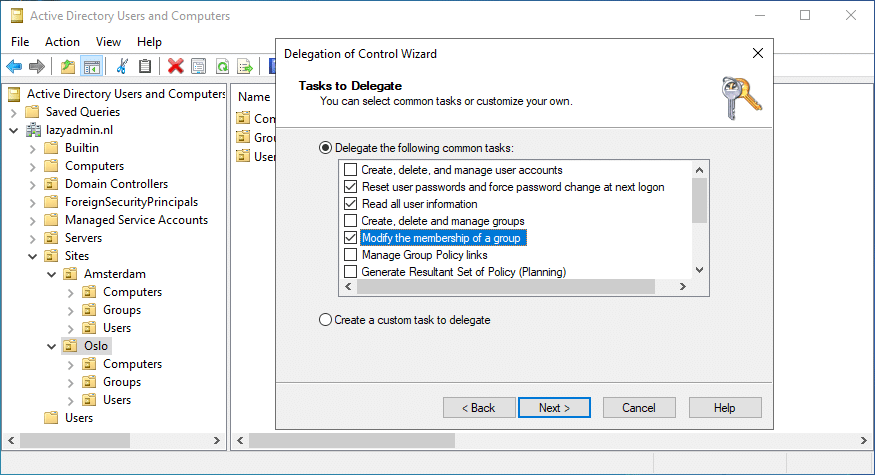
- After you have selected the permissions, click Next and Finish to assign the permissions.
Finding Objects
In larger environments, it can sometimes be difficult to find that specific computer or user. Instead of clicking through all OU’s or Containers, you can also use the search function in Active Directory Users and Computers to quickly find it.
The search function works from the selected container or OU down. So if you select the default Users container, then it will only search in the users.
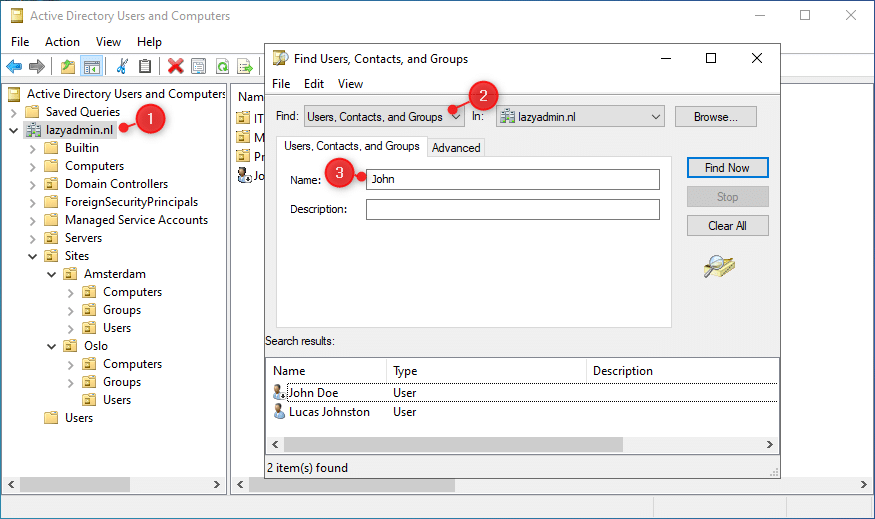
Personally, I search always on the domain level. For this, simply right-click on your domain name (1) and select Find.
In the Find dialog, you will need to select what you are searching for (2). By default, Users, Contacts, and Groups are selected. But you can also search for Computers, Printers, or Organizational Units for example.
Enter the name, or a part of, that you are searching for and click on Find Now
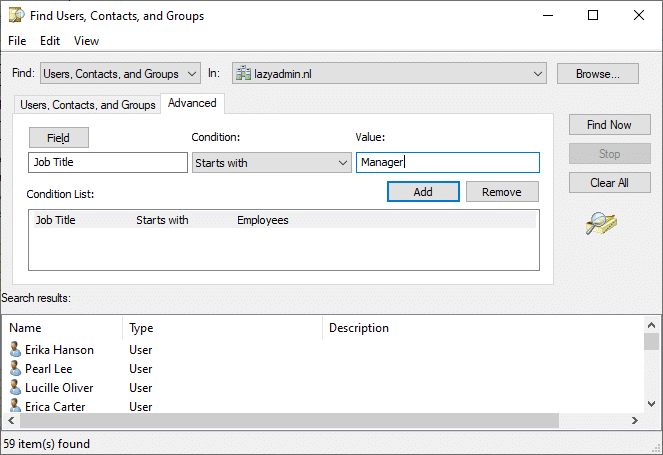
You can also use the Advanced search option, which allows you to specify multiple conditions to search on. For example, we can find all employees that have a specific job title:
Using Queries
The Saved Queries in the Active Directory Users and Computers is often an overlooked feature that is really handy. It allows you to create custom search queries in your Active Directory and save them.
You can use some of the built-in queries, use the advanced search features, or even create your own LDAP query for the search folders.
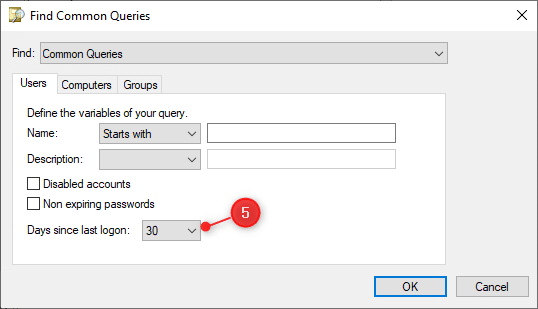
A simple example to create is the Inactive accounts queries:
- Right-click on Saved Queries and choose New > Query
- Enter a name (this is how it will be displayed in the sidebar)
- Select the folder on which you want to run the query, for example, your users
- Click on Define Query
- Select days since last logon, and set it to 30 days for example.
- Click Ok (twice) to create the search query and view the results.
Wrapping Up
By installing the Active Directory Users and Computers on your computer you can easily manage your Active Directory without the need of logging in on the domain controller every time.
If you are not using PowerShell a lot, then make sure that you try out the Saved Queries feature to create your own collection. These can really be time savers in your daily work. Also, make sure that you enable the AD recycle bin!
I hope you found this article helpful, if you have any questions, just drop a comment below.
If you’ve ever managed an Active Directory domain controller, you’re probably familiar with this long-standing, easy-to-use «Active Directory Users and Computers» console.
Here is a full presentation of it.
- Available folders
- Builtin folder
- Computers folder
- Domain Controllers folder
- ForeignSecurityPrincipals folder
- Managed Service Accounts folder
- Users folder
- Create new objects in your Active Directory domain
- Create a new user
- Create a new group
- Create an organizational unit
- Reference a shared folder
- Reference a shared printer
- Add a printer on a client PC from the Active Directory
- Advanced features
- Filter options
- Actions
- Delegate Control
- Find
- Change Domain
- Change Domain Controller
- Raise domain functional level
- Operations Master
- Properties
- Resultant Set of Policy (Planning)
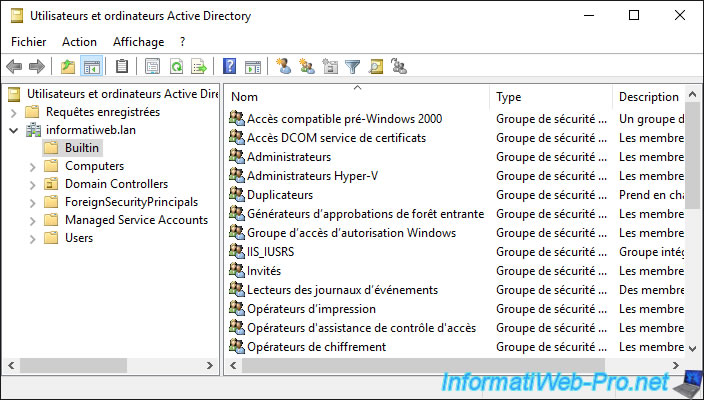
1. Available folders
By default, only the main folders are displayed :
- Builtin
- Computers
- Domain Controllers
- ForeignSecurityPrincipals
- Managed Service Accounts
- Users
1.1. Builtin folder
In the «Builtin» folder, you will find the groups created by default by Windows Server and Active Directory.
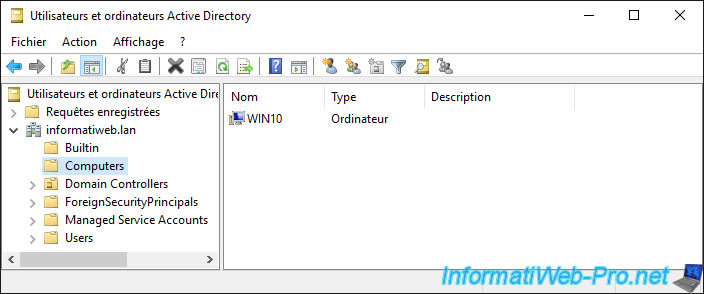
1.2. Computers folder
In the «Computers» folder, you will find the «computer» type objects corresponding to the client computers that you have joined to your Active Directory domain.
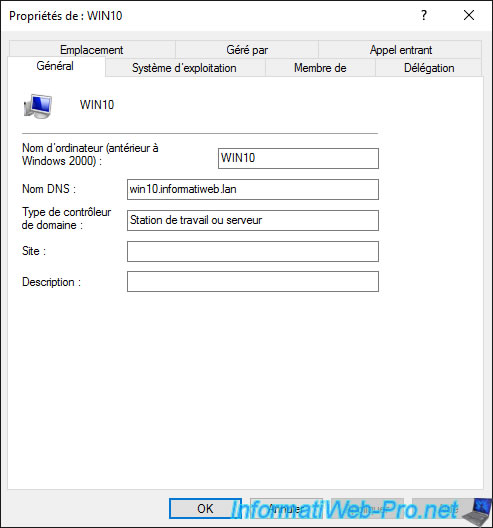
If you display the properties of a computer type object, you will find, for example :
- the NETBIOS name of the affected computer
- its full DNS name
- the type of computer or domain controller. In this case, it indicates that it’s a workstation. In other words, a client computer with a client version of Windows (ex : Win 10).
In the «Operating System» tab, you will find information about the operating system installed on it :
- the name of the operating system : in our case, Windows 10 Professional
- its version : 10.0 (19041)
- the service pack installed (if applicable)

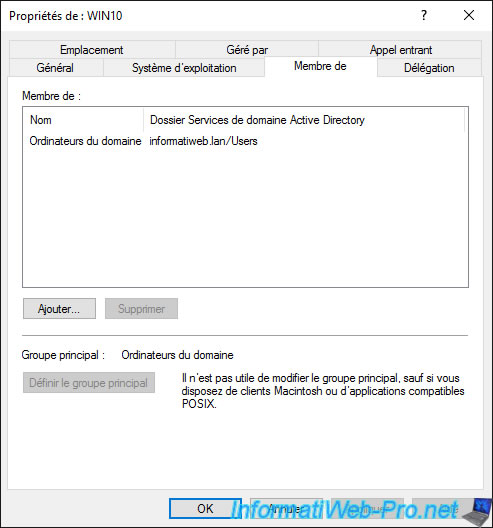
In the «Member of» tab, you can choose in which group you want to add this computer.
By default, computer objects are members of the «Domain Computers» group.
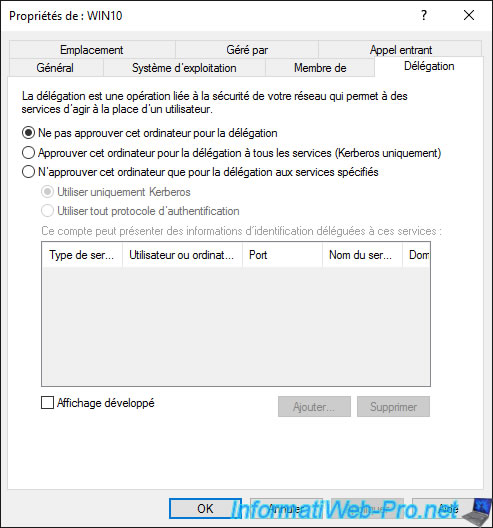
In the «Delegation» tab, you can approve or not this computer for Kerberos or for specific services.
This tab is particularly useful when you implement dynamic migration with several Hyper-V servers.
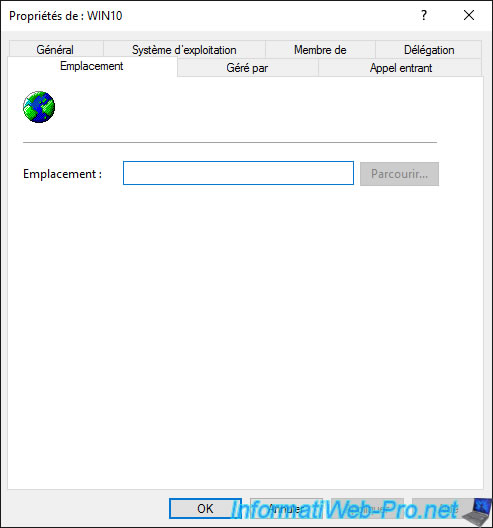
In the «Location» tab, you can choose its location.
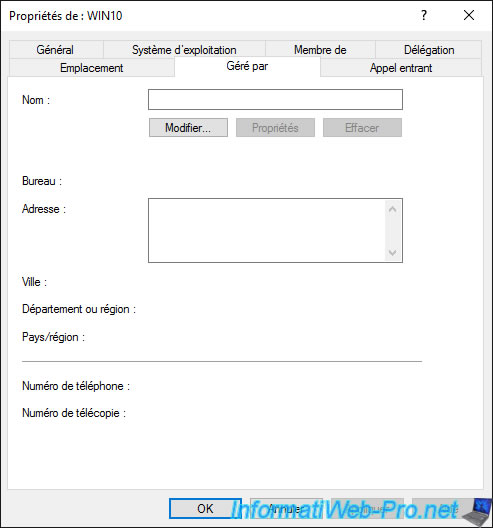
You can delegate management of a computer to a user in your Active Directory domain.
Although this «Managed By» tab is mostly useful for domain controllers.
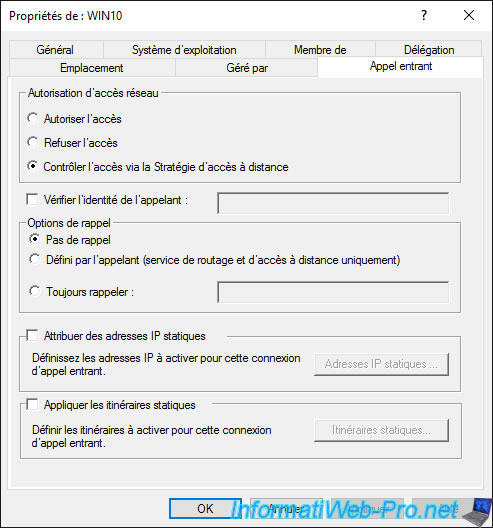
Finally, in the «Dial-In» tab, you can :
- choose whether this computer can access the network or not, or if this setting is managed by the «NPS Network policy»
- assign static IP addresses to this computer
- apply static routes if necessary
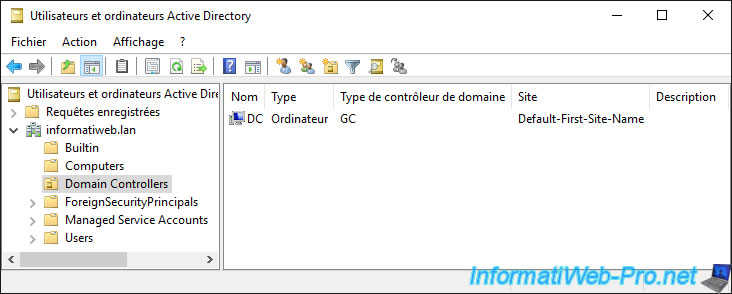
1.3. Domain Controllers folder
In the «Domain Controllers» folder, you will find the list of domain controllers joined to this Active Directory domain.
If you display the properties of the computer object of a domain controller, you may find out :
- his NETBIOS name
- his DNS name
- what type is this domain controller : global catalog, …
- in which Active Directory site it’s located
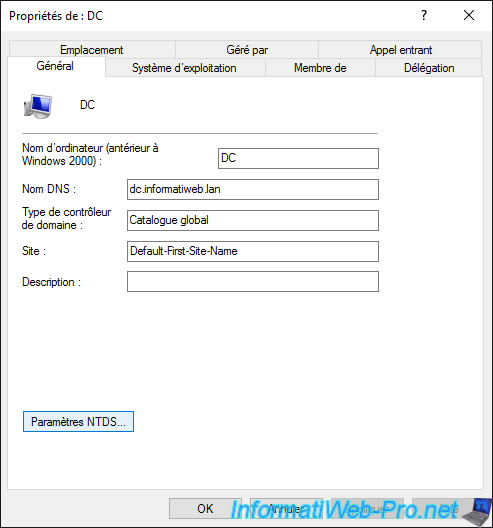
In the case of a domain controller, a «NTDS Settings» button is present in the properties of the computer object.
In these NTDS Settings, you can choose whether or not this domain controller should act as a «Global Catalog».
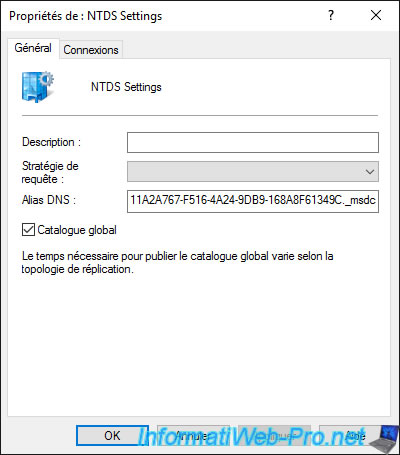
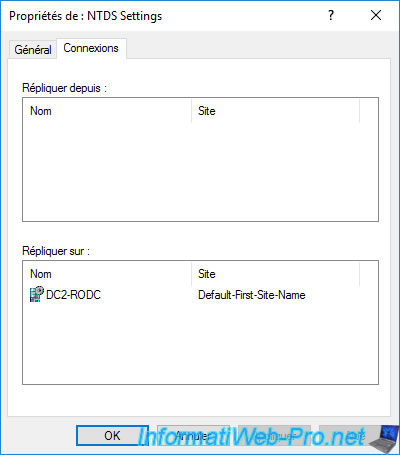
In the «Connections» tab, you will find the list of domain controllers from or to which the data of your Active Directory domain are replicated.
For example, assuming that we add a new domain controller to our Active Directory domain, and that we choose our domain controller «DC» as the source, we would see a «DC2-RODC — Default-First-Site-Name» appear in the «Replicate To» list.
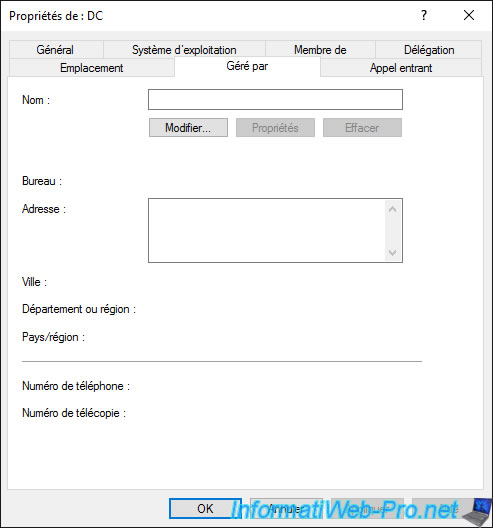
The «Managed By» tab is blank by default for writable domain controllers.
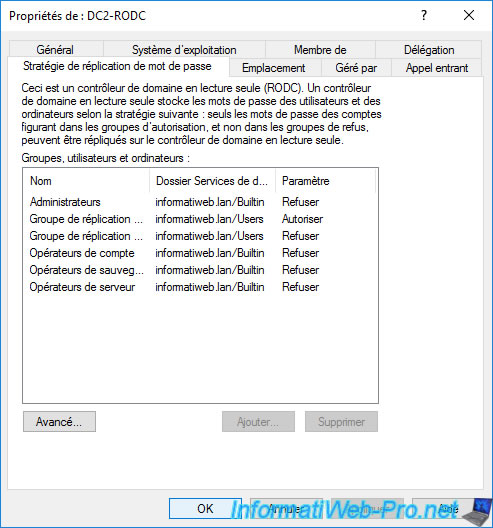
In the case of read-only domain controllers (RODCs), an additional «Password Replication Policy» tab will be displayed.
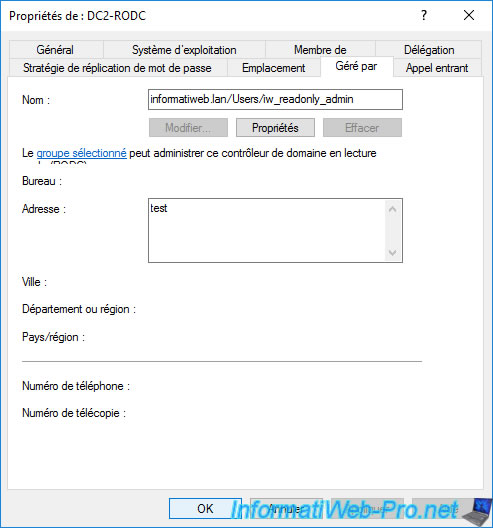
Still in the case of a read-only domain controller (RODC), you will be able to find the name of its delegated administrator if you defined one when you deployed this read-only domain controller (RODC).
1.4. ForeignSecurityPrincipals folder
This «ForeignSecurityPrincipals» folder looks empty by default, but actually contains several special security-related identities.
To learn all about this somewhat special folder, refer to the Microsoft site : Active Directory: Foreign Security Principals and Special Identities
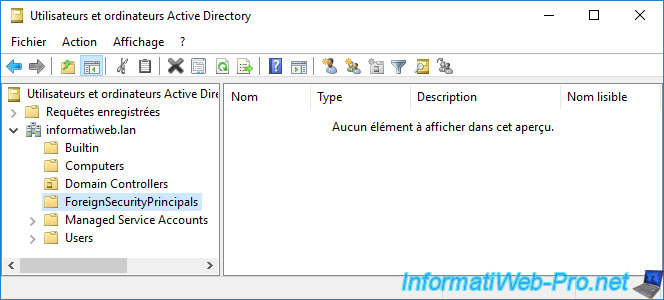
To display the contents of this «ForeignSecurityPrincipals» folder, you must go to the «View» menu and click «Advanced Features».
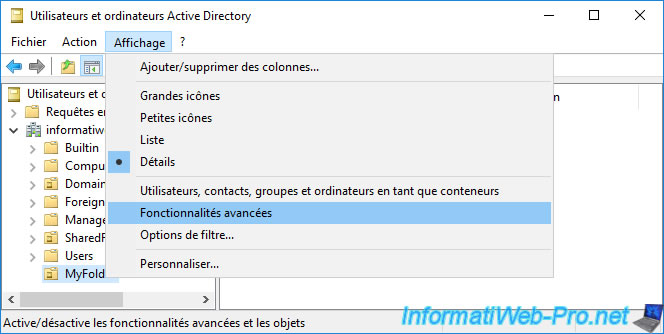
Now, as you can see, several security identities appear, include one which is for example linked to the «NT AUTHORITY\Authenticated Users» group.

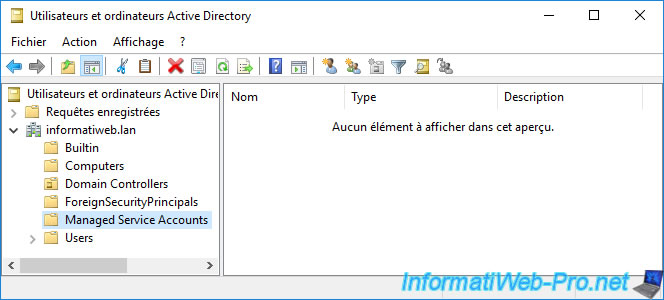
1.5. Managed Service Accounts folder
Managed Service Accounts are domain accounts whose password is automatically managed by the domain controller.
These managed service accounts are used to run specific services (the services that you find on Windows), scheduled tasks or for application pools on Microsoft IIS web servers.
Sources : Running Assessments with Managed Service Accounts
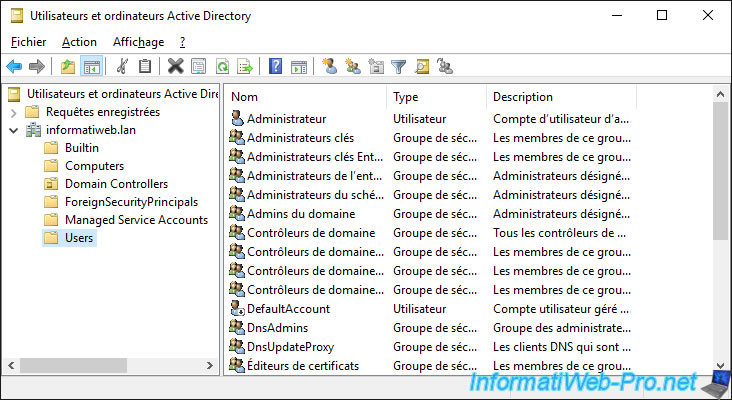
1.6. Users folder
In the «Users» folder, you will find by default, a list of users and groups created during the installation of Windows Server or created later during the installation of specific roles (including AD DS).
Among these users and groups, you will obviously find :
- the «Administrator» account of the server which also becomes the administrator of the domain when you promote your server as a domain controller
- the «Domain Admins» group
- and more
One of the main tools for performing administrative tasks in an Active Directory domain is the Active Directory Users and Computers (ADUC) MMC snap-in. The ADUC is a Microsoft Management Console snap-in dsa.msc which is used to manage users, groups, computers, and Organizational units in the AD domain.
In this article, we will look at how to install the Active Directory Users and Computers console on computers running Windows Server and desktop editions of Windows 10 and 11.
Installing Active Directory Users and Computers Snap-in on Windows Server
The ADUC console is automatically installed on a Windows server when it’s promoted to the domain controller as part of the Active Directory Domain Services (AD DS) role deployment. You can manually install the ADUC snap-in on any Windows Server member host.
You can install ADUC console on Windows Server 2022/2019/2016 using Server Manager (Add roles and features > Features > Remote Server Administration Tools > Role Administration Tools > AD DS and AD LDS Tools > AD DS Tools > AD DS Snaps-Ins and Command Line Tools) or with the PowerShell command:
Install-WindowsFeature -Name RSAT-ADDS-Tools

Check that the ADUC console is installed on Windows Server:
Get-WindowsFeature -Name RSAT-ADDS-Tools

How to Install ADUC on Windows 10 and 11
An ADUC snap-in can be installed as part of the Remote Server Administration Tools (RSAT) on the Pro and Enterprise editions of Windows 10 and Windows 11 (but not on the Home editions). You can install ADUC on Windows 10 and 11 by using the Settings app or with PowerShell.
Enable Active Directory Users and Computers Console on Windows 10 and 11
On modern versions of Windows 10 and 11 (with build 1809 and later), you can install the ADUC console from the modern Settings app.
- Press the Start menu > Settings > System;
- Select Optional Features > Add a feature;
- From the list of optional features, select RSAT: Active Directory Domain Services and Lightweight Directory Tools, and press Install.

- Windows will download the ADUC RSAT binary files and install them on your computer.
- You will need to restart your computer when the RSAT installation is complete.

The RSAT was distributed as a separate MSU update file in previous versions of Windows. For example, to install RSAT on Windows 10 1803, you must download and install the KB2693643 update. You can then enable a specific RSAT option using the Control Panel > Turn Windows Features On or Off applet (optionalfeatures.exe).
Install the ADUC Snap-in on Windows 10 or 11 Using PowerShell
You can use PowerShell to install the Active Directory console on Windows 10 and 11. Open an elevated PowerShell prompt and run the command to check whether the RSAT Active Directory feature is installed on your computer:
Get-WindowsCapability -Online | Where-Object {$_.Name -like "RSAT.ActiveDirectory*"}

In this case the RSAT: Active Directory Domain Services and Lightweight Directory Services Tools feature is not installed (State > NotPresent).
If the RSAT ActiveDirectory Tools feature is missing, you can install it:
Add-WindowsCapability -Online -Name Rsat.ActiveDirectory.DS-LDS.Tools~~~~0.0.1.0

You can also use the DISM command to install the RSAT ADUC feature:
DISM /Online /Add-Capability /CapabilityName:Rsat.ActiveDirectory.DS-LDS.Tools~~~~0.0.1.0

Check the AD RSAT status. The State should be changed to Installed.

Note. The PowerShell Active Directory module is also installed with the ADUC console.
Unable to Install RSAT Active Directory on Windows
The RSAT components in the latest versions of Windows are delivered as Features on Demand (FoD). Windows doesn’t store the local RSAT binaries on a local drive; instead, it downloads the RSAT files from the Microsoft Update servers. If your computer is in an isolated (disconnected) environment, you will receive an error when you try to install the ADUC snap-in:
0x800f0954

No features to install
You can use the FoD ISO image to install the RSAT components on offline computers. FoD DVD medias is available for download from your Volume License Servicing Center (VLSC) or on my.visualstudio.com.

Download and mount the FoD ISO image to a virtual drive (for example, to drive F:). You can then install the ADUC feature from local media using the command:
Add-WindowsCapability -online -name Rsat.ActiveDirectory.DS-LDS.Tools~~~~0.0.1.0 -source -Source "F:\" –LimitAccess
If you are using WSUS or SCCM to deploy Windows updates to client devices, you must enable the special GPO option to correctly install Features on Demand (including ADUC) on computers.
- Open the local Group Policy Editor (gpedit.msc) and go to Computer Configuration > Administrative Templates > System;
- Enable the GPO option Specify settings for optional component installation and component repair and check the Download repair content and optional features directly from Windows Update instead of Windows Server Update Services (WSUS);

- Update the Group Policy settings on the computer by using the command: gpupdate /force.

Without this option, Windows 11 will try to get RSAT from your local Windows Update Server (errors 0x8024402c and 0x800f081f).
How to Open and Use Active Directory (DSA.msc) Snap-in on Windows
To run the Active Directory snap-in on Windows 11, go to Start Menu > All Programs > Windows Tools.
On Windows 10 (and previous versions) the AD Management snap-ins are available in the Administrative Tools section of the Control Panel.

As you can see, it refers to the MMC console %SystemRoot%\system32\dsa.msc.
This means that you can quickly open the ADUC console by pressing Win+R, typing dsa.msc and clicking OK.

If your computer is joined to the Active Directory domain, the ADUC console will automatically connect to the nearest DC in your Active Directory site.
If the console can’t find the domain controller, you can use the PowerShell command to get the name of your LogonServer:
$env:LOGONSERVER
Right-click on the root in the ADUC console and select Change Domain Controller. Select the name of your logon DC from the list.
Always use the nearest domain controller when managing Active Directory from ADUC. The RSAT console may become slow when working with a domain controller at a remote site.
If you want to connect to AD using the dsa.msc snap-in from a non-domain joined computer, you must:
- Run the command:
runas /netonly /user:Domain_Name\Domain_USER mmc
- Select File > Add/Remove Snap-In;
- Add Active Directory Users and Computers snap-In to the right pane and press OK;

- Connect to the domain with right-click on ADUC > Connect to the domain and enter the domain name.


The ADUC snap-in should display your Active Directory domain structure.

You will see a standard set of Active Directory OUs and containers:
- Saved Queries — saved search criteria for quick searches against Active Directory (LDAP query supported);
- Builtin — built-in user accounts;
- Computers — default container for computer accounts;
- Domain Controllers — default container for domain controllers;
- ForeignSecurityPrincipals — contains information about objects from trusted external domains;
- Users — default container for user accounts.
Depending on the domain structure, the ADUC console may contain other containers. Some AD containers are not displayed by default. To display them, select View > Advanced Features in the top menu.

In the ADUC console, you can perform the following actions:
- Create and manage user accounts, computers, and Active Directory groups;
- View and edit AD object attributes with ADSI Edit;
- Search for AD objects;
- Change user password in Active Directory or reset it;
- Create Organizational Units and build hierarchical structures for AD objects. Enable or disable OU accidental deletion protection;
- Delegate administrative permission to OUs to non-admin domain users;
- Raise domain functional level, and move FSMO roles to another domain controller.
Cyril Kardashevsky
I enjoy technology and developing websites. Since 2012 I’m running a few of my own websites, and share useful content on gadgets, PC administration and website promotion.