
Applies ToWindows 10 Windows 8.1 Windows 8 Windows 7
Проблемы
Ваш ДИСК или DVD диск не виден в File Explorer (так называемый Windows Explorer в Windows 7 и более ранних версиях Windows), а устройство отмечено желтым восклицательным знаком в диспетчере устройств. Кроме того, после открытия диалогового окна свойств свойств свойств устройств одна из следующих ошибок указана в области состояния устройства:
-
Windows не может запустить это аппаратное устройство, поскольку его информация о конфигурации (в реестре) является неполной или поврежденной. (Код 19)
-
Устройство не работает должным образом, поскольку Windows не может загрузить драйверы, необходимые для этого устройства. (Код 31)
-
Драйвер (услуга) для этого устройства был отключен. Альтернативный драйвер может предоставлять эту функциональность. (Код 32)
-
Windows не может загрузить драйвер устройства для этого оборудования. Водитель может быть поврежден или отсутствует. (Код 39)
-
Windows успешно загрузила драйвер устройства для этого оборудования, но не может найти аппаратное устройство. (Код 41)
Эта проблема может возникнуть после одной из следующих ситуаций:
-
Вы обновляете операционную систему Windows.
-
Вы устанавливаете или удаляете программы записи компакт-дисков или DVD.
-
Вы удаляете цифровое изображение Microsoft.
Существуют различные причины, по которым диск CD или DVD не обнаружен. Резолюции, перечисленные в этой статье, могут помочь решить некоторые экземпляры, но не все экземпляры этой проблемы. Возможно, вам также придется обратиться к производителю оборудования для получения помощи с вашим оборудованием.
Решение
Для каждого из следующих методов, нажмите на заголовок, и он откроется, чтобы показать вам больше информации:
Для Windows 10 перейдите к методу 2.
В Windows 7 и 8.1, чтобы открыть оборудование и устройства устранение неполадок, следуйте следующим шагам:
-
Нажмите на клавишу логотипа Windows и R, чтобы открыть поле диалога Run.
-
Введите управление в поле диалога Run, а затем нажмите Enter.
-
В поле поиска в панели управления, введите устранение неполадок,а затем нажмите Устранение неполадок.
-
Под элементом «Оборудование и звук» нажмите «Нафотог» устройство. Если вам предлагается ввести пароль администратора или предоставить подтверждение, введите пароль или предоставьте подтверждение.
Если ваша проблема не решена, попробуйте следующий метод.
-
Проверить диск активирован в BIOS. Системы BIOS различаются в зависимости от устройства. Если вы не знаете, как проверить настройки диска в BIOS вашего устройства, обратитесь к производителю вашего устройства.
-
Кроме того, проверить с производителем компьютера, если диск пришел с ним, или производитель диска, если он был приобретен отдельно, что драйверы чипсета для устройства являются текущими.
Если ваша проблема не решена, попробуйте следующий метод.
Чтобы обновить драйвер, ищите драйвер на сайте производителя устройства, а затем следуйте инструкциям по установке на веб-сайте.
Чтобы переустановить драйвер, выполните следующие действия:
-
Нажмите на клавишу логотипа Windows и R, чтобы открыть поле диалога Run.
-
Введите devmgmt.msc в поле диалога Run, затем нажмите Enter. Если вам предложенпароль для администратора пароль или подтверждение, введите пароль, или выберите Разрешить
-
В Device Manager расширьте диски DVD/CD-ROM,нажмите на CD и DVD-диски, а затем выберите Uninstall.
-
Если вам будет предложено подтвердить, что вы хотите удалить устройство, выберите OK.
-
Перезагрузите компьютер.
После перезагрузки компьютера драйверы будут автоматически установлены.
Если ваша проблема не решена, попробуйте следующий метод.
Чтобы удалить и переустановить драйвер IDE/ATAPI, выполните следующие действия:
-
С самого начала,поиск менеджера устройств. Откройте диспетчер атакжем управления устройствами из результатов поиска и выберите меню View. Выберите Показать скрытые устройства.
-
Расширьте контроллеры IDE/ATAPI, а затем:
-
Выберите и право йгнули НА канал ATA 0,а затем нажмите Uninstall
-
Выберите и право йгнулкнопку ATA Channel 1, а затем нажмите Uninstall
-
Выберите и правой кнопкой мыши Стандартный двойной канал PCI IDE контроллер, а затем нажмите Uninstall
-
Если есть дополнительные записи, нажмите на них правой кнопкой мыши, а затем выберите Uninstall
-
-
Перезагрузка устройства.
После перезагрузки компьютера драйверы будут автоматически установлены.
Если ваша проблема не решена, попробуйте следующий метод.
Эта проблема может быть вызвана двумя записями реестра Windows, которые были повреждены. Чтобы использовать редактор реестра для удаления поврежденных записей реестра, выполните следующие действия:
-
Нажмите на клавишу логотипа Windows и R, чтобы открыть поле диалога Run.
-
Введите regedit в поле диалога Run, затем нажмите Enter. Если вам предложенпароль для администратора пароль или подтверждение, введите пароль, или выберите Разрешить
-
В навигационном панели найдите и выберите следующий подключка реестра:
HKEY_LOCAL_MACHINE\SYSTEM\CurrentControlSet\Control\Class\{4D36E965-E325-11CE-BFC1-08002BE10318}
-
В правом стеле выберите UpperFilters.Заметка Вы также можете увидеть запись реестра UpperFilters.bak. Вы не должны удалить эту запись. Нажмите только UpperFilters. Если вы не видите запись реестра UpperFilters, возможно, вам все равно придется удалить запись реестра LowerFilters. Для этого перейдите на 7-й шаг.
-
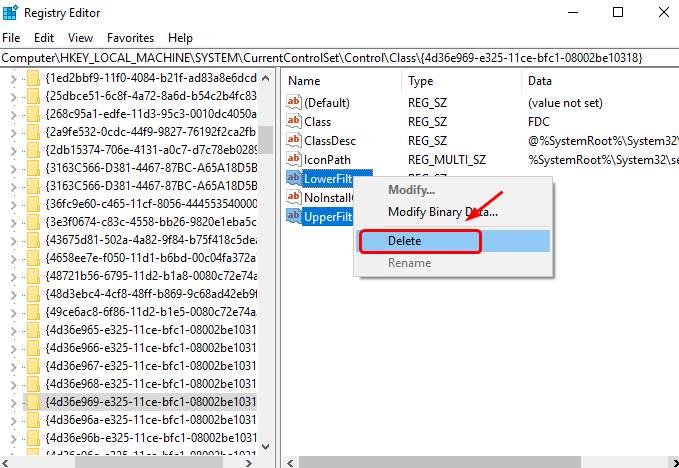
В меню Edit выберите Удалить.
-
Когда вам будет предложено подтвердить удаление, выберите «Да».
-
В правильном стеку выберите LowerFilters.Заметка Если вы не видите запись реестра LowerFilters, перейдите к следующему методу.
-
В меню Edit выберите Удалить.
-
Когда вам будет предложено подтвердить удаление, выберите «Да».
-
Закройте редактор реестра.
-
Перезагрузите компьютер.
Примечание:Чтобы использовать этот метод, необходимо войти в Windows в качестве администратора. Чтобы убедиться, что вы зарегистрировались в качестве администратора, поднимите панель управления, выберите учетные записи пользователей,а затем выберите Управление учетными записями пользователей.Важно:
-
Внимательно следуйте за шагами в этом разделе. Серьезные проблемы могут возникнуть, если вы измените реестр неправильно. Перед тем, как изменить его, резервное копирование реестра для восстановления в случае возникновения проблем.
-
После попытки этого метода некоторые приложения, такие как программное обеспечение для записи компакт-дисков или DVD, могут работать неправильно. Если это так, попробуйте установить и переустановить пострадавшее приложение.
Если ваша проблема не решена, попробуйте следующий метод.
Чтобы создать подключку реестра, выполните следующие действия:
-
Нажмите на клавишу логотипа Windows и R, чтобы открыть окно Run.
-
Введите regedit в поле Run, затем нажмите Enter. Если вам предложенпароль для администратора пароль или подтверждение, введите пароль, или выберите Разрешить.
-
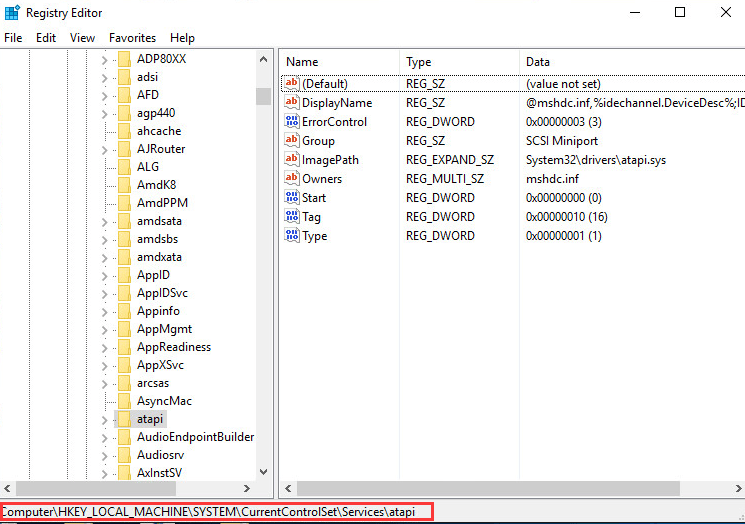
В навигационном панели найдите следующий подключка реестра:
HKEY_LOCAL_MACHINE\SYSTEM\CurrentControlSet\Services\atapi
-
Право нажмите atapi, точка к новой, а затем выберите ключ.
-
Введите контроллер0, а затем нажмите Введите.
-
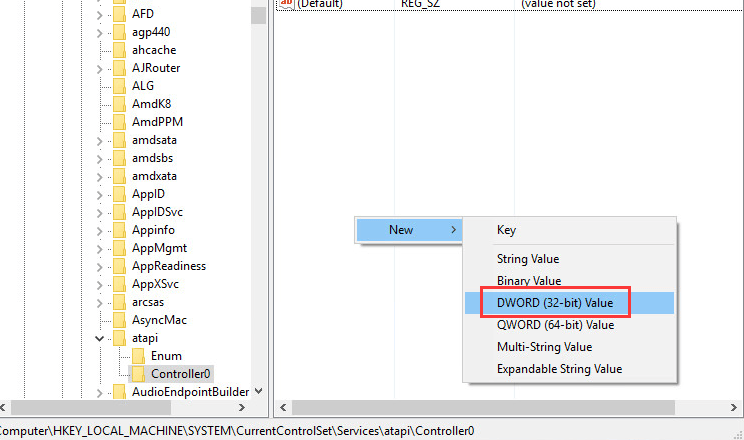
Право-нажмите Контроллер0, укажите на новый, а затем выберите DWORD (32-бит) Значение .
-
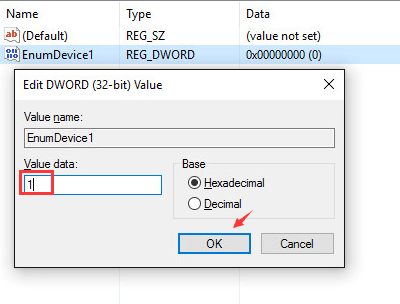
Введите EnumDevice1, а затем нажмите Введите.
-
Правый щелчок EnumDevice1, выберите Изменить ….
-
Введите 1 в поле данных значения, а затем выберите OK.
-
Закройте редактор реестра.
-
Перезагрузите компьютер.
Примечания.
-
Чтобы использовать этот метод, необходимо войти в Windows в качестве администратора. Чтобы убедиться, что вы зарегистрировались в качестве администратора, поднимите панель управления, выберите учетные записи пользователей,а затем выберите Управление учетными записями пользователей.
-
Этот метод следует использовать на Windows 7, Windows 8 или 8.1, или Windows 10 версия 1507. Проблемы, исправленные этим методом, не должны возникать в Windows 10 1511 или позже.
Важно: Внимательно следуйте шагам этого метода. Серьезные проблемы могут возникнуть, если вы измените реестр неправильно. Перед тем, как изменить его, резервное копирование реестра для восстановления в случае возникновения проблем.
Нужна дополнительная помощь?
Нужны дополнительные параметры?
Изучите преимущества подписки, просмотрите учебные курсы, узнайте, как защитить свое устройство и т. д.
Symptoms
Your CD or DVD drive is not showing up in File Explorer Windows 10, and the device is marked with a yellow exclamation point in Device Manager. After you open the device’s Properties dialog box, one of the following errors is listed in the Device status area:
- Windows cannot start this hardware device because its configuration information is incomplete or damaged. (Code 19)
- The device is not working properly because Windows cannot load the drivers required for this device. (Code 31
- A driver (service) for this device has been disabled. An alternate driver may be providing this functionality. (Code 32)
- Windows cannot load the device driver for this hardware. The driver may be corrupted or missing. (Code 39)
- Windows successfully loaded the device driver for this hardware but cannot find the hardware device. (Code 41)
This issue may have occurred after one of the following situations:
- You upgrade the Windows operating system.
- You install or uninstall CD or DVD recording programs.
- You uninstall Microsoft Digital Image.
Resolution
Quite a lot of users find their CD or DVD disc drive not showing up in File Explorer, Disk Management or Device Manager because of the reasons above. So, to help troubleshoot the problem, here we introduce 7 best ways that proved to be able to fix CD/DVD disc drive missing in Windows 10. Apply each of the solutions until the CD/DVD drive icon is back on your Windows computer.
7 solutions to show hidden CD/DVD devices:
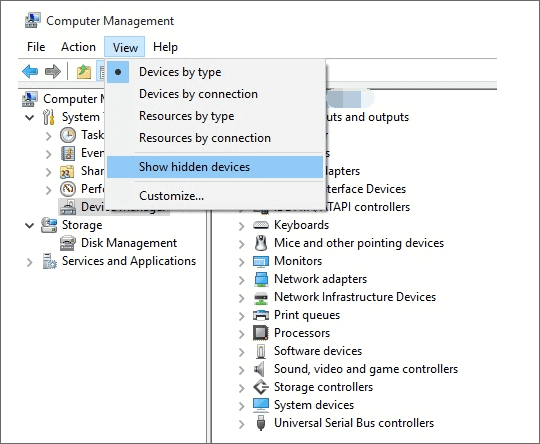
Solution 1. Show Hidden (Unhide) CD/DVD Devices in Windows 10
Have you attempted to show the hidden device in Windows 10? At times, Windows 10 update will do a reset, and restore some settings to an earlier state. As soon as your disc is not showing up as normal, try at first to unhide CD/DVD device.
Navigate to This PC -> Manage -> Device Manager -> View -> Show hidden devices.
Solution 2. Uninstall IDE ATA/ ATAPI Controllers
If solution 1 (show hidden devices) does not solve the problem, please continue.
Step 1. Locate the DVD/CD-ROM drives and IDE ATA/ATAPI controllers items. Right-click on each entry present under both «DVD/CD-ROM drives» and «IDE ATA/ATAPI controllers» sections one by one and select Uninstall.
Step 2. Right-click again these items and select «Scan for hardware change» this time.
Step 3. Reboot your computer after these changes.
Solution 3. Update or reinstall CD/DVD Driver
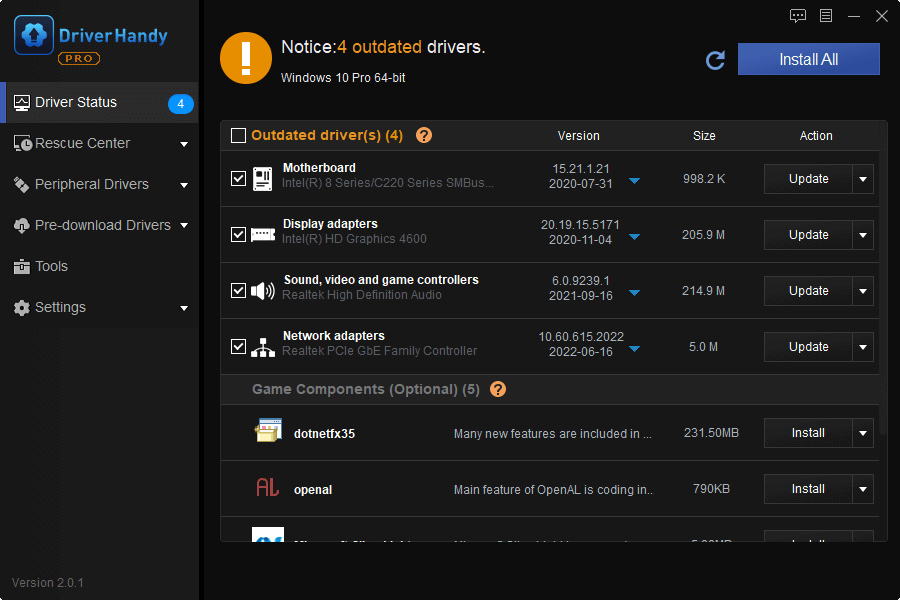
To update the driver, download EaseUS DriverHandy, which is a professional driver manager. It can help you update your CD/DVD drivers and manage your other device drivers. It can automatically update your device drivers to the latest versions. Download to try.
Step 1. Download and click open DriverHandy.
Step 2. Find the target drivers and click «Update.»
Solution 4. Fix CD/DVD Drive Missing by Command Prompt
Using command prompt usually increases the chance to fix CD/DVD disc missing in Windows 10, and it’s comparatively simple to operate.
Step 1. To open elevated Command Prompt in Windows 10, only type CMD in the start menu search box. Right-click on the Command Prompt desktop app and choose Run as administrator.
Step 2. Copy(Ctrl+C) and paste(Ctrl+V) the following command in the Command Prompt and press Enter.
reg.exe add “HKLM\System\CurrentControlSet\Services\atapi\Controller0” /f /v EnumDevice1 /t REG_DWORD /d 0x00000001
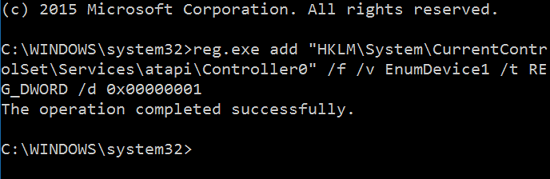
Step 3. A message «The operation completed successfully» then appears. Close the Command Prompt window and go back to check if the CD/DVD icon is back.
Solution 5. Fix Corrupted Registry Entries
Warnings: Registry entry needs to be taken very carefully, as any improper modifying of it can result in severe consequences. So, use the best free backup software to backup Windows 10 registry before fixing corrupted registry entries to make CD/DVD show up again.
Step 1. Press Windows+R keys simultaneously to launch a Run command. Type regedit and press Enter.
Step 2. Follow the path
HKEY_LOCAL_MACHINE\SYSTEM\CurrentControlSet\Control\Class\ {4D36E965-E325-11CE-BFC1-08002BE10318}
Step 3. Look for UpperFilters and LowerFilters strings on the right side panel.
Step 4. Right-click them and choose «Delete».
Solution 6. Create a Registry Subkey
Warnings: Again, Registry entry needs to be taken very carefully, as any improper modifying of it can result in severe consequences. So, use the best free backup software to backup Windows 10 before fixing corrupted registry entries to make CD/DVD show up again.
Step 1. Open Registry, as solution 4 step 1 taught.
Step 2. Follow the path
HKEY_LOCAL_MACHINE\SYSTEM\CurrentControlSet\Services\atapi\
Step 3. Right-click on the blank space on the right panel, when the New option pops up, choose Key.
Step 4. Create a new Controller0 key under atapi key.
Step 5. Select the new Controller0 key. On the right side of the pane, right click on the blank space and choose DWORD(32-bit) Value.
Step 6. Set the name as EnumDevice1 and press Enter. Then double-click it to set the Value data as 1. Press OK to save the setting.
Step 7. Exit Registry Editor.
Step 8. Restart your computer.
Solution 7. Download a Third-party CD/DVD Repair Tool
In case that all the free methods failed to fix CD/DVD missing problem in Windows 10 unfortunately, don’t give it up so early. Some third-party CD/DVD repair software is powerful enough to repair many disc problems, though most of which are not free, it’s still worth a try.
Conclusion
Thank you for reading. I truly hope the solutions in this article solved your problem. If another method solved the DVD drive not showing in Windows issue, please let me know and I will make sure to mention your method here.
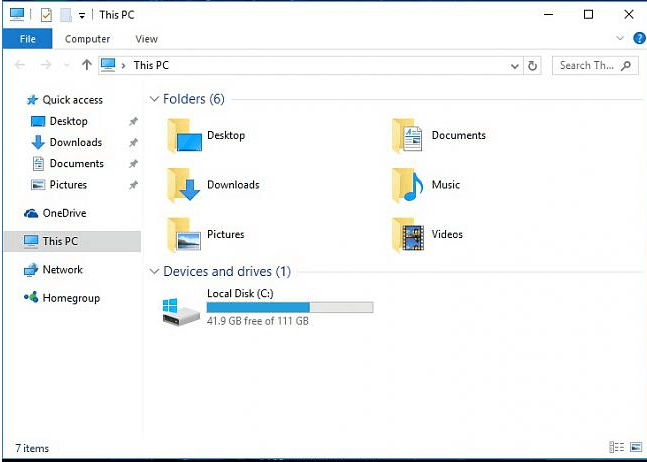
If you’ve recently upgraded to Windows 10, and you couldn’t find the DVD drive option in This PC (Windows 10 OS) window, you’re not alone. Some of you might not even see your DVD/CD ROM option in Device Manager. No need to worry too much about it, it’s possible to fix.
Here are 4 fixes for you to try. You may not have to try them all; just work your way down until you find the one works for you.
Method 1: Uninstall IDE ATA/ ATAPI controllers
Method 2: Update drivers
Method 3: Manually fix corrupted registry entries
Method 4: Create a registry subkey
1: Uninstall IDE ATA/ ATAPI controllers
One of the reasons why you can’t see DVD/CD-ROM in your Windows 10 PC could be faulty device drivers. You can reinstall the drivers to fix it. Here is how:
1) On your keyboard, press the Windows logo key and R at the same time, click Device Manager.
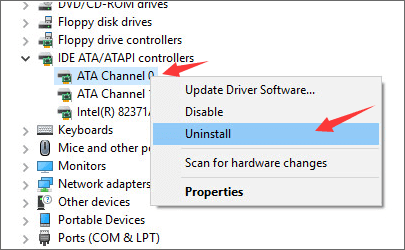
2) Locate IDE ATA/ ATAPI controllers.
3) Right-click ATA Channel 0 and click Uninstall.
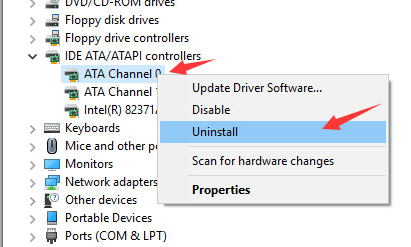
4) Right-click ATA Channel 1 and click Uninstall.
5) If you have more options under IDE/ ATAPI controllers category, right-click them and click Uninstall as above procedures.
6) Reboot your computer after these changes.
7) Your computer will be able to help you with the detection of the DVD for Windows 10.
2: Update drivers
If uninstalling the IDE ATA/ ATAPI controller drivers doesn’t solve the problem for you, it’s likely that you’re using the wrong driver altogether.
There are two ways you can get the right drivers for your disc /DVD drive: manually or automatically.
Manual driver update – You can update your disc drive driver manually by going to the manufacturer’s website for your computer, and searching for the most recent correct driver for it. Be sure to choose only driver that is compatible with your variant of Windows 10.
Automatic driver update – If you don’t have the time, patience or computer skills to update your drivers manually, you can do it automatically with Driver Easy. Driver Easy will automatically recognize your system and find the correct driver for your exact disc drive, and your variant of Windows 10, and it will download and install it correctly:
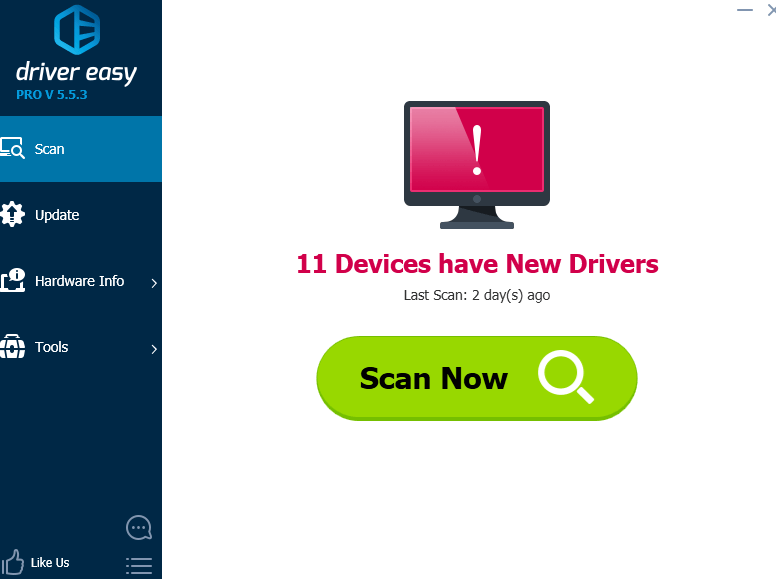
1) Download and install Driver Easy.
2) Run Driver Easy and click the Scan Now button. Driver Easy will then scan your computer and detect any problem drivers.
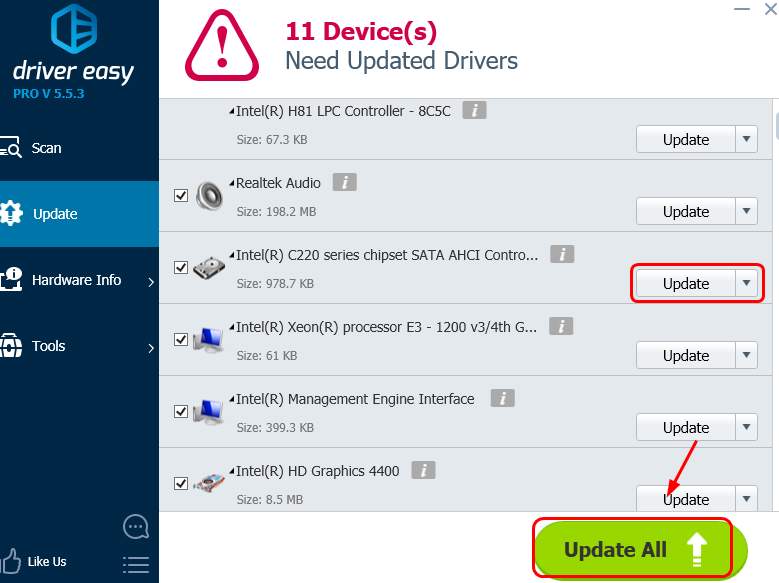
3) Click the Update button next to all flagged devices to automatically download and install the correct version of their drivers (you can do this with the FREE version).
Or click Update All to automatically download and install the correct version of all the drivers that are missing or out of date on your system (this requires the Pro version – you’ll be prompted to upgrade when you click Update All).
3: Manually fix corrupted registry entries
IMPORTANT: Before we move on, it’s strongly recommended that you back-up and restore your registry first.
If your registry entry is off, you’ll not be able to see certain device on your PC. To fix it:
1) On your keyboard, press the Windows logo key and R at the same time to invoke a Run command. Type regedit and press Enter.
2) Follow the path:
HKEY_LOCAL_MACHINE\SYSTEM\CurrentControlSet\Control\Class\ {4D36E965-E325-11CE-BFC1-08002BE10318}
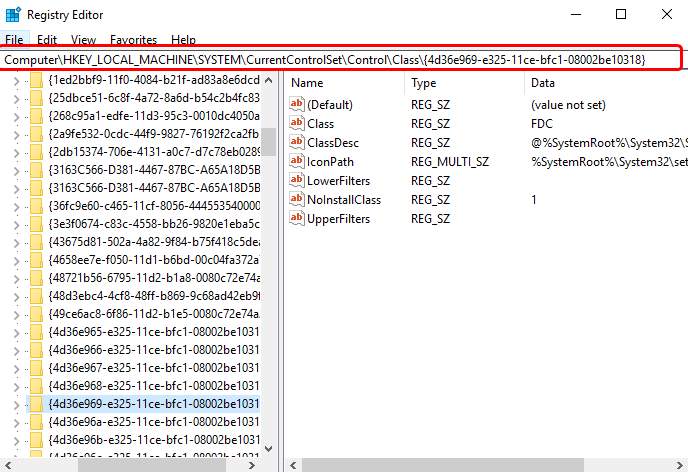
3) Look for UpperFilters and LowerFilters strings on the right side panel. If you can’t see these two items, move on to Method 2.
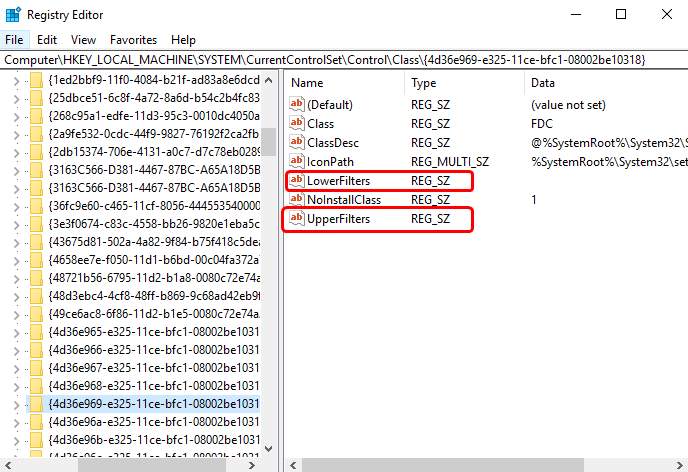
4) Delete them.
4: Create a registry subkey
If you can’t see UpperFilters and LowerFilters in the Registry pane, please follow the steps below.
1) On your keyboard, press the Windows logo key and R at the same time to invoke a Run command. Type regedit and press Enter.
2) Follow the path:
HKEY_LOCAL_MACHINE\SYSTEM\CurrentControlSet\Services\atapi\
3) Right-click the blank space on the right panel, when the New option pops up, click Key.
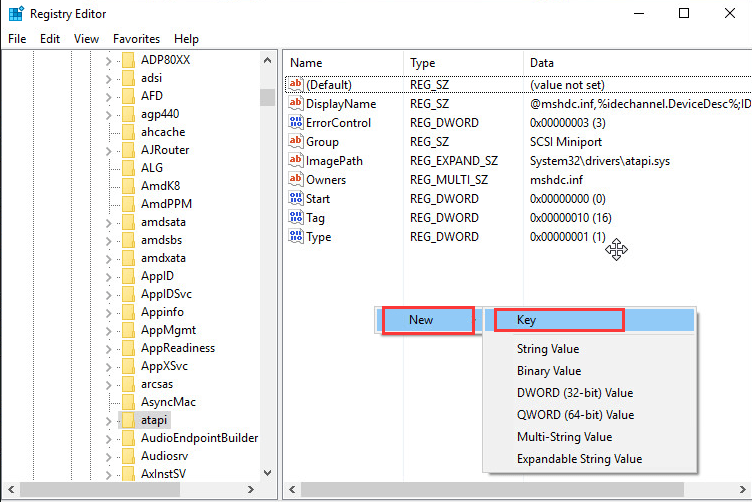
4) Create a new Controller0 key under atapi key.
5) Go to the new Controller0 key. On the right side of the pane, right-click the blank space and click DWORD(32-bit) Value.
6) Set the name as EnumDevice1 and press Enter. Double-click to set the Value data as 1. Press OK to save.
7) Exit Registry Editor.
 Restart your computer.
47
47 people found this helpful
Fix CD or DVD Drive Not Reading Discs in Windows 10: If you have recently upgraded to Windows 10 then you may face this issue where your CD or DVD cannot read the disk and you may need to repair or replace your DVD drive. Well, it’s not necessary to replace it as there are a lot of fixes which can solve this error easily and today we are going to discuss how to fix this issue. There is no particular cause for this issue but it may be caused due to incompatible drivers, corrupted or outdated drivers etc. So without wasting any time let’s see how to Fix CD or DVD Drive Not Reading Discs in Windows 10 with the help of below-listed troubleshooting guide.
Table of Contents
Make sure to create a restore point just in case something goes wrong.
Method 1: Rollback CD or DVD drive drivers
1.Press Windows Key + R then type devmgmt.msc and hit Enter.

2.Expand DVD/CD-ROM drives then right-click on your CD/DVD drive and select Properties.
3.Switch to driver tab and click Roll Back Driver.

4.Wait for the driver to be rolled back then close Device Manager.
5.Reboot your PC to save changes.
Method 2: Uninstall CD/DVD drive
1.Press the Windows key + R button to open the Run dialogue box.
2.Type devmgmt.msc and then press Enter.
3.In Device Manager, expand DVD/CD-ROM drives, right-click the CD and DVD devices and then click Uninstall.

4.Restart the computer. After the computer restarts, the drivers will be automatically installed.
Method 3: Run Hardware and Devices Troubleshooter
1.Type control in Windows Search then click on Control Panel from the search result.
2.Search Troubleshoot and click on Troubleshooting.
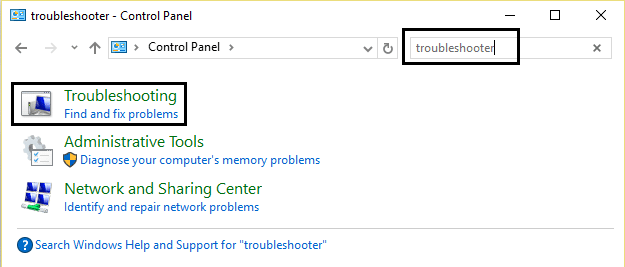
3.Next, click on View all in the left pane.
4.Click and run the Troubleshooter for Hardware and Device.
5.The above Troubleshooter may be able to Fix CD or DVD Drive Not Reading Discs in Windows 10.
Method 4: Disable and then enable the DVD or CD drive
1.Press Windows Key + R then type devmgmt.msc and hit Enter.
2.Expand DVD/CD-ROM then right -click on your device and select disable.

3.Now again right-click on your CD/DVD drive and select Enable device.

8.Reboot your PC to save changes and see if you’re able to Fix CD or DVD Drive Not Reading Discs in Windows 10.
Method 5: Registry Fix
1.Press the Windows key + R button to open the Run dialogue box.
2.Type regedit in the Run dialogue box, then press Enter.
3.Now go to the following registry key:
HKEY_LOCAL_MACHINE\SYSTEM\CurrentControlSet\Control\Class\{4D36E965-E325-11CE-BFC1-08002BE10318}

4.In the right pane search for UpperFilters and LowerFilters.
Note: if you can’t find these entries then try the next method.
5.Delete both of these entries. Make sure you are not deleting UpperFilters.bak or LowerFilters.bak only delete the specified entries.
6.Exit Registry Editor and restart the computer.
Method 6: Create a Registry Subkey
1.Press the Windows key + R to open the Run dialogue box.
2.Type regedit and then press Enter.
3.Locate the following registry key:
HKEY_LOCAL_MACHINE\SYSTEM\CurrentControlSet\Services\atapi
4.Create a new key Controller0 under atapi key.

4.Select the Controller0 key and create new DWORD EnumDevice1.
5.Change the value from 0(default) to 1 and then click OK.
6.Restart your PC to save changes.
Recommended:
- Fix Windows Defender Update fails with error 0x80070643
- Fix If playback doesn’t begin shortly try restarting your device
- How to Schedule Windows 10 Automatic Shutdown
- Fix Favorites missing in Internet Explorer on Windows 10
That’s it you have successfully Fix CD or DVD Drive Not Reading Discs in Windows 10 but if you still have any questions regarding this post then feel free to ask them in the comment’s section.
- Нажмите комбинацию «Win+R», чтобы открыть диалоговое окно «Выполнить».
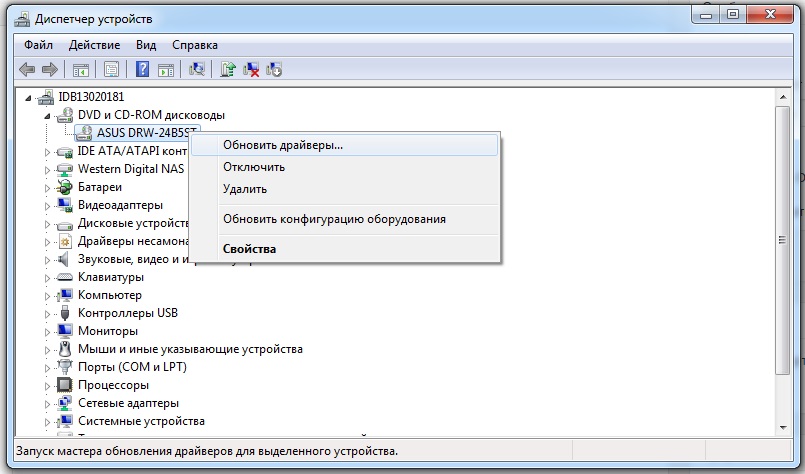
- В командной строке введите «devmgmt.msc» и нажмите на кнопку «Ок». Дождитесь запуска «Диспетчера устройств».
- В верхнем меню кликните на пункт «Действие» и там выберите строку «Обновить конфигурацию оборудования».
- Удостоверьтесь, что в пункте меню «Вид» активирована опция «Показать скрытые устройства».
- Откройте категорию «DVD и CD-ROM дисководы» и найдите там нужный привод.
- Кликните на него правой кнопкой мыши и в появившемся меню кликните на пункт «Обновить драйверы…».
- Если обновление драйверов не принесло результата, можете попробовать удалить привод через меню «Действие» — «Удалить», а затем установить его вновь, соответственно используя меню «Действие» — «Установить».
Делаем DVD-привод видимым под Windows 10
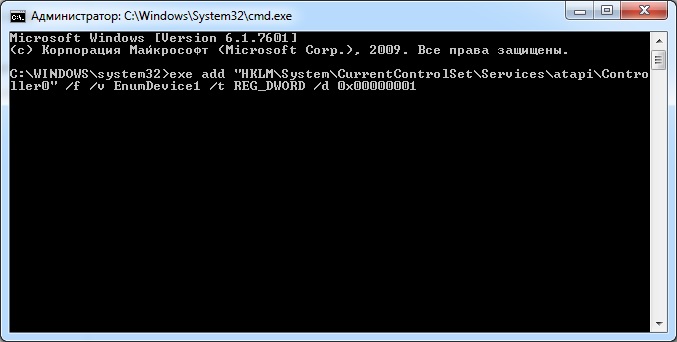
- Реестр: если используется ATAPI-, а не SATA-привод, запустите командную строку от имени Администратора. Затем введите команду «reg.exe add «HKLM\System\CurrentControlSet\Services\atapi\Controller0» /f /v EnumDevice1 /t REG_DWORD /d 0x00000001», нажмите кнопку «Enter», а после всего этого перезапустите Windows.
- Оборудование: перезапустите компьютер и зайдите в настройки BIOS Setup или UEFI. Проверьте, присутствует ли в BIOS Setup оптический привод в списке подключенных к плате SATA-устройств. Если нет, то разберите корпус компьютера и проверьте надежность подсоединения кабеля, идущего от материнской платой к DVD-приводу.
В случае неудачи: ремонт или замена устройства
Если ваш DVD-привод по-прежнему никак не распознается, остается только отсоединить его и отремонтировать. Но прежде всего, в случае со старыми, «жестко» вмонтированными в корпус DVD-приводами ноутбуков, ремонт будет оправдан достаточно редко.
Поэтому в таком случае рекомендуем вам подумать о приобретении нового ноутбука с операционной системой Windows. Мощные модели с интегрированным DVD-приводом можно получить уже за небольшие деньги, как показывает наш соответствующий рейтинг.
Еще одно решение проблемы — приобретение недорогого внешнего DVD-привода.
Фото: компании-производители, CHIP.de