Компьютер не видит airpods windows

AirPods work as regular wireless headphones on devices outside the Apple ecosystem. While the audio quality is top-notch on any device, you might encounter some stumbling blocks while connecting AirPods to non-Apple devices.

This tutorial will cover 9 troubleshooting fixes to try if AirPods are not connecting to your PC. Before you proceed, we recommend connecting a different Bluetooth audio device to your PC. That’ll help diagnose the source of the problem.

A pair of AirPods in their case

If other Bluetooth devices connect to your PC without issues, there’s likely a problem with your AirPods. But if your computer fails to connect to all Bluetooth devices, focus your troubleshooting efforts on fixing your PC’s Bluetooth.

Note: Although the screenshots in this article are from a Windows 11 PC, the recommendations will work on older Windows versions, particularly Windows 10.

1. Turn On Bluetooth

AirPods (and other Bluetooth devices) won’t connect to your computer if Bluetooth is disabled. Check your PC’s settings and make sure Bluetooth is on.

Go to Settings > Bluetooth & devices and toggle on Bluetooth.

Settings data-lazy-src=

If your PC’s Bluetooth is already on, turn it off, wait a few seconds, turn it back on, and try connecting the AirPods again.

2. Check AirPods Battery Level

Your AirPods won’t pair or connect to your PC if the batteries of either earbud are low. Check your AirPods battery and make sure they hold at least 50% charge. You’ll need an Apple device (iPhone, iPad, or Mac) to check the AirPods battery level.

Connect the AirPods to your iPhone, place both AirPods in the charging case, and close the lid. Move the AirPods close to your iPhone, iPad, or iPod touch and open the lid. The AirPods battery status should show up on your device’s screen after some seconds.

AirPod battery status

Charge your AirPods with Apple-certified charging accessories and try connecting them to your PC again.

3. Force Reboot Your AirPods (Max)

Restarting the AirPods Max will fix audio and connectivity-related problems. If the AirPods Max won’t connect to your computer, force-restart the AirPods and reconnect the headphones to your PC.

Press and hold the Noise Control button and Digital Crown until the status light flashes amber.

Visual instructions for rebooting your AirPod Max headphones

Reset your AirPods Max to factory settings (see next section for steps) if the problem persists.

4. Reset Your AirPods

This entails deleting the AirPods from your device’s memory and reconnecting it from scratch. If the AirPods are paired to your computer but fail to connect subsequently, forget the AirPods, and reconnect it from scratch.

  1. Open the Windows Settings app, select Bluetooth & devices on the sidebar, and select Devices.
Settings data-lazy-src=

  1. Scroll to the “Audio” section, select the three-dot menu icon next to the AirPods, and select Remove device.
Remove device option

  1. Go to Settings, select Bluetooth & devices on the sidebar, turn on Bluetooth, and select the Add device button.
Settings data-lazy-src=

  1. Select Yes on the confirmation prompt.
Yes confirmation prompt

  1. Return to the “Bluetooth & devices” page (Settings > Bluetooth & devices) and select Add device.
Settings data-lazy-src=

The next step is to put your AirPods in pairing mode and reconnect it to your PC.

  1. Insert both AirPods in the charging case, close the lid, and reopen it after 5-10 seconds. Afterward, press and hold the Setup button on the back of the charging case until the status light flashes white.
AirPod case

If you use an AirPods Max, press and hold the Noise Control and Digital Crown for 15 seconds until the status light flashes amber and then white. Apple recommends charging your AirPods Max for a few minutes before resetting it to factory settings.

  1. Select your AirPods in the list of devices.
AirPods selected in device window

Note that it might take some minutes for your PC to detect the AirPods. Select Done when you get a “Your device is ready to go” success message.

Done button

Make sure the AirPods are near your PC when in pairing mode. If your AirPods remain undetected, close and reopen the charging case and put the AirPods in pairing mode again. Try the next fix if Windows doesn’t find your AirPods.

5. Start Background Bluetooth Services

Bluetooth Support Service and Bluetooth User Support Service are background processes that facilitate the discovery of Bluetooth devices and the proper functioning of Bluetooth in Windows. Your computer won’t detect or connect to AirPods or other Bluetooth devices if these services are inactive or disabled. Check the Windows Services Manager and make sure they’re both running.

  1. Press the Windows key + R to open the Windows Run box. Type or paste services.msc in the dialog box and select OK.
services.msc in dialog box

  1. Locate Bluetooth Support Service, check the “Status” column, and make sure it reads “Running.” Otherwise, double-click the services and jump to the next step to get them running.
"Status" column reading "Running"

  1. Select Start, wait for the service to start running, and select OK to save the change.
Start service and OK button

6. Run the Windows Troubleshooter

This is a built-in tool that diagnoses and fixes Bluetooth-related problems in Windows. Run the troubleshooter if you can’t connect AirPods or other Bluetooth devices to your PC.

  1. Type troubleshoot in the Windows Search box and Troubleshoot settings in the search results.
Troubleshoot settings

  1. Select Other troubleshooters.
System data-lazy-src=

  1. Locate Bluetooth on the page and select Run.
Run button

  1. The troubleshooter will find and fix any Bluetooth-related issues. Close the Bluetooth troubleshooter and try connecting the AirPods to your computer.
Close button

7. Reboot Your Computer

Your computer may be the problem. Close all open applications and restart your computer. That’ll refresh Windows and fix temporary system glitches preventing your AirPods from connecting to your PC.

Press the Windows key or Start menu icon, select the Power icon, and select Restart.

Restart button

8. Update Bluetooth and AirPods Driver

Having the latest driver is essential to connecting AirPods and other Bluetooth accessories to your PC. Connect your computer to the internet and follow the steps below to update the AirPods and Windows Bluetooth drivers.

  1. Press Windows key + X or right-click the Start menu and select Device Manager on the Quick Access Menu.
Start Menu data-lazy-src=

  1. Expand the Bluetooth category, right-click your PC’s Bluetooth driver, and select Update driver.
Update driver option

If your AirPods are paired to your PC, right-click the AirPod’s driver and select Update driver.

Update driver option

  1. Select Search automatically for drivers.
Search automatically for drivers

If the update agent says you have the best driver installed, check your PC manufacturer’s website for new driver updates.

9. Update Your Computer

Bluetooth connectivity problems are sometimes caused by bugs at the system level. Head to the Windows updates menu and install any updates available for your computer. Updating your computer’s operating system can get rid of any bug responsible for the connectivity problem.

Go to Settings > Windows Update and select Download now to install available updates.

Settings data-lazy-src=

Get Connected, Stay Connected

AirPods may not connect to your PC if it’s in use by another device (smartphone or computer). To avoid connection conflicts, turn off Bluetooth on other nearby devices before connecting to your PC.

Related Posts

Источник

Можно ли использовать AirPods с компьютером Windows 10, 8.1 или Windows 7? Да, можно: достаточно, чтобы компьютер или ноутбук имел Bluetooth адаптер, и он исправно работал — после подключения AirPods их можно будет использовать как наушники с микрофоном.

В этой инструкции подробно о том, как подключить Apple AirPods или AirPods Pro к ПК или ноутбуку, а также о возможных проблемах, с которыми при этом можно столкнуться. В контексте темы может быть полезным: Как подключить любые Bluetooth-наушники к ноутбуку или компьютеру и решить возможные проблемы со звуком, Как подключить и использовать AirPods с Android.

Подключение AirPods к компьютеру

Как было отмечено выше, для возможности подключения, ваш компьютер должен быть оборудован Bluetooth, адаптер должен исправно работать и не быть отключен, дальнейшие шаги выглядят следующим образом:

  1. Переведите AirPods в режим сопряжения. Для этого поместите их в футляр, откройте его, а затем нажмите и удерживайте круглую кнопку на корпусе, пока светодиодный индикатор не замигает белым цветом. Если он не начинает мигать, подождите чуть дольше, не отпуская кнопку: он будет светиться белым, мигнет несколько раз оранжевым, а затем начнет мигать белым.
    Режим сопряжения AirPods

  2. Выполните сопряжение AirPods с компьютером. Для этого в Windows 10 зайдите в Параметры (Win+I или значок шестеренки в меню «Пуск») — Устройства — Добавление Bluetooth или другого устройства — Bluetooth, дождитесь, когда в списке появятся AirPods и нажмите по ним, дождитесь завершения подключения.
    Подключить AirPods к Windows 10

  3. В Windows 7 и 8.1 вы можете зайти в Панель управления — Устройства и принтеры — Добавить устройство и так же подключиться к AirPods.
  4. Включите вывод звука и микрофон от AirPods. В Windows 10 зайдите в Параметры — Система — Звук и убедитесь, что в качестве устройств вывода и ввода установлены AirPods.
    Настройка вывода звука на AirPods в Windows 10

  5. В Windows 7 и 8.1 перейдите в «Устройства записи и воспроизведения» (через правый клик по динамику в области уведомлений) и установите AirPods в качестве устройства по умолчанию для воспроизведения и записи (нажатие правой кнопкой по AirPods — использовать по умолчанию и использовать как устройство связи по умолчанию). В Windows 10 также лучше заглянуть в такой раздел (см. Как открыть устройства записи и воспроизведения Windows 10). В некоторых мессенджерах (например, Skype) выбрать микрофон по умолчанию нужно в настройках самой программы.
    Настройка AirPods в устройствах записи и воспроизведения

Как правило, на этом все настройки заканчиваются — AirPods работают с Windows и каких-либо проблем нет, а повторное подключение обычно происходит автоматически (или без сопряжения, а простым подключением устройства в параметрах устройств). Единственный нюанс — при использовании с iPhone, наушники придется подключать к нему заново.

Возможные проблемы при подключении AirPods и AirPods Pro в Windows 10, 8.1 и Windows 7

Далее — некоторые распространенные проблемы при использовании AirPods на компьютере с Windows и возможные подходы для их решения:

Использование AirPods с компьютером — видео

В случае, если при попытке подключить AirPods к ноутбуку или компьютеру у вас что-то работает не так как ожидается, опишите ситуацию, особое внимание обратив на модель ноутбука и Bluetooth-адаптера, возможно, решение найдется.

Источник

Apart from working with Apple devices, the AirPods also work with Windows 11 PCs and laptops to deliver quality audio to users via Bluetooth. However, many users have reported that they are experiencing the AirPods not working issue on their Windows devices after updating to Microsoft’s latest Windows 11 platform.

As you are already reading this article, we presume you are facing the AirPods not working issue or some other issues with your AirPods on your Windows 11 PC or laptop. Fret not, as we have curated this in-depth guide to help you resolve the issue and use your Apple AirPods seamlessly with your Windows 11 computer. Check out the following sections for all the details!

Fix AirPods Not Working on Windows 11 PC or Laptop

Although Apple’s AirPods are designed to work best with iPhones, iPads, and Macs, they work quite well with Windows 11 PCs and laptops with Bluetooth, offering most features of the earphones to users. I have been using the AirPods Pro 2 with my Windows 11 laptop, and it has been a splendid experience, at least most of the time. At times, however, I experience connection failures, audio issues, and minor glitches here and there.

So, after scouring through various guides and user reports online, I have found some of the most effective fixes to resolve the AirPods not working issue on Windows 11 PCs and laptops. With these fixes and suggestions, I have tried to address most issues that you may face with your AirPods while using them with your Windows 11 devices.

I have also provided easy-to-follow, step-by-step guides to help you execute the fixes on your Windows 11 PC or laptop to get the TWS earbuds working again. Check them out below to fix the AirPods not working issue on your Windows 11 device right now!

1. Check Your AirPods Firmware Version

Okay, let’s put first things first! Much like how the iPhone has iOS, your AirPods also has firmware that you need to keep updated. If your AirPods is running an outdated firmware version, you can experience various issues, including the AirPods not working issue in Windows 11. So, check the current firmware version of your AirPods and make sure it is running the latest version.

Now, to check the AirPods firmware version, you need an iPhone, iPad, or Mac. You can refer to the Check Your AirPods Firmware section in our in-depth guide on how to fix AirPods not connecting to iPhone to learn how you can use your iPhone to check the AirPods firmware and make sure it is up to date.

If your AirPods firmware is updated to the latest version, you can proceed to the next section. However, if it is not updated, you need to update the AirPods firmware before using it further. Unfortunately, there is no direct way to update the AirPods.

All you can do is keep them connected to your iPhone and keep the iPhone sufficiently charged and connected to an active internet network. The AirPods firmware will be automatically updated.

After the update, use our guide on How to Connect AirPods to Windows 11 PCs and laptops to properly pair and connect them to your device. After a successful connection, the AirPods should properly work on your Windows 11 computer.

2. Check If Your AirPods Are Still Connected to Your iPhone or Other Device(s)

Now, if you wear the AirPods and hear the connection chime in your ears, but do not get any audio output from your Windows 11 PC or laptop, chances are your earbuds have connected to another Bluetooth device nearby. You see the AirPods are designed to automatically connect to the device to which they were connected in their last session. 

So, even if Bluetooth is enabled on your Windows 11 PC or laptop and you have already paired the AirPods with it, the earbuds might still not automatically connect to your Windows 11 device. 

Previously, if you used them with, say your iPhone, before putting them back in the charging case, the next time you put them on, they will automatically connect to your iPhone, if it is nearby. Hence, it is recommended that you check whether or not your AirPods are connected to any other device instead of your Windows 11 PC or laptop when you are using them. 

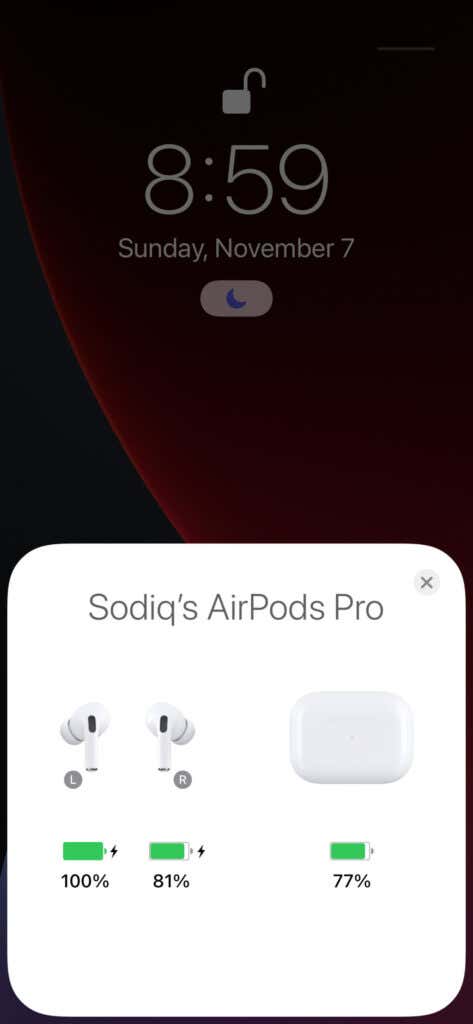
On your iPhone, you can open the Control Center and tap the AirPlay button in the Music tile to check if the AirPods are connected to it. If the AirPods are indeed connected, tap the iPhone option to temporarily disconnect them.

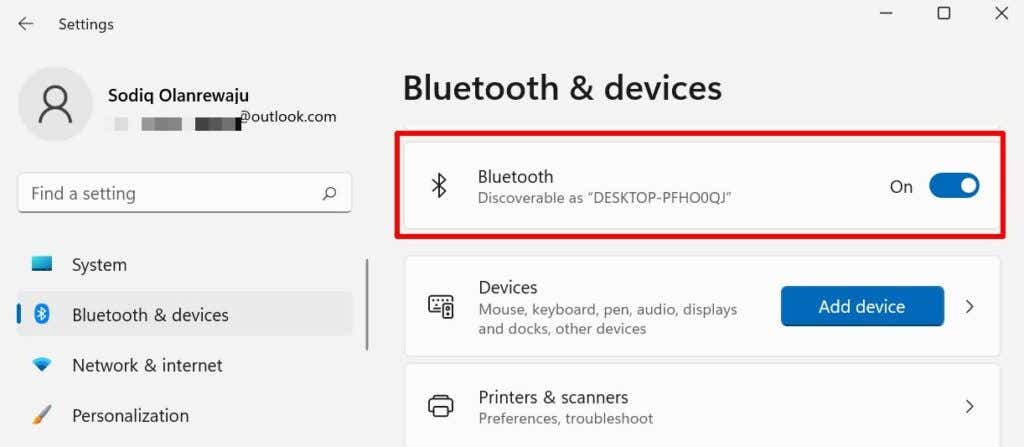
Once they are disconnected from your iPhone or any other device, open the Bluetooth & devices settings on your Windows 11 PC or laptop, and manually connect the AirPods using the Connect button.

3. Make Sure Bluetooth is Properly Working in Windows 11

It is needless to say, for the AirPods to properly work with your Windows 11 PC or laptop, the Bluetooth functionality of your device should be properly working. You see much like any other feature on a Windows 11 PC or laptop, Bluetooth operations can sometimes run into issues, which in turn could cause the AirPods not working issue in Windows 11.

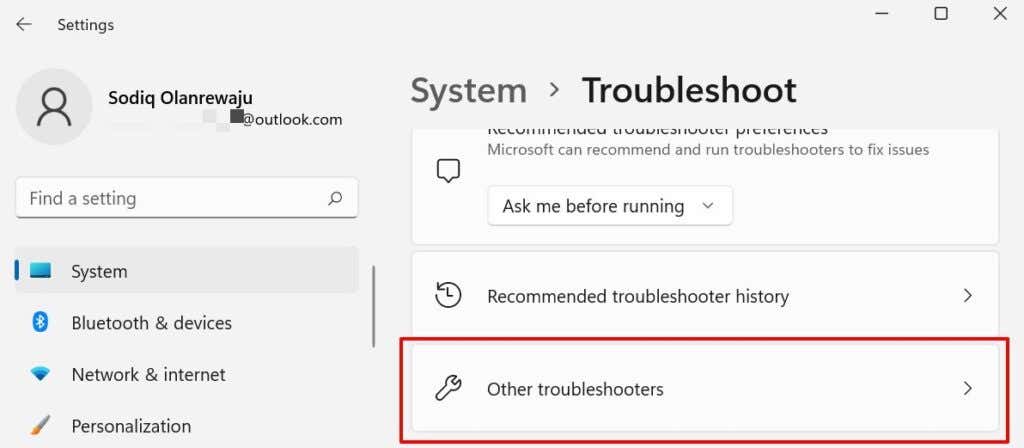
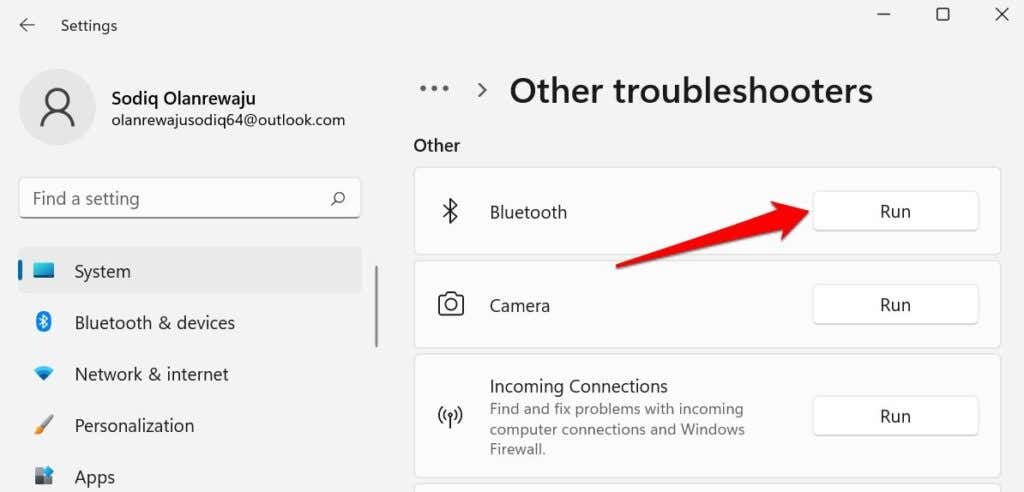
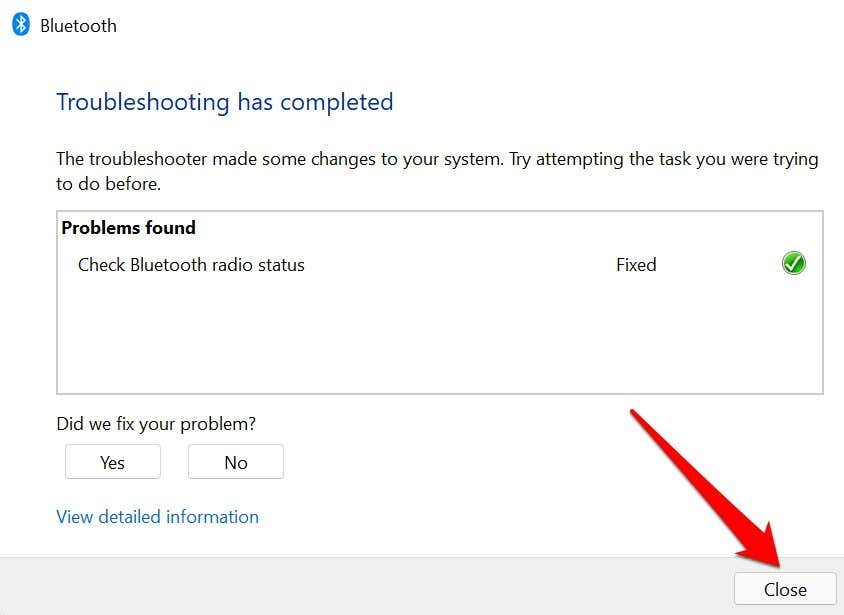
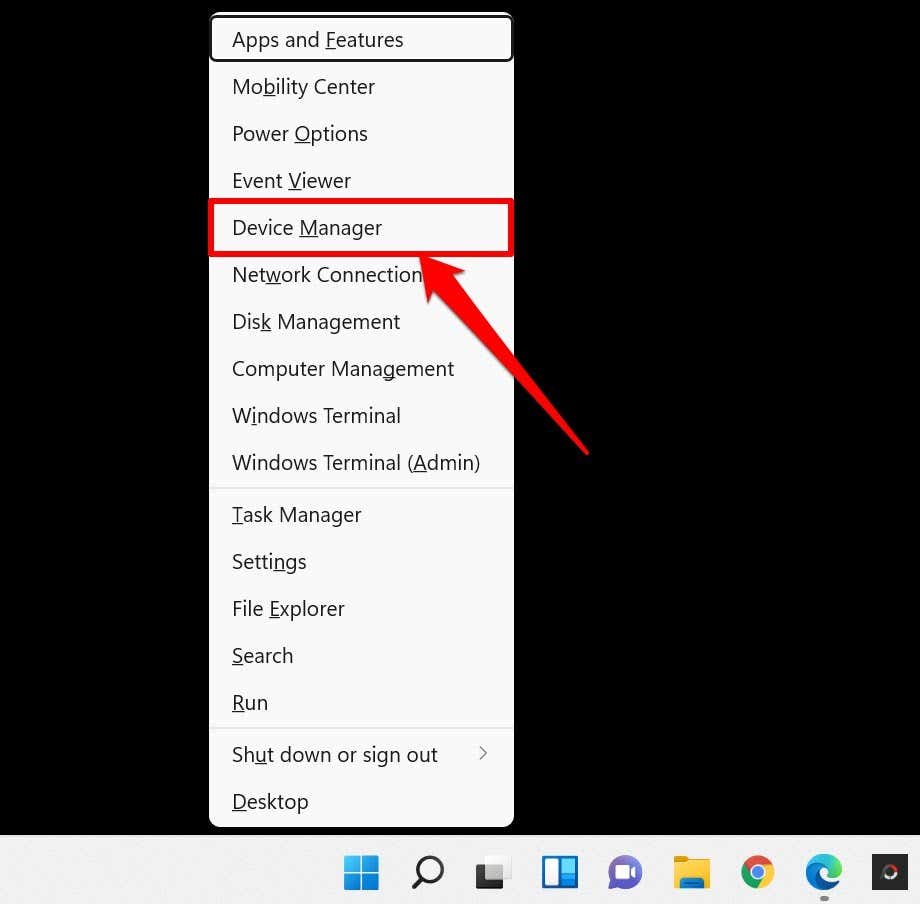
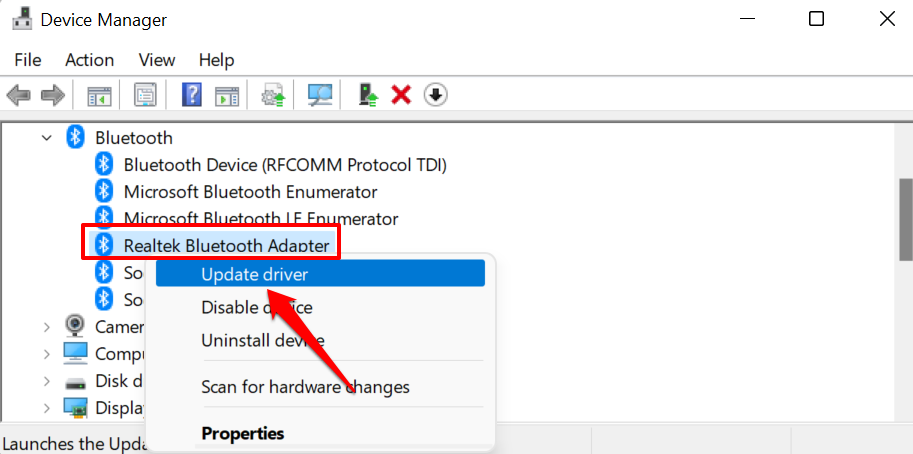
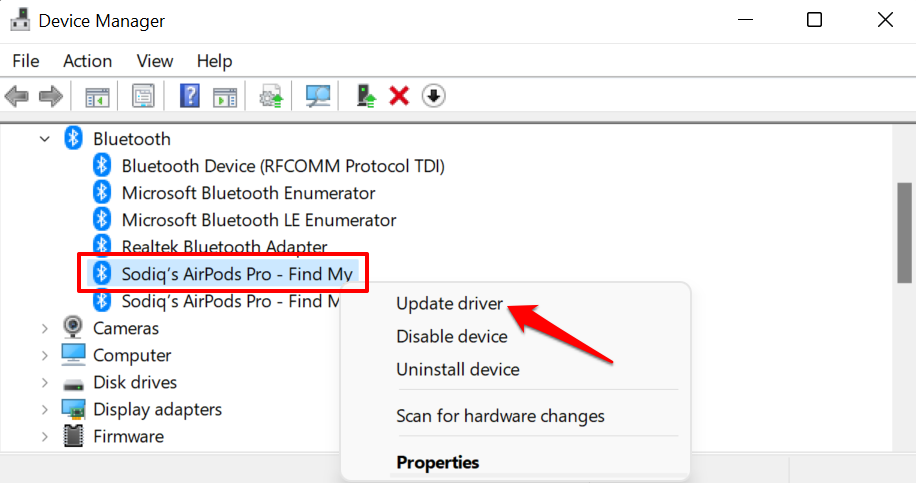
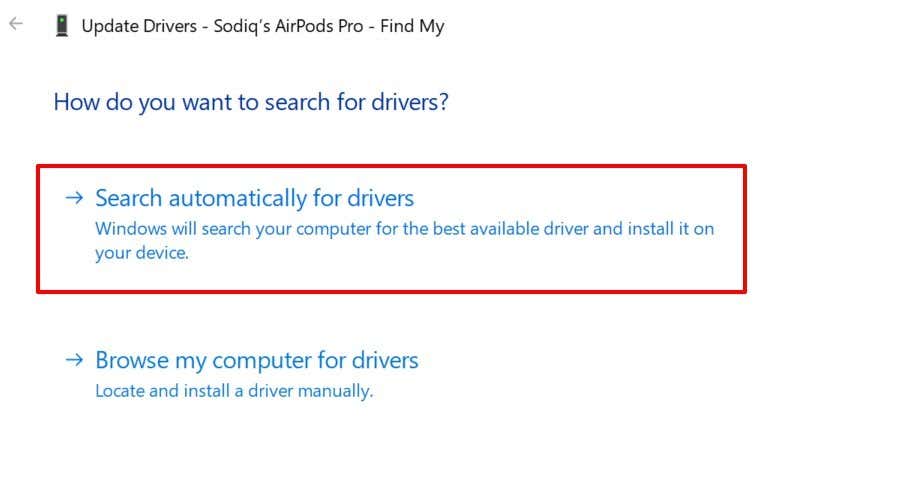
In this case, you can go through our in-depth guide on how to fix Bluetooth not working in Windows 11 to identify the issue with the wireless functionality of your Windows 11 device and get it resolved. You can try updating or reinstalling the Bluetooth driver, running the Bluetooth troubleshooter, or trying any of the other fixes mentioned in the linked guide.

After resolving the Bluetooth issue on your Windows 11 PC or laptop, reconnect the AirPods to it and check whether or not the earbuds are working as expected. 

If you did not find an effective fix in the How to Fix Bluetooth in Windows 11 guide, you can also check out our in-depth guide on How to Fix Bluetooth headphones not working in Windows 11 via the provided link.

4. Make Sure AirPods are Selected to Audio in Windows 11

Another common situation that often causes the AirPods not working issue or the no-sound issue for the AirPods on Windows 11 devices is when the earbuds are not selected for audio. You see if you use multiple audio devices on your Windows 11 PC or laptop, the AirPods might not be automatically selected to output audio right after you connect them to Windows 11.

In this case, you can use the following steps to make sure that the AirPods are selected to output audio on your Windows 11 PC or laptop:

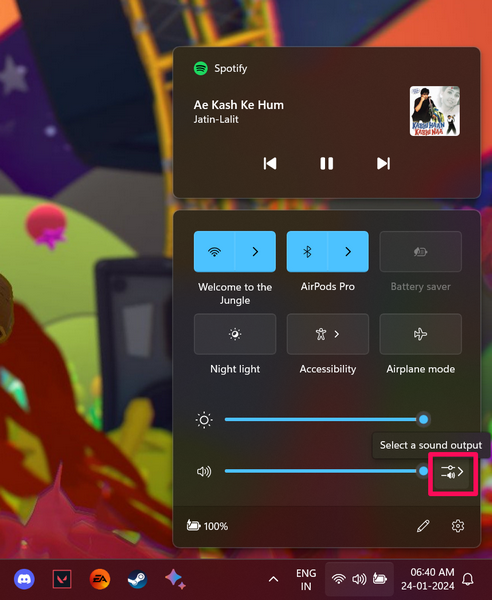
1. While on any screen on your Windows 11 PC or laptop, press the Windows + A shortcut to open the Action Center.

2. On the Action Center UI, click the Select a sound output button at the bottom.

AirPods selected for audio in windows 11 1

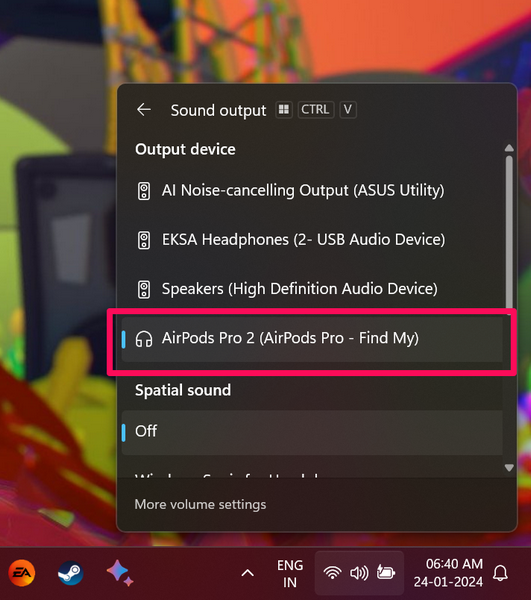
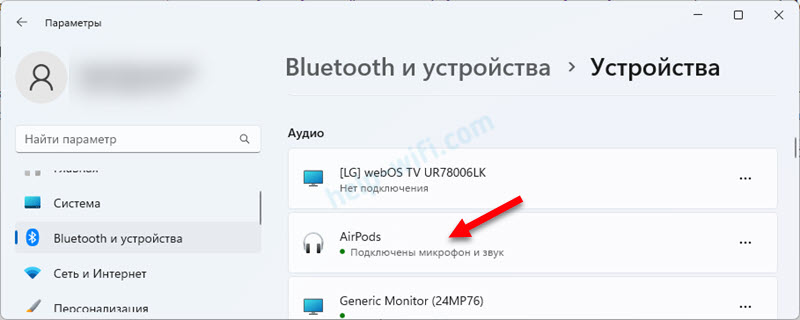
3. Now, make sure that your AirPods are selected for audio on your Windows 11 PC or laptop.

AirPods selected for audio in windows 11 3

5. Reconnect the AirPods to Your Windows 11 PC or Laptop

Now, if you are still experiencing the AirPods not working issue on your Windows 11 PC or laptop, you can try disconnecting the AirPods from your computer and then reconnecting them again. This trick can get rid of any connection issues that might be causing interference between the AirPods and your Windows 11 PC or laptop, and resolve the AirPods not working issue right away.

So, you can follow the steps right below to disconnect the AirPods from your Windows 11 device and then connect them back:

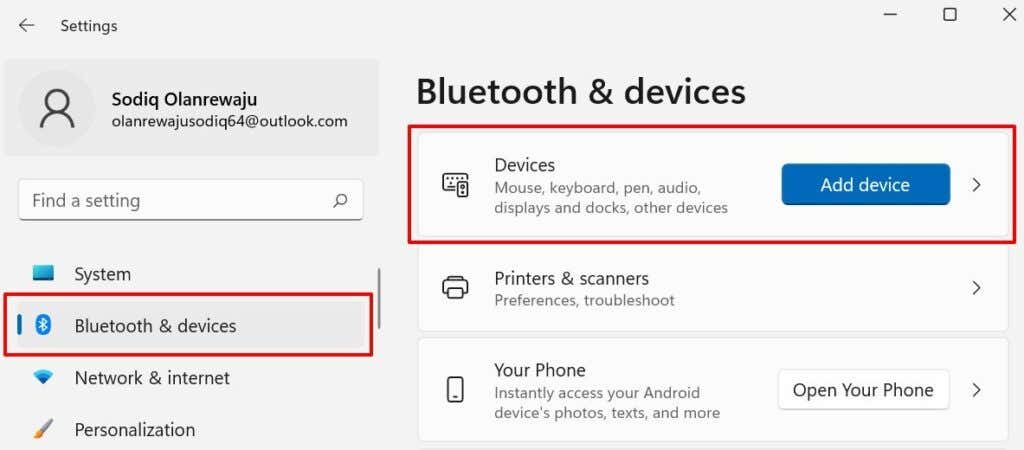
1. Use Windows + I to open the Settings app on your Windows 11 PC or laptop.

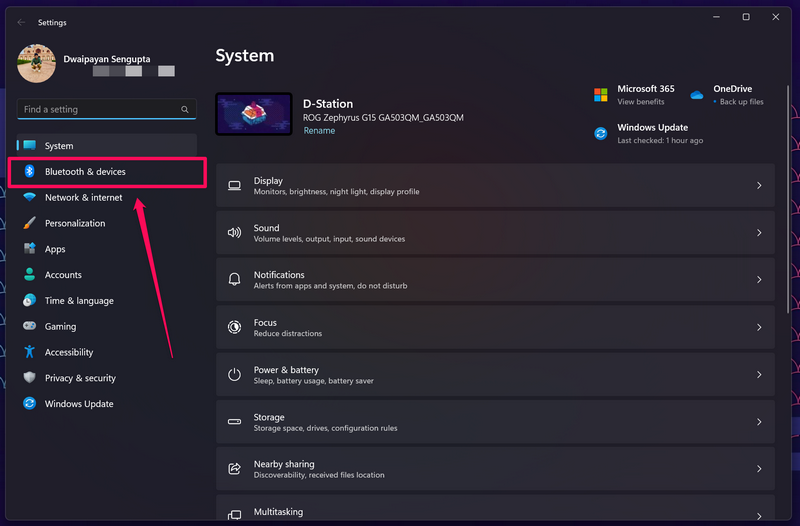
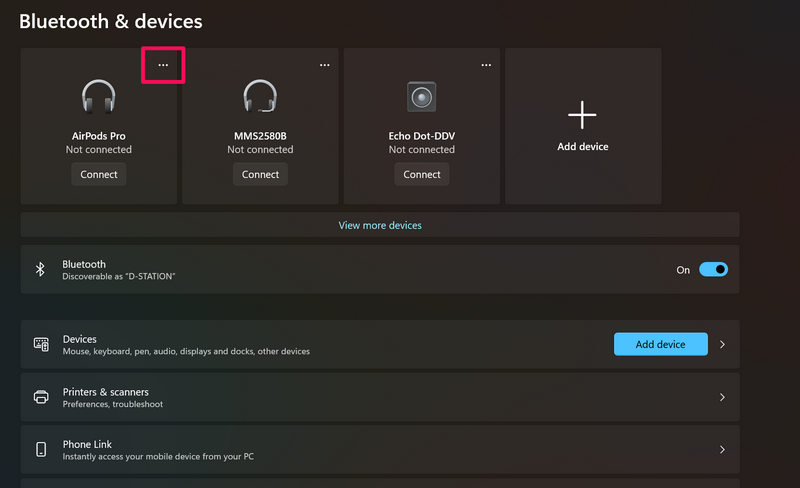
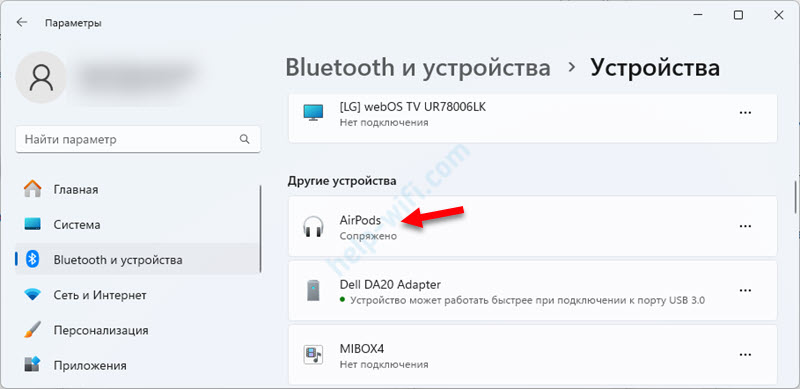
2. Go to the Bluetooth & devices tab on the left navigation bar.

enable bluetooth in windows 11 1

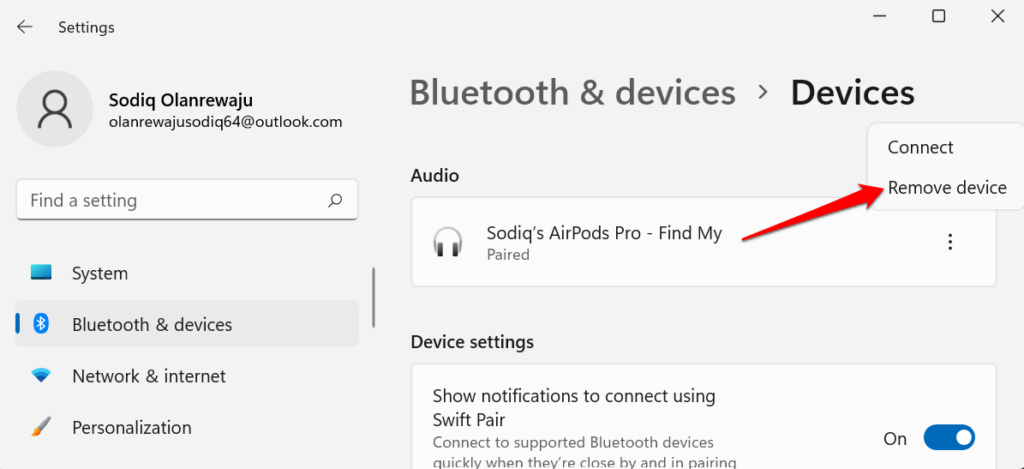
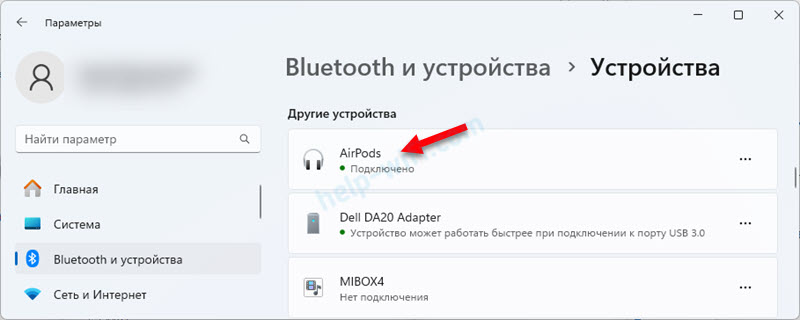
3. Locate the AirPods on the right pane and click the three-dot (more) button to open the context menu.

AirPods connect to Windows 11

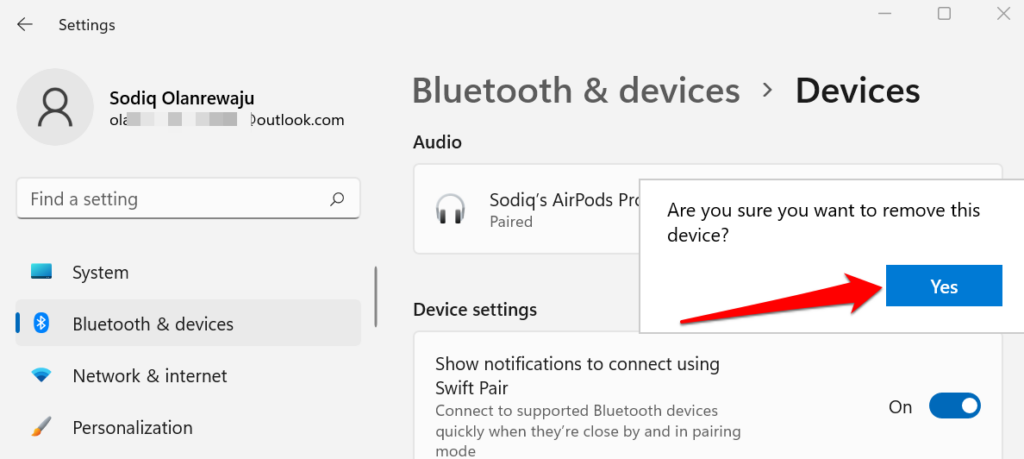
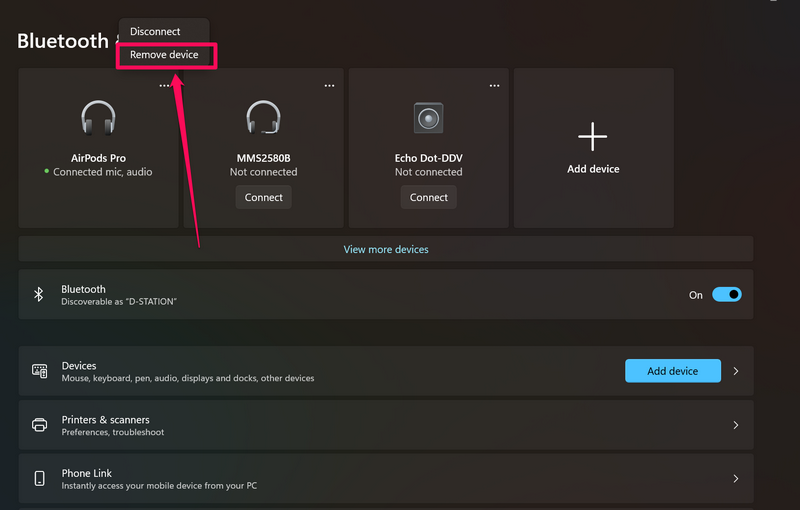
4. Click the Remove device option to instantly disconnect the AirPods from your Windows 11 PC or laptop.

Disconnect AirPods in Windows 11

5. Once the earbuds are removed from the Bluetooth & device settings page on your Windows 11 device, use the previously-mentioned How to Connect AirPods to Windows 11 guide to reconnect the earbuds.

After reconnecting the AirPods to your Windows 11 PC or laptop, they should work fine in case the AirPods not working issue on your device was due to a connection issue.

6. Turn Off Audio Enhancements and Spatial Sound for AirPods in Windows 11

If you are experiencing bad audio quality or audio glitches on your AirPods while using them with your Windows 11 PC or laptop, you can try turning off the Audio enhancements and Spatial sound features. This trick has worked for many users who were experiencing poor audio output from their AirPods on their Windows 11 devices. 

So, there is a high chance that it will resolve the issues for your AirPods and get it fixed in no time. You can follow the steps right below to turn off Audio enhancements and Spatial sound for the AirPods on your Windows 11 PC or laptop:

1. Press Windows + I to launch the Settings app on your Windows 11 device.

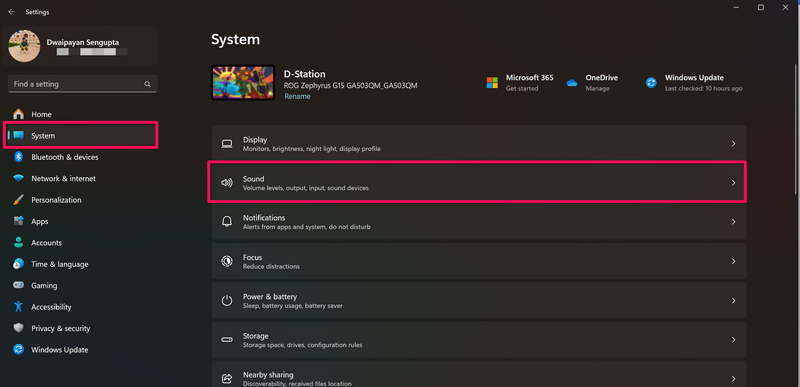
2. Under the System tab on the left navigation bar, click the Sound option.

Turn off audio enhancements and spatial sound AirPods in Windows 11 1

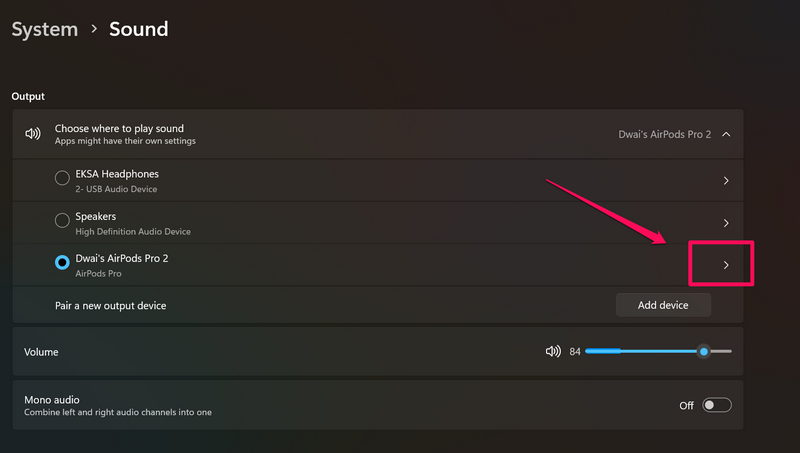
3. Locate your AirPods on the list and click the arrow next to it to open its Properties.

Turn off audio enhancements and spatial sound AirPods in Windows 11 2

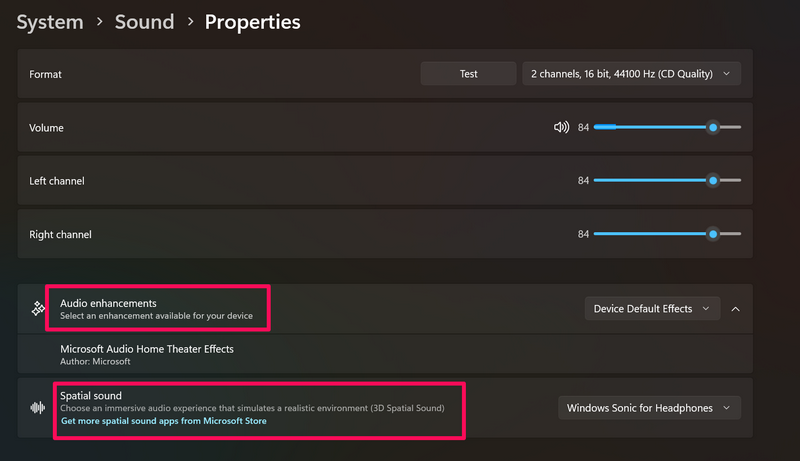
4. On the following page, scroll down to find the Audio enhancements and Spatial sound options.

Turn off audio enhancements and spatial sound AirPods in Windows 11 3

5. Click the boxes next to the mentioned options and set them both to Off.

Turn off audio enhancements and spatial sound AirPods in Windows 11 4

This will turn off the additional audio enhancements and spatial audio features for the AirPods on your Windows 11 PC or laptop. So, if these features were interfering with the operations of the AirPods, causing them to malfunction, this fix should get them working on your Windows device right away.

7. Make Sure Bluetooth Services are Set to Automatic in Windows 11

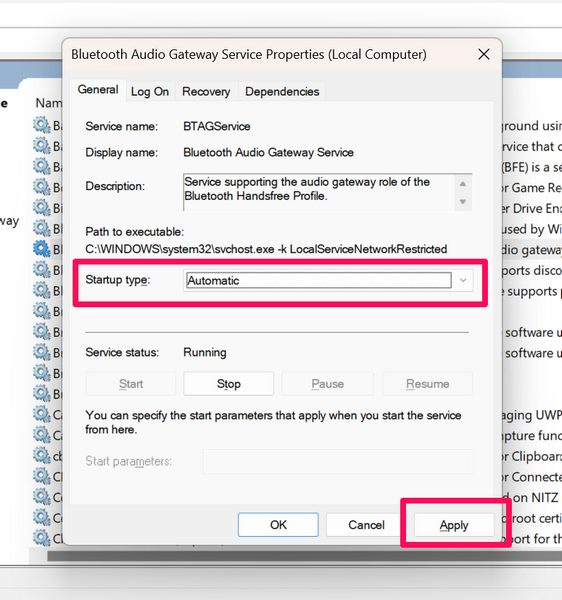
Now, another fix you can try when you experience the AirPods not working issue on your Windows 11 device is to ensure the Bluetooth Support Service and the Bluetooth Audio Gateway Service are set to Automatic. These services make sure all the Bluetooth audio accessories are discoverable by your Windows 11 PC or laptop and work every time you connect them to the device.

So, if these services on your Windows 11 PC or laptop are set to run manually, you might face the AirPods not connecting or AirPods not working issue on your computer. You can follow the steps right below to make sure the aforesaid Bluetooth services are set to Automatic on your Windows 11 device:

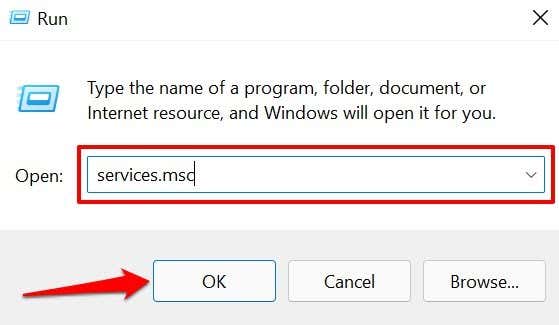
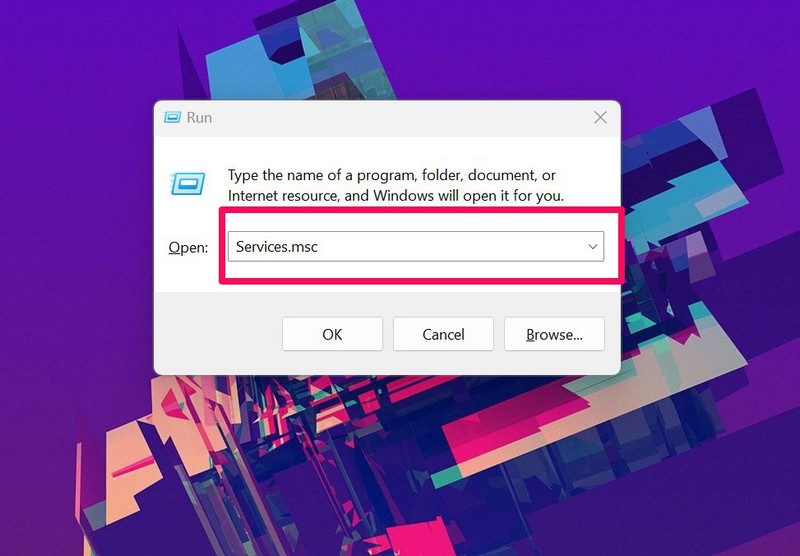
1. Use Windows + R to open the Run tool on your PC or laptop.

2. Type in “services.msc” (without quotes) and press Enter to open the Services window on your device.

Services windows 11 enable xbox services ss 1

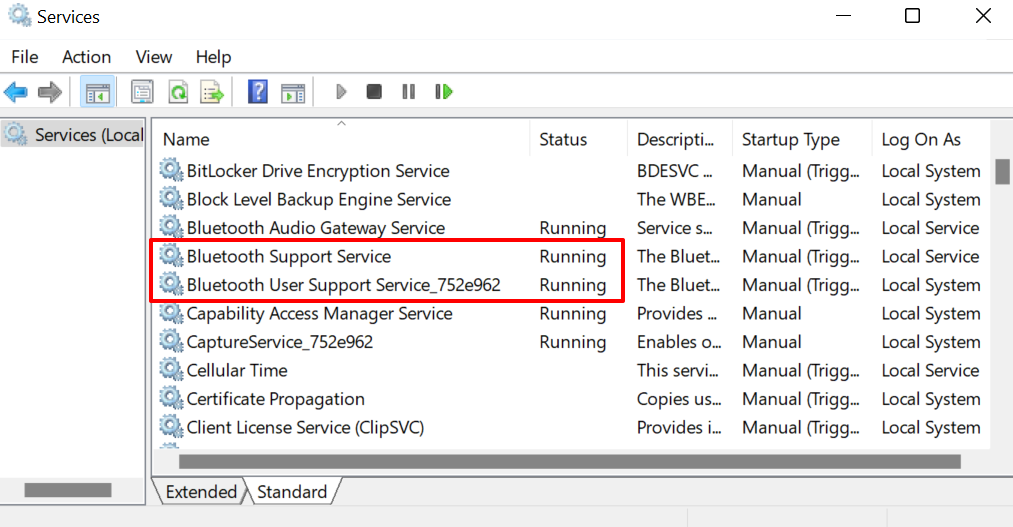
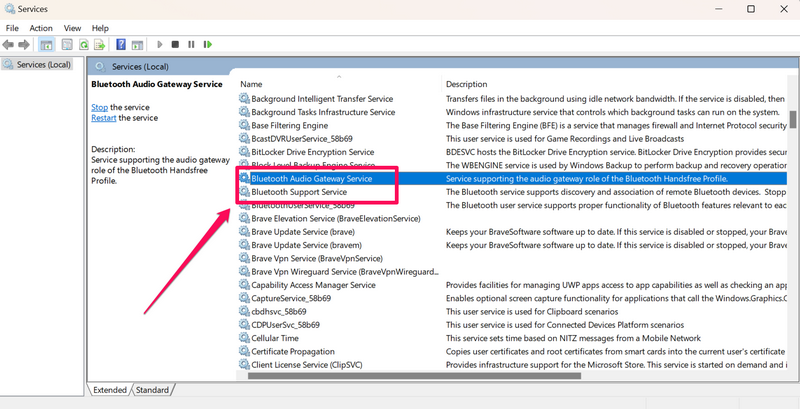
3. Now, locate the Bluetooth Audio Gateway Service and the Bluetooth Support Service on the right pane.

Set Bluetooth service to automatic in windows 11 3

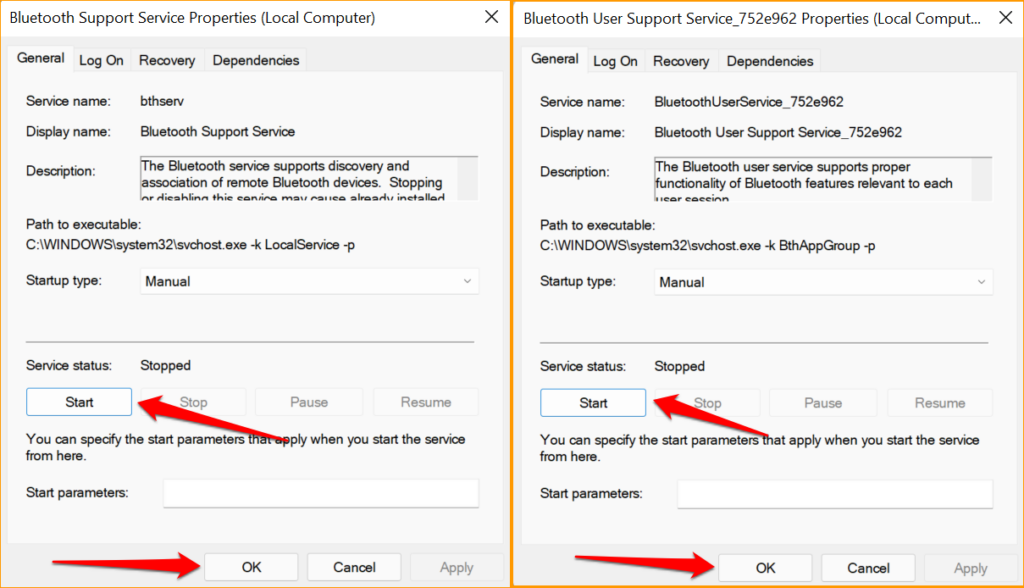
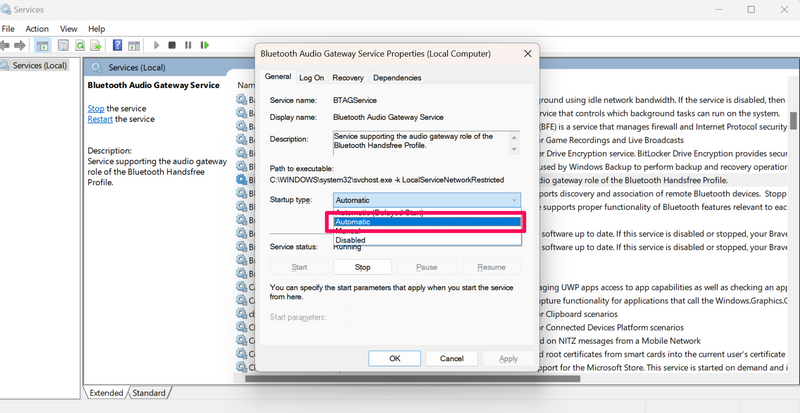
4. You can then double-click each of the services to open their properties and set the Startup type to Automatic.

Set Bluetooth service to automatic in windows 11 1

5. After the change, make sure to click the Apply button to save it on your Windows 11 PC or laptop.

Set Bluetooth service to automatic in windows 11 2

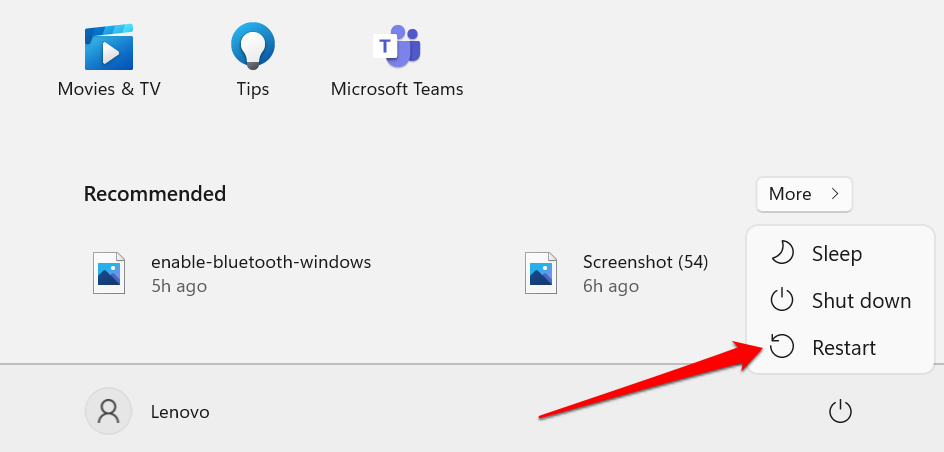
Once you have set the Bluetooth Audio Gateway Service and the Bluetooth Support Service to Automatic, restart your Windows 11 PC or laptop. Following the restart, check whether or not the AirPods not working issue has been resolved on your device.

8. Check for Windows 11 Updates

Microsoft keeps rolling out new Windows 11 updates for users every now and then to fix known bugs and issues in the operating system. So, if you have not updated your Windows 11 PC or laptop in a while, chances are you are running an outdated Windows 11 version with bugs that might be causing your AirPods to malfunction.

In this case, you can check for the latest Windows 11 updates on your PC or laptop and get them installed as soon as possible. Use the following steps to do on your Windows 11 device:

1. Press Windows + I to open the Settings app.

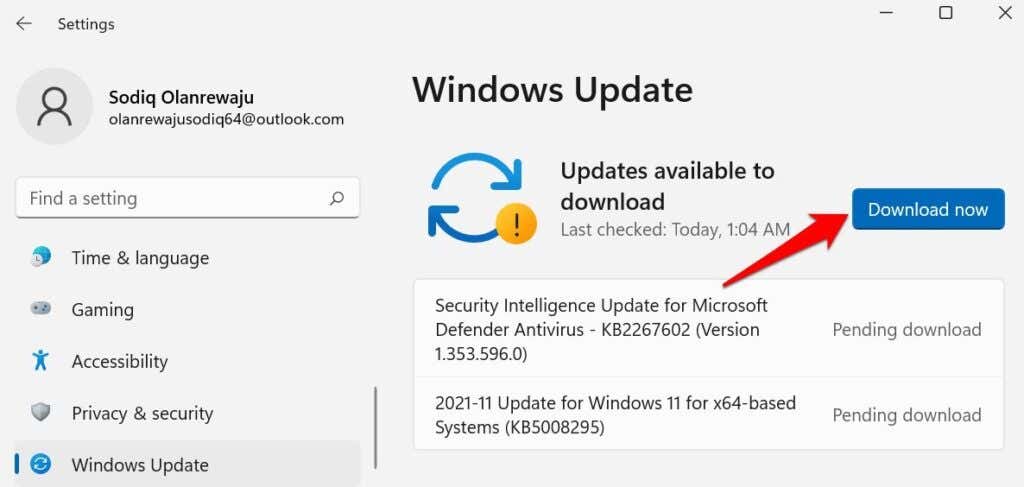
2. Go to the Windows Update tab on the left navigation bar and click the Check for updates button.

copy paste not working windows updates ss 2

Note: Make sure your Windows 11 PC or laptop is connected to an active internet network during this stage.

3. Once the Windows updates are ready, click the Download and install button to initiate the update process.

4. Wait for the Windows update to complete.

5. Restart your Windows 11 PC or laptop if it is not restarted automatically.

After the restart, connect your AirPods to the Windows 11 device and check whether or not it is working properly.

9. Reset Your AirPods

Another thing that you can try when you experience the AirPods not working issue on your Windows 11 PC or laptop is resetting the Bluetooth earbuds from Apple. If the AirPods are not working properly with your Windows 11 device due to a system glitch, a reset should get rid of it.

You can follow the steps right below to reset your AirPods to try and resolve the AirPods not working issue in Windows 11:

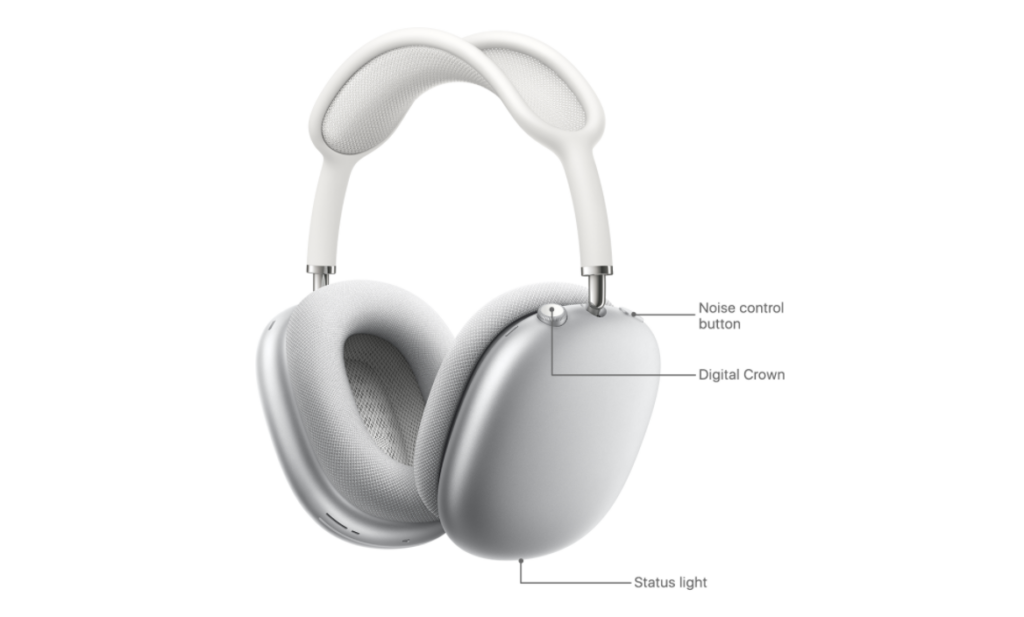
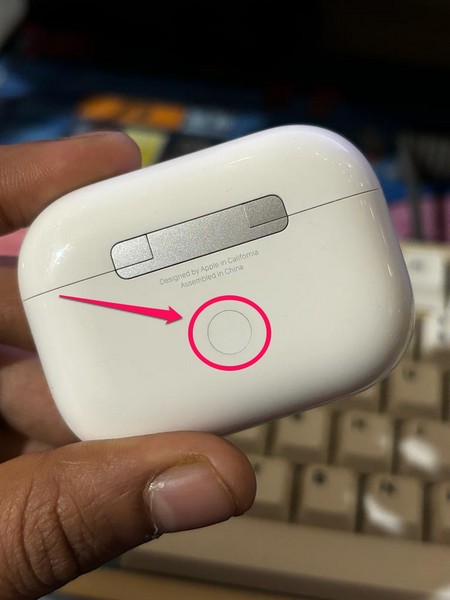
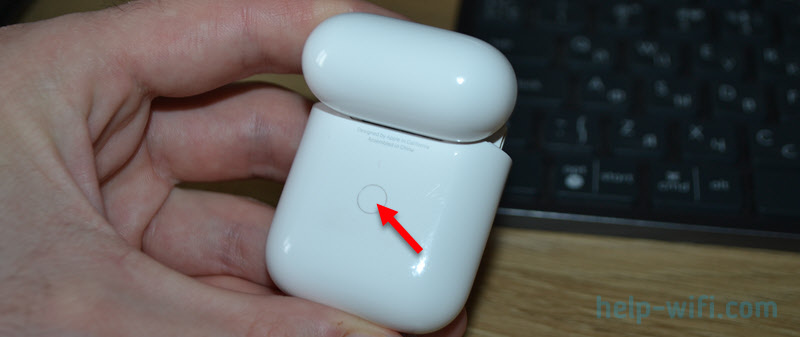
1. With the earbuds inside, open the lid of the AirPods charging case.

2. Now, press and hold the physical button on the AirPods case.

AirPods physical button

3. Continue holding the button until you see the indicator LED of the AirPods flash amber and then white.

This will reset your AirPods and get it back to its factory settings. After the reset, pair the AirPods with your Windows 11 PC or laptop once again and check whether or not the earbuds are working properly.

10. Contact Apple Support

Now, if none of the above-mentioned methods helped you to resolve the AirPods not working issue on your Windows 11 device, you might want to contact Apple’s support team. There might be a hardware issue with your AirPods that might be preventing it from connecting and working with a Windows 11 PC or laptop.

So, we’d recommend you download the Apple Support app on your iPhone or go to the official Apple Support page to explore all the options. However, it is best to take your AirPods to a nearby Apple Store or an Apple-authorized service center to directly consult with a technician who might be able to better understand the issue and get it fixed.

FAQs

Do Apple AirPods work with Windows 11?

Yes, Apple’s AirPods, ranging from the 1st-Gen AirPods to the AirPods Max, seamlessly work with Microsoft’s Windows 11 platform. The Windows 11 PC or laptop must have Bluetooth connectivity for the AirPods to connect and output high-quality audio.

How to connect my AirPods to my Windows 11 computer?

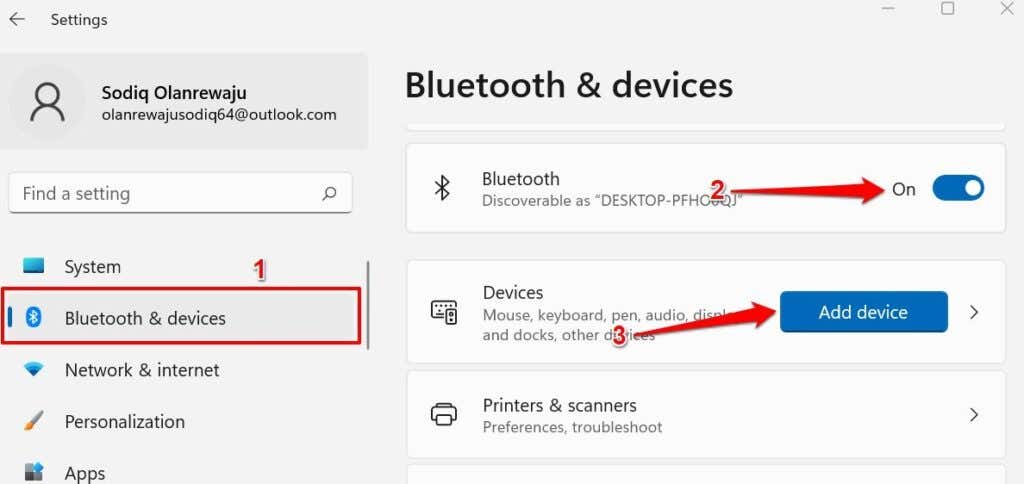
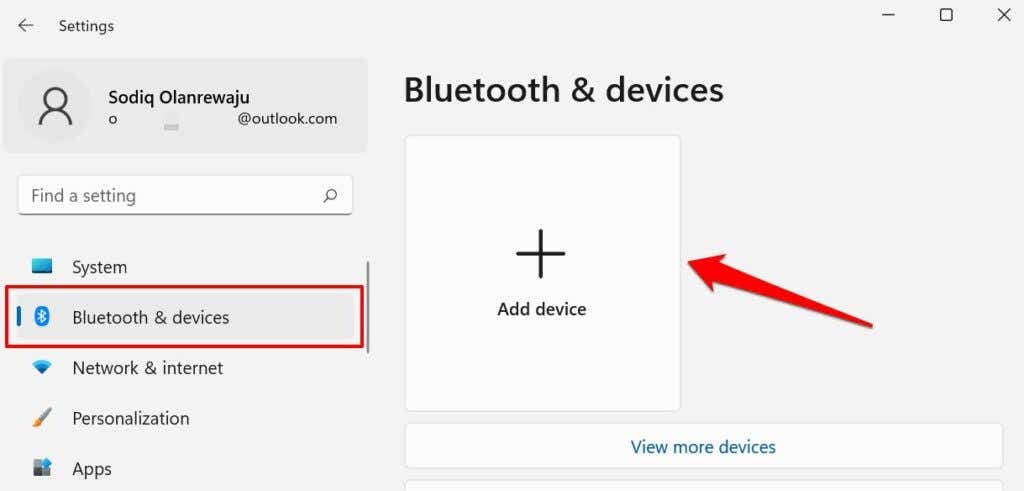
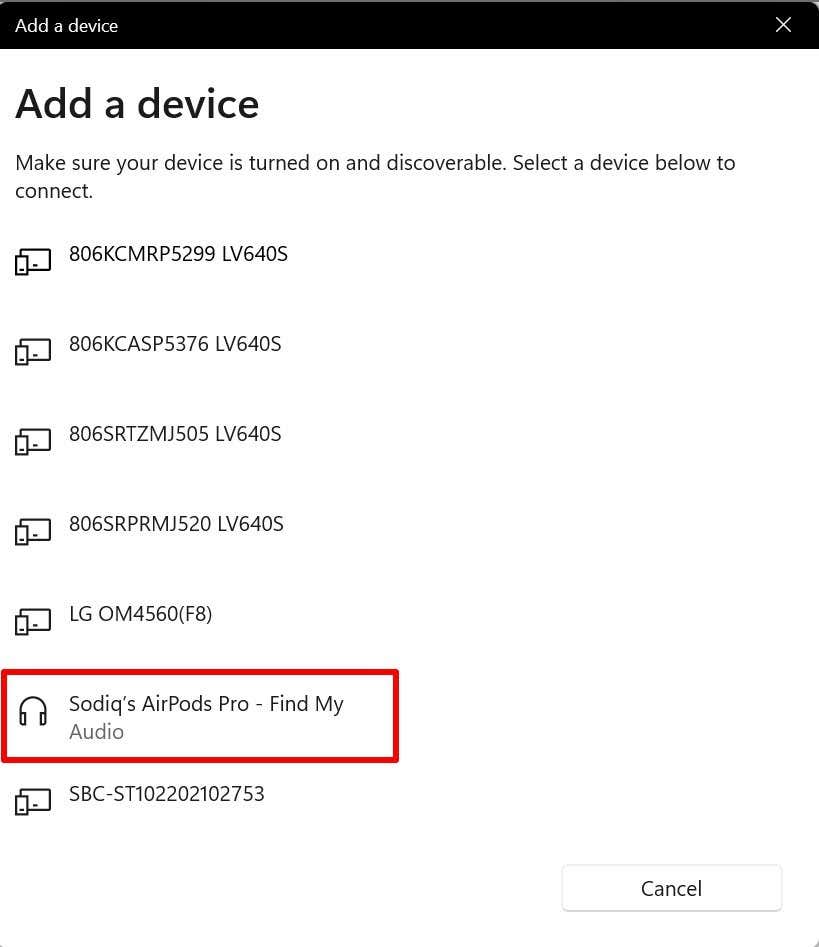
To connect AirPods to a Windows 11 PC or laptop, you can go to the Bluetooth & device settings and add a new device. Next, press and hold the button on the AirPods case to make it discoverable to nearby Bluetooth devices, and then, select the AirPods on the Add a Device UI on the Windows 11 computer to connect.

Why is the AirPods not working with my Windows 11 computer?

There can be various reasons why the AirPods might not work with a Windows 11 PC or laptop. These include issues with the Bluetooth functionality of the Windows device, outdated AirPods firmware, issues with the Bluetooth drivers, or an outdated Windows 11 version.

Wrapping Up

There you have it, folks! This was our comprehensive guide on how to fix AirPods not working on Windows 11 PCs and laptops. Apple’s AirPods are great audio accessories that are quite expensive compared to the competition. So, if you use an iPhone and a Windows computer, using the AirPods with both your devices is how you can fully utilize the TWS earbuds.

Hence, we hope this article helps you resolve any issue that you might experience with the AirPods and your Windows 11 computer. If you were facing such an issue and one of the fixes helped you resolve it, don’t forget to let us know in the comments below. We will see you in our next guide!

Источник

4986

В этой статье я хочу поделиться решениями проблемы с подключением наушников AirPods от Apple к ноутбуку или компьютеру на Windows. В комментариях к другим статьям мне приходилось решать разные проблемы с AirPods. В том числе, когда они не подключаются, или не работают после подключения к ноутбуку. Есть несколько проверенных и рабочих решений, которыми я с радостью поделюсь.

Для успешного подключения AirPods к ноутбуку по Bluetooth, нам необходимо:

  1. Чтобы на ноутбуке или ПК работал Bluetooth и выполнялся поиск устройств.
  2. Чтобы AirPods находились в режиме сопряжения. Это очень важно, иначе ноутбук не сможет их обнаружить.
  3. Чтобы на ноутбуке была установлена не очень старая версия Windows и новый драйвер Bluetooth адаптера. Из-за этого даже после успешного подключения наушники могут не работать (статус «Сопряжено», нет возможности выбрать AirPods для вывода звука и т. д.). Часто вижу такое даже в Windows 10.

Сначала я рекомендую выполнить подключение AirPods к компьютеру или ноутбуку по моей инструкции. А если у вас установлена Windows 11, то смотрите инструкцию по подключению AirPods к Windows 11. В большинстве случаев, если все сделать по инструкции, то наушники подключаются и отлично работают.

Если по инструкции не удалось подключить, ноутбук не видит AirPods, ошибка при подключении, или не удается вывести звук на наушники уже после подключения, тогда смотрите мои решения. Они подойдут для всех наушников от Apple: AirPods, AirPods Pro, AirPods Max (независимо от поколения). Что касается ноутбука или компьютера, то на нем может быть установлена Windows 11, Windows 10, или даже Windows 7. Правда с семеркой может быть больше проблем.

Почему ноутбук не видит AirPods?

Сначала рассмотрим самый частый случай, когда ноутбук или компьютер не может обнаружить наушники. Windows выполняет поиск устройств, но AirPods нет в списке устройств Bluetooth.

Я рекомендую убедиться, что ваш ноутбук все таки выполняет поиск Bluetooth устройств. Если не знаете как запустить поиск, то смотрите инструкции по ссылкам выше. Вот так выглядит окно поиска:

В этом окне должны появиться наши AirPods. Если они там не появляются – это проблема. Но если поиск идет – это уже хорошо. Еще желательно убедиться, что этот компьютер находит другие устройства.

Чаще всего причина в том, что наушник не в режиме сопряжения. А когда они не в режиме сопряжения, то они не доступны для поиска и подключения, и ноутбук не сможет их найти.

Решение: чтобы на AirPods и AirPods Pro активировать режим сопряжения, нужно открыть кейс и на 2-3 секунды зажать кнопку на кейсе. А на AirPods Max нужно зажать кнопку управления шумом. Если у вас AirPods 4, то там нужно сделать двойное нажатие по сенсорной кнопке. Она находится спереди кейса под индикатором. Я писал об этом в инструкции по подключению AirPods 4.

Активация режима сопряжения на Apple AirPods если они не подключаются к ноутбуку

Когда наушники доступны для поиска и подключения, то индикатор на кейсе или одном наушнике (в случае с AirPods Max) должен мигать белым цветом. В этот момент заново запустите поиск на компьютере (если окно закрыто) и он должен обнаружить наушники.

Если это не помогло или появляется ошибка «Это не сработало…», «Сопряжено»

  1. Проверьте, находит ли эти AirPods другое устройство. Например, телефон, или другой компьютер.
  2. Возможно, эти наушник уже подключены к вашему компьютеру, поэтому он их не определяет как новое устройство. Или они отображаются на вкладке «Другие устройства» и статус возле них «Сопряжено».
    AirPods не подключаются к Windows и статус "Сопряжено"

    А если нажать на кнопку «Подключить» возле AirPods, то появится ошибка «Это не сработало. Убедитесь что устройство Bluetooth все еще доступно для обнаружения, а затем повторите попытку». Их нужно удалить в настройках Bluetooth в Windows (открыть меню из трех точек напротив наушников и выбрать «Удалить устройство») и только после этого подключать заново.

  3. Сделайте сброс настроек наушников AirPods и после этого выполните подключение.
  4. Посмотрите решения в статье ноутбук не видит Bluetooth устройства или Windows 11 не видит Bluetooth наушники (если у вас Windows 11).

AirPods нет в устройствах воспроизведения, нет звука, статус «Подключено» в «Другие устройства»

Еще одна частая проблема, когда после подключения AirPods к компьютеру звук на наушники не выводится. AirPods подключены, но отображаются в разделе «Другие устройства» и чаще всего возле них надпись «Подключено». Не отображаются в настройках звука, чтобы можно было выбрать их в качестве устройства для вывода звука с ноутбука или ПК.

Нет звука через AirPods в Windows, не отображаются в устройствах вывода звука

Они должны отображаться на вкладке «Аудио» со статусом «Подключены микрофон и звук» или «Подключенный голос, музыка», как у меня на скриншоте ниже. Тогда все будет работать.

AirPods не подключаются к компьютеру для вывода звука

Причина, как правило, в устаревшей версии Windows, или в устаревшем драйвере Bluetooth адаптера. Иногда причина в отключенных службах, в свойствах наушников. Но как показывает мой опыт, если обновление и/или откат драйвера не помогает, в службах все хорошо, то проблему можно решить только переустановкой Windows на более новую.

В Windows 7 такие проблемы очень часто, в Windows 10 меньше, а в Windows 11 их практически нет (если установлены все обновления). AirPods в Windows 11 вообще отлично работают. Я сам часто подключаю свои AirPods 2 поколения к ноутбуку.

У меня есть две статьи, в которых я очень подробно показывал решения этой проблемы:

  • Для Windows 11 – Нет звука в Bluetooth наушниках (колонке) в Windows 11
  • Для Windows 10 и Windows 7 – Bluetooth наушники не воспроизводят звук с ноутбука

Но если ничего не сработало, а желание выводить звук с ноутбука на AirPods осталось, тогда установите все доступные обновления Windows, а если это не поможет (что скорее всего) – обновитесь до Windows 11, или выполните чистую установку.

Источник

Since the advent of AirPods, listening to music and audio has never been so convenient. Just like any other tech gadgets, they are bound to misbehave once in a while. For instance, you might have issues trying to connect them to your computer. While this can be aggravating, it isn’t time to trash them because most connection issues can be fixed.

This article highlights some quick fixes you can try to get your AirPods connected to your computer again. Let’s get started.

Connection issues are relatively common in AirPods, but the good news is that they can be resolved. To begin with, there might be several reasons why your AirPods aren’t connecting to your computer. Some common culprits include misconfiguration in your Bluetooth settings, outdated drivers, clogged pods, and in some rare cases, hardware issues.

Whatever the root cause, here are some quick fixes to get your AirPods connecting to your computer again.

Enable Your Bluetooth and Make Sure You’re Close to Your Computer

Let’s start with the basics. AirPods can only connect to your computer through Bluetooth. In that regard, before you try out the fixes, we’ll highlight, go to your computer and ensure Bluetooth is turned on. If it’s enabled and your AirPods still won’t connect to your computer, the culprit might be the connection distance.

Bluetooth technology is constrained by distance—ten meters, to be exact. If you’re far from your computer, consider moving closer to it and see if that resolves the connection problems.

Disable Your Bluetooth and Turn It Back On

If your Bluetooth is on, but your AirPods are still not connecting to the computer, consider turning Bluetooth off and back on again. Your AirPods should connect to your PC once again after resetting the connection.

Disconnect Other Bluetooth Devices Connected to Your Computer

Having your computer paired with other devices while trying to connect your AirPods to the same device might result in magnetic interference. Plus, if any of the connected devices are faulty, it will most likely tamper with your connection. For that reason, if you have multiple devices connected to your computer’s Bluetooth and are having connection issues with your AirPods, try disconnecting them and see if that helps.

Magnetic interference doesn’t only emanate from the devices that are directly connected to your computer but also from those that surround your AirPods. These include routers, keyboards, and mice. To fix the issue, moving to an isolated area is advised to see if your AirPods will connect again.

Ensure Your AirPods Are Charged

If your AirPods aren’t connecting to the PC, another culprit is probably the battery level. Check that the accessories hold at least 50% of the charge before using them. If they’re running low on power, place them in the charging case, shut the top, and allow for a boost.

Note: Always charge your AirPods using an accessory that has been certified by Apple. Otherwise, you risk damaging your battery.

Restart Your Computer

Restarting your computer is known to fix many software glitches, including connection issues. It releases any processes that might be clogged up in the RAM, allowing the device to create new connections. Once you turn on your computer, the connection issues should be cleared, and your AirPods should connect to the PC again. If this process has not worked for you, consider trying out the subsequent fixes.

Update Your Bluetooth and AirPods Drivers

Working on outdated Bluetooth drivers is bound to cause connection issues. The same is true for outdated AirPods drivers. Here’s how to update your Bluetooth drivers.

  1. On your computer, press the “Windows + X” keys.
  2. From the menu, click on “Device Manager.”

  3. Open the “Bluetooth” menu.

  4. Right-click on your computer’s Bluetooth driver.

  5. From the options, select “Update driver.”

If the connection issues persist even after the driver update, try updating your AirPods’ drivers too.

Here’s how to go about it,

  1. Pair your AirPods with your computer and press “Windows + X” keys and select “Device Manager.”
  2. Right-click on your AirPods’ driver and choose “Update driver.”

With updated drivers, you’re less likely to experience connection issues. If you still face the same problems, move on to the next fix.

Hard Reset Your AirPods

Here’s how to hard reset your AirPods.

  1. Connect your AirPods to your iPhone.
  2. Place the AirPods inside the charging case and close the lid.
  3. Press and hold the button on the back of the case for 15 seconds until the LED light turns green. Release the button and connect your AirPods to the computer again.

Clean Your AirPods

AirPods are wearables and are bound to collect dirt and, most commonly, earwax. Once the dirt has accumulated on the accessory, the pods are likely to clog up. Wear and tear are inevitable. To avoid—or rather, minimize this—it’s best to keep your AirPods in their case whenever they’re not in use.

If you sense that dirt is the culprit behind your AirPods not connecting to a PC, it’s time to clean them. While cleaning, use isopropyl alcohol, which has a 70% alcohol content. Having clean AirPods will significantly reduce the chances of any connection problems occurring.

Update Your Computer

An outdated operating system can cause various software issues, including connectivity problems. Check for updates and run the most recent Operating System version to avoid any system-level bugs.

AirPods Are Paired but Still Won’t Connect to PC

If your AirPods are already paired but still won’t connect to the PC, then the culprit is most likely the firmware—an operating system AirPods are built on. Of course, there might be other underlying issues, like wrong Bluetooth configuration or hardware faults. Whatever the cause, here are some quick fixes to get your AirPods connecting to the PC again.

Troubleshoot Bluetooth and Hardware Issues

Windows is jam-packed with various troubleshooters designed to help discover and fix any underlying faults. In that regard, it doesn’t hurt to run some scans to fix your AirPods.

Here’s how to troubleshoot Bluetooth and hardware problems.

  1. On your computer, search for “Command Prompt.”

  2. From the results that pop up, right-click on “Command Prompt” and select “Run as administrator.”

  3. Type in “msdt.exe -id DeviceDiagnostic,” and press the “Enter” key.

  4. Click “Next,” and follow the instructions on the wizard to finish the troubleshooting process.

Remove Any Multiple Instances of Your AirPods from the Device Manager

  1. Press the “Ctrl + X” button on your computer and open “Device Manager.”

  2. Expand the “Bluetooth” menu.

  3. Remove any grayed-out or multiple instances of your AirPods. To remove the device, right-click on the AirPods you’d like to remove and select “Uninstall device.” After uninstalling, restart your computer and try connecting the AirPods to your computer again.

Edit the String Values in the Registry Editor

An absent registry value string may also be the cause of your AirPods pairing but not connecting to the PC. In fact, changing the registry values has led to success for many users.

Here’s how to edit the string value in the Registry Editor,

  1. On your computer, launch the “Registry Editor.”

  2. Expand the “HKEY_LOCAL_MACHINE” menu.

  3. Open “SYSTEM.”

  4. Open the “ControlSet001” menu.

  5. Navigate to the “Class” menu.

  6. Navigate to the file named “{e0cbf06c-cd8b-4647-bb8a-263b43f0f974}.”

  7. Select “0000.”

  8. Right-click the window and navigate to “New.”

  9. Select “String Value.”

  10. Name the file as “PnPCapabilities.”

  11. Open the file and type in “24” as the “Value data.” Restart your computer for the edits to take effect.

Once you restart your computer, your AirPods should successfully connect to the computer.

Note: Be careful when editing the system values in your Registry Editor. Wrong edits can result in the system malfunctioning.

AirPods Won’t Stay Connected to PC

AirPods that won’t stay connected to the computer usually result from low battery levels. Ensure that the inner parts of the case are free from dirt, so they don’t prevent power from reaching the pods.

Some other fixes to the problem you can try are listed below.

Stay Connected

As you can see, your AirPods not connecting to the PC is not a call for a new addition to your next shopping list. In fact, most of the connection issues can easily be fixed by restarting your Bluetooth connection or device. Rarely will you find yourself sifting through the inner workings of your computer, for instance, editing the registry string values. Whatever the weight of your issue, we hope that at least one or two of the above fixes have worked for you and that your AirPods are connecting to your PC again.

What other fixes have you tried to get your AirPods connecting to a PC again? Did they work? Please share your experience with us in the comments section below.

Источник

Понравилась статья? Поделить с друзьями:
0 0 голоса
Рейтинг статьи
Подписаться
Уведомить о
guest

0 комментариев
Старые
Новые Популярные
Межтекстовые Отзывы
Посмотреть все комментарии
  • При загрузке windows 7 параметры восстановления системы
  • Эмулятор iphone на пк windows 10 для игр
  • Vhd resizer windows 10
  • Настройка меню пуск windows server 2016
  • Нам не удалось установить windows в выбранное расположение 0x800701b1