
Одна из проблем, знакомая отдельным пользователям Windows 11 — проблемы при выключении ноутбука или ПК: после нажатия кнопки «Завершение работы» полного выключения не происходит — обычно вместо этого экран гаснет, но кулеры продолжают работать, а в некоторых случаях сразу происходит перезагрузка и повторный запуск системы, возможны и иные сценарии, например — сообщение о том, что какое-то приложение мешает завершению работы или бесконечный экран «Завершение работы».
В этой инструкции подробно о способах решить проблему, если компьютер с Windows 11 не выключается после завершения работы. Также может быть полезным: Что делать, если компьютер или ноутбук сам включается.
Отключение быстрого запуска — первое что следует попробовать
При появлении проблем выключения ПК или ноутбука с Windows 11 первое, что стоит попробовать сделать — отключить функцию «Быстрый запуск» и посмотреть, повлияет ли это на ситуацию. Необходимые шаги:
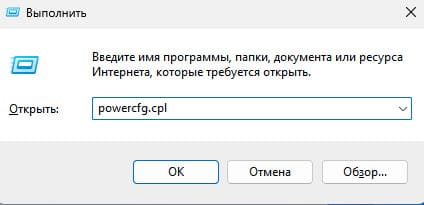
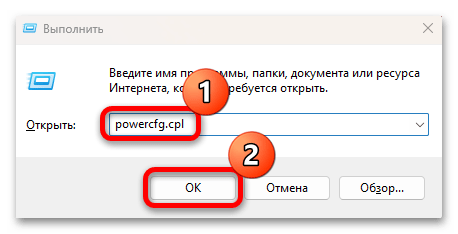
- Нажмите правой кнопкой мыши по кнопке «Пуск», выберите пункт «Выполнить», введите powercfg.cpl в окно «Выполнить» и нажмите «Ок».
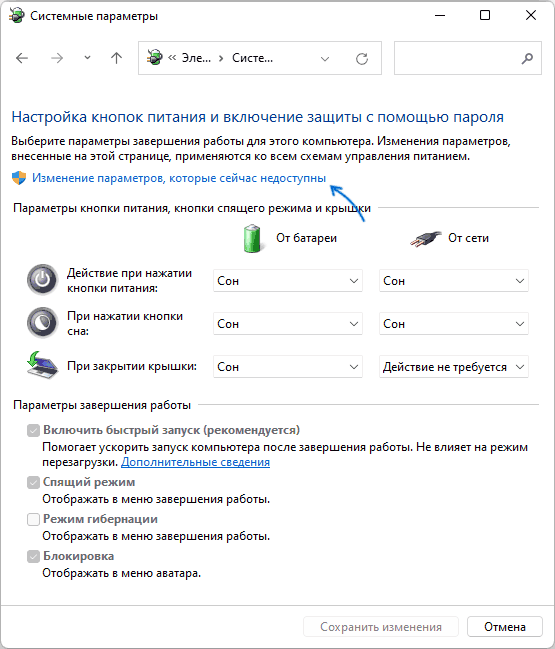
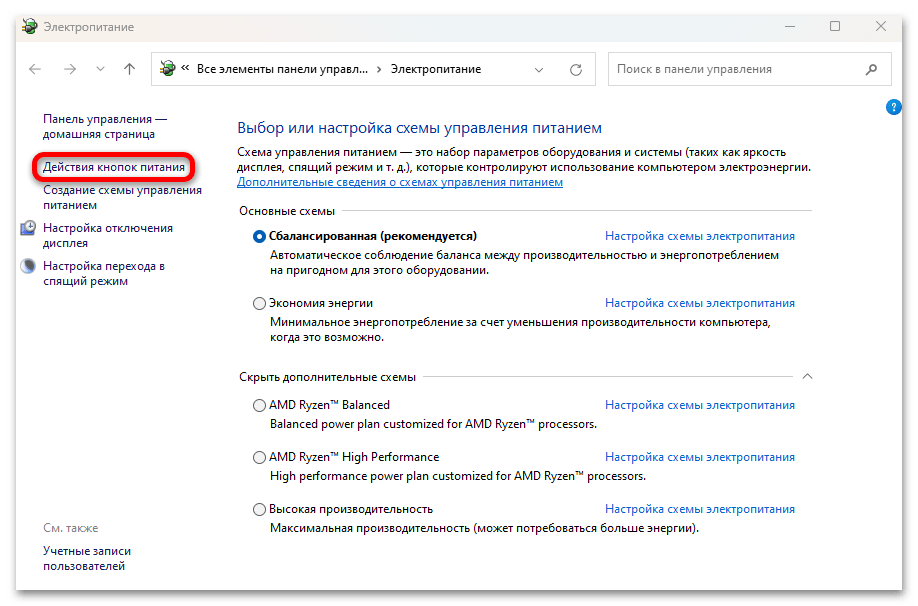
- В окне управления параметрами электропитания нажмите «Действие кнопок питания» в панели слева.

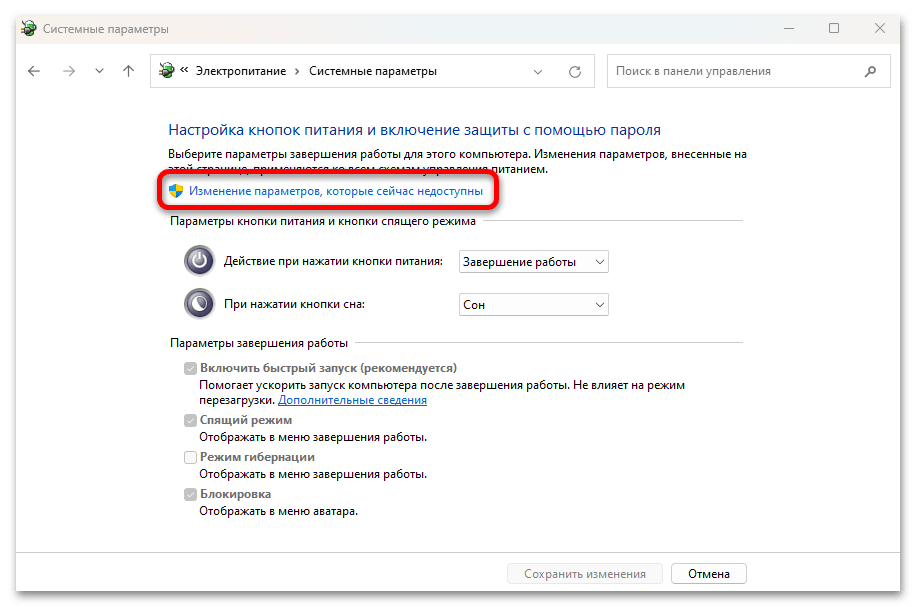
- Нажмите по пункту «Изменение параметров, которые сейчас недоступны».

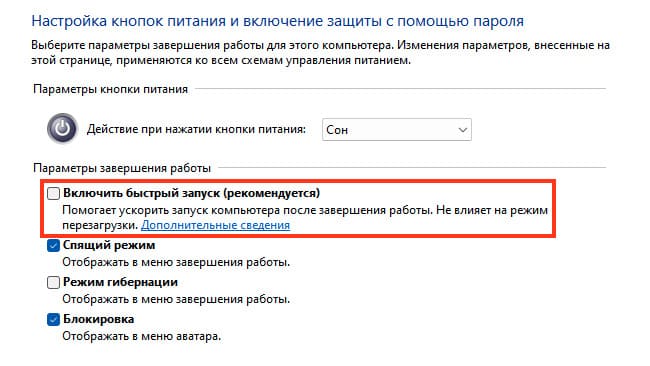
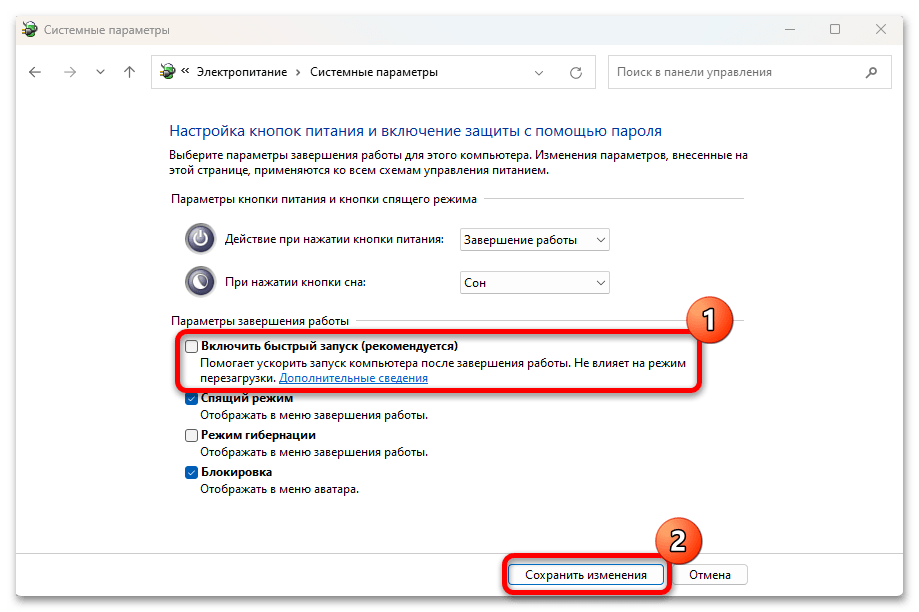
- Уберите отметку «Включить быстрый запуск (рекомендуется)» и примените настройки.
- Перезагрузите компьютер. Более детальные инструкции доступны здесь: Как отключить быстрый запуск в Windows 11.


Быстрый запуск будет отключен, после этого можно будет проверить, работает ли завершение работы исправно теперь. Кстати, в некоторых случаях отключение быстрого запуска может даже ускорить загрузку системы.
Если выключение Windows 11 стало проходить в штатном режиме, с большой вероятностью причина — не те драйверы чипсета и управления электропитанием (они могут быть совместимыми, но не полностью подходящими к вашему оборудованию), либо отсутствие некоторых из них.
Вы можете оставить отключенным быстрый запуск и не заниматься драйверами (при этом, вероятно, каких-либо проблем не возникнет), либо попробовать установить необходимые драйверы вручную.
Драйверы чипсета, управления электропитанием, дополнительные утилиты производителя
За исключением случаев, когда проблемы с выключением вызваны аппаратными неисправностями, самая распространенная причина — драйверы системных устройств. При этом в диспетчере устройств вы можете видеть, что все драйверы установлены, проблем не наблюдается, а обновления не нужны.
Однако, в некоторых случаях ручная установка оригинальных драйверов от производителя материнской платы или ноутбука может решить проблему, даже если драйверы на официальном сайте не самые новые и разрабатывались для предыдущей версии ОС. Среди драйверов, на которые следует обратить внимание:
- Любые доступные драйверы чипсета.
- Intel Management Engine Interface или Intel ME (перед установкой удалите текущий, более новый, драйвер в диспетчере устройств). К этому драйверу рекомендую отнестись с особым вниманием.
- Всё, что связано с управлением электропитанием, особенно для ноутбуков — в зависимости от производителя такие утилиты могут иметь названия, содержащие Power, ACPI, ATK или ATKACPI, Power Management.
Во всех случаях необходимо вручную скачать соответствующие драйверы с официального сайта производителя материнской платы (для ПК) или ноутбука именно для вашей модели устройства и установить их, а затем проверить — решило ли это проблему. Учитывайте, что даже если на сайте представлены драйверы только для предыдущих версий Windows они, в большинстве своем, могут исправно работать и в Windows 11.
Программы и фоновые процессы, мешающие выключению

Если завершение работы Windows 11 не происходит, при этом экран также не выключается, а вместо этого вы бесконечно наблюдаете сообщение «Завершение работы», причиной этому может быть какое-то ПО на компьютере. Среди возможных кандидатов, о которых есть отзывы в контексте рассматриваемой проблемы:
- Элементы Microsoft Edge в автозагрузке Windows. Попробуйте их отключить при наличии. Подробнее — Как удалить программы из автозагрузки Windows 11. Незакрытый или работающий в фоне Edge также вызывает проблему у некоторых пользователей.
- Программное обеспечение Intel Rapid Storage Technology (Intel RST, Технология хранения Intel). Проверьте, есть ли такой компонент в списке установленных программ, попробуйте его удалить, перезагрузить компьютер и посмотреть, решит ли это проблему после перезагрузки компьютера.
- Некоторые работающие в фоне торрент-клиенты при активной загрузке или раздаче файлов. Проверьте, меняется ли ситуация, если перед завершением работы принудительно выйти из клиента.
Если проблема появилась недавно, попробуйте вспомнить, какое ПО вы устанавливали перед этим на вашем компьютере, не исключено, что именно оно явилось причиной проблемы.
Таймеры пробуждения, вывод устройствами из спящего режима
Если при завершении работы сразу после выключения ваше устройство включается снова, попробуйте выполнить следующие шаги:
- Нажмите клавиши Win+R на клавиатуре, введите powercfg.cpl и нажмите Enter.
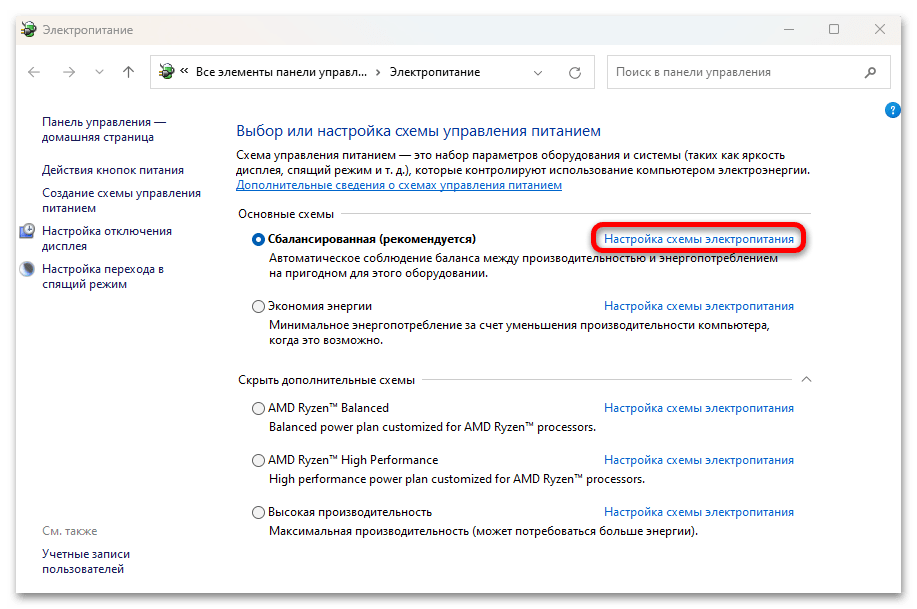
- Нажмите «Настройка схемы электропитания» справа от текущей схемы электропитания.
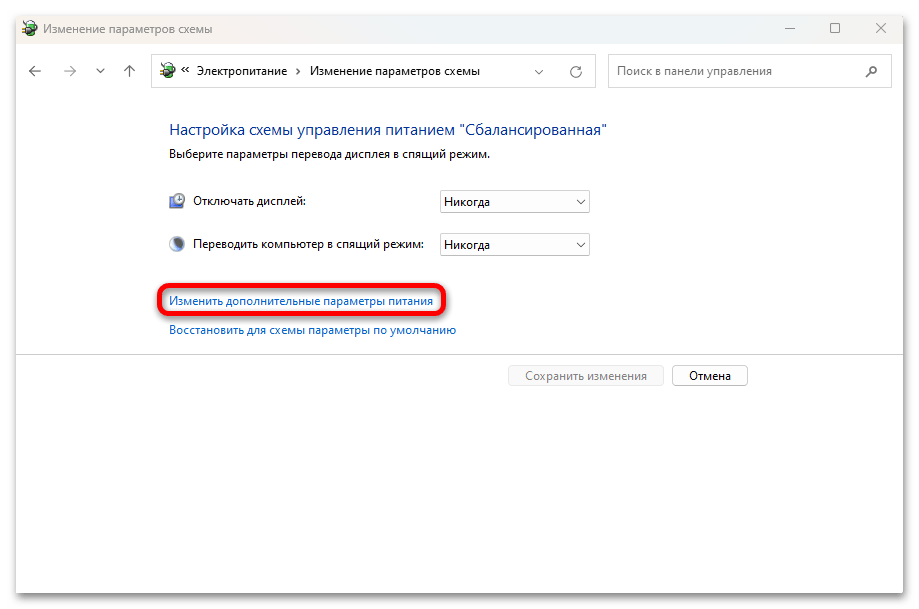
- Нажмите «Изменить дополнительные параметры питания».
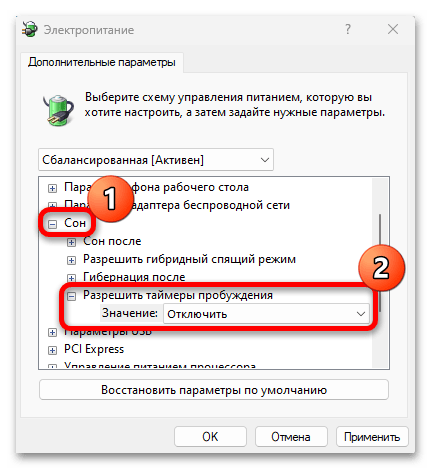
- Отключите таймеры пробуждения в разделе «Сон» и примените настройки.

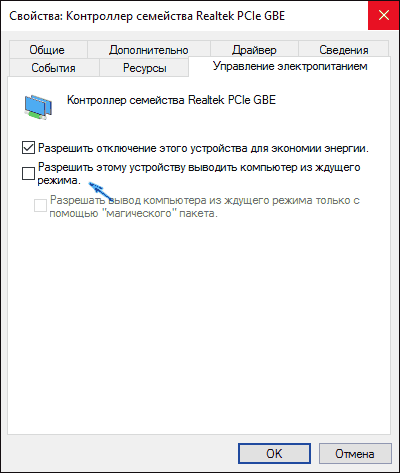
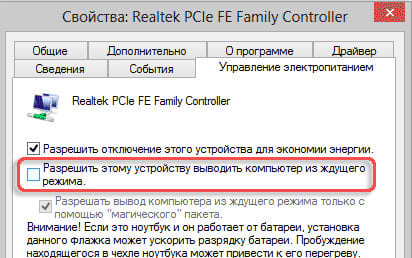
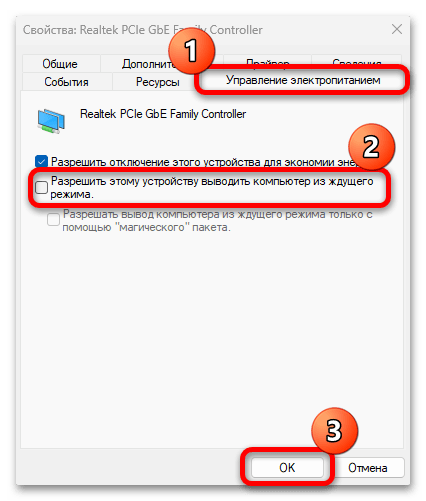
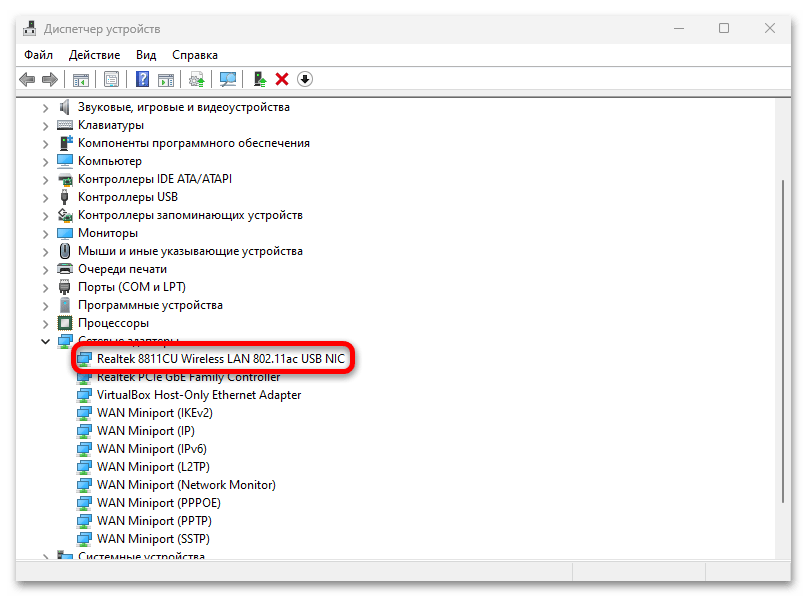
- Зайдите в диспетчер устройств и откройте свойства вашего Ethernet адаптера в разделе «Сетевые адаптеры». На вкладке «Дополнительно» снимите отметку «Разрешить этому устройству выводить компьютер из ждущего режима».

- Выполните действия, аналогичные 5-му пункту для Wi-Fi адаптера при его наличии.

Проблема с завершением работы Windows 11 не нова и присутствовала в предыдущих версиях системы. По отзывам пользователей, с ней столкнувшейся, в некоторых случаях помогало:
- Отключение недавно подключенных USB-устройств
- Откат недавно обновленных драйверов устройств
- Отключение модуля Bluetooth в диспетчере устройств
- Отключение второго HDD или SSD, особенно если он подключен вместо оптического привода на ноутбуке
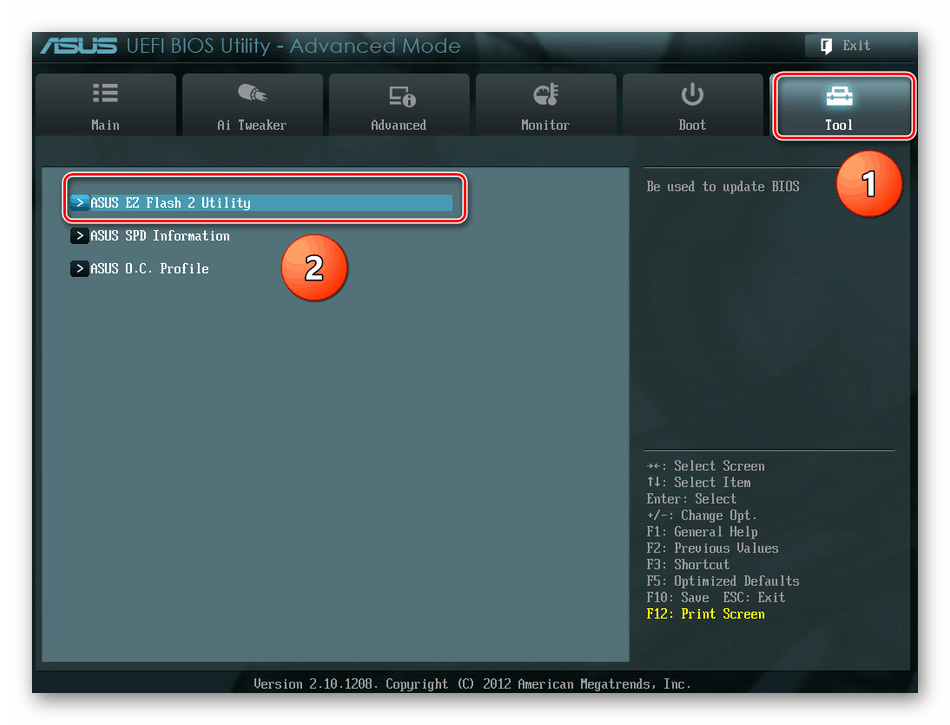
- Обновление или сброс БИОС
Также может оказаться полезной следующая информация:
- Если проблема появилась недавно, попробуйте использовать точки восстановления системы.
- При возникновении проблемы после установки обновлений Windows, попробуйте удалить их: Как удалить обновления Windows 11. А иногда, наоборот, может помочь установка имеющихся обновлений системы.
- На всякий случай выполните проверку целостности системных файлов Windows.
Завершая, ещё одна, самая неприятная возможная причина проблем при завершении работы: аппаратная неисправность, чаще всего — блока питания ПК, но иногда виноватой может оказаться материнская плата и другие компоненты компьютера.
Иногда, при попытке выключить компьютер через кнопку Завершение работы в меню Пуск Windows 10/11, устройство может не выключаться полностью. Дисплей может оставаться включенным, вентиляторы продолжать работать, а индикаторы — светиться. В этой статье разберем, что делать, если компьютер на базе Windows не выключается при завершении работы.
Приобрести оригинальные ключи активации Windows всегда можно у нас в каталоге:
Windows 11 — от 1690 ₽
Windows 10 — от 1490 ₽
Совет 1. Отключите быстрый запуск Windows
Функция быстрого запуска (Fast startup), которая появилась с Windows 8.1, может быть причиной проблемы. По умолчанию, она включена как в Windows 10, так и в Windows 11, если устройство поддерживает этот режим. Быстрый запуск представляет собой гибрид между гибернацией и полным выключением.
Чтобы отключить быстрый запуск в Windows:
1. Откройте Панель управления > Электропитание (или введите powercfg.cpl).
2. Выберите Действие кнопки питания.
3. Нажмите Изменение параметров, которые сейчас недоступны.

4. Снимите чекбокс с опции Включить быстрый запуск (рекомендуется) и сохраните изменения.
Совет 2. Выключите Windows через командную строку
Если проблема связана с быстрым запуском, попробуйте выключить компьютер через командную строку:
1. Откройте Командную строку с правами администратора.
2. Введите команду:
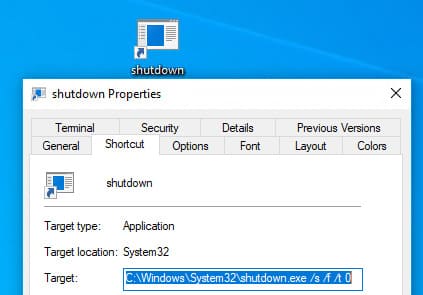
shutdown /s /f /t 0
Если после этого компьютер выключится нормально, вы можете создать ярлык на рабочем столе для выполнения этой команды.
Совет 3. Отключение задач и драйверов, мешающих выключению
Некоторые задания или драйверы могут мешать корректному завершению работы Windows. Выполните команду:
powercfg /requests
Она покажет список процессов и задач, которые могут препятствовать выключению (в идеале везде должно быть None).
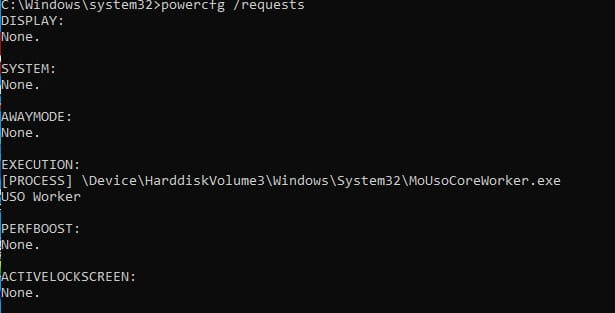
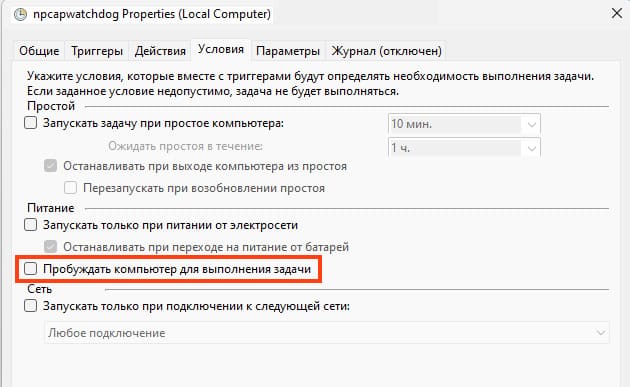
Завершите ненужные процессы и отключите опцию Пробуждать компьютер для выполнения задачи в Планировщике задач.
1. Откройте Планировщик задач.
2. Если у вас есть задача npcapwatchdog в библиотеке планировщика задач. Перейдите в свойства задачи, на вкладке Условия снимите флажок Пробуждать компьютер для выполнения задачи.
Совет 4. Проверьте параметры электропитания оборудования
Проверьте, что устройства не имеют разрешения выводить компьютер из ждущего режима:
1. Откройте Диспетчер устройств (devmgmt.msc).
2. Разверните раздел Сетевые адаптеры и откройте свойства вашего Ethernet или Wi-Fi адаптера.
3. На вкладке Управление электропитанием снимите чекбокс Разрешить этому устройству выводить компьютер из ждущего режима.
4. Аналогично проверьте параметры для Корневых USB-концентраторов и Bluetooth-адаптеров.
Дополнительные советы:
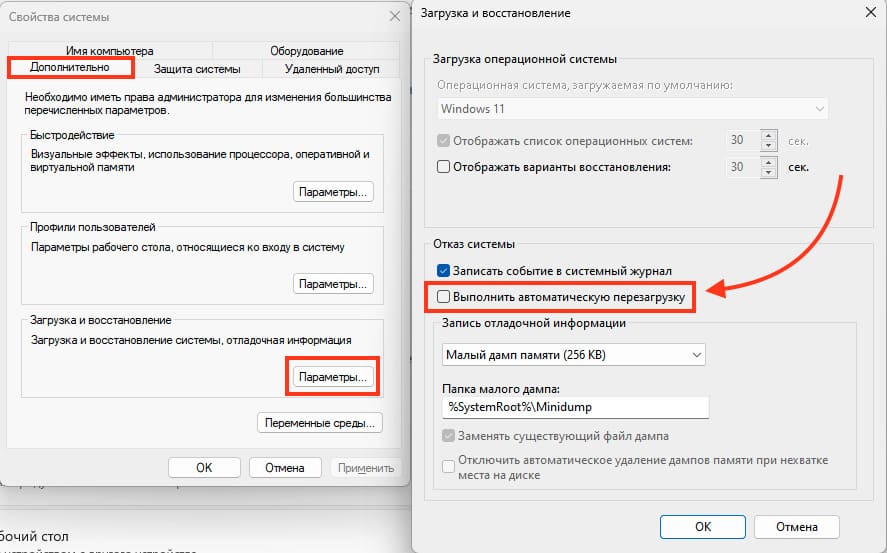
1. Отключите автоматическую перезагрузку при сбое системы: введите в поиске SystemPropertiesAdvanced.exe > Загрузка и восстановление — Параметры > снимите чекбокс Выполнить автоматическую перезагрузку.
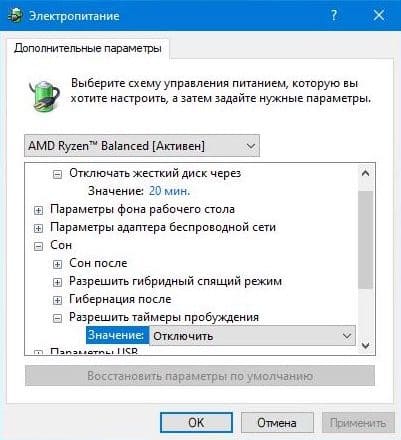
2. В настройках электропитания убедитесь, что для раздела Жесткий диск выбрано отключение через 20 минут, а для раздела Сон отключены Таймеры пробуждения.
3. Проверьте таймауты завершения процессов и служб в реестре (значения по умолчанию для Windows 10 представлены ниже):
HKEY_LOCAL_MACHINE\SYSTEM\CurrentControlSet\ControlWaitToKillServiceTimeout = 5000
4. Также проверьте, что для пользователя не заданы параметры (если параметры заданы, измените их на указанные значения):
HKEY_CURRENT_USER\Control Panel\DesktopAutoEndTasks = 1
HungAppTimeout = 5000
WaitToKillAppTimeout = 5000
5. Обновите драйверы оборудования.
6. Отключите Службу оптимизации доставки обновлений.
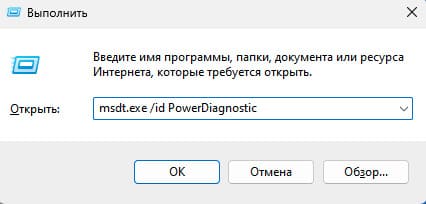
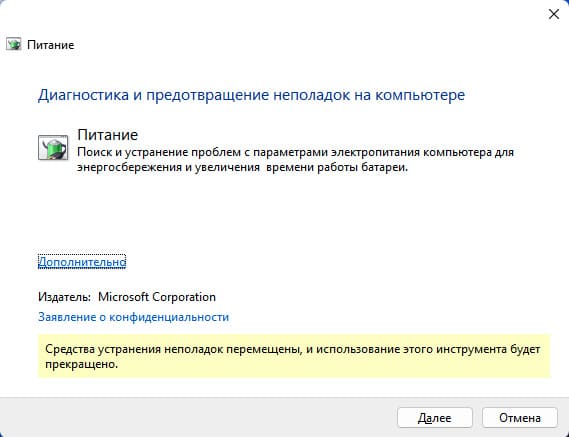
7. Запустите мастер устранения неполадок электропитания:
msdt.exe /id PowerDiagnostic
Лицензионный ключ активации Windows 11 от
Все способы:
- Способ 1: Отключение быстрого запуска
- Способ 2: Обновление драйверов
- Способ 3: Отключение фоновых процессов
- Способ 4: Деактивация таймеров пробуждения
- Способ 5: Восстановление системы
- Дополнительные рекомендации
- Вариант 1: Отключение USB-оборудования
- Вариант 2: Отключение второго HDD/SSD
- Вариант 3: Откат недавно обновленных драйверов устройств
- Вариант 4: Проверка целостности системных файлов
- Вариант 5: Удаление недавно установленного обновления
- Вариант 6: Обновление или сброс BIOS
- Вопросы и ответы: 0
Способ 1: Отключение быстрого запуска
Если вы столкнулись с проблемой, когда не выключается компьютер с Windows 11 (гаснет экран, но кулеры и системный блок продолжают работать или в некоторых случаях происходит обычная перезагрузка), тогда в первую очередь стоит проверить, активна ли функция «Быстрый запуск». При наличии таковой отключите ее:
- Одновременно нажмите клавиши «Win + R» — отобразится окно «Выполнить», где в текстовом поле нужно ввести команду
powercfg.cpl, затем нажать кнопку «ОК» или клавишу «Enter». - Запустится окно с параметрами электропитания ПК. Кликните по ссылке «Действия кнопок питания» на панели слева.
- Далее нужно щелкнуть по строке «Изменение параметров, которые сейчас недоступны», чтобы активировать дополнительные функции.
- Снимите галочку у опции «Включить быстрый запуск» внизу, затем сохраните изменения, нажав соответствующую кнопку.
После этого перезагрузите компьютер и проверьте, правильно ли выполняется его выключение. В некоторых случаях отключение функции даже способствует более быстрой загрузке. Если же проблема действительно пропала, тогда истинная причина, скорее всего, заключается в том, что возникла неполадка с драйверами чипсета и управления электропитания. Можете воспользоваться следующим способом, после чего вновь активировать функцию «Быстрый запуск».
Способ 2: Обновление драйверов
Иногда проблемы с выключением связаны с драйверами материнской платы компьютера или ноутбука. Также стоит обратить внимание на те компоненты, которые отвечают за электропитание и работу аккумулятора, в особенности на лэптопах. В их названиях, как правило, есть такие слова и сочетания, как Power Management, Power, ACPI, ATKACPI и другие подобные.
Даже если в «Диспетчере устройств» нет соответствующих обозначений о том, что с программным обеспечением что-то не в порядке, рекомендуем вручную установить или обновить драйвер для проблемных комплектующих.
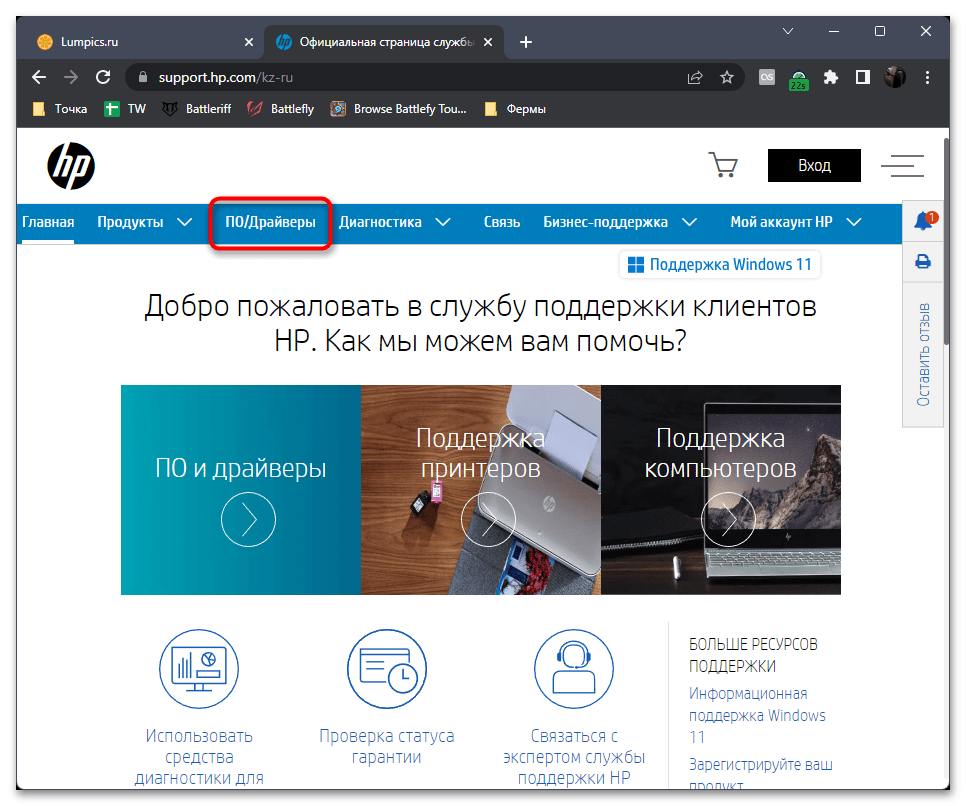
Лучше искать драйверы на официальных сайтах производителей материнских плат для настольных ПК или ноутбуков. На таких ресурсах, как правило, размещаются актуальные программные компоненты. Ранее на примере лэптопа от HP мы разбирали, как отыскать для него ПО – переходите к соответствующему разделу статьи по ссылке.
Подробнее: Установка драйверов в Windows 11
Если система сообщает, что актуальное программное обеспечение уже используется, также можете попробовать удалить драйвер, затем снова установить скачанное с официального сайта ПО:
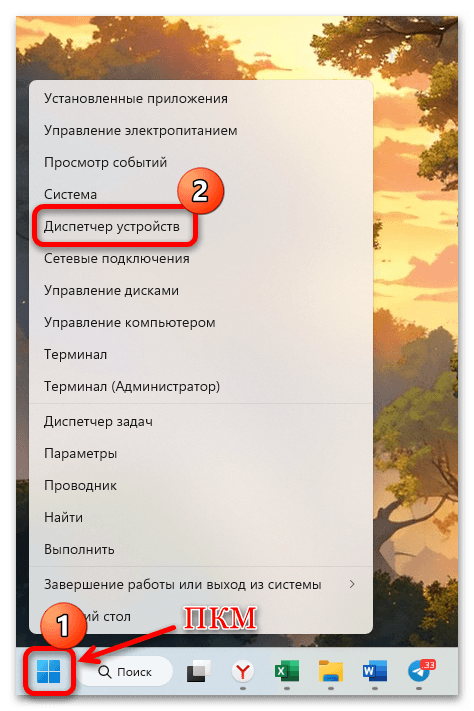
- Кликните правой кнопкой мыши по «Пуску» и из появившегося меню выберите «Диспетчер устройств».
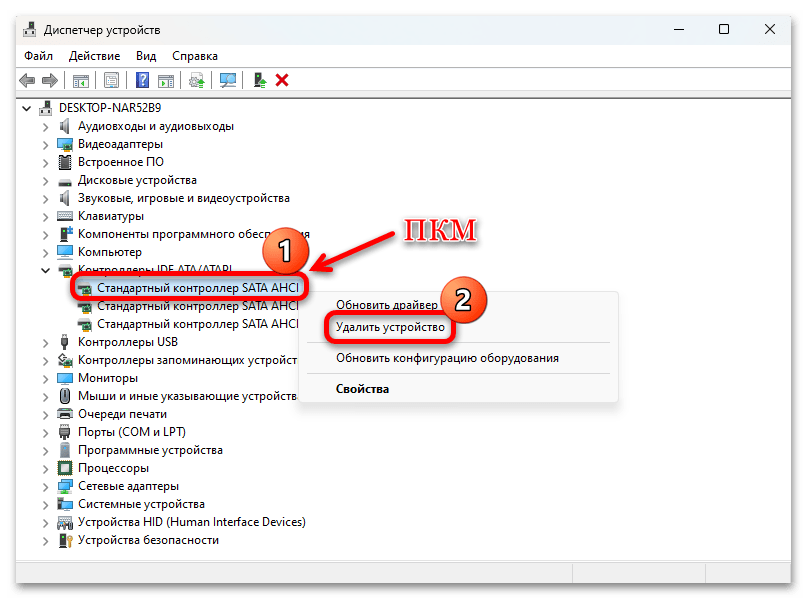
- Найдите проблемное оборудование (чипсет, который находится на материнской плате, располагается внутри раздела «Системные устройства» и в своем названии содержит слово «chipset»), затем кликните правой кнопкой мыши по названию компонента и выберите пункт «Удалить».
- Затем останется подтвердить действие в системном окне.
Стоит обратить внимание на такие названия, как Intel Management Engine Interface или Intel ME – программное обеспечение, интегрируемое в процессоры от Intel для удаленного управления и обеспечения безопасности Windows.
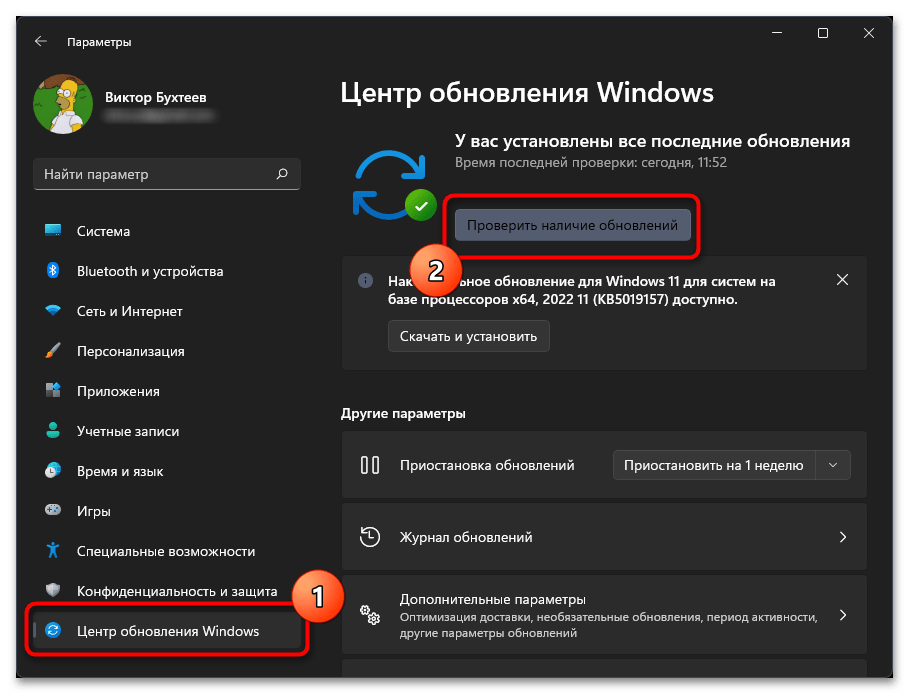
В качестве альтернативы для обновления компонентов можете воспользоваться встроенными средствами, также устанавливающими актуальные апдейты. В Windows 11 реализована возможность отдельной инсталляции драйверов для некоторых устройств, которые есть в системе (но в основном важные обновления устанавливаются со стандартным апдейтом для Win 11). Как правило, они находятся в разделе «Необязательные обновления». Вероятно, установка актуального ПО для оборудования и всей системы устранит неполадку с выключением.
Подробнее: Установка обновлений в Windows 11 вручную
Способ 3: Отключение фоновых процессов
Если после попытки отключить компьютер экран также не гаснет, а вместо этого отображается бесконечная загрузка с надписью «Завершение работы», значит, есть вероятность, что выключению препятствует какая-либо программа или процесс, работающие в фоновом режиме. Вспомните, устанавливали вы приложения перед тем, как начала происходить данная неполадка. Если да, то попробуйте удалить потенциально конфликтующий софт.
Читайте также: Удаление ненужных программ в Windows 11
Также есть несколько методов отключения фоновых процессов с применением встроенных возможностей операционной системы. Используйте наши руководства из отдельной статьи на сайте, чтобы исправить проблему с бесконечным выключением ПК.
Подробнее: Как отключить фоновые приложения в Windows 11

Способ 4: Деактивация таймеров пробуждения
Когда компьютер повторно включается после отключения, есть смысл проверить, активны ли таймеры пробуждения, а также имеются ли устройства, которые выводят ПК из спящего режима. В первом случае нужно следовать такой инструкции:
- Вызовите окно «Выполнить» («Win + R»), используйте команду
powercfg.cplи нажмите на кнопку «ОК». - Кликните по строке «Настройка схемы электропитания» у действующего режима.
- Далее выберите строку «Изменить дополнительные параметры питания».
- В появившемся окне разверните меню «Сон», затем «Разрешить таймеры пробуждения» и отключите параметр. Если у вас ноутбук, проделать то же самое нужно как для питания от сети, так и от батареи.
- Сохраните настройки, кликнув по кнопке «ОК».


Также можете индивидуально отключить возможность выводить устройство из спящего режима для сетевого адаптера и Wi-Fi модуля.
- Запустите «Диспетчер устройств» и разверните меню «Сетевые адаптеры». Дважды кликните по нужному компоненту.
- Перейдите на вкладку «Управление электропитанием» и снимите отметку у опции «Разрешить этому устройству выводить компьютер из ждущего режима». Сохраните настройки.
- То же самое проделайте с адаптером Wi-Fi (в названии есть слово «Wireless»).

Способ 5: Восстановление системы
Вспомните не только о том, осуществлялась ли установка каких-либо сторонних приложений, но и об изменении любых системных настроек, например в «Параметрах» или «Редакторе реестра», до того, как возникла проблема с запуском. Если да, лучше откатить состояние системы до той точки восстановления, когда проблем не наблюдалось. Рекомендация подойдет при условии, что ранее уже были созданы точки (вручную или автоматически), а сам возврат выполнить довольно просто: достаточно следовать нашей инструкции на сайте, выбрав для себя наиболее подходящий вариант.
Подробнее: Восстановление системы Windows 11 с помощью точек восстановления
Причина неполадки может быть довольно глубже, поэтому рассмотренные выше варианты не всегда помогают ее исправить. В некоторых ситуациях, особенно в случае критических программных повреждений, потребуется весьма радикальное решение – сброс настроек до заводских. О том, как это правильно сделать, читайте в нашем отдельном руководстве.
Подробнее: Сброс Windows 11 к заводским настройкам
Дополнительные рекомендации
Стоит рассмотреть еще несколько дополнительных решений, которые могут пригодиться при восстановлении работоспособности операционной системы. Некоторые из рекомендаций не всегда способны исправить причину появления неполадки, но с помощью них получится правильно выключить компьютер.
Вариант 1: Отключение USB-оборудования
Если к вашему системному блоку или ноутбуку подключено несколько дополнительных USB-устройств (накопители, принтер, различное цифровое оборудование), какой-то из таких девайсов и мог стать причиной невозможности отключить ПК стандартным способом (точнее – программное обеспечение устройства, конфликтующее с ОС).
Отключите все USB-оборудование, после чего проверьте, работает ли выключение ПК стандартным способом.
Вариант 2: Отключение второго HDD/SSD
Как и в предыдущем варианте, все дело может быть в дополнительном оборудовании, в частности во втором накопителе, если он используется в системе. Некоторым пользователям помогает отключение жесткого диска от материнской платы. Как правило, такая ситуация возникает с персональными компьютерами, где есть возможность подключения сразу нескольких накопителей. Однако подобное вполне может произойти и с лэптопами, в особенности когда второй диск подключен вместо оптического дисковода.
Читайте также: Как разобрать компьютер / ноутбук
Вариант 3: Откат недавно обновленных драйверов устройств
Некорректно установившиеся драйверы устройств тоже могут стать причиной трудности при выключении ПК. В этой ситуации следует попробовать откатить их до предыдущей версии. Не обязательно откатывать саму систему, как в Способе 5, — достаточно воспользоваться встроенными функциями «Диспетчера устройств».
Запустите штатное средство для управления устройствами, затем разверните соответствующую ветку и двойным кликом выберите оборудование, с которым, по вашему мнению, есть проблемы. Перейдите на вкладку «Драйвер». Если кнопка «Откатить» активна, нажмите на нее и подтвердите действие.
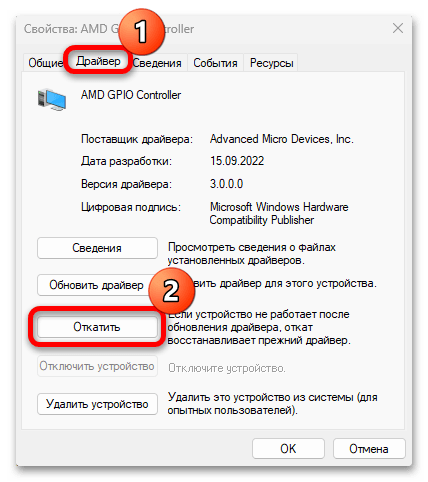
После этого новая версия будет удалена, а программное обеспечение оборудования вернется к состоянию до обновления. Если необходимо, выполните повторную инсталляцию апдейта для устройства.
Вариант 4: Проверка целостности системных файлов
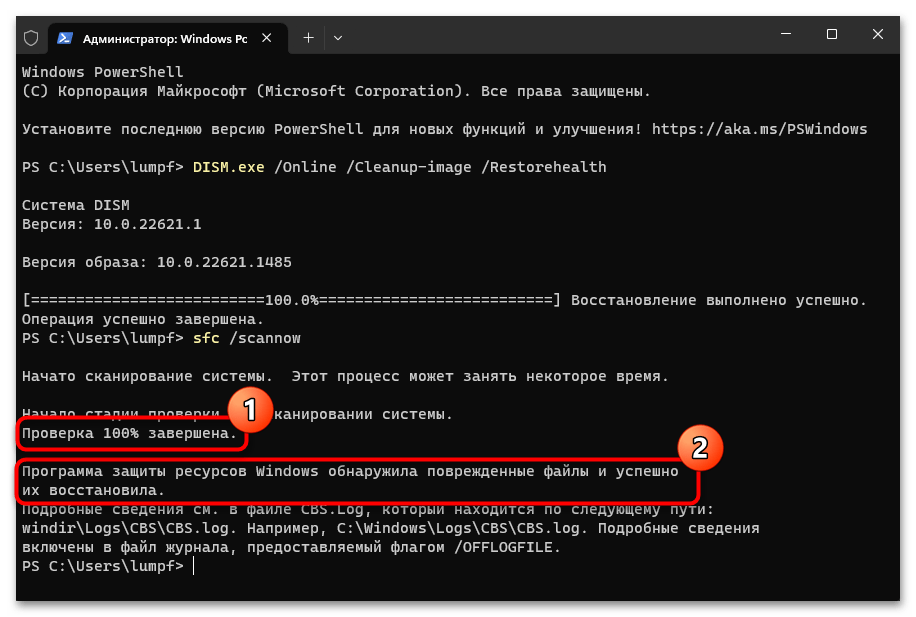
При повреждении системных файлов также возникают различные нарушения в работе операционной системы. Если проблема с выключением ПК является следствием именно этой причины, можете использовать предустановленные утилиты для проверки и восстановления данных. Весь процесс автоматизирован, пользователю достаточно выполнить соответствующие консольные команды, чтобы средства начали работу. Сначала используйте SFC для определения и исправления нарушений целостности файлов, а если не помогло, запустите DISM, проверяющий и восстанавливающий хранилища этих файлов.
Подробнее: Восстановление системных файлов в Windows 11
Вариант 5: Удаление недавно установленного обновления
Как с некорректной установкой драйверов для устройств, так и с самой системой может возникать аналогичная проблема – неудачно применившееся обновление нарушило работу Windows 11, вследствие чего компьютер перестал выключаться.
Также не следует исключать ситуацию, когда дело не в новой версии ОС, а на стороне разработчика. Скорее всего, тогда неполадка будет носить массовый характер и ее оперативно исправят. Как бы то ни было, вам потребуется выполнить удаление последнего обновления, чтобы ОС смогла работать как прежде. Существует несколько способов сделать это, о чем более детально писал наш автор.
Подробнее: Удаление установленных ранее обновлений в Windows 11
Вариант 6: Обновление или сброс BIOS
Иногда помогает обновление или, наоборот, откат версии BIOS. В первом случае установка актуальной версии способствует стабильной работе ОС в целом, поскольку, вероятно, сама Windows 11 обновляется нормально, а BIOS – уже сильно устарел, из-за чего в итоге возник конфликт программного обеспечения.
Обратная ситуация: во время обновления BIOS возникла проблема, которая, на первый взгляд, никаким образом не проявляется, но приведшая к тому, что стало невозможно отключить ПК. Тогда есть смысл попробовать вернуть прежнюю версию, после чего, если нужно, выполнить повторное обновление. Обо всем этом мы ранее писали в отдельных материалах.
Подробнее: Обновление / откат к предыдущей версии BIOS на компьютере
Наша группа в TelegramПолезные советы и помощь
Page Content:
- Part 1. Why Is My Windows 11 Not Shut Down
- Part 2. Alternative Ways to Shut Down Your Computer (5 Ways)
- Part 3. Create a Bootable Windows 11 Backup (Important!)
- Part 4. Completely Fix the Windows 11 Not Shutting Down Problem (8 Ways)
Turning off your computer or device is vital when you have completed your day’s work. When troubleshooting a common computer glitch, shutting down your device can be the simplest escape, and Windows 11 is no different. But what do you do if you come across a Windows 11 won’t shut down problem? Fortunately, there are several simple solutions.
Shutting down and restarting our computers are two of the most popular methods we use to resolve a wide range of difficulties on Windows 11. Getting a Refresh or Restart is generally helpful in resolving minor or transitory difficulties, such as particular errors or slow speed. What happens if you cannot even shut down your computer? Isn’t it supposed to be annoying? In this post, you will discover many solutions to the problem of Windows 11 PC or laptop stuck on shutting down screen, or computer won’t shut down just restarts. Don’t worry, we got all issues and solutions covered here!
Why Is My Windows 11 Not Shut Down?
It is common to find yourself in trouble with software-related issues when attempting to shut down your computer. Depending on the cause, either a flaw in the Windows 11 operating system or an application interfering with the PC’s capacity to function properly has been identified.
A broken power button is another reason a computer would not shut down properly (if you’re shutting down manually). Fortunately, this is a very unusual situation that most people will not have to be concerned about; nevertheless, other methods of shutting down Windows 11 do not require the actual power button. There’s also a possibility that nothing is wrong with Windows or the power button, but a specific option has been switched off, causing your device not to shut down even when you push the power button.
Alternative Ways to Shut Down Your Windows 11 Computer
The most straightforward method is to shut down your computer at the time of issue and then attempt to restart it again.
It is possible to resolve the problem of not being able to shut down your computer by applying numerous methods of shutting down the computer.
- 1. Use Physical Power Button
- 2. Press Ctrl + Alt + Delete
- 3. Use CMD
- 4. Use Shortcuts Alt+F4
- 5. Use Batch File
Now let’s learn each of these solutions one by one:
1. Use Physical Power Button to Shut Down
Even if a software fault prevents you from shutting down Windows 11 using the mouse or keyboard, most computers will react to a press-and-hold of the power button for many seconds. This works regardless of whether the power button is enabled in Control Panel or disabled.
2. Press Ctrl + Alt + Delete to Find the Shut Down Option
The Ctrl+alt+Delete shortcut keys allow you to shut down your Windows 11 PC. This shortcut key may stop running programs and enter a safe mode to shut down the PC. This option is helpful when the Start menu or other methods don’t function. Here’s how it works:
Step 1. Press Ctrl + Alt + Delete
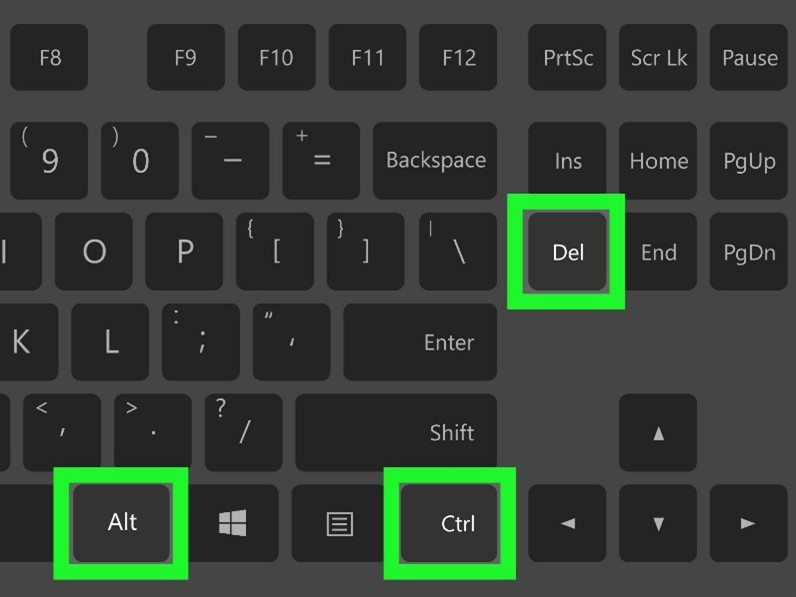
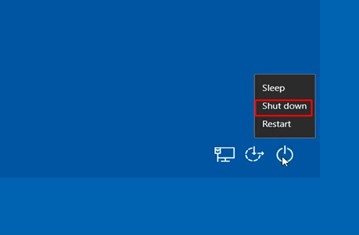
Step 2. Click the Power symbol in the bottom right.
Step 3. Select Shutdown/Reboot
3. Shut Down Windows 11 Using CMD
Adding the /S argument to the shutdown command enables a local machine to shut down quickly. You may remotely shut down the system using this syntax, but you must be logged in as an administrator. So, when you run across this problem, follow the steps below:
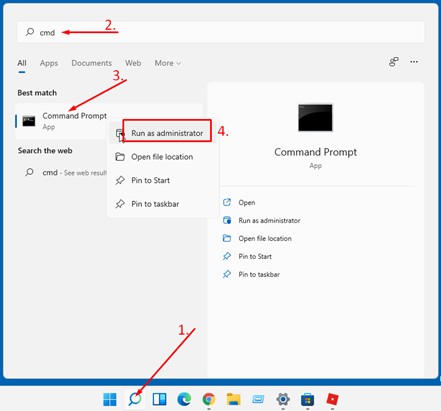
Step 1. Press Win+S.
Step 2. Enter CMD.
Step 3. Right-click on the Command Prompt under the Best match tab.
Step 4. Click on Run as administrator
Step 5. When prompted by UAC, choose Yes to run the Command Prompt.
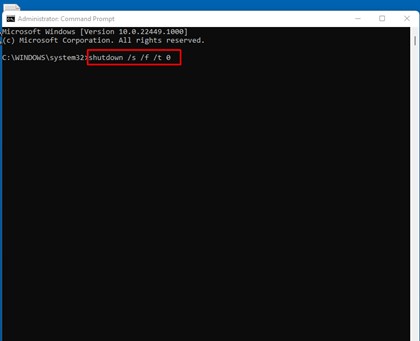
Step 6. Then right-click the prompt and paste the command.
Step 7. To execute the command, press Enter.
4. Use Windows 11 Shut Down Shortcuts Alt+F4
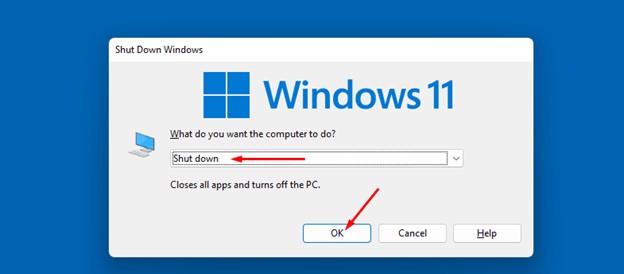
Alt+f4 is another alternative if Windows 11 does not shut down properly. A ‘Shut Down Windows’ box will appear with various options. This shortcut works when no programs are running or are minimized to the taskbar.
Step 1. Close or minimize all running applications.
Step 2. Press F4 and Alt together.
Step 3. Shutdown should be the default option. Press OK or Enter.
5. Customize a Shutdown Button Using Batch File
You can use a batch file to design a new shutdown button for Windows 11 that won’t shut down. Look below:
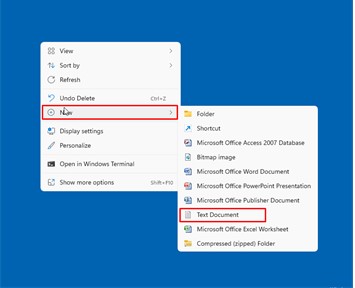
Step 1. Right-click desktop and choose New and select Text Document
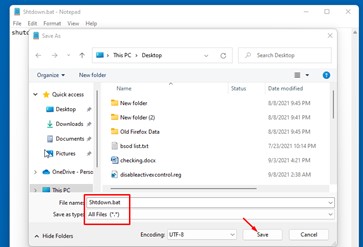
Step 2. Copy shutdown /s /f /t
Step 3. Copy the Command into the text file.
Step 4. Go to File > Save As.
Step 5. Select All Files (*.*) as the Save As Type.
Step 6. Type «Shutdown.bat» as the File name and Save.
Next, Create a Bootable Windows 11 Backup
Repairing your computer is the last choice if restarting does not fix the problem. Not shutting down may lead to the Windows 11 won’t boot issue; therefore, you should completely back up the files and applications before trying to solve it.
That is why we recommend using EaseUS Todo Backup Free to make a backup of the critical data on a disk or partition. EaseUS Todo Backup can function well in the hard drive and partition backups. In addition, this tool is also highly praised due to its disks and OS clone functions. A few clicks, and you’ll be back up and running on a corrupted hard disk with the ability to restore files from a backup location.
Download this trustworthy, effective, and all-around Windows free backup program for free and begin the process of data backup.
The full guide below may be helpful when you wish to use this reliable backup software.
Step 1. Prepare a USB drive which can be written and read.
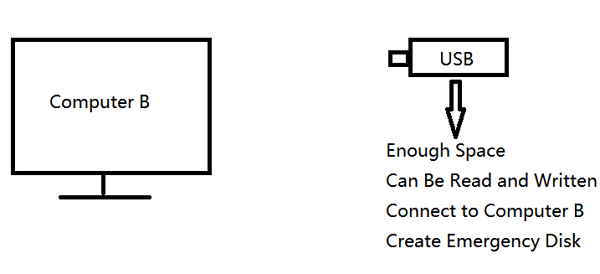
Step 2. Launch and install EaseUS Todo Backup on the Computer B.
Step 3. Find and click «Tools» and choose «Create Emergency Disk«.

Step 4. Choose the Boot disk location. You can create an ISO file, a bootable USB or CD/DVD disc.

Step 5. Then click «Create» to start.
Do you have the following issues while using EaseUS Todo Backup for backup and recovery? Start a live chat with an EaseUS Expert to tailor a professional backup solution specific to your requirements.
- Unable to back up
- Backup process stuck
- Recovery failed
At Last, Completely Fix the Windows 11 Not Shutting Down Problem
If clicking the power button doesn’t completely shut down your computer, the following methods may help.
| Workable Solutions | Step-by-step Troubleshooting |
|---|---|
| Simple Win 11 Shut Down Methods |
Fix 1. Change Power Settings…Full steps Fix 2. Disable Fast Start-up…Full steps Fix 3. Run Power Troubleshooter…Full steps Fix 4. Update the Windows…Full steps |
| Advanced Win 11 Shut Down Methods |
Fix 1. Update Drivers…Full steps Fix 2. Run System File Checker…Full steps Fix 3. Scan and Remove Third-party Programs…Full steps Fix 4. Reinstall Windows 11…Full steps |
Here are the particular steps of how to completely fix Windows 11 not shutting down the problem by using the ways mentioned above.
1. Change Power Settings
Windows 11 won’t shut down due to mismatched power choices. However, hitting the hardware power button does not turn off the computer due to the error setting. But first, we must verify the settings.
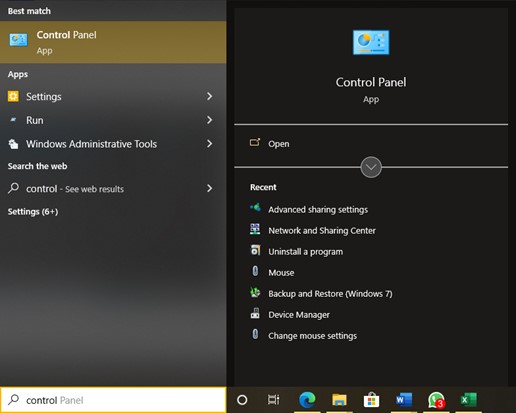
Step 1. Open the Taskbar, click Start. Type Control and press Enter.
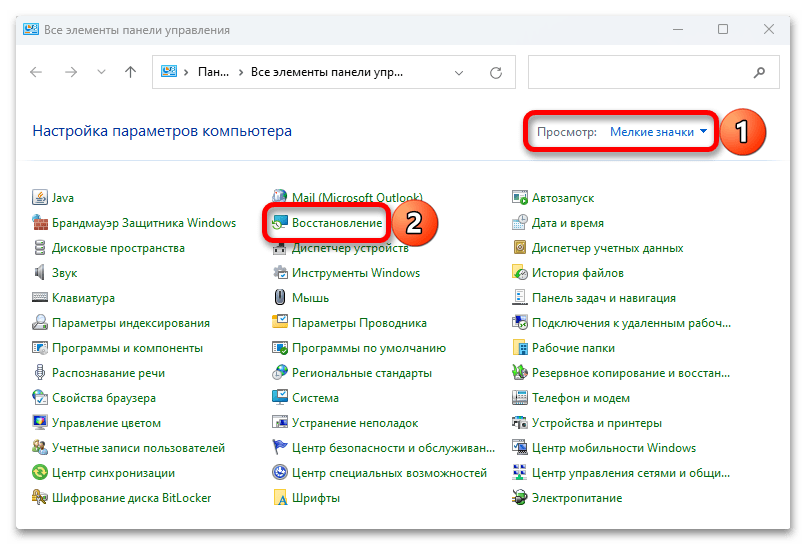
Step 2. Pick Large icons or Small icons from the drop-down menu in the Control panel.
Step 3. Click on Power Options.
Step 4. Choose «Choose what the power button does.»
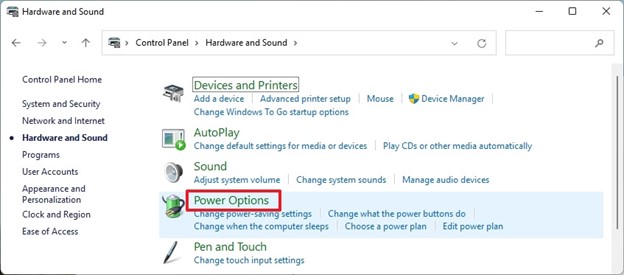
Step 5. Select «Shut down» under «When I hit the Power button.»
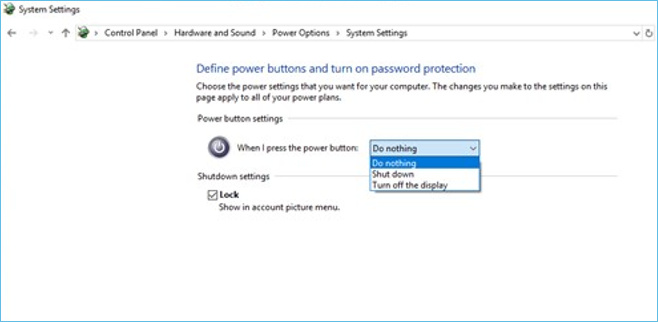
Step 6. Click «Save.»
2. Disable Fast Start-up
Fast start-up is a valuable utility for Windows users, but it has drawbacks. Fast start-up in Windows 11 or previous versions typically causes hardware incompatibilities. So, if Windows 11 won’t shut down, deactivate this option.
Step 1. Press Win+S, Type Control, and Press Enter.
Step 2. Control Panel > Power Options.
Step 3. Select the «Choose what the power button does.»
Step 4. On the next window, click the Change unavailable settings.
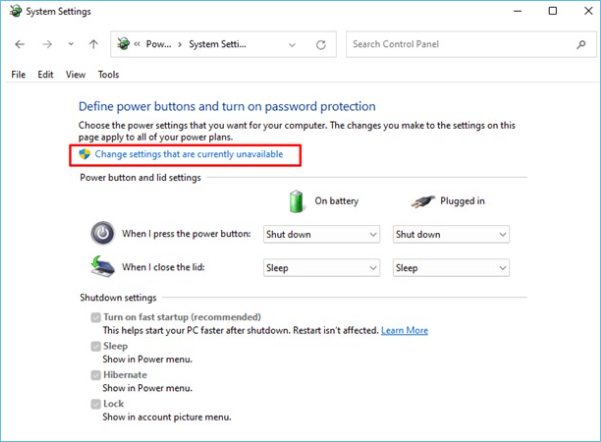
Step 5. Click «Turn on quick start-up (recommended)» again and «Save changes.»
3. Run Power Troubleshooter
Power troubleshooter is the suggested fix for Windows 11 not shutting down correctly. After identifying the problem, the utility will also fix or recommend a solution.
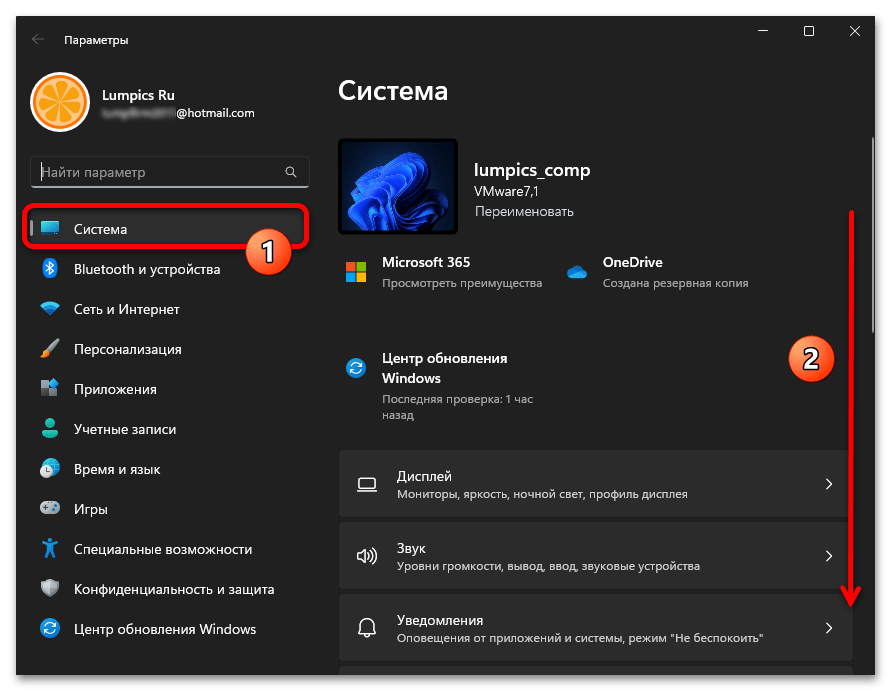
Step 1. Press Windows + I key
Step 2. Go to the right window and scroll down.
Step 3. Troubleshoot the problem.

(Note: The Troubleshooter will tell you what the problem is, and you follow what the Power Troubleshooter Says.)
4. Update the Windows
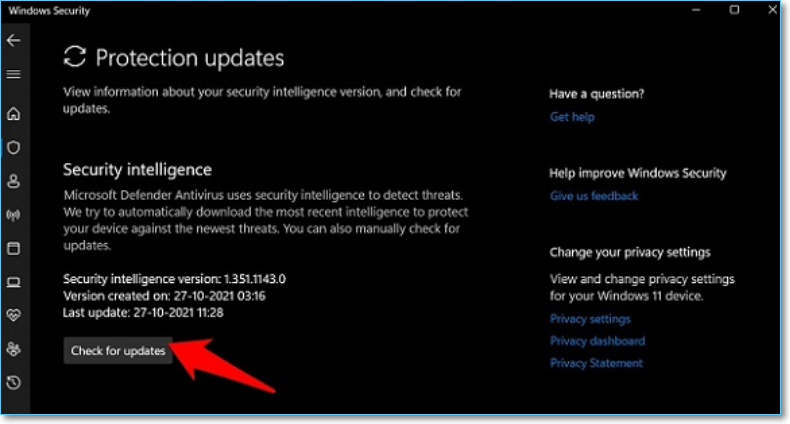
It’s worth a try if you haven’t updated Windows 11 lately. Because updates may fix bugs or system problems like Windows 11 not shutting down. So, check for updates and install them if any are pending. This approach also allows for updates for OEM drivers, so follow the instructions. –
Step 1. Press the Window key + and Check for updates.
Step 2. Activate all pending updates on your PC. Click on Restart immediately.
5. Update Drivers
Check for outdated drivers if your Windows 11 PC won’t shut down. Windows has a built-in device Manager tool that helps you roll back, uninstall, update, and see driver data and attributes. So, follow these procedures to update drivers manually:
Step 1. Open the Run Window and Type «devmgmt. msc» then press Enter.
Step 2. The GUI will show a list of all installed devices and drivers. Double click each item and look for a yellow warning mark.
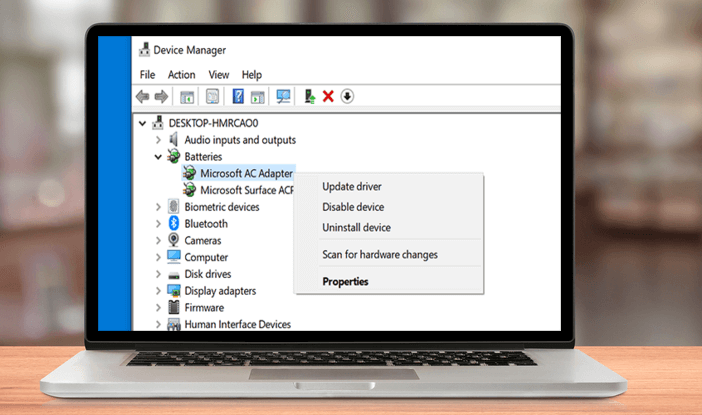
Step 3. If detected, right-click and choose – Update Driver.
Step 4. Then, choose Auto search for drivers from the wizard’s menu.
Step 5. See if the best drivers are installed. If not, replicate with all cautioned drivers and check whether Windows 11 shuts down now.
6. Run System File Checker
SFC is a universal solution for Windows 11 to repair issues caused by missing or damaged system files. SFC is a must-have program that can even resolve a Windows 11 shutdown issue. Follow these instructions to run the System File Checker from the Command Prompt:
Step 1. Enter cmd.exe in Windows Search. Then press Ctrl+Shift+Enter to finish.
Step 2. When UAC prompts, choose Yes.
Step 3. Enter the command «SFC /scan now» in the command prompt.
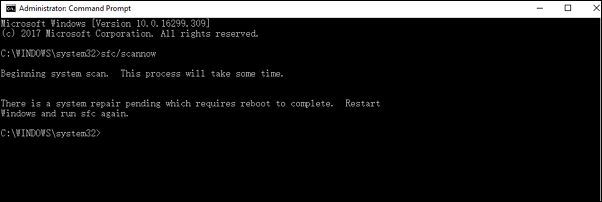
Step 4. Wait for a few minutes and then restart the machine.
7. Scan and Remove Suspicious Third-party Programs
If you are a gamer and have loaded heavy gaming programs and software, the laptop may not shut down properly. Remove them as stated below:
Step 1. Open the taskbar’s Search and type Apps & features
Step 2. Locate the unwanted applications and select Uninstall from the three dots menu.
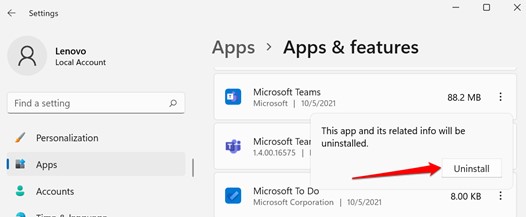
Step 3. Re-click ‘Uninstall’ to confirm.
8. Reinstall Windows 11
Finally, if everything else fails, you may have to reboot Windows. During a reset, you may opt to preserve or delete personal files. Here’s how.
Step 1. Press the Windows key + I to open Settings. Select Advanced Options from the Windows Update tab.
Step 2. Scroll down to Recovery and click.
Step 3. Under Recovery options, select Reset PC to start resetting your PC.
What Should You Concern When Fixing Windows 11 Not Shutting Down Problem?
To fix the Windows 11 Won’t Shut Down problem, you must use all the procedures on this page. While some solutions are straightforward and safe, others have the potential to cause data loss. Using the Ease Todo Backup program to back up your data, you won’t have to worry about trying unsafe ways.
Start a live chat with an EaseUS Expert to tailor a solution specific to your boot issuess. We are here to assist you with the following as well:
- PC won’t boot
- Cloned hard disk cannot boot
- System not booting error
Shutting down and restarting are often very common fixes we use to solve a lot of different issues on Windows 11. Getting a new startup mostly helps the system to resolve simple or temporary issues like certain errors or PC hanging, etc. However, what if you are not able to just shut the computer down? Should be annoying, right? So, in this post, you will find multiple solutions to Windows 11 not Shutting Down.
The shut down problem in Windows 11 mostly occurs due to high resource consuming processes, bugs, heavyweight third-party programs, or presence of malware. However, you can get help and some hint to get rid of the processes by reading this article – How to Fix Windows 11 disk usage 100%. These kinds of bugs are expected for an operating system that has been introduced or is still in the development phase, which is the case with Windows 11. But, do not worry- we do have a couple of tricks and workarounds you can try to fix the problem of being unable to shut down Windows 11 PC.
Windows 11 not Shutting down
Here is how to fix Windows 11 not Shutting down –
Way-1: Alternate ways of Shutting down Windows 11 PC
We suggest you try different ways of shutting down first because the issue might be temporary and got fixed once you reboot. Here are some of the easy alternate ways to shut down Windows 11 PC –
1] Using Physical power Button
Every laptop or desktop comes with a power button so where other options for shutting down fail this is a useful one. You need to just press and hold the physical power button for a few seconds until the machine has shut down completely. In case, the computer is powered off successfully this is confirmed that the running problem is related to software only and not to hardware. Therefore, press the Power button again (but not hold this time) to start the PC and focus on solving them.
2] Using Ctrl + Alt + Delete
Because you are struggling to shut down your Windows 11 system Ctrl+alt+Delete hotkeys should provide you relief. This shortcut combination has the capability to brings ongoing functions and processes to end and enter into a secure environment to turn off the PC. When Start menu power options or other ways don’t work this option is useful to power off your machine securely. If you are interested in other hotkeys see – Complete list of Windows 11 Keyboard shortcuts. Coming to the point now shut down the PC using the following guidelines –
- Press – Ctrl + Alt + Delete.
- Click on the Power icon visible on the bottom right corner.
- Select Shut down or Restart.
3] Via Command line
Shutdown command allows a local computer to directly and instantly shut down after adding /S parameter. Using this syntax, you can also shut down the machine remotely and the only requirement is to sign in as an administrator account. So, at the time you encounter the issue, pursue the instructions –
- Press – Win+S.
- Type – CMD.
- Right-click on Command Prompt showing under Best match.
- Select – Run as administrator.
- Click Yes on UAC to open Command prompt as administrator.
- Copy –
shutdown /s /f /t 0and right-click on the prompt. - Press Enter to run the command.
- This will directly shut down the computer.
4] Through Alt + F4
During facing Windows 11 not Shutting Down completely, Alt+f4 is another option you can use. This will invoke a ‘Shut Down Windows’ dialog with multiple menus in a dropdown. This hotkey is functional when either you’re not running any program or have minimized them to the taskbar. So move forward with the steps below –
- Close or minimize all the programs open on your computer.
- Press the Alt key together with F4.
- Shut down should be selected by default.
- Click Enter or Press OK.
5] Using Run command
The command executed through command prompt works with equal efficiency when used via Run command to shut down the PC. Hence, go with the underneath steps –
- Press – Win+R.
- Type –
shutdown /s /f /t 0 - Hit the – enter.
6] Create a custom shut down button using batch file
You can create a custom shutdown button using a bat file and use it anytime when encountering the issue. Follow the guide –
- Right-click on desktop and hover over New.
- Click on Text Document from the sub-menu.
- Copy
shutdown /s /f /t 0. - Open the text document and paste the command into it.
- Next, click – File > Save as.
- On the Save as type drop-down, choose – All Files (*.*).
- In Fie name bar, type Shutdown.bat.
- Click – Save.
- The shutdown shortcut is ready to use; just double click it and all done.
Way-2: Change Power options
Sometimes Windows 11 not Shutting Down occurs due to misconfigured settings under Power options. However, the erroneousness setting prevents the computer from being turned off even on pressing the hardware power button. But before moving to the next way we must check the settings once –
- Click Start from the Taskbar.
- Type – Control.
- Press – Enter.
- When the Control panel appears, click the drop-down for View by: and select Large icons or Small icons.
- Next, click – Power Options.
- Select – “Choose what the power button does”.
- In the drop-down menu corresponding to “When I press the Power button”, select “Shut down”.
- Hit “Save Changes”.
Note for Laptop users: – you need to make sure Shut down is selected for “Plugged in” as well as “On battery”.
Way-3: Disable Fast startup to fix Windows 11 stuck on shutting down
Fast startup is although a handy tool for Windows users but there are negative sides of this Setting. Hardware incompatible systems often encounter glitch after enabling fast startup in Windows 11 or other versions. That’s why, if Windows 11 stuck on shutting down then disable this setting.
- Pres Win+S and write control.
- Hit the Enter key.
- Select Power Options from Control panel.
- Next, click – “Choose what the power button does”.
- On the next window click the link – Change settings that are currently unavailable.
- Now, uncheck the box for “Turn on fast startup (recommended)“.
- Click – “Save changes”.
- Reboot the system.
Way-4: Run Power Troubleshooter
Windows offers built-in powerful and free tools to repair almost all the issues and same with this one. When Windows 11 not Shutting Down properly problem occurs, the recommended Fix it utility is Power troubleshooter. In addition to diagnosing the root cause, the tool will repair or suggest something that can solve this.
- Press Windows + I keys.
- Once Settings app opens go to the right pane and move down.
- Click Troubleshoot.
- Select – Other troubleshooters from next page.
- Find Power and click Run.
- The tool will start detecting the issue, give it a couple of minutes.
- Follow that the Power Troubleshooter says.
Way-5: End task unnecessary processes
Most of the time the shut down problem in Windows 11 occurs because some processes freeze the desktop. Due to the functions, power on Start menu stops responding making you unable to click it, or even after clicking no changes appears. Furthermore, after selection of shut down there does nothing. Terminating the process creates a difference during this issue so move on with the steps below –
- Right-click on the Start.
- Select – Task Manager.
- Click on More details to see the full view of the tool.
- Have a look at the processes’ list and find which one may be the culprit in this case. The process which is eating more resources such as CPU, Disk, and Memory will be the factor. So, identify such process, right-click on it and select End task.
- Back to the Start menu and try shutting down the PC.
- If it is still not possible then repeat the same and “End task” the next process which is consuming more resources.
Way-6: Run System File checker
SFC is just like a universal solution for Windows 11 competent in fixing the errors that appear due to missing or corrupt system files. Every issue in Windows operating system somehow has relations with this reason whether it started due to 3rd party programs, malware attacks, corruption in dll or exe files, or anything else. Therefore when you find Windows 11 shutdown problem then SFC is a must-use tool to bring into application. Here are the steps helping you to run the System file checker using the Command Prompt –
- Click the – Windows Search.
- Type – Cmd.exe.
- Press – Ctrl+Shift+Enter.
- Click Yes when UAC is prompted.
- In the command prompt, type the following text and press the Enter Key –
SFC /scannow - You will see – ‘Beginning the system scan. This will take some time.’
- So give it some minutes and reboot the computer after getting completed.
Way-7: Install available updates
If you have not installed updates on your Windows 11 recently, it would be worth giving a shot. The reason being, updates may contain the solution to the bug or system issues like Windows 11 not shutting down. Therefore, check for updates and if find any pending then install it to solve the problem. Furthermore, updates for OEM drivers are also available through this method so follow the guideline –
- Press – Winkey + I.
- Click – Windows Update.
- Select – ‘Check for updates’.
- Allow your PC to download and install all the pending updates.
- Lastly, click – Restart now.
- Now again reach the Windows Update Settings page and select – Advanced options.
- Click – “Optional updates”. Download and install them as well.
Way-8: Update drivers to solve Windows 11 not Shutting Down
Drivers, the apps to establish communication between hardware and software in the Windows operating system, should be always in up-to-date condition. Once got outdated, the OS starts behaving wrong and throws some errors. Windows 11 PC is not shutting down indicates that certain drivers might not be updated. Windows offers a built-in utility, Device Manager that assists to perform all the necessary tasks such as roll back, remove, update the drivers, and know its details and properties. Therefore, move along with the steps to update the drivers manually –
- Press – Windows key + R.
- Type – devmgmt.msc.
- Hit the enter key to launch the Device Manager.
- You can see a list of all installed devices and drivers on the GUI. Double-clicking on a device will unfold the drivers’ list.
- So, double click every item there successively and check if any driver has a yellow caution mark.
- If found, right-click and select – Update driver from the list of options.
- From the wizard that appears, click on Search automatically for drivers.
- When the system shows – The best drivers for your device are already installed then it is right.
- Repeat the same with all drivers having the caution and see if Windows 11 is shutting down now.
Way-9: Uninstall updates
Commonly, installing Windows updates solve errors and problems in Windows the opposite is equally valid. Yes, on many occasions, Windows 11 won’t shut down after update and this occurs because of bugs arrived through the push. Sometimes Microsoft recognizes the issue and sends resolution through small update but if mass number of users are not affected you may have to solve the issue yourself. The easiest option in this condition is to uninstall the Windows update. The most important thing about this method is you must have to confirm that the error started after installing an update. Go along with the steps –
- Click – Start.
- Type – updates.
- Press – Enter.
- Once Setings page appears, click – Update history.
- Open every section (“Feature update”, “Quality updates”, “Driver updates”, “Definition updates”, and “Other updates”) and check the date when they are installed. If anyone is installed just before the starting of the shut down problem then you will have to remove this. Note the KB number.
- For this, press Win + R.
- Type – appwiz.cpl.
- Hit the – Enter.
- Click the link that says – View installed updates.
- Right click the update (having the shape of KB…..)
- Select – Uninstalled.
- Confirm and go through the instruction until the uninstallation is completed.
- Now your device should shut down for sure.
Way-10: Run a full scan of Windows Defender
The presence of malware on a computer always makes a mess and so with this issue. When getting Windows 11 not shutting down properly problem you must run an antivirus program that can detect and kill the threat. Windows Defender is a robust built-in tool and you don’t need to be concerned about the malware as it is fully capable to deal with this situation. All you have to do is run a full scan of the tool with the help of the instructions below –
- Press – Windows key + I.
- Select – Privacy & Security.
- From the right side of Settings page, click Windows Security.
- Select – Virus & threat protection.
- An additional app Windows Security will prompt up, click on Scan options link.
- Check the option – “Full scan”.
- Click – Scan now.
- This process will take some time so sit back and after this is finished, follow the suggestions of the Windows security app.
Way-11: Uninstall heavyweight or buggy third party programs
If you are a game lover and have installed heavyweight gaming apps and software the there is possibility that the shut down issue on the laptop is originated because of these. Therefore, remove them by following the steps –
- Click the Search from the taskbar.
- Type – apps & features.
- Press – Enter.
- Find the software that you need to remove.
- Click on 3 vertical dots and select Uninstall.
- Give your confirmation by again clicking on ‘Uninstall’.
- Follow the instructions on the Setup of the software to remove it completely.
Way-12: Do a clean boot
Clean boot will ensure that no third-party services are somehow interrupting the normal procedure of your computer. Using this configuration Windows 11 will start with loading the set of only basic programs where no interference will occur. This method will give you a space to check whether what is the actual reason for the Shut down issue. Then you can resolve the problem using the following guideline –
- Press the keys Windows + S.
- Type – “Msconfig” (without quotes).
- When System configuration appears in the results, click and open the same.
- Click on the Services tab.
- Be sure to put a checkmark in the box next to “Hide all Microsoft Services”. This will prevent us from disabling the essential Windows operations in the next step.
- Then, click on “Disable all”.
- Click on Apply and then OK.
- When prompted, hit Restart.
- Now see what is the behavior of Windows 11 when shutting down.
Way-13: System restore
Doing a System restore would be useful if you started facing a certain issue after some changes were made on the system, intentionally or unintentionally. Sometimes, it could be hard for us to pinpoint what exactly went wrong or what changed on the computer. This method allows using the System Restore tool to revert the system back to a point where everything was working just fine. Remember that the data and changes of this period will be wiped therefore store them in a separate drive if necessary. Now pursue the steps carefully –
- Click the Search.
- Type – rstrui.
- A wizard will show up saying – Restore system files and settings; click on Next.
- Choose a restore point prior to the day when the problem started. Click Show more points if you want to choose from any manually created or Automatic restore points.
- Select one and then click on Next.
- From the coming screen click on Finish.
- Note that this is a time taking process and might take a couple of hours to complete as a lot of changes need to be made to the system.
- Finally, Windows 11 not Shutting Down all the way will be fixed.
Way 14: Reinstall Windows 11
If Windows 11 not shutting down PC still persists despite following all above methods then you can reinstall the operating system. By default this version offers built-in Settings to reset PC keeping the files and apps in the Recovery section. We have already covered these tips, so, follow every step in this post carefully – How to Reinstall Windows 11 without losing data.
Methods list:
Way-1: Alternate ways of Shutting down Windows 11 PC
Way-2: Change Power options
Way-3: Disable Fast startup
Way-4: Run Power Troubleshooter
Way-5: End task unnecessary processes
Way-6: Run System File checker
Way-7: Install available updates
Way-8: Update drivers
Way-9: Uninstall updates
Way-10: Run a full scan of Windows Defender
Way-11: Uninstall heavyweight or buggy third party programs
Way 12: Do a clean boot
Way-13: System restore
Way 14: Reinstall Windows 11
That’s all!!