
Building iOS apps on Windows might sound complex since Apple keeps iOS development exclusive to Mac (Xcode only works on macOS). But with the right tools and a bit of creativity, you can develop iOS apps on Windows, too. This guide shows you working methods to make iOS development possible on the Windows platform. Let’s walk through how to develop iOS apps on Windows using cross-platform options, cloud-based Mac services, and virtualization.
Methods to Develop iOS Apps on Windows
Method 1: Virtualization
Virtualization lets you run macOS on a Windows PC. It is the process that enables a virtual environment where Xcode can operate as if on a Mac. With virtualization, you can run different OS on the Windows platform. VirtualBox and VMware Workstation (paid) are popular options for this. With these tools, you can run Xcode and develop iOS apps on Windows. Here’s a quick guide on how you can set up a virtual machine.

How to set up a virtual machine
Prerequisites
- Windows PC with 8GB RAM (16GB recommended), multi-core CPU with virtualization support (Intel VT-x or AMD-V enabled in BIOS).
- A macOS .iso or .dmg file. You can get the file from Apple’s developer portal or a macOS recovery image.
- VMware Workstation Player (free for non-commercial use) or VirtualBox (free).
- At least 100GB free disk space for the VM and Xcode.
- Apple Developer Account(optional), for signing apps and testing on devices.
- Ensure your PC supports Intel VT-x or AMD-V for smooth virtualization.
Install VMware Workstation Player or VirtualBox. Now you have to download a macOS installer from the Mac App Store on a Mac (if available) or use a recovery image from Apple’s support site. Alternatively, you can also get a pre-built macOS .iso from a trusted source.
Apple’s EULA prohibits running macOS on non-Apple hardware, so virtualization may breach terms of service. For personal projects, this is often overlooked, but commercial developers should consult legal advice or opt for cloud-based solutions.
If you have a .dmg file, convert it to .iso using tools like dmg2img or an online converter. After this step, you will need to tweak of VirtualBox for MacOS.
Run these commands in Command Prompt (as administrator):
cd "C:\Program Files\Oracle\VirtualBox"
VBoxManage setextradata "YourVMName" "VBoxInternal/Devices/efi/0/Config/DmiSystemProduct" "iMac19,1"
VBoxManage setextradata "YourVMName" "VBoxInternal/Devices/efi/0/Config/DmiSystemVersion" "1.0"
VBoxManage setextradata "YourVMName" "VBoxInternal/Devices/smc/0/Config/DeviceKey" "ourhardworkbythesewordsguardedpleasedontsteal(c)AppleComputerInc"
VBoxManage setextradata "YourVMName" "VBoxInternal/Devices/smc/0/Config/GetKeyFromRealSMC" 1
Replace «YourVMName» with the name of your VM.
- Open VirtualBox, click «New,» and name your VM.
- Set the type to «Mac OS X» and version to your macOS version (e.g., macOS 64-bit).
- Allocate 4–8GB RAM, 2–4 CPU cores, and 100GB disk space (VMDK format, dynamically allocated).
- Under «Storage,» attach the macOS .iso.
- Enable EFI in «System» settings and set graphics memory to 128MB.
- Boot the VM and install macOS, formatting the disk as APFS.
Now install Xcode and create a project to get started.
Method 2: Use Cloud-Based Mac Services
You can rent the Mac in the cloud as an alternative to virtualization. Services like MacStadium, MacinCloud, and XcodeClub provide remote access to macOS systems pre-installed with Xcode, accessible via Remote Desktop Protocol (RDP) from your Windows PC.
2.1. MacinCloud
It is the most recognized tool for cloud-based Mac access. It offers flexible pricing, ideal for those who are just starting out. It gives access to a wealth of iOS development tools such as Xcode, Visual Studio, Xamarin, Flutter, Ionic, and Cordova. You can use eGPU for graphic-intensive tasks. It is widely praised for ease of use to beginners.
Many users reported lag in RDP connection and slow simulator performance. Support can be slow, sometimes taking days to respond. Overall, this is an excellent tool for building iOS on Windows
2.2. MacStadium
It is popular in enterprise development, offering dedicated hardware such as Mac Minis, Mac Pros, and iMac Pros. It supports fast cloning. It supports Jenkins and GitHub Actions for automated builds. You will find the pre-installed Xcode. Many users find it a costlier option.
Plus, features like Orka may make users feel overwhelmed. For affordability, MacinCloud’s pay-as-you-go plan (~$1/hour) or XcodeClub’s budget-friendly plans (~$25/month) are better options. If you want a simpler option, then XCodeClub is a great option.
2.3. XcodeClub
XcodeClub, while praised for its performance and customer service, has a smaller footprint, with fewer mentions and a niche following, often highlighted for its affordability and responsiveness. It is a lightweight and simple-to-use platform for iOS development.
Talking about its features, with all the plans, it gives you admin rights. This means you can install any SDK or software. Moreover, TeamViewer-Based RDP is an excellent option to start, monitor, or shut down virtual Macs. Tools like Xcode Flutter are supported by XCodeClub.
For iOS development on Windows, MacinCloud is the most accessible entry point but struggles with performance and restrictions. XcodeClub excels in speed, affordability, and flexibility, which is ideal for solo developers needing control. MacStadium is best for teams or enterprise-grade stability but comes at a premium. Test each service’s trial to match your needs, especially if simulator performance or admin access is critical.
Method 3: Use Cross-Platform Frameworks
3.1. React Native
React Native, backed by Meta, is one of the most popular frameworks for building iOS apps. Big names like Pinterest, Walmart, and Shopify use it because it’s fast and efficient. Since it’s based on JavaScript and React, web developers can easily pick it up to build apps that feel native. It provides a strong ecosystem for building cross-platform apps.
Quick development, tons of third-party libraries, and the ability to use one codebase for both iOS and Android are benefits of using it. You also get features like hot reloading for instant updates, and you don’t need a Mac to get started.
If you’re on Windows, here’s how to begin:
Install Node.js, the React Native CLI, and Expo CLI.
Then, create your app using npx react-native init MyApp, and use the Expo Go app to test it on iOS.
It’s a great way to build quality iOS apps while using your web development skills.
- Language: JavaScript
- Features: Uses React for native-like UI/UX, supports third-party libraries, and integrates with Expo for testing.
- Setup: Install Node.js, React Native CLI, and Expo on Windows. Use Expo Go to test on iOS devices.
- Use Case: Ideal for web developers transitioning to mobile apps.
3.2. Flutter
Flutter, backed by Google, is another popular framework for building iOS apps on Windows. It powers millions of apps worldwide, including Google Ads, eBay, Alibaba, SpaceX, and many others. It’s built with Dart, a language that is used to create great UIs.
Flutter is rich in features with a huge widget library and hot reload. You can build pixel-perfect UIs and use the same code for both iOS and Android. Perfect one, if you care about both speed and design. It also performs well and supports tools like Codemagic, which lets you build and test iOS apps in the cloud. Windows users can use Flutter to build iOS apps.
If you’re using Windows, here’s how to get started:
Install the Flutter SDK and Visual Studio Code,
Run flutter create my_app, and use flutter run or Codemagic for testing your app on iOS.
Flutter makes it easy to build sleek, efficient apps that feel right at home on any device.
- Language: Dart
- Features: Offers a rich widget library for visually appealing UIs and supports hot reload for real-time testing.
- Setup: Install Flutter SDK and Visual Studio Code. Use Codemagic for cloud-based iOS builds.
- Use Case: Great for developers wanting fast, beautiful apps across platforms.
3.3. Xamarin
Xamarin, a Microsoft product, is a popular iOS development option. Apps like Alaska Airlines and millions of others have been built with this framework. It works well with the .NET ecosystem. It uses C#, so if you’re already familiar with .NET, it’s an easy transition to building native iOS apps.
It is tightly integrated with Visual Studio and gives you access to native iOS APIs. It compiles down to native code. It means you can build native-like apps and share a lot of code across iOS and Android. It is generally used for enterprise-level projects.
For developers, it provides a wealth of features for debugging and development. If you’re on Windows, getting started is simple: install Visual Studio with the Xamarin plugin and create a Xamarin.Form a project and pair it with a Mac to handle iOS builds through Visual Studio. Xamarin gives .NET developers the tools to build high-performance iOS apps without switching tech stacks.
- Language: C#
- Features: Integrates with Visual Studio, supports native platform APIs, and compiles to native code.
- Setup: Install Visual Studio with Xamarin plugin. Pair with a Mac for compilation.
- Use Case: Perfect for .NET developers targeting iOS and Android.
Method 4: Swift Development on Windows
1. Swift Sandbox
Swift Sandbox is an online IDE that lets you write and run Swift code directly in your browser. It sends your code to a remote server for compilation and then returns the output, making it simple and accessible for beginners. While it’s not suitable for building full iOS apps, it’s great for learning Swift syntax, testing small code snippets, and experimenting without needing any local setup.
2. Swift for Windows
Swift for Windows allows you to build and run Swift code on a Windows machine using the Swift 5.6.1 toolchain. After downloading and installing it, you can write Swift programs and use Visual Studio for editing, compiling, and debugging. While it doesn’t support native iOS development, it’s useful for creating console apps, learning the language, or developing cross-platform projects with Swift.
3. Visual Studio with Swift Plugin
Using Visual Studio with a Swift plugin lets you write Swift code on Windows, but to compile iOS apps, you need to connect it to a Mac build host. This setup allows you to develop in a Windows environment while offloading the iOS compilation to a Mac, since Apple’s build tools only run on macOS. It’s a practical option for teams using Windows who still want to work with Swift for iOS development.
Challenges of iOS Development on Windows
Xcode is exclusively made for macOS. It comes with everything you need to build iOS apps, like the iOS SDK, Swift compiler, Interface Builder, and tools for submitting to the App Store. Apple keeps it exclusive to its own ecosystem, so developers use Apple hardware and software together for the best performance.
That said, if you’re on Windows, you’re not completely out of luck. While you can’t install Xcode or the iOS SDK directly, there are workarounds like using virtual machines, cloud-based Mac services, cross-platform tools, or Swift packages. These options all come with trade-offs.

iOS App Development on Windows [Smart Practices]
If you’re building iOS apps on Windows, there are a few smart practices that’ll make your life easier and your apps better.
1. Streamline Your Workflow
Start by using version control tools like Git. It helps you track changes and collaborate easily, especially if you’re switching between Windows and macOS. Also, try to automate builds using tools like Codemagic—it works well with Flutter and React Native and saves you a lot of manual work.
2. Test in Real-World Conditions
Don’t rely only on simulators. Mix in emulators, cloud-based testing platforms like BrowserStack, and actual devices when you can. This way, your app performs well for all users, not just under ideal test conditions.
3. Know the iOS Rules
Familiarize yourself with Apple’s design guidelines to build smooth, user-friendly interfaces. Also, keep in mind that submitting apps to the App Store still requires a Mac. So plan for that step, even if your main development happens on Windows
4. Keep Up with Changes
iOS development tools move fast. Keep an eye on updates to React Native, Flutter, and even Swift support for Windows. Staying current helps you take advantage of new features and stay compatible.
These habits will help you build high-quality iOS apps from a Windows setup.
Best Approach for iOS Development on Windows
When it comes to developing iOS apps on Windows, there’s no one-size-fits-all answer. The best approach depends on your budget, experience, and the complexity of your project.
1. Go Virtual If You’re Tech-Savvy
Virtualization is a solid option for solo developers with strong technical skills and powerful PCs. It gives you full access to Xcode, which is essential for native development—but setup can be tricky and performance may vary.
2. Use Cloud Macs for Simplicity and Compliance
If you’re part of a team or want a plug-and-play solution, renting a cloud-based Mac is a convenient and legal option. It’s perfect for projects that need frequent App Store submissions without the hassle of physical hardware.
3. Try Cross-Platform Frameworks for Speed
Frameworks like Flutter, React Native, and Xamarin are great for startups or indie devs aiming to target both iOS and Android. They’re especially useful if you already know JavaScript, Dart, or C#.
4. Explore Swift on Windows for Learning
If you’re just exploring Swift or working on smaller apps, Swift for Windows is a good place to start. But it’s not ideal for full-scale iOS development.
Conclusion
Developing iOS apps on Windows is not only possible but increasingly viable in 2025, thanks to virtualization, cloud services, cross-platform frameworks, Swift tools, and emulators. By choosing the right approach, whether it’s running Xcode via a virtual machine, renting a cloud Mac, or using React Native, you can create apps that captivate iOS users without breaking the bank. Each method has its strengths, so align your choice with your skills, budget, and project needs.
To wrap it up:
- Virtual machines work best for those with the hardware and patience.
- Cloud Macs offer plug-and-play simplicity for teams and frequent deployments.
- Cross-platform frameworks like Flutter, Xamarin, and React Native are great for building one and shipping to both platforms.
- Swift on Windows is great for learning or small-scale development.
- And emulators are a must for thorough testing, regardless of the setup.
If you’re serious about mobile app development on Windows, start small, test often, and scale with the setup that matches your workflow best.
Ready to take the next step? Explore one method that fits your style and test it out. You might be surprised how much you can accomplish without a Mac.
Can you develop iOS apps on Windows?
Yes. You can create your own iOS apps on Windows.
However, experienced iOS app developers know that without using Xcode (an IDE), you cannot build or publish iOS apps. Importantly, Xcode only runs on macOS.
So, is it really possible to build an iOS app on Windows? If yes, then how? Don’t worry. To answer this, we have curated the best 5 ways to develop iOS apps using a Windows computer. Let’s understand the step by step process to windows iOS development.
Table of Contents
- How to Develop iOS Apps on Windows
- Best Ways to Develop iOS Apps on Windows
- Get a Mac in the Cloud
- Create iOS Apps on Windows with Cross-Platform Tools
- Build “Hackintosh” to Run Xcode
- Work in React Native Environment
- Use Xamarin to Write iOS Apps on Windows
- FAQs
- Conclusion
Wondering how to use Xcode on windows or how to create iOS app on Windows? Since, without using Xcode (an IDE), you cannot build or publish iOS apps. This is because Xcode only runs on macOS with the iOS SDK. However, if you wish to develop iOS app on Windows, you need virtualization software.
Using a virtual machine such as VirtualBox and VMware, you get access to virtual Mac OS. Hence, developing iOS apps on Windows will be easier for you.
With a virtual machine, you are allowed to run Windows on Linux operating systems (Linux OS) and even Windows on a Mac operating system. One of the significant benefits of virtualization software is that it helps run multiple OS side-by-side, which is beneficial to build cross-platform apps.
Now, you require 2 things to run Mac OS on a virtual machine.
- A copy of OS as a virtual image file or an installer
- A virtual machine tool like VirtualBox or VMWare
Get a copy of macOS by downloading it from the App Store so that you can start the iOS development process. Also, look out for installers and search for virtual disk images with macOS pre-installed.
Not sure how to code iOS on Windows? Want to develop an app for iPhone on Windows? Here is the answer to the following steps that you need to follow.
- Install VirtualBox or VMware and create a virtual machine on your computer
- Install Mac OS in your virtual machine
- Install Xcode on macOS (choose the desired outcome in “System Preferences”)
- Start building iOS apps
Note: The system specs should be between 4-8 GB of RAM, an Intel i5/i7 compatible CPU, and a minimum of 10 GB free disk space. Also, while configuring macOS, enter a VALID Apple ID.
Once you install macOS and Xcode, you will have access to coding and iOS Simulator capabilities to build and test apps in a similar environment like Mac.
Do You Want to Create an iPhone App?
Looking to Create an iPhone app? Get in touch with our experienced iPhone app developers for a free consultation.
We will also discuss 5 more ways of iOS app development using a Windows computer in the next section. Let’s check how to make ios apps on Windows.
Best Ways to Develop iOS Apps on Windows
Apart from using virtual machines, there are other ways that you can use to build iOS apps on Windows PC. Let’s discuss all of them one by one.
-
Get a Mac in the Cloud
You can rent a Mac in the cloud. MacinCloud and MacStadium are some of the providers that offer affordable rent-a-Mac products.
Generally, prices start at $25/month and you have an option to choose from various Apple hardware options, like the brand new Mac Mini and Mac Pro.
Connect with cloud-based Macs via a remote desktop connection. Windows offers a stock remote desktop client that you can use for iOS development on PC. So, once you are signed in, install Xcode and start the iOS app development process.
-
Create iOS Apps on Windows with Cross-Platform Tools
Cross-platform tools, like Xamarin and PhoneGap (now Cordova), can code your apps and export them to iOS and Android by reducing your development time and cost in half. Hence, help you to build iOS App on Windows in an efficient manner.
The cross-platform tool ecosystem is vast for developing iOS apps on PC. By using complete integrated development environments like Xamarin with C#, you can build cross-platform applications. Other Windows-based development tools like PhoneGap and Appcelerator with HTML5 let you build native apps. React Native will help you to write native apps with a Javascript wrapper.
To conclude, cross-platform tools require you to know the fundamentals of programming languages, such as C#, HTML5, Swift, CSS, and JavaScript. It is essential for you to understand the iOS and Android ecosystems to code native apps. Also, you need to understand the iOS and Android ecosystems to code native apps and hybrid apps.
-
Build “Hackintosh” to Run Xcode
To work on iOS app development on Windows PC, you need to build a Hackintosh. The term “Hackintosh” has come from one of the old names of Apple computers, Macintosh with the term ‘Hack’.
Hackintosh is a PC that helps to run Mac OS. With Hackintosh, you can install OS(macOS) as the bootable operating system on your Windows PC. You also have a choice to develop a dual-boot system that can operate both Windows and macOS.
-
Work in React Native Environment
React Native has several exceptional features, such as open-source, support for 3rd parties libraries, and even helps in using the same code on different platforms. No matter whether you want to develop web apps or hybrid apps, React Native is the best choice to develop iOS apps.
With the help of React Native, an Android emulator, and Mac OS deployment machines, you can build an application for iOS devices on Windows PC. For checking the result, use the Expo simulator, which is available for both Android and iOS platforms.
-
Use Xamarin to Write iOS Apps on Windows
Using Xamarin is a better choice when it comes to comparing it with Cloud Mac or other frameworks for hybrid app development. You get a cost-effective solution for iOS development on Windows.
Xamarin uses C# to code apps. To create iPhone applications on Windows, it features like native platform integration for Android and iOS and Google emulator build, run and deploy the app to iOS device from Windows PC.
Need Guidance in Building iOS Apps on Windows?
Want to validate your app idea? Share your mobile app idea. Our expert team of iOS developers has experience in developing over 2800 iOS apps.
Now you know how to develop iOS app on Windows and if you also want to learn to do the same on Linux then refer our guide to develop iOS apps on Linux. Also, if you want to know which are the top IDEs for iOS and the cost to develop iOS apps? If yes, then read the FAQ section.
Frequently Asked Questions
Which is the top integrated development environment for iOS?
Here are the best integrated development environments that you can use to create iOS apps.
- Xcode
- AppCode
How much does it cost to build iOS apps?
The average cost to build an iOS app could range from $10,000 to $1,00,000. However, this range depends on different factors, such as the type of app, number of the app’s screens, app complexity, features & functionality, design, and location of the app developers.
Do I need a Mac to develop iOS apps?
Yes, you need Mac computer which has the latest version of Xcode as you would require to compile a final product that can be uploaded to the Apple App Store. The main tool for developing for iOS and macOS is Xcode, which is exclusively accessible on Macs.
Conclusion
In this guide, we have shared the five best ways to build iOS apps on Windows computers. Don’t let the unavailability of Mac OS stop you from developing iOS apps.
These are the exact Xcodes alternatives that you are looking for. So, start to work on the iOS development in Windows using any of the options.
These are the easiest options to build iOS apps on windows. For those looking for professional assistance, consider connecting with top iOS app development companies who offer expert solutions to build high-quality, feature-rich applications tailored to iOS standards, ensuring a seamless user experience and optimized performance..
Let’s have a glimpse of the best iOS apps developed by our iOS team.
Food Delivery App That Secured Funding of $1.2 Billion
Glovo is one of the unicorn apps developed by Space-O. Apple chose Glovo for its “Best of 2016” award. This iOS app offers multi-category grocery product delivery and has over 30 million app downloads. TechCrunch, Financial Times, and Bloomberg have covered this application.
Learn More
eLearning Platform That Secured Funding of $1.4 Million
We created Fyule Video Lab, a video learning platform for an EdTech startup, funded by $1.4 million from an Angel syndicate including leaders from Google, Deloitte, Tata 1mg, and Axis Capital. We developed this platform for iOS, Android, and web using Flutter, PHP, Laravel, and MySQL.
Learn More
OpenAI-based
Image to Text App
ReadGenie is a reading assistant app that uses technologies like OCR and GPT 3.5 model to convert/extract images to text, summarize the main points, generate new content, and translate content to multiple languages.
Learn More
Get in touch with us to discuss your app idea with our app consultant. We will help you with everything from idea validation to app deployment.
Последнее обновление: 01.12.2023
Рассмотрим построение проекта на Maui и C# для iOS.
Взаимодействие iOS и Maui
Весь код для непосредственного взаимодействия с платформой iOS расположен в проекте в папке Platforms/iOS/
Здесь нас будут интересовать два файла: AppDelegate.cs и Program.cs.
Работа приложения iOS начинается с кода, расположенного в файле Program.cs:
using ObjCRuntime;
using UIKit;

namespace HelloApp
{
    public class Program
    {
        static void Main(string[] args)
        {
            UIApplication.Main(args, null, typeof(AppDelegate));
        }
    }
}
Метод Main класса Program служит точкой входа в приложения. В нем же в свою очередь вызывается метод UIApplication.Main(), который определяет суть приложения и который
обращается к классу AppDelegate из файла AppDelegate.cs:
using Foundation;

namespace HelloApp
{
    [Register("AppDelegate")]
    public class AppDelegate : MauiUIApplicationDelegate
    {
        protected override MauiApp CreateMauiApp() => MauiProgram.CreateMauiApp();
    }
}
А класс Appdelegate, в свою очередь, переопределяет метод CreateMauiApp(), в котором вызывается метод CreateMauiApp() и
таким образом реализуется связь с кодом приложения MAUI.
Компиляция проекта для iOS из Visual Studio на Windows
Рассмотрим, как создавать приложения под iOS из Visual Studio на Windows. Прежде всего, следует отметить, что технически для компиляции приложения под iOS
необходим MacBook. Кроме того, на MacOS должны быть установлены
все необходимые инструменты для разработки под Maui, как описывалось в прошлой теме, и также должна быть установлена последняя версия XCode.
Для подключения к MacOS Visual Studio применяет SSH.
Возьмем простейший проект Maui, который создается по умолчанию. Прежде всего нам надо открыть доступ извне на
самой машине под управлением Mac OS. Для этого на MacOS перейдем к настройкам общего доступа, среди которых надо включить опцию «Удаленный вход»:
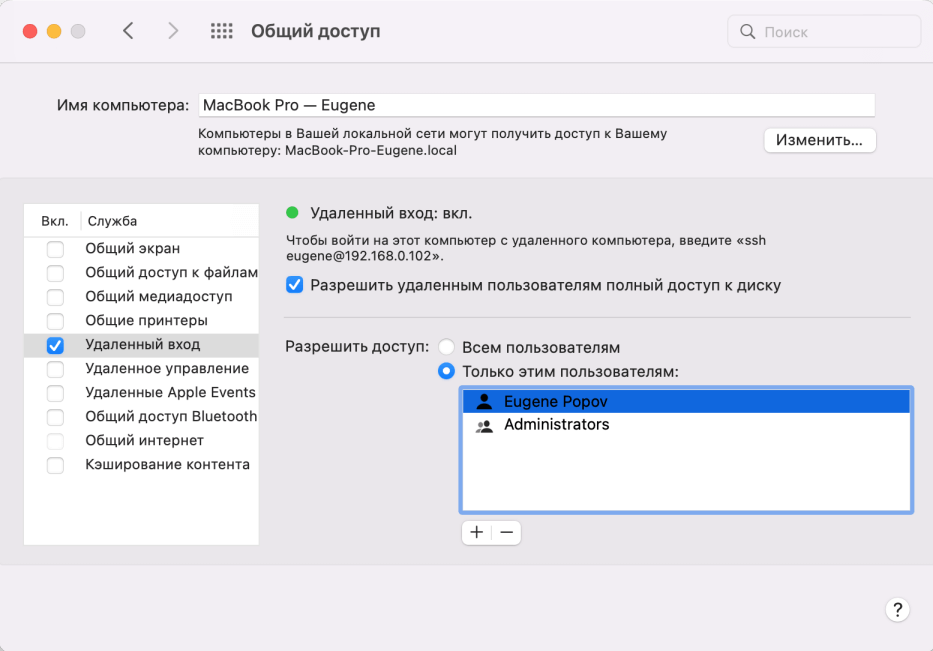
В этом окне надо отметить IP-адрес в рамках подсети, по которому мы будем подключаться к макбуку. В моем случае 192.168.0.102.
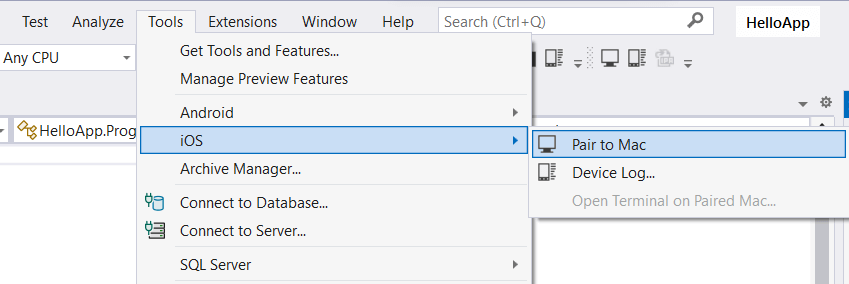
Это были все необходимые настройки для Mac OS. Теперь перейдем к Visual Studio. Перейдем к пункту меню Tools -> iOS -> Pair to Mac
Открывшееся окно отобразит список доступных хостов MacOS для подключения:
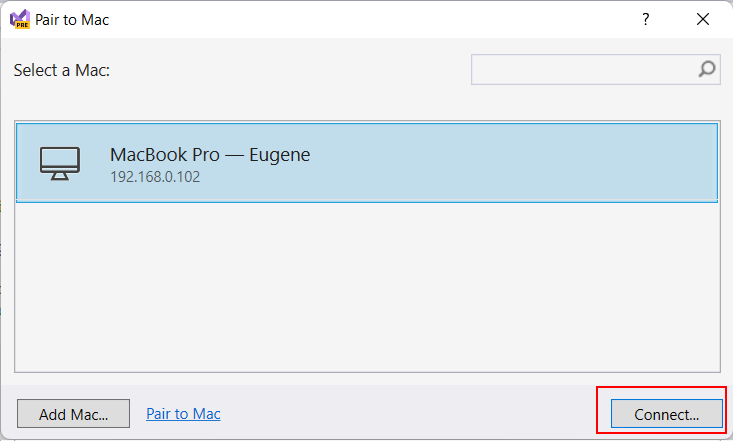
Выберем в этом окне нужное подключение и нажмем на кнопку Connect. После этого откроется диалоговое окно, в котором надо будет ввести аутентификационные данные для подключения к Mac OS (то есть логин и пароль пользователя
на машине Mac OS):
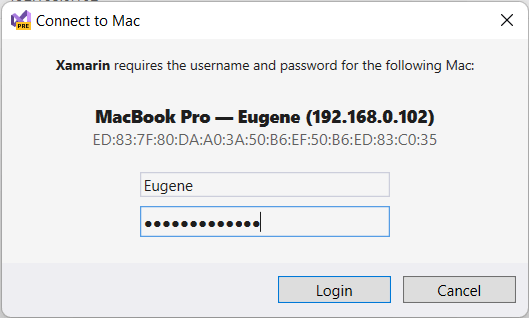
Если вы вдруг не уверены в правильности вводимого логина, то его можно узнать на Mac OS, введя в терминал команду whoami.
При первом подключении Visual Studio может загружать и установливать некоторые необходимые пакеты для связи с MacOS.
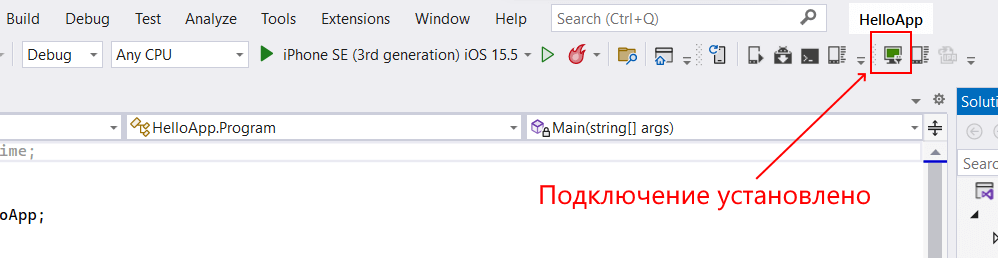
После успешного логина и подключения все окна можно закрыть. А Visual Studio с помощью значка зеленого монитора на панели инструментов укажет, что подключение успешно установлено
И затем мы сможем использовать удаленную машину Mac OS для компиляции приложения, а в Visual Studio мы сможем выбрать нужный симулятор iOS и запустить проект:

После этого запустится на симуляторе наш проект:
Стоит отметить, что несмотря на то, что мы можем запустить приложения на симуляторе непосредственно в Windows, но все равно нам необходим Mac OS
для компиляции проекта.
Настройка компиляции под iOS
Если мы перейдем к свойствам проекта в visual Studio, то в секции Application/iOS Targets мы можем настроить минимальную и целевую версии iOS, под которые выполняется
построение проекта.
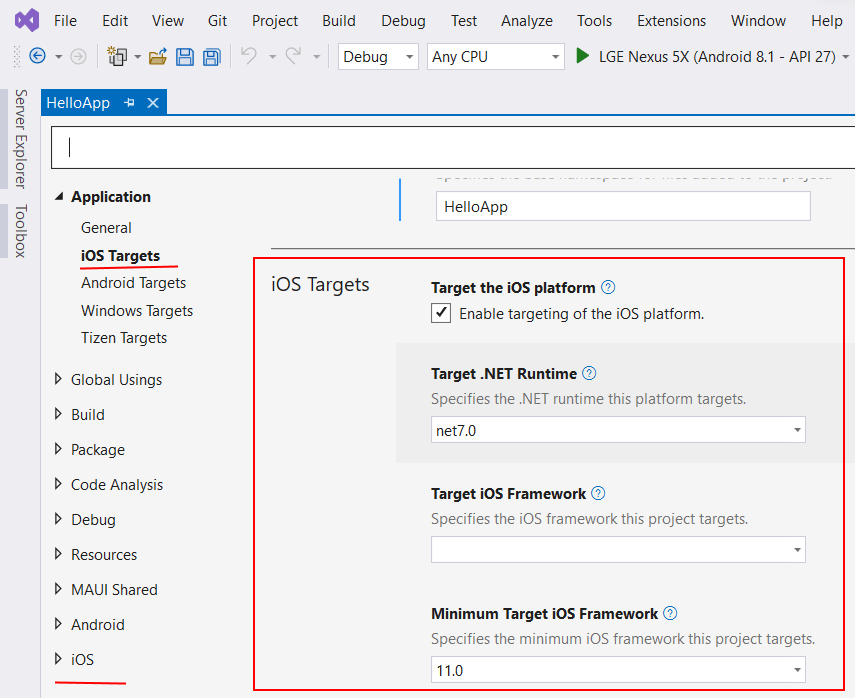
Здесь нам доступны следующие опции:
-
Target the iOS platform: при установке этого флажка .NET MAUI при построении проекта будет также создавать версию приложения для iOS.
-
Target .NET Runtime: применяемая версия .NET
-
Target iOS Framework: применяемая версия iOS
-
Minimum Target iOS Framework: минимальная версия iOS, под которую создается приложение
Кроме того, внизу свойств проекта с помощью пункта iOS можно настроить различные параметры публикации проекта.
Компиляция проекта для iOS на Mac OS
При компиляции проекта MAUI под iOS на Mac OS все естественно несколько проще. Если мы используем Visual Studio for Mac, то также мы можем
выбрать из панели запуска нужный симулятор iOS, либо даже подключиться к реальному устройству с iOS через WiFi:
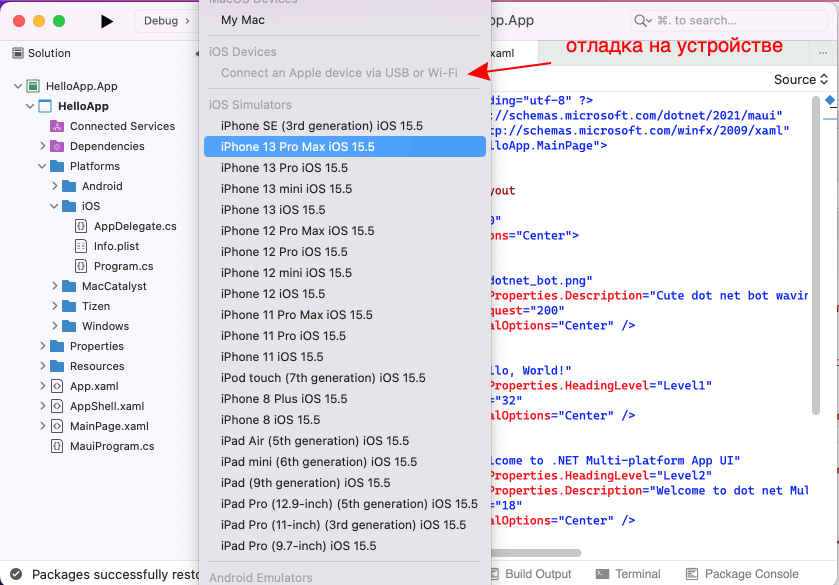
При выборе симулятора iOS будет запущено приложение на выбранном симуляторе XCode.

В апреле этого года на конференции //Build был сделан очень интересный анонс, который показал возможность компиляции и сборки ObjectiveC кода для Windows Store. С радостью хочу сообщить что теперь эта технология и инструменты стали публичными, вы можете уже сейчас загрузить компоненты сборки ObjC/iOS приложений для Visual Studio 2015 и собрать приложение для Windows Store.
C чего начать
По адресу https://github.com/Microsoft/WinObjC/releases опубликован SDK который содержит компоненты для сборки приложения iOS для Windows Store. Для того чтобы попробовать их в деле вам понадобится Windows 10 и Visual Studio Community 2015. Распакуйте содержимое winobjc.zip и откройте файл samples\HelloUI\HelloUI-WinStore10.sln. Далее делаем активным проект Hello-UI-Winstore (в Solution Explorer вызвать контекстное меню, «Set as StartUP Project») и нажимаем F5.

Добро пожаловать в мир кросс-компиляции ObjectiveC для Windows.
Пакет, который подготовила команда Microsoft содержит компилятор ObjectiveC, компоненты интеграции с Visual Studio 2015, основные части SDK iOS и дополнительные инструменты конвертации приложений.
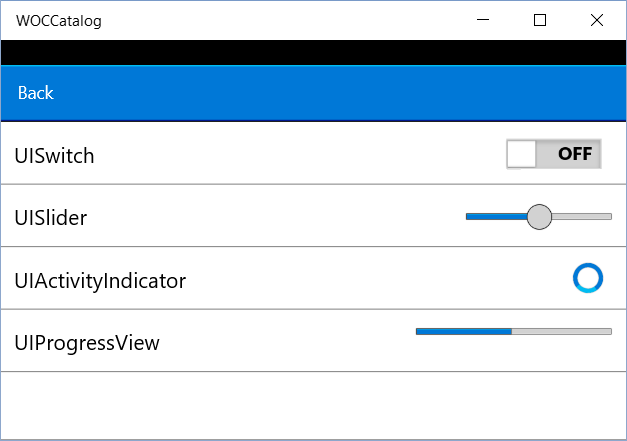
C основными возможностями SDK вы можете ознакомиться из примера samples\WOCCatalog\WOCCatalog-WinStore10.sln.
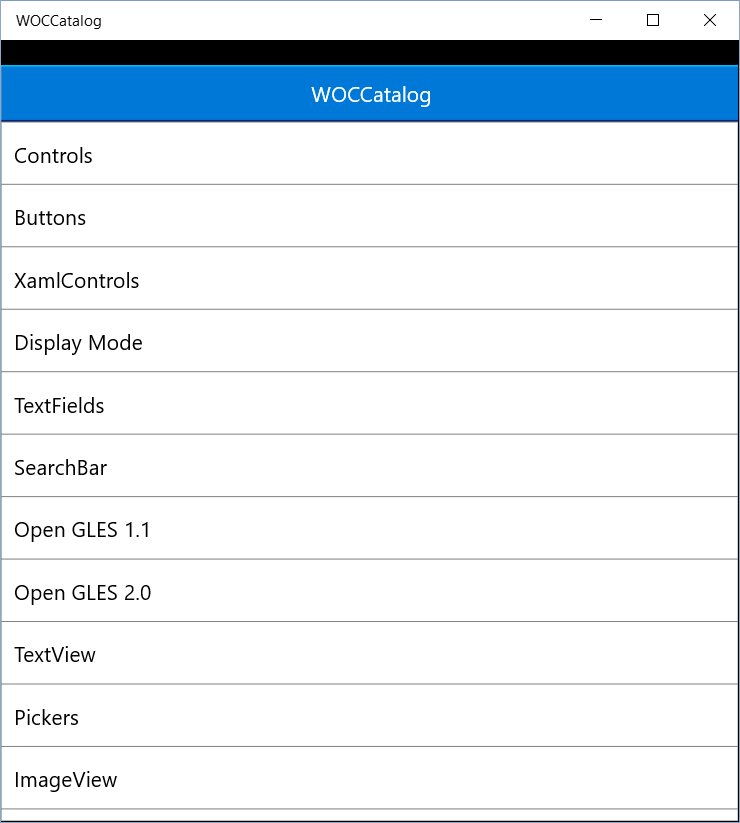
В этом примере показаны основные варианты использования интерфейсных компонент:
Взаимодействие с OpenGL:

Кстати говоря, этот SDK также может собирать приложения для Windows 8.1 и Windows Phone 8.1.
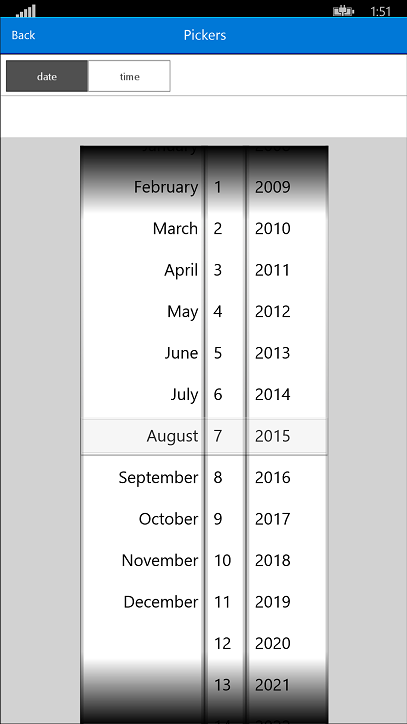
Несколько необычно видеть стандартные интерфейсные элементы iOS на Windows Phone.
Конвертация проектов iOS
Для того чтобы превратить проект iOS в проект Visual Studio можно воспользоваться специальной утилитой \bin\vsimporter.exe.
Например, сделаем git clone https://github.com/ericjohnson/canabalt-ios.git и запустим в каталоге исходного кода этого проекта vsimporter. В результате у вас появится файл Canabalt-WinStore10.sln, открываем его в Visual Studio 2015 и собираем проект:
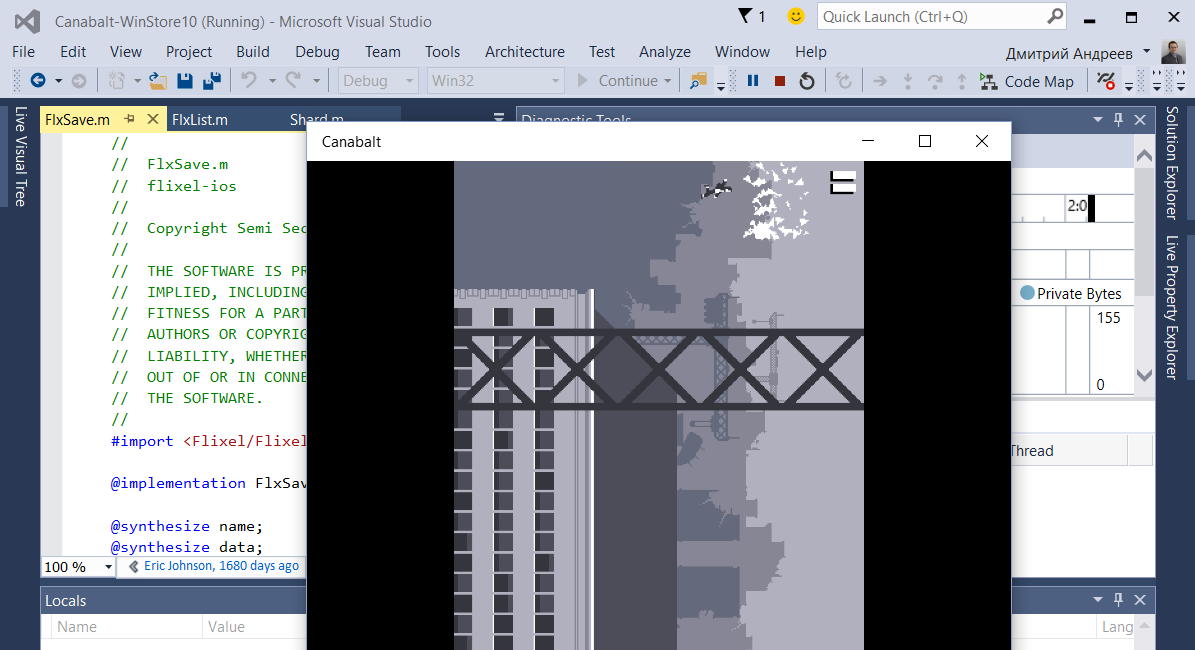
Почему-то он работает повернутый на 90 градусов.
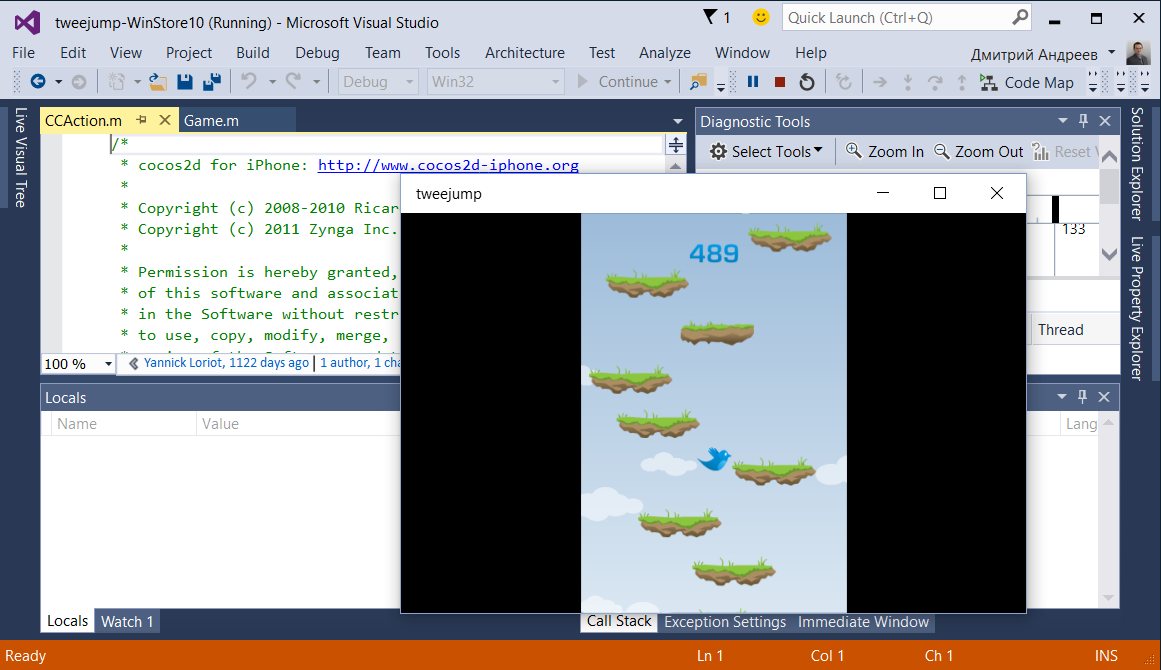
Или например:
git clone https://github.com/haqu/tweejump.git
cd tweejump
winobjc_sdk_path\bin\vsimporter.exe
Результат компиляции для Windows 10:
Что пока в активной разработке?
Проект WinobjC находится в активной разработке и некоторые возможности не работают:
- Нет поддержки ARM, только x86.
- Оптимизации компилятора не работают. Скорее всего они приведут к крашу clang, пока можно использовать только debug сборки.
- Autolayout
- Storyboard support
- MapKit
- AssetsLibrary
- AddressBook
- Ads
- Objective-C annotations
- Media Capture
Если у вас есть вопросы и вы хотели бы узнать больше об этом проекте, обращайтесь на форумы http://stackoverflow.com/, маркируйте свои вопросы тегом WinObjC и почитайте вики https://github.com/Microsoft/WinObjC/wiki.
Xcode is an Integrated Development Environment (IDE) that runs exclusively on macOS. This means that Xcode cannot be used on Windows machines, posing a significant challenge for developers. The restriction that Apple’s software cannot be used on non-Apple machines becomes a barrier for many developers and organizations who cannot afford a Mac machine.
However, there are alternative solutions for developers who want to build iOS apps but lack access to Mac hardware. Developers can use Apple’s powerful development tools without expensive equipment by finding alternative ways to run Xcode for Windows.
Yet, several questions arise when attempting to overcome this restriction: Is it impossible to avoid solely relying on Apple for development? Or can we find solutions to set up a stable environment on our systems and run Xcode for Windows?
TABLE OF CONTENTS
- What Is Xcode?
- How To Build iOS Apps With Xcode for Windows?
- Rent a Mac To Build an iOS Application
- Hackintosh
- Cross-Platform Development
- How To Test iOS Apps Built Using Xcode for Windows?
- Conclusion
- Frequently Asked Questions (FAQ’s)
What Is Xcode?
Xcode is an IDE for developing software for Apple’s operating system, i.e., macOS, iOS, visionOS, etc. It is free to use and is recommended by Apple for its best experience in app development, debugging, and testing. This includes features facilitating Apple app development, such as code completion and integrating version control systems like Git to commit from within a single screen without leaving the code.

Not only the development but Xcode tries to provide a single solution for testing as well. Features like capturing the test results and diagnosing them with video and screenshots prove helpful for testers and save much of their time.
The benefits of Xcode surpass its popularity, and it is often the most recommended tool for app development for Apple operating systems. That doesn’t mean each developer and tester must buy an Apple machine when they have already worked on Windows OS systems for all other projects.
Note
Conduct iOS app testing across real devices and OS combinations. Try LambdaTest Today!
How To Build iOS Apps With Xcode for Windows?
Xcode is officially available only for macOS, meaning developers typically need access to a Mac for iOS or macOS app development. While official support for Windows in Xcode is unlikely, developers and testers can explore alternative methods to develop applications without relying on an Apple machine.
This is possible with a few additional steps and some extra effort.
- Selecting a Virtual Machine Software for macOS Installation.
- Installing the virtual machine.
- Installing macOS on the virtual machine.
- Downloading Xcode.
Let’s start by selecting the virtual machine software essential for using Xcode for Windows.
Selecting a Virtual Machine Software for macOS Installation
Virtual machines are a concept that divides the resources of the primary operating system to install another operating system alongside them. This gives us a perception that the system has two operating systems, but in reality, one is primary while the other is virtual (also called a guest operating system), which means it just exists within a sandbox environment.
Without software assistance, developers cannot run two operating systems simultaneously on a single physical machine. They need virtualization software to create and manage virtual machines, enabling the simultaneous operation of multiple operating systems.
Learning about how various operating systems handle resources is important. For those wanting to learn more, looking at Operating System Interview Questions can give useful information on system virtualization and its uses.
Two popular virtualization software options are listed below:
- VMWare
- Virtual Box
VMWare
It is a well-known name in virtualization technology, having been around since 1998. It has evolved to meet changing requirements and is known for its efficient resource utilization in guest operating systems. VMware is scalable and highly secure.
A user can boot an operating system by two methods with VMWare:
- With PXE (Preboot Execution Environment), which is server-based booting.
- With a media device (such as a pen drive)

Source
Both methods are effective, but using a media device is more popular. It is faster and easier to install the operating system. Users only need to assign the memory usage and specify the OS and platform ISO image locations, and the OS will be ready to install Xcode.
VirtualBox
VirtualBox is another popular virtualization software offered by Oracle Corporation. It is open-source and provides high performance for users wanting to install multiple operating systems on their PC or Linux machine. VirtualBox is known for its user-friendly interface and fast execution, from installation to booting up the OS. Like VMware, VirtualBox offers two installation methods: PXE and using a media device. Both methods follow similar installation steps.
While other virtualization software options are available, VMWare and VirtualBox have stood the test of time and continue to evolve, providing the best user experience. It is recommended to use one of these two options. For further steps on installing virtualization software, we will be using a virtual box.
Installing the Virtual Machine
Let’s start by installing VirtualBox on the local machine for demonstration purposes. The installation steps are similar in VMWare as well.
Follow the steps below to install VirtualBox.
- Download the VirtualBox by visiting the official website and download the binary for Windows hosts since we use a Windows machine.
- After downloading the Windows binary, follow the installation steps. During the installation, allocate memory for macOS to run smoothly later and click on Next.
- Once the installation is complete, you will be prompted to finish the installation by clicking on the Finish button.


Great! Now that you have successfully installed the virtualization software on your local machine, it’s time to install macOS in VirtualBox.
Installing macOS in VirtualBox
After successfully installing VirtualBox on your local system, the next step is to install macOS. To do this, you’ll need to download an ISO image of macOS from the Internet. However, Apple doesn’t provide ISO images of its operating system, so you must search for a download link.
For this demonstration, we’ll use the Internet Archive, which provides authentic images. Below are the steps to install Internet Archive to achieve ISO images.
- Navigate to the website and select ISO IMAGE on the macOS ISO download page:
- Select current available ISO images of different macOS versions from the dropdown option.
- Open the VirtualBox and click New to initiate a new guest operating system installation process:
- Configure the options by providing the path where VirtualBox is stored. In the ISO Image section, select the BigSur ISO image downloaded in the previous steps and “Type” as Microsoft Windows.
- Select the hardware usage and click the Next button.
- Lastly, allocate the desired amount of hard drive space for running macOS and click the Next to proceed.
- Finally, click Finish to install Big Sur on Windows using VirtualBox.


If you don’t require the latest macOS version and any version will suffice, it’s better to choose an older one. The latest versions may encounter frequent errors and latency issues, as the Virtualbox software is not immediately configured for compatibility after a new release.
For this demonstration, we will choose Big Sur for these reasons.
Note: Before installing macOS (or any other operating system) on Windows using VirtualBox, it’s recommended to disable Hyper-V. Running two virtualization software simultaneously can lead to conflicts and is not recommended.


A minimum of 4GB RAM and 2 CPU cores are required for macOS. The user should allocate more memory for better performance from the guest OS.


Great! Now that we’ve completed both the steps of installing virtualization software and macOS and an iOS image, let’s install Xcode on VirtualBox on macOS.
Downloading Xcode in Virtual macOS
Xcode is an IDE available on Apple’s official software marketplace, the App Store. You cannot download any software from this store without an official Apple ID. Hence, the first step is to create an Apple ID to access the store.
Below are the steps to be followed once you have created the Apple ID to access the store.
- Access the App Store and search for Xcode in the search box. Click on GET beside Xcode to download the software:
- Next, you need command-line tools to facilitate the development process and help create an environment for iOS app development. These tools will be used during development.

Run the following command on the Terminal to install command line tools:
xcode-select --install
This method allows for the development and testing of iOS applications using Xcode. To deploy applications, users need a developer account with Apple. Testers can access Apple’s simulators through this guest operating system, although latency can be expected.
This approach, one of the oldest for building and testing iOS apps on Windows using Xcode, highlights how virtualization has expanded beyond development to include activities like gaming. This expansion is supported by the increased primary and secondary memory capacity in modern systems.
However, the method for developing apps through virtualization has remained unchanged and hasn’t become more convenient or efficient over the past decade.
Even with these advancements, the effectiveness of iOS app development on a physical Mac cannot be matched. Therefore, a more effective solution may be transitioning from local systems to cloud platforms, reducing resource consumption and eliminating memory-sharing overheads.
Rent a Mac To Build an iOS Application
Renting a Mac to develop macOS or iOS apps has become more cost-effective with modern cloud computing. Services like MacStadium, MacinCloud, and XcodeClub offer Mac OS X virtual machines that can be rented by the hour. These virtual machines can be quickly set up and destroyed, ensuring no sensitive data is left behind. It’s important to sign up for an Apple account and ensure software like Xcode is installed on the virtual machine before starting development. Once rented, the Mac can be accessed using RDP or a VNC client, and users can log in to the Mac OS X desktop to begin development.
Hackintosh
A method that Windows users can use to build iOS applications using Xcode is called Hackintoshing. The term “Hackintosh” has been used by macOS enthusiasts aiming to run macOS on non-Apple hardware since the 1980s. However, earlier attempts involved complex technical tweaks and were often unsuccessful.
In 2005, Apple made a significant change by transitioning its OS system to Intel’s x86-64 architecture from PowerPC. This change made running macOS on a PC much easier, as the OS was now compatible with the same architecture used by other operating systems like Windows. This transition led to an increase in the number of ready-to-install macOS binaries available in the market, resulting in a surge in downloads. This process of running macOS on non-Apple hardware is commonly referred to as “Hackintosh,” essentially meaning “hacking the Macintosh.”

macOS on an HP system
It is true that Xcode for Windows is not available and is exclusively for macOS. However, it is possible to install macOS on a laptop, effectively creating an unlicensed version of a Macintosh, which allows for continuing the development journey. The downside of this method is that the user loses their Windows operating system entirely, as macOS becomes the primary operating system. This approach is similar to virtualization, but instead of running a guest operating system, macOS becomes the primary OS.
Despite losing Windows, this method offers the advantage of being able to build iOS apps and Android apps using the same system by switching between operating systems. It is a cost-efficient solution, and the process is relatively straightforward.
Cross-Platform Development
Cross-platform development allows developers to write code once and build applications for both Android and iOS from the same codebase. Flutter is a framework designed for efficient cross-platform development with low memory usage. However, it’s important to note that while cross-platform frameworks like Flutter can be used to build iOS applications, certain tasks still require Xcode. Currently, Xcode for Windows is unavailable.
React Native is another popular choice among developers for mobile app development. Choosing the right framework for building mobile apps is crucial, and developers often compare Flutter vs React Native to determine the best fit for their project.
To learn more about Flutter and how to perform testing using Flutter for both Android and iOS applications, follow a detailed guide on Flutter testing to validate the working of your apps.
While Xcode provides testing capabilities, using it on a Windows PC can be challenging, especially when sharing resources or using virtual machines. Some testing features, such as parallel testing, running automation code, and recording testing sessions, may not be available.
This limitation can frustrate projects with large, complex applications requiring thorough testing.
To address these challenges, developers can leverage cloud services to speed up testing without changing their operating system. By using cloud-based testing services, developers can access a wide range of testing capabilities and resources, improving efficiency and streamlining the testing process.
How To Test iOS Apps Built Using Xcode for Windows?
Xcode has a few tools to test iOS applications within the macOS environment. However, these tools are designed to work best on a Mac machine. A reliable solution to use Xcode for Windows is to use a cloud-based testing platform, which offers speed, efficiency, and cost-effectiveness.
One such platform is LambdaTest; it is a great solution for cross-platform and cross-browser testing. It is an AI-native test execution platform that lets you conduct manual and automated mobile testing on a virtual macOS online environment across a wide range of real devices, 3000+ browsers, and OS combinations, ensuring device and browser compatibility across different platforms.
With LambdaTest, you can perform Android automation and iOS app testing on a real device in the cloud. It also allows you to use emulators or simulators for mobile app testing.
Since LambdaTest is a cloud-based platform, users do not need to install anything on their local system. iOS apps developed using Xcode or other tools can be directly uploaded to the LambdaTest platform using the Real Device Testing feature.
Users can upload their .apk or .ipa files, and once uploaded, these apps will be installed and can be operated on the selected iOS or Android devices. This process eliminates the need to visit the App Store for testing purposes.
Apart from these, there are other benefits that LambdaTest offers that will help you perform iOS or Android testing thoroughly.
- Device Support: It lets you conduct Android and iOS app testing using the more popular mobile automation testing tools such as Appium, Espresso, and XCUIT.
- Network Throttling: It lets you simulate different network conditions, such as 3G, 4G, and WiFi, to test your app’s performance under varying network speeds.
- Geo-location Testing: It lets you conduct geolocation testing to help you simulate different geographic locations to test your mobile app under various locations.
- Multiple Installation Support: The users can install multiple applications in a single session on LambdaTest, providing convenience and saving the time to uninstall and reinstall the apps.
- Intelligent UI Inspector: It offers an intelligent UI inspector that helps identify elements and provides device logs to aid in debugging the application, all with a single click. This feature is a frequent action in testing and saves a significant amount of time.
To learn how to perform app automation on a real device, watch the video tutorial below and get familiar with the features of LamdbaTest that will help you perform automation testing.
To get started with LambdaTest, you need to follow the steps.
- Sign up for a LambdaTest.
- Go to the Real Time > App Testing > Virtual Mobile from the menu on the left-hand side.
- Select any operating system of your choice. For demonstration purposes, we will use iOS as the operating system and upload the .ipa file to the cloud.
- Select your mobile device and model after uploading your .ipa file. We will select the iPhone as the device and the iPhone 15 Pro Max as the mobile device with this configuration for demonstration purposes and click the Start button.
- Using the left menu options, you can perform manual testing on the mobile app, including changing keyboard language, adjusting device orientation, activating sleep mode, and adjusting volume levels via the Device Controls menu. You can record your testing sessions and share them by selecting Record Session. Additionally, you can test native mobile apps from different geographical locations using the IP Geolocation option.


A virtual device will be launched in a cloud environment based on your chosen configuration and the uploaded app.


To learn more about real-time and real-device testing, watch this video demonstrating how to perform real-time testing on a real-device cloud.
To get more video tutorials on mobile and web automation, subscribe to the LambdaTest YouTube channel and get started with your automation testing journey.
Conclusion
Xcode is one of the best tools available for iOS app development today. Apple has ensured that it works according to the developer, consumes fewer resources, and makes the work easier to execute. Unfortunately, Apple doesn’t want it shared with users working on a different operating system for several reasons discussed in this post. Due to this, a user with a Windows system is left only with the option to buy an Apple device or install macOS to use Xcode. This post on Xcode for Windows tries to explore these methods in simple steps with a demonstration.
From installing a virtual machine to deleting their Windows OS files, users can choose the method that suits them best and works for the team. All the methods are free to use and don’t require any purchase of physical or digital assets. Also, once you are done with development, the testing becomes much easier with cloud tools like LambdaTest, which are made specifically for this purpose. They provide additional testing tools, support for automation frameworks, third-party integrations, and real Apple devices to test on. Combining these methods with these testing tools results in a high-quality application that demands lower maintenance. Ultimately, this is the combination that all the organizations aspire for.
Frequently Asked Questions (FAQs)
Can I code iOS apps on Windows?
Yes, iOS applications can be built on Windows with different IDEs and frameworks, such as Flutter. However, if you wish to code using Xcode, it is not officially available by Apple, and you may have to install macOS explicitly.
Is Xcode only for Mac?
Yes, Xcode is available exclusively for Apple machines. However, one can use Xcode on Windows using different methods like virtualization, renting a Mac, or using Hackintosh.
Harish Rajora
I am a computer science engineer. I love to keep growing as the technological world grows. I feel there is no powerful tool than a computer to change the world in any way. Apart from my field of study, I like reading books a lot and write sometimes on https://www.themeaninglesslife.com .