
Способ 1: Параметры системы
В параметрах Windows 10 есть специальный раздел, в котором можно не только активировать функцию «Ночной свет», но и изменить ее настройки. Об этом — далее по тексту:
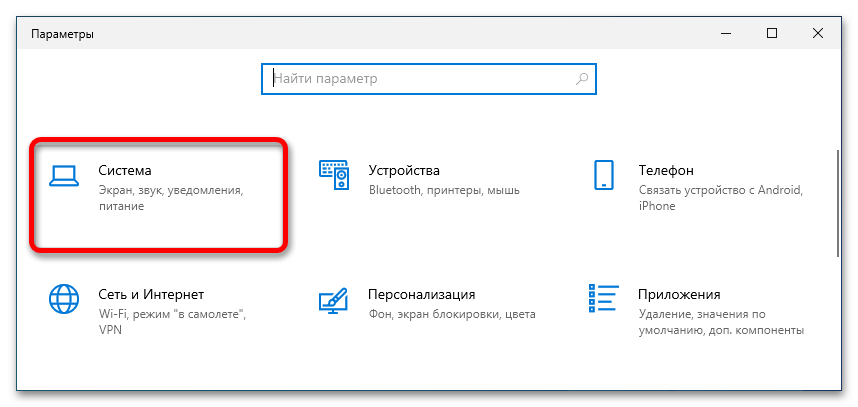
- Откройте окно «Параметров» любым доступным способом. Проще всего это сделать через контекстное меню кнопки «Пуск». Для этого щелкните по ней правой кнопкой мыши и выберите в списке опций соответствующий пункт.
Читайте также: Как открыть «Параметры» в Windows 10
- В появившемся окне проследуйте в раздел «Система», кликнув левой кнопкой мыши по соответствующему элементу меню.
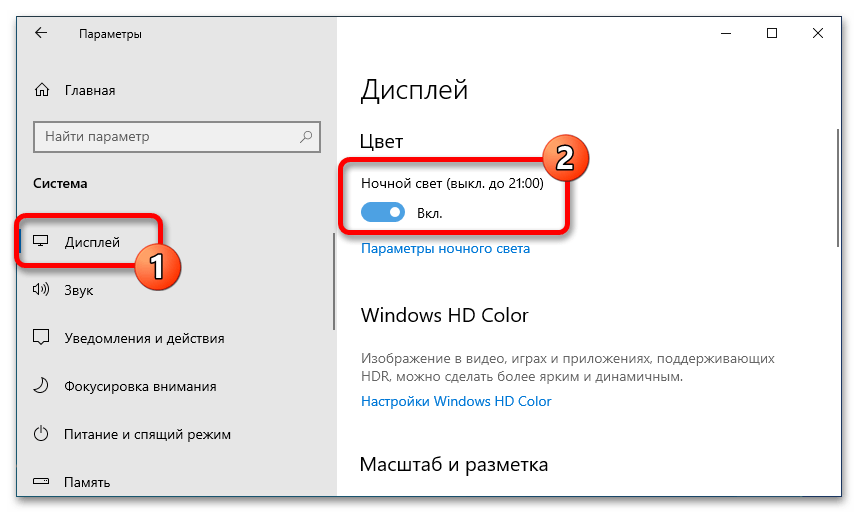
- Находясь во вкладке «Дисплей», активируйте функцию «Ночной свет», переведя ее переключатель в активное положение.
- При необходимости вы можете настроить работу этой функции. Делается это в специальном меню. Щелкните по ссылке «Параметры ночного света», чтобы открыть его.
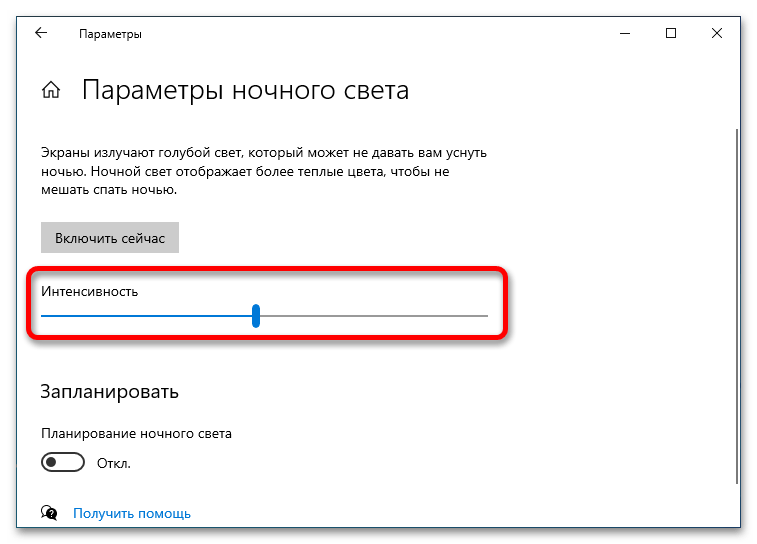
- Воспользуйтесь ползунком, чтобы настроить интенсивность «Ночного света». Чем ближе он будет находиться к левому краю, тем ниже будет его насыщенность.
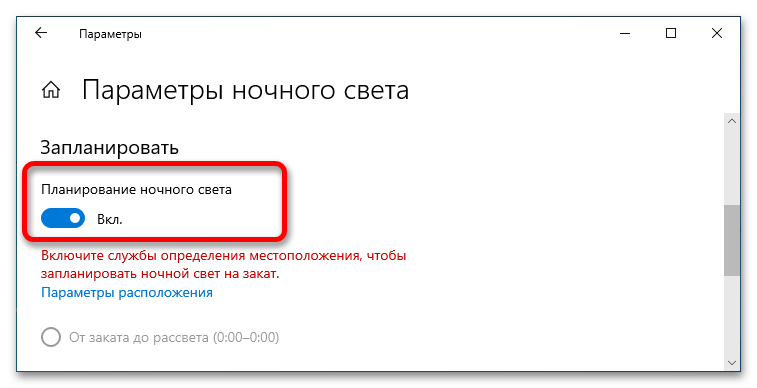
- Установите переключатель «Планирование ночного света», чтобы вручную можно было выставить часы, когда функция будет активироваться автоматически.

Если служба определения местоположения у вас активирована, можете выбрать значение по умолчанию — «От заката до рассвета».

В противном случае поставьте переключатель в положение «Установить часы» и из соответствующих выпадающих меню «Включить» и «Выключить» определите интервал, когда функция «Ночной свет» будет работать.


Способ 2: Панель уведомлений
Активировать функцию «Ночной свет» можно не заходя в параметры системы, а кликнув по соответствующему значку на панели уведомлений. Сначала разверните ее, нажав по иконке диалога в правой части панели задач, а затем в появившемся интерфейсе кликните по плитке «Ночной свет», чтобы активировать эту функцию.
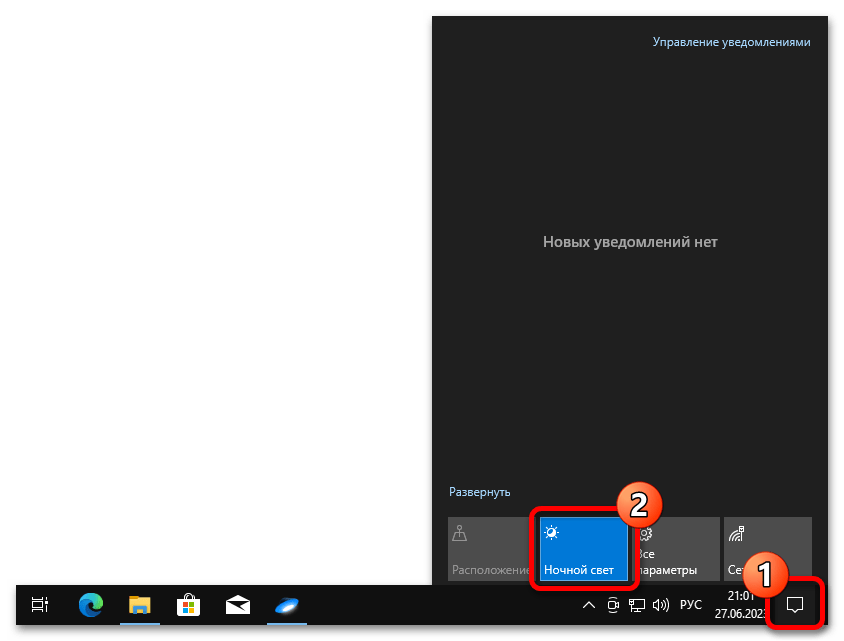
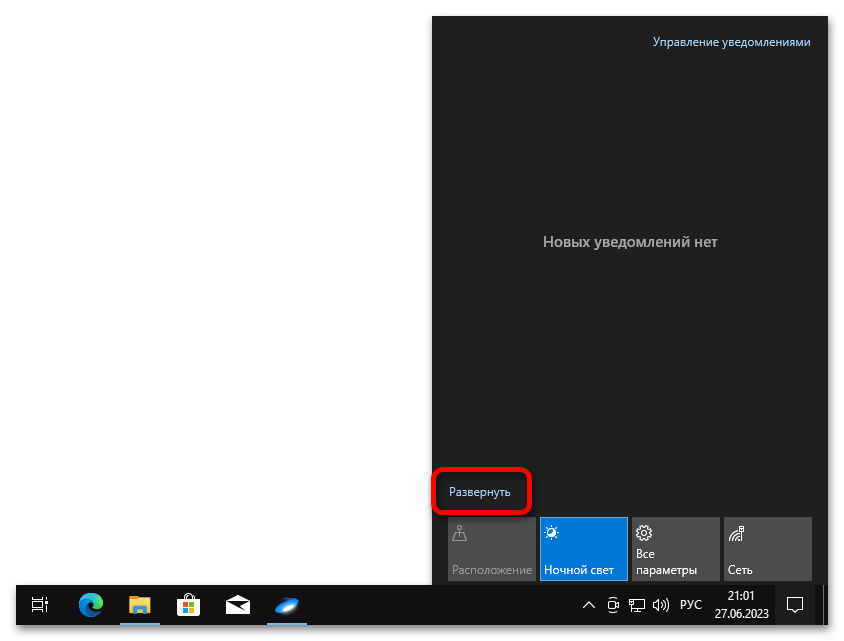
Если соответствующий элемент у вас отсутствует, тогда разверните весь список функций, нажав по строке «Развернуть».
Обратите внимание! Этот способ не позволяет настроить работу «Ночного света», а только активирует ее. Но достаточно единожды задать параметры в настройках системы, чтобы они применялись в обоих способах активации функции.
Наша группа в TelegramПолезные советы и помощь
Adjust size and color
-
To adjust the size of text, apps, and other items, select the Start button, then select Settings > Accessibility > Text size. Use the slider next to Text size to make just the text on your screen larger.
-
To scale up everything on your screen, select the Start button, then select Settings > System > Display, and change the Scale drop-down menu, select the value to a larger percentage.
Note: You can create a custom scale in the settings, but we do not recommend it. To customize the scale, expand the Scale settings and enter a custom scaling size between 100% and 500%.
Make things bigger
-
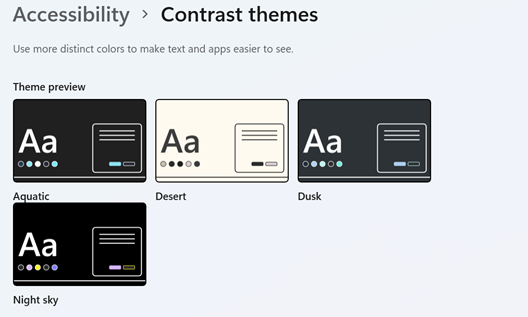
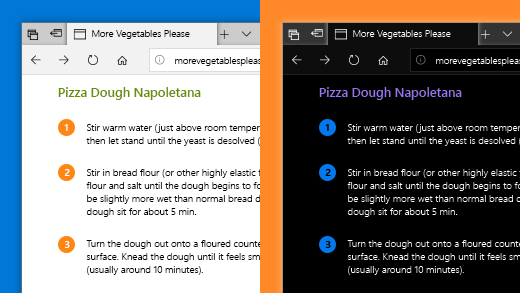
If there’s not enough contrast between the elements on your screen, try using a high contrast theme. Select the Start button, then select Settings > Accessibility > Contrast themes, select one of the options in the drop-down menu next to Contrast themes, and select Apply. You can select between Aquatic, Desert, Dusk, and Night sky.

Turn on contrast themes
Know where you’re pointing
-
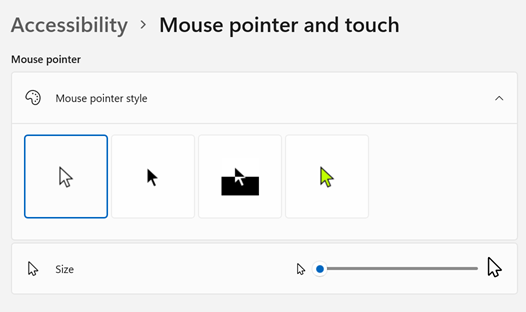
Make your mouse more visible by changing the color and size of the mouse pointer. Select the Start button, then select Settings > Accessibility > Mouse pointer & touch, and choose the options that work best for you.

-
By adding pointer trails you can see where the mouse is moving on the screen. Select the Start button, then select Settings > Bluetooth & devices > Mouse > Additional mouse settings. In the Mouse Properties window, select the Pointer Options tab, and then Display pointer trails.
-
Windows can also show visual feedback when you touch the screen. Select the Start button, then select Settings > Accessibility > Mouse pointer & touch, and then set Touch indicator to On.
To see the touch indicator circle more visibly, expand the Touch indicator settings, and then select the Make the circle darker and larger checkbox.
Change text cursor & mouse pointer
Magnify your screen
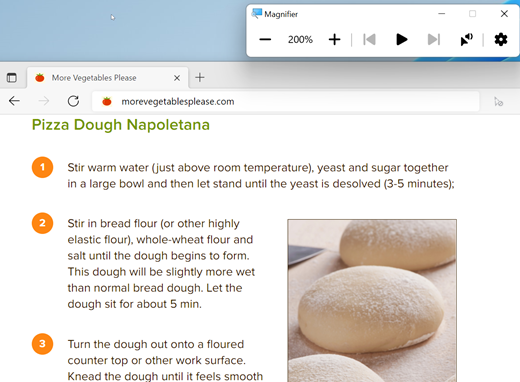
Magnifier enlarges part or all of your screen so you can see words and images better. To open Magnifier quickly, press the Windows logo key+Plus sign(+). When Magnifier is open, use Windows logo key+Plus sign(+) or Windows logo key+Minus sign(-) to zoom in or out. To switch between the set magnification level and 1x magnification use Ctrl+Alt+Minus sign (-). To close Magnifier, press Windows logo key+Esc.
Open Magnifier
To learn more about Magnifier, see Use Magnifier to see items on the screen.
Apply color filters
Make photos, text, and colors easier to see by applying a color filter to your screen. Color filters change the color palette on the screen and can help you distinguish between things that differ only by color.
To apply color filters, select the Start button, then select Settings > Accessibility > Color filters, set Color filters to On, and choose the options that work best for you.
-
To turn on and turn off your color filters quickly, select the Start button, then select Settings > Accessibility > Color filters, and set Keyboard shortcut for color filters to On. Then press the Windows logo key+Ctrl+C to turn them on and off.
Open color filters
To learn more about color filters, read Use color filters in Windows.
Use Narrator to navigate your PC
Narrator is the built-in screen reader in Windows that reads aloud what’s on your screen so you can use that information to navigate your PC. To start or stop Narrator, press the Windows logo key+Ctrl+Enter.
Open Narrator
For more info on how to use Narrator, check out the Complete guide to Narrator.
Ever felt the problem of watery eyes when you work on your laptop screen for long hours? That’s because your eyes get strained due to the blue light when you keep looking at a computer screen. That’s a common problem faced not only on computer screens but on smartphones as well. To tackle the problem, a software feature called the blue light filter exists on Windows 10.
Microsoft added the Windows 10 blue light filter back in 2016. The feature adjusts the color temperature of your screen to decrease the amount of blue light coming out of it.
The goal is to address the problem of people having eye strains, and sometimes headaches while using their computers. In later updates of Windows 10, Microsoft has started calling the feature Night Light. For the uninitiated, the eye saver mode in Windows 10 can be found while digging the Settings app.
Now, before going ahead and discussing it further, let me tell you the need for options/programs to decrease the blue light. “Can’t I just decrease the brightness and reduce the strain?” – You’d ask.
Even after decreasing the brightness, blue light emissions from the screen are still high enough to swell your eyes with water. There’s a receptor cell named Melanopsin beside rods and cones in our retina. Melanopsin is blue light sensitive. Well, I think that’s enough biology, let’s tell you about the Blue Light Settings in Windows 10.
How to enable the Blue Light filter on Windows 10?
Windows 10 Blue Light Filter setting is very easy to set up and use. This means that it comes with a cleaner and fewer configuration options. You get the option to adjust the screen’s color temperature automatically, toggling it on and off, and set personalized hours.
To enable the Blue Light filter in Windows 10, you need to follow these steps:
- Simply open the Settings app on your Windows 10 PC. Now, navigate to the System > Display page.
- Near the top, you’ll find a Night Light toggle below the Colour tab. Now, turn this toggle to On.
- After enabling Windows 10 Blue Light filter, you need to click on Night light settings for further options.

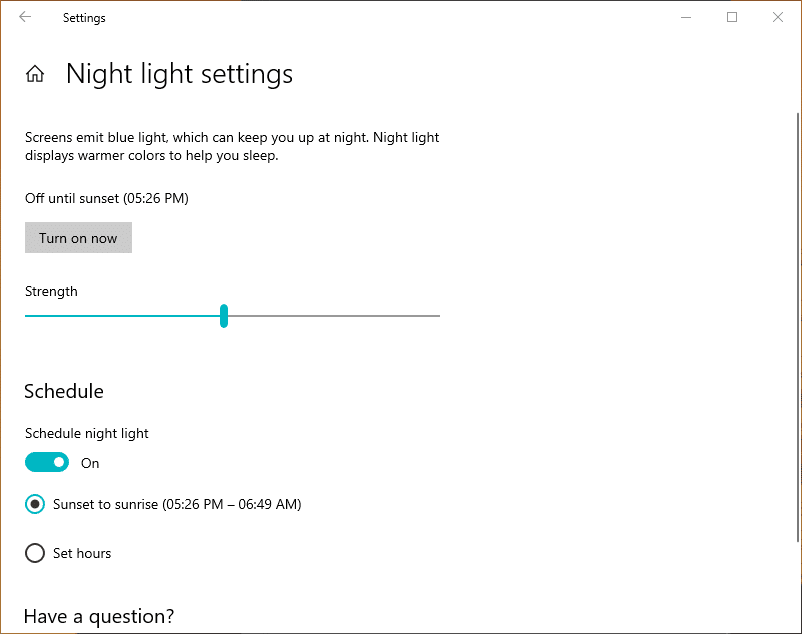
- The Blue light settings page tells you that displays emit blue light, and Windows 10 can show warmer color to make it easier to sleep at night. Here, click on the Turn on now button if you haven’t done it already.
- After that, you can find the slider option to set the color temperature or strength of the blue light filter in Windows 10.
If you go all the way to 100%, your PCs screen will turn dark orange. So, it’s recommended to keep the strength near 50%.
- Furthermore, you can also schedule the Night Light feature to automatically kick in as the sun sets in your regions (requires you to enable location permissions).
- If you want, you can set custom hours for the Night Light feature to work.
So, guys, this how you can enable the blue light filter in Windows 10 and save your eyes. Now, if you don’t want to tweak any settings, you can also enable and disable the Night Light feature directly from the Action Center.

How to enable the blue light filter in Windows 7?
Microsoft’s old offerings, including Windows 7, Windows 8/8.1, don’t have any sort of eye saver mode built-in. But this doesn’t mean you can’t do anything about it.
You can download this highly useful app called F.lux that enables the blue light filter for PC running the older Windows versions. The app comes loaded with various features, including presets, color filters, to customize the blue light filter as per your needs.
You can also disable the filter for specific apps. For instance, when you’re editing images in Photoshop or Lightroom. The change in color temperature might affect your edit drastically.
Anyway, it’s a great tool, and you can even use it on your Windows 10 machine as well.
Did you find this Windows 10 tip interesting? Don’t forget to tell us your views and comments.
Also, check out our article on How To Fix Windows 10 Brightness Control Not Working Issue in detail here!
Frequently Asked Questions
1. Is blue light harmful?
Yes, blue light emitted from screens can prove to be harmful in the long term.
2. What is a blue light filter?
A blue light filter is a screen overlay that decreases the amount of blue light coming from a screen.
3. Is blue light filter good for eyes?
If you tend to have a lot of screen time, or use devices in a dark environment, blue light filter can prove to be quite useful.
Fossbytes co-founder and an aspiring entrepreneur who keeps a close eye on open source, tech giants, and security.
Get in touch with him by sending an email — [email protected]
Лучшие приложения, которые помогут снизить напряжение и усталость глаз при работе за компьютером.
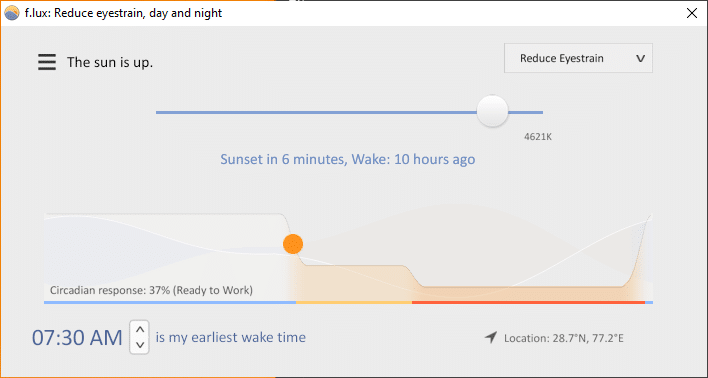
1. f.lux

- Платформы: macOS, Windows.
- Цена: бесплатно.
Популярная утилита, изменяющая цветовую температуру дисплея в сторону более тёплых оттенков, чтобы снизить негативное воздействие яркого белого свечения экрана, а также избежать нарушения циркадных ритмов и проблем с засыпанием.
Даже после появления функции Night Shift в macOS многие продолжают использовать f.lux из-за большего количества настроек и возможностей.
Попробовать f.lux →
2. Look Up

- Платформы: macOS.
- Цена: 229 рублей.
Look Up борется с усталостью глаз несколько иначе. Приложение заставляет периодически делать перерывы, используя правило «20−20−20», которое гласит, что каждые 20 минут нужно отрываться от экрана на 20 секунд и смотреть вдаль на 20 футов (около 6 метров).
Look Up автоматически ведёт отсчёт времени, остаётся лишь следовать рекомендациям. Кроме того, в приложении есть примеры растяжек, чтобы размять затёкшую спину.
Попробовать Look Up →
3. Stretchly

- Платформы: macOS, Windows.
- Цена: бесплатно.
Stretchly работает примерно по тому же принципу, что и предыдущее приложение. Через заданные промежутки времени оно разворачивается на весь экран, предлагая сделать перерыв и рекомендуя простые упражнения для глаз.
Помимо коротких двадцатисекундных перерывов, настроенных по умолчанию на каждые 10 минут, есть более долгие пятиминутные, которые предлагается делать каждые полчаса. В это время стоит пройтись, размяться или выйти на улицу.
Попробовать Stretchly →
4. EyeLeo

- Платформы: Windows.
- Цена: бесплатно.
Утилита EyeLeo также призвана снизить напряжение глазных мышц от постоянной работы за компьютером. Как и другие аналоги, она основана на системе коротких и долгих перерывов, во время которых симпатичный леопард предлагает отводить глаза от экрана и выполнять несложную гимнастику. Приложение полностью бесплатно и поддерживает работу с несколькими мониторами.
Попробовать EyeLeo →
5. Shady

- Платформы: macOS.
- Цена: бесплатно.
Миниатюрная утилита Shady создана специально для трудоголиков, которые засиживаются за работой до поздней ночи. С её помощью можно снизить мышечное напряжение глаз путём уменьшения яркости подсветки дисплея до минимального значения. Это достигается за счёт затемнения экрана, прозрачность которого можно настраивать, добиваясь необходимого эффекта.
Попробовать Shady →
6. Lumen
- Платформы: macOS.
- Цена: бесплатно.
Ещё одна утилита для полуночников, которая поможет защитить глаза при работе ночью. Она умеет автоматически регулировать уровень яркости дисплея в зависимости от преобладающих на экране цветов. Это будет очень полезно при переключении между браузером со светлым фоном и редактором кода с включённой ночной темой оформления. Lumen самообучается, запоминая предпочтения пользователя и затем повторяя эти действия.
Попробовать Lumen →
7. Shifty

- Платформы: macOS.
- Цена: бесплатно.
Эта утилита создана специально для пользователей macOS, которые предпочли для регулировки цветовой температуры экрана встроенную функцию Night Shift. С помощью Shifty можно расширить возможности ночного режима, изменять цвета, настраивать исключения для определённых приложений или отключать функцию на заданный период времени.
Попробовать Shifty →
Читайте также:
- Как защитить глаза при работе за компьютером →
- Гимнастика для глаз: 8 простых упражнений, которые вернут вам зоркость →
- 11 советов для здоровья глаз →
Microsoft has invested significantly in making Windows 10 a solid operating system for people with accessibility needs. A number of tools are built into the OS to make a PC easier to use when a user can’t hear or see what’s going on, and the Windows 10 upgrade is free for users who need these accessibility features. Now, Microsoft is baking in support for Windows 10 Eye Control for users who can’t use a standard keyboard and mouse, and we took a look at how well it works.
Beta support for eye control was introduced to Windows Insiders via preview build 16257. For now, support is limited to just one specific piece of eye tracking hardware, the Tobii Eye Tracker 4C, but that will change in the near future as support for more hardware options is added. For example, support is coming soon for the Tobii Dynavox PCEye Mini, PCEyePlus, EyeMobile Plus, and i-Series.
A number of key capabilities will be supported by Windows 10 Eye Control. These capabilities are focused on accessing applications, entering information, and communicating, and they add on to the eye tracking features that Tobii already brings to Windows 10.
How to use Eye Tracking in Windows 10
Eye Control Launchpad
The basic Windows 10 Eye Control user interface (UI) element is the launchpad, which allows users to simply look at icons to access the mouse, keyboard, and text-to-speech features as well as to move the launchpad to the top or bottom of the display. Interacting with the Eye Control UI is simple but requires some practice: just look at the screen and focus, or “dwell” as Microsoft calls it, on a button or other element until it engages. The system provides feedback throughout that lets you know what you’re doing.
The Eye Control mouse
Selecting the Eye Control mouse from the launchpad lets a user place the mouse cursor at a specific point on the screen and then make fine adjustments to its location. Then, users can emulate mouse actions including left-click, double left-click, and right-click, as well as cancel a particular mouse session.
Eye Control keyboard
Next up is the Eye Control keyboard, which lets a user enter information just by dwelling on individual keys. Letters, numbers, symbols, and function keys are all accessible, although for now, support is limited to the EN-US keyboard layout.
Eye Control shape-writing
The same shape-writing that’s supported via touch and mouse is also supported in Windows 10 Eye Control. A user can simply dwell on the first and last characters of a word and glancing at different letters to generate words. The system provides a hint of the predicted word, along with alternative predictions that can be selected if the initial hint was incorrect.
Eye Control text-to-speech
Finally, a user can use the text-to-speech feature to type words using either the standard keyboard or shape-writing, and the system will speak the resulting words and sentences aloud. In addition, phrases are available that can be immediately spoken aloud, and the displayed choices can be customized. The text-to-speech feature uses the default voices, which can be adjusted in Settings > Time & Language > Speech > Text-to-speech.

Setting up Windows 10 Eye Control
Getting eye tracking to work in build 16257 is fairly straightforward. First, install the Tobii Eye Tracker 4C using Tobii Core eye tracking hot fix release 2.10.11.6458. Follow all of the usual Tobii instructions to make sure your eye tracker is located properly. Then, calibrate the hardware and create a profile — the installation routine will automatically run you through the process.
Next, go to Settings > Update & Security and hit the “Check for updates” button. You should receive a new Tobii Eye Tracker HIDClass Driver, and it should automatically install.

Once that’s completed, simply go to Settings > Ease of Access > Other Options and toggle the switch under “Eye control (beta)” to On. You’ll see the Eye Control launchpad show up on your display.
Great in concept, but frustratingly buggy
In our experience, the Eye Control software is in an incredibly buggy state. We could indeed move the cursor around the screen, open the keyboard and select individual keys, and use the text-to-speech functionality. Mouse control was unusable, however, meaning that we couldn’t place our cursor in an input text box or actually select items on the display. If you’re a Windows Insider with a Tobii Eye Tracker 4C, then it’s certainly worth turning Eye Control on to get a sense of how things will work.
Ultimately, we got enough working that we could see the promise of Windows 10’s Eye Control once the bugs are worked out. The Tobii Eye Tracker 4C is a great device (especially for gaming) and, once calibrated, really does let you attain surprising precision just by looking at your screen. Once that precision is matched with stable software in Windows 10 Fall Creators Update, then the benefits will be profound for users who can’t use a traditional keyboard and mouse to control their PCs.