
Что такое wget?
Это утилита командной строки для получения файлов с использованием HTTP, HTTPS и FTP протоколов.
Как установить wget на компьютер с ОС Windows?
Вариант, которым пользуюсь сам, это скачать архив с уже скомпилированными бинарными файлами GNU Wget 0

После того как скачали архив, в любом месте создаём папку wget, например в C:\Program Files\wget и в эту папку распаковываем всё содержимое скачанного архива.
Чтобы программа свободно вызывалась отовсюду нужно добавить путь в переменную среды Path операционной системы Windows. Для этого заходим в Панель управления > Система

В зависимости какая разрядность у вашей установленной Windows, запускайте 32-битную либо 64-битную версию программы, wget либо wget64 соответственно.
Обратите внимание, что начиная с версии wget 1.20 прекращена поддержка Windows XP.
Примеры команд для wget:
Скачать файл с докачкой по протоколу http
wget -c http://ftp.byfly.by/pub/CentOS/8/isos/x86_64/CentOS-8.3.2011-x86_64-boot.iso
Скачать файл по протоколу https
wget --no-check-certificate https://www.linux.org.ru/images/7626/original.jpg
Скачать файл с докачкой по протоколу ftp
wget -c ftp://ftp.byfly.by/pub/CentOS/8/isos/x86_64/CentOS-8.3.2011-x86_64-boot.iso
Скачать с докачкой файлы по списку ссылок (в текстовом файле)
wget -c -i spisok.txt
Скачать рекурсивно указанный сайт
wget -rkx URL
Описание прочих команд смотрите во встроенной в программу помощи
wget -h
GNU Wget 1.20.3, программа для загрузки файлов из сети в автономном режиме.
Использование: wget [ПАРАМЕТР]... [URL]...

Обязательные аргументы для длинных параметров являются обязательными и для коротких параметров.

Запуск:
  -V,  --version           показать версию Wget и завершить работу
  -h,  --help              показать эту справку
  -b,  --background        после запуска перейти в фоновый режим
  -e,  --execute=КОМАНДА   выполнить команду в стиле <.wgetrc>

Журналирование и входной файл:
  -o,  --output-file=ФАЙЛ    записывать сообщения в ФАЙЛ
  -a,  --append-output=ФАЙЛ  дописывать сообщения в конец ФАЙЛА
  -d,  --debug               показать много отладочной информации
  -q,  --quiet               ничего не выводить
  -v,  --verbose             показывать подробные сведения (по умолчанию)
  -nv, --no-verbose          отключить вывод подробных сведений (не полностью)
       --report-speed=ТИП    единицы измерения пропускной способности
                             определить ТИПОМ. ТИП может быть равно bits
  -i,  --input-file=ФАЙЛ     загрузить URL-ы согласно локальному
                             или внешнему ФАЙЛУ
   --input-metalink=ФАЙЛ     скачать файлы, перечисленные в локальном
                             ФАЙЛЕ Metalink
  -F,  --force-html          считать, что входной файл - HTML
  -B,  --base=URL            считать, что ссылки из входного файла (-i -F)
                             указаны относительно URL
       --config=ФАЙЛ         задать файл настроек
       --no-config           не читать файлы настроек
       --rejected-log=ФАЙЛ   протоколировать причины отброса URL в ФАЙЛ

Загрузка:
  -t,  --tries=ЧИСЛО             установить ЧИСЛО повторных попыток
                                 (0 без ограничения)
       --retry-connrefused       повторять, даже если в подключении отказано
  -O,  --output-document=ФАЙЛ    записывать документы в ФАЙЛ
  -nc, --no-clobber              пропускать загрузки, которые приведут к
                                 загрузке уже существующих файлов
                                 (и их перезаписи)
       --no-netrc                  don't try to obtain credentials from .netrc
  -c,  --continue                возобновить загрузку частично загруженного
                                 файла
       --start-pos=СМЕЩЕНИЕ      начинать загрузку со СМЕЩЕНИЯ (считается с 0)
       --progress=ТИП            выбрать тип индикатора выполнения
       --show-progress           показывать индикатор выполнения в любом
                                 режиме подробности
  -N,  --timestamping            не загружать повторно файлы, только если они
                                 не новее, чем локальные
       --no-use-server-timestamps    не использовать проверку
                                 if-modified-since для запросов в режиме учёта
                                 меток времени
  --no-use-server-timestamps     не устанавливать метку времени локальному
                                 файлу, полученную с сервера
  -S,  --server-response         вывод ответа сервера
       --spider                  ничего не загружать
  -T,  --timeout=СЕКУНДЫ         установка значений всех тайм-аутов равными
                                 числу СЕКУНД
       --dns-servers=АДРЕСА      список запрашиваемых серверов DNS
                                 (через запятую)
       --bind-dns-address=АДРЕС  привязать определитель DNS к АДРЕСУ
                                 (имя компьютера или IP) локального компьютера
       --dns-timeout=СЕК         установка тайм-аута поиска в DNS в СЕК
       --connect-timeout=СЕК     установка тайм-аута подключения в СЕК
       --read-timeout=СЕК        установка тайм-аута чтения в СЕК
  -w,  --wait=СЕКУНДЫ            пауза в СЕКУНДАХ между загрузками
       --waitretry=СЕКУНДЫ       пауза в 1..СЕКУНДЫ между повторными
                                 попытками загрузки
       --random-wait             пауза в 0.5*WAIT...1.5*WAIT секунд
                                 между загрузками
       --no-proxy                явно выключить прокси
  -Q,  --quota=ЧИСЛО             установить величину квоты загрузки в ЧИСЛО
       --bind-address=АДРЕС      привязать АДРЕС (имя компьютера или IP)
                                 локального компьютера
       --limit-rate=СКОРОСТЬ     ограничить СКОРОСТЬ загрузки
       --no-dns-cache            отключить кэширование DNS-запросов
       --restrict-file-names=ОС  использовать в именах файлов символы,
                                 допустимые в ОС
       --ignore-case             игнорировать регистр при сопоставлении
                                 файлов и/или каталогов
  -4,  --inet4-only              подключаться только к адресам IPv4
  -6,  --inet6-only              подключаться только к адресам IPv6
       --prefer-family=СЕМЕЙСТВО подключаться сначала к адресам указанного
                                 семейства (может быть IPv6, IPv4 или ничего)
       --user=ПОЛЬЗОВАТЕЛЬ       установить и ftp- и http-пользователя в
                                 ПОЛЬЗОВАТЕЛЬ
       --password=ПАРОЛЬ         установить ftp- и http-пароль в ПАРОЛЬ
       --ask-password            запрашивать пароли
       --use-askpass=КОМАНДА     указать обработчик мандатов для запроса
                                 имени пользователя и пароля. Если
                                 КОМАНДА не указана, то используется
                                 переменная окружения WGET_ASKPASS
                                 или SSH_ASKPASS.
       --no-iri                  выключить поддержку IRI
       --local-encoding=КДР      использовать КДР как локальную кодировку
                                 для IRI
       --remote-encoding=КДР     использовать КДР как удалённую кодировку
                                 по умолчанию
       --unlink                  удалить файл перед затиранием
       --keep-badhash            оставлять файлы с неправильными
                                 контрольными суммами (добавляя .badhash)
       --metalink-index=НОМЕР    порядковый НОМЕР metaurl
                                 Metalink application/metalink4+xml
       --metalink-over-http      использовать метаданные Metalink из
                                 заголовка ответов HTTP
       --preferred-location      предпочитаемое расположение ресурсов Metalink

Каталоги:
  -nd, --no-directories           не создавать каталоги
  -x,  --force-directories        принудительно создавать каталоги
  -nH, --no-host-directories      не создавать каталоги как на узле
       --protocol-directories     использовать имя протокола в каталогах
  -P,  --directory-prefix=ПРЕФИКС сохранять файлы в ПРЕФИКС/..
       --cut-dirs=ЧИСЛО           игнорировать ЧИСЛО компонентов удалённого
                                  каталога

Параметры HTTP:
       --http-user=ПОЛЬЗОВ.    установить http-пользователя в ПОЛЬЗОВАТЕЛЬ
       --http-password=ПАРОЛЬ  установить http-пароль в ПАРОЛЬ
       --no-cache              отвергать кэшированные сервером данные
       --default-page=ИМЯ      изменить имя страницы по умолчанию (обычно
                               это )
  -E,  --adjust-extension      сохранять документы HTML/CSS с надлежащими
                               расширениями
       --ignore-length         игнорировать поле заголовка
       --header=СТРОКА         вставить СТРОКУ между заголовками
       --compression=TYPE          choose compression, one of auto, gzip and none. (default: none)
       --max-redirect          максимально допустимое число перенаправлений
                               на страницу
       --proxy-user=ПОЛЬЗОВ.   установить ПОЛЬЗОВАТЕЛЯ в качестве имени
                               пользователя для прокси
       --proxy-password=ПАРОЛЬ   установить ПАРОЛЬ в качестве пароля для
                               прокси
       --referer=URL           включить в HTTP-запрос заголовок
       --save-headers          сохранять HTTP-заголовки в файл
  -U,  --user-agent=АГЕНТ      идентифицировать себя как АГЕНТ вместо
                               Wget/ВЕРСИЯ
       --no-http-keep-alive    отключить поддержание активности HTTP
                               (постоянные подключения)
       --no-cookies            не использовать кукисы
       --load-cookies=ФАЙЛ     загрузить кукисы из ФАЙЛА перед сеансом
       --save-cookies=ФАЙЛ     сохранить кукисы в ФАЙЛ после сеанса
       --keep-session-cookies  загрузить и сохранить кукисы сеанса
                               (непостоянные)
       --post-data=СТРОКА      использовать метод POST; отправка СТРОКИ в
                               качестве данных
       --post-file=ФАЙЛ        использовать метод POST; отправка содержимого
                               ФАЙЛА
       --method=HTTPMethod     использовать метод  в заголовке
       --body-data=СТРОКА      отправка СТРОКИ в качестве данных;
                               ДОЛЖЕН быть указан параметр --method
       --body-file=ФАЙЛ        отправка содержимого ФАЙЛА;
                               ДОЛЖЕН быть указан параметр --method
       --content-disposition   учитывать заголовок Content-Disposition
                               при выборе имён для локальных файлов
                               (ЭКСПЕРИМЕНТАЛЬНЫЙ)
       --content-on-error      выводить принятые данные при ошибках сервера
       --auth-no-challenge     отправлять информацию об аутентификации
                               Basic HTTP не дожидаясь первого ответа
                               сервера

Параметры HTTPS (SSL/TLS):
       --secure-protocol=PR        choose secure protocol, one of auto, SSLv2,
                                     SSLv3, TLSv1, TLSv1_1, TLSv1_2 and PFS
       --https-only             переходить только по безопасным ссылкам HTTPS
       --no-check-certificate   не проверять сертификат сервера
       --certificate=FILE       файл сертификата пользователя
       --certificate-type=ТИП   тип сертификата пользователя: PEM или DER
       --private-key=ФАЙЛ       файл секретного ключа
       --private-key-type=ТИП   тип секретного ключа: PEM или DER
       --ca-certificate=ФАЙЛ    файл с набором CA
       --ca-directory=КАТ       каталог, в котором хранится список CA
       --crl-file=ФАЙЛ          файл с набором CRL
       --pinnedpubkey=ФАЙЛ/ХЭШИ  Файл с открытым ключом (PEM/DER) или любое
                                 количество хэшей sha256 в виде base64,
                                 начинающихся с  и разделённых <;>,
                                 по которым проверяется ответный узел

Параметры HSTS:
       --no-hsts               отключить HSTS
       --hsts-file             путь к базе данных HSTS (заменит значение
                               по умолчанию)

Параметры FTP:
       --ftp-user=ПОЛЬЗОВАТЕЛЬ установить ftp-пользователя в ПОЛЬЗОВАТЕЛЬ
       --ftp-password=ПАРОЛЬ   установить ftp-пароль в ПАРОЛЬ
       --no-remove-listing     не удалять файлы <.listing>
       --no-glob               выключить маски для имён файлов FTP
       --no-passive-ftp        отключить <пассивный> режим передачи
       --preserve-permissions  сохранять права доступа удалённых файлов
       --retr-symlinks         при рекурсии загружать файлы по ссылкам
                               (не каталоги)

Параметры FTPS:
       --ftps-implicit                 безусловно использовать FTPS (порт
                                       по умолчанию - 990)
       --ftps-resume-ssl               возобновлять сеанс SSL/TLS, начатый
                                       в канале управления, при открытии
                                       канала данных
       --ftps-clear-data-connection    шифровать только канал управления;
                                       данные не шифруются
       --ftps-fallback-to-ftp          вернуться к FTP, если FTPS не
                                       поддерживается сервером
Параметры WARC:
       --warc-file=ФАЙЛ          записать данные запроса/ответа в файл .warc.gz
       --warc-header=СТРОКА      вставить СТРОКУ в запись warcinfo
       --warc-max-size=ЧИСЛО     максимальный размер файлов WARC равен ЧИСЛУ
       --warc-cdx                записать индексные файлы CDX
       --warc-dedup=ФАЙЛ         не сохранять записи, перечисленные в файле CDX
       --no-warc-compression     не сжимать файлы WARC с помощью GZIP
       --no-warc-digests         не вычислять дайджесты SHA1
       --no-warc-keep-log        не сохранять файл журнала в записи WARC
       --warc-tempdir=КАТАЛОГ    расположение для временных файлов,
                                 создаваемых процедурой записи WARC

Рекурсивная загрузка:
  -r,  --recursive          включение рекурсивной загрузки
  -l,  --level=ЧИСЛО        глубина рекурсии (inf и 0 - бесконечность)
       --delete-after       удалять локальные файлы после загрузки
  -k,  --convert-links      делать ссылки локальными в загруженном
                            HTML или CSS
       --convert-file-only  преобразовывать только файловую часть URL
                            (базовую часть имени)
  --backups=N               перед записью файла X, ротировать до N
                            резервных файлов
  -K,  --backup-converted   перед преобразованием файла X делать резервную
                            копию в виде X.orig
  -m,  --mirror             короткий параметр, эквивалентный
                            -N -r -l inf --no-remove-listing
  -p,  --page-requisites    загрузить все изображения и проч., необходимые
                            для отображения HTML-страницы
       --strict-comments    включить строгую (SGML) обработку комментариев
                            HTML

Разрешения/запреты при рекурсии:
  -A,  --accept=СПИСОК             список разрешённых расширений
                                   через запятую
  -R,  --reject=СПИСОК             список запрещённых расширений,
                                   разделённых запятыми.
       --accept-regex=РЕГВЫР       регулярное выражение для разрешённых URL
       --reject-regex=РЕГВЫР       регулярное выражение для запрещённых URL
       --regex-type=ТИП            тип регулярного выражения (posix|pcre)
  -D,  --domains=СПИСОК            список разрешённых доменов,
                                   через запятую
       --exclude-domains=СПИСОК    список запрещённых доменов,
                                   через запятую
       --follow-ftp                следовать по ссылкам FTP в HTML-документах
       --follow-tags=СПИСОК        список используемых тегов HTML,
                                   через запятую
       --ignore-tags=СПИСОК        список игнорируемых тегов HTML,
                                   через запятую
  -H,  --span-hosts                заходить на чужие узлы при рекурсии
  -L,  --relative                  следовать только по относительным ссылкам
  -I,  --include-directories=СПИСОК список разрешённых каталогов
  --trust-server-names  использовать имя, указанное в перенаправляющем URL,
                        в качестве последнего компонента.
  -X,  --exclude-directories=СПИСОК список исключаемых каталогов
  -np, --no-parent                 не подниматься в родительский каталог
Linux wget: ваш загрузчик командной строки
Wget — это открыто распостраняемая утилита для загрузки файлов из интернет.
Он поддерживает HTTP, FTP, HTTPS и другие протоколы, а также средство аутентификации и множество других опций.
Если вы пользователь Linux или Mac, WGET либо уже включен в пакет, который вы используете, либо это простой случай установки из любого репозитория, который вы предпочитаете, с помощью одной команды.
Как установить команду wget в Linux
Используйте команду apt / apt-get, если вы работаете в Ubuntu / Debian / Mint Linux:
$ sudo apt install wget
Пользователь Fedora Linux должен ввести команду dnf
$ sudo dnf install wget
Пользователь RHEL / CentOS / Oracle Linux должен ввести команду yum :
$ sudo yum install wget
Пользователь SUSE / OpenSUSE Linux должен ввести команду zypper:
$ zypper install wget
Пользователь Arch Linux должен ввести команду pacman:
$ sudo pacman -S wget
К сожалению, в Windows все не так просто (хотя не так сложно!).
Для запуска WGET вам необходимо скачать, распаковать и установить утилиту вручную.
Установите WGET в Windows 10
Загрузите классическую 32-разрядную версию 1.14 здесь или перейдите в эту коллекцию двоичных файлов Windows на сайте Eternal Bored здесь, чтобы получить более поздние версии и более быстрые 64-разрядные сборки.
Вот загружаемый zip-файл для 64-разрядной версии 1.2.
Если вы хотите иметь возможность запускать WGET из любого каталога в терминале, вам нужно будет узнать о переменных пути в Windows, чтобы решить, куда копировать новый исполняемый файл. Если вы это сделаете, то сможете сделать WGET командой, которую можно запускать из любого каталога в командной строке, это отдельная тема по настройке Windows.
Запуск WGET из любого места
Во-первых, нам нужно определить, куда копировать WGET.exe.
Мы собираемся переместить wget.exe в каталог Windows, который позволит запускать WGET из любого места.
После того, как вы загрузили wget.exe (или распаковали связанные с ним zip-файлы дистрибутива), откройте командный терминал, набрав «cmd» в меню поиска и запустите командную строку.
Во-первых, нам нужно выяснить, в каком каталоге это должно быть. В командную строку введите:
path
Вы должны увидеть что-то вроде этого:

Благодаря переменной окружения “Path” мы знаем, что нам нужно скопировать wget.exe в папку c:\Windows\System32.
Скопируйте WGET.exe в каталог System32 и перезапустите командную строку.
Если вы хотите проверить правильность работы WGET, перезапустите терминал и введите:
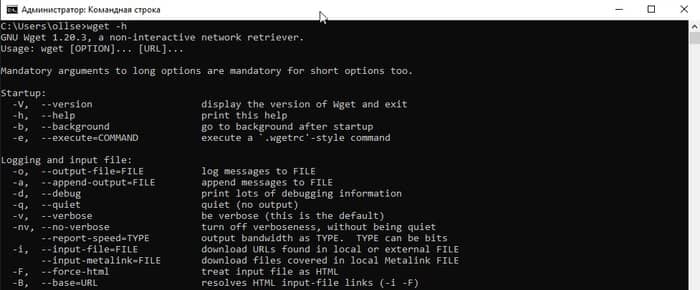
wget -h
Если вы скопировали файл в нужное место, вы увидите файл справки со всеми доступными командами.
Итак, вы должны увидеть что-то вроде этого:
Начнем работать с WGET
Мы будем работать в командной строке, поэтому давайте создадим каталог загрузок только для загрузок WGET.
Чтобы создать каталог, воспользуемся командой md («создать каталог»).
Перейдите в корневой каталог c: / и введите команду:
md wgetdown
Затем перейдите в новый каталог и введите «dir», и вы увидите (пустое) содержимое.

После того, как вы установили WGET и создали новый каталог, все, что вам нужно сделать, это изучить некоторые тонкости аргументов WGET, чтобы убедиться, что вы получаете то, что вам нужно.
Руководство Gnu.org WGET — особенно полезный ресурс для тех, кто действительно хочет узнать подробности.
Вот несколько советов, как извлечь из этого максимум пользы:
Linux wget примеры команд
Синтаксис:
wget url
wget [options] url
Давайте посмотрим на некоторые распространенные примеры команд Linux wget, синтаксис и использование.
WGET можно использовать для:
Скачать один файл с помощью wget
$ wget https://cyberciti.biz/here/lsst.tar.gz
Загрузить несколько файлов с помощью wget
$ wget https://cyberciti.biz/download/lsst.tar.gz ftp://ftp.freebsd.org/pub/sys.tar.gz ftp://ftp.redhat.com/pub/xyz-1rc-i386.rpm
Можно прочитать URL из файла
Вы можете поместить все URL в текстовый файл и использовать опцию -i, чтобы wget загрузил все файлы. Сначала создайте текстовый файл:
$ xed /temp/download.txt
Добавить список URL:
https://cyberciti.biz/download/lsst.tar.gz
ftp://ftp.freebsd.org/pub/sys.tar.gz
ftp://ftp.redhat.com/pub/xyz-1rc-i386.rpm
Введите команду wget следующим образом:
$ wget -i /temp/download.txt
Можно ограничить скорость загрузки
$ wget -c -o /temp/susedvd.log —limit-rate=50k ftp://ftp.novell.com/pub/suse/dvd1.iso
Используйте wget с сайтами, защищенными паролем
Вы можете указать http имя пользователя / пароль на сервере следующим образом:
$ wget —http-user=vivek —http-password=Secrete http://cyberciti.biz/vivek/csits.tar.gz
Другой способ указать имя пользователя и пароль — в самом URL.
$ wget ‘http://username:password@cyberciti.biz/file.tar.gz
Скачать все mp3 или pdf файлы с удаленного FTP сервера
$ wget ftp://somedom-url/pub/downloads/*.mp3
$ wget ftp://somedom-url/pub/downloads/*.pdf
Скачать сайт целиком
$ wget -r -k -l 7 -p -E -nc https://site.com/
Рассмотрим используемые параметры:
-r — указывает на то, что нужно рекурсивно переходить по ссылкам на сайте, чтобы скачивать страницы.
-k — используется для того, чтобы wget преобразовал все ссылки в скаченных файлах таким образом, чтобы по ним можно было переходить на локальном компьютере (в автономном режиме).
-p — указывает на то, что нужно загрузить все файлы, которые требуются для отображения страниц (изображения, css и т.д.).
-l — определяет максимальную глубину вложенности страниц, которые wget должен скачать (по умолчанию значение равно 5, в примере мы установили 7). В большинстве случаев сайты имеют страницы с большой степенью вложенности и wget может просто «закопаться», скачивая новые страницы. Чтобы этого не произошло можно использовать параметр -l.
-E — добавлять к загруженным файлам расширение .html.
-nc — при использовании данного параметра существующие файлы не будут перезаписаны. Это удобно, когда нужно продолжить загрузку сайта, прерванную в предыдущий раз.
По умолчанию wget загружает файл и сохраняет его с оригинальным именем в URL — в текущем каталоге.
Здесь я перечислил набор инструкций для WGET для рекурсивного зеркалирования вашего сайта, загрузки всех изображений, CSS и JavaScript, локализации всех URL-адресов (чтобы сайт работал на вашем локальном компьютере) и сохранения всех страниц как .html файл.
Чтобы скачать ваш сайт, выполните эту команду:
wget -r https://www.yoursite.com
Чтобы скачать сайт и локализовать все URL:
wget —convert-links -r https://www.yoursite.com
Чтобы создать полноценное оффлайн зеркало сайта:
wget —mirror —convert-links —adjust-extension —page-requisites —no-parent https://www.yoursite.com
Чтобы скачать сайт и сохранить файлы как .html:
wget —html-extension -r https://www.yoursite.com
Чтобы скачать все изображения в формате jpg с сайта:
wget -A «*.jpg» -r https://www.yoursite.com
Дополнительные сведения об операциях, связанных с конкретным типом файлов, можно найти в этой полезной ветке на Stack .
Установите другой пользовательский агент:
Некоторые веб-серверы настроены так, чтобы запрещать пользовательский агент WGET по умолчанию — по очевидным причинам экономии полосы пропускания. Вы можете попробовать изменить свой пользовательский агент, чтобы обойти это. Например, притворившись роботом Google:
wget —user-agent=»Googlebot/2.1 (+https://www.googlebot.com/bot.html)» -r https://www.yoursite.com
Wget режим «паук»:
Wget может получать страницы без их сохранения, что может быть полезной функцией, если вы ищете неработающие ссылки на веб-сайте. Не забудьте включить рекурсивный режим, который позволяет wget сканировать документ и искать ссылки для перехода.
wget —spider -r https://www.yoursite.com
Вы также можете сохранить это в файл журнала, добавив эту опцию:
wget —spider -r https://www.yoursite.com -o wget.log
wget -m -l 10 -e robots=off -p -k -E —reject-regex «wp» —no-check-certificate -U=«Mozilla/5.0 (Windows NT 10.0; Win64; x64) AppleWebKit/537.36 (KHTML, like Gecko) Chrome/68.0.3440.106 Safari/537.36» site-addr.com
Как найти неработающие ссылки на вашем сайте
wget —spider -r -nd -nv -H -l 2 -w 2 -o run1.log https://site.by
Наслаждайтесь использованием этого мощного инструмента, и я надеюсь, что вам понравился мой урок.

wget — консольная программа для загрузки файлов по сети. Wget как WWW робот. wput -полная противоположность программы wget. Программа может загружать файлы на FTP-серверы с помощью простого интерфейса командной строки, похожего на интерфейс wget. cURL альтернатива wget.
Скачать wget для Windows.
Часто употребляемы ключи утилиты wget, больше ключей смотрите в документации:
wget http://www.site.com/page15.html -O - | gzip > /path/to/local/file/`date +%d.%m.%y.%R`.html.gz
Скачивание файла Lite_PHP_BrowsCapINI и сохранение его под именем lite_php_browscap.ini в заданной директории
wget -c http://browscap.org/stream?q=Lite_PHP_BrowsCapINI -O /usr/share/lite_php_browscap.ini
Команда пригодится для переноса сайтов:
wget -mc --ftp-user='USER' --ftp-password='PASSWD' -o ./perenos.log ftp:// --restrict-file-names=nocontrol &
Скачать любой лендинг пейдж, сайт на WordPress и прочих платформах CMS, вместе со стилями CSS, изображениями, скриптами, шрифтами, текстовым контентом. Команда для консоли Windows cmd. Позволяет скачивать HTTPS сайты, Для примера, скачаем лендинг со сравнением хостингов https://wow2.top/land-compare-best-web-hosting-services/
wget --page-requisites -r -l 10 --no-check-certificate https://wow2.top/land-compare-best-web-hosting-services/
Вариант 2 (не тестировал):
wget —no-parent -nd -k -p -H -E -K —restrict-file-names=windows https://wow2.top/land-compare-best-web-hosting-services/
Читайте также: 8 способов копирования любого сайта целиком.
$ wget -i FILE
Мне понадобилось скачивать много картинок с вебсайтов, зная их URL. Делюсь тем как я это делаю под Windows 10.
-
Распаковать в директорию wget, в моем случае chdir /D d:\wget
-
В диалоговом окне «Выполнить» (Windows+R), набираем cmd, жмем выполнить
-
В cmd переходим в нужную директорию, при помощи команды
chdir /D d:\wget
-
создаем текстовый файл downloads.txt, каждая строка в которой это отедльный url
d:\wget>wget -i downloads.txt

Очень часто нужно перенести архив, который находится на Google Drive (Гугл Диске), на наш сервер через wget. Доступ к архиву должен быть открыт для всех, тогда команда сработает.
Пример, у нас есть ссылка:
https://drive.google.com/file/d/1OvKu1g79T7cIzMtNVnVPEr8etP7tiMaa/view?usp=sharing
Команда для скачивания архива c Google Drive:
export OUR_ID=1jP1go_8QFqdsoGkkBEGfMuZn5RBOb1vC

wget --load-cookies /tmp/cookies.txt "https://docs.google.com/uc?export=download&confirm=$(wget --quiet --save-cookies /tmp/cookies.txt --keep-session-cookies --no-check-certificate 'https://docs.google.com/uc?export=download&id=$OUR_ID' -O- | sed -rn 's/.*confirm=([0-9A-Za-z_]+).*/\1\n/p')&id=$OUR_ID" -O backup.zip && rm -rf /tmp/cookies.txt
где
📌 Удобный подбор VPS по параметрам доступен на DIEGfinder.com — официальном инструменте проекта DIEG. Это часть единой экосистемы, созданной для того, чтобы помочь быстро найти подходящий VPS/VDS сервер для любых задач хостинга.
📌 Для тестирования скриптов, установщиков VPN и Python-ботов рекомендуем использовать надежные VPS на короткий срок. Подробнее о быстрой аренде VPS для экспериментов — читайте здесь.
💥 Подпишись в Телеграм 💥 и задай вопрос по сайтам и хостингам бесплатно!
7 Самых Популярных Статей
- Как запустить скрипты и веб-приложения на Python
- Что такое страны TIER 1,2,3
- 7 способов сравнения файлов по содержимому в Windows или Linux
- Установка и тестирование веб-панели HestiaCP
- Китайский VPN Shadowsocks простая установка и настройка
- top, htop, atop определение загрузки ОС (Load average, LA)
- Использование rsync в примерах
7 Самых Популярных Обзоров
- ТОП 4 лучших антидетект браузеров (Бесплатные & Платные)
- Обзор Cloudways: Управляемый хостинг WordPress без головной боли
- Обзор и отзывы о PQ Hosting в 2024 году
- Хостинг в России
- Хостинг в Европе
- Обзор браузера Dolphin {anty} для мультиаккаунтинга
- Хостинг в Турции
WGET is a free tool to crawl websites and download files via the command line.
In this wget tutorial, we will learn how to install and how to use wget commands with examples.

What is Wget?
Wget is free command-line tool created by the GNU Project that is used todownload files from the internet.
- It lets you download files from the internet via FTP, HTTP or HTTPS (web pages, pdf, xml sitemaps, etc.).
- It provides recursive downloads, which means that Wget downloads the requested document, then the documents linked from that document, and then the next, etc.
- It follows the links and directory structure.
- It lets you overwrite the links with the correct domain, helping you create mirrors of websites.
What Is the Wget Command?
The wget command is a tool developed by the GNU Project to download files from the web. Wget allows you to retrieve content and files from web servers using a command-line interface. The name “wget” comes from “World Wide Web” and “get”. Wget supports downloads via FTP, SFTP, HTTP, and HTTPS protocols.
Wget is used by developers to automate file downloads.
Install Wget
To install wget on Windows, install the executable file from eternallybored.org. To install wget on Mac, use the brew install wget command on Mac. Make sure that it is not already installed first by running the wget -V command in the command line interface. For more details on how to install Wget, read one of the following tutorials.
- Install Wget on Mac
- Install Wget on Windows
- Install Wget on Linux
Downloading Files From the Command Line (Wget Basics)
Let’s look at the wget syntax, view the basic commands structure and understand the most important options.
Wget Syntax
Wget has two arguments: [OPTION] and [URL] .
wget [OPTION]... [URL]...
- [OPTION] tells what to do with the [URL] argument provided after. It has a short and a long-form (ex:
-Vand--versionare doing the same thing). - [URL] is the file or the directory you wish to download.
- You can call many OPTIONS or URLs at once.
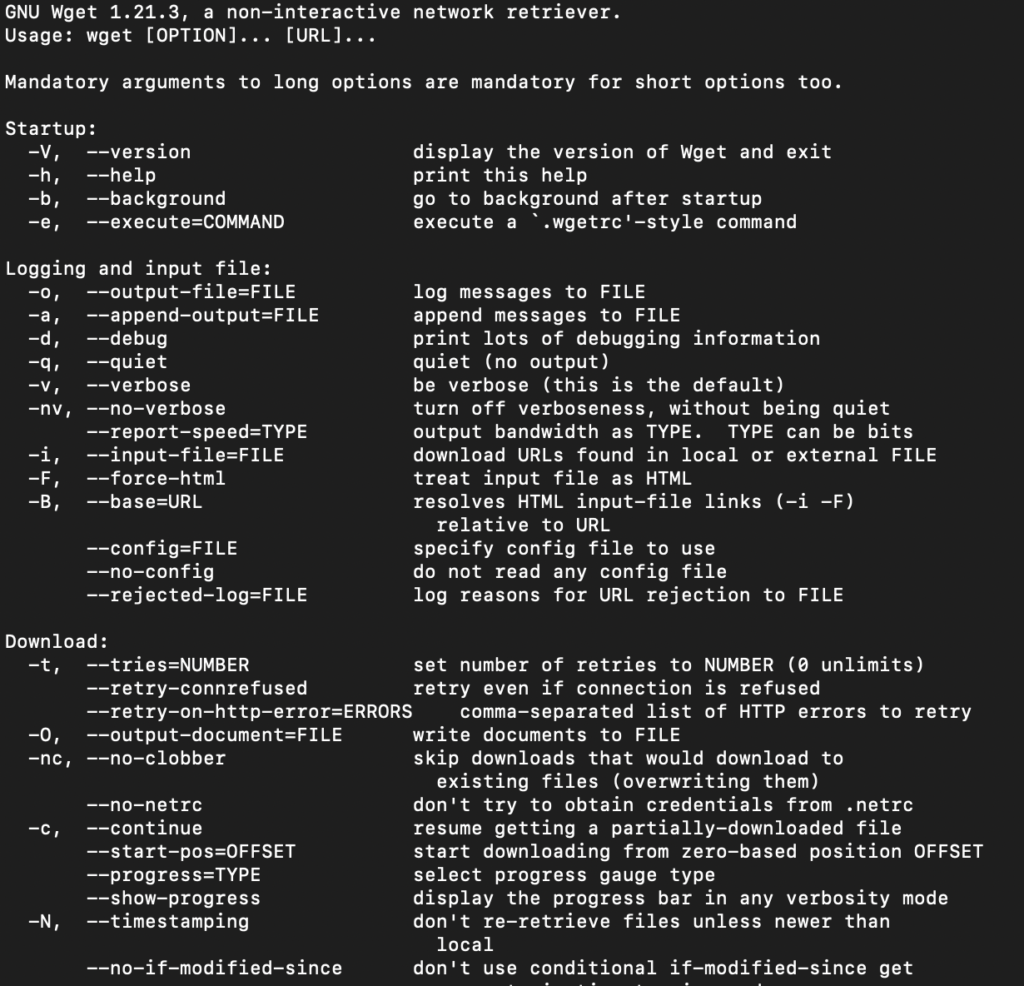
View WGET Arguments
To view available wget Arguments, use the wget help command:
The output will show you an exhaustive list of all the wget command parameters.
Here are the 11 best things that you can do with Wget:
- Download a single file
- Download a files to a specific directory
- Rename a downloaded files
- Define User Agent
- Extract as Googlebot
- Extract Robots.txt when it changes
- Convert links on a page
- Mirror a single page
- Extract Multiple URLs from a list
- Limit Speed
- Number of attempts
- Use Proxies
- Continue Interrupted Downloads
- Extract Entire Website
Download a single file with Wget
$ wget https://example.com/robots.txt
Download a File to a Specific Output Directory
Here replace <YOUR-PATH> by the output directory location where you want to save the file.
$ wget ‐P <YOUR-PATH> https://example.com/sitemap.xml
Rename Downloaded File when Retrieving with Wget
To output the file with a different name:
$ wget -O <YOUR-FILENAME.html> https://example.com/file.html
Define User Agent in WGET
Identify yourself. Define your user-agent.
$ wget --user-agent=Chrome https://example.com/file.html
Extract as Googlebot with Wget Command
$ wget --user-agent="Mozilla/5.0 (Linux; Android 6.0.1; Nexus 5X Build/MMB29P) AppleWebKit/537.36 (KHTML, like Gecko) Chrome/86.0.4240.198 Mobile Safari/537.36 (compatible; Googlebot/2.1; +http://www.google.com/bot.html)" https://example.com/path
Let’s extract robots.txt only if the latest version in the server is more recent than the local copy.
First time that you extract use -S to keep a timestamps of the file.
$ wget -S https://example.com/robots.txt
Later, to check if the robots.txt file has changed, and download it if it has.
$ wget -N https://example.com/robots.txt
Wget command to Convert Links on a Page
Convert the links in the HTML so they still work in your local version. (ex: example.com/path to localhost:8000/path)
$ wget --convert-links https://example.com/path
Mirror a Single Webpage in Wget
To mirror a single web page so that it can work on your local.
$ wget -E -H -k -K -p --convert-links https://example.com/path
Add all urls in a urls.txt file.
https://example.com/1
https://example.com/2
https://example.com/3
To be a good citizen of the web, it is important not to crawl too fast by using --wait and --limit-rate.
--wait=1: Wait 1 second between extractions.--limit-rate=10K: Limit the download speed (bytes per second)
Define Number of Retry Attempts in Wget
Sometimes the internet connection fails, sometimes the attempts it blocked, sometimes the server does not respond. Define a number of attempts with the -tries function.
$ wget -tries=10 https://example.com
How to Use Proxies With Wget?
To set a proxy with Wget, we need to update the ~/.wgetrc file located at /etc/wgetrc.
You can modify the ~/.wgetrc in your favourite text editor.
$ vi ~/.wgetrc # VI
$ code ~/.wgetrc # VSCode
And add these lines to the wget parameters:
use_proxy = on
http_proxy =  http://username:password@proxy.server.address:port/
https_proxy =  http://username:password@proxy.server.address:port/
Then, by running any wget command, you’ll be using proxies.
Alternatively, you can use the -e command to run wget with proxies without changing the environment variables.
wget -e use_proxy=yes -e http_proxy=http://proxy.server.address:port/ https://example.com
How to remove the Wget proxies?
When you don’t want to use the proxies anymore, update the ~/.wgetrc to remove the lines that you added or simply use the command below to override them:
Continue Interrupted Downloads with Wget
When your retrieval process is interrupted, continue the download with restarting the whole extraction using the -c command.
$ wget -c https://example.com
Recursive mode extract a page, and follows the links on the pages to extract them as well.
This is extracting your entire site and can put extra load on your server. Be sure that you know what you do or that you involve the devs.
$ wget --recursive --page-requisites --adjust-extension --span-hosts --wait=1 --limit-rate=10K --convert-links --restrict-file-names=windows --no-clobber --domains example.com --no-parent example.com
| Command | What it does |
|---|---|
| –recursive | Follow links in the document. The maximum depth is 5. |
| –page-requisites | Get all assets (CSS/JS/images) |
| –adjust-extension | Save files with .html at the end. |
| –span-hosts | Include necessary assets from offsite as well. |
| –wait=1 | Wait 1 second between extractions. |
| –limit-rate=10K | Limit the download speed (bytes per second) |
| –convert-links | Convert the links in the HTML so they still work in your local version. |
| –restrict-file-names=windows | Modify filenames to work in Windows. |
| –no-clobber | Overwrite existing files. |
| –domains example.com | Do not follow links outside this domain. |
| –no-parent | Do not ever ascend to the parent directory when retrieving recursively |
| –level | Specify the depth of crawling. |
$ wget --spider -r https://example.com -o wget.log
Wget VS Curl
Wget’s strength compared to curl is its ability to download recursively. This means that it will download a document, then follow the links and then download those documents as well.
Use Wget With Python
Wget is strictly command line, but there is a package that you can import the wget package that mimics wget.
import wget
url = 'http://www.jcchouinard.com/robots.txt'
filename = wget.download(url)
filename
Debugging: What to Do When Wget is Not Working
Wget Command Not Found
If you get the -bash: wget: command not found error on Mac, Linux or Windows, it means that the wget GNU is either not installed or does not work properly.
Go back and make sure that you installed wget properly.
Wget is not recognized as an internal or external command
If you get the following error
'wget' is not recognized as an internal or external command, operable program or batch file
It is more than likely that the wget package was not installed on Windows. Fix the error by installing wget first and then start over using the command.
Otherwise, it may also mean that the wget command is not not found in your system’s PATH.
Adding Wget to the System’s Path (Windows)
Adding the wget command to the system’s path will allow you to run wget from anywhere.
To add wget to the Windows System ‘s Path you need to copy the wget.exe file to the right directory.
- Download the wget file for Windows
- Press
Windows + Eto open File Explorer. - Find where you downloaded
wget.exe(e.g. Downloads folder) - Copy the
wget.exefile - Paste into the System Directory (System32 is already in your system’s path)
- Go to
C:\Windows\System32. - Paste your
wget.exefile into your System32 folder
- Go to
wget: missing URL
The “wget: missing URL” error message occurs when you run the wget command without providing a URL to download.
One of the use cases that I have seen this is when users used flags without the proper casing.
$ wget -v
# wget: missing URL
Above the casing of the v flag should not be lowercase, but uppercase.
Or use the verbose way of calling it with the double-dash and full name.
$ wget --version
# No error
Alternatives to Wget on Mac and Windows
You can use cURL as an alternative of Wget command line tool. It also has to be installed on Mac, Linux and Windows.
Wget for Web Scraping
By allowing you to download files from the Internet, the wget command-line tool is incredibly useful in web scraping. It has a set of useful features that make web scraping easy:
- Batch Downloading:
wgetallows you to download multiple files or web pages in a single command. - Recursive Downloading: the
--recursiveflag inwgetallows you to follow links and download an entire website - Retries:
wgetis designed to handle unstable network connections and interruptions and retry failed extractions - Command-line options: Options are available to improve scraping capabilities (download speed, User-Agent headers, cookies for authentication, etc.).
- Header and User-Agent Spoofing: To avoid being blocked by websites when web scraping,
wgetallows you to change the User-Agent header to make your requests appear more regular users. - Limiting Server Load: By using the
--waitand--limit-rateoptions, you can control the speed at whichwgetfetches data.
About Wget
| Wget was developed by | Hrvoje Nikšić |
| Wget is Maintained by | Tim Rühsen and al. |
| Wget Supported Protocols | HTTP(S), FTP(S) |
| Wget was Created In | January 1996 |
| Installing Wget | brew install wget |
| Wget Command | wget [option]…[URL]… |
Wget FAQs
What is Wget Used For?
Wget is used to download files from the Internet without the use of a browser. It supports HTTP, HTTPS, and FTP protocols, as well as retrieval through HTTP proxies.
How Does Wget Work?
Wget is non-interactive and allows to download files from the internet in the background without the need of a browser or user interface. It works by following links to create local versions of remote web sites, while respecting robots.txt.
What is the Difference Between Wget and cURL?
Both Wget and cURL are command-line utilities that allow file transfer from the internet. Although, Curl generally offers more features than Wget, wget provide features such as recursive downloads.
Can you Use Wget With Python?
Yes, you can run wget get in Python by installing the wget library with $pip install wget
Does Wget Respect Robots.txt?
Yes, Wget respects the Robot Exclusion Standard (/robots.txt)
Is Wget Free?
Yes, GNU Wget is free software that everyone can use, redistribute and/or modify under the terms of the GNU General Public License
What is recursive download?
Recursive download, or recursive retrieval, is the capacity of downloading documents, follow the links within them and finally downloading those documents until all linked documents are downloaded, or the maximum depth specified is reached.
How to specify download location in Wget?
Use the -P or –directory-prefix=PREFIX. Example: $ wget -P /path <url>
Conclusion
This is it.
You now know how to install and use Wget in your command-line.
SEO Strategist at Tripadvisor, ex- Seek (Melbourne, Australia). Specialized in technical SEO. Writer in Python, Information Retrieval, SEO and machine learning. Guest author at SearchEngineJournal, SearchEngineLand and OnCrawl.
Home » KB » SysAdmin » How to Use wget Command With Examples
wget is a free GNU command-line utility tool used to download files. It retrieves files using HTTP, HTTPS, and FTP protocols and is useful for downloads in unstable networks.
In this article, you will learn how to use the wget command with examples.

Requirements
- A Linux system (this tutorial uses Ubuntu 22.04).
- Access to the terminal.
What Is wget?
wget is a tool that sustains file downloads in unstable and slow network connections. If a network problem occurs during a download, this software resumes file retrieval without starting from scratch.
Another useful feature is performing recursive downloads. wget transfers not only individual files but also entire directory structures by following links. As a result, the tool creates local copies of entire web pages, maintaining their structure and content.
The wget command is highly flexible and works in terminals, scripts, and cron jobs. The user does not have to be active or logged in during the download.
The following text lists some crucial benefits and risks of using wget.
Benefits of wget
The wget tool has many features and benefits. Some of them are listed below:
- Resuming downloads.
wgetsupports the ability to resume interrupted downloads. This feature is useful for large files or unstable connections. - Bandwidth control.
wgetallows users to limit bandwidth usage during downloads, enabling better management of network resources. - Versatility. The tool handles protocols such as HTTP, HTTPS, and FTP, making it versatile for downloading content from different sources.
- Scriptability. Using the command in a CLI makes integrating into scripts or automated workflows for repetitive tasks easy.
Risks of Using wget
While wget offers features for uninterrupted and easy downloads, there are some risks you should be aware of:
- Unintended downloads. The tool sometimes inadvertently downloads large volumes of data or entire websites if not used cautiously.
- Server overload. Careless utilization of
wget, particularly with recursive downloads, burdens servers excessively, potentially breaching website usage guidelines. - Security issues. Employing
wgetto retrieve content from dubious sources or via maliciously constructed URLs exposes systems to security threats like malware or phishing schemes. - Incomplete mirroring. Recursive downloads sometimes don’t capture dynamically generated content or interactive elements, leading to incomplete local replicas of websites.
- Legal concerns: The use of
wgetfor specific content types sometimes infringes upon copyright or intellectual property rights.
How to Check if wget Is Installed
The wget package is most likely already on the system, as it often comes pre-installed.
To check the tool is available on your system, run the command without any options:
wgetIf wget is already installed, the output shows the command is missing a URL:

Otherwise, the output looks like this if wget is not installed:
How to Install wget
If the output shows the tool is not installed on your system, you can install it manually. Below are the installation instructions for Ubuntu/Debian, CentOS, Windows, and MacOS.
Install wget on Ubuntu/Debian
Before installing wget on Ubuntu, update the repository with:
sudo apt update
Next, install the tool on Ubuntu or Debian releases with:
sudo apt install wget
Install wget on CentOS/Fedora
To install wget on CentOS or Fedora, type the following command:
sudo yum install wget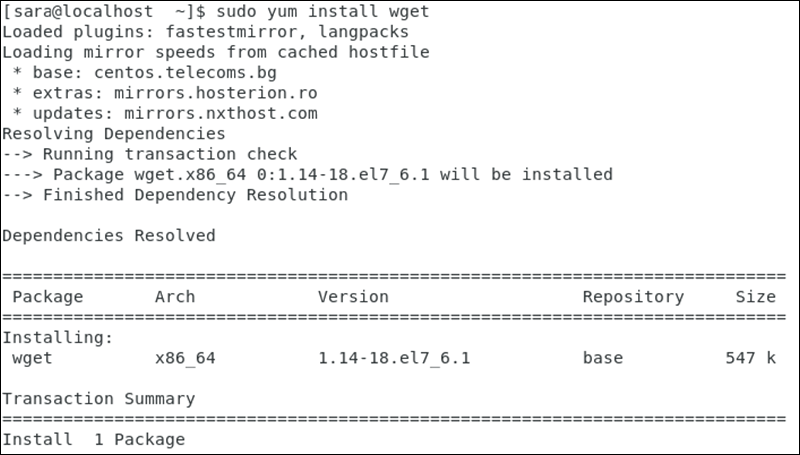
Install wget on Windows
To install and configure wget on Windows:
1. Download wget for Windows and install the package.
2. Copy and paste the wget.exe file to the system32 folder.

3. Run wget in CMD.

The output shows wget is installed.
Install wget on MacOS
To install wget on macOS, first install Homebrew, a package manager for macOS. The tool doesn’t come with the system by default.
After successful Homebrew installation, install wget with:
wget -V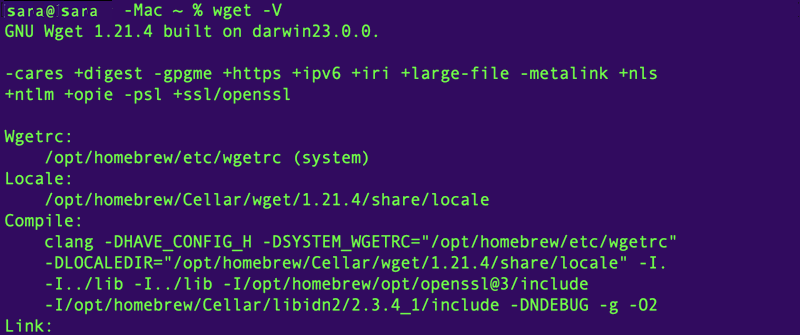
wget Syntax
The wget syntax has the following pattern:
wget [option] [url]wget can run with no options as long as the URL is provided. The command performs a basic download of the resource located at the URL, using default settings for the download process. However, using options allows users to modify the download process.
wget Options
The wget arguments specify how to download content from the URL. The most common wget options are in the table below.
| Option | Description |
|---|---|
-b, --background |
Goes to background immediately after startup. |
-q, --quiet |
Runs wget in quiet mode, suppressing output except for errors and essential messages. |
-d, --debug |
Turns on debug output. |
-O, --output-document=[file] |
Specifies the output file name. |
-e [command], --execute [command] |
Executes a command after the download completes. This is useful for performing additional actions, such as running a script. |
-v, --verbose |
Turns on verbose output with all the available data. The default output is verbose. |
-nv, --no-verbose |
Turns on verbose output with all the available data. The default output is verbose. |
-c, --continue |
Resumes downloading a partially downloaded file. |
-r, --recursive |
Enables recursive downloading. |
-P, --directory-prefix=[prefix] |
Specifies the directory where downloaded files are to be saved. |
-l, --level=[depth] |
Limits the recursion depth when downloading recursively. |
--limit-rate=[rate] |
Limits the download rate to the specified value. |
-R, --reject=[list] |
Specifies a comma-separated list of file extensions to reject during recursive downloads. |
-A, --accept=[list] |
Specifies a comma-separated list of file extensions to accept during recursive downloads. |
-i, --input-file |
Specifies a file containing a list of URLs wget downloads. |
-m, --mirror |
Downloads all of the website’s content recursively, including directories, subdirectories, and linked pages, while preserving the original directory structure. |
--tries=[number_of_tries] |
Sets the maximum number of retries for failed downloads when using wget. |
--no-check-certificate |
Disables SSL certificate verification when making HTTPS connections. |
U, --user-agent="user-agent-here" |
Allows users to specify a custom user agent string for HTTP requests. |
wget Examples
Due to an abundance of available options, wget has plenty of use-case scenarios. The following text presents some common wget practical examples.
Download File from Web
To download a file from the web, use:
wget [URL]For example, to download the file to install the Puppet server package on Ubuntu, enter:
wget https://apt.puppetlabs.com/puppet8-release-jammy.deb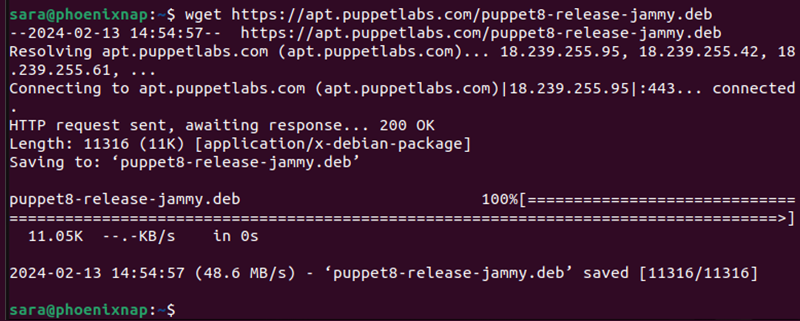
Download File and Specify a Name
To download a file and save it under a specified name, run:
wget -O [file_name] [URL]The wget command allows users to rename files before downloading them.
For example:
wget -O PuppetServer https://apt.puppetlabs.com/puppet8-release-jammy.deb
The command instructed to download the specified file and name it PupperServer.
Download File to Specific Directory
By default, wget downloads a file in the directory the user is in. To save the file in a different location, use:
wget -P [target_directory] [URL]For example, download the Puppet server to ./Documents with the following command:
wget -P ./Documents https://apt.puppetlabs.com/puppet8-release-jammy.deb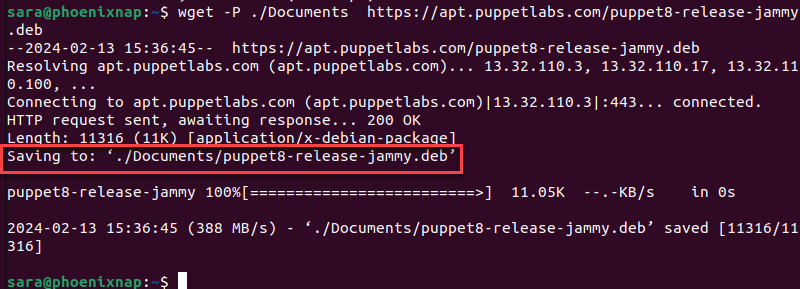
Set Download Speed
Set the download speed when downloading a big file so it does not use the full available bandwidth. The download speed is defined in kilobytes (k) and megabytes (m). Use the command:
wget --limit-rate [maximum_speed] [URL]For example, to get Python3 on Linux and limit the download speed to 1 megabyte, use the command:
wget --limit-rate 1m https://www.python.org/ftp/python/3.12.1/Python-3.12.1.tgz
Continue Download After Interruption
Instead of having to start from scratch, wget is able to resume downloading where it stopped before the interruption. This is a useful feature if there is a loss of connection while downloading a file.
The syntax is:
wget -c [URL]For instance, the download of the script for Pip installation has stopped:
wget https://raw.githubusercontent.com/nvm-sh/nvm/v0.39.7/install.sh | bash
To resume installation, run:
wget -c https://raw.githubusercontent.com/nvm-sh/nvm/v0.39.7/install.sh | bash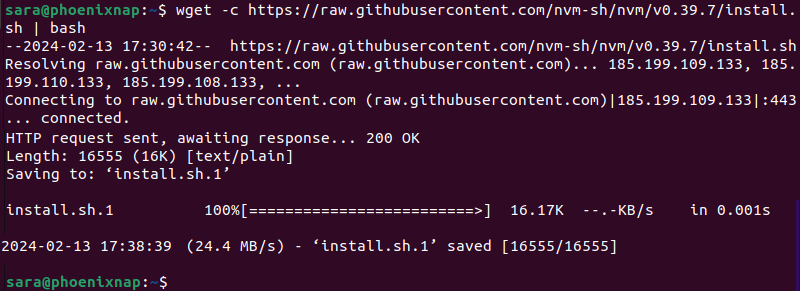
Download Multiple Files
wget allows downloading multiple files at the same time using the command:
wget -i [file_name]To do so, follow the steps outlined below:
1. First, create and open a file under the name MultipleDownloads.txt (or a name of your choice) using a text editor. In this case, we used Vim:
vim MultipleDownloads.txt2. Once in the editor, add the URLs of the packages you want to download, one per line.

3. Save and exit the file.
4. Run the wget command in the terminal window:
wget -i MultipleDownloads.txt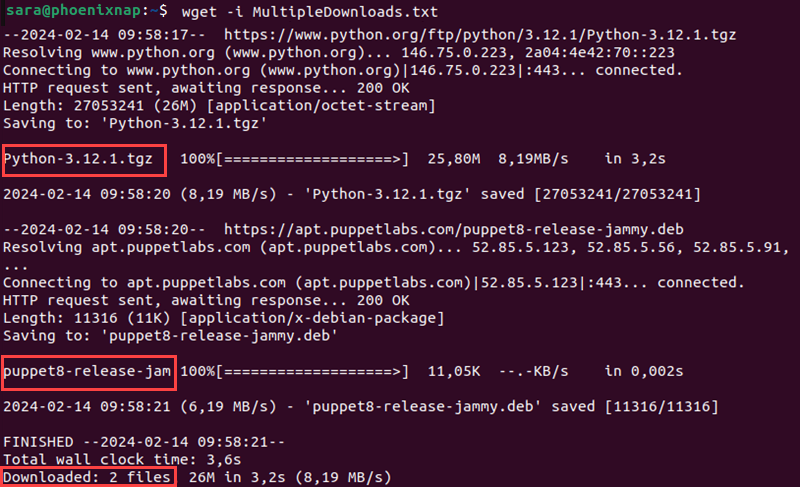
This prompts wget to download from each URL specified in the text file.
Download Web Page (Mirror Web page)
wget is able to download an entire website using the -m option. It prompts wget to create a specified website mirror. The basic command for doing so is:
wget -m [URL]For example:
wget -m https://phoenixnap.com
Download in Background
wget allows users to download in the background, a practical feature when dealing with a large file. The syntax is:
wget -b [URL]For instance, download Puppet in the background with:
wget-b https://apt.puppetlabs.com/puppet8-release-jammy.deb
Check the download status with the tail command:
tail -f wget-log
Increase Retry Attempts
Set how many times wget attempts to download a file after being interrupted by a network issue with this command:
wget --tries=[number_of_tries] [URL]By default, the number of retry attempts is set to 20.
Another option is to set the number to infinity with the values 0 or inf, as in the following example:
wget --tries=inf http://download.virtualbox.org/virtualbox/rpm/rhel/virtualbox.repo
Skip Certificate Check
By default, wget checks whether the server has a valid SSL/TLS certificate. If it does not identify an authentic certificate, it refuses to download.
The --no-check-certificate option avoids certificate authorities checking for a server certificate. However, utilize it only when assured of the website’s credibility. The syntax is:
wget --no-check-certificate [URL]If http://enteratonerisk.com has an untrusted certificate but doesn’t harm the system, download it with:
wget --no-check-certificate http://example.com
Change User Agent
When downloading a webpage, wget essentially emulates a browser. In some cases, the output shows a lack of permission to access the server, or the connection is forbidden. This is likely because a website blocks client browsers with a specific «User-Agent».
«User-Agent» is a header field the browser sends to the server it wants to access. Therefore, to download from a server refusing to connect, try to modify the user agent.
Find a database of all user agents online, find the one needed, and run the command:
wget --user-agent="User-Agent-Here" "[URL]"or
wget -U "User-Agent-Here" "[URL]"For example, to emulate Chrome (version 100), change the user agent with the command:
wget --user-agent=" Mozilla/5.0 (Windows NT 10.0; Win64; x64) AppleWebKit/537.36 (KHTML, like Gecko) Chrome/100.0.4884.135 Safari/537.36" "https://phoenixnap.com"
Note: Make sure to always download from a trusted source because wget can instruct a download of a script from a malicious source. We outline this and many other dangerous commands in our article 14 Dangerous Linux Terminal Commands.
Conclusion
After reading this article, you now know how to use the wget tool by following practical examples.
Next, learn how to fix the wget: command not found error.
Was this article helpful?
YesNo
