
-
Home
-
Partition Manager
- CMD List Drives: How to List Drives in Command Prompt? [Answered]
By Ariel | Follow |
Last Updated
Sometimes you may to need list all drives on your systems. How to list drives in CMD/PowerShell? This post of MiniTool provides a full guide on PowerShell/CMD list drives and a professional tool to manage your drives.
When formatting a drive or copying files from a drive to another drive, you may need to use the CMD or Windows PowerShell tool to list drives. However, many people don’t know how to list drives in Command Prompt or PowerShell, like a user from the superuser forum:
Is there a way to list the available drives from cmd.exe? (Other than manually typing c: d: …) and seeing which ones return errors.https://superuser.com/questions/139899/see-available-drives-from-windows-cli
How to List Drives in CMD
Command Prompt, also known as CMD, is the command-line interpreter in Windows operating system. You can input certain commands in the Command Prompt window to take corresponding actions. If you want to list drives of your systems, you can use the WMIC (Windows Management Instrumentation for Management) or Diskpart command.
List Drives CMD via WMIC:
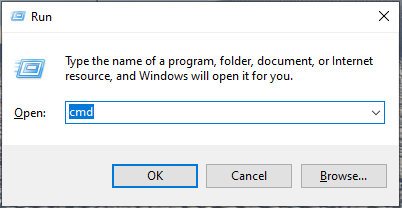
Step 1. Press Win + R keys to open the Run dialog box, and then type cmd in it and press Ctrl + Shift + Enter keys together to open the elevated Command Prompt window.
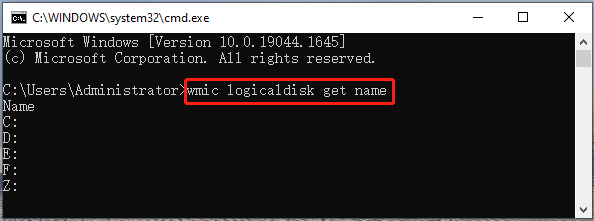
Step 2. To let CMD list drives, type one of the following commands and hit Enter.
- wmic logicaldisk get name
- wmic logicaldisk get caption
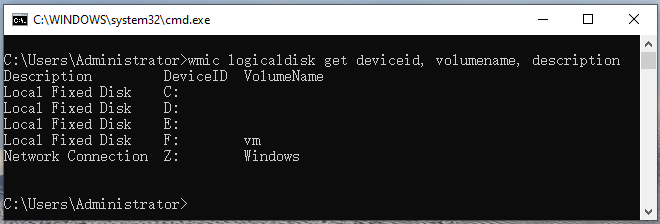
Step 3. If you want to display the Device ID and volume name, type the following command and hit Enter. Also, you can run the fsutil fsinfo drives command to list drives on your computer
wmic logicaldisk get deviceid, volumename, description
List Drives CMD via Diskpart:
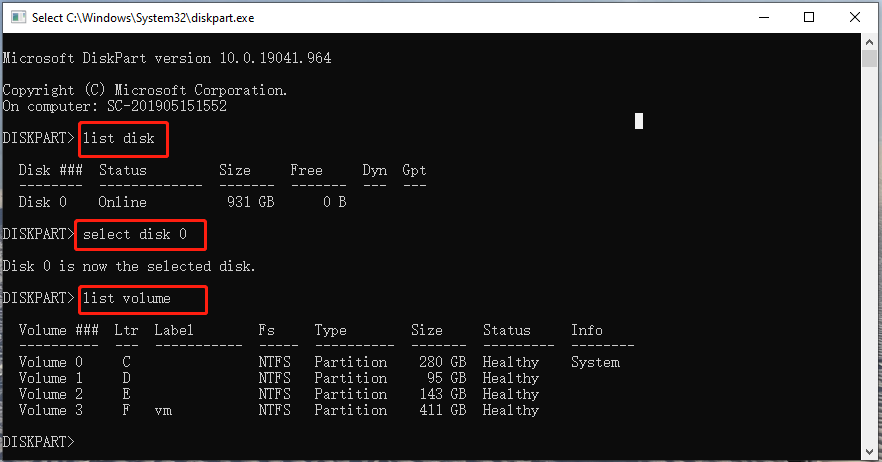
DiskPart is a disk partition management tool that uses command lines to perform operations. It can be used to list drives CMD as well. Here’s how to use it.
Step 1. Open the Command Prompt window again as we explained above.
Step 2. Type the following commands in order and hit Enter after each one. Then you will see a list of drives on the disk, including partition/volume number, label, letter, file system, size, and status.
- diskpart
- list disk
- select disk *
- list volume/list partition
How to List Drives in PowerShell
PowerShell is a command-line tool like CMD. Here you can let PowerShell list drives as well. To do so, follow the steps below:
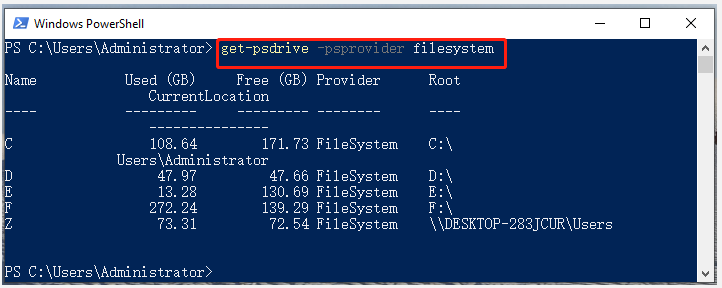
Step 1. Open the Run dialog box, and then type powershell in it and hit Enter.
Step 2. In the Windows PowerShell window, type the following command and hit Enter.
get-psdrive -psprovider filesystem
How to let PowerShell/CMD list drive letters? Now, I believe that you already have known the answer.
Better Choice Than PowerShell/CMD List Drives
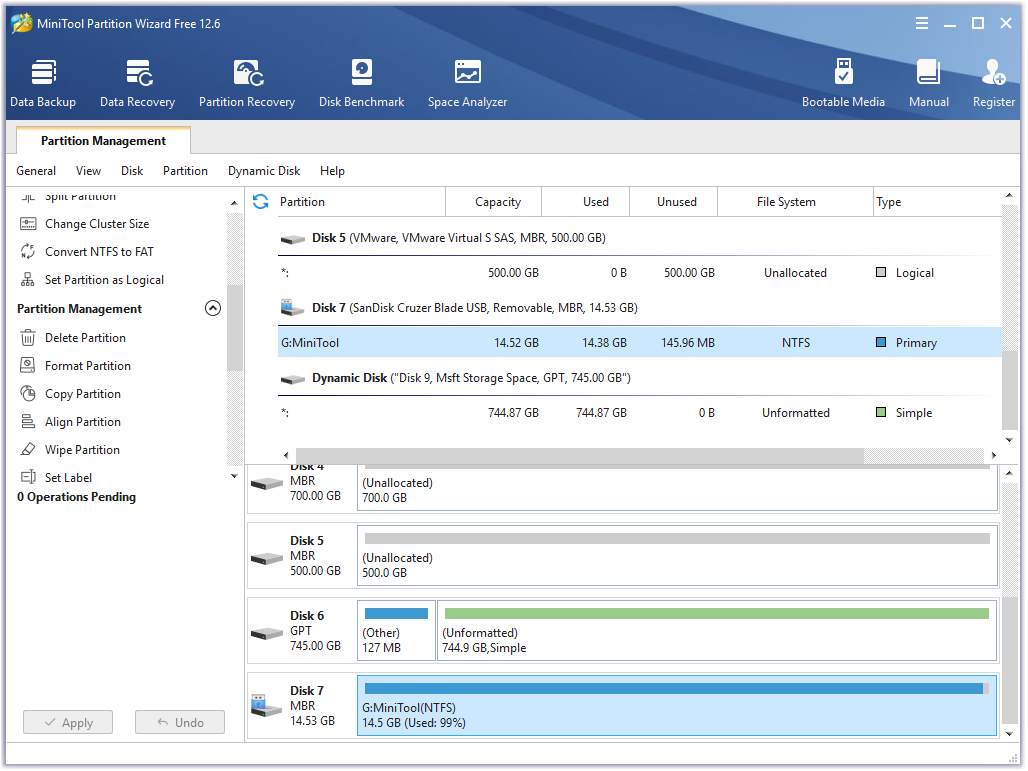
Although both of the two Windows tools can help you list drives, you may encounter some limitations to further managing drives/disks with them. For example, you can’t format a drive larger than 32GB to FAT32 using CMD. If you want to manage your hard disk or partitions more effectively, it’s highly recommended that you use a professional tool like MiniTool Partition Wizard.
MiniTool Partition Wizard DemoClick to Download100%Clean & Safe
It is a popular partition manager trusted by millions of users around the world. With this tool, you can not only obtain the drive information easily but do many other powerful tasks, including create/extend/move/format/wipe partition, convert NTFS to FAT32 without data loss, convert MBR to GPT, migrate OS, rebuild MBR, recover data, etc.
About The Author
Position: Columnist
Ariel has been working as a highly professional computer-relevant technology editor at MiniTool for many years. She has a strong passion for researching all knowledge related to the computer’s disk, partition, and Windows OS. Up till now, she has finished thousands of articles covering a broad range of topics and helped lots of users fix various problems. She focuses on the fields of disk management, OS backup, and PDF editing and provides her readers with insightful and informative content.
Содержание статьи:
- Перечень «сподручных» команд // CMD // Таблицы
- Для просмотра характеристик устройства, сведений о системе
- Для работы с сетью
- Для работы с дисками / флешками
- Для загрузки и восстановления Windows
- Общие операции
- 📌Дополнения
- Вопросы и ответы: 10
Доброго времени!
Ни для кого не секрет, что очень многие операции в Windows можно выполнять с помощью командной строки (на англ.: CMD). А в некоторых случаях — это, пожалуй, вообще единственный вариант решить вопрос!
Я в своих заметках тоже нередко обращаюсь к ней за помощью. 😉 И в сегодняшней статье, как раз, решил собрать все самые необходимые и популярные команды (думаю, в качестве небольшого сподручного материала, чтобы было куда сослаться «в трудную минуту», — она точно не помешает на блоге).
Заранее предупрежу:
- я не ставлю целью разобрать все команды! Только основное, что часто приходиться делать;
- часть нижеперечисленных команд нужно выполнять с правами администратора (если оных прав не будет — вместо результата увидите сообщение похожее на «недостаточно прав, или настроена групповая политика»)!
*
*
Перечень «сподручных» команд // CMD // Таблицы
Для просмотра характеристик устройства, сведений о системе
👉 Также в помощь!
1) Программы для проверки и мониторинга температуры процессора, видеокарты, диска
2) Как узнать характеристики компьютера, ноутбука
| № | Команда (скопировать в окно CMD и нажать Enter) | Описание команды / результат ее выполнения |
| 1 | systeminfo | Покажет информацию о системе: версию ОС Windows, модель компьютера (ноутбука), владельца, версию BIOS, кол-во ОЗУ, домен (рабочую группу), имя ПК, сетевые адаптеры и пр. |
| 2 | wmic cpu get name | Узнать модель ЦП (примерный ответ: «AMD Ryzen 3 5300U with Radeon Graphics.»). Др. способы. |
| 3 | wmic bios get serialnumber | Серийный номер устройства (ноутбука, например). |
| 4 | wmic baseboard get product
wmic baseboard get version |
Модель мат. платы / ее версия. |
| 5 | wmic bios get SMBIOSBIOSVersion | Версия BIOS. |
| 6 | wmic path win32_VideoController get name | Название видеокарты (др. способы). |
| 7 | wmic path win32_VideoController get VideoModeDescription | Разрешение экрана, цвета. |
| 8 | wmic OS get Caption,OSArchitecture,Version | Информация о Windows. |
| 9 | wmic DISKDRIVE get Caption | Информация о накопителях. |
| 10 | wmic /namespace:\\root\wmi PATH MSAcpi_ThermalZoneTemperature get CurrentTemperature | Посмотреть температуру ЦП (для перевода в градусы Цельсия — полученное значение нужно разделить на 10 и отнять 273,15). |
| 11 | Winver
или Ver |
Показать окно с версией установленной системы.
-//- Отобразить версию ОС прямо в окне CMD. |
| 12 | Hostname | Узнать текущее имя ПК. |
| 13 | wmic path softwarelicensingservice get OA3xOriginalProductKey | Команда покажет текущий лиценз. ключ Windows. |
| 14 |
|
Отображение сведений о лицензии (подробно, кратко). |
*
Для работы с сетью
👉 В помощь!
Коллекция заметок по настройки сети и интернета на компьютере.
| № | Команда (скопировать в окно CMD и нажать Enter) | Описание команды / результат ее выполнения |
| 1 | ipconfig /all | Показывает сетевые настройки для сетевых адаптеров (IP-адрес, MAC-адрес, и пр.). |
| 2 | ping ya.ru
или ping ya.ru -t |
Определение пинга до ресурса www.ya.ru (разумеется, адрес можно указать свой).
Примечание: второй вариант команды (с наличием на конце -t) запускает безостановочную проверку. |
| 3 | GETMAC | Посмотреть MAC-адрес. |
| 4 | nslookup ya.ru | Покажет IP-адрес по доменному имени. |
| 5 | netsh wlan set autoconfig enabled=no interface=»Wi-Fi»
Обратная операция: netsh wlan set autoconfig enabled=yes interface=»Wi-Fi» |
Выключает авто-поиск сетей по Wi-Fi (в некоторых случаях это увел. скорость работы Wi-Fi подключения, и снижает пинг!).
Примечание: вместо «Wi-Fi» нужно указать название своего адаптера, используемого для подключения по Wi-Fi. |
| 6 | netcfg -d
или
|
Сброс сетевых настроек.* |
| 7 | netsh wlan show all | Просмотреть всю информацию о беспроводных устройствах. |
| 8 | netsh wlan show drivers | -//- о драйверах. |
| 9 | netstat -abno | Информация о текущих подключениях и состоянии портов. |
*
Для работы с дисками / флешками
👉 В помощь!
1) Восстановление работы флешки (прошивка) / восстановление пропавших и удаленных файлов с флешки/диска;
2) Лучшие программы для работы с накопителями (флешками, HDD, SSD и пр.).
| № | Команда (скопировать в окно CMD и нажать Enter) | Описание команды / результат ее выполнения |
| 1 | chkdsk v: /f | Проверка диска на ошибки (вместо V — нужно указать свою букву диска).
Рекомендуется запускать после некорректного выключения ПК, при ошибках чтения и пр. |
| 2 | diskmgmt.msc | Вызвать встроенную утилиту «управление дисками». |
| 3 | format E: /FS:exFAT /Q /V:fleska | Форматирование диска/флешки (быстрое). Где:
|
| 4 |
или
|
Запуск утилиты Diskpart (для работы с дисками) и просмотр информации о дисках (томах).
Первая команда покажет наличие всех физических дисков, вторая — всех томов на них. (для просмотра разделов: List Partition) |
| 5 | Вводить последовательно (по одной!)
|
Второй пример с Diskpart: смотрим все тома на дисках, выбираем первый из них (цифра «1» заменяема!), и присваиваем ему букву «R». |
| 6 | Вводить последовательно (по одной!)
|
Еще один пример с Diskpart: просмотр томов, выбор одного из них и полная его очистка. Будьте аккуратны с этой последовательностью команд, она удаляет информацию!
Кстати, после очистки диска (Diskpart, list disk, select disk 1, clean) его можно конвертировать: convert gpt (или convert mbr). |
| 7 | defrag /A /C /U /V | Анализ дисков на фрагментацию. |
| 8 | defrag C: /W /V | Дефрагментация диска «C», и вывод отчета по операции. |
| 9 | DEL /F «C:\111\Новый текстовый документ.txt» | Принудительное удаление файла * (нужно указать правильный путь до него).
Полезно в тех случаях, когда файл не удается удалить из проводника. |
| 9.1 | del /q /f /s %SYSTEMDRIVE%\*.log | Удаление всех Log-файлов с системного диска (вместо «.log» можно использовать и др. расширения). |
| 10 | RD /S «C:\111» | Удаление папки * (также нужно указать путь до нее). |
| 11 | VOL D: | Вывод серийного номера и названия диска. |
| 12 | wmic logicaldisk get name, VolumeName, Size, FileSystem, NumberOfBlocks, description | Получить информацию по всем подключенным дискам (объем, имя, тип и пр.). Более подробно тут. |
*
Для загрузки и восстановления Windows
📌 Примечание: если у вас не загружается Windows — командную строку можно вызвать с установочной флешки.
| № | Команда (скопировать в окно CMD и нажать Enter) | Описание команды / результат ее выполнения |
| 1 | chkdsk /x/f/r
можно и так: chkdsk D: /f |
Проверка текущего сист. диска на ошибки (/ либо проверка указанного диска). |
| 2 | sfc /scannow | Проверка целостности системных файлов. |
| 3 | BCDEDIT | Диспетчер загрузки Windows |
| 4 |
Затем, узнав том с Windows, использовать: bcdboot d:\windows |
Сначала узнаем том, на котором установлена Windows, затем восстанавливаем файлы загрузки. |
| 5 |
Затем ввести: bcdboot D:\windows /s Z: /f UEFI |
Сначала узнаем все тома дисков в системе.
Далее выбираем «ESP» том, он в 99-512 МБ (FAT32) (важно: вместо «2» нужно будет выбрать свой том). Затем присваиваем ему букву Z. Далее указываем букву тома с Windows (вначале мы узнали и ее тоже) и восстанавливаем файлы загрузки. |
| 6 | rstrui | Запуск утилиты для отката системы (если есть точки восстановления). |
| 7 | sysdm.cpl | Создать точку восстановления ОС в окне «Защита системы». |
| 8 | wmic.exe /Namespace:\\root\default Path SystemRestore Call CreateRestorePoint “MyRestorePoint”, 100, 7 | Создать точку восстановления системы в авто-режиме (без лишних вопросов). |
| 9 | bcdedit /set {default} safeboot minimal
или bcdedit /set {default} safeboot network |
Загрузка безопасного режима (можно вводить, загрузившись с установочной флешки). Полезная команда, если в обычном режиме Windows не загружается («лагает»).
—//— C поддержкой сети. * Важно: чтобы отменить загрузку в безопасном режиме — в рабочей Windows используйте команду: bcdedit /deletevalue {default} safeboot |
| 10 | msconfig | Конфигурация системы (здесь можно настроить запуск служб, автозагрузку ПО, режим загрузки ОС). |
| 11 | dism /online /export-driver /destination:F:\MyDrivers
Dism /online /Add-Driver /Driver:F:\MyDrivers /Recurse |
Первая команда создает копию драйверов, вторая — восстанавливает их из копии. Работает в Windows 10/11 (Net Framework 3.5). |
*
Общие операции
| № | Команда (скопировать в окно CMD и нажать Enter) | Описание команды / результат ее выполнения |
| 1 | Pause | Ставит на «паузу» выполнение последовательности команд, и ждет нажатия одной из кнопок клавиатуры. |
| 2 | net start | Просмотр списка запущенных служб. |
| 3 | net start WlanSvc
или net stop WlanSvc |
Запустить службу WlanSvc / остановить службу -//- |
| 4 | ASSOC | Просмотреть таблицу: расширение (например, «.RAR») / программа, которая его открывает. |
| 5 | DATE | Просмотр и установка даты (полезно, когда не работают параметры ОС).
В помощь: настройка даты и времени в Windows. |
| 6 | shutdown.exe -r -f -t 20 | Перезагрузка компьютера через 20 сек.
Прим.: время задается в секундах. В 1 часе = 3600 сек.! |
| 7 | shutdown /s /t 60 | Выключение компьютера через минуту.
Прим.: время задается в секундах. |
| 8 | TASKLIST
и доп. в помощь taskkill /F /IM explorer.exe & start explorer |
Просмотр всех выполняемых программ и служб.
Завершение процесса explorer.exe (проводник), и его запуск. Удобная штука, когда диспетчер задач «лагает», или вы в нем не можете «поймать» проводник. |
| 9 | wmic computersystem where name=»%computername%» call joindomainorworkgroup name=»homework» | Сменить рабочую группу текущему компьютеру (вместо «homework» — напишите свое название).
Необходима перезагрузка ПК! |
| 10 | wmic computersystem where name=»%computername%» call rename name=»newpc» | Сменить имя компьютеру (вместо «newpc» задайте свое имя ПК).
Необходима перезагрузка ПК! |
| 11 | powercfg -a
еще доп.: powercfg -h on powercfg -h off |
Просмотр режимов выкл. ПК (гибернация, сон и пр.).
*** Вкл. / откл. гибернацию. |
| 12 | start /high /D «C:\Games\World of Warcraft Classic» wow.exe | Запуск приложения с нужным приоритетом (в моем случае — высокий приоритет, который чаще всего и нужен). Часто помогает снизить тормоза в играх.
Более подробно о приоритетах тут. |
| 13 | xcopy C:\Games D:\backup /f /i /y /s | Копирует один каталог в другой (без лишних вопросов; с перезаписью файлов!).
Удобно использовать для создания резервных копий нужных папок. |
| 14 | dir C:\Fraps /B /S > initial_c.txt
dir c:\initial_c.txt /w/o/s/p |
Все файлы из папки C:\Fraps запишет в файл initial_c.txt.
Найдет все файлы на диске «C:» с названием «initial_c.txt». Найдет все файлы на диске «C:» с расширением «.txt». |
| 15 | more c:\Users\initial_c.txt
type c:\Users\initial_c.txt |
Прочитать и вывести содержимое текстового файла на экран. |
| 16 |
|
|
| 17 | HELP | Выводит справку по всем командам Windows. |
| 18 | EXIT | Выход из CMD. |
*
📌Дополнения
Показ скрытых файлов
Полезные команды для проводника (позволят отображать скрытые расширения, скрытые и системные файлы):
reg add «HKCU\Software\Microsoft\Windows\CurrentVersion\Explorer\Advanced» /v HideFileExt /t REG_DWORD /d 00000000 /f
reg add “HKCU\Software\Microsoft\Windows\CurrentVersion\Explorer\Advanced” /v Hidden /t REG_DWORD /d 1 /f
reg add “HKCU\Software\Microsoft\Windows\CurrentVersion\Explorer\Advanced” /v ShowSuperHidden /t REG_DWORD /d 0 /f
После выполнения команд — не забудьте перезагрузить проводник (ПК).
*
Как автоматизировать выполнение определенных команд
Например, вам требуется постоянно запускать игру с нужным приоритетом (чаще с высоким), или очищать какие-то папки от мусора (определенных файлов), или еще что…
В этом случае можно сделать так:
- создать 📌BAT-файл с нужными вам командами (по ссылке привел все нюансы его создания + примеры) и проверить — оценить, всё ли выполняется правильно после его запуска;
- настроить 📌планировщик заданий в Windows, чтобы запускать этот BAT-файл в нужное вам время, например, при каждом включении ПК / или в определенное время (скажем, по вторникам и четвергам с 14-00 до 16-00).
*
Что делать, если не загружается Windows
📌Вариант 1: воспользоваться другим рабочим компьютером и записать установочную флешку с Windows. Также не помешает и LiveCD-флешка (эта «штуковина» позволит загружать «полноценную» Windows с флешки, и, само собой, работать с командной строкой… Для восстановления загрузчика Windows — обратите внимание на эту табличку).
*
📌Вариант 2: воспользоваться телефоном (под Android) и записать на нем установочную флешку. Далее подключить ее к ПК, и загрузиться…
*
📌Кстати, открыть окно командной строки можно и с установочной флешки с Windows: достаточно загрузиться с нее и нажать сочетание Shift+F10. Далее можно выполнить многое из таблиц выше…
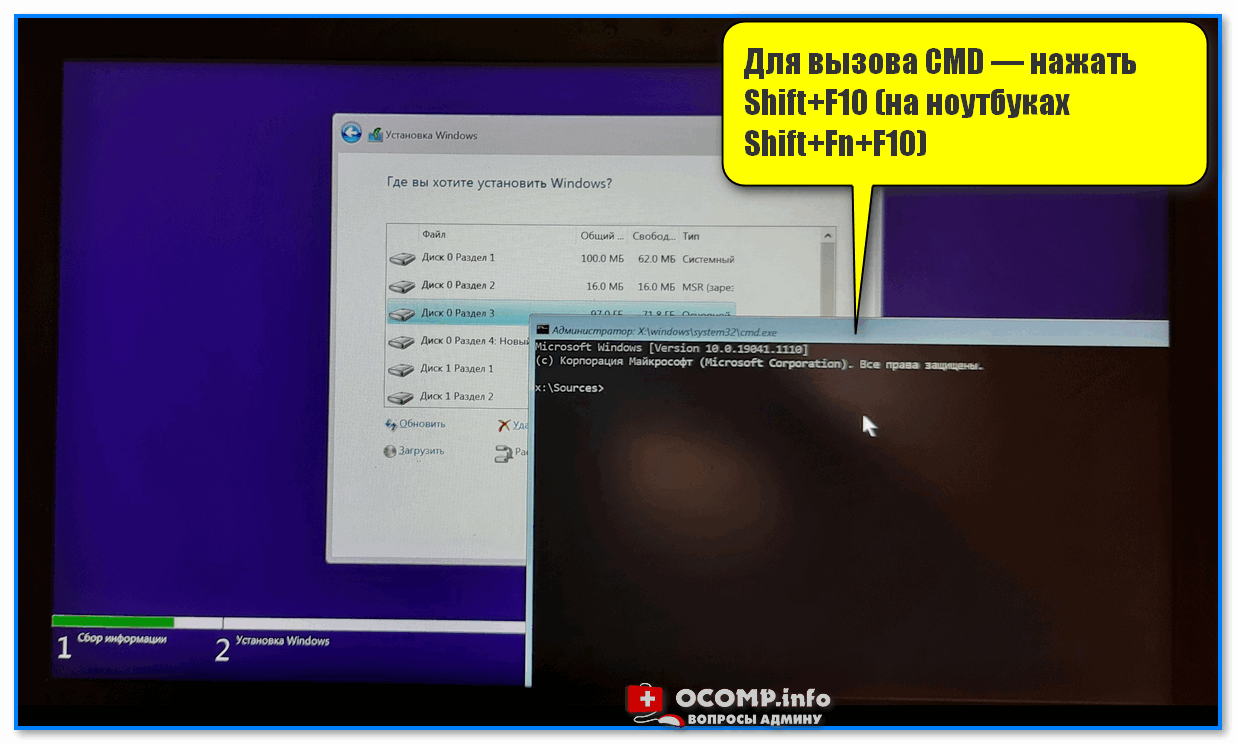
Установка Windows — запуск командной строки
*
📌 Рекомендую! Коллекция аварийных флешек, которую нужно иметь на экстренный случай (как раз, когда не загружается Windows).
*
На сим пока всё, дополнения приветствуются!
Успехов!
👋
If you need to obtain a list of all disk drives on a Microsoft Windows system
from a
command line interface (CLI), e.g., a command prompt window, you can do so using
Windows Management Instrumentation Command-line (WMIC). You can obtain
a list of drives by opening a
command prompt window and then issuing a wmic logicaldisk get command followed by parameters relevant to the information you
wish to see. You can see a list of parameter options by issuing the command
wmic logicaldisk get /?.
C:\>wmic logicaldisk get /?

Property get operations.
USAGE:

GET [<property list>] [<get switches>]
NOTE: <property list> ::= <property name> | <property name>,  <property list>

The following properties are available:
Property                                Type                    Operation
========                                ====                    =========
Access                                  N/A                     N/A
Availability                            N/A                     N/A
BlockSize                               N/A                     N/A
Caption                                 N/A                     N/A
Compressed                              N/A                     N/A
ConfigManagerErrorCode                  N/A                     N/A
ConfigManagerUserConfig                 N/A                     N/A
Description                             N/A                     N/A
DeviceID                                N/A                     N/A
DriveType                               N/A                     N/A
ErrorCleared                            N/A                     N/A
ErrorDescription                        N/A                     N/A
ErrorMethodology                        N/A                     N/A
FileSystem                              N/A                     N/A
FreeSpace                               N/A                     N/A
InstallDate                             N/A                     N/A
LastErrorCode                           N/A                     N/A
MaximumComponentLength                  N/A                     N/A
MediaType                               N/A                     N/A
Name                                    N/A                     N/A
NumberOfBlocks                          N/A                     N/A
PNPDeviceID                             N/A                     N/A
PowerManagementCapabilities             N/A                     N/A
PowerManagementSupported                N/A                     N/A
ProviderName                            N/A                     N/A
Purpose                                 N/A                     N/A
QuotasDisabled                          N/A                     N/A
QuotasIncomplete                        N/A                     N/A
QuotasRebuilding                        N/A                     N/A
Size                                    N/A                     N/A
Status                                  N/A                     N/A
StatusInfo                              N/A                     N/A
SupportsDiskQuotas                      N/A                     N/A
SupportsFileBasedCompression            N/A                     N/A
VolumeName                              N/A                     N/A
VolumeSerialNumber                      N/A                     N/A

The following GET switches are available:

/VALUE                       - Return value.
/ALL(default)                - Return the data and metadata for the attribute.
/TRANSLATE:<table name>      - Translate output via values from <table name>.
/EVERY:<interval> [/REPEAT:<repeat count>] - Returns value every (X interval) se
conds, If /REPEAT specified the command is executed <repeat count> times.
/FORMAT:<format specifier>   - Keyword/XSL filename to process the XML results.

NOTE: Order of /TRANSLATE and /FORMAT switches influences the appearance of outp
ut.
Case1: If /TRANSLATE precedes /FORMAT, then translation of results will be follo
wed by formatting.
Case2: If /TRANSLATE succeeds /FORMAT, then translation of the formatted results
 will be done.


C:\>
For example, the results from issuing the command on a Windows 10
system to display the device ID, volume name, and description are shown
below:
C:\>wmic logicaldisk get deviceid, volumename, description
Description       DeviceID  VolumeName
Local Fixed Disk  C:        OS
CD-ROM Disc       D:
CD-ROM Disc       E:
Removable Disk    F:        EMTEC


C:\>
In the above example, drive C: is the internal disk drive in the system
and drive F: is an 8 GB USB 2.0
flash
drive. If I only want to see a particular type of drive, e.g., only
internal disk drives or only removeable
USB-attached
drives, I can add a «where»
argument to the command and specify a drive type. The
values that can be used to specify drive types are shown below:
| Value | Description |
|---|---|
| 0 | Unknown |
| 1 | No Root Directory |
| 2 | Removable Disk |
| 3 | Local Disk |
| 4 | Network Drive |
| 5 | Compact Disc |
| 6 | RAM Disk |
For instance, if I only wanted to see local disks, e.g., the internal disk
drive in the system, I could use the command below, which would only show
drive C:
C:\>wmic logicaldisk where drivetype=3 get deviceid, volumename, description
Description       DeviceID  VolumeName
Local Fixed Disk  C:        OS


C:\>
If I only wanted to see removable disks, such as
USB flash drives, attached to the system, I could use the command below:
C:\>wmic logicaldisk where drivetype=2 get deviceid, volumename, description
Description     DeviceID  VolumeName
Removable Disk  F:        EMTEC


C:\>
If I use a drive type of 5, instead, I should see
compact disc (CD) drives.
C:\>wmic logicaldisk where drivetype=5 get deviceid, volumename, description
Description  DeviceID  VolumeName
CD-ROM Disc  D:
CD-ROM Disc  E:


C:\>
In the example above, thought the output shows two
CD-ROM
drives, the system doesn’t actually have any CD-ROM drives in it nor
externally attached to it. Instead, an Android phone is connected to the
Dell laptop by a USB cable and is being reported as drives D: and E:,
though if I attempt to view the contents of those drives, I see «the device
is not ready.»
C:\>dir d:
The device is not ready.

C:\>dir e:
The device is not ready.

C:\>
You can, of course, specify other parameters on the command line. E.g.,
you can request the media type be displayed by including mediatype as a parameter. The output will then show the type of media currently
present in the logical drive. The value may not be exact for removable drives
if currently there is no media in the drive. E.g.:
C:\>wmic logicaldisk where drivetype=2 get deviceid, volumename, description, mediatype
Description     DeviceID  MediaType  VolumeName
Removable Disk  F:                   EMTEC


C:\>wmic logicaldisk where drivetype=3 get deviceid, volumename, description, mediatype
Description       DeviceID  MediaType  VolumeName
Local Fixed Disk  C:        12         OS


C:\>
C:\>wmic logicaldisk where drivetype=5 get deviceid, volumename, description, mediatype
Description  DeviceID  MediaType  VolumeName
CD-ROM Disc  D:        11
CD-ROM Disc  E:        11


C:\>
The media type values are listed below:
- Format is unknown (0)
- 5¼-Inch Floppy Disk (1)
-
5 1/4-Inch Floppy Disk — 1.2 MB — 512 bytes/sector
- 3½-Inch Floppy Disk (2)
-
3 1/2-Inch Floppy Disk — 1.44 MB -512 bytes/sector
- 3½-Inch Floppy Disk (3)
-
3 1/2-Inch Floppy Disk — 2.88 MB — 512 bytes/sector
- 3½-Inch Floppy Disk (4)
-
3 1/2-Inch Floppy Disk — 20.8 MB — 512 bytes/sector
- 3½-Inch Floppy Disk (5)
-
3 1/2-Inch Floppy Disk — 720 KB — 512 bytes/sector
- 5¼-Inch Floppy Disk (6)
-
5 1/4-Inch Floppy Disk — 360 KB — 512 bytes/sector
- 5¼-Inch Floppy Disk (7)
-
5 1/4-Inch Floppy Disk — 320 KB — 512 bytes/sector
- 5¼-Inch Floppy Disk (8)
-
5 1/4-Inch Floppy Disk — 320 KB — 1024 bytes/sector
- 5¼-Inch Floppy Disk (9)
-
5 1/4-Inch Floppy Disk — 180 KB — 512 bytes/sector
- 5¼-Inch Floppy Disk (10)
-
5 1/4-Inch Floppy Disk — 160 KB — 512 bytes/sector
- Removable media other than floppy (11)
- Fixed hard disk media (12)
- 3½-Inch Floppy Disk (13)
-
3 1/2-Inch Floppy Disk — 120 MB — 512 bytes/sector
- 3½-Inch Floppy Disk (14)
-
3 1/2-Inch Floppy Disk — 640 KB — 512 bytes/sector
- 5¼-Inch Floppy Disk (15)
-
5 1/4-Inch Floppy Disk — 640 KB — 512 bytes/sector
- 5¼-Inch Floppy Disk (16)
-
5 1/4-Inch Floppy Disk — 720 KB — 512 bytes/sector
- 3½-Inch Floppy Disk (17)
-
3 1/2-Inch Floppy Disk — 1.2 MB — 512 bytes/sector
- 3½-Inch Floppy Disk (18)
-
3 1/2-Inch Floppy Disk — 1.23 MB — 1024 bytes/sector
- 5¼-Inch Floppy Disk (19)
-
5 1/4-Inch Floppy Disk — 1.23 MB — 1024 bytes/sector
- 3½-Inch Floppy Disk (20)
-
3 1/2-Inch Floppy Disk — 128 MB — 512 bytes/sector
- 3½-Inch Floppy Disk (21)
-
3 1/2-Inch Floppy Disk — 230 MB — 512 bytes/sector
- 8-Inch Floppy Disk (22)
-
8-Inch Floppy Disk — 256 KB — 128 bytes/sector
Related articles:
-
Obtaining the model number and serial number for a HDD from the command line
Date: October 13, 2015
MoonPoint Support -
Using wmic to get disk drive information
Date: July 10, 2015
MoonPoint Support
References:
-
Win32_LogicalDisk class
Microsoft Develper Network
Last Updated :
30 Nov, 2021
DiskPart is a powerful tool for disk management under Windows OS. Diskpart Command is used to manage the computer hard drive, partitions, and volumes. This Command is not only limited to Windows 10 but also available in Windows 8.1,8,7 or even in Windows 2000. The Diskpart is used from creating or deleting partitions to wiping the drive clean or fixing errors on drives.
Diskpart looks similar to the Disk Management tool, but the only difference is that diskpart is a command prompt utility which makes it more powerful and provides more functionality than the Disk Management tool.
Let us see how Diskpart can help you to manage your drives, partitions, and volumes.
Note: You should always run your computer in Administrator mode while you are making use of DiskPart.
Syntax:
diskpart <parameter>
Parameters:
You can run the following commands from the Diskpart command interpreter:
ACTIVE      - Mark the selected partition as active.
ADD         - Add a mirror to a simple volume.
ASSIGN      - Assign a drive letter or mount point to the selected volume.
ATTRIBUTES  - Manipulate volume or disk attributes.
ATTACH      - Attaches a virtual disk file.
AUTOMOUNT   - Enable and disable automatic mounting of basic volumes.
BREAK       - Break a mirror set.
CLEAN       - Clear the configuration information, or all information, off the
             disk.
COMPACT     - Attempts to reduce the physical size of the file.
CONVERT     - Convert between different disk formats.
CREATE      - Create a volume, partition or virtual disk.
DELETE      - Delete an object.
DETAIL      - Provide details about an object.
DETACH      - Detaches a virtual disk file.
EXIT        - Exit DiskPart.
EXTEND      - Extend a volume.
EXPAND      - Expands the maximum size available on a virtual disk.
FILESYSTEMS - Display current and supported file systems on the volume.
FORMAT      - Format the volume or partition.
GPT         - Assign attributes to the selected GPT partition.
HELP        - Display a list of commands.
IMPORT      - Import a disk group.
INACTIVE    - Mark the selected partition as inactive.
LIST        - Display a list of objects.
MERGE       - Merges a child disk with its parents.
ONLINE      - Online an object that is currently marked as offline.
OFFLINE     - Offline an object that is currently marked as online.
RECOVER     - Refreshes the state of all disks in the selected pack.
             Attempts recovery on disks in the invalid pack, and
             resynchronizes mirrored volumes and RAID5 volumes
             that have stale plex or parity data.
REM         - Does nothing. This is used to comment scripts.
REMOVE      - Remove a drive letter or mount point assignment.
REPAIR      - Repair a RAID-5 volume with a failed member.
RESCAN      - Rescan the computer looking for disks and volumes.
RETAIN      - Place a retained partition under a simple volume.
SAN         - Display or set the SAN policy for the currently booted OS.
SELECT      - Shift the focus to an object.
SETID       - Change the partition type.
SHRINK      - Reduce the size of the selected volume.
UNIQUEID    - Displays or sets the GUID partition table (GPT) identifier or
             master boot record (MBR) signature of a disk.
Open and List Drives or Partitions or Volumes:
It is important to list the drives, partitions, or volumes before we go ahead and implement DiskPart commands on them. Follow the below-mentioned steps to list the drives:
- Type diskpart, after pressing Windows+R Keys and clicking on ok.

- In the DiskPart command Window, type list disk and hit Enter

- This will list all the available drives with a number specified to them starting from 0.
- If you want to see all the volumes then type list volume and hit Enter.

- This will list all the available volumes with a number specified to it starting from 0.
The above article, explains the use cases and parameters of the diskpart command on Windows.
Sometimes the disk on your Windows 10 system may not work correctly, or the Windows fails to start because of the hard disk error. To rectify such disk errors, Windows 10 comes with an excellent tool known as DiskPart.
The DiskPart is a powerful command tool that lets you manage the Windows disks and partitions using Command Prompt or Windows PowerShell. This command interpreter allows you to delete, create, and modify partitions on any drives your PC can detect, even the external hard drives and USB storage. It is quite useful when any Pendrive or hard disks get corrupted because of logical errors and stopped working. Using DiskPart commands, you can wipe out the data and start clean.
To fix various Windows 10/11 problems, we recommend Outbyte PC Repair:
This software will repair common computer errors, protect you from file loss, malware damage, hardware failure, and optimise your computer for peak performance. In three simple steps, you can resolve PC issues and remove virus damage:
- Download Outbyte PC Repair Software
- Click Start Scan to detect Windows 10/11 issues that may be causing PC issues.
- Click Repair All to fix issues with your computer’s security and performance.
This month, Outbyte has been downloaded by 23,167 readers.
DiskPart is not a new concept. It has been the part of the Windows even before Windows 10. It is the best alternative when other disk utility such as Disk Management Tool fails to work.
In this guide, we would learn to use the common DiskPart commands to fix ‘Drive not Working’ and other disk errors.
How to open DiskPart on Windows 10?
Launching the DiskPart is not a big task. You just require to open the command terminals, either the Command Prompt or Windows PowerShell with the administrative rights.
In this guide, we would use the Command Prompt to run the DiskPart commands. The same commands can be directly used in Windows PowerShell without any changes.
-
Search Command Prompt in the Windows search bar and launch it with admin rights.

-
In the command window, type diskpart and hit enter. The DISKPART tool would be open and ready to use.

-
If you want to glance on the full list of available commands of DiskPart type help in the command window and press the enter key.

-
After using it, type Exit and hit the enter key to exit the tool.


Common DiskPart Commands
We would now explore the common DiskPart Command Prompt commands that you will mostly require.
| Command | Description |
| ACTIVE | Mark the selected partition as active. |
| ADD | Add a mirror to a simple volume. |
| ASSIGN | Assign a drive letter or mount point to the selected volume. |
| ATTRIBUTES | Manipulate volume or disk attributes. |
| ATTACH | Attaches a virtual disk file. |
| AUTOMOUNT | Enable and disable automatic mounting of basic volumes. |
| BREAK | Break a mirror set. |
| CLEAN | Clear the configuration information, or all information, off the disk. |
| COMPACT | Attempts to reduce the physical size of the file. |
| CONVERT | Convert between different disk formats. |
| CREATE | Create a volume, partition, or virtual disk. (No virtual disk management in Windows XP.) |
| DELETE | Delete an object. |
| DETAIL | Provide details about an object. |
| DETACH | Detaches a virtual disk file. |
| EXIT | Exit DiskPart. |
| EXTEND | Extend a volume. |
| EXPAND | Expands the maximum size available on a virtual disk |
| FILESYSTEMS | Display current and supported file systems on the volume. |
| FORMAT | Format the volume or partition. |
| GPT | Assign attributes to the selected GPT partition. |
| HELP | Display a list of commands. |
| IMPORT | Import a disk group. |
| INACTIVE | Mark the selected partition as inactive. |
| LIST | Display a list of objects. |
| MERGE | Merges a child disk with its parents. |
| ONLINE | Online an object that is currently marked as offline. |
| OFFLINE | Offline an object that is currently marked as online. |
| RECOVER | Refreshes the state of all disks in the selected pack. Attempts recovery on disks in the invalid pack, and resynchronizes mirrored volumes and RAID5 volumes that have stale plex or parity data |
| REM | Does nothing. This is used to comment scripts. |
| REMOVE | Remove a drive letter or mount point assignment. |
| REPAIR | Repair a RAID-5 volume with a failed member. |
| RESCAN | Rescan the computer looking for disks and volumes. |
| RETAIN | Place a retained partition under a simple volume. |
| SAN | Display or set the SAN policy for the currently booted OS. |
| SELECT | Shift the focus to an object. |
| SETID | Change the partition type. |
| SHRINK | Reduce the size of the selected volume. |
| UNIQUEID | Displays or sets the GUID partition table (GPT) identifier or master boot record (MBR) signature of a disk. |
Listing Existing Hard Drives, Volumes & Partitions using DiskPart
Before applying any destructive commands, you can first check the current internal and external hard disks and USB storage layout.
To check the available disks:
- Open the DiskPart and after “DISKPART>” prompt type list disk and hit enter. This command will list all the available and detectable storage disks, including internal and external drives and USB storage.

- To apply the DiskPart commands on the disks, you need to remember the disk number. For example, the windows disk is “Disk 0.“

To display the list of detected Volumes:
- Launch DiskPart and next to “DISKPART>” prompt type list volume.

- All volumes would be listed.

Check the list of partitions:
- To check the partition list, you must first select the hard disk with the list disk command.
- After the disk list is displayed, type select disk followed by the disk number.

- Once the disk is selected, type list partition, and hit the enter key, the selected disk’s partition list will be displayed. You can further modify the partitions using the partition number.


How to Delete Hard Drive, Volume, and Partition using DiskPart ?
If you want to delete the Volume or Partition of your system’s hard disk using Diskpart, follow these steps:
- First, select the hard drive using the select disk command, followed by the disk number.
- Now open the partition list of the chosen disk using list partition command.
- Chose the partition using select partition # command, replace # with the required partition number.
- Once the partition is selected, you can delete it using the delete partition command. The partition will be deleted.

- Similarly, you can delete the disk volume. Type list volume, check your chosen volume number, then type select volume #, replacing # with your volume number.

- Type delete volume, to delete the chosen volume.


How to Completely Wipe Out the Hard Disk using DiskPart?
If you face a problem in formatting the system hard disk, external hard drive, or the USB Pendrive, then using DiskPart, you can easily wipe them out. Obviously, you won’t be able to clean the disk on which your OS is installed.
- Similar to previous steps, on the DISKPART prompt window, type list disk.
- By typing select disk # command where # is your disk number, choose the disk that you want to format completely.
- After selecting the disk, type clean command to format it completely. Remember that it would not warn you, so make sure that you have selected the correct disk.

- After the cleanup, DiskPart would display the success message, and the disk would be ready for creating the new partitions.

How to Create and Format New Hard Drive Partitions using DiskPart?
Using the steps from the last section, you might have cleaned your hard disk. Now its time to create the new partitions and format them with Windows-friendly file systems like NTFS or FAT32.

- Open the disk list using the list disk command and select the disk using the select disk # command, where # is the disk number.
- After selecting the disk type the create partition primary command to create a partition using the entire space on that drive.
- If you want to create multiple partitions, you can assign how much space a partition could take. For that type, create partition primary size=X, where X is the size that you wish to set to the partition.
- To ensure that the new partition is listed, type list partition command.
- Use active command to activate the partition. It is required to use the partition as a bootable drive.
- To format the partition with the NTFS file system, use format FS=NTFS label=Data quick command. You can replace Data with any label you want.
- After it gets format, the DiskPart would automatically assign the letter to the partition. If it doesn’t, you can manually set it. For that type, assign letter=g, where you can replace g with any drive letter that you want.

Conclusion
These are the top used DiskPart commands that you can use to fix your hard drive problems and clean the USB drives and hard disks.
There are more commands, too, if you want to know about them, type help after launching DISKPART in the command window.
1. How to open DiskPart in Windows 10?
You can open DiskPart utility through Command Prompt or Windows PowerShell in Windows 10. After launching any of the command terminals, type diskpart to launch DiskPart.
2. How to fix hard drive problems with DiskPart?
DiskPart utility is specifically available for solving the disk issues on Windows 10. After launching the diskpart, type the help command to know about all the commands supported by diskpart. This post guides you on how to use the most common DiskPart commands.
Peter is an Electrical Engineer whose primary interest is tinkering with his computer. He is passionate about Windows 10 Platform and enjoys writing tips and tutorials about it.