
Предлагаем вам подробную пошаговую инструкцию по установке Windows 10 с флешки. Руководство подойдёт и тем, кто инсталлирует операционную систему с DVD-дисков, поскольку принципиальных отличий в процессе нет. Но мы всё же рекомендуем использовать именно флешку объёмом от восьми гигабайт даже при наличии DVD-привода, поскольку на установку уйдет в три-четыре раза меньше времени.
Загрузочным диском называют любой съемный носитель, на котором хранятся установочные файлы операционной системы Windows 10. Чтобы сделать флешку загрузочной, недостаточно просто скопировать на нее дистрибутив. Тем не менее сложностей у опытного пользователя с установкой не возникнет, поскольку существуют инструменты для автоматического создания загрузочного диска. Все будет просто. Смотрите также: как создать загрузочный диск Windows 10.
С помощью Windows Installation Media Creation Tool
Эта бесплатная утилита является стандартным средством от компании Microsoft и доступна для скачивания с официального сайта. Прежде чем воспользоваться программой, следует узнать разрядность процессора, установленного на компьютер, для которого загрузочная флешка создается.
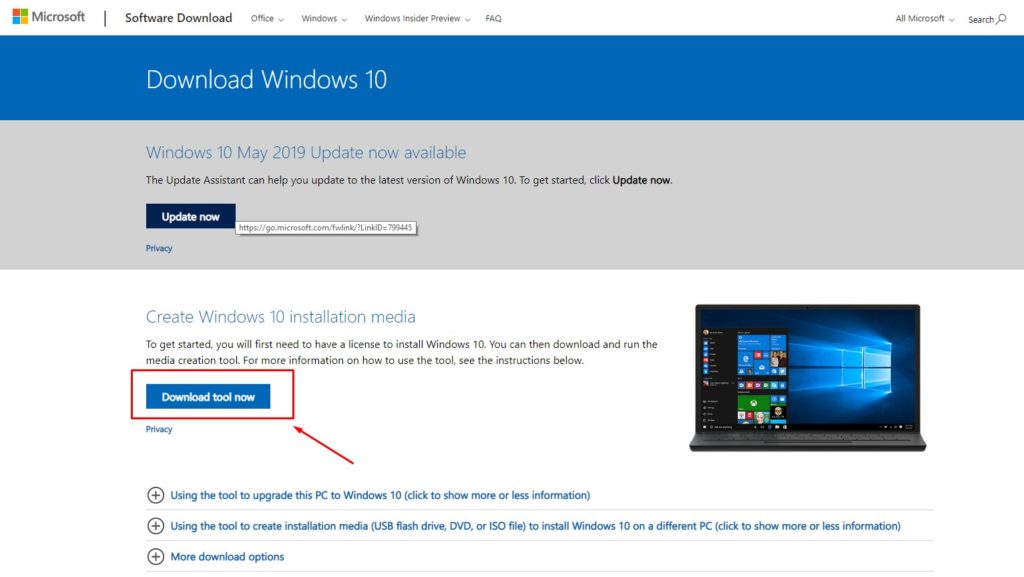
Скачиваем утилиту с сайта Microsoft
Скачав и открыв утилиту, делаем следующее:
- Принимаем условия лицензионного соглашения.
- Поскольку утилита также позволяет обновить систему в режиме онлайн, выбираем опцию «Создать установочный носитель».
- Убираем отметку в пункте «Использовать рекомендованные параметры», выбираем язык системы, в графе «Выпуск» указываем вариант «Windows 10», а в графе «Архитектура» — разрядность системы.
- В окне «Выберите носитель» отмечаем «USB-устройство».
- Далее, если к компьютеру подключено несколько съёмных накопителей, выбираем нужную флешку, нажимаем «Далее» и ждём завершения записи.
С помощью командной строки
Альтернативное стандартное средство — командная строка внутри операционной системы Windows 10. Чтобы создать с её помощью загрузочный диск с системой Виндовс, действуем таким образом:
- Открываем командную строку от имени администратора (утилиту можно найти в поиске панели Пуск).
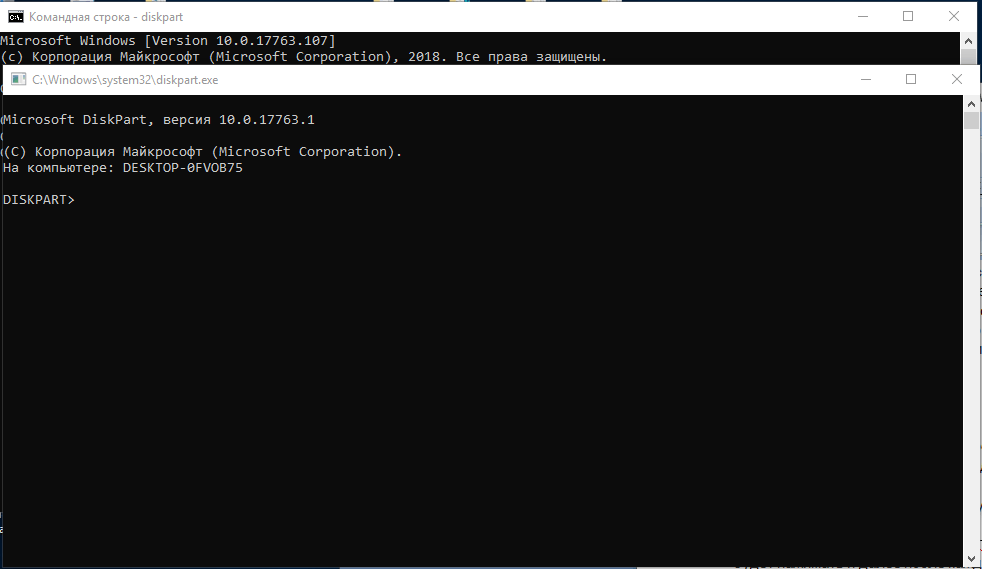
Запускаем DISKPART
- Набираем в ней слово diskpart и нажимаем Enter (обратите внимание: Enter нужно будет нажимать и далее после каждой команды).
- Вводим словосочетание list disc. Открывается нумерованный список всех установленных накопителей, среди которых находим нашу флешку. Ориентироваться придется по объёму памяти, он указан рядом с каждым диском в списке.
- Вводим команду select disc X, где X — это номер флешки в списке.
- Следующая команда — clean. С её помощью мы очищаем будущий загрузочный диск.
- Теперь набираем create partition primary, чтобы создать на флешке раздел для образа Windows 10.
- Форматируем раздел, набрав format fs=fat32. Для быстрого форматирования добавляем в конце слово quick.
- Для подготовки флешки к загрузке набираем active.
- Команда assign присвоит разделу определённое имя.
- Команда exit завершит операцию. Флешка подготовлена, осталось перебросить на неё образ операционной системы Windows.
С помощью UltraISO

Идеальное решение для создания загрузочного диска
Пример удобной сторонней программы. Она не бесплатна, но для однократной записи можно воспользоваться пробной версией. Создать загрузочный диск в UltraISO очень легко:
- Открываем программу и переходим в раздел «Файл». Кликаем «Открыть» и выбираем заранее подготовленный образ системы.
- Переходим в «Самозагрузку», где выбираем функцию «Записать образ жёст. диска».
- Выбираем будущую загрузочную флешку в строке «Disc drive», а также метод записи (рекомендуется «USB-HDD+»). Запускаем процесс кнопкой «Записать».
Как подготовить компьютер к установке Windows 10 с флешки
Прежде чем инсталлировать систему Виндовс, компьютер следует подготовить, то есть настроить: выбрать съёмный носитель в качестве загрузочного, сохранить пользовательские файлы, если они есть, установить очерёдность загрузки и так далее.
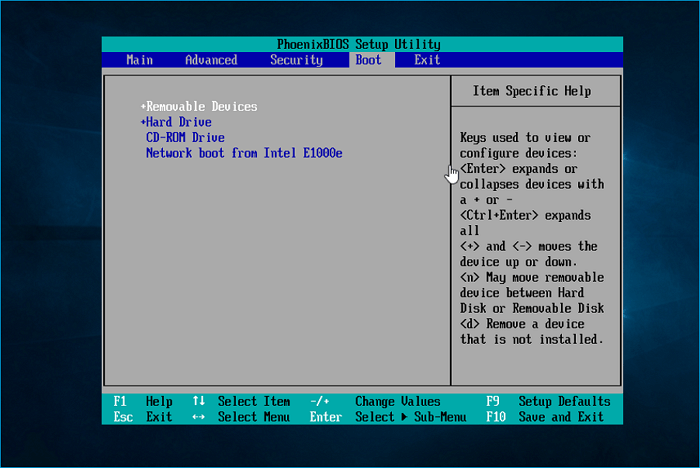
Настройка BIOS

Нужно выбрать приоритет устройств
Если компьютер управляется BIOS, подготовить его можно двумя способами. Так или иначе, первым делом следует вставить загрузочную флешку в USB-порт компьютера. Далее последовательность действий следующая:
- Включаем или перезагружаем компьютер, а при появлении стартового экрана нажимаем F12 и держим до тех пор, пока не появится меню выбора загрузочного накопителя (boot menu). Примечание: в зависимости от модели компьютера (материнской платы) клавиша открытия может быть иной, но она всегда указывается на загрузочном экране внизу.
- В открывшемся окне выбираем USB-накопитель и Enter. Начнется загрузка компьютера с флешки.
Альтернативный вариант (для «биоса» типа AWARD):
- Перезагружаем (включаем) компьютер и при появлении стартового экрана нажимаем F1 или Del. Открывается меню BIOS.
- Переходим в раздел Advanced BIOS Features. Выбираем первый загрузочный диск (строка First Boot Device) и указываем в качестве него любое доступное устройство с приставкой USB (например, USB-HDD).
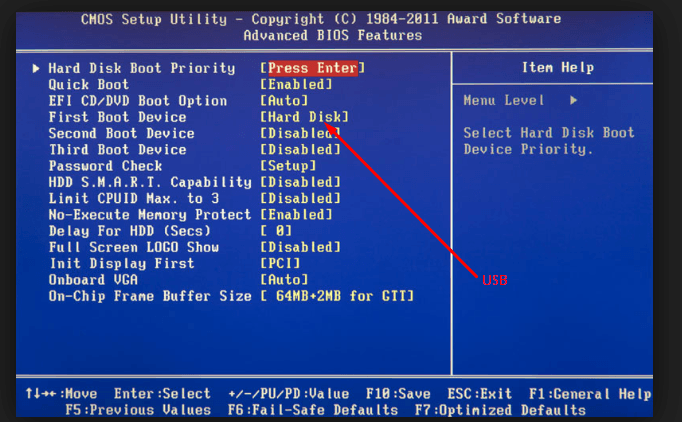
Сейчас основным загрузочным устройством указан жесткий диск
- Нажимаем Esc и, оказавшись в главном меню, выбираем опцию SaveExit Setup. Все, компьютер готов.
Настройка UEFI
Если вместо BIOS на компьютере установлен UEFI, настройка будет несколько иной, поскольку интерфейсы различаются как набором функций, так и оформлением. Чтобы загрузить ПК с флешки, при ее форматировании необходимо выбрать систему FAT32. Последовательность действий:
- Запускаем компьютер и при появлении загрузочного экрана нажимаем клавишу для входа в интерфейс. Как и в случае с BIOS, она будет разной в зависимости от модели материнской платы.
- Выбираем язык интерфейса (вверху, в правом углу экрана можно вызвать выпадающий список).
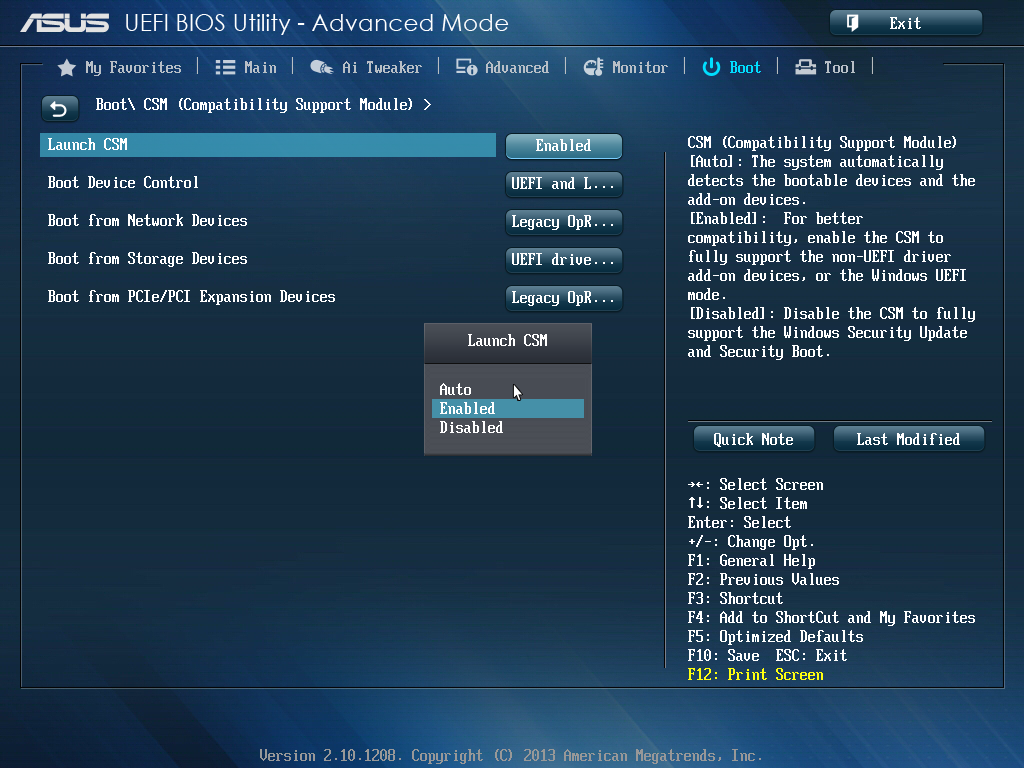
- Скорее всего, окажется, что по умолчанию flash-накопитель с UEFI несовместим. Проблема заключается в защитной функции Secure Boot, которую следует выключить. Для этого активируем совместимость с «биосом» (Launch CSM, затем Legasy BIOS). После этого станет доступно меню Secure Boot, где функцию можно будет отключить.

Launch CSM
- Нажимаем F8 и из списка устройств выбираем флешку. Сохраняем настройки и выходим. Компьютер загрузится без перезапуска.
Процесс установки Windows 10 с флешки
Когда мы загрузимся с флешки, автоматически откроется программа-установщик. Она будет помогать нам на всех этапах установки. Наши действия:
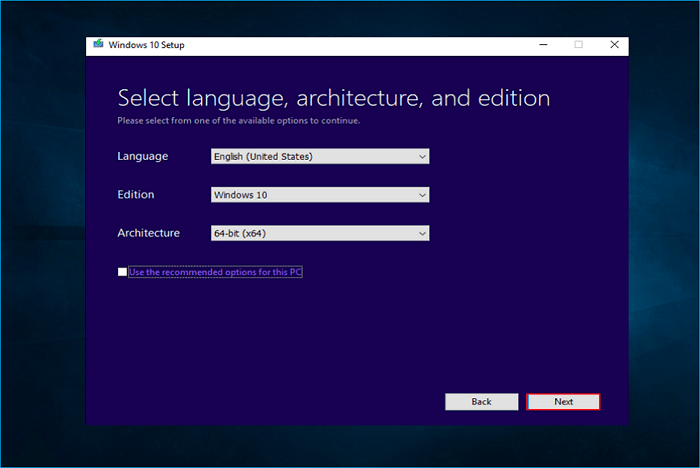
- Задаём региональные параметры: язык, раскладку клавиатуры, формат отображения даты и точного времени. «Далее».
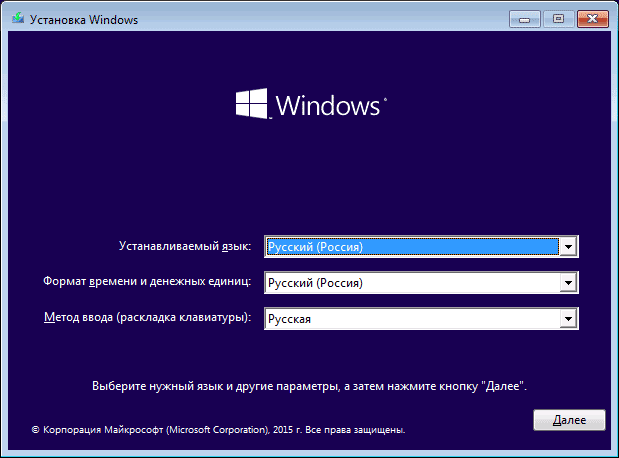
Выбираем язык
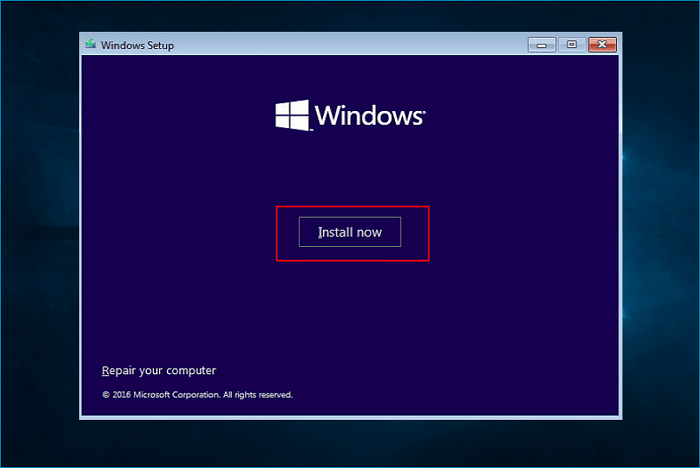
- С помощью инсталлятора можно как установить Windows 10, так и восстановить её после сбоя, поэтому на следующем экране нам предлагают выбрать дальнейший путь. Так как нас интересует инсталляция, нажимаем «Установить».
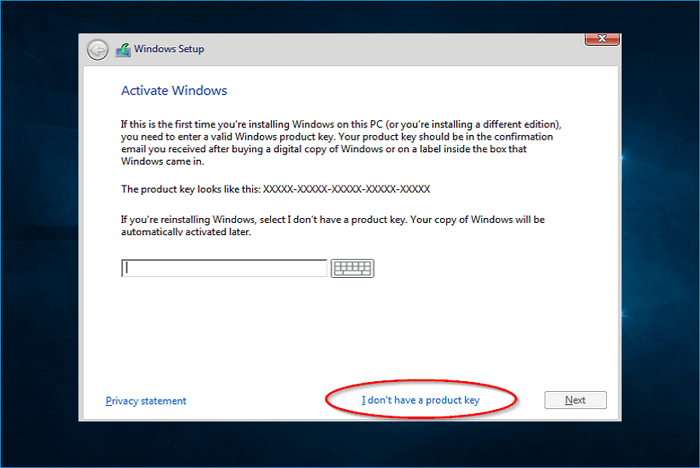
- Переходим на страницу активации Windows 10, где необходимо ввести код продукта. Если код вшит в интерфейс UEFI, программа подставит его автоматически. Вводить ничего не нужно и в том случае, если мы устанавливаем копию Windows 10 повторно. Тогда следует пропустить этот шаг, и система активируется сама после установки, при подключении к интернету.
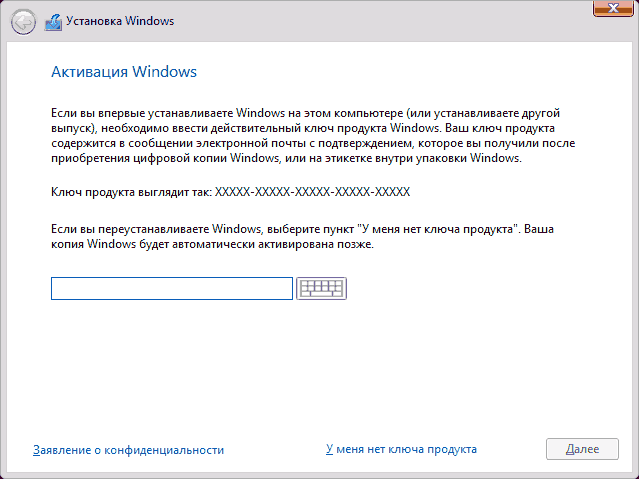
Вводим ключ продукта
- Если мы пропускаем ввод кода активации, установщик предложит выбрать версию Windows. Выбираем разрядность и редакцию операционной системы, которые нас интересуют. «Далее».
- Принимаем условия лицензионного соглашения и в следующем окне выбираем тип установки Windows. Предлагается два варианта. Первый — обновление уже установленной системы с сохранением имеющихся программ, второй — форматирование (полная очистка) системного раздела диска и полноценная установка системы Windows. Желательно выбирать именно полную переустановку: она займёт больше времени, но система будет работать более стабильно, без ошибок. Чтобы выбрать полноценную инсталляцию, нажимаем кнопку «Выборочная».
Выбор системного раздела
Лучше всего устанавливать Windows 10 на новый или полностью очищенный локальный диск. Однако на практике это возможно далеко не всегда. Если мы предпочли полноценную установку, инсталлятор предложит нам выбрать раздел для размещения системных файлов.
В появившемся окне мы увидим больше разделов, чем видели в проводнике до начала установки. Например, у лэптопа всегда есть скрытый раздел, зарезервированный для системы аварийного восстановления. Его трогать не стоит. Также могут отобразиться системные разделы, сохранившиеся от предшествующих версий Windows. Их можно удалить. Если мы предварительно сохранили ценные пользовательские файлы в отдельный раздел, важно не стереть по ошибке и его.
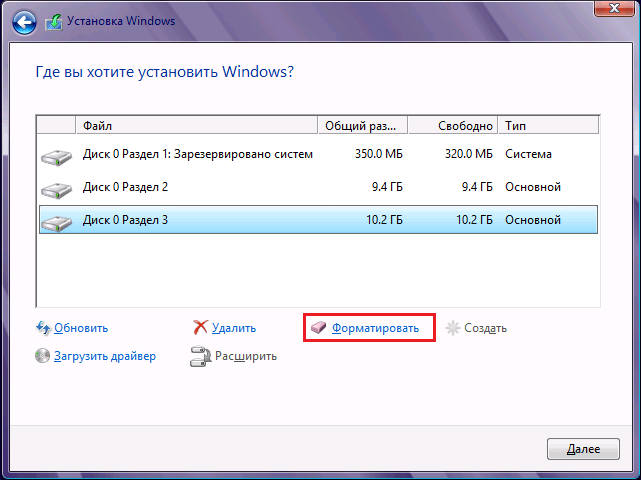
Форматируем все разделы
Обычно система устанавливается в основной раздел, который соответствует диску C. Поскольку буквенных обозначений в списке установщика не будет, диск C нам придётся выявить, ориентируясь на размер, который указан для каждого раздела. Определив его, выбираем опцию «Форматировать» прямо под списком, чтобы подготовить сектор к установке.
Завершение установки Windows
Разобравшись с разделами, нажимаем «Далее», и программа начинает распаковку сжатых файлов. Длительность этого этапа зависит от технических характеристик загрузочной флешки и локального диска. Даже если процесс растянется на час и более, пугаться не стоит. Дело пойдёт гораздо быстрее, если система устанавливается на SSD. В процессе установки Windows компьютер будет время от времени перезагружаться, а после этого появится окно приветствия и создания учетной записи Microsoft. Также будет интересно: установка и настройка Windows 10 на SSD.
Как настроить Windows 10 после установки с флешки
По окончании установки с флешки основные настройки Windows 10 производит автоматически. Система сама предложит пользователю выбрать домашний регион, раскладку клавиатуры, политику конфиденциальности. Однако программа автоматической настройки всегда действует по одному алгоритму и не учитывает индивидуальных потребностей пользователя. Поэтому после установки потребуются некоторые самостоятельные действия. Смотрите также: настройка Windows 10 после установки.
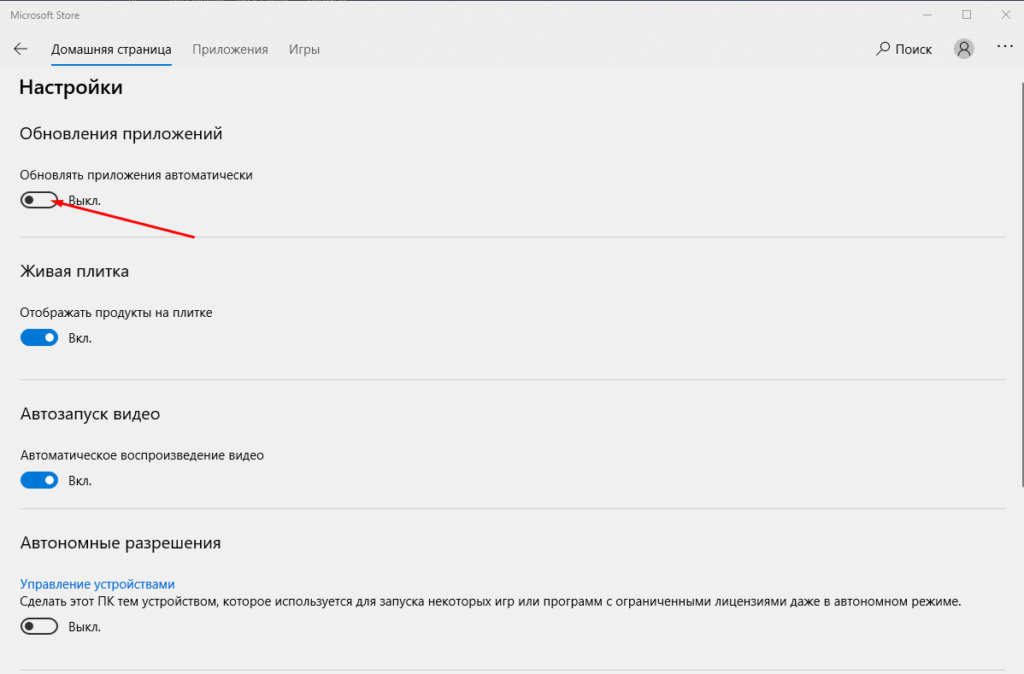
Отключаем автоматическое обновление Windows Store
В онлайн-магазине Windows Store продаются разнообразные приложения для ОС. Некоторые программы распространяются через этот магазин бесплатно, и все они автоматически обновляются. Однако некоторые обновления, равно как и процесс их поиска, требуют немало ресурсов компьютера и замедляют систему, поэтому автообновление желательно отключить.
Для этого через поисковую строку в панели задач находим Microsoft Store, открываем его, нажимаем кнопку многоточия в правом верхнем углу и выбираем «Настройки». В графе «Обновлять приложения автоматически» ставим тумблер в положение «Выкл.» и перезагружаем компьютер.
Отключаем обновления
Останавливаем лишние службы
Фоновые процессы Windows 10 — посредники между устройствами и ОС — называются также службами. Некоторые из них по умолчанию работают даже тогда, когда устройство, для которого они предназначены, к компьютеру не подключено.
Например, факса у большинства из нас нет, а Bluetooth-модуль, если на компьютере и установлен, то используется редко. Естественно, ненужные службы замедляют систему наравне с прочими.
- Чтобы отключить их, переходим в поиск, а оттуда — в раздел «Средства администрирования Windows», где выбираем пункт «Службы».
- Открывается список.
- В нём выбираем службу, которую хотим отключить, щелкаем по ней два раза и в графе «Тип запуска» выбираем вариант «Отключена», затем ОК.
Повторяем те же действия для каждой ненужной службы и перезагружаем компьютер.
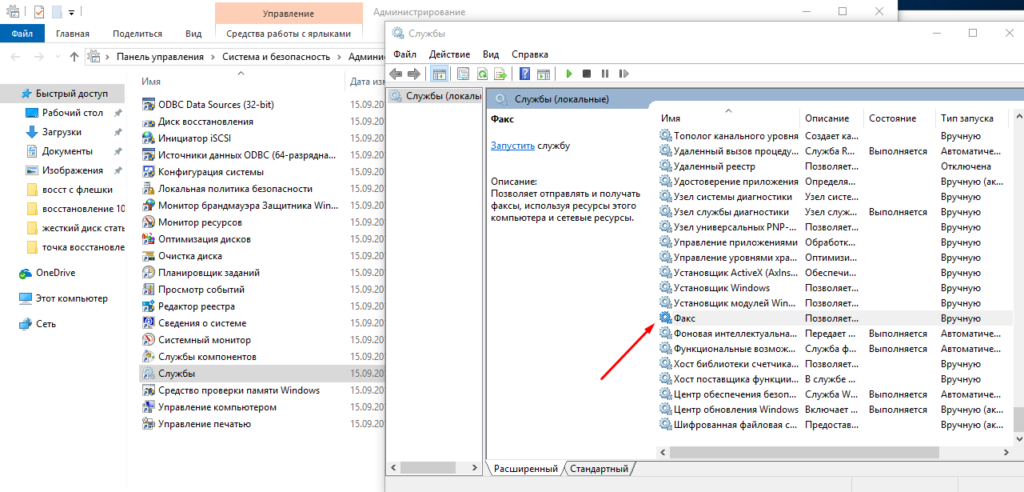
Отключаем то, чем не пользуемся. По умолчанию Факс и так должен быть отключен
Проверяем и инсталлируем драйверы
Необходимые драйверы устройств системы Windows устанавливает самостоятельно. В любой момент мы можем обновить отдельные драйверы вручную.
- Чтобы сделать это, нажимаем Win+X, заходим в «Диспетчер устройств», находим интересующее нас оборудование, ПКМ и затем — «Обновить драйвер».
- Далее «Автоматический поиск обновлений драйверов» и ждём завершения процесса.
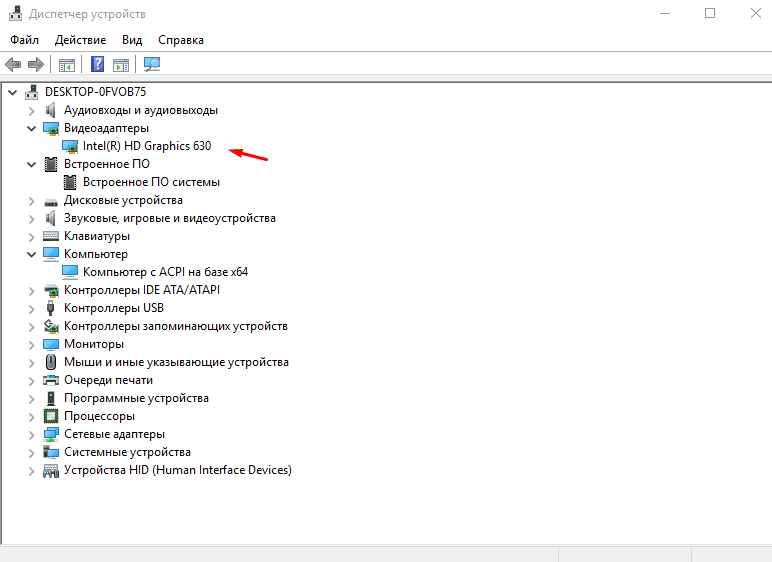
Один из первых драйверов, который нужно обновить
Проблема в том, что драйверы для сторонних устройств компания Microsoft предоставляет в урезанном виде. Например, если мы подсоединили беспроводную мышь, то работать она будет. Но если мы, например, захотим проверить уровень заряда аккумулятора или настроить кнопки, то нам понадобится панель управления, которую Windows вместе с драйвером не предоставит. Поэтому, если пользователю важен дополнительный функционал, целесообразно скачивать драйвер устройства самостоятельно с сайта производителя.
Отключаем автоматическое обновление Windows 10 (опционально)
Функция автоматического обновления полезна, и отказываться от неё производитель не рекомендует. Однако часто процесс скачивания и установки обновлений занимает много времени и сильно нагружает систему, что неудобно для пользователя, особенно если компьютер слабый. Поэтому некоторые предпочитают запускать обновление самостоятельно, в удобное для себя время.
- Чтобы отключить функцию, снова переходим в «Службы» и дважды щелкаем по строке «Центр обновления Windows».
- В графе «Тип запуска» выбираем «Отключена» и OK.
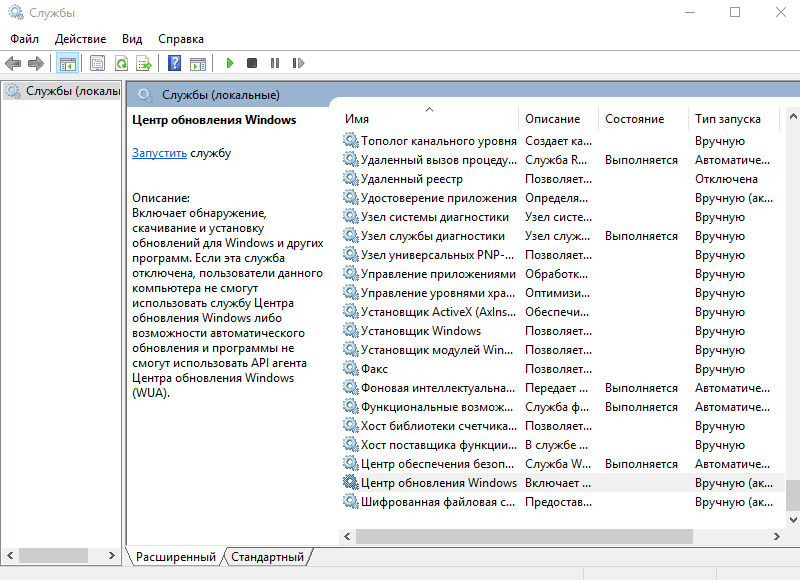
Отключаем Центр обновления (хотя без особой нужды можно этого и не делать)
Отключаем программы слежения (телеметрию)
Пользователи операционной системы Windows 10 часто жалуются на то, что система передает в Microsoft огромное количество сведений учетной записи для анализа. Естественно, речь не идет о номерах банковских карт и личных паролях, но постоянный сбор даже служебных сведений некоторым не нравится. К тому же процесс забирает часть ресурсов и замедляет систему, поэтому при желании эту функцию тоже можно отключить.
- Открываем «Параметры» (значок шестеренки в меню Пуск), находим апплет «Конфиденциальность» и в разделе «Общие» отключаем все доступные функции.
- В разделе «Речь, рукописный ввод и ввод текста» нажимаем «Отключить речевые службы и предложения по вводу».
- Далее переходим в раздел «Диагностика и отзывы» и отключаем все функции там.
- Наконец, убираем галочки в разделе «Журнал действий» и перезагружаемся.
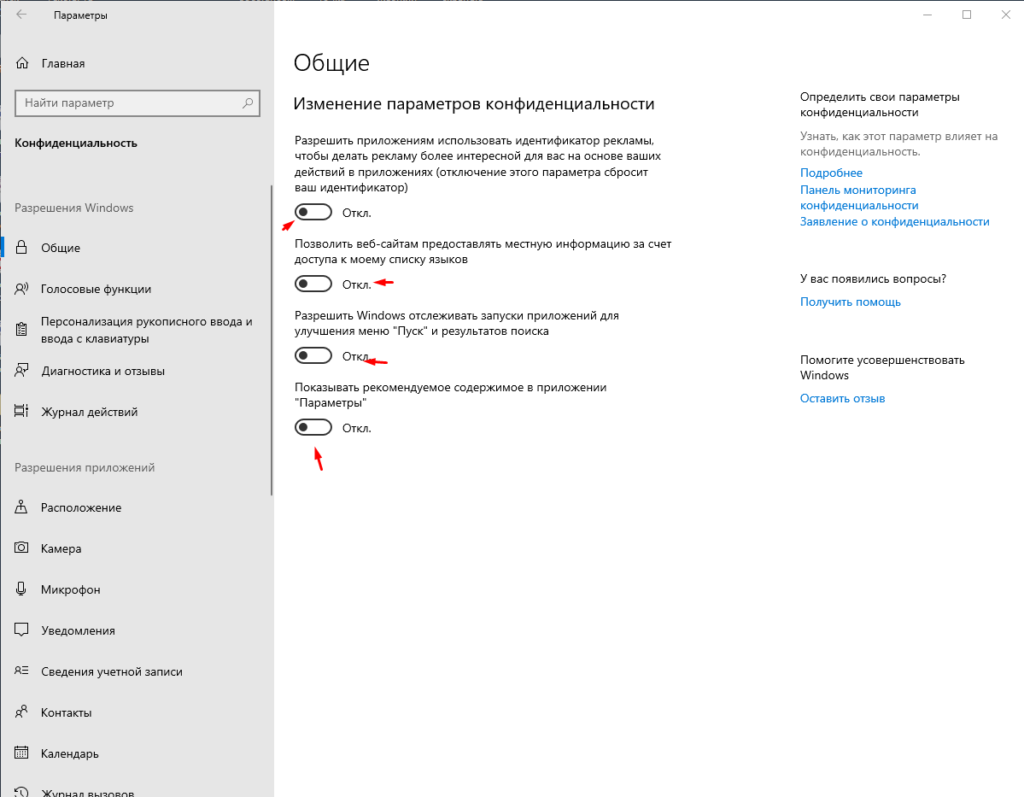
Отключаем все
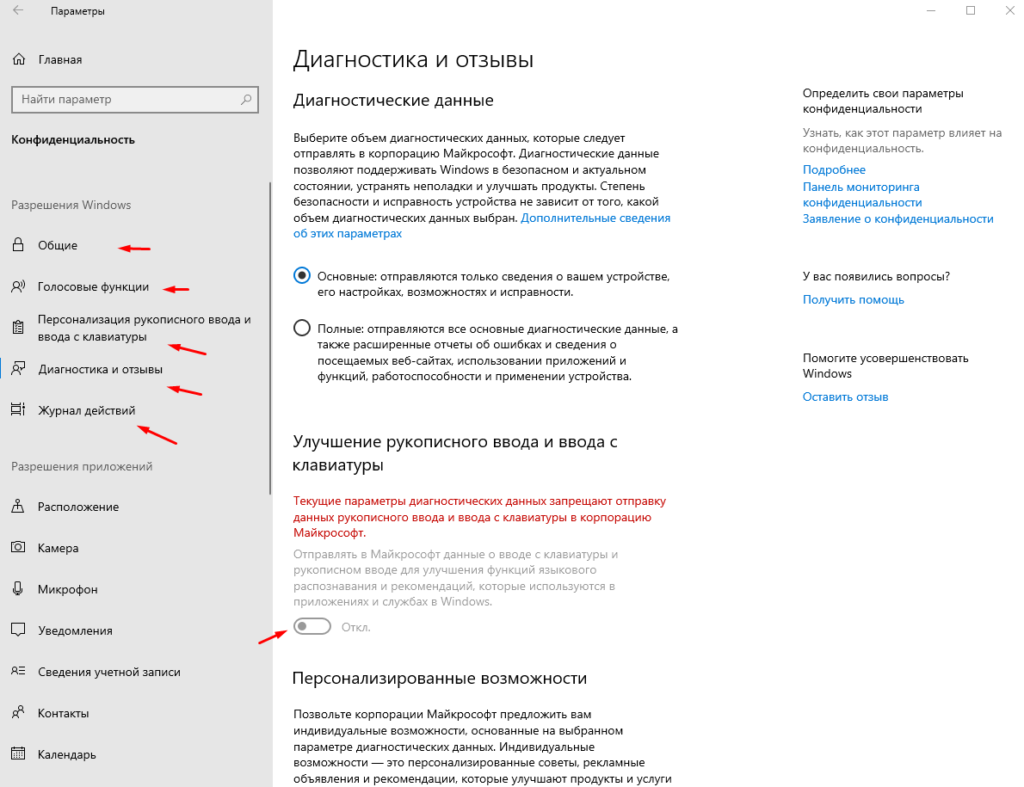
Пункты для отключения
Отключаем визуальные эффекты
Анимации, тени и прочие зрительные эффекты в Windows радуют глаз, однако требуют немало оперативной памяти и снижают общую производительность, поэтому от большинства эффектов имеет смысл отказаться.
- Для этого через поисковую строку находим раздел «Настройка представления», открываем вкладку «Визуальные эффекты» и выбираем вариант «Обеспечить наилучшее быстродействие».
- ОК.
- При желании отдельные функции можно оставить. Для этого выбираем вариант «Особые эффекты» и в списке отмечаем галочками те опции, от которых не хотим отказываться.
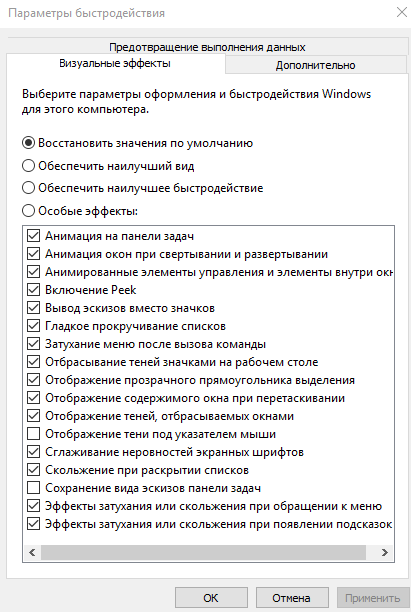
Настраиваем визуальные элементы
Отключаем фоновые приложения
Подобно службам, некоторые стандартные приложения в Windows 10 действуют в фоновом режиме. Пусть они и не отнимают много ресурсов, их всё же лучше деактивировать. Для этого в «Параметрах» выбираем раздел «Конфиденциальность» и далее — пункт «Фоновые приложения», где отключаем опцию «Разрешить приложениям работать в фоновом режиме».

Отключаем фоновые приложения, которые нам не нужны
На этом процесс установки и настройки системы Windows 10 можно назвать завершенным.
Post Views: 10 735
-
Home
-
News
- [Full Guide] How to Install Windows 10 from Command Prompt?
By Yamila | Follow |
Last Updated
In some cases, you may consider installing Windows 10 with Command Prompt. How can you do that? In this post, MiniTool Partition Wizard provides a step-by-step guide on how to install Windows 10 from Command Prompt. You can take a look.
For some reason, you may randomly want to install Windows 10 from Command Prompt. To help you complete this operation, there are two methods available. Just keep reading and pick one according to your needs.
Note:
Before you install Windows from Command Prompt, you should first click here to download the Windows 10 ISO file. Then right-click the file in File Explorer and select Mount.
Method 1: Install Windows 10 from CD/DVD Using Command Prompt
If you have a CD/DVD, you can easily learn how to install Windows 10 from Command Prompt with it by following the steps below.
Step 1: Press Windows + R to open the Run dialog.
Step 2: Type cmd in the text box and then press Ctrl + Shift + Enter to open Command Prompt as an administrator.
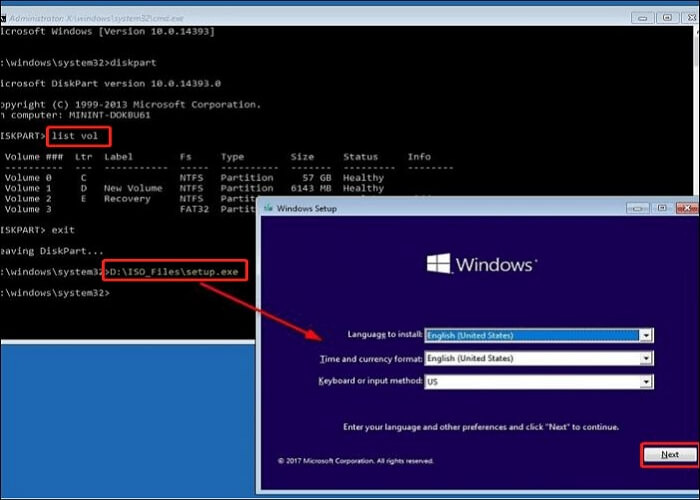
Step 3: In the elevated Command Prompt, type diskpart and press Enter.
Step 4: After that, type list vol and press Enter to execute this command. It will list all the volumes in your system. You should figure out the correct volume containing the mounted Windows 10 ISO file.
Step 5: Type exit and press Enter to quit Diskpart. Then execute the G:\setup.exe command to open the Windows 10 Setup window.
Tips:
Replace G with the drive letter of your drive where the ISO file locates.
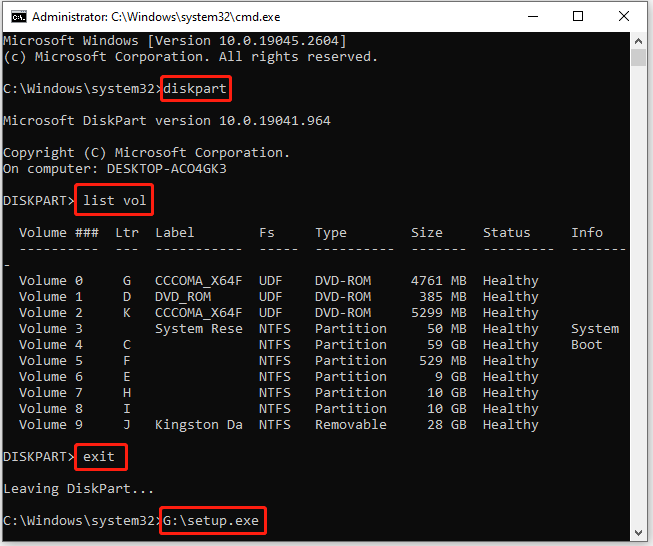
Step 6: Follow the on-screen instructions to install Windows 10 from Command Prompt.
Method 2: Install Windows 10 from USB Using Command Prompt
In addition to installing Windows 10 from CD/DVD, it’s also a great way to use a USB drive to install Windows 10. Here’s detailed information on how to install Windows 10 from USB using Command Prompt.
Note:
The USB drive you use to install Windows from Command Prompt should have at least 8GB of space. Besides, it’s necessary to make a backup if there are important files on the USB drive.
Step 1: Connect the prepared USB drive to your PC.
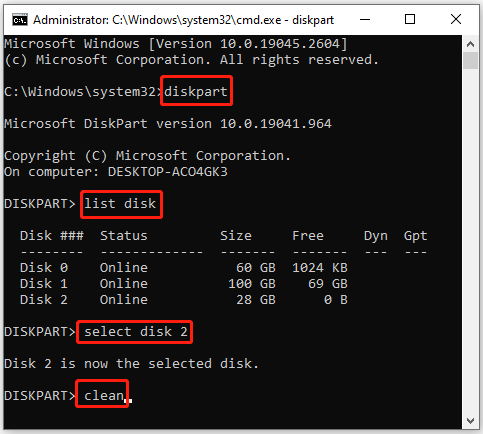
Step 2: Run Command Prompt as an administrator. Then type the following commands one by one and press Enter after each to erase the USB drive.
- diskpart
- list disk
- select disk N (N represents the number of your USB drive)
- clean
Step 3: After cleaning the USB drive, recreate a new partition by running the given commands.
- create partition primary
- select partition X (Replace X with the number of the newly created partition; you can use the list partition command to find the partition number if you are not sure which it is)
- active
- format fs=ntfs quick (You can also format the partition to FAT32 instead of NTFS)
- assign letter=I

Step 4: Once done, exit Diskpart. Then execute these commands so that you can navigate to the mounted ISO image and copy it to the target USB drive.
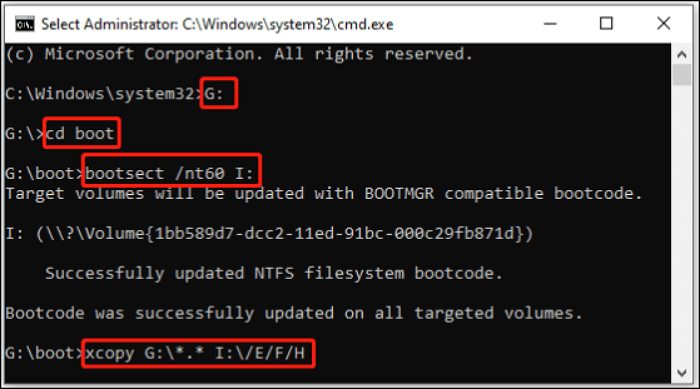
- G: (G is the drive letter of the drive with the mounted Windows ISO image)
- cd boot
- bootsect /nt60 I: (I refers to your USB drive’s drive letter)
- xcopy G:\*.* I:\ /E /F /H (/E copies all subfolders, /H copies all hidden files, and /F displays all source and destination file names as it’s copying.)

Step 5: Set the USB drive as the first boot option with this guide: How To Change Boot Order Safely On Windows Device. Then reboot your PC from the USB drive and follow the on-screen instructions to install Windows 10.
That’s all about how to install Windows 10 from USB using Command Prompt. You can have a try.
Bonus Tip: Obtain Windows 10 Without Installing OS
From the above, you may learn how to install Windows 10 from Command Prompt. It’s a helpful but time-consuming way. And if you are not familiar with these command lines, you may sometimes feel confused while installing Windows 10 with Command Prompt.
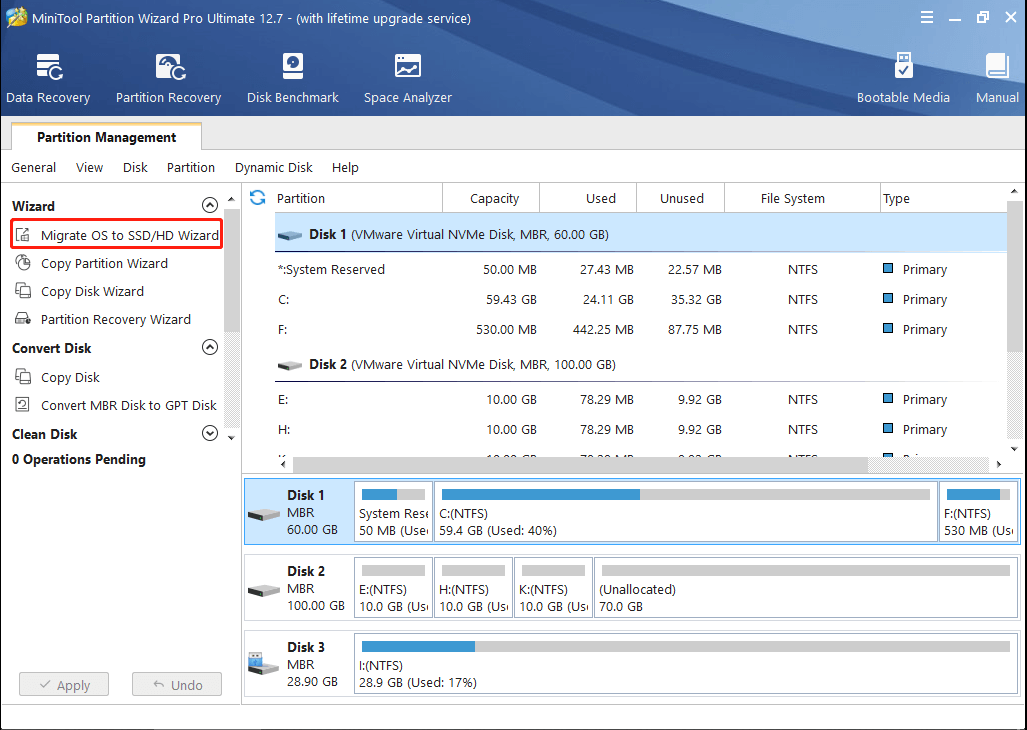
Is there an easier way to get Windows 10 on your computer? Well, to simplify the Windows installation, we’d like to recommend you take advantage of MiniTool Partition Wizard. It’s a professional disk partition software that enables you to migrate OS to SSD without installing the OS.
Therefore, if you have another computer that is running Windows 10 properly, you can try using an SSD drive to transfer the operating system to the target computer with MiniTool Partition Wizard. To do this, you need to get this program installed on the source computer to migrate Windows 10 to SSD. Then connect the SSD with Windows 10 to the target computer.
MiniTool Partition Wizard DemoClick to Download100%Clean & Safe
After reading this post, you may find ways to effectively install Windows 10 from Command Prompt. Besides, you can try getting Windows more quickly and easily with MiniTool Partition Wizard. If you have any problems with Windows installation, you can leave a message in the comment part below.
About The Author
Position: Columnist
Yamila is a fan of computer science. She can solve many common issues for computer users by writing articles with simple and clear words. The very aspect that she is good at is partition management including create partition, format partition, copy disk and so on.
When she is free, she enjoys reading, doing some excerpts, listening to music and playing games.
- How to use the command history function in Command Prompt
- How to open Command Prompt on Windows 10, 8, 7, Vista and XP
In the following article, let’s learn about how to open Command Prompt during Windows installation.
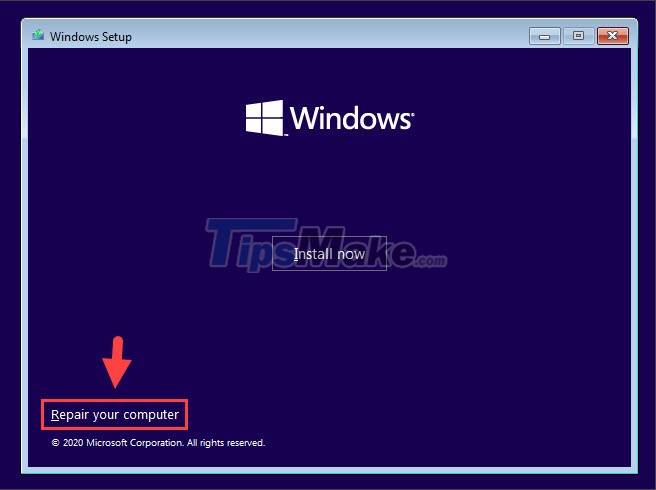
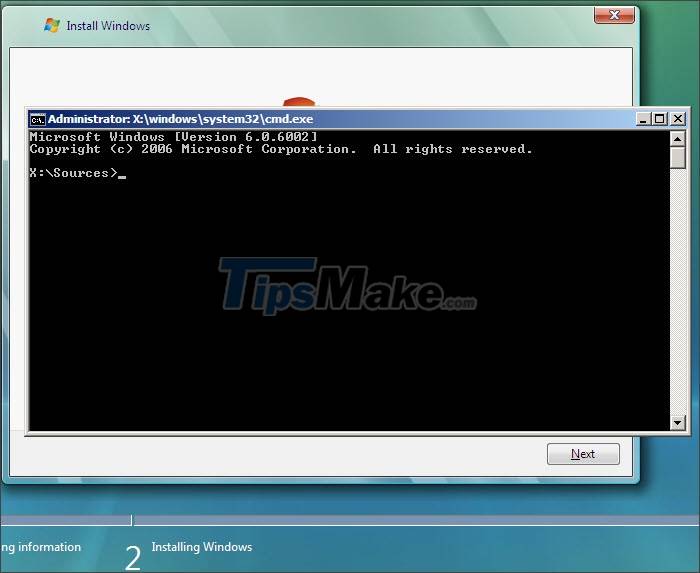
1. On the Windows 10 installation interface
Step 1: On the installation screen, click Repair your computer.
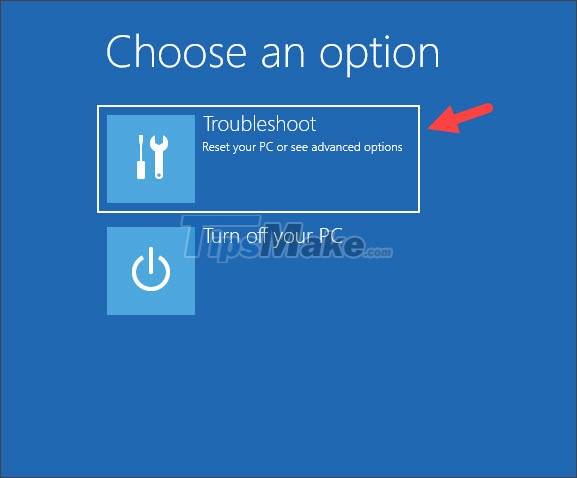
Step 2: Click Troubleshoot.
Step 3: You choose Command Prompt.
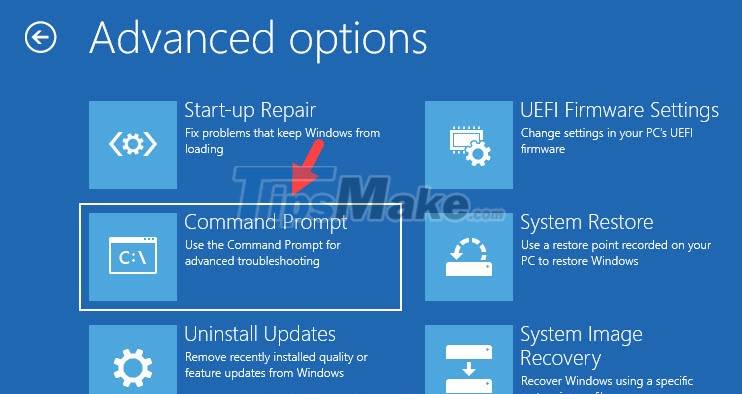
After that, the Command Prompt window will appear as success.
2. On the Windows 8/8.1 installation interface
Step 1: Click Repair your computer.

Step 2: Click Troubleshoot.

Step 3: Click on Advanced options.

Step 4: You choose Command Prompt.

After that, the Command Prompt window will appear and you can perform CMD commands on it.

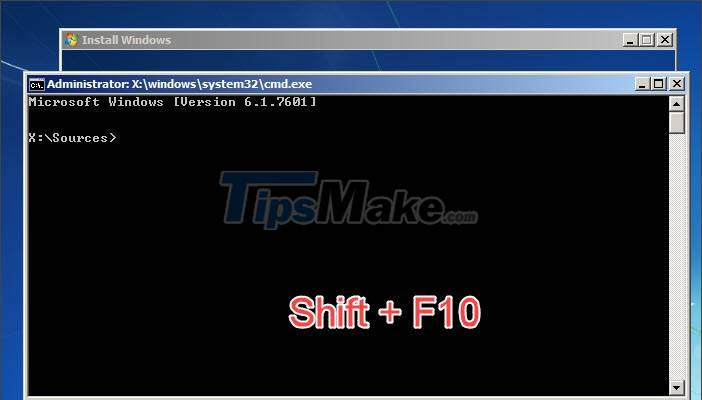
3. On the Windows 7 installation interface
On the Windows 7 installation interface, you do not need to click Repair your computer, but use a keyboard shortcut to open the Command Prompt.
Press the keyboard shortcut Shift + F10 and the Command Prompt window will appear on the screen.
4. On the Windows Vista installation interface
Similar to Windows 7, you can open Command Prompt on Windows Vista with the keyboard shortcut Shift + F10.
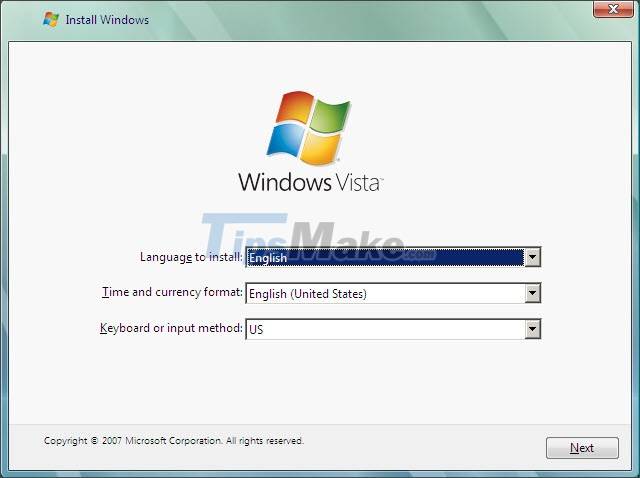
After executing the Shift + F10 command, the Command Prompt window will appear on the screen.
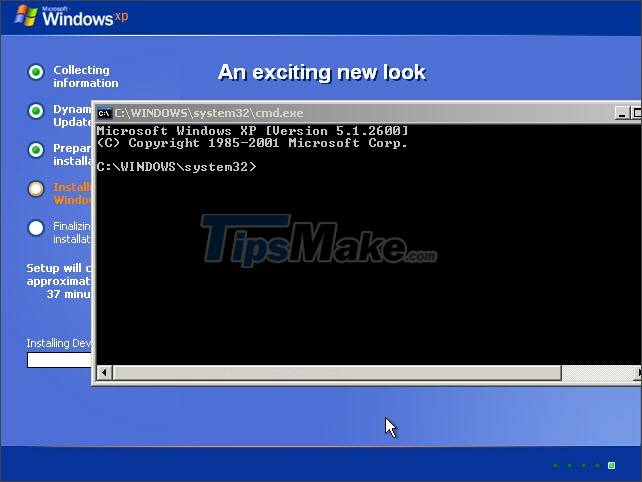
5. On the Windows XP installation interface
For Windows XP, you will be able to open the Command Prompt while installing to the Installing Windows step. In the meantime, press Shift + F10.
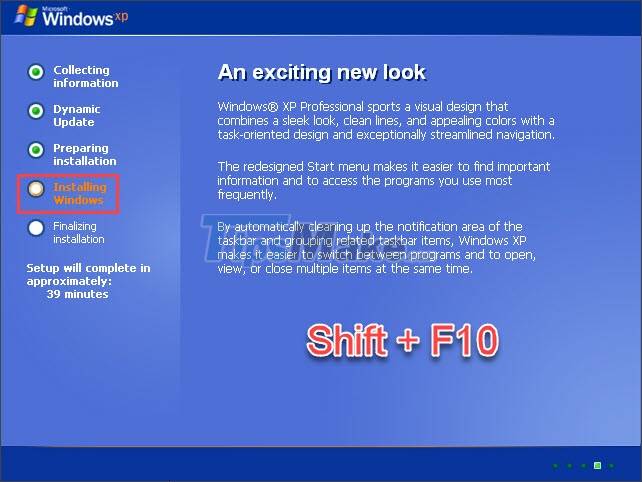
After pressing the Shift + F10 combination, the Command Prompt window will display on our screen.
Through sharing in this article, you can quickly and easily open the Command Prompt dialog box and perform CMD commands during Windows installation. Good luck!
5 stars4 stars3 stars2 stars1 star3.9 ★ | 132 Vote
You should read it
- Add Command Prompt to Power User Menu on Windows 10
- How to Execute a Program in Command Prompt
- How to Open Folders in CMD
- How to Make Command Prompt Appear at School
- How to open Microsoft Excel from Command Prompt
- Instructions for using Command Prompt
- How to Watch Star Wars on Command Prompt
- How to open Microsoft Word from Command Prompt
May be interested
- Common GHOST errors and how to fix them
summary of common errors when ghosting and instructions on how to fix it. you should consult before performing the ghost to be able to grasp the cause and offer a solution.
- Download Ghost Windows 10 LTSB 1607 2021

windows 10 ltsb is a stripped-down version of windows released by microsoft in 2016, which removed all unnecessary components to provide the most stable lightweight version of windows 10 ltsb 2016.
- Create a Windows installation USB on Ubuntu using the WoeUSB tool
detailed instructions on how to create a windows usb install on ubuntu operating system through the woeusb tool. tips to create usb install win on linux fastest
- How to download a Windows installer, Office directly from Microsoft
instructions on how to download the original windows installer, download the original office installer (all versions). download the iso file to install from the microsoft homepage
- Link to download the ISO file Windows 10 20H1 directly from Microsoft
there are many ways to get the link to download the iso windows 10 20h1 file online, but many of them are not safe, contain many malicious codes that steal user information, for the best safety, users should get the download link. genuine windows 10 iso file 20h1 from the publisher microsoft.
- How to create Hiren’s BootCD PE using ISO2USB
how to create hiren’s bootcd pe x64 usb, a legendary professional computer rescue toolkit. create professional rescue usb with hiren’s bootcd pe x64 latest updated from the author of hiren’s bootcd
If your Windows OS constantly lags or throws random errors, installing Windows 10 or Updating is better to eliminate the issues. Windows allows you to install Windows 10 from command prompt in 2 ways: with a USB or CD/DVD. EaseUS details installing Windows 10 from the command prompt and a much easier process with EaseUS OS2Go.
How to Install Windows 10 Without Using Command Prompt
Back in the old days, people used to remember CMD commands to perform all major tasks on the computer. However, CMD commands are complex and time-consuming. A simple error can move or erase all your data. Are you unfamiliar with CMD commands and looking for an easier way to install Windows 10? EaseUS OS2Go comes to your rescue.
With EaseUS OS2Go, you can create a Windows live USB with BIOS and UEFI support to boot your PC directly. The software lets you bypass the Windows system requirements like Secure Boot, Microsoft Account, TPM2.0, etc, to install Windows. For example, it lets you install Windows 10 without a Microsoft account. A simple click will clone the Windows 11/10/8/7 to a portable USB, helping you run the OS anywhere and at any time.
Unlike the Windows Media Creation Tool, OS2Go lets you create a bootable USB drive without the ISO file and install and run Windows OS on a USB or hard drive. This acts like a bootable disk, helps with portable Windows, and a backup. Download it now, and make a bootable USB with Windows 10.
Now that you have a bootable USB with the help of EaseUS OS2Go follow the steps below to install Windows 10 using it:
Part 1: Create a portable USB using EaseUS OS2Go
Step 1. Install EaseUS OS2Go on your Windows computer, it will display your system drive’s used space. Plug in a USB drive that is larger than the system drive used space. Choose the target USB drive and click Next to continue.

Step 2. EaseUS OS2Go will notify you that the following operation would delete all data on your drive. Make sure that you have backed up all the important data. Click the Continue button to proceed.

Step 3. Adjust disk layout. The default disk layout on the target drive will be exactly the same as the resource drive. You could also edit the layout according to your needs. Tick the option there if you’re using a Solid State Drive as the Windows bootable drive. Next, click Proceed.

Step 4. Then EaseUS OS2Go will start to create the portable USB drive. It usually takes a while depending on your OS and Network condition. When the progress reaches 100%, the USB drive should be bootable now.

Step 5. Insert the portable Windows USB and start your computer. Press the required key (F2, DEL, F10…) to access BIOS. Choose to boot from the USB disk.
Note: Please make sure that the boot mode (UEFI or Legacy) of the portable USB and your target computer are the same, otherwise you may not be able to boot.
Part 2: Change the Boot order from BIOS
Once you insert the bootable Windows 10 USB, you need to change the boot order from BIOS to start from the USB.
Step 1. Enter the BIOS. To enter the BIOS, restart your Windows PC and continuously press the BIOS key while restarting to invoke the BIOS settings.
⭐Note: Depending upon the manufacturer, the BIOS can be anything from Del, Esc, F2, F10, F9, etc.
Step 2. Navigate to the Boot Options menu and change the boot order to the appropriate Boot Media Device.
Step 3. Save changes and restart the PC to boot with USB.
Part 3: Windows 10 installation with Bootable Media
Step 1. Once you turn on the PC, you will see a message about pressing a key to boot from the device.
Step 2. Once the Windows Setup loads, select the Setup options for language, edition, etc.
Step 3. Click Install Now.
Step 4. Enter your product key or accept the license terms when reading the Microsoft Software License Terms.
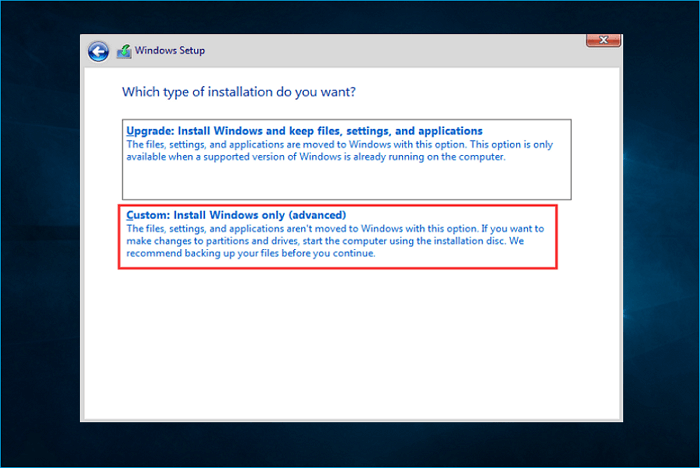
Step 5. Select Custom: Install Windows only (Advanced) option.
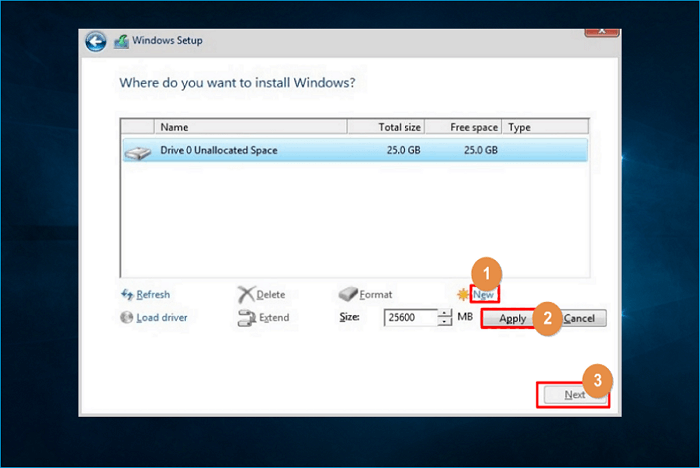
Step 6. Now, you have to choose the hard drive or partition to install Windows 10. Make sure you select the one with enough space to accommodate the OS.
Step 7. Once you complete the Windows 10 installation, click on Restart now.
If you want to learn how to install Windows 10 from BIOS from USB, you can refer to the following article.
How to Install Windows 10 from USB from BIOS
This guide will show you everything you need to know about installing Windows 10 from BIOS from USB on your computer. Read more >>
2 Common Ways to Install Windows 10 Command Prompt
If you frequently use Command Prompt and wish to install Windows with it. You can choose any of these methods to install Windows. You must download the Windows Media Creation Tool and mount the ISO files onto a drive for both methods.
- Way 1. Install Windows 10 from USB Using Command Prompt
- Way 2. Install Windows 10 from CD Using Command Prompt
Way 1. Install Windows 10 from USB Using Command Prompt
To install Windows 10 from USB, you need to make a bootable USB drive with installation files. You can reduce the installation time with a USB and directly boot the PC. Make sure to insert a USB with a size greater than 8GB to accommodate the required files.
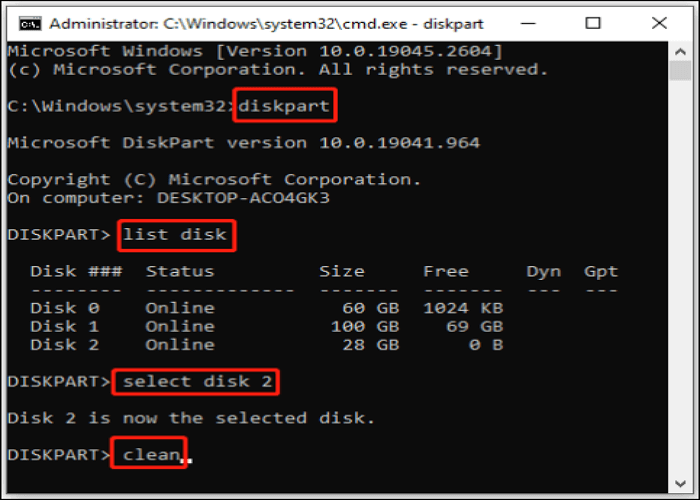
Step 1. Press the Windows + R keys to open the Run dialog box. Enter the disk part and press OK to run the Diskpart command for Windows 10 install.
Step 2. Now, type the following commands one after the other, and press Enter for each command below.
- list disk
- select disk 1
- clean
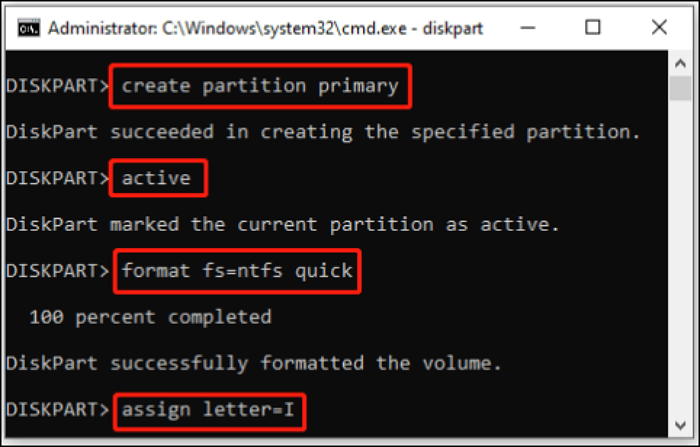
- create partition primary
- select partition 1
- active
- format fs=ntfs quick (or format fs=fat32 quick)
- assign letter=X
- exit
- Warning
- 1️⃣The Clean command will make all the data on the drive invisible. It marks all the data as deleted. Run the command to remove all the data from the USB and perform a clean install.
- 2️⃣Also, replace the 1 with the USB flash drive number and change the X to any available letter to use the USB drive.
Step 3. Now, you will have to navigate to the mounted Windows 10 ISO image and boot it using the command lines below:
- G:
- cd boot
- bootsect /nt60 X:
- Notice:
- 1️⃣You need to replace the letter G with the letter of your mount drive as it appears in the File Explorer.
- 2️⃣ Replace the X with the correct drive letter for the USB flash drive.
Step 4. Enter the below command to copy the image to the USB flash drive.
xcopy G:\*.* X:\ /E /F /H
Notes:
- /E- to copy all subfolders.
- /H- to copy all hidden files.
- /F- to display all source and destination files during copying.
Step 5. Now, you have the bootable USB flash drive to install Windows. Insert into the PC and install Windows with WinRE.
The steps to install Windows 10 with WinRE are given in the method below. Follow from step 4 to the end.
- Important
- The Windows 10 installation will remove everything on the PC’s primary hard drive. If you do not want to lose data, back up important files.
Way 2. Install Windows 10 from CD Using Command Prompt
Let us see how to use a CD to install Windows 10 via Command Prompt.
Step 1. Open the Run dialog box (Windows + R). Enter diskpart, and click OK to open Diskpart for Windows 10 installation.
Step 2. Type the list vol and execute it to find the partition with ISO files.
Step 3. Enter G:\ISO_Files\setup.exe and execute the command.
Note: Replace the G with the disk number containing the mounted Windows 10 disc image.
Step 4. This prompts the Windows Setup page to open. Make the selections for language, time, currency, keyboard, and input methods, and click Next.
Step 5. Click Install now.
Step 6. If this is your first time installing Windows 10 on the PC, you must enter the genuine product key. If you are going for a reinstallation, click on the I don’t have a product key and click Next.
Step 7. Select the Windows 10 edition you currently use if you choose I don’t have a product key. Click Next and accept the license terms.
Step 8. In the type of installation window, go for Custom: Install Windows only (Advanced).
Step 9. Now, select the hard drive or partition to install Windows 10. Select the drive with enough free space to accommodate the OS.
Step 10. Once you complete the Windows 10 installation, click Restart now to restart the PC with Windows 10.
Share this article on your social media to help more people install Windows 10 with ease!
To Sum Up
You can install Windows 10 from command prompt using a USB or CD. The article details the process and commands to perform the Windows 10 installation. You can choose one of them based on what you have: USB or CD.
As you can see, creating a bootable USB or CD requires you to remember and execute complex CMD commands. Better go with EaseUS OS2Go to create bootable USB with simple steps and install Windows 10. Download it now, and start your Windows installation.
FAQs on Command Prompt Install Windows 10
Here are some frequently asked questions on installing Windows 10 from Command Prompt.
1. How to boot Windows 10 from Command Prompt?
To boot Windows 10 from CMD, open the command prompt with admin privileges. Enter:
- diskpart
- list vol
- G:\setup.exe
These commands will boot Windows 10.
2. How to restore PC with Command Prompt?
Open CMD as administrator, and enter the rstrui.exe command. Execute the command and follow the instructions in the System Restore Wizard to restore the PC.
3. How do I force my computer to boot from USB?
Turn off the device and insert the bootable USB drive into the PC. Now, turn on the device and use the UEFI menu to boot Windows from the USB.
4. Can you install Windows 10 through BIOS?
To boot Windows 10 from BIOS, connect a bootable installation media to the PC. Boot the system into BIOS, and use the Boot Options Menu to install Windows 10.
Используем Diskpart для создания загрузочной флешки с Windows 10.
Хотя вы можете создать загрузочный USB для установки Windows 10 с помощью различных инструментов, в том числе с Media Creation Tool и PowerShell, вы можете использовать инструмент командной строки Diskpart для создания флеш-диска и установить Windows 10 на любом устройстве.
В этом руководстве вы узнаете, как использовать командную строку для создания загрузочного диска USB с Windows 10.
Чтобы создать USB-накопитель с установочными файлами Windows 10, вам потребуется USB-накопитель объемом не менее 4 ГБ, и ISO образ Windows 10, подключите флешку к вашему ПК и выполните следующие действия:
Шаг: 1. Откройте меню «Пуск» и начните набирать «Командная строка».
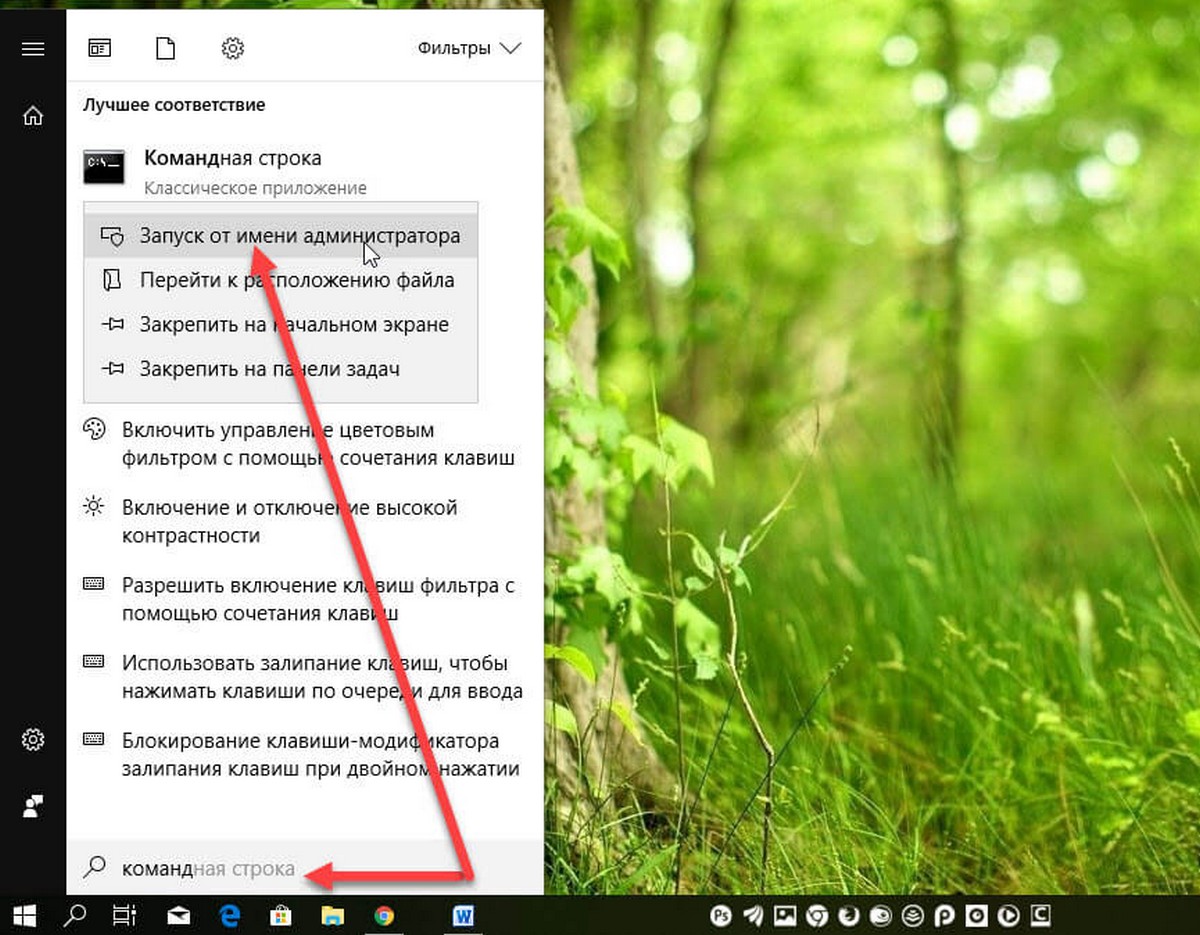
Шаг: 2. В найденных результатах , кликните правой кнопкой мыши верхний результат и выберите «Запуск от имени администратора».
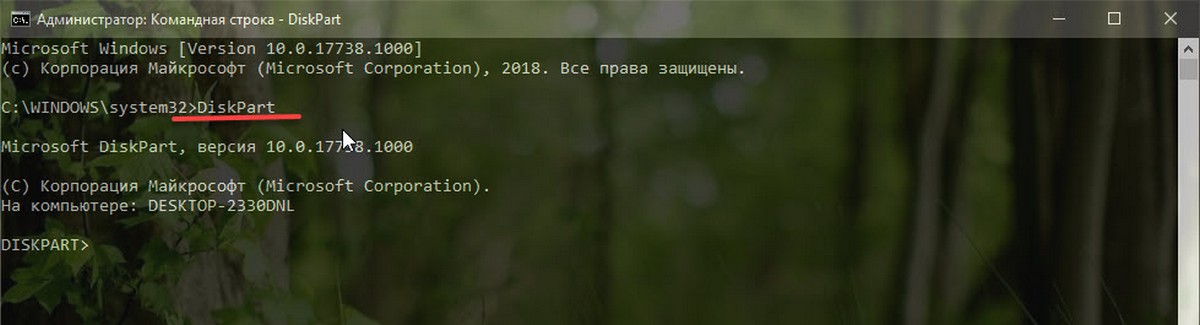
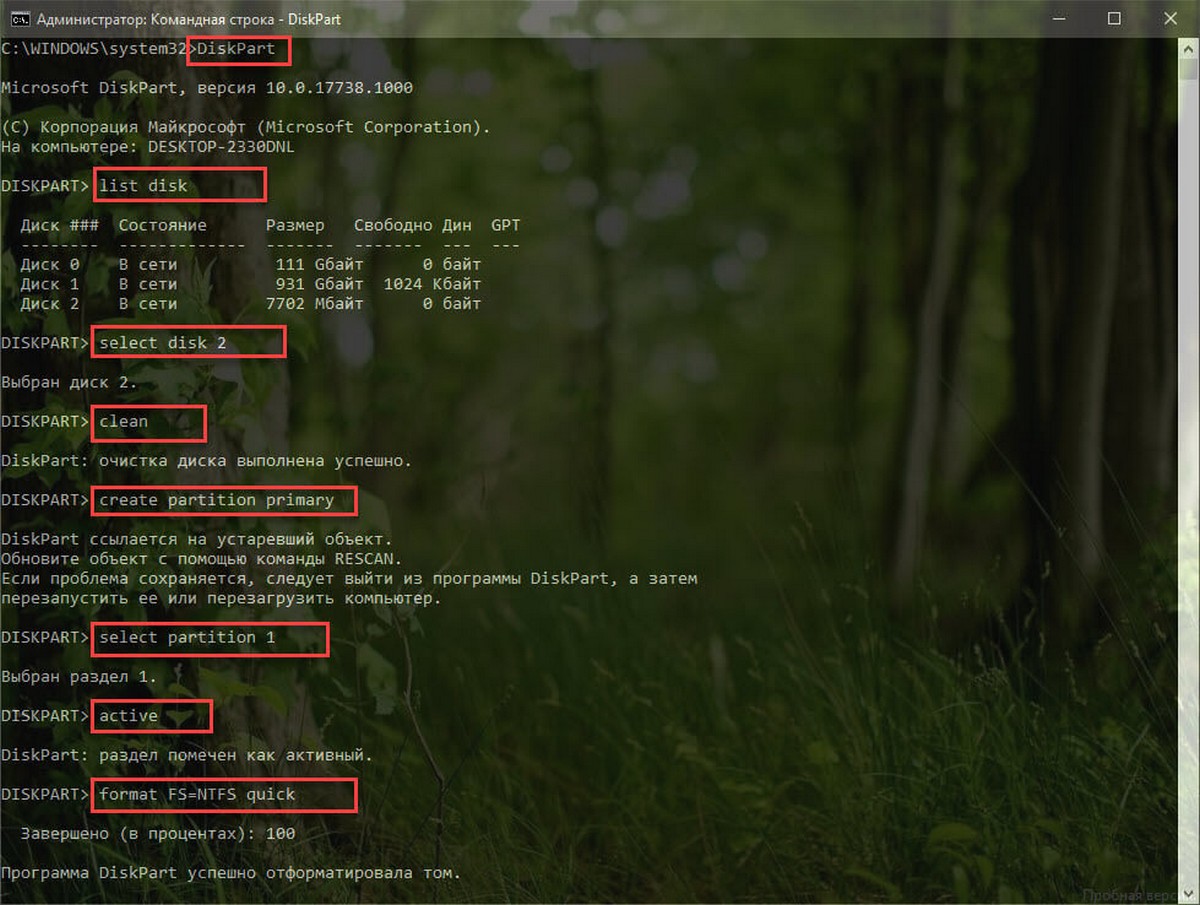
Шаг: 3. Введите следующую команду, чтобы открыть Diskpart и нажмите Enter :
DiskPart
Шаг: 4. Введите следующие команды по очереди и нажмите Enter:
list disk
select disk 2
clean
create partition primary
select partition 1
active
format FS=NTFS quick
Примечание: Мы используем команду select disk 2 в качестве примера, но вам нужно заменить 2 номером флэш-диска, который вы хотите использовать. Кроме того, если вы создаете загрузочный носитель для устройства, которое использует UEFI, вам необходимо отформатировать диск с использованием файловой системы FAT32 , а не NTFS с помощью этой команды: format fs=FAT32 quick.
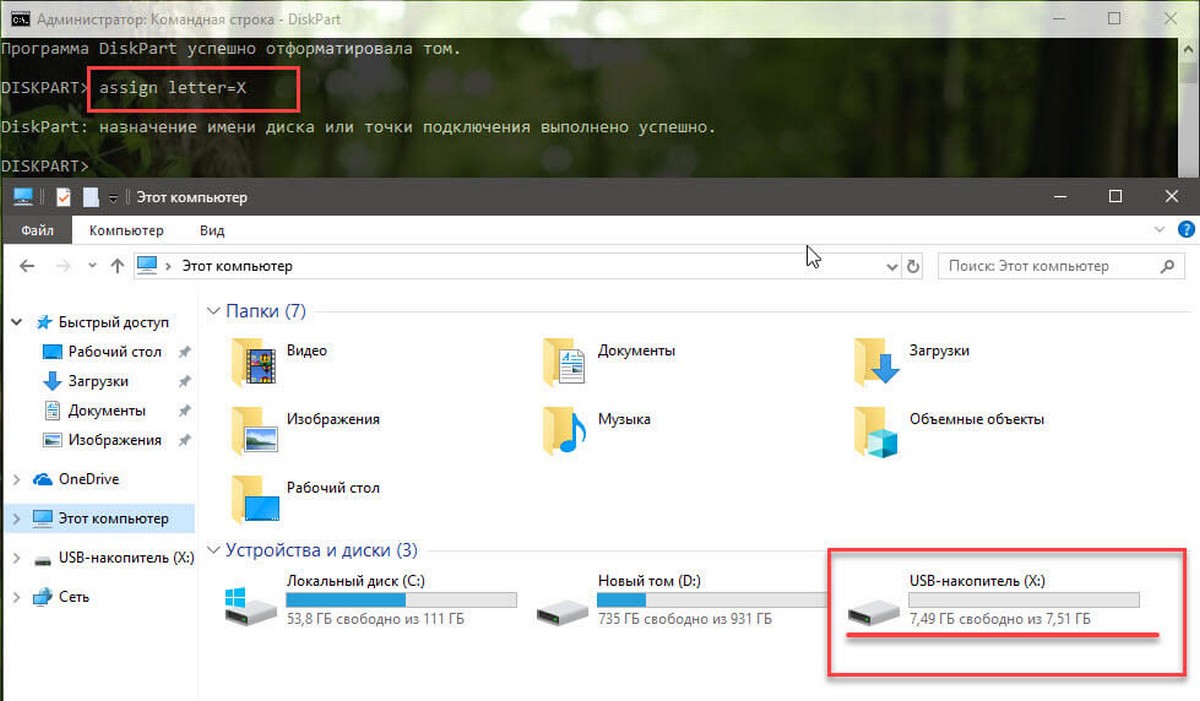
Шаг: 5. Введите следующую команду чтобы назначить букву диска для вашего USB флэш-накопителя и нажмите Enter :
assign letter=X
В команде измените X на любую букву, которую вы хотите использовать.
Шаг: 6. Теперь введите следующую команду для выхода из инструмента и нажмите Enter :
Exit
Шаг: 7. Смонтируйте ISO образ Windows 10, для этого просто дважды кликните на нем, откройте «Этот компьютер» и посмотрите букву диска назначенную ISO образу.
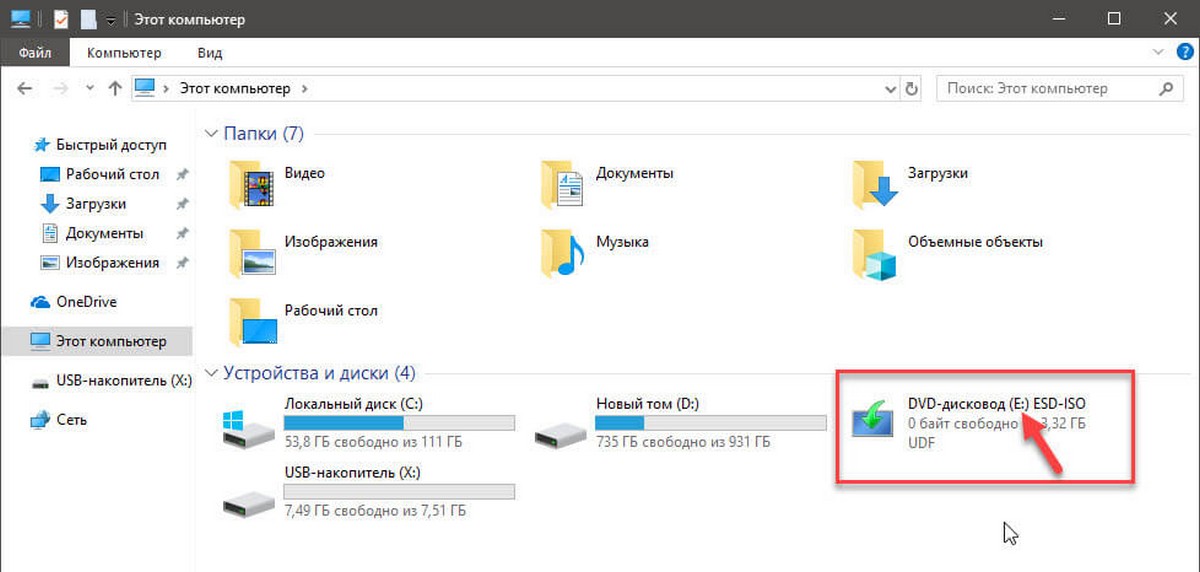
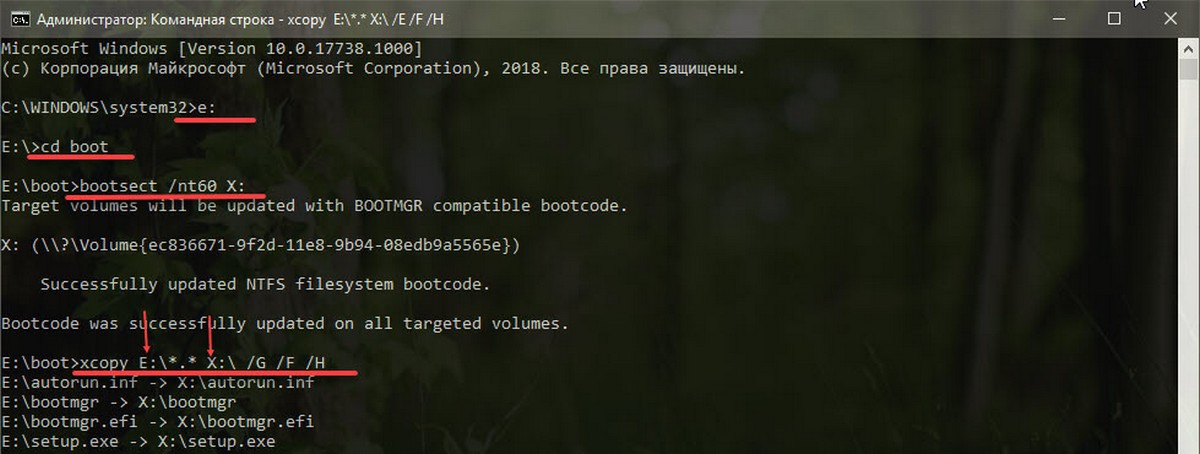
Шаг: 8. Введите следующие команды, чтобы попасть в загрузочную папку, расположенную в корневом каталоге Windows 10 ISO, и нажмите Enter :
e:
Где е: это буква диска назначенная системой образу
cd boot
Шаг: 9. Введите следующую команду для обновления загрузочного кода тома и нажмите Enter :
bootsect /nt60 X:
Шаг: 10. Введите следующую команду, чтобы скопировать все файлы Windows 10 на USB флэш-накопитель и нажмите Enter :
xcopy E:\*.* X:\ /E /F /H
В команде измените буквы букв E на букву диска образа ISO Windows 10 и X буквой флэш-накопителя.
Все! После того, как вы выполнили эти шаги, вы можете использовать загрузочный флеш-диск для установки Windows 10.
Рекомендуем: Как создать загрузочный USB-накопитель Windows 10 с помощью PowerShell
Как использовать средство Media Creation Tool для создания носителя с Windows 10