Все способы:
- Способ 1: Поиск в меню Пуск
- Способ 2: Меню Параметры
- Способ 3: Панель управления
- Способ 4: Исполняемый файл Защитника Windows 10
- Способ 5: Утилита Выполнить
- Вопросы и ответы: 4
Защитник в операционной системе Windows 10 — стандартное средство, обеспечивающее безопасность во время взаимодействия со сторонними файлами и программами. Иногда пользователям требуется обратиться к настройкам этого компонента, например, чтобы активировать его или отключить. В таких случаях нужно запустить графическое меню, где и осуществляются все конфигурации. Далее мы хотим обсудить именно эту тему, продемонстрировав доступные варианты перехода к редактированию Защитника.
Способ 1: Поиск в меню Пуск
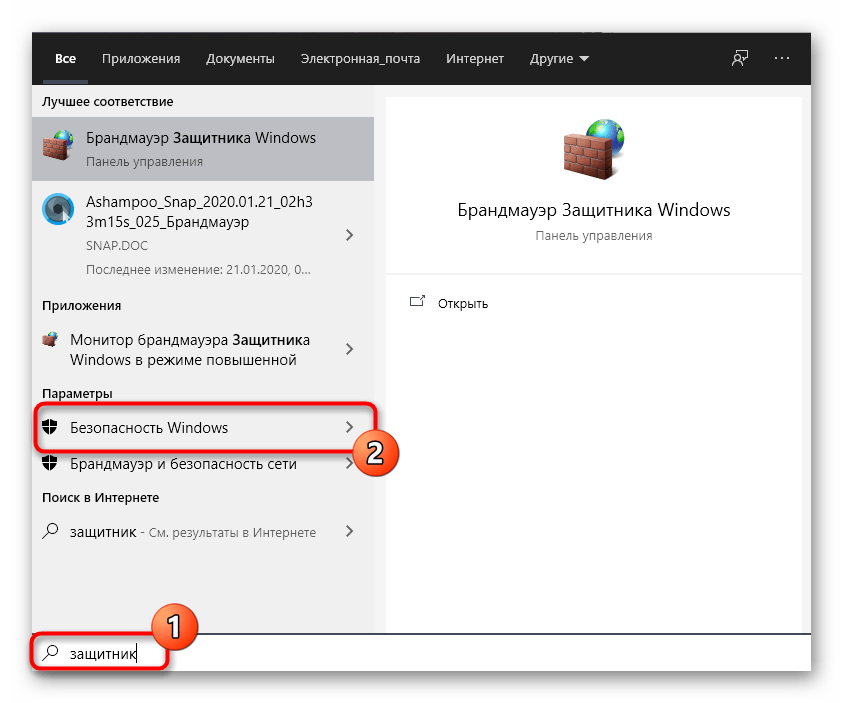
Самый простой метод — отыскать необходимое меню через встроенную в меню Пуск строку поиска. Для этого нужно лишь нажать по соответствующей кнопке и начать вписывать запрос. При отображении подходящего результата «Безопасность Windows» щелкните по нему левой кнопкой мыши, чтобы открыть меню.
Способ 2: Меню Параметры
Как известно, Защитник Виндовс в последней версии располагается в отдельном разделе меню Параметры, поэтому основной метод перехода к данному компоненту и осуществляется через эту оснастку. Сделать это можно следующим образом:
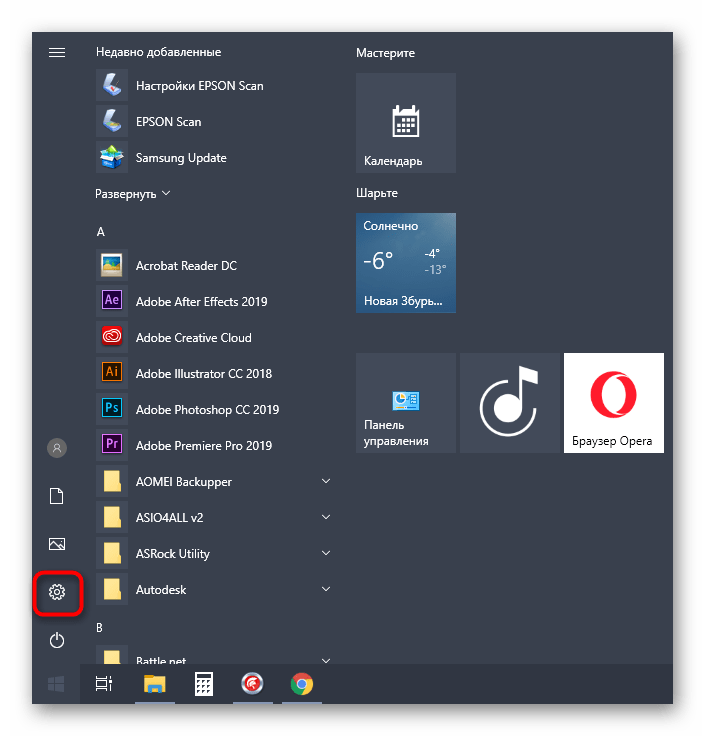
- Нажмите по кнопке «Пуск» и перейдите в «Параметры», щелкнув по значку в виде шестеренки.
- Здесь вам нужен последний пункт «Обновление и безопасность».
- Воспользуйтесь панелью слева, чтобы переместиться в «Безопасность Windows».
- Нажмите на «Открыть службу «Безопасность Windows»» или самостоятельно перейдите к областям защиты, выбрав подходящий пункт в списке.
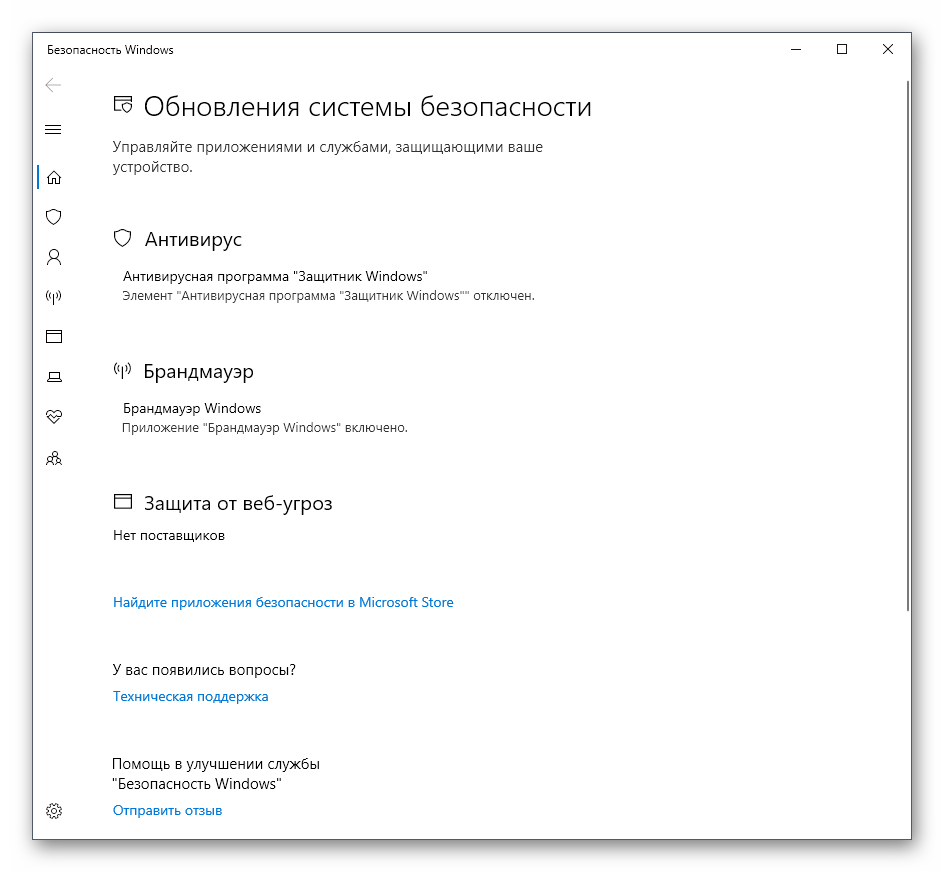
- Теперь вы можете перейти к управлению защитой операционной системы. Разобраться в этом поможет краткий обзор безопасности, представленный на главной странице службы.


Способ 3: Панель управления
Разработчики Windows 10 активно занимаются переносом параметров из привычного многим меню Панель управления в Параметры. Однако сейчас там все еще можно найти множество полезных оснасток и опций, что относится и рассматриваемому сегодня Защитнику. Его открытие осуществляется следующим образом:
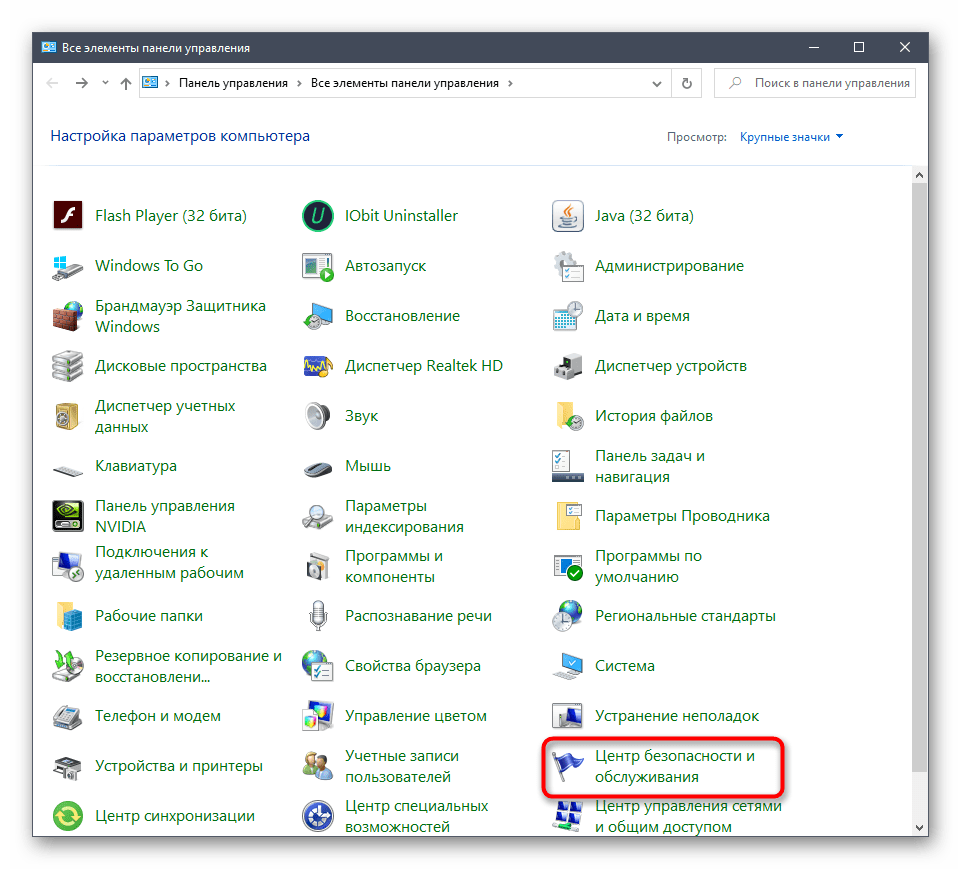
- Откройте меню Пуск и через поиск отыщите приложение «Панель управления».
- Здесь вас интересует раздел «Центр безопасности и обслуживания».
- В появившемся окне разверните категорию «Безопасность».
- Щелкните по надписи «Просмотреть в службе «Безопасность Windows»» возле необходимого параметра.
- После этого сразу же будет открыто окно и вы можете приступить к конфигурации нужных опций.


Способ 4: Исполняемый файл Защитника Windows 10
Этот способ, как и рассмотренный далее, позволяет лишь запустить саму службу безопасности, при этом не попадая в увиденное ранее графическое меню. Данный вариант подойдет тем пользователям, кто заинтересован во введении данной службы в режим активного функционирования. Осуществляется это при помощи соответствующего исполняемого файла.
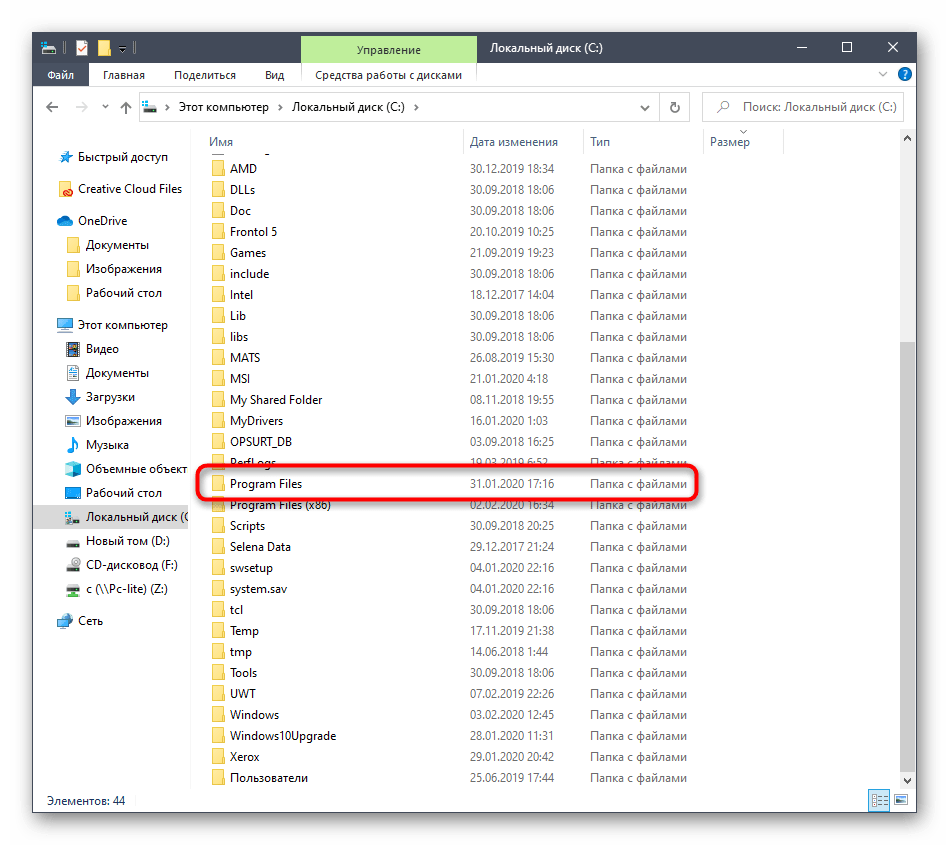
- Откройте Проводник и переместитесь к системному разделу жесткого диска.
- Тут откройте директорию «Program Files».
- В ней отыщите каталог «Windows Defender».
- Остается только запустить файл «MpCmdRun», дважды кликнув по нему левой кнопкой мыши.


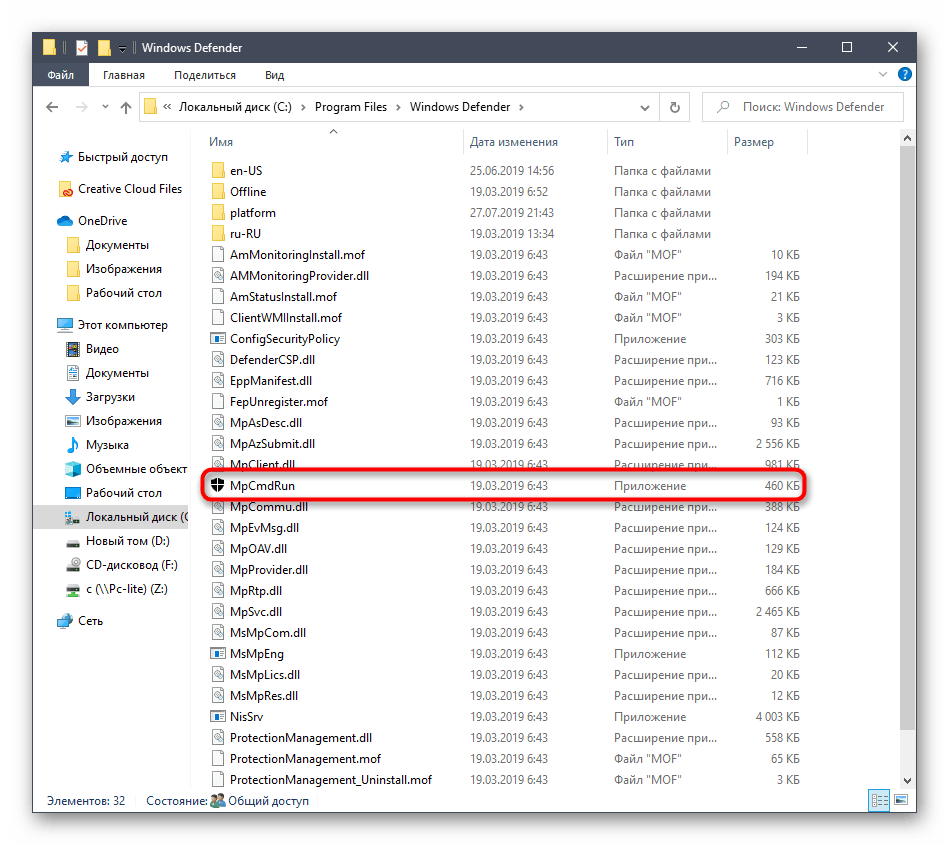
После этого буквально на секунду отобразится окно консоли, а затем оно будет автоматически закрыто. Теперь служба работает и должно начаться автоматическое сканирование на вирусы, если оно было запланировано.
Способ 5: Утилита Выполнить
Последний метод нашей сегодняшней статьи практически идентичен упомянутому выше, однако само действие выполняется буквально в несколько кликов. Для этого придется запустить утилиту Выполнить клавишами Win + R и ввести там С:\Program Files\Windows Defender\MpCmdRun.exe. После нажатия по клавише Enter служба будет автоматически запущена точно таким же образом, как это было показано ранее.

После запуска Защитника в Виндовс 10 каждому пользователю нужно выполнить в данном меню ряд разных действий, например, активировать его, отключить или добавить исключения. Разобраться в этом помогут отдельные материалы на нашем сайте. Перейти к ним можно, нажав по ссылкам ниже.
Читайте также:
Отключение Защитника в Windows 10
Включение Защитника в Windows 10
Добавление исключений в Защитнике Windows 10
Сегодня мы разобрали варианты открытия меню Защитника Windows 10. Вам осталось только выбрать подходящий и следовать инструкциям, чтобы справиться с этой задачей без каких-либо трудностей.
Наша группа в TelegramПолезные советы и помощь
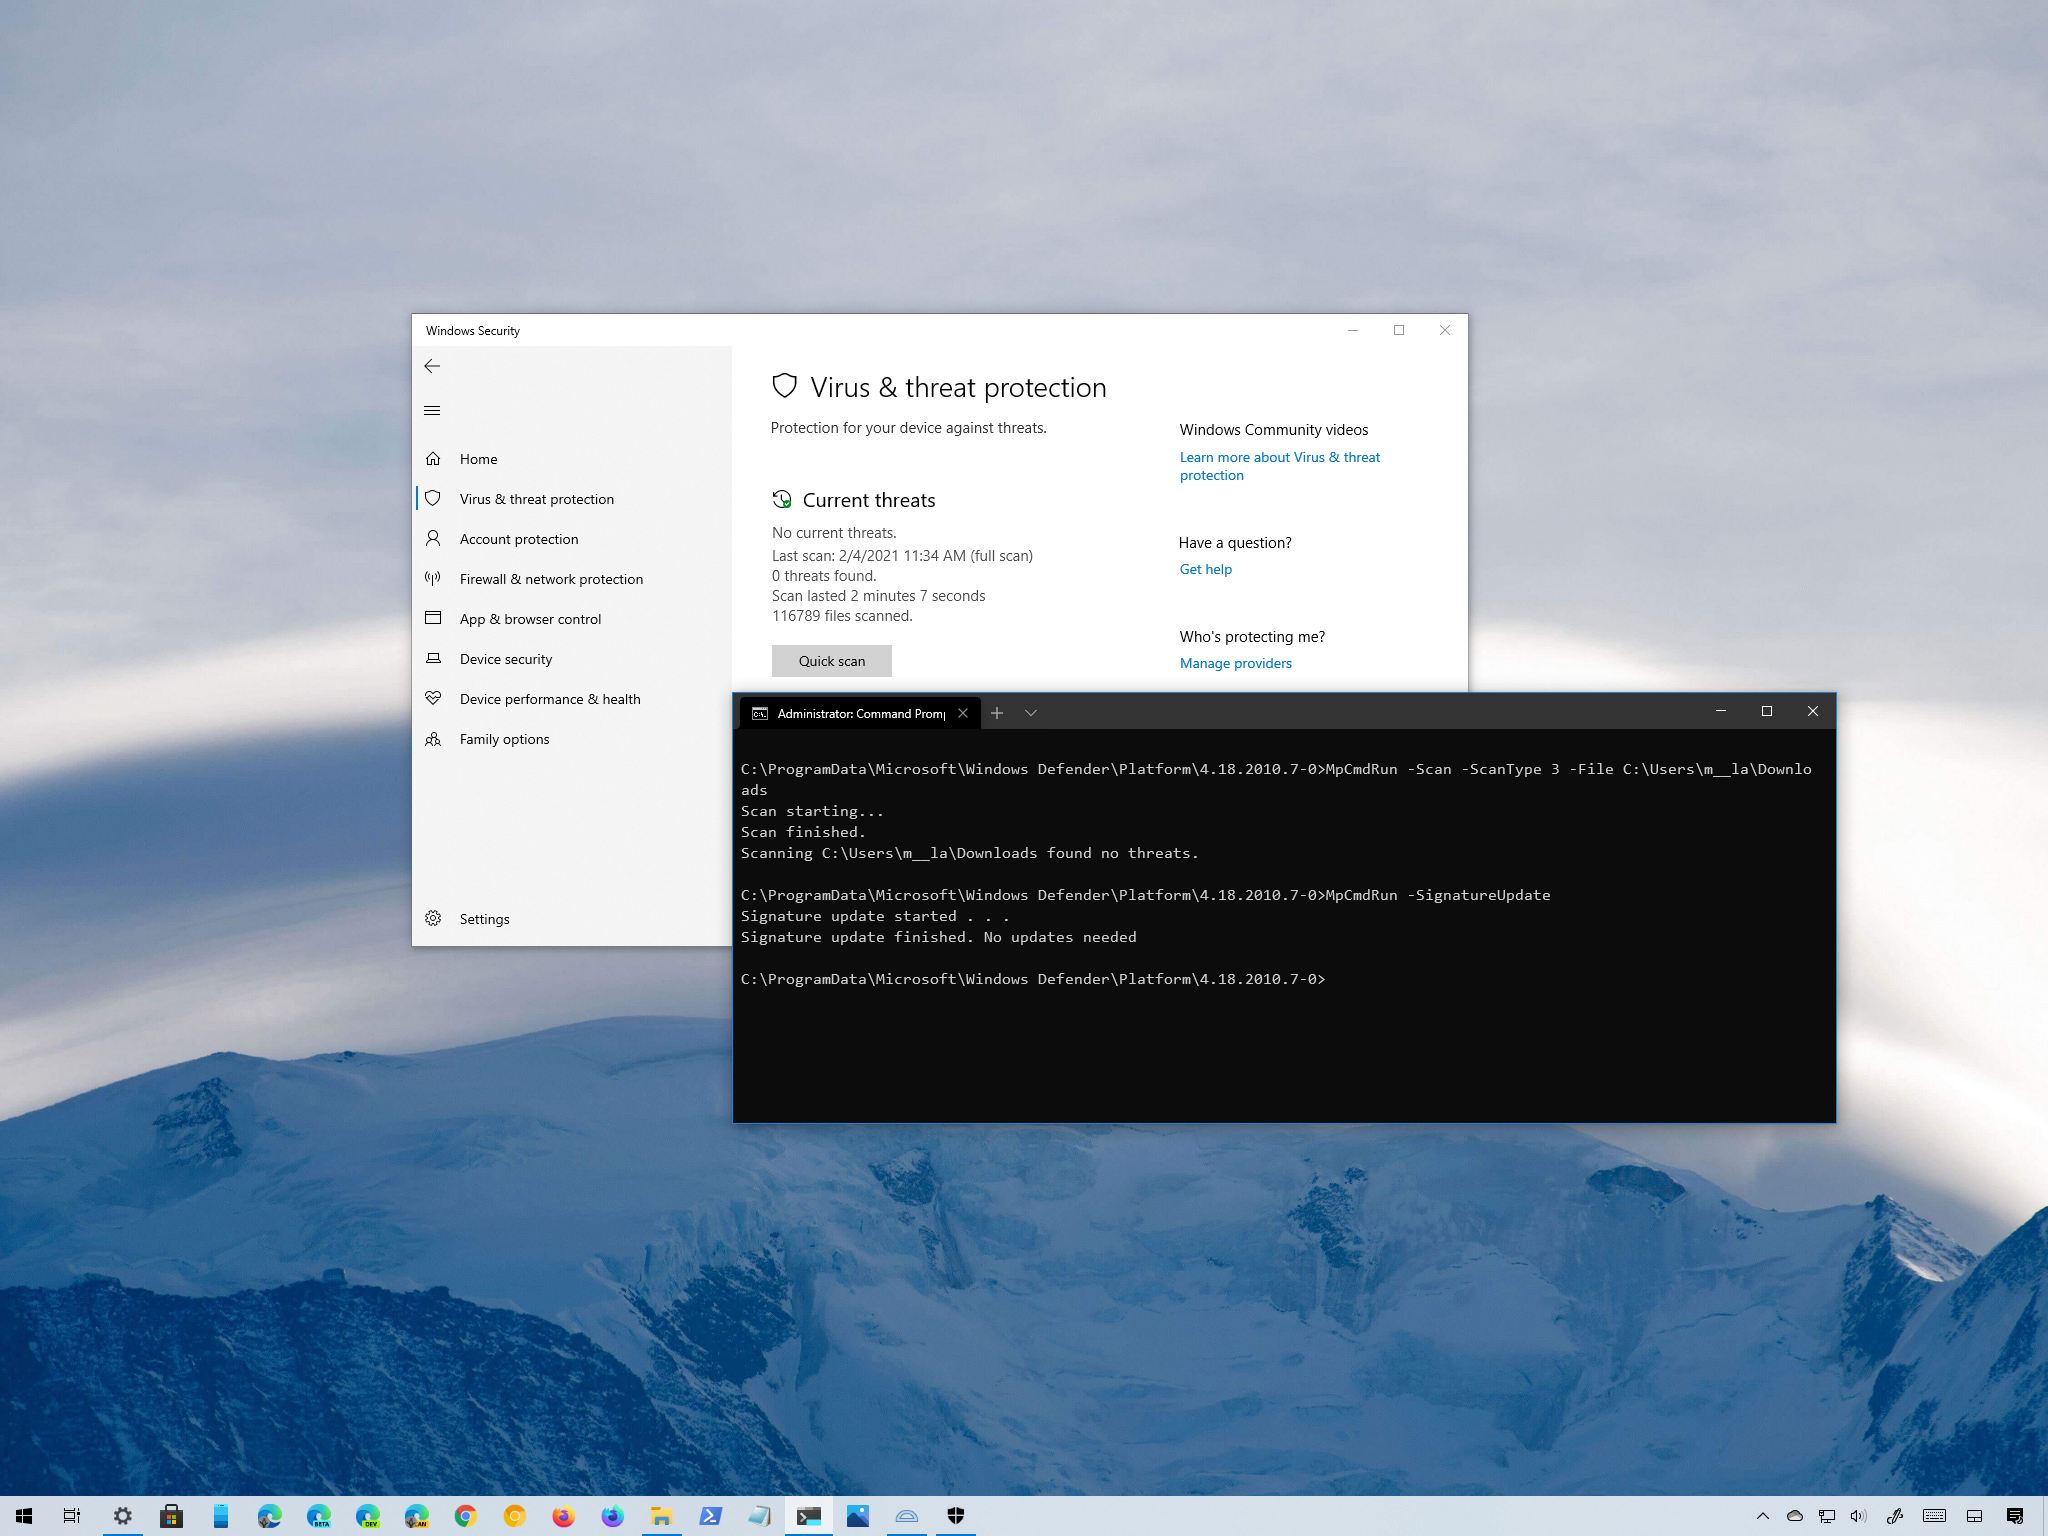
(Image credit: Windows Central)
On Windows 10, Microsoft Defender Antivirus provides advanced real-time protection to protect your device and files against viruses, ransomware, spyware, rootkits, and other forms of malware, including hackers.
Although you can easily control the feature using the Windows Security app, you can also handle various aspects of the antivirus (updates, scans, and quarantined items) through Command Prompt. Usually, managing the experience with commands can be useful in many situations. For instance, when you need to use a script to automate some of the anti-malware tasks. You want to set a specific schedule to download updates or perform a quick, full, or custom scan. Or when you need to complete particular tasks on multiple computers.
In this Windows 10 guide, we will walk you through the steps to manage Microsoft Defender Antivirus with Command Prompt.
- How to check for updates on Microsoft Defender
- How to perform quick virus scan with Microsoft Defender
- How to perform full virus scan with Microsoft Defender
- How to perform custom virus scan with Microsoft Defender
- How to perform boot sector malware scan on Microsoft Defender
- How to restore quarantined items on Microsoft Defender
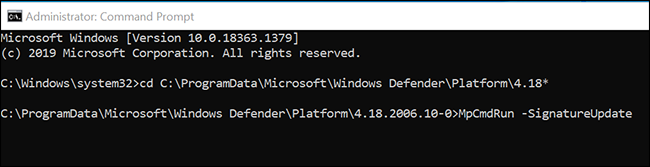
How to check for updates on Microsoft Defender
To check and download updates for Microsoft Defender, use these steps:
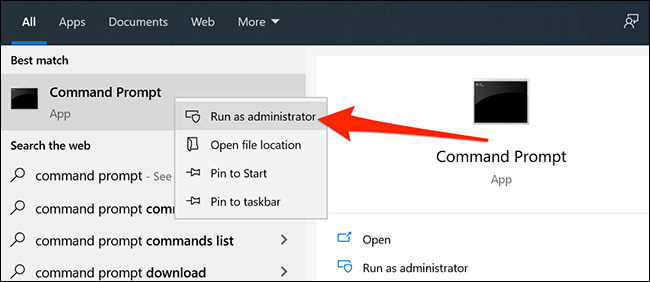
- Open Start.
- Search for Command Prompt, right-click the top result, and select the Run as administrator option.
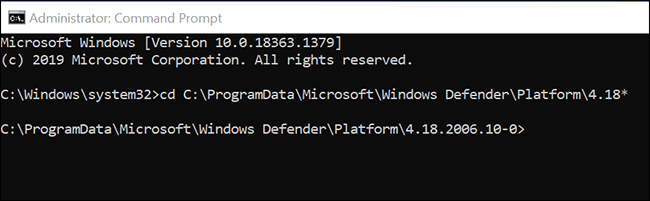
- Type the following command to open the antivirus tool location and press Enter:
cd C:\ProgramData\Microsoft\Windows Defender\Platform\4.18* - Type the following command to check and update Microsoft Defender Antivirus and press Enter:
MpCmdRun -SignatureUpdate
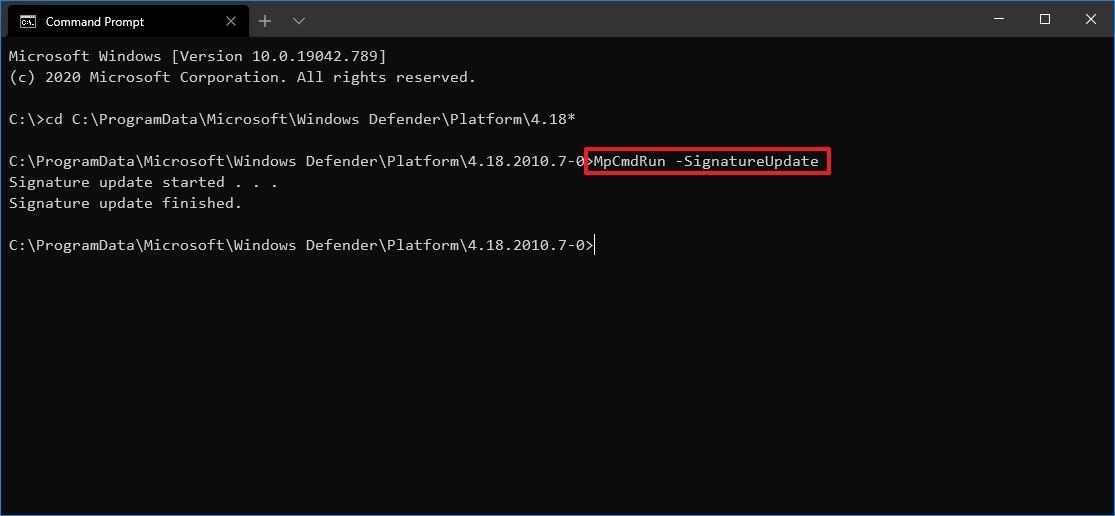
Once you complete the steps, the tool will check and download any update available for the built-in antivirus.
Uninstall definitions updates
You can also remove previously installed updates with these steps:
- Open Start.
- Search for Command Prompt, right-click the top result, and select the Run as administrator option.
- Type the following command to open the antivirus tool location and press Enter:
cd C:\ProgramData\Microsoft\Windows Defender\Platform\4.18* - Type the following command to remove the most recent definitions and press Enter:
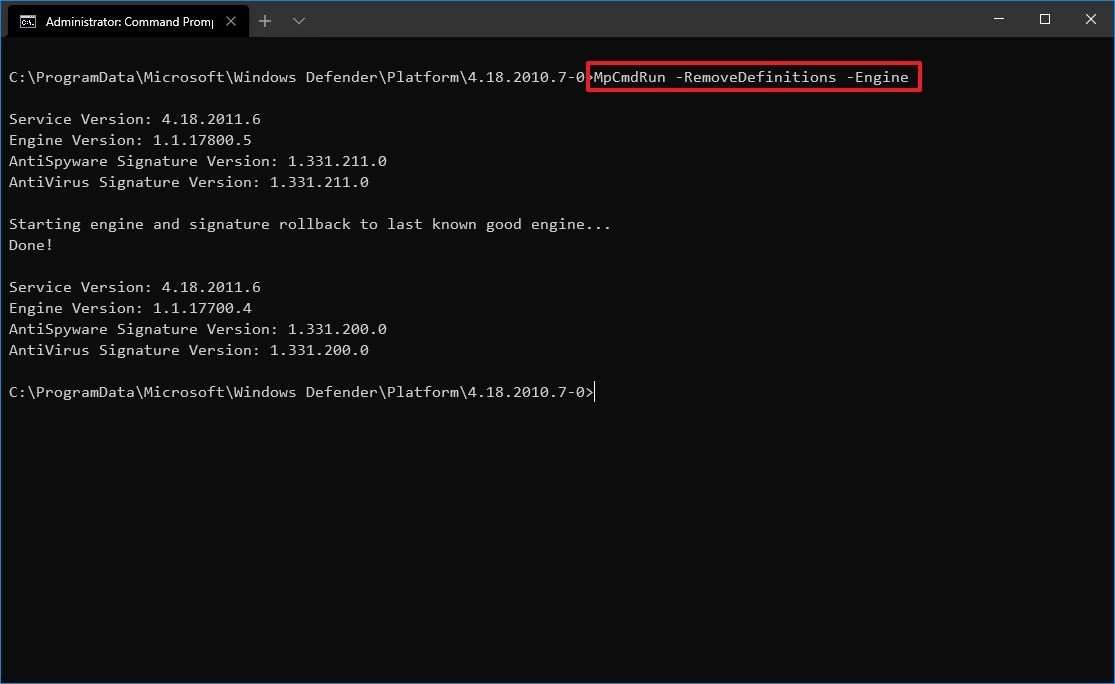
MpCmdRun -RemoveDefinitions -AllThe -All option restores the previous definitions from the backup or original default set of signatures. - Type the following command to rollback the engine version and press Enter:
MpCmdRun -RemoveDefinitions -EngineThe -Engine option rolls back to the previous version of the antivirus engine.
- Type the following command to remove dynamic signature updates and press Enter:
MpCmdRun -RemoveDefinitions -DynamicSignaturesThe -DynamicSignatures option uninstalls only the dynamic signatures.
After you complete the steps, the definitions will be removed from your computer according to your configuration.
All the latest news, reviews, and guides for Windows and Xbox diehards.
How to perform quick virus scan with Microsoft Defender
To perform a quick Microsoft Defender scan, use these steps:
- Open Start.
- Search for Command Prompt, right-click the top result, and select the Run as administrator option.
- Type the following command to open the antivirus tool location and press Enter:
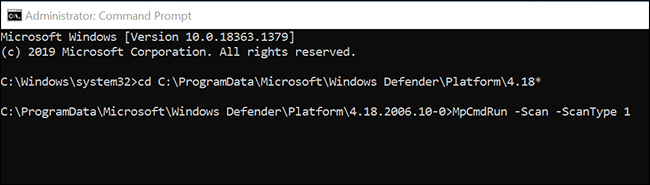
cd C:\ProgramData\Microsoft\Windows Defender\Platform\4.18* - Type the following command to perform a quick antivirus scan and press Enter:
MpCmdRun -Scan -ScanType 1Quick tip: You can also replace 1 with the 0 option in the command to start a default scan according to your configuration.

Once you complete the steps, the scan will begin, but it takes more than one day, the process will stop automatically.
How to perform full virus scan with Microsoft Defender
To perform a full Microsoft Defender scan with Command Prompt, use these steps:
- Open Start.
- Search for Command Prompt, right-click the top result, and select the Run as administrator option.
- Type the following command to open the antivirus tool location and press Enter:
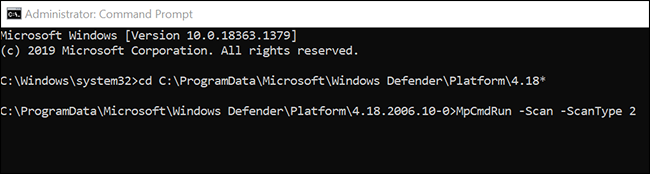
cd C:\ProgramData\Microsoft\Windows Defender\Platform\4.18* - Type the following command to perform a full antivirus scan and press Enter:
MpCmdRun -Scan -ScanType 2
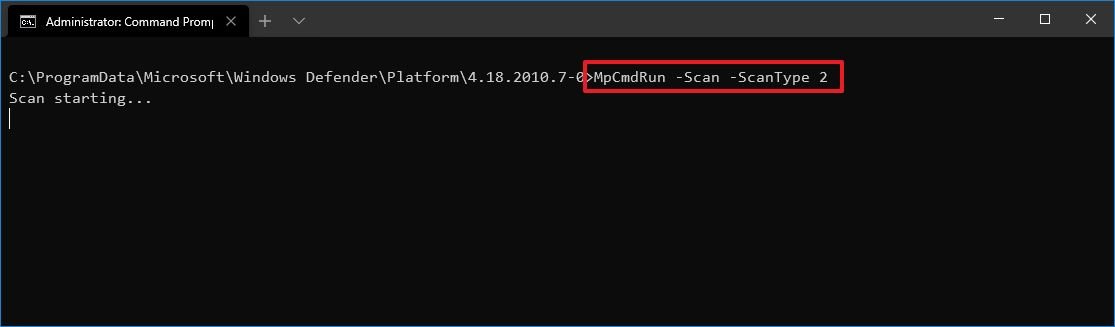
After you complete the steps, the antivirus will perform a full malware scan on your device. Depending on the amount of data, this process can take a very long time.
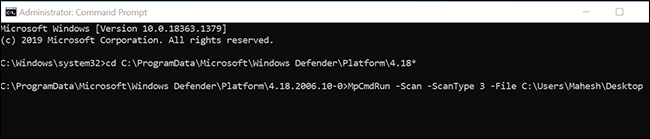
How to perform custom virus scan with Microsoft Defender
To customize a malware scan using Command Prompt, use these steps:
- Open Start.
- Search for Command Prompt, right-click the top result, and select the Run as administrator option.
- Type the following command to open the antivirus tool location and press Enter:
cd C:\ProgramData\Microsoft\Windows Defender\Platform\4.18* - Type the following command to perform a custom antivirus scan and press Enter:
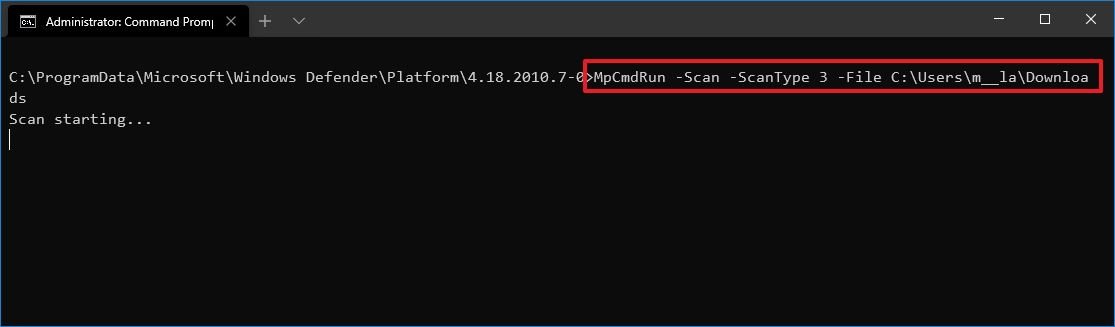
MpCmdRun -Scan -ScanType 3 -File PATH\TO\FOLDER-FILESIn the command, make sure to specify the path to the folder you want to scan.For example, this command scans the «Downloads» folder:MpCmdRun -Scan -ScanType 3 -File C:\Users\username\Downloads
- (Optional) Type the following command to perform a custom scan with timeout time and press Enter:
MpCmdRun -Scan -ScanType 3 -File PATH\TO\FOLDER-FILES -Timeout 1In the command, make sure to specify the path to the folder you want to scan.For example, this command scans the «Downloads» folder and sets the timeout to one day:MpCmdRun -Scan -ScanType 3 -File C:\Users\username\Downloads -Timeout 1Quick note: You can always change the number for the timeout option to specify another number of days. The option is also available for quick and full scan commands.
Once you complete the steps, the anti-malware solution will only scan the location you specified. If you are using the «-Timeout» option, then if the scan is taking a long time, it will timeout once the time you specified has been reached.
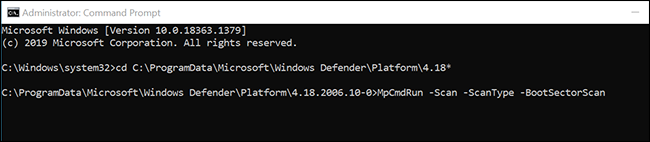
How to perform boot sector malware scan on Microsoft Defender
On Windows 10, the boot sector is an essential section in the installation drive that stores the instructions on how to start the boot process. Sometimes, viruses can also attack the boot sector causing unwanted behaviors, which can be challenging to troubleshoot and fix. However, Microsoft Defender Antivirus includes an option to check and remove malicious code that may be residing in the boot sector.
To scan the boot sector for malware with Microsoft Defender, use these steps:
- Open Start.
- Search for Command Prompt, right-click the top result, and select the Run as administrator option.
- Type the following command to open the antivirus tool location and press Enter:
cd C:\ProgramData\Microsoft\Windows Defender\Platform\4.18* - Type the following command to perform a custom antivirus scan and press Enter:
MpCmdRun -Scan -ScanType -BootSectorScan

After you complete the steps, Microsoft Defender Antivirus will scan the boot sector for any malicious code that may be affecting the device.
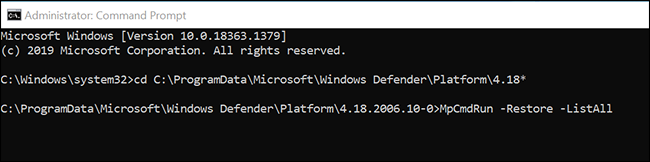
How to restore quarantined items on Microsoft Defender
The Microsoft Defender Antivirus command-line tool also includes an option to view a list of quarantined items and another option to restore items that might have been detected as malicious when they are not harmful.
To view and restore quarantined items with Command Prompt, use these steps:
- Open Start.
- Search for Command Prompt, right-click the top result, and select the Run as administrator option.
- Type the following command to open the antivirus tool location and press Enter:
cd C:\ProgramData\Microsoft\Windows Defender\Platform\4.18* - Type the following command to view quarantined items and press Enter:
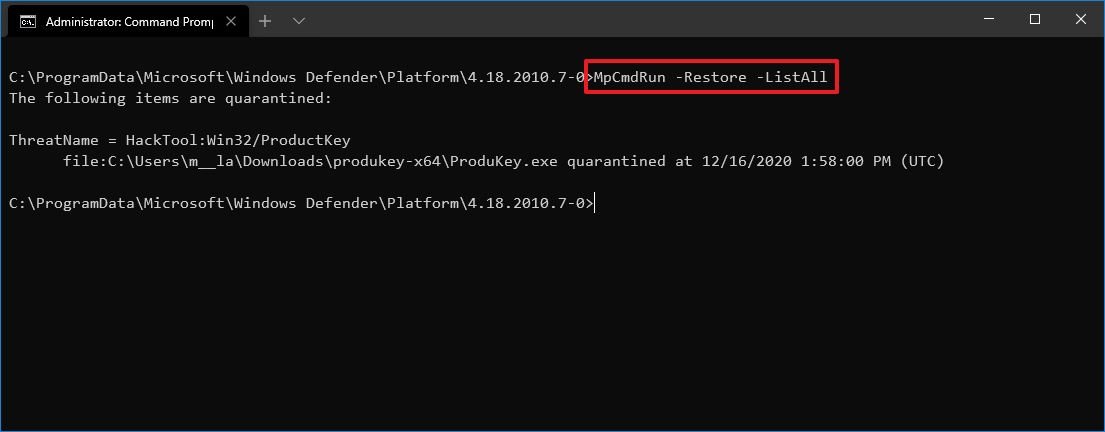
MpCmdRun -Restore -ListAll
- Type the following command to restore all quarantined item and press Enter:
MpCmdRun -Restore -All - Type the following command to restore a specific quarantined item and press Enter:
MpCmdRun -Restore -Name ITEM-NAMEIn the command, replace the «ITEM-NAME» for the name of the quarantined item you want to restore. - Type the following command to restore a specific quarantined item to a specific path and press Enter:
MpCmdRun -Restore -Name ITEM-NAME -FilePath PATH\TO\RESTOREDIn the command, make sure to specify the path to restore the item.For example, this command restores a specific item to the Documents folder:MpCmdRun -Restore -Name app.exe -FilePath C:\Users\username\Downloads
Once you complete the steps, the items will be restored in the original or alternate location, depending on the command.
This guide focuses on the more important commands you can use with Command Prompt, but the tool includes additional options, which you can view running the
MpCmdRuncommand.
While you can manage a number of functions through Command Prompt, the tool is quite limited. For example, you cannot start an offline scan or change preferences. If you want to manage settings and control virtually every aspect of Microsoft Defender Antivirus with commands, you should be using the PowerShell modules instead.
Mauro Huculak has been a Windows How-To Expert contributor for WindowsCentral.com for nearly a decade and has over 15 years of experience writing comprehensive guides. He also has an IT background and has achieved different professional certifications from Microsoft, Cisco, VMware, and CompTIA. He has been recognized as a Microsoft MVP for many years.
Windows Security, formerly known as Microsoft Defender, is the go-to app for those who want to know more about security in Windows 10 and Windows 11. This app is part of Microsoft’s operating system, and this is where you can find out what your antivirus has been doing, what your firewall has to say, and whether other security features are turned on and working well. However, before you can get any information, you must know how to access Windows Security. That’s why, in this article, I show you several ways to open Windows Security in Windows 10 and Windows 11:
1. Where to find Windows Security in the system tray
By default, Windows Security is started automatically by Windows, and it runs in the background, protecting your computer or device. Few people know that you can find its icon in the system tray (the bottom-right corner of the taskbar) in Windows 11 and Windows 10.
Click or tap the arrow pointing upwards to Show hidden icons, and then, in the list of icons, click or tap the blue shield. If you hover your mouse over it, it says Microsoft Defender. Don’t worry, it’s just another name for Windows Security.
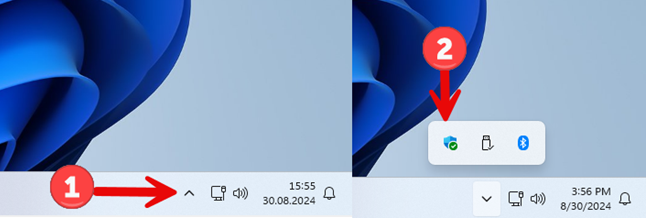
Opening Windows Security from the system tray in Windows 11
In Windows 10, the process is identical, even though things look a little different. The main difference is that the Windows Security icon is a white shield instead of a blue one.
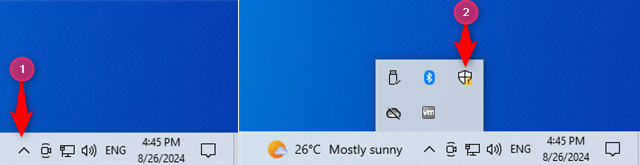
Opening Windows Security from the system tray in Windows 10
Keep in mind that Windows Security displays an exclamation mark alongside its icon when it finds issues that require your attention, similar to the screenshot above.
2. Open Windows Security from the command line (CMD, PowerShell, Terminal)
Some people who work with Windows Security need to find a way to open it from a command-line app like the Command Prompt, PowerShell, or Windows Terminal. Open any of these apps on your Windows computer, type this command, and press Enter:
start windowsdefender:
Here’s me running it in the Windows Terminal from Windows 11:
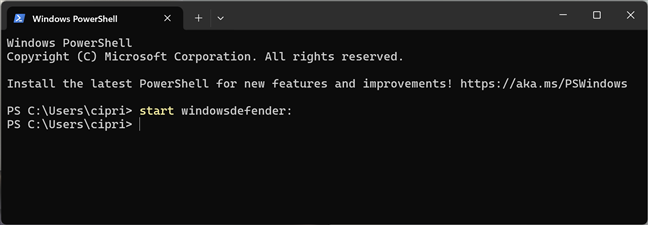
Opening Windows Security from Windows Terminal
In the screenshot below, I’ve started CMD and ran the same command in Windows 10:

Opening Windows Security from CMD
TIP: If your computer is having issues loading Windows, here’s how to open Command Prompt when Windows doesn’t boot.
3. How to access Windows Security from the Start Menu
A simple way of accessing Windows Security is from the Start Menu. In Windows 10, click or tap Start, scroll down through the list of apps until you find those that start with the letter W, and then choose the Windows Security shortcut.
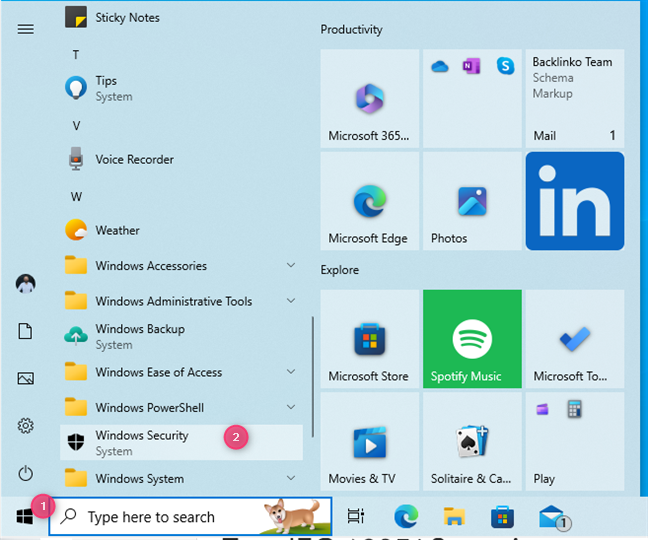
The Windows Security shortcut in the Windows 10 Start Menu
In Windows 11, things are a bit different: click or tap Start followed by All apps. Then, in the list of apps, scroll to the bottom, find the Windows Security shortcut, and tap on it.
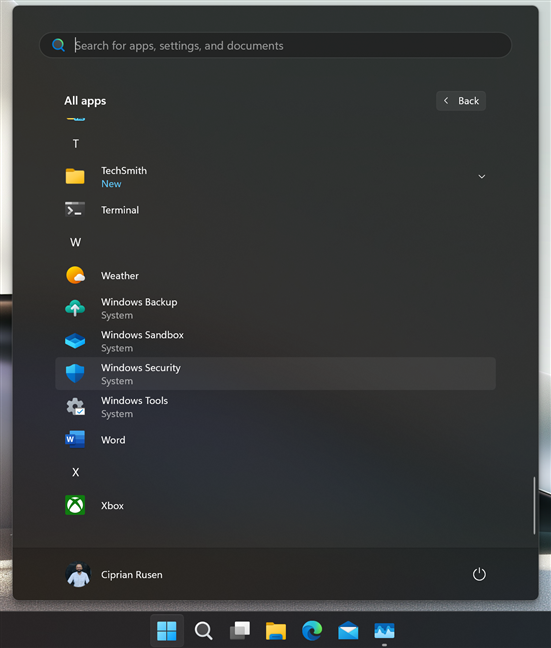
The Windows Security shortcut in the Windows 11 Start Menu
4. How to create a Windows Security shortcut on your desktop
After finding the Windows Security shortcut in the Start Menu (using the instructions from the previous section), you can drag and drop it to the desktop. If you execute the move correctly, a Link text and the Windows Security shortcut accompany your cursor as you move it across the desktop. Release the left mouse button (or lift your finger from the touchscreen) anywhere on the desktop, and Windows 10 creates a new shortcut right there.
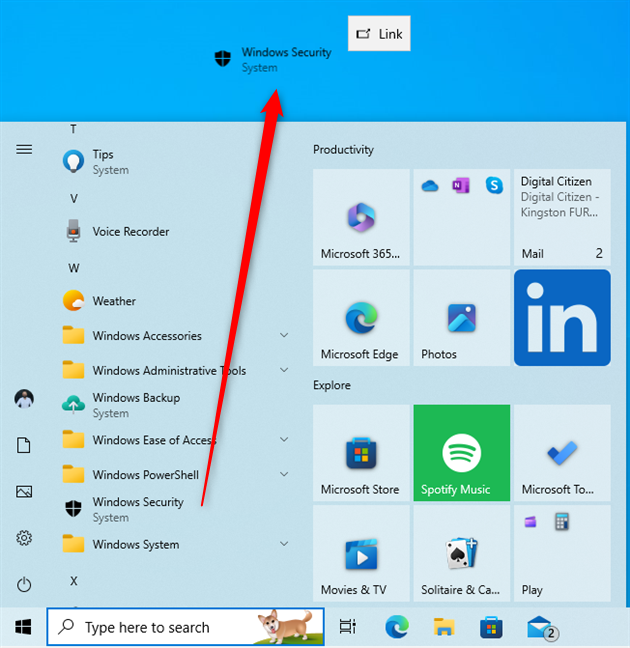
Creating a Windows Security shortcut on the Windows 10 desktop
In Windows 11, it’s just as easy to create a Windows Security shortcut on the desktop using the Start Menu. Find the Windows Security shortcut in the All apps list, click or press and hold on it, and then move the mouse (or your finger) outside the Start Menu somewhere on the desktop. When you see the Link text alongside the shortcut, release the mouse or lift your finger, and the shortcut is created.
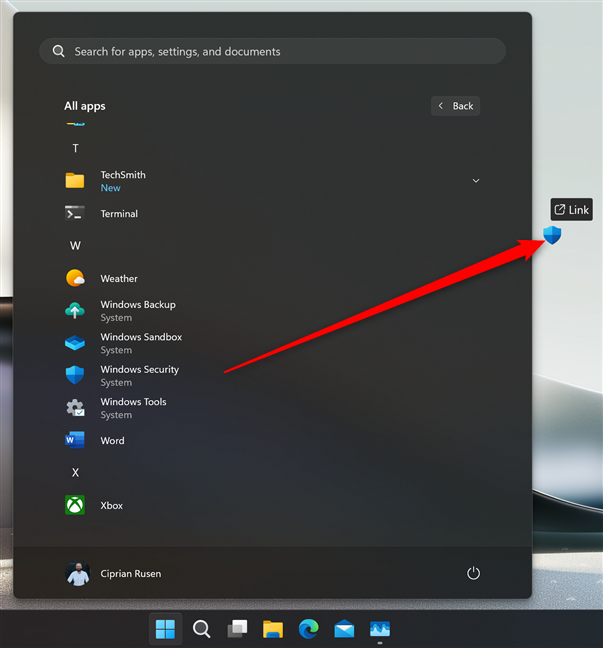
Creating a Windows Security shortcut on the Windows 11 desktop
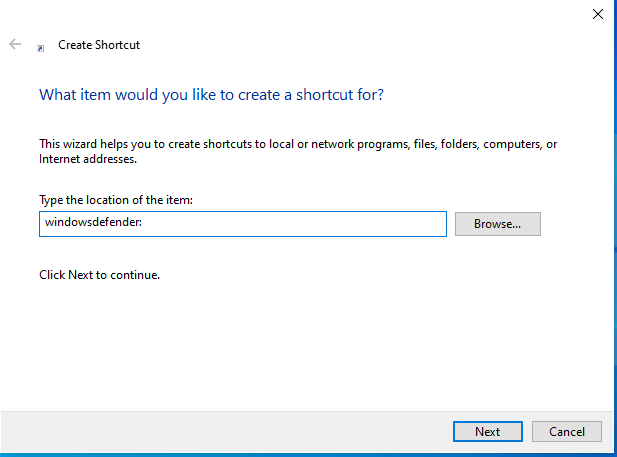
You can also create a Windows Security shortcut using the Create Shortcut wizard. Right-click (or press and hold) on the empty space on your desktop and choose New > Shortcut. Then, copy and paste or type the following as your target location:
windowsdefender:
You can also use this target:
%windir%\explorer.exe windowsdefender:
Click or tap Next, name the shortcut Windows Security, and press Finish.
Creating a Windows Security shortcut
Keep in mind that the first target that I provide creates a shortcut using the default Windows Security icon, while the second uses the File Explorer icon.
5. How open Windows Security with a keyboard shortcut
If you’ve created a Windows Security shortcut on the desktop by dragging it from the Start Menu, as shown in this guide’s fourth method, you can then edit the shortcut’s Properties in order to open this app with a keyboard shortcut. After creating the shortcut on the desktop, right-click (or press and hold) on it and choose Properties.
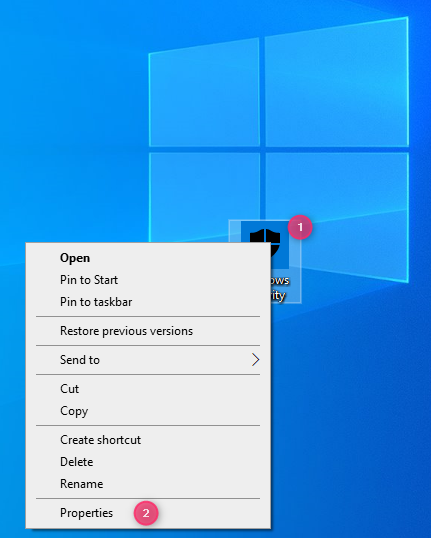
Accessing the Properties of the Windows Security shortcut
Next, click or tap inside the Shortcut key text box and press the shortcut key combination you want to use to open this app. For example, you could press CTRL + ALT + W, like I did in my screenshot. When you’re done setting up the shortcut key, press OK.
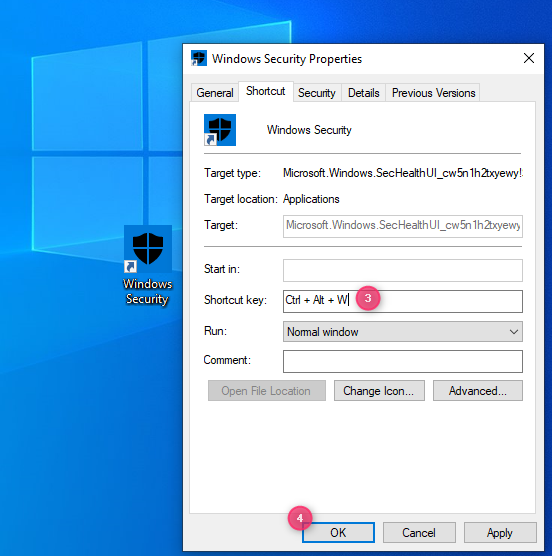
Setting the shortcut key for Windows Security
This method works the same in Windows 10 and Windows 11. If you need more information, read this guide: How to open any program (or app) with a keyboard shortcut in Windows.
6. How to open Windows Security with Run
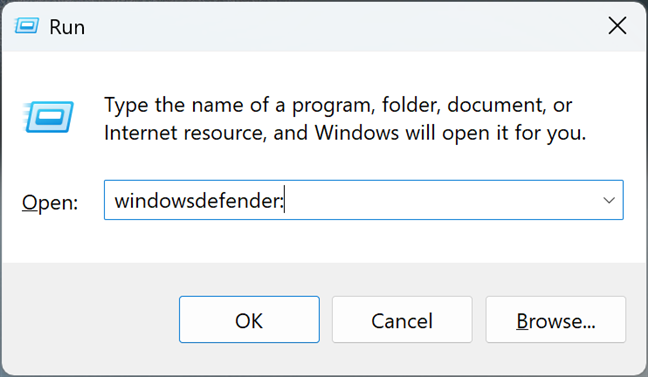
An old-school way of opening apps in Windows is through the Run dialog. Press Windows + R on your keyboard, and in the Open field, type:
windowsdefender:
Don’t forget to press Enter on your keyboard or click/tap OK to execute your command and open Windows Security.
Opening Window Security from Run
7. How to find Windows Security using search
People who are wondering where to find Windows Security on their Windows computer can always use search. It’s a fast and reliable way of opening apps.
If you’re using Windows 10, click or tap inside the Search box on the taskbar, type the word security, and choose the Windows Security search result.
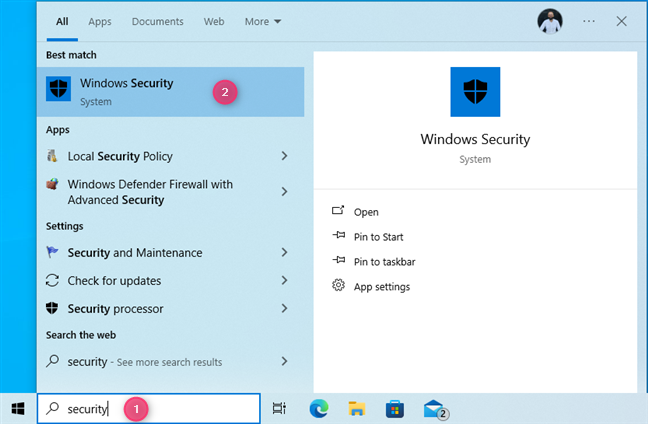
Accessing Windows Security via search in Windows 10
If you’re using Windows 11, finding Windows Security works exactly the same way. However, remember that the search feature may not always display Windows Security as the first search result on the list. It may also display folders with this name or apps like those in the screenshot below.
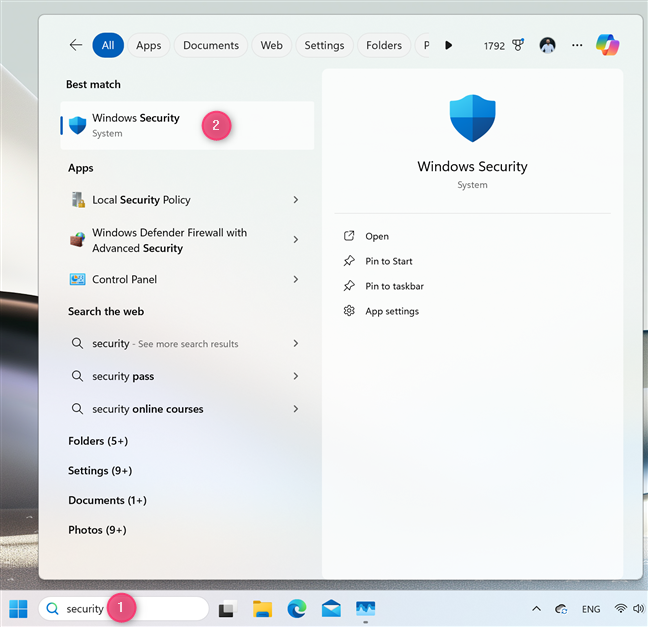
Accessing Windows Security via search in Windows 11
8. How to start Windows Security from File Explorer
Few people know that File Explorer offers another convenient way to start Windows Security. Open File Explorer and type or copy and paste this command in its address bar:
windowsdefender:
Then, press Enter on your keyboard to execute it.🙂
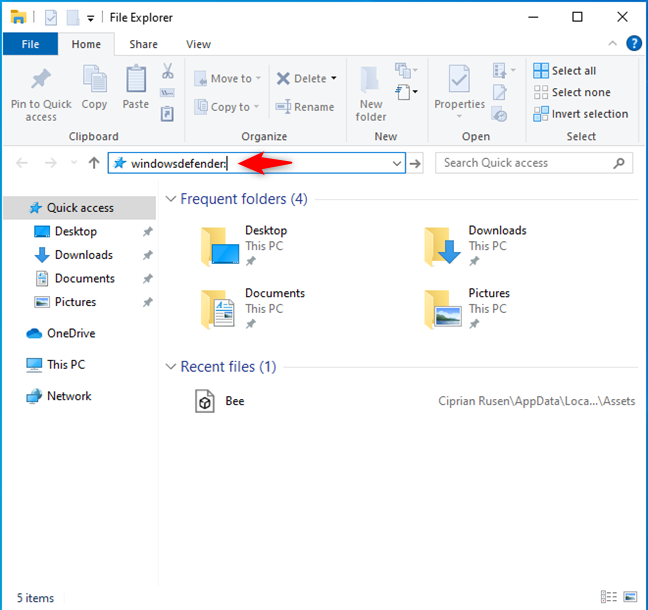
Opening Windows Security from File Explorer in Windows 10
While the screenshot above is from Windows 10, the steps involved work the same in Windows 11, even though File Explorer looks different.
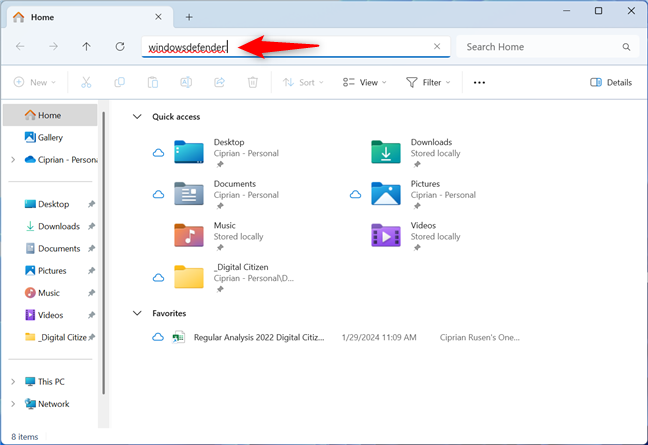
Opening Windows Security from File Explorer in Windows 11
9. Pin Windows Security on your taskbar or Start Menu
Locate the Windows Security shortcut in the Start Menu. As shown in method 3, in Windows 10, you can find this shortcut at the bottom of the apps list. Then, right-click or press and hold Windows Security, and a contextual menu appears. The first option in the menu is Pin to Start, which pins the Windows Security shortcut in the Start Menu. If you choose More, an extension opens, allowing you to Pin to taskbar.
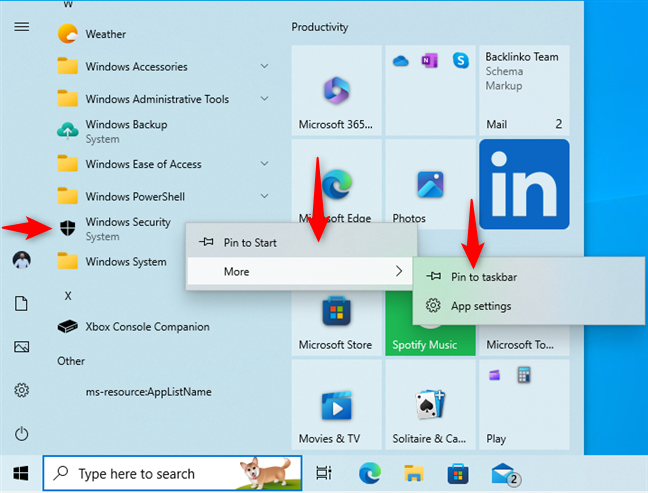
Pinning Windows Security to the Start Menu or the taskbar in Windows 10
The steps are similar in Windows 11. However, you first need to click or tap Start, followed by All apps, to see the list of apps installed on your computer. Then, right-click (or press and hold) the Windows Security shortcut and pin it where you want.
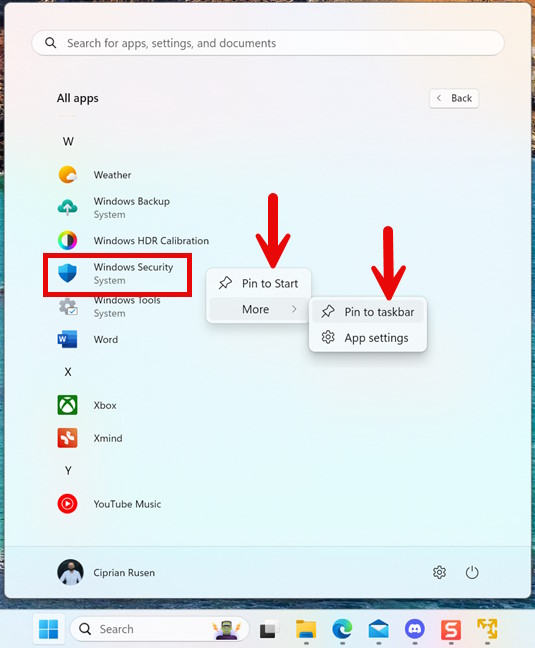
Pinning Windows Security to the Start Menu or the taskbar in Windows 11
10. How to open Windows Security using Settings
If you’re already using the Settings app and need to access Windows Security, you can do that really quickly:
Open Settings and go to the Update & Security category. On the left side of the window, select Windows Security; then, on the right, click or tap Open Windows Security.
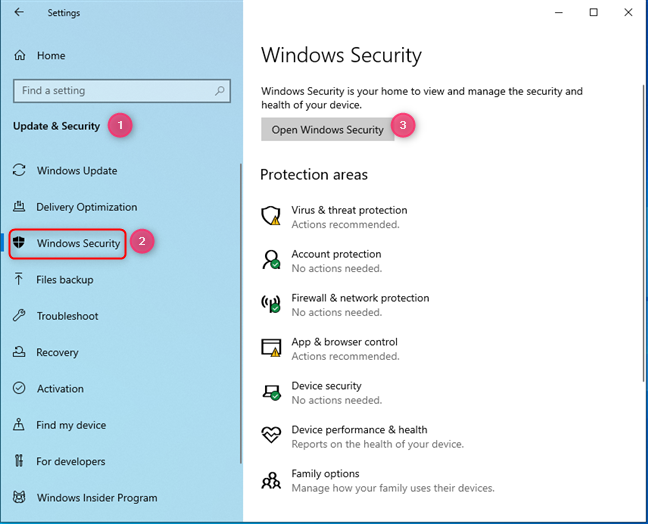
Open Windows Security from the Windows 10 Settings
If you’re using Windows 11, open the Settings app (Windows + I) and choose Privacy & security on the left. On the right side of the window, click or tap Windows Security, followed by Open Windows Security.
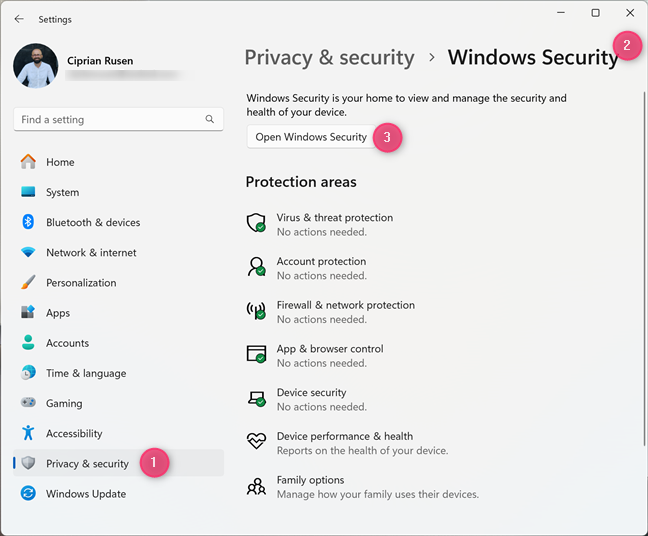
Open Windows Security from the Windows 11 Settings
11. Start Windows Security from Task Manager
If you’re using Task Manager to view running apps and processes, and you need to bring up Windows Security, you can do that straight from this app, like this:
In Windows 10, open Task Manager (a quick way is to press the Control + Shift + Escape keys simultaneously). If you get the compact view of the Task Manager, click or tap on More details. Next, click or tap File > Run new task.
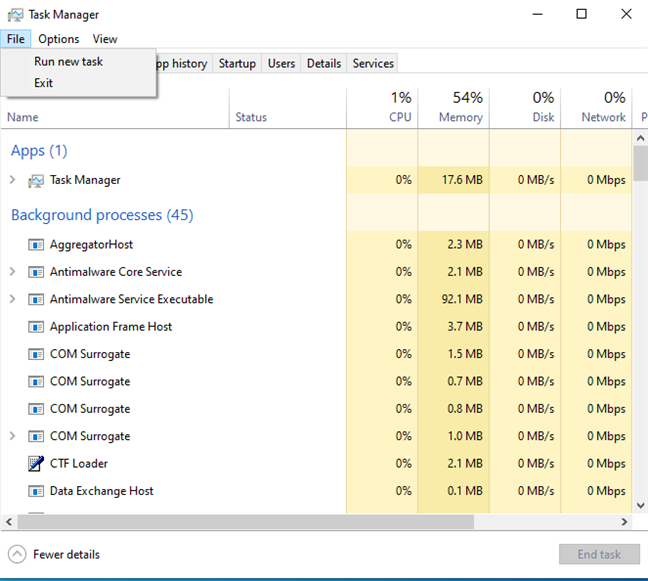
In Task Manager go to File > Run new task
In the Create new task window, type or copy and paste this command in the address bar:
windowsdefender:
Don’t forget to press Enter or click or tap OK.
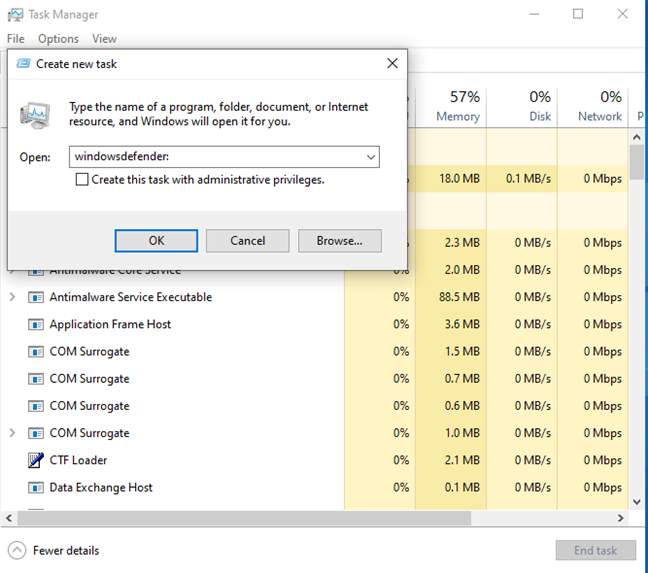
Run Windows Security from Task Manager
This process no longer works in Windows 11 because the Task Manager has been completely revamped, and it no longer gives you access to the Create new task window, like it does in Windows 10.
What is your preferred way of accessing Windows Security?
This is a lengthy tutorial that aims to provide you with as complete information as possible. Most people need to know a method or two for opening Windows Security, while others may have to experiment with most of the methods I detailed and then choose the one that suits their needs. Regardless, let me know which works best for you and why. How do you access Windows Security on your Windows 10 or Windows 11 computer?