
В версиях Windows, отличных от Professional (например Windows 10 Home) отсутствует раздел «Локальные пользователи и группы» в оснастке «Управление компьютером». Однако иногда возникает необходимость создать/удалить/изменить ещё одного пользователя в данной операционной системе. Разберём, как это сделать.
Самым простым вариантом создать пользователя в не-Pro редакциях Windows – через командную строку.
Открытие командной строки
Для следующих манипуляций необходимо запустить командную строку от имени администратора.
Открыть командную строку можно несколькими способами:
-
Для версий Windows 8-11
Нажмите по кнопке «Пуск» правой кнопкой мыши и выберите «Командная строка (администратор)», «Powershell (администратор)» или «Терминал (администратор»).
При появлении диалога UAC – согласитесь на запуск. -
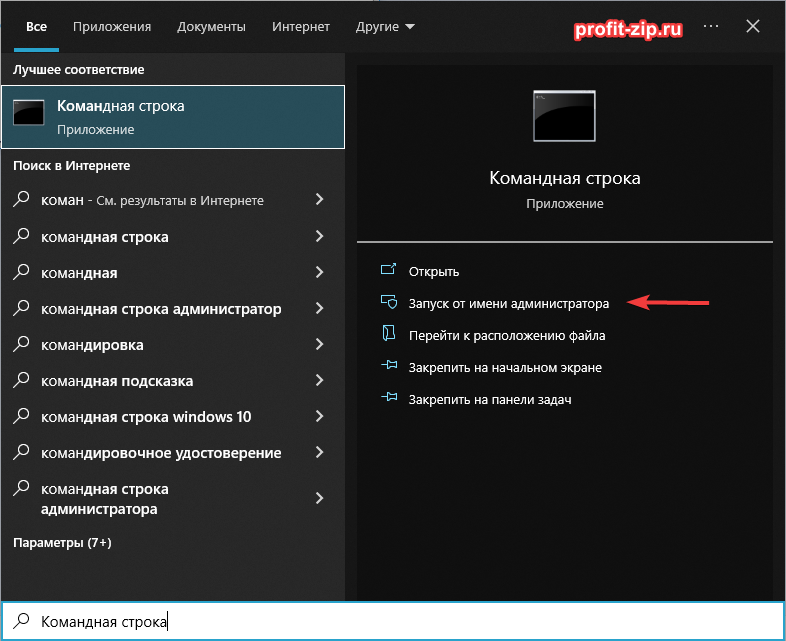
Для всех версий Windows
Найдите «Командная строка» в списке программ в меню «Пуск» или через Поиск среди приложений. Нажмите правой кнопкой мыши по приложению «Командная строка» и/или в контекстном меню выберите «Запуск от имени администратора».

-
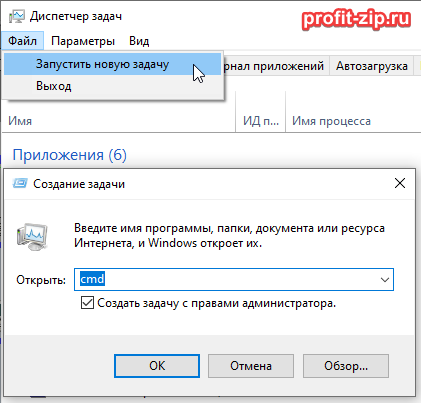
Для всех версий, через Диспетчер задач
Запустите Диспетчер задач. Сверху нажмите Файл – Запустить новую задачу.
В появившемся окне «Создание задачи» введите напротив поля «Открыть» –cmd, установите галочку «Создать задачу с правами администратора» и нажмите «ОК»
Команды управления пользователями через CMD
Заполните данные и команды изменятся автоматически:
- Создать пользователя:
net user "Пользователь" /add
- Создать пользователя с установленным паролем:
net user "Пользователь" "Пароль" /add
- Удалить пользователя:
net user "Пользователь" /delete
- Отключить пользователя:
net user "Пользователь" /active:no
/active:yes – включает пользователя.
Отключенный пользователь остаётся стандартным пользователем системы, но действия от его имени становятся недоступны. Авторизоваться от имени отключенного пользователя также нельзя. - Изменить пароль уже существующего пользователя:
net user "Пользователь" "Пароль"
- Отключить обязательную смену/установку пароля при первом входе пользователя:
net user "Пользователь" /passwordreq:no
/passwordreq:yes – включает обязательную смену/установку пароля.
- Установить срок действия пароля пользователя – неограниченным (убрать срок действия пароля):
wmic useraccount where "name='Пользователь'" set passwordexpires=false
set passwordexpires=true – включает ограничение срока действия пароля
- Изменить срок действия пароля:
net accounts /maxpwage:30
Вместо 30 – количество дней. Применяется ко всем пользователям системы, у которых срок действия пароля – НЕ неограничен.
Значение по умолчанию – 42 дня, максимальное – 999 дней. - Запретить смену пароля пользователем:
net user "Пользователь" /passwordchg:no
/passwordchg:yes – разрешить смену пароля пользователем
- Добавить пользователя в локальную группу:
net localgroup "Администраторы" "Пользователь" /add
- Удалить пользователя из локальной группы:
net localgroup "Администраторы" "Пользователь" /delete
- Установить рабочее время учётной записи:
net user "Пользователь" /times:X
/times:X – отвечает за установку времени, в которое учётной записью можно пользоваться.
X может принимать значения вида:
Дни_недели, диапазон_времениилиДни_недели, диапазон_времени; Дни_недели, диапазон_времени
Дни недели принимают следующие значения и указываются через символ «дефис» ( — ):- M – понедельник
- T – вторник
- W – среда
- Th – четверг
- F – пятница
- Sa – суббота
- Su – воскресенье
Время может быть в формате
8:00-17:00или8am-5pmКроме того, можно перечислять несколько интервалов через точку с запятой ( ; )
Пример:
M-F,8:00-17:00– учетная запись будет доступна с понедельника по пятницу, с 8:00 до 17:00M-F,8:00-17:00;Sa,8:00-12:00– учетная запись будет доступна с понедельника по пятницу, с 8:00 до 17:00, а также в субботу с 8:00 до 12:00M-F,8:00-17:00;Sa,8:00-15:00;Su,8:00-12:00– учетная запись будет доступна с понедельника по пятницу с 8:00 до 17:00, в субботу с 8:00 до 15:00, в воскресенье – с 8:00 до 12:00M-F,8:00-12:00;M-F,13:00-17:00– учетная запись будет доступна с понедельника по пятницу, с 8:00 до 12:00 и с 13:00 до 17:00 (стандартная рабочая неделя, исключая обеденное время)
Несколько деталей
При создании пользователя, каталог пользователя (по умолчанию C:\Users\Username) не создаётся. Каталог создастся в момент первого входа пользователя в систему.
Создать пользователя с именем уже существующего пользователя нельзя.
При удалении пользователя, каталог удаляемого пользователя не удалится. Все файлы пользователя останутся доступны в каталоге пользователей.
При создании пользователя с именем уже существовавшего ранее пользователя (при условии, что папка удалённого пользователя не удалена), папка пользователя приобретёт название вида Username.PCname (где Username – имя пользователя, а PCname – имя компьютера), а если такая уже существует – название каталога будет иметь вид Username.PCname.000 (где Username – имя пользователя, PCname – имя компьютера, а 000 – порядковый номер папки)
Имя пользователя, пароль и названия групп пользователей, по хорошему, должны обрамляться в кавычки (например: ««Пользователь»»), однако не запрещается ими не пользоваться, но только при условии, что в выражении нет пробелов. В случае, если в имени пользователя, пароле или названии группы пользователей присутствует пробел, использование кавычек обязательно, т.к. иначе команды могут сработать неправильно или не сработать вовсе.
Содержание
1. Введение
Учетная запись – это совокупность данных о пользователе, необходимая для его аутентификации и предоставления доступа к его личным данным и настройкам. Таким образом, учетная запись состоит из имени пользователя и пароля (либо иных способов аутентификации). Пароль зачастую зашифрован или хэширован. Учетная запись может хранить фотографию пользователя или иное изображение, учитывать давность различные статистические характеристики поведенияпользователя в системе.
Не редко за одним компьютером работают несколько пользователей. В Linux управление пользователями удобнее производить в командной строке. В группе семейств операционных систем Microsoft такая возможность так же присутствует, как и GUI (Graphical User Interface).
Управление учетными пользователями является одной из основных обязанностей системного администратора. Очень удобно объединять пользователей в группы, редактировать их права доступа в зависимости, например, от должности в компании. От этого напрямую зависит обеспечение безопасности информационной системы.
2. Управление учетными записями через lusrmgr.msc
Сразу после установки Windows мы начинаем работу с правами Администратор. Данные права в ОС позволяют, например, создавать, изменять, удалять иные учетные записи, выполнять любые операции по настройке системы.
Для управления учетными записями используется оснастка lusrmgr.msc (рис. 1). Мы также можем открыть её, введя название в поле команды «Выполнить», либо же во внутрисистемный поиск.
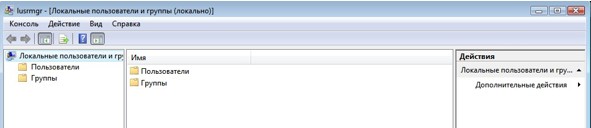
Рис. 1. Окно lusrmgr.msc
Для того, чтобы создать учетную запись, нужно сделать следующее:
- Перейти в папку «Пользователи» (рис. 2).
- В строке меню выбираем «Действие», затем «Новый пользователь».
- Обязательно заполняем поле «Пользователь», остальное при необходимости (рис. 3).
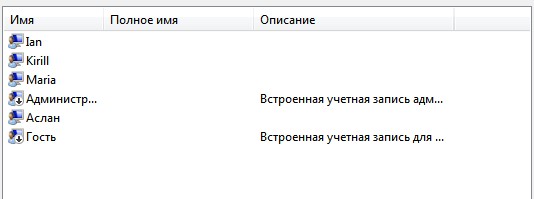
Рис. 2. Пользователи в ОС
Рис. 3. Создание пользователя
Группа пользователей — это совокупность учетных записей пользователей, которые имеют одинаковые права и разрешения безопасности. Учетная запись пользователя должна быть членом хотя бы одной группы пользователей.
Разные пользователи имеют разные потребности, администратор может распределить нужные разрешения и запреты. Если у нас много пользователей, то удобно распределить права не индивидуально, а по группам пользователей. В Windows есть несколько встроенных групп: Администраторы (Administrators), Пользователи (Users), Опытные пользователи (Power Users), Операторы архива (Backup Operators), Гости (Guests), Пользователи удаленного рабочего стола, DHCP Administrators, DHCP Users и WINS Users. Мы также можем создать свою группу. Для этого:
- Переходим в папку «Группы» (рис. 4).
- В строке меню выбираем «Действие», затем «Создать группу».
- Обязательно заполняем поле «Имя группы», остальное при необходимости (рис. 5.1 — 5.2).
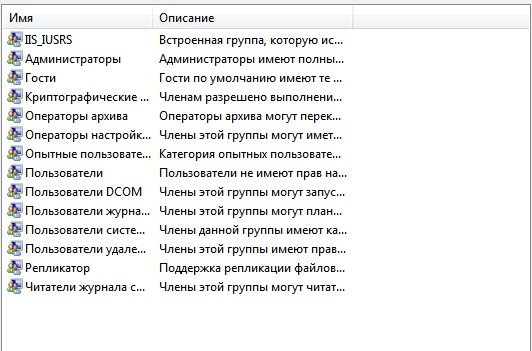
Рис. 4. Список всех групп
Рис. 5.1. Создание группы
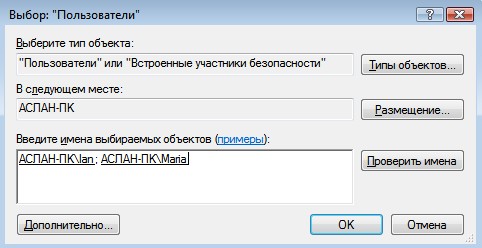
Рис. 5.2. Добавление пользователей в группу
Просмотреть, к каким группам принадлежит пользователь можно в папке «Пользователи», нажав правой кнопкой мыши на пользователя, затем выбрав «Свойства», «Членство в группах». Если мы перейдем во вкладку «Общие», то сможем управлять паролем пользователя, а также, при необходимости, отключить учетную запись (рис. 6).
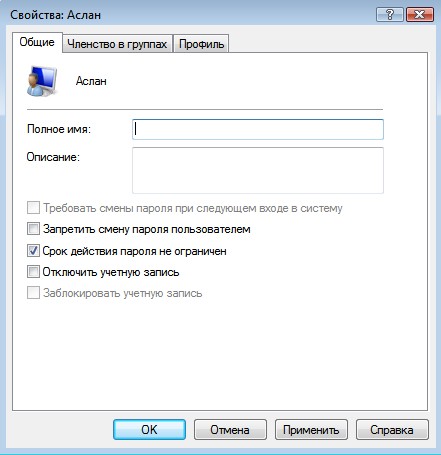
Рис. 6. Управление во вкладке «Общие»
Администратор также может задавать ограничения по времени действия пароля, для этого необходимо воспользоваться оснасткой gpedit.msc. Далее перейти в «Конфигурация компьютера», «Конфигурация Windows», «Параметры безопасности», «Политика учетных записей», «Политика паролей» (рис. 7).
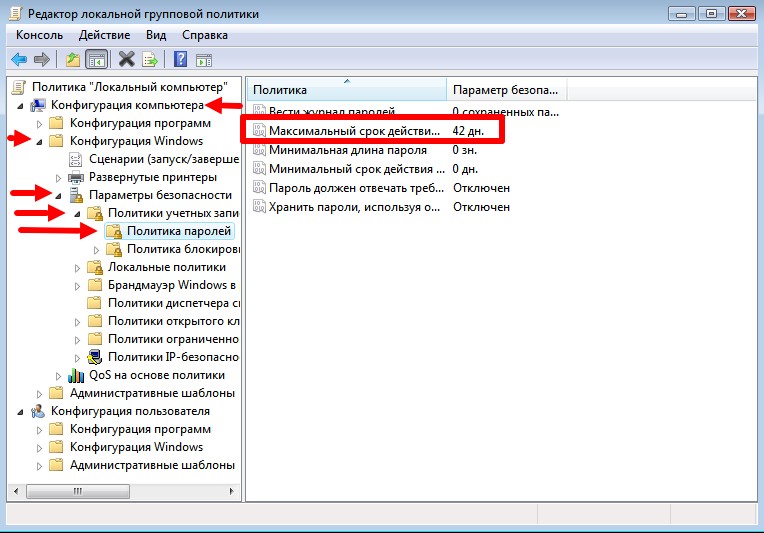
Рис. 7. Изменение времени действия пароля
3. Управление учетными записями через cmd
Как и говорилось ранее, управление учетными записями мы можем производить через командную строку. Для начала мы пропишем команду whoami и whoami /user (рис. 8). Первая отображает сведения о текущем пользователе, вторая дополнительно показывает SID (security identifier). SID — это структура данных переменной длины, которая идентифицирует учетную запись пользователя, группы, домена или компьютера. Последние 4 цифры указывают на относительный идентификатор безопасности объекта (RID). 3 набора цифр перед RID это как раз и есть SID.
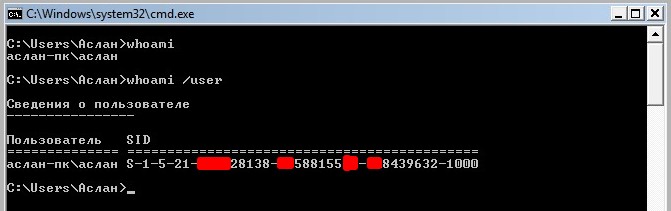
Рис. 8. whoami и whoami /user
Для дальнейшего управления учетными записями нам понадобиться команда net user. С помощью неё мы сможем:
- добавить учетную запись (net user NAME PASSWORD /ADD) (рис. 9.1);
- добавить пароль учетной записи (net user NAME PASSWORD) (рис. 9.4);
- переименовать учетную запись (wmic useraccount where name=’NAME’ rename ‘NEWNAME’) (рис. 9.2);
- просмотреть информацию об учетной записи (net user NAME) (рис. 9.3);
- изменить пароль учетной записи (net user NAME NEW_PASSWORD);
- отключить учетную запись (net user NAME /active:no);
- удалить учетную запись (net user NAME /delete) (рис. 9.5).
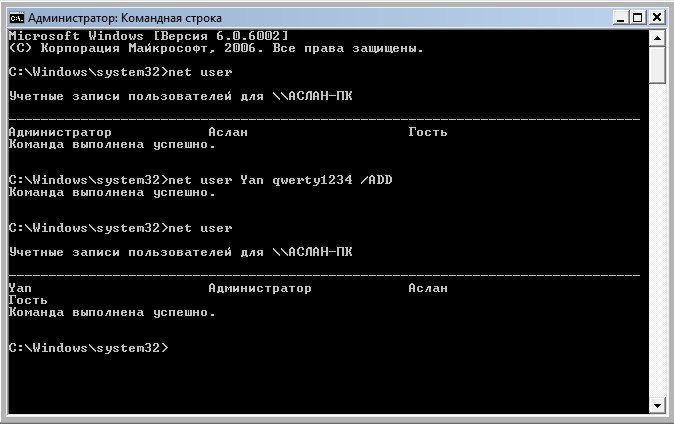
Рис. 9.1. Добавление учетной записи
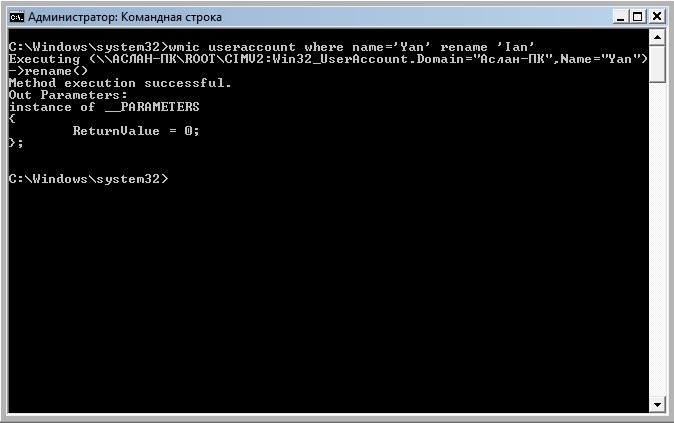
Рис. 9.2. Добавление учетной записи
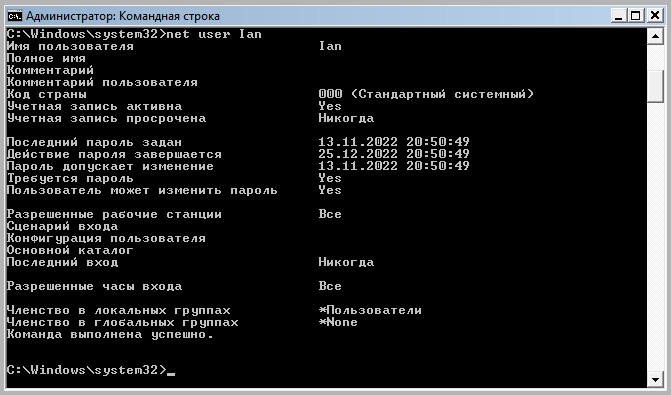
Рис. 9.3. Добавление учетной записи
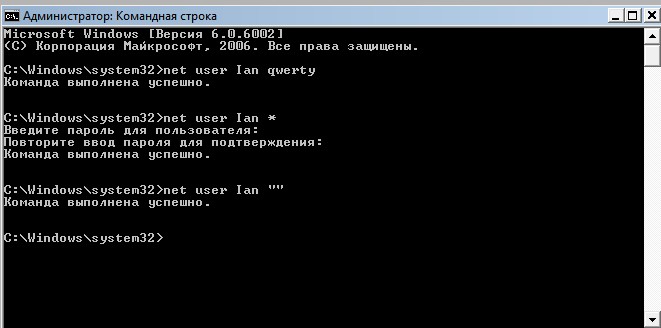
Рис. 9.4. Добавление пароля к учетной записи
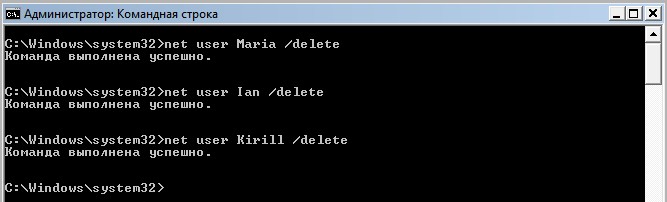
Рис. 9.5. Удаление учетной записи
Для работы с группами необходимо использовать команду net localgroup. Например, с помощью неё мы можем:
- вывести список всех локальных групп (net localgroup);
- добавить локальную группу (net localgroup GROUPNAME /add);
- добавить учетные записи существующих пользователей в группу (net localgroup GROUPNAME USERNAME1 USERNAME2 /add /domain);
- вывести список пользователей локальной группы (net localgroup GROUPNAME).
4. Заключение
Таким образом, ознакомившись с основами управления пользователями в операционной системе Windows можно сделать следующие выводы:
Создание учетной записи, изменение пароля учетной записи и многие другие действия можно выполнять как через различные оснастки, так и через командную строку. Во втором случае мы можем использовать, например, команду net user. Также и с изменениями групп, они тоже могут выполняться двумя вышеописанными способами.
Для обеспечения информационной безопасности необходимо сортировать их учетные записи по группам, где можно вводить ограничения их прав (например, просмотр определенных папок).
What to Know
- Enter the net user command into Command Prompt for a list of all the local user accounts.
- The net user command can add, remove, and make changes to the user accounts on a computer.
- Some switches that work with this command include username, password, /add, and /delete.
This article describes how to use the net user command in Windows. Included on this page are the various net user switches and some examples of the net user command that you can adapt for your own commands.
Net User Command Syntax
net user [username [password | *] [/add] [options]] [/domain]] [username [/delete] [/domain]] [/help] [/?]
See How to Read Command Syntax if you’re not sure how to read the net user command syntax explained above or in the table below. The availability of certain net user command switches and other net user command syntax may differ from operating system to operating system.
| Net User Command Options | |
|---|---|
| Option | Explanation |
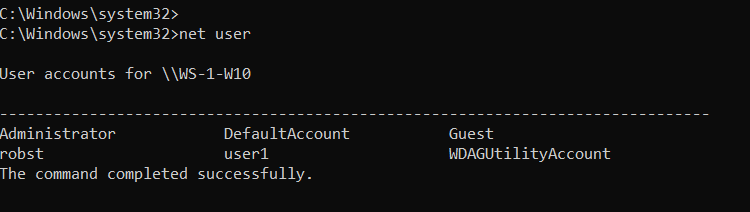
| net user | Execute the net user command alone to show a very simple list of every user account, active or not, on the computer you’re currently using. |
| username | This is the name of the user account, up to 20 characters long, that you want to make changes to, add, or remove. Using username with no other option will show detailed information about the user in the Command Prompt window. |
| password | Use the password option to modify an existing password or assign one when creating a new username. The minimum characters required can be viewed using the net accounts command. A maximum of 127 characters is allowed1. |
| * | You also have the option of using * in place of a password to force the entering of a password in the Command Prompt window after executing the net user command. |
| /add | Use the /add option to add a new username on the system. |
| options | See Additional Net User Command Options below for a complete list of available options to be used at this point when executing net user. |
| /domain | This switch forces net user to execute on the current domain controller instead of the local computer. |
| /delete | The /delete switch removes the specified username from the system. |
| /help | Use this switch to display detailed information about the net user command. Using this option is the same as using the net help command with net user: net help user. |
| /? | The standard help command switch also works with the net user command but only displays the basic command syntax. Executing net user without options is equal to using the /? switch. |
[1] Windows 98 and Windows 95 only support passwords up to 14 characters long. If you’re creating an account that might be used from a computer with one of those versions of Windows, consider keeping the password length within the requirements for those operating systems.
The following options are to be used where options is noted in the net user command syntax above:
| Additional Net User Command Options | |
|---|---|
| Option | Explanation |
| /active:{yes | no} | Use this switch to activate or deactivate the specified useraccount. If you don’t use the /active option, the net user assumes yes. |
| /comment:»text« | Use this option to enter a description of the account. A maximum of 48 characters is allowed. The text entered using the /comment switch is viewable in the Description field in a user’s profile in Users and Groups in Windows. |
| /countrycode:nnn | This switch is used to set a country code for the user, which determines the language used for error and help messages. If the /countrycode switch isn’t used, the computer’s default country code is used: 000. |
| /expires:{date | never} | The /expires switch is used to set a specific date (see below) in which the account, not the password, should expire. If the /expires switch isn’t used, never is assumed. |
| date (with /expires only) | If you choose to specify a date then it must be in mm/dd/yy or mm/dd/yyyy format, months and days as numbers, fully spelled out, or abbreviated to three letters. |
| /fullname:»name« | Use the /fullname switch to specify the real name of the person using the username account. |
| /homedir:pathname | Set a pathname with the /homedir switch if you want a home directory other than the default2. |
| /passwordchg:{yes | no} | This option specifies whether this user can change his or her own password. If /passwordchg is not used, the net user assumes yes. |
| /passwordreq:{yes | no} | This option specifies whether this user is required to have a password at all. If this switch isn’t used, yes is assumed. |
| /logonpasswordchg:{yes | no} | This switch forces the user to change his or her password at the next logon. Net user assumes no if you don’t use this option. The /logonpasswordchg switch is not available in Windows XP. |
| /profilepath:pathname | This option sets a pathname for the user’s logon profile. |
| /scriptpath:pathname | This option sets a pathname for the user’s logon script. |
| /times:[timeframe | all] | Use this switch to specify a timeframe (see below) that the user can log on. If you don’t use /times then net user assumes that all times are okay. If you do use this switch, but don’t specify either timeframe or all, then net user assumes that no times are okay and the user is not allowed to log on. |
| timeframe (with /times only) | If you choose to specify a timeframe you must do so in a particular way. Days of the week must be spelled out completely or abbreviated in MTWThFSaSu format. Times of day can be in a 24-hour format, or 12-hour format using AM and PM or A.M. and P.M. Periods of time should use dashes, day and time should be separated by commas and day/time groups by semicolons. |
| /usercomment:»text« | This switch adds or changes the User Comment for the specified account. |
| /workstations:{computername[,…] | *} | Use this option to specify the hostnames of up to eight computers that the user is allowed to log on to. This switch is really only useful when used with /domain. If you don’t use /workstations to specify allowed computers then all computers (*) is assumed. |
[2] The default home directory is C:\Users\[username]\ in Windows 11, Windows 10, Windows 8, Windows 7, and Windows Vista. In Windows XP, the default home directory is C:\Documents and Settings\[username]\. For example, if the user account on a Windows 11 tablet is named «Tim,» the default home directory created when the account was first set up was C:\Users\Tim\.
Net User Command Examples
Below are a few ways you might use this command.
Get the Full List of Users
This first example of the net user command shows that in its simplest form (enter net user), it will produce a list of all the users on the computer, much like this:
Administrator DefaultAccount ExtraGuest jonfi WDAGUtilityAccount
This computer has over a dozen user accounts, so they’re separated into multiple columns.
You can also use net users in place of net user. They’re completely interchangeable.
Examine One User
net user administrator
In the above net user example, the command produces all the details on the administrator user account. Here’s an example of what might display:
User name AdministratorFull NameComment Built-in account for administering the computer/domainUser's commentCountry/region code 000 (System Default)Account active NoAccount expires NeverPassword last set 8/24/2020 1:21:25 PMPassword expires NeverPassword changeable 8/24/2020 1:21:25 PMPassword required YesUser may change password YesWorkstations allowed AllLogon scriptUser profileHome directoryLast logon 11/9/2021 11:48:13 AMLogon hours allowed AllLocal Group Memberships *AdministratorsGlobal Group memberships *None
As you can see, all the details for that user on this computer are listed.
Change When a User Can Log In
net user rodriguezr /times:M-F,7AM-4PM;Sa,8AM-12PM
Here’s an example where the rodriguezr account is having its login days and times changed.
Make a New User
net user nadeema r28Wqn90 /add /comment:"Basic user account." /fullname:"Ahmed Nadeem" /logonpasswordchg:yes /workstations:jr7tww,jr2rtw /domain
We thought we’d throw the kitchen sink at you with this one. This is the kind of net user application you might never do at home, but you might very well see in a script published for a new user by the IT department in a company.
Here, we’re setting up a new user account with the name nadeema, and setting the initial password as r28Wqn90. This is a standard account in our company, which we note in the account itself [/comment:»Basic user account.«], and is the new Human Resources executive, Ahmed [/fullname:»Ahmed Nadeem«].
We want Ahmed to change his password to something he won’t forget, so we want him to set his own the first time he logs on [/logonpasswordchg:yes]. Also, Ahmed should only have access to the two computers in the Human Resources office [/workstations:jr7twwr,jr2rtwb]. Finally, our company uses a domain controller [/domain], so Ahmed’s account should be set up there.
As you can see, the net user command can be used for a lot more than simple user account adds, changes, and removals. We configured several advanced aspects of Ahmed’s new account right from Command Prompt.
Delete a User
net user nadeema /delete
Now, we’ll finish off with an easy one. Ahmed [nadeema] didn’t work out as the latest HR member, so he was let go, and his account removed [/delete].
Net User Command Availability
The net user command is available from within the Command Prompt in most versions of Windows including Windows 10, Windows 8, Windows 7, Windows Vista, Windows XP, Windows Server operating systems, and some older versions of Windows, too.
Net User Related Commands
The net user command is a subset of the net command and so is similar to its sister commands like net use, net time, net send, net view, etc.
Thanks for letting us know!
Get the Latest Tech News Delivered Every Day
Subscribe
In this tutorial, you will learn how to use the net user command to create, delete and change user accounts in the Windows command prompt (CDM).
We can perform the following tasks using the net user command:
- View user accounts.
- Add and Remove user accounts.
- Activate and Deactivate user accounts.
- Change the user password.
If you are operating in an Active Directory domain environment, always use the /domain command switch to execute the net user command on the domain controller rather than on the local computer.
Examples
List users on the local computer:
net userList users on the domain controller:
net user /domainThis command displays detailed information about the Administrator account:
net user AdministratorCreate a user named user1 with a password of strongPassword:
net user /add user1 "strongPassword"Delete the user user1 from the computer:
net user /delete user2This command enables the built-in Administrator account on Windows 10/11:
net user Administrator /active:yesThis command sets (changes) the Administrator account password:
net user Administrator "adminPassWord"Execute the following command to disable the Administrator account on Windows 10/11:
net user Administrator /active:noThis command forces the user user1 to change the password at the next logon:
net user user1 /logonpasswordchg:yesCreate a user; the user must change the password at the next logon:
net user /add user1 "strongPassword" /logonpasswordchg:yesCreate a new user; the account expires on January 31st:
net user /add user1 "strongPassword" /expires:01/31/2023Command Options
| username | The name of the user to create, delete, view, or modify. |
| password | Password for the user. |
| * | Use this option to produce a prompt for the password. |
| /add | Use this option when you want to create a new user. |
| /delete | Use this option to remove a user from the Windows system. |
| /active:{yes | no} | Activates or Deactivates a user. The default is yes when creating a new user. |
| /expires:{date | never} | Use this option to set the expiration date (mm/dd/yy) for an account. The default is never. |
| /fullname:»name» | Full name of the user. |
| /passwordchg:{yes | no} | Specifies whether users can change their own password. The default is yes. |
| /passwordreq:{yes | no} | No means the user can log in without a password. The default is YES. |
| /logonpasswordchg:{yes|no} | Specifies whether the user should change the password at the next logon. The default is NO. |
| /homedir:path | The home directory location. |
| /comment:»text» | Use this option to add a description to the user’s account. |
You can view the manual page by typing net help user at the command prompt.
View a User
When you execute the net user command without any options, it displays a list of user accounts on the computer.
net userYou will see an output similar to the following:
Add the /domain command switch if you want to list users on the Active Directory Domain controller.
net user /domainTo see detailed information about a particular user, execute the command net user Username, where the Username is the name of the user you want to view. For example, you can view the Administrator account by running the following command:
net user AdministratorCreate and Delete User Accounts
To create a user account, use the following syntax:
net user /add UserName PasswordFor example, the following command creates a user named user1 with a password of strongPassword:
net user /add user1 "strongPassword"Use an asterisk (*) in place of the password to produce a prompt, as shown in the following example:
net user /add user1 *
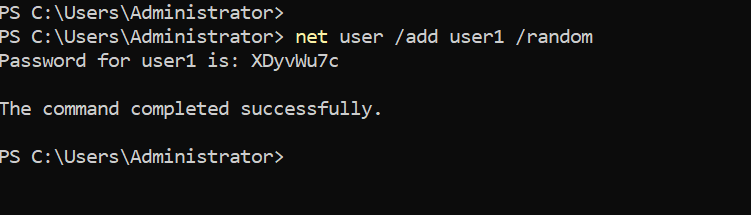
Alternatively, you can also use the /random option to generate a strong random password, as shown in the following example:
net user /add user1 /randomThe randomly generated password will be displayed on the command prompt after you execute the command.
To delete a user, use the following syntax:
net user /delete UserNameThe following command deletes the user user1 from the computer:
net user /delete user2Change Passwords
To change passwords, use the following syntax:
net user UserName New-PasswordUse an asterisk (*) or /random in place of the password to produce a prompt or generate a random password:
net user UserName *
net user user1 /random
Notes
The net user command is most of the time used in Windows Server to manage Active Directory users.
Windows 10/11 uses a new Settings pane to manage users, but the net user command is still useful for some tasks. For example, if you want to activate the built-in Administrator account, it is easy to do that using this command.
While working at the command prompt, run the net help user command to see all available command options.
In the next tutorial, we are going to learn how to manage Windows groups using the net localgroup CMD command.
Загрузить PDF
Загрузить PDF
В Windows командная строка является аналогом терминала в Mac OS X, то есть в ней можно вводить команды, чтобы настроить систему. Большинство команд можно заменить простым обращением к графическому интерфейсу пользователя, но создать (или удалить) учетную запись пользователя легче и быстрее с помощью командной строки.
-

Для этого нажмите кнопку «Пуск» в левом нижнем углу экрана. Чтобы создать или удалить учетную запись, войдите в систему в качестве администратора.
- Также можно нажать кнопку ⊞ Win, чтобы открыть меню «Пуск».
-

Значок командной строки появиться в результатах поиска в верхней части меню «Пуск».
- Также можно нажать ⊞ Win+Х, чтобы открыть панель быстрого доступа, на которой есть значок командной строки.
-
Откроется выпадающее меню.
-
Вы не получите доступ к командной строке, если вошли в систему в качестве гостя.
- Если вы используете панель быстрого доступа, просто нажмите «Командная строка (Администратор)». Не выбирайте стандартную опцию командной строки.
-
Так вы откроете командную строку как администратор.
Реклама


-
Так вы активируете курсор внутри командной строки.[1]
-
Для этого введите команду net user (имя пользователя) (пароль) /add и нажмите ↵ Enter. Так будет создана новая учетная запись пользователя.
- Замените информацию в круглых скобках на имя пользователя и пароль. Не забудьте удалить круглые скобки.
-
Для этого введите команду net user (имя пользователя) /delete и нажмите ↵ Enter. Выбранная учетная запись будет удалена.
- Когда учетная запись будет создана или удалена, в командной строке появится строка с сообщением «The command completed successfully» (Команда успешно выполнена).
-
Теперь вы знаете, как создавать и удалять учетные записи пользователей с помощью командной строки.
Реклама


Советы
- Если вы открыли командную строку без опции «Запуск от имени администратора», вы не сможете создавать или удалять учетные записи пользователей.
Реклама
Предупреждения
- Будьте осторожны, когда удаляете учетную запись пользователя – если ее удалить, восстановить ее не получится.
Реклама
Об этой статье
Эту страницу просматривали 95 793 раза.