
Last Updated :
20 Oct, 2020
The move is an internal command found in the Windows Command Interpreter (cmd) that is used to move files and folders/directories. The command is robust than a regular move operation, as it allows for pattern matching via the inclusion of Wildcards in the source path.
The command is a very generic one and is available (in one form or the other) in almost every single operating system out there (under different aliases). In this article, we will learn about the move command and would learn various uses/applications of it.
Description of the Command :
MOVE [/Y | /-Y] [drive:][path]dirname1 dirname2
- [drive:][path]filename1 –
Specifies the location and name of the file or files you want to move. - destination –
Specifies the new location of the file. The destination can consist of a drive letter and colon, a directory name, or a combination. If you are moving only one file, you can also include a filename if you want to rename the file when you move it. - [drive:][path]dirname1 –
Specifies the directory you want to rename. - dirname2 –
Specifies the new name of the directory. - /Y –
Suppresses prompting to confirm you want to overwrite an existing destination file. - /Y –
Causes prompting to confirm you want to overwrite an existing destination file.
The switch /Y may be present in the COPYCMD environment variable. This may be overridden with /-Y on the command line. The default is to prompt on overwrites unless the MOVE command is being executed from within a batch script. The above output can be obtained by executing the command move /? in cmd.
The above text is a little cryptic at first, but the command is really basic and follows the minimal blueprint.
Syntax :
MOVE [options] (Source) (Target)
Key :
- [option] –
An optional flag denoted by /Y or /-Y, that is used to suppress the confirmation prompt on overwritten files. The default is to prompt on overwrites unless the MOVE command is being executed from within a batch script. - (Source) –
A path of the file/files that would be used to move them. This path can contain wildcards ( * ? ) in the path. If more then files are made to move, then wildcards are used. - (Target) –
A path for the new location of the file.
Using the Command :
Throughout this section, we would take the following directory as example for demonstrating the usage of move command.

Moving a File from One Folder to Another :
move source_path destination_path
- source_path –
It is the path of the file which we are willing to move, and the destination_path is the location to which we want the file to be moved.
Example :
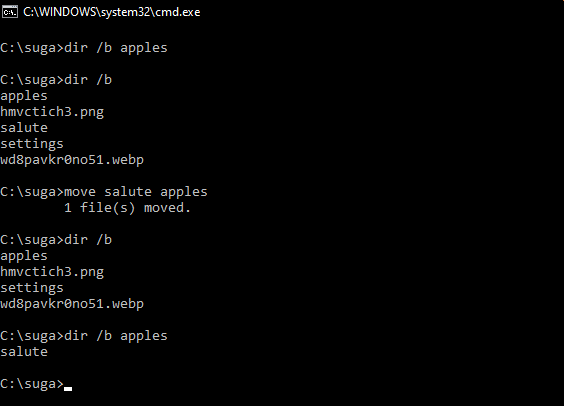
- The Dir /b command is used to list all the files and folders inside a directory.
- In the above example, we have moved an extension-less file named salute from C:\suga to C:\suga\apples directory.
Moving Multiple Files from One Path to Another :
move source_path destination_path
- source_path –
It is a path containing wildcards that will allow more than one file to be taken as a source. The destination_path is now a path to a directory where the moved files would reside (should not contain wildcards).
Example :

- In the above example we have moved all the files inside C:\suga folder which matches the pattern *.* to C:\suga\Apples directory.
- It should be noted that wildcard in source_path should match with the file(s) otherwise it would result in source_path being null, and a subsequent error.
Moving Directory from One Path to Another :
move source_dir_path Destination_dir_path
- source_dir_path –
It is the path to the directory to which we are moving, and destination_dir_path is the new location where it would be moved to.
Example :

- In the above example, we have moved the C:\suga\apples directory to C:\Users\Public directory.
- Multiple Directories can be moved using the method described in Moving multiple files from one path to another (with little modification to make is eligible for directories).
Moving a File to Another Folder with a Same Name File already existing :
There are two ways to tackle this situation –
- Abort the move process.
- Continue the move process, by overwriting the existing file with the newer one.
By default, the move command upon encountering any name collisions would prompt the user, asking whether he wants to rewrite the existing file with the new one, or stop the move process (via a Y/N prompt). To abort the move process, the user can simply enter N in the prompt input, stating that the file should not be overwritten. The prompt seeking for user input (for overwrite of files) appears as follows –
Overwrite {full_file_path}? (Yes/No/All):
When the users enter N in the prompt the output appears as follows –
Overwrite {full_file_path}? (Yes/No/All): N

0 file(s) moved.
When the user enters Y in the prompt the output appears as follows –
Overwrite {full_file_path}? (Yes/No/All): Y

1 file(s) moved.
To continue the move process by overwriting existing files (on all name collisions), a /Y switch needs to be added to the command as follows –
move /Y source_path destination_path
Указанные при описании команды COPY проблемы можно решить с помощью команды XCOPY, которая предоставляет намного больше возможностей при копировании. Необходимо отметить, правда, что XCOPY может работать только с файлами и каталогами, но не с устройствами.
Синтаксис этой команды:
XCOPY источник [результат] [ключи]Команда XCOPY имеет множество ключей, мы коснемся лишь некоторых из них. Ключ /D[:[дата]] позволяет копировать только файлы, измененные не ранее указанной даты. Если параметр дата не указан, то копирование будет производиться только если источник новее результата. Например, команда
XCOPY "C:\Мои документы\*.*" "D:\BACKUP\Мои документы" /Dскопирует в каталог ‘D:\BACKUP\Мои документы’ только те файлы из каталога ‘C:\Мои документы’, которые были изменены со времени последнего подобного копирования или которых вообще не было в ‘D:\BACKUP\Мои документы’.
Ключ /S позволяет копировать все непустые подкаталоги в каталоге-источнике. С помощью же ключа /E можно копировать вообще все подкаталоги, включая и пустые.
Если указан ключ /C, то копирование будет продолжаться даже в случае возникновения ошибок. Это бывает очень полезным при операциях копирования, производимых над группами файлов, например, при резервном копировании данных.
Ключ /I важен для случая, когда копируются несколько файлов, а файл назначения отсутствует. При задании этого ключа команда XCOPY считает, что файл назначения должен быть каталогом. Например, если задать ключ /I в команде копирования всех файлов с расширением txt из текущего каталога в несуществующий еще подкаталог TEXT,
XCOPY *.txt TEXT /Iто подкаталог TEXT будет создан без дополнительных запросов.
Ключи /Q, /F и /L отвечают за режим отображения при копировании. При задании ключа /Q имена файлов при копировании не отображаются, ключа /F — отображаются полные пути источника и результата. Ключ /L обозначает, что отображаются только файлы, которые должны быть скопированы (при этом само копирование не производится).
С помощью ключа /H можно копировать скрытые и системные файлы, а с помощью ключа /R — заменять файлы с атрибутом «Только для чтения». Например, для копирования всех файлов из корневого каталога диска C: (включая системные и скрытые) в каталог SYS на диске D:, нужно ввести следующую команду:
XCOPY C:\*.* D:\SYS /HКлюч /T позволяет применять XCOPY для копирования только структуры каталогов источника, без дублирования находящихся в этих каталогах файлов, причем пустые каталоги и подкаталоги не включаются. Для того, чтобы все же включить пустые каталоги и подкаталоги, нужно использовать комбинацию ключей /T /E.
Используя XCOPY можно при копировании обновлять только уже существующие файлы (новые файлы при этом не записываются). Для этого применяется ключ /U. Например, если в каталоге C:\2 находились файлы a.txt и b.txt, а в каталоге C:\1 — файлы a.txt, b.txt, c.txt и d.txt, то после выполнения команды
XCOPY C:\1 C:\2 /Uв каталоге C:\2 по-прежнему останутся лишь два файла a.txt и b.txt, содержимое которых будет заменено содержимым соответствующих файлов из каталога C:\1. Если с помощью XCOPY копировался файл с атрибутом «Только для чтения», то по умолчанию у файла-копии этот атрибут снимется. Для того, чтобы копировать не только данные, но и полностью атрибуты файла, необходимо использовать ключ /K.
Ключи /Y и /-Y определяют, нужно ли запрашивать подтверждение перед заменой файлов при копировании. /Y означает, что такой запрос нужен, /-Y — не нужен.
This tutorial explains how to move files or directories to another location on a Windows system.
Move files to another directory
move filename destinationFolder
Example: to move file ‘data.docx’ to the folder ‘d:\backup\folder’
move data.docx d:\backup\folder\
You can also rename the file while moving it to the new location
move data.docx d:\backup\folder\newData.docx
We can’t move multiple files with single command. i.e the below command would not work.
move file1 file2 D:\folder1\folder2
This would give the error The syntax of the command is incorrect.
However we can use wildcards to move files in bulk. For example, if you want to move all text files from current folder to a new location you can use the below command.
move *.txt destinationDirectory
To move all files starting with letter ‘A’, you can use below command.
move A* destinationDirectory
Move directories
Syntax:
move directory newDirectoryPath
Example: To move the directory ‘data’ to ‘D:\data\folder1\’
move data D:\data\folder1
1. Can we move multiple directories using wild cards like the way we do it with files?
No, wild cards does not work for directories. You get the below error
C:\>move tmp* Documents\folder1\
The filename, directory name, or volume label syntax is incorrect.
2. How to specify the directories/files which have white spaces in the names?
You need to enclose the name of the file/directory in double quotes.
Example: move "file with spaces" "D:\directory with spaces"
Errors
If you do not have write privileges on source file/directory or on the destination folder, you would get error as below.
C:\Users\user1>move mydata.pdf c:\users\user2
Access is denied.
        0 file(s) moved.
In the Windows Command Prompt, we use the move command to move files from one directory to another (cut and paste).
The syntax of the move command is as follows:
move <Source> <Target>We can also use the move command to move folders from one location to another.
Command Options
| /Y | Do not ask for confirmation if a duplicate file is found at the destination. The destination file will be overwritten. |
| /-Y | Ask before overwriting destination files. |
Examples
Move sales.doc in the current directory to C:\backup directory:
move sales.doc C:\backupMove C:\data\sales.doc to C:\backup directory. The file will be overwritten if it already exists in the destination folder:
move /y C:\data\sales.doc C:\backupMove C:\data\finance to C:\backup folder:
move C:\data\finance C:\backupMove all files in a directory
You can use wildcards with the move command. For example, the following command moves all files in the C:\data to C:\backup.
move /y C:\data\* C:\backupThe following command moves all files with a .doc extension to the backup folder:
move /y C:\data\*.doc C:\backupIn the following example, all files whose names start with screenshot are moved to the C:\backup directory.
move /y C:\data\screenshot* C:\backup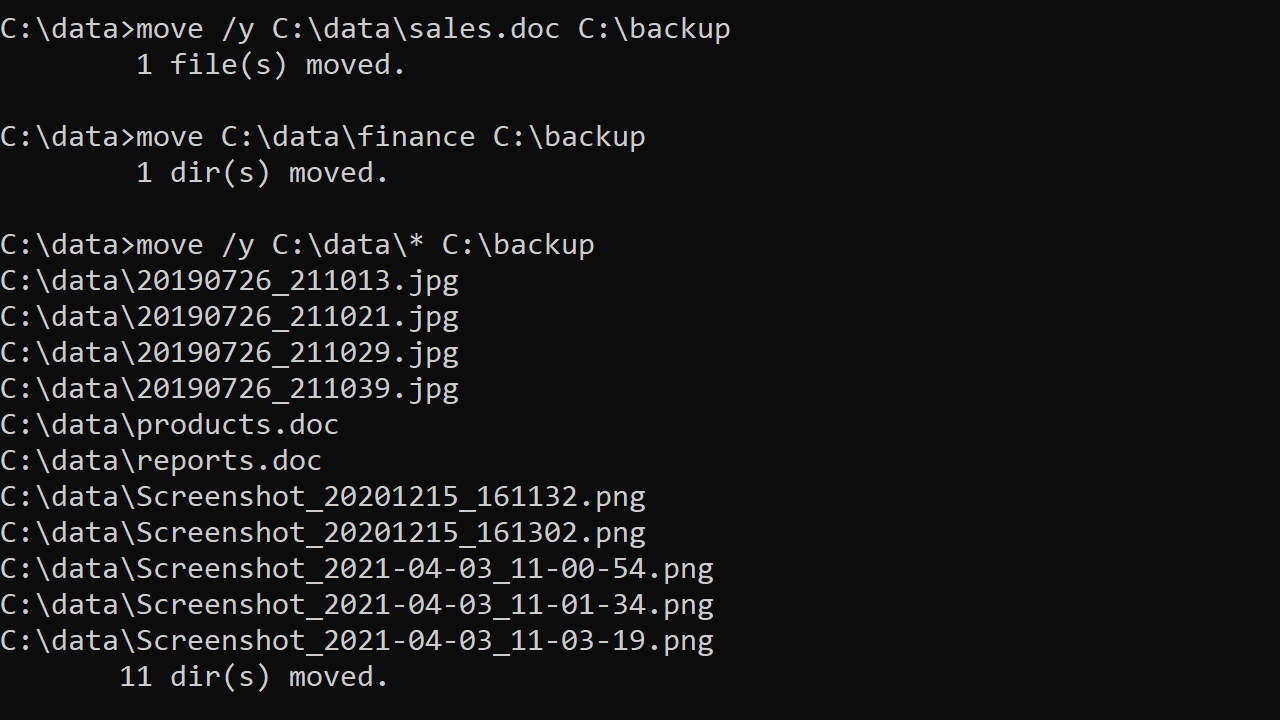
Move two or more files
To move two or more files without using wildcards, you have to use a for loop, as shown in the following example:
for %i in (sales.doc, products.doc) do move /y %i C:\backupIf you want to run the for command in a batch file, you would use two % (%%) with the variable.
for %%i in (sales.doc, products.doc) do move /y %%i C:\backupThe move command deletes the source file after it is copied to the destination. If you want to keep the original file, use the copy or xcopy.
Download Article
An easy guide to file management using the Windows command terminal
Download Article
Everyone understands that Computers can be difficult. At times, Computers just do the exact opposite of what the user tells them, and this can get really frustrating. This is where the Windows Command line Terminal comes into play. The Command line Terminal acts as a sort of direct communication line with the device. In the sense that whatever you input into the Terminal, the Computer will do exactly as instructed. This allows for users to effectively utilize the Terminal as a plan B whenever the software of their device seems to be malfunctioning. When an operating system or software fails and won’t allow the user to move any of their precious files, it can cause a logistical issue. This why learning how to move files using the Command line Terminal can be so useful.
-

- All versions of the Microsoft Windows Operating system have some form of the Start Menu, typically associated with the Microsoft logo itself.
-
- The term “cmd” is the Microsoft term for the Windows Terminal
Advertisement
-

In order to properly move files, one must be logged in as an administrator, to do this after selecting the Command line icon click “Run as Administrator”.
- The Command line icon appears as a black box with a little scribble in the top left. This is indicative of the GUI of the Terminal which is literally just a black background with white text.


Advertisement
-
At the prompt line type in “move /?”
- The “move” command will be the primary command used to transport files/folders in the Windows Terminal.
- The “/?” option of the command is essentially a help manual. With any command, after inputting “/?”, it brings up a manual for all the respective options and varieties for that respective command.
-
- The “dir” command essentially lists all the files/folders that are situated in your current directory. It is short for directory.
- The file names that are listed in blue are all files that can be accessed by the current user, those in white are only available to administrators.
-
- Keep in mind, the copy command simply duplicates a file/folder and pastes it to the intended destination. The original file/folder still exists in its original spot and must be deleted.
- If you wish to do this, simply input “del [filename]”, and the file/folder should be deleted
-
If you are planning on moving your files to a new directory it is important to first establish this new directory before moving the files. To do this simply input “mkdir [filename]”.
- The command “mkdir” stands for “make directory”
- A directory is a file system that stores and organizes a variety of files, folders, documents, and even other directories


Advertisement
-
To move a file/folder simply input “move [filename] [destination]” into the prompt.
- The terms in brackets should be replaced with their literal substitutes.
-
To copy a file/folder in Windows simply type in “copy [source] [destination]”
- There is no need to do a paste command of any sort, technically speaking it is already in the command. The destination half of the command represents the paste command.
-
Simply type in “cd [directory]”, and then input “dir” to display all the stored files/folders.
- If done properly, the name of the file/folder should appear in blue


Advertisement
Ask a Question
200 characters left
Include your email address to get a message when this question is answered.
Submit
Advertisement
Thanks for submitting a tip for review!
About This Article
Thanks to all authors for creating a page that has been read 38,341 times.