
The ipconfig command is used in Windows to display information about a computer’s network interfaces.
Basic Use
To execute the ipconfig command open the Windows Command Prompt (cmd) and type ipconfig. The command will display information about each of the network interfaces (NICs) on the computer. Here is the output for a single network interface:
C:\>ipconfig

Windows IP Configuration

Wireless LAN adapter Wi-Fi:

   Connection-specific DNS Suffix  . : xyz.st.provider.net.
   IPv6 Address. . . . . . . . . . . : 2601:0:4501:0:f064:0:d977:505f
   Temporary IPv6 Address. . . . . . : 2601:0:4501:0:648b:0:1531:fae6
   Temporary IPv6 Address. . . . . . : 2601:0:4501:0:8916:0:f988:98d
   Link-local IPv6 Address . . . . . : fe80::f064:4a1a:0:0f%5
   IPv4 Address. . . . . . . . . . . : 192.168.0.11
   Subnet Mask . . . . . . . . . . . : 255.255.255.0
   Default Gateway . . . . . . . . . : fe80::0:7eff:0:0%5
                                       192.168.0.1
The default output includes information on the interface’s IP addresses, subnet mask, and default gateway (router). To obtain additional information such as DHCP and DNS settings use the /all option. It will also display information about the physical interface such as the MAC address and device description:
C:\>ipconfig /all

Windows IP Configuration

Wireless LAN adapter Wi-Fi:

   Connection-specific DNS Suffix  . : xys.st.provider.net.
   Description . . . . . . . . . . . : Intel(R) Dual Band
   Physical Address. . . . . . . . . : 01-02-03-04-05-06
   DHCP Enabled. . . . . . . . . . . : Yes
   Autoconfiguration Enabled . . . . : Yes
   IPv6 Address. . . . . . . . . . . : 2601:0:0:9630:f064:0:0:505f
   Temporary IPv6 Address. . . . . . : 2601:0:0:9630:0:f520:0:fae6
   Temporary IPv6 Address. . . . . . : 2601:0:0:9630:0:ab2b:0:98d
   Link-local IPv6 Address . . . . . : fe80::0:4a1a:0:505f%5
   IPv4 Address. . . . . . . . . . . : 192.168.0.11(Preferred)
   Subnet Mask . . . . . . . . . . . : 255.255.255.0
   Lease Obtained. . . . . . . . . . : Friday, April 16, 2021 10:14 AM
   Lease Expires . . . . . . . . . . : Sunday, April 18, 2021 1:16 PM
   Default Gateway . . . . . . . . . : 0::0:0:0:0%5
                                       192.168.0.1
   DHCP Server . . . . . . . . . . . : 192.168.0.1
   DHCPv6 IAID . . . . . . . . . . . : 75800000
   DHCPv6 Client DUID. . . . . . . . : 01-00-00-61-00-00-00-00-00-00-13
   DNS Servers . . . . . . . . . . . : 0:0:0::1
                                       0:0:0::2
                                       8.8.8.8
                                       1.1.1.1
   NetBIOS over Tcpip. . . . . . . . : Enabled
Common Ipconfig Options
The following table lists common options for the ipconfig command.
Using Ipconfig to Reset Your DHCP IP Address
If your network adapter is configured to obtain an IP address automatically using DHCP you can reset it by using the /release and /renew parameters for ipconfig.
C:\>ipconfig /release

C:\>ipconfig /renew
This will reset the IP address on all network interfaces on the computer. To reset the IP address of just one interface, provide its name as an argument. If the interface name contains spaces be sure to enclose it in quotes.
C:\>ipconfig /release "Wi-Fi"
One thing to note is that the interface name displayed by ipconfig is not necessarily the actual name of the interface. For example, if you try to use the name «Wireless LAN adapter Wi-Fi» to release the interface from the example above you will receive the following error:
C:>ipconfig /release "Wireless LAN adapter Wi-Fi"

Windows IP Configuration

The operation failed as no adapter is in the state permissible for
this operation.
To obtain a true list of the network interface names use the wmic command:
C:\>wmic nic get NetConnectionID
NetConnectionID

Ethernet
Wi-Fi
Bluetooth Network Connection
Note that the interface is actually called «Wi-Fi». That is the name you will need to use in ipconfig to release or renew the DHCP address for the interface.
Using Ipconfig to Display Your DNS Cache
In order to increase speed and efficiency computers often cache DNS information, at least for a short time period. You can use the /displaydns option for ipconfig to display your current DNS cache.
C:\>ipconfig /displaydns

Windows IP Configuration

forcesafesearch.google.com
    ----------------------------------------
    Record Name . . . . . : forcesafesearch.google.com
    Record Type . . . . . : 1
    Time To Live  . . . . : 56066
    Data Length . . . . . : 4
    Section . . . . . . . : Answer
    A (Host) Record . . . : 216.239.38.120
To delete all of your DNS cache entries (flush) you can use ipconfig’s /flushdns option.
C:>ipconfig /flushdns

Windows IP Configuration

Successfully flushed the DNS Resolver Cache.
Setting a Network Interface’s IP Address
While ipconfig lets you display information, it cannot be used to change an interface’s IP address. For that you can use the netsh command, however, the command is being deprecated by Microsoft, so you are better of using PowerShell.
First open PowerShell and type Get-NetIPConfiguration. Below is an example of the output for a single interface. Note the interfaces InterfaceIndex.
PS C:\> get-netipconfiguration

InterfaceAlias       : Wi-Fi
InterfaceIndex       : 5
InterfaceDescription : Intel(R) Dual Band
NetProfile.Name      : wifissid 3
IPv6Address          : 2601:0:0:9630:0:4a1a:0:505f
IPv4Address          : 192.168.0.11
IPv6DefaultGateway   : fe80::0:0:0:d58e
IPv4DefaultGateway   : 192.168.0.1
DNSServer            : 8.8.8.8
                       1.1.1.1
Next set the IP address, subnet mask, and default gateway for the interface using the New-NetIPAddress cmdlet:
PS C:\>New-NetIPAddress -InterfaceIndex 5 -IPAddress 192.168.0.100 -PrefixLength 24 -DefaultGateway 192.168.0.1
Here is a breakdown of the parameters used:
-InterfaceIndex: The index of the interface you want to update
-IPAddress: The IP address you want to assign to the interface
-PrefexLength: The number of bits used by the subnet mask
-DefaultGateway: The IP address of the computer’s default gateway (router)
Next you can use the Set-DnsClientServerAddress cmdlet to specify the DNS servers for the interface to use:
PS C:\>Set-DNSClientServerAddress -InterfaceIndex 5 -ServerAddresses ("8.8.8.8", "1.1.1.1")
Here is a breakdown of the parameters used:
-InterfaceIndex: The index of the interface you want to update
-ServerAddresses: A list of the DNS servers to assign to the interface
Links and Resources
-
Ipconfig documentation
-
Netsh documentation
-
Get-NetIPConfiguration documentation
-
New-NetIPAddress
-
Set-DNSClientServerAddress
(Image credit: Future)
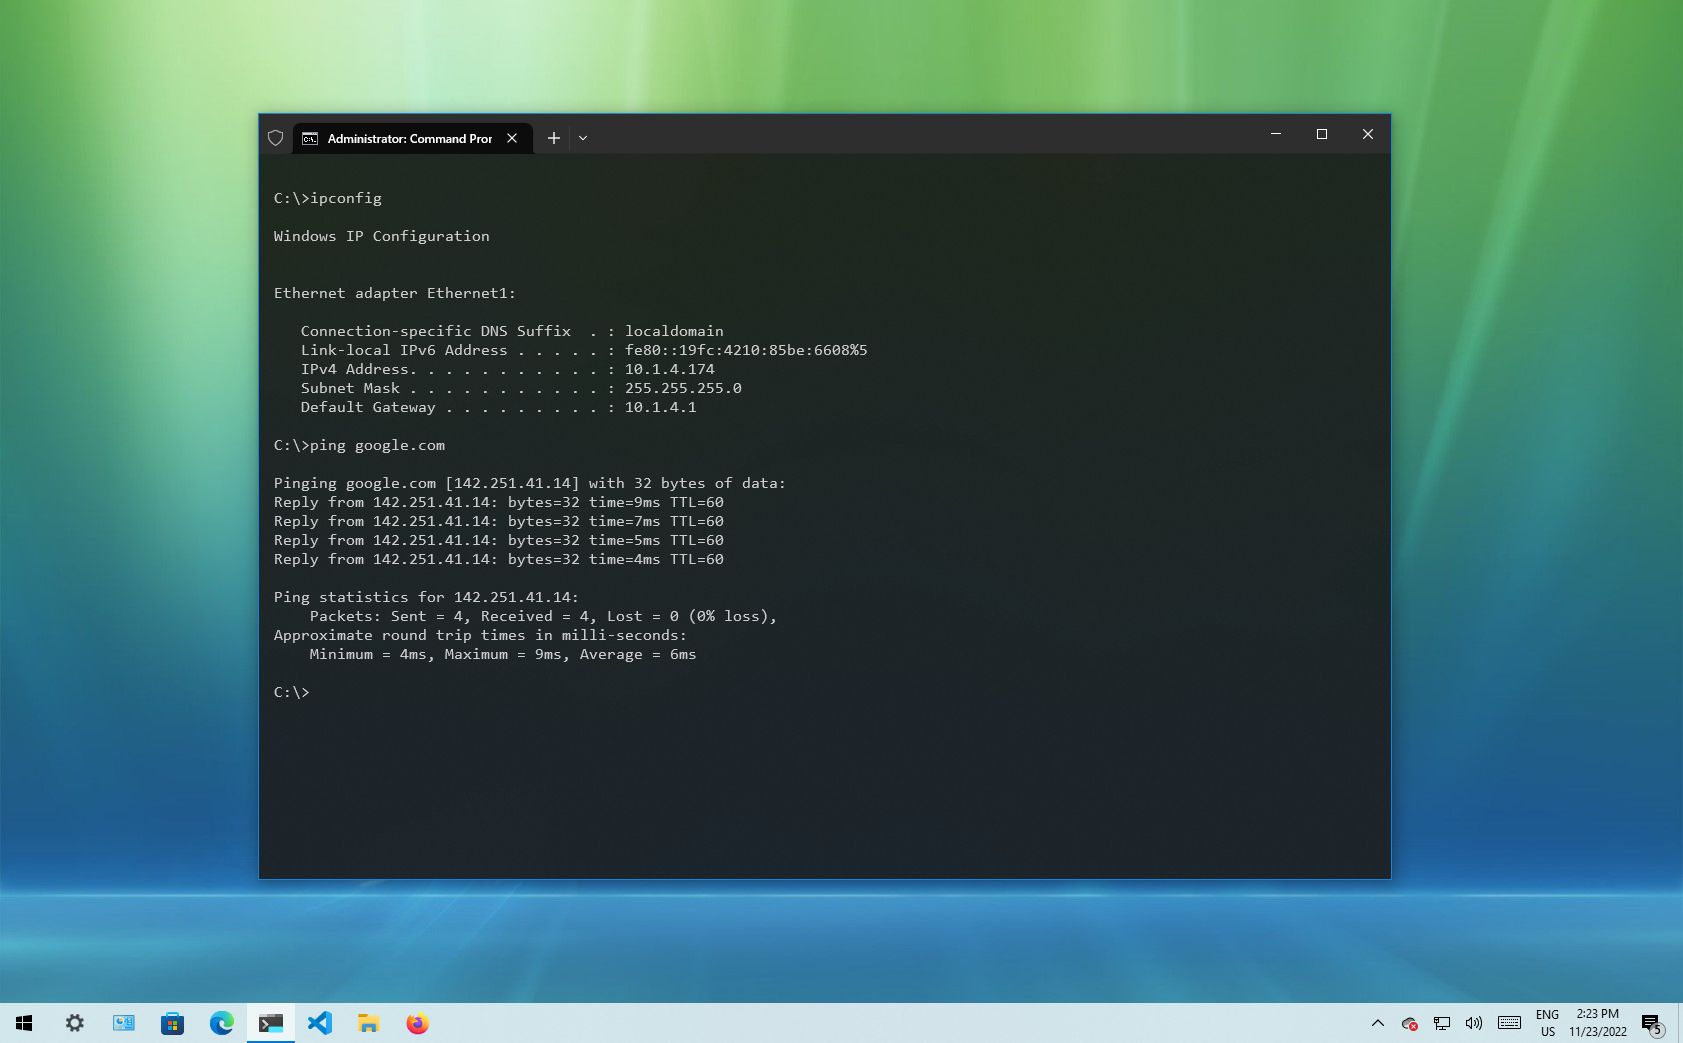
Windows 10 makes it easy to connect to a network and the internet using a wired or wireless connection. However, sometimes, you may still need to manually manage settings or troubleshoot connectivity problems, which is when the built-in command-line tools can come in handy.
Regardless of the issue, Windows 10 will likely have a Command Prompt tool to help you resolve the most common problems. For instance, ipconfig and ping are among the most important tools for viewing network settings and troubleshooting connectivity issues. If you are dealing with a routing problem, the route command can display the current routing table to examine and determine related problems, and with the nslookup tool, you can diagnose DNS problems.
You also have tools like arp to troubleshoot switching problems and determine the MAC address from an IP address. The netstat command-line tool allows you to view statistics for all the connections. And you can use the netsh tool to display and change many aspects of the network configuration, such as checking the current configuration, resetting settings, managing Wi-Fi and Ethernet settings, enabling or disabling the firewall, and a lot more.
This guide highlights eight Command Prompt tools that should help you manage and troubleshoot networking problems on your device and across the network.
1. IPConfig
On Windows 10, ipconfig (Internet Protocol configuration) is among the most common networking tools that allow you to query and show current TCP/IP (Transmission Control Protocol/Internet Protocol) network configuration. The command also includes options to perform different actions, such as refreshing Dynamic Host Configuration Protocol (DHCP) and Domain Name System (DNS) settings.
Display network configuration
To get started with ipconfig on Windows 10, use these steps:
All the latest news, reviews, and guides for Windows and Xbox diehards.
- Open Start.
- Search for Command Prompt, right-click the top result, and select the Run as administrator option.
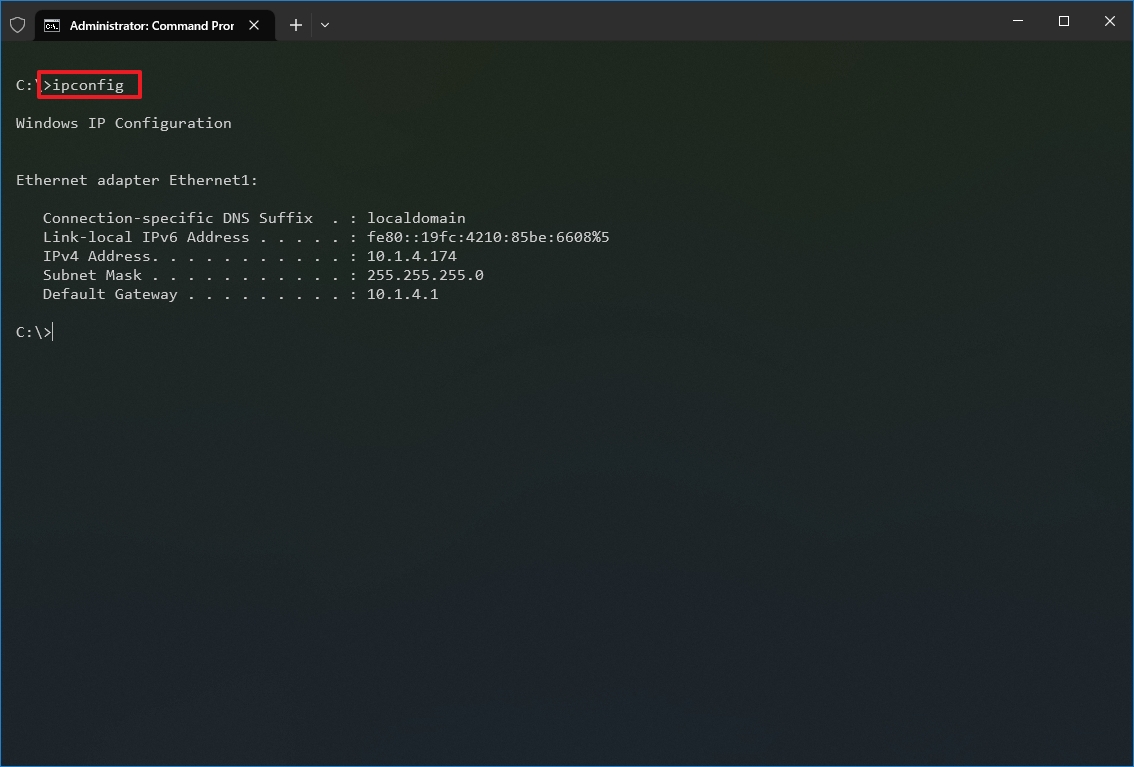
- Type the following command to view a summary of the TCP/IP network configuration and press Enter: ipconfig
- Quick tip: In Command Prompt, you can use the CLS command to clear the screen after you no longer need the information to continue running commands without clutter.
- Type the following command to view the complete TCP/IP network configuration and press Enter: ipconfig /all
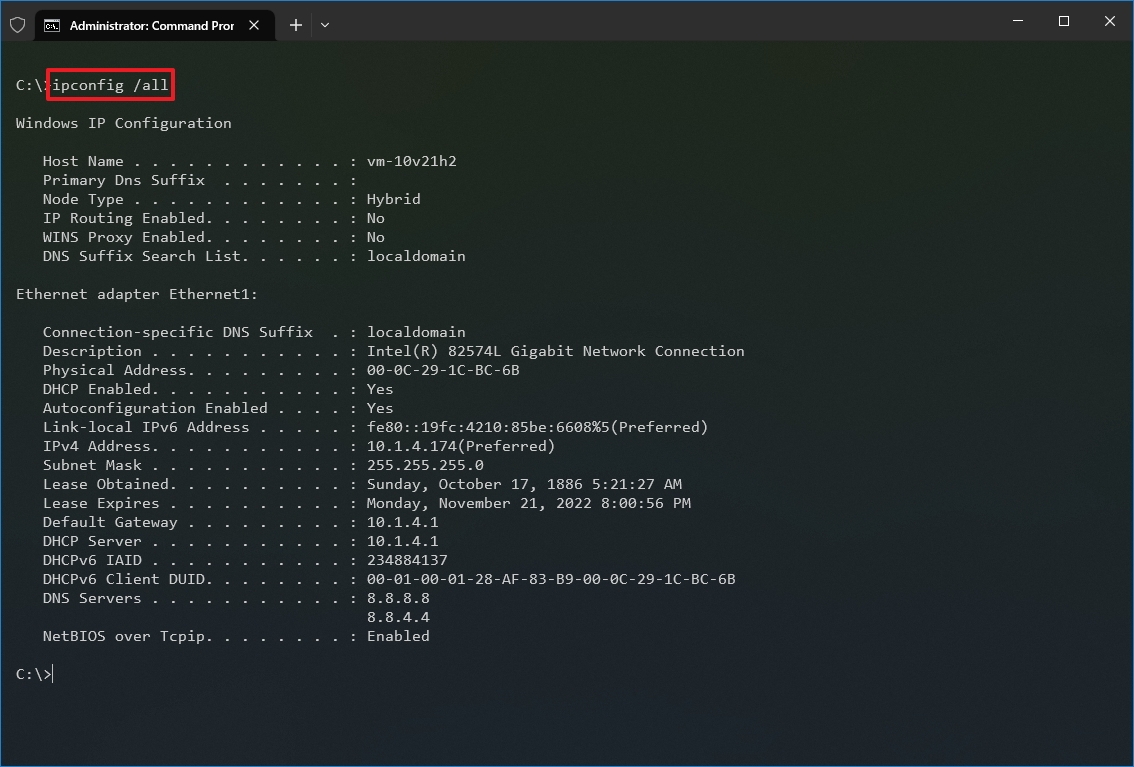
Once you complete the steps, you will have an overview of the PC’s entire TCP/IP configuration.
Refresh network settings
To release and renew the network configuration with Command Prompt, use these steps:
- Open Start.
- Search for Command Prompt, right-click the top result, and select the Run as administrator option.
- Type the following command to remove the current network configuration and press Enter: ipconfig /release
- Type the following command to reconfigure the network configuration and press Enter: ipconfig /renew
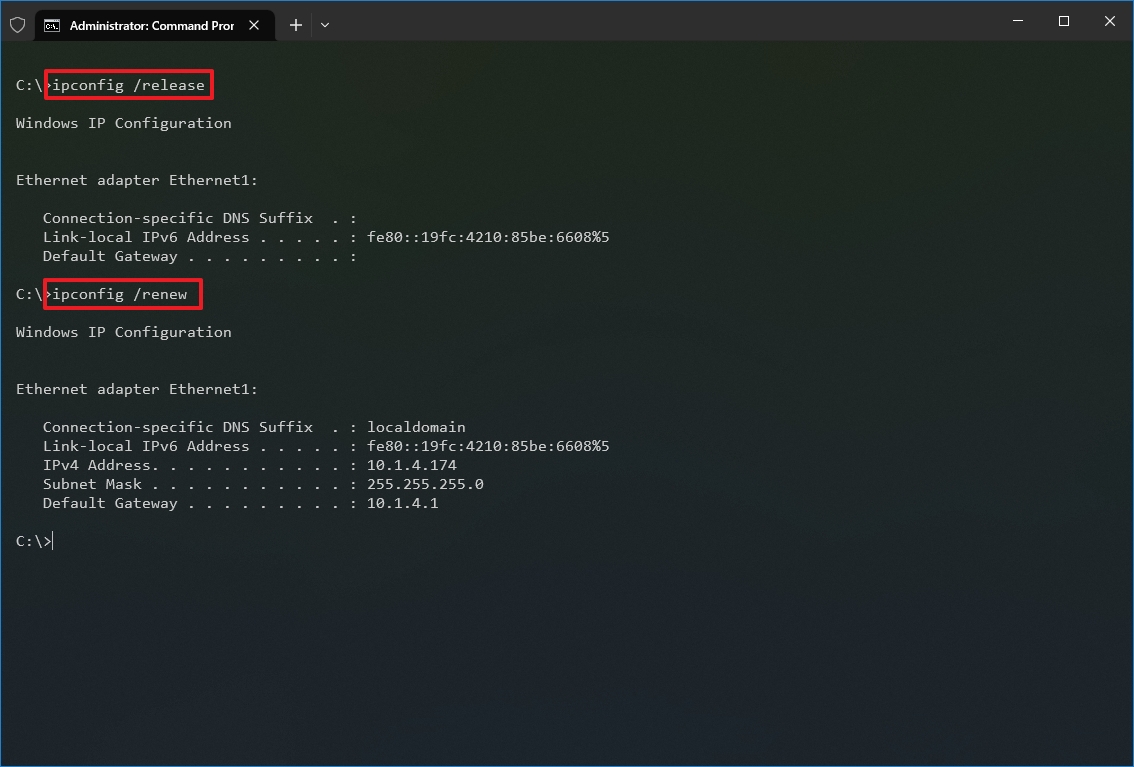
After you complete the steps, the first command will clear the current configuration, and the second command will fetch new settings from the DHCP server to resolve connectivity issues. If the dynamically assigned settings have not expired in the server, it is common to see the same IP address reconfigured on the device.
Refresh DNS settings
To flush and rebuild the current DNS cache entries on Windows 10, use these steps:
- Open Start.
- Search for Command Prompt, right-click the top result, and select the Run as administrator option.
- Type the following command to clear the DNS system cache on the device and press Enter: ipconfig /flushdns
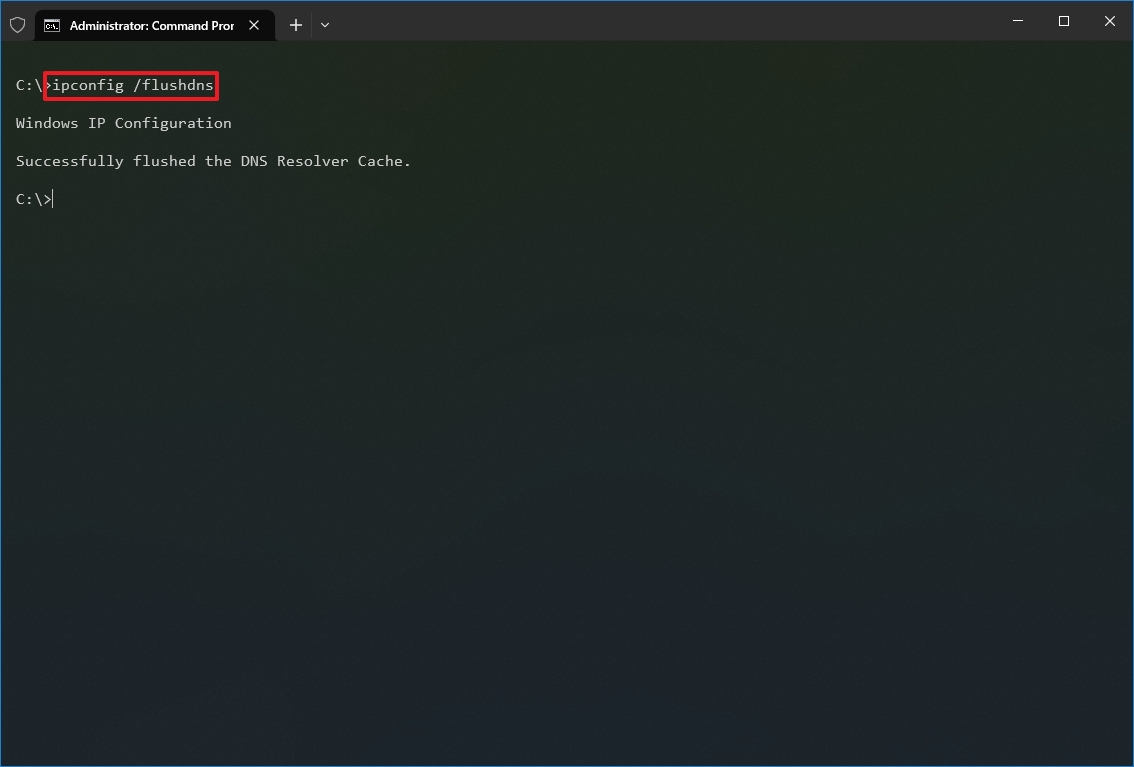
Once you complete the steps, the entries stored in the DNS cache of Windows 10 will be deleted and refreshed. Usually, this command will come in handy when you cannot connect to another computer or website using the host or domain name due to outdated information in the local cache.
2. Ping
Ping is another essential networking tool because it allows you to send ICMP (Internet Control Message Protocol) echo request messages to test the IP connectivity with other devices, whether it is another computer in the network or internet service.
Test device connectivity
To test the network connectivity with the ping command on Windows 10, use these steps:
- Open Start.
- Search for Command Prompt, right-click the top result, and select the Run as administrator option.
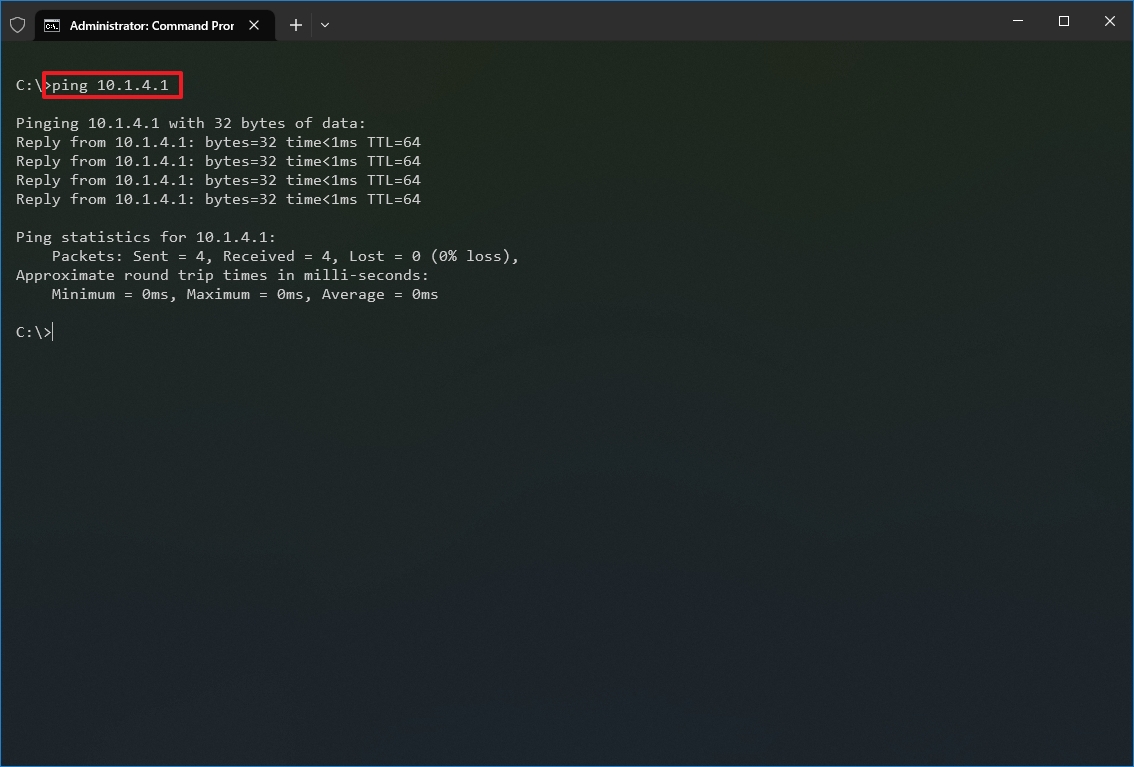
- Type the following command to send ICMP echo requests to test connectivity and press Enter: ping IP-OR-DOMAIN
In the command, replace IP-OR-DOMAIN with the actual IP address or domain name of the computer or service you want to test. For example, this command tests the communication between the local device and router: ping 10.1.4.1
- Quick tip: If you use the -a option (for example, ping -a 10.1.4.1), the command will also resolve the address to a hostname.
- (Optional) Type the following command to test the local computer networking stack and press Enter: ping 127.0.0.1 or ping loopback
- Quick note: The 127.0.0.1 is a well-known address, and it is referred to as the loopback address. When you run the command, if you get a reply, it means that the networking stack on Windows 10 is up and running. This is the same as pinging the device using its own network address.
Once you complete the steps, receiving four successful echo replies from the destination means the device can talk with the remote host. If the request times out, there is a problem between the host and the remote device.
If you are dealing with connectivity problems, start pinning the local computer to ensure the network stack is working. Then test the router’s connection to ensure the issue is not in the local network. Then try to ping a website to find out whether there is a problem with the internet connection or the remote host.
You should also know that the ping command will always time out if the remote device or service blocks the ICMP protocol.
Diagnose packet loss activity
The ping command includes many options that you can access with the «ping /?» command, and one of these options is the ability to set the time you want to run the tool, which can come in handy to examine packets lost when you are troubleshooting connectivity problems.
To run the ping command for a specific period, use these steps:
- Open Start.
- Search for Command Prompt, right-click the top result, and select the Run as administrator option.
- Type the following command to continue pinging until stopped and press Enter: ping IP-OR-DOMAIN -t
In the command, replace IP-OR-DOMAIN with the actual IP address or domain name of the computer or service you want to test. For example, this command tests the communication between the local device and router: ping 10.1.4.1 -t
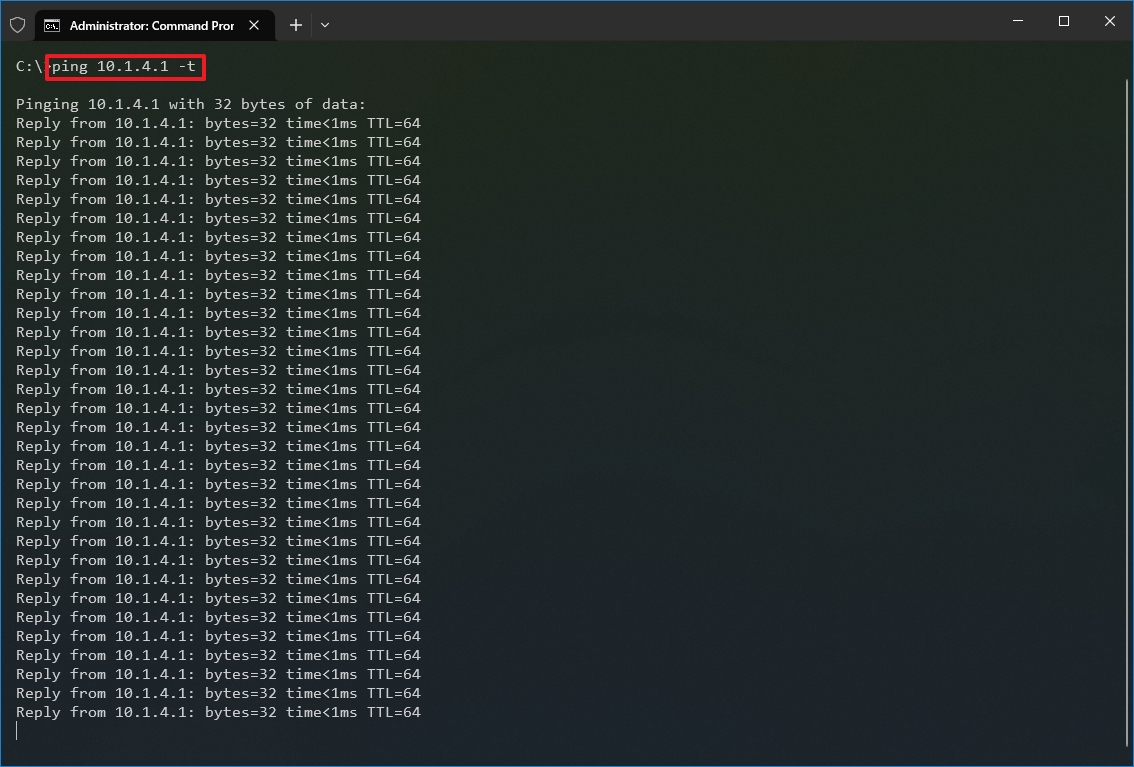
- Use the «Control + C» keyboard shortcut to stop the ping.
After you complete the steps, you will be able to see the successful and lost requests that can give you a clue on how to continue troubleshooting and resolving the connectivity problem. Administrators usually use the ping command in a local network to find out when a service goes down quickly. Also, the tool can be used as a quick way to know when the server is up and running again when restarting a server remotely.
3. Tracert
Windows 10 also includes tracert (Trace Route), a diagnostic tool to determine the network path to a destination using a series of ICMP echo requests. However, unlike the ping command, each request includes a TTL (Time to Live) value that increases by one each time, allowing to display of a list of the route the requests have taken and their duration.
To trace the route to a destination with Command Prompt on Windows 10, use these steps:
- Open Start.
- Search for Command Prompt, right-click the top result, and select the Run as administrator option.
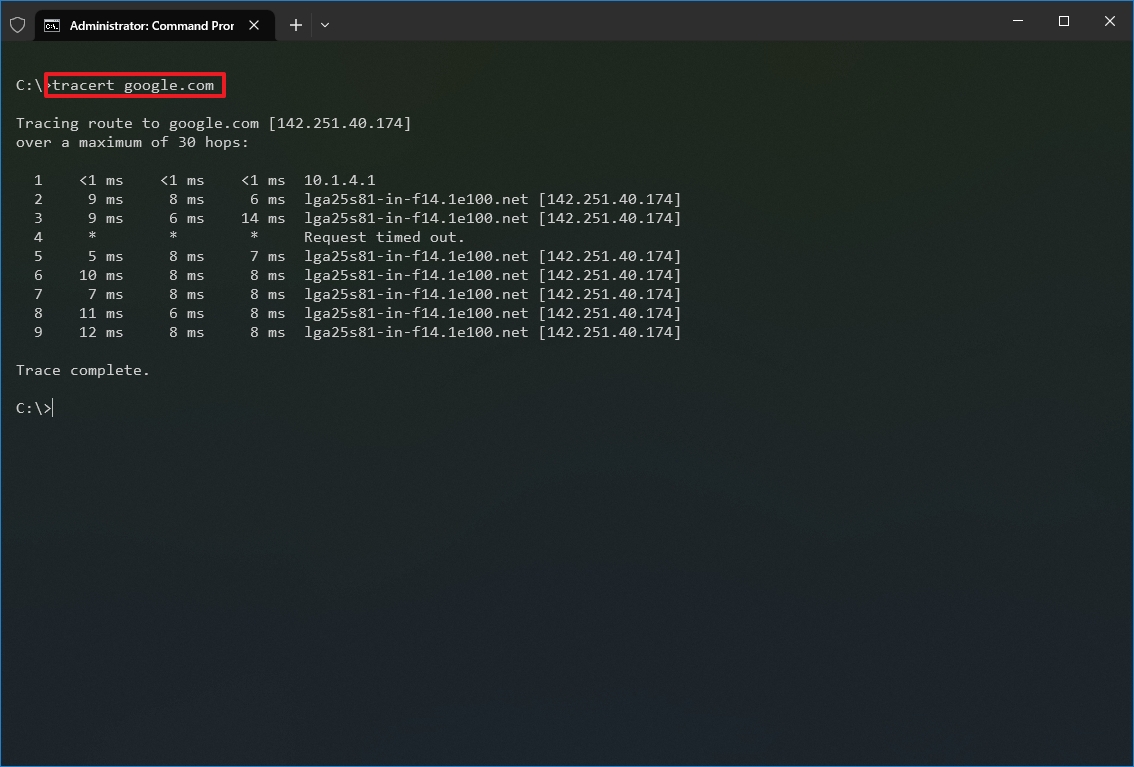
- Type the following command to understand the path taken to the destination and press Enter: tracert IP-OR-DOMAIN
In the command, replace IP-OR-DOMAIN with the actual IP address or domain name for the destination you want to troubleshoot. For example, this command allows you to view the path the packets are taking to reach Google.com: tracert google.com
- (Optional) Type the following command to adjust the hop counts to the destination and press Enter: tracert -h HOP-COUNT IP-OR-DOMAIN
In the command, replace IP-OR-DOMAIN with the actual IP address or domain name for the destination you want to troubleshoot and HOP-COUNT for the number of hops you want to trace. For example, this command puts the limit of 5 hops (nodes) to the destination: tracert -h 5 google.com
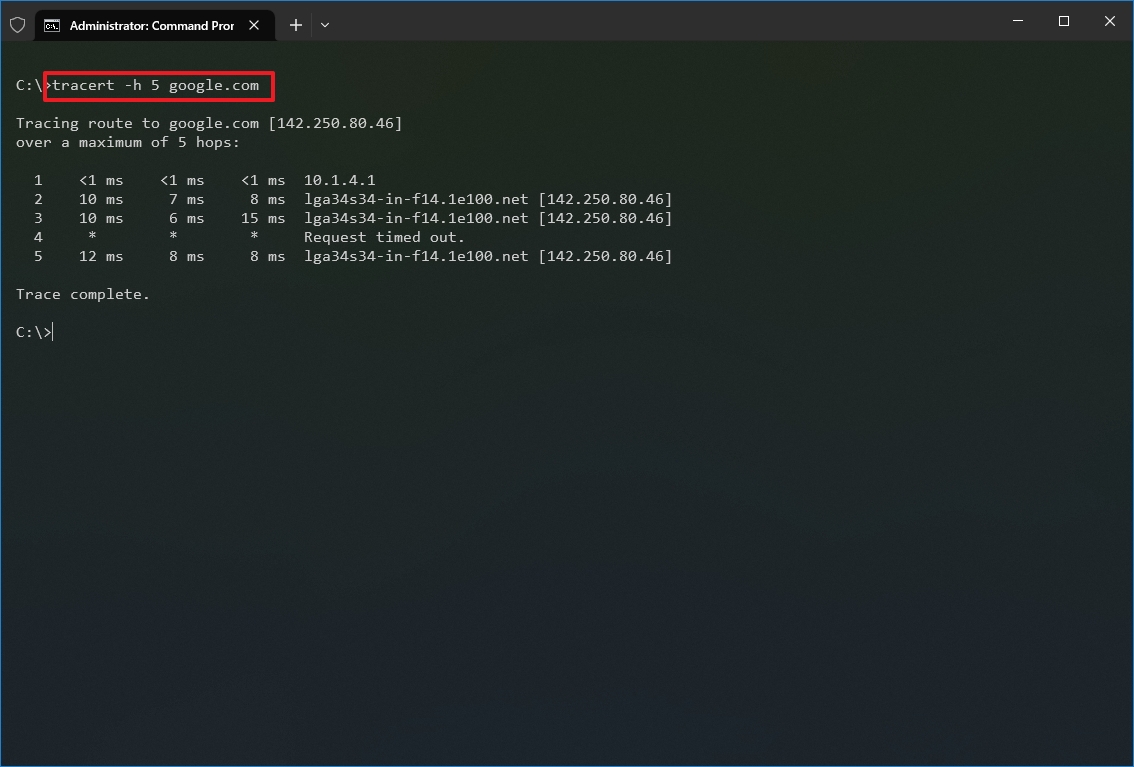
Once you complete the steps, you will know if the destination is reachable or if there is a networking problem along the way.
Similar to the ping tool, tracert includes several options, which you can view with the «tracert /?» command.
4. NSLookup
The nslookup (Name Server Lookup) tool can show valuable details to troubleshoot and resolve DNS-related issues. The tool includes an interactive and non-interactive modes. However, you will be using the non-interactive mode more often than not, which means you will type the full command to obtain the necessary information.
You can use this command to display the default DNS name and address of the local device and determine the domain name of an IP address or the name servers for a specific node.
To get started with nslookup on Windows 10, use these steps:
- Open Start.
- Search for Command Prompt, right-click the top result, and select the Run as administrator option.
- Type the following command to look up the local DNS name and address and press Enter: nslookup
- Quick note: This command also happens to open the nslookup interactive mode.
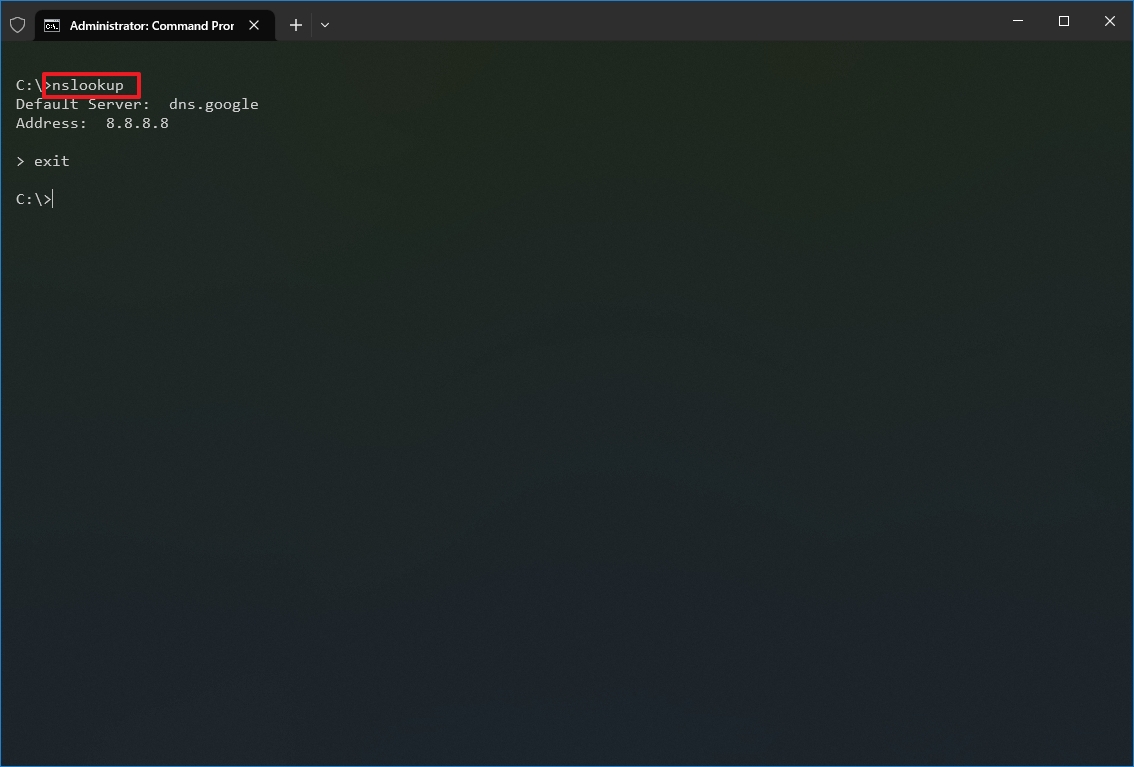
- Confirm the current DNS information.
- Type the following command to exit the interactive mode and press Enter: exit
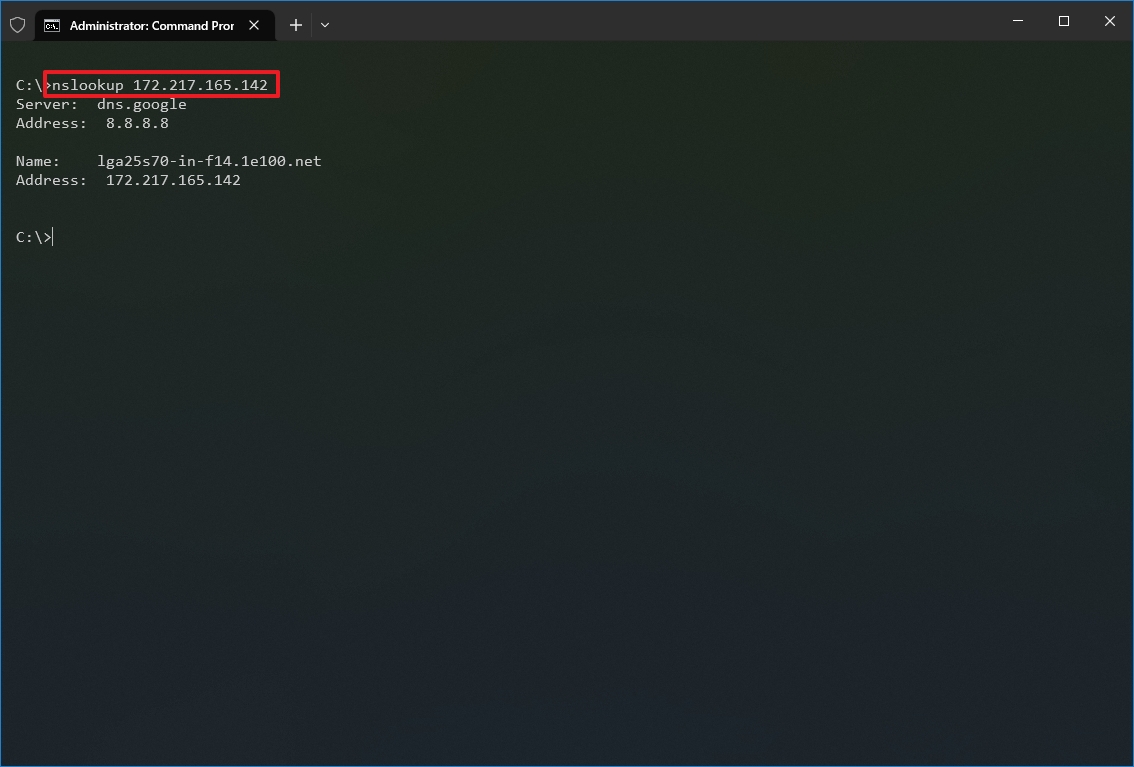
- Type the following command to determine the name and address of a specific server and press Enter: nslookup IP-ADDRESS
In the command, replace the IP-ADDRESS with the address of the remote device. For example, this command looks up the IP address 172.217.165.142 address: nslookup 172.217.165.142
- Type the following command to determine the address of a specific server and press Enter: nslookup DOMAIN-NAME
In the command, replace the DOMAIN-NAME with the address of the remote device. For example, this command looks up the IP address Google.com address: nslookup google.com
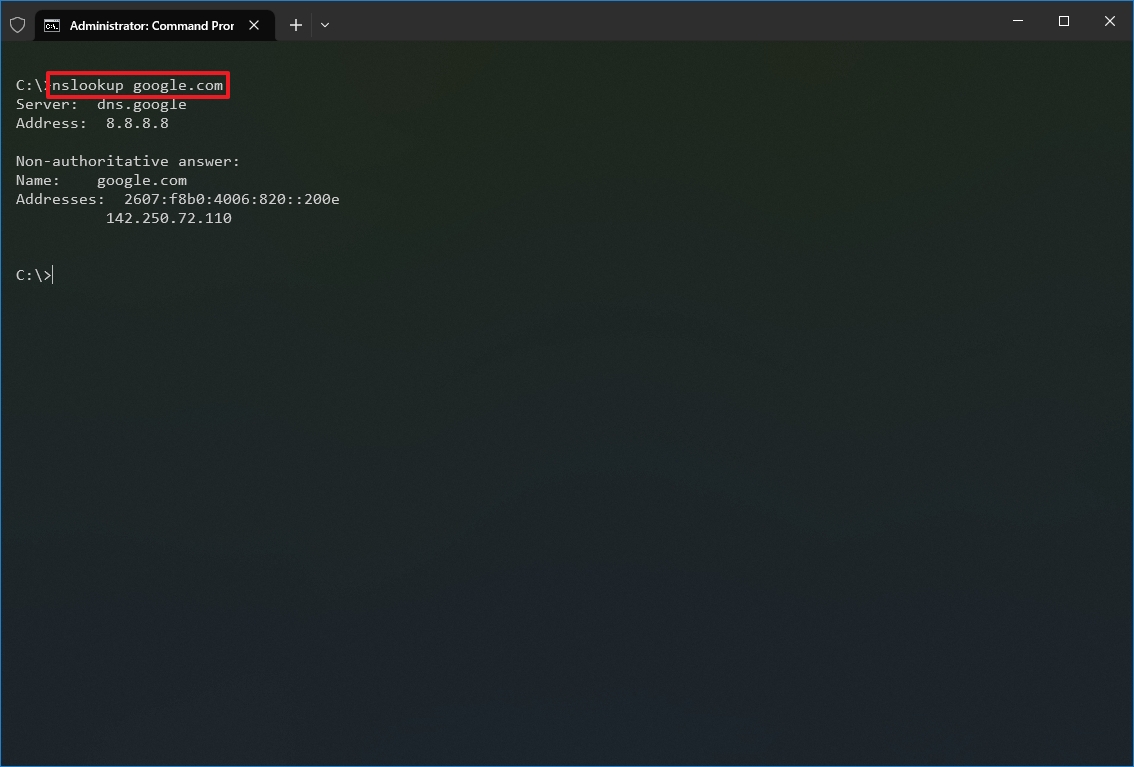
After you complete the steps, depending on the command, you will know whether the device has a DNS resolver and the IP address or domain and vice versa of the remote host.
5. NetStat
The netstat (Network Statistics) tool displays statistics for all network connections. It allows you to understand open and connected ports to monitor and troubleshoot networking problems for Windows 10 and apps.
When using the netstat tool, you can list active network connections and listening ports. You can view network adapter and protocol statistics. You can even display the current routing table and much more.
To get started with netstat, use these steps:
- Open Start.
- Search for Command Prompt, right-click the top result, and select the Run as administrator option.
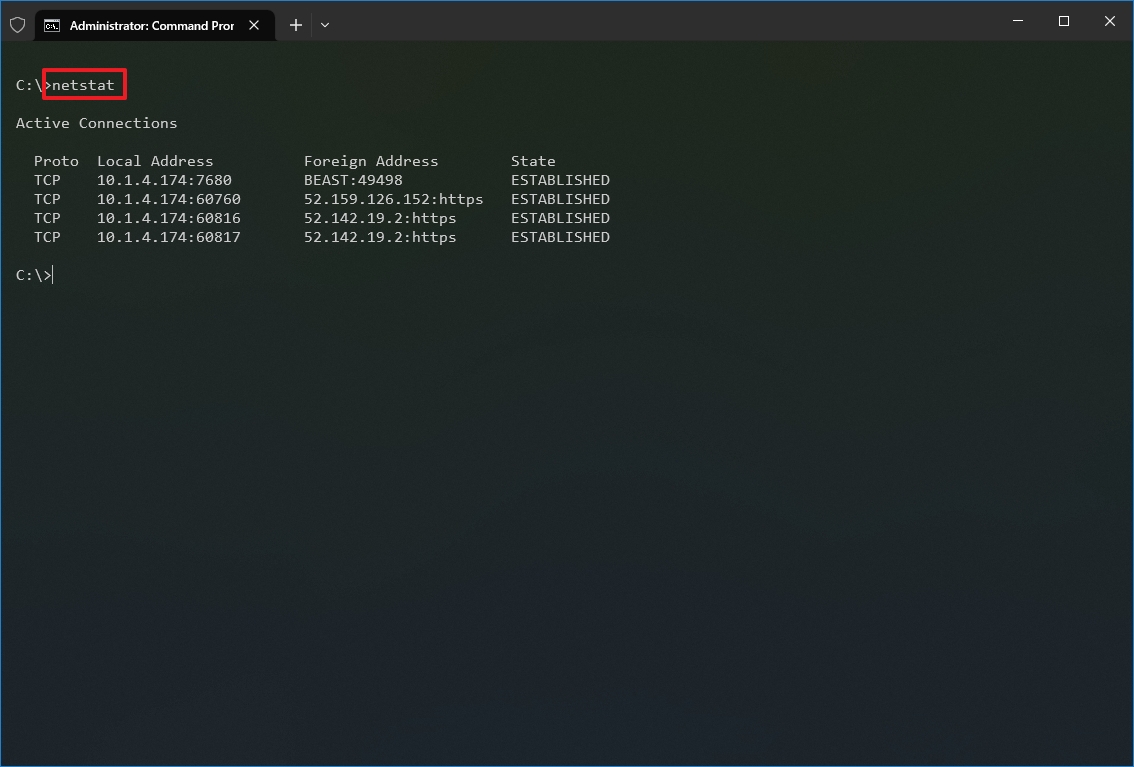
- Type the following command to show all active TCP connections and press Enter: netstat
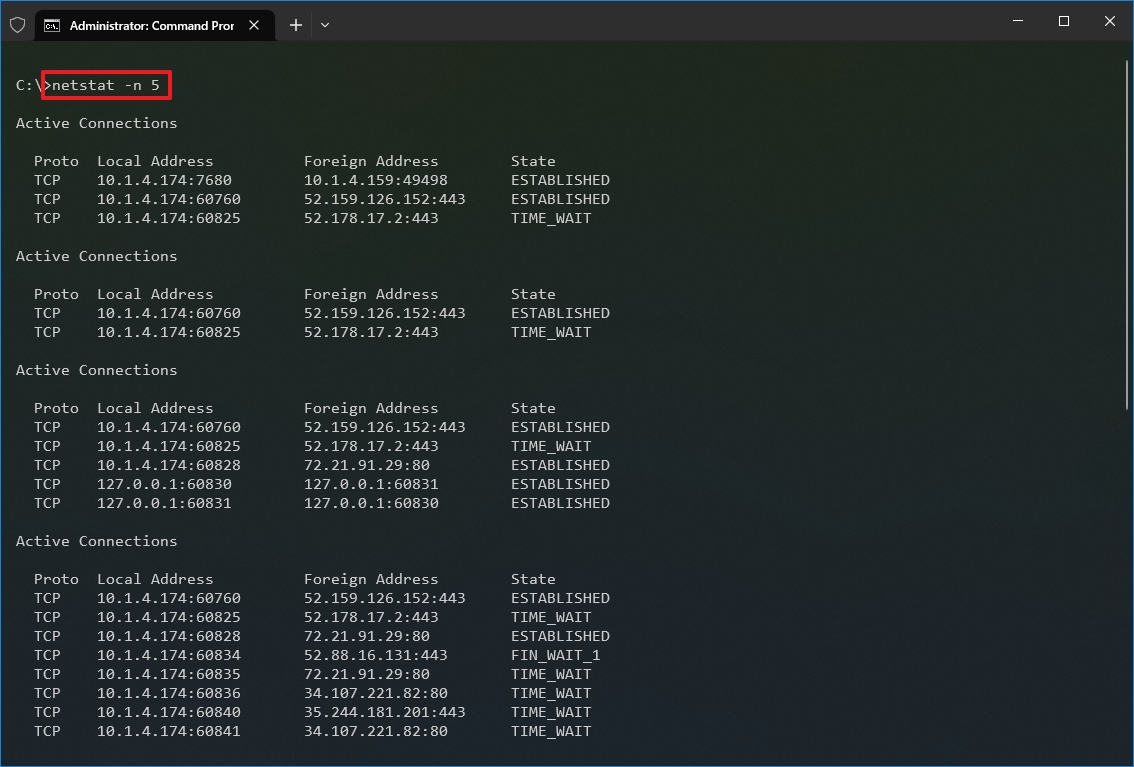
- (Optional) Type the following command to display active connections showing numeric IP address and port number instead of trying to determine the names and press Enter: netstat -n

- (Optional) Type the following command to refresh the information at a specific interval and press Enter: netstat -n INTERVAL
In the command, make sure to replace INTERVAL for the number (in seconds) you want to redisplay the information. This example refreshes the command in question every five seconds: netstat -n 5
- Quick note: When using the interval parameter, you can terminate the command using the «Ctrl + C» keyboard shortcut in the console.
Once you run the command, it will return a list of all active connections in four columns, including:
- Proto: Displays the connection protocol, including TCP or UDP.
- Local Address: Displays the device’s IP address followed by a semicolon with a port number of the connection. The double-semicolon inside brackets indicates the local IPv6 address. The «0.0.0.0» address also refers to the local address.
- Foreign Address: Shows the remote computer’s IP (or FQDN) address with the port number after the semicolon port name (for instance, https, http, microsoft-ds, wsd).
- State: Shows whether the connection is active (established), if the port has been closed (time_wait) and if the program has not closed the port (close_wait). Other statuses available include closed, fin_wait_1, fin_wait_2, last_ack, listen, syn_received, syn_send, and timed_wait.
6. ARP
Windows 10 maintains an arp (Address Resolution Protocol) table, which stores IP to Media Access Control (MAC) entries that the system has resolved. The arp tool lets you view the entire table, modify the entries, and use it to determine a remote computer’s MAC address.
Usually, you do not need to worry about MAC addresses, but there are scenarios when this information may come in handy. For example, when troubleshooting network problems at the data link layer (switching) or when restricting access or filtering content through the network for specific devices.
To get started with arp on Windows 10, use these steps:
- Open Start.
- Search for Command Prompt, right-click the top result, and select the Run as administrator option.
- Type the following command to view the current arp table cache on Windows 10 and press Enter: arp -a

- Type the following command to determine the MAC address of a remote device and press Enter: arp -a IP
In the command, make sure to replace IP with the address of the destination. For example, this command reveals the physical address of the 10.1.4.120 destination: arp -a 10.1.4.120

- Confirm the MAC (physical) address for the remote device.
After you complete the steps, you will be able to view the entire arp table and MAC address of a specific IP address.
If you want to know all the available options, use the «arp /?» command to list the available options with their corresponding descriptions.
7. Route
The route tool displays the routing table that allows Windows 10 to understand the network and communicate with other devices and services. The tool also offers some options to modify and clear the table as needed.
Like the arp tool, you typically do not have to worry about the routing table, but the command-line tool will come in handy when troubleshooting related problems.
To view or flush the routing table available on Windows 10, use these steps:
- Open Start.
- Search for Command Prompt, right-click the top result, and select the Run as administrator option.
- Type the following command to view the routing table known to Windows 10 and press Enter: route print

- Confirm the routing table information.
- (Optional) Type the following command to clear the routing table and press Enter: route -f
- Quick note: When running this command, the device will lose network connectivity since the system no longer understands the network topology. After running the command, restart the machine to allow the networking stack to rebuild the routing table. Usually, you should not have to clear the table unless you modify some of the entries and you need to reset the table.
Once you complete the steps, you will understand the routing table and how to clear the information.
You can also use the «route /?» command to view a list of available options, including options to change networking metrics, specify a gateway, add a new route, and much more. However, modifying these settings is usually not recommended unless you understand how the network works.
8. Netsh
On Windows 10, netsh (Network Shell) is a legacy command-line tool that allows you to display and change virtually any network configuration. For instance, you can use the tool to view the current network configurations, manage wireless connections, reset the network stack to fix most common problems, enable or disable the firewall, and a lot more.
To get started with the netsh command-line tool, use these steps:
- Open Start.
- Search for Command Prompt, right-click the top result, and select the Run as administrator option.
- Type the following command to view a list of the available commands (contexts) and press Enter: netsh /?
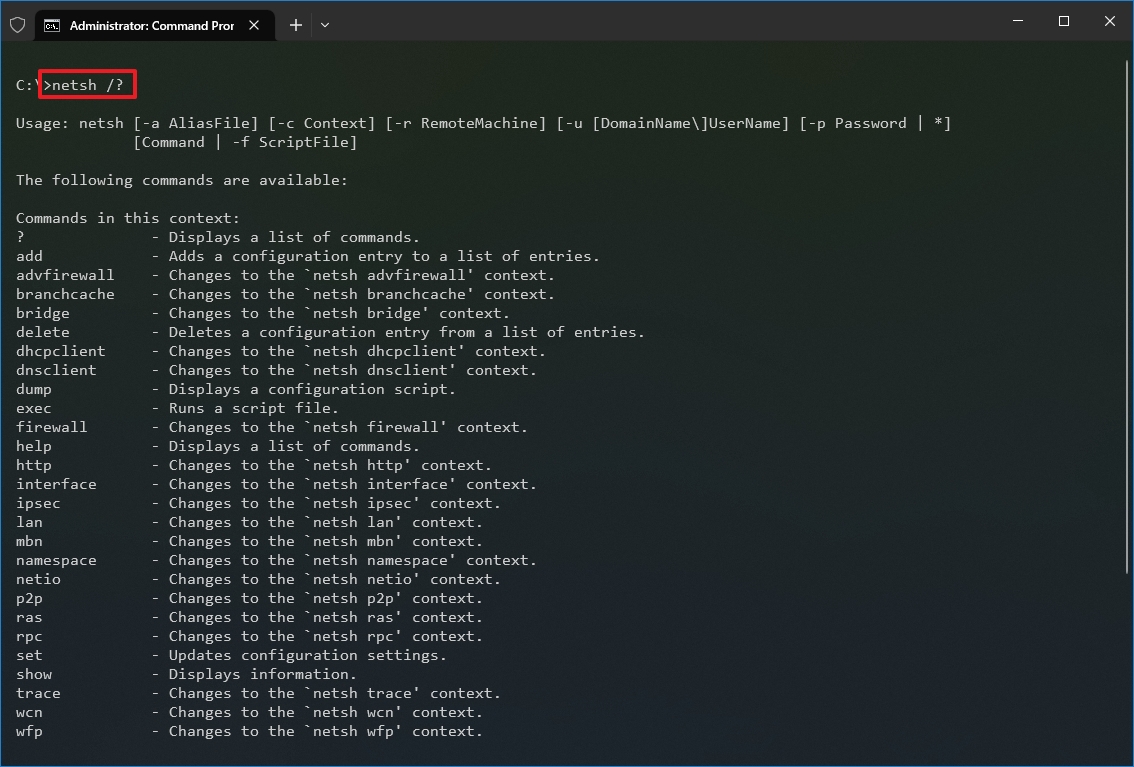
- Type the following command to view the list of available subcommands (subcontexts) for a specific option and press Enter: netsh CONTEXT-COMMAND
In the command, change the CONTEXT-COMMAND for the command that includes additional options. For example, this command shows the commands available to manage the firewall with netsh: netsh advfirewall /?
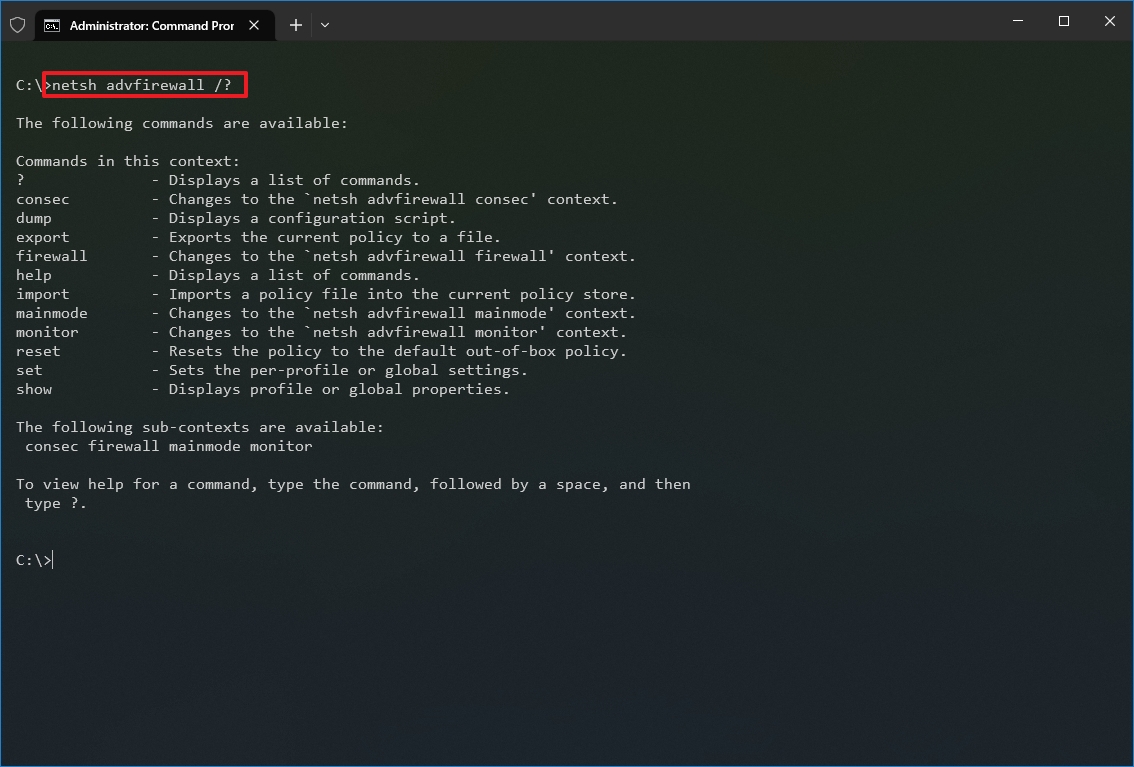
Once you complete the steps, you will know how to navigate the netsh contexts and subcontexts command to manage networking settings.
Reset system network stack
To reset the network stack to resolve common connectivity problems, use these steps:
- Open Start.
- Search for Command Prompt, right-click the top result, and select the Run as administrator option.
- Type the following command to reset the winsock stack and press Enter: netsh winsock reset
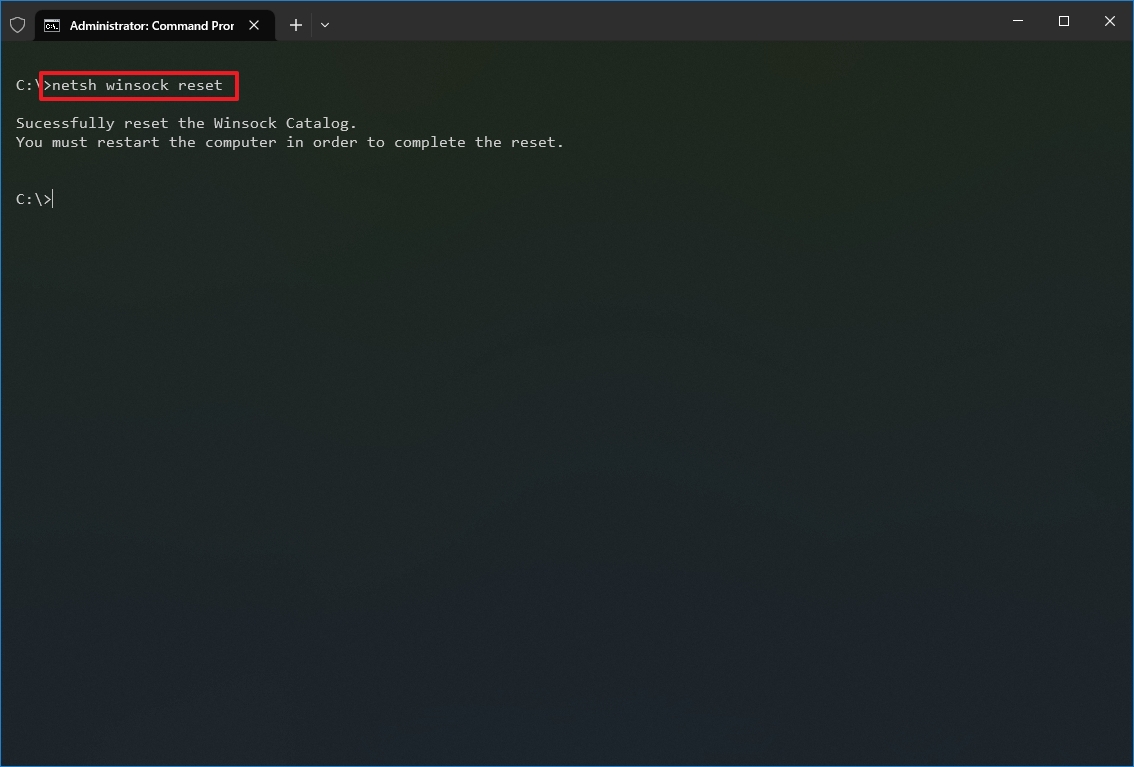
- Restart your computer.
After you complete the steps, the winsock configuration will reset, hopefully fixing the problems connecting to a network and the internet.
Export and import network configuration
To export the network configuration with netsh on Windows 10, use these steps:
- Open Start.
- Search for Command Prompt, right-click the top result, and select the Run as administrator option.
- Type the following command to export the current configuration for all the network adapters and press Enter: netsh -c interface dump>PATH\TO\EXPORTED.txt
In the command, replace the PATH\TO\EXPORTED.txt with the path and name of the file to store the configuration. For example, the following command exports the settings to the netshconfig.txt file: netsh -c interface dump>c:\netshconfig.txt
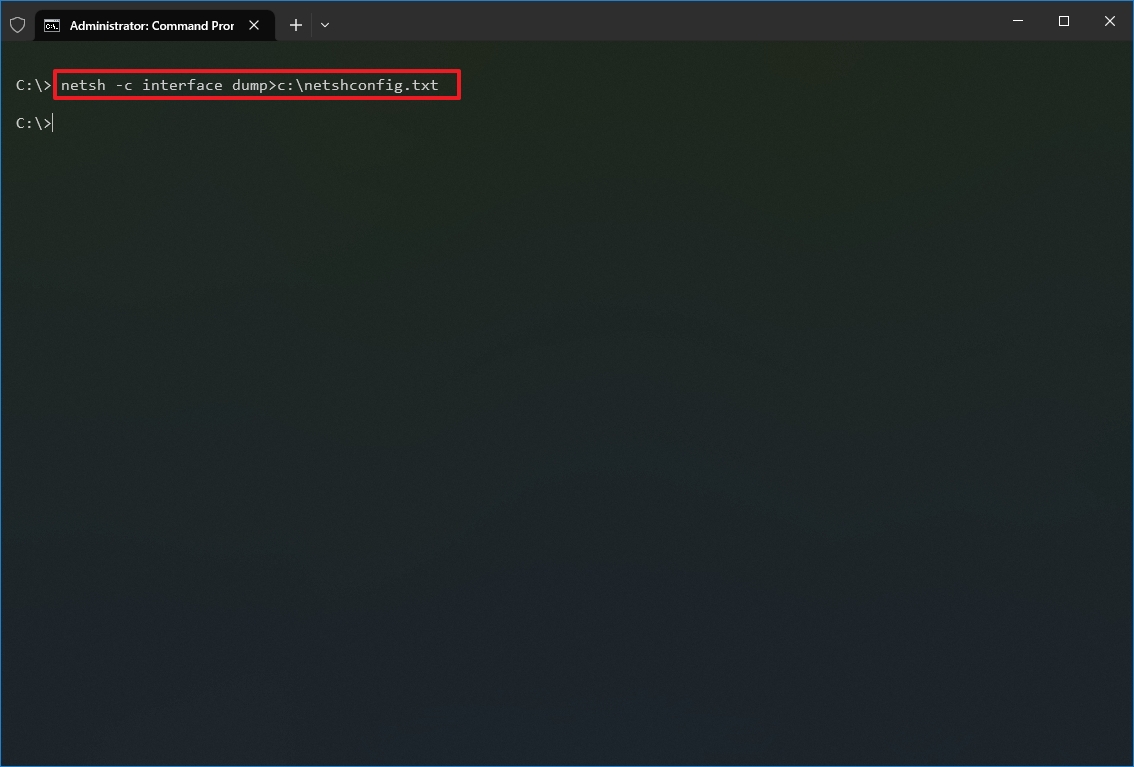
Once you complete the steps, you can open the file with any text editor to view the exported configuration.
Import network configuration
To import the network configuration settings with netsh, use these steps:
- Open Start.
- Search for Command Prompt, right-click the top result, and select the Run as administrator option.
- Type the following command to import the network configuration and press Enter: netsh -c interface dump>PATH\TO\IMPORTED.txt
In the command, replace the PATH\TO\EXPORTED.txt with the path and name of the file you want with the exported configuration. For example, the following command imports the settings from the netshconfig.txt file: netsh -f c:\netshconfig.txt
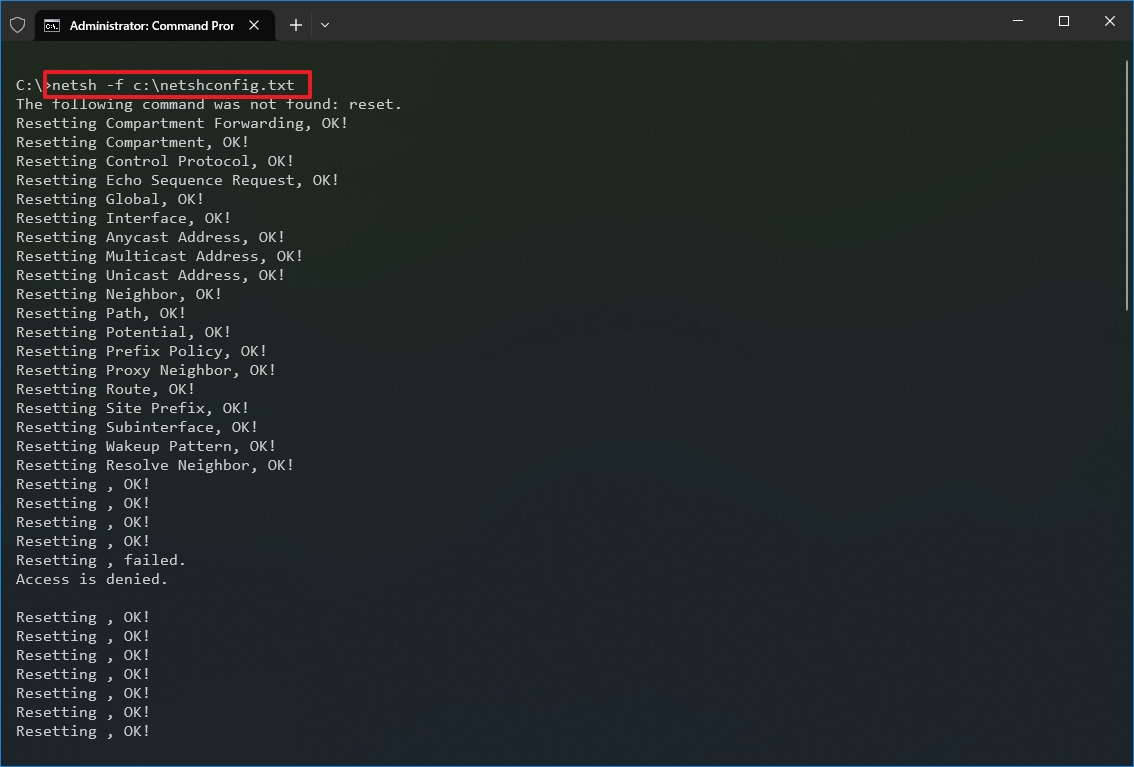
After you complete the steps, the new networking configuration will be imported and applied to Windows 10.
Enable and disable firewall
To enable the Windows 10 firewall with netsh, use these steps:
- Open Start.
- Search for Command Prompt, right-click the top result, and select the Run as administrator option.
- Type the following command to enable the default firewall and press Enter: netsh advfirewall set currentprofile state on
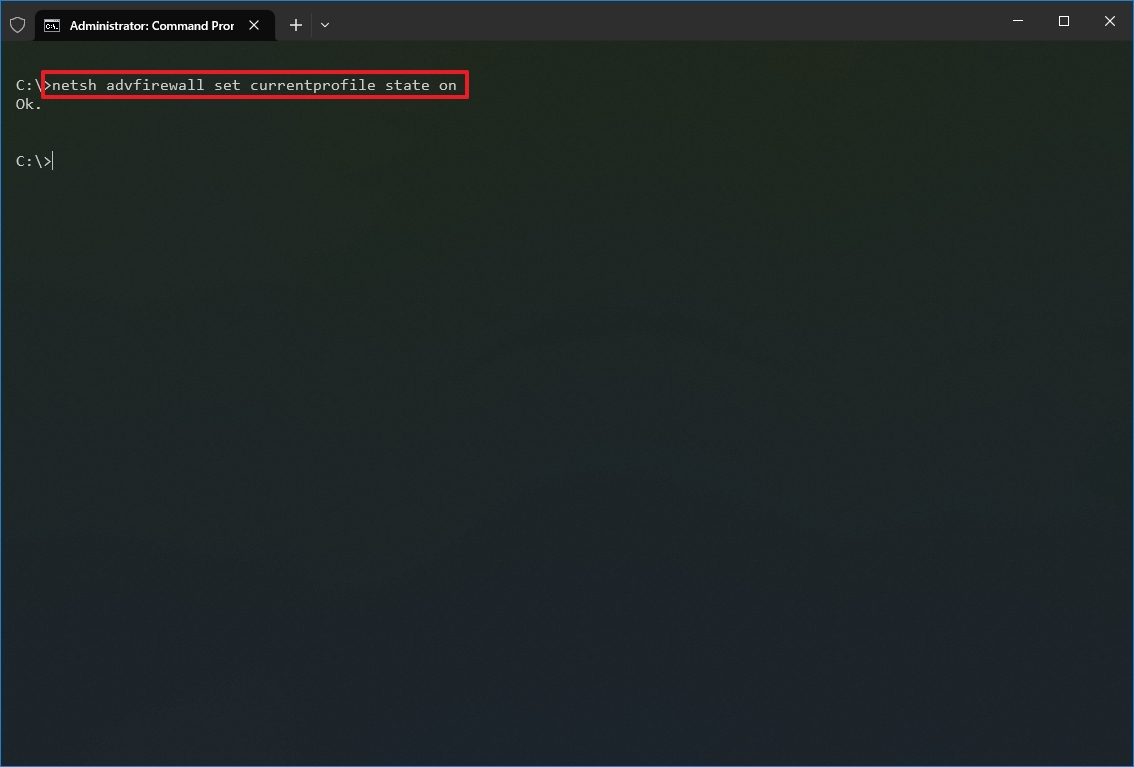
Once you complete the steps, the Windows Defender Firewall will enable on the device.
Disable firewall
To disable the Windows 10 firewall with netsh, use these steps:
- Open Start.
- Search for Command Prompt, right-click the top result, and select the Run as administrator option.
- Type the following command to disable the default firewall and press Enter: netsh advfirewall set currentprofile state off

Once you complete the steps, the Windows Defender Firewall will be disabled on the device.
On Windows 10, there are many tools you can use to change settings and troubleshoot networking issues using Command Prompt, PowerShell, and graphical applications. However, in this guide, we only focus on getting you started with some of the most common tools available in Command Prompt.
More resources
For more helpful articles, coverage, and answers to common questions about Windows 10 and Windows 11, visit the following resources:
- Windows 11 on Windows Central — All you need to know
- Windows 10 on Windows Central — All you need to know
Mauro Huculak has been a Windows How-To Expert contributor for WindowsCentral.com for nearly a decade and has over 15 years of experience writing comprehensive guides. He also has an IT background and has achieved different professional certifications from Microsoft, Cisco, VMware, and CompTIA. He has been recognized as a Microsoft MVP for many years.
This post mainly introduces the ipconfig command. Learn how to use various ipconfig commands, e.g. ipconfig, ipconfig /all, ipconfig /release, ipconfig /renew, ipconfig /flushdns, ipconfig /displaydns, etc. to find your IP address, release or renew IP address, flush DNS, etc. on your Windows 10/11 computer.
What is ipconfig Command?
ipconfig is short for internet protocol configuration. It is a console application in Windows OS that can display all your current TCP/IP network configuration values like your IP address. It can also flush your DNS (Domain Name System) settings, refresh DHCP (Dynamic Host Configuration Protocol) settings, etc. The ipconfig command is also available in macOS and ReactOS.
Main ipconfig Commands Introduction
Before you use the ipconfig commands, you should open Windows Command Prompt first. You can press Windows + R, type cmd, and press Ctrl + Shift + Enter to run Command Prompt as administrator.
Use ipconfig command to get IP address
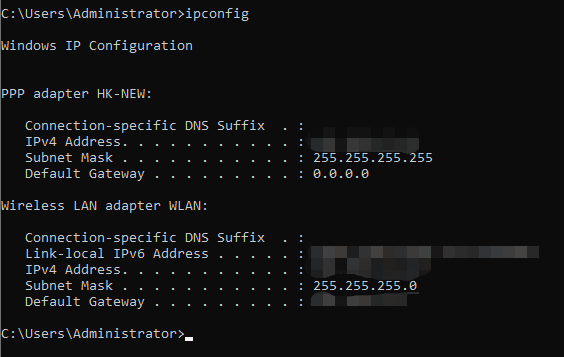
You can type the ipconfig command without parameters in the Command Prompt window and press Enter. This command displays the Internet Protocol version IPv4 and IPv6 addresses, subnet mask, and default gateway for all adapters.
The ipconfig command displays the basic TCP/IP configuration for all adapters. To display the full TCP/IP configurations for all adapters on your computer, you can type the ipconfig /all command and press Enter. The ipconfig /all command displays more detailed information than ipconfig clone. It displays your IPv4 address, IPv6 address, DNS servers, MAC address, adapter description, DHCP details, etc.
ipconfig /release command
This ipconfig command releases the IPv4 address of all network adapters. To release the IPv6 address of all adapters, type the command ipconfig /release6 and press Enter.
If you want to release the IPv4/IPv6 address for a specific adapter, you can type ipconfig /release [adapter] or ipconfig /release6 [adapter] command. Replace adapter in the command with the exact name of the target adapter. You can see the name of all adapters by typing ipconfig command.
The ipconfig /release command sends a DHCP release notification to the DHCP server to force release the current DHCP configuration and IP address, and mark the old client’s IP address as available.
ipconfig /renew command
After you type the ipconfig /release command to release the old IP address, you can type the command ipconfig /renew and press Enter to request a new IP address for the client. This command will renew the DHCP configuration for all adapters.
To renew the IP address for a specific adapter, you can type ipconfig /renew [adapter] command. For IPv6, you can type ipconfig /renew6 [adapter] command. Type the real adapter name in the command.
ipconfig /displaydns command
Your computer creates a local cache of all DNS records. The DNS Resolver Cache is used to translate domain names to IP addresses. To check the detailed information of all DNS records, you can type the ipconfig /displaydns command in Command Prompt and press Enter. It will display the DNS record name, type, time to live, data length, section, etc.
ipconfig /flushdns command
This command can flush and reset the DNS Resolver Cache. When troubleshooting DNS problems, you can use this ipconfig command to clear problematic DNS cache entries and make sure future requests use the fresh DNS information.
ipconfig /registerdns command
This command refreshes all DHCP leases and registers the DNS names again.
ipconfig /showclassid command
This ipconfig command displays all the DHCP class IDs for all adapters. Type the ipconfig /showclassid6 command to display all the IPv6 DHCP class IDs. For a specific adapter, add the adapter name at the end of the command.
ipconfig /setclassid command
Type this command to configure the DHCP class IDs for adapters. For a specific adapter, add the adapter name at the end of the command.
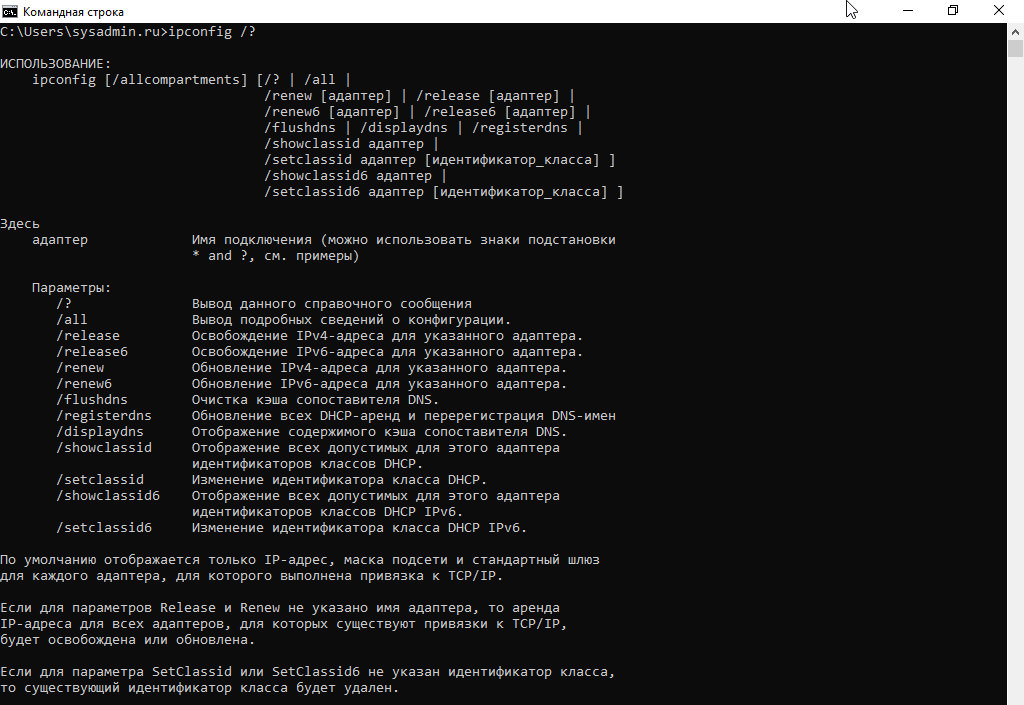
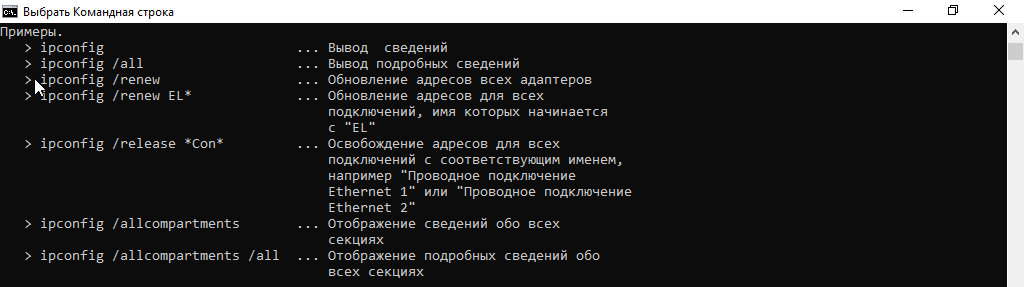
ipconfig /? command
Display help of the ipconfig commands.
Verdict
In this post, you’ve learned the various ipconfig commands. Now you can use the ipconfig command to check your IP address, use the ipconfig /release and ipconfig /renew commands to release and renew your IP address, use ipconfig /displaydns and ipconfig /flushdns commands to display or reset/flush DNS, etc.
If you have other computer problems, please visit MiniTool Software official website.
- 01.11.2020
- 12 416
- 0
- 30.01.2021
- 5
- 4
- 1

- Содержание статьи
- Описание
- Синтаксис
- Параметры
- Примечания
- Примеры использования
- Справочная информация
- Добавить комментарий
Описание
IPCONFIG — Служит для отображения всех текущих параметров сети TCP/IP и обновления параметров DHCP и DNS. При вызове команды ipconfig без параметров выводится только IP-адрес, маска подсети и основной шлюз для каждого сетевого адаптера.
Синтаксис
ipconfig [/all] [/renew [адаптер]] [/release [адаптер]] [/flushdns] [/displaydns] [/registerdns] [/showclassid адаптер] [/setclassid адаптер [код_класса]]Параметры
| Параметр | Описание |
|---|---|
| /all | Вывод полной конфигурации TCP/IP для всех адаптеров. Без этого параметра команда ipconfig выводит только IP-адреса, маску подсети и основной шлюз для каждого адаптера. Адаптеры могут представлять собой физические интерфейсы, такие как установленные сетевые адаптеры, или логические интерфейсы, такие как подключения удаленного доступа. |
| /renew [адаптер] | Обновление конфигурации DHCP для всех адаптеров (если адаптер не задан) или для заданного адаптера. Данный параметр доступен только на компьютерах с адаптерами, настроенными для автоматического получения IP-адресов. Чтобы указать адаптер, введите без параметров имя, выводимое командой ipconfig. |
| /release [адаптер] | Отправка сообщения DHCPRELEASE серверу DHCP для освобождения текущей конфигурации DHCP и удаление конфигурации IP-адресов для всех адаптеров (если адаптер не задан) или для заданного адаптера. Этот адаптер отключает протокол TCP/IP для адаптеров, настроенных для автоматического получения IP-адресов. Чтобы указать адаптер, введите без параметров имя, выводимое командой ipconfig. |
| /flushdns | Сброс и очистка содержимого кэша сопоставления имен DNS клиента. Во время устранения неполадок DNS эту процедуру используют для удаления из кэша записей отрицательных попыток сопоставления и других динамически добавляемых записей. |
| /displaydns | Отображение содержимого кэша сопоставления имен DNS клиента, включающего записи, предварительно загруженные из локального файла Hosts, а также последние полученные записи ресурсов для запросов на сопоставление имен. Эта информация используется службой DNS клиента для быстрого сопоставления часто встречаемых имен без обращения к указанным в конфигурации DNS-серверам. |
| /registerdns | Динамическая регистрация вручную имен DNS и IP-адресов, настроенных на компьютере. Этот параметр полезен при устранении неполадок в случае отказа в регистрации имени DNS или при выяснении причин неполадок динамического обновления между клиентом и DNS-сервером без перезагрузки клиента. Имена, зарегистрированные в DNS, определяются параметрами DNS в дополнительных свойствах протокола TCP/IP. |
| /showclassid адаптер | Отображение кода класса DHCP для указанного адаптера. Чтобы просмотреть код класса DHCP для всех адаптеров, вместо параметра адаптер укажите звездочку (*). Данный параметр доступен только на компьютерах с адаптерами, настроенными для автоматического получения IP-адресов. |
| /setclassid адаптер [код_класса] | Задание кода класса DHCP для указанного адаптера. Чтобы задать код класса DHCP для всех адаптеров, вместо параметра адаптер укажите звездочку (*). Данный параметр доступен только на компьютерах с адаптерами, настроенными для автоматического получения IP-адресов. Если код класса DHCP не задан, текущий код класса удаляется. |
| /? | Отображение справки в командной строке. |
Примечания
- Команда ipconfig является эквивалентом для командной строки команды winipcfg, имеющейся в Windows Millennium Edition, Windows 98 и Windows 95. Хотя Windows XP не имеет графического эквивалента команде winipcfg, для просмотра и обновления IP-адреса можно воспользоваться окном «Сетевые подключения». Для этого откройте окно Сетевые подключения, щелкните правой кнопкой мыши сетевое подключение, выберите команду Состояние, а затем откройте вкладку Поддержка.
- Данная команда доступна только на компьютерах с адаптерами, настроенными для автоматического получения IP-адресов. Это позволяет пользователям определять, какие значения конфигурации были получены с помощью DHCP, APIPA или другой конфигурации.
- Если имя адаптер содержит пробелы, его следует заключать в кавычки (т. е. «имя_адаптера«).
- В именах адаптеров, задаваемых для команды ipconfig, поддерживается использование подстановочного знака звездочки (*) для задания имен, начинающихся с указанной строки или содержащих указанную строку. Например, имя Подкл* будет включать все адаптеры, начинающиеся со строки «Подкл», а имя *сет* — все адаптера, содержащие строку «сет».
- Эта команда доступна, только если в свойствах сетевого адаптера в объекте Сетевые подключения в качестве компонента установлен протокол Интернета (TCP/IP).
Примеры использования
Чтобы вывести основную конфигурацию TCP/IP для всех адаптеров, введите:
ipconfigЧтобы вывести полную конфигурацию TCP/IP для всех адаптеров, введите:
ipconfig /allЧтобы обновить конфигурацию IP-адреса, назначенного DHCP-сервером, только для адаптера Подключение по локальной сети, введите:
ipconfig /renew "Подключение по локальной сети"Чтобы сбросить кэш сопоставления имен DNS при наличии неполадок в сопоставлении имен, введите:
ipconfig /flushdnsЧтобы вывести код класса DHCP для всех адаптеров с именами, начинающимися со слова Подключение, введите:
ipconfig /showclassid Подключение*Чтобы задать код класса DHCP TEST для адаптера Подключение по локальной сети, введите:
ipconfig /setclassid "Подключение по локальной сети" TESTСправочная информация
Когда нужен сброс сетевых настроек?
Сброс сетевых настроек в Windows 11 и Windows 10 — это крайняя мера для устранения сложных проблем с доступом к локальной сети или интернету. Процедура возвращает сетевые адаптеры, стек TCP/IP, Winsock и другие параметры к заводским значениям, удаляет и переустанавливает все сетевые адаптеры. В этой статье мы разберём, как выполнить сброс через графический интерфейс, командную строку и PowerShell, а также как сохранить текущие настройки перед процедурой.
Приобрести оригинальные ключи активации Windows 11 можно у нас в каталоге от 1690 ₽
Подготовка к сбросу сетевых настроек
Перед сбросом сетевых настроек попробуйте стандартные методы диагностики:
— Проверьте IP-адреса, DNS-серверы и настройки маршрутизатора.
— Обновите драйверы сетевых адаптеров.
— Перезагрузите компьютер и маршрутизатор.
— Запустите встроенную утилиту диагностики сети:
msdt.exe /id NetworkDiagnosticsNetworkAdapter

Если проблема не решена, сохраните текущие сетевые настройки, так как сброс удалит статические IP, DNS, маршруты, Wi-Fi профили и VPN-подключения.

Сохранение текущих сетевых настроек
1. Выведите список сетевых адаптеров в PowerShell:
Get-NetAdapter | Select Name, InterfaceIndex, InterfaceDescription, InterfaceOperationalStatus, MediaConnectionState, DriverInformation | Format-Table

2. Проверьте, какие адаптеры используют статические IP:
Get-NetIPInterface -InterfaceIndex 7
Если Dhcp=Disabled, настройки заданы вручную.

3. Сохраните настройки адаптера в файл:
Get-NetIPConfiguration -InterfaceIndex 7 >> C:\network_settings.txt

4. Выведите статические маршруты:
Route Print
Запишите маршруты из секции Persistent Routes.

5. Сохраните настройки VPN-подключений:
Get-VpnConnection
6. Экспортируйте Wi-Fi профили:
netsh wlan show profile
netsh wlan export profile name="Xiaomi_20F5" key=clear folder=C:\ps
7. Сохраните настройки Winsock:
netsh winsock show catalog > C:\winsock-backup.txt
Эти данные помогут восстановить сетевые настройки после сброса.
Сброс сетевых настроек через графический интерфейс
В Windows 11, Windows 10 (версия 1607 и выше) и Windows Server 2019/2022 сброс выполняется через Параметры:
1. Откройте Параметры → Сеть и Интернет или выполните:
ms-settings:network

2. Прокрутите вниз и выберите Сброс сети (Network Reset) или в Windows 11 выберите Дополнительные сетевые параметры и далее Сброс сети.


3. Нажмите Сбросить сейчас (Reset Now) и подтвердите действие.

Windows удалит все сетевые адаптеры, очистит настройки TCP/IP, DNS, Wi-Fi и перезагрузится через 5 минут. После перезагрузки система автоматически обнаружит и установит драйверы адаптеров. Настройте параметры сети заново и проверьте, решена ли проблема.
Сброс сетевых настроек через командную строку
Для более точного контроля используйте командную строку или PowerShell. Выполняйте команды с правами администратора.
Очистка кэша DNS
Сбросьте кэш DNS:
ipconfig /flushdns

Сброс Winsock
Сбросьте настройки Winsock:
netsh winsock reset
Эта команда очищает параметры в ветке реестра:
HKEY_LOCAL_MACHINE\SYSTEM\CurrentControlSet\Services\WinSock2\Parameters
Старые настройки сохраняются в Protocol_Catalog_Before_Reset. После выполнения перезагрузите компьютер.

Сброс стека TCP/IP
Сбросьте настройки TCP/IPv4:
netsh int ip reset
Для TCP/IPv6:
netsh int ipv6 reset
Команды очищают ветки реестра:
— HKLM\SYSTEM\CurrentControlSet\Services\Tcpip\Parameters
— HKLM\SYSTEM\CurrentControlSet\Services\DHCP\Parameters
Удаление сетевых адаптеров
Удалите все сетевые адаптеры, включая виртуальные WAN Miniport:
netcfg -d
Сброс правил брандмауэра
Очистите правила Windows Defender Firewall:
netsh advfirewall reset

Сброс расширенных настроек адаптера
В PowerShell проверьте текущие параметры адаптера:
Get-NetAdapterAdvancedProperty -Name Ethernet0 | Format-Table -AutoSize

Сбросьте их:
Reset-NetAdapterAdvancedProperty -Name Ethernet0
Действия после сброса
1. Перезагрузите компьютер.
2. Windows автоматически установит драйверы сетевых адаптеров.
3. Если используется DHCP, настройки сети восстановятся автоматически. В противном случае восстановите IP-адреса, DNS, маршруты и Wi-Fi профили из сохранённых файлов.
4. Проверьте доступ к сети.
Дополнительные рекомендации
— Перед сбросом убедитесь, что у вас есть доступ к последним драйверам сетевых адаптеров с сайта производителя.
— Если проблема сохраняется, проверьте настройки маршрутизатора или обратитесь к провайдеру.
— Для корпоративных сетей убедитесь, что групповые политики не блокируют изменения.
— Сохраняйте резервные копии настроек в надёжном месте, например, на внешнем носителе.
Сброс сетевых настроек в Windows 11 и Windows 10 — эффективный способ устранить неполадки с сетью, если другие методы не помогли. Следуя этим шагам, вы сможете вернуть систему к заводским параметрам и восстановить подключение.