
In this tutorial, you will learn how to use the net user command to create, delete and change user accounts in the Windows command prompt (CDM).
We can perform the following tasks using the net user command:
- View user accounts.
- Add and Remove user accounts.
- Activate and Deactivate user accounts.
- Change the user password.
If you are operating in an Active Directory domain environment, always use the /domain command switch to execute the net user command on the domain controller rather than on the local computer.
Examples
List users on the local computer:
net userList users on the domain controller:
net user /domainThis command displays detailed information about the Administrator account:
net user AdministratorCreate a user named user1 with a password of strongPassword:
net user /add user1 "strongPassword"Delete the user user1 from the computer:
net user /delete user2This command enables the built-in Administrator account on Windows 10/11:
net user Administrator /active:yesThis command sets (changes) the Administrator account password:
net user Administrator "adminPassWord"Execute the following command to disable the Administrator account on Windows 10/11:
net user Administrator /active:noThis command forces the user user1 to change the password at the next logon:
net user user1 /logonpasswordchg:yesCreate a user; the user must change the password at the next logon:
net user /add user1 "strongPassword" /logonpasswordchg:yesCreate a new user; the account expires on January 31st:
net user /add user1 "strongPassword" /expires:01/31/2023Command Options
| username | The name of the user to create, delete, view, or modify. |
| password | Password for the user. |
| * | Use this option to produce a prompt for the password. |
| /add | Use this option when you want to create a new user. |
| /delete | Use this option to remove a user from the Windows system. |
| /active:{yes | no} | Activates or Deactivates a user. The default is yes when creating a new user. |
| /expires:{date | never} | Use this option to set the expiration date (mm/dd/yy) for an account. The default is never. |
| /fullname:»name» | Full name of the user. |
| /passwordchg:{yes | no} | Specifies whether users can change their own password. The default is yes. |
| /passwordreq:{yes | no} | No means the user can log in without a password. The default is YES. |
| /logonpasswordchg:{yes|no} | Specifies whether the user should change the password at the next logon. The default is NO. |
| /homedir:path | The home directory location. |
| /comment:»text» | Use this option to add a description to the user’s account. |
You can view the manual page by typing net help user at the command prompt.
View a User
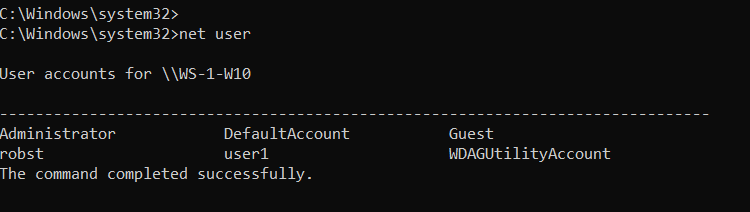
When you execute the net user command without any options, it displays a list of user accounts on the computer.
net userYou will see an output similar to the following:
Add the /domain command switch if you want to list users on the Active Directory Domain controller.
net user /domainTo see detailed information about a particular user, execute the command net user Username, where the Username is the name of the user you want to view. For example, you can view the Administrator account by running the following command:
net user AdministratorCreate and Delete User Accounts
To create a user account, use the following syntax:
net user /add UserName PasswordFor example, the following command creates a user named user1 with a password of strongPassword:
net user /add user1 "strongPassword"Use an asterisk (*) in place of the password to produce a prompt, as shown in the following example:
net user /add user1 *
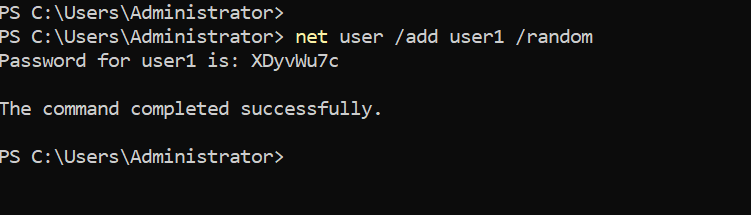
Alternatively, you can also use the /random option to generate a strong random password, as shown in the following example:
net user /add user1 /randomThe randomly generated password will be displayed on the command prompt after you execute the command.
To delete a user, use the following syntax:
net user /delete UserNameThe following command deletes the user user1 from the computer:
net user /delete user2Change Passwords
To change passwords, use the following syntax:
net user UserName New-PasswordUse an asterisk (*) or /random in place of the password to produce a prompt or generate a random password:
net user UserName *
net user user1 /random
Notes
The net user command is most of the time used in Windows Server to manage Active Directory users.
Windows 10/11 uses a new Settings pane to manage users, but the net user command is still useful for some tasks. For example, if you want to activate the built-in Administrator account, it is easy to do that using this command.
While working at the command prompt, run the net help user command to see all available command options.
In the next tutorial, we are going to learn how to manage Windows groups using the net localgroup CMD command.
What to Know
- Enter the net user command into Command Prompt for a list of all the local user accounts.
- The net user command can add, remove, and make changes to the user accounts on a computer.
- Some switches that work with this command include username, password, /add, and /delete.
This article describes how to use the net user command in Windows. Included on this page are the various net user switches and some examples of the net user command that you can adapt for your own commands.
Net User Command Syntax
net user [username [password | *] [/add] [options]] [/domain]] [username [/delete] [/domain]] [/help] [/?]
See How to Read Command Syntax if you’re not sure how to read the net user command syntax explained above or in the table below. The availability of certain net user command switches and other net user command syntax may differ from operating system to operating system.
| Net User Command Options | |
|---|---|
| Option | Explanation |
| net user | Execute the net user command alone to show a very simple list of every user account, active or not, on the computer you’re currently using. |
| username | This is the name of the user account, up to 20 characters long, that you want to make changes to, add, or remove. Using username with no other option will show detailed information about the user in the Command Prompt window. |
| password | Use the password option to modify an existing password or assign one when creating a new username. The minimum characters required can be viewed using the net accounts command. A maximum of 127 characters is allowed1. |
| * | You also have the option of using * in place of a password to force the entering of a password in the Command Prompt window after executing the net user command. |
| /add | Use the /add option to add a new username on the system. |
| options | See Additional Net User Command Options below for a complete list of available options to be used at this point when executing net user. |
| /domain | This switch forces net user to execute on the current domain controller instead of the local computer. |
| /delete | The /delete switch removes the specified username from the system. |
| /help | Use this switch to display detailed information about the net user command. Using this option is the same as using the net help command with net user: net help user. |
| /? | The standard help command switch also works with the net user command but only displays the basic command syntax. Executing net user without options is equal to using the /? switch. |
[1] Windows 98 and Windows 95 only support passwords up to 14 characters long. If you’re creating an account that might be used from a computer with one of those versions of Windows, consider keeping the password length within the requirements for those operating systems.
The following options are to be used where options is noted in the net user command syntax above:
| Additional Net User Command Options | |
|---|---|
| Option | Explanation |
| /active:{yes | no} | Use this switch to activate or deactivate the specified useraccount. If you don’t use the /active option, the net user assumes yes. |
| /comment:»text« | Use this option to enter a description of the account. A maximum of 48 characters is allowed. The text entered using the /comment switch is viewable in the Description field in a user’s profile in Users and Groups in Windows. |
| /countrycode:nnn | This switch is used to set a country code for the user, which determines the language used for error and help messages. If the /countrycode switch isn’t used, the computer’s default country code is used: 000. |
| /expires:{date | never} | The /expires switch is used to set a specific date (see below) in which the account, not the password, should expire. If the /expires switch isn’t used, never is assumed. |
| date (with /expires only) | If you choose to specify a date then it must be in mm/dd/yy or mm/dd/yyyy format, months and days as numbers, fully spelled out, or abbreviated to three letters. |
| /fullname:»name« | Use the /fullname switch to specify the real name of the person using the username account. |
| /homedir:pathname | Set a pathname with the /homedir switch if you want a home directory other than the default2. |
| /passwordchg:{yes | no} | This option specifies whether this user can change his or her own password. If /passwordchg is not used, the net user assumes yes. |
| /passwordreq:{yes | no} | This option specifies whether this user is required to have a password at all. If this switch isn’t used, yes is assumed. |
| /logonpasswordchg:{yes | no} | This switch forces the user to change his or her password at the next logon. Net user assumes no if you don’t use this option. The /logonpasswordchg switch is not available in Windows XP. |
| /profilepath:pathname | This option sets a pathname for the user’s logon profile. |
| /scriptpath:pathname | This option sets a pathname for the user’s logon script. |
| /times:[timeframe | all] | Use this switch to specify a timeframe (see below) that the user can log on. If you don’t use /times then net user assumes that all times are okay. If you do use this switch, but don’t specify either timeframe or all, then net user assumes that no times are okay and the user is not allowed to log on. |
| timeframe (with /times only) | If you choose to specify a timeframe you must do so in a particular way. Days of the week must be spelled out completely or abbreviated in MTWThFSaSu format. Times of day can be in a 24-hour format, or 12-hour format using AM and PM or A.M. and P.M. Periods of time should use dashes, day and time should be separated by commas and day/time groups by semicolons. |
| /usercomment:»text« | This switch adds or changes the User Comment for the specified account. |
| /workstations:{computername[,…] | *} | Use this option to specify the hostnames of up to eight computers that the user is allowed to log on to. This switch is really only useful when used with /domain. If you don’t use /workstations to specify allowed computers then all computers (*) is assumed. |
[2] The default home directory is C:\Users\[username]\ in Windows 11, Windows 10, Windows 8, Windows 7, and Windows Vista. In Windows XP, the default home directory is C:\Documents and Settings\[username]\. For example, if the user account on a Windows 11 tablet is named «Tim,» the default home directory created when the account was first set up was C:\Users\Tim\.
Net User Command Examples
Below are a few ways you might use this command.
Get the Full List of Users
This first example of the net user command shows that in its simplest form (enter net user), it will produce a list of all the users on the computer, much like this:
Administrator DefaultAccount ExtraGuest jonfi WDAGUtilityAccount
This computer has over a dozen user accounts, so they’re separated into multiple columns.
You can also use net users in place of net user. They’re completely interchangeable.
Examine One User
net user administrator
In the above net user example, the command produces all the details on the administrator user account. Here’s an example of what might display:
User name AdministratorFull NameComment Built-in account for administering the computer/domainUser's commentCountry/region code 000 (System Default)Account active NoAccount expires NeverPassword last set 8/24/2020 1:21:25 PMPassword expires NeverPassword changeable 8/24/2020 1:21:25 PMPassword required YesUser may change password YesWorkstations allowed AllLogon scriptUser profileHome directoryLast logon 11/9/2021 11:48:13 AMLogon hours allowed AllLocal Group Memberships *AdministratorsGlobal Group memberships *None
As you can see, all the details for that user on this computer are listed.
Change When a User Can Log In
net user rodriguezr /times:M-F,7AM-4PM;Sa,8AM-12PM
Here’s an example where the rodriguezr account is having its login days and times changed.
Make a New User
net user nadeema r28Wqn90 /add /comment:"Basic user account." /fullname:"Ahmed Nadeem" /logonpasswordchg:yes /workstations:jr7tww,jr2rtw /domain
We thought we’d throw the kitchen sink at you with this one. This is the kind of net user application you might never do at home, but you might very well see in a script published for a new user by the IT department in a company.
Here, we’re setting up a new user account with the name nadeema, and setting the initial password as r28Wqn90. This is a standard account in our company, which we note in the account itself [/comment:»Basic user account.«], and is the new Human Resources executive, Ahmed [/fullname:»Ahmed Nadeem«].
We want Ahmed to change his password to something he won’t forget, so we want him to set his own the first time he logs on [/logonpasswordchg:yes]. Also, Ahmed should only have access to the two computers in the Human Resources office [/workstations:jr7twwr,jr2rtwb]. Finally, our company uses a domain controller [/domain], so Ahmed’s account should be set up there.
As you can see, the net user command can be used for a lot more than simple user account adds, changes, and removals. We configured several advanced aspects of Ahmed’s new account right from Command Prompt.
Delete a User
net user nadeema /delete
Now, we’ll finish off with an easy one. Ahmed [nadeema] didn’t work out as the latest HR member, so he was let go, and his account removed [/delete].
Net User Command Availability
The net user command is available from within the Command Prompt in most versions of Windows including Windows 10, Windows 8, Windows 7, Windows Vista, Windows XP, Windows Server operating systems, and some older versions of Windows, too.
Net User Related Commands
The net user command is a subset of the net command and so is similar to its sister commands like net use, net time, net send, net view, etc.
Thanks for letting us know!
Get the Latest Tech News Delivered Every Day
Subscribe
-
Home
-
News
- [Full Guide] – How to Use Net User Command on Windows 11/10?
By Daisy | Follow |
Last Updated
The net user command is a command-line utility included with Windows that allows you to manage Windows local user accounts. This post from MiniTool teaches you how to use the net user command. Now, keep on your reading.
What is Net User Command
Net User is a command line tool available in Windows 11/10/8/7/Vista. The net user command is a command-line utility included with Windows that allows you to manage Windows local user accounts.
It allows you to create, delete, enable or disable users on the system and set passwords for network user accounts. Windows administrators can use the net user command-line tool to add or modify user accounts. Besides, you can get network user account information, enable or disable user accounts, set home directory paths, set account expiration times, and more.
Net User Command Syntax
Net user command follows the standard syntax system shown below. You need to launch the Command Prompt tool on your PC and you can start using the net user command.
net user [<UserName> {<Password> | *} [<Options>]] [/domain]

net user [<UserName> {<Password> | *} /add [<Options>] [/domain]]

net user [<UserName> [/delete] [/domain]]
Various functions can be performed using the appropriate parameters of the net user. You can use the following parameters with the net user command:
- <username> – Specify the username to the account you want to perform the action on.
- <password> – Set or change the password for the specified user account. Use * to get a prompt for the password.
- /domain – Used for managing domain accounts.
- /add – Create a new user account.
- /delete – Delete a user account.
- /active – Enable or disable the user account. Options are yes or no.
- /expire – Set the date when the account expires.
- /time – Specifies the times that a user is allowed to log in.
Net User Command Examples
How to use net user command? First, you need to open Command Prompt. To do this, type cmd into the Start menu, then right-click Command Prompt and choose Run as administrator.
Command 1: List All the User Accounts
To list all the user accounts present in your system, type net user and press the Enter Key.
Tips:
Tip: This WDAGUtilityAccount is part of Windows Defender Application Guard, which provides your computer with additional security against malicious attacks while using the Internet.

Command 2: Add a New User Account
To add a new user account in your Windows, you need to type net user /add username and press the Enter key.
To verify whether your new user account is created or not, you can either use the net user command again. Alternatively, you can go to Control Panel > User Accounts > Change Account Type. You can see your newly created user account.
Command 3: Create a Password for the New Account
To assign a password to your new account, type Replace user_name and new_password with the new account name you created previously and the password that you want to create.
Command 4: Enable or Disable User accounts
To enable and disable accounts, simply replace /Active:no with /Active:yes.
Command 5: Delete a Specific User Account
To delete a specific user account, you can use the command net user /delete user_account_name. Replace user_account_name with the name of the user account that you want to delete.
About The Author
Position: Columnist
Having been an editor at MiniTool since graduating college as an English major, Daisy specializes in writing about data backups, disk cloning, and file syncing as well as general computer knowledge and issues. In her free time, Daisy enjoys running and going with friends to the amusement park.
Windows — многопользовательская система, что означает, что в ней могут относительно независимо работать несколько пользователей. Помимо пользовательских учетных записей, создаваемых при установке и после, в системе предусмотрено несколько скрытых системных учетных записей. При необходимости вы можете получить список и тех и других.
В этой простой инструкции подробно о способах посмотреть список пользователей Windows 11 или Windows 10, большинство из которых подойдёт и для предыдущих версий системы. Если вам требуется получить список пользователей без входа в систему, обратите внимание на последний раздел этого материала.
Windows PowerShell или Терминал Windows
Если по той или иной причине вам потребовалось получить список всех пользователей Windows 11, Windows 10 или одной из предыдущих версий системы — сделать это можно как в графическом интерфейсе, так и средствами командной стройки или PowerShell.
Я рекомендую начать с PowerShell, так как он позволяет быстро получить максимум информации об учетных записях пользователей:
- Запустите Windows PowerShell или Терминал Windows от имени администратора, для этого можно нажать правой кнопкой мыши по кнопке «Пуск» и выбрать нужный пункт контекстного меню.
- Введите команду
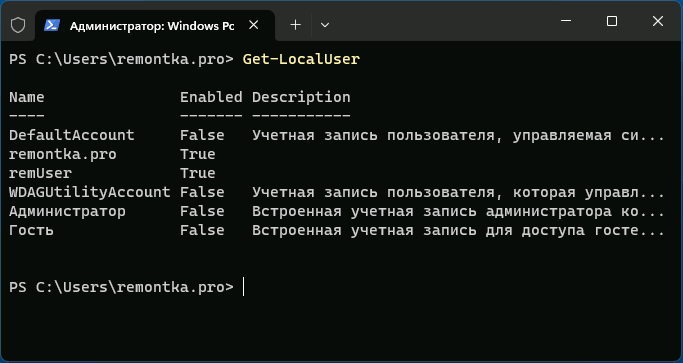
Get-LocalUser
и нажмите Enter.
- В результате вы получите полный список учетных записей пользователей, а также информацию, включена ли учетная запись в столбце «Enabled».

Обратите внимание, некоторые учетные записи могут вызвать вопросы, ответы на них можно найти в статьях:
- Как включить скрытую системную учетную запись Администратор в Windows 11 (подойдет и для Windows 10)
- Для чего нужна учетная запись WDAGUtilityAccount в Windows 11/10
Командная строка
Список пользователей Windows можно получить с помощью командной строки:
- Запустите командную строку (права администратора не обязательны).
- Введите команду
net user
и нажмите Enter, чтобы получить список всех пользователей.

- Ещё одни вариант команды:
wmic useraccount get name


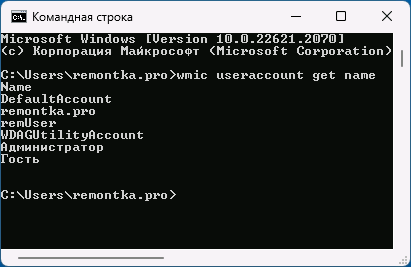
Оба варианта отобразят как активных, так и отключенных (скрытых) пользователей, но без информации, о том, что это за учетная запись и включена ли она. Второй вариант команды допускает следующую модификацию:
wmic useraccount get name,status
для просмотра информации о статусе учетных записей (для включенных — Ok, для отключенных — Degraded).
Параметры Windows 11 и Windows 10
«Основной», но не идеальный метод просмотра списка пользователей в графическом интерфейсе — приложение «Параметры»:
- Откройте «Параметры».
- В Windows 11 откройте раздел «Учетные записи» — «Другие пользователи» для того, чтобы посмотреть список пользователей, помимо текущего (и без отключенных и системных учетных записей).

- Если вы используете семейную группу (например, для родительского контроля Windows), пользователи, добавленные в семью, будут показаны не в «Другие пользователи», а в «Учетные записи» — «Семья».

- В Windows 10 откройте «Параметры» — «Учетные записи» — «Семья и другие пользователи». На открывшемся экране будут показаны пользователи компьютера (за исключением текущего), а также члены семейной группы при их наличии.


Как в Windows 11, так и в Windows 10 в «Параметрах» вы не увидите отключенные учетные записи.
Локальные пользователи и группы
Ещё один вариант просмотра пользователей в графическом интерфейсе — оснастка «Локальные пользователи и группы».
- Нажмите клавиши Win+R на клавиатуре, либо нажмите правой кнопкой мыши по кнопке «Пуск» и выберите пункт «Выполнить». Введите lusrmgr.msc в диалоговое окно «Выполнить» и нажмите Enter.
- В открывшемся окне «Пользователи» вы сможете посмотреть список пользователей текущей системы, их статус (если рядом со значком отображается стрелка — пользователь отключен).

- Дважды нажав по учетной записи пользователя, можно изменить её параметры (например, включить или отключить пользователя) и посмотреть описание.


Некоторые дополнительные детали, которые могут пригодиться в части получения списка пользователей:
- Если при использовании способов получения списка пользователей в командной строке или PowerShell вам требуется вывести список в файл, просто добавьте «> путь_к_файлу» через пробел после команды, например:
wmic useraccount get name,status > spisok.txt
Учитывайте, что путь (папка) в которую сохраняется файл должен существовать, а если для сохранения файла в указанном расположении требуются права администратора, консоль следует запускать с соответствующими правами.
- При необходимости получить список пользователей без входа в систему в случае, если он невозможен, либо если система не запускается, вы можете использовать утилиты с WinPE, те же самые, которые описаны в последней части инструкции про сброс пароля Windows 11 (подойдет и для других версий системы).
Если у вас остаются вопросы, касающиеся просмотра списка пользователей Windows, вы можете задать их в комментариях ниже, описав ситуацию и задачу в деталях.
Windows is a GUI based OS. Users get an easy-to-use interface for complex tasks like creating a new user and setting up permissions for it, among other things. Many complex tasks are done with a few clicks but many of them can be done from the command line.
Windows 10 has plenty of command line tools; some tools like the ping tool do not have a UI and can only be used from the command line. The Diskpart tool is another great example of a command line tool but it has a GUI counterpart app i.e. the Disk Management utility.
Net User is a command line tool on Windows 10 that allows users to manage user accounts on the system. The tool supports all sorts of commands and switches that can be added on top of the main command to modify it.
The tool can be used to;
- Create a new user
- Delete an existing user
- Modify a user
- Change the permissions for a user
- Unlock the super administrator
- Set an expiry date for the account
- Force a user to change their password when they sign in
The list is fairly long of what you can use the tool for.
Use Net User commands
To use the Net User utility, you must know which commands you will use and what those commands do. To get started;
- Open Command Prompt with admin rights.
- Enter net user and tap Enter
- This command will return every single user that is configured on the system.
- You can modify the command with switches to perform other operations.
- View information for user
Net user [username]
Example
Net user fatiw
Create new user
Use this command to create a new user where you have to replace username and password with the username for the new user and the password that you want to set for them. The square brackets can go, they’re not part of the syntax.
net user [username] [password]
Delete a user
The above command can be modified to delete a user.
net user [username] /delete
Net user commands and switches
The Net User utility has a large number of commands and switches that it supports. You can read the full list, and what they do on official documentation released by Microsoft here.
To use them, follow this general syntax:
net user [<UserName> {<Password> | *} [<Options>]] [/domain]
net user [<UserName> {<Password> | *} /add [<Options>] [/domain]]
net user [<UserName> [/delete] [/domain]]
The square brackets are not part of the syntax and neither are the greater than and less than symbols however the asterisk, and the slash are part of it and should not be removed.
Conclusion
The Net User utility is best used to unlock the super admin user, or to hide it. Most users know that the GUI is a much easier way to create a user account or modify it. Some operations e.g., expiring a user or forcing a user to change their password may be easier to manage with this tool. Regardless, you should be careful with it since you may end up deleting a user and their files.

Fatima Wahab
Fatima has been writing for AddictiveTips for six years. She began as a junior writer and has been working as the Editor in Chief since 2014.
Fatima gets an adrenaline rush from figuring out how technology works, and how to manipulate it. A well-designed app, something that solves a common everyday problem and looks