
Provide feedback
Saved searches
Use saved searches to filter your results more quickly
Sign up
Appearance settings
The Remote Desktop Connection (RDC) tool, also known as Microsoft Terminal Services Client (MSTSC), allows a user to connect to another computer remotely over the network using the Remote Desktop Protocol (RDP). Most users use this tool via its Graphical User Interface (GUI) which is convenient to use, but this article focuses on using the Remote Desktop via the command line.
Connecting to other computers using RDC through the command line allows you to control different settings and preferences of the connection. Windows allows a user to use certain switches to predefine the settings before the connection is made. For example, you can define the name or IP address of the remote computer, or adjust the RDC window size even before running the tool.
Learn how to enable RDC in Windows 11.
Table of Contents
Let us help you become aware of the switch options and how you can use them to configure your RDC connections.
MSTSC commands and switches
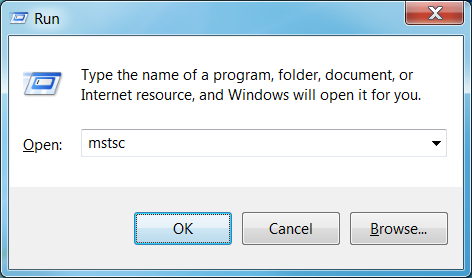
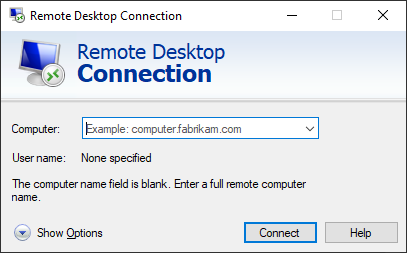
The conventional way to open the RDC in Windows is by searching for “Remote Desktop Connection” or “RDC” in Run and open the tool.
 using Command Line 1")
This then opens the RDC tool where you can enter the name of IP address with port number (optional) of the remote computer that you want to connect to.
 using Command Line 2")
Most of you would already be aware of this method.
This section covers the possible commands and switches that you can use with RDC via the command line. We shall start with the most basic ones and then continue.
Launch RDC from Run
The very basic command to run Remote Desktop Connection from the command line is via Run. Simply type in the following in Run and hit Enter.
mstsc
Running this will open the RDC with a blank text field. However, with the addition of a few switches, you can change the settings and preferences of the RDC connection. Let us continue forward with a few examples.
Use RDC to connect via console
Although RDC fully supports GUI, you can also connect to remote machines through a console. This will help in case you wish to continue the session that you got disconnected from earlier. In contrast, a regular GUI-based RDC session creates a new session each time you connect to the same machine.
Use the following command to connect to a remote computer via console:
mstsc /console
 using Command Line 4")
Launch RDC with IP address
You can also launch RDC along with the IP address of the machine to connect it with. If the port on the machine is changed from the default value, you can also add the port number. Use the following commands to do so:
mstsc /v:IPAddress
mstsc /v:IPAddress:PortNumber
Replace IPAddress with the complete IP address of the remote computer that you want to connect with, and PortNumber with the port number if changed from its default value.
 using Command Line 5")
Launch RDC with computer name
You can also connect to the remote computer by its unique computer name. The switch used for this is the same one used with the IP address and port number in the steps above.
mstsc /v:ComputerName
Replace ComputerName with the unique name of the remote device that you can find in its settings or properties.
 using Command Line 6")
Launch RDC in full-screen mode
You can also launch the RDC connection in full-screen mode. Here is how:
mstsc /f
 using Command Line 7")
These switches can be combined into a single command to execute an RDC connection to your preferences. Here is an example:
mstsc /f /v:192.168.10.122:8002
 using Command Line 8")
MSTSC commands and switches
There are more commands and switches you can use with mstsc command-line to adjust your settings for the connection beforehand. Here is the complete list:
| <connectionfile> | For a .rdp file required to make a connection (if applicable). |
| /v: | IP Address or computer name of the remote computer. |
| /g: | IP Address or device name of a Remote Gateway Server (if applicable). |
| /admin | To establish a connection with administrative privileges. |
| /f | View the Remote Desktop Window in full-screen mode. |
| /w: | To specify the width of the Remote Desktop Window. |
| /h: | To specify the height of the Remote Desktop Window. |
| /public | Run the Remote Desktop Connection publicly (less secure). |
| /span | To match the width and height of the Remote Desktop with the local desktop. |
| /edit <connectionfile> | To edit a .rdp file. |
| /multimonTo make the monitor layout of the Remote Desktop Services session identical to the client-side configuration. | |
| /restrictedAdmin | Connect to the remote PC in Restricted Administration mode. The credentials are not sent to the remote PC in this mode, protecting you if you connect to a compromised PC. |
| /remoteGuard | Connect your device to a remote device using the Remote Guard, which prevents sending credentials to a remote PC. |
| /prompt | To prompt you to put in credentials to connect to the remote PC. |
| /shadow: | The ID of the session that you want to connect to. |
| /control | Give control of the session when shadowing. |
| /noConsentPrompt | To allow shadowing without user consent. |
| /migrate | Migrate legacy connection files created with Client Connection Manager to new .rdp connection files. |
| /? | To get help in the command prompt. |
These switches can have the following syntax in either Run or the Command Prompt:
mstsc [<connection file>] [/v:<server[:port]>] [/g:<gateway>]
[/admin] [/f] [/w:<width> /h:<height>] [/public] |
[/span] [/multimon] [/edit "connection file"] [/restrictedAdmin]
[/remoteGuard] [/prompt] [/shadow:<sessionID> [/control][/noConsentPrompt]]
The parameters in the alligator brackets (< and >) are variables that you can adjust according to your preferences.
Troubleshoot RDC via command line
You can also troubleshoot Remote Desktop services through the command line. For example, if you are unable to connect to a device using the GUI RDC but have access via console, you can check whether there are any configurations to be made that will connect you via GUI successfully.
Check if RDP is enabled from Command prompt
Learn how to enable RDP remotely.
You can run the following command to check the status of your device if RDP is enabled or disabled:
netstat /p tcp /a | findstr 3389
 using Command Line 9")
If the results come back as “Listening,” it means that RDP is enabled.
Check if RDP is enabled from PowerShell
Another method to check whether RDP is enabled is through Windows PowerShell. You can run the following commands in PowerShell and it will tell you whether the service is available or not.
if ((Get-ItemProperty "hklm:\System\CurrentControlSet\Control\Terminal Server").fDenyTSConnections -eq 0) { write-host "RDP is Enabled" } else { write-host "RDP is NOT enabled" }
 using Command Line 10")
If the script returns “RDP is enabled,” it means that it is.
Frequently Asked Questions
What is MSTSC?
Microsoft Terminal Services Client (MSTSC) is a tool that allows a user to remotely connect to another device over the network as if they were physically present on the remote device.
How to open Remote Desktop from the command line?
You can open the Remote Desktop Connection window from Run or Command Prompt using mstsc. You may also add switches like /v and /f to control the connection’s arguments.
How to add username and password to mstsc command line?
You cannot add a username or password directly to the mstsc command. However, you can store the credentials in a generic key against the machine you want to connect to using these 2 commands:cmdkey /generic:"<server>" /user:"<user>" /pass:"<password>"
mstsc /v:"<server>"
Is the RDP and RDC the same?
Remote Desktop Connection (RDC) is a tool used to establish a remote connection between devices. Remote Desktop Protocol (RDP) is the technology that RDC uses to create this remote connection.
on October 30, 2018
The Run command for Windows Remote desktop application is Mstsc
Just open Run from start menu and type mstsc in the text box next to open and press enter.
This command mstsc can be used from command line too.
A system running Windows 7/Windows 10 allows only one remote desktop connection at a time, means only one remote user can work on it any time. A computer running Windows server edition can support remote sessions for multiple users at the same time.
Mstsc command
Every time we connect to the server it opens a new user session. To avoid this we can open a connection to the console. This allows us to login back to the same user session if we already have one. To do this we need to add /console switch to the mstsc command.
mstsc /console
This command can be run from command prompt or from Run window.
Run command for opening remote desktop session in full screen mode
Add /f switch to the command.
mstsc /f
Run command for specifying the remote computer name from the command itself
Use /v switch in this case.
mstsc /v:computername
Run command to specify remote desktop connection settings using a rdp file
mstsc RDP_filename
A RDP file can be created using the ‘Save As‘ button in the General tab in mstsc(Remote desktop connection client) window.
These commands work on XP, Vista, Windows 7 and Server 2003/2008 operating systems.
Run command for Remote desktop manager
There is no Run command for opening remote desktop connection manager directly. It is usually installed in the path C:\Program Files\Remote Desktop Connection Manager\RDCman.exe. By specifying this complete path we can launch connection manager.
Relevant Posts:
How to enable Remote desktop from command line
The Remote Desktop Protocol (RDP) is something Microsoft made since years ago. It lets you see and use another computer from yours over a network. Most people use the Remote Desktop Connection app (mstsc.exe) that comes with Windows. But, if you like doing things with command lines, because you want more control or to write scripts (for example, to automate stuffs), there’s a way for that too.
In this guide, we’re going to look at how to use the command line to make an RDP connection, turn on remote access, and handle Remote Desktop sessions on Windows 11.
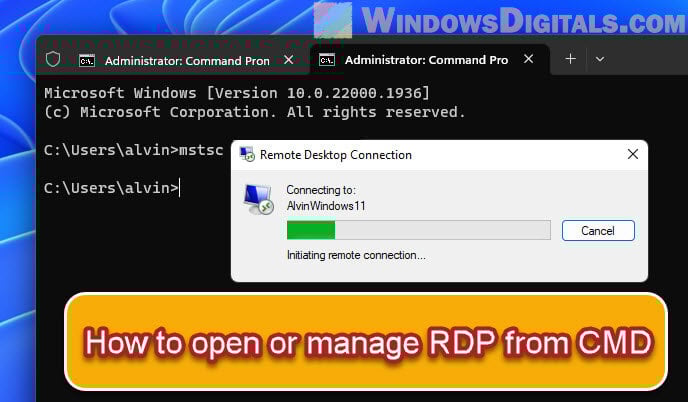
How to start an RDP connection with Command Prompt
The command prompt in Windows is a speedy way to start an RDP connection. You’ll use the mstsc command, which stands for Microsoft Terminal Services Client, to do this.
After opening the command prompt, type this to begin a remote connection:
mstsc /v:yourRemoteComputer
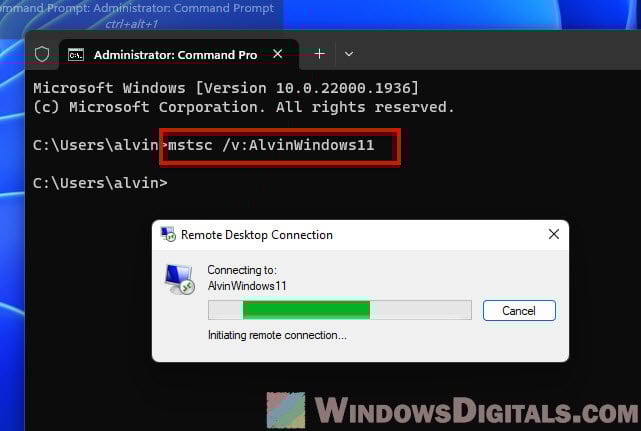
Replace “yourRemoteComputer” with the IP address or computer name you’re connecting to. This way is quick because you don’t have to click through lots of menus.
Also see: How to Remote Desktop Over The Internet in Windows 11
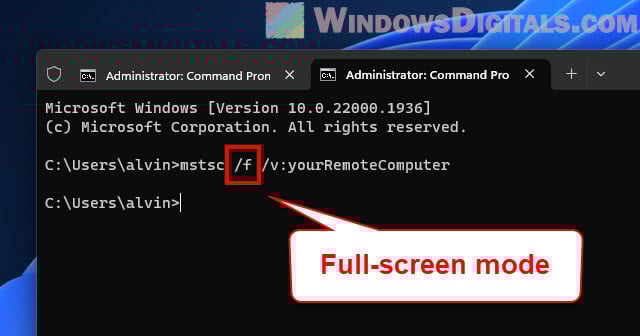
Using the command line for remote desktop
The mstsc command has many options to change how your Remote Desktop sessions work. For instance, /f makes it full screen, and /admin gives you admin rights.
mstsc /f /v:yourRemoteComputer
To see all options, type this:
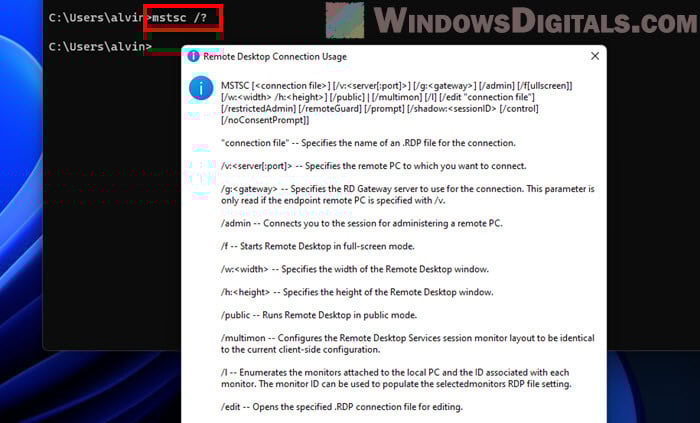
mstsc /?
Handy tip: Windows 11: Check Who is Logged in Remotely or Locally
How to join the main session of a remote computer
The mstsc /console or mstsc /admin command in newer Windows versions helps you join the main session of a remote computer. This is great for certain apps or admin tasks that need the main session.
Here’s how to do it:
- Open the command prompt.
- Type this command and press Enter:
mstsc /admin /v:yourRemoteComputer
Change “yourRemoteComputer” to the computer’s name or IP you want to connect to.
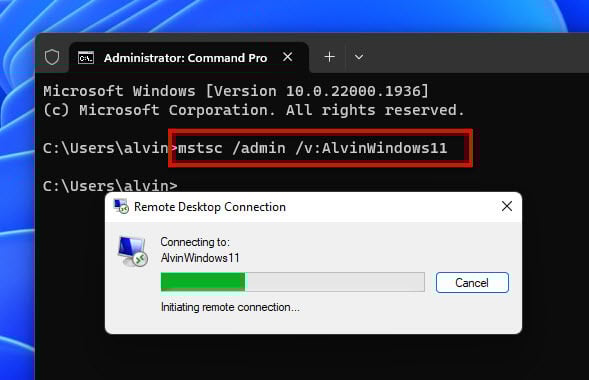
This starts a session to the remote computer’s main session. But be careful, because this session might already be in use, and you don’t want to interrupt someone’s work.
Linked issue: Windows 11 Remote Desktop “An authentication error has occurred”
How to begin and end a remote desktop session
Handling Remote Desktop sessions is key for remote system care. The mstsc command starts a session. To end it, just close the Remote Desktop window. Or, for more control, use command line ways to finish it.
The logoff command ends a session. You need the session ID, which you find by typing query session.
logoff SessionID
Useful resource: How to Install Telnet via CMD or PowerShell in Windows 11
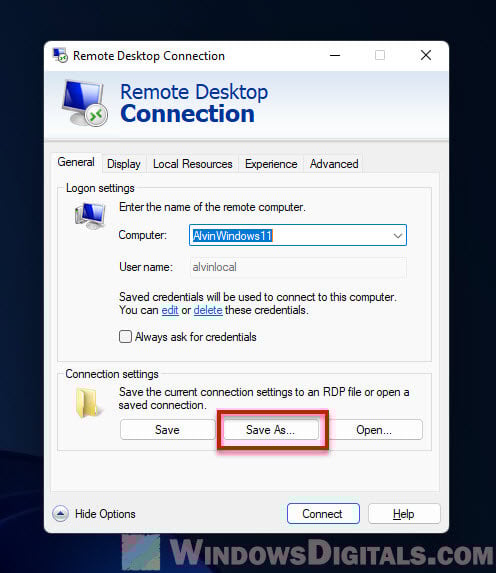
Using a RDP file for remote desktop
.rdp files are Microsoft Remote Desktop config files that save settings for sessions. They’re handy for connecting to a computer with specific settings without entering them each time.
Here’s how to make a .rdp file:
- Open Remote Desktop Connection by typing mstsc in the command prompt or search bar and press Enter.
- In the window, put the remote computer’s name or IP in the “Computer” field.
- Click “Show Options” for more settings, like your username, display options, and more.
- After setting things up, click “Save As” under Connection settings.

- Save the .rdp file where you want, with a name you choose.
To use the .rdp file, type this command, swapping “C:\file.rdp” with your .rdp file’s location and name:
mstsc C:\file.rdp
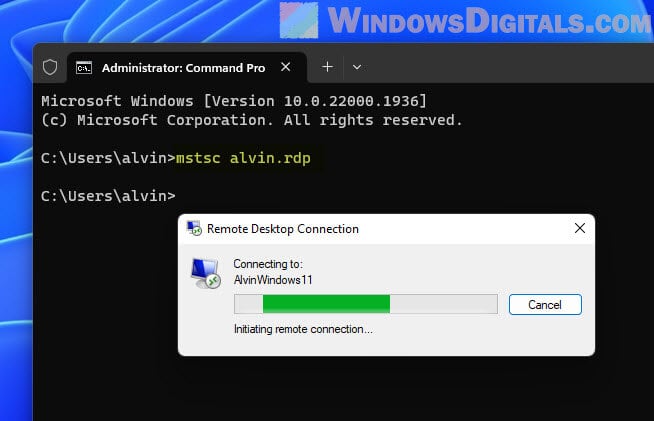
This opens a Remote Desktop session with your saved settings. If you saved your login info in the .rdp file, it’ll log you in automatically; otherwise, you’ll need to type your password.
Turning on remote access in Windows 11
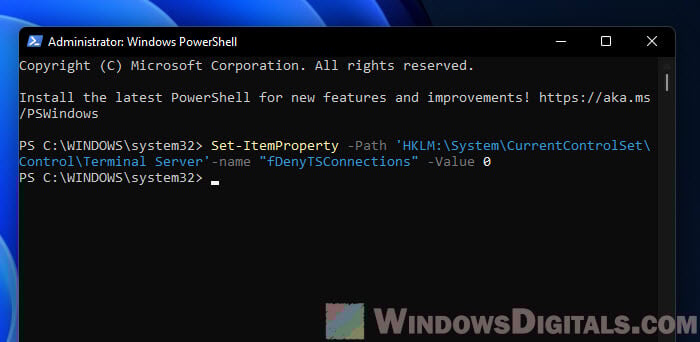
Before making a remote connection, the computer you want to connect to must have Remote Desktop turned on. While you can easily do this in Windows 11 settings, you can also use the command line with PowerShell for more direct control.
To turn on Remote Desktop with PowerShell, first open PowerShell as an admin. Type “PowerShell” in the Windows search bar, right-click the Windows PowerShell app, and choose “Run as administrator.”
Then, enable Remote Desktop with this command:
Set-ItemProperty -Path 'HKLM:\System\CurrentControlSet\Control\Terminal Server'-name "fDenyTSConnections" -Value 0
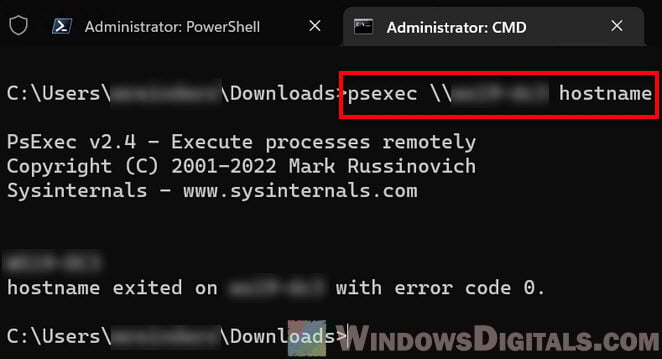
How to run commands on a remote system
For system management, sometimes you need to run commands on another computer. Windows has a tool called PsExec in the Sysinternals suite for this. After installing PsExec, you can use it to run commands remotely like this:
psexec \\remoteComputer command
Replace “remoteComputer” with the remote computer’s name, and “command” with what you want to do.
To sum up
We’ve covered how to use the command prompt for Remote Desktop stuff in Windows 11. From basic connections to more detailed tasks like joining a computer’s main session, using the command line gives you lots of flexibility and efficiency for managing remote connections (especially useful if you’re a network admin).
Command lines are great for when you need to automate things, do lots of tasks at once, or work on computers without using the graphical interface. .rdp files help save session settings for later, and tools like PsExec and the mstsc /admin command give you more control over remote computers.
But, always use these commands wisely and correctly to avoid messing up someone else’s work or making the system less secure. Make sure your RDP connections are safe and only let trusted people access them.
The Remote Desktop Connection (RSD) feature has been active in the Windows operating system since Windows NT Server 4.0; though as a Terminal Server. Come the Windows 10, RSD now exists as an inbuilt standalone app that can be accessed from not only Windows 10 computers but from major mobile and computer OS like Android, iOS, Linux, and Mac. RSD has been used by many companies and firms to control and operate computers in its network remotely. It is also essential for solving problems on devices you can’t access physically.
What is a Remote Desktop Connection?
Remote Desktop Connection (RSD), which is often shortened to Remote Desktop, is a feature created by Microsoft that allows a local computer to control a remote PC after connecting to it over the internet or a network.
Simply put, Remote Desktop Connection is the ability to connect and use another computer from your computer.
Before we proceed, note any edition of Windows can act as a Remote Desktop Client. But to host a remote season, you need a PC running Windows 11/10 Pro or Enterprise.
We have already seen the different ways to enable Remote Desktop Connection in Windows. Today, we will take a look at some command-line options for using RDP. Instead of starting Remote Desktop Connection from the Start menu, Windows 10/8/7 allows you to start it from the search box, from the Run dialog box, or from a command line. With these methods, you can use additional command line parameters to control how Remote Desktop Connection looks or behaves.
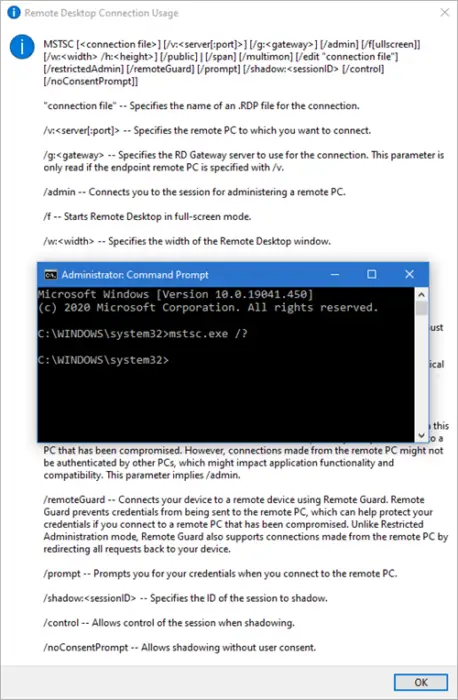
From the Run dialogue box or the Command Prompt, we can carry so many instructions easily. To see all the possible commands and a brief description you can access, copy and paste any of the commands below:
mstsc.exe /?
This is the syntax-
MSTSC [<connection file>] [/v:<server[:port]>] [/g:<gateway>] [/admin] [/f[ullscreen]] [/w:<width> /h:<height>] [/public] | [/span] [/multimon] [/edit "connection file"] [/restrictedAdmin] [/remoteGuard] [/prompt] [/shadow:<sessionID> [/control] [/noConsentPrompt]]
Continue reading to see a few descriptions:
- Whenever you connect to the server, Windows opens a new user session. You can avoid this by opening a connection to the console. Add /console to the mstsc
mstsc /console
- To open remote desktop session in full screen, run the command below (/f);
mstsc /f
- To specify the remote computer name from the command, use the command below (/v);
mstsc /v:computername
Brief description of the Syntax above
"connection file" – Specifies the name of an .RDP file for the connection.
/v:<server[:port]> – Specifies the remote PC to which you want to connect.
/g:<gateway> – Specifies the RD Gateway server to use for the connection. This parameter is only read if the endpoint remote PC is specified with /v.
/admin – Connects you to the session for administering a remote PC.
In this version of Remote Desktop Connection, if the Remote Desktop Session Host role service is installed on the remote computer, running mstsc /admin will do the following (for the current connection only):
- Disable Remote Desktop Services client access licensing
- Disable time zone redirection
- Disable RD Connection Broker redirection
- Disable Remote Desktop Easy Print
- Disables Plug and Play device redirection for this connection only.
- Changes the remote session theme to Windows Classic View (if it’s available) for this connection only.
/f – Starts Remote Desktop in full-screen mode.
/w:<width> – Specifies the width of the Remote Desktop window.
/h:<height> – Specifies the height of the Remote Desktop window.
/public– Runs Remote Desktop in public mode.
/span – Matches the remote desktop width and height with the local virtual desktop, spanning across multiple monitors, if necessary. To span across monitors, the monitors must be arranged to form a rectangle.
/multimon – Configures the Remote Desktop Services session monitor layout to be identical to the current client-side configuration.
/edit – Opens the specified .RDP connection file for editing.
With the Remote Desktop Connection, you have access to only computers in your network. You can use only one remote desktop connection on Windows at a time, i.e., one remote user per Windows.
However, a PC running Windows 11/10 Server edition can run remote Sessions for different users at the same time.
Read next: How to use Windows Remote Desktop in Windows Home (RDP).