
The copy Command Prompt command duplicates a file, storing the second version in a different location of your choosing.
Use the command to copy a file using its specific name and file extension or use a wildcard to copy groups of files at once, regardless of the file names or extensions. Some other command options include verification that the files were copied correctly and suppression of prompts to overwrite files of the same name.
Copy Command Availability
Copy Command Options (Windows 11 Command Prompt).
The copy command is available from within the Command Prompt in Windows 11, Windows 10, Windows 8, Windows 7, Windows Vista, and Windows XP, as well as from the Advanced Startup Options and System Recovery Options repair/recovery menus.
The availability of certain copy command switches and other command syntax might differ from operating system to operating system.
Copy Command Syntax
The command accepts the following general form:
copy [/d] [/v] [/n] [/y | /-y] [/z] [/l] [/a | /b] source [/a | /b] [+ source [/a | /b] [+ …]] [destination [/a | /b]] [/?]
See How to Read Command Syntax if you’re not sure how to interpret the copy command syntax as it’s described above or in the table below.
| Copy Command Options | |
|---|---|
| Item | Explanation |
| /d | Allows the destination file to be created decrypted. |
| /v | Verifies that new files are written correctly. |
| /n | Uses short file name, if available, when copying a file with a non-8dot3 name. |
| /y | Suppresses confirmation prompts to overwrite the destination file if it’s the same name as the source file. |
| /-y | Shows confirmation prompts to overwrite a file if the source file name is identical to the destination file name. |
| /z | Copies networked files in restartable mode. |
| /l | Copies the link to source instead of the actual file that source points to. This is only relevant if source is a symbolic link. |
| /a | Indicates an ASCII text file. |
| /b | Indicates a binary file. |
| source | This is the location and name of the file you want to copy. The source may not be a folder and you may not use wildcard characters (the asterisk). |
| destination | This is the location and/or file name that the file specified in source should be copied to. |
| /? | Use the help switch with the copy command to show detailed help about the command’s several options. |
Append files by choosing several source files but just one destination file.
Copy Command Examples
Below are several examples of how to use the copy command:
Copy to a Different Folder
copy Z:\Software\program.iso C:\Users\Jon\Downloads\Programs\
The copies program.iso from the Z: drive to the user’s Programs folder.
Take note of the space between these two commands. It’s not obvious at first, but the only spaces in this example of the copy command are after copy and between the source and destination files.
Copy and Rename
copy Y:\install\j93n.exe Y:\more\m1284.msi
You can use the copy command to rename a file and even change its file extension. In this example, the j93n.exe file copies to a new folder on the Y: drive as m1284.msi.
This isn’t a file conversion technique (i.e., the EXE file isn’t really being converted to MSI) but instead a way to make an identical copy but with the destination file saved under a different name and inside a different folder.
copy D:\i386\atapi.sy_ C:\Windows\atapi.sys
In the above example, the atapi.sy_ file, located in the i386 folder on the Windows XP installation CD, is copied to the C:\Windows directory as atapi.sys.
Unlike the Y: drive example above, this one is a bit more realistic, since copying files like that from a disc is a common practice when fixing some specific Windows problems.
Copy to Current Path
copy D:\readme.htm
In this example, the copy command has no destination specified, so the readme.htm file is copied to whatever directory you typed the copy command from.
For example, if you type copy d:\readme.htm from the C:\Windows> prompt, that HTM file will be copied to C:\Windows.
Copy Only Certain File Types
copy /y /v C:\Users\Jon\Downloads\*.mp3 C:\Users\Jon\Music\DownloadedMusic\
This command copies all MP3s (*.mp3) from the Downloads folder to the Music\DownloadedMusic\ folder, but we want to make sure that every file is copied, even if there’s already one in DownloadedMusic with the same name (/y). We’ll verify the copy (/v) to make sure Command Prompt tells us whether the files were actually copied or if an error happened in the process.
A folder has to already exist in the destination location before the copy command will copy files to it. Make new folders in Command Prompt with the mkdir command.
Merge Files Into One
copy Z:\file1.txt+Z:\file2.txt+Z:\file3.txt Z:\combined.txt
This will merge three TXT files into a new one called combined.txt. As you can see, each file that should be part of the merge needs to be separated by +, but no spaces.
You can also use the asterisk to append multiple files. So, in our example, we could replace all those .txt instances with Z:\*.txt, but only if we want to merge every single TXT file from the Z: drive.
Copy Related Commands
This command is similar to the xcopy command, but unlike copy, xcopy works on folders, too.
Of course, a command isn’t necessary if you’d rather copy a file in Windows using File Explorer.
Thanks for letting us know!
Get the Latest Tech News Delivered Every Day
Subscribe
Указанные при описании команды COPY проблемы можно решить с помощью команды XCOPY, которая предоставляет намного больше возможностей при копировании. Необходимо отметить, правда, что XCOPY может работать только с файлами и каталогами, но не с устройствами.
Синтаксис этой команды:
XCOPY источник [результат] [ключи]Команда XCOPY имеет множество ключей, мы коснемся лишь некоторых из них. Ключ /D[:[дата]] позволяет копировать только файлы, измененные не ранее указанной даты. Если параметр дата не указан, то копирование будет производиться только если источник новее результата. Например, команда
XCOPY "C:\Мои документы\*.*" "D:\BACKUP\Мои документы" /Dскопирует в каталог ‘D:\BACKUP\Мои документы’ только те файлы из каталога ‘C:\Мои документы’, которые были изменены со времени последнего подобного копирования или которых вообще не было в ‘D:\BACKUP\Мои документы’.
Ключ /S позволяет копировать все непустые подкаталоги в каталоге-источнике. С помощью же ключа /E можно копировать вообще все подкаталоги, включая и пустые.
Если указан ключ /C, то копирование будет продолжаться даже в случае возникновения ошибок. Это бывает очень полезным при операциях копирования, производимых над группами файлов, например, при резервном копировании данных.
Ключ /I важен для случая, когда копируются несколько файлов, а файл назначения отсутствует. При задании этого ключа команда XCOPY считает, что файл назначения должен быть каталогом. Например, если задать ключ /I в команде копирования всех файлов с расширением txt из текущего каталога в несуществующий еще подкаталог TEXT,
XCOPY *.txt TEXT /Iто подкаталог TEXT будет создан без дополнительных запросов.
Ключи /Q, /F и /L отвечают за режим отображения при копировании. При задании ключа /Q имена файлов при копировании не отображаются, ключа /F — отображаются полные пути источника и результата. Ключ /L обозначает, что отображаются только файлы, которые должны быть скопированы (при этом само копирование не производится).
С помощью ключа /H можно копировать скрытые и системные файлы, а с помощью ключа /R — заменять файлы с атрибутом «Только для чтения». Например, для копирования всех файлов из корневого каталога диска C: (включая системные и скрытые) в каталог SYS на диске D:, нужно ввести следующую команду:
XCOPY C:\*.* D:\SYS /HКлюч /T позволяет применять XCOPY для копирования только структуры каталогов источника, без дублирования находящихся в этих каталогах файлов, причем пустые каталоги и подкаталоги не включаются. Для того, чтобы все же включить пустые каталоги и подкаталоги, нужно использовать комбинацию ключей /T /E.
Используя XCOPY можно при копировании обновлять только уже существующие файлы (новые файлы при этом не записываются). Для этого применяется ключ /U. Например, если в каталоге C:\2 находились файлы a.txt и b.txt, а в каталоге C:\1 — файлы a.txt, b.txt, c.txt и d.txt, то после выполнения команды
XCOPY C:\1 C:\2 /Uв каталоге C:\2 по-прежнему останутся лишь два файла a.txt и b.txt, содержимое которых будет заменено содержимым соответствующих файлов из каталога C:\1. Если с помощью XCOPY копировался файл с атрибутом «Только для чтения», то по умолчанию у файла-копии этот атрибут снимется. Для того, чтобы копировать не только данные, но и полностью атрибуты файла, необходимо использовать ключ /K.
Ключи /Y и /-Y определяют, нужно ли запрашивать подтверждение перед заменой файлов при копировании. /Y означает, что такой запрос нужен, /-Y — не нужен.
The `copy` command in Windows Command Prompt is used to duplicate files from one location to another, allowing users to easily manage and back up their data.
Here’s a simple example of how to use the `copy` command:
copy C:\source\file.txt D:\destination\file.txt
Understanding Windows CMD
What is CMD?
CMD, short for Command Prompt, is a command-line interpreter in Windows that allows users to execute commands for managing files and running applications. It offers a text-based interface to interact with the operating system, often used by professionals and power users for its efficiency.
Basic Navigation in CMD
To start using the copy command in windows cmd, you first need to navigate through CMD.
-
Opening CMD: You can open CMD by pressing `Win + R`, typing `cmd`, and hitting `Enter`. Alternatively, you can search for «Command Prompt» in the Start menu.
-
Basic CMD Commands Overview: Familiarize yourself with basic commands that help in navigation:
- `cd` (change directory) to navigate between folders.
- `dir` to list files and directories in the current folder.
Copy Folder Windows Cmd: A Quick How-To Guide
How to Use the Copy Command in CMD
Syntax of the Copy Command
The copy command in cmd operates following a simple syntax:
copy [source] [destination]
- Source: This is the path to the file you want to copy.
- Destination: This is the path where you want to place the copied file.
Examples of the Copy Command in CMD
Copying a Single File
To copy a single file, you would use:
copy C:\source\file.txt C:\destination\
This command copies `file.txt` from the `C:\source` directory to the `C:\destination` directory.
Copying Multiple Files
You can also copy multiple files using wildcards:
copy C:\source\*.txt C:\destination\
This command copies all `.txt` files from the `C:\source` directory to the `C:\destination` directory, which is useful for bulk file management.
Copying Files with Different Extensions
If you want to copy files of a specific type, use the wildcard for their extension:
copy C:\source\*.jpg C:\destination\
This example will copy all JPEG files from the source folder to the destination, showcasing the flexibility of the copy command in windows cmd.
Mastering Pwd in Windows Cmd: Your Quick Reference Guide
Advanced Features of the Copy Command
Overwriting Existing Files
By default, if a file with the same name exists in the destination folder, CMD will prompt you for a decision. To force the command to overwrite without asking, use the `/Y` switch:
copy /Y C:\source\file.txt C:\destination\
This command makes it easier to automate file transfers without interruptions.
Creating Backup Copies
When working with important files, creating backup versions is vital. You can specify a new name for the copied file to keep copies organized:
copy C:\source\file.txt C:\destination\file_backup.txt
This command creates a backup of `file.txt` and saves it as `file_backup.txt` in the destination, ensuring version control.
Using Command Line Parameters
CMD offers various command line parameters for enhanced usability. Some useful parameters include:
- `/V`: Verifies each new file after copying to ensure it was copied correctly.
- `/N`: Uses short filenames if available.
Here’s an example using the `/V` parameter:
copy /V C:\source\file.txt C:\destination\
This command will verify that `file.txt` has been copied correctly, providing an extra layer of assurance.
Cmd Commands Windows 10 Repair: Your Quick Guide
Common Errors and Troubleshooting
Common Issues When Using the Copy Command
It’s crucial to be aware of common errors that might occur while using the copy command cmd windows.
-
File Not Found Error: This error appears when the specified source file does not exist.
- Solution: Double-check the file’s path and ensure the filename is correct.
-
Permission Denied Error: This error may occur if your user account does not have the necessary permissions to access the target folder.
- Solution: Run CMD as an administrator by right-clicking the CMD icon and selecting «Run as administrator.»
How to Check File Paths
Before executing commands, it’s essential to verify your current directory and file paths:
- Showing Current Directory: Use the `cd` command alone:
cd
This command displays the path of your current working directory, helping you locate files accurately.
- Listing Files in a Directory: To view all files and folders in your current directory, use:
dir
This command lists the contents of the current folder, ensuring the files you need are present.
Mastering SCP in Windows Cmd: Quick Transfer Guide
Using Copy Command in Scripts
Automating Copy Tasks
To streamline tasks that involve the copy command in cmd, you can create a batch file. This is a script file that allows the execution of multiple commands. Here’s a simple example:
@echo off
copy C:\source\*.txt C:\destination\
This batch file, when run, will copy all `.txt` files from the `C:\source` directory to `C:\destination`.
Real-world Application Scenarios
The power of the copy command in cmd is evident in real-world applications:
- Backing Up Important Files: Regularly copying files to a backup location ensures data safety.
- Organizing Files from Various Directories: You can use the command to consolidate files into a single folder for easier access and management.
Repair Windows Cmd: Quick Fixes and Tips
Conclusion
Understanding how to effectively use the copy command in windows cmd is invaluable for anyone looking to enhance their productivity or manage files efficiently within the Windows environment. By practicing these commands and leveraging the advanced features, users can significantly optimize their file management tasks.
Call to Action
To continue honing your command-line skills, consider subscribing for more tips and tricks on using CMD effectively. Explore related articles to deepen your understanding and become a CMD expert!
Using copy command, we can copy files from one directory to another directory. This command is similar to the Linux cp command, but it does not match with the full functionality of cp. Windows copy command can be used to copy files only, we can’t copy directories.
The syntax and usecases of copy command are explained below with examples.
Copy the contents of a file to another file
copy sourceFile destinationFile
Example: To copy a file from c:\data\file1.doc to D:\backup\file2.doc
copy c:\data\file1.doc D:\backup\file2.doc
If the destination file already exists you will be prompted for confirmation. To suppress this confirmation you can use /Y switch with copy command. This would be useful if you are executing copy command from a batch file.
c\> copy /Y c:\dir1\subdir1\file1.txt c:\dir2\subdir2\file2.txt
If the destination file exists, the above command will overwrite the same without asking the user for confirmation.
Copy file to another directory
When we specify a directory path as the destination, the files will be copied with the same name. We can assign a different name by specifying the new name in the destination path. Example is shown below.
To copy the file 1.doc loated at c:\data\documents to the directory c:\data\newdocs
c\> copy c:\data\documents\1.doc c:\data\newdocs\
Copy files with white space in name
If the file name has white space within it, we can wrap up the name in double quotes.
Example: To copy file, my resume.doc to another folder
copy "my resume.doc" D:\data\
Copy multiple files
We can’t specify multiple file names in copy command. However, we can use wildcards to identify a group of files and then copy all of them in a single command.
For example, to copy all excel files from current folder to another folder F:\backup
copy *.xls F:\backup\
To copy all files in current folder to another folder
copy * D:\dir1\dir2
Use of environment variables
We can use environment variables in the copy command to specify the path of the folders. Like USERPROFILE, SystemRoot, ProgramFiles, TEMP, WINDIR, APPDATA, HOMEPATH.
For example, to copy a file to a user’s documents folder
Copy D:\file.pdf %HOMEPATH%\Documents\
The above command copies the file to the My Documents folder of the current logged in user.
You may also want to read
- Xcopy command syntax and examples
- Robocopy command
In this tutorial, we will learn how to copy files and folders in the Windows Command prompt.
We are going to look at two cmd commands: Copy and Xcopy.
Note that the copy command has some limitations compared to the xcopy. For example, to copy directories or hidden files, you have to use the xcopy command.
Copy Command
On Windows, we can use the copy command to copy one or more files from one location to another:
copy C:\data\sales.doc C:\backupThe preceding command will copy sales.doc from C:\data\ to C:\backup.
Use the /y switch to overwrite duplicate files without confirmation:
copy /y C:\data\sales.doc C:\backupWe can also save a file to a different name. For example, the following command saves file1.txt as file2.txt in the same directory:
copy file1.txt file2.txtYou can also use wildcards to copy multiple files:
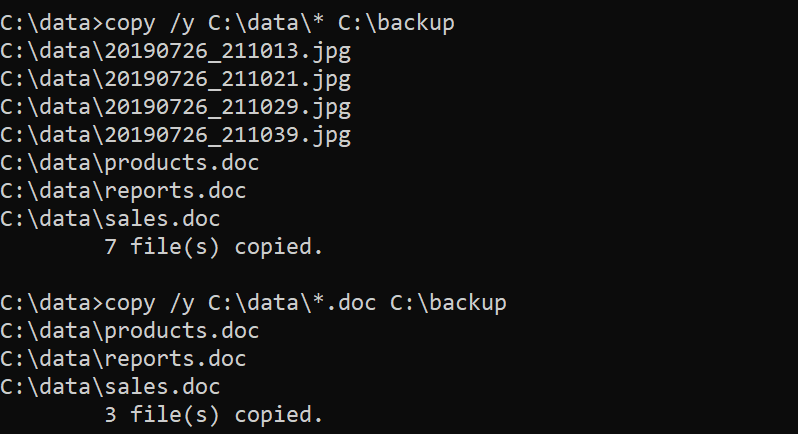
copy /y C:\data\* C:\backup
copy /y C:\data\*.doc C:\backup
The first command copies all files in the C:\data\ directory to C:\backup. The second command copies all files with a .doc extension to the C:\backup.
We can also combine several files into one:
copy file1+file2 file3
copy error* C:\backup\report.txt
In the first line, file1 and file2 are combined to make one file named file3. In the second line, all files whose names start with «error» are copied to the C:\backup, as a single file called report.txt.
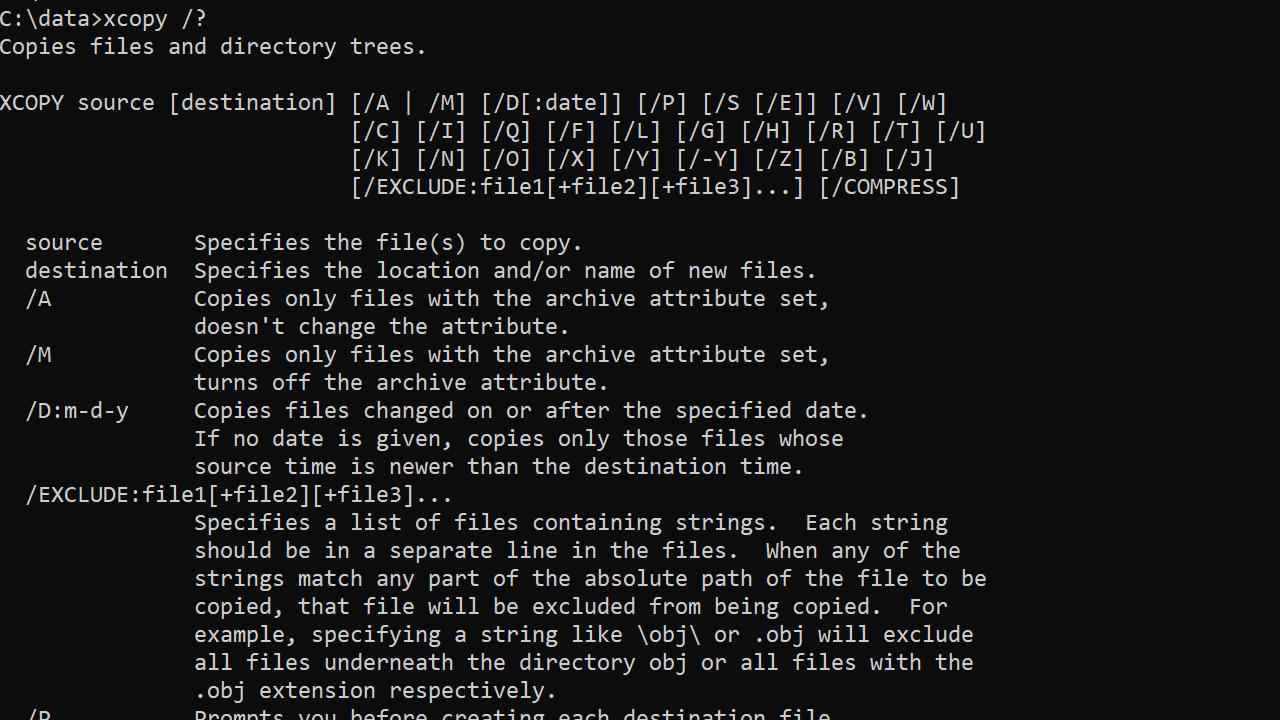
You can get a list of all available options with the copy /? command.
Xcopy Command
The xcopy command offers more features. For example, with xcopy, we can copy directories and subdirectories, as well as hidden files.
Command Options
| /Y | Prompt before overwriting an existing file. |
| /H | Copy hidden files/system files. |
| /S | Copy directories and subdirectories. Empty directories are not included by default (use /e for that). |
| /E | Include empty directories. |
| /I | Create the destination folder if it does not exist. Use this option when you want to copy the parent folder itself. |
| /T | Copy directory tree without files. Empty directories are not included by default. Use /e option to include empty folders. |
| /P | Prompt for confirmation before creating each file. |
| /Q | Quiet mode. |
| /exclude | Specify a text file that contains a list of files to exclude. See the examples. |
| /Z | Resume mode. Use this option when copying files over a network. |
| /D:m-d-y | Copies files changed on or after the specified date. |
Examples of Using the Xcopy Command
Copy sales.doc from the current directory to C:\backup:
xcopy sales.doc C:\backupCopy C:\data\accounts (all files including subdirectories) to C:\backup:
xcopy /s /e /h /i /y C:\data\accounts C:\backup\accounts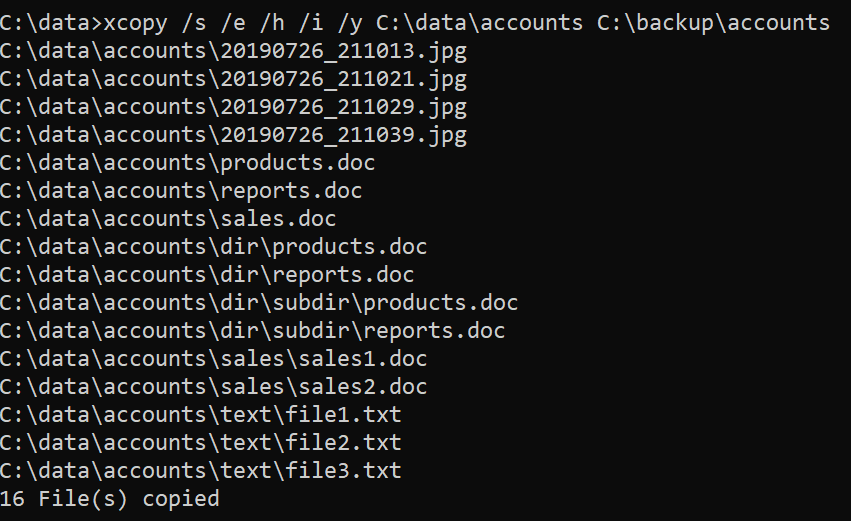
In the following example (without /I switch), the contents of the folder are copied but not the folder itself:
xcopy /s /e /h /y C:\data\accounts C:\backup\Copy the directory structure of C:\OneDrive to the backup directory:
xcopy /s /e /t /y C:\OneDrive C:\backup\You can use wildcard characters to match patterns. The following command copies all files with a .jpg extension:
xcopy /s /h /y C:\data\*.jpg C:\backupUsing for loop to copy multiple files:
for %i in (sales.doc, products.doc) do xcopy /y %i C:\backupExcluding files with xcopy
With the /exclude, we can provide a text file that contains items we want to exclude.
xcopy /s /e /h /y /exclude:C:\Users\user1\files-to-exclude.txt C:\data\ C:\backup\The files-to-exclude.txt may look like the following:
.doc
sales*
In this example, we exclude items with the .doc extension and files whose name starts with sales.
You can get a list of all available options with the xcopy /? command.