
Managing multiple Remote Desktop Protocol (RDP) sessions on a Windows Server 2019 can be crucial for organizations that need to provide access to several users simultaneously. By default, Windows Server 2019 restricts RDP sessions to two concurrent connections. However, with proper configuration, you can increase this limit how to allow more than 2 RDP sessions to a Windows server 2019. This guide will walk you through the essential steps to earn this.
Understanding RDP Session Limits
The default limit of two RDP sessions on Windows Server 2019 is designed for administrative purposes. This restriction ensures that only a few administrators can access the server concurrently to perform management tasks. To accommodate more users, you need to enable Remote Desktop Services (RDS), which provides the infrastructure needed to support multiple simultaneous RDP sessions.
Prerequisites
Before proceeding, ensure you have the following:
- Windows Server 2019: Installed and properly configured.
- Administrator Access: You need administrative privileges to make the necessary changes.
- Licensing: Remote Desktop Services Client Access Licenses (RDS CALs) are required for each user or device connecting to the server.
1. Install Remote Desktop Services (RDS)
To support multiple RDP sessions, you need to install and configure Remote Desktop Services. Follow these steps:
a. Open Server Manager
- Click on the Start menu.
- Open Server Manager.
b. Add Roles and Features
- In the Server Manager dashboard, press on Manage in the top-right corner.
- Select Add Roles and Features.
c. Select Installation Type
- In the Add Roles & Features Wizard, select Role-based or feature-based installation & click Next.
d. Select Server
- Choose the server where you want to install RDS and click Next.
e. Select Server Roles
- In the Select server roles window, scroll down and check Remote Desktop Services.
- Click Next through the following prompts to proceed with the installation.
2. Configure Remote Desktop Services
After installing RDS, configure the necessary settings to allow multiple RDP sessions.
a. Open Remote Desktop Services Configuration
- In Server Manager, click on Remote Desktop Services on the left-hand side.
- Select Overview.
b. Configure the Deployment
- Press on Tasks & select Edit Deployment Properties.
- Configure the various settings such as RD Licensing, RD Gateway, and RD Session Host as required.
c. Install the Licensing Role
- In the Remote Desktop Services deployment properties, navigate to RD Licensing.
- Add the Remote Desktop Licensing role if not already installed.
- Configure the licensing mode (per user or per device) and specify the license server.
3. Activate the License Server
To comply with Microsoft’s licensing requirements and enable multiple RDP sessions, you must activate the license server and install RDS CALs.
a. Open Remote Desktop Licensing Manager
- Open the Start menu.
- Search for and open Remote Desktop Licensing Manager.
b. Activate the License Server
- Right-click on the license server name and select Activate Server.
- See the wizard to complete the activation process.
c. Install RDS CALs
- After activation, right-click on the license server name again and select Install Licenses.
- Follow the wizard to install your RDS CALs.
4. Configure RD Session Host
To allow more than two RDP sessions, configure the RD Session Host to handle multiple connections.
a. Open RD Session Host Configuration
- Open the Start menu and search for Remote Desktop Session Host Configuration.
- Open the configuration tool.
b. Set Session Limits
- In the RD Session Host Configuration window, right-click on RDP-Tcp under Connections and select Properties.
- Go to the Network Adapter tab.
- Select the network adapter and configure the maximum number of connections. Set this to a higher number based on your requirements and available licenses.
5. Group Policy Configuration (Optional)
You can also use Group Policy to configure RDP session limits.
a. Open Group Policy Editor
- Press Windows + R, type gpedit.msc, and press Enter.
b. Navigate to RDP Settings
- Go to PC Configuration > Administrative Templates > Windows Components > Remote Desktop Services > Remote Desktop Session Host > Connections.
c. Configure Settings
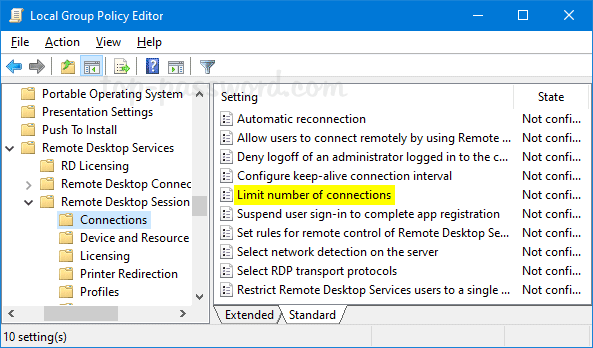
- Double-click on Limit number of connections.
- Enable the policy and set the desired number of connections.
- Apply the changes.
6. Verify Configuration
After completing the above steps, verify that your configuration allows more than two RDP sessions.
a. Open Task Manager
- On your server, press Ctrl + Shift + Esc to open Task Manager.
- Go to the Users tab to see the list of active RDP sessions.
b. Test Multiple Connections
- From different client machines, attempt to establish multiple RDP sessions to the server.
- Ensure that all sessions are successfully connected without encountering the default two-session limit.
Conclusion
Allowing more than two RDP sessions on a Windows Server 2019 involves installing and configuring Remote Desktop Services, setting up a license server, and configuring session limits through RD Session Host or Group Policy. By following these steps, you can effectively manage multiple remote connections, enhancing productivity and providing greater access to server resources. Ensure that you comply with Microsoft’s licensing requirements to avoid any legal issues. With the proper setup, your Windows Server 2019 can handle multiple RDP sessions efficiently, supporting your organization’s needs.
May 18, 2020 updated by
Leave a reply »
By default, Windows Server allows only a single Remote Desktop session. When the limit is reached, you should get one of the following warnings:
“The number of connections to this computer is limited and all connections are in use right now. Try connecting later or contact your system administrator.”
or
“Another user is signed in. If you continue, they’ll be disconnected. Do you want to sign in anyway?”

Sometimes you may need to increase the number of simultaneous remote connections so that multiple users are allowed to connect via RDP at the same time. In this tutorial we’ll show you how to enable multiple Remote Desktop connections in Windows Server 2019 / 2016 / 2012.
How to Enable Multiple Remote Desktop Connections?
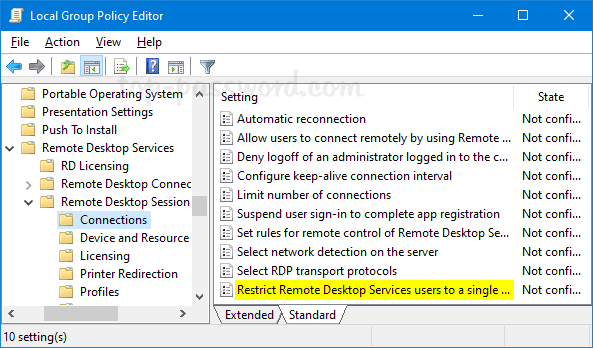
- Press the Windows key + R together to open the Run box, type gpedit.msc and hit Enter to launch the Local Group Policy Editor.
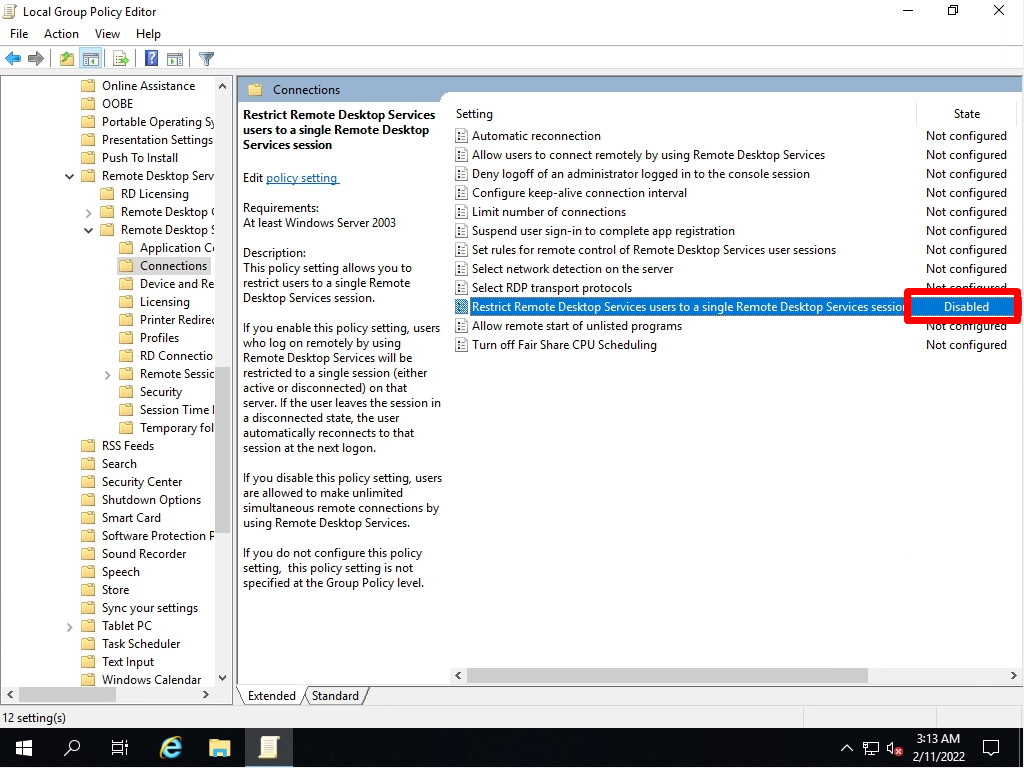
- In the left pane, navigate to:
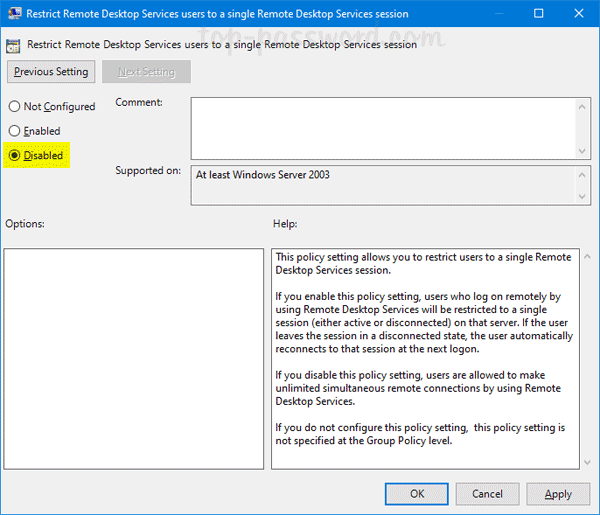
Computer Configuration -> Administrative Templates -> Windows Components -> Remote Desktop Services -> Remote Desktop Session Host -> Connections. On the right, double-click on the “Restrict Remote Desktop Services users to a single Remote Desktop Services session” policy.
- Select the Disabled option and click OK.

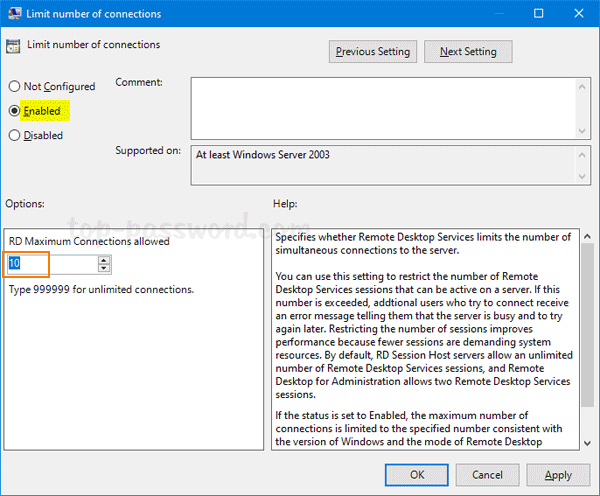
- Next, double-click on the “Limit number of connections” policy to modify.
- Choose the Enabled option and you can increase the “RD Maximum Connections allowed“.

- Once it’s done, reboot the server and the group policy changes will automatically apply. Now your server should allow multiple users to connect via RDP at the same time.
- Previous Post: 3 Methods to Stop Sharing a Folder in Windows 10
- Next Post: 3 Ways to Configure Windows to Create Crash Dumps on BSOD

Windows Server 2019
The number of users who can connect to Windows Server 2019 by Remote Desktop (RDP) at the same time with the same account is up to two, but the default setting of the local group policy is a connection restriction setting that allows only one person to connect, and there are multiple server administrators. If you connect by person, it will be a session conflict. This default setting is inconvenient because multiple members cannot work together.
This article describes the procedure for changing the settings of the local group policy to allow multiple (two) users to connect to Remote Desktop with the same user account
Change Remote Desktop Connection limit in Local Group Policy
Step 1:
Right-click “Windows Mark” at the bottom left of the desktop screen -> select “Run”.
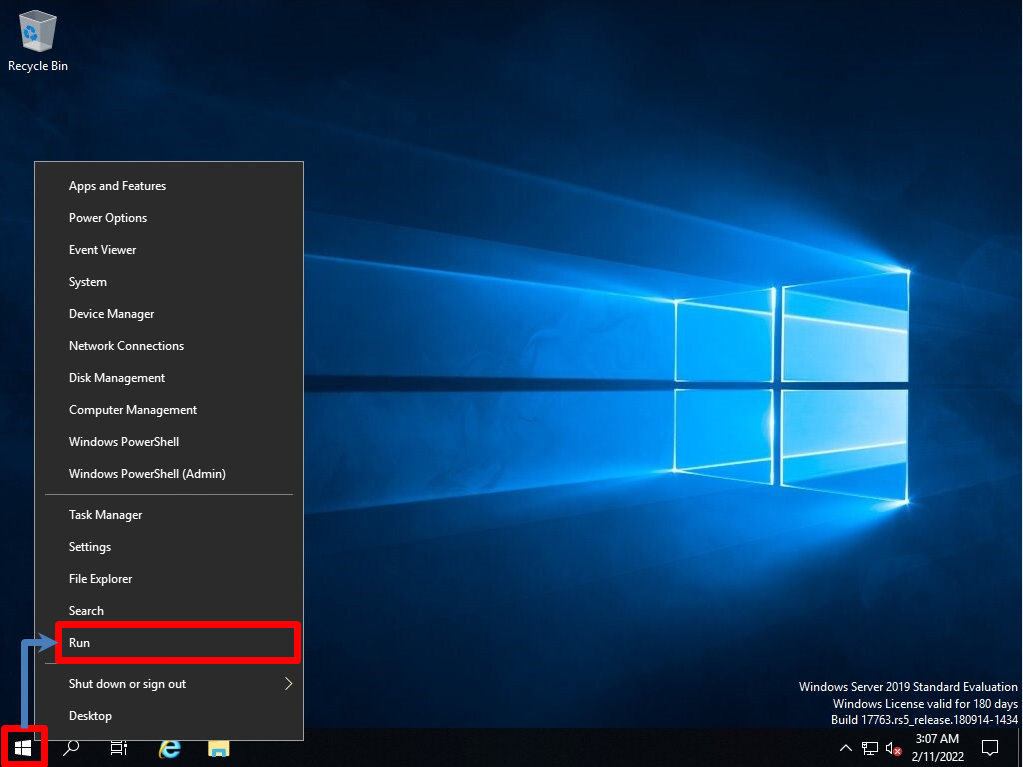
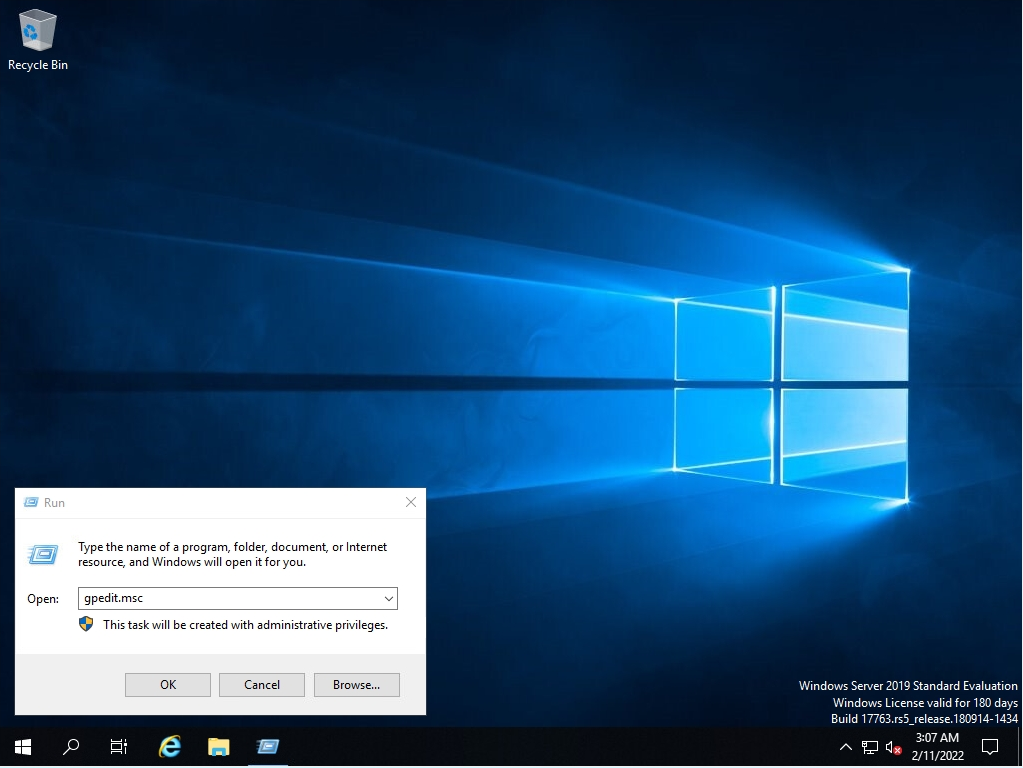
Step 2:
Enter “gpedit.msc” as the name -> select “OK” to launch the Local Group Policy Editor
Step 3:
Expand the tree on the left and double-click the following settings
[Computer Configuration]
-[Administrative Templates]
-[Windows Components]
-[Remote Desktop Services]
-[Remote Desktop Session Host]
- [Connections]
-[Restrict Remote Desktop Services users to a single Remote Desktop Services session]

Step 4:
Select “Disabled”
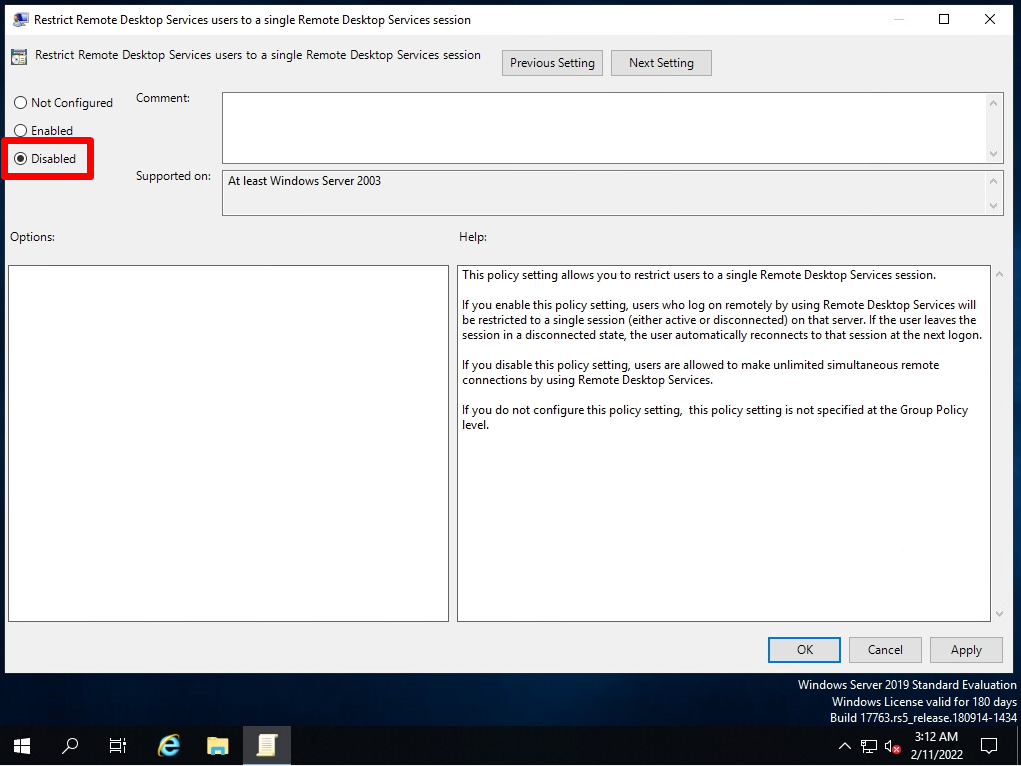
Step 5:
Confirm that the state is Disabled
Confirm multiple session connections with the same account from the connected terminal
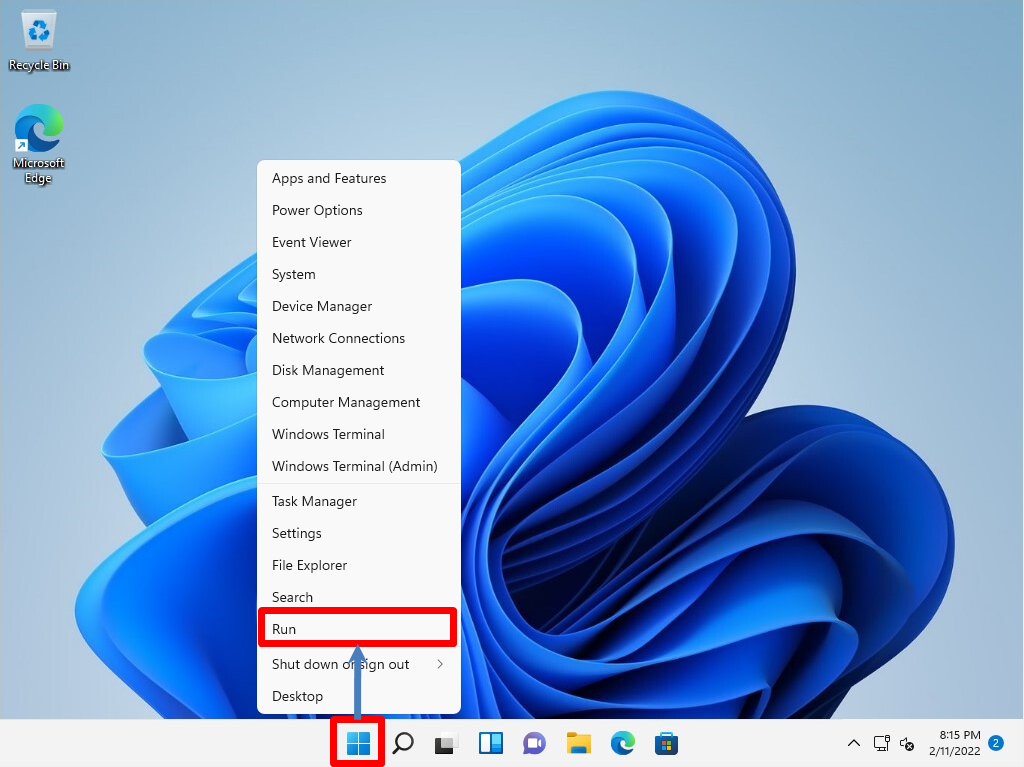
Step 1:
Select “Run” on the connected device
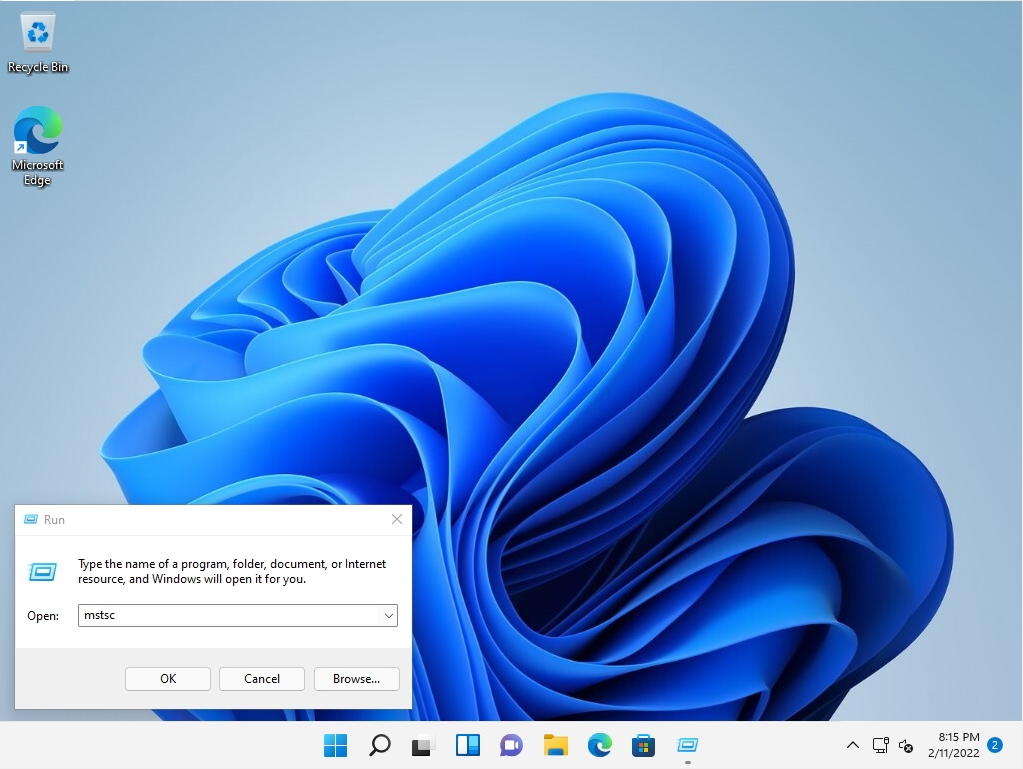
Step 2:
Open : Enter mstsc -> Select OK.
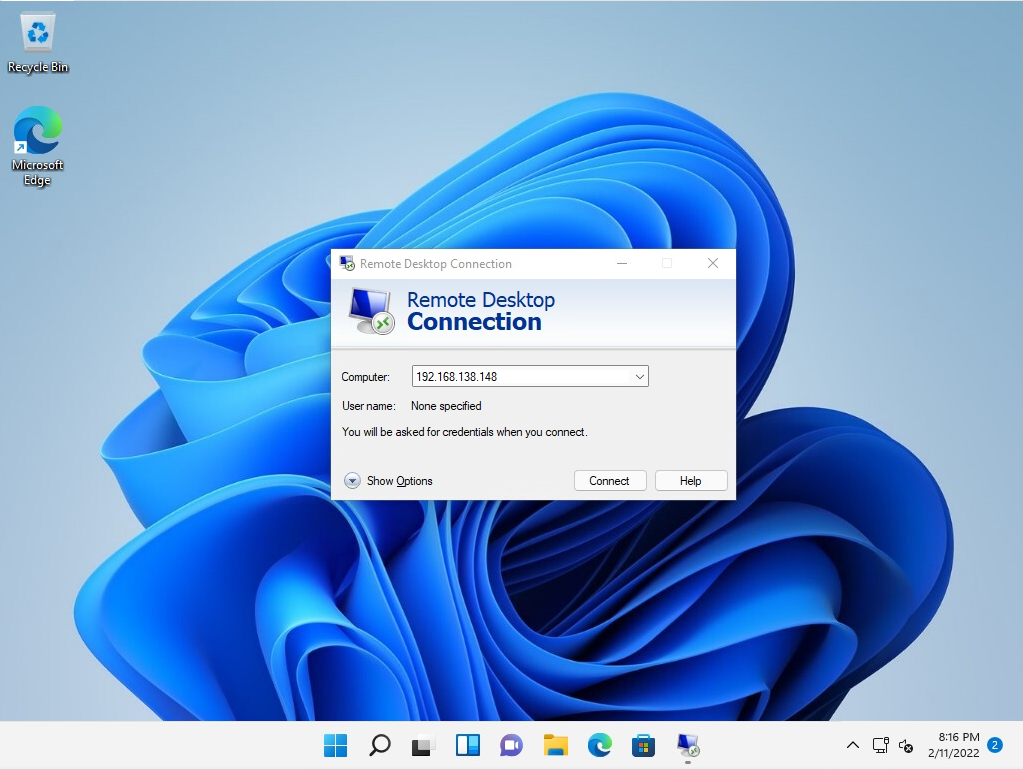
Step 3:
Computer: Enter “Remote IP Address” -> Select “Connect”
Step 4:
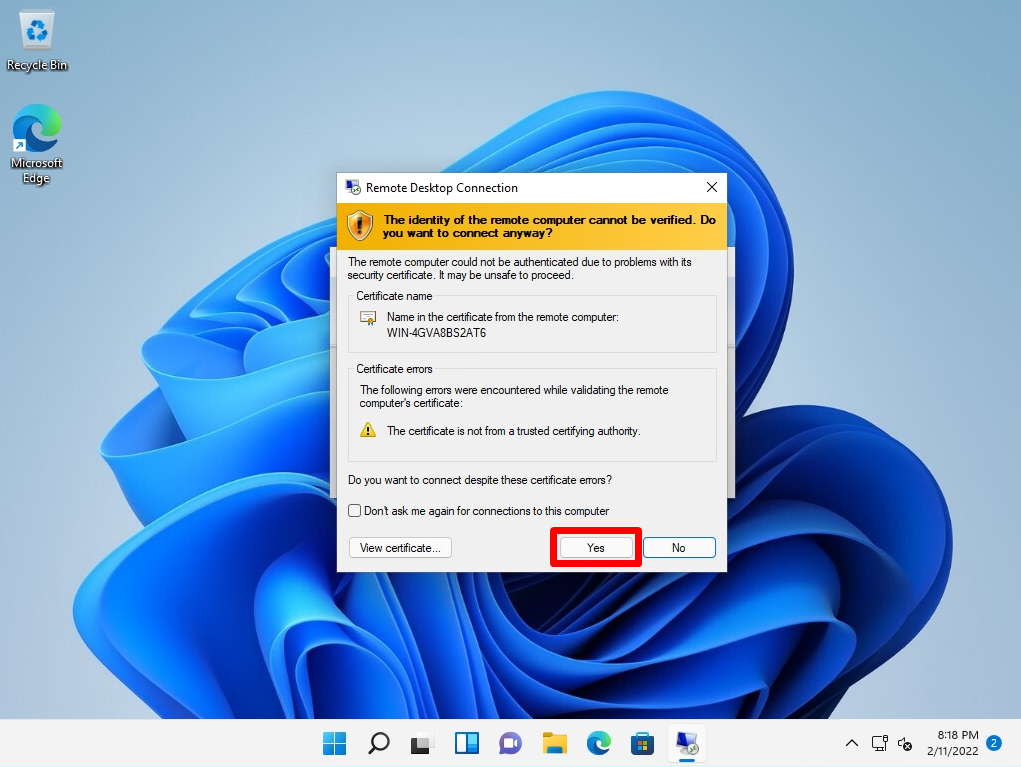
Enter user name and password -> Select “OK”
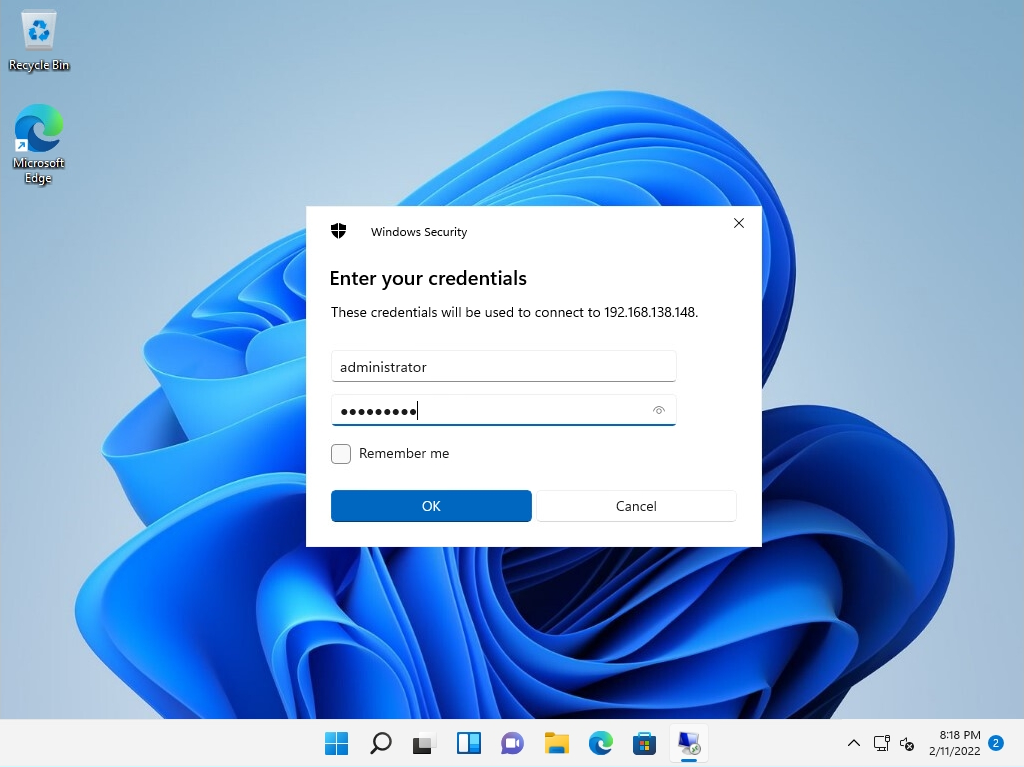
If the security certificate screen is output, select “Yes”
Step 5:
Repeat steps 1 to 4 again to confirm that you can connect with the same account
This article describes about enable multiple RDP sessions to a Windows Server Operating System by installation, configuration, and activation using a Remote Desktop License Server. By default, Microsoft Windows Server Operating System will allow only 2 remote desktop sessions at-a-time. In order to use more than 2 users we need to configure RDS CALs (Remote Desktop Services client access licenses).
Remote Desktop Services enables clients to connect to virtual desktops and remotely access programs, including graphics-intensive applications. Using a Remote Desktop, the client computer can connect remotely to a “host” computer.
In order to install Windows Server Operating System on the server, a customer needs to purchase a license for that operating system activation. Windows Server Operating System licenses do not give them the legal right to provide connections to users or computers, which is why CALs (Client Access Licenses) are needed.
Install Remote Desktop Licensing Role
Step 1: Logged in windows server 2019, open Server Manager ->Manage-> Add Roles and Features.

Select RDP service
Step 2: At Role Services select Remote Desktop Session Host

Remote Desktop Session host
Step 3: Remote Desktop session host must be selected with added features like Remote Server Administration Tools, Role Administration Tools, Remote Desktop Services Tools, and Remote desktop Licensing Diagnoser Tools.
Step 4: After installation server needs to be rebooted.
Install Remote Desktop Licensing Diagnoser
It is a tool that provides administrators with a quick diagnostic for checking configurations and communication between RD License servers and RD Session Hosts.
After rebooting the server, you will get a notification as shown below “ No license server is required for 120 days during the licensing grace period ”
licensing grace period of 120 Days
Now it will allow multiple users to access the machine using remote desktop for 120days. until completion of 120days we can use the RDP services.
Check Remote Desktop Licensing Diagnoser using lsdiag.msc command.

RD License Server status
You can see the license is not configured. After 120days you can configure the license. When users access the Remote Desktop Services session host, the license server provides them with client access licenses (CALs).
Activate CAL License
Configure Client Access Licenses (CALs) on remote desktop licensing as shown below.
Login into the server and open the server manager, enable the Remote Desktop Licensing option

Remote Desktop Licensing
It will install the Remote Desktop Licensing Manager tool as well. After installation reboot the server.
once reboot has been done, run the licmgr.exe command to open Remote Desktop Licensing Manager. Select your computer, click on Action and select Activate server to configure the license for CALs.

Remote Desktop Licensing Manager
We can activate license using one of the options shown below

Remote Desktop Licensing Management.
- Automatic connection: Required Internet connection
- Web Browser: login into Microsoft select Activate a license server
- Telephone: call to a toll-free number and need to provide the Product ID.
Once activation is done, have to configure RDS client access licenses (CALs) in the windows machine.
Basically, we have 2 types of RDS (Remote Desktop Session) client access licenses (CALs) model
- RDS Per Device CALs: Each device has its own RDS CAL. The maximum number of hosts that can connect to your RDS server, for example (40) if you have a license for 40per device only. It is possible we can revoke RDS CALs.
- RDS Per User CALs: This type of RDS license enables users to connect from any number of machines to the server.
- It can’t be revoked RDS CALs.
Configure Local Group Policy for RD licensing Server
- Open a command prompt and run gpedit.msc to open local group policy and navigate as shown below
Local Computer Policy>> Computer Configuration\Administrative Templates\Windows Components\Remote DesktopServices\Remote Desktop Session Host\Licensing\Use the specified RD license servers.
License Servers to use: Here we need to provide server ipaddress which RDP license has configured.

Use the specified RD license server
2. Final steps to configure the RDS client access licenses (CALs) model
Open a command prompt and run gpedit.msc to open local group policy and navigate as shown below
Local Computer Policy>> Computer Configuration\Administrative Templates\Windows Components\Remote DesktopServices\Remote Desktop Session Host\Licensing\Set the Remote Desktop licensing mode.

Set the Remote Desktop licensing mode
Now restart the machine. The license has been configured successfully.
To check the license status, open the Remote Desktop Licensing Manager tool and verify it.
3. Provide elevated privileges for MSLicensing key:
Make sure that necessary permissions to run the remote desktop software, either by adding users to administrator’s group or by editing the relevant key’s permissions to give your user profile full control.
Open Windows Registry(regedit) with Run as Administrator, navigate to below location.
Computer\HKEY_LOCAL_MACHINE\SOFTWARE\Microsoft\MSLicensing
Right click on MSLicensing and select Permission as shown below

Permissions to MSLicensing
Select Permissions, you will get Security Tab. Here will see Groups and Users. Select the group which you required and enable Full Control flag.
conclusion:
As mentioned above enable multiple RDP sessions to a Windows Server in Windows server 2019 machine has been explained step by step procedure. The above-mentioned procedure is the same for windows server 2012r2/2016/2019/2022 machines as well. if you have any question regarding enable multiple RDP sessions to a Windows Server, please drop a comment.
Hello, how are you today? In this opportunity, we are going to talk about multiple desktops in Windows Server 2019. It is a type of technology that allows a user to work on a computer through their graphical desktop from another terminal located elsewhere. In other words, it is the possibility of completely controlling a distant device through a network connection. In Windows, this function is present since the XP version. Indeed, it is possible to activate it also in Windows Server. However, its use in the desktop version is limited to a single user. While in Windows Server 2019, the number of users is only two. But we’re here to help you, so we’ll show you how to jump this limitation. Through an open-source tool, we will see how to enable multiple remote desktops on Windows Server 2019.
Part 1. Preparing the server.
The first thing we need to do is check to see if the remote desktop is activated. With this intention we follow the following path: Control Panel>System and Security>Advanced system settings. Once there, please select the Security tab. Verify that the box corresponding to Allow remote connections to this computer is checked.

Create users who will connect by remote desktop.
Next, we will create the users who will be able to connect remotely to the server. We will then add these users to the corresponding group. To see in detail how to manage groups and users, please click here. With this in mind, press the Win+X combination and select Computer Management.
Then follow this path: Local users and groups>Users

At this point, add users who will be able to connect by the remote server. In this case, I will add 5 users, but you can add any number of users.

Then go to the Groups section, and click on Remote Desktop Users.

Step 2. Downloading RDPWrapper
As mentioned above, to bypass this Microsoft ban we will use an opensource software called RDPWrapper. With this in mind, please go to the project’s GitHub page. There you can download the zipped file.

Then unzip the file to the location of your choice. Once the folder is unzipped, double click on the file install.bat

The installation will begin immediately, please wait a few seconds while the installer does his job.

Then click on RDPConf.exe. Wait until the program’s configuration tab loads. You can leave the default settings. Please note that all three diagnostic options must be green and fully supported. However, it is likely that the not supported warning will appear in red. If this happens, the program will not work and you will not be able to connect multiple users. But do not worry, we will solve this issue.

This problem arises because Windows has released updates that have broken the program. The solution is to replace the rdpwrap.ini file in the installation folder of the program (C:\Program Files\RDP Wrapper). To download the new file, please go to the following link.

Now, in order to replace the file, it is necessary to stop the remote desktop service. If you don’t, the file will issue an access denied warning. So open a command prompt with administrative privileges and type the following command:
net stop termservice
Then replaces the rdpwrap.ini file in the installation folder. And at the same command prompt with administrative privileges, please run the following command to restart the remote desktop protocol
net start termservice Once the protocol starts, please go to the program folder and re-run RDPConf.exe. If you have done everything correctly, the result of the configuration window should be as follows:

By activating the program it will be possible to enable multiple remote desktops in Windows Server 2019.
Connecting Multiple Remote Desktop Users to Windows Server 2019
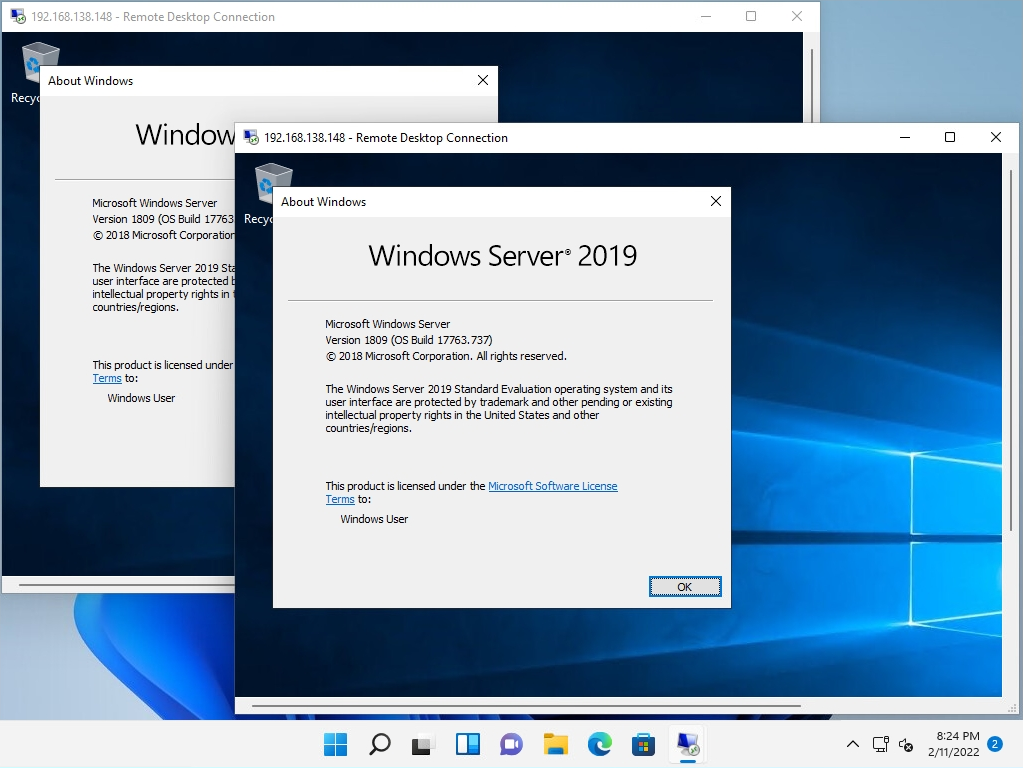
Finally, we will check if it is possible to connect more than two users per remote desktop. To achieve this, we will connect from a Windows 10 computer. Please follow the directions in this article. Here you can see the 5 remote writer users connected simultaneously from a Windows 10 computer.

In the following image, you can see the 5 users running in the task manager.

In the final analysis, we have seen how to enable multiple remote desktops on Windows Server 2019. With these instructions, it is possible to bypass the restrictions imposed by Microsoft and be able to connect more than two desktops. Even if Windows updates damage the program, we learned how to solve the problem. I hope you enjoyed the tutorial as much as I did. Greetings and see you soon!
— Advertisement —
Everything Linux, A.I, IT News, DataOps, Open Source and more delivered right to you.
Subscribe
«The best Linux newsletter on the web»