
Операционная система Windows далеко не идеальна и не отличается стабильной работой. Нередко после обновлений ОС ее загрузка становится невозможной. В этом случае необходимо знать, как восстановить Windows 10 без переустановки системы.
Владимир Пантелеев
Основатель PulsePC
Когда нужно восстановить ОС
Инструкция
Отключить автоматическое обновление
Ошибки при обновлении
Отменить восстановление
Мнение эксперта
Восстановить без потери данных
Когда нужно восстановить ОС
Инструкция
Отключить автоматическое обновление
Ошибки при обновлении
Отменить восстановление
Мнение эксперта
Восстановить без потери данных
Часто Windows может перестать загружаться из-за проблемной программы или повреждения критически важных файлов ОС. В этом случае также нужно знать, как восстановить Windows 10 с помощью средств самой системы.
Когда операционную систему нужно восстанавливать
Существуют различные причины, по которым вдруг может потребоваться восстановление операционной системы Windows 10. Рассмотрим их подробнее:
- Зависание ПК без видимых на то причин. Если компьютер работает нестабильно, постоянно перезагружается или зависает, то явно существует проблема в операционной системе, и ее нужно попробовать восстановить.
- Некорректная установка обновлений или проблемный пакет. Часто проблемы со стабильностью ОС появляются после установки обновлений от компании Microsoft. В них разработчики оперативно латают дыры в безопасности и исправляют некоторые баги, но в то же время ломают что-нибудь другое.
- Некорректная установка драйвера или программы. Иногда программное обеспечение и драйверы могут работать некорректно, негативно влияя на стабильность операционной системы. И не всегда переустановка драйверов помогает решить проблему. В этом случае потребуется восстановление ОС.
- Вирусы в операционной системе. Вредоносное ПО разного типа может существенно повредить файлы операционной системы, и в результате она будет работать неправильно. Восстановление ОС может помочь, но только после удаления всех вирусов.
- ОС перестала загружаться. Такое бывает, если оказался поврежден загрузчик Windows или прочие файлы, необходимые для запуска и работы ОС. Восстановление может помочь решить проблему, но потребуется установочная флешка с Windows. Если не запускается, есть 10 способов это исправить — об этом рассказали в нашем материале.
- Нужно было сбросить параметры Windows до заводских. Сброс параметров Windows до заводских требуется в тех случаях, если было заменено железо компьютера, хотя в таких случаях рекомендуют чистую установку ОС.
Пошаговая инструкция по восстановлению Windows 10 на компьютере или ноутбуке
Теперь рассмотрим подробнее способы восстановления работоспособности операционной системы Windows. Некоторые из них основаны на возможностях ОС, другие же требуют наличия дополнительных инструментов — например, установочного USB-накопителя с Windows.
1. С помощью командной строки
В составе ОС Windows есть функция, которая позволяет восстановить поврежденные системные файлы из-под работающей ОС. Для этого потребуется командная строка, терминал или Windows PowerShell. Алгоритм действий такой:
- Щелкните правой кнопкой мыши по кнопке «Пуск» и в появившемся меню выберите «Windows PowerShell (Администратор)».
»")
- В окне инструмента введите команду «sfc /scannow» и нажмите «Enter».

Эта команда запустит процесс проверки системных файлов на целостность и, если такие действительно найдутся, система попробует их восстановить — для этого по завершении проверки потребуется перезагрузить компьютер. Если этот способ не дал результатов, то нужно переходить к следующему варианту.
2. Сброс до заводских настроек
Это один из наиболее радикальных способов: во время его использования из ОС удаляются все пользовательские приложения и драйверы, и возвращается состояние только что установленной системы. Иногда такой вариант позволяет решить проблему с драйверами или криво установленными программами. Сделать же нужно следующее:
- Нажмите «Win+I» для запуска параметров Windows и щелкните по плитке «Обновление и безопасность».

- В столбце справа выберите «Восстановление» и в блоке «Вернуть компьютер в исходное состояние» нажмите «Начать».

- После этого нужно будет выбрать вариант восстановления: с сохранением пользовательских данных или без них. Мы рекомендуем выбрать «Удалить все».

После этого начнется процесс сброса Windows до заводских параметров. Во время сброса компьютер перезагрузится, и после рестарта вы получите полностью чистую операционную систему, которую нужно будет настраивать заново. Такой вариант помогает в большинстве случаев, поскольку удаляются и обновления ОС, но если он вам не помог — переходите к следующему.
3. Из точки восстановления системы
Восстановление системы с помощью чек-пойнта, или «точки восстановления», может вернуть ОС в то состояние, когда она работала нормально. Но важно, чтобы такие точки создавались перед установкой обновлений или драйверов. Сам процесс восстановления не особенно сложный, с ним справится даже новичок. Вот подробная инструкция:
- Нажмите сочетание клавиш «Win+R», введите в строке «control» и нажмите «ОК».

- В списке выберите раздел «Центр безопасности и обслуживания».

- Далее щелкните по пункту «Восстановление».

- Затем выберите «Запуск восстановления системы».

- Запустится мастер восстановления, в котором нужно будет щелкнуть «Далее».

- На следующем этапе выберите нужную точку восстановления и нажмите «Далее».

- Дальше просто щелкните «Готово».

После этого начнется процесс восстановления ОС из контрольной точки, причем компьютер перезагрузится. Учтите, что все программы, которые были установлены уже после создания контрольной точки, будут удалены. Но такой способ хорош, если ОС запускается, и у вас есть заранее созданные контрольные точки.
4. С загрузочной флешки
Этот метод позволяет выполнить восстановление Windows даже в том случае, если операционная система не запускается. Однако понадобится установочный USB-накопитель с системой и некоторое количество свободного времени. Инструкция по восстановлению Windows при помощи USB-накопителя такая:
- Вставьте USB-накопитель в порт компьютера и запустите его с зажатой клавишей F12, F11, F2 или F1 в зависимости от типа вашего BIOS.

- В появившемся окне в качестве диска для загрузки выберите USB-накопитель.

- Дождитесь загрузки окна с выбором параметров установки и зажмите комбинацию «Shift+F10» для вызова командной строки.

- В консоли последовательно введите команды «chkdsk /f /r C» (если система была установлена на диске «С»), «sfc /scannow /offbootdir=C:\ /offwindir=C:\windows». Не забывайте нажимать «Enter» после ввода каждой команды.
После этого попробуйте перезагрузить компьютер в стандартном режиме — система должна запуститься. Если этого не случилось, то, вероятно, вам поможет только полная переустановка операционной системы.
5. С установочного диска
Восстановление с установочного диска происходит по тому же сценарию, что и восстановление с USB-накопителя. С помощью такого способа можно восстановить работоспособность ОС Windows 10 на старом компьютере с DVD-приводом, однако такой вариант используется крайне редко.
Как отключить автоматическое обновление системы Windows 10
Львиная доля проблем возникает после установки обновлений в ОС Windows, поэтому многие пользователи считают, что их лучше отключить вовсе. Однако полностью выключить их средствами ОС невозможно и поэтому приходится использовать сторонний софт, например, небольшую утилиту Stop Windows 10 Updates.
Скачать программу можно на официальном сайте разработчика: есть как портативная версия, не требующая установки, так и классическая. Пользоваться программой достаточно просто. Мы рассмотрим весь процесс, начиная со скачивания Stop Windows 10 Updates.
- Перейдите по ссылке и нажмите кнопку «Download».

- Откройте каталог «Загрузки» и двойным кликом откройте только что скачанный архив.

- Скопируйте исполняемый файл из архива в любое место и запустите его двойным кликом.

- Запустится мастер установки — в нем сразу нажмите «Далее».

- Примите условия лицензионного соглашения и щелкните «Далее».

- На следующих этапах нажимайте «Далее», ничего не меняя, а затем кликните кнопку «Установить».

- По окончании установки нажмите «Завершить».

- Найдите установленную программу в списке и запустите ее стандартным способом.

- В окне программы нажмите на большую красную кнопку «Запрет обновлений Windows».

Осталось только дождаться, пока программа завершит работу. После этого обновления не будут устанавливаться автоматически. Стоит заметить, что Stop Windows 10 Updates не работает на последней версии Windows 11 24H2, но на 23Н3 работает нормально. Это нужно учитывать перед использованием утилиты.
Какие ошибки возникают при обновлении Windows 10
Во время обновления Windows 10 могут возникать разные ошибки, которые способны помешать установить конкретный пакет обновления, или же могут привести к тому, что операционная система будет работать нестабильно. Рассмотрим основные типы ошибок подробнее:
- Ошибка подключения к интернету. Нередко после установки очередного пакета обновления ОС встречает нас фразой «Нет подключения к интернету». Решить проблему можно только сбросив настройки сети при помощи командной строки и команд «netsh winsock reset catalog», «netsh int ipv4 reset reset.log» и «ipconfig /renew».
- Отказ периферийных устройств. Такое тоже часто случается после установки Windows 10. Для исправления ситуации можно переустановить драйверы устройств, а если не поможет — откатить систему при помощи точки восстановления, созданной заранее.
- Проблемы в работе видеокарты. Могут возникать по причине автоматического и не всегда удачного обновления драйверов системой. Нужно попытаться откатить драйверы или восстановить ОС. Можно также попробовать полную переустановку драйверов.
- Проблемы со звуком. Здесь все то же самое — проблемы со звуком могут наблюдаться по причине проблемных драйверов, которые были установлены вместе с обновлением. Нужно попробовать переустановить драйверы.
- Не работающий Microsoft Store. Магазин Microsoft часто ломается после очередного обновления Windows 10. Восстановить его можно, сбросив настройки магазина при помощи команды «-ExecutionPolicy Unrestricted Add-AppxPackage -DisableDevelopmentMode -Register $Env:SystemRoot\WinStore\AppxManifest.xml», которую нужно выполнять в Windows PowerShell.
Можно ли отменить восстановление Windows 10
В теории запустить процесс восстановления системы можно принудительной перезагрузкой компьютера. Но делать этого не рекомендуется, поскольку можно окончательно убить систему или даже повредить какое-либо железо. Поэтому лучше дождаться завершения процесса и уже после этого, если результаты не устроили, можно будет полностью переустановить Windows.
Мнение эксперта
На вопросы редакции Hi-Tech Mail о восстановлении системы Windows 10 ответил Владимир Пантелеев, основатель PulsePC.
Какие ошибки допускают пользователи при восстановлении Windows 10?
- Отсутствие резервной копии данных. Многие начинают восстановление системы, не сделав бэкап важных файлов. В результате после сброса или переустановки Windows данные теряются.
- Использование неподходящего образа или утилиты. Некоторые скачивают ISO с непроверенных источников, например, с торрент-треккеров, что может привести к установке поврежденной или зараженной версии системы.
- Удаление раздела восстановления. Пользователи в стремлении «очистить диск» могут случайно удалить скрытые разделы, содержащие заводской образ Windows, и лишиться штатных средств восстановления.
- Игнорирование драйверов и ключей. После восстановления Windows может не быть драйверов сетевого оборудования, а ключ активации не всегда подтягивается автоматически — особенно на старых устройствах.
- Выбор сброса «без удаления файлов», когда вирус уже в системе. Если заражение затронуло системные файлы, такой способ неэффективен — вредонос останется.
Расскажите о главных правилах, которые надо соблюдать при восстановлении Windows 10
- Сделайте резервную копию файлов. На внешний диск или облако — всё важное, особенно документы, фотографии, файлы с рабочего стола.
- Убедитесь в наличии установочной флешки или образа. Лучше заранее создать носитель с официальным инструментом Media Creation Tool от Microsoft.
- Заранее скачайте драйвера. Особенно для сетевых устройств (LAN/Wi-Fi), на случай если Windows после восстановления не увидит сеть.
- Запишите лицензионный ключ, если система не привязана к учетной записи Microsoft.
- Отключите все лишние внешние накопители. Это поможет избежать случайного форматирования не того диска.
- Если ПК нестабилен, начните с простых способов восстановления. Например, через «Вернуть компьютер в исходное состояние» или «Восстановление системы» до точки отката.
Какие есть лайфхаки, которые облегчают процесс восстановления Windows 10?
- Используйте встроенный образ Windows для быстрого восстановления. Сочетание Shift + Перезагрузка позволяет зайти в меню восстановления даже без рабочего рабочего стола.
- Создайте пользовательский образ системы после «чистой» установки. Это позволит в будущем восстановиться в один клик без переустановки и настройки всего с нуля.
- Установите Windows на SSD. Это не только ускоряет работу, но и сам процесс восстановления становится гораздо быстрее.
- Храните установочный образ на другом разделе или флешке с меткой и понятным названием, чтобы всегда была под рукой.
- Заведите учетную запись Microsoft. Это упростит активацию, синхронизацию настроек и даже вход в систему после восстановления.
Как восстановить Windows 10 без потери данных
Подведем итоги и выделим, что нужно запомнить о восстановлении операционной системы Windows 10.
- В ОС Windows есть встроенные инструменты, позволяющие выполнить восстановление системы.
- Самый простой способ — использовать восстановление из контрольных точек, которые создаются заранее.
- Если проблема не очень серьезная, то можно восстановить системные файлы при помощи командной строки и всего одной команды.
- Если система не загружается, можно выполнить восстановление из среды установки Windows при помощи той же командной строки, но потребуется загрузочный USB-накопитель с Windows.
- Если проблемы возникают регулярно после обновления системы, то рекомендуется отключить обновления — хотя бы на время.
-
Home
-
Clone Disk
- How to Perform a System Restore from Command Prompt Windows 10/7?
How to Perform a System Restore from Command Prompt Windows 10/7?
By Ariel | Follow |
Last Updated
Do you know how to start a system restore from command prompt? If you are trying to figure it out, come to this post. MiniTool will walk you through a full guide to perform a system restore from command prompt on Windows 10 and Windows 7.
As you know, the system restore feature can help you restore operating system to an earlier working state. Besides, you can use this feature when some ransomware attacks your computer and damage the system files.
So, when you encounter the ransomware attacks, you may need to restore system. However, performing a system restore is not an easy operation. This is because, as you know, the fake antivirus programs and ransomware infections may block the Safe Mode of your operating system.
At this time, you have to run system restore from command prompt. Now, let’s see how to perform sys restore command on Windows 10 and Windows 7.
How to Perform a System Restore from Command Prompt Windows 7
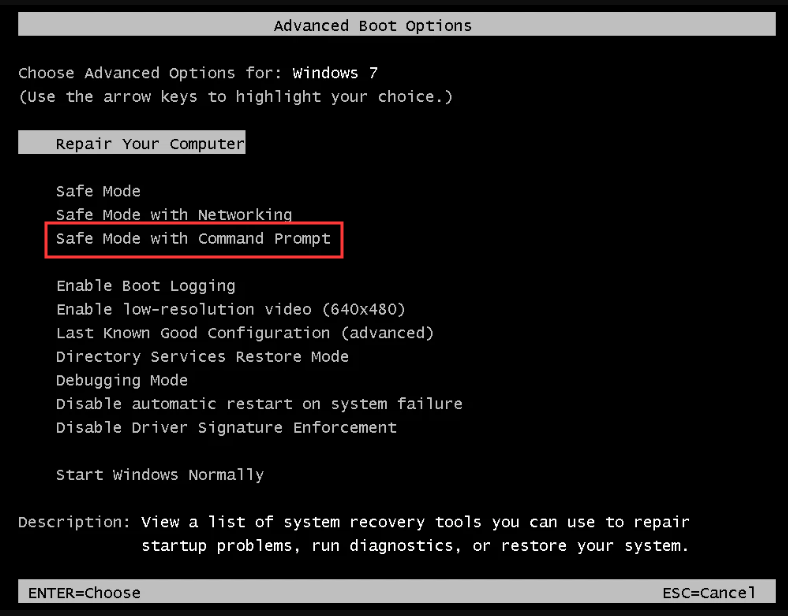
Step 1. Press the Power button to turn on your PC. During the start process, press F8 key to open the Advanced Boot Options screen.
Step 2. Select the Safe Mode with Command Prompt by pressing the arrow keys. After that, press Enter.
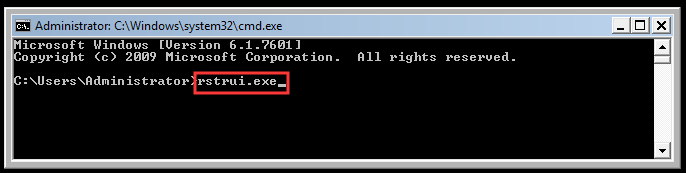
Step 3. In the command prompt, type cd restore command ad hit Enter.

Step 4. Then type rstrui.exe command and hit Enter
Step 5. Now, a System Restore window pops up. Click Next to continue.
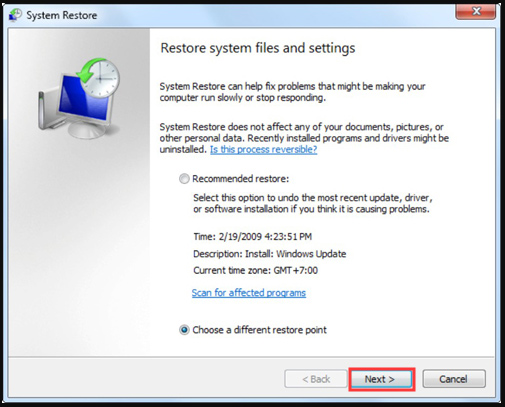
Step 6. In the list of restore points, select a restore point that you want to restore and click Next.

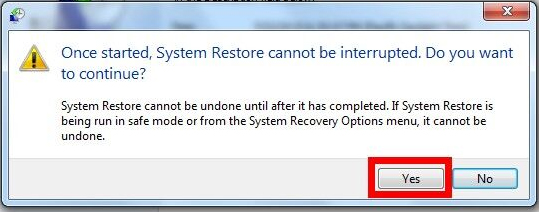
Step 7. Then you will receive a confirmation message: Once started, System Restore cannot be interrupted. Do you want to continue? Just click Yes.
Now, your system should be restored to an earlier working state. Next. Let’s see how to perform a Windows 10 system restore from command prompt.
How to Perform System Restore from Command Prompt Windows 10
This process is similar to do on Windows 7. Before you do, you can read this post to boot your Windows 10 PC from Safe Mode. After that, you can follow the steps below to perform the Windows 10 system restore from command prompt.
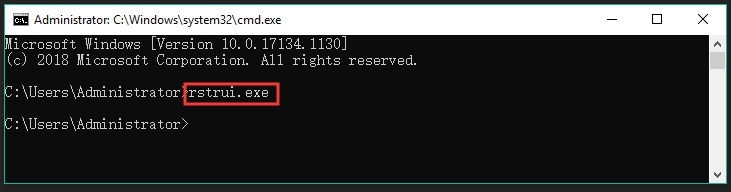
Step 1. Press Win + R keys to open the Run dialog box, and then type cmd in it and press Ctrl + Shift + Enter keys to open the elevated command prompt that will grant you an administrator privilege.
Step 2. In the pop-up window, type rstrui.exe command and hit Enter.
Step 3. The system restores window will pop up immediately, click Next to continue.
Step 4. In the list of all system restore points, select the Restore point that you prefer to and click the Next button.
Step 5. Then confirm your restore point by clicking the Finish button. After that, your computer should be restored to an earlier state and fix this issue.
Now, I believe you already have known how to perform a system restore from command prompt Windows 10/7.
Tips & Tricks for the Problems When Performing System Restore from Command Prompt
In addition to the above question, many users encounter new problems when running system restore from command prompt. For example, a user received the error message “not enough memory resources are available to process this command”. For this problem, you can try freeing up your PC’s storage space.
There are some users complained that their PC won’t boot and cannot access the Safe Mode. Don’t be alarmed. You can read this post, in which we provide detailed steps for entering Safe Mode when your PC won’t boot.
About The Author
Position: Columnist
Ariel has been working as a highly professional computer-relevant technology editor at MiniTool for many years. She has a strong passion for researching all knowledge related to the computer’s disk, partition, and Windows OS. Up till now, she has finished thousands of articles covering a broad range of topics and helped lots of users fix various problems. She focuses on the fields of disk management, OS backup, and PDF editing and provides her readers with insightful and informative content.
If you encounter problems with your Windows 10/11 and you’re unable to solve them, or your computer won’t boot into Windows, don’t worry. Here’s a guide on how to repair your Windows 10/11 by using Command Prompt from Safe mode or via Windows Recovery.
Starting up Windows 10/11 in Safe Mode with Command Prompt
If you can only boot into safe mode with command prompt, or into the Windows Recovery Environment, there is still a chance to repair Windows 10/11 by using the command prompt tool before you reset or reinstall Windows.
To start, we will show you how to enter safe mode with command prompt on Windows 11/10, or access the command prompt from the Windows Recovery Environment. If you already know how to open the command prompt without booting into Windows, you may skip this step.
Entering Safe Mode with Command Prompt
If you still have access to your Windows 10/11, enter safe mode by Shift-clicking the Restart button from the Start menu. Next, select (6) from the Startup Settings to boot into safe mode with command prompt on the next restart.
If you have no access to your Windows 10/11, perform the following steps:
- Hold and press the power switch on your computer casing for about 5 seconds until your computer completely shuts down.
- Power on your computer and wait for it to start loading the Windows 10 or Windows 11 logo.
- Hold and press the power switch again to force another shutdown.
- Repeat steps 2-3 for 3-4 times.
- When Windows detects too many failed startups, it will automatically boot into Windows Recovery.
When you are in Windows Recovery, select Troubleshoot > Advanced Options > Startup Settings. Press the 6 key to boot into Windows safe mode with command prompt on the next restart.
Opening Command Prompt from Windows Recovery
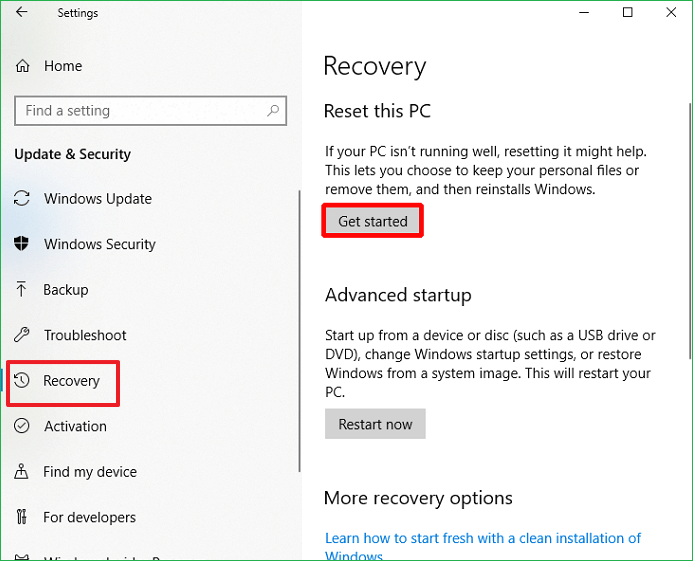
If you’re still able to access Windows 10/11, enter Windows Recovery by going to Start menu > Settings > Update & Security > Recovery > Advanced startup. Click on Restart now to boot into Windows Recovery.
If you can’t access Windows, repeat the force shutdown steps mentioned above to force boot your PC into Windows Recovery Environment.
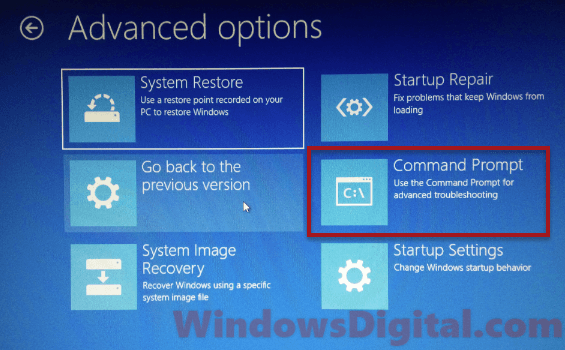
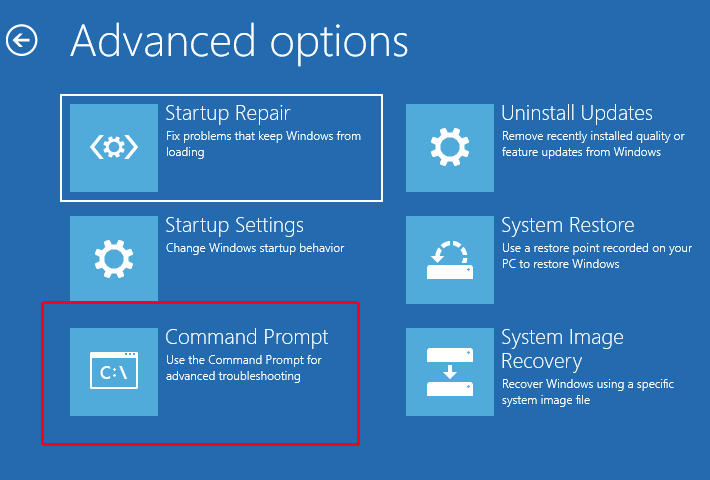
Once you’re in Windows Recovery, select Troubleshoot > Advanced Options > Command Prompt. You will then be able to execute commands directly from the Windows Recovery CMD.
If you have a recovery drive created prior to the problem, you can set your BIOS to boot the recovery drive to enter Windows Recovery Environment.
Repairing Windows 11/10 Using SFC scannow in CMD
The first repair command we’ll execute is the system file check (SFC). SFC is able to automatically scan for corrupted and missing system files, and repair or replace them in Windows 11/10. In the command prompt, enter the following command.
sfc /scannow
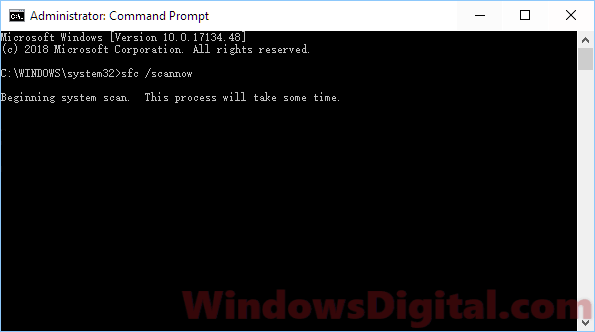
The process may take 30 minutes or up to several hours depending on the size of the Windows system files and your HDD performance. When the scan is completed, you can choose to restart your PC now to verify if the problem still persists or continue executing other commands below.
Running CHKDSK to Check for Hard Drive Errors
A hard drive error is one of the most common errors that causes Windows to crash or corrupt. Running check disk (chkdsk) will certainly help to check and repair unwanted disk errors on your HDD, especially on your Windows partition.
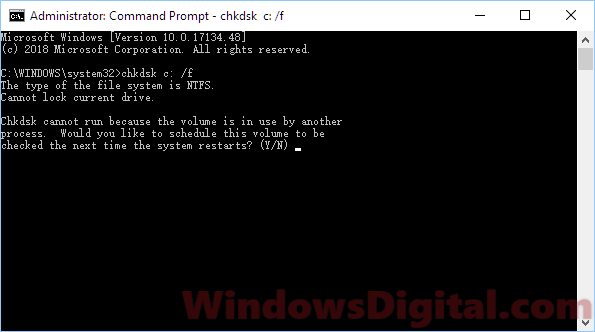
In the command prompt, enter the following command to perform chkdsk.
chkdsk c: /f
Since you’re not currently using your disk, chkdsk should not ask you to restart your PC. If it tells you that the volume is in use and that it will schedule the chkdsk scan on your next restart, press the Y key to proceed.
Similar to the system file check, the scan may take some time. Try not to interrupt the scan. When the scan is completed, restart your PC and verify if your problem is solved. Continue to the next repair command if the problem still exists.
Running DISM to Repair Windows 10/11 Image
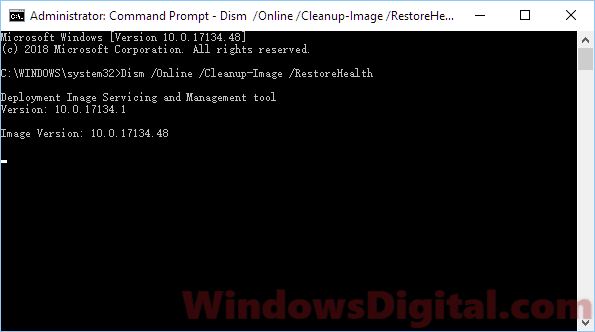
Deployment Imaging and Servicing Management (DISM) is a Windows built-in tool to automatically update files and correct service problems for your Windows 10/11 image. In the cmd, enter the following command.
Dism /Online /Cleanup-Image /RestoreHealth
Running Bootrec to Repair Windows 10/11 Boot Problem
Bootrec.exe is an incredibly useful tool to repair boot problems in Windows 10/11. When startup repair or any kind of troubleshoot can’t repair your Windows boot problem, you should try using bootrec repair tool.
In the command prompt, enter the following commands followed by an Enter key after each line of command.
bootrec /fixmbr
bootrec /fixboot
bootrec /rebuildbcd
bcdboot c:\windows /s c:
These commands are to execute bootrec.exe to fix the Master Boot Record (MBR) and other boot problems in Windows 11/10. Replace C: if your Windows is stored on another drive. Reboot your computer after executing all commands.
If none of the solutions above work to repair your Windows boot problem, you may then decide if you want to system restore Windows 11/10 to a previous date, roll back Windows 11/10 update to an earlier build, or reset Windows 11/10 to factory settings.
Performing a factory reset helps to fix your Windows 10 PC if it has run into errors preventing it from functioning correctly. There exist a couple of ways to perform a factory reset for Windows 10. One of these ways entails using Command Prompt. In this article, you’ll learn everything you need to know about how to factory reset Windows 10 from Command Prompt or reset PC from Command Prompt.
First, we’ll describe whether factory resetting your PC using Command Prompt is possible. Next, we’ll outline things to do before performing the reset. From there, you’ll learn two ways to reset your Windows 10. In the pro tip section, we’ll teach you how to reset Windows 10 using a built-in tool.
📃Also read: How to Factory Reset Windows 11 from Command Prompt
Carrying out a factory reset on your Windows 10 computer helps to fix any issues preventing your device from working as expected. Normally, a factory reset seeks to address issues related to malware attacks, disk errors, program failures, and other software-related problems.
During factory reset, your computer system will delete all files and programs and reinstall Windows 10. There exist a couple of ways to factory reset Windows 10. On whether it’s possible to perform a Windows 10 factory reset from Command Prompt, the answer is YES. You can factory reset your Windows 10 from Command Prompt. In the next sections of this article, you’ll learn how to reset a PC acting abnormally.
If you are wondering how to factory reset Windows 11 from BIOS, you can read this article.
Factory Reset Windows 11 from BIOS Without Losing Data
This article discusses how to factory reset Windows 11 from BIOS. Read more >>
What to Do Before Performing a Factory Reset
Since a factory reset wipes out all your data and settings before reinstalling Windows, you should back up all the data on your computer. This ensures you can access your important files and programs after reinstalling the OS. EaseUS Todo Backup is one of the best software for backing up your computer before performing a factory reset.
It has the ability to back up and restore all your important files whenever needed. You can create backups for your disks or partitions and store them on an external hard drive, the cloud, local drives, NAS, or the network.
This backup software also comes with advanced options like incremental and differential backups. The main backup features of EaseUS Todo Backup include:
- Multi-path backup storage.
- Simple backup management.
- Create a scheduled backup.
- Enhanced backup efficiency.
- Secured password-protect backups.
Please download and install EaseUS Todo Backup on your computer and back up your data before you start resetting Windows 10. The steps to get started with this software are very simple.
Step 1. To start backup, click the Select backup contents.

Step 2. There are four data backup categories: File, Disk, OS, and Mail.

Step 3. On the left-hand side, you’ll see a list of local and network files. Selecting the files to be backed up by expanding the directory.

Step 4. Follow the instructions on the screen and pick the location where you wish to store the backup.

In Backup Options, click Options to encrypt the backup with a password, specify the backup schedule, and choose whether or not to start the backup at a certain event in Backup Scheme. There are a variety of customizable features available for you to explore, and you may tailor the backup operation to meet your specific requirements.

Step 5. Backups can be stored on a local disk, in EaseUS’s cloud service, or on a network attached storage device (NAS).

Step 6. EaseUS Todo Backup allows customers to back up data to a third-party cloud drive or the company’s own cloud storage.
If you wish to back up your data to a third-party cloud drive, select Local Drive, scroll down to add Cloud Device and enter your account information.

You may also use EaseUS’s own cloud storage service. Click EaseUS Cloud, create an account using your EaseUS Account, then log in to your account.

Step 7. To begin a backup, choose Backup Now. It will appear in the shape of a card on the left-hand panel when the backup process has been successfully finished. To handle the backup job in more detail, right-click on it.

Also read:
How to Reset Windows 10 to Factory Settings Using Command Prompt
One of the easiest ways to reset a malfunctioning Windows 10 computer is via Command Prompt. This method guarantees that you’ll have the underlying issues fixed and access your device afresh. This section will outline how to use Command Prompt to reset Windows 10 and perform a fresh start. We’ll discuss the two ways to reset PC using CMD.
- Way 1. Reset Windows 10 Using Command Prompt
- Way 2. Fresh Start Windows 10 via Command Prompt
Way 1. Reset Windows 10 Using Command Prompt
Quick steps:
- Go to Advanced Options > Troubleshoot > Command Prompt.
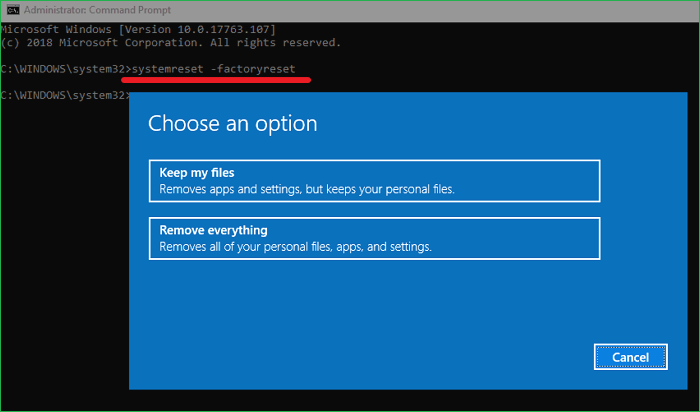
- Type systemreset -factoryreset in the Command Prompt window.
- Select whether you want to Keep My Files or Remove Everything.
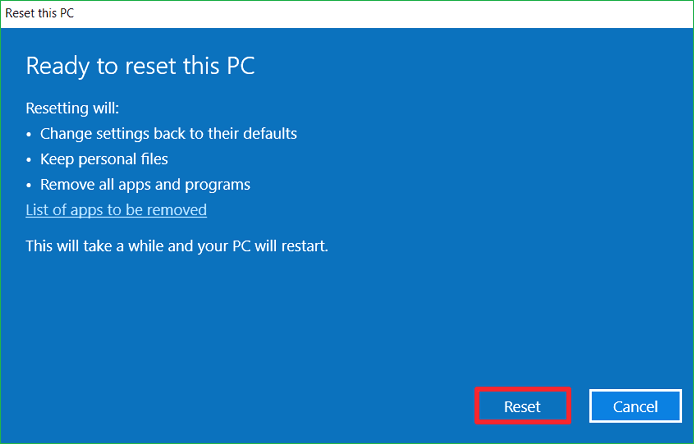
- A windows will display what resetting will do to your PC. If everything is per your selection, click on the Reset button.
To reset your Windows 10 PC, you’ll need to use the factory reset command in the Command Prompt window. You can type systemreset –factoryreset in the Command Prompt window and press Enter to factory reset Windows 10. You’ll have the option to either keep or remove your files before Windows reinstalls. Follow the steps below:
Step 1. If your PC is bootable, you can launch Command Prompt as an administrator by typing cmd in the search bar. Otherwise, if your computer has failed to start as normal, restart it, then press and hold the power button for about 10 seconds. Do this twice for your system to enter Windows Recovery Environment (WinRE). Once on WinRE, go to «Advanced Options»>»Troubleshoot»>»Command Prompt».
Step 2. Paste the following command in the Command Prompt window and hit «Enter»: systemreset -factoryreset
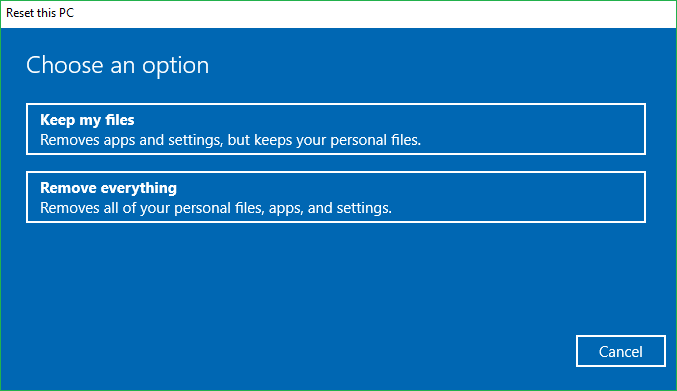
Step 3. On the next window, select whether you want to «Keep My Files» or «Remove Everything». You can select the second option if you have a backup for your files. Click «Remove everything».
Step 4. On the next screen, the system will display what resetting will do to your PC. If everything is per your selection, click on the «Reset button». The reset process will then begin, and you’ll have your Windows PC restored to its defaults. Stay patient until the reset process completes.
Way 2. Fresh Start Windows 10 via Command Prompt
Quick steps:
- Launch Command Prompt as an administrator. Type systemreset -cleanpc and hit Enter.
- The Fresh Start window will appear and press Next.
- The system will download the required files, reinstall Windows, and perform an update.
- You’ll need to stay patient until this process finishes.
If you opt to «Fresh Start» Windows 10, you’ll have the operating system reinstalled and then updated. This method will retain your data but clear all the preinstalled applications and programs. However, the system will reinstall your Microsoft Store apps once the Fresh Start process completes.
Follow the steps below to perform a Fresh Start via Command Prompt.
Step 1. Launch Command Prompt as an administrator. Next, type systemreset -cleanpc then hit the «Enter» key.
Step 2. After a short time, the Fresh Start window will appear. Hit the «Next» button to continue.
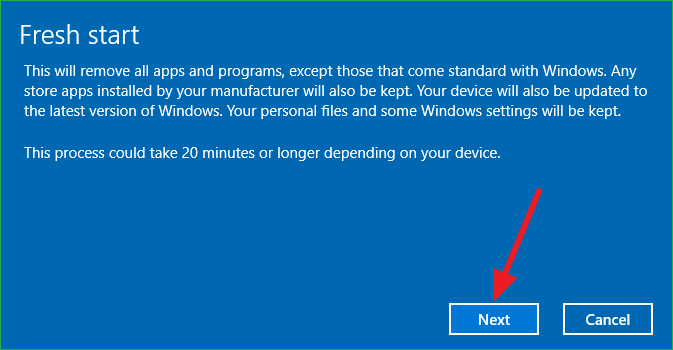
Step 3. Once you’ve decided to perform a fresh start, the system will download the required files, reinstall Windows, and perform an update. You’ll need to stay patient until this process finishes. If everything goes uninterrupted, you’ll have a fresh version of Windows installed on your PC.
Share this post with your friends if it is helpful.
Pro Tip: How to Factory Reset Windows 10 with Built-in Tool
Apart from using Command Prompt, it’s also possible to reset your Windows 10 computer by clicking on the «Reset This PC» option under Settings. This feature is built-in and is attached to your Windows ISO file. When factory resetting your PC, you’ll have the option to keep or delete your files. Follow the steps below to factory reset Windows using the «Reset This PC» option.
Step 1. Go to Settings on your PC, then click «Update & Security».
Step 2. Navigate to the «Recovery» section and click the «Get Started» button under «Reset this PC».
Step 3. When the «Choose an option» window is displayed, select whether you want to keep or delete your files.
Step 4. Follow the onscreen instructions, then click «Reset». From there, the system will restore to its defaults and then restart. Stay patient for the process to reach its completion. From there, you’ll have all errors fixed and access your computer as usual.
The Bottom Line
This article tells you how to reset PC using Command Prompt. To sum it up, it’s possible to factory reset Windows 10 from Command Prompt, provided you follow the right steps. Command Prompt factory reset makes it very convenient for someone to reset their device. Before you reset Windows 10, it’s important to back up your data efficiently using a more reliable tool like EaseUS Todo Backup.
This not only guarantees the safety of your data before the reset process but also after. The software allows creating backups for your disks or partitions and storing them on an external hard drive, the cloud, local drives, NAS, or the network. Ensure you download EaseUS Todo Backup today and start using it.
FAQs on Factory Reset Windows 10 from Command Prompt
1. How Do I Factory Reset My Computer from BIOS?
Follow the steps below:
- Power on your computer and press the relevant keys to enter BIOS. Once on BIOS, click on «Advanced» and then «Special Configuration».
- Click on «Factory Recovery» and choose «Enabled» in the drop-down menu. Next, click on the «Home» tab and go to «Save and Exit». Click yes to confirm exit saving changes. Your computer will then restart.
- When the «Choose an option» screen displays, click on the «Troubleshoot» option.
- Next, click on «Factory Reset». Type Y to confirm the factory reset process.
2. How to Force Restart PC Using CMD?
If you want to force restart your PC using CMD, type Shutdown -r-f, then hit «Enter». If you want a timed force restart, type Shutdown -r-f-t 00 and hit «Enter».
3. What Do You Do When a Factory Reset Doesn’t Work?
If a factory reset fails to work, it’s recommended to run the system file checker (SFC) command to check for corrupted system files. The SFC command will repair these files and allow you to reset your device successfully.
4. How to Restore Windows 10 from Command Prompt?
You can restore Windows 10 from Command Prompt by enabling Safe Mode. You can achieve that via the following steps:
- Press and hold the «Shift» key, then click on the «Start». Click on «Power», then «Restart».
- Once your computer has restarted and the Choose an option setup screen appears, click «Troubleshoot>Advanced options>Startup Settings>Restart».
- When the Startup Settings screen displays, select option 6 (Enable Safe Mode with Command Prompt).
- When the CMD window opens, type rstrui.exe and hit «Enter». Next, you can choose how you want to restore your system. You can either select «use recommended restore point» or «choose a restore point». Click «Next» and follow the next set of instructions to complete this process.
Many people have problems with their Windows 11/10 computers, such as hard disk errors, corrupted files, missing files, Windows update errors, and Windows startup problems. This post from MiniTool tells you how to repair Windows 11/10 using Command Prompt.
Some users are experiencing Windows 11/10 errors including app crashes, display glitches, sudden black screens, or slow/stuck start-up. If your problem is with system files or Windows startup, you can use Command Prompt to fix it.
The following provides 5 ways for you to repair Windows 11/10 via Command Prompt.
How to Enter Command Prompt
You can start Command Prompt in different ways depending on whether you can start Windows 11.
Case 1: You Can Start Windows 11/10 Normally
Step 1: Type Command Prompt in the Search box.
Step 2: In the right panel, choose the Run as administrator option.
Case 2: You Can’t Start Windows 11/10 Normmlly
Step 1: Boot your computer from Windows installation media.
Step 2: Select Repair your computer.
Step 3: Choose Troubleshoot > Advanced options > Command Prompt.
How to Repair Windows 11/10 Using Command Prompt
Way 1: Via CHKDSK
ScanDisk Repair (commonly known as CHKDSK) is an essential tool for monitoring the health of your disk drives with Windows. This tool is mainly used to speed up the Windows operating system and repair hard disks. Here is how to repair Windows 11 with it.
Step 1: Launch Command Prompt as administrator.
Step 2: Type chkdsk f: /f /x /r and press Enter (f: refer to drive f and you can replace it based on your needs). Then, it will start to scan for errors and repair them.
Way 2: Via SFC Command
SFC (System File Checker) checks the integrity of protected system files. If some of them are corrupted or missing, SFC will replace them with the correct versions located in C:\Windows. Follow the steps below to run SFC commands:
Step 1: Launch Command Prompt as administrator.
Step 2: Type sfc /scannow and press Enter. This process may take you much time to scan, and you just need to wait patiently.
Way 3: Via DISM Command
Windows 10/11 has a command-line utility called DISM (Deployment Image Servicing and Management). DISM command can be used to repair and prepare Windows images, including, Windows Setup, Windows Recovery Environment, and Windows PE.
Step 1: Launch Command Prompt as administrator.
Step 2: Type the following command and press Enter after each one.
- Dism /Online /Cleanup-Image /CheckHealth
- Dism /Online /Cleanup-Image /ScanHealth
- Dism /Online /Cleanup-Image /RestoreHealth
Way 4: Via Bootrec.exe
If you are having boot issues with Windows 11/10, the bootrec.exe tool can help you fix them in most cases. Windows will perform an automatic scan and try to rebuild the BCD file.
Step 1: Open Command Prompt as administrator.
Step 2: Type the following commands in order and press Enter after each.
- bootrec.exe
- BOOTREC /FIXMBR
- BOOTREC /FIXBOOT
- BOOTREC /RebuildBcd
Way 5: Via Rstrui.exe
You can also restore your Windows 10/11 to the previous state as long as you have enabled the System Restore feature via the Rstrui.exe. Here are the steps:
Step 1: Launch Command Prompt as administrator.
Step 2: Type rstrui.exe and press the Enter key.
Step 3: Then, you can choose to use the recommended restore point or choose another restore point.
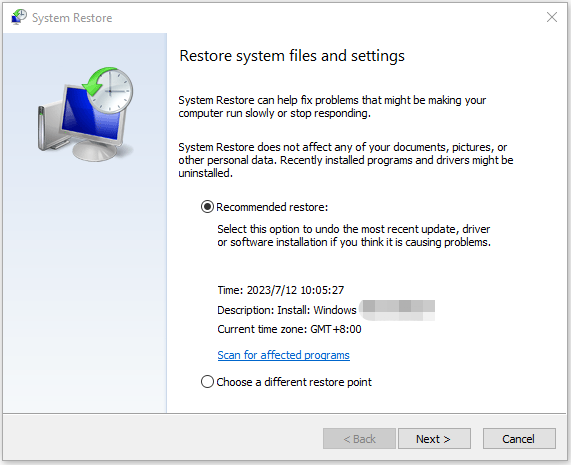
Step 4: Follow the on-screen instructions to finish the steps.
Way 6: Via System Reset Command
You can also choose to reset your PC via the system reset command. It will keep your data and remove all apps and programs, except for preinstalled software.
Step 1: Launch Command Prompt as administrator.
Step 2: Type systemreset -cleanpc and press Enter.
Tips:
If your computer cannot boot, you can boot into recovery mode and select Troubleshoot > Reset this PC.
What to Do After Repairing Windows 11/10
After repairing Windows 11/10, what to do? It is strongly recommended to create a system image because it is a good way to safeguard your PC and it enables you to repair Windows 11/10.
So, to create a system image, the professional Windows backup software – MiniTool ShadowMaker is a good choice. It can back up the operating system, disks, partitions, files, and folders. Besides, it can also restore the computer to an earlier state with the system image created before, or clone the OS to SSD without data loss.
MiniTool ShadowMaker TrialClick to Download100%Clean & Safe
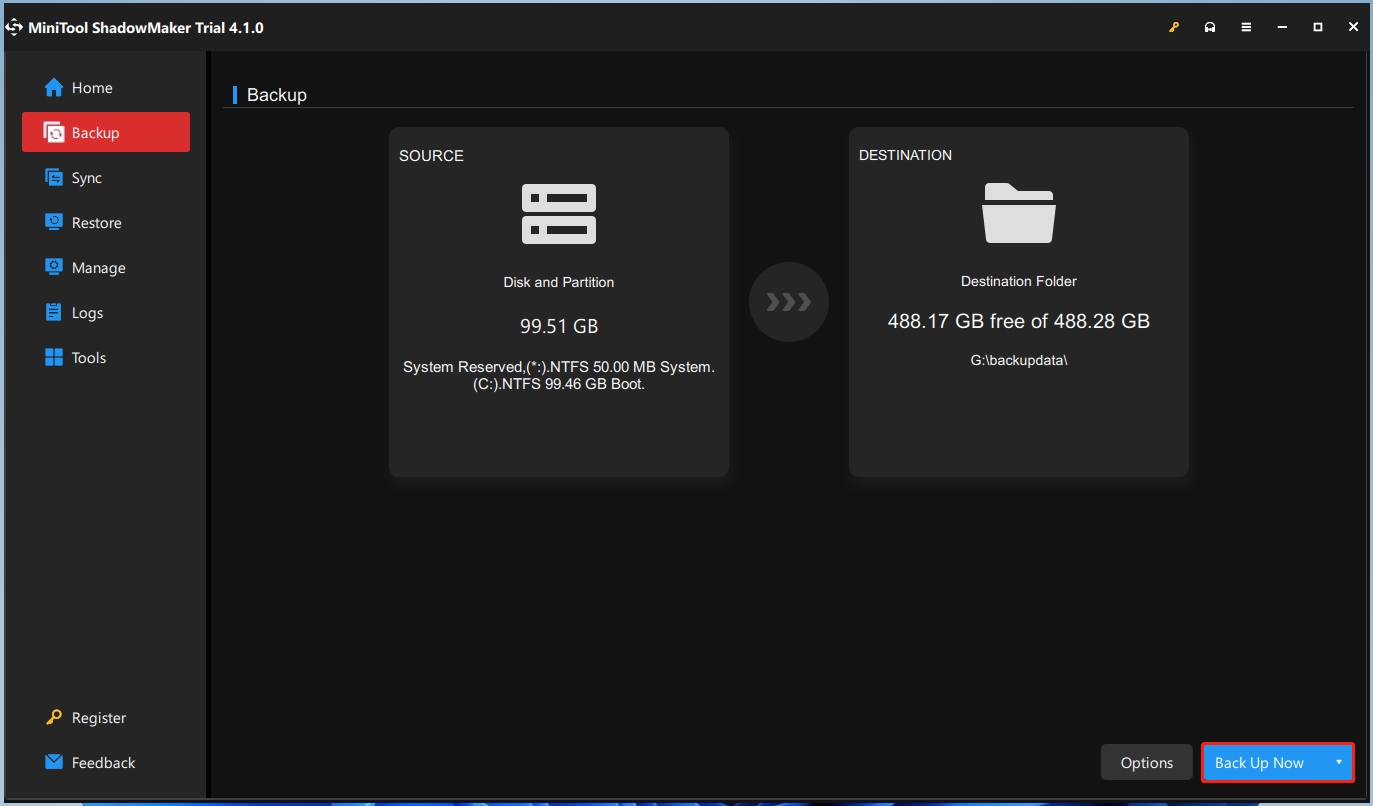
Step 1: Launch MiniTool ShadowMaker after installing it.
Step 2: Go to the Backup tab and you don’t need to choose anything since the system partitions are selected by default.
Step 3: Then, click the DESTINATION part to choose a location to store the system image file.
Step 4: At last, click the Back Up Now button to start the backup task right now.
Tips:
You can click Tools > Media Builder to create a bootable media with a USB hard drive, USB flash drive, or CD/DVD disc.
Bottom Line
To sum up, this post has walked you through how to repair Windows 11/10 using Command Prompt. After repairing Windows 11/10, you had better create a system image to safeguard your computer. On the other hand, if you have any problem with MiniTool ShadowMaker, please feel free to contact us via the email [email protected] and we will reply to you as soon as possible.