
Уровень сложностиСредний
Время на прочтение7 мин
Количество просмотров13K

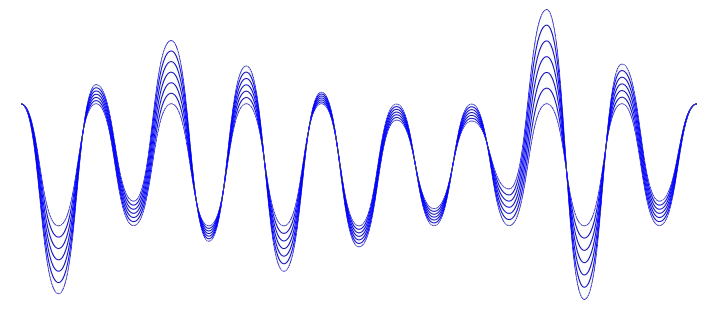
Сравнение производительности lossless-кодеков на материале CD-качества, то есть аудиофайлах PCM с битовой глубиной 16 бит и частотой дискретизации 44,1 кГц, источник
В своё время MP3 совершил революцию в распространении музыки. Больше не нужно было покупать дорогие компакт-диски. Достаточно поставить на ночь загрузку из «Напстера» — и к утру у тебя несколько файлов MP3, которые можно слушать совершенно бесплатно! Любые исполнители и альбомы. Это было невероятно.
Но сейчас времена изменились. Файлы скачиваются за секунды, а место на диске измеряется терабайтами. Нет смысла подвергать музыку калечащему сжатию с потерей информации. Можно спокойно скачивать и хранить её в lossless-форматах, причём со значительным сжатием.
Есть ряд lossless-кодеков, которые эффективнее .FLAC по степени сжатия.
Немного истории lossless-кодеков
До 2000 года большинство lossless-кодеков были асимметричными, то есть увеличивали нагрузку на CPU при увеличении степени сжатия, однако это практически никак не сказывалось на скорости декодирования.
К началу 21 века среди специалистов распространилось мнение, что для максимального сжатия нужно использовать сложный симметричный алгоритм. Такие алгоритмы требуют больших вычислительных ресурсов CPU при декодировании звука. Первым компрессором, который значительно превзошёл FLAC по степени сжатия файлов, стал Monkey’s Audio (форматы .APE и .MAC) в 2000 году.

Компрессор Monkey’s Audio
Затем вышел ещё более сложный проприетарный кодек OptimFROG, который превосходит остальных в своих самых тяжёлых режимах сжатия.
Симметричный алгоритм реализован и в кодеке WavPack конца 90-х, который позже был доработан и усовершенствован.
Затем появился TAK, который обозначен зелёным цветом на следующей диаграмме.
Сравнение производительности lossless-кодеков на материале CD-качества:

Аудиофайлы PCM с битовой глубиной 16 бит и частотой дискретизации 44,1 кГц, источник
WavPack, а затем OptimFROG реализовали дополнительную обработку кодирования, которая минимально влияет на скорость декодирования. В то же время FLAC был значительно усовершенствован. Эталонный кодер работает с произвольными коэффициентами LPC (линейное предсказательное кодирование) по принципу грубой оценки нескольких альтернатив (например, длины истории), затем выбирает лучшую и вычисляет её до конца.
Сравнение производительности lossless-кодеков на материале высокого качества:

Аудиофайлы PCM с битовой глубиной 16−24 бит и частотой дискретизации 96−352,8 кГц, источник
На высокой частоте дискретизации звуковая информация включает множество странных вещей, включая пустоты. Эталонный FLAC не всегда хорошо справляется с этой задачей. Практически все остальные кодеки используют те же коды Голомба, но пытаются оптимизировать их реализацию.
Сравнение производительности lossless-кодеков на многоканальном звуке:

Аудиофайлы PCM с более чем двумя каналами, преимущественно 5.1, включая один низкочастотный (LFE) и два канала объёмного звучания (surround), источник
Конвертацию любых форматов друг в друга можно осуществлять с помощью программы ffmpeg. Недавно её портировали на wasm, так что конвертацию удобно делать в браузере: локально своём компьютере или на сервере. Вот пример такого сервера:

Проект опенсорсный, то есть его легко захостить у себя.
Быстрый кодек HALAC
Один из новых lossless-кодеков — HALAC (High Availability Lossless Audio Compression) от автора кодека изображений с похожим названием HALIC (High Availability Lossless Image Compression).
HALAC обладает примерно теми же качествами, что и его «брат» для изображений: фокусируется в первую очередь на высокой скорости кодирования при сохранении достойного уровня сжатия. Приоритеты расставлены таким образом, потому что в lossless-кодировании коэффициент сжатия обычно ограничен. Тут нельзя уменьшить файл в десятки раз, как в MP3, так что оптимизация по размеру — не самая благодарная задача. А вот оптимизация по скорости — другое дело. Она позволяет ускорить процесс в несколько раз, по сравнению со стандартными кодеками WavPack и FLAC.
В таблицах ниже сравнивается результат кодирования оригинальных аудиофайлов разными кодеками без сжатия: ALAC, WavPack с разными шаблонами кодирования (Fast и Normal), FLAC с разными шаблонами кодирования (Fast (0) и Default (5)) — и HALAC версии 0.1.9, это самая первая версия от декабря 2023 года.
Особого внимания заслуживают две нижних строки в каждой таблице: время кодирования и время декодирования.

Тестовая машина старой конфигурации: процессор Core i7 3770k, 3,9 ГГц, 16 ГБ RAM, 256 ГБ SSD.

Для объективности в бенчмарках подобрали музыку разных жанров. Все кодеки работали на исходном материале .wav, 16 бит, 2 канала, 44100 bps).

За полтора года вышел десяток обновлений, а степень сжатия улучшилась примерно на 2%.

Windows-бинарники:
- HALAC_ENCODE_V.0.3.8_x64.exe (70,5 КБ)
- HALAC_DECODE_V.0.3.8_x64.exe (65,5 КБ)
Linux-бинарники:
- HALAC_ENCODE_V.0.3.8_x64_Linux_Static (2,12 МБ)
- HALAC_DECODE_V.0.3.8_x64_Linux_Static (2,11 МБ)
Их можно скачать — и проверить результаты на своём компьютере. Например, альтернативные бенчмарки версии 0.1.9 с разными настройками FLAC показали следующие результаты.
Кодирование:
10,1 сек для flac -0r0 --no-md5 --totally-silent
10,4 сек для HALAC
11,0 сек для flac -1 --no-md5
14,4 сек для flac -0
16,1 сек для TAK -p0
Декодирование:
13,8 для HALAC
16,6 для flac в режиме <code>-0r0 --no-md5</code>
18,5 для TAK -p0
Коэффициент сжатия тоже достойный, вот сравнение итогового размера файлов:
13 360 205 283 байт для FLAC -0r0
12 772 828 991 для FLAC -1
12 393 304 500 для HALAC
12 032 168 423 для FLAC -5
Здесь HALAC сравнивается с самым быстрым вариантом FLAC без проверки хэшей --no-md5. По умолчанию flac.exe вычисляет хэш MD5 на всех шаблонах, если не указать эту «недокументированную» опцию. Тестирование проводилось на четырёх музыкальных альбомах, машина Core i5-1135-G7, версия FLAC 1.4.3 win32.
Разработана ещё отдельная экспериментальная версия HALAC+ с увеличенной степенью сжатия на уровне FLAC -8, а скорость кодирования примерно вчетверо выше. В этом кодеке реализован алгоритм адаптивных кодов Райса (Adaptive Rice Coding) и простая коррекция ошибок.
Кодеки вроде HALAC привлекают внимание не столько из-за своей практической пользы, сколько их академического интереса: как улучшить показатели сжатия и за счёт каких алгоритмов/методов (об этом ниже).
Теоретически, HALAC можно использовать ещё и как оригинальный способ обфускации/шифрования аудиофайлов в неизвестный формат. Насчёт «неизвестного» не преувеличение: за год с момента официального анонса на форуме HydrogenAudio кодер и декодер скачали 490 и 463 раза, соответственно, а последнюю версию — 198 и 169 раз.
Как видно по бенчмаркам, время кодирования и время декодирования у HALAC в несколько раз меньше, чем у всех остальных форматов lossless-сжатия. Дело в том, что в нём используется энтропийные кодеры Asymmetric Numeral Systems (ANS) и Finite State Entropy (FSE).
Новый метод энтропийного кодирования — ANS
Энтропийное кодирование — это метод lossless-сжатия данных с помощью усреднения вероятностей появления элементов в закодированной последовательности.
Согласно теореме Шеннона об источнике шифрования, существует предел сжатия без потерь, зависящий от энтропии источника. Чем более предсказуемы получаемые данные, тем лучше их можно сжать. Случайная независимая равновероятная последовательность сжатию без потерь не поддаётся.
Два самых популярных метода энтропийного кодирования — код Хаффмана и арифметическое кодирование, они используются практически во всех кодеках, архиваторах и т. д.

Кодирование сообщения «WIKI» с помощью арифметического кодирования:
1. Вычисляется встречаемость букв.
2. Интервал разбивается на части в соответствии с соотношением встречаемостей.
3−5. Соответствующий интервал итеративно разбивается для каждой буквы в сообщении.
6. Для представления сообщения выбирается любое значение в конечном интервале.
2*−6*. Пример работы алгоритма для сообщения «KIWI».
источник
Ниже результат арифметического кодирования слов WIKI и KIWI в виде круговой диаграммы. Две красные линии представляют значения, соответствующие этим уникальным последовательностям, всё остальное совпадает:

В отличие от кода Хаффмана, арифметическое кодирование не имеет жёсткого постоянного соответствия входных символов группам битов выходного потока. Это даёт алгоритму большую гибкость в представлении дробных частот встречаемости символов. Таким образом, арифметическое кодирование обычно эффективнее кода Хаффмана, но с ним есть проблема: у некоторых версий патентные ограничения от компании IBM.
ANS — новый метод энтропийного кодирования, который в 2006 году создал польский учёный и программист Ярек Дуда из Ягеллонского университета. ANS по степени сжатия даёт примерно столь же хорошее приближение к оптимальному энтропийному кодированию, как и арифметическое кодирование, но обладает более высоким быстродействием.
Он не уступает по скорости распаковки алгоритмам Хаффмана, не защищён патентами и свободен к использованию. Целью было именно создание свободной альтернативы арифметическому кодированию.
Благодаря свободной лицензии и высокой эффективности примерно с 2014 года ANS нашёл распространение в опенсорсных программных проектах, в том числе:
- компрессор Facebook Zstandard (также используется в ядре Linux),
- браузер Google Chrome (с версии 123, вышла в марте 2024-го года),
- операционная система Android (с версии Android 4.14 в январе 2024-го), опубликован как RFC 8478 для MIME и HTTP,
- компрессор Apple LZFSE,
- библиотека сжатия Google Draco 3D (используется Pixar и др.),
- алгоритм сжатия изображений PIK;
- библиотека высокоскоростного сжатия Nvidia nvCOMP,
- алгоритм сжатия Dropbox DivANS,
- алгоритм сжатия изображений JPEG XL.
ANS показал себя как эффективная альтернатива арифметическому сжатию. Он используется в некоторых современных ОС и браузерах, а также форматах сжатия изображений. В то же время до сих пор ни разу не находил применение в форматах сжатия звука.
Большинство из них использует коды Голомба, известное семейство энтропийных кодов. Но в тестах коды Голомба выполняют кодирование примерно на 30−40% медленнее из-за расчёта адаптивного параметра , давая лишь мизерную прибавку в степени сжатия (1−2%).
Вероятно, HALAC стал первым аудиоформатом, который использует ANS для lossless-кодирования. Результаты бенчмарков показывают, что по производительности он явно превосходит ALAC, WavPack и FLAC, хотя разработчик даже не уверен, что применил ANS наиболее эффективным способом… Кодек HALAC не использует никакие оптимизации для GPU и SIMD, а текущая версия однопоточная. В будущем он в первую очередь планирует добавить параллелизм.
HALAC в 3−5 раз быстрее обычного FLAC. Можно предположить, что другие lossless-кодеки будущих поколений тоже реализуют методы сжатия ANS, за счёт чего смогут кардинально увеличить производительность.
© 2025 ООО «МТ ФИНАНС»
Telegram-канал со скидками, розыгрышами призов и новостями IT 💻

Аудио-кодирование: секреты раскрыты
Настройка аудио для видеозахвата и трансляции.
Как люди, непосредственно связанные с AV сферой, мы постоянно говорим об аудио-кодировании и аудиокодеках, а что же это такое? Аудиокодек – это, по сути, устройство или алгоритм, способный кодировать и декодировать цифровой аудиосигнал.

На практике аудиоволны, которые передаются по воздуху, являются продолжительными аналоговыми сигналами. Сигналы преобразуются в цифровой формат устройством, которое называется аналого-цифровой преобразователь (АЦП), а устройство обратного преобразования – цифро-аналоговый преобразователь (ЦАП). Кодек находится между этими двумя функциями и именно он позволяет откорректировать некоторые важные параметры для успешного захвата, записи и трансляции звукового сигнала: алгоритм кодека, частота дискретизации, разрядность и скорость передачи данных.

Три наиболее популярных аудиокодека: Pulse-Code Modulation (PCM), MP3 и Advanced Audio Coding (AAC). Выбор кодека определяет степень сжатия и качество записи. PCM – кодек, который используется компьютерами, CD-дисками, цифровыми телефонами и иногда SACD-дисками. Источник сигнала для PCM сэмплируется через равные интервалы, и каждый сэмпл представляет собой амплитуду аналогового сигнала в цифровом значении. PCM – это наиболее простой вариант для оцифровки аналогового сигнала.
При наличии правильных параметров этот оцифрованный сигнал может быть полностью реконструирован обратно в аналоговый без каких-либо потерь. Но этот кодек, обеспечивающий практически полную идентичность оригинальному аудио, к сожалению, не очень экономичен, что выражается в очень больших объемах файлов, а такие файлы не подходят для потокового вещания. Мы рекомендуем использовать PCM для записи цифровых образов для ваших источников или когда вы занимаетесь постобработкой аудио.
К счастью, у нас всегда есть возможность выбрать другой кодек, который может сжимать цифровые данные (по сравнению с PCM) на основании некоторых полезных наблюдений о поведении звуковых волн. Но в этом случае приходится идти на компромисс: все альтернативные алгоритмы сопряжены с «потерями», так как невозможно полностью восстановить исходный сигнал, но, тем не менее, результат всё равно хорош настолько, что большинство пользователей не смогут уловить разницу.
MP3 – это формат аудио-кодирования с использованием как раз такого алгоритма сжатия цифровых данных, который позволяет сохранять аудиосигнал в меньшие по объему файлы. Кодек MP3 чаще всего используется пользователями для записи и хранения музыкальных файлов. Мы рекомендуем применять MP3 для трансляций аудио-контента, так как ему требуется меньшая пропускная способность сети.
AAC – это более новый алгоритм кодирования аудиосигнала, ставший «преемником» MP3. AAC стал стандартом для форматов MPEG-2 и MPEG-4. По сути это тоже кодек сжатия цифровых данных, но с меньшей, чем у MP3, потерей качества при кодировании с одинаковыми битрейтами. Мы рекомендуем использовать этот кодек для онлайн трансляций.
Частота дискретизации (кГц, kHz)
Частота дискретизации (или частота сэмплирования) — частота, с которой происходит оцифровка, хранение, обработка или конвертация сигнала из аналога в цифру. Дискретизация по времени означает, что сигнал представляется рядом своих отсчетов (сэмплов), взятых через равные промежутки времени.
Измеряется в герцах (Гц, Hz) или килогерцах (кГц, kHz,) 1 кГц равен 1000 Гц. Например, 44 100 сэмплов в секунду можно обозначить как 44 100 Гц или 44,1 кГц. Выбранная частота дискретизации будет определять максимальную частоту воспроизведения, и, как следует из теоремы Котельникова, для того, чтобы полностью восстановить исходный сигнал, частота дискретизации должна в два раза превышать наибольшую частоту в спектре сигнала.
Как известно, человеческое ухо способно улавливать частоты между 20 Гц и 20 кГц. Учитывая эти параметры и значения, показанные в таблице ниже, можно понять, почему именно частота 44,1 кГц была выбрана в качестве частоты дискретизации для CD и до сих пор считается очень хорошей частотой для записи.

Есть ряд причин для выбора более высокой частоты дискретизации, хотя может показаться, что воспроизводить звук вне диапазона человеческого слуха – пустая трата сил и времени. При этом среднестатистическому слушателю будет вполне достаточно 44,1 – 48 кГц для качественного решения большинства задач.
Разрядность
Наряду с частотой дискретизации есть такое понятие как разрядность или глубина звука. Разрядность – это количество бит цифровой информации для кодирования каждого сэмпла. Проще говоря, разрядность определяет «точность» измерения входного сигнала. Чем больше разрядность, тем меньше погрешность каждого отдельного преобразования величины электрического сигнала в число и обратно. С минимальной возможной разрядностью есть только два варианта измерения точности звука: 0 для полной тишины и 1 для звучания в полном объеме. Если разрядность равна 8 (16), то при измерении входного сигнала может быть получено 28= 256 (216= 65 536) различных значений.
Разрядность закреплена в кодеке PCM, но для кодеков, которые предполагают сжатие (например, MP3 и AAC) этот параметр рассчитывается при кодировании и может меняться от сэмпла к сэмплу.
Битрейт
Битрейт — это показатель количества информации, которым кодируется одна секунда звучания. Чем он выше, тем меньше искажений и тем ближе закодированная композиция к оригиналу. Для линейного PCM битрейт рассчитывается очень просто.
битрейт = частота дискретизации × разрядность × каналы
Для таких систем как Epiphan Pearl Mini, которые кодируют линейный PCM 16-бит (разрядность 16), этот расчет может быть использован для определения, сколько дополнительных полос пропускания может потребоваться для PCM аудио. Например, для стерео (два канала) оцифровка сигнала производится с частотой 44,1 кГц на 16-бит, а битрейт при этом рассчитывается таким образом:
44,1 кГц × 16 бит × 2 = 1 411,2 кбит/с
Между тем алгоритмы сжатия аудиосигнала, такие как AAC и MP3, имеют меньшее количество бит для передачи сигнала (в этом и заключается их цель), поэтому они используют небольшие битрейты. Обычно значения находятся в диапазоне от 96 кбит/с до 320 кбит/с. Для этих кодеков чем выше битрейт вы выбираете, тем больше аудио бит вы получаете на сэмпл, и тем выше будет качество звучания.
Частота дискретизации, разрядность и битрейты в реальной жизни.
Аудио CD-диски, одни из первых наиболее популярных изобретений для простых пользователей для хранения цифрового аудио, использовали частоту 44,1 кГц (20 Гц – 20 кГц, диапазон человеческого уха) и разрядность 16-бит. Данные значения были выбраны, чтобы при хорошем качестве звука иметь возможность сохранять как можно больше аудио на диске.
Когда к аудио добавилось видео и появились DVD, а позднее Blu-Ray диски, был создан новый стандарт. Записи для DVD и Blu-Rays обычно используют линейный формат PCM с частотой 48 кГц (стерео) или 96 кГц (звук 5.1 Surround) и разрядность 24. Эти значения были выбраны в качестве идеального варианта, чтобы сохранять аудио с синхронизацией с видео и при этом получать максимально возможное качество с использованием дополнительного доступного дискового пространства.
Наши рекомендации
CD, DVD и Blu-Ray диски преследовали одну цель – дать потребителю высококачественный механизм воспроизведения. Задачей всех разработок было предоставить высокое качество аудио и видео, не заботясь о величине файла (лишь бы он умещался на диск). Такое качество мог обеспечить линейный PCM.
Напротив, у мобильных средств информации и потокового медиа совсем другая цель – использовать максимально низкий битрейт, при этом достаточный для поддержания приемлемого для слушателя качества. Для этой задачи лучше всего подходят алгоритмы сжатия. Теми же принципами вы можете руководствоваться для своих записей.

При записи аудио с видео…
В случае если запись будет использоваться для последующей обработки, выбирайте кодек PCM с частотой 48 кГц и максимальной разрядностью (16 или 24), чтобы обеспечить наилучшее качество аудио. Мы рекомендуем данные параметры для Epiphan Pearl Mini.
При потоковой передаче аудио с видео…
При потоковой передаче или записи для последующей трансляции можно получить хорошее звучание аудио при меньшей полосе пропускания, используя кодеки AAC или MP3 с частотой 44,1 кГц и битрейт 128 кбит/с или выше. Такие параметры гарантируют, что звук будет достаточно хорош и не скажется на качестве трансляции.
0. Об авторе
Всем привет, меня зовут Максим Логвинов и я студент Харьковского Национального университета радиоэлектроники.
Меня всегда интересовали звук и музыка. Я сам любил писать электронную танцевальную музыку и мне всегда было интересно, как человеку, который недостаточно хорошо разбирается в высоких материях математики, узнать, что же происходит со звуком в компьютере: как он пишется, сжимается, какие для этого существуют технологии и так далее. Ведь со школьной скамьи и физики я понимал, что звук — он «аналоговый»: его мало того что нужно преобразовать в цифровой (для чего необходимы такие устройства как АЦП), но его нужно как-то сохранить. А ещё лучше, чтобы эта музыка занимала поменьше дискового пространства, чтобы можно было поместить в скупую папку побольше музыки. И чтобы звучала хорошо, без всяких слышимых артефактов сжатия. Музыкант ведь. Натренированное ухо, не лишённое музыкального слуха, достаточно сложно обмануть методами, которые используются для компрессии звука с потерями — по крайней мере, на достаточно низких битрейтах. Ишь, какой привередливый.
А давайте посмотрим, что из себя представляет звук, как он кодируется и какие инструменты используются для этого самого кодирования. Более того, поэкспериментируем с битрейтами одного из самых продвинутых на сегодняшний день кодеков — Opus и оценим, что и с какими циферками можно закодировать, чтобы и рыбку съесть, и… Собственно, просто почему бы и нет? Почему бы не попытаться описать простым языком не только то, как хранится и кодируется аудио компьютером, но и протестировать один из лучших кодеков на сегодняшний день? Особенно, если речь идёт о сверхнизких битрейтах, где практически все существующие кодеки начинают творить невероятные вещи со звуком в попытках уложиться в малый размер файла. Если хочется отвлечься от рутины и узнать, какие выводы были получены при тестировании нового кодека — добро пожаловать под кат.
1. Кодирование звука
Звук имеет физическую природу. Любой звук — это колебания в пространстве (в данном случае — в воздухе), которые улавливаются нашим ухом. Колебания имеют непрерывный характер, который можно описать математическими моделями. Делать же этого мы, конечно же, не будем, но поставим перед собой вопрос: как колебания, имеющие непрерывную природу, записать в машину, которая оперирует лишь нулями и единицами?
1.1. Ни сжатия, ни потерь
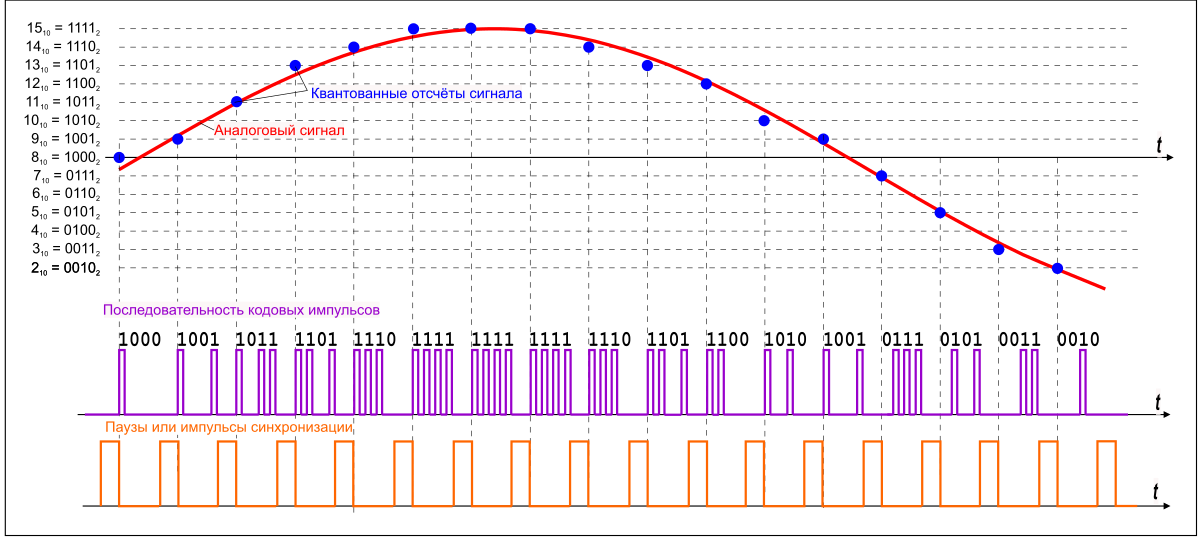
Рис. 1.1 — Графическое описание импульсно-кодовой модуляции
Формат WAV (WAVE) сохраняет аудио-дорожку в её истинном качестве, не проводя никаких манипуляций с самим аудио-файлом.
Для того, чтобы записать звук, нам необходимо преобразовать его в набор нулей и единиц. В случае с форматом WAV делается это наитупейшим образом: входящий звуковой поток разбивается на малейшие отрезки (кванты, отсюда термины «частота квантования», «частота выборки» или «частота дискретизации«) и в каждый такой отрезок времени пишется текущее значение аналогового сигнала в двоичной форме. Файлы формата WAV могут быть записаны с частотой дискретизации, к примеру, от 8 кГц до 192 кГц, но, де-факто, стандартом считается частота выборки в 44.1 кГц.
Следует отметить, что WAV, как контейнер, поддерживает и другие способы хранения аудио-информации: к примеру, ADPCM, который способен, в зависимости от полосы пропускания, кодировать аудио-данные с переменной частотой дискретизации.
Частота 44.1 кГц произошла не случайно. Если допустить неточности в описании, то данная цифра произошла как утверждение теоремы Котельникова: для сохранения максимально правильной формы волны при частотах до 20 кГц (теоретический предел слышимости человеческого уха) необходима частота дискретизации вдвое выше — 40 кГц. Собственно, частота именно в 44.1 кГц обусловлена техническими аспектами, подробности которых можно прочитать здесь.
В каждом таком отрезке в двоичной форме кодируется фактическое напряжение аналогового сигнала: наивысший уровень можно представить в виде «1111», наинизший — в виде «0000». И вот здесь вступает в игру второй параметр — глубина звучания, определяющая, насколько точно будет оцифровано значение волны в отрезок времени. Зачастую файлы формата WAV пишутся с разрядностью в 16 бит или 32 бит. Выше разрядность — точнее запись.
Кстати, о PCM. Что из себя представляет запись на обыкновенном компакт-диске, которые были так популярны после аудиокассет? Именно — поток несжатых нулей и единиц в формате PCM. Разрядность — 16 бит, частота выборки — 44.1 кГц. Какой тогда битрейт будет у такой записи?
- 44100 раз в секунду пишется 16-битное число. 44100 * 16 = 705600 бит/с для одного канала;
- для стерео-записи данное значение умножается на 2 — 1411200 бит/с или наши ~1411 кбит/с;
- для 32-разрядной записи это значение будет в два раза больше — ~2822 кбит/с.
Вывод: отсюда прожорливость данных файлов к свободному пространству на жёстком диске, но в качестве выигрыша — полное отсутствие потерь при записи и прослушивании аудио-файла.
1.2. Сжатие без потерь
О сжатии без потерь я не буду много писать. С этим термином можно ознакомиться здесь. Фактически, данный метод представляет собой, говоря грубо, архивацию аудиозаписи алгоритмами, заложенными в кодек, но данные при этом не теряются и сохраняется возможность восстановить аудио-запись с точностью бит-в-бит. При декодировании таких форматов мы получаем, фактически, тот же WAVE-формат, только он занимает меньше дискового пространства; сжатие — приблизительно двухкратное и зависит от характера кодируемой композиции. При прослушивании записи кодек производит «разархивирование» композиции и шлёт поток несжатых нулей и единиц на обработку звуковой карте.
Таких кодеков существует достаточно много: это FLAC (Free Lossless Audio Codec), разработанный организацией Xiph (она же и разработала Opus), ALAC (Apple Lossless) от одноимённой компании, APE (Monkey’s audio), WV (WavPack) и прочие, менее известные форматы сжатия аудио без потерь.
1.3. Сжатие с потерями — обманываем свой слух
Учёные умы начали задумываться о том, что, в принципе, часто нет смысла сохранять полную информацию об аудиозаписи, так как наше ухо несовершенно. Оно может не слышать тихих звуков после громких, оно может не слышать слишком высокие и слишком низкие частоты и так далее. Эти феномены называются эффектом маскировки.
В итоге поняли: можно ведь выбросить здесь, подрезать там, а слушатель практически ничего не заметит — несовершенное ухо просто даст возможность слушателю обмануть себя. Следовательно, появляется возможность избавиться от психоакустической избыточности в файле.
Собственно, психоакустика существует как дисциплина и изучает психологические и физиологические особенности восприятия звуков человеком. Собственно, эти психоакустические модели и были заложены в основу работы программ сжатия с потерями и одним из первых таких форматов стал MPEG 1 Layer III или просто MP3. Здесь же оговорюсь, что маркетинг, оперирующий фактами практически без преувеличения, сделал своё дело: аудио-файл занимает в десять раз меньше места (с оговоркой: это при кодировании с битрейтом в 128 кбит/с, что позволяет получить «приемлемое для типичного слушателя качество» — вспоминаем 1411 кбит/с для WAVE), а, следовательно, на компакт-диск или на жёсткий диск поместится уже на порядок больше аудио-записей. Фурор! Популярность формата взорвала индустрию цифровой звукозаписи. В периоды не самых быстрых подключений к сети Интернет передавать подобные файлы стало как нельзя удобно. Удобно передавать, удобно хранить, удобно закинуть пачку композиций себе на плеер. Создано множество аппаратных декодеров формата MP3, в связи с чем файл проигрывался чуть ли не на
холодильнике
каждой железке.
На момент написания данной статьи уже истекли сроки патентных ограничений и лицензионные сборы прекращены.
Что же касается сжатия с потерями и каким образом получается сжать аудио-файл на порядок без существенной потери для слушателя качества? Если вкратце, от одного кодека к другому нижеследующая последовательность мало отличается. Описание данного процесса упрощено до безобразия, но его течение приблизительно таково:
- входящий поток несжатых данных разбивается равные отрезки — на кадры (фреймы);
- для того, чтобы создать непрерывный участок спектра, для анализа, помимо уже выбранного кадра, берётся предыдущий и следующий кадр;
- сжатие №1: участок проходит через MDCT (модифицированное дискретное косинус-преобразование). Говоря грубо, это преобразование проводит спектральный анализ звукового сигнала — оно даёт возможность получить информацию о том, насколько велика энергия звука в каждом отрезке спектра.
В случае с Layer III производится второе MDCT-преобразование, которые повышает эффективность кодирования высоких частот на более низких битрейтах — это оказалось серебряной пулей для взрыва популярности данного кодека.Спасибо пользователю interrupt за поправку: MPEG 1 Layer III использует гибридный подход для преобразования аудио-данных: сначала спектр кодируемого аудио-файла разделяется на множество спектральных полос, как это происходит в SBC (Sub-band coding, англ.); каждая из этих полос преобразуется MDCT к частотному виду, который, собственно, уже даёт конкретную информацию о том, какие частоты и с какой энергией, присутствуют в кадре. - Результат анализа MDCT передаётся психоакустической модели, которая является чем-то вроде «виртуального уха». На данном этапе даются ответы на вопросы, что оставлять, а что можно выбросить из аудио-сигнала без существенного ущерба для восприятия.
- сжатие №2: кадр, который прошёл через такое преобразование, может быть сжат с использованием кодов Хаффмана; фактически, если опять говорить грубо, каждый кадр дополнительно архивируется, избавляясь от избыточности. Это похоже на что-то вроде упаковки длинных цепочек нулей и единиц в более короткий формат;
- кадры склеиваются; в каждый такой кадр добавляется необходимая информация для кодека:
- номер/размер кадра;
- версия формата (MPEG1/2/2.5);
- версия слоя (Layer I/II/III);
- частота дискретизации;
- режим стерео-базы (моно, стерео, совмещённое стерео).
Следует отметить факт того, что формат MP3 не лишён существенных недостатков, при этом сам формат уже не позволяет должным образом расширять его возможности. Возьмём, к примеру, такое явление как pre-echo. Феномен данного артефакта сжатия кратко и достаточно неплохо описан здесь, но его суть заключается в искажении резко нарастающих относительно тишины звуков, например, инструмента Hi Hat. При кодировании такого инструмента в тишине, из-за особенностей работы MDCT, резкий переход будет создаваться с множеством колебаний. В исходной записи этих колебаний не существует, но при их наличии в результирующей записи они достаточно отчётливо улавливаются ухом. Современные кодеки, такие как AAC и OGG также не лишены этого недостатка, но стараются бороться с ними, применяя более точные и совершенные алгоритмы. А вот MusePack (о нём ниже), к примеру, данного недостатка лишён, так как
не использует для повышения эффективности второе MDCT-преобразованиеиспользует SBC вкупе с очень качественной психоакустической моделью, чем и объясняется его качественное кодирование лишь начиная с битрейтов в 160 кбит/с. Редко, но метко: с таким битрейтом кодек кодирует аудио лучше, чем MP3 с аналогичным битрейтом.Нельзя не отметить, что разработчики свободного кодека Lame всё же пытаются совершенствовать своё детище, улучшая психоакустические модели и алгоритмы кодирования с переменным битрейтом; релиз версии 3.100 представлен в декабре 2017 года.
Подробную информацию о том, как внутри устроен MP3 с точки зрения формата кадров, можно почитать здесь.
А вот потрясающую статью (а, точнее, её перевод) о том, как работает сжатие аудио кодеком MP3, можно прочитать здесь. Рекомендую!
1.4. Кодирование с потерями совершенствуется: краткое описание формата AAC
На момент написания статьи кодеку MP3 уже более 23 лет. Дабы не повторяться со статьёй (её более новая версия), где уже описаны кодеки OGG Vorbis (и снова привет организации Xiph — это также её разработка), MPC (Musepack), WMA (Windows Media Audio) и AAC, я опишу здесь вкратце формат AAC с точки зрения технологий, которые являлись до недавних пор передовыми в сфере кодирования с потерями.
По моему скромному мнению, AAC (Advanced Audio Codec) — один из самих продвинутых форматов в области кодирования данных. Опишу основные особенности данного формата, начиная с популярных профилей, которые можно представить матрёшкой (см. рис. ниже):
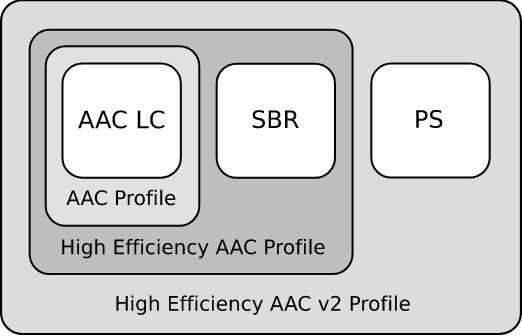
Рис. 1.2 — Иерархия профилей AAC, источник — Википедия
— Low Complexity Advanced Audio Coding (LC-AAC)
Низкая сложность декодирования отлично подходит для реализации аппаратного кодека; аппаратные требования к ЦПУ и ОЗУ также низки, что и снискало большую популярность к этому профилю. Достаточно эффективно кодирует сигнал с 96 кбит/с.
— High-Efficiency Advanced Audio Coding (HE-AAC).
Профиль HE-AAC является расширением LC-AAC и дополнен запатентованной технологией SBR (Spectral Band Replication, груб. — «спектральное повторение», статья на английском). Именно технология спектрального повторения позволяет «сохранить» высокие частоты при кодировании с низкими битрейтами.
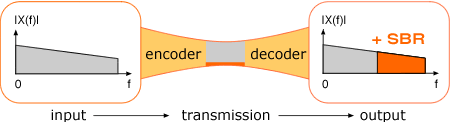
Рис. 1.3 — Графическое изображение принципа восстановления высоких частот
Почему «сохранить» — в кавычках? Потому что царь — не настоящий: кодек отводит место для дополнительной информации, которая используется синтезатором кодека для восстановления высоких частот, но так как эти частоты синтезируются, то бишь воссоздаются кодеком, они, фактически, являются приблизительной копией высоких частот, которые существовали в исходном файле. На практике, сигнал, кодированный битрейтом 48 кбит/с будет звучать, например, аналогично формату mp3@98 кбит/с, если это поддерживается декодером; в противном случае такой файл будет проигрываться попросту без восстановления высоких частот и его битрейт будет соответствовать его качеству, аналогичному mp3.
— High-Efficiency Advanced Audio Coding Version 2 (HE-AACv2)
Данный профиль относительно молодой (описан в 2006 году), он создан для более эффективного кодирования аудио в условиях низкой пропускной способности.
Вторая версия профиля является расширением, собственно, первого профиля, изменения заключаются в добавлении технологии PS (Parametric Stereo). Принцип несколько похож на технологию SBR: кодек также отводит место под информацию для восстановления стерео-базы, жертвуя аккуратностью.
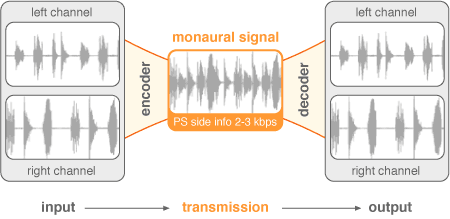
Рис. 1.4 — Графическое изображения кодирования параметрического стерео
Условия для работы данного профиля такие же, как и для вышеописанного HE-AAC; отсутствие поддержки профиля декодером приведёт к тому, что запись будет звучать в моно.
— AAC-LD (Advanced Audio Coding — Low Delay)
Профиль AAC-LD имеет усовершенствованные алгоритмы кодирования для уменьшения задержек (до 20 мс.);
— AAC-ELD (Advanced Audio Coding — Enhanced Low Delay)
Данный профиль, который наследует все возможности HE-AACv2 (используются аналоги технологий SBR и PS, но спроектированные для низких задержек);
— AAC Main Profile
Данный профиль был представлен как MPEG-2 AAC или HC-AAC (High Complexity Advanced Audio Coding). Не совместим с LC-AAC;
— AAC-LTP (Advanced Audio Coding — Long Term Prediction)
Этот профиль более сложный и ресурсоёмкий (но и более качественный), чем все остальные. Также не совместим с LC-AAC.
Вот и всё, что я хотел написать об этом кодеке. Основной акцент я сделал на технологии, которые используются в различных профилях AAC (которые, кстати, порождают множество аббревиатур: AAC, LC-AAC, eAAC+, aacPlus, HE-AAC и т.д.), так как буду сравнивать их с таковыми в Opus, но кодек делает своё дело: он широко используется в интернет-радио, а также в технологиях цифрового радио-вещания: DRM (Digital Radio Mondiale) и DAB (Digital Audio Broadcasting) (ознакомиться с этими технологиями можно здесь), YouTube, как аудио-дорожка к множеству роликов в контейнерах mp4, mkv и пр.
2. Введение в Opus: описание формата

Рис. 2.1 — Логотип Opus
21 декабря 2017 года организация Xiph представила бета-версию аудиокодека Opus версии 1.3. Я не буду вдаваться в высокие материи при описании данного кодека, так как подобная информация находится в свободном доступе (например, здесь, здесь, а для знающих английский — здесь и здесь.)). Информацию о релизе этой бета-версии можно найти здесь. Здесь я отмечу, что данный кодек является замечательным кандидатом на замену остальных кодеков. У него немало достоинств:
- битрейт от 6 до 510 Kbit/s;
- частота дискретизации от 8 до 48KHz;
- поддержка постоянного (CBR) и переменного (VBR) битрейтов;
- поддержка узкополосного и широкополосного звука;
- поддержка голоса и музыки;
- поддержка стерео и моно;
- поддержка переменного битрейта (VBR);
- возможность восстановления звукового потока в случае потери кадров (PLC);
- поддержка до 255 каналов;
- доступность реализаций с использованием арифметики с плавающей и фиксированной запятой.
Кодек распространяется под лицензией BSD и полностью избавлен от всех патентных преследований, а также утверждён в качестве интернет-стандарта. Opus можно использовать в любых своих проектах, включая коммерческие, без необходимости открытия исходных текстов. На данный момент кодек используется в мессенджере Telegram для реализации VoIP, в проекте WebRTC, для кодирования аудио-дорожки в видео YouTube и т.д. Перспективы данного кодека не стоит недооценивать.
Может возникнуть резонный вопрос: что такого особенного в вышеописанных тезисах? Всё это есть практически в любом более-менее современном кодеке. Ответы последуют далее в статье.
Одна из ключевых особенностей данного кодека — чрезвычайно низкие задержки кодирования: от 2.5 мс. (!) до 60 мс, что просто необходимо, как воздух, приложениям, позволяющим пользователям общаться голосом в сети Интернет. Такие низкие задержки также позволяют строить интерактивные приложения, например, цифровую звуковую студию для совместного написания музыки или что-то в этом роде. Стоит отметить, что по этому параметру кодек конкурирует с относительно новым профилем AAC-ELD, описанному выше; тем не менее, минимальная задержка алгоритмов кодирования составляет прибл. 20 мс., что ни чуть не является проблемой для свободного, открытого и бесплатного кодека Opus.
Я не буду рассматривать все тонкости, связанные с кодированием аудио этим кодеком, но ниже опишу режимы, которые меняются кодеком в зависимости от смены битрейта.
2.1. Opus: режимы кодирования
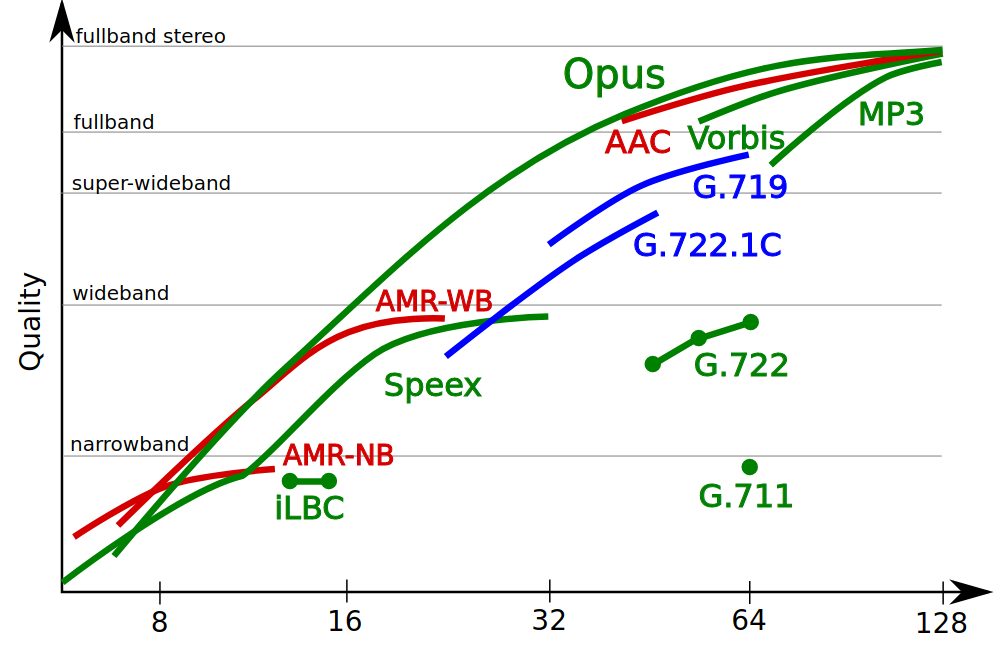
Рис. 2.2 — Сравнение качества кодирования различными кодеками — официальный график с сайта opus-codec.org
После выхода данной бета-версии мне стало интересно, как меняются режимы кодирования в зависимости от битрейта, поэтому я и решил провести эксперименты, начиная с самых низких битрейтов, но только с ними. Проводить эксперименты с более высокими битрейтами я не вижу смысла — это отлично описано в статьях (например, здесь).
Сейчас же перечислим те режимы, которыми оперирует кодек:
- Режим кодирования сигнала — LP, hybrid, MDCT:
- LPC или LP (кодирование с линейным предсказанием, статья на английском) используется в кодеках сжатия голоса и позволяет кодировать голос с достаточным для восприятия качеством, используя при этом очень низкие битрейты. Используется в кодеках GSM, AMR, SILK (также используемый в Skype), Speex (и снова привет Xiph; правда, она объявила кодек как «deprecated» и рекомендует использовать Opus). В кодеке Opus для кодирования голоса на низких битрейтах используется модифицированный кодек SILK, который не является обратно совместимым с таковым в Skype;
- MDCT (модифицированное дискретное косинус-преобразование) — разновидность преобразования Фурье (о нём можно почитать здесь), используется практически во всех кодеках для сжатия музыки с потерями (lossy compression): MP3, AAC, OGG Vorbis и т.д. В кодеке Opus используется кодек CELT (статья на английском);
- Hybrid mode (гибридный режим кодирования) является разработкой организации Xiph и заключается в том, что для кодирования нижней части спектра сигнала (до 8 кГц) используется LP, а для верхнего (от 8 кГц и выше) — MDCT, а на выходе получаем компромиссное качество звука при сохранении достаточно низкого битрейта.
- Стерео-база:
- кодирование в режиме моно;
- кодирование в режиме стерео;
- кодирование в режиме совмещённого стерео (Joint Stereo).
- Исходя из вышеперечисленного — изменение ширины спектра в зависимости от битрейта:
- Narrowband (узкополосное кодирование) — кодирование сигнала с шириной спектра до 6 кГц, соответствует качеству кодирования кодеками GSM и AMR-NB;
- Wideband (широкополосное кодирование) — кодирование сигнала с шириной полосы от 6 кГц до 14 кГц, соответствует качеству кодирования кодеком AMR-WB (или так называемый операторами «HD Voice»), который используется ныне в сетях третьего поколения (3G);
- Fullband (полное кодирование полосы) — сохранение всей слышимой человеческим ухом полосы (от 20 Гц до 20 кГц), моно-сигнал;
- Fullband stereo — см. выше, но стерео-сигнал.
2.2. Низкие битрейты — высокие частоты. Как достигнуты такие результаты?
В начале данной статьи я не зря рассматривал кодек AAC и его навороченные профили, которые, фактически, строят стерео-базу и восстановление высоких частот, что называется, «из воздуха». Утрирую, конечно, но выражение недалеко от истины. Но вот беда: кодек покрыт патентами и является проприетарной разработкой альянса из компаний Bell Labs, Института интегральных схем общества Фраунгофера (который, кстати, и является ключевым создателем формата MP3), Dolby Laboratories и т.д. Следовательно, использование данных технологий потребует лицензионных отчислений, что недопустимо для полностью открытого и свободного кодека. Поэтому разработчики Opus пошли иным путём: они реализовали собственные алгоритмы воспроизведения высоких частот — Band Folding (Spectral Folding, Hybrid Folding). Об этом подходе кодирования высоких частот можно ознакомиться, соответственно, здесь (там даже интерактивные картинки есть), здесь (см. 4.4.1) и здесь. Кодек не синтезирует высокие частоты из дополнительных данных, как это делает HE-AACv2, он берёт за основу сам сигнал, исходя из энергии в области высоких частот, закодированной в оригинальном сигнале. Слепое тестирование со стороны энтузиастов показывает, что данный метод очень эффективен, не говоря уже о том, что подобный метод такого воспроизведения высоких частот, по заверениям разработчиков, более прост в исполнении, нежели SBR или его аналог и реализуем с меньшими алгоритмическими задержками.
К слову: результаты слепого тестирования можно посмотреть на графиках по следующей ссылке.
Давайте же испытаем это последнее слово в области сжатии звука с потерями.
2.3. Opus: инструменты для кодирования и тестирования
Данное тестирование проводилось на коротком отрывке из аудиокниги Вадима Зеланда — Трансерфинг реальности. Книга была озвучена российским актёром и радиоведущим Михаилом Черняком, который обладает приятным тембром голоса.
Как был получен отрывок?
- Утилитой «youtube-dl» был скачан фрагмент файла формата WebM — контейнер, в котором присутствует только аудио-дорожка:
youtube-dl "https://www.youtube.com/watch?v=_-OUXW3a0Yw" -f 250 - Фрагмент был перекодирован в формат WAV для скармливания его кодеку opusenc (исходный файл был переименован для удобства):
ffmpeg -i tr1_original.webm -acodec pcm_s16le tr1.wav - Чтобы не заморачиваться с кодированием множества файлов с разными битрейтами, я воспользовался простой однострочной программой на языке Bash и получил на выходе множество необходимых мне файлов:
for i in `seq 8 21`; do opusenc --bitrate $i tr1.wav tr-enc-${i}.opus ; done - все эти файлы были импортированы в Audacity и в проигрыватель Qmmp, чтобы оценивать качество звучания на слух и визуально оценивать соответствующую дорожку.
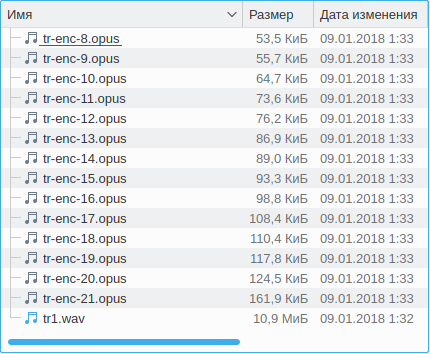
Рис. 2.3 — Результат выполнения скрипта — скриншот программы Dolphin
Дальше пойдёт описание практически каждой из них — с приложением скриншотов и субъективного описания звучания, после чего последуют небольшие выводы.
3. Оценка звучания кодированных дорожек
По-хорошему, оценка звучания должна быть объективной и проводиться, к примеру, с использованием метода слепого ABX-тестирования (статья на английском). Тестирование проводится для того, чтобы исключить эффект пустышки (плацебо).
Если вкратце, суть метода заключается в прослушивании при помощи вспомогательного ПО (Foobar или аналогичное веб-приложение, см. прим. на рис. 3.1) двух семплов: референсного и сжатого — кнопки А и В соответственно. Слушатель заранее не знает, какой из них является сжатым, а какой — референсным.
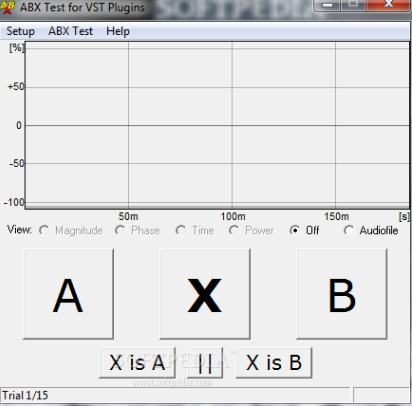
Рис. 3.1 — Пример внешнего вида одной из программ слепого ABX-тестирования
Далее слушатель прослушивает аудиозапись, подставленную программой под кнопку Х и пытается определить: к какому из двух семплов (А или В) относится семпл на кнопке Х. После выбора ответа слушателем цикл повторяется определённое количество раз, после чего программой выводится результат, где показано, с какой вероятностью слушатель нажимал кнопки случайно.
Стоит оговориться, что существуют люди, которые не воспринимают эффекты психоакустической компрессии и, фактически, не могут отличить, например, запись mp3@128 кбит/с от FLAC — для них оба файла звучат «замечательно». Таких людей немало и для них 128 кбит/с — полностью прозрачное звучание, так как они не задумываются над тем, какие там артефакты и как они звучат. Музыка есть? Инструменты слышны? Отлично. Это ещё одна из причин высокой популярности формата MP3.
Я принципиально не проводил слепое ABX-тестирование, но пожелал описать субъективное восприятие звука с приведением скриншотов спектрограммы каждого семпла в надежде, что читателям данной статьи это будет интересно.
Поехали.
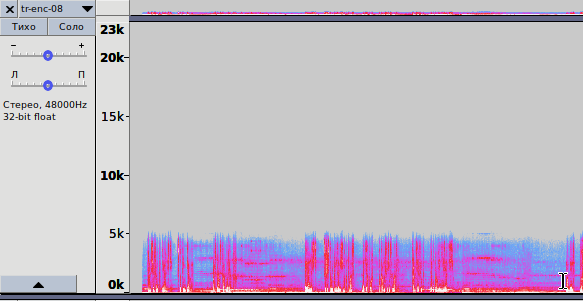
Рис. 3.2 — Спектрограмма записи, кодированной с битрейтом 8 кбит/с
opus-enc-8.opus
1. На рис. 3.2 показана спектрограмма для кодирования практически с самым низким битрейтом. Аудио-файл кодируется методом LP, кодек отводит спектр частот в 6 кГц; всё, что выше — обрезается. В итоге размер файла чрезвычайно мал, качество звучания соответствует таковому с кодеком AMR-NB (Narrowband). Классика жанра в сетях сотовой связи второго поколения (GSM). Поведение кодека Opus соответствует вышеописанному в диапазоне битрейтов от 6 до 9 кбит/с.

Рис. 3.3 — Спектрограмма записи, кодированной с битрейтом 10 кбит/с
opus-enc-10.opus
2. На рис. 3.3 показана спектрограмма для кодирования с битрейтом в 10 кбит/с. Та же ситуация: кодирование методом LP, но спектр частот уже шире — до 8 кГц. По звучанию — среднее между AMR-NB и AMR-WB.
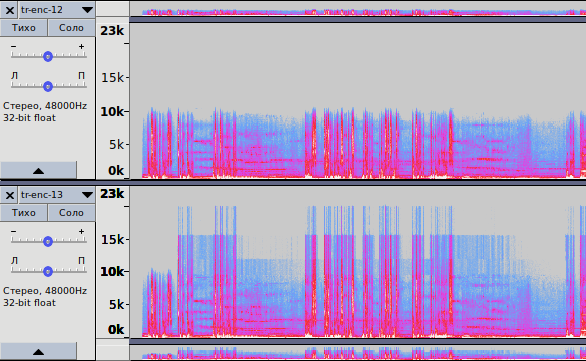
Рис. 3.4 — Спектрограмма записей, кодированных с битрейтами 12 и 13 кбит/с
opus-enc-12.opus
opus-enc-13.opus
3. На рис. 3.4 показано две спектрограммы: для битрейтов 12 и 13 кбит/с соответственно. Здесь ситуация интереснее: при 12 кбит/с используется всё то же LP, но ширина спектра расширена ещё больше: до 10 кГц и звучание практически идентично таковому в AMR-WB.
Начиная с битрейта 13 кбит/с кодек переключается в гибридный режим и начинает использовать сразу три метода: LP, MDCT и Band Folding. Всё, что лежит в диапазоне от 0 до 8 кГц, кодируется LP, от 8 до 10 кГц — MDCT; именно этот отрезок спектра в 2 кГц используется как исходная информация для использования Band Folding — отсюда получаем фактически восстановленные высокие частоты, вплоть до 20 кГц.
Отчётливо видны «мазки» вдоль записи, начинающиеся с 10 кГц; видна попытка кодека сохранить максимум информации о высоких частотах. Интересно, что уже при 13 кбит/с. кодек в гибридном режиме, с использованием Hybrid Folding, пытается работать в режиме Fullband, восстанавливая спектр вплоть до 20 кГц.
Что же по поводу звучания? Звучание голоса просто Фантастическое — с большой буквы Ф. На такой результат не способен даже HE-AAC с его SBR — даже близко не способен. Высокие частоты, в области которых находятся шипящие, свистящие, цокающие (Ш, Щ, С, Ц) звуки воспроизводятся потрясающе, слушать человеческую речь — приятно. Не забываем про цифру «13 кбит/с», а ведь с таким битрейтом раньше работали кодеки GSM (AMR-NB), где толком и не разобрать, где «Ш», а где «С»…
Тем не менее, не стоит забывать, что для кодирования музыки такой режим всё ещё плохо подходит: из-за кодирования нижней части спектра методом LP в области нижних частот присутствуют существенные искажения, особенно, в области перехода, где голоса нет, но слышен соответствующий данной области FX-эффект «атмосферного ржавого скрипа».

Рис. 3.5 — Спектрограмма записей, кодированных с битрейтами 14 и 15 кбит/с
opus-enc-14.opus
opus-enc-15.opus
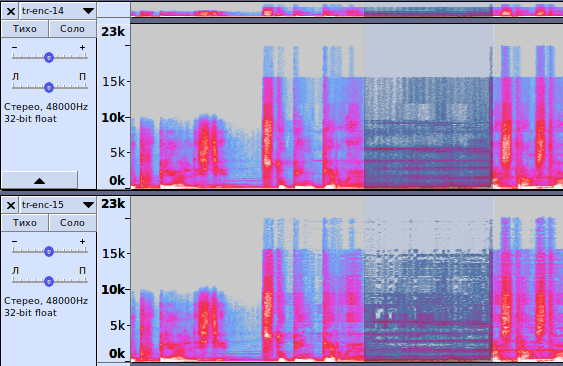
Рис. 3.6 — Обратите внимание на выделенную область FX-эффекта
4. На рис 3.5 видно, как меняется способ кодирования сигнала от перехода к более высокому битрейту — с 14 до 15 кбит/с. Пока спектрограмма записи для битрейта в 14 кбит/с похожа на вышеописанную с 13 кбит/с, то начиная с битрейта в 15 кбит/с использование гибридного режима прекращается и кодек полностью полагается на MDCT и Band Folding.
Почему я так решил? Потому что при прослушивании записи в области FX-эффектов все искажения, которые присущи LP, пропадают. Да и если присмотреться на спектрограмму обеих записей (см. также рис. 3.6), то можно увидеть, что точность воспроизведения спектра увеличена. Однако, характерный «мазок», разделяющий спектр пополам, в области 10 кГц, можно увидеть в обоих случаях.
Это как раз тот случай, когда качество здесь сопоставимо с таковым у mp3@80 кбит/с, если не выше. Опять-таки, не имею права ставить свои суждения истиной в последней инстанции, так как не проводил слепое ABX-тестирование.
5. Начиная с битрейта в 18 кбит/с (opus-enc-18.opus), последнего становится достаточно для того, чтобы переключиться в режим Fullband Stereo, а это означает, что на данном битрейте можно получить «приемлемое» качество записи в условиях очень малой пропускной способности сети. Нет, это не фиаско, братан, это победа!
Далее всё достаточно просто: пропорционально, с увеличением битрейта, кодек всё реже использует Band Folding, так как, собственно, битрейт становится достаточным для того, чтобы закодировать более высокие частоты без надобности в их искусственном восстановлении. Чем выше битрейт — тем более широкий спектр будет закодирован без применения Band Folding.
4. Вместо заключения
Что же касается меня, то тот «порог прозрачности» (или «Transparency», как это называют носители английского языка), который выражается в моей неспособности отличить оригинал от сжатого аналога — прибл. 170 кбит/с. Для mp3 этот параметр лежит в пределах 224-256 кбит/с, в зависимости от характера музыки.
Что же тут сказать. Технологии стремительно развиваются. И не только технологии сжатия аудио-данных — все технологии, не побоюсь обобщить. Особенно приятно, что такие качественные технологии, которые позволяют так качественно обмануть человеческое ухо и позволяющие быть настолько универсальными, также развиваются и остаются свободными и открытыми. Спасибо разработчикам и тем потрясающим людям, которые творят и двигают прогресс. А также спасибо всем за внимание и всем, кто осилил статью до конца.
P.S.: В статью будут вноситься правки при обнаружении существенных неточностей; будут исправляться синтаксические и семантические ошибки.
P.P.S.: Ссылка на мою собственную статью, написанную с использованием сервиса telegra.ph. Она нигде не публиковалась, является моей авторской работой (автора можно проверить) и является более старой версией текущей статьи.
Многие люди знают такой формат аудиофайлов, как MP3, но на самом деле существует множество других форматов, к которым относится AAC, FLAC, OGG или WMA. Некоторые люди даже не знают, почему вовсе существует так много расширений, для чего они предназначены, а также какой вариант является самым оптимальным для использования. Поэтому целесообразно изучить особенности каждого формата, чтобы иметь возможность сравнить их, а также выбрать для себя лучший вариант. Например, если хочется посмотреть видео или послушать аудио о том, куда лучше ехать в отпуск, то не всегда удается запустить файл из-за его формата, поэтому приходится устанавливать программы, читающие расширение. Поэтому важно знать об особенностях всех видов аудиофайлов.

Виды аудиофайлов
Аудиофайлы могут быть представлены в многочисленных размерах и типах. Почти все аудиоформаты делятся на три основные разновидности. Каждая категория обладает своими нюансами, а также содержит несколько расширений.
Несжатые аудиоформаты
Несжатый звук состоит из настоящих волн звука, захваченных и преобразованных в цифровой формат без дальнейшей обработки. Поэтому несжатые аудиофайлы, как правило, отличаются высокой точностью, но при этом занимают много места на диске. Видео в одну минуту для 24-битного стерео с частотой 96 кГц весит около 34 Мб.

PCM
PCM расшифровывается как импульсно-кодовая модуляция (англ. pulse code modulation). Данный формат является цифровым представлением необработанных аналоговых сигналов звука. Аналоговые файлы существуют в виде осциллограмм. Чтобы преобразовать форму сигнала в цифровой вид, звук дискретизируется и записывается с конкретными интервалами или импульсами.
Данный аудиоформат обладает частотой дискретизации и разрядностью. В нем нет сжатия, поэтому данная запись наиболее приближена к аналоговому звучанию. PCM — это самый популярный аудиоформат, поэтому он был выбран, чтобы использовать на DVD-дисках. Имеется подтип PCM, который называется линейной импульсно-кодовой модуляцией, при котором для отборки выборки применяются линейные интервалы. LPCM считается самой популярной формой PCM, поэтому сейчас эти термины практически идентичны.

WAV
WAV расшифровывается как формат аудиофайла Waveform. Данный стандарт создан Microsoft и IBM в 1991 году. Пользователи считают, что все файлы WAV представлены несжатыми аудиофайлами, но это мнение ошибочно. WAV — это контейнер Windows для разнообразных форматов муызки. Файл WAV может включать сжатый звук, но он редко применяется для этих целей. Многие файлы WAV включают несжатый звук в формате PCM. Файл WAV — это уникальная оболочка, предназначенная для кодировки PCM, поэтому она считается наиболее подходящей для применения в операционных системах Windows. Но даже системы Mac часто могут открывать WAV-файлы без каких-либо проблем или задержек.
AIFF
AIFF расшифровывается как формат файла для обмена аудио. Он был создан компанией Apple для систем Mac еще в 1988 году. Файлы данного формата могут включать множество разновидностей аудиоформатов. Например, существует сжатая версия под названием AIFF-C и другая версия под названием Apple Loops, используемая GarageBand и Logic Pro. Они применяют одинаковое расширение AIFF.
Многочисленные файлов AIFF включают несжатый звук формата PCM. Файл AIFF — это всего лишь оболочка для кодировки PCM, поэтому он считается наиболее подходящим для применения в операционных системах Mac. Но эти файлы можно легко открывать на Windows.

Аудиоформаты со сжатием с потерями
Сжатие с потерями предполагает потерю некоторых данных в процессе сжатия, которое требуется для уменьшения веса файлов, чтобы они не занимали много места на диске. Во время данного процесса ухудшается качество звука и точность воспроизведения звука.
MP3
MP3 расшифровывается как MPEG-1 Audio Layer 3. Он был разработан и представлен общественности еще в 1993 году и стремительно набирал популярность, со временем став самым распространенным форматом музыки в мире.
Основная цель MP3 заключается в отбрасывании звуковых данных, существующих за пределами слышимости. Снижается качество звуков, которые сложно услышать. Почти все цифровые устройства в разных странах мира с функцией воспроизведения звука может читать и воспроизводить MP3-файлы. Когда нужен универсальный формат, MP3 никогда не подведет, именно поэтому это один из самых популярных в мире форматов аудиофайлов.

AAC
AAC расшифровывается как Advanced Audio Coding (расширенное кодирование звука). Он был создан и выпущен в 1997 году в качестве преемника MP3. Хотя он стал популярным цифровым аудиоформатом, но не смог обогнать MP3. Алгоритм сжатия, применяемый форматом AAC, намного более продвинутый и технический, чем у MP3. Когда вы сравниваете одну и ту же запись в форматах MP3 и AAC с одним и тем же битрейтом, AAC обычно имеет лучшее качество звука. AAC по-прежнему широко применяется многими пользователями. Он считается стандартным способом сжатия звука, используемым YouTube, Android, iOS, iTunes и другими устройствами.
OGG (Vorbis)
OGG является уникальным мультимедийным контейнером, содержащим все разновидности форматов сжатия, но обычно он применяется для хранения файлов Vorbis. Vorbis был разработан еще в 2000 году, а также стал очень популярным по двум основаниям: он обладает открытым исходным кодом, благодаря которому им можно пользоваться совершенно бесплатно, а также функционирует намного лучше, чем многие другие форматы сжатия с потерями.
MP3 и AAC имеют такие прочные позиции, что OGG было трудно завоевать расположение пользователей. На данный момент он часто применяется любителями ПО с открытым исходным кодом.

WMA
WMA расшифровывается как Windows Media Audio. Он был разработан в 1999 году, причем с этого времени было внесено множество корректировок, но сохранилось первоначальное название и расширение WMA. Это проприетарный формат, разработанный крупной компанией Microsoft.
В отличие от AAC и OGG, WMA применялся для удаления определенных недостатков в методе сжатия MP3. Подход WMA к сжатию очень похож на методику AAC и OGG. WMA является лучшим типом аудиофайла по методу сжатия. Главный минус данного формата заключается в том, что он не поддерживается многочисленными устройствами и платформами.
Аудиоформаты со сжатием без потерь
Данный метод уменьшает размер файла без потери данных. Существенным минусом считается то, что сжатые файлы без потерь весят больше, чем аудиофайлы с потерями.

FLAC
FLAC расшифровывается как бесплатный аудиокодек без потерь. Он оперативно стал очень популярным с 2001 года. FLAC может легко и быстро сжимать файл до 60% без потери даже 1 бита данных. FLAC — это формат аудиофайлов с открытым исходным кодом, поэтому он применятся без необходимости внесения платы.
FLAC поддерживается большим количеством разнообразных программ и устройств, а также считается прекрасной альтернативой MP3 для воспроизведения музыки.

ALAC
ALAC расшифровывается как аудиокодек Apple без потерь. Он был разработан и запущен в 2004 году как проприетарный формат, но в конечном итоге был распространен с открытым исходным кодом в 2011 году. Он менее эффективен, чем FLAC, в отношении сжатия. Однако пользователи Apple не могут выбрать подходящий вариант, поскольку iTunes и iOS обладают встроенной поддержкой ALAC.

WMA
WMA расшифровывается как Windows Media Audio. Существует альтернатива без потерь, которая называется WMA Lossless и использует то же расширение. Он относится к проприетарным форматам, поэтому не подходит для любителей ПО с открытым исходным кодом, хотя имеет поддержку как в системах Windows, так и Mac.
Основная сложность WMA Lossless — это ограниченная аппаратная поддержка. Если вам надо прослушать сжатый файл без потерь на различных устройствах или системах, то лучше всего применять FLAC.
Таким образом, если человек записывает и редактирует необработанный звук, то желательно применять несжатый формат аудиофайла. Это позволит работать с максимальным качеством звука. Только после окончания работы можно выбрать любой вышеуказанный формат для сжатия.
Нашли нарушение? Пожаловаться на содержание
Introduction
Audio can be stored in many different file and compression formats, and converting between them can be a real pain. It is especially
difficult in a .NET application, since the framework class library provides almost no support for the various Windows APIs for audio compression and decompression.
In this article I will explain what different types of audio file formats are available, and what steps you will need to go through to convert between formats.
Then I’ll explain the main audio codec related APIs that Windows offers. I’ll finish up by showing some working examples of converting files between various formats in .NET, making use of my open source NAudio library.
Understanding Audio Formats
Before you get started trying to convert audio between formats, you need to understand some of the basics
of how audio is stored. By all means skip this section if you already know this, but it is important to have a basic grasp of some key concepts if you
are to avoid the frustration of finding that the conversions you are trying to accomplish are not allowed. The first thing to understand is the difference
between compressed and uncompressed audio formats. All audio formats fall into one of these two broad categories.
Uncompressed Audio (PCM)
Uncompressed audio, or linear PCM, is the format your soundcard wants to work with. It consists of a series of «samples». Each sample is a number representing how loud the audio is at a single point in time. One of the most common sampling rates is 44.1kHz, which means that we record the level of the signal 44100 times a second. This is often stored in a 16 bit integer, so you’d be storing 88200 bytes per second. If your signal is stereo, then you store a left sample followed by a right sample, so now you’d need 176400 bytes per second. This is the format that audio CDs use.
There are three main variations of PCM audio. First, there are multiple different sample rates. 44.1kHz is used on audio CDs, while DVDs typically use 48kHz. Lower sample rates are sometimes used for voice communications (e.g. telephony and radio) such as 16kHz or even 8kHz. The quality is degraded, but it is usually good enough for voice (music would not sound so good). Sometimes in professional recording studios, higher sample rates are used, such as 96kHz, although it is debatable what benefits this gives, since 44.1kHz is more than enough to record the highest frequency sound that a human ear can hear. It is worth noting that you can’t just choose any sample rate you like. Most soundcards will support only a limited subset of sample rates. The most commonly suported values are 8kHz, 16kHz, 22.05kHz, 16kHz, 32kHz, 44.1kHz, and 48kHz.
Second, PCM can be recorded at different bit depths. 16 bit is by far the most common, and the one you should use by default. It is stored as a signed value (-32768 to +32767), and a silent file would contain all 0s. I strongly recommend against using 8 bit PCM. It sounds horrible. Unless you are wanting to create a special old-skool sound-effect, you should not use it. If you want to save space there are much better ways of reducing the size of your audio files. 24 bit is commonly used in recording studios, as it gives plenty of resolution even at lower recording levels, which is desirable to reduce the chance of «clipping». 24 bit can be a pain to work with as you need to find out whether samples are stored back to back, or whether they have an extra byte inserted to bring them to four byte alignment.
The final bit depth you need to know about is 32 bit IEEE floating point (in the .NET world this is a «float» or «Single»). Although 32 bits of resolution is overkill for a single audio file, it is extremely useful when you are mixing files together. If you were mixing two 16 bit files, you could easily get overflow, so typically you convert to 32 bit floating point (with -1 and 1 representing the min and max values of the 16 bit file), and then mix them together. Now the range could be between -2 and +2, so you might need reduce the overall volume of the mixed file to avoid clipping converting back down to 16 bit. Although 32 bit floating point audio is a type of PCM, it is not usually referred to as PCM, so as not to cause confusion with PCM represented as 32 bit integers (which is rare but does exist). It is quite often simply called «floating point» audio.
Note: there are other bit depths — some systems use 20 bit, or 32 bit integer. Some mixing programs use 64 bit double precision floating point numbers rather than 32 bit ones, although it would be very unusual to write audio files to disk at such a high bit depth. Another complication is that you sometimes need to know whether the samples are stored in «big endian» or «little endian» format. But the most common two bit depths you should expect to encounter are 16 bit PCM and 32 bit floating point.
The third main variation on PCM is the number of channels. This is usually either 1 (mono) or 2 (stereo), but you can of course have more (such as 5.1 which is common for movie sound-tracks). The samples for each channel are stored interleaved one after the other, and a pair or group of samples is sometimes referred to as a «frame».
Uncompressed Audio Containers
You can’t just write PCM samples directly to disk and expect a media player to know how to play it. It would have no way of knowing what sample rate, bit depth and channel count you are using. So PCM samples are put inside a container. In Windows, the universal container format for PCM files is the WAV file.
A WAV file consists of a number of «chunks». The most important two are the format chunk and the data chunk. The format chunk contains a WAVEFORMAT structure (possibly with some extra bytes as well), which indicates the format of the audio in the data chunk. This includes whether it is PCM or IEEE floating point, and indicates what the sample rate, bit depth and channel count is. For convenience, it also contains other useful information, such as what the average number of bytes per second is (although for PCM you can easily calculate that for yourself).
WAV is not the only container format that PCM is stored in. If you are dealing with files from coming from Mac OS, they may be in an AIFF file. One big difference to watch out for is that AIFF files normally use big-endian byte ordering for their samples, whilst WAV files use little-endian.
Compressed Audio Formats
There are numerous audio compression formats (also called «codecs»). Their common goal is to reduce the amount of storage space required for audio, since PCM takes up a lot of disk space. To achieve this various compromises are often made to the sound quality, although there are some «lossless» audio formats such as «FLAC» or Apple Lossless (ALAC), which conceptually are similar to zipping a WAV file. They decompress to the exact same PCM that you compressed.
Compressed audio formats fall into two broad categories. One is aimed at simply reducing the file-size whilst retaining as much audio fidelity as possible. This includes formats like MP3, WMA, Vorbis and AAC. They are most often used for music and can often achieve around 10 times size reduction without a particularly noticable degradation in sound quality. In addition there are formats like Dolby Digital which take into account the need for surround sound in movies.
The other category is codecs designed specifically for voice communications. These are often much more drastic, as they may need to be transmitted in real-time. The quality is greatly reduced, but it allows for very fast transmission. Another consideration that some voice codecs take into account is the processor work required to encode and decode. Mobile processors are powerful enough these days that this is no longer a major consideration, but it explains why some telephony codecs are so rudimentary. One example of this is G.711, or mu and a-law, which simply converts each 16 bit sample to an 8 bit sample, so in one sense it is still a form of PCM (although not linear). Other commonly encountered telephony or radio codecs include ADPCM, GSM 610, G.722, G.723.1, G.729a, IMBE/AMBE, ACELP. There are also a number targetted more for internet teleophony scenarios such as Speex, Windows Media Voice, and Skype’s codec SILK.
As you can see, there is an overwhelming variety of audio codecs available, and more are being created all the time (opus is a particuarly interesting new one). You are not going to be able to write a program that supports them all, but it is possible to cover a good proportion of them.
Compressed Audio Containers
Containers for compressed audio is where things start to get very tricky. The WAV file format can actually contain most of the codecs I have already mentioned. The format chunk of the WAV file is flexible enough (especially with the introduction of WAVEFORMATEXTENSIBLE) to define pretty much anything. But the WAV file format has limitations of its own (e.g. needing to report the file length in the header, doesn’t support very large files, doesn’t have good support for adding metadata such as album art). So many compressed audio types come with their own container format. For example MP3 files consist simply of a series of compressed chunks of MP3 data with optional metadata sections added to the beginning or end. WMA files use the Microsoft ASF format. AAC files can use the MP4 container format. This means that, like with WAV, audio files typically contain more than just encoded audio data. Either you or the decoder you use will need to understand how to get the compressed audio out of the container it is stored in.
Bitrates and Block Alignment
Most codecs offer a variety of bitrates. The bitrate is the average number of bits required to store a second’s worth of audio. You select your desired bitrate when you initialise the encoder. Codecs can be either constant bitrate (CBR) or variable bitrate (VBR). In a constant bitrate codec, the same number of input bytes always turns into the same number of output bytes. It makes it easy to navigate through the encoded file as every compressed block is the same number of bytes. The size of this block is sometimes called the «block align» value. If you are decoding a CBR file, you should try to only give the decoder exact multiples of «block align» to decode each time. With a VBR file, the encoder can change the bit rate as it sees fit, which allows it to achieve a greater compression rate. The downside is that it is harder to reposition within the file, as half-way through the file may not mean half-way through the audio. Also, the decoder will probably need to be able to cope with being given incomplete blocks to decode.
A Conversion Pipeline
Now we’ve covered the basics of compressed and uncompressed audio formats, we need to think about what conversion we are trying to do. You are usually doing one of three things. First is decoding, where you take a compressed audio type and convert it to PCM. The second is encoding where you take PCM and convert it to a compressed format. You can’t go directly from one compressed format to another though. That is called transcoding, and involves first decoding to PCM, and then encoding to another format. There may even be an additional step in the middle, as you sometimes need to transcode from one PCM format to another.
Decoding
Every decoder has a single preferred PCM output format for a given input type. For example, your MP3 file may natively decode to 44.1kHz stereo 16 bit, and a G.711 file will decode to 8kHz mono 16 bit. If you want floating point output, or 32kHz your decoder might be willing to oblige, but often you have to do that as a separate stage yourself.
Encoding
Likewise, your encoder is not likely to accept any type of PCM as its input. It will have specific constraints. Usually both mono and stereo are supported, and most codecs are flexible about sample rate. But bit depth will almost always need to be 16 bit. You should also never attempt to change the input format to an encoder midway through encoding a file. Whilst some file formats (e.g. MP3) technically allow sample-rate and channel count to change in the middle of a file, this makes life very difficult for anyone who is trying to play that file.
Transcoding PCM
You should realise by now that some conversions cannot be done in one step. Having gone from compressed to PCM, you may need to change to a different variant of PCM. Or maybe you already have PCM but it is not in the right format for your encoder. There are three ways in which PCM can be changed, and these are often done as three separate stages, although you could make a transcoder that combined them. These are changing the sample rate (known as resampling), changing the bit depth, and changing the channel count.
Changing PCM Channel Count
Probably the easiest change to PCM is modifying the number of channels. To go from mono to stero, you just need to repeat every sample. So for example, if we have a byte array called input, containing 16 bit mono samples, and we want to convert it to stereo, all we need to do is:
private byte[] MonoToStereo(byte[] input)
{
    byte[] output = new byte[input.Length * 2];
    int outputIndex = 0;
    for (int n = 0; n < input.Length; n+=2)
    {
        // copy in the first 16 bit sample
        output[outputIndex++] = input[n];
        output[outputIndex++] = input[n+1];
        // now copy it in again
        output[outputIndex++] = input[n];
        output[outputIndex++] = input[n+1];
    }
    return output;
}
How about stereo to mono? Here we have a choice. The easiest is just to throw one channel away. In this example we keep the left channel and throw away the right:
private byte[] StereoToMono(byte[] input)
{
    byte[] output = new byte[input.Length / 2];
    int outputIndex = 0;
    for (int n = 0; n < input.Length; n+=4)
    {
        // copy in the first 16 bit sample
        output[outputIndex++] = input[n];
        output[outputIndex++] = input[n+1];
    }
    return output;
}
Alternatively we might want to mix left and right channels together. This means we actually need to access the sample values. If it is 16 bit,
that means every two bytes must be turned into an Int16. You can use bit manipulation for that, but here I’ll show the use of the
BitConverter helper class. I mix the samples by adding them together and dividing by two. Notice that I’ve used 32 bit integers to do this,
to prevent overflow problems. But when I’m ready to write out my sample, I convert back down to a 16 bit number and use BitConverter to turn this into bytes.
private byte[] MixStereoToMono(byte[] input)
{
    byte[] output = new byte[input.Length / 2];
    int outputIndex = 0;
    for (int n = 0; n < input.Length; n+=4)
    {
        int leftChannel = BitConverter.ToInt16(input,n);
        int rightChannel = BitConverter.ToInt16(input,n+2);
        int mixed = (leftChannel + rightChannel) / 2;
        byte[] outSample = BitConverter.GetBytes((short)mixed);

        // copy in the first 16 bit sample
        output[outputIndex++] = outSample[0];
        output[outputIndex++] = outSample[1];
    }
    return output;
}
There are of course other strategies you could use for changing channel count, but those are the most common.
Changing PCM Bit Depth
Changing PCM bit depth is also relatively straightforward, although working with 24 bit can be tricky. Let’s start with a more common transition, going from 16 bit to 32 bit floating point. I’ll imagine we’ve got our 16 bit PCM in a byte array again, but this time we’ll return it as a float array, making it easier to do analysis or DSP. Obviously you could use BitConverter to put the bits back into a byte array again if you want.
public float[] Convert16BitToFloat(byte[] input)
{
    int inputSamples = input.Length / 2; // 16 bit input, so 2 bytes per sample
    float[] output = new float[inputSamples];
    int outputIndex = 0;
    for(int n = 0; n < inputSamples; n++)
    {
        short sample = BitConverter.ToInt16(input,n*2);
        output[outputIndex++] = sample / 32768f;
    }
    return output;
}
Why did I divide by 32768 when Int16.MaxValue is 32767? The answer is that Int16.MinValue is -32768, so I know that my audio is entirely in the range ±1.0. If it goes outside ±1.0, some audio programs will interpret that as clipping, which might seem strange if you knew you hadn’t amplified the audio in any way. It doesn’t really matter to be honest, so long as that you are careful not to clip when you go back to 16 bit, which we’ll come back to shortly.
What about 24 bit audio? It depends on how the audio is laid out. In this example, we’ll assume it is packed right up together. To benefit from BitConverter we’ll copy every 3 bytes into a temporary buffer of 4 bytes and then convert into an int. Then we’ll divide by the maximum 24 bit value to get into the ±1.0 range again. Please note that using BitConverter is not the fastest way to do this. I usually make an implementation with BitConverter as a reference and then check my bit manipulation code against it.
public float[] Convert24BitToFloat(byte[] input)
{
    int inputSamples = input.Length / 3; // 24 bit input
    float[] output = new float[inputSamples];
    int outputIndex = 0;
    var temp = new byte[4];
    for(int n = 0; n < inputSamples; n++)
    {
        // copy 3 bytes in
        Array.Copy(input,n*3,temp,0,3);
        int sample = BitConverter.ToInt32(temp,0);
        output[outputIndex++] = sample / 16777216f;
    }
    return output;
}
How about going the other way, say from floating point back down to 16 bit? This is fairly easy, but at this stage we need to decide what to do with samples that «clip». You could simply throw an exception, but more often you will simply use «hard limiting», where any samples out of range will just be set to their maximum value. Here’s a code sample showing us reading some floating point samples, adjusting their volume, and then clipping before writing 16 bit samples into an array of Int16.
for (int sample = 0; sample < sourceSamples; sample++)
{
    // adjust volume
    float sample32 = sourceBuffer[sample] * volume;
    // clip
    if (sample32 > 1.0f)
        sample32 = 1.0f;
    if (sample32 < -1.0f)
        sample32 = -1.0f;
    destBuffer[destOffset++] = (short)(sample32 * 32767);
}
Resampling
Resampling is the hardest transformation to perform on PCM correctly. The first issue is that the number of output samples for a given number of input samples is not necessarily a whole number. The second issue is that resampling can introduce unwanted artefacts such as «aliasing». This means that ideally you want to use an algorithm that has been written by someone who knows what they are doing.
You might be tempted to think that for some sample rate conversions this is an easy task. For example if you have 16kHz audio and want 8kHz audio, you could throw away every other sample. And to go from 8kHz to 16kHz you could add in an extra sample between each original one. But what value should that extra sample have? Should it be 0? Or should we just repeat each sample? Or maybe we could calculate an in-between value — the average of the previous and next samples. This is called «linear interpolation», and if you are interested in finding out more about interpolation strategies you could start by looking here.
One way to deal with the problem of aliasing is to put your audio through a low pass filter (LPF). If an audio file is sampled at 48kHz, the highest frequency it can contain is half that value (read up on the Nyquist Theorem if you want to understand why). So if you resampled to 16kHz, any frequencies above 8kHz in the original file could appear «aliased» as lower frequency noises in the resampled file. So it would be best to filter out any sounds above 8kHz before downsampling. If you are going the other way, say resampling a 16kHz file to 44.1kHz, then you would hope that the resulting file would not contain any information above 8kHz, since the original did not. But you could run a low pass filter after conversion, just to remove any artefacts from the resampling.
We’ll talk later about how to use someone else’s resampling algorithm, but let’s say for the moment that we throw caution (and common sense) to the wind and want to implement our own «naive» resampling algorithm. We could do it something like this:
// Just about worst resampling algorithm possible:
private float[] ResampleNaive(float[] inBuffer, int inputSampleRate, int outputSampleRate)
{
    var outBuffer = new List<float>();
    double ratio = (double) inputSampleRate / outputSampleRate;
    int outSample = 0;
    while (true)
    {
        int inBufferIndex = (int)(outSample++ * ratio);
        if (inBufferIndex < read)
            writer.WriteSample(inBuffer[inBufferIndex]);
        else
            break;
    }
    return outBuffer.ToArray();
}
Testing your Resampler
Now if you try this algorithm out on say a spoken word recording,
then you be pleasantly surprised to find that it sounds reasonably good. Maybe
resampling isn’t so complicated after all. And with speech it might just about be possible to get away with such a naive approach. After all, the most important test for audio is the «use your ears» test, and if you like what you hear, who cares if your algorithm is sub-optimal?
However, the limitations of this approach to resampling are made very obvious when we give it a different sort of input. One of the best test signals you can use to check the quality of your resampler is a sine wave sweep. This is a sine wave signal that starts off at a low frequency and gradually increases in frequency over time. The open source Audacity audio editor can generate these (select «Generate | Chirp …»). You should start at a low frequency (e.g. 20Hz, about as low as the human ear can hear), and go up to half the sample rate of your input file. One word of caution — be very careful about playing one of these files, especially with ear-buds in. You could find it a very unpleasant and painful experience. Turn the volume right down first.
We can get a visual representation of this file, by using any audio program that plots a spectrogram. My favourite is a VST plugin by Schwa called Spectro, but there are plenty of programs that can draw these graphs from a WAV file. Basically, the X axis represents time, and the Y axis represents frequency, so our sweep will look something like this:

If we downsample this file to 16kHz, the resulting file will not be able to contain any frequencies above 8kHz, but we should expect the first part of the graph to remain unscathed. Let’s have a look at how well the Media Foundation Resampler does at its maximum quality setting.

Not bad. You can see that there is a very small amount of aliasing just before the cut-off frequency. This is because Media Foundation uses a low pass filter to try to cut out all frequencies above 8kHz, but real-world filters are not perfect, and so a small compromise has to be made.
Now lets see how our naive algorithm got on. Remember that we didn’t bother to do any filtering at all.

Wow! As you can see, all kinds of additional noise has made it into our file. If you listen to it, you’ll still hear the main sweep as the dominant sound originally, but it carries on past the point at which it was supposed to cut off and we end up with something that sounds like some weird psychadelic sci-fi soundtrack. The takeaway is that if you need to resample, you should probably not try to write your own algorithm.
What Codecs Can I Use?
For .NET developers, when thinking about what audio codecs you want to use, you have two options. The first is to make use of the various Windows APIs that let you access encoders and decoders already installed on your PC. The second is to either write your own codec, or more likely, write a P/Invoke wrapper for a third party DLL. We’ll focus mainly on the first approach, with a few brief examples later of how the second can be done.
There are three main API’s for encoding and decoding audio in Windows. These are ACM, DMO and MFT.
Audio Compression Manager (ACM)
The Audio Compression Manager is the longest serving and most universally supported Windows API for audio codecs. ACM codecs are DLLs with a .acm extension and are installed as «drivers» on your system. Windows XP and above come with a small selection of these, covering a few telephony codecs like G.711, GSM, ADPCM, and also has an MP3 decoder. Strangely enough Microsoft did not choose to include a Windows Media Format decoder as an ACM. One thing to note with ACM is that most of them are 32 bit. So if you are running in a 64 bit process, you will typically only be able to access the ones that come with Windows as they are x64 capable.
Enumerating ACM Codecs
To find out what ACM codecs are installed on your system, you need to call the acmDriverEnum function, and pass in a callback function. Then, each time the callback is called, you use the driver handle you are passed to call acmDriverDetails, which fills in an instance of the ACMDRIVERDETAILS structure. On its own, this doesn’t give you too much useful information other than the codec name, but you can then ask the driver for a list of the «format tags» it supports. You do this by calling acmFormatTagEnum, which takes a callback which will return a filled in ACMFORMATTAGDETAILS structure for each format tag.
There are typically two format tags for each ACM codec. One is the format it decodes or encodes to, and the other is PCM. However, this is just a high-level description of the format. To get the actual details of possible input and output formats, there is another enumeration we must do, which is to call acmFormatEnum, passing in the format tag. Once again, this requires the use of a callback function which will be called with each of the valid formats that can be used as inputs or outputs to this codec. Each callback provides an instance of ACMFORMATDETAILS which contains details of the format. Most importantly, it contains a pointer to a WAVEFORMATEX structure. This is very important, as it is typically the WAVEFORMATEX structure that is used to get hold of the right codec and to tell it what you want to convert from and to.
Unfortunately, WAVEFORMATEX is quite tricky to marshal in a .NET environment, as it is a variable length structure with an arbitrary number of «extra bytes» at the end. My approach is to have a special version of the structure for marshaling which has enough spare bytes at the end. I also use a Custom Marshaler to to enable me to deal more easily with known Wave formats.
When you are dealing with third party ACM codecs, you often need to examine these WAVEFORMATEX structures in a hex editor, in order to make sure that you can pass in one that is exactly right. You’ll also need this if you want to make a WAV file that Windows Media Player can play as it will use this WAVEFORMATEX structure to search for an ACM decoder.
If all this sounds like a ridiculous amount of work just to find out what codecs you can use, the good news is that I have already written the interop for all this. Here’s some code to enumerate the ACM codecs and print out details about all the format tags and formats it supports:
foreach (var driver in AcmDriver.EnumerateAcmDrivers())
{
    StringBuilder builder = new StringBuilder();
    builder.AppendFormat("Long Name: {0}\r\n", driver.LongName);
    builder.AppendFormat("Short Name: {0}\r\n", driver.ShortName);
    builder.AppendFormat("Driver ID: {0}\r\n", driver.DriverId);
    driver.Open();
    builder.AppendFormat("FormatTags:\r\n");
    foreach (AcmFormatTag formatTag in driver.FormatTags)
    {
        builder.AppendFormat("===========================================\r\n");
        builder.AppendFormat("Format Tag {0}: {1}\r\n", formatTag.FormatTagIndex, formatTag.FormatDescription);
        builder.AppendFormat("   Standard Format Count: {0}\r\n", formatTag.StandardFormatsCount);
        builder.AppendFormat("   Support Flags: {0}\r\n", formatTag.SupportFlags);
        builder.AppendFormat("   Format Tag: {0}, Format Size: {1}\r\n", formatTag.FormatTag, formatTag.FormatSize);
        builder.AppendFormat("   Formats:\r\n");
        foreach (AcmFormat format in driver.GetFormats(formatTag))
        {
            builder.AppendFormat("   ===========================================\r\n");
            builder.AppendFormat("   Format {0}: {1}\r\n", format.FormatIndex, format.FormatDescription);
            builder.AppendFormat("      FormatTag: {0}, Support Flags: {1}\r\n", format.FormatTag, format.SupportFlags);
            builder.AppendFormat("      WaveFormat: {0} {1}Hz Channels: {2} Bits: {3} Block Align: {4},
                AverageBytesPerSecond: {5} ({6:0.0} kbps), Extra Size: {7}\r\n",
                format.WaveFormat.Encoding, format.WaveFormat.SampleRate, format.WaveFormat.Channels,
                format.WaveFormat.BitsPerSample, format.WaveFormat.BlockAlign,
                 format.WaveFormat.AverageBytesPerSecond,
                (format.WaveFormat.AverageBytesPerSecond * 8) / 1000.0,
                format.WaveFormat.ExtraSize);
            if (format.WaveFormat is WaveFormatExtraData && format.WaveFormat.ExtraSize > 0)
            {
                WaveFormatExtraData wfed = (WaveFormatExtraData)format.WaveFormat;
                builder.Append("      Extra Bytes:\r\n      ");
                for (int n = 0; n < format.WaveFormat.ExtraSize; n++)
                {
                    builder.AppendFormat("{0:X2} ", wfed.ExtraData[n]);
                }
                builder.Append("\r\n");
            }
        }
    }
    driver.Close();
    Console.WriteLine(builder.ToString());
}
ACM does have one other nice trick up its sleeve. It can suggest a PCM format for you, based on a compressed one. This means you don’t need to go through the hard work of trying to work out what output format you need to give to the decoder. The function in question is called acmFormatSuggest and we’ll see it in action later on.
It is important to note that although ACM relies heavily on the WAVEFORMATEX structure, it does not mean it can only be used for WAV files. MP3 files for example can be encoded and decoded through an ACM codec. You just need to work out what the appropriate WAVEFORMATEX structure that the MP3 decoder is expecting, construct one and pass it in.
DirectX Media Objects (DMO)
DirectX Media Objects are a part of the overall DirectX collection of APIs and I think they were the intended successor to ACM, but have ended up being superceded by MFT (see next section). It has a vast sprawling COM-based API, and was very difficult to make use of in a .NET application. Many of the DMOs actually also implement the MFT interfaces, so they can be used from either API. There is probably very little point bothering with this API, as I don’t think it will be supported in Windows Store apps. My recommendations is to use ACM for legacy OS support (Windows XP), and MFT for anything more up to date.
Media Foundation Transforms (MFT)
Microsoft Media Foundation is a new API that was introduced with Windows Vista, essentially obsoleting ACM. It is a more powerful API, but also much more intimidating, especially for .NET developers, as it is COM based and requires huge amounts of interop to be written to get anything done. It also makes heavy use of GUIDs — a guid for every media type, and a guid for every property («attribute») of every media type. Whilst ACM is still available in Windows 8, one big reason to pay attention to Media Foundation is that it is the only encoding and decoding API available in Windows Store apps. It also appears that Windows Phone 8 supports a limited subset of this API, meaning that Media Foundation is definitely the future for audio codecs on the Windows platform.
One important thing to note about Media Foundation is that unlike ACM, it is not an audio specific API. It also covers video decoders, encoders and filters. This is part of the reason why the API can seem rather convoluted for dealing with audio, as it attempts to be general purpose for any type of media. One really nice benefit of this approach though is that you can play or extract the audio from your video files. You could even use it to overdub videos with your own soundtrack.
Windows comes with a decent selection of Media Foundation audio decoders, including the ability to play MP3 and WMA files. Windows 7 includes an AAC decoder and encoder, which allows you to work with the format favoured by Apple. As for encoders, the selection is a bit more limited. From Windows Vista on there should be a Windows Media Encoder, and Windows 8 comes with an MP3 encoder. This article is a helpful guide to what you can expect to find on different versions of Windows.
As well as encoding and decoding audio, Media Foundation transforms can be used for audio effects. The main audio effect that is of note in Media Foundation is the Resampler MFT. My Windows 8 PC also has an AEC (acoustic echo cancellation) effect, which would be very useful if you were implementing a Skype-like program, although AEC effects can be tricky to configure correctly (since you need to supply two input streams).
Enumerating Media Foundation Codecs
We’ve looked at how to programatically find out about what ACM codecs you have installed. How do we do the same thing in Media Foundation? First of all, we can ask for what audio encoders, decoders and effects are installed, using the MFTEnumEx function (or MFTEnum for Windows Vista). This returns a pointer to an array of IMFActivate COM interfaces, not the most friendly format for interop with .NET. You can walk through the array with some pointer arithmetic and using Marshal.GetObjectForIUnknown for each IMFActivate. You need to remember to call Marshal.FreeCoTaskMem on the array pointer when you are done.
Here’s some example code showing how you would get enumerate the transforms. The category GUID is one of the items from the MFT_CATEGORY list, allowing you to look for just audio decoders, encoders or effects.
public static IEnumerable<IMFActivate> EnumerateTransforms(Guid category)
{
    IntPtr interfacesPointer;
    IMFActivate[] interfaces;
    int interfaceCount;
    MediaFoundationInterop.MFTEnumEx(category, _MFT_ENUM_FLAG.MFT_ENUM_FLAG_ALL,
        null, null, out interfacesPointer, out interfaceCount);
    interfaces = new IMFActivate[interfaceCount];
    for (int n = 0; n < interfaceCount; n++)
    {
        var ptr =
            Marshal.ReadIntPtr(new IntPtr(interfacesPointer.ToInt64() + n*Marshal.SizeOf(interfacesPointer)));
        interfaces[n] = (IMFActivate) Marshal.GetObjectForIUnknown(ptr);
    }

    foreach (var i in interfaces)
    {
        yield return i;
    }
    Marshal.FreeCoTaskMem(interfacesPointer);
}
The IMFActivate interface actually allows you to construct instances of the IMFTransform objects, but we don’t need to do that yet. Instead we take advantage of the fact that IMFActivate derives from IMFAttributes (a common base class in Media Foundation), and this serves as a property bag, containing useful information about the codec. Each property is indexed by a Guid, so if you know what you are looking for, you can request the property with a known Guid. Alternatively, you can enumerate through each property and see what each transform has to say about itself.
To find out how many properties there are, you call IMFAttributes.GetCount, and then you can repeatedly call IMFAttributes.GetItemByIndex with an incrementing index. This will read the properties into a PROPVARIANT structure, which is not very easy to write the interop for since it contains a large C++ union, but essentially it can be replicated in C# with a structure declared using StructLayout(LayoutKind.Explicit). Fortunately, of the numerous types that can be contained within a PROPVARIANT, Media Foundation uses only a limited selection (UINT32, UINT64, double, GUID, wide-character string, byte array, or IUnknown pointer). You may need to call PropVariantClear to free up memory if it was a byte array (which in Media Foundation is VT_VECTOR | VT_UI1, not VT_BLOB).
Once you have done this you’ll end up with a list of Guids, and values (several of which will also be Guids), which probably won’t make any sense to you (unless you are gifted with an incredible ability to memorise Guids). The reverse lookup of Guids to their meanings is a tiresome process, but one cool website that was of great use to me is the UUID lookup site. Alternatively, you can trawl through the Windows SDK header files looking for Guids, interface definitions, and error codes. Here’s a bit of code I have in LINQPad to help me quickly search the media foundation header files:
Directory.EnumerateFiles(@"C:\Program Files (x86)\Microsoft SDKs\Windows\v7.1A\Include\","mf*.h")
    .SelectMany(f => File.ReadAllLines(f).Select((l,n) => new { File=f, Line=l, LineNumber=n+1  }))
    .Where(l => l.Line.Contains("MF_E_ATTRIBUTENOTFOUND"))
Here are some of the key properties you will find on one of these activation objects:
- MFT_FRIENDLY_NAME_Attribute (string) Friendly name
- MF_TRANSFORM_CATEGORY_Attribute (Guid) Tells you whether this is an audio encoder, decoder or effect. It is one of the values in this MFT_CATEGORY list.
- MFT_TRANSFORM_CLSID_Attribute (Guid) The class identifier of this transform. Useful if you want to
create an instance of it directly, rather than by using theIMFActivateinstance.
- MFT_INPUT_TYPES_Attributes (byte array) This is an array of pointers to instances of the MFT_REGISTER_TYPE_INFO structure, which again is an unfriendly way of presenting data to .NET. I’ve made a helper function (shown below) that lets me marshal the pointers contained in this byte array into instances of the structure using
Marshal.PtrToStructure. For an audio decoder, this list is important as it indicates what types of audio it can decompress. - MFT_OUTPUT_TYPES_Attributes (byte array) This is similar to input types, but more useful with encoders, as it . For decoders, it will typically be PCM. Some encoders support multiple output types. For example the Windows Media Audio codec has a few different flavours, including regular WMA, WMA Professional and WMA Lossless.
Here’s my helper function for accessing arrays of structure pointers stored in a PROPVARIANT byte array:
public T[] GetBlobAsArrayOf<T>()
{
    var blobByteLength = blobVal.Length;
    var singleInstance = (T) Activator.CreateInstance(typeof (T));
    var structSize = Marshal.SizeOf(singleInstance);
    if (blobByteLength%structSize != 0)
    {
        throw new InvalidDataException(String.Format("Blob size {0} not a multiple of struct size {1}", blobByteLength, structSize));
    }
    var items = blobByteLength/structSize;
    var array = new T[items];
    for (int n = 0; n < items; n++)
    {
        array[n] = (T) Activator.CreateInstance(typeof (T));
        Marshal.PtrToStructure(new IntPtr((long) blobVal.Data + n*structSize), array[n]);
    }
    return array;
}
Once you’ve gone to the trouble of decoding this MFT_REGISTER_INFO, you once again are greeted with a couple of unfriendly Guids — a «major type» and a «subtype». The major type is a Guid from this list and will likely be MFMediaType_Audio. If the major type is audio, then the subtype will be one of the many possible audio subtypes. This list contains the most common ones, but anyone is free to create their own audio subtype with its own Guid. The ones you will probably find most useful are:
- MFAudioFormat_PCM for all uncompressed PCM stored in integer format
- MFAudioFormat_Float for 32 bit floating point IEEE audio
- MFAudioFormat_MP3 MP3
- MFAudioFormat_WMAudioV8 (strangely enough this also includes Windows Media Audio version 9.
MFAudioFormat_WMAudioV9is used to refer to Windows Media Audio Professional) - MFAudioFormat_AAC AAC
One of the ways I approach converting all these Guids into meaningful strings, is by using attributes in my definition files. For example:
[FieldDescription("Windows Media Audio")]
public static readonly Guid MFAudioFormat_WMAudioV8 = new Guid("00000161-0000-0010-8000-00aa00389b71");
[FieldDescription("Windows Media Audio Professional")]
public static readonly Guid MFAudioFormat_WMAudioV9 = new Guid("00000162-0000-0010-8000-00aa00389b71");
This approach allows me to use reflection to search for a matching Guid and pull out the description or property name if available.
When we actually get round to using our codecs, we’ll need more than just a major type and a subtype. As with the WAVEFORMAT structure used in ACM, codecs need information about sample rates, bit depths, number of channels etc. Encoders often offer a selection of «bitrates» as well. The higher the bitrate, the better the audio quality but the bigger the file. You have to trade off what is more important to you — file size or audio quality.
To store these additional bits of information about an audio format, Media Foundation uses the concept of a «Media Type», represented by the IMFMediaType interface. Like the IMFActivate interface, it inherits from IMFAttributes and its key value store contains information about the audio format. Thankfully, most of the important parameters are integers. Here’s some of the key attributes that you will find on an audio media type:
- MF_MT_MAJOR_TYPE — (Guid) The major media type (audio)
- MF_MT_SUBTYPE — (Guid) The audio subtype from the list shown above
- MF_MT_AUDIO_SAMPLES_PER_SECOND — (UINT) The sample rate (e.g. 44100)
- MF_MT_AUDIO_NUM_CHANNELS — (UINT) The number of channels usually 1 (mono) or 2 (stereo)
- MF_MT_AUDIO_BITS_PER_SAMPLE — (UINT) The bits per sample, most relevant for PCM, but sometimes compressed formats have support for higher resolution audio (e.g. WMA Professional has a 24 bit audio mode)
- MF_MT_AUDIO_AVG_BYTES_PER_SECOND (UINT) The average number of bytes per second. Multiply by 8 to get the bitrate. (There is also
MF_MT_AVG_BITRATEbut this is not always present)
You can create a new Media Type object yourself using the MFCreateMediaType function, and then add properties to it. You can also get them other ways, such as callig MFTranscodeGetAudioOutputAvailableTypes which I demonstrate later when I show how to encode files using Media Foundation.
Examples of Encoding and Decoding with NAudio
Congratulations if you have made it this far. We’re now ready to show some real-world examples of decoding and encoding files in C#. Whilst it would be nice to put the entire source code for these examples into this article, it would also make it incredibly long, since the necessary interop wrapper classes for some of these APIs are extremely verbose. Instead, I will be demonstrating the use of my own .NET audio library, NAudio, which is the library I wish someone else would have written for me.
I’ve been working on NAudio for 10 years now and still it doesn’t do everything I would like. I’ve also been helped by lots of people along the way, including a number of authors here on CodeProject, so thanks to everyone who shared their knowledge — there is not always as much information as you would like about how to use Windows audio APIs. There are other .NET audio libraries, and they will be wrapping the same Windows APIs, so it is likely that you can achieve the same results with similar code in those libraries too. NAudio is open source, so you can borrow and adapt its code for your own purposes.
For each category of encode or decode, I will explain a bit of what NAudio is doing for you under the hood, and show the simplest possible code to achieve the conversion.
Converting Compressed Audio to PCM WAV with ACM
Although it is tempting to pick MP3 as our first example, it will be simpler to start with something that is constant bit rate, and stored within a WAV file. Let’s imagine that we have a GSM encoded WAV file, and want to convert it to a PCM WAV file.
NAudio provides two helper classes for reading and writing WAV files — the WaveFileReader and WaveFileWriter classes. The WaveFileReader is able to read the WAV format chunk into a WaveFormat object (accessed by the WaveFormat property) and the Read method reads only the audio data from the WAV file’s data chunk.
using(var reader = new WaveFileReader("gsm.wav"))
using(var converter = WaveFormatConversionStream.CreatePcmStream(reader)) {
    WaveFileWriter.CreateWaveFile("pcm.wav", converter);
}
Fairly simple, and in fact, this is all you need to convert pretty much any WAV file containing compressed audio to PCM in NAudio. But how does it work?
The first thing to notice is that we are calling WaveFormatConversionStream.CreatePcmStream. What this does is makes a call into acmFormatSuggest. We pre-populate the WaveFormat that gets passed in, with an encoding of PCM, the same sample rate and channel count as the compressed file, and a bit depth of 16. That’s because that is by far the most likely format that any given compressed format will decode to. But acmFormatSuggest allows the codec to tell us the exact PCM format it would decode the given compressed format into.
public static WaveFormat SuggestPcmFormat(WaveFormat compressedFormat)
{
    WaveFormat suggestedFormat = new WaveFormat(compressedFormat.SampleRate, 16, compressedFormat.Channels);
    MmException.Try(AcmInterop.acmFormatSuggest(IntPtr.Zero, compressedFormat,
      suggestedFormat, Marshal.SizeOf(suggestedFormat), AcmFormatSuggestFlags.FormatTag),
      "acmFormatSuggest");
    return suggestedFormat;
}
Having determined what output format we want, now we create a new instance of WaveFormatConversionStream, which is NAudio’s way of wrapping an ACM conversion stream. The constructor of WaveFormatConversionStream calls acmStreamOpen, passing in the desired input and output formats. Windows will query each ACM codec in turn, asking if it can perform the desired conversion. If no codecs are able to, you will get an ACMERR_NOTPOSSIBLE error. For example, imagine if we change our example to specify that we wanted our GSM encoded WAV file to be converted into 44.1kHz stereo 24 bit :
var desiredOutputFormat = new WaveFormat(44100,24,2);
using(var reader = new WaveFileReader("gsm.wav"))
using(var converter = new WaveFormatConversionStream(desiredOutputFormat, reader)) {
    WaveFileWriter.CreateWaveFile("pcm.wav", converter);
}
This would result in ACMERR_NOTPOSSIBLE since the GSM decoder will only output 8kHz 16 bit mono.
If we have managed to successfully open an ACM codec, we now need to set up an instance of ACMSTREAMHEADER which contains points to both an input and an output buffer for your codec. These are passed in as pointers, and they should be pinned so that the garbage collector does not move them, or you will get memory corruption. You can pin your buffer like this:
sourceBuffer = new byte[sourceBufferLength];
hSourceBuffer = GCHandle.Alloc(sourceBuffer, GCHandleType.Pinned);
streamHeader.sourceBufferPointer = hSourceBuffer.AddrOfPinnedObject();
The source and destination buffers you declare will need to be big enough for whatever conversion you want to do. Usually you would encode or decode no more than a few seconds of audio at a time. For a decoder, remember that the destination buffer will need to be bigger than the source buffer.
How is the data actually pulled through the codec? That is happening in our call to WaveFileWriter.CreateWaveFile. Here’s a simplified version of what goes on in CreateWaveFile:
public static void CreateWaveFile(string filename, IWaveProvider sourceProvider)
{
    using (var writer = new WaveFileWriter(filename, sourceProvider.WaveFormat))
    {
        var buffer = new byte[sourceProvider.WaveFormat.AverageBytesPerSecond * 4];
        while (true)
        {
            int bytesRead = sourceProvider.Read(buffer, 0, buffer.Length);
            if (bytesRead == 0) break;
            writer.Write(buffer, 0, bytesRead);
        }
    }
}
What is happening is that we are asking for four seconds at a time from the sourceProvider and writing them into the WAV file, until the sourceProvider stops providing input data (there is more code in the real version to stop you accidentally filling your entire hard disk). In this case, the sourceProvider is an instance of WaveFormatConversionStream, so calling Read will do two things.
First, WaveFormatConversionStream.Read must work out how many bytes it needs to read from its «source stream» (in our case, the GSM WAV file). ACM codecs are supposed to help you with this calculation by implementing the acmStreamSize function. However, unfortunately some codecs are badly written and so it is not always a reliable guide. Another consideration is that the number of output bytes requested may not translate into an exact number of bytes from the source file. For this reason, you may find that you end up having to convert more than was asked for, and keep the leftovers until next time.
To pass audio through an ACM codec, we need to use the ACMSTREAMHEADER we set up earlier. Every time we convert a block of audio we first must call acmStreamPrepareHeader on this structure (making sure the source and destination buffer sizes are correctly filled in), and after each block conversion we call acmStreamUnprepareHeader. When I originally started trying to use ACM, I thought I could save time by not calling Prepare and Unprepare multiple times, but I found this to be unreliable, so now I always Prepare and Unprepare before and after every block.
Having prepared your ACMSTREAMHEADER you are now ready to convert it. First, you copy the bytes you read from the source file into your pinned source buffer. Then set up both cbSrcLength and cbSrcLengthUsed to be the number of bytes you want to convert. You then call acmStreamConvert. After it has completed, it will tell you what it has done by setting the cbDestLengthUsed (how many bytes it has written to the output), and cbSrcLengthUsed (how many source bytes it converted) fields. If it didn’t use all the source buffer you provided, you’ll need to back up in the input file and send those bytes in again on the next call to acmStreamConvert. If you didn’t get as many output bytes as you wanted, you’ll need to read another block of data from the input file, and try again. If WaveFormatConversionStream gets more bytes than it wanted, it has to save them ready for the next call to Read. Fortunately, with CBR files, we can always predict exactly how many output bytes will be created from a given number of input files, so the only issue is whether the number of output bytes requested maps to a multiple of «block align» in the input file.
Converting MP3 to WAV with ACM and DMO
How would we go about converting MP3 to WAV with ACM? In theory the same technique could be used. However, since our MP3 file is not a WAV file, we need to create a suitable WaveFormat in order to request the appropriate ACM codec. The way to find out what should be in the WaveFormat structure, you can use the code to enumerate the supported formats of the installed codecs described earlier in this article. It turns out to be an instance of the MPEGLAYER3WAVEFORMAT structure. Here’s how I implement this structure in C# (inheriting from WaveFormat which implements WAVEFORMATEX):
[StructLayout(LayoutKind.Sequential, CharSet = CharSet.Ansi, Pack = 2)]
public class Mp3WaveFormat : WaveFormat
{
    public Mp3WaveFormatId id;
    public Mp3WaveFormatFlags flags;
    public ushort blockSize;
    public ushort framesPerBlock;
    public ushort codecDelay;
    private const short Mp3WaveFormatExtraBytes = 12; // MPEGLAYER3_WFX_EXTRA_BYTES
    public Mp3WaveFormat(int sampleRate, int channels, int blockSize, int bitRate)
    {
        waveFormatTag = WaveFormatEncoding.MpegLayer3;
        this.channels = (short)channels;
        this.averageBytesPerSecond = bitRate / 8;
        this.bitsPerSample = 0; // must be zero
        this.blockAlign = 1; // must be 1
        this.sampleRate = sampleRate;

        this.extraSize = Mp3WaveFormatExtraBytes;
        this.id = Mp3WaveFormatId.Mpeg;
        this.flags = Mp3WaveFormatFlags.PaddingIso;
        this.blockSize = (ushort)blockSize;
        this.framesPerBlock = 1;
        this.codecDelay = 0;
    }
}
But this gives us another problem. How do we find out the sample rate, channels etc from an MP3 file? Without that information, we have no idea what sort of PCM it will turn into. For this reason, NAudio takes a slightly different approach with MP3 files, and introduces the Mp3FileReader class.
The first task of the MP3FileReader is to find the first MP3 frame header. An MP3 file largely consists of a series of MP3 «frames», which are blocks of data that can be individually converted to PCM. However, they can also contain ID3 or ID3v2 tags which include metadata about the MP3 file such as its title, artist and album name. Most MP3 codecs will let you pass ID3 frames in, but they will of course not decompress to any audio. For the MP3 decoder to be able to do anything it needs at least one complete frame in its input buffer.
It is also worth noting that variable bitrate MP3s can contain a special ‘XING’ or ‘VBRI’ header at the beginning as well — the best guide you will find is this article on CodeProject. However, once we have found the first MP3 frame, we can use that to find the sample rate and number of channels, which is important as that governs the PCM format we will decompress to (number of bits will always be 16).
You can decode MP3s by simply passing chunks of the file into the ACM decoder, and as long as it contains at least one frame, there should be some output created. Any leftover source bytes are obviously part of the next frame (or maybe not MP3 data at all). However, since in NAudio we know how to parse MP3 frames, we can send them to the ACM decoder one at a time. The MP3FileReader requires an instance of IMp3FrameDecompressor, but by default it uses the AcmMp3FrameDecompressor. The IMp3FrameDecompressor interface looks like this:
public interface IMp3FrameDecompressor : IDisposable
{
    int DecompressFrame(Mp3Frame frame, byte[] dest, int destOffset);
    void Reset();
    WaveFormat OutputFormat { get; }
}
The DecompressFrame method is the most important part, as it decompresses a single Mp3Frame to PCM and writes it into the destination buffer, returning the number of bytes it wrote. Here’s a slightly edited version of the AcmMp3FrameDecompressor. It uses NAudio’s AcmStream to take care of the Prepare and Unprepare headers for us:
public class AcmMp3FrameDecompressor : IMp3FrameDecompressor
{
    private readonly AcmStream conversionStream;
    private readonly WaveFormat pcmFormat;

    public AcmMp3FrameDecompressor(WaveFormat sourceFormat)
    {
        this.pcmFormat = AcmStream.SuggestPcmFormat(sourceFormat);
        conversionStream = new AcmStream(sourceFormat, pcmFormat);
    }

    public WaveFormat OutputFormat { get { return pcmFormat; } }

    public int DecompressFrame(Mp3Frame frame, byte[] dest, int destOffset)
    {
        Array.Copy(frame.RawData, conversionStream.SourceBuffer, frame.FrameLength);
        int sourceBytesConverted = 0;
        int converted = conversionStream.Convert(frame.FrameLength, out sourceBytesConverted);
        if (sourceBytesConverted != frame.FrameLength)
        {
            throw new InvalidOperationException(String.Format(
                "Couldn't convert the whole MP3 frame (converted {0}/{1})",
                sourceBytesConverted, frame.FrameLength));
        }
        Array.Copy(conversionStream.DestBuffer, 0, dest, destOffset, converted);
        return converted;
    }

    // ... more reset and dispose stuff
}
As you can see, we ask the ACM codec for the most appropriate PCM format to decode to. Then when we decompress a frame, we copy the whole frame (including its four byte header) into the conversion stream’s source buffer. Since we know we are passing in a whole frame, we are expecting the codec to tell us that it converted all the source bytes. After the conversion we copy the data out of the pinned destination buffer into the buffer that the caller wants us to use.
The advantage of having an IMp3FrameDecompressor is that it allows alternative strategies for decompressing MP3 frames to be used. For example, NAudio also includes a DMO based MP3 frame decompressor, which could be used instead. Here’s the basic implementation of DmoMp3FrameDecompressor which gives you an idea of how you can use the NAudio DMO object wrappers to work with DirectX Media Objects.
public class DmoMp3FrameDecompressor : IMp3FrameDecompressor
{
    private WindowsMediaMp3Decoder mp3Decoder;
    private WaveFormat pcmFormat;
    private MediaBuffer inputMediaBuffer;
    private DmoOutputDataBuffer outputBuffer;
    private bool reposition;

    public DmoMp3FrameDecompressor(WaveFormat sourceFormat)
    {
        this.mp3Decoder = new WindowsMediaMp3Decoder();
        if (!mp3Decoder.MediaObject.SupportsInputWaveFormat(0, sourceFormat))
        {
            throw new ArgumentException("Unsupported input format");
        }
        mp3Decoder.MediaObject.SetInputWaveFormat(0, sourceFormat);
        pcmFormat = new WaveFormat(sourceFormat.SampleRate, sourceFormat.Channels); // 16 bit
        if (!mp3Decoder.MediaObject.SupportsOutputWaveFormat(0, pcmFormat))
        {
            throw new ArgumentException(String.Format("Unsupported output format {0}", pcmFormat));
        }
        mp3Decoder.MediaObject.SetOutputWaveFormat(0, pcmFormat);

        // a second is more than enough to decompress a frame at a time
        inputMediaBuffer = new MediaBuffer(sourceFormat.AverageBytesPerSecond);
        outputBuffer = new DmoOutputDataBuffer(pcmFormat.AverageBytesPerSecond);
    }

    public WaveFormat OutputFormat { get { return pcmFormat; } }

    public int DecompressFrame(Mp3Frame frame, byte[] dest, int destOffset)
    {
        // 1. copy into our DMO's input buffer
        inputMediaBuffer.LoadData(frame.RawData, frame.FrameLength);

        if (reposition)
        {
            mp3Decoder.MediaObject.Flush();
            reposition = false;
        }

        // 2. Give the input buffer to the DMO to process
        mp3Decoder.MediaObject.ProcessInput(0, inputMediaBuffer, DmoInputDataBufferFlags.None, 0, 0);

        outputBuffer.MediaBuffer.SetLength(0);
        outputBuffer.StatusFlags = DmoOutputDataBufferFlags.None;

        // 3. Now ask the DMO for some output data
        mp3Decoder.MediaObject.ProcessOutput(DmoProcessOutputFlags.None, 1, new[] { outputBuffer });

        if (outputBuffer.Length == 0)
        {
            Debug.WriteLine("ResamplerDmoStream.Read: No output data available");
            return 0;
        }

        // 5. Now get the data out of the output buffer
        outputBuffer.RetrieveData(dest, destOffset);

        return outputBuffer.Length;
    }

    // ... Reset and Dispose
}
It would also be possible to extend NAudio with your own custom MP3 frame decompressors. I hope to add one soon that uses Media Foundation. Alternatively, you could make a fully managed one out of another of my open source projects, NLayer.
With all that out of the way, what is the code to convert MP3 to WAV in NAudio? It’s actually very simple:
using(var reader = new Mp3FileReader("somefile.mp3")) {
    WaveFileWriter.CreateWaveFile("pcm.wav", reader);
}
If you want to change the MP3 frame decompressor, you can specify a different one like this:
using(var reader = new Mp3FileReader("somefile.mp3", (wf) => new DmoMp3FrameDecompressor(wf)))
{
    WaveFileWriter.CreateWaveFile("pcm.wav", reader);
}
Chaining ACM Codecs to Perform Multi-Step Conversions
I have explained that a decoder will typically only support a single PCM format as its decoder output format. But what if you wanted a different sample rate for example? The good thing is that ACM includes a resampler, so you could chain one onto the end of the other. Let’s show two simple examples. First, let’s decode some a-law (8kHz), and then upsample to 16kHz:
using(var reader = new WaveFileReader("alaw.wav"))
using(var converter = WaveFormatConversionStream.CreatePcmStream(reader))
using(var upsampler = new WaveFormatConversionStream(new WaveFormat(16000, converter.WaveFormat.Channels), converter))
{
    WaveFileWriter.CreateWaveFile("pcm16000.wav", upsampler);
}
We could do a similar thing to downsample an MP3 File to 32kHz. Remember that the Mp3FileReader is already outputting PCM, probably at 44.1kHz stereo. So we can connect another WaveFormatConversionStream to perform the resampling step:
using(var reader = new Mp3FileReader("example.mp3"))
using(var downsampler = new WaveFormatConversionStream(new WaveFormat(32000, reader.WaveFormat.Channels), reader))
{
    WaveFileWriter.CreateWaveFile("pcm32000.wav", downsampler);
}
Encoding as GSM with ACM
Before we leave ACM to talk about Media Foundation, let’s look briefly about how we would encode a file using ACM. It is in fact very similar to decoding, but the main difference is that you must know in advance the exact WaveFormat structure the encoder wants. So for example, I know that the GSM encoder wants a WAVEFORMATEX that contains two extra bytes, representing the number of samples per block. I make a derived WaveFormat class, which sets up the appropriate values for 13kbps GSM 610, and fills in the number of samples per block value:
[StructLayout(LayoutKind.Sequential, Pack = 2)]
public class Gsm610WaveFormat : WaveFormat
{
    private short samplesPerBlock;

    public Gsm610WaveFormat()
    {
        this.waveFormatTag = WaveFormatEncoding.Gsm610;
        this.channels = 1;
        this.averageBytesPerSecond = 1625; // 13kbps
        this.bitsPerSample = 0; // must be zero
        this.blockAlign = 65;
        this.sampleRate = 8000;

        this.extraSize = 2;
        this.samplesPerBlock = 320;
    }

    public short SamplesPerBlock { get { return this.samplesPerBlock; } }
}
It is worth reiterating that you don’t need to understand what all the values in the structure mean, because the codec itself is able to tell you what values it wants (see the section on enumerating ACM codecs for more information). With this custom WaveFormat available, we can now do the conversion from PCM to GSM quite simply:
using(var reader = new WaveFileReader("pcm.wav"))
using(var converter = new WaveFormatConversionStream(new Gsm610WaveFormat(), reader)) {
    WaveFileWriter.CreateWaveFile("gsm.wav", converter);
}
Remember that there will likely be only one PCM format that the encoder will accept as valid input (in this case 8kHz, 16 bit, mono). But using this technique you should be able to use any ACM encoder installed on your computer.
Converting WMA, MP3 or AAC to WAV with Media Foundation
So far I have focussed on explaining how you can use ACM, but in the introduction I said that the future of codec APIs on the Windows platform is the Media Foundation API. So how do we decompress a file with Media Foundation? Media Foundation has the concept of «source readers», which enable it to handle the reading of many different types of file. In other words, classes such as WavFileReader and Mp3FileReader in NAudio may actually not be necessary (although they do still provide some other benefits such as reading custom chunks from a WAV file, or trimming an MP3 file by discarding frames from the beginning or end).
First we must create our source reader. To do this, we use the MFCreateSourceReaderFromURL function. As the name suggests, this could actually be used for streaming audio with a http:// or mms:// URL, but if we are playing a file from local disk, we can either use a file:// URL by or pass in the path directly.
IMFSourceReader pReader;
MediaFoundationInterop.MFCreateSourceReaderFromURL(fileName, null, out pReader);
This gives us an instance of the IMFSourceReader interface. There’s a few things we need to do first before using it. First we «select» the first audio stream in the file. This is because IMFSourceReader deals with video files too, so there may in fact be more than one audio stream, and a video stream too. The simplest way is to deselect everything, and then select the first audio stream only.
pReader.SetStreamSelection(MediaFoundationInterop.MF_SOURCE_READER_ALL_STREAMS, false);
pReader.SetStreamSelection(MediaFoundationInterop.MF_SOURCE_READER_FIRST_AUDIO_STREAM, true);
Now we need to tell the source reader that we would like PCM. This is a really nice feature, which means the source reader will itself attempt to find the appropriate codec to decompress the audio into PCM for us. We do this by calling SetCurrentMediaType, with a «partial» media type object, that simply specifies that we want PCM.
IMFMediaType partialMediaType;
MediaFoundationInterop.MFCreateMediaType(out partialMediaType);
partialMediaType.SetGUID(MediaFoundationAttributes.MF_MT_MAJOR_TYPE, MediaTypes.MFMediaType_Audio);
partialMediaType.SetGUID(MediaFoundationAttributes.MF_MT_SUBTYPE, AudioSubtypes.MFAudioFormat_PCM);
pReader.SetCurrentMediaType(MediaFoundationInterop.MF_SOURCE_READER_FIRST_AUDIO_STREAM, IntPtr.Zero, partialMediaType);
Marshal.ReleaseComObject(partialMediaType);
Assuming this worked, we can now call GetCurrentMediaType to find out the exact PCM format our stream will be decoded into. NAudio uses this to generate a WaveFormat object representing the decompressed format of this MediaFoundationReader.
IMFMediaType uncompressedMediaType;
pReader.GetCurrentMediaType(MediaFoundationInterop.MF_SOURCE_READER_FIRST_AUDIO_STREAM,
        out uncompressedMediaType);
Guid audioSubType;
uncompressedMediaType.GetGUID(MediaFoundationAttributes.MF_MT_SUBTYPE, out audioSubType);
Debug.Assert(audioSubType == AudioSubtypes.MFAudioFormat_PCM);
int channels;
uncompressedMediaType.GetUINT32(MediaFoundationAttributes.MF_MT_AUDIO_NUM_CHANNELS, out channels);
int bits;
uncompressedMediaType.GetUINT32(MediaFoundationAttributes.MF_MT_AUDIO_BITS_PER_SAMPLE, out bits);
int sampleRate;
uncompressedMediaType.GetUINT32(MediaFoundationAttributes.MF_MT_AUDIO_SAMPLES_PER_SECOND, out sampleRate);
waveFormat = new WaveFormat(sampleRate, bits, channels);
Now we have set up our source reader, we are ready to decode audio. The basic technique is to keep calling ReadSample on the IMFSourceReader interface. Despite the name this does not mean read a single PCM sample. Instead, it reads the next chunk of compressed data from the source file and returns it as a sample containing PCM. Media Foundation actually timestamps all its samples in units of 100ns each. However, since we know that each sample follows the last directly in audio, we don’t need to use the timestamp for anything here. Here’s how you read out the next sample:
IMFSample pSample;
int dwFlags;
ulong timestamp;
int actualStreamIndex;
pReader.ReadSample(MediaFoundationInterop.MF_SOURCE_READER_FIRST_AUDIO_STREAM, 0, out actualStreamIndex, out dwFlags, out timestamp, out pSample);
if (dwFlags != 0) // reached the end of the stream or media type changed
{
    return;
}
Now we have read a sample, we can’t actually get access to its raw PCM data until we turn it into an IMFMediaBuffer. Calling ConvertToContiguousBuffer does this, and it is not until we call Lock on that buffer that we have an actual pointer to the memory containing the raw PCM samples, which we can then copy into our own byte array.
IMFMediaBuffer pBuffer;
pSample.ConvertToContiguousBuffer(out pBuffer);
IntPtr pAudioData = IntPtr.Zero;
int cbBuffer;
int pcbMaxLength;
pBuffer.Lock(out pAudioData, out pcbMaxLength, out cbBuffer);
var decoderOutputBuffer = new byte[cbBuffer];
Marshal.Copy(pAudioData, decoderOutputBuffer, 0, cbBuffer);
pBuffer.Unlock();
Marshal.ReleaseComObject(pBuffer);
Marshal.ReleaseComObject(pSample);
As usual, NAudio tries to prevent you from having to write all this interop code yourself, so you can convert WMA (or MP3 or AAC or whatever) to PCM using the following simple code (n.b. this is new to NAudio 1.7 which is currently in pre-release):
using(var reader = new MediaFoundationReader("myfile.wma"))
{
    WaveFileWriter.CreateWaveFile("myfile.wav", reader);
}
Extracting audio from a video file with Media Foundation
The general purpose nature of the Media Foundation APIs may cause some frustration when only dealing with audio, but it does have considerable benefits. One of those is that it becomes trivially easy to extract the audio from a video file. Here’s how to save the soundtrack of an .m4v video file to WAV:
using(var reader = new MediaFoundationReader("movie.m4v"))
{
    WaveFileWriter.CreateWaveFile("soundtrack.wav", reader);
}
Encoding PCM to WMA, MP3 or AAC with Media Foundation
So we’ve seen that decoding audio is quite easy with Media Foundation. What about encoding? This is a little more intricate, as (like with ACM), you need to make some decisions about exactly what encoding format you want to encode to.
Often, when you are writing an application that supports encoding, you want to present your users with a choice of encoding formats. For this, you need to be able to query what encoders are on the system. However, if you do that, you may end up showing some encoders that aren’t really appropriate for your application. So it may make more sense to have a shortlist of audio subtypes (e.g. MP3, WMA and AAC) and then ask Media Foundation what bitrates are available for those types.
The way we do this is with a call to MFTranscodeGetAudioOutputAvailableTypes. This will allow us to get a list of IMFMediaType objects that represent all the possible formats the encoders can create for that type. This will generally return a very long list, so it needs to be filtered down. First, of all, you should only select formats that match the sample rate and channel count of your input. Having done this, the main difference between the remaining media formats should be different bitrates. However, sometimes there are extra configurable parameters. For example the AAC encoder in Windows 8 lets you select the MF_MT_AAC_PAYLOAD_TYPE. Here’s a function that will find the possible encoding bitrates for an encoding type (e.g. WMA, MP3, AAC), given an input file with a specific sample rate and channel count:
public static int[] GetEncodeBitrates(Guid audioSubtype, int sampleRate, int channels)
{
    var bitRates = new HashSet<int>();
    IMFCollection availableTypes;
    MediaFoundationInterop.MFTranscodeGetAudioOutputAvailableTypes(
        audioSubtype, _MFT_ENUM_FLAG.MFT_ENUM_FLAG_ALL, null, out availableTypes);
    int count;
    availableTypes.GetElementCount(out count);
    for (int n = 0; n < count; n++)
    {
        object mediaTypeObject;
        availableTypes.GetElement(n, out mediaTypeObject);
        var mediaType = (IMFMediaType)mediaTypeObject;

        // filter out types that are for the wrong sample rate and channels
        int samplesPerSecond;
        mediaType.GetUINT32(MediaFoundationAttributes.MF_MT_AUDIO_SAMPLES_PER_SECOND, out samplesPerSecond);
        if (sampleRate != samplesPerSecond)
            continue;
        int channelCount;
        mediaType.GetUINT32(MediaFoundationAttributes.MF_MT_AUDIO_NUM_CHANNELS, out channelCount);
        if (channels != channelCount)
            continue;

        int bytesPerSecond;
        mediaType.GetUINT32(MediaFoundationAttributes.MF_MT_AUDIO_AVG_BYTES_PER_SECOND, out bytesPerSecond);
        bitRates.Add(bytesPerSecond*8);
        Marshal.ReleaseComObject(mediaType);
    }
    Marshal.ReleaseComObject(availableTypes);
    return bitRates.ToArray();
}
Once we have decided what exact bitrate we want to use, we are ready to start encoding. We start by creating a «sink writer». Sink writers are Media Foundation’s way of giving you classes that know how to write to various container types. The container types supported by Media Foundation are shown in this list. You can create a sink writer in various ways, but the simplest is to call MFCreateSinkWriterFromURL. This takes an attributes parameter which you could use to specify the container type you want, but it can also work it out from your filename. However, you should bear in mind that different versions of Windows support different container types, so in Windows 8 you can create a .aac file, but if you are using Windows 7 you will have to put your AAC audio into a .mp4 container. Unlike MFCreateSourceReaderFromURL, you can’t provide a path in the file:// format. This one wants a regular file path.
Having created your sink writer, you need to configure its input and output media types. The output media type should be one of the IMFMediaType objects returned by MFTranscodeGetAudioOutputAvailableTypes. The input type will be a PCM media type which you either configure yourself, or create using MFInitMediaTypeFromWaveFormatEx. You will get an MF_E_INVALIDMEDIATYPE here if you request an encoding that is not possible. Finally you call BeginWriting on the sink writer.
int streamIndex;
writer.AddStream(outputMediaType, out streamIndex);
writer.SetInputMediaType(streamIndex, inputMediaType, null);
writer.BeginWriting();
Now we are ready to work our way through the input file and encode it. The basic procedure is to create an IMFSample, fill it with data from the input file, and then pass it to the sink writer’s WriteSample function. However, configuring the sample object is a little tricky to get right.
You can create an IMFSample easily enough by calling MFCreateSample. But each sample needs to contain at least one IMFMediaBuffer. Since we want to write PCM directly into this buffer, we create one using MFCreateMemoryBuffer. You can specify the size of the buffer in bytes. I tend to deal with encoding in blocks of one second at a time, so this buffer needs to be the same size as the average bytes per second of the input file’s PCM WaveFormat.
Now to be able to copy data from our source file into the buffer, we use the same technique of calling Lock on the IMFMediaBuffer, doing a Marshal.Copy of a second’s worth of PCM from our source into the pointer returned by Lock. Then we Unlock the buffer, and tell it how many bytes we wrote into it by calling SetCurrentLength.
The other important thing to do when encoding is to call SetSampleTime and SetSampleDuration on the IMFSample. This is annoying to have to do, because really we’d just like the encoder to assume that all the samples we give it follow on from the last one. This feature is probably more relevant for encoding video, where you want to timestamp individual frames. The timestamps and durations used by Media Foundation are in units of 100ns. So we can use this function to convert from a number of bytes to the correct units:
private static long BytesToNsPosition(int bytes, WaveFormat waveFormat)
{
    long nsPosition = (10000000L * bytes) / waveFormat.AverageBytesPerSecond;
    return nsPosition;
}
Having set up our media buffer and sample, we can pass it to the encoder using WriteSample. You can also call Flush at this point. You might be tempted to think that having flushed the writer, you could save memory and reuse the media buffer and sample, but my tests doing this resulted in a corrupted encode. So it is probably best to simply create new buffers and samples each time. Here’s the code that NAudio uses to pass a single buffer into the encoder:
private long ConvertOneBuffer(IMFSinkWriter writer, int streamIndex, IWaveProvider inputProvider, long position, byte[] managedBuffer)
{
    long durationConverted = 0;
    int maxLength;
    IMFMediaBuffer buffer = MediaFoundationApi.CreateMemoryBuffer(managedBuffer.Length);
    buffer.GetMaxLength(out maxLength);

    IMFSample sample = MediaFoundationApi.CreateSample();
    sample.AddBuffer(buffer);

    IntPtr ptr;
    int currentLength;
    buffer.Lock(out ptr, out maxLength, out currentLength);
    int read = inputProvider.Read(managedBuffer, 0, maxLength);
    if (read > 0)
    {
        durationConverted = BytesToNsPosition(read, inputProvider.WaveFormat);
        Marshal.Copy(managedBuffer, 0, ptr, read);
        buffer.SetCurrentLength(read);
        buffer.Unlock();
        sample.SetSampleTime(position);
        sample.SetSampleDuration(durationConverted);
        writer.WriteSample(streamIndex, sample);
        //writer.Flush(streamIndex);
    }
    else
    {
        buffer.Unlock();
    }

    Marshal.ReleaseComObject(sample);
    Marshal.ReleaseComObject(buffer);
    return durationConverted;
}
If all this seems like a lot of work, the good news is that NAudio offers a simplified interface. The MediaFoundationEncoder class (again new for NAudio 1.7) allows you to perform an encode very simply. The EncodeToWma, EncodeToMp3 and EncodeToAac helper methods take an input IWaveProvider (almost everything in NAudio is an IWaveProvider, so this can be a file reader, or a stream of audio data you have generated i some other way), an output filename, and a desired bitrate.
using(var reader = MediaFoundationReader("somefile.mp3"))
{
    MediaFoundationEncoder.EncodeToWma(reader, "encoded.wma", 192000);
}
Or if you prefer you can use MediaFoundationEncoder.GetOutputMediaTypes to request all the media types available for a particular audio subtype. For example if you were encoding AAC, you might want to let the user pick from a list of possible encodings, and pass that in to the MediaFoundationEncoder constructor.
var outputTypes = MediaFoundationEncoder.GetOutputMediaTypes(
    AudioSubtypes.MFAudioFormat_AAC;
var mediaType = // TODO: select one
using(var reader = MediaFoundationReader("somefile.mp4"))
using(var encoder = MediaFoundationEncoder(mediaType))
{
    encoder.Encode("outFile.mp4", reader);
}
Resampling with Media Foundation
The last thing I want to discuss with Media Foundation is the Resampler object. To use this we must access the IMFTransform interface directly as we will not be using Source Readers or Sink Writers. Passing data through an IMFTransform correctly is one of the hardest Media Foundation tasks to implement correctly in .NET. The good news is that once you have done it, you can use it for any of the MFTs including encoders and decoders, so you could support decoding from or encoding to a network stream instead of a file for example.
The first thing to do is create the COM object that implements the IMFTransform interface. There are several ways you can go about this. One is to use the ActivateObject call on the IMFActivate interface you get by enumerating the Media Foundation Transforms. You will have to use this technique if you are writing a Windows Store application. For other application types, if you know the GUID of the specific transform you want to create (as we do with the Resampler), you can create one by using the ComImport attribute:
[ComImport, Guid("f447b69e-1884-4a7e-8055-346f74d6edb3")]
class ResamplerMediaComObject
{
}
When you create an instance of this class, you get a wrapper round the COM object, allowing you to cast it to any of the interfaces supported by that COM object. So we first cast it to an IMFTransform, and then we need to set its input and output types. For the resampler both will be PCM, and in NAudio it is easiest to construct them from pre-existing WaveFormat structures:
var comObject = new ResamplerMediaComObject();
resamplerTransform = (IMFTransform) comObject;

var inputMediaFormat = MediaFoundationApi.CreateMediaTypeFromWaveFormat(sourceProvider.WaveFormat);
resamplerTransform.SetInputType(0, inputMediaFormat, 0);
Marshal.ReleaseComObject(inputMediaFormat);

var outputMediaFormat = MediaFoundationApi.CreateMediaTypeFromWaveFormat(waveFormat);
resamplerTransform.SetOutputType(0, outputMediaFormat, 0);
Marshal.ReleaseComObject(outputMediaFormat);
We also have the opportunity for the Resampler to set its quality which is a number between 1 and 60. 1 is lowest quality (linear interpolation), with 60 the highest quality. The higher the quality, the more latency will be introduced (i.e. you need to read more input samples before any output samples appear). I have not done any performance measurements to see how much additional CPU usage is required, but the resampler seems to perform well enough at the highest quality. You can set the property using the IWMResamplerProps interface, which is implemented by the same COM object:
var resamplerProps = (IWMResamplerProps) comObject;
// 60 is the best quality, 1 is linear interpolation
resamplerProps.SetHalfFilterLength(60);
The final step before we can start passing data through our transform is to send it some initiaization messages:
resamplerTransform.ProcessMessage(MFT_MESSAGE_TYPE.MFT_MESSAGE_COMMAND_FLUSH, IntPtr.Zero);
resamplerTransform.ProcessMessage(MFT_MESSAGE_TYPE.MFT_MESSAGE_NOTIFY_BEGIN_STREAMING, IntPtr.Zero);
resamplerTransform.ProcessMessage(MFT_MESSAGE_TYPE.MFT_MESSAGE_NOTIFY_START_OF_STREAM, IntPtr.Zero);
Now to pass audio through the transform, we must do the following steps:
- Read some PCM data from our source file and use that to create a sample containing a memory buffer
- Call ProcessInput on our transform, passing in the sample
- Call ProcessOutput on our transform, and copy the data out of the returned sample object
The first two steps are very similar to what we have to do when supplying data to a sink writer, while the third is similar to what we do when reading from a source reader, so the code should begin to look familiar by now. Here’s us some code that creates an IMFSample:
private IMFSample ReadFromSource()
{
    // we always read a full second
    int bytesRead = sourceProvider.Read(sourceBuffer, 0, sourceBuffer.Length);
    if (bytesRead == 0) return null;

    var mediaBuffer = MediaFoundationApi.CreateMemoryBuffer(bytesRead);
    IntPtr pBuffer;
    int maxLength, currentLength;
    mediaBuffer.Lock(out pBuffer, out maxLength, out currentLength);
    Marshal.Copy(sourceBuffer, 0, pBuffer, bytesRead);
    mediaBuffer.Unlock();
    mediaBuffer.SetCurrentLength(bytesRead);

    var sample = MediaFoundationApi.CreateSample();
    sample.AddBuffer(mediaBuffer);
    // we'll set the time, I don't think it is needed for Resampler, but other MFTs might need it
    sample.SetSampleTime(inputPosition);
    long duration = BytesToNsPosition(bytesRead, sourceProvider.WaveFormat);
    sample.SetSampleDuration(duration);
    inputPosition += duration;
    Marshal.ReleaseComObject(mediaBuffer);
    return sample;
}
Having created the IMFSample, pass it to the transform:
transform.ProcessInput(0, sample, 0);
Then we can read from the sample and write it into our managed output buffer (called outputBuffer here):
private int ReadFromTransform()
{
    var outputDataBuffer = new MFT_OUTPUT_DATA_BUFFER[1];
    // we have to create our own for
    var sample = MediaFoundationApi.CreateSample();
    var pBuffer = MediaFoundationApi.CreateMemoryBuffer(outputBuffer.Length);
    sample.AddBuffer(pBuffer);
    sample.SetSampleTime(outputPosition); // hopefully this is not needed
    outputDataBuffer[0].pSample = sample;

    _MFT_PROCESS_OUTPUT_STATUS status;
    var hr = transform.ProcessOutput(_MFT_PROCESS_OUTPUT_FLAGS.None,
                                     1, outputDataBuffer, out status);
    if (hr == MediaFoundationErrors.MF_E_TRANSFORM_NEED_MORE_INPUT)
    {
        Marshal.ReleaseComObject(pBuffer);
        Marshal.ReleaseComObject(sample);
        // nothing to read
        return 0;
    }
    else if (hr != 0)
    {
        Marshal.ThrowExceptionForHR(hr);
    }

    IMFMediaBuffer outputMediaBuffer;
    outputDataBuffer[0].pSample.ConvertToContiguousBuffer(out outputMediaBuffer);
    IntPtr pOutputBuffer;
    int outputBufferLength;
    int maxSize;
    outputMediaBuffer.Lock(out pOutputBuffer, out maxSize, out outputBufferLength);
    outputBuffer = BufferHelpers.Ensure(outputBuffer, outputBufferLength);
    Marshal.Copy(pOutputBuffer, outputBuffer, 0, outputBufferLength);
    outputBufferOffset = 0;
    outputBufferCount = outputBufferLength;
    outputMediaBuffer.Unlock();
    outputPosition += BytesToNsPosition(outputBufferCount, WaveFormat); // hopefully not needed
    Marshal.ReleaseComObject(pBuffer);
    Marshal.ReleaseComObject(sample);
    Marshal.ReleaseComObject(outputMediaBuffer);
    return outputBufferLength;
}
Again, you are probably thinking that this is a ridiculous amount of code to have to write just to pass your audio through a resampler. I have attempted to make this as simple as possible with NAudio. Here’s the code that resamples an MP3 file to 16kHz with NAudio:
using (var reader = new MediaFoundationReader("input.mp3"))
using (var resampler = new MediaFoundationResampler(reader, 16000))
{
    WaveFileWriter.CreateWaveFile("output resampled 16kHz.wav", resampler);
}
Nice and simple. The MediaFoundationResampler class also has an overload takes a WaveFormat parameter allowing you to take advantage of its ability to change bit depth or channel count. Let’s turn the same MP3 file into an IEEE floating point file with the resampler:
using (var reader = new MediaFoundationReader("input.mp3"))
using (var resampler = new MediaFoundationResampler(reader,
  WaveFormat.CreateIeeeFloatWaveFormat(reader.WaveFormat.SampleRate, reader.WaveFormat.Channels)))
{
    WaveFileWriter.CreateWaveFile("output IEEE float.wav", resampler);
}
Changing bit depth and channel count
We’ve already shown the algorithms involved in changing bit depth and channel count, and although the Media Foundation Resampler is able to do this, sometimes it might be simpler just to do in code, especially if you are targetting an OS that doesn’t support Media Foundation. NAudio contains a variety of helper classes that you can chain together to move between bit depths and change the number of channels.
Here’s some of the available classes for manipulating the channel count:
- MonoToStereoProvider16 turns 16 bit mono audio into stereo, allowing you to adjust the volume put into each channel.
- StereoToMonoProvider16 lets you go the other way, choosing left or right channel, or even mixing different amounts of them together
- MultiplexingSampleProvider and MultiplexingWaveProvider are much more powerful, allowing you to swap left and right channels, copying the same input from one channel to multiple channels etc. Read more about these classes here.
There are also a lot of classes for manipulating bit depth. I’ll mention just a few of the more commonly used ones:
- Wave16ToFloatProvider and WaveFloatTo16Provider let you move between 16 bit and IEEE float while using the
IWaveProviderinterface (which passes audio data around in byte arrays) - Alternatively, NAudio has
ISampleProviderfor use with IEEE float and passes audio data around in float arrays, which make manipulating and exampining samples much easier. Pcm16BitToSampleProvider, Pcm24BitToSampleProvider, will get you from PCM to IEEE float, and then SampleToWaveProvider16 should be used to get back down to 16 bit format ready to write out to a WAV file.
Converting Audio Without ACM or MFT
There are some occasions when you need to convert to or from an audio codec that isn’t covered by ACM or MFT. Or perhaps your application needs to support Windows XP and the MFTs you want are not available. In this situation you have three main options for converting audio.
First, and most simple is to bundle a command line audio converter tool with your application. There are lots of great open source audio conversion programs such as sox. Another great example is lame.exe which can encode MP3s. If you create a WAV file, you can use lame.exe to convert it to WAV at 128kbps like so:
var infile = @"C:\Users\Mark\Desktop\Temp\somefile.wav";
var outfile = @"c:\users\mark\Desktop\Temp\encoded128.mp3";
var lamepath = @"C:\Users\Mark\Apps\lame.exe";
Process p = new Process();
p.StartInfo.FileName = lamepath;
p.StartInfo.UseShellExecute = false;
p.StartInfo.Arguments = String.Format("-b 128 \"{0}\" \"{1}\"", infile, outfile);
p.StartInfo.CreateNoWindow = true;
p.Start();
Some command line programs even let you stream data to and from its stdin and stdout. For example, you can use lame.exe encode an MP3 file on the fly without the intermediate step of making a WAV file. Here’s an example of how to encode 16kHz mono PCM to MP3 directly (read about the command line switches here):
string outputFileName = @"c:\users\mark\documents\test.mp3";
Process p = new Process();
p.StartInfo.FileName = @"lame.exe";
p.StartInfo.UseShellExecute = false;
p.StartInfo.RedirectStandardInput = true;
p.StartInfo.Arguments = "-r -s 16 -m m - \"" + outputFileName + "\"";
p.StartInfo.CreateNoWindow = true;
p.Start();
// now write your raw PCM audio into the standard input stream and close it when you are done
p.StandardInput.BaseStream;
Your second option is to port the codec into managed code. Depending on the codec, this could be a big task. NAudio contains fully managed implementations of G.711 (MuLawDecoder, MuLawEncoder, ALawDecoder, ALawEncoder) and G.722 (G722Codec). I’ve also ported an MP3 decoder which is available in the NLayer project (can’t be part of NAudio due to open source license incompatibility). There is also a fully managed Ogg Vorbis decoder available at NVorbis. This includes an NAudio compatible class called VorbisWaveReader. Not all codecs are open source though, so porting to managed code is not always an option.
The third option is to write your own P/Invoke wrappers for an unmanged codec DLL. For example, Yuval Naveh has done this to add FLAC support to NAudio in his PracticeSharp open source project. Writing interop wrappers can be a time-consuming and frustrating process, but is often quicker than attempting a full managed port of a codec.
Performance issues
I’ll finish off with some brief comments on performance, as it is quite common to want to decode and resample audio in real-time, and sometimes you need to encode it in real-time as well. Modern processors are actually well equipped to handle most audio encoding and decoding tasks quickly enough for this not to become an issue. However, there are a few tricks you can use to speed things up a bit.
One is to avoid giving the garbage collector extra work by declaring your buffers up front and reusing them. Sometimes this might mean creating a buffer pool, where you cycle through a few buffers, allowing more than one to be in active use at one time. But the garbage collector remains the most likely thing to cause a stutter in audio playback, so if you can possibly avoid creating new objects during decode, you should.
Another is to use appropriately sized buffers. I would usually recommend encoding or decoding around a second at a time. The smaller the buffers you try to work with, the more unecessary work is done. However, if you use buffers that are too large, sometimes the encoder or decoder will not work correctly. This is usually a compromise, as if you want to work at low latencies (which is sometimes important in audio), you will need to work with much smaller buffers.
One of the annoying things about wrapping unmanaged audio APIs in .NET is that you find yourself copying data between arrays more times than ought to be necessary. There are some tricks you can use to avoid copies or speed them up. For example, Buffer.BlockCopy allows you to quickly copy between arrays, even of different types (so you could move data from a byte[] to a float[] for example). If the API allows it, you can use a GCHandle on a pinned byte[] and call AddrOfPinnedObject to give the API direct access to your byte array without an additional copy step.
Finally, on the interop signatures themselves, there are ways to speed things up. For example, you can apply the SuppressUnmanagedCodeSecurity attribute if you understand and are happy with the consequences.
Summary
Working with compressed audio formats in .NET applications can be a frustrating task at times, but hopefully in this article I have given you enough information to be able to add read and write support into your applications for the vast majority of commonly used codecs.
Where is the Code?
All of the code shared in this article (with the exception of a few self-contained examples) is part of the NAudio project. The main NAudio dll contains all of the P/Invoke and COM interop wrappers as well as a large number of helper classes. In addition, NAudio comes with two demo projects, one called NAudioDemo and NAudioWpfDemo. These include examples of how to enumerate ACM and MFT codecs, how to use Media Foundation to encode and decode audio in any format. The Media Foundation interop is a relatively new addition to the NAudio library and as such the interface is likely to evolve a bit over the coming months.
All of the code for the main library and the sample projects can be downloaded by going to the Source Control tab at the NAudio project page. On that page, you can click the Download link to get the very latest code. Alternatively you can download the source code for the last official release (1.6) but that will not contain any Media Foundation support.
Here are some of the sections of the NAudio demo projects that are relevant for encoding and decoding files. First, in the NAudioDemo project, you can use this screen to view details of all installed ACM codecs, and perform ecoding and decoding of WAV files:
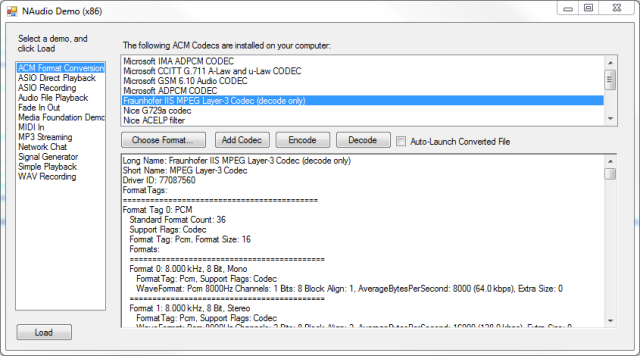
The WPF demo app has a screen that lets you enumerate your Media Foundation Transforms:
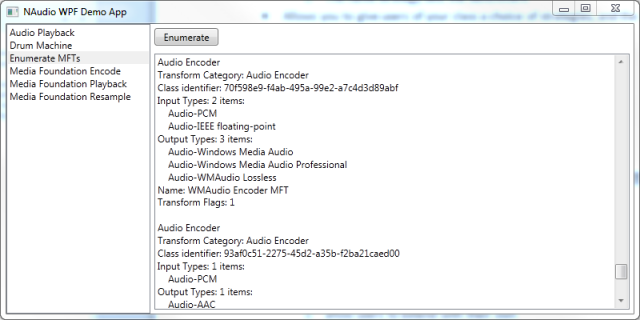
Another lets you use the encoder to create WMA, MP3, or AAC files (depending on what encoders are on your system):

And there is one that lets you experiment with the Media Foundation Resampler:

History
I’ll try to keep this article updated with any new audio encoding tips and tricks I learn, and any API updates to NAudio.
Please also let me know in the comments if you spot any mistakes.
- First version, 1 Dec 2012.
- Minor corrections, 11 Dec 2012, 4 Jan 2013