
В этой инструкции пошагово описаны способы отключить автоматические обновления Windows 10 (т.е. установку обновлений). В начале инструкции — проверенные и работающие в настоящее время методы отключения обновлений, далее — дополнительные варианты, которые к настоящему моменту могут не функционировать.
По умолчанию, Windows 10 автоматически проверяет наличие обновление, скачивает и устанавливает их, при этом отключить обновления стало сложнее, чем в предыдущих версиях операционной системы. Тем не менее, сделать это возможно: с помощью средств администрирования ОС или сторонних программ. В инструкции ниже — о том, как полностью отключить обновления системы, если же вам требуется отключить установку конкретного обновления KB и удалить его, необходимую информацию вы найдете в руководстве Как удалить обновления Windows 10. См. также: Как отключить автоматическое обновление драйверов в Windows 10, Программы управления обновлениями Windows 10.
Полное отключение обновлений Windows 10 без отключения Центра обновлений
Суть нижеприведенного метода отключения обновлений заключается в настройке обновлений таким образом, чтобы системы использовала локальный сервер обновлений. При этом, по причине фактического отсутствия этого сервера, обновления загружаться не будут.
Одновременно, служба центра обновлений Windows продолжит работать (не нагружая систему), а какие-либо серверы Майкрософт заблокированы не будут: это может быть полезным для работоспособности и правильного функционирования остальных компонентов системы, установки некоторых компонентов разработки Майкрософт, обновления приложений из Windows Store и других задач.
Чтобы отключить обновления Windows 10 этим методом, создайте reg-файл со следующим содержимым:
Windows Registry Editor Version 5.00

[HKEY_LOCAL_MACHINE\SOFTWARE\Policies\Microsoft\Windows\WindowsUpdate]
"DoNotConnectToWindowsUpdateInternetLocations"=dword:00000001
"UpdateServiceUrlAlternate"="server.wsus"
"WUServer"="server.wsus"
"WUStatusServer"="server.wsus"

[HKEY_LOCAL_MACHINE\SOFTWARE\Policies\Microsoft\Windows\WindowsUpdate\AU]
"UseWUServer"=dword:00000001
После этого «запустите» созданный файл и согласитесь с добавлением параметров в реестр. Сразу после этого, без перезагрузки компьютера, обновления перестанут скачиваться и обновляться.
- Из раздела реестра
HKEY_LOCAL_MACHINE\SOFTWARE\Policies\Microsoft\Windows\WindowsUpdate
удалите параметры DoNotConnectToWindowsUpdateInternetLocations, UpdateServiceUrlAlternate, WUServer, WUStatusServer
- Из раздела реестра
HKEY_LOCAL_MACHINE\SOFTWARE\Policies\Microsoft\Windows\WindowsUpdate\AU
удалите параметр UseWUServer
Этот же метод отключения обновлений реализован в бесплатной утилите Winaero Tweaker.
Отключение автоматического обновление с возможностью ручного обновления
С выходом новых версий Windows 10 многие способы отключения обновлений перестали работать: служба «Центр обновления Windows» включается сама по себе, блокировка в hosts не срабатывает, задания в планировщике заданий автоматически активируются со временем, параметры реестра работают не для всех редакций ОС.
Тем не менее, способ отключения обновлений (во всяком случае, их автоматического поиска, скачивания на компьютер и установки) существует. В заданиях Windows 10 присутствует задание Schedule Scan (в разделе UpdateOrchestrator), которое, используя системную программу C:\Windows\System32\UsoClient.exe регулярно выполняет проверку наличия обновлений, и мы можем сделать так, чтобы оно не работало. При этом обновления определений вредоносных программ для защитника Windows продолжат устанавливаться автоматически.
Отключение задания Schedule Scan и автоматических обновлений
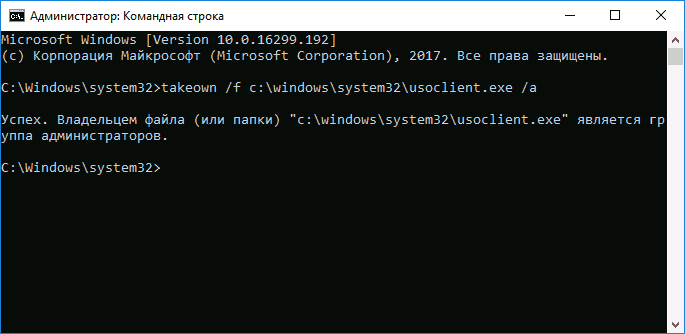
Для того, чтобы задание Schedule Scan перестало работать, а соответственно перестали автоматически проверяться и скачиваться обновления Windows 10, можно установить запрет на чтение и выполнение программы UsoClient.exe, без чего задание работать не будет.
Порядок действий будет следующим (для выполнения действий вы должны быть администратором в системе)
- Запустите командную строку от имени администратора. Для этого можно начать набирать «Командная строка» в поиске на панели задач, затем нажать правой кнопкой мыши по найденному результату и выбрать пункт «Запуск от имени администратора».
- В командной строке введите команду
takeown /f c:\windows\system32\usoclient.exe /a
и нажмите Enter.

- Закройте командную строку, перейдите в папку C:\Windows\System32\ и найдите там файл usoclient.exe, нажмите по нему правой кнопкой мыши и выберите пункт «Свойства».
- На вкладке «Безопасность» нажмите кнопку «Изменить».
- Поочередно выберите каждый пункт в списке «Группы или пользователи» и снимите для них все отметки в столбце «Разрешить» ниже.
- Нажмите Ок и подтвердите изменение разрешений.
- Перезагрузите компьютер.
После этого обновления Windows 10 не будут устанавливаться (и обнаруживаться) автоматически. Однако, при желании вы можете проверить наличие обновлений и установить их вручную в «Параметры» — «Обновление и безопасность» — «Центр обновления Windows».
При желании, вы можете вернуть разрешения на использование файла usoclient.exe командной в командной строке, запущенной от имени администратора:
icacls c:\windows\system32\usoclient.exe /reset
(однако, разрешения для TrustedInstaller не будут возвращены, равно как и не будет изменен владелец файла).
Примечания: Иногда, когда Windows 10 попробует обратиться к файлу usoclient.exe вы можете получить сообщение об ошибке «Отказано в доступе». Описанные выше шаги 3-6 можно выполнить и в командной строке, используя icacls, но рекомендую визуальный путь, поскольку список групп и пользователей с разрешениями может меняться по ходу обновлений ОС (а в командной строке нужно их указывать вручную).
В комментариях предлагают ещё один способ, который может оказаться работоспособным, лично не проверил:
Есть ещё одна идея, которая автоматически отключает службу «Центр обновления Windows», в чём суть. Windows 10 включает сам «Центр обновления Windows», в Управление компьютером — Служебные программы — Просмотр событий — Журналы Windows — Система, отображается информация об этом, при этом указывается, что сам пользователь включил службу (ага, только выключил недавно). Событие есть, продолжаем. Создаём .bat, который останавливает службу и меняет тип запуска на «Отключено»:
net stop wuauserv
sc config wuauserv start=disabled
Теперь создаём задачу в Управление компьютером — Служебные программы — Планировщик заданий.
- Триггеры. Журнал: Система. Источник: Service Control Manager.
- Код события: 7040. Действия. Запуск нашего .bat-файла.
Остальные настройки по вашему усмотрению.
Центр обновления Windows 10
Как вы могли заметить, обычно центр обновления включается снова, параметры реестра и задания планировщика система также приводит в нужное ей состояние, таким образом, что обновления продолжают скачиваться. Однако, есть способы решить эту проблему, причем это тот редкий случай, когда я рекомендую использовать стороннее средство. Прежде всего, рекомендую попробовать программу, по которой у меня опубликована отдельная инструкция — Как отключить обновления Windows 10 в Windows Update Blocker.
Windows Updates Disabler
Windows Updates Disabler представляет собой сценарий .bat для простого отключения всех обновлений Windows 11/10, а также служб и заданий, которые могли бы их снова включить и отдельный .bat файл для того, чтобы при необходимости откатить все сделанные изменения.
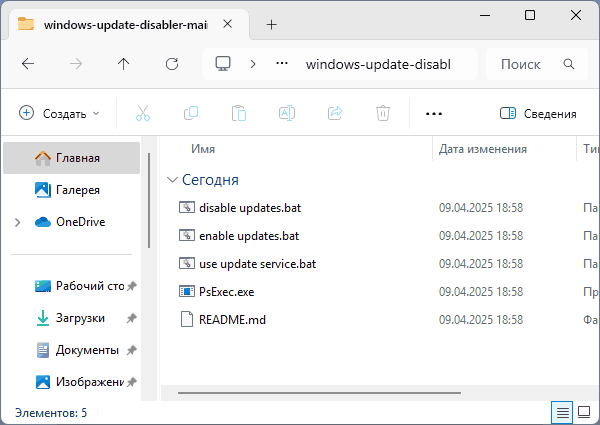
Подробная информация по загрузке и использованию доступна в отдельной инструкции.
UpdateDisabler
UpdateDisabler — простая утилита, которая позволяет очень просто и полностью отключить обновления Windows 10 и, возможно, на текущий момент времени — это одно из самых действенных решений.
При установке, UpdateDisabler создает и запускает службу, которая не дает Windows 10 снова начать загружать обновления, т.е. желаемый результат достигается не путем изменения параметров реестра или отключения службы «Центр обновления Windows 10», которые затем вновь изменяются самой системой, а постоянно следит за наличием заданий обновления и состоянием центра обновлений и, при необходимости, сразу отключает их.
Процесс отключения обновлений с помощью UpdateDisabler:
- Скачайте архив с сайта https://winaero.com/download.php?view.1932 и распакуйте на компьютер. Не рекомендую в качестве места хранения рабочий стол или папки документов, далее нам потребуется вводить путь к файлу программы.
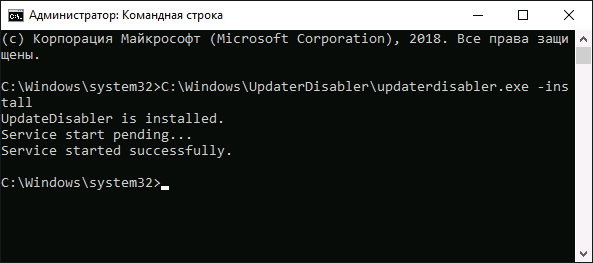
- Запустите командную строку от имени администратора (для этого можно начать набирать «Командная строка» в поиске на панели задач, затем нажать правой кнопкой мыши по найденному результату и выбрать пункт «Запуск от имени администратора») и введите команду, состоящую из пути к файлу UpdaterDisabler.exe и параметра -install, как на примере ниже:
C:\Windows\UpdaterDisabler\UpdaterDisabler.exe -install

- Служба отключения обновлений Windows 10 будет установлена и запущена, обновления скачиваться не будут (в том числе и вручную через параметры), также не будет выполняться и их поиск. Не удаляйте файл программы, оставьте его в том же расположении, откуда производилась установка.

- При необходимости снова включить обновления, используйте тот же метод, но в качестве параметра укажите -remove.
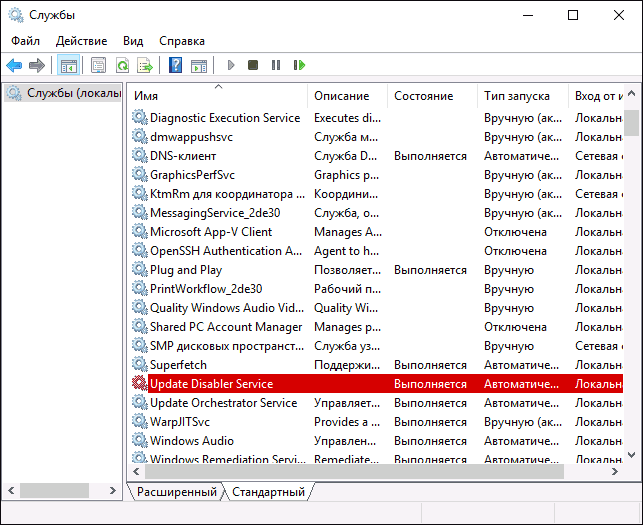
На данный момент времени утилита работает исправно, а операционная система не включает автоматические обновления снова.
Изменение параметров запуска службы Центр обновления Windows
Этот способ подходит не только для Windows 10 Профессиональная и Корпоративная, но и для домашней версии (если у вас Pro, рекомендую вариант с помощью редактора локальной групповой политики, который описан далее). Заключается он в отключении службы центра обновления. Однако, начиная с версии 1709 этот способ перестал работать в описываемом виде (служба включается со временем сама).
Перед использованием метода настоятельно рекомендую создать точку восстановления системы, по некоторым отзывам в комментариях, пользователям не удается откатить изменения (сам воспроизвести проблему не смог).
После отключения указанной службы, ОС не сможет автоматически загружать обновления и устанавливать их до тех пор, пока вы снова не включите ее. С недавних пор Центр обновления Windows 10 стал сам включаться, но это можно обойти и отключить его навсегда. Для отключения проделайте следующие шаги.
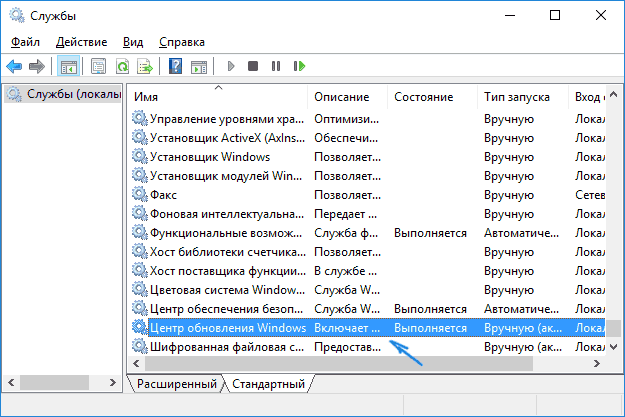
- Нажмите клавиши Win+R (Win — клавиша с эмблемой ОС), введите services.msc в окно «Выполнить» и нажмите Enter. Откроется окно «Службы».

- Найдите в списке службу «Центр обновления Windows» (Windows Update), дважды кликните по ней.
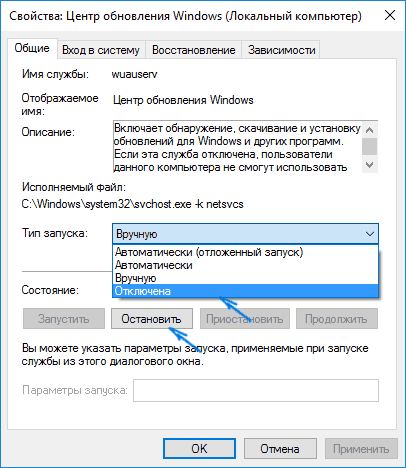
- Нажмите «Остановить». Также установите в поле «Тип запуска» значение «Отключена», примените настройки.

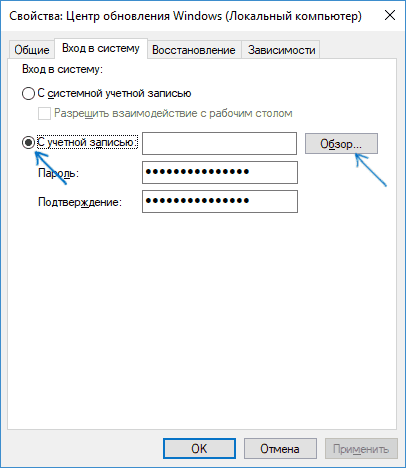
- Если так и оставить, то через некоторое время Центр обновления снова включится. Чтобы этого не произошло, в этом же окне, после применения параметров, перейдите на вкладку «Вход в систему», выберите пункт «С учетной записью» и нажмите «Обзор».
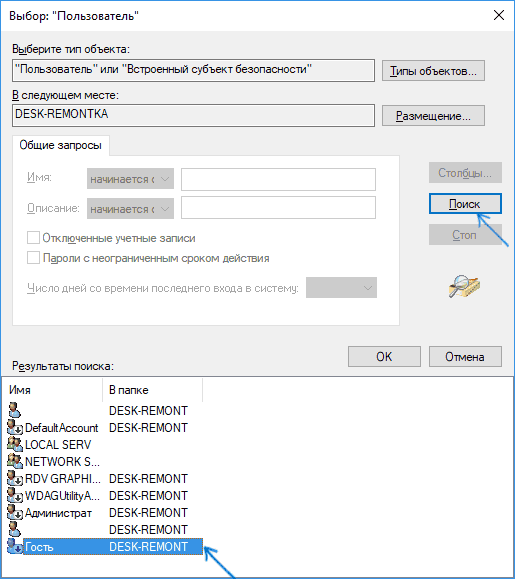
- В следующем окне нажмите «Дополнительно», затем — «Поиск» и в списке выберите пользователя без прав администратора, например, встроенного пользователя Гость.

- В окне уберите пароль и подтверждение пароля для пользователя (у него нет пароля) и примените настройки.
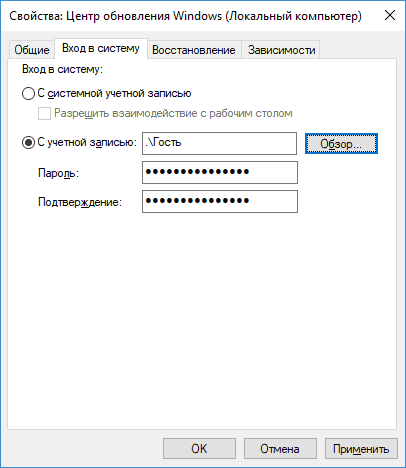
Теперь автоматическое обновление системы происходить не будет: при необходимости, вы можете аналогичным образом вновь запустить службу Центра обновления и сменить пользователя, от которого производится запуск на «С системной учетной записью».
Также на сайте доступна инструкция с дополнительными способами (хотя приведенного выше должно быть достаточно): Как отключить Центр обновления Windows 10.
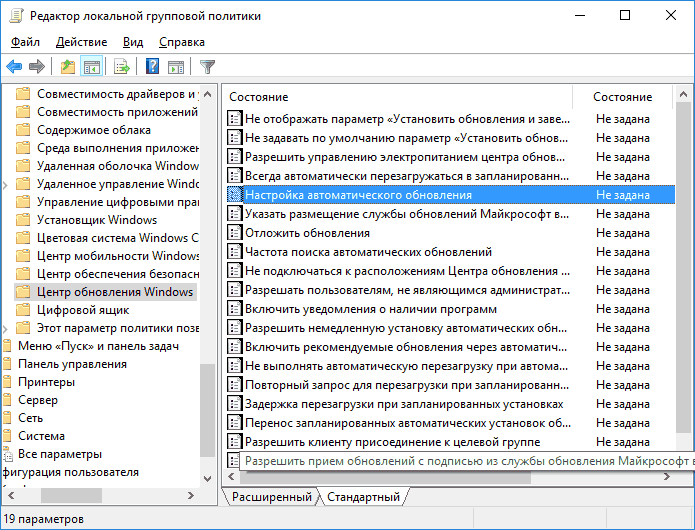
Редактор локальной групповой политики
Отключение обновлений с помощью редактора локальной групповой политики работает только для Windows 10 Pro и Enterprise, но при этом является самым надежным способом для выполнения указанной задачи. Действия по шагам:
- Запустите редактор локальной групповой политики (нажать Win+R, ввести gpedit.msc)
- Перейдите к разделу «Конфигурация компьютера» — «Административные шаблоны» — «Компоненты Windows» — «Центр обновления Windows». Найдите пункт «Настройка автоматического обновления» и дважды кликните по нему.

- В окне настройки установите «Отключено» для того, чтобы Windows 10 никогда не проверяла и не устанавливала обновления.

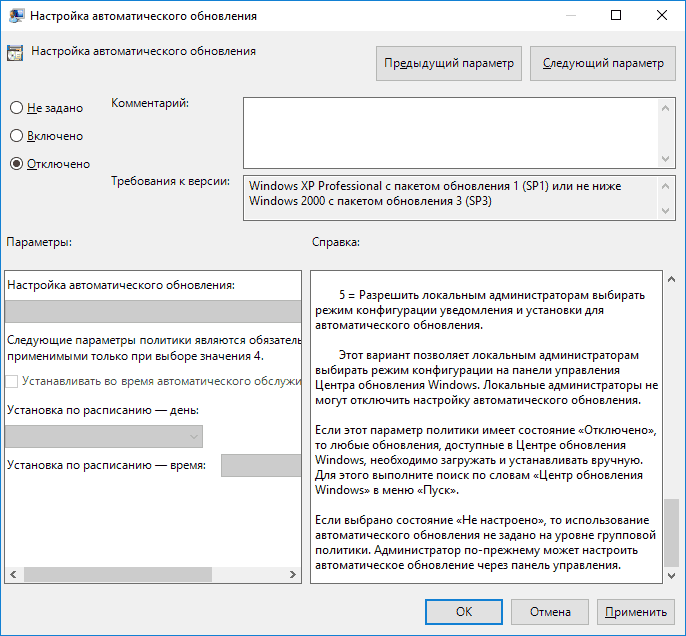
Закройте редактор, после чего зайдите в параметры системы и выполните проверку наличия обновлений (это нужно, чтобы изменения вступили в силу, сообщают, что иногда срабатывает не сразу. При этом при ручной проверке обновления найдутся, но в будущем автоматически поиск и установка выполняться не будут).
То же действие можно сделать и с помощью редактора реестра (в Домашней работать не будет), для этого в разделе HKEY_LOCAL_MACHINE\ SOFTWARE\ Policies\ Microsoft\ Windows\ WindowsUpdate\ AU создайте параметр DWORD с именем NoAutoUpdate и значением 1 (единица).
Использование лимитного подключения
Примечание: начиная с Windows 10 «Обновление для дизайнеров» в апреле 2017 года, задание лимитного подключения не будет блокировать все обновления, некоторые продолжат скачиваться и устанавливаться.
По умолчанию, Windows 10 не загружает обновления автоматически при использовании лимитного подключения. Таким образом, если вы для своей Wi-Fi укажите «Задать как лимитное подключение» (для локальной сети не получится), это отключить установку обновлений. Способ также работает для всех редакций Windows 10.
Чтобы сделать это, зайдите в Параметры — Сеть и Интернет — Wi-Fi, нажмите по имени нужной Wi-Fi сети, а затем в её параметрах включите пункт «Задать как лимитное подключение», чтобы ОС относилось к этому подключению как к Интернету с оплатой за трафик.
Отключение установки конкретного обновления
В некоторых случаях может потребоваться отключить установку конкретного обновления, которое приводит к неправильной работе системы. Для этого можно использовать официальную утилиту Microsoft Show or Hide Updates (Показывать или скрывать обновления):
- Загрузите утилиту со страницы официального сайта. Примечание: утилиту перестали поддерживать, но вместо неё можно использовать PowerShell.
- Запустите утилиту, нажмите кнопку Далее, а затем — Hide Updates (скрыть обновления).

- Выберите обновления, установку которых необходимо отключить.
- Нажмите Далее и дождитесь завершения выполнения задачи.
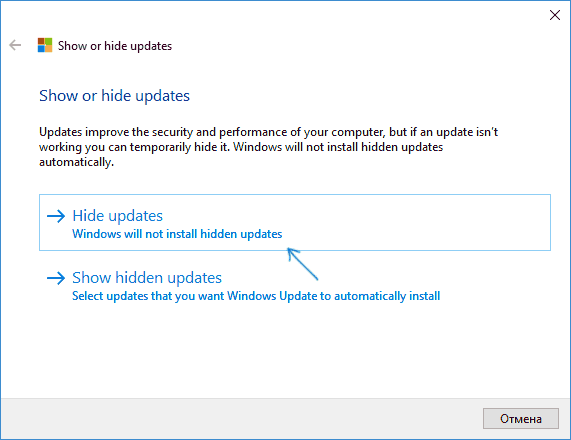
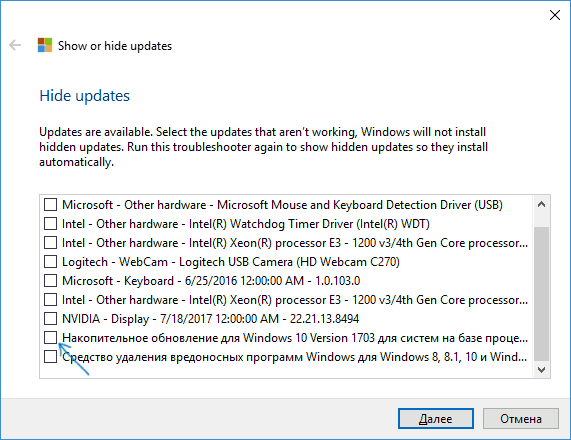
После этого выбранное обновление не будет устанавливаться. Если же вы решите установить его, снова запустите утилиту и выберите пункт Show hidden updates (показать скрытые обновления), после чего уберите обновление из числа скрытых.
Запрет обновления до Windows 10 новой версии
В последнее время обновления компонентов Windows 10 стали устанавливаться на компьютеры автоматически вне зависимости от настроек. Существует следующий способ отключить это:
- В панели управления — программы и компоненты — просмотр установленных обновлений найдите и удалите обновления KB4023814 и KB4023057 если они там присутствуют.
- Создайте следующий reg файл и внесите изменения в реестр Windows 10.
Windows Registry Editor Version 5.00

[HKEY_LOCAL_MACHINE\SOFTWARE\Policies\Microsoft\Windows\WindowsUpdate]
"DisableOSUpgrade"=dword:00000001

[HKEY_LOCAL_MACHINE\SOFTWARE\Policies\Microsoft\WindowsStore]
"DisableOSUpgrade"=dword:00000001

[HKEY_LOCAL_MACHINE\SOFTWARE\Microsoft\Windows\CurrentVersion\WindowsUpdate\OSUpgrade]
"AllowOSUpgrade"=dword:00000000
"ReservationsAllowed"=dword:00000000

[HKEY_LOCAL_MACHINE\SYSTEM\Setup\UpgradeNotification]
"UpgradeAvailable"=dword:00000000
Ещё один метод, который подойдет только для Windows 10 Pro описан в инструкции Как задать целевую (максимальную) версию Windows 10 в реестре.
Программы для отключения обновлений Windows 10
Сразу после выхода Windows 10 появилось множество программ, позволяющих выключить те или иные функции системы (см. например статью про Отключение шпионства Windows 10). Есть таковые и для отключения автоматических обновлений.
Рекомендуемой мной решение — O&O ShutUp10. Все, что потребуется, это включить два пункта в программе:

И, после применения настроек перезагрузить компьютер. Скачать утилиту можно с официального сайта https://www.oo-software.com/en/shutup10
Еще одна программа, работающая в настоящее время и не содержащая чего-либо нежелательного (проверял portable-версию, вам рекомендую тоже выполнять проверку на Virustotal) — бесплатная Win Updates Disabler, доступная для скачивания на сайте site2unblock.com.
После загрузки программы все что требуется сделать — отметить пункт «Disable Windows Updates» и нажать кнопку «Apply Now» (применить сейчас). Для работы требуются права администратора и, помимо прочего, программа умеет отключать защитник Windows и брандмауэр. Второе ПО такого рода — Windows Update Blocker, правда этот вариант платный.
Приостановка обновлений в Параметрах
В Windows 10 последней версии в разделе параметров «Обновление и безопасность» — «Центр обновления Windows» — «Дополнительные параметры» появился новый пункт — «Приостановка обновлений».
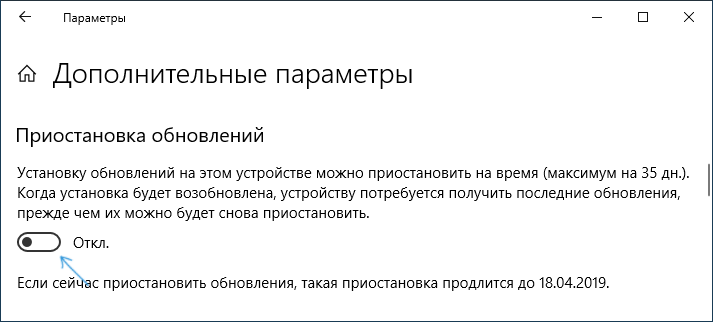
При использовании опции любые обновления перестанут устанавливаться на период 35 дней. Но есть одна особенность: после того, как вы отключите её, автоматически запустится загрузка и установка всех вышедших обновлений, а до этого момента повторная приостановка будет невозможна.
Надеюсь, вы смогли найти способы, подходящие в вашей ситуации. Если нет — спрашивайте в комментариях. На всякий случай отмечу, что отключение обновлений системы, особенно если это лицензионная ОС Windows 10 — не самая лучшая практика, делайте это только при явной необходимости.
System Log Event IDs
Service Control Manager Events
- Event ID 7000: The service failed to start due to the following error…
- Event ID 7001: The service depends on the service which failed to start…
- Event ID 7034: The service terminated unexpectedly…
- Event ID 7040: The start type of the service was changed from…
- Event ID 7045: A service was installed in the system.
System Shutdown and Startup Events
- Event ID 6005: The Event Log service was started.
- Event ID 6006: The Event Log service was stopped.
- Event ID 6008: The previous system shutdown was unexpected.
Time Change Events
- Event ID 1 (Kernel-General): The system time has changed to…
Disk and Hardware Events
- Event ID 7 (Disk): The device, \Device\Harddisk0\DR0, has a bad block.
- Event ID 51 (Disk): An error was detected on device \Device\Harddisk0\DR0 during a paging operation.
Security Log Event IDs
Successful Logon Events
- Event ID 4624: An account was successfully logged on.
Failed Logon Events
- Event ID 4625: An account failed to log on.
Account Management Events
- Event ID 4720: A user account was created.
- Event ID 4722: A user account was enabled.
- Event ID 4725: A user account was disabled.
- Event ID 4726: A user account was deleted.
Privilege Use Events
- Event ID 4672: Special privileges assigned to new logon.
Audit Log Clearing
- Event ID 1102: The audit log was cleared.
System Integrity Events
- Event ID 4616: The system time was changed.
Additional Account Management Events
- Event ID 4727: A security-enabled global group was created.
- Event ID 4728: A member was added to a security-enabled global group.
- Event ID 4732: A member was added to a security-enabled local group.
- Event ID 4756: A member was added to a security-enabled universal group.
- Event ID 4767: A user account was unlocked.
Application Log Event IDs
Application Errors
- Event ID 1000 (Application Error): Faulting application name…
Application Hang
- Event ID 1002 (Application Hang): The program [application name] version [version] stopped interacting with Windows…
MsiInstaller Events
- Event ID 11707: Installation of [product name] succeeded.
- Event ID 11708: Installation of [product name] failed.
Setup Log Event IDs
Windows Update Events
- Event ID 19 (WindowsUpdateClient): Installation Successful: Windows successfully installed the following update…
- Event ID 20 (WindowsUpdateClient): Installation Failure: Windows failed to install the following update…
- Event ID 21 (WindowsUpdateClient): Installation Pending: Windows is waiting to install the following update…
System Installation Events
- Event ID 300 (Setup): The Windows installer has initiated a system restart to complete the installation or update…
Application and Service Logs Event IDs
PowerShell Logs
- Event ID 4103 (Microsoft-Windows-PowerShell): PowerShell Pipeline Execution Details.
- Event ID 4104 (Microsoft-Windows-PowerShell): PowerShell Script Block Logging.
Sysmon Logs
- Event ID 1: Process Creation — Logs the creation of a process, including details like the parent process, command line, hashes, and more.
- Event ID 2: File Creation Time Change — Detects when the creation time of a file is modified.
- Event ID 3: Network Connection — Captures TCP/UDP connections established by a process.
- Event ID 4: Sysmon Service State Changed — Logs when Sysmon starts or shuts down.
- Event ID 5: Process Terminated — Logs when a process ends.
- Event ID 6: Driver Loaded — Captures the loading of kernel-mode drivers or dynamic-link libraries.
- Event ID 7: Image Loaded — Logs the loading of an image (DLL or EXE) into a process.
- Event ID 8: CreateRemoteThread — Logs the creation of a thread in a process by another process, often used in injection techniques.
- Event ID 9: Raw Access Read — Logs processes attempting to read raw disk sectors.
- Event ID 10: Process Access — Captures details of a process accessing another process.
- Event ID 11: File Creation — Logs the creation of new files.
- Event ID 12: Registry Object Added or Deleted — Logs the creation or deletion of registry keys and values.
- Event ID 13: Registry Value Set — Logs when a registry value is modified.
- Event ID 14: Registry Object Renamed — Logs the renaming of registry keys.
- Event ID 15: File Stream Created — Logs the creation of alternate data streams.
- Event ID 16: Sysmon Configuration Change — Logs when the Sysmon configuration is modified.
- Event ID 17: Pipe Created — Logs the creation of named pipes.
- Event ID 18: Pipe Connected — Logs the connection to a named pipe.
- Event ID 19: WMI Event Filter — Captures the creation of WMI event filters.
- Event ID 20: WMI Event Consumer — Logs the creation of WMI event consumers.
- Event ID 21: WMI Event Consumer Binding — Logs the binding between WMI filters and consumers.
- Event ID 22: DNS Query — Captures DNS query requests.
- Event ID 23: File Deleted — Logs when a file is deleted.
- Event ID 24: Clipboard Changed — Logs changes to the clipboard.
- Event ID 25: Process Tampering — Detects tampering with process memory, such as injection.
- Event ID 26: FileShare Access — Logs access to network shares.
- Event ID 27: FileCopy Detected — Captures file copy operations using special tools or APIs.
Windows Defender Logs
- Event ID 1000 (Windows Defender): Malware Detection.
- Event ID 1116 (Windows Defender): Antivirus scan started.
Task Scheduler Logs
- Event ID 106 (TaskScheduler): Task registered or updated.
Remote Desktop Services Logs
- Event ID 1149 (TerminalServices-RemoteConnectionManager): Remote Desktop Services: User authentication succeeded.
- Event ID 4634: An account was logged off.
- Event ID 4647: User initiated logoff.
- Event ID 4648: A logon was attempted using explicit credentials.
- Event ID 5038 (System Integrity): Code integrity determined that the image hash of a file is not valid.
- Event ID 6281 (Audit Failure): Code Integrity determined that the page hashes of an image file are not valid.
- Event ID 4719: System audit policy was changed.
- Event ID 4739: Domain Policy was changed.
- Event ID 4663: An attempt was made to access an object.
- Event ID 5140: A network share object was accessed.
Event submitted by
Event Log Doctor
Event ID:
7040
Source:
Service Control Manager
Message:
The start type of the Windows Modules Installer service was changed from auto start to demand start.
Recommended Links
-
Event ID 7040 — Basic Service Operations
Solution by
Event Log Doctor
2012-02-06 10:38:39 UTC
Windows 2003 and later log this event when the startup type of a service changes.
Message definition:
The start type of the %1 service was changed from %2 to %3.
User Information
Only an Email address is required for returning users.
Email:
Name / Alias:
Hide Name
Solution
Your solution: *
Additional Links
Name:
URL:
What is Error 7040?
Error 7040 is a kind of Runtime error that is found in the Microsoft Windows operating systems. The file can be found for Microsoft Silverlight. Microsoft Silverlight Error 7040 has a popularity rating of 1 / 10.
Errors
This tutorial contains information on Error 7040 or otherwise known as Microsoft Silverlight Error 7040. Errors such as Microsoft Silverlight Error 7040 indicate your machine has faulty hardware or software that should be fixed when possible. Below is information on how to repair Error 7040 and get your computer back to normal.
Signs of Error 7040:
- When your computer freezes or locks up at random.
- When your computer crashes when you are running Microsoft Silverlight.
- If Microsoft Silverlight Error 7040 pops up and causes a program to shutdown or your computer to crash.
- Your computer is running slow, taking a long time to boot up, and you suspect Error 7040 by Microsoft Silverlight is the cause.
What Causes Runtime Errors Like Error 7040?
There are several causes of runtime errors like Microsoft Silverlight Error 7040, such as viruses, out of date drivers, missing files or folders, incomplete or poor installation, and registry errors. They can also occur due to an issue with the computer’s memory, which may often be due to a hardware problem. In some cases there was an issue installing Microsoft Silverlight and an error occurred.
How to Fix Microsoft Silverlight Error 7040
Follow the step by step instructions below to fix the Error 7040 problem. We recommend you do each in order. If you wish to skip these steps because they are too time consuming or you are not a computer expert, see our easier solution below.
Step 1 — Uninstall and Reinstall Microsoft Silverlight
If the Microsoft Silverlight Error 7040 is a result of using Microsoft Silverlight, you may want to try reinstalling it and see if the problem is fixed. Please follow these steps:
Windows XP
- Click “Start Menu”.
- Click “Control Panel”.
- Select the “Add or Remove” program icon.
- Find the Error 7040 associated program.
- Click the Change/Remove button on the right side.
- The uninstaller pop up will give you instructions. Click “okay” or “next” or “yes” until it is complete.
- Reinstall the software.
Windows 7 and Windows Vista
- Click “Start Menu”.
- Click “Control Panel”.
- Click “Uninstall a Program” which is under the “Programs” header.
- Find the Error 7040 associated program.
- Right click on it and select “Uninstall”.
- The uninstaller pop up will give you instructions. Click “okay” or “next” or “yes” until it is complete.
- Reinstall the software and run the program.
Windows 8, 8.1, and 10
- Click “Start Menu”.
- Click “Programs and Features”.
- Find the software that is linked to **insert file name**.
- Click Uninstall/Change.
- The uninstaller will pop up and give you instructions. Click “okay” and “next” until it is complete.
- Restart your computer.
- Reinstall the software and run the program.
Step 2 — Remove Registry Entry related to Error 7040
WARNING: Do NOT edit the Windows Registry unless you absolutely know what you are doing. You may end up causing more trouble than you start with. Proceed at your OWN RISK.
- Create a backup of registry files.
- Click “Start”.
- Type regedit, select it, and grant permission in order to proceed.
- Click HKEY LOCAL MACHINE>>SOFTWARE>>Microsoft>>Windows>>Current Version>>Uninstall.
- Find the Microsoft Silverlight Error 7040 software from the list you wish to uninstall.
- Select the software and double click the UninstallString icon on the right side.
- Copy the highlighted text.
- Exit and go to the search field.
- Paste the data.
- Select Okay in order to uninstall the program.
- Reinstall the software.
Step 3 – Ensure Junk Isn’t Causing Microsoft Silverlight Error 7040
Any space that isn’t regularly cleaned out tends to accumulate junk. Your personal computer is no exception. Constant web browsing, installation of applications, and even browser thumbnail caches slow down your device and in the absence of adequate memory, can also trigger a Microsoft Silverlight Error 7040 error.
So how do you get around this problem?
- You can either use the Disk Cleanup Tool that comes baked into your Windows operating system.
- Or you can use a more specialized hard drive clean up solution that does a thorough job and flushes the most stubborn temporary files from your system.
Both solutions may take several minutes to complete the processing of your system data if you haven’t conducted a clean up in a while.
The browser caches are almost a lost cause because they tend to fill up quite rapidly, thanks to our constantly connected and on the go lifestyle.
Here’s how you can run the Window’s Disk Cleanup Tool, without performance issues or surprises.
- For Windows XP and Windows 7, the program can be ran from “Start” and from the “Command Prompt”.
- Click “Start”, go to All Programs > Accessories > System Tools, click Disk Cleanup. Next choose the type of files you wish to remove, click OK, followed by “Delete Files”.
- Open up the Command Prompt, type “c:\windows\cleanmgr.exe /d” for XP and “cleanmgr” for Windows 7. Finish by pressing “Enter”.
- For Windows 8 and Windows 8.1, the Disk Cleanup Tool can be accessed directly from “Settings”. Click “Control Panel” and then “Administrative Tools”. You can select the drive that you want to run the clean up on. Select the files you want to get rid of and then click “OK” and “Delete Files”.
- For Windows 10, the process is simplified further. Type Disk Cleanup directly in the search bar and press “Enter”. Choose the drive and then the files that you wish to wipe. Click “OK”, followed by “Delete Files”.
The progressive ease with which the Cleanup Tool can be used points to the growing importance of regularly deleting temporary files and its place in preventing Microsoft Silverlight Error 7040.
PRO TIP:
Remember to run the Disk Cleanup as an administrator.
Step 4 – Fix Infections and Eliminate Malware in Your PC
How do you gauge if your system is infected with a malware and virus?
Well, for one, you may find certain applications misbehaving.
And you may also see the occurrence of Error 7040.
Infections and malware are the result of:
- Browsing the Internet using open or unencrypted public Wi-Fi connections
- Downloading applications from unknown and untrustworthy sources
- Intentional planting of viruses in your home and office networks
But thankfully, their impact can be contained.
- Enter “safe mode” by pressing the F8 key repeatedly when your device is restarting. Choose “Safe Mode with Networking” from the Advanced Boot Options menu.
- Back up all the data in your device to a secure location. This is preferably a storage unit that is not connected to your existing network.
- Leave program files as is. They are where the infection generally spreads from and may have been compromised.
- Run a thorough full-system scan or check of an on-demand scanner. If you already have an antivirus or anti-malware program installed, let it do the heavy lifting.
- Restart your computer once the process has run its course.
- Lastly, change all your passwords and update your drivers and operating system.
PRO TIP: Are you annoyed by the frequent updates to your antivirus program? Don’t be! These regular updates add new virus signatures to your software database for exponentially better protection.
Step 5 – Return to the Past to Eliminate Error 7040
The steps outlined up until this point in the tutorial should have fixed Microsoft Silverlight Error 7040 error. But the process of tracking what has caused an error is a series of educated guesses. So in case the situation persists, move to Step 5.
Windows devices give users the ability to travel back in time and restore system settings to an uncorrupted, error free state.
This can be done through the convenient “System Restore” program. The best part of the process is the fact that using System Restore doesn’t affect your personal data. There is no need to take backups of new songs and pictures in your hard drive.
- Open “Control Panel” and click on “System & Security”.
- Choose the option “System”.
- To the left of the modal, click on “System Protection”.
- The System Properties window should pop-up. You’ll be able to see the option “System Restore”. Click on it.
- Go with “Recommended restore” for the path of least hassles and surprises.
- Choose a system restore point (by date) that will guarantee taking your device back to the time when Error 7040 hasn’t been triggered yet.
- Tap “Next” and wrap up by clicking “Finish”.
If you’re using Windows 7 OS, you can reach “System Restore” by following the path Start > All Programs > Accessories > System Tools.
Step 6 — Error 7040 Caused by Outdated Drivers
Updating a driver is not as common as updating your operating system or an application used to run front-end interface tasks.
Drivers are software snippets in charge of the different hardware units that keep your device functional.
So when you detect an Microsoft Silverlight Error 7040 error, updating your drivers may be a good bet. But it is time consuming and shouldn’t be viewed as a quick fix.
Here’s the step-by-step process you can go through to update drivers for Windows 8, Windows 8.1 and Windows 10.
- Check the site of your hardware maker for the latest versions of all the drivers you need. Download and extract them. We strongly advice going with original drivers. In most cases, they are available for free on the vendor website. Installing an incompatible driver causes more problems than it can ever fix.
- Open “Device Manager” from the Control Panel.
- Go through the various hardware component groupings and choose the ones you would like to update.
- On Windows 10 and Windows 8, right-click on the icon of the hardware you would like to update and click “Update Driver”.
- On Windows 7 and Vista, you right-click the hardware icon, choose “Properties”, navigate to the Driver panel, and then click “Update Driver”.
- Next you can let your device automatically search for the most compatible drivers, or you can choose to update the drivers from the versions you have on your hard drive. If you have an installer disk, then the latter should be your preferred course of action. The former may often get the driver selection incorrect.
- You may need to navigate a host of warnings from the Windows OS as you finalize the driver update. These include “Windows can’t verify that the driver is compatible” and “Windows can’t verify the publisher of this driver”. If you know that you have the right one in line, click “Yes”.
- Restart the system and hopefully the Microsoft Silverlight Error 7040 error should have been fixed.
Step 7 – Call the Windows System File Checker into Action
By now the Microsoft Silverlight Error 7040 plaguing your device should have been fixed. But if you haven’t resolved the issue yet, you can explore the Windows File Checker option.
With the Windows File Checker, you can audit all the system files your device needs to operate, locate missing ones, and restore them.
Sound familiar? It is almost like “System Restore”, but not quite. The System Restore essentially takes you back in time to a supposedly perfect set up of system files. The File Checker is more exhaustive.
It identifies what is amiss and fills the gaps.
- First and foremost, open up an elevated command prompt.
- Next, if you are using Windows 8, 8.1 or 10, enter “DISM.exe /Online /Cleanup-image /Restorehealth” into the window and press Enter.
- The process of running the Deployment Image Servicing and Management (DISM) tool may take several minutes.
- Once it completes, type the following command into the prompt “sfc /scannow”.
- Your device will now go through all protected files and if it detects an anomaly, it will replace the compromised version with a cached version that resides at %WinDir%\System32\dllcache.
Step 8 – Is your RAM Corrupted? Find Out.
Is it possible? Can the memory sticks of your device trigger Error 7040?
It is unlikely – because the RAM chips have no moving parts and consume little power. But at this stage, if all else has failed, diagnosing your RAM may be a good move.
You can use the Windows Memory Diagnostics Tool to get the job done. Users who are on a Linux or Mac and are experiencing crashes can use memtest86.
- Open up your device and go straight to the “Control Panel”.
- Click on “Administrative Tools”.
- Choose “Windows Memory Diagnostic”.
- What this built-in option does is it burns an ISO image of your RAM and boots the computer from this image.
- The process takes a while to complete. Once it is done, the “Status” field at the bottom of the screen populates with the result of the diagnosis. If there are no issues with your RAM/memory, you’ll see “No problems have been detected”.
One drawback of the Windows Memory Diagnostic tool pertains to the number of passes it runs and the RAM segments it checks.
Memtest86 methodically goes over all the segments of your memory – irrespective of whether it is occupied or not.
But the Windows alternative only checks the occupied memory segments and may be ineffective in gauging the cause of the Microsoft Silverlight Error 7040 error.
Step 9 – Is your Hard Drive Corrupted? Find Out.
Your RAM or working memory isn’t the only culprit that may precipitate an Microsoft Silverlight Error 7040 error. The hard drive of your device also warrants close inspection.
The symptoms of hard drive error and corruption span:
- Frequent crashes and the Blue Screen of Death (BSoD).
- Performance issues like excessively slow responses.
- Errors like Error 7040.
Hard drives are definitely robust, but they don’t last forever.
There are three things that you can do to diagnose the health of your permanent memory.
- It is possible that your device may have a hard time reading your drive. This can be the cause of an Microsoft Silverlight Error 7040 error. You should eliminate this possibility by connecting your drive to another device and checking for the recurrence of the issue. If nothing happens, your drive health is okay.
- Collect S.M.A.R.T data by using the WMIC (Windows Management Instrumentation Command-line) in the command prompt. To do this, simply type “wmic” into the command prompt and press Enter. Next follow it up with “diskdrive get status”. The S.M.A.R.T status reading is a reliable indicator of the longevity of your drive.
- Fix what’s corrupt. Let’s assume you do find that all isn’t well with your hard drive. Before you invest in an expensive replacement, using Check Disk or chkdsk is worth a shot.
- Open the command prompt. Make sure you are in Admin mode.
- Type “chkdsk C: /F /X /R” and press “Enter”. “C” here is the drive letter and “R” recovers data, if possible, from the bad sectors.
- Allow the system to restart if the prompt shows up.
- And you should be done.
These steps can lead to the resolution you’re seeking. Otherwise the Microsoft Silverlight Error 7040 may appear again. If it does, move to Step 10.
Step 10 – Update Windows OS
Like the software applications you use to render specific tasks on your device, the Operating System also requires periodic updates.
Yes, we’ve all heard the troubling stories.
Devices often develop problems post unfinished updates that do not go through. But these OS updates include important security patches. Not having them applied to your system leaves it vulnerable to viruses and malware.
And may also trigger Error 7040.
So here’s how Windows 7, Windows 8, Windows 8.1 and Windows 10 users can check for the latest updates and push them through:
- Click the “Start” button on the lower left-hand corner of your device.
- Type “Updates” in the search bar. There should be a “Windows Update” or “Check for Updates” option, based on the OS version you’re using.
- Click it. The system will let you know if any updates are available.
- You have the convenience of choosing the components of the update you’d like to push through. Always prioritize the security updates.
- Click “OK” followed by “Install Updates”.
Step 11 – Refresh the OS to Eliminate Persistent Microsoft Silverlight Error 7040 Error
“Windows Refresh” is a lifesaver.
For those of you who are still with us and nothing has worked to eliminate the Error 7040, until recently, a fresh install of Windows would have been the only option.
Not anymore.
The Windows Refresh is similar to reinstalling your Windows OS, but without touching your personal data. That’s hours of backup time saved in a jiffy.
Through the Refresh, all your system files become good as new. The only minor annoyance is the fact that any custom apps you’ve installed are gone and the system applications you had uninstalled are back.
Still, it is the best bet as the final step of this process.
- Enter the “Settings” of your PC and click on “Change Settings”.
- Click “Update and recovery” and then choose “Recovery”.
- Select “Keep my files”. This removes apps and settings, but lets your personal files live on.
- You’ll get some warning messages about the apps that will be uninstalled. If you’ve gone through a recent OS upgrade, the Refresh process makes it so that you can’t go back to your previous OS version – if you should ever feel the need to do it.
- Click the “Refresh” button.
Are you using an older version of Windows that doesn’t come with the power to “Refresh”?
Maybe it is time to start from scratch.
- Enter your BIOS set-up.
- This is where you need to change your computer’s boot order. Make it so that the boot happens not from the existing system files, but from the CD/DVD Drive.
- Place the original Windows disk in the CD/DVD drive.
- Turn on or restart the device.
- Choose where you’d like the system files to be installed.
- Your PC will restart several times as the process runs its course.
FAQ’s
Do Runtime Errors Like Error 7040 Mean My Computer is Infected?
Runtime errors are usually not associated with viruses. Sometimes they will come disguised as false alerts which are actually viruses in disguise. These are mostly pretty easy to distinguish, however. In these cases, it is recommended that you scan your computer with an antivirus software.
Should I Bring My Computer to the Repair Shop if There are Runtime Errors Like Error 7040?
You can bring it to the repair shop but they will charge you a lot more than trying to fix it on your own or by using a specialized repair software. We would recommend trying some of the DIY ideas first such as diagnosing the problem and then working backwards from there. For example, if a specific program is causing it, try reinstalling the program. If that doesn’t work, try using a software to diagnose the errors on your system. As a last recourse, you can bring it to the repair shop.
Can I Edit the Windows Registry Myself?
The Windows Registry gives you full ownership and allows you to edit permissions so that you can make necessary changes onto it. Right clicking on each file can do the trick. This can be dangerous, however, if you don’t know what you are doing. In situations like this, a better option is to use a program that is specifically designed to solve Registry errors.
Start Download Now
Author:
Curtis Hansen has been using, fiddling with, and repairing computers ever since he was a little kid. He contributes to this website to help others solve their computer issues without having to buy a new one.
Event Id 7040 Windows Modules Installer 17
laugiacEvent Id 7040 Windows Modules Installer 17
http://jinyurl.com/hor65
Windows Modules Installer Stops & Restarts . windows-modules-installer-stops . an event 7040 («The start type of the Windows Modules .
<Provider Name=»Service Control Manager» Guid=» . Event ID: 7040. Task Category . The start type of the Windows Modules Installer service was changed from demand .
Services that depend on the Windows Trace Session . 839803 The Windows Trace Session Manager service does not start and Event ID . Apr 17, 2018. Email .
MidwayUSA is a privately held American retailer of various hunting and outdoor-related products.
This article is explaining about system event id 7036 with the information . Enables applications such as Windows Media Player and the Image . (17 ) . 95ec0d2f82