
Как и в предыдущих версиях ОС, в Windows 11 есть два основных сетевых профиля или типа сети, определяющих основные параметры безопасности — общественная или общедоступная сеть и частная или личная сеть. Есть и третий вариант — сеть домена, но у домашних пользователей он, как правило, не используется.
В этой инструкции подробно о том, как изменить тип сети в Windows 11 несколькими способами — в Параметрах или списке сетевых подключений, а также альтернативными методами.
Изменение сетевого профиля Windows 11
В Windows 11 доступны следующие несколько способов изменить тип сети или сетевой профиль. Первые три позволяют быстро выполнить смену типа сети для активных подключений, четвертый — для всех сетей.
Тип сети в Параметрах
Первый метод — использование переключения типа сети в Параметрах, шаги будут следующими:
- Откройте «Параметры» — «Сеть и Интернет», либо нажмите правой кнопкой мыши по значку соединения в области уведомлений и выберите пункт «Параметры сети и Интернета».
- Если вам нужно изменить тип текущей сети, нажмите по указанию типа в пункте «Свойства».

- Вверху страницы настроек подключения выберите нужный тип сетевого профиля — Общедоступная сеть или частная сеть.
- Если вы используете более одного сетевого подключения, например и Ethernet и Wi-Fi подключение, на странице параметров «Сеть и Интернет» можно отдельно выбрать соответствующие пункты: Ethernet — чтобы переключить тип локальной сети и Wi-Fi, а затем — свойства текущей беспроводной сети, чтобы изменить её тип.


Изменение типа сети в Терминале Windows (PowerShell)
Следующий способ — использование команды в Windows PowerShell для изменения типа сети. Для этого потребуется знать имя сети, для которой мы задаем применяемый сетевой профиль. Посмотреть его можно в «Центр управления сетями и общим доступом», а можно прямо в PowerShell.
- Нажмите правой кнопкой мыши по кнопке «Пуск» и выберите пункт «Терминал (Администратор)».
- Введите команду
Get-NetConnectionProfile
в результате выполнения которой вы получите информацию о текущих сетевых профилях. В следующей команде нам потребуется имя (Name) сети, для которой мы меняем тип.
- Введите команду
Set-NetConnectionProfile -Name "Имя_сети" -NetworkCategory Тип_сети
где Имя_сети меняем на полученное в предыдущей команде, а Тип_сети может быть Private или Public — частная или общедоступная соответственно.


Какие-либо сообщения об успехе выполнения команды не появятся, но профиль сети будет изменен.
Принудительная установка типа сети в Локальной политике безопасности
Локальная политики безопасности Windows позволяет переопределить типы сети, а также запретить выполнять изменения другими способами, включая описанные выше. Действия состоят из следующих шагов:
- Нажмите правой кнопкой мыши по кнопке «Пуск», выберите пункт «Выполнить», введите secpol.msc и нажмите Enter.
- В открывшемся окне выберите «Политики диспетчера списка сетей» и дважды нажмите по верхнему пункту: он может иметь название «Сеть» или имя текущей беспроводной сети.

- Перейдите на вкладку «Сетевое расположение» и установите «Тип расположения» (Личное — частная сеть, Общее — общедоступная или общественная сеть), а также установите «Пользователь не может изменить расположение», иначе изменения типа сети не произойдет.

- Примените настройки.


Учитывайте, что при этом подходе в дальнейшем тип сети можно будет изменить вновь только в локальной политике безопасности.
В редакторе реестра
Информация о сетях и используемом сетевом профиле хранится в реестре, это позволяет изменить тип не только активной сети, но и для сетей, к которым мы когда-либо подключались и, возможно, будем подключаться в будущем.
- Нажмите клавиши Win+R на клавиатуре, введите regedit и нажмите Enter для запуска редактора реестра.
- В редакторе реестра перейдите к разделу
HKEY_LOCAL_MACHINE\SOFTWARE\Microsoft\Windows NT\CurrentVersion\NetworkList\Profiles
- Этот раздел содержит вложенные подразделы, каждый из которых представляет собой параметры сетей, к которым когда-либо производилось подключение. Выбрав такой подраздел, вы можете посмотреть на значение параметра ProfileName в правой панели редактора, чтобы определить, к какой сети он относится.

- Для изменения типа сети, дважды нажмите по параметру Category и установите нужное значение: 0 — общедоступная, 1 — частная, 2 — доменная.

- Примените настройки и закройте редактор реестра.

Для того, чтобы профиль сети изменился может потребоваться перезагрузка компьютера после выполнения указанных действий.
В ранних версиях ОС можно было применить дополнительный способ — выполнение сброса сети Windows, после чего появлялся запрос о предпочитаемом типе сети, однако в текущих версиях Windows 11 после сброса автоматически выбирается общественная (общедоступная) сеть и, если требуется изменить её на частную (ранее — домашняя), выполнять это требуется вручную.
Как посмотреть текущий тип сети и их отличия
Первоначальный выбор типа сети производится при первом к ней подключении: Windows показывает уведомление, запрашивающее разрешение на обнаружение компьютера другими компьютерами и устройствами в сети. Если ответить «Да» — будет включен профиль «Частная сеть», если «Нет» — «Общедоступная сеть».
Проверить текущий тип активной сети в Windows 11 можно одним из следующих способов:
- Зайти в Параметры — Сеть и Интернет и посмотреть на пункт «Свойства» в описании используемого Ethernet или Wi-Fi подключения, там будет указано «Общественная сеть» или «Частная сеть».
- Открыть окно «Безопасность Windows», перейти в раздел «Брандмауэр и безопасность сети», где будет указано три типа сетевых профилей и, рядом с одним из них — пометка «активный», именно этот профиль используется для текущего соединения.

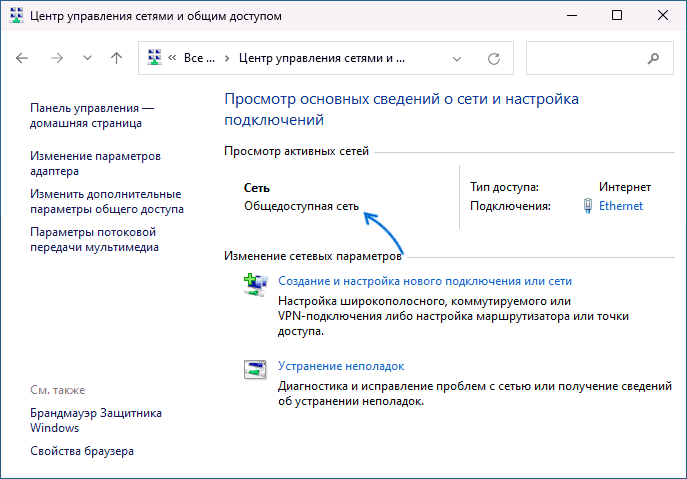
- Открыть «Центр управления сетями и общим доступом», который всё ещё доступен в панели управления Windows 11 — там будет указан тип сети для активного соединения.


Теперь об отличиях двух вариантов сетевых профилей или типов сети в Windows:
- Частная (личная) сеть — менее безопасная и предполагает, что используется локальная сеть. По умолчанию включены такие опции как сетевое обнаружение, общий доступ к файлам и принтерам. Предполагается, что этот профиль сети вы используете в окружении, где все подключенные устройства — ваши, которым вы доверяете.
- Общедоступная или общественная сеть — тип сети, при которой указанные функции отключены, то есть при обзоре сети ваши устройства видны не будут, во всяком случае в разделе «Сеть» Windows.
Помимо упомянутых функций общего доступа, для разных типов сетей отличаются некоторые предустановленные правила брандмауэра Windows.
Некоторые пользователи, исходя из названия «Общедоступная» предполагают, что этот тип сети менее безопасен для использования, хотя по факту дело обстоит ровно наоборот — тип сети «общественная» в большей степени изолирует вас от других устройств в сети.
Windows operating systems, particularly Windows 10 and Windows 11, are complex pieces of software that rely on a multitude of services to function correctly. One of the vital components that manage these services is the Service Control Manager (SCM). However, users often encounter problems related to various Event IDs, one of the most common being Event ID 7001. This article delves into what Event ID 7001 is, the implications it has for system performance, and, most importantly, how to fix it.
Understanding Service Control Manager Event ID 7001
Event ID 7001 is logged in the Windows Event Viewer when a service fails to start due to a dependency service not being started. Essentially, it acts as a notification that while the system attempted to launch a specific service, it was unable to do so because another service, which it relies on, is not running. This can lead to issues with applications, system stability, and performance.
Commonly, Event ID 7001 might look something like this:
Service Control Manager
Event ID: 7001
The [Service Name] service depends on the [Dependent Service Name] service which failed to start due to the following error: [Error Message].
This event is typically seen in the Windows logs, particularly under Windows Logs -> System in the Event Viewer. If you’re encountering this message, it’s essential to understand its implications. It indicates that there are service dependencies that are not being met, impacting your system’s functionality.
Common Causes of Event ID 7001
There are several factors that can lead to Event ID 7001:
-
Disabled Services: Sometimes, services that are necessary for others to function are inadvertently disabled. For instance, if you’ve disabled the «RPC Endpoint Mapper,» any service that requires it will fail.
-
Improper Service Configuration: Manual changes to services or their startup types can cause dependencies to break.
-
Corrupted System Files: Files may become corrupted due to improper shutdowns, malware, or other software issues.
-
Malware Infection: Some malware can interfere with the normal functioning of Windows services, causing essential services to fail.
-
Windows Updates: Occasionally, updates can mess with existing configurations or even disable necessary services inadvertently.
How to Diagnose Event ID 7001
Before diving into fixes, it’s crucial to properly diagnose the root cause of the issue. Here’s how you can do that:
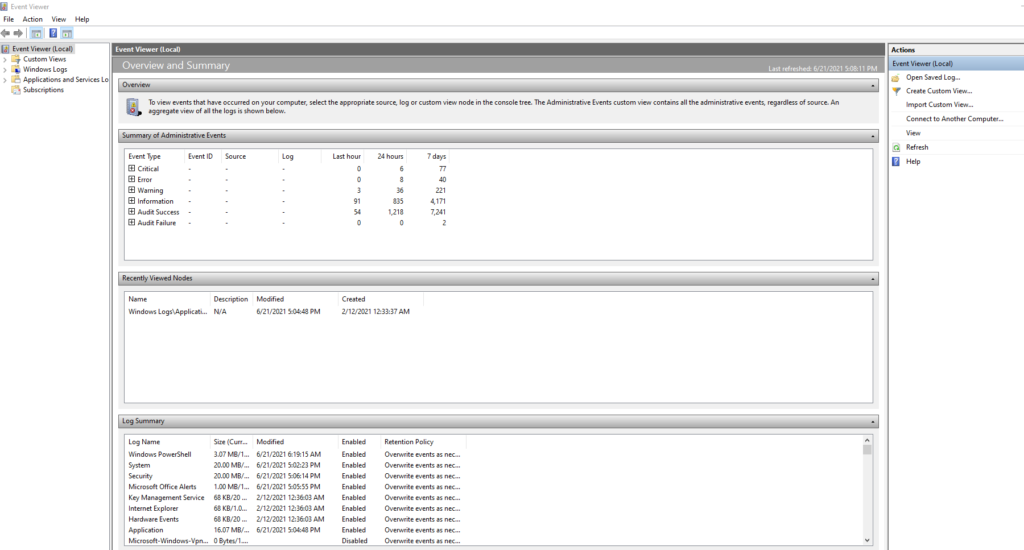
1. Check the Event Viewer
The first step in diagnosing Event ID 7001 is to look at the Event Viewer logs to understand which services are involved. To access the Event Viewer:
- Press
Windows + Rkeys to open the Run dialog box. - Type
eventvwr.mscand press Enter. - Expand the
Windows Logsfolder and click onSystem. - Look for Event ID 7001 and review the details to identify which services are causing the issue.
2. Identify Dependent Services
Once you identify the service that is having issues, the next step is to determine its dependencies:
- Press
Windows + R, typeservices.msc, and hit Enter. - Find the service in question, right-click it, and select
Properties. - Navigate to the
Dependenciestab to see other services that it relies on.
3. Check Service Status
Make sure all dependent services are running:
- In the Services window, look closely at the services listed in the Dependencies section.
- Ensure they’re running. If not, right-click on them, and select
Start.
4. Run System File Checker
Corrupted system files can lead to various issues, including problems with services. You can run the System File Checker (SFC) to fix corrupt files:
- Open Command Prompt as an administrator by right-clicking the Start button and selecting
Windows Terminal (Admin). - Type the command
sfc /scannowand press Enter. - Allow the scan to complete and fix any corrupted files.
After performing these diagnostics, you might be able to pinpoint the specific issue causing Event ID 7001. If the problem persists, follow the fixes suggested below.
Fixing Event ID 7001 in Windows 10/11
Here are several methods you can employ to fix Event ID 7001:
Method 1: Enable Dependent Services
If you identified that a service that the primary service is dependent on is disabled, you need to enable it.
- Open
services.msc. - Look for the service listed in the Dependency section from your earlier diagnostic.
- Right-click and select
Properties. - Set the Startup type to
Automatic. - Click
Start. - Apply the changes and close.
Method 2: Adjust Service Startup Types
Sometimes, setting the dependent services to Automatic may not be enough. Instead, try setting the service that generated the event ID to Automatic (Delayed Start), which allows the system to boot up other services before it starts.
- Open
services.msc. - Find the service that is generating Event ID 7001.
- Right-click and select
Properties. - Change the Startup type to
Automatic (Delayed Start). - Click
OK.
Method 3: Perform a Clean Boot
A clean boot can help identify if background programs are causing issues.
- Press
Windows + R, typemsconfig, and press Enter. - Go to the
Servicestab and checkHide all Microsoft services. - Click
Disable all, then go to theStartuptab and clickOpen Task Manager. - Disable all startup items.
- Restart your computer.
Check if the issue persists. If the service runs without generating the event ID after a clean boot, you can narrow down the problem to one of the startup programs.
Method 4: Re-register System Services
If certain services like Windows Update or RPC have issues, you can re-register them. This is commonly applicable for services that are integral to system operations.
- Open Command Prompt as an administrator.
- Execute the following commands one by one:
sc config "wuauserv" start= auto sc config "bits" start= auto - Restart your computer.
Method 5: Check for Windows Updates
Sometimes, Microsoft releases patches to fix issues related to services. Check for and install any available updates:
- Open the
Settingsapp (Windows + I). - Go to
Update & Security. - Click on
Check for updates. - Install any required updates and restart your system.
Method 6: Restore Default Services Configuration
If services are mistakenly disabled or their settings changed, consider restoring them to their default configuration:
- Open Command Prompt as an administrator.
- Run the command:
DISM /Online /Cleanup-Image /RestoreHealth - Follow that with:
sfc /scannow
Method 7: Scan for Malware
Malware can interfere with the normal operation of services:
- Use Windows Defender or any trusted antivirus to perform a full system scan.
- Remove any threats detected and restart your computer.
Method 8: Check Registry Settings
Some settings in the Windows Registry might impact the behavior of services. Ensure that the following registry keys are set correctly:
- Press
Windows + R, typeregedit, and press Enter. - Navigate to the path:
HKEY_LOCAL_MACHINESYSTEMCurrentControlSetServices[ServiceName] - Verify the
StartDWORD value:0– Boot1– System2– Automatic3– Manual4– Disabled
Make necessary modifications, but be cautious when making changes to the registry.
Method 9: System Restore
If the issue began recently and the methods above have not resolved it, you may consider performing a system restore to revert your system settings to an earlier date:
- Press
Windows + R, typerstrui, hit Enter. - Follow the prompts to select a restore point and restore your system.
Conclusion
Event ID 7001 is a relatively common issue that can significantly impact Windows 10 and 11 systems if not addressed. While it can be alarming to see logs indicating service start failures, understanding the underlying cause and following the various troubleshooting methods can help you resolve the issue effectively.
It’s always good practice to maintain regular backups of important data and to frequently check for system updates and malware. If you’re uncertain or uncomfortable with performing some of these fixes, it may be wise to consult with a competent IT professional or the official Microsoft support channels.
By conducting regular maintenance on your Windows system and understanding how to handle service-related issues like Event ID 7001, you can enjoy a smoother and more reliable computing experience.
The Windows operating system provides a robust environment for user applications and services. However, users may encounter various issues as they navigate through regular usage, one of which is the Service Control Manager (SCM) Event ID 7001 error. This error is often an indication of problems related to service dependencies, causing disruptions that may hinder the performance of your Windows PC.
Understanding «Service Control Manager Event ID 7001»
The Service Control Manager is a core component of Windows responsible for managing the states of services and ensuring they operate correctly. Each service in Windows can depend on other services to function properly. When a dependent service fails or is not started successfully, you may encounter the Event ID 7001 error in the Windows Event Viewer.
What Does Event ID 7001 Indicate?
Event ID 7001 can appear with various messages, but the general description is that a service failed to start due to a failure in its dependent service. The message typically reads:
The [service name] service depends on the [dependent service name] service which failed to start due to the following error: [error description].This error can stem from various issues, including:
- Corrupted system files: Damaged files may prevent services from starting.
- Misconfigured services: Services that depend on others may have incorrect settings or dependencies.
- Software conflicts: Third-party software may interfere with the proper operation of Windows services.
- Malware or malicious software: Malware can disrupt service relations.
- Hardware issues: Problems with hardware components can also lead to services failing to start.
How to Diagnose Event ID 7001
Before diving into the solutions, it’s essential to diagnose the issue correctly. Here are some steps you can take to identify the underlying problem:
1. Check Event Viewer
The Event Viewer provides detailed logs of system events, including errors related to services. To access Event Viewer:
- Press Windows + R to open the Run dialog.
- Type
eventvwr.mscand hit Enter. - In the Event Viewer, navigate to Windows Logs > System.
- Look for the 7001 event and double-click on it to view details, including the service name and specific error messages.
2. Identify Related Services
Once you’ve located Event ID 7001, note which service is failing and which dependent service is causing the issue. Use this information to investigate further.
3. Use Command Prompt Tools
You can utilize Command Prompt to diagnose system health and service statuses. Open Command Prompt with administrator privileges (right-click the Start button and choose Windows Terminal (Admin)). Then, use the following commands:
-
Check the health of system files:
sfc /scannow -
Check the status of specified services:
sc queryex [service name] -
Check for service dependencies:
sc qc [service name]
Fixing Event ID 7001
Once you have identified the problematic service and gathered sufficient information, you can proceed with solutions to fix the Event ID 7001 error.
Solution 1: Restart the Dependent Services
Sometimes, the issue can be resolved simply by restarting the services. Follow these steps:
- Press Windows + R, type
services.msc, and hit Enter. - In the Services window, locate the dependent service listed in the Event ID 7001.
- Right-click on the service and select Restart.
- After restarting, also restart the service that directly failed.
Solution 2: Adjust Service Dependencies in Registry
If a service dependency needs to be modified, you can do this through the Windows Registry Editor:
- Press Windows + R, type
regedit, and hit Enter. - Navigate to:
HKEY_LOCAL_MACHINESYSTEMCurrentControlSetServices[service name] - Locate the DependOnService key and modify it if necessary, ensuring it reflects the correct order of service dependencies.
- Be cautious while editing the registry and always create a backup before making changes.
Solution 3: Check for Corrupted System Files
To repair any corrupted system files that could be causing the issue, use the following command in an elevated Command Prompt:
sfc /scannowThe System File Checker tool will scan and repair corrupted files. After it completes, restart your computer and check if the issue persists.
Solution 4: Run DISM Tool
The Deployment Image Servicing and Management (DISM) tool can also help fix Windows images and repair them:
- Open Command Prompt with administrator privileges.
- Execute the command:
DISM /Online /Cleanup-Image /RestoreHealth - After the process completes, reboot your computer.
Solution 5: Disable or Uninstall Conflicting Software
If the Event ID 7001 error occurs after installing new software, that software may conflict with Windows services.
- Open Settings > Apps.
- Find the newly installed application and select it.
- Click on Uninstall.
- After removing the conflicting software, monitor if the issue remains.
Solution 6: Perform a Clean Boot
Performing a clean boot will start Windows with a minimal set of drivers and services. This helps eliminate software conflicts:
- Press Windows + R, type
msconfig, and hit Enter. - In the System Configuration window, go to the Services tab.
- Check the box for Hide all Microsoft services.
- Click on Disable all.
- Go to the Startup tab and click on Open Task Manager.
- Disable all startup items.
- Restart your computer.
Your PC will boot with minimal services. Check if the error still appears.
Solution 7: Malware Scan
If you suspect malware might be causing the issue, run a comprehensive antivirus scan. You can use Windows Defender or any reputable third-party antivirus software.
- Open Settings > Privacy & Security > Windows Security.
- Click on Virus & threat protection.
- Select Quick scan or Scan options for a full scan.
Quarantine or remove any threats detected.
Solution 8: Reset Services to Defaults
Resetting services to their default settings can also help fix issues:
- Download and run a utilities tool like Tweaker to reset ALL services to their default settings.
- In the tool, locate the option to reset services.
- Follow instructions to complete the process.
Solution 9: Update Windows
Outdated Windows versions may cause compatibility issues and services not to work correctly:
- Open Settings > Update & Security > Windows Update.
- Check for and install any available updates.
Solution 10: System Restore
If the error arose after a recent change, you might want to perform a System Restore:
- Press Windows + R, type
rstrui.exe, and press Enter to open System Restore. - Follow the prompts to restore your system to a previous checkpoint before the error began occurring.
Solution 11: Repair Install
If none of the solutions work, a repair install of Windows can resolve deeper issues while keeping your files and applications intact:
- Download the Windows 10/11 installation media from Microsoft’s website.
- Run the setup file and select Upgrade to keep your files and settings.
- Follow the on-screen instructions.
Conclusion
Encountering Service Control Manager Event ID 7001 on Windows 10/11 can be frustrating, but with the right approach, it can often be resolved efficiently. Begin by diagnosing the issue accurately, then move through the suggested solutions methodically. Whether it requires restarting services, troubleshooting system files, or modifying settings in the Windows Registry, you should be able to restore functionality.
If all else fails, do not hesitate to seek professional support, as persistent issues may indicate a deeper underlying problem requiring expert intervention. By staying proactive with your system maintenance — including regular updates, scans, and monitoring services — you can minimize the chances of facing Event ID 7001 or other similar errors in the future.
При подключении к новой сети Windows предлагает выбрать её тип: Общедоступная или Частная сеть. Профили сети в Windows являются частью Microsoft Defender Firewall и помогают применять разные правила брандмауэра в зависимости от профиля. В этой статье разберём, как сменить профиль сети с «общедоступной» на «частную» и наоборот.
Приобрести оригинальные ключи активации Windows всегда можно у нас в каталоге от 1099 ₽
Типы (профили) сети в Windows
Каждое подключение в Windows (будь то Ethernet или Wi-Fi) может быть отнесено к одному из профилей сети:
— Частная сеть — для домашней или рабочей сети. Устройства видят ваш компьютер, доступен общий доступ к файлам и принтерам.
— Общедоступная сеть — для недоверенных мест (кафе, аэропорт). Компьютер скрыт от других устройств, и сетевые папки недоступны.
— Доменная сеть — для компьютеров, добавленных в домен Active Directory.
Профиль назначается автоматически при первом подключении. Чтобы повторно выбрать профиль для сети, выполните действия ниже.
Изменение профиля для сети в Windows
Панель параметров Windows
1. Откройте Параметры → Сеть и Интернет → Состояние.
2. Перейдите к Свойствам сетевого подключения.

3. Выберите нужный профиль: Частная сеть или Общедоступная сеть.

Примечание: В Windows Server 2022/2019 пункт Свойства находится в разделе Ethernet (или Wi-Fi, если активированы беспроводные сети).
В Windows вы можете сбросить все настройки и профили для всех сохраненных сетей, выбрав Параметры > Сеть и Интернет > Дополнительные сетевые параметры > Сброс сети. Перезагрузите компьютер.

Изменение профиля сети с помощью PowerShell
Для управления профилями сетевых подключений можно воспользоваться PowerShell. Запустите консоль от имени администратора и введите:
1. Просмотрите список сетевых подключений, в нашем примере на компьютере имеется 4 сетевых подключения, с разными типами сетей:
Get-NetConnectionProfile
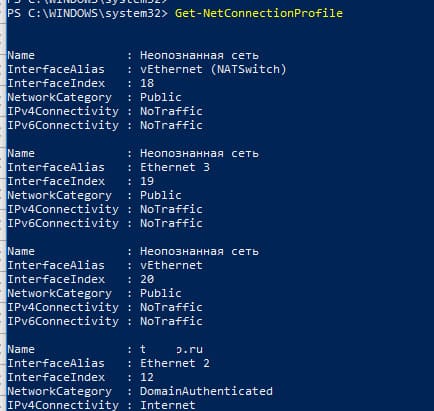
2. Найдите индекс (InterfaceIndex) нужного сетевого интерфейса, в нашем случае это 19.
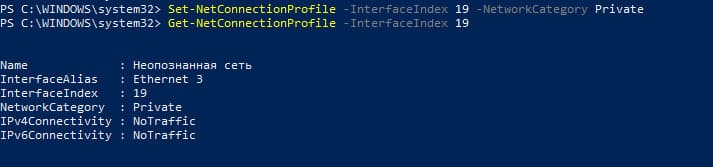
3. Измените профиль для подключения на Частная сеть:
Set-NetConnectionProfile -InterfaceIndex 19 -NetworkCategory Private
4. Если необходимо вернуть Общедоступная сеть, выполните:
Set-NetConnectionProfile -InterfaceIndex 19 -NetworkCategory Public
5. Проверим, что профиль сети изменился:
Get-NetConnectionProfile -InterfaceIndex 19
Брандмауэр Windows Defender автоматически применит правила для сетевого подключения в соответствии с назначенным профилем без необходимости перезагрузки системы.
По аналогии, можно изменить тип сети на Общедоступная с помощью команды:
Set-NetConnectionProfile -InterfaceIndex 19 -NetworkCategory Public
или на Доменная сеть:
Set-NetConnectionProfile -InterfaceIndex 19 -NetworkCategory DomainAuthenticated
Также вы можете изменить профиль сети для всех сетевых адаптеров компьютера одновременно:
Get-NetConnectionProfile | Set-NetConnectionProfile -NetworkCategory Private
На устройствах в домене изменить профиль сетевого подключения с доменного на частный или общедоступный невозможно. Чтобы проверить, добавлен ли компьютер в домен AD, используйте команду:
(Get-CimInstance -ClassName Win32_ComputerSystem).PartOfDomain
Попробуйте изменить сетевой профиль:
Set-NetConnectionProfile -InterfaceIndex 19 -NetworkCategory Public -Verbose
Появится сообщение об ошибке, так как смена доменного профиля невозможна.

Изменение типа сети в реестре Windows
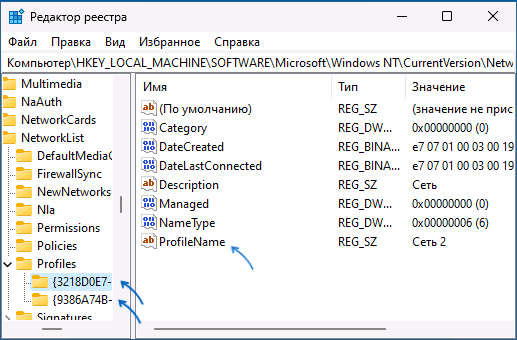
1. Откройте regedit.exe и перейдите в HKEY_LOCAL_MACHINE\SOFTWARE\Microsoft\Windows NT\CurrentVersion\NetworkList\Profiles.
2. Найдите GUID сети (в формате {xxxxxxxx-xxxx-……..} ), указанный в поле ProfileName.
3. Измените значение параметра Category на:
— 0 — Общедоступная сеть
— 1 — Частная сеть
— 2 — Доменная сеть
Перезагрузите компьютер, чтобы применить изменения.

Смена профиля через политику безопасности
Редактор локальной политики безопасности позволяет указать профиль сети:
1. Откройте secpol.msc и выберите Политики диспетчера списка сетей.
2. Найдите нужную сеть, откройте её свойства, перейдите на вкладку Сетевое расположение и выберите Частная сеть (Личное).


Примечание: для доменных компьютеров этот профиль сменить нельзя, так как при перезагрузке он вернётся на Доменная сеть.
Проблемы с доменным профилем в Windows Server
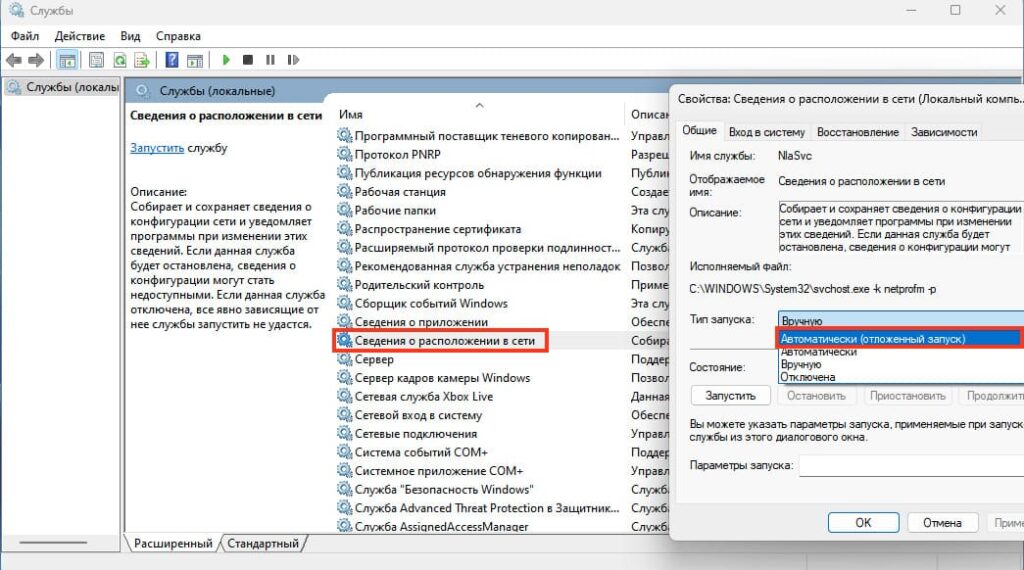
Иногда на Windows Server 2022/2019 профиль сети самопроизвольно меняется с доменного на частный. Решить это можно перезапуском службы Сведения о расположении в сети (NlaSvc):
Get-Service NlaSvc | Restart-Service -Force
Чтобы настроить отложенный запуск для службы NlaSvc, измените её параметры на Автоматически (отложенный запуск).
Для контроллеров домена добавьте зависимость службы NlaSvc от DNS:
sc config nlasvc depend=DNS
Также в некоторых случаях вам может помочь принудительное указание DNS суффикса вашего домена в настройках сетевого адаптера (сетевой адаптера -> TCP/IPv4 -> Дополнительно -> DNS, укажите имя вашего домена в поле DNS-суффикс подключение и проверьте, что включена опция Использовать DNS-суффикс подключения при регистрации в DNS.

Эти действия помогут управлять сетевыми профилями и решат проблему со сменой сетевого профиля в Windows Server.
The Service Control Manager Error (Event ID 7001) can occur due to installation issues or hardware problems. Thankfully, it’s an easy fix without needing professional assistance.
Before anything, what is the Service Control Manager and what function does it play?
What Is the Service Control Manager?
The Service Control Manager allows you to make changes to different Windows processes, features, and programs that run in the background. This tool lets you modify services like the Windows Defender, as well as other third-party apps, such as antivirus suites that protect your computer.
Depending on your Windows 10/11 computer’s software configuration, you can access this utility to modify a program or service’s execution pattern all while maintaining a certain level of efficiency with other existing apps. Here’s how to use the Service Control Manager:
- Right-click on the Windows menu and select Manage.
- Double-click on the Services and Applications section and choose Services.
- Double-click on the service that you want to modify. Doing this will launch the service’s Properties menu.
- Now, you will see a set of execution options. Choose whatever you prefer. The Automatic Startup option sets the service to launch at startup, while the Manual Startup option lets you launch the service only when needed. The Disabled option will deactivate the service entirely.
- Hit OK to apply the changes.
Like other Windows 10/11 services and utilities, the Service Control Manager is also at risk of errors. One particular error associated with it is the Service Control Manager Event ID 7001.
What Is Service Control Manager Event ID 7001 on Windows 10/11?
Some Windows 10/11 users have reportedly encountered the Service Control Manager Error with Event ID 7001 while using the Event Viewer. It seems that this error is a result of a system issue associated with the Service Control Manager. If you go to the Event Viewer’s General tab, you should see the detailed error and have an idea about what’s causing it.
Generally, the Event ID 7001 error comes with this error message:
<System>
<Provider Name=”Service Control Manager” Guid=”{555908d1-a6d7-4695-8e1e-26931d2012f4}” EventSourceName=”Service Control Manager” />
<EventID Qualifiers=”49152″>7001</EventID>
<Version>0</Version>
<Level>2</Level>
<Task>0</Task>
<Opcode>0</Opcode>
<Keywords>0x8080000000000000</Keywords>
<TimeCreated SystemTime=”2018-10-
13T17:00:04.618596100Z” />
<EventRecordID>13970</EventRecordID>
<Correlation />
<Execution ProcessID=”884″ ThreadID=”3636″ />
<Channel>System</Channel>
<Computer>My Computer</Computer>
<Security />
</System>
– <EventData>
<Data Name=”param1″>RasMan</Data>
<Data Name=”param2″>SstpSvc</Data>
<Data Name=”param3″>%%0</Data>
<Binary> 5200610073004D0061006E000000 </ Binary>
</ EVENTDATE>
</ Event>
But then again, there could be other factors that could cause the Service Control Manager Error with Event ID 7001. And we will share them with you in the next part.
What Causes ‘Service Control Manager Error 7001’ on Windows 10/11?
There are various culprits that can contribute to the occurrence of this error. Below, we have listed some scenarios or instances where the Service Control Manager Event ID 7001 error will show:
- Mandatory Services Are Disabled – For the Computer Browser service to run efficiently, there are many different mandatory services that must be enabled. When they are not running, the error 7001 may appear. In this case, you need to access the Services utility to enable all the essential services.
- There Are Missing Network Discovery Dependencies – If you see that the Event IDs on the Event Viewer window is associated with the Network Discovery function, then the fix will involve running different commands using an elevated Command Prompt.
- Some System Files Are Corrupted – In some cases, you will see the error if your system has experienced system file In such a scenario, the best solution is to refresh Windows by performing a clean install.
- A Software Conflict Has Happened – According to some users, this error may occur after performing a system change like a driver installation or update. To fix this, you may need to use the System Restore utility.
- Malware Infection – It is possible that some sort of malware entity has infected your computer, resulting in the error.
How to Fix ‘Service Control Manager Error 7001’ on Windows 10/11
If you encounter the Service Control Manager Event ID 7001 on your Windows 10/11 device, then there is good news. You can easily resolve it by following the solutions below.
However, before you proceed, try easy troubleshooting methods first. Your Windows 10/11 device may just need a quick restart as plenty of processes are already running in the background, and that there are no sufficient resources to be allocated for new processes, which leads to the error.
It could also be the case of malware entities wreaking havoc on your system. Malware infection may have affected essential services, causing them not to run properly and throw the error message that you’re seeing.
If the basic troubleshooting methods did not work, then move on with the following solutions:
Solution #1: Enable All Essential and Related Services
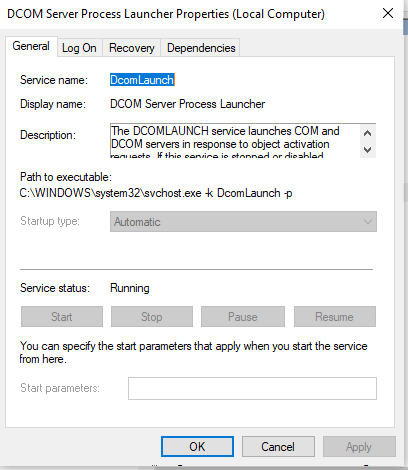
As mentioned above, the error may surface if the essential services required by the Service Control Manager are disabled. These include the DCOM Server Process Launcher, Security Accounts Manager, Server, and RPC Endpoint Mapper. By making sure these services are enabled, you can get rid of the error.
Here’s how to enable the mentioned services:
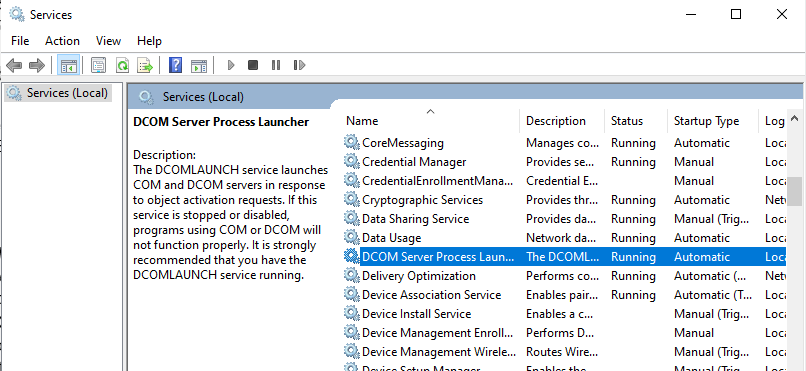
- Press the Windows + R keys to launch the Run utility.
- Type services.msc into the text field and hit OK. This will open the Services utility.
- Next, double-click on any of the above services to open Properties.
- Go to the General tab. Make sure that the status is Running.
- Navigate to Startup Type and select Automatic.
- Hit Apply then OK to apply your changes.
- Repeat the above steps for all other services.
- Restart your computer and see if the error still shows.
Solution #2: Repair All the Faulty Discovery Dependencies
You may also see the Service Control Manager Event ID 7001 if there is a problem with any of the Network Discovery dependencies. By cleaning the PeerNetworking folder, some users were able to resolve the problem.
Here’s a guide on how to do so:
- Launch the Run utility by pressing the Windows + R keys.
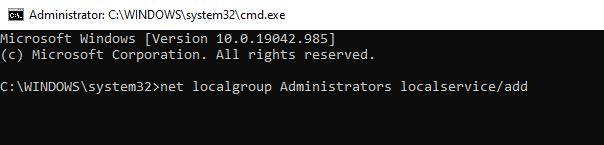
- Type cmd into the text field and press the CTRL + Shift + Enter keys simultaneously. This will open an elevated Command Prompt.

- Next, type the following commands and hit Enter after each one of them:
- net localgroup Administrators localservice /add
- net localgroup Administrators service /add
- Launch File Explorer and navigate to this location: C:\Windows\ServiceProfiles\LocalService\AppData\Roaming.
- Go to the PeerNetworking folder and delete all its contents.
- Restart your computer and see if the Service Control Manager Event ID error 7001 is resolved.
Solution #3: Adjust the Service Logon User Rights
Based on the error’s general information, we can assume that it could be caused by a service that failed to start. And in some cases, it could happen because the service does not have sufficient user rights.
To fix this, adjust the service’s logon user rights. Here’s how:
- Go to the Services app and right-click on the problematic service highlighted on the error information.
- Select Properties.
- Go to the Log On tab and select This Account.

- Provide your username and password. Hit the Apply and OK button to apply the changes.
Solution #4: Optimize Your Drives
By optimizing your drives, you help improve your computer’s performance. If you want to optimize your Windows 10/11 drives, you may use the built-in Defragment and Optimize Drives tool.
To use it, follow these steps:
- Type optimize drives into the search field and click on the top-most result.
- Now, you will see a percentage of fragmentation of each disk in the Current Status column.
- Ideally, it must be less than 10%. If a disk’s fragmentation is more than 10%, then you have to optimize it. To do so, just click on the drive and hit the Optimize button.
Solution #5: Reset the TCP/IP of Your Windows Device
You may also see the error on your Windows computer if the Net.Tcp Port Sharing service is unable to start. In this scenario, resetting the TCP/IP of your device may resolve the problem.
Here’s how:
- Click the Start menu and type cmd into the search field.
- Right-click on the most relevant search result and select Run as Administrator.
- When the elevated Command Prompt opens, type the netsh int ip reset command.
- Hit Enter.
Solution #6: Enable the Net.Tcp Port Sharing Service
If the above solutions did not resolve the error, then this solution is worth trying. Many affected users have reportedly fixed the problem by enabling the Net.Tcp Port Sharing service.
Here’s how they did it:
- Press the Windows + R keys to launch the Run utility.
- Launch the Services Management Console by typing services.msc into the Run dialog box and hitting Enter.
- Scroll down the list and find the Net.Tcp Port Service.
- Double-click on the service and set its startup type to Automatic.
- Click the Start button and hit OK to continue.
- Restart your computer and check if this solution helps.
Solution #7: Disable the TCP Port Sharing Feature
Another solution you should try involves disabling the TCP Port Sharing feature. You can do this by using the Control Panel.
Just follow the instructions below:
- Input Turn Windows Features On and Off into the search field.
- Click on the top-most result.
- Expand the .NET Framework 4.6 Advanced Services section.
- Next, expand the WCF Services.
- Disable the TCP Port Sharing feature by unticking the box next to it.
- Hit OK to save your settings.
- Restart your computer.
Solution #8: Perform a System Restore
If all else fails, you may need to perform a System Restore. This way, you can restore your system to a previous point when the error does not show.
For this solution to work, you need to have a restore point first. To create one, follow these instructions.
- Type create a restore point into the search field. The System Properties window should now appear.
- Click the Configure button.
- If System Protection is disabled, enable it.
- Hit OK to proceed.
- Next, go to the System Properties window and select the partition associated with your system.
- Press the Create button.
- Add a description to the restore point and click Create once again.
- At this point, your system will create a restore point. Wait for it to finish.
- Once done, hit the Close button.
To restore Windows 10/11 using a restore point, do the following:
- Press the Power button twice or thrice to enter the Troubleshoot window.
- Select Advanced Options and click System Restore.
- In the window that appears, hit the Next button.
- Choose a restore point and hit Next.
- Confirm your action and press Finish.
Solution #9: Reset Every Windows Component
If none of the solutions has worked so far, then it is possibly the case of your system dealing with a system file corruption. Unfortunately, this calls for a more complex fix. So, if you find yourself in such a situation, then try resetting every Windows component relevant to the process.
Reset Windows components by following any of these procedures:
Repair Install
This is the approach we recommend if you plan to retain your applications and personal files. But to proceed with this, you need compatible installation media. Here’s how to perform a repair install:
- Download the Windows 10/11 ISO file from here.
- Save it on your computer, preferably on your desktop.
- Next, mount the file.
- Double-click on the setup.exe file to begin the repair and installation process.
Alternatively, you can use a USB installation media, but you need to have a USB flash drive with a minimum of 4 GB space for 32-bit installation and 8 GB for 64-bit.
Solution #10: Install Any Pending Windows Update
As you may already know, Microsoft fixes previously reported bugs and issues on Windows 10/11 by rolling out regular updates. So, you may try installing any available Windows update to resolve the Service Control Manager Event ID 7001 error.
To install a Windows update, do the following:
- Go to the Start menu.
- Click on the Settings icon. It is the one that has a gear icon.
- Next, select Update and Security.
- Navigate to the Windows Update tab.
- Hit the Update button. If an update is detected, it should start downloading right away.
- Wait for the process to complete. Once done, restart your computer.
Clean Install
This is usually the default choice if you are looking for a fast method that allows you to reset every Windows component without having to insert an installation media. But remember that this method may cause you to lose your data, so make sure you have a backup file.
Windows 10/11 Error Prevention Tips
To avoid errors like the Service Control Manager Event ID 7001, make sure your computer is running at an optimal state. Below are some tips that can help speed things up. Try them in any order you desire.
Tip #1: Make Sure Everything Is Up to Date
One of the best ways to ensure you make the most of your Windows 10/11 PC is to have the latest Windows 10 version. When you install the latest version, you are also installing the latest device drivers and improving your computer’s performance.
Tip #2: Make It a Habit to Restart Your PC and Open Those That You Only Need
Opening too many programs, tabs, and apps can slow down your computer. Worse, it can trigger error messages to appear. If you feel that your computer is becoming sluggish, restart it and open only the apps that you need.
To restart your computer, click the Start button. Go to Power and select Restart.
Tip #3: Free Up Disk Space
You can significantly improve your device’s performance by freeing up some disk space on your computer. To check if a disk has no sufficient space, go to Start and select Settings. Next, click System then Storage. All your drives will be listed in the Storage area. Take note of the total amount of free space and delete files from disks that are running low in space.
Tip #4: Pause Cloud Syncing
We know how handy the cloud is, especially when it comes to backing up files. However, syncing your files all the time can take a toll on your PC. Syncing real-time can slow down your PC. If you notice your PC is performing poorly, pause automatic syncing temporarily.
Tip #5: Disable Unnecessary Startup Programs
Whenever you switch on your computer, some programs will automatically launch and start in the background. You can disable them if you notice your computer is running slow.
Summary
The Service Control Manager plays an essential role in the Windows 10/11 platform. Not only does it allow you to make changes in core processes, but it also lets you modify various services like Windows Defender.
But as with other services, this tool may also encounter errors, and one of the most notorious ones is the Service Control Manager Error with Event ID 7001.
This error can be triggered by many different factors. The most common ones include disabled mandatory services, missing network discovery dependencies, corrupted system files, and software conflict.
Regardless of the cause, the error can be resolved. While some fixes are complex like clean installing Windows 10/11, others are easy to do such as enabling some services and disabling some features. And if you feel that the issue requires the help of professionals, you can always turn to the experts at Microsoft. They should be able to provide you with a solution that is suited for your scenario.
Have you used the Service Control Manager before? What errors did you encounter while using it? Share your experience in the comments!
Give us some love and rate our post!