
Все способы:
- Способ 1: Поиск проблемной программы
- Способ 2: Проверка целостности системных файлов
- Способ 3: Сканирование ПК на наличие вирусов
- Способ 4: Изменение файла подкачки
- Способ 5: Обновление драйверов комплектующих
- Способ 6: Проверка оперативной памяти
- Способ 7: Освобождение места на системном диске
- Способ 8: Определение температур комплектующих
- Способ 9: Проверка аппаратных неисправностей комплектующих
- Вопросы и ответы: 0
Способ 1: Поиск проблемной программы
Ошибка «BugCheck 1001» в Windows 10 часто связана с использованием сторонних программ. Они могут конфликтовать с системными настройками или драйверами, из-за чего и происходит вылет с синим экраном смерти. Поиск проблемного ПО осуществляется в несколько этапов. Всегда лучше начать с поиска информации в «Просмотре событий». Иногда это позволяет сразу выявить софт, который вызвал зависание, а затем решить проблему конкретно с ним.
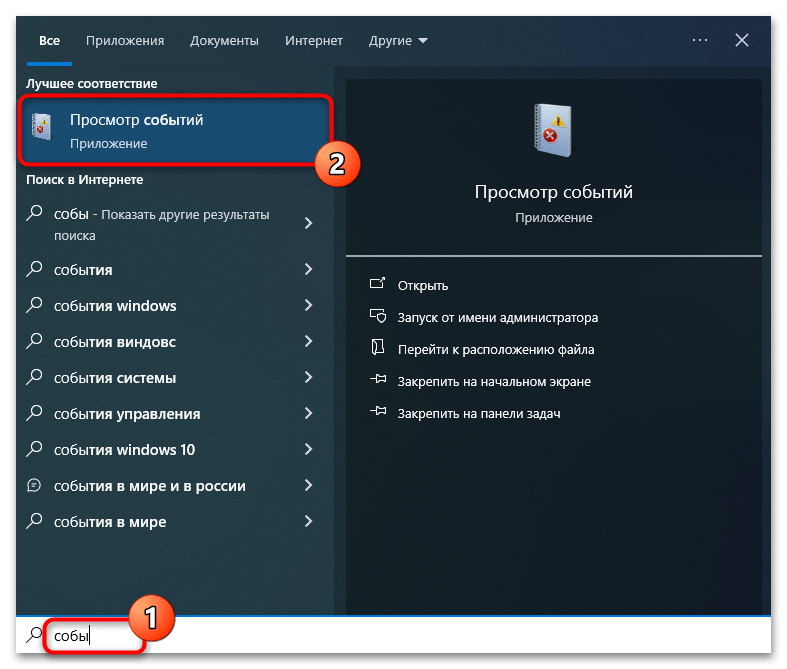
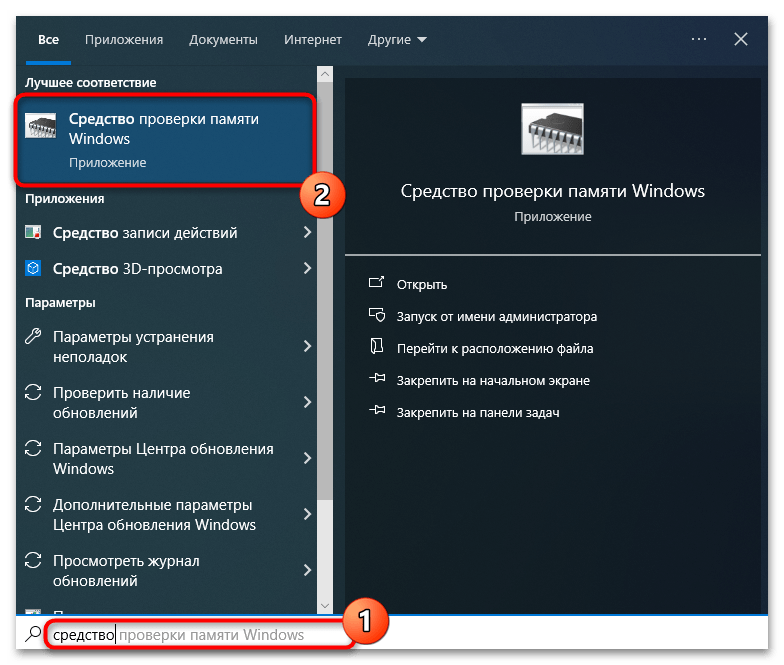
- Откройте «Пуск» и отыщите классическое приложение «Просмотр событий». Запустите его для выполнения дальнейших действий.
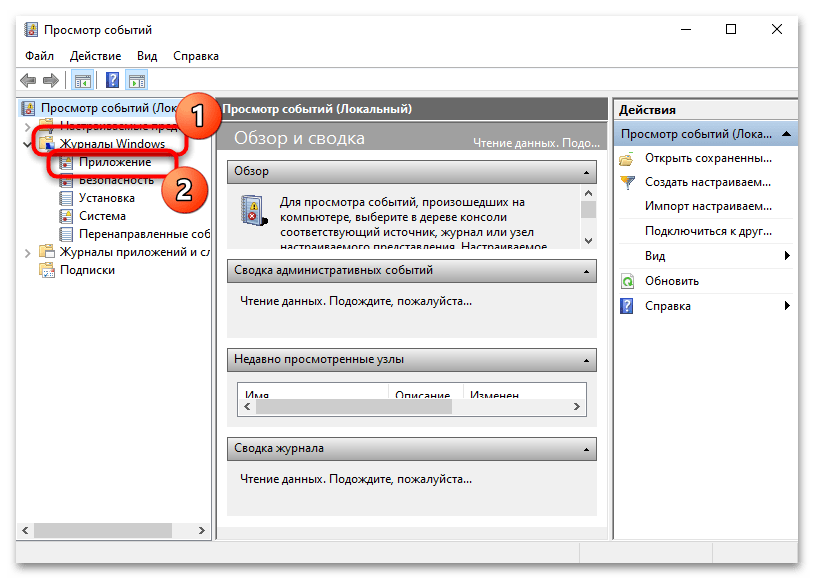
- Понадобится открыть раздел «Журналы Windows», затем перейти в «Приложения». Это позволит выставить фильтр по событиям, которые связаны с запускаемыми программами.
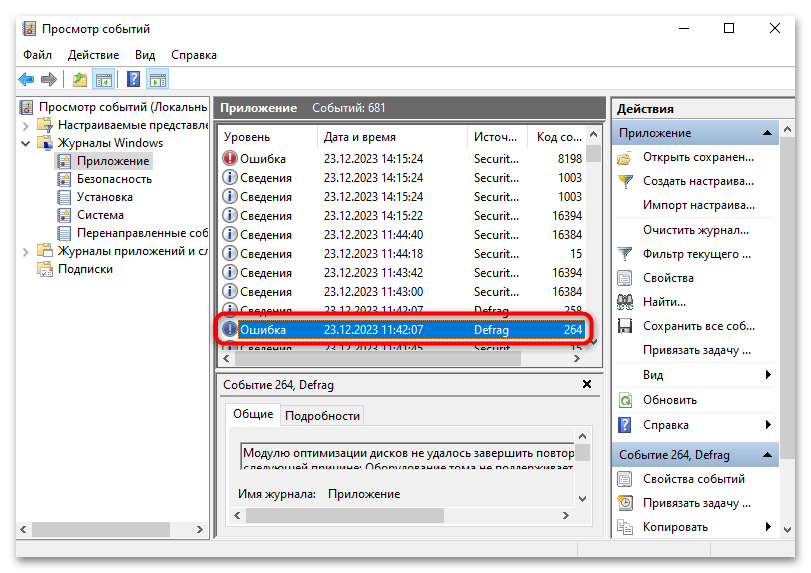
- Отыщите тут события с уровнем «Ошибка» и внимательно изучите информацию о них в подробностях. Если найдете какую-то программу с ошибкой «BugCheck 1001», проверьте исполняемый файл и решите, что делать с таким софтом далее.
Если так программу отыскать не удается, понадобится отключить все пользовательские службы, что сделает невозможным запуск стороннего софта при следующем включении компьютера. Благодаря этому есть шанс выяснить, влияет ли какое-то приложение на возникновение ошибки «BugCheck 1001». После этого уже нужно будет поочередно включать каждую службу и следить за поведением ПК, чтобы отыскать виновника.
- Для начала щелкните правой кнопкой мыши по «Пуску» и из появившегося контекстного меню выберите пункт «Выполнить».
- В утилите напишите команду
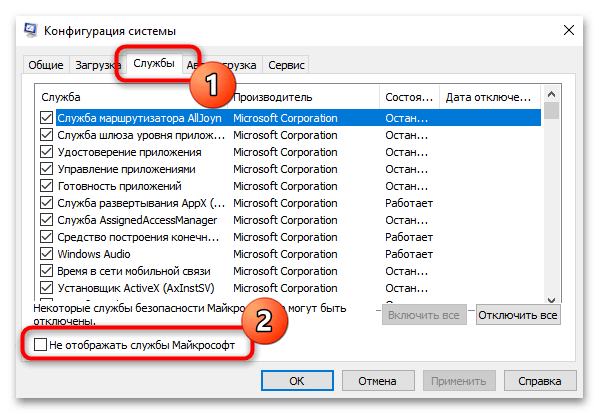
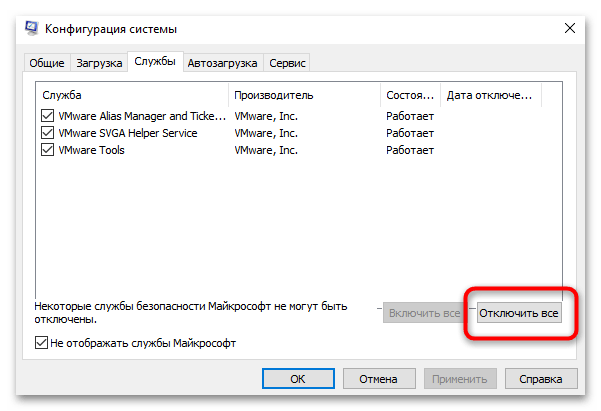
msconfigи активируйте ее, нажав по клавише Enter. - Перейдите на вкладку «Службы» и поставьте галочку возле пункта «Не отображать службы Майкрософт». Это позволит не запутаться, чтобы случайно не отключить системные компоненты.
- Далее можете самостоятельно снять галочки со всех оставшихся служб, оставив только приложение видеокарты, или использовать кнопку «Отключить все». Примените изменения и перезагрузите компьютер.

Еще есть другие методы, но они больше относятся к поиску программ, которые нагружают компьютер. Редко, но такой софт тоже провоцирует появление ошибки «BugCheck 1001», если он полностью загружает оперативную память или процессор, мешая корректно выполнять системные задачи. О поиске такого софта более детально читайте в другой статье на нашем сайте по ссылке ниже.
Читайте также: Поиск программы, тормозящей компьютер
Следующие действия уже известны: следите за состоянием компьютера, если сбой исчез, начинайте по очереди включать каждую службу и далее тестировать Windows 10. Если виновник будет найден, можно попробовать обновить программу, поискать информацию на официальном сайте по поводу конфликтов или подсказок по их решению. Иногда единственным вариантом является удаление проблемного ПО, что в большинстве случаев осуществляется так:
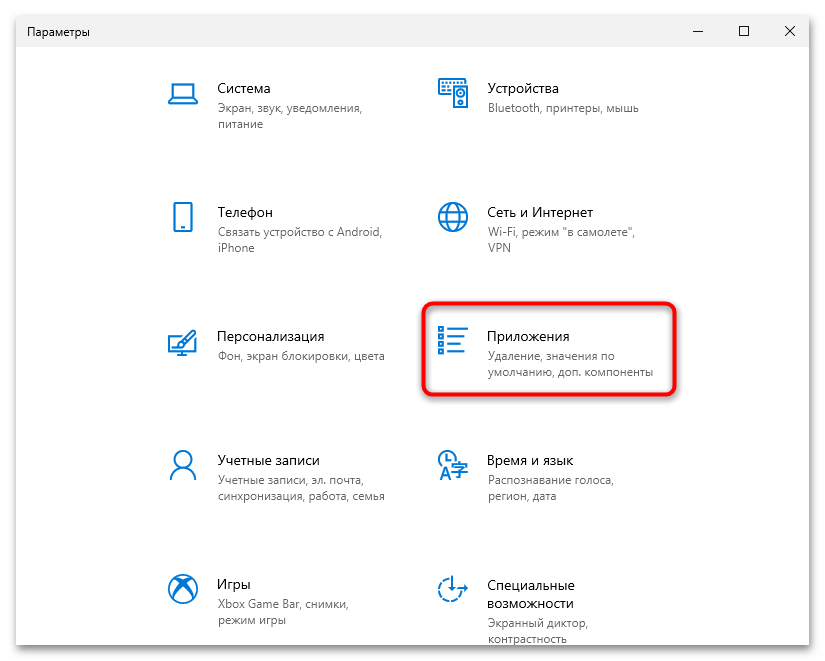
- Откройте «Пуск» и слева нажмите по значку с шестеренкой, чтобы перейти в «Параметры».
- Выберите раздел «Приложения».
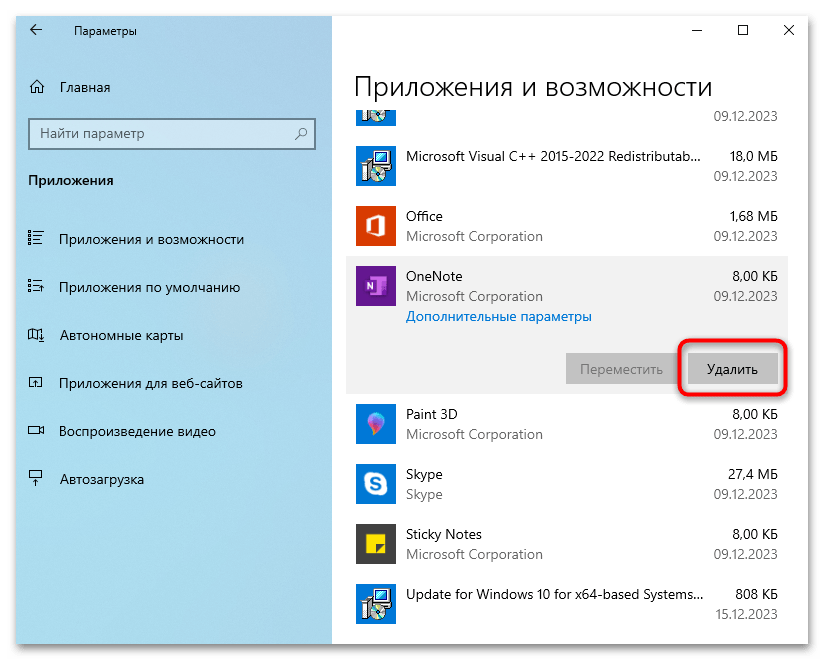
- Отыщите ту самую программу, нажмите по ней левой кнопкой мыши и вызовите действие «Удалить». Следуйте инструкциям в появившемся окне деинсталлятора.

Если с этим процессом возникают проблемы или даже после удаления от программы все равно остаются какие-то следы, скорее всего, понадобится воспользоваться разными методами принудительной деинсталляции. Для этого предлагаем ознакомиться с другим материалом на нашем сайте, перейдя по следующей ссылке.
Читайте также: Методы принудительного удаления программ в Windows 10
Способ 2: Проверка целостности системных файлов
Нарушение целостности системных файлов подразумевает, что какие-то важные компоненты отсутствуют или не могут запускаться. Это может привести к появлению ошибки «BugCheck 1001» и вылетов с синим экраном смерти. За проверку целостности системных файлов отвечают консольные утилиты. Их нужно только запустить и ожидать результата проверки. Если неполадки будут найдены, они исправятся при помощи этих же утилит. Более детальные инструкции по взаимодействию с ними вы найдете в статье ниже.
Подробнее: Как проверить целостность системных файлов в Windows 10
Обязательно прочитайте информацию в рекомендуемой статье и про утилиту DISM, которой нужно воспользоваться в случае неработоспособности SFC или сразу после, чтобы проверить и другие системные компоненты.
Применяемых команд может быть несколько, поэтому процесс займет некоторое время. Не пренебрегайте данным методом, поскольку часто как раз «сломанные» системные файлы и являются причиной возникновения рассматриваемой ошибки.
Способ 3: Сканирование ПК на наличие вирусов
Существует много разных типов компьютерных вирусов. Одни из них крадут пользовательские данные, а другие дестабилизируют систему. Как раз во втором случае действие вредоносного файла может блокировать выполнение системных задач или же заменять их код, негативно влияя на работу ПК. Соответственно, это тоже приводит к вылету синего экрана с ошибкой «BugCheck 1001», поэтому есть смысл проверить операционную систему на наличие вирусов. Делается это как при помощи встроенного средства, так и через сторонние антивирусы.
Подробнее: Борьба с компьютерными вирусами
Способ 4: Изменение файла подкачки
Проблемы оперативной памяти — одна из вероятных причин появления ошибки «BugCheck 1001» в Windows 10. Мы еще рассмотрим разные методы, связанные с исправлением работы данного компонента, но пока хотелось бы остановиться на системной настройке. Она связана с файлом подкачки, то есть виртуальной памятью, которая выделяется при работе с требовательными программами и играми. Если весь объем будет использован или произойдет проблема с определением нужного количества виртуальной памяти, может появиться синий экран. Поэтому требуется проверить текущие настройки файла подкачки и отрегулировать их под характеристики своего компьютера.
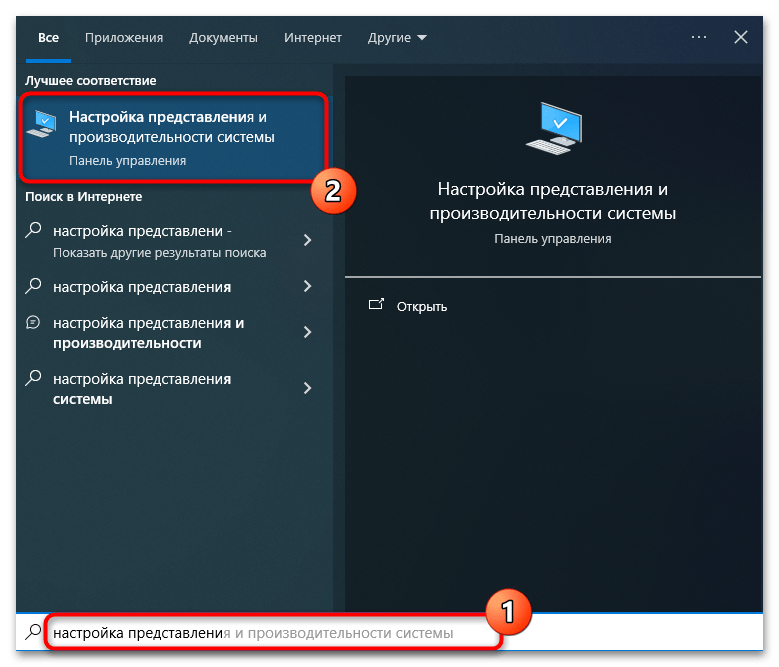
- Откройте «Пуск» и отыщите элемент «Панели управления» с названием «Настройка представления и производительности системы». Кликните по нему левой кнопкой мыши, чтобы открыть новое окно.
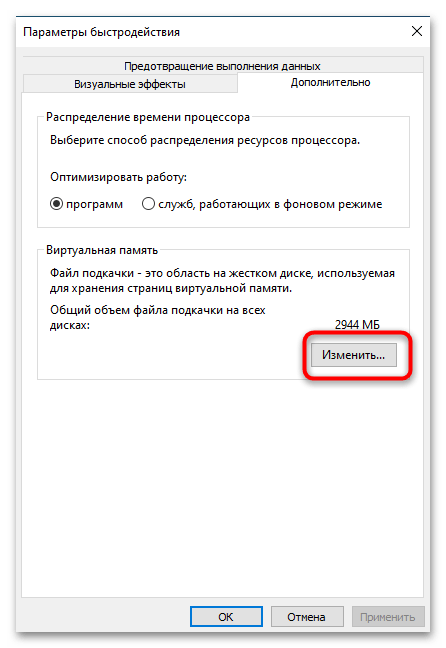
- Перейдите на вкладку «Дополнительно» и нажмите по кнопке «Изменить».
- Лучше снять галочку с пункта «Автоматически выбирать объем файла подкачки».
- Далее вы можете самостоятельно установить размер, отталкиваясь от исходного количества ОЗУ, или назначить его по выбору системы. Совсем без файла подкачки оставлять Windows 10 не рекомендуется.


Оптимальный размер и необходимость в использовании файла подкачки — темы индивидуальные для каждого ПК. Нужно учитывать сложность запускаемых программ, то есть сколько ОЗУ они потребляют, общий объем оперативной памяти в ПК и наличие места на жестком диске.
Способ 5: Обновление драйверов комплектующих
Еще одна возможная причина появления рассматриваемого сбоя — некорректная работа драйверов устройств или их отсутствие. Почти всегда для решения ситуации достаточно проверить все драйверы в Windows 10 и установить их актуальные версии. В качестве примера будет рассмотрена материнская плата, но обладатели ноутбуков тоже могут отыскать официальные страницы поддержки, откуда происходит загрузка всех необходимых файлов.
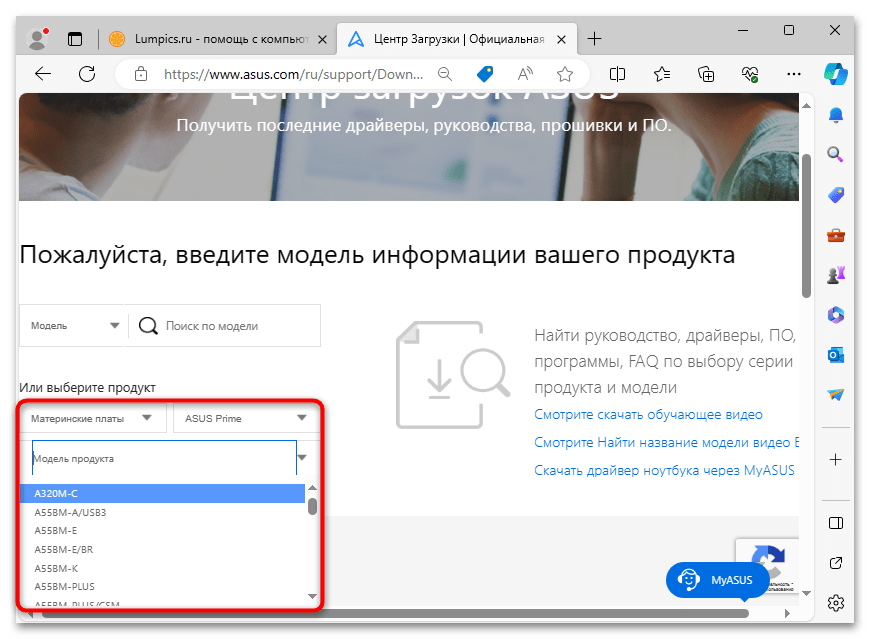
- Откройте официальный сайт производителя вашего ноутбука или материнской платы. Используйте поиск, чтобы отыскать модель устройства.
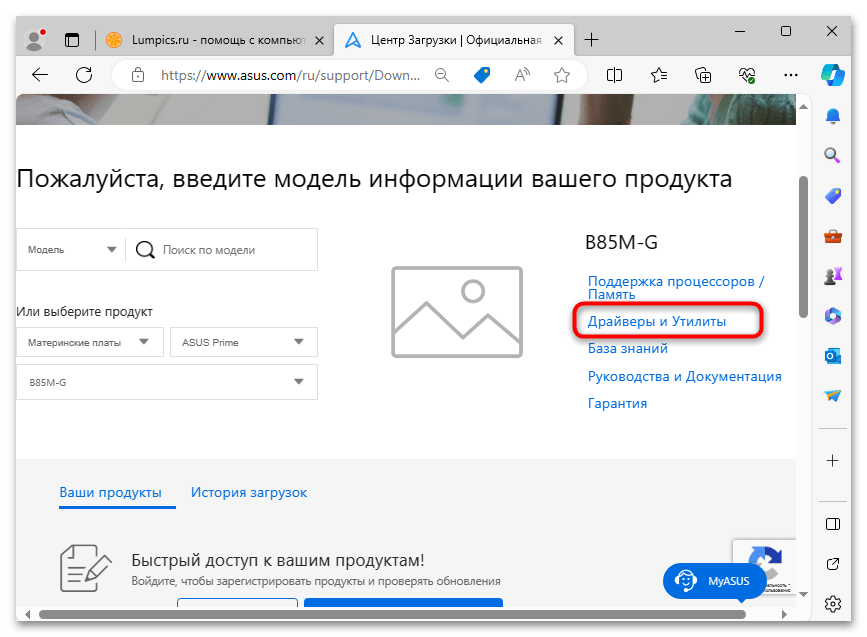
- Перейдите к разделу «Драйверы и утилиты».
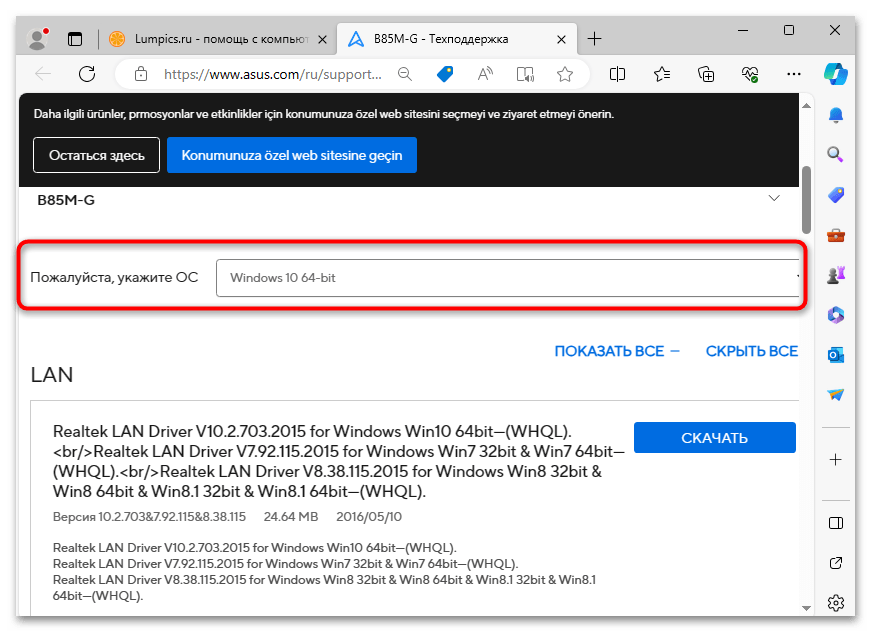
- Обязательно убедитесь в том, что ваша операционная система была распознана правильно.
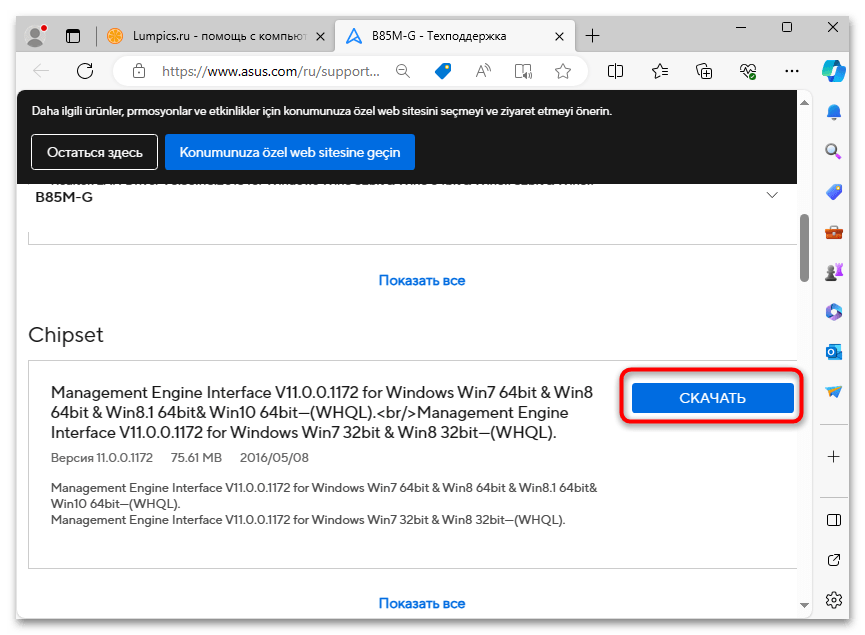
- Скачайте каждый драйвер для устройств, выбирая последние версии.
- В большинстве случаев вы получите EXE-файл или архив с наличием в нем инсталлятора. Запустите установщик и следуйте простым инструкциям внутри него, чтобы завершить инсталляцию.

Вы можете отдавать предпочтение другим доступным методам поиска драйверов для Windows 10. Это могут быть сторонние библиотеки, специальные программы или даже встроенное в ОС средство, которое иногда позволяет автоматически инсталлировать найденные апдейты. Больше информации по каждому методу вы найдете в отдельном материале на нашем сайте.
Читайте также: Как проверить обновления драйверов в Windows 10
Способ 6: Проверка оперативной памяти
Как уже было сказано в одном из предыдущих методов, оперативная память тоже становится причиной различных системных ошибок, провоцирующих вылет с синим экраном. Сначала рекомендуется проверить ее на наличие программных неполадок. Для этого подходит встроенное в Windows 10 средство, а также можно использовать специализированный софт с расширенным набором функций.
Читайте также: Проверка оперативной памяти в Windows 10
Способ 7: Освобождение места на системном диске
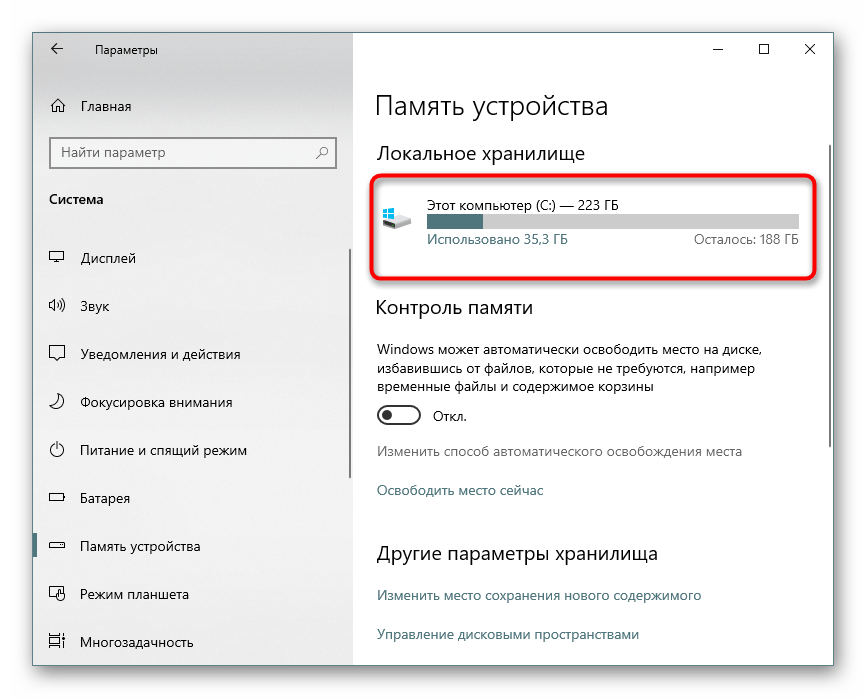
Рекомендуем обратить внимание на то, сколько места осталось на системном разделе жесткого диска. Для корректной работы компьютера свободного пространства должно быть не меньше 15 гигабайт, чтобы ОС имела возможность сохранять резервные копии и подготавливать системные обновления к установке. Если диск забит под завязку, лучше избавиться от лишнего. Сделать это можно как путем удаления временных файлов, так и через проверку установленных программ и деинсталляцию ненужных.
Подробнее: Освобождаем место на диске C в Windows 10
Способ 8: Определение температур комплектующих
Существует вероятность, что синий экран смерти с ошибкой «BugCheck 1001» появляется в Windows 10 только в тех случаях, когда температура видеокарты или процессора достигает предела. Срабатывает средство защиты, поэтому ОС прекращает свою работу, затем происходит выключение компьютера. Проверить эту причину на своем железе довольно просто — проверьте максимальную температуру во время нагрузки.
Подробнее:
Просмотр температуры CPU в Windows 10
Узнаем температуру видеокарты в Windows 10
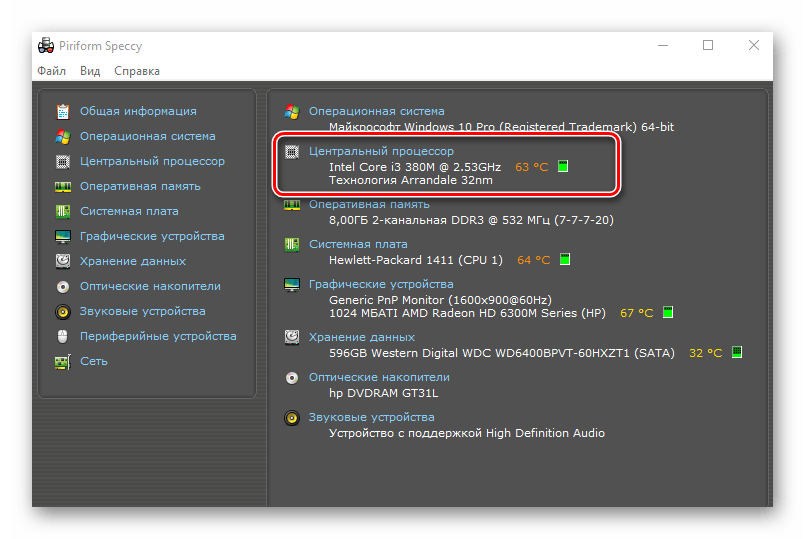
Если температура любого из комплектующих превышает 90 градусов, понадобится заняться настройкой охлаждения. Иногда достаточно увеличить скорость оборотов кулеров или почистить компьютер от мусора. Если он в эксплуатации уже давно, возможно, засохла термопаста на процессоре, поэтому ее нужно заменить, после чего проблема с перегревом будет решена.
Читайте также:
Увеличиваем скорость кулера на процессоре
Способ 9: Проверка аппаратных неисправностей комплектующих
Очень редко, но проблема может сохраняться даже после выполнения всех предыдущих рекомендаций. Некоторые пользователи продолжают сталкиваться с ней даже после полной переустановки операционной системы. Это означает, что дело в аппаратных неисправностях какого-то из комплектующих. Если вы разбираетесь в этом, проверьте устройства на работоспособность самостоятельно. При отсутствии нужных знаний и навыков лучше сразу обратиться в сервисный центр для дальнейшей диагностики и ремонта.
Читайте также: Проверяем процессор / SSD / видеокарту / оперативную память на работоспособность

Наша группа в TelegramПолезные советы и помощь
Your Windows 10 computer may occasionally stop working. This problem can manifest in a variety of ways. For example, the system may suddenly lock up, your computer becomes completely unresponsive, and eventually crashes. You may even get various Blue Screen of Death errors. If you want to identify the exact cause of the problem, you can launch the Windows Error Reporting tool and check the event log.
Oftentimes, you’ll see a mysterious Event ID 1001 error next to the hardware or software problem that bricked your computer. Let’s explore what causes this error and how you can fix it.
What Causes Event ID 1001 Errors?
The Event ID 1001 error is usually caused by hardware failure, application errors, malware, and Blue Screen of Death errors. Some of the most common root causes for these problems include high CPU and RAM usage, overheating issues, app compatibility issues, or running resource-demanding programs on low-end devices. Malware infections or corrupted Windows system files may also cause error 1001.
Contents
- 1 How Do I Fix and Prevent Event ID 1000 Errors?
- 1.1 Close Background Programs
- 1.2 Run Apps in Compatibility Mode
- 1.3 Disable Windows Defender Sample Submission
- 1.4 Reinstall the Problematic Program
- 1.5 Check Your System Files
- 1.6 Scan Your System for Malware
- 1.7 Conclusion
How Do I Fix and Prevent Event ID 1000 Errors?
Close Background Programs
Make sure to disable unnecessary background apps to reduce the strain they put on your system. Close all the unnecessary apps when running resource-hogging processes to free up more system resources for your main programs.
Go to Task Manager, click on the Processes tab, right-click on the apps you want to close and select the End Task option.
Run Apps in Compatibility Mode
Keep your apps and OS updated to make sure everything runs smoothly on your device. If you’re running outdated app versions on the latest Windows 10 OS versions, you’re bound to experience various glitches.
When launching your apps, right-click on your app icon and select Run as administrator.
To permanently enable this option, right-click on your app and select Properties. Then click on the Compatibility tab and tick the Run this program in compatibility mode for option and the Run this program as an administrator setting.
Disable Windows Defender Sample Submission
Check if the Event ID 1001 error occurs due to running multiple security solutions on your computer. The OS automatically disables Windows Security when it detects you installed a second antivirus solution. Then, Windows telemetry generates the Event ID 1001 error.
For example, Windows Error Reporting often throws this error after installing McAfee Endpoint Security Threat Prevention or McAfee VirusScan Enterprise.
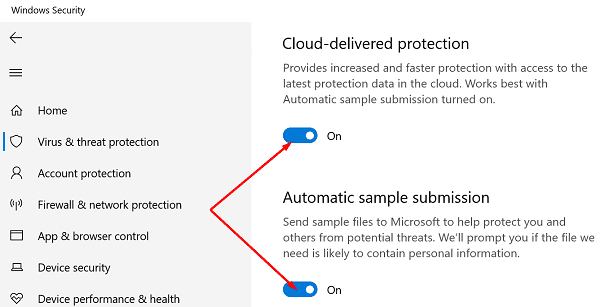
To prevent this error, turn off Windows Security’s cloud-based protection and automatic sample submission features before installing additional antimalware tools.
Reinstall the Problematic Program
Identify the app or program causing the Event ID 1001 error and uninstall it. Then restart your computer and download a fresh copy of the problematic app. If the respective app or program got corrupted, reinstall it should fix the problem.
Check Your System Files
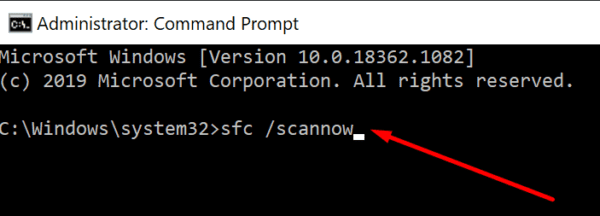
If your system files got corrupted, your computer might fail to run apps and programs properly. Repair faulty system files with the SFC and DISM commands, restart your computer, and check if this solution solved the annoying Event ID 1001 error.
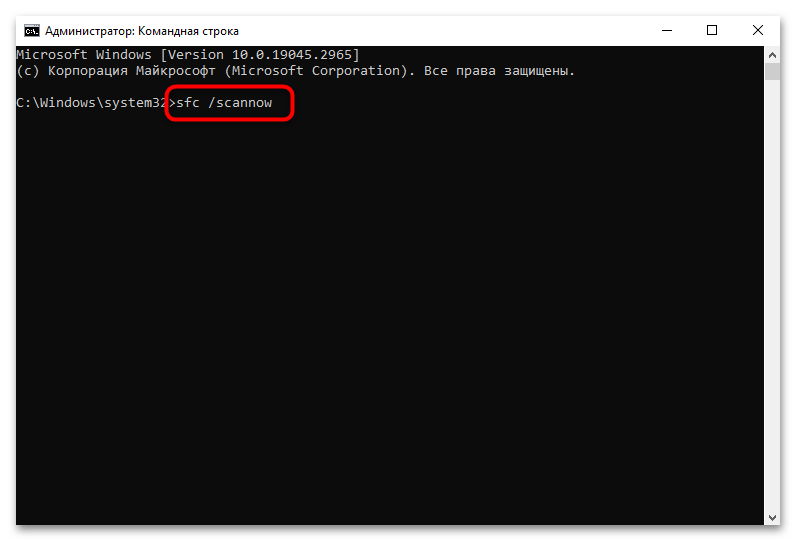
- Launch Command Prompt with admin rights and run the sfc /scannow command.

- Wait until your machine has finished running the command.
- Then run the DISM /Online /Cleanup-Image /RestoreHealth command.
- Restart your computer and check the results.
Scan Your System for Malware
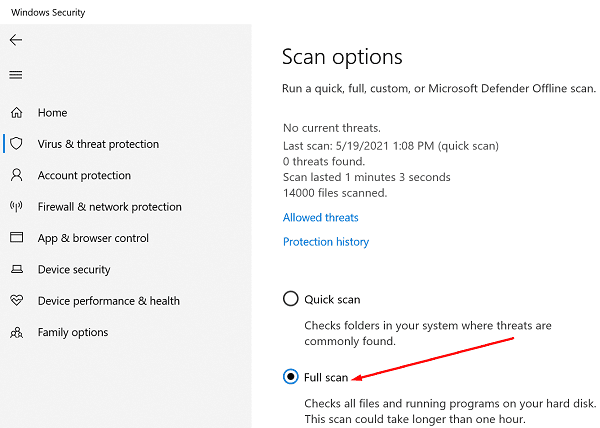
Virus or malware infections often break your system’s performance and trigger unexpected glitches. Run an in-depth antivirus scan to remove any malware traces. Do that regularly to prevent hackers from turning your machine into a zombie computer.
For example, if you use Windows 10’s built-in antivirus tool, launch Windows Security and click on Scan options. Select the Full scan option and let your antivirus scan your hard disk.
Conclusion
Event ID 1001 is an error code that can be triggered by a long list of factors. The troubleshooting solutions you’ll use depend on the error details available in the Windows Error Reporting tool. To fix the Event ID 1001 error, run your apps in Compatibility Mode with admin privileges. If the error persists, reinstall the problematic programs and repair your system files.
Did you find other solutions to troubleshoot this error? Let us know in the comments below.
The Event Viewer logs events that lead to errors. The event logs can help you understand what triggered or where exactly the issue is coming from so you can be apply the relevant troubleshooting steps. In this post, we provide the most applicable solutions to Windows Error Reporting Event ID 1001 on Windows 11/10.

Windows Error Reporting Event ID 1001 is generic, which means it can occur on your Windows 11/10 computer due to several reasons; and to successfully resolve the issue, we have to identify the event name referenced in Event Viewer. This event indicates that an application has crashed the system. The instance of this error will differ to a large extent depending on several factors, including information contained in the log file. The solutions provided in this post apply to the instance of the Windows Error Reporting Event ID 1001 with the following Event Name:
- AEAPPINVW8
- RADAR_PRE_LEAK_64
- MemDiagV1
The symbolic name for this Event ID is WER_EL_BUCKET_LOG. Code 1001 is like a universal code in case of a Windows error. It represents almost all the main errors like application crashes, lagging systems, generic reports, etc.
Read: Windows Errors, System Error Messages and Codes: Complete List and Meaning
There is no known adverse effect of this error on the system in terms of performance, security compromise, or general health of the system other than the event log getting flooded with the error. However, if you are looking to stop the Windows Error Reporting Event ID 1001 from occurring and getting logged, you can try our recommended suggestions below in no particular order and see if that helps you accomplish this task. Remember that almost all errors in the Event Viewer log are unimportant – the errors issued are just informative and a report has been sent to Microsoft. We suggest the following course of action:
- Run Memory Test
- Change Virtual Memory/Page File
- Delete/Disable all tasks in the Customer Experience Improvement Program folder in Task Scheduler
- Disable Automatic Updates
- Perform System Restore or Uninstall update
Let’s take a look at the description of the process involved concerning each of the listed solutions.
1] Run Memory Test

The Event Name RADAR_PRE_LEAK_64 or MemDiagV1 are memory issues. RADAR is Microsoft’s Memory Leak Detector that indicates an app or program is not properly handling memory. Some games, such as BlackOps are known to frequently cause the report to be written, and it’s nothing to worry about. However, in this case of Windows Error Reporting Event ID 1001, you can use Task Manager and/or use Process Explorer from SysInternals to identify the app or game that’s having Memory leak issues – it’s imperative to note that some errant memory “tweaking” could cause some memory to become unusable.
Related: The computer has rebooted from a bugcheck
In addition, you can also test for defective physical memory on your PC with the inbuilt Windows Memory Diagnostic Tool or the advanced MemTest86+. Although this is a software issue, where an app or program is not properly managing its memory, rather than a hardware issue, you can run Hardware and Devices Troubleshooter to rule out faulty hardware, which could be due to either physical damage or corrupt driver/software linked to the hardware.
Read: Memory leak issue in Remote Registry Service causes Windows to hang
2] Change Virtual Memory/ Page File

What these errors are is memory errors. The Windows operating system ships with factory default virtual memory. If you have more RAM than factory settings, you need to change your virtual memory to match the physical RAM installed on your computer.
To change the Page File size or Virtual Memory on your Windows 11/10 PC, do the following:
- In the Taskbar Search, type Advanced System.
- In the search result, click on View Advanced System Settings. Alternatively, press Windows key + R, then type sysdm. cpl in the Run dialog box and hit Enter to open System Properties.
- In System Properties, click the Advanced tab.
- In the Performance section, click the Settings button.
- In the Performance Options sheet, click the Advanced tab.
- In the Advanced tab, under Virtual memory, select Change.
- Now, uncheck Automatically manage paging file size for all drives option.
- Next, highlight or select your Windows system drive.
- Select the radio button for the Custom size option.
- Change the Initial size value and the Maximum size value to a higher value.
- Click Set.
- Click Apply to save changes.
- Click OK all the way to exit.
Read: How to reset Virtual Memory or Page File in Windows
3] Delete/Disable all tasks in the Customer Experience Improvement Program folder in Task Scheduler

As reported by some affected users, the Event Name AEAPPINVW8 is triggered by Windows Automatic Maintenance because they notice the error appears at the time task is scheduled to run. Also, this issue was confirmed or reproduced by manually triggering Windows Automatic Maintenance as the error message promptly appeared in the event log. The scheduled task that triggers the error is called Program Data Update, which is part of the Customer Experience Improvement Program – a task that collects information about software installations, uninstalls, and such.
In this case, you can run System Maintenance Troubleshooter to automatically detect and fix common maintenance problems on your Windows 11/10 computer. Also, in Task Scheduler, delete/disable all scheduled tasks in the Customer Experience Improvement Program folder that runs or is triggered at the specified time the error appears and is logged in Event Viewer. – here’s how:
- Press the Windows key + R keys to invoke the Run dialog.
- In the Run dialog box, type taskschd.msc and hit Enter to open Task Scheduler.
- Navigate to the directory path below:
Task Scheduler Library > Microsoft > Windows > Customer Experience Program Improvement Program
- At the location, in the middle pane of the opened folder, select one or more task(s) you want to delete.
Note: If you want to delete or disable more than one task, you can press and hold the Ctrl key while clicking on the tasks one after the other to highlight all.
- Once you have selected all the tasks you want to delete/disable, do either of the following:
- Click on Delete or Disable under Selected Items in the right Actions pane.
- Click on Action (Alt+A) on the toolbar and click Delete or Disable (Alt+D).
- Right-click on the selected task(s) and click Delete or Disable on the context menu.
- Click Yes on the prompt that pops up to confirm.
- Exit Task Scheduler when done.
Read: How to Import or Export Tasks from Task Scheduler in Windows
4] Disable Automatic Updates
These errors as logged in Event Viewer might also report WindowsUpdateFailure2 or StoreAgentScanForUpdatesFailure0. In this case, what worked is to disable Automatic Updates for Windows and Microsoft Store apps. In addition, you can run the Windows Update Troubleshooter and the Windows Store Apps Troubleshooter to resolve any underlying issues causing both the Windows update and Microsoft Store apps update failures.
Read: Recommended Windows Update policies Admins should be using
5] Perform System Restore or Uninstall update
Some PC users reported they started seeing this error entry in event logs after successfully installing a new Windows update on their system. If you’re in a similar situation, then the applicable solution here is to either perform System Restore or uninstall the ‘problematic’ update. If the update installed is a Windows optional update for the driver of particular hardware on your computer, like the graphics card, you can roll back the driver updates in Device Manager.
Read: Bad GPU Driver Update causing problems in Windows
I hope you find this post informative and helpful!
These Event IDs-related error posts might interest you:
- DistributedCOM error 10001, Unable to start a DCOM Server
- How to fix DCOM Event ID 10016 error on Windows
- Event ID 10010, Server did not register with DCOM within timeout
- How to fix Event ID 642 ESENT error on Windows
What is a Fault Bucket error in Windows 10?
On a Windows 11/10 computer, a Fault Bucket identification number is a number assigned by the system to identify specific types of errors. This number is used by Microsoft to identify a particular program error when you send an error report.
Read: How to read Windows Defender Event Log using WinDefLogView
What is CbsPackageServicingFailure2?
One of those is the Windows Event Error CbsPackageServicingFailure2. The only way users find out about this error is by going to their Windows logs. It is thought to be a system problem potentially caused by the Windows update cache that initiates repeated downloads and installations. Affected users reported that the error did not affect the regular use of Windows on their devices.
How do I view Windows log files?
To view the Windows Setup event logs on your device, follow these steps:
- Start the Event Viewer.
- Expand the Windows Logs node.
- Click System.
- In the Actions pane, click Open Saved Log.
- Locate the Setup.etl file. By default, this file is available in the %WINDIR%\Panther directory. The log file contents appear in the Event Viewer.
Read: What or Where is CBS.log? How to read CBS.log file in Windows
Does Windows have a crash log?
When your hardware or software of the system crashes, hangs, or freezes then the operating system generates and maintains a crash log record to identify the causes of the crashes. Windows operating system maintains this log in Event Viewer. At any time, you can review and as well clear the Event Log in Windows 11/10.
Have you ever faced a situation when your system suddenly stopped working, became unresponsive, or even crashed? Whenever these issues occur Event Viewer may show Event Id 1001. This error is likely to appear when an application uses high resources, causes conflicts, or becomes corrupted. This is Event Id 1001 Windows Error Reporting that may cause system crash, freeze and hang, and sometimes blue screen bug check. This post will present solutions to this problem.
Generally, Event Id 1001 Windows Error Reporting can be resolved by uninstalling the application, updating Windows, and increasing paging file size. Furthermore, running an SFC scan, DISM, using Windows Defender malware Scan, disk cleanup, and stopping background apps. See: Fix Event ID 86 SCEP Certificate enrollment initialization Failed in Windows 11 or 10.
Event Id 1001 Windows Error Reporting
Here is how to fix Event Id 1001 Windows Error Reporting:
Use SFC and DISM
System file corruption may be a major reason for this Event id 1001 and SFC scan, identification, and repair can resolve this issue. Here’s the method to run the system file checker:
- Click on the Windows Search and type CMD.
- Select Run as Administrator.
- Click Yes when a UAC pop-up appears.
- Once the command prompt opens, paste
SFC /Scannowand hit Enter.
- Allow the cmd command to scan, verify, and repair the damaged files and then restart the PC.
- Check if Windows Error Reporting 1001 Event Id is fixed.
- In case, the glitch continues to occur, once more open Command Prompt as administrator.
- Then, run the below piece commands one by one:
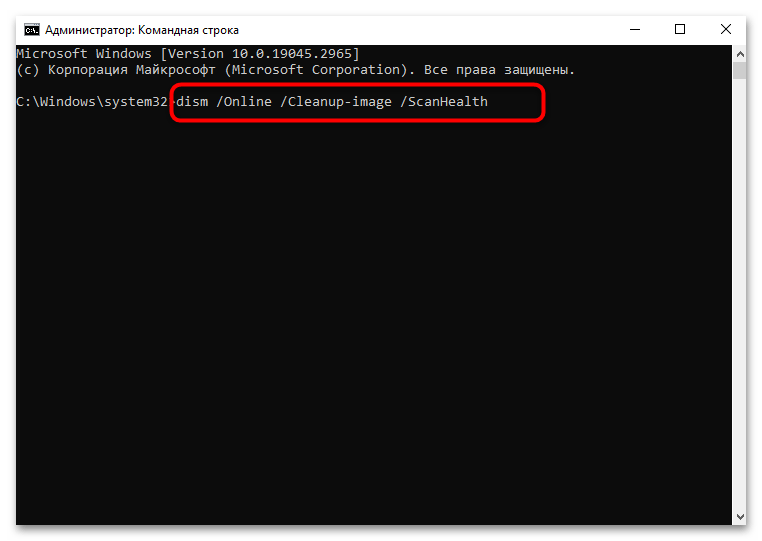
dism /online /cleanup-image /checkhealth
dism /online /cleanup-image /scanhealth
dism /online /cleanup-image /restorehealth- At last, restart the system.
SFC /Scannow, DISM.Exe, CHKDSK Windows 10
Scan for Viruses
Malware and Viruses can affect the PC performance and shows this unexpected Event Id 1001 Windows Error Reporting. An in-depth antivirus scan can track and remove threats and fix the error. Fortunately, there’s a built-in security suite that comes in Windows to remove malware; here’s a simple guide to run this:
- Press Windows + I on your keyboard to launch Settings.
- Click on the Privacy & security option.
- Select “Windows Security”.
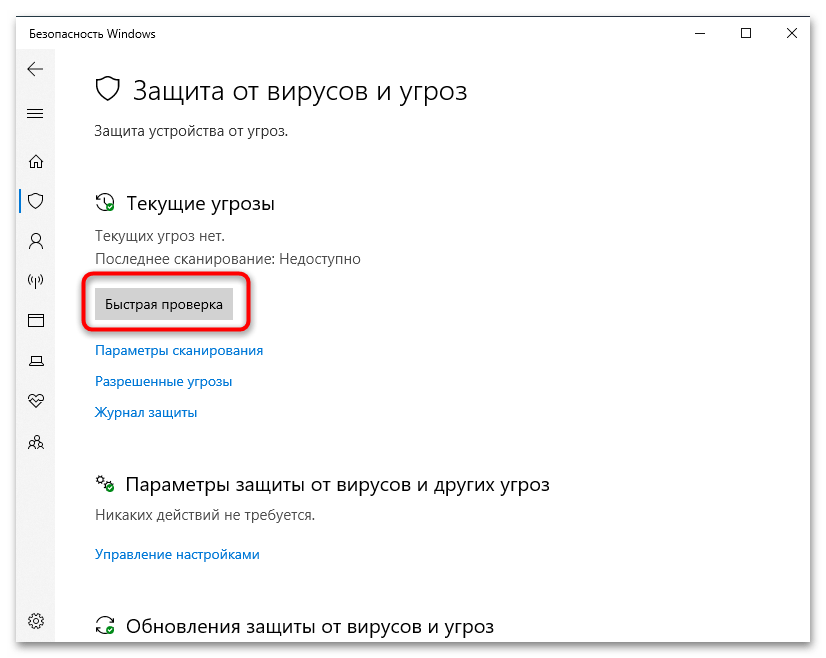
- On the new application, click on Virus & Threat Protection.
- Select Scan options.
- Here you’ll see three levels of scanning; choose Full Scan and click on Scan Now below.
- Once the full scanning is completed, a list of threats shows.
- Click on Apply to remove these threats.
- Restart your system and check whether the error is resolved.
Run Disk Cleanup
Insufficient disk space is obviously an obstruction in running an application and may be a reason for this Event Id 1001 Windows Error Reporting. Here’s the way to clean the storage and fix this problem:
- Press Windows + S.
- Type cleanmgr.exe and press the Enter key.
- A new pop-up will appear with drive options.
- Select C: drive from drop-down menu and click Ok.
- When a new window prompts, click on Clean up system files.
- Again choose C: drive and press Enter.
- On the window that opens, tick all the checkboxes on the left side and click OK.
- Click on Delete Files to confirm the option.
Increase Paging file size Allocation
The paging file size aka the swap file size or virtual memory file size is a space used by Windows to supplement physical RAM when it becomes full. It temporarily stores data that would normally reside in RAM.
If your system doesn’t have enough paging file size you will face this error id 1001. So here’s how to fix it:
- Press Windows + R.
- Type sysdm.cpl and hit Enter.
- A new pop-up that shows System Properties appears.
- Select the Advanced tab.
- Click on Settings under Performance.
- A new window pops up; click on the “Advanced” tab.
- Click on Change under Virtual memory.
- On a new tab, uncheck the first box, “Automatically manage paging files for all drives”.
- Select the custom size option, enter a value in both boxes, and click OK. To enter the values, follow: How to Tweak Paging File for better Windows 11 or 10 Performance.
- Once the process is complete, check if the error has been resolved.
Terminate Unnecessary Background Apps
Sometimes multiple applications run in the background, which affects the overall system performance, leading to this Event Id 1001 Windows Error Reporting. However, closing these unnecessary apps is easy and becomes the solution to the issue. Follow the given steps below:
- Press Ctrl + Alt + Delete.
- Once a Task Manager opens, you’ll see the list of running apps under the Processes tab.
- Select the unnecessary app Individually, right-click on it, and hit End Task.
- After ending task for running apps, go to the Startup tab.
- To terminate all these programs from the auto start, right-click on them one by one, and hit Disable.
- Reboot your system and check if the issue is resolved.
Uninstall troublesome Software
Predominantly conflicts with third-party apps and system programs are the reason behind the event Id 1001 Windows error reporting. This problem shows when software itself or its update is malicious and is installed on your computer. So it’s important to stay alert and fix the issue by following the steps:
- Press Windows + R.
- Type appwiz.cpl and hit Enter.
- A new window Programs and Features opens up.
- Find the app which can cause this error and right-click on it.
- Select Uninstall.
- Once the app is uninstalled, reboot your system.
- Repeat the same steps with the third-party program if they are installed.
Disable Automatic Sample submission and Cloud-delivered Protection
If your system has enabled Cloud-delivered protection in Wndows Security, then this type of error can occur. So here’s how you can turn off this:
- Press Windows and S.
- Type Windows Security and click on the app to open it.
- Once a new window opens, click on Virus & threat protection tab.
- Click on Manage settings, scroll below, and turn off the Cloud-delivered protection option.
- Also, disable the Automatic sample submission setting.
- Restart your computer and check whether the issue has been resolved.
These are the top 7 working methods to resolve this Event Id 1001 Windows Error Reporting in your Windows 11/10. We hope this guide helps you to resolve this error.
Methods:
Use SFC and DISM
Scan for Viruses
Run Disk Cleanup
Increase Paging file size Allocation
Terminate Unnecessary Background Apps
Uninstall troublesome Software
Disable Automatic Sample submission and Cloud-delivered Protection
That’s all!!
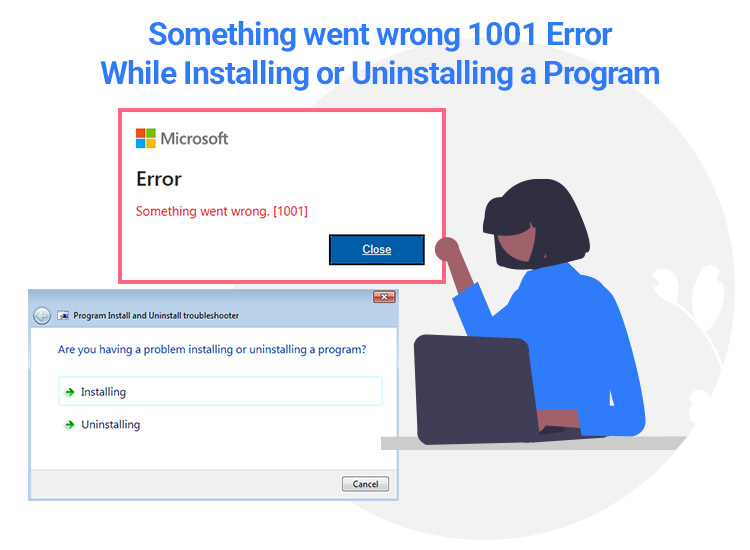
If you are also getting the Microsoft Something Went Wrong 1001 or Error Code 1001 while installing, uninstalling, or using Outlook or any other app, you can use the solutions offered in this guide to fix this issue with ease.
Microsoft Outlook or the Microsoft Office Suite is a collection of multiple office tools for spreadsheets, documents, presentations, and otherwise. To use these features, you need to install these tools as per your requirements. The Suite allows you to download and install the tools you have purchased in the Suite pack and use them.
However, some users complain that while installing the Microsoft apps, the Windows operating system shows the Error Code 1001. This error code is one of the most common error codes you will encounter.
Something Went Wrong 1001 error can appear while installing an app from the Microsoft Suite or while signing into your Microsoft account. With the help of this guide, we will learn how to solve the 1001 Error or the Something Went Wrong 1001 with ease. Let’s dive into the solutions right away.
Solutions to Fix the Something Went Wrong 1001 Error on Windows
In the coming sections of this guide, we will have a look at some of the best solutions to fix Error Code 1001. To get rid of the error, you need to execute the solutions chronologically until the issue is fixed. So, start right away.
Fix 1: Restart the PC
The first method to solve the 1001 Error Code on a Windows PC is to restart the system. Some temporary bug or internet connectivity issue may present the error code on your PC. Hence, you should try restarting the system first before getting into any other solution. If restarting the system does not work, follow the next solution to fix the Error 1001.
Fix 2: Run the WAM Repair Command
Let’s have a look at the next solution for how to solve the 1001 Error on Windows. You can run the WAM Repair command on the Windows PowerShell tool. This method is even recommended by Microsoft to fix the error. Follow the below steps to learn how to do this:
- Press the combination of the Win + S keys, type PowerShell, and Run as Administrator.
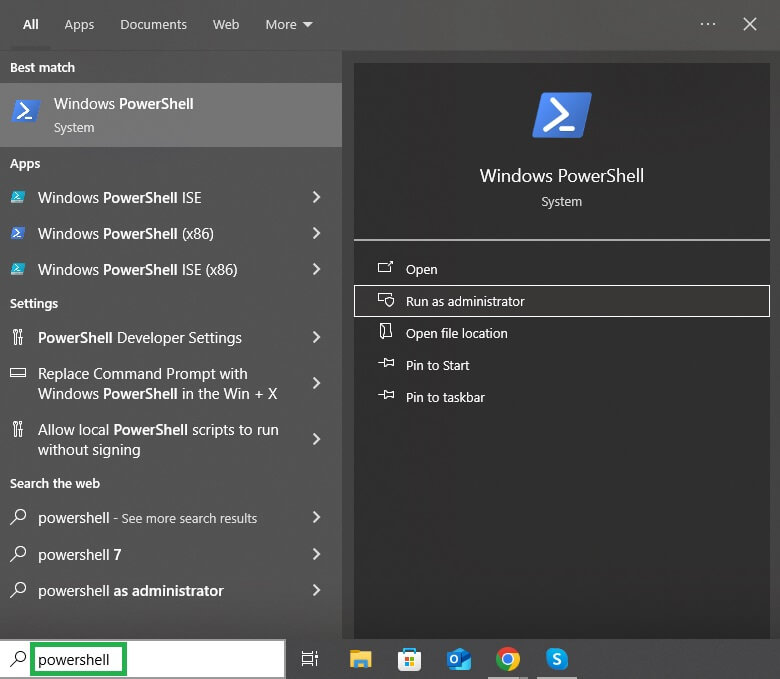
- Now, you need to enter the below commands followed by the Enter key.
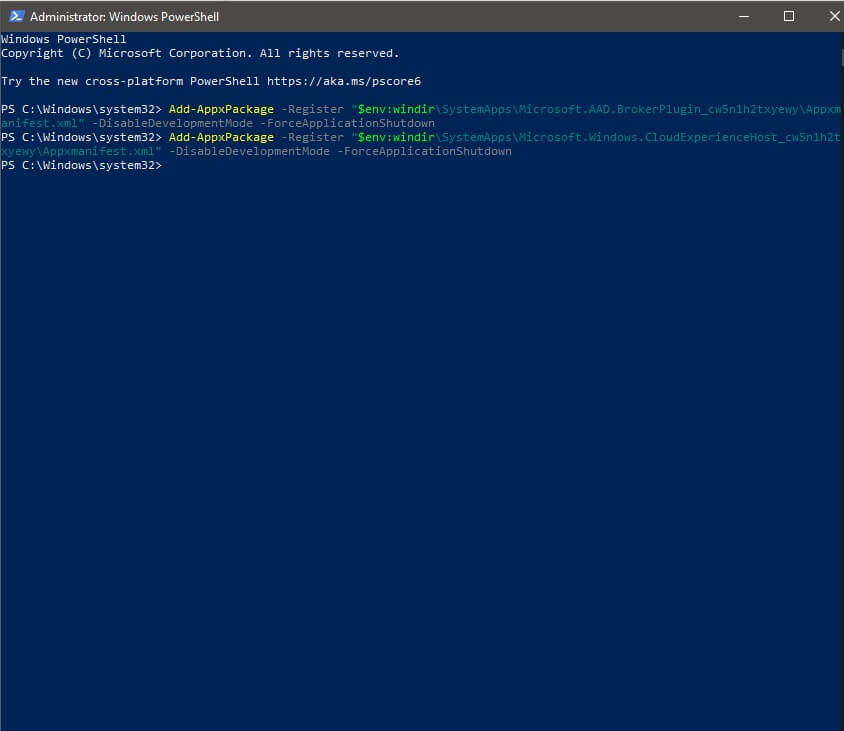
Add-AppxPackage –Register “$env:windir\SystemApps\Microsoft.AAD.BrokerPlugin_cw5n1h2txyewy\Appxmanifest.xml” -DisableDevelopmentMode –ForceApplicationShutdown
Add-AppxPackage –Register “$env:windir\SystemApps\Microsoft.Windows.CloudExperienceHost_cw5n1h2txyewy\Appxmanifest.xml” -DisableDevelopmentMode –ForceApplicationShutdown
This is a common solution that will allow you to fix the Something Went Wrong 1001 error on a Windows PC. Follow the next solution to fix the error if this one does not work.
Also know: How to Add or Remove Programs on Windows 10 and 11
Fix 3: User Profile Management Issue
Here’s another answer for how to solve the 1001 Error. The user profile management can also cause the 1001 error. If the files are not stored correctly, it can clash with the authenticated data and thus cause an error. You need to ensure that all the User Profile Management files and folders are present. Ensure that the Registry Editor contains the below folders:
- HKEY_CURRENT_USER\SOFTWARE\Microsoft\Windows NT\CurrentVersion\WorkplaceJoin
- HKEY_CURRENT_USER\SOFTWARE\Microsoft\Windows\CurrentVersion\AAD
- HKEY_CURRENT_USER\SOFTWARE\Microsoft\IdentityCRL
- %localappdata%\Microsoft\TokenBroker
- %localappdata%\Packages\<any app package>\AC\TokenBroker
- %localappdata%\Packages\Microsoft.Windows.CloudExperienceHost_cw5n1h2txyewy
- %localappdata%\Packages\Microsoft.AAD.BrokerPlugin_cw5n1h2txyewy
If all the files and folders are available but the Outlook Error 1001 still appears, follow the next fix to get rid of the error.
Fix 4: Delete Cache Files
Let’s have a look at another solution for how to solve 1001 Error on Windows 11/10. You can delete the cache files from the Microsoft installation folder. Accumulated cache files can cause problems in signing into the Microsoft account and installing its apps. You can use the below solutions to fix the error by clearing the cache:
- Press the combination of the Win + R keys, type the below command, and hit the Enter key to open the folder.
%localappdata%\Microsoft\Outlook\RoamCache
- Select all the files present in the folder, press the combination of the Shift + Delete keys, and hit the Enter key.
Once all the cache files have been deleted, you will be able to install the apps as required. Follow the next solution if the error persists.
Fix 5: Repair the Microsoft 365 or Office App
The ultimate solution to solve the 1001 Error is to repair the app. Thankfully, the developers at Microsoft have added a feature that allows you to fix any faulty or damaged installation file(s) if any. You can take the help of the below solutions to fix the error right away:
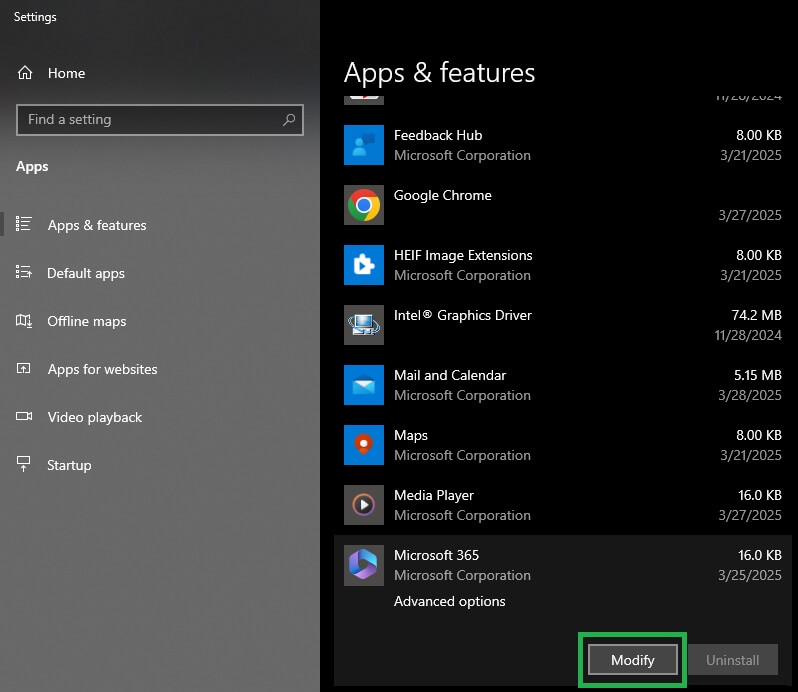
- Press the combination of the Win + S keys, type Apps & Features, and press the Enter key.
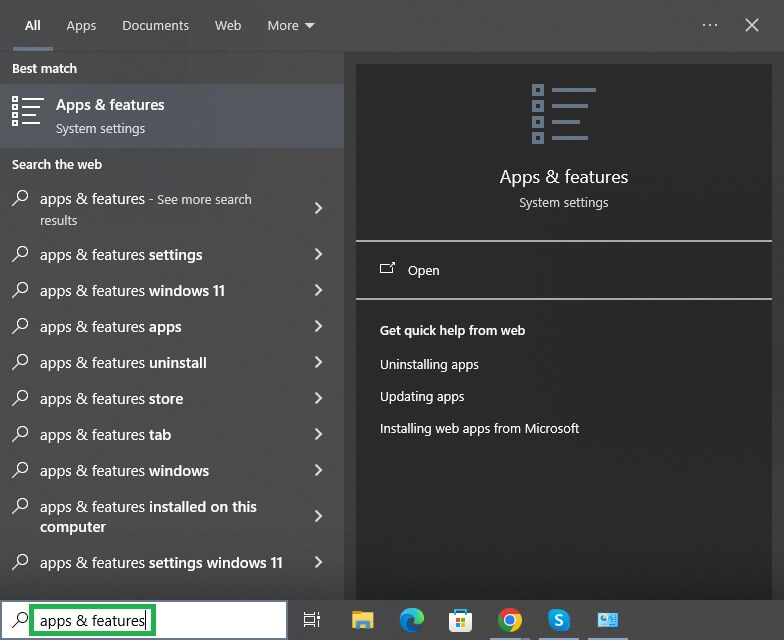
- From the list of apps, find the respective Microsoft app that you wish to fix, select it, and click the Modify button.
- Now, you may opt for a Quick or Online solution as suited to repair the required app.
You can repeat the solution for as many apps as you like to fix the Error Code 1001.
Also know: How to Fix “The Application was Unable to Start Correctly 0xc00007B” Error in Windows 10
Error 1001 on Microsoft: Closing Words
It’s very important to install different apps from the Microsoft Suite to take the maximum benefits out of all the features. The Error 1001 can interrupt you from using the Microsoft apps. The above solutions will help you fix the problem with ease. If you have any questions related to the guide on how to solve the 1001 Error on Windows 11/10, you can use the comments section below. You can subscribe to our newsletter for daily updates and follow our social media pages to show your support.