
Readers help support Windows Report. We may get a commission if you buy through our links.
Read our disclosure page to find out how can you help Windows Report sustain the editorial team. Read more
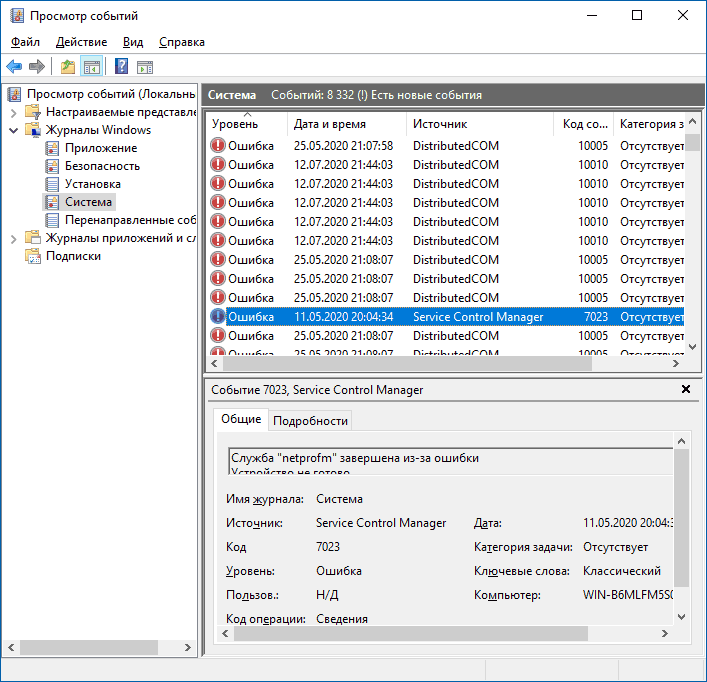
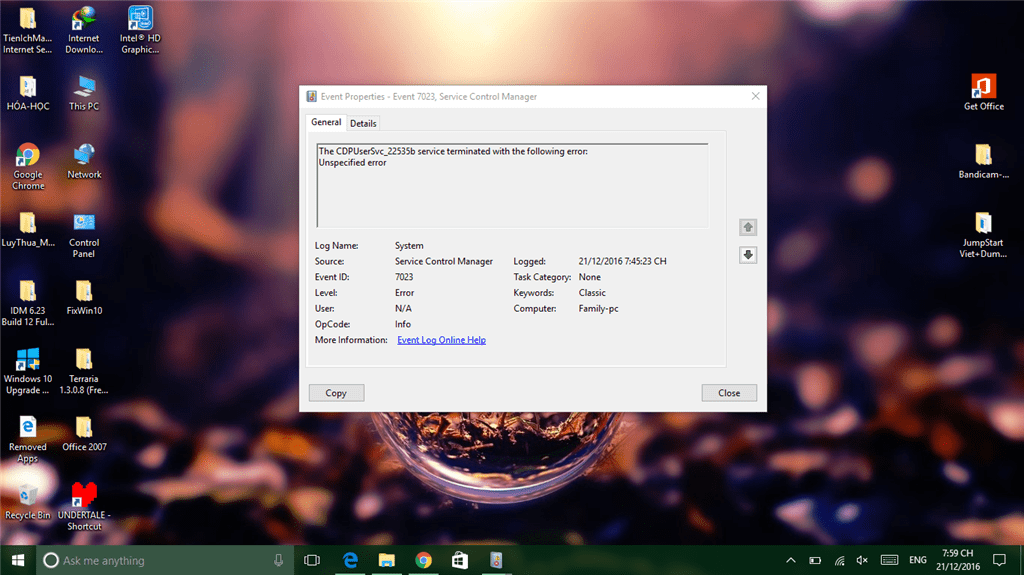
Some users have posted on Microsoft’s forum about a Connected Devices Service error with event ID 7023. This happens when a service stops unexpectedly.
If you are also facing this issue, this guide contains the solution that will help you fix this issue for good.
What does the event ID 7023 indicate?
The event ID 7023 error means that the service specified in the error message stopped unexpectedly. This can be due to corrupt system files and some other factors.
Irrespective of the cause, the solutions in this guide should help you fix the issue quickly.
How can I fix the Event ID 7023 error in Windows 10?
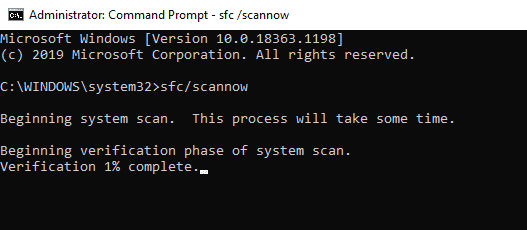
1. Run a System File Checker scan
- Press the Windows key, type cmd, and click Run as administrator for Command Prompt.

- Before running an SFC scan, input this command and hit Enter:
DISM.exe /Online /Cleanup-image /Restorehealth
- Then type in this SFC scan command and press Enter:
sfc /scannow
- Wait until the scan has reached 100 percent.
- When you have received a scan outcome, restart your desktop or laptop if the outcome says Windows Resource Protection repaired system files.


A few users reported nothing happening while using the SFC scan on their PCs. If that’s the case, try to use DISM commands in Windows 10 to fix the corrupt system files causing the event ID 7023.
2. Check the Connected Devices Platform Service is enabled and running
- Press the Windows key + R, type services.msc, and click OK.
- Then double-click Connected Devices Platform Service.

- If that service is disabled, select Automatic (delayed) in the Startup type drop-down menu.
- Now, click the Start button to run that service if it’s not running.
- Finally, click the Apply button, followed by OK to save the settings.


As mentioned earlier, the event ID 7023 might be due to a disabled service. The solution to this to set the service to run automatically.
3. Check that dependent Connected Devices Platform services are enabled
- Open the Services window as outlined within the first few steps of resolution one.
- Next, double-click Network Connection Broker to open the properties window for that service.
- Select the Automatic option on the Startup type drop-down menu.
- If the service isn’t running, press the Start button.
- Now, click Apply, followed by OK to complete the process.
- Next, double-click TCP/IP NetBIOS Helper to open its service window.
- Choose the Automatic startup option.
- Next, click the Start button (if needed).
- Select the Apply and OK options to finish.


In some cases, this event ID 7023 issue can be down to services that are dependent on the Connected Devices Platform. You need to enable these services to fix this.
4. Select the Restart the Service option
- Open the Services window as outlined for the first resolution.
- Double-click Connected Devices Platform Service to open that service window.
- Now, select the Recovery tab.
- Select the Restart the service option for the First and Second Failures.
- Press the Apply button, followed by OK to close the Connected Devices Platform Service window.


Sometimes, the Connected Devices Platform can fail for some reason, leading to the event ID 7023. To circumvent this, you need to set the service to restart when it fails.
- Event ID 7000: How to fix this Service control manager error
- Error no Ace Condition 804 (0x324): Fix it With 4 Steps
- Error Corrupt Log Cleared 798 (0x31E): Fix it With 4 Steps
- Error Orphan Name Exhausted 799 (0x31F): How to Fix it
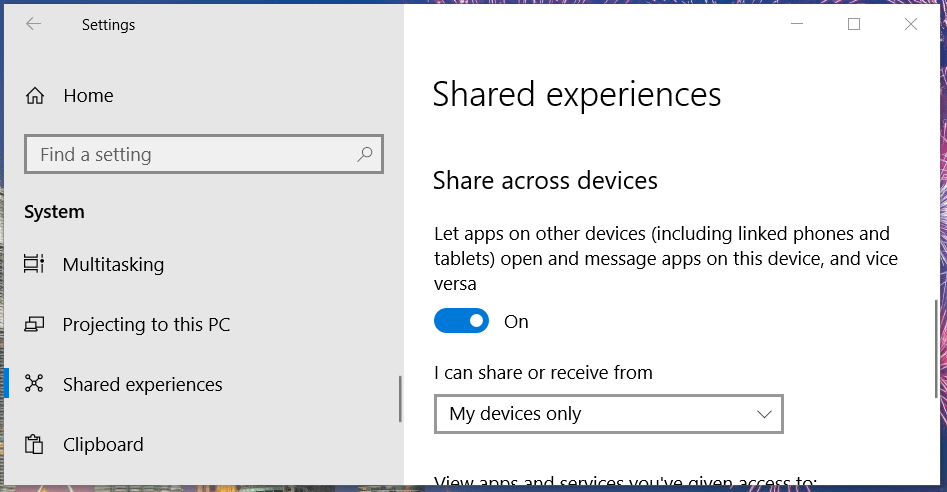
- Press the Windows key + I to open the Settings app and select System.

- Next, click Shared experiences on the left pane.
- Toggle the Share across devices option on if it’s off.


Some users have found the Shared experiences feature to be the cause of the event ID 7023. Hence, you need to disable the feature and restart your PC.
6. Clean boot Windows 10
- Press the Windows key + R, type msconfig, and click OK.
- Click the Services tab at the top.
- Now, uncheck the Hide all Microsoft services checkbox and select Disable all.

- Click the Startup tab and select Open Task Manager.
- Next, right-click each of the apps there and select the Disable option.

- Finally, go back to the System Configuration window and click Apply, followed by OK.


This resolution will ensure no third-party programs can conflict with Connected Devices Platform Service.
A conflicting third-party program was most likely the culprit if this solution fixes the issue. If you restore your original boot settings, you’ll need to identify that program to uninstall it.
The above resolutions are among the most likely fixes for the event ID 7023 error that crashes Windows 10. Even more, use this guide on how to fix high CPU usage event ID error.
Before you go, don’t miss our guide on Event ID 7034 for more useful tips.
Note that there might still be other ways to fix the same issue; users who have resolved this error with other resolutions are welcome to share their fixes in the comments below.
Matthew Adams
Windows Hardware Expert
Matthew is a freelancer who has produced a variety of articles on various topics related to technology. His main focus is the Windows OS and all the things surrounding it.
He is passionate about the tech world, always staying up-to-date with the latest and greatest. With an analytical view, he likes problem-solving, focusing on errors and their causes.
In his free time, he likes to read and write about history and tries to always develop new skills.
Facing Event ID 7023 error in Windows 10 and are clueless how to resolve the issue?
If you are one of the curious individuals who like to keep an eye on what is happening under the hood of their operating system, you may find yourself frequently scanning the Event Viewer.
Using the Event Viewer, users can view application and system messages, such as errors, information messages, and warnings, which gives them the ability to troubleshoot a variety of Windows problems.
Recently, a number of users reported that their Windows crashes unexpectedly, and the Event Viewer displays an error message with the Event ID 7023. We had a look into this matter and discovered that it can be caused by a number of reasons, including corrupt system files and termination of the Connected Devices Service.
If you are facing a similar issue, you are in the right place because in this guide, we are going to walk you through several relevant troubleshooting steps in detail.
Let’s get started.
1. Run DISM and SFC Scans.
It is common for the error at hand to occur due to corruption errors in the system. Luckily, Windows comes with several built-in troubleshooting utilities that are specifically designed to tackle issues like the Event ID 7023 error in Windows 10.
Two such handy utilities are DISM and SFC, which scan your operating system for issues, identify them, and then resolve them with little to no users input. If your screen is displaying the Event ID 7023 error, then the first thing that you should do is run DISM and SFC scan.
If a corruption error is a culprit behind the issue, these tools with resolve the issue in no time.
Here is what you need to do:
- Type cmd in the search bar and click on Run as administrator to launch elevated Command Prompt.
- Inside the Command Prompt window, type the command mentioned below and hit Enter to execute it.
sfc /scannow
- If the System File Checker detects issues, it will resolve them. Once done, open Command Prompt by following the first step again.
- Now type the command mentioned below in the elevated Command Prompt and hit Enter to execute the command.
DISM /online /Cleanup-Image / ScanHealth
- Next, execute the following command.
DISM /Online /Cleanup-Image /RestoreHealth
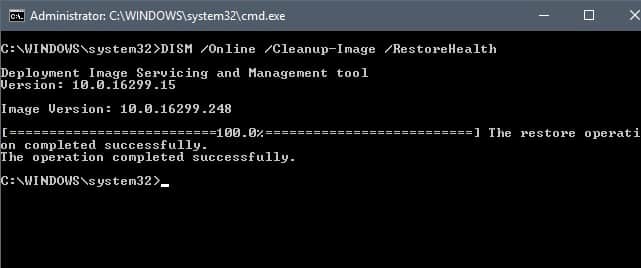
- Once done, restart your PC and check if doing so resolved the issue.
If a corruption error or bug within the system was causing the error at hand, running the SFC and DISM scans will resolve the issue.
2. Enable Connected Devices Platform Service.
As we mentioned earlier, the issue at hand can be caused by the termination of the Connected Devices Service.
However, before we proceed with finding a solution, you need to know that this service involves connecting external devices and peripherals. This includes Bluetooth, external storage, keyboard mouse, printers, cameras, and smartphones. In the event that the service is terminated, you may face issues using those devices.
If this scenario is applicable, then simply enabling the Connected Devices Service can help you resolve the issue.
Here is how you can do that:
- Press Windows + R keys on your keyboard simultaneously to open a Run dialogue box.
- In the text field of the dialogue box, type ‘services.msc‘ and hit Enter. Doing so will launch Services window on your computer.
- Now locate and double-click on Connected Devices Platform Service.
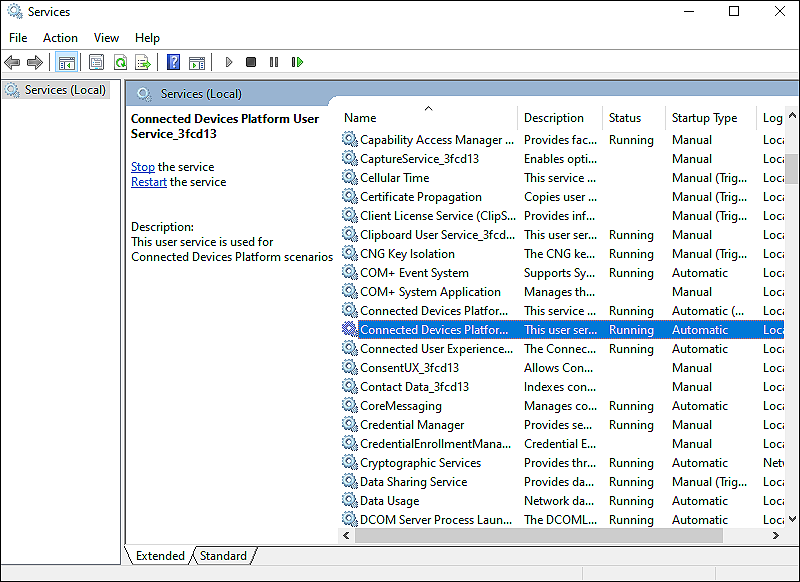
- Expand the dropdown menu against Startup type and select Automatic (delayed).
- If the service is not running already, click on the Start button and hit Apply to save the changes.
If the Connected Devices Platform Service was disabled, enabling it will resolve the issue at hand.
3. Enable Network Connection Broker Service.
If you are unable to enable the Connected Devices Platform Service, check whether the dependencies it needs are enabled, which includes Network Connection Broker Service.
In the event that the Network Connection Broker has been stopped, disabled, or is no longer functioning correctly, the Connected Devices Platform Service cannot be launched.
Here is how you can enable Network Connection Broker Service:
- Press Windows + R keys on your keyboard simultaneously to open a Run dialogue box.
- In the text field of the dialogue box, type ‘services.msc‘ and hit Enter. This will launch Services window on your computer.
- Locate Network Connection Broker service on your screen and double-click on it.
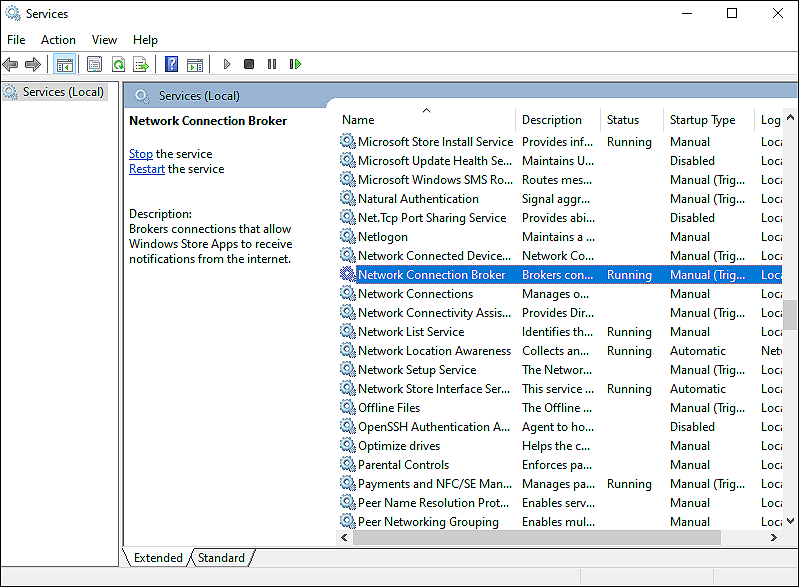
- Now expand the dropdown menu against Startup type and select Automatic.
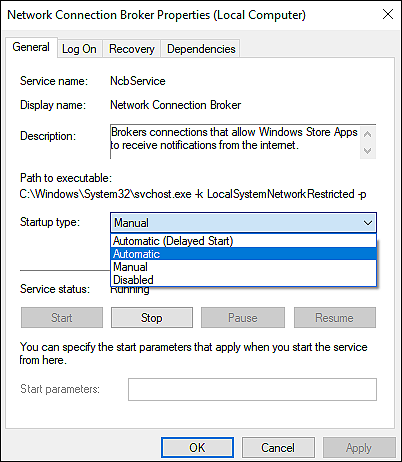
- Click on the Start button if the service isn’t running already and hit Apply to save the changes.
This should resolve the Event ID 7023 error in Windows 10.
4. Restart the Service.
In case the Connected Devices Platform Service was already enabled, try restarting it.
Restarting the service helps keep it running efficiently and can often speed up performance if you’ve been having issues.
Here is how you can restart the Connected Devices Platform Service on your PC:
- Open the Services window as mentioned earlier.
- Locate Connected Devices Platform Service and double-click on it.
- Go to the Recovery tab and expand the dropdown menu against Subsequent failures.
- Choose Restart the Service and press the Apply button to save your new service settings.
Hopefully, restarting the service will help you fix the error under consideration.
There is a working solution reported on the Microsoft Forums, which relates to Shared experiences, strangely enough.
Several users managed to resolve the issue at hand by enabling the Share across devices option, which is why we encourage you to give it a shot.
Here is all that you need to do:
- Go to Settings and click on System.
- In the next window, select Shared experiences from the left pane.
- Locate Share across devices option in the right pane toggle it on if it’s off.
In case, the error at hand had to do something with the Shared experiences feature, following the steps mentioned above should help you resolve it.
6. Try Using CleanMyPC.
The corruption errors within your computer system are also commonly responsible for errors like the one under discussion.
In case you haven’t deep cleaned your PC and cleared the junk files in a while, now can be the time to do so, because not taking action now can lead to further issues in your PC.
You can get rid of junk files and viruses within your computer system using a well-to-do PC cleaner and we highly recommend using CleanMyPC if you’re looking for a recommendation.

CleanMyPC comes with a wide range of system maintenance tools including (but not limited to) a Multi Uninstaller, Registry Cleaner, and a Speed Booster. You can use these tools to address all your system-related problems such as slow performance, sluggish performance, or privacy threats.
The best thing about CleanMyPC is that it is a lot simpler to use than the other cleaners offered online, so even if you are a first-time user, you will be fine!
Try CleanMyPC Now!
7. Clean Boot Windows.
In case none of the methods above work for you, there is a chance that a background program in your operating system is causing the problem.
With a clean boot state, you will be able to identify the faulty background program with a minimum set of drivers. Once the culprit is identified, you can uninstall that program and hopefully, the error at hand will be resolved once and for all.
Here is how you can clean boot your PC:
- Type System Configuration in the search bar and go to the Services tab.
- Checkmark the Hide all Microsoft services box and click Disable all.

- Now go to the Startup tab and click on Open Task Manager.
- Disable all the items inside the window and restart your PC.
- Upon restarting, try installing the updates again.
Hopefully, a clean boot will resolve the issue once and for all.
This brings us to the end of our guide on fixing the Event ID 7023 error in Windows 10. We tried walking you through all the steps in detail and hope that one of the methods mentioned above did the trick for you. In case you still have any confusion about the methods, please let us know in the comment section below!
If this guide helped you, please share it. 🙂
-
Zainab Falak is a staff writer for Saint and an expert in Microsoft Windows, having authored more than 200 posts. She has a Bachelors in Actuarial Sciences and her passion for computers extends to exploring various aspects, from UI customization to the Windows registry and exploring error codes. Twitter
LinkedIn
View all posts
Если вы из тех пользователей, которые заглядывают в просмотр событий Windows 10 (Win+R — eventvwr.msc) для анализа ошибок, с большой вероятностью вы там обнаружите ошибки, имеющих код события 7000, 7001, 7009, 7011, 7023, 7031, 7034, а возможно и некоторыми другими похожими. Сообщения об ошибках могут быть разными, но всегда связаны со службами Windows, например:
- 7000 Служба не ответила на запрос своевременно
- 7001 Служба является зависимой от службы, которую не удалось запустить из-за ошибки Не удалось запустить дочернюю службу
- 7001 Служба является зависимой от службы, которую не удалось запустить из-за ошибки Присоединенное к системе устройство не работает
- 7011 Превышение времени ожидания (60000 мс) при ожидании ответа транзакции от службы
- 7023 Служба завершена из-за ошибки Устройство не готово
- 7031 Служба была неожиданно завершена. Это произошло (раз): 1
- 7034 Служба неожиданно прервана. Это произошло (раз): 1
- 7043 Служба не завершила работу должным образом после получения управления для выполнения предзавершающих операций
В этой инструкции подробно о том, что может вызывать такие ошибки в Windows 10, как исправить ошибки с указанными кодами от источника Service Control Manager в Windows 10, стоит ли это делать и дополнительная информация, которая может оказаться полезной.
Ошибки с источником Service Control Manager — причины, необходимость исправления
Прежде чем вы решите переживать и пытаться исправить ошибки с кодами события 7000, 7001, 7009, 7011, 7023, 7031, 7034, 7043 и источником Service Control Manager, учитывайте следующий важный момент: такие ошибки вы встретите на любой, даже самой чистой и беспроблемной системе Windows 10. Если в просмотре событий эти ошибки появляются время от времени, а не ежедневно при включении компьютера, работе и завершении работы, причинами могут быть обычные процессы работы Windows 10 связанные с:
- Установкой обновлений (при этом некоторые службы могут завершаться, а другие, зависимые от них, вызывать ошибку).
- Установкой новых версий драйверов (в том числе и самой Windows 10, в этих случаях мы можем получить ошибки, связанных с тем, что устройство не готово или не работает).
- Установкой сторонних программ, взаимодействующих со службами (иногда лишь временно, для успешного выполнения установки).
- Автоматическим обслуживанием системы (редко).
Во всех случаях появление ошибок возможно не при самом процессе, а после повторного включения компьютера или ноутбука, так как многие процессы установки завершаются лишь после перезагрузки.
В случае же если у вас эти ошибки возникают ежедневно, причины могут быть самыми разными, среди них:
- Ручное вмешательство в тип запуска служб, отключение служб, использование различных программ «для оптимизации», «ускорения» и «отключения слежки» Windows Получить представление о том, как отключение одних служб может влиять на работу других можно получить из статьи Не удалось запустить дочернюю службу — как исправить.
- В случае, если ошибок нет после перезагрузки компьютера или ноутбука, но присутствуют после завершения работы и последующего включения (особенно по прошествии некоторого времени), можно попробовать отключить быстрый запуск Windows 10. Желательно также вручную установить все оригинальные драйверы чипсета с сайта производителя ноутбука или материнской платы, в случае если у вас ПК.
- Нестабильная работа каких-либо устройств (плохое подключение, неисправности). Иногда — проблемы при задействовании устройства после перехода в режим энергосбережения. Можно попробовать отключить экономию энергию для устройств в дополнительных параметрах схемы электропитания в панели управления и в свойствах устройства в диспетчере устройств на вкладке «Управление электропитанием» (присутствует не для всех устройств). Особенно часто это касается USB устройств, сетевых и Wi-Fi адаптеров.
- Иногда ошибки могут появляться при завершении работы, если какие-то сторонние программы (например, клиенты для загрузки файлов из Интернета) мешают завершиться какой-либо сетевой службе.
Также при регулярном появлении указанных ошибок стоит проверить, а появляются ли они, если выполнить чистую загрузку Windows 10 — если нет, можно предположить, что правильному запуску служб мешают какие-то сторонние программы или антивирусы. Также может оказаться, что эти программы инициируют запуск служб, которые не могут быть запущены из-за отключенных дочерних служб.
Если проблема появилась недавно, вам могут помочь точки восстановления системы на дату, предшествующую появлению ошибок.
Увеличение времени ожидания запуска служб для ошибок с кодами 7000, 7009 и 7011
Ошибки типа «Превышение времени ожидания» или «Не ответила на запрос своевременно» при запуске служб c кодами события 7000, 7009 и 7011 могут появляться на медленных компьютерах и ноутбуках с HDD. В таких ситуациях мы можем увеличить время ожидания запуска службы:
- Запустите редактор реестра, для этого нажмите клавиши Win+R на клавиатуре, введите regedit и нажмите Enter.
- Перейдите в раздел реестра
HKEY_LOCAL_MACHINE\SYSTEM\CurrentControlSet\Control
- В правой панели редактора реестра найдите параметр с именем ServicesPipeTimeout. Если такой параметр отсутствует, нажмите правой кнопкой мыши в пустом месте панели справа, выберите «Создать» — «Параметр DWORD» и задайте имя ServicesPipeTimeout для этого параметра.
- Дважды нажмите по параметру ServicesPipeTimeout, выберите «Десятичный» и задайте значение 60000.
- Нажмите Ок, закройте редактор реестра и перезагрузите компьютер.
Указанные действия установят время ожидания для запуска службы равным 60 секунд. Если этого окажется недостаточно, можно попробовать увеличить значение.
Надеюсь, предложенный материал поможет разобраться с ошибками Service Control Manager в просмотре событий Windows 10 и предпринять действия для исправления ситуации при необходимости.
If you are experiencing ‘Windows error event ID 7023’ while you open ‘Event Viewer’ in Windows 10 computer, then you are in right place for the solution. Here, you will be guided with easy steps/methods to resolve the issue. Let’s starts the discussion.
‘Event Viewer’ in Windows: Event Viewer is component of Microsoft’s Windows NT operating system that offers administrators and users view the event logs on local or remote machine. Applications and operating system components can be use this centralized log service to report events that have taken place like a failure to start a component or to complete an action.
However, several users reported that they faced ‘Windows error event ID 7023’ while they open Event Viewer service in Windows 10 computer. They explained that while troubleshooting the issue in web server they notice this error in Event Viewer service. The Event ID 7023 error indicates that some Windows service like ‘Windows Process Activation Service’ service or ‘Connected Devices Platform Services’ is terminated or not running properly in computer that’s why you are facing the error. Let’s take a look at error message.
“Event ID 7023: The Windows Process Activation Service service terminated with the following error: The system cannot find the file specified”
The possible reason behind Windows error event ID 7023 can be corruption in system files or registry, corruption in system images or drives, problem with Windows service like ‘Windows Process Activation Service’ service or ‘Connected Devices Platform Services’, malware or viruses issues in computer and other reasons.
The Event ID error can also be occurred due to interference of your third-party antivirus software installed in computer. You can disable your antivirus temporarily or uninstall antivirus completely from computer in order to fix the issue. Let’s go for the solution.
How to fix Windows error event ID 7023?
Method 1: Fix ‘Event ID 7023’ in Windows 10 with ‘PC Repair Tool’
If this error is occurred due to some problems in Windows computer, then you can fix the issue with ‘PC Repair Tool’. This software offers you to find and fix BSOD errors, EXE errors, DLL errors, problems with programs, malware or viruses issue, system files or registry issues, and other system issues with just few clicks. You can get this tool through button/link below.
Method 2: Run SFC and DISM scan
You can run SFC scan to repair system files and run DISM scan to repair system images in order to fix Windows error event ID 7023.
Step 1: Press ‘Windows + X’ keys on keyboard and select ‘Command Prompt as Administrator’
Step 2: Run SFC Scan. Type ‘sfc /scannow’ command and hit ‘Enter’ key to execute
Step 3: Once executed, run DISM scan. Type the following command commands and hit ‘Enter’ key after each command to execute
DISM /online /Cleanup-Image / ScanHealth
DISM /Online /Cleanup-Image /RestoreHealth
Step 4: Once executed, restart your computer and check if the error is resolved.
Method 3: Enable ‘Connected Devices Platform Service’ service or ‘Windows Process Activation Service’ service
This Event Viewer error can be occurred if ‘Connected Devices Platform Service’ service or ‘Windows Process Activation Service’ service is disabled or not running properly in computer. You can enable this service in order to fix the issue.
Step 1: Press ‘Windows + R’ keys on keyboard, type ‘services.msc’ in the opened ‘Run’ dialog box and hit ‘OK’ button to open ‘Services’ window
Step 2: Find and double-click on ‘Connected Devices Platform Service’ to open its ‘Properties’
Step 3: In ‘Properties’, select ‘Automatic (Delayed)’ option from ‘Startup Type’ dropdown and hit ‘Start’ button under ‘Service Status’ section, if the service is disabled.
Step 4: Finally, save the changes by hitting ‘Apply’ and ‘OK’ button and then restart your computer. Repeat the same steps if you are facing error causing by termination of ‘Windows Process Activation Service’ and enable this service.
Method 4: Check dependent ‘connected device platform service’ services are enabled
Check some dependent services are running properly or not.
Step 1: Open ‘Services’ window using above method, find and double-click on ‘Network Connection Broker’ service to open its ‘Properties’
Step 2: In ‘Properties’, select ‘Automatic’ option from ‘Startup Type’ dropdown and click on ‘Start’ button under ‘Service Status’ section, and finally hit ‘Apply’ and ‘OK’ to save the changes. Repeat the same steps for ‘TCP/IP NetBIOS Helper’ service and enable it if not enabled.
Method 5: Select ‘Restart the service’ option in ‘Connected Devices Platform Service’ service or ‘Windows Process Activation Service’ service’
Step 1: Open ‘Properties’ window of ‘Connected Devices Platform Service’ service or ‘Windows Process Activation Service’ service in ‘Services’ window. To do so, you can follow ‘step 1’ of above method
Step 2: In ‘Properties’ window, click on ‘Recovery’ tab and select ‘Restart the service’ option from ‘Subsequent failures’ dropdown, and then hit ‘Apply’ and ‘OK’ to save the changes.
Method 6: Turn ON ‘Share Across Devices’ option in settings
Step 1: Press ‘Windows + I’ keys on keyboard to open ‘Settings’ App in Windows 10
Step 2: In ‘Settings’ App, go to ‘System >Shared Experiences’ and in right pane, turn ON ‘Share across devices’ option if it is OFF. Once done, please check if the error is resolved.
Method 7: Perform Clean Boot operation in Windows 10
If the problem is still persist, then you can try to fix this issue by performing clean boot operation in Windows computer.
Step 1: Press ‘Windows + R’ keys on keyboard, type ‘msconfig’ in the opened ‘Run’ dialog box and hit ‘OK’ to open ‘System Configuration’ window
Step 2: In the opened window, under ‘General’ tab, click ‘Selective Startup’ radio button and deselect ‘Load Startup items’ checkbox and tick ‘Use original boot configuration’ checkbox
Step 3: Click on ‘Services’ tab, select ‘Hide all Microsoft Services’ checkbox and hit ‘Disable All’ button
Step 4: Finally, click ‘Apply’ and ‘OK’ button to save the changes and restart your computer. After restart, please check if the error is resolved.
Conclusion
I am sure this post helped you on How to fix Windows error event ID 7023 with several easy steps/methods. You can read & follow our instructions to do so. That’s all. For any suggestions or queries, please write on comment box below.
We all know how it feels when the computer suddenly crashes. It’s pretty annoying! Unfortunately, there is nothing that can be dont to prevent it but, there are tricks which can prevent further crashes of the computer. Computer crashes are probably caused due to malfunctioning hardware, corrupt system files or corrupt applications. Finding out the cause of the crash is pretty important because once we know the cause fixing it becomes easier.
Computers these days are built to provide the users with a crash-free, and error-free experience, but still, some conditions are inevitable causing errors and issues in the computer. Unlike the older days, the necessity of hiring a computer professional to fix the issue has reduced as most errors and issues in the computer is self fixable as the solution and fixes are readily available on the internet. This makes things easier as most computer users have access to the internet and finding the fixes and solutions online has become easier with SEO.
Even Windows OS has its share in being faulty. The OS is one of the best and is being actively updated and managed by Microsoft, even then errors and bugs trouble the users as they are inevitable and should be manually managed by the users. Windows 10 is the latest and the currently supported version of Windows OS, is very powerful and comparatively effective in providing the user with a stable efficient workstation. The OS has some of the best feature sets which let users function efficiently with the OS. it provides a great platform to run applications and software to work and function efficiently. Even such features have shortfalls and those shortfalls can cause havoc.
Recently some Windows 10 users have raised queries about the sudden crashing of the system with an error relating to the drivers. The Event ID 7023 has been reported which is probably caused due to driver malfunctioning or corrupt system files. This issue caused a sudden blackout and OS crashes. But since there are methods to solve the issue, users have been able to tackle the situation, if you are looking for a fix for a similar issue, this article is the right one, you will find all the methods that will possibly fix the issue on your computer. These methods have been tested and have worked on mostly all the users who faced similar issues, so it is only obvious that this will help you with fixing the issue.
Recommended Post:- Solved – Windows Live Mail not working on Windows 10
Methods To Fix The Event ID 7023 Error on Windows 10
Here are some easy methods, that you can use to fix the issue on Windows 10:
Method 1: Check the System Files using the Built-In File Checker
Windows OS is loaded with troubleshooters and error checkers which can be implemented to fix issues related to the computer. With the file checker in the operating system, we can check and fix the issues with the corrupt files.
- To run the file checker, open the command prompt by searching for the command prompt in the search bar, and then run it as an administrator by right-clicking on the icon and selecting “ run as an administrator option”.
- Now, in the command prompt terminal, run the command “ DISM.exe /Online /Cleanup-image /Restorehealth” this will run the file checker and then fix the necessary files on the computer.
- Once done, you can exit the command prompt, or you can try another file checker command. Enter “sfc /scannow” this command will run a scan and then fix the issue with the corrupt files.
- Once you run these commands they will find the faulty files and then replace those files with the files that were cached on the computer.
Method 2: Check for the Services Related to Connected Devices
You need to make sure that the services related to connected devices are running and fully functional, by doing this you will come to know whether the services have failed or stopped running.
- To check for services, open the Run command by pressing the Windows key and the R key on the keyboard.
- In the run command, enter “services.msc and hit enter.
- Now in the services tool, look for Connected Devices Platform Service and go to its properties by right-clicking on it.
- Here in the properties, select on automatic in the drop-down menu near the startup type.
- This will enable the service and will automatically run it on the startup.
Method 3: Set Restart Services Once Service Fail
The service to has an option which on switching on will restart the particular service when it fails or crashes, enabling this can fix the issue.
- To enable the option, open the services tool as mentioned above, and go to the recovery tab.
- Here find the option “subsequent failure” click on the drop-down menu near this option and select the option “ restart the service.
- Now save the changes and exit the tool.
Method 4: Clean Boot The System
Clean booting the computer will enable the computer to boot properly with all the hardware resources dedicated to system restart. When the computer restarts with good resources, it will allow the computer to run every important service at startup and let users access the computer more efficiently.
- To clean boot the computer, open the Run command.
- Here enter “msconfig” and hit enter.
- No in the system configuration tool, go to services.
- Here, click on the “hide all Microsoft services”.
- Now, click on disable all which will disable all the services providing all the system services to function efficiently.
- Once done, quit the tool and open the task manager.
- Here go to the startups tab and disable all the startups.
- Once done, restart the computer. When the computer restarts, all the system services will properly start and will function properly.
Hope all the information provided above was helpful and informative, fix the issue effectively and prevent your computer from crashing.