
What is Error 6006?
Error 6006 is a kind of Runtime error that is found in the Microsoft Windows operating systems. The file can be found for InstallShield. Installshield Error 6006 has a popularity rating of 1 / 10.
Errors
This tutorial contains information on Error 6006 or otherwise known as Installshield Error 6006. Errors such as Installshield Error 6006 indicate your machine has faulty hardware or software that should be fixed when possible. Below is information on how to repair Error 6006 and get your computer back to normal.
Signs of Error 6006:
- When your computer freezes or locks up at random.
- When your computer crashes when you are running InstallShield.
- If Installshield Error 6006 pops up and causes a program to shutdown or your computer to crash.
- Your computer is running slow, taking a long time to boot up, and you suspect Error 6006 by InstallShield is the cause.
What Causes Runtime Errors Like Error 6006?
There are several causes of runtime errors like Installshield Error 6006, such as viruses, out of date drivers, missing files or folders, incomplete or poor installation, and registry errors. They can also occur due to an issue with the computer’s memory, which may often be due to a hardware problem. In some cases there was an issue installing InstallShield and an error occurred.
How to Fix Installshield Error 6006
Follow the step by step instructions below to fix the Error 6006 problem. We recommend you do each in order. If you wish to skip these steps because they are too time consuming or you are not a computer expert, see our easier solution below.
Step 1 — Uninstall and Reinstall InstallShield
If the Installshield Error 6006 is a result of using InstallShield, you may want to try reinstalling it and see if the problem is fixed. Please follow these steps:
Windows XP
- Click “Start Menu”.
- Click “Control Panel”.
- Select the “Add or Remove” program icon.
- Find the Error 6006 associated program.
- Click the Change/Remove button on the right side.
- The uninstaller pop up will give you instructions. Click “okay” or “next” or “yes” until it is complete.
- Reinstall the software.
Windows 7 and Windows Vista
- Click “Start Menu”.
- Click “Control Panel”.
- Click “Uninstall a Program” which is under the “Programs” header.
- Find the Error 6006 associated program.
- Right click on it and select “Uninstall”.
- The uninstaller pop up will give you instructions. Click “okay” or “next” or “yes” until it is complete.
- Reinstall the software and run the program.
Windows 8, 8.1, and 10
- Click “Start Menu”.
- Click “Programs and Features”.
- Find the software that is linked to **insert file name**.
- Click Uninstall/Change.
- The uninstaller will pop up and give you instructions. Click “okay” and “next” until it is complete.
- Restart your computer.
- Reinstall the software and run the program.
Step 2 — Remove Registry Entry related to Error 6006
WARNING: Do NOT edit the Windows Registry unless you absolutely know what you are doing. You may end up causing more trouble than you start with. Proceed at your OWN RISK.
- Create a backup of registry files.
- Click “Start”.
- Type regedit, select it, and grant permission in order to proceed.
- Click HKEY LOCAL MACHINE>>SOFTWARE>>Microsoft>>Windows>>Current Version>>Uninstall.
- Find the Installshield Error 6006 software from the list you wish to uninstall.
- Select the software and double click the UninstallString icon on the right side.
- Copy the highlighted text.
- Exit and go to the search field.
- Paste the data.
- Select Okay in order to uninstall the program.
- Reinstall the software.
Step 3 – Ensure Junk Isn’t Causing Installshield Error 6006
Any space that isn’t regularly cleaned out tends to accumulate junk. Your personal computer is no exception. Constant web browsing, installation of applications, and even browser thumbnail caches slow down your device and in the absence of adequate memory, can also trigger a Installshield Error 6006 error.
So how do you get around this problem?
- You can either use the Disk Cleanup Tool that comes baked into your Windows operating system.
- Or you can use a more specialized hard drive clean up solution that does a thorough job and flushes the most stubborn temporary files from your system.
Both solutions may take several minutes to complete the processing of your system data if you haven’t conducted a clean up in a while.
The browser caches are almost a lost cause because they tend to fill up quite rapidly, thanks to our constantly connected and on the go lifestyle.
Here’s how you can run the Window’s Disk Cleanup Tool, without performance issues or surprises.
- For Windows XP and Windows 7, the program can be ran from “Start” and from the “Command Prompt”.
- Click “Start”, go to All Programs > Accessories > System Tools, click Disk Cleanup. Next choose the type of files you wish to remove, click OK, followed by “Delete Files”.
- Open up the Command Prompt, type “c:\windows\cleanmgr.exe /d” for XP and “cleanmgr” for Windows 7. Finish by pressing “Enter”.
- For Windows 8 and Windows 8.1, the Disk Cleanup Tool can be accessed directly from “Settings”. Click “Control Panel” and then “Administrative Tools”. You can select the drive that you want to run the clean up on. Select the files you want to get rid of and then click “OK” and “Delete Files”.
- For Windows 10, the process is simplified further. Type Disk Cleanup directly in the search bar and press “Enter”. Choose the drive and then the files that you wish to wipe. Click “OK”, followed by “Delete Files”.
The progressive ease with which the Cleanup Tool can be used points to the growing importance of regularly deleting temporary files and its place in preventing Installshield Error 6006.
PRO TIP:
Remember to run the Disk Cleanup as an administrator.
Step 4 – Fix Infections and Eliminate Malware in Your PC
How do you gauge if your system is infected with a malware and virus?
Well, for one, you may find certain applications misbehaving.
And you may also see the occurrence of Error 6006.
Infections and malware are the result of:
- Browsing the Internet using open or unencrypted public Wi-Fi connections
- Downloading applications from unknown and untrustworthy sources
- Intentional planting of viruses in your home and office networks
But thankfully, their impact can be contained.
- Enter “safe mode” by pressing the F8 key repeatedly when your device is restarting. Choose “Safe Mode with Networking” from the Advanced Boot Options menu.
- Back up all the data in your device to a secure location. This is preferably a storage unit that is not connected to your existing network.
- Leave program files as is. They are where the infection generally spreads from and may have been compromised.
- Run a thorough full-system scan or check of an on-demand scanner. If you already have an antivirus or anti-malware program installed, let it do the heavy lifting.
- Restart your computer once the process has run its course.
- Lastly, change all your passwords and update your drivers and operating system.
PRO TIP: Are you annoyed by the frequent updates to your antivirus program? Don’t be! These regular updates add new virus signatures to your software database for exponentially better protection.
Step 5 – Return to the Past to Eliminate Error 6006
The steps outlined up until this point in the tutorial should have fixed Installshield Error 6006 error. But the process of tracking what has caused an error is a series of educated guesses. So in case the situation persists, move to Step 5.
Windows devices give users the ability to travel back in time and restore system settings to an uncorrupted, error free state.
This can be done through the convenient “System Restore” program. The best part of the process is the fact that using System Restore doesn’t affect your personal data. There is no need to take backups of new songs and pictures in your hard drive.
- Open “Control Panel” and click on “System & Security”.
- Choose the option “System”.
- To the left of the modal, click on “System Protection”.
- The System Properties window should pop-up. You’ll be able to see the option “System Restore”. Click on it.
- Go with “Recommended restore” for the path of least hassles and surprises.
- Choose a system restore point (by date) that will guarantee taking your device back to the time when Error 6006 hasn’t been triggered yet.
- Tap “Next” and wrap up by clicking “Finish”.
If you’re using Windows 7 OS, you can reach “System Restore” by following the path Start > All Programs > Accessories > System Tools.
Step 6 — Error 6006 Caused by Outdated Drivers
Updating a driver is not as common as updating your operating system or an application used to run front-end interface tasks.
Drivers are software snippets in charge of the different hardware units that keep your device functional.
So when you detect an Installshield Error 6006 error, updating your drivers may be a good bet. But it is time consuming and shouldn’t be viewed as a quick fix.
Here’s the step-by-step process you can go through to update drivers for Windows 8, Windows 8.1 and Windows 10.
- Check the site of your hardware maker for the latest versions of all the drivers you need. Download and extract them. We strongly advice going with original drivers. In most cases, they are available for free on the vendor website. Installing an incompatible driver causes more problems than it can ever fix.
- Open “Device Manager” from the Control Panel.
- Go through the various hardware component groupings and choose the ones you would like to update.
- On Windows 10 and Windows 8, right-click on the icon of the hardware you would like to update and click “Update Driver”.
- On Windows 7 and Vista, you right-click the hardware icon, choose “Properties”, navigate to the Driver panel, and then click “Update Driver”.
- Next you can let your device automatically search for the most compatible drivers, or you can choose to update the drivers from the versions you have on your hard drive. If you have an installer disk, then the latter should be your preferred course of action. The former may often get the driver selection incorrect.
- You may need to navigate a host of warnings from the Windows OS as you finalize the driver update. These include “Windows can’t verify that the driver is compatible” and “Windows can’t verify the publisher of this driver”. If you know that you have the right one in line, click “Yes”.
- Restart the system and hopefully the Installshield Error 6006 error should have been fixed.
Step 7 – Call the Windows System File Checker into Action
By now the Installshield Error 6006 plaguing your device should have been fixed. But if you haven’t resolved the issue yet, you can explore the Windows File Checker option.
With the Windows File Checker, you can audit all the system files your device needs to operate, locate missing ones, and restore them.
Sound familiar? It is almost like “System Restore”, but not quite. The System Restore essentially takes you back in time to a supposedly perfect set up of system files. The File Checker is more exhaustive.
It identifies what is amiss and fills the gaps.
- First and foremost, open up an elevated command prompt.
- Next, if you are using Windows 8, 8.1 or 10, enter “DISM.exe /Online /Cleanup-image /Restorehealth” into the window and press Enter.
- The process of running the Deployment Image Servicing and Management (DISM) tool may take several minutes.
- Once it completes, type the following command into the prompt “sfc /scannow”.
- Your device will now go through all protected files and if it detects an anomaly, it will replace the compromised version with a cached version that resides at %WinDir%\System32\dllcache.
Step 8 – Is your RAM Corrupted? Find Out.
Is it possible? Can the memory sticks of your device trigger Error 6006?
It is unlikely – because the RAM chips have no moving parts and consume little power. But at this stage, if all else has failed, diagnosing your RAM may be a good move.
You can use the Windows Memory Diagnostics Tool to get the job done. Users who are on a Linux or Mac and are experiencing crashes can use memtest86.
- Open up your device and go straight to the “Control Panel”.
- Click on “Administrative Tools”.
- Choose “Windows Memory Diagnostic”.
- What this built-in option does is it burns an ISO image of your RAM and boots the computer from this image.
- The process takes a while to complete. Once it is done, the “Status” field at the bottom of the screen populates with the result of the diagnosis. If there are no issues with your RAM/memory, you’ll see “No problems have been detected”.
One drawback of the Windows Memory Diagnostic tool pertains to the number of passes it runs and the RAM segments it checks.
Memtest86 methodically goes over all the segments of your memory – irrespective of whether it is occupied or not.
But the Windows alternative only checks the occupied memory segments and may be ineffective in gauging the cause of the Installshield Error 6006 error.
Step 9 – Is your Hard Drive Corrupted? Find Out.
Your RAM or working memory isn’t the only culprit that may precipitate an Installshield Error 6006 error. The hard drive of your device also warrants close inspection.
The symptoms of hard drive error and corruption span:
- Frequent crashes and the Blue Screen of Death (BSoD).
- Performance issues like excessively slow responses.
- Errors like Error 6006.
Hard drives are definitely robust, but they don’t last forever.
There are three things that you can do to diagnose the health of your permanent memory.
- It is possible that your device may have a hard time reading your drive. This can be the cause of an Installshield Error 6006 error. You should eliminate this possibility by connecting your drive to another device and checking for the recurrence of the issue. If nothing happens, your drive health is okay.
- Collect S.M.A.R.T data by using the WMIC (Windows Management Instrumentation Command-line) in the command prompt. To do this, simply type “wmic” into the command prompt and press Enter. Next follow it up with “diskdrive get status”. The S.M.A.R.T status reading is a reliable indicator of the longevity of your drive.
- Fix what’s corrupt. Let’s assume you do find that all isn’t well with your hard drive. Before you invest in an expensive replacement, using Check Disk or chkdsk is worth a shot.
- Open the command prompt. Make sure you are in Admin mode.
- Type “chkdsk C: /F /X /R” and press “Enter”. “C” here is the drive letter and “R” recovers data, if possible, from the bad sectors.
- Allow the system to restart if the prompt shows up.
- And you should be done.
These steps can lead to the resolution you’re seeking. Otherwise the Installshield Error 6006 may appear again. If it does, move to Step 10.
Step 10 – Update Windows OS
Like the software applications you use to render specific tasks on your device, the Operating System also requires periodic updates.
Yes, we’ve all heard the troubling stories.
Devices often develop problems post unfinished updates that do not go through. But these OS updates include important security patches. Not having them applied to your system leaves it vulnerable to viruses and malware.
And may also trigger Error 6006.
So here’s how Windows 7, Windows 8, Windows 8.1 and Windows 10 users can check for the latest updates and push them through:
- Click the “Start” button on the lower left-hand corner of your device.
- Type “Updates” in the search bar. There should be a “Windows Update” or “Check for Updates” option, based on the OS version you’re using.
- Click it. The system will let you know if any updates are available.
- You have the convenience of choosing the components of the update you’d like to push through. Always prioritize the security updates.
- Click “OK” followed by “Install Updates”.
Step 11 – Refresh the OS to Eliminate Persistent Installshield Error 6006 Error
“Windows Refresh” is a lifesaver.
For those of you who are still with us and nothing has worked to eliminate the Error 6006, until recently, a fresh install of Windows would have been the only option.
Not anymore.
The Windows Refresh is similar to reinstalling your Windows OS, but without touching your personal data. That’s hours of backup time saved in a jiffy.
Through the Refresh, all your system files become good as new. The only minor annoyance is the fact that any custom apps you’ve installed are gone and the system applications you had uninstalled are back.
Still, it is the best bet as the final step of this process.
- Enter the “Settings” of your PC and click on “Change Settings”.
- Click “Update and recovery” and then choose “Recovery”.
- Select “Keep my files”. This removes apps and settings, but lets your personal files live on.
- You’ll get some warning messages about the apps that will be uninstalled. If you’ve gone through a recent OS upgrade, the Refresh process makes it so that you can’t go back to your previous OS version – if you should ever feel the need to do it.
- Click the “Refresh” button.
Are you using an older version of Windows that doesn’t come with the power to “Refresh”?
Maybe it is time to start from scratch.
- Enter your BIOS set-up.
- This is where you need to change your computer’s boot order. Make it so that the boot happens not from the existing system files, but from the CD/DVD Drive.
- Place the original Windows disk in the CD/DVD drive.
- Turn on or restart the device.
- Choose where you’d like the system files to be installed.
- Your PC will restart several times as the process runs its course.
FAQ’s
Do Runtime Errors Like Error 6006 Cause My Computer to Freeze Up?
A runtime error basically refers to an error that affects a running program. The error may cause a program to freeze, crash, or hang. Sometimes they can cause the entire computer to freeze up on you. They are one of the top causes of a computer freezing up.
Will Removing Runtime Errors Like Error 6006 Improve My Start Up Speed?
Runtime errors have no impact on the start up speed since the error occurs while the program is running. It may, however, cause the OS to crash during or after start up. Correcting runtime errors will have no impact on the startup speed of the computer. It may just help you save time by reducing crashes and errors which may cause the computer to keep starting up.
Are Runtime Errors Like Error 6006 Related to the Blue Screen of Death (BSoD)?
Yes, the two can be connected since a BSoD is often due to the OS not being able to access a file, leading the system to crash. Technically speaking, a runtime error does not cause BSoD but the two can be interlinked. Solving the cause of runtime errors may also help you get rid of the blue screen of death. They are both usually due to the same reason, such as a hardware error.
Start Download Now
Author:
Curtis Hansen has been using, fiddling with, and repairing computers ever since he was a little kid. He contributes to this website to help others solve their computer issues without having to buy a new one.
Redfall is an exciting new game that combines the gameplay and visuals of Borderlands and Dishonored to create an immersive experience for gamers. However, like any game, it’s not without its flaws.
One issue that players have reported is the dreaded “error code 6006,” which can cause the game to crash and leave players frustrated. In this guide, we will explore what causes error code 6006 in Redfall and provide some tips on how to fix it, so that you can continue enjoying this thrilling game without any interruptions.
There could be several possible causes of error code 6006 in Redfall. Here are some of the most common ones:
- Server issues: Sometimes, the game servers may be down, or there may be connectivity issues, leading to the error code 6006.
- Corrupted game files: If some of the game files are corrupted or missing, it may lead to the error code 6006.
- Outdated drivers: Outdated drivers, especially graphics drivers, may cause issues with the game, leading to the error code 6006.
- Antivirus software: Sometimes, antivirus software may block the game from running correctly, causing the error code 6006.
- Hardware issues: If there are hardware issues, such as overheating, low RAM, or a faulty hard drive, it may lead to the error code 6006.
Solution 1: Restart the PC
When you experience an Error Code 6006 or any bug in your game, it’s recommended to start by restarting the computer before attempting any other fixes. This is because restarting the computer can resolve any temporary errors caused by outdated cookies and cache or conflicts with other software on your system. Simply restarting the PC

Solution 2: Close Unwanted Programs on PC
If too many programs are running in the background, using too much internet/RAM/Disk can cause Redfall Error Code 6006 on Windows 11.
Closing unwanted programs will help you eliminate the crashing issue on your PC.
So, let’s close unwanted programs:
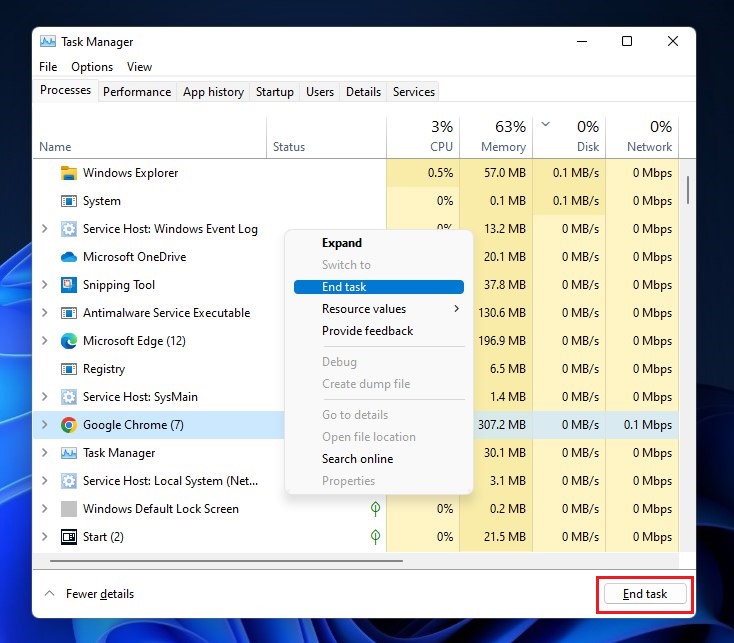
- Press Ctrl + Shift + ESC keys to open Task Manager
- Now check which program is using more Network
- Right-click on that program and select End task

- And check if the crash is solved or not.
Solution 3: Verify the Game Files On Steam
Sometimes the game file will get corrupted or get deleted, which eventually causes an Error Code 6006 issue on the Redfall on PC.
Verify the Game File in Steam
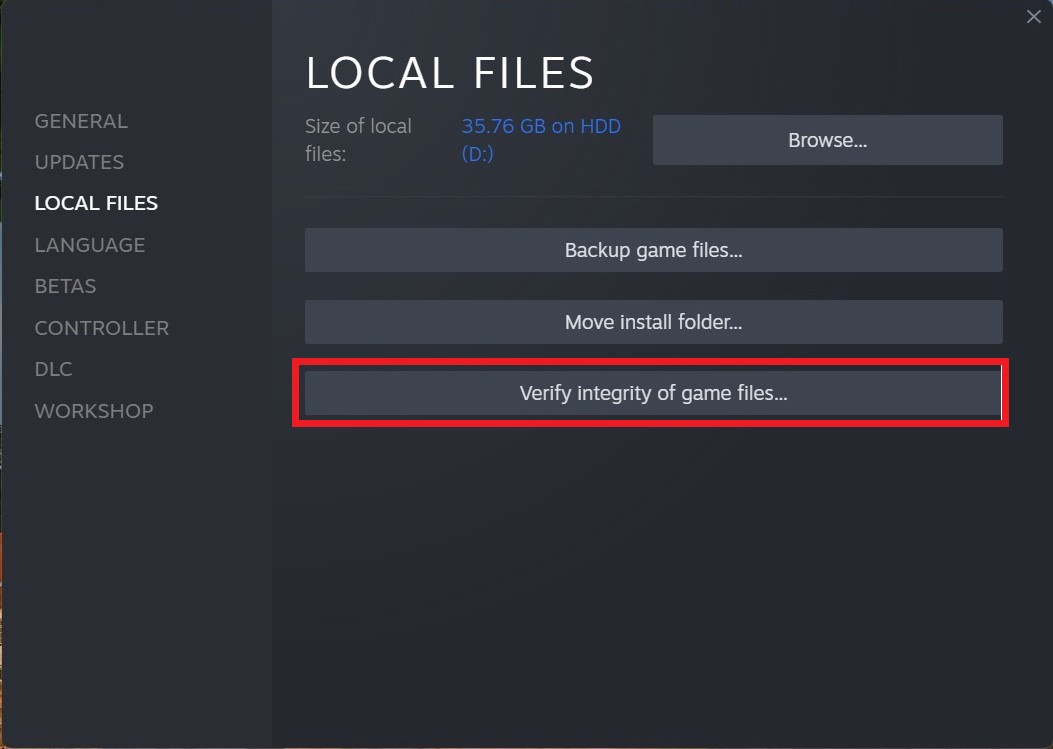
Follow the steps to verify the game file on Steam software:
- Launch the Steam Software
- Now login in the steam
- Navigate to the library
- Select the game and right-click on the game
- Now select properties
- Now click on the “Local file” Option
- A further menu will open
- Click on the “Verify Integrity of the Game Cache“

- Now the software is verifying the files, and this will take some time.
Sometimes the game file will get corrupted or get deleted that eventually causing an Error Code 6006 issue on Steam.
Solution 4: Update Graphics Card Driver Via Windows Update
Updating your graphics card driver is an important step in ensuring your computer is running smoothly and efficiently. With the latest driver updates, you can improve your system’s performance, fix any bugs, and enjoy new features. In this solution, we will be showing you how to update your graphics card driver using Windows Update, a simple and straightforward method for keeping your drivers up to date. So, let’s get started!
Here is how you can update drivers via optional updates on Windows 11:
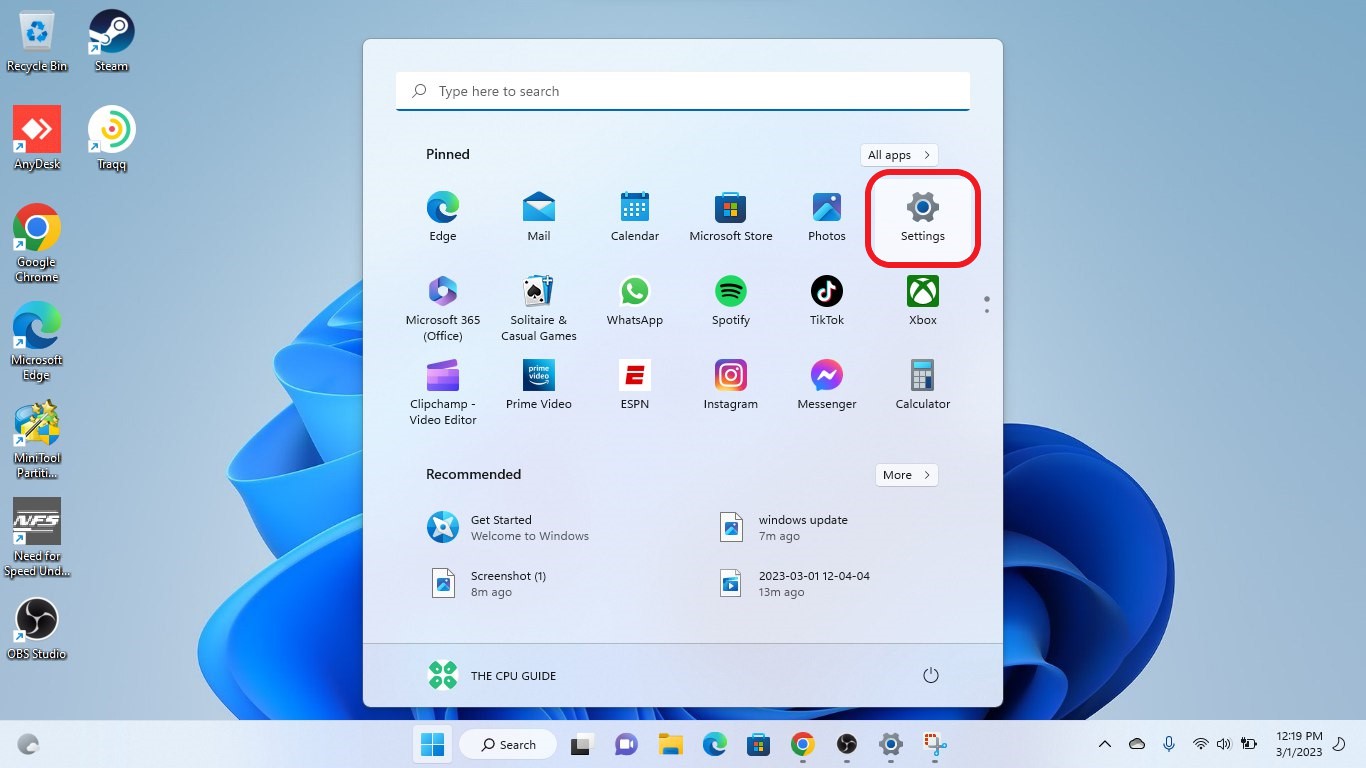
- Click on the Windows icon

- Click on the Settings icon
- A new window will pop up
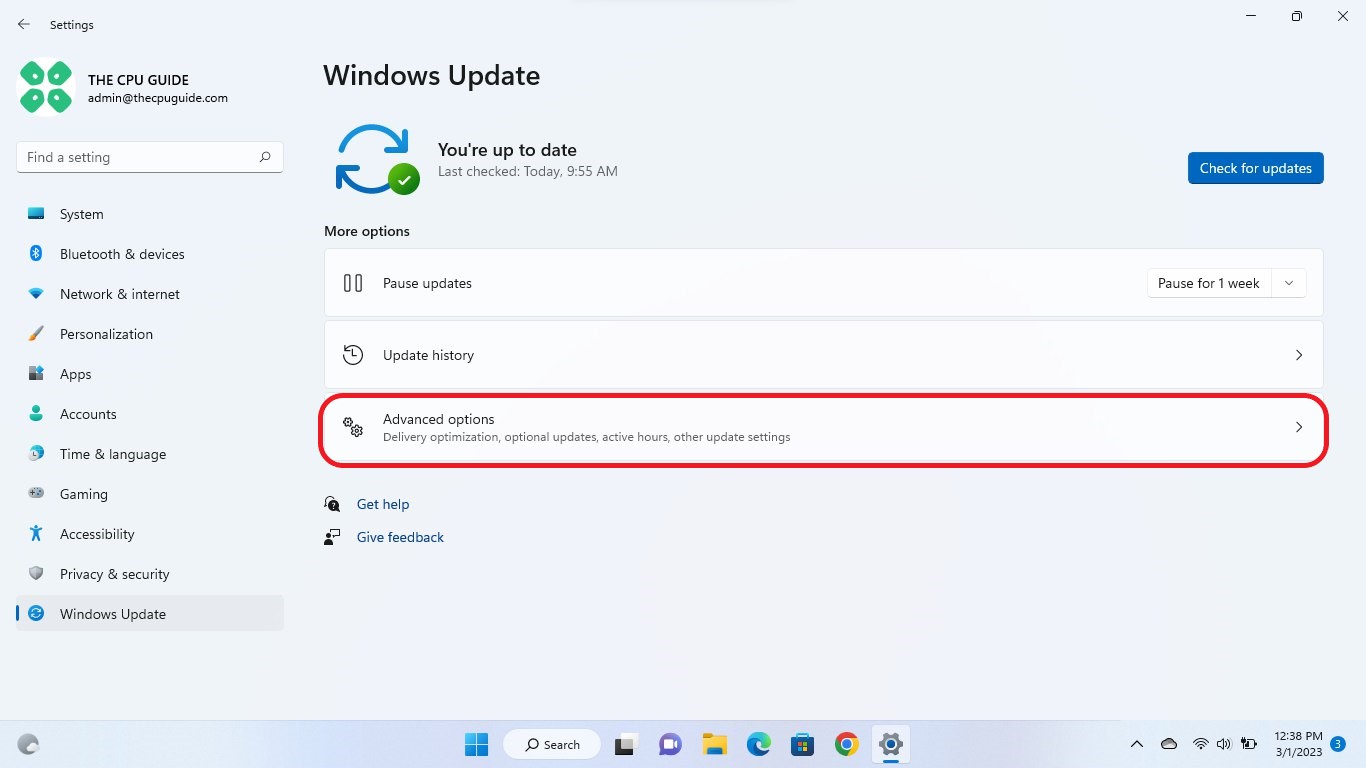
- Select Windows Update from the left menu
- The new window will pop up
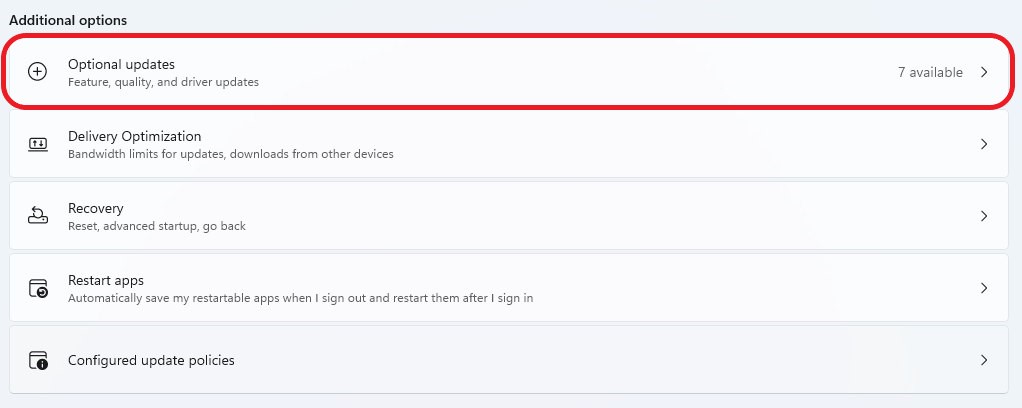
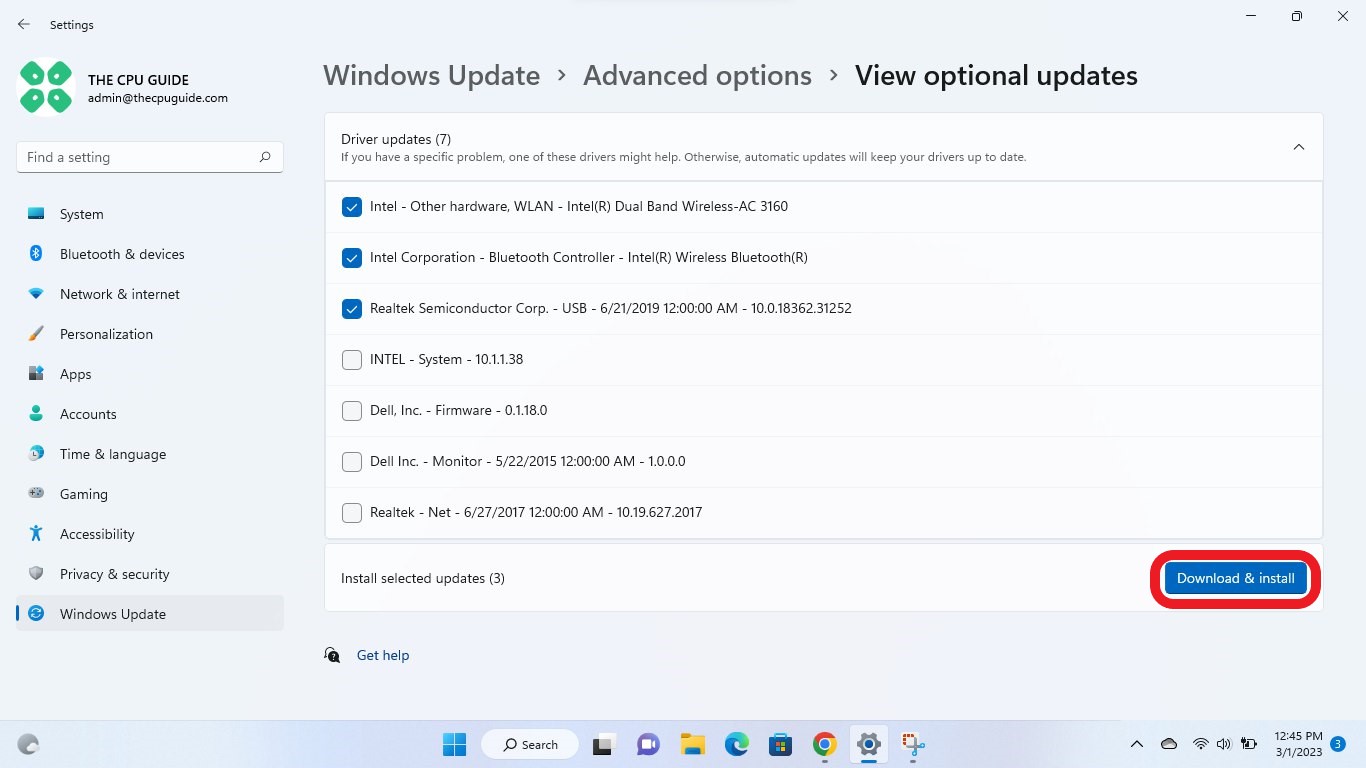
- Now select Advanced options
- Click on Optional updates

- A new window will open
- Click on the drop-down button for Driver updates
- Now, select your desired drivers
- Now press the Download & Install button
If you cannot update your drivers through Windows Update, then you can try updating the Graphics Drivers through Device Manager to fix the Redfall that Error Code 6006.
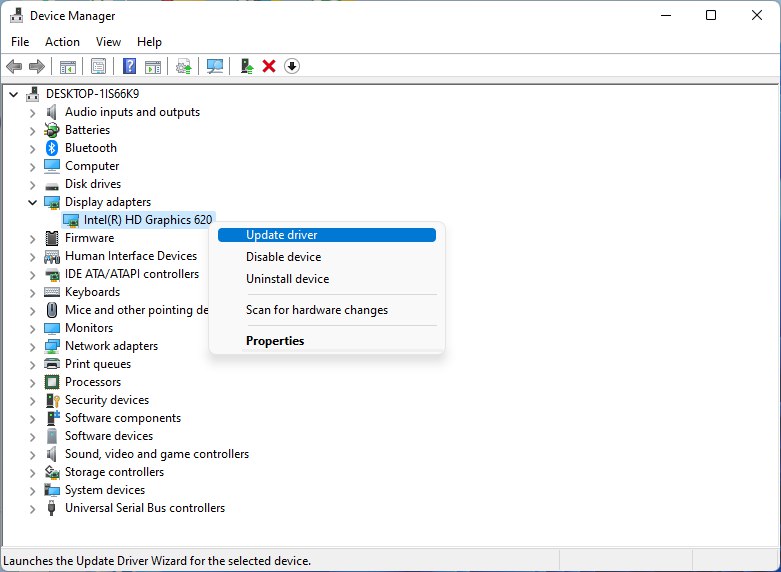
Solution 5: Update Graphic Drivers Via Device Manager
Updating your graphics card driver is essential for ensuring optimal performance and compatibility with the latest software and games. Updating your graphics card driver can be done via the Device Manager in Windows and is a straightforward process that can be completed in just a few steps.
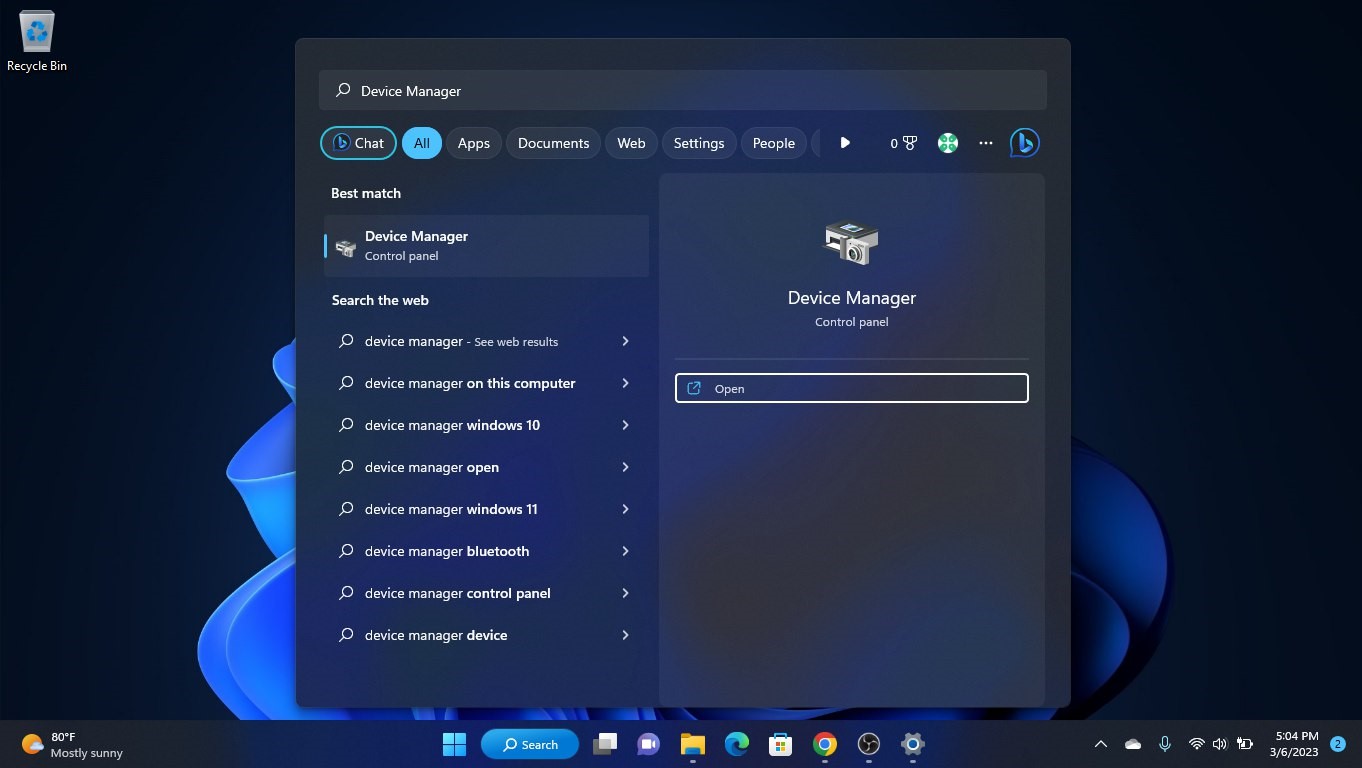
Here is how you can update drivers through Device Manager:
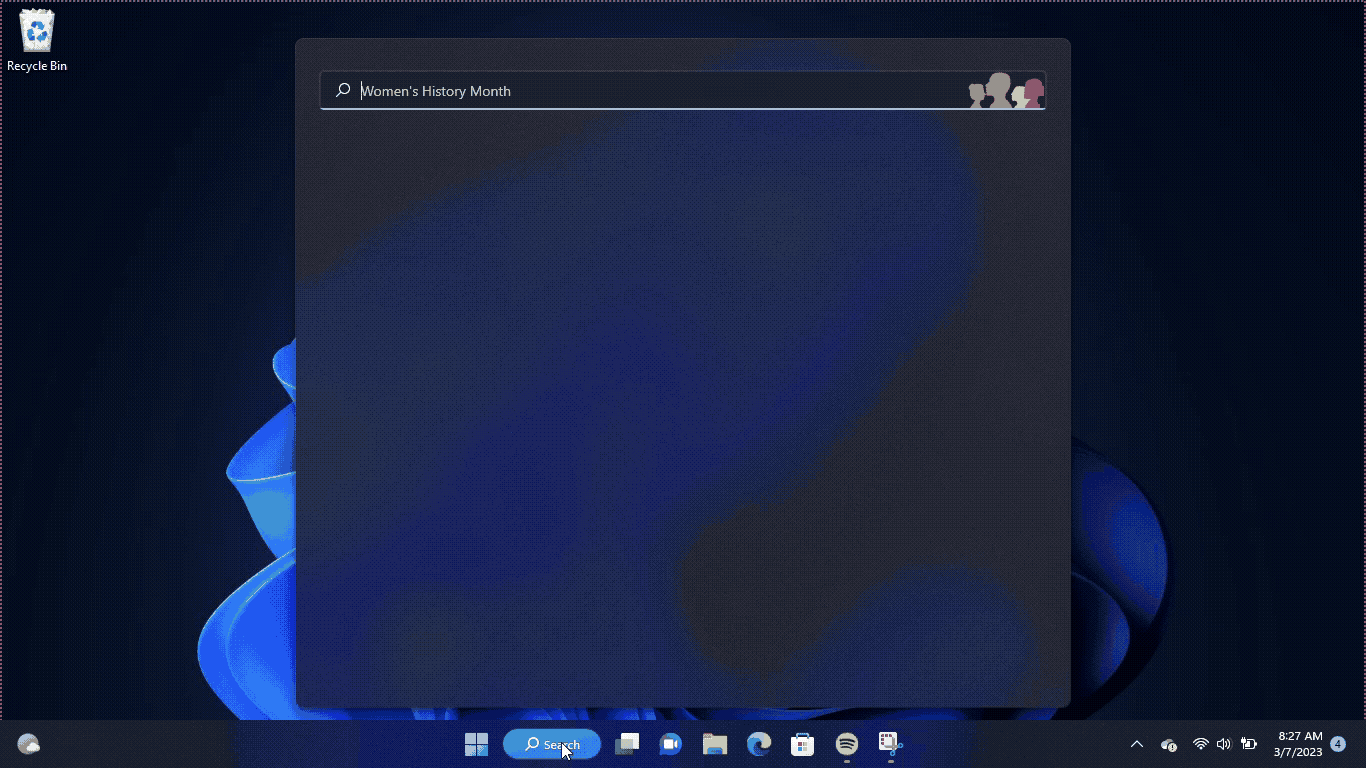
- Click on the Search icon
- Type Device Manager
- Click to open Device Manager

- Then select the Display adapters
- A further menu will open
- Right-click on the graphic card name
- Click on the Update driver

Solution 6: Check for Driver’s Updates of GPU/Video Cards of Different Company
An issue that can cause crashes in Redfall is outdated GPU drivers. When the video card drivers are not up to date, the GPU cannot keep up with modern gaming and may cause crashes. To resolve this, we suggest updating the video card drivers. Direct links to the main GPU manufacturers can be found below.
- AMD
- Nvidia
- Intel
If the above solution didn’t work out for you, then try the next solution.
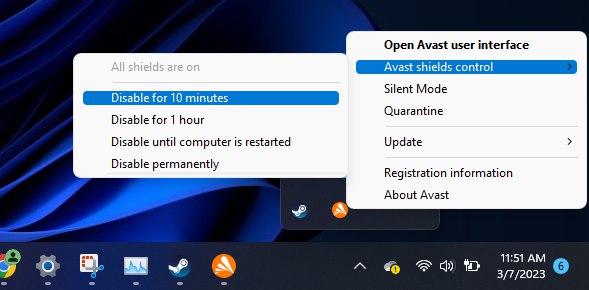
Solution 7: Disable Antivirus Software
In some cases, the third-party antivirus software installed on a computer may prevent the game Redfall from running properly.
So, you need to disable the antivirus for a few minutes to check if the antivirus is causing Error Code 6006 issue on Redfall.
In order, to disable the antivirus follow the step below :
- Select the arrow button on the taskbar a Small menu will open.
- Then click left on the Avast antivirus icon.
- The setting menu will open and select “Avast shield control“
- In a further menu, you will select the “10 minutes option“

- Now restart the game.
If the issue persists then proceed to the next solution.
Solution 8: Antivirus
Installing antivirus software is a vital solution for any computer user, especially gamers and tech enthusiasts. It provides a strong layer of protection against various cyber threats that can damage your system and compromise your personal information.
With regular updates and advanced security features, antivirus software can detect and remove viruses, malware, and other malicious programs that can cause crashes and system errors. It’s a feasible solution that can keep your system running smoothly and securely. Here are our 3 favorite award-winning Antiviruses,
1. Norton
Trusted by more than 50 million customers worldwide. It comes with features Like real-time threat protection, password management, parental controls, and 100% Virus protection.
Up to 77% Off

2. AVG Antivirus
Get comprehensive security that keeps you safe online with award-winning antivirus with a rating of 4.3 with over 7000 reviews on Trustpilot. It offers ransomware protection, a customizable firewall, and more.
40% Off

3. Avast Antivirus
Get advanced protection against new and sophisticated threats, like ransomware and phishing attacks to protect your digital identity and data with Avast Premium Security’s easy-to-use privacy tools.
Upto 50% Off

If you still have any queries or suggestions, share your experience with us in the comments section below.
Meet Hammad, a dynamic writer with a passion for gaming and a talent for analysis. With extensive years of experience in the gaming industry, Hammad has a unique perspective on the latest gaming trends and technologies. In addition to writing about gaming, Hammad also guides our team with marketing news and his investment analysis.
-
#1
In order to get Cortana to work, I need to plug-in my headset to the front panel. Currently, the front panel doesn’t work, but I’ve read Realtek will fix this problem.
I have tried to install Realtek 2.75 64-bit, but keep getting an error code 6006. The dialogue box gives three solutions: Close all other apps, clean Temp files, and check your internet connection (web based installs).
I have done the first two operations for a solution, and ignored the last since I’m installing from my computer. But those suggestions haven’t helped.
There are quite a number of different answers for how to fix this problem including one that suggested using SmartPCFixer, which I did, but nothing has worked for me so far.
Has anyone else encountered this problem. Have you fixed it? If so, how?
Last edited:
-
#2
Any front panel connections on your case are likely connected to their respective motherboard connectors.
Whether they function properly or not might very well be contingent on whether you have the proper motherboard drivers installed, specifically the Chipset Driver as well as any associated BUS drivers.
My best advice at this point would be to check with your MotherBoard or PC Manufacturer for those drivers and see if installing them will help with the issue.
With respect to your having used something called «SmartPCFixer» I would suggest that you consider uninstalling that, as those types of programs are often loaded with Bloatware some of which might be considered Malware as well. While I can’t speak specifically to that particular program, it has been my experience that they generally don’t work and often are just a scam.
-
#3
In order to get Cortana to work, I need to plug-in my headset to the front panel. Currently, the front panel doesn’t work, but I’ve read Realtek will fix this problem.
I have tried to install Realtek 2.75 64-bit, but keep getting an error code 6006. The dialogue box gives three solutions: Close all other apps, clean Temp files, and check your internet connection (web based installs).
I have done the first two operations for a solution, and ignored the last since I’m installing from my computer. But those suggestions haven’t helped.
There are quite a number of different answers for how to fix this problem including one that suggested using SmartPCFixer, which I did, but nothing has worked for me so far.
Has anyone else encountered this problem. Have you fixed it? If so, how?
-
#4
I solved my own problem. My profile was corrupt. I loaded a new one and installed Realtek using compatibility for Windows 8.
-
#5
Any front panel connections on your case are likely connected to their respective motherboard connectors.
Whether they function properly or not might very well be contingent on whether you have the proper motherboard drivers installed, specifically the Chipset Driver as well as any associated BUS drivers.
My best advice at this point would be to check with your MotherBoard or PC Manufacturer for those drivers and see if installing them will help with the issue.With respect to your having used something called «SmartPCFixer» I would suggest that you consider uninstalling that, as those types of programs are often loaded with Bloatware some of which might be considered Malware as well. While I can’t speak specifically to that particular program, it has been my experience that they generally don’t work and often are just a scam.
Thank you for your post. Actually, SmartPCFixer is quite a good tool with no noticeable bloatware. Thanks again.
-
#6
Good to hear. Thanks for posting back and updating your thread with that information. And by the way…..
Welcome to the forum.
QuickBooks error 6006 occurs when you try to sync the QuickBooks company file. However, these files do not match the files that are installed in QuickBooks. For instance, when you install the GUARD1 PLUS, you will see a dialogue box stating “Error code: -6006” along with some fixes. The error message recommends you close any running programs, empty the temporary folder, and check the internet connection. However, multiple reasons significantly contribute to provoking error 6006 in QuickBooks. This comprehensive blog covers some instant solutions, along with the ones mentioned above, that help you get rid of this error. Also, you will gain valuable insights about all the causes responsible for error 6006. Therefore, we suggest going through this blog till the end.
What Causes QuickBooks Error 6006
Here is a list of all those reasons that can trigger error 6006 while syncing the QuickBooks Desktop company file.
- You haven’t restarted the system after installing a program.
- Another app is running a setup program.
- The CD is damaged through which you are trying to install the application.
- Problems with the CD or DVD drive.
- The hard drive doesn’t have the required space.
- Your PC lacks enough system resources like RAM, processor, etc.
- Issues with Windows installation.
One or more of these reasons can contribute to the occurrence of error 6006 in QuickBooks, and you might need to resolve all of them to troubleshoot it.
Top Solutions to Fix QuickBooks Error 6006
Now that you are aware of the causes that trigger QuickBooks Error 6006 let’s implement the solutions in order.
Fix 1: Restart the System and use an Admin Account to Sign in
Sometimes, a simple restart can resolve even the most complex-looking errors; the same is true for error 6006. In this first solution, all you need to do is restart the system and log in with an admin account to check if the error is resolved. If not, follow the next solutions
Fix 2: Run QuickBooks as an Administrator and Install the Latest Updates
QuickBooks requires admin rights to perform several operations, including installation and update. With this solution, we will launch QuickBooks with admin rights, update it, and check if the error is resolved.
Note: If you have a QuickBooks Desktop payroll subscription turned on, consider downloading the latest tax table after every step to keep your payroll info accurate.
- Right-click the QuickBooks Desktop icon and choose Run as Administrator from the drop-down menu.
Now, update QuickBooks to the latest release. Let’s learn how to update QuickBooks with the instructions below.
- As you have already started QuickBooks as an admin, move to the Help tab and select Update QuickBooks Desktop.
- Move to the Update Now tab and select the Get Updates option, which will prompt QuickBooks to download the most recent updates.
- Re-launch QuickBooks, and when prompted, click Yes to install the updates.
Retry to perform the same action that triggered error 6006 earlier to check if this solution helps resolve it. If not, move to the next solution.
Fix 3: Consider checking the conditions of the “GAURD1PLUS CD”
In this solution, you only need to check the configuration of GAURD1PLUS CD and ensure everything is correctly configured. If all seems to be fine and you still get the same error, follow the next solution.
Fix 4: Consider Checking the functionality of the CD or the DVD drive
If you are trying to install QuickBooks using a CD, you must ensure that the CD drive works fine. If you suspect there are some issues with the CD drive; you can download the QuickBooks application installer from the official website and try installing it. Follow the next solution if you still get the error with the downloaded QuickBooks installer file.
Fix 5: Ensure you have at least 1.5 GB free space in your hard drive
QuickBooks is a large application, and installing it requires a minimum of 1.5 GB of free disk space. If you do not have the required free space on your hard drive, try clearing the junk files or upgrading the hard drive and retry the installation. If you still get the error code 6006 even after having enough free space, follow the next troubleshooting solution.
Fix 6: Close all the applications running in the background
Interruptions caused by the application running in the background can be a big reason for the occurrence of error code 6006, and thus, with this solution, we will terminate all background processes running in the background using the Task Manager and check if this resolves the issue.
- Press the Ctrl + Shift + Esc keys together on the keyboard to launch Windows Task Manager.
- Right-click every program running on the system and select End Task.
Once all the programs and background processes are closed, retry to install QuickBooks and check if the error is resolved. If not, we suggest you follow the next troubleshooting solution.
Fix 7: Turn off the System Tray to free the RAM and processor space
With this solution, we will close the applications running in the system tray to have more RAM for the installation. Click the System tray icon at the bottom left of the screen and right-click every application displayed there. Select Close/Exit or any relevant option to close the applications and retry to install QuickBooks. Follow the last troubleshooting solution if this does not help resolve the issue.
Fix 8: Rename the InstallShield File name
In this solution, you will need to rename the InstallShield file that you will find in this location ‘C:\Program Files\Common Files\InstallShield.’ To rename the file, add the word “old” at the end of the file name. For instance, “InstallShieldOLD”.
Fix 9: Delete the Junk from the Temp Folder
Deleting the junk from the Temp folder is a simple process; all you need to do is press the Windows + R keys and enter Temp in the search field. Next, press Enter and select all the files in the folder. Later, Delete it and check if the error is resolved. If not, follow the next solution.
Fix 10: Update Windows
The last solution to resolve error 6006 is to check for and install Windows updates.
For Windows 10:
- Open the Windows Start menu by pressing the Start key on the keyboard and select Settings.
- Select the option that says Update & Security, and then click Windows Update.
- Lastly, hit the Check for updates button.
Install the updates if they are available.
For Windows 11:
- Go to the Windows Start menu and select Settings.
- Select Windows Update and then select Check for updates.
If the updates are available for your Windows operating system, install them.
Conclusion
Hopefully, the effective fixes mentioned in this blog have helped you get past QuickBooks error code 6006. However, we understand that QuickBooks error 6006 may become complex to resolve at times. In that case, you can always get in touch with the QuickBooks experts by dialing.They provide immediate solutions to get your business operations on track effortlessly.
FAQs
1. What message do you see while installing the GUARD1 PLUS?
You will see the following message in a dialogue box when you install GUARD1 PLUS.
• “InstallShield
• Setup has experienced an error.
• Close any running programs
• Empty your temporary folder
• Check your internet connection (Internet-based Setups)
• Then try to run the Setup again.
• Error code: -6006”
2. Do I need to upgrade my system to resolve error 6006?
Having low system storage can also trigger error 6006, so you might need to upgrade your hard drive to fix it. You can also try upgrading the RAM and processor to let QuickBooks function smoothly.
Kate is a certified public accountant (CPA) with expertise in various accounting software. She is technically inclined and finds passion in helping businesses and self-employed people carry out bookkeeping, payroll, and taxation without worrying about errors. Every once in a while, Kate loves to travel to far-off places and relax in the lap of nature.
Skip to content
Situation: The client is running Windows 2012 R2 server. The Event logs show these ID 6005 Description: The winlogon notification subscriber <subscriber> is taking long time to handle the notification event.
Event ID 6006, Description: The winlogon notification subscriber <Profiles> took 606 second(s) to handle the notification event (Logon).
Troubleshooting: In most cases, this is the DNS issue. In our case, Reverse Lookup Zones has a double DNS record. for example server1 and server2 have the same IP address. That cause login slow.
That also could be GP Folder Redirection and Drive Mapping drive issue.
Bob Lin
Bob Lin, Chicagotech-MVP, MCSE & CNE
Data recovery, Windows OS Recovery, Networking, and Computer Troubleshooting on
http://www.ChicagoTech.net
How to Install and Configure Windows, VMware, Virtualization and Cisco on
http://www.HowToNetworking.com
View all posts by Bob Lin