
Все способы:
- Способ 1: Средство автоматического устранения неполадок
- Способ 2: Проверка состояния службы
- Способ 3: Ручная установка обновлений
- Способ 4: Восстановление системных файлов
- Способ 5: Установка/включение .NET Framework
- Решение возможных проблем
- Способ 6: Редактирование реестра
- Вопросы и ответы: 2
Способ 1: Средство автоматического устранения неполадок
Если ошибка 0x800f0831 возникает при попытке обновить систему Windows 10, стоит попробовать устранить возможные проблемы, которые могут быть связаны непосредственно с «Центром обновления». В операционке уже предустановлено средство для этого, вам останется только запустить его вручную:
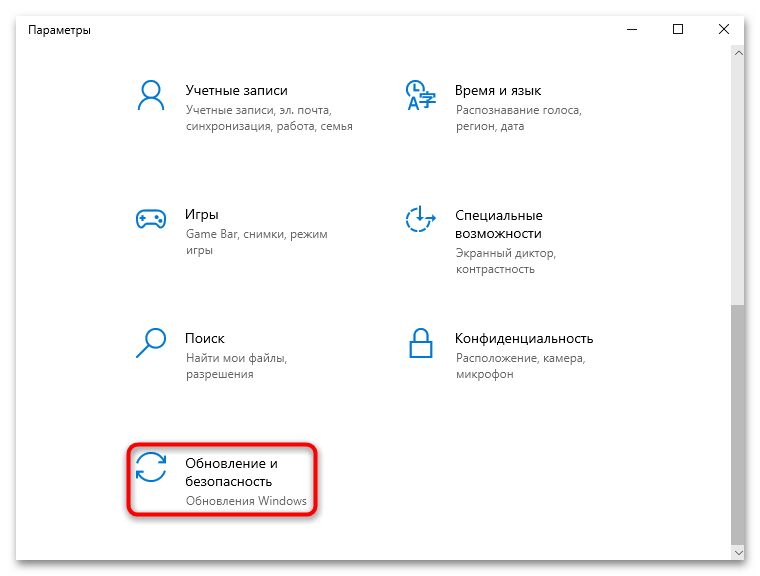
- Откройте меню «Пуск» и запустите приложение «Параметры».
- Перейдите в раздел «Обновление и безопасность» в открывшемся окне.
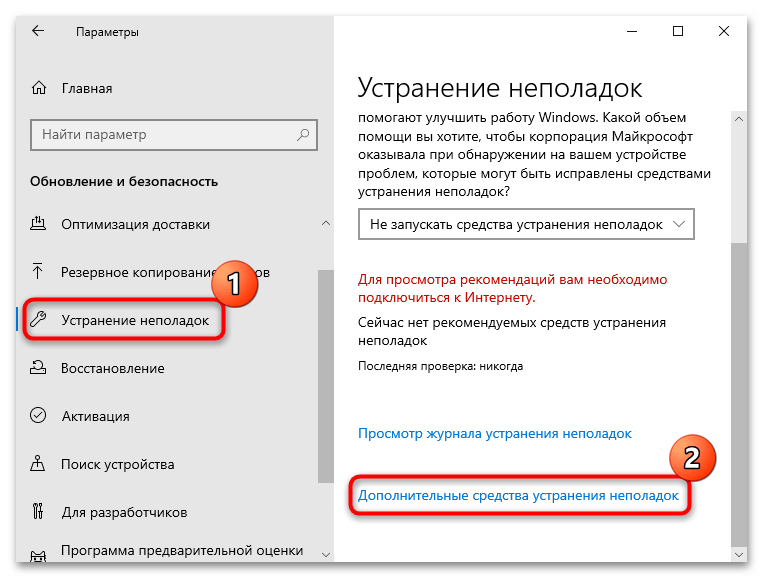
- На панели слева переключитесь на вкладку «Устранение неполадок», затем в центральной части окна щелкните по ссылке «Дополнительные средства устранения неполадок».
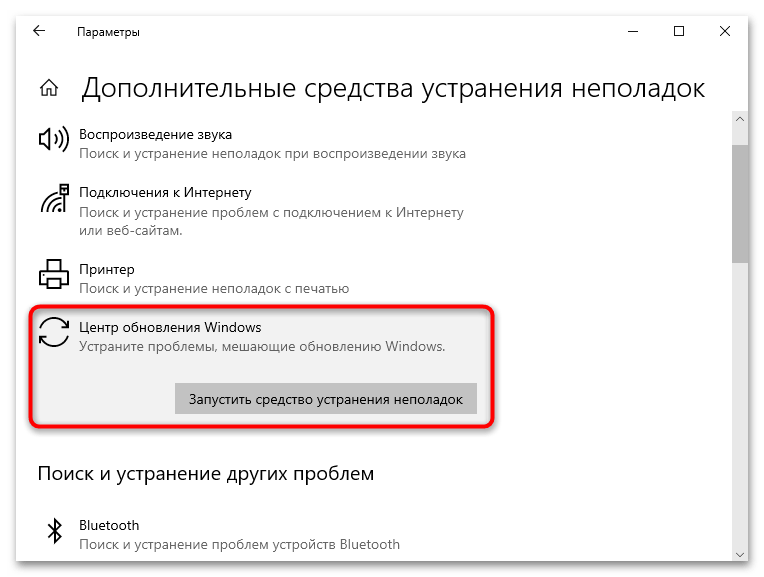
- В списке доступных средств найдите строку «Центр обновления Windows» и щелкните по ней. Появится кнопка, запускающая средство, на которую нужно нажать.
Процесс автоматизирован: средство начнет сканирование системы на наличие неполадок, которые могли стать причиной проблем в работе «Центра обновления Windows», тем самым вызывая ошибку. Если понадобится вмешательство со стороны пользователя, будут предложена инструкция по исправлению ситуации.
Способ 2: Проверка состояния службы
Также стоит проверить, включена ли служба «Центра обновления Windows». Она должна работать и иметь автоматический тип запуска для корректной загрузки и установки обновлений в систему.
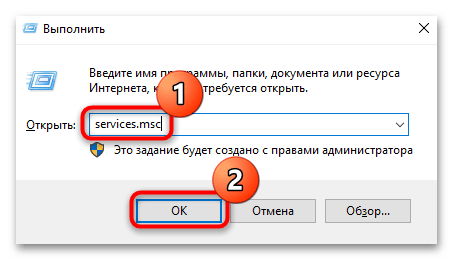
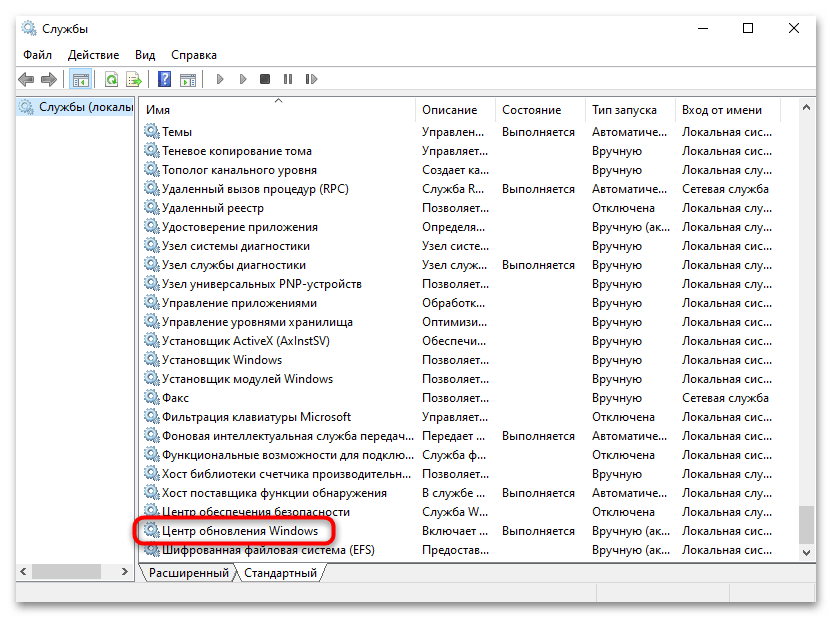
- Вызовите диалоговое окно «Выполнить», используя сочетание клавиш «Win + R», затем введите запрос
services.mscи нажмите на кнопку «ОК» для открытия оснастки по управлению службами. - В списке найдите пункт «Центр обновления Windows» и дважды кликните по нему левой кнопкой мыши.
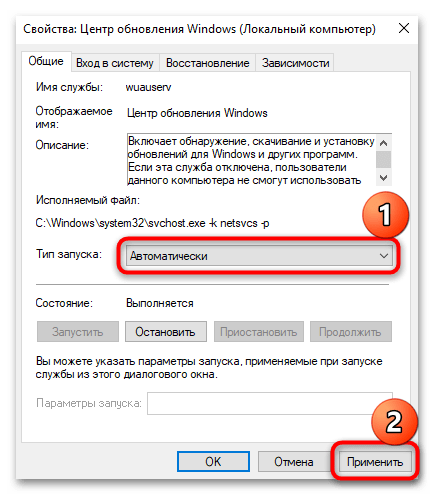
- В следующем окне убедитесь, что установлен автоматический тип запуска. Если нет, выставьте его из выпадающего меню и примените настройки.
- Если потребуется, запустите работу службы, нажав на соответствующую кнопку, затем подтвердите новые параметры кнопкой «ОК».
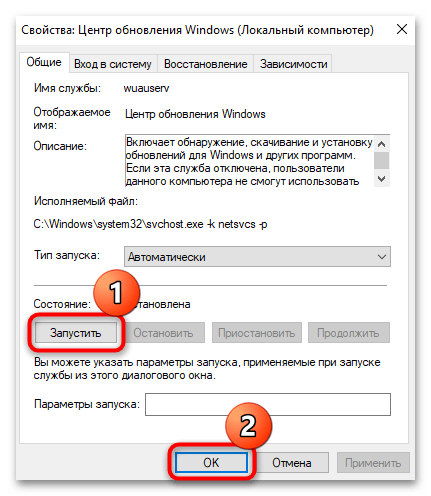
После можно закрывать оснастку «Службы» и проверять, устранена ли ошибка 0x800f0831 в Windows 10.
Способ 3: Ручная установка обновлений
Некоторые обновления не могут быть установлены в систему автоматически ввиду самых разных обстоятельств. Тогда следует попробовать произвести эту процедуру вручную. В некоторых случаях это позволяет исправить текущую ошибку и избавиться от появления новых аналогичных неполадок. Для этого понадобится зайти на официальный сайт Microsoft, самостоятельно скачать нужный апдейт и инициализировать его установку. Детальнее про такой метод обновления ОС узнайте из нашего отдельного материала.
Подробнее: Устанавливаем обновления для Windows 10 вручную
Способ 4: Восстановление системных файлов
Как ни странно, но одна из самых распространенных ошибок порой оказывается связана с повреждением системных файлов. Вам потребуется проверить их целостность и восстановить при необходимости, а для этого в Windows 10 уже есть встроенная утилита SFC. Ранее мы разбирали, как правильно ее применять. Также можно дополнительно воспользоваться средством DISM для сканирования и восстановления целостности хранилища системных файлов.
Подробнее: Как проверить целостность системных файлов в Windows 10
Способ 5: Установка/включение .NET Framework
Компоненты .NET Framework нужны для корректного запуска программного обеспечения, некоторых веб-служб и даже обновлений в Windows 10. Поскольку чаще всего ошибка 0x800f0831 связана с апдейтами, стоит активировать .NET Framework или при необходимости установить (если не удается включить более ранние версии):
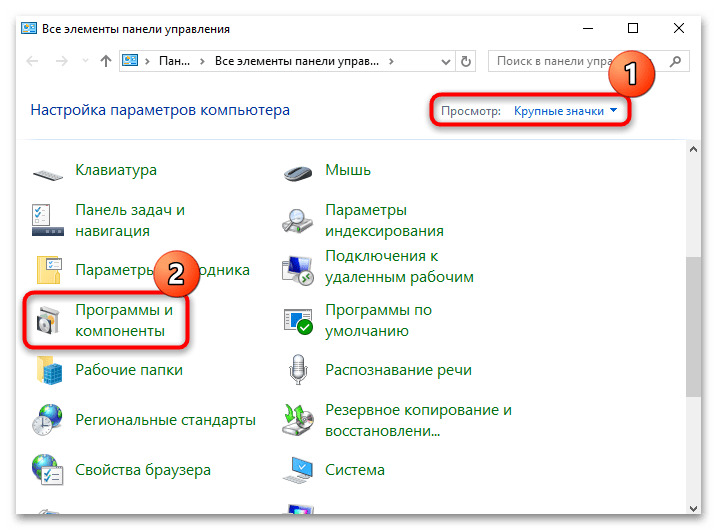
- Запустите классическую «Панель управления», отыскав средство в главном меню или с помощью строки поиска.
- Для удобства в меню «Просмотр» измените просмотра на «Крупные значки» или «Мелкие значки», затем откройте раздел «Программы и компоненты».
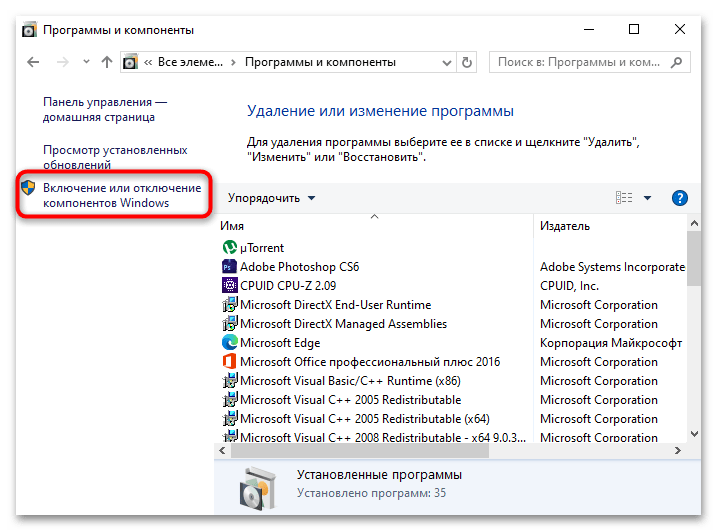
- В новом окне кликните по строке «Включение и выключение компонентов Windows», расположенной на панели слева.
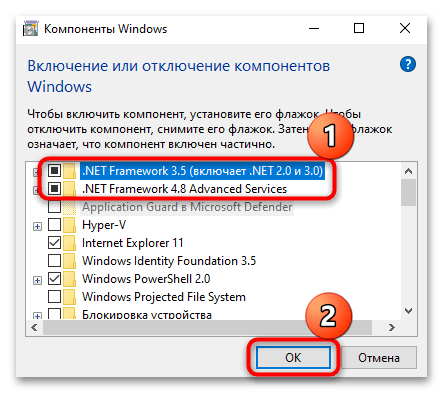
- В списке найдите пункты, где есть название «.NET Framework», отметьте их и нажмите на кнопку «ОК».

Перезагрузите компьютер и проверьте, была ли устранена неполадка.
Решение возможных проблем
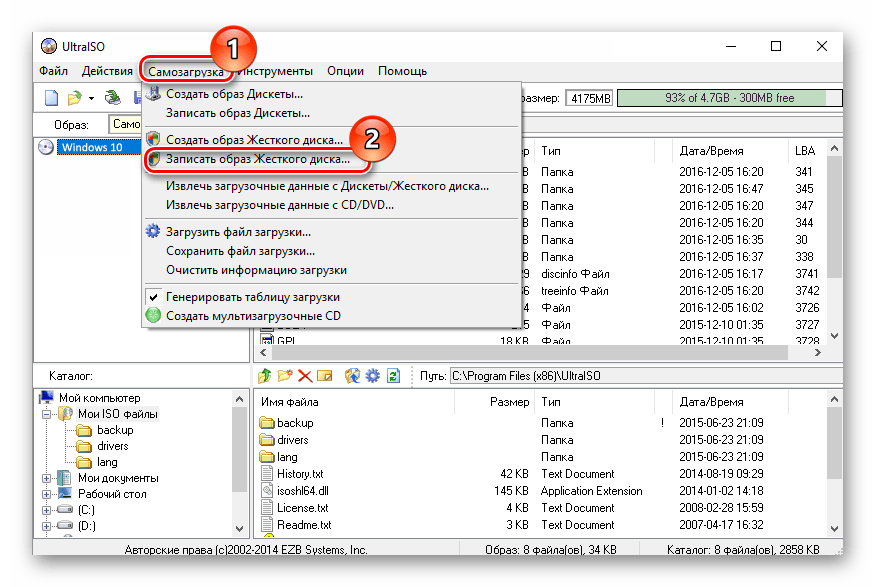
Встречаются ситуации, когда более ранняя версия компонента попросту не запускается или не устанавливается. Ее можно активировать принудительно, создав исполняемый файл, но предварительно понадобится создать установочный накопитель (оптический диск или флешку):
- Создайте загрузочный накопитель с образом Windows 10 так, как описано в нашем отдельном руководстве.
Подробнее: Руководство по созданию загрузочной флешки / диска с Windows 10
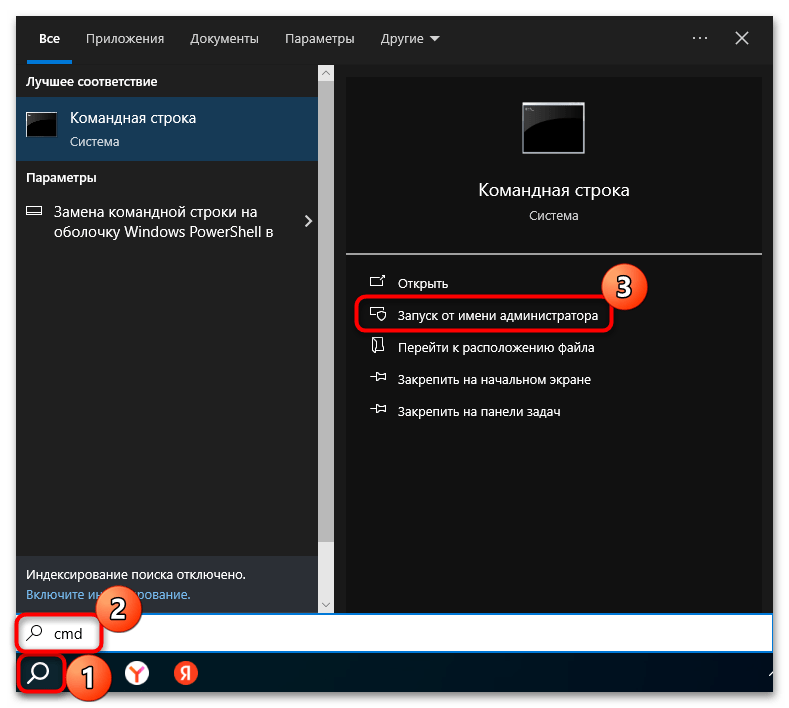
- Подключите флешку (или вставьте диск в привод, если это накопитель такого типа), затем запустите «Этот компьютер» и посмотрите, какая буква присвоена загрузочному накопителю. Далее запустите «Командную строку» от имени администратора: в поисковой строке ОС введите запрос
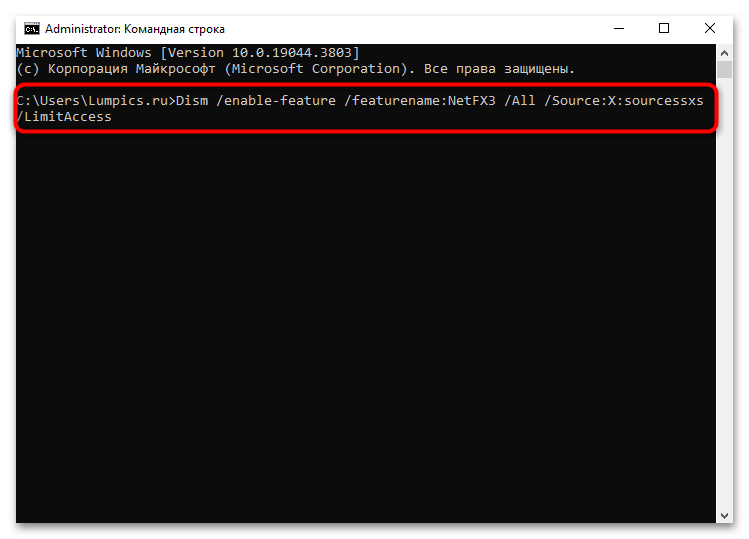
cmdи выберите нужный тип запуска. - Вставьте команду
Dism /online /enable-feature /featurename:NetFX3 /All /Source:X:sourcessxs /LimitAccess, где под буквой «X» подразумевается буква вашего загрузочного накопителя.
Теперь запустите офлайн-установщик .NET Framework с помощью специального скрипта. В некоторых случаях это значительно может сэкономить время (если такую процедуру потребуется проделывать не единожды). Отметим, что установочный накопитель все равно необходим.
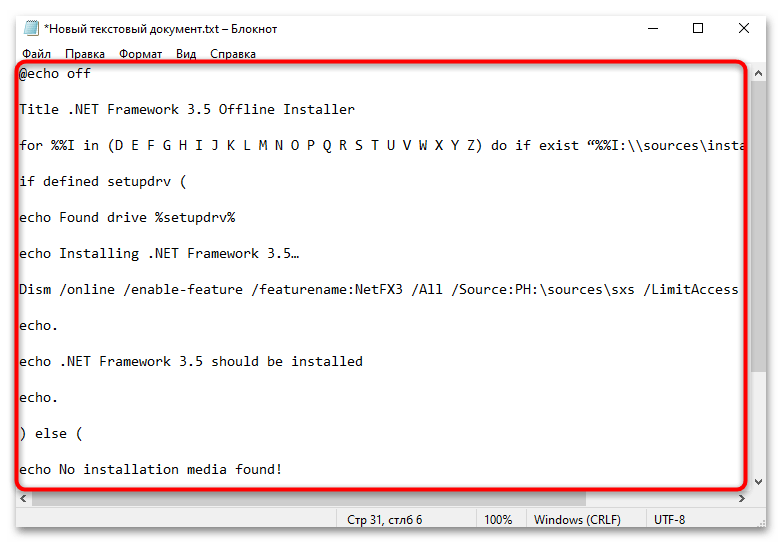
- Откройте штатный «Блокнот» и вставьте в документ следующее содержание:
Title .NET Framework 3.5 Offline Installer

for %%I in (D E F G H I J K L M N O P Q R S T U V W X Y Z) do if exist "%%I:sourcesinstall.wim" set setupdrv=%%I

if defined setupdrv (

echo Found drive %setupdrv%

echo Installing .NET Framework 3.5...

Dism /online /enable-feature /featurename:NetFX3 /All /Source:%setupdrv%:sourcessxs /LimitAccess

echo.

echo .NET Framework 3.5 should be installed

echo.

) else (

echo No installation media found!

echo Insert DVD or USB flash drive and run this file once again.

echo.

)
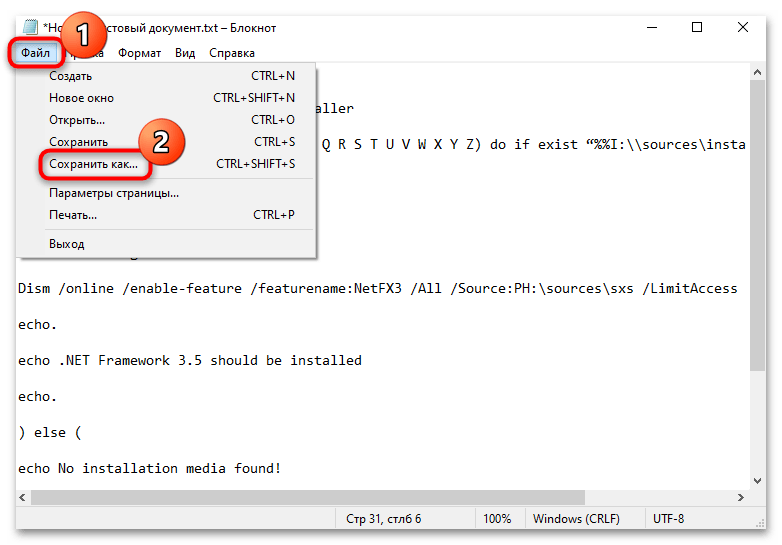
Pause - Нажмите на вкладку «Файл» и выберите «Сохранить как».
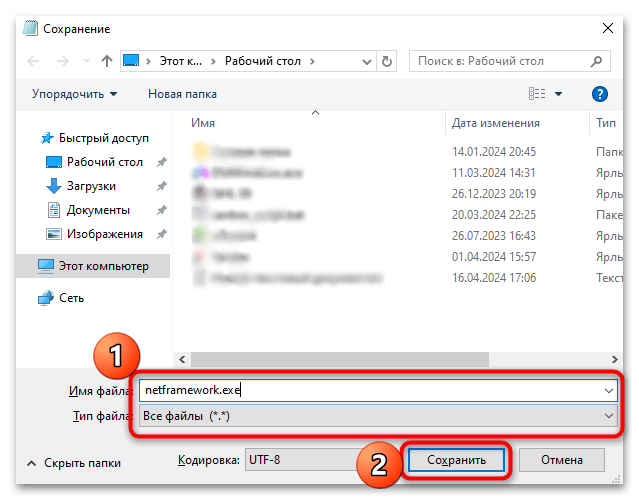
- Выберите из меню «Тип файла» пункт «Все файлы» и задайте имя для будущего скрипта, дописав в конце расширение исполняемого файла —
.exe, затем укажите место для сохранения.
На этом создание скрипта завершено. После подключения к компьютеру установочного накопителя и двойного клика по созданному файлу начнется установка устаревшего компонента .NET Framework в офлайн-режиме.
Иногда может потребоваться переустановка компонентов .NET Framework, несмотря на то, что они уже предустановлены в системе. Такое оказывается необходимо, если они по каким-то причинам были повреждены (тогда и включить их в соответствии с инструкцией выше вряд ли получится). О переустановке ПО мы писали в тематической статье на сайте.
Подробнее: Переустановка .NET Framework в Windows 10
Способ 6: Редактирование реестра
Если ничего не помогло, есть вариант очистить системный реестр от разделов, которые содержат в себе ключи обновления Windows 10. После их удаления система создаст новые автоматически, и таким образом получится исправить некоторые ошибки.
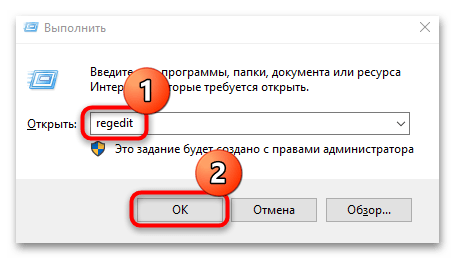
- Через окно «Выполнить» (сочетание клавиш «Win + R») запустите «Редактор реестра», введя команду
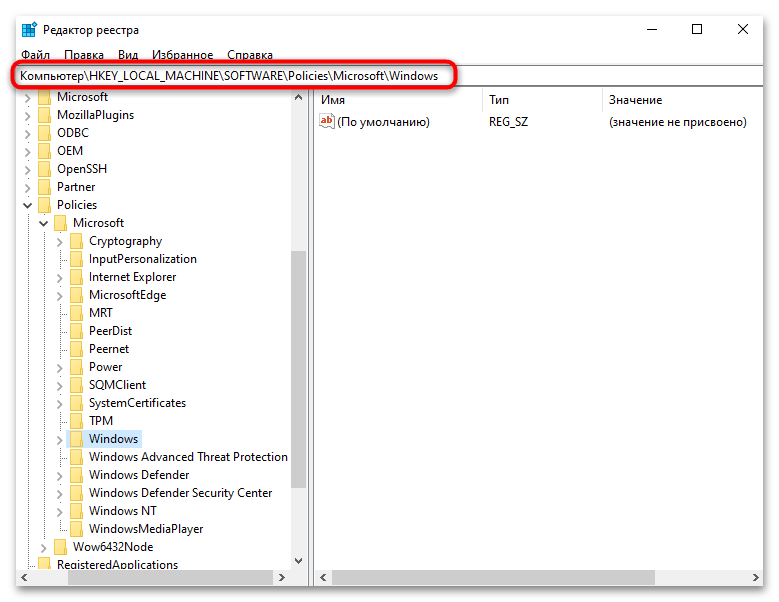
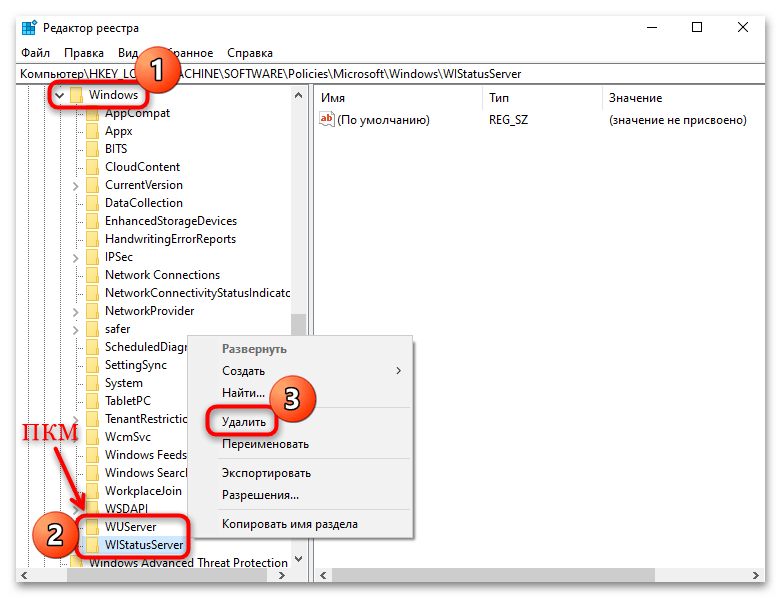
regeditи нажав на кнопку «ОК». - Разверните ветку
HKEY_LOCAL_MACHINE\SOFTWARE\Policies\Microsoft\Windows\или вставьте путь в адресную строку вверху. - На панели слева в каталоге «Windows» отыщите разделы под названием «WUServer» и «WIStatusServer» — их понадобится удалить. Кликайте поочередно по каждой папке правой кнопкой мыши, выбирайте пункт «Удалить», после чего подтверждайте действие.
Чтобы система создала новые разделы в системном реестре, перезагрузите компьютер и попробуйте снова обновить Windows 10.
Наша группа в TelegramПолезные советы и помощь
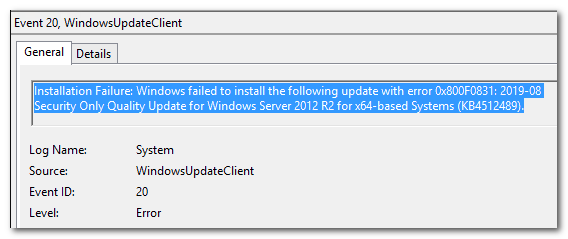
Ошибка 0x800f0831, как правило, обнаруживается пользователями в системном средстве «Просмотр событий» после неудачной установки кумулятивного обновления для ОС Windows.
Причины ошибки 0x800f0831
Самая распространенная на сегодняшний день причина за 0x800f0831 — это отсутствующий манифест предыдущего пакета обновлений. Другими словами, Центр обновлений Windows не может понять, какой конкретно апдейт был установлен ранее, а поэтому он отказывается производить установку нового. Решается все ручной установкой нужного обновления.
К другим причинам можно отнести:
- не удается установить подключение с серверами Центра обновления Windows;
- отключена служба Центра обновления;
- в системе отсутствуют библиотеки .NET 3.5 Framework.
Как исправить ошибку 0x800f0831
Метод №1 Установка нужного обновления вручную
Самый простой метод решения подобной ошибки — установка проблемного обновления вручную. Откройте журнал обновлений в Центре обновления и узнайте номер апдейта, с которым у вашей системы возникает ошибка 0x800f0831.
Например, пользователи частенько жалуются на эту ошибку с обновлением под номером KB4512489. Так или иначе как только вы узнаете номер, перейдите по этой ссылке и найдите нужное обновление. Далее вам остается загрузить пакет обновления и запустить установку.
Метод №2 Отключение VPN или прокси
Тут все довольно просто: отключите VPN или прокси-сервер, если вы используете их у себя на компьютере. Дело в том, что данные средства могут буквально блокировать подключение к серверам Центра обновления, что делает апдейт ОС Windows невозможным.
Вот как отключить прокси-сервер на своем компьютере:
- нажмите Win+S для вызова поисковой строки;
- пропишите «прокси» и выберите «Параметры прокси-сервера»;
- отключите прокси-сервер, выставив «Откл.» возле соответствующей опции;
- перезагрузите свой компьютер.
VPN от сторонних разработчиков вам придется отключать самостоятельно. Как только VPN и прокси-сервер будут деактивированы, попробуйте обновить свою Windows еще раз. На этот раз ошибки 0x800f0831 может не быть.
Метод №3 Корректировка параметров службы Центра обновления
Возможно, служба Центра обновления перестала по той или иной причине работать в вашей системе. Например, некоторое ПО может деактивировать определенные службы в ОС Windows. Вам необходимо открыть свойства службы и выставить для нее нужные параметры. Попробуйте сделать вот что:
- нажмите Win+R;
- пропишите services.msc и нажмите Enter;
- найдите службу «Центр обновления Windows» и дважды кликните на нее ЛКМ;
- выберите в типе запуска значение «Автоматически»;
- сохраните изменения и перезагрузите ПК.
Запустите обновление Windows и проверьте наличие ошибки 0x800f0831.
Метод №4 SFC и DISM
Системные файлы и хранилище компонентов Windows могли повредиться. Вам нужно пустить в работу средства SFC и DISM, дабы восстановить их. Сделать это можно вот так:
- нажмите Windows+R;
- напишите cmd и нажмите Ctrl+Shift+Enter;
- выполните следующий ряд команд, перезагружая свой ПК после каждой из них:
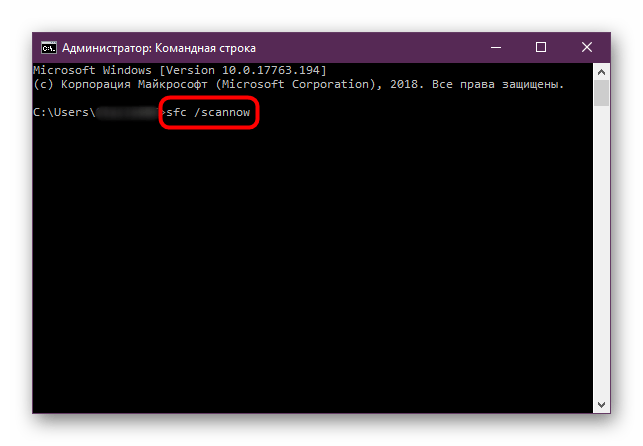
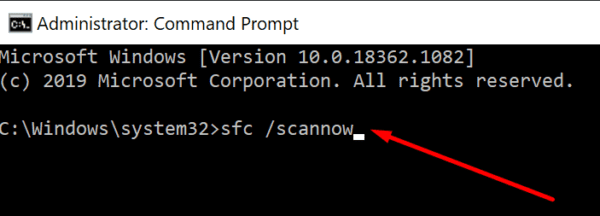
- sfc / scannow
- dism /online /cleanup-image /restorehealth
Метод №5 Включение .NET Framework 3.5
Ошибка 0x800f0831 при обновлении Windows может возникать в том случае, если в вашей системе деактивирован .NET Framework 3.5. Для его активации вам нужно сделать следующее:
- нажмите Win+R и выполните appwiz.cpl;
- кликните на ссылку «Включение и отключение компонентов Windows»;
- активируйте .NET Framework 3.5 и сохраните изменения;
- перезагрузите компьютер.
Если у вас не получилось включить .NET Framework 3.5 вышеуказанным способом, то попробуйте сделать следующее:
- создайте установочный носитель Windows;
- нажмите Win+R;
- пропишите notepad.exe и нажмите Ctrl+Shift+Enter;
- вставьте в Блокнот этот набор команд:
- @echo off
Title .NET Framework 3.5 Offline Installer
for %%I in (D E F G H I J K L M N O P Q R S T U V W X Y Z) do if exist «%%I:\\sources\install.wim» set setupdrv=%%I
if defined setupdrv (
echo Found drive %setupdrv%
echo Installing .NET Framework 3.5…
Dism /online /enable-feature /featurename:NetFX3 /All /Source:PLACEHOLDER:\sources\sxs /LimitAccess
echo.
echo .NET Framework 3.5 should be installed
echo.
) else (
echo No installation media found!
echo Insert DVD or USB flash drive and run this file once again.
echo.
)
pause
- @echo off
Заметка: замените PLACEHOLDER на букву, которой подписан установочный носитель Windows.
- сохраните файл в любое удобное вам место и (обязательно!) измените его расширение на .cmd;
- дважды кликните на созданный файл и дождитесь завершения процесс активации .NET Framework 3.5;
- перезагрузите компьютер.
Запускаем обновление Windows и смотрим, возникнет ли снова ошибка 0x800f0831.
Many users have reported 0x800f0831 Windows 10 errors when you use Windows update services. When you face this error, you cannot install any cumulative, security, or other essential updates on your PC. This error occurs when you install a particular update KB5012599 in your Windows 10/11. Usually, this error is triggered by a corrupt Windows Store cache and disabled Windows update service, antivirus program, or damaged update files. If you are also facing the same update error on your Windows 10 PC, the troubleshooting methods in this article will help you attain 0x800f0831 21h1 fix. So, continue reading!

Table of Contents
There are a few reasons that contribute to the discussed error code in your Windows 10 PC. They are listed below.
- Windows version does not support upgrading the computer.
- Plugged-in external USB devices are incompatible.
- Few essential services are not running.
- Antivirus and Malware are preventing the update.
- Not enough space for a computer to install new updates.
- Corrupt data, inadequate internet supply.
- Outdated BIOS and very old computer.
- Corrupt Windows registry and Windows File System.
Now, you know the reasons that cause the discussed error. Follow the below-mentioned troubleshooting methods to fix the same.
Method 1: Basic Troubleshooting Methods
Following are the basic methods to fix the issue.
1A. Repair System Files
If your system has any corrupt files, you must repair them first before installing any updates. System File Checker (SFC command) scans and fixes any corrupt files in your computer. Deployment Image Servicing and Management (DISM) repairs Windows OS errors with a powerful command line. To resolve update error 0x800f0831 Windows 10, you are advised to run SFC/DISM utilities on your Windows 10 computer as instructed in our guide How to Repair System Files on Windows 10.

Once you have completed the scanning process, check if you can install the latest updates.
1B. Disable Antivirus Temporarily (If Applicable)
The antivirus suite may sometimes prevent any new latest updates from being installed on your PC. Many compatibility issues are identified by several Windows users they are difficult to fix. Antivirus software like Norton and Avast may prevent any latest Windows update and you are advised to disable any inbuilt or third-party antivirus software temporarily to resolve the same. Read our guide on How to Disable Antivirus Temporarily on Windows 10 and follow the instructions to disable your Antivirus program temporarily on your PC.

After fixing 0x800f0831 error on your Windows 10 PC, make sure to re-enable the antivirus program since a system without a security suite is always a threat.
1C. Use Google DNS
Some users have suggested that changing the DNS addresses has helped them 0x800f0831 fix in Windows 10 computers. Google DNS has 8.8.8.8 and 8.8.4.4 IP addresses that are simple and easy to remember to establish a secure DNS connection between the client and the server.
Here is our simple guide on How to change DNS settings in Windows 10 that will help you change your DNS addresses on your computer. You can also switch to any Open DNS or Google DNS on your Windows 10 computer by following our guide on How to Switch to OpenDNS or Google DNS on Windows. Follow as instructed and check if you can install cumulative updates on your PC.
1D. Disable Proxy Server
Sometimes, with inappropriate network configurations on your Windows 10 computer, you will face 0x800f0831 Windows 10 20h2 error. If you have installed any VPN service or use proxy servers on your PC, read out How to Disable VPN and Proxy on Windows 10 and implement the steps as instructed in the article.

After disabling the VPN client and proxy servers, check if you have fixed the discussed error. Still, if you face the same problem, try connecting to a Mobile hotspot.
1E. Update BIOS
Several Windows 10 users around the world have reported that 0x800f0831 error vanished after updating BIOS. But in case, if you have the latest version of BIOS and still face the same error, you must reinstall BIOS. If all above methods fail to fix your problem, you are advised to update BIOS as instructed in our guide What is BIOS and how to update BIOS?

Once you have updated your BIOS, then you would have fixed update error 0x800f0831 Windows 10.
Method 2: Unplug External Devices
When you face an update error 0x800f0831 21h1 error in your Windows 10 computer, check if you have connected any external peripheral devices or USB devices. If so, you are advised to remove them to avoid any electromagnetic interference contributing to the error. Follow as instructed.
1. Firstly, unplug all external USB devices connected to your computer.

2. Then, disconnect the webcam devices, printer, and other peripherals and leave the most extremely necessary devices connected.
Check if you have fixed the 0x800f0831 error.
Also Read: Fix Windows Update Error 0x800704c7
Method 3: Set Proper Date & Time Settings
Incorrect date and time settings in your computer may contribute to 0x800f0831 Windows 10 21h1 error on Windows PC. To sync the date, region, and time settings in your Windows 10 computer, follow the below-listed instructions.
1. Press the Windows + I keys together to open Windows Settings.
2. Now, select Time & Language setting.

3. Next, in the Date & time tab, ensure the two values Set the time automatically and Set the time zone automatically options are toggled on.

4. Then, click on Sync now as highlighted above. Check if you can have attained 0x800f0831 fix.
Method 4: Run Windows Update Troubleshooter
If there are any bugs and problems in your computer, you cannot update your Windows PC. Windows built-in troubleshooter helps you fix network connectivity issues, corrupt registry keys, and corrupt Windows components contributing to 0x800f0831 Windows 10 21h1 error can also be fixed by this tool. Follow the steps instructed in our guide How to Run Windows Update Troubleshooter.

Perform as demonstrated and thereby resolve the problems identified by the troubleshooter.
Also Read: How to Fix Windows Update Error 80072ee2
Method 5: Reset Windows Update Components
An effective way to fix 0x800f0831 Windows 10 21h1 is resetting Windows update components if no other options have helped you. All the Windows update files are stored on your computer and if it is corrupt or incompatible, you must face several frustrating problems. To fix the corrupt Windows Update components in your computer, follow our guide on How to Reset Windows Update Components on Windows 10.

This simple process involves running a set of commands in the command prompt so that all the essential Windows services are restarted on your Windows 10 PC. After executing all the commands, check if you can install Cumulative Updates.
Method 6: Restart Essential Windows Services
Some essential Windows services like Windows Update and Background Intelligent Transfer services must be enabled on your computer to avoid error code 0x800f0831 21h1. The Background Intelligent Transfer services use available bandwidth to install any latest updates so that your computer installs any update only if there is no other installation in progress. If these services are disabled in your system, you are more likely to face the discussed error. Hence, restart essential Windows services as instructed below.
1. Hit the Windows key, type Services, and click on Run as administrator.

2. Now, scroll down and double-click on Background Intelligent Transfer Service.

3. Now, select Startup type to Automatic, as depicted.
Note: If the Service status is Stopped, then click on the Start button. If the Service status is Running, click on Stop and Start it again.

4. Click on Apply > OK to save the changes. Check if you can attain 0x800f0831 21h1 fix.
5. Repeat all these steps for other Windows services like Cryptographic, MSI Installer, and Windows Update Services.
Also Read: 7 Ways to Fix iaStorA.sys BSOD Error on Windows 10
Method 7: Delete Software Distribution Folder
If you have ensured Windows Update services are running and still face update errors in Windows 10, then there is another simple workaround to fix update problems. Firstly, stop the Windows Update service and delete the Software Distribution folder in your File Explorer. Then again start Windows Update services. Follow as instructed below.
1. Launch the Services window as an administrator as you did in Method 4.
2. Now, scroll down the screen and right-click on Windows Update.

3A. If the Status is not set to Running, skip to Step 5.
3B. If the Status is Running, click on Stop as shown.

4. Wait for 2 to 3 seconds on the prompt screen, Windows is attempting to stop the following service on Local Computer…

5. Now, open File Explorer by clicking Windows + E keys simultaneously. Now, navigate to the following path.
C:\Windows\SoftwareDistribution\DataStore
6. Now, select and right-click on all the files and folders and click on Delete option.

7. Similarly, navigate to the path, and Delete all the files and folders.
C:\Windows\SoftwareDistribution\Download

8. Again, switch to Services window and right-click on the Windows Update, and select the Start option.

9. Wait for 3 to 5 seconds in the prompt, Windows is attempting to start the following service on Local Computer…

Finally, you have restarted your Windows Update services thereby deleting the contents in the Software Distribution folder. Check if you can 0x800f0831 fix.
Method 8: Uninstall Recent Updates
Any previous incompatible updates in your Windows 10 PC might not allow new updates to be downloaded in it. Hence, you are advised to uninstall the recent updates that are being installed on your computer to 0x800f0831 fix. It is very easy to do the task and the steps are demonstrated as follows.
1. Hit the Windows key and type Control Panel, then click on Open.

2. Set View by > Category, then click on Uninstall a program option under the Programs menu as depicted.

3. Now, click on View installed updates in the left pane as shown.

4. Next, search and select the most recent update by referring to Installed On the date and clicking on Uninstall option as shown below.

5. Finally, confirm any prompt and restart your computer.
Check if you can fix the discussed update error on Windows 10.
Also Read: How to Delete Win Setup Files in Windows 10
Method 9: Extend System Partition
If there is insufficient space in the system partition, you cannot install any new updates on your Windows 10 PC. There are several other ways to increase the memory space of your computer, but they may not help you all the time. You must extend the system reserved partition to fix 0x800f0831 Windows 10 20h2 error. Although there are many third-party tools to increase the system reserved partition, we prefer manually doing it by following our guide How to Extend System Drive Partition (C:) in Windows 10.

Once you have extended your system partition, check if you have fixed the issue.
Method 10: Clear Storage Space
If your PC does not have any drive space to install any new applications from Microsoft Store, you will face the discussed error code. Hence, firstly check the drive space and clean the temporary files if necessary.
Step I: Check Drive Space
To check the drive space in your Windows 10 PC, follow the below-mentioned steps.
1. Press the Windows + E keys together to open File Explorer.
2. Now, click on This PC from the left screen.
3. Check the disk space under Devices and drivers as shown. If they are in red, consider clearing the temporary files.

Step II: Clear Temporary Files
If there is minimum available space in your computer contributing to update error 0x800f0831, follow our guide 10 Ways to Free Up Hard Disk Space on Windows that helps you clear all unnecessary files in your computer.

Finally, if you can attain 0x800f0831 fix.
Also Read: Fix Windows 10 Update Error 0x80072ee7
Method 11: Manually Install Updates
If all other solutions in this guide fail to work for you, still you can manually download the required update. The Windows 10 update history webpage has all history of updates released for your Windows computer. Follow the below-listed instructions to install the updates forcefully.
1. Hit the Windows + I keys simultaneously to open Settings in your system.
2. Now, click on Update & Security.

3. Now, select the View update history option as highlighted below.

4. In the list, make sure the KB number is pending to be downloaded due to conflicting errors.
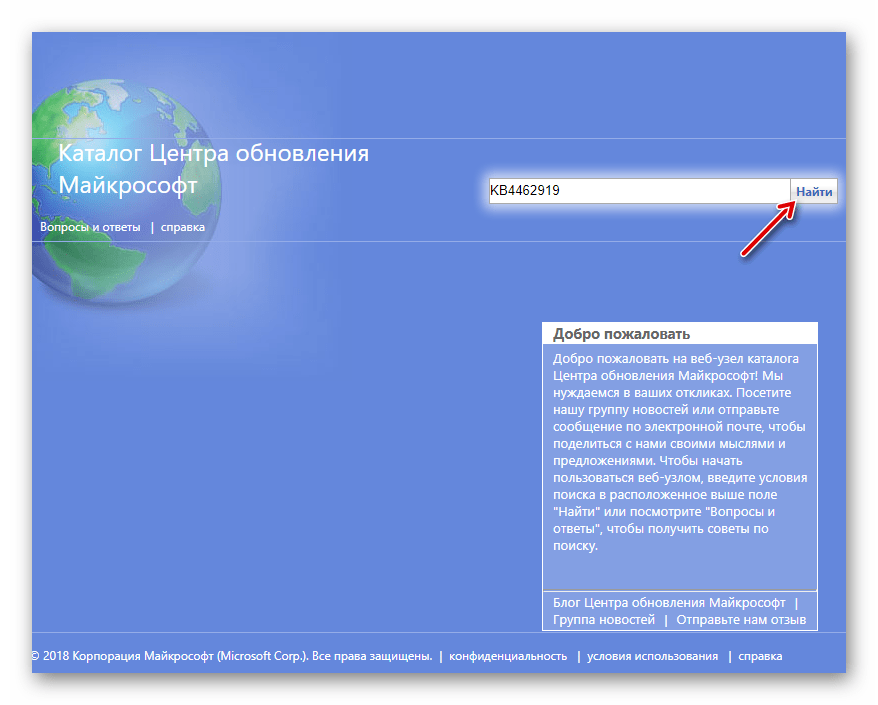
5. Here, type the KB number in the Microsoft Update Catalog search bar.

6. Finally, click on Download corresponding to your latest update and follow the on-screen instructions to complete the process.

Method 12: Update via Media Creation Tool
If you cannot install the update manually, you can try installing it using the Media Creation Tool. This is the official download platform recommended by Microsoft to fix any update errors in your Windows 10 PC. Follow the below-mentioned steps to do the same.
1. Open any browser and launch the official download page of the Media Creation tool.
2. Now, click on the Download tool now button under Create Windows 10 installation media.

3. Run the setup file and click on Yes in the User Account Control (UAC) prompt if any.
4. Now, click on Accept button in the Windows 10 Setup window as shown.

5. Wait for the scanning process to be complete and select the Upgrade this PC now option and then click on Next button.

6. Wait until the Windows ISO is downloaded to your PC and click on Accept.
Note: You have to wait until all the pending updates in your computer are installed on your PC so the Media Creation Tool can update your Operating System to the most recent version.
7. Finally, click on Install to complete the process.
Also Read: How to Fix Windows Update 0x80070057 Error
Method 13: Tweak Windows Registry
Next, you are advised to clean the Windows Registry path corresponding to the Windows update download path to fix the discussed error code. You must always be careful in handling the Windows registry, else you may end up losing your files. Follow the below-mentioned steps to tweak registry keys thereby fixing the discussed error.
1. Go to search menu and type Registry editor. Then, click on Run as administrator.

2. Now, go to the following path into the Registry Editor.
HKEY_LOCAL_MACHINE\SOFTWARE\Policies\Microsoft\Windows\WindowsUpdate

3. In the right pane, search for WUServer and WIStatusServer.
3A. If you cannot find them, you cannot remove the Windows update download path. Move ahead to the next troubleshooting method.
3B. If you can find the entries, right-click on them and click on Delete.

4. Finally, restart your computer and check if you have attained 0x800f0831 21h1 fix.
Method 14: Perform System Restore
If you are not satisfied with any of these methods, then the only option left is to restore your computer to its previous version. To do so, follow our guide on How to use System Restore on Windows 10 and implement the instructions as demonstrated. In the end, your computer will be restored to a previous state where it does not face any errors at all.

After restoring your Windows 10 PC, check if can attain 0x800f0831 21h1 fix.
Also Read: Fix Windows Update Error Code 0x80070017
Method 15: Reset PC
If your computer deals with severe corrupt Windows components, an efficient way to clean all these corrupt components and boot your data is to repair install PC as instructed in our guide How to Reset Windows 10 Without Losing Data. Follow as instructed in this article and at the end, you would have fixed the 0x800f0831 21h1 update error.

Recommended:
- Fix Corsair Scimitar Side Buttons Not Working
- Fix Error Applying Transforms in Windows 10
- Fix Error Code 0x80d0000a in Windows 10
- Fix Windows 10 Update Error 0xc1900204
We hope the guide was useful and you were able to attain Windows 10 Update error 0x800f0831 21h1 fix. Let us know what you want to learn about next. Feel free to reach out to us with your queries and suggestions via the comments section below.
When you’re trying to install a new Windows cumulative update, error code 0x800f0831 may sometimes pop up on the screen. This error indicates your computer could not access Microsoft’s Update servers or the update services stopped working. Restart your computer and check if the error persists. If it does, follow the steps below to fix the problem.
Contents
- 1 How Do I Fix Windows Upgrade Error 0x800f0831?
- 1.1 Check Your Connection
- 1.2 Run the Update Troubleshooter
- 1.3 Restart the Update Services
- 1.4 Manually Install the Updates
- 1.5 Conclusion
How Do I Fix Windows Upgrade Error 0x800f0831?
Check Your Connection
Unplug your router and wait for two minutes to get rid of flea power. Meanwhile, restart your computer. Then plug the router back in and wait until your computer goes back online. Make sure to disconnect all the other devices using the connection. If you’re on Wi-Fi, temporarily switch to a cable connection if that’s possible.
Run the Update Troubleshooter
The Update troubleshooter can automatically detect and fix the issues that are causing error code 0x800f0831.
- Go to Settings, and select Update and Security.
- Click on the Troubleshoot option in the left-hand pane.
- Then select Show additional troubleshooters.
- Launch the Update troubleshooter and let it scan and fix your system.
- Check for updates again.
Restart the Update Services
You can quickly restart the Windows Update services via Command Prompt. This will help you establish a new connection to Microsoft’s Update servers.
- Press the Windows and X keys, and select Command Prompt (Admin).
- Then run the commands below one by one. Hit Enter after each command and wait until CMD finishes running the current command before entering a new one:
net stop bitsnet stop wuauservnet stop appidsvcnet stop cryptsvcDel "%ALLUSERSPROFILE%\Application Data\Microsoft\Network\Downloader\*.*"rmdir %systemroot%\SoftwareDistribution /S /Qrmdir %systemroot%\system32\catroot2 /S /Qnet start bitsnet start wuauservnet start appidsvcnet start cryptsvc
Additionally, scan and repair your disk with the help of the commands below:
dism.exe /Online /Cleanup-image /Restorehealthsfc /scannow
Restart your computer and check for updates again.
Manually Install the Updates
Alternatively, you can install the stubborn updates manually using Microsoft’s Update Catalog website. Close all the unnecessary programs, and open a new browser tab. Then go to Microsoft’s Update Catalog and enter the update’s KB number in the search field. Hit the Download button and check if your computer can install the update.
Conclusion
If error code 0x800f0831 prevents you from installing the latest Windows updates on your computer, restart your router and computer. If the issue persists, manually download the updates from Microsoft’s Update Catalog webpage, and check if your machine can install them. Additionally, run the Update Troubleshooter, and restart the Update Services. If you found other ways to fix Windows Update error 0x800f0831, feel free to share your ideas in the comments below.
The error code 0x800f0831 can usually be traced back to a faulty connection to Windows update servers. Since it’s hard to determine specific causes for the error right away, it helps to have various solutions and see which one works. We explain how error 0x800f0831 can be fixed in Windows 10 and 11 with Windows repair tools, the update troubleshooter and the DISM and SFC tools.
When does the error code 0x800f0831 appear?
Although updates for Windows are usually automatic, you may still sometimes encounter error codes such as 0x80072f8f, 0x800705b4, or 0xc0000005. An error code that you will also encounter frequently during updates is 0x800f0831. The code indicates a problem with the connection to Windows servers, resulting in blocked updates. Since updates are important to keep your Windows system secure, you should address the problem as soon as possible.
Vulnerabilities can occur due to updates and other Windows errors. Protect yourself from cyberthreats with MyDefender from IONOS. It comes with ransomware protection, virus scanning and automatic backups.
Solutions for error 0x800f0831
The following solutions are possible when error 0x800f0831 occurs:
Troubleshoot 0x800f0831 using the Windows update troubleshooter
An obvious and often successful solution is the Windows Troubleshooter tool.
- Access the troubleshooter from the Windows task bar.
- Go to Additional troubleshooters (Windows 10) or to Other troubleshooters (Windows 11).
- Click on Windows Update and on Run to perform troubleshooting for the selected update component.
- Now follow the Windows correction suggestions and restart your PC.
Reset update components
If the troubleshooter does not work, it may help to manually reset the operating system’s update components:
- Open the command prompt with administrator rights by pressing [Ctrl] + [R], typing
cmdand confirming with [Ctrl] + [Shift] + [Enter]. - Disable the Windows Update components one after the other with the following CMD commands. Confirm each command with [Enter]:
net stop wuauserv
net stop cryptSvc
net stop bits
net stop msiserver
ren C:\\Windows\\SoftwareDistribution SoftwareDistribution.old
ren C:\\Windows\\System32\\catroot2 Catroot2.old
bash
- Afterwards, activate each component manually with the following commands:
net start wuauserv
net start cryptSvc
net start bits
net start msiserver
bash
- Restart your computer.
Use Windows tools SFC and DISM
Another reason for the 0x800f0831 Windows update error can be damaged Windows system files. Windows provides the SFC (System File Checker) and DISM (Deployment Image Servicing and Management) tools to repair or reset the files.
- Open the command prompt again with [Ctrl] + [R], enter the command
cmdand confirm with [Ctrl] + [Shift] + [Enter]. - Now enter the command
sfc /scannowand press [Enter]. - After the scan is complete, restart your computer.
- If Windows does not find any corrupted system files, start the command prompt again, enter the following commands one after the other and confirm each of them by clicking on [Enter]:
DISM.exe /Online /Cleanup-image /Scanhealth
DISM.exe /Online /Cleanup-image /Checkhealth
DISM.exe /Online /Cleanup-image /Restorehealth
bash
- Restart the computer and check if the error is still there.
Install the update manually
If the installation of the update in question still fails, you can download it directly from the Microsoft Update Catalog.
- Visit the Microsoft Update Catalog.
- Search for the KB number to find the correct update. You can determine this by going to Update & Security (Windows 10) or Windows Update (Windows 11) and then Update history. There you will find all successful or failed updates with the corresponding KB number.
- Enter the KB number in the Microsoft Update Catalog in the search field and click Search.
- Click on Download next to the correct update, extract the downloaded file with a double click and select where you want to save it.
- Once the file is unzipped, double-click to install it.
Click here for important legal
disclaimers.