
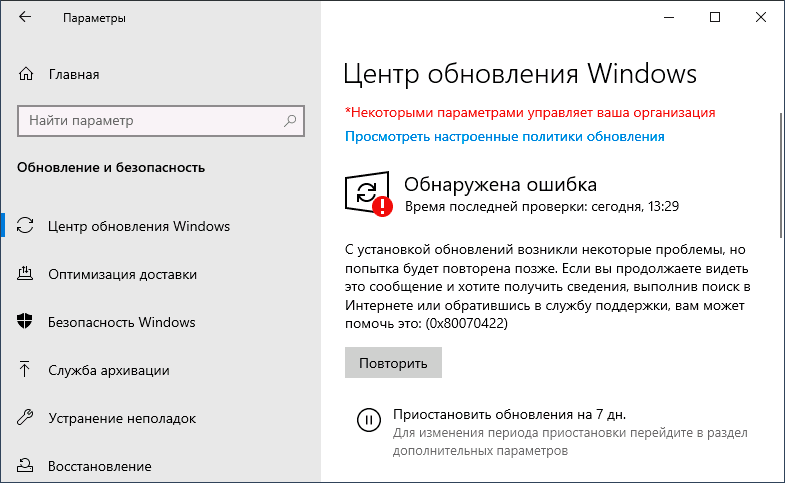
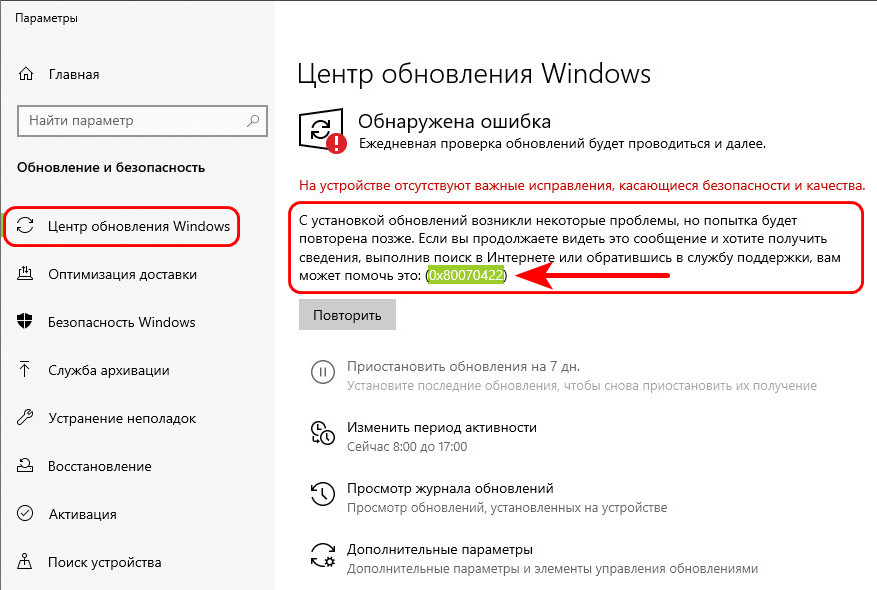
При установке обновлений в Windows 10, а также некоторых компонентов системы вы можете столкнуться с ошибкой 0x80070422 и сообщением «С установкой обновлений возникли некоторые проблемы, но попытка будет повторена позже» либо «Установщик обнаружил ошибку 0x80070422».
В этой инструкции подробно о том, как исправить ошибку 0x80070422 в центре обновлений Windows 10, а также при использовании автономного установщика обновлений или попытке установить компоненты системы.
Исправление ошибки 0x80070422
В большинстве случаев рассматриваемая ошибка при установке обновлений Windows 10 бывает вызвана отключенными службами, необходимыми для такой установки. Причем эти службы требуются не только для использования центра обновлений, но и для их установки в виде автономных установщиков. Решение в данном случае обычно состоит из следующих шагов:
- Нажмите клавиши Win+R на клавиатуре (Win — клавиша с эмблемой Windows), введите services.msc и нажмите Enter.
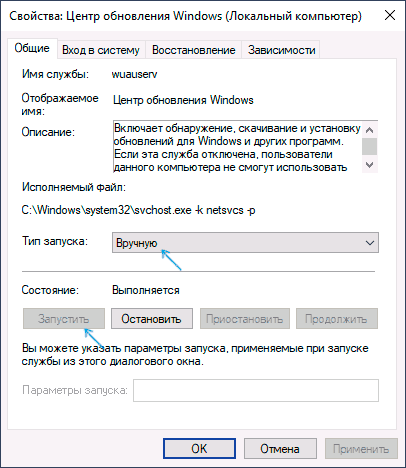
- В открывшемся списке служб найдите службу «Центр обновления Windows» и дважды нажмите по ней.
- Если в поле «Тип запуска» установлено «Отключено», установите «Вручную» или «Автоматически», нажмите «Запустить», примените настройки. Если изменить тип запуска нельзя (поле неактивно), далее будет описан дополнительный метод. Если кнопка «Запустить» не активна, то по завершении всех действий просто перезагрузите компьютер.

- Повторите то же самое для «Фоновая интеллектуальная служба передачи (BITS)».
После этого попробуйте повторить установку обновления или компонента Windows 10 и проверить, сохранилась ли ошибка 0x80070422. Если при запуске служб вы видите ошибку о том, что не удалось запустить дочернюю службу, об этом здесь: Как исправить ошибку «Не удалось запустить дочернюю службу».
Если на 3-м шаге вы не можете изменить тип запуска, сделать то же самое можно в редакторе реестра:
- Нажмите клавиши Win+R, введите regedit и нажмите Enter.
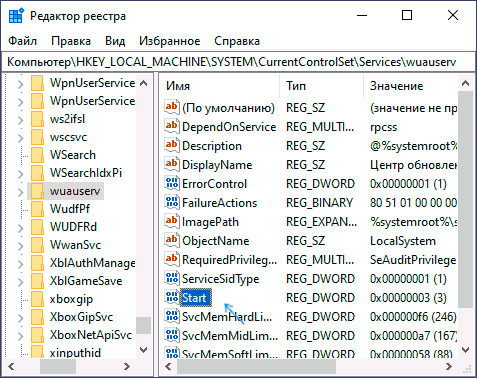
- Перейдите к разделу реестра
HKEY_LOCAL_MACHINE\SYSTEM\CurrentControlSet\Services\wuauserv
- В правой панели редактора реестра дважды нажмите по параметру Start и задайте значение 2 для него.

- Повторите то же самое для раздела
HKEY_LOCAL_MACHINE\SYSTEM\CurrentControlSet\Services\BITS
- Выполните перезагрузку компьютера.
По завершении, опять же проверьте, была ли решена проблема.
Дополнительная информация
Некоторые дополнительные сведения, которые могут помочь при решении проблемы с ошибкой 0x80070422:
- В случае, если на компьютере используются какие-то средства для оптимизации или блокировки функций Windows 10, они могут вызывать такую ошибку.
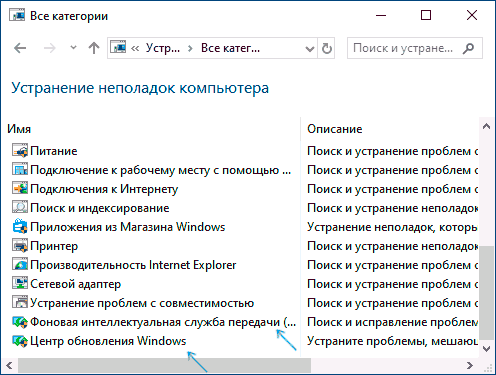
- Дли исправления можно попробовать использовать встроенные средства устранения неполадок Windows 10, а именно «Панель управления» — «Устранение неполадок» — «Просмотр всех категорий», где следует выбрать пункты «Фоновая интеллектуальная служба передачи (BITS)» и «Центр обновления Windows».

- Если вы используете сторонние программы управления обновлениями Windows 10, они также могут вызывать проблему.
- Если на компьютере остались точки восстановления Windows 10 на дату, предшествующую появлению ошибки, попробуйте использовать их.
При установке обновлений, а особенно обновлений таких сложных разработок, как операционная система, часто происходят всевозможные сбои. И далеко не все из них связаны с низким качеством самого апдейта. Вот и пользователи Windows при установке очередного обновления время от времени сталкиваются с угрожающей надписью «ошибка 0x80070422», после которой обновление прерывается.
Впрочем, этот тип ошибки можно «поймать» не только при апдейте через Центр обновлений, но и во время обычной установки компонентов Windows, запуске Защитника Windows или из-за отключенного брандмауэра. Рассказываем, что это за ошибка, и как ее исправить.
Содержание
- Если ошибка Windows 0x80070422 возникает при обновлении
- Ошибка появляется при запуске Защитника Windows
- Ошибка возникает из-за брандмауэра
- Доверимся средству устранения неполадок Windows?
- Если ничего не помогает
- Итоги
Если ошибка Windows 0x80070422 возникает при обновлении
Чаще всего такая ошибка при обновлении операционной системы возникает из-за отключения служб, отвечающих за установку апдейта. Соответственно, и исправить ее можно, включив нужные службы.
- Нажмите сочетание клавиш Win+R, введите команду services.msc и нажмите Enter.
- В появившемся окне найдите службу «Центр обновления Windows» и дважды кликните по ней левой кнопкой мыши.
- В поле «Тип запуска» выберите «Автоматически» или «Вручную», нажмите кнопку «Запустить» и сохраните изменения кнопкой «Применить».
- Нажмите «ОК» и закройте открытые диалоговые окна, после чего попробуйте повторить установку компонента, который вызвал код ошибки 0x80070422.
Чаще всего этого окажется достаточно, ошибка исчезнет. Если же этого не произошло, еще раз запустите services.msc через окно «Выполнить», найдите в списке служб «Фоновая интеллектуальная служба передачи (BITS)» и повторите те же действия, которые вы совершили при работе со службой Центра обновления Windows.
- Читайте нас там, где вам удобно: 🔹 Телеграм 🔹 Дзен 🔹 Вконтакте
Правда, тут есть один нюанс. В некоторых случаях система просто не даст изменить тип запуска служб через окно графического интерфейса. И здесь вам потребуется немного поработать с редактором реестра.
- Нажмите сочетание клавиш Win+R, введите команду regedit и нажмите Enter.
- В открывшемся редакторе реестра найдите ветку HKEY_LOCAL_MACHINE\SYSTEM\CurrentControlSet\Services\wuauserv.
- Найдите в правой части окна параметр Start и два раза кликните по нему левой кнопкой мыши.
- Поменяйте значение параметра на 2 и нажмите «ОК».
- Откройте ветку HKEY_LOCAL_MACHINE\SYSTEM\CurrentControlSet\Services\BITS и повторите эту же процедуру для параметра Start.
- Закройте редактор реестра и перезагрузите компьютер.
После этого вновь попробуйте установить обновление, вызвавшее ошибку 0x80070422. Скорее всего, проблема будет решена.
Ошибка появляется при запуске Защитника Windows
Бывает и так, что ошибка 0x80070422 в Windows 10 появляется и при запуске Защитника, как исправить ее в этом случае? Здесь нам, опять же, поможет команда services.msc. Выполните ее, как было указано в примерах выше. После этого:
- найдите там пункт «Служба антивирусной программы Microsoft Defender» и дважды щелкните по нему левой кнопкой мыши;
- в поле «Тип запуска» выберите «Автоматический» и нажмите кнопку «Запустить»;
- сохраните изменения с помощью кнопки «Применить» и нажмите «ОК».
Ошибка возникает из-за брандмауэра
Еще одна причина появления ошибки 0x80070422 в Windows 10 может возникать не из-за обновления или неработающей антивирусной защиты, а «благодаря» брандмауэру. А точнее отключенному брандмауэру.
Дело в том, что некоторые пользователи слабых компьютеров считают, что брандмауэр излишне нагружает и без того не самое производительное «железо» и банально отключают его. Говорить о том, что таким образом резко ухудшается качество защиты компьютера в рамках сегодняшней статьи вряд ли стоит. Да это и без того очевидно. Но мало кто знает, что отключенный брандмауэр также может стать причиной появления ошибки 0x80070422. В общем, включить его все-таки придется.
- Откройте Пуск -> Панель управления.
- Найдите там пункт Система и безопасность -> Брандмауэр Защитника Windows.
- В левой части окна выберите пункт «Включение и выключение брандмауэра Защитника Windows».
- Установите флажок в положение «Включить брандмауэр Защитника Windows» как для частной, так и для общественной сети.
- Нажмите «ОК» и закройте открытые окна.
Доверимся средству устранения неполадок Windows?
Многие пользователи не слишком верят в возможности средства устранения неполадок Windows, но и оно может принести пользу. Не стоит обходить его стороной и в нашем случае.
- Откройте Пуск -> Панель управления -> Устранение неполадок.
- Откройте раздел «Просмотр всех категорий» в левой части окна.
- Найдите пункт «Центр обновления Windows» в самом конце списка.
- Нажмите «Далее» и дождитесь завершения процедуры анализа неполадок.
- Повторите эти действия для пункта «Фоновая интеллектуальная служба передачи (BITS)».
Если ничего не помогает
Если вы испробовали все вышеописанные способы, а ошибка никуда не исчезла, обратите внимание на то, как вы выполняете обновление системы. Если для этого используется сторонний софт, именно он и может стать причиной появления ошибки 0x80070422. В этом случае попробуйте оказаться от такого ПО и попробовать выполнить обновление с помощью встроенных средств самой Windows.
Кроме того, хорошим способом решения проблемы станет откат до предыдущей работоспособной версии системы. Правда, сработает это только при наличии точки восстановления Windows 10 или 11 на тот момент, когда такой ошибки не возникало.
Итоги
В сегодняшней статье мы разобрали, что означает код 0x80070422, и выяснили, как исправить эту ошибку Windows в зависимости от того, когда она появляется. А возникать она может как при обновлении операционной системы, так и при выключенных брандмауэре и защитнике Windows. В большинстве же случаев ее появление связано с отключением некоторых служб. Ну а для решения проблемы обычно достаточно включить их обратно.
Читайте также
- Как сбросить ноутбук до заводских настроек
- Ошибка 0x80070057: простые способы решения проблемы
Windows error code 0x80070422 is a common problem that Windows users may encounter when updating their operating system. It usually occurs when the windows update service is not running properly or is hindered by a third-party antivirus or firewall system. Moreover, it can be frustrating when suddenly an error appears stating that you may not be able to install new updates or security patches.
However, there are several potential fixes that you can try to resolve the issue, from enabling the windows update manager to checking your date and time and from disabling IPv6 to running the system file manager. It is advised to back up your data before applying the fixes to protect it from data loss. This article will briefly explain 8 such solutions with easy-to-follow steps so you can get over this error.
| Workable Solutions | Step-by-step Troubleshooting |
|---|---|
| Restart Your PC | Save any open files and close all applications. Click the «Start» menu and the «Power» icon…Full steps |
| Enable the Update Service | Open the Run box by pressing the «Windows» +» R» keys on your keyboard…Full steps |
| Check Your Date and Time | Open the Windows Settings app by clicking the Start menu and selecting…Full steps |
| Disable IPv6 | The first step is opening the dialogue box by pressing the «Windows + R» keys…Full steps |
| Other Workable Solutions | Run Windows Update Troubleshooter > Run System File Checker…Full steps |
What Is Windows Update Error 0x80070422
Are you wondering what is windows update error 0x80070422? You are at the right place! Microsoft regularly releases updates for its Windows operating system. The reason is to keep windows users up to date with the latest advancements. Besides this, it also ensures that users are protected from the latest security threats and that their systems are running at optimal performance levels.
However, users have experienced bizarre errors while updating their windows. One such error is windows error code 0x80070422. This error typically indicates that the windows update service is not running or is blocked by third-party software. Resultantly, you are refrained from using the latest features and are also vulnerable to malicious threats. If you also face this issue, this article will help you fix this error with simple methods.
What Causes the Windows Update Error 0x80070422
Are you looking for the reasons why you receive windows update error 0x80070422? Worry no more! This section will help you find some of the most common causes that result in this abnormality:
Windows Update service not running or disabled: One possible cause of the error is that the Windows update service is not working/running or has been disabled. This can occur if the service has been turned off or blocked by third-party software, preventing you from downloading and installing updates.
Problem with the Windows Registry: Another common cause of the error is a problem with the Windows Registry, which can occur if a key or value related to the Windows Update service has been corrupted or deleted.
Network issues: The error can also be caused by network issues, such as a slow or unstable internet connection, which can prevent your system from communicating with Microsoft servers and downloading the necessary updates
Third-party software: A firewall or antivirus software may also cause problems with network communication, leading to the error.
How to Recover Data Without Windows 10 (Bonus Tip)
Do you want to avoid losing your data before applying the fixes? We have a solution for you! It is important to have reliable data recovery software on hand. EaseUS Data Recovery Wizard is a powerful and easy-to-use tool that can restore deleted, lost, or formatted files from your Windows 11/10/8/7 system.
With a user-friendly interface and a range of features, this hard drive recovery software is an ideal solution for recovering important data quickly and easily. It supports every file type from various storage devices, such as photos, documents, and other media. In short, it is a handy tool you must download on your PC to save yourself from the unforeseen event of data loss.
To get benefit from this immaculate tool, follow the steps mentioned below:
Note: To guarantee a high data recovery chance, install EaseUS data recovery software on another disk instead of the original disk where you lost files.
Step 1. Launch EaseUS Data Recovery Wizard on your Windows 11, Windows 10, Windows 8, or Windows 7 computer. Select the disk partition or storage location where you lost data and click «Search for Lost Data».

Step 2. This recovery software will start scanning the disk to find all lost and deleted files. When the scan process completes, click «Filter» > «Type» to specify lost file types. If you remember the file name, you can also search in the search box, which is the fastest way to find the target file.

Step 3. Preview and restore lost Windows files. You can double-click to preview the scanned files. Then, select the target data and click the «Recover» button to save them to another safe spot in the PC or Cloud drive.

8 Best Ways to Fix Windows 10 Update Error 0x80070422
Looking for solutions to fix windows 10 update error 0x80070422? Do not worry! This section will help you keep your system up to date with the latest Windows updates without the error code 0x80070422.
Some users might get their error resolved with just one fix, while others may require following a couple of fixes. So, without any further delay, let us look into the solutions:
Fix 1. Restart Your PC to Fix Error Code 0x80070422
Looking for an easy solution to help overcome the windows update error prompt? This fix is for you! Restarting your computer is an efficient way to fix many software and hardware-related bugs and glitches. To restart your PC, follow the steps below:
Step 1. Save any open files and close all applications.
Step 2. Click the «Start» menu and the «Power» icon.
Step 3. Click «Restart» from the power options menu.
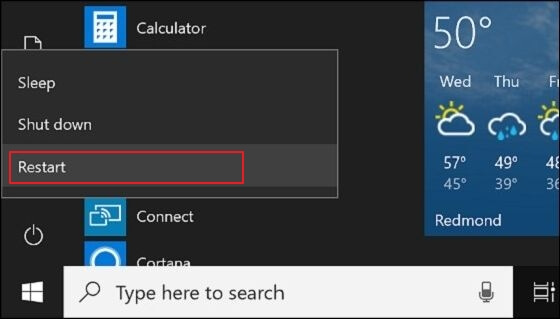
Step 4. Wait for your PC to shut down and restart. This may take a few minutes.
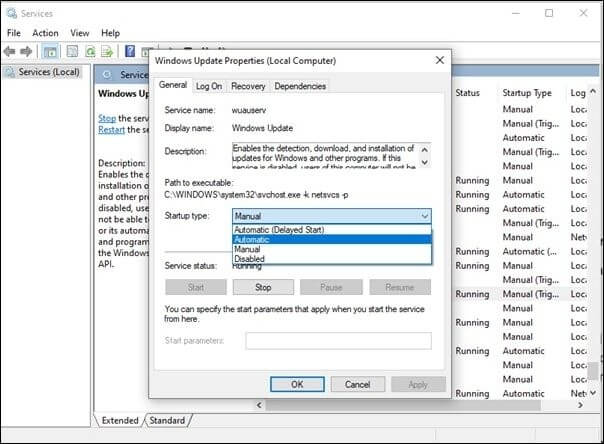
Fix 2. Enable the Windows Update Service
Are you looking for another way to overcome this error? One possible reason behind windows not updating could be that the Windows update service is disabled. Enabling this service can help fix this and ensure that your computer is equipped with the latest security patches and bug fixes. If you can’t update Windows, follow this guide to force update Windows 10.
Step 1. Open the Run box by pressing the «Windows» +» R» keys on your keyboard.
Step 2. Type services.msc into the Run box and press Enter to open the Services window.
Step 3. Scroll down to the «Windows Update» service, right-click on it, and select «Properties.»
Step 4. In the Windows Update Properties window, set the Startup type to «Automatic» and click the «Start» button to let the service start automatically.
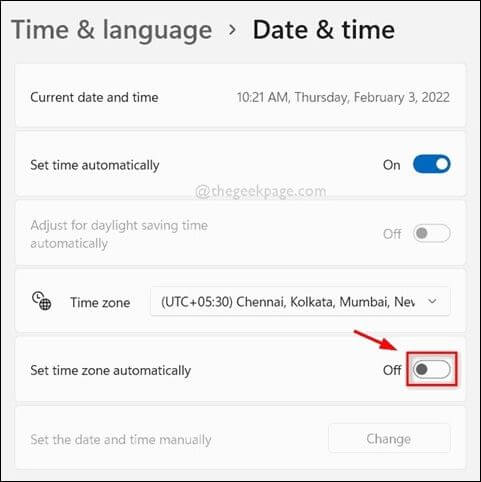
Fix 3. Check Your Date and Time to Fix Error Code 0x80070422
Plenty of Windows errors occur only due to incorrect dates and times. Thus, Setting your device’s date and time automatically can help you fix error code 0x80070422. It is a simple process and is explained below:
Step 1. Open the Windows Settings app by clicking the Start menu and selecting the Gear icon.
Step 2. Click «Time & Language» and select «Date & Time» from the left sidebar.
Step 3. Toggle on the «Set time automatically» and «Set time zone automatically» options if they are not already enabled.
Fix 4. Disable IPv6 to Fix Error Code 0x80070422
Is the issue still not resolved? Do not panic! Another potential fix for the Windows 10 update error 0x80070422 is to disable IPv6. It stands for Internet Protocol version 6, the successor to IPv4 and the current Internet Protocol version that most networks still use. However, sometimes it disrupts the windows update. Here are the steps to disable IPv6:
Step 1. The first step is opening the dialogue box by pressing the «Windows + R» keys on your keyboard.
Step 2. Type ncpa.cpl into the Run box and press Enter to open the Network Connections window.
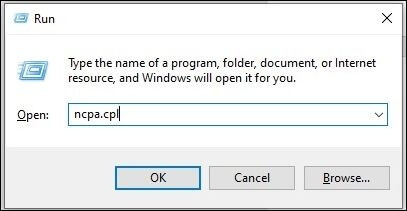
Step 3. Right-click on your active network connection and select «Properties».
Step 4. In the Properties window, scroll down to find «Internet Protocol Version 6 (TCP/IPv6)» and uncheck the box next to it. Then, click «OK» to save the changes.
Fix 5. Run Windows Update Troubleshooter to Fix Error 0x80070422
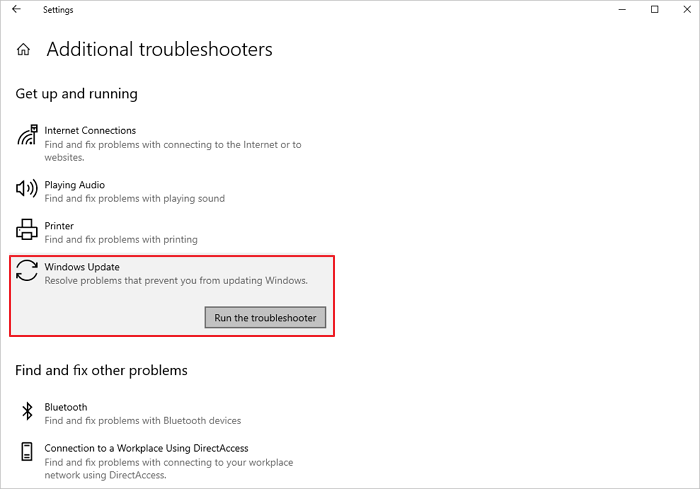
The Windows Update Troubleshooter is a built-in tool in Windows that scans your system for issues preventing updates from being installed and then provides suggested solutions for any problems it finds. To run this tool, follow the steps mentioned below:
Step 1. Press the «Windows key + I» to open the Settings app.
Step 2. Click «Update & Security» and select «Troubleshoot» from the left-hand menu.
Step 3. Scroll down and click «Windows Update» under the «Get up and running» section.
Step 4. Click on the «Run the troubleshooter» button and wait for the tool to complete its scan.
Fix 6. Run System File Checker (SFC) And DISM to Fix Code 0x80070422
SFC (System File Checker) is a built-in Windows utility that checks and repairs system files. DISM (Deployment Image Servicing and Management) is a command-line tool used to service and prepare Windows images, including those used for Windows deployment, recovery, and more. These built-in tools can scan your system for corrupt or missing system files and replace them with healthy copies. Here are the steps to run SFC and DISM:
Step 1. Press the «Windows key + X» and select «Command Prompt (Admin)» or «Windows PowerShell (Admin)» from the menu.
Step 2. In the command prompt or PowerShell window, type sfc /scannow and press Enter. The SFC tool will scan your system for any corrupted files and replace them if necessary.
Step 3. After the SFC tool completes its scan, type DISM /Online /Cleanup-Image /RestoreHealth and press Enter. The DISM tool will check for any corrupted system files that were not fixed by SFC and replace them if necessary.
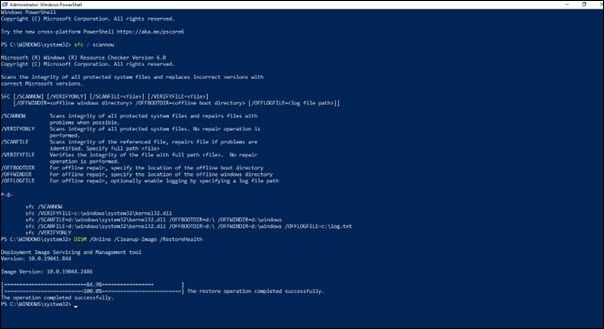
Step 4. Please wait for the DISM tool to complete its scan and fix any issues. Restart your PC after it is done.
Fix 7. Fix Code 0x80070422 by Restarting Other Services
In Windows, a service is a background process that runs independently of the user and is usually responsible for system-level operations or functionalities. Services are designed to run automatically at startup and can be started, stopped, or restarted. Sometimes restarting these services helps to overcome this update error, and you can do it as well by following the easy steps given below:
Step 1. Press the «Windows key + R» to open the Run dialog box, type «services.msc», and hit Enter.
Step 2. In the Services window, scroll down and locate the following services: «Background Intelligent Transfer Service (BITS),» «Cryptographic Service,» and «Windows Update.»
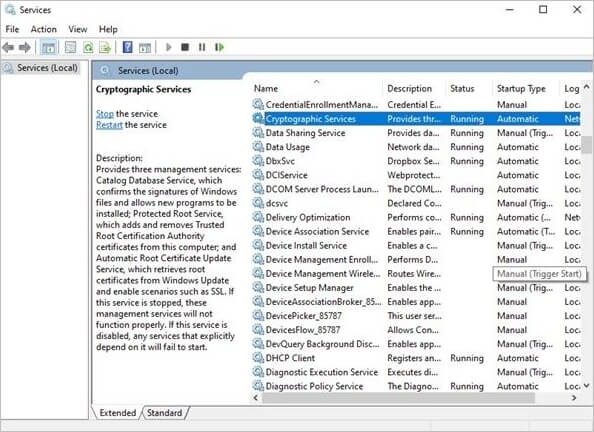
Step 3. Right-click each service and select «Restart» from the context menu. If the service is not running, select «Start» instead.
Step 4. Once all three services have been restarted, close the Services window and try running Windows Update again.
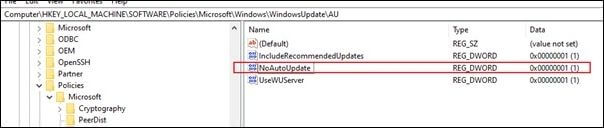
Fix 8. Check a Few Registry Values to Fix
The Windows Registry is a hierarchical database that stores configuration settings and options on Microsoft Windows operating systems. The Registry Editor is a tool that allows users to view and edit the Windows Registry. Checking some registry values mentioned below can help you fix this issue:
Step 1. Press the «Windows key + R» to open the Run dialog box.
Step 2. Type regedit and hit Enter to open the Registry Editor.
Step 3. Navigate to the following key:
HKEY_LOCAL_MACHINE\SOFTWARE\Policies\Microsoft\Windows\WindowsUpdate\AU
Step 4. Check if the values «NoAutoUpdate» and «AUOptions» exist. Suppose they do not, right-click on the right panel and choose «New > DWORD (32-bit) Value» to create them. Set the value of «NoAutoUpdate» to 0 and «AUOptions» to 5.
Watch this video to learn how to fix Windows 10 update error 0x80070422. The presenter has provided step-by-step instructions on performing several fixes, including running the Windows Update troubleshooter, resetting Windows Update components, and more.
- 0:11: Go to the services.
- 0:33: Select three services from them.
- 0:46: Locate windows event collector.
- 1:00: Change its startup type to automatic
- 1:16: Locate Windows event log
Conclusion
The Windows update error code 0x80070422 can be caused by several factors, such as disabled services, network configuration issues, or corrupted system files. However, it is possible to fix this issue, which this article proved by providing eight effective solutions with easy-to-follow steps.
The user should choose the solution that best fits his situation, considering factors such as technical skills, available time, and the cause of the error. It is recommended to use EaseUS free data recovery software as a precaution if you encounter data loss during the update process or any other time to recover lost or deleted files easily.
Error Code 0x80070422 FAQs
Are you still ambiguous? Do not worry! This section will help you get answers to some commonly asked questions mentioned below:
1. What does error 0x80070422 mean?
Error 0x80070422 is a Windows Update error code and is prompted due to the failure of the windows update service to start itself. This error can prevent windows from downloading and installing important updates, leaving the system vulnerable to security risks and stability issues.
2. How do I fix a Windows Update that won’t update?
You can try several solutions to fix Windows 10 won’t update, such as checking your internet connection and restarting the windows update service. Besides this, running the windows update troubleshooter and clearing the windows update cache can also be tried to fix this issue. If you want detailed instructions on resolving windows update issues, click here.
3. Is there a way to force a Windows Update?
Yes, there is a way to force Windows 11 to update on a PC. To do this, read the easy and quick steps in this article. Once all the steps are performed, windows should begin checking for updates and installing them if they are available. It is important to note that forcing an update can sometimes cause issues or errors, so it is a good idea to ensure your important files are backed up before attempting this.
4. Why is my system update not updating?
If your system update is not updating, there may be various reasons behind it, including:
- slow or unstable internet connection
- need for more storage space.
- third-party software interference
- useless or corrupted system files
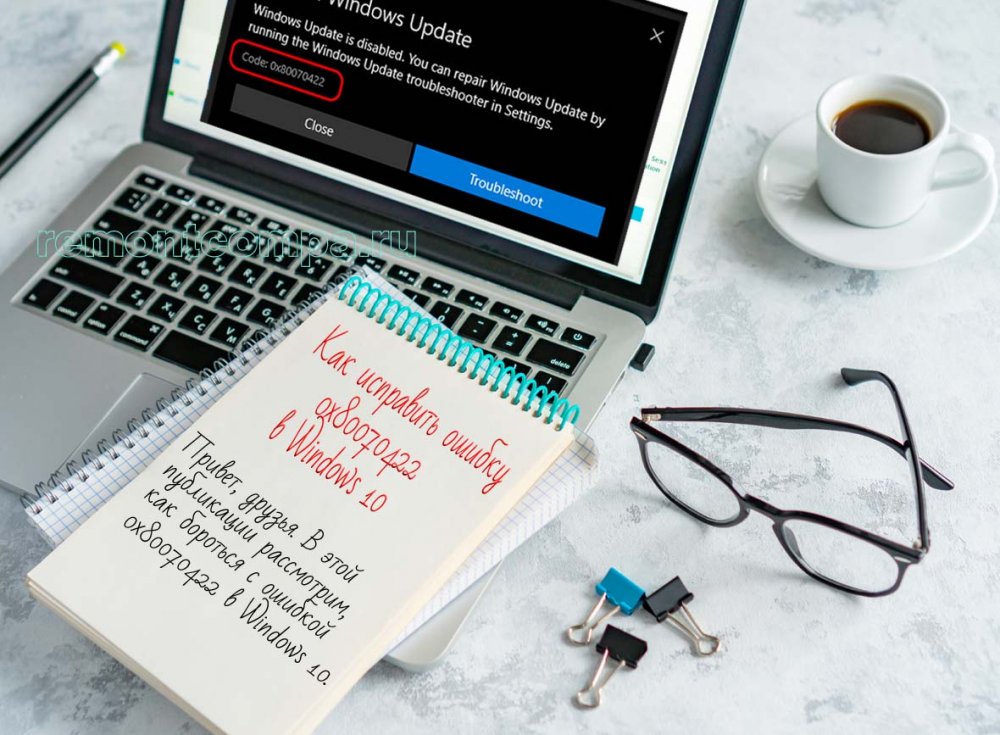
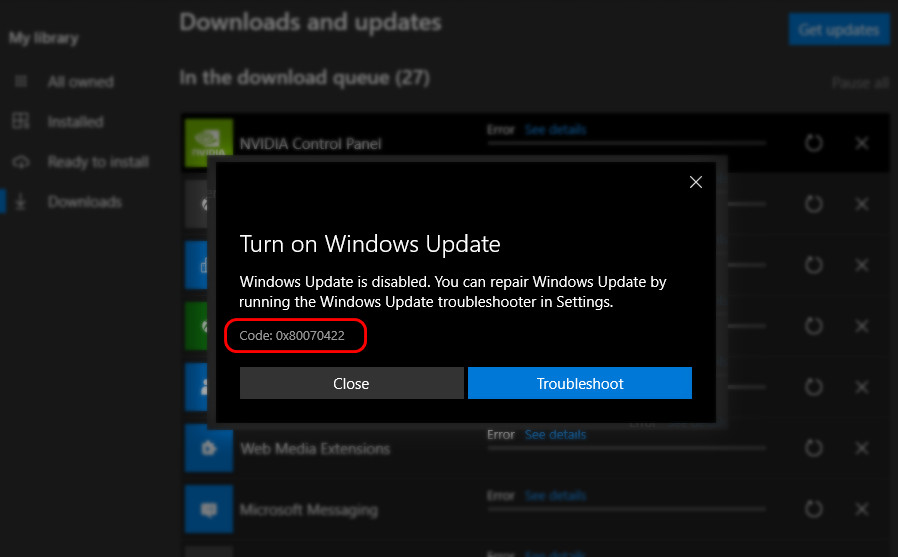
Привет, друзья. В этой публикации рассмотрим, как бороться с ошибкой 0x80070422 в Windows 10. Код этой ошибки может фигурировать при возникновении разных проблем с актуальной операционной системой от Microsoft. Это системные обновления Windows 10, скачивание и обновление контента из Microsoft Store, работа системного брандмауэра, работа функционала архивации Windows и прочие. Ошибку 0x80070422 могут провоцировать разные причины и, соответственно, разные действия могут помочь устранить эти причины. Давайте посмотрим, что можно предпринять для устранения ошибки 0x80070422 в Windows 10.
Итак, друзья, ошибка 0x80070422. Может возникать в процессе обновления Windows 10.
В процессе работы с Windows Store.
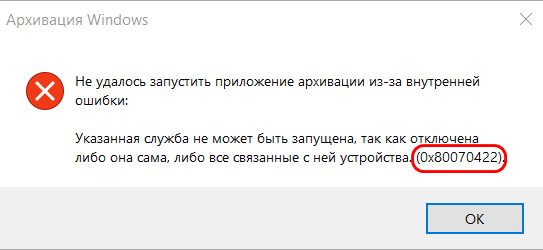
При создании архивов Windows и восстановлении к ним.
Как бороться с этой ошибкой, если у вас нет свежих или вообще хоть каких-нибудь точки восстановления или системного бэкапа, чтобы решить проблему откатом к состоянию системы, когда этой проблемы не наблюдалось?
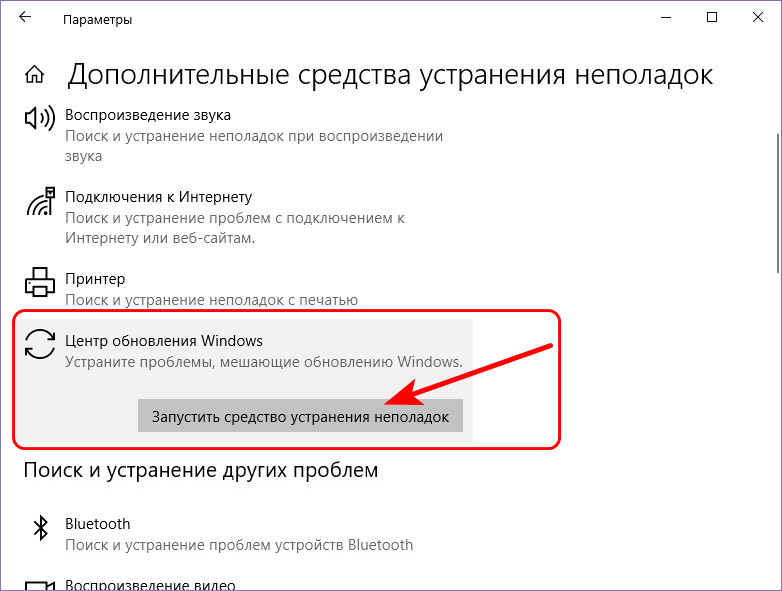
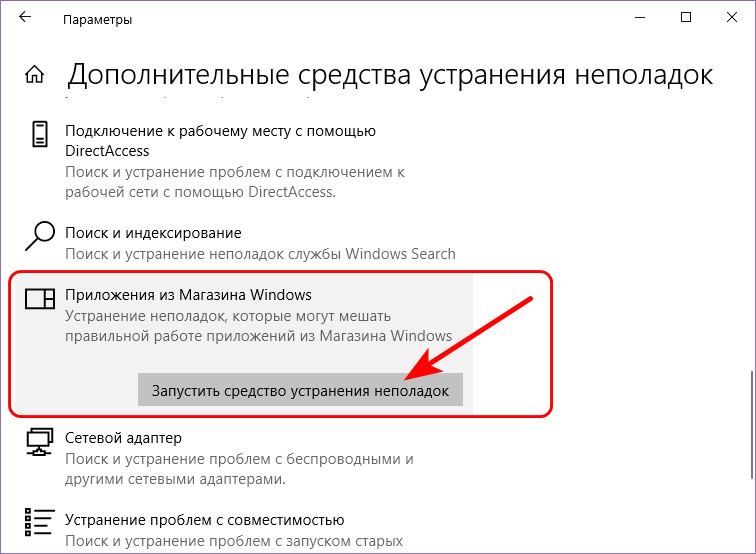
Друзья, если у вас ошибка 0x80070422 при системных обновлениях, загрузке или обновлении контента с Microsoft Store, воспользуйтесь средством устранения неполадок Windows 10. Это средство просканирует системные службы и прочий функционал, необходимый для корректной работы центра обновления и Microsoft Store, и само включит всё необходимое. В системном приложении «Параметры» идём по пути «Обновление и безопасность > Устранение неполадок». Кликаем «Дополнительные средства устранения неполадок».
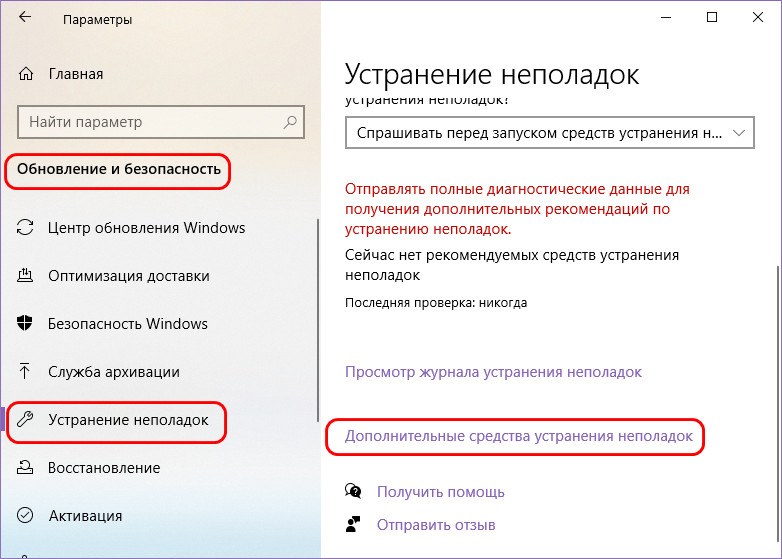
Если у вас проблемы в центре обновления Windows 10, запускаем, соответственно, средство устранения неполадок для центра.
А если проблемы с магазином Microsoft Store — запускаем средство устранения неполадок для магазина.
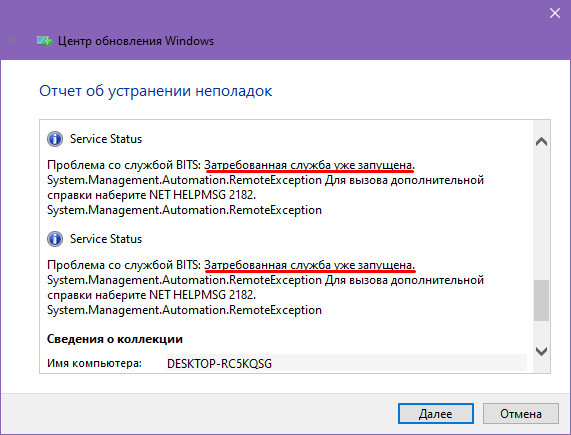
Запустится диагностика проблем, по её итогу будем видеть, что проблемы обнаружены, и средство устранения неполадок эти проблемы якобы решило. Что за проблемы у нас были, можем посмотреть в дополнительных сведениях диагностики.
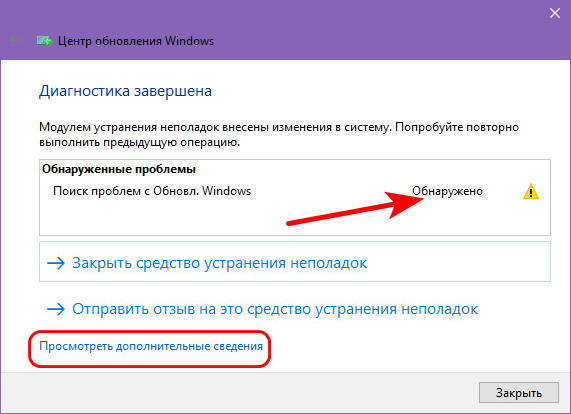
Ну вот в нашем случае, например, были проблемы со службой, необходимой для работы центра обновления Windows 10, и теперь эта служба запущена.
Если же средство устранения неполадок Windows 10 не помогло, идём далее.
Если вам не помогло средство устранения неполадок, а также если ошибка 0x80070422 у вас появляется при пользовании функционалом архивации Windows 10, возможно, причина кроется повреждении системных файлов, отвечающих как раз таки за работу этих функций. Попробуйте восстановить целостность системных файлов.
Иногда ошибка 0x80070422 в работе центра обновления Windows 10 возникает из-за настроек стороннего антивируса или файервола. Надо отключить на время антивирус или файервол и попробовать запустить системные обновления. Ну и если что, разбираться уже тогда с настройками антивируса или файервола.
Ошибку 0x80070422, возникающую при системных обновлениях Windows, может помочь устранить очистка от хлама. Друзья, речь не идёт об обычной очистке диска С, хотя, возможно, и она не будет лишней. Так, центр обновления не будет корректно работать в условиях нехватки места на диске С, ему попросту негде будет хранить файлы установки обновлений. Если не знаете, как чистить диск С, статья «Очистка диска в Windows 10» вам в помощь. Но в контексте рассмотрения ошибки 0x80070422 мы будем чистить несколько иной тип хлама.
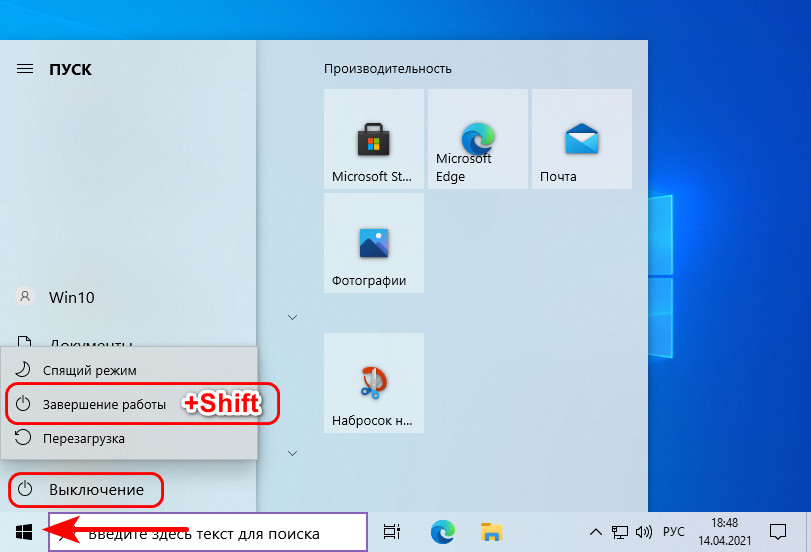
Попробуйте для начала перезапустить компьютер без функции быстрого запуска Windows 10, это очистит оперативную память вашего компьютера от скопившегося хлама. Сделайте полное выключение компьютера – удерживая зажатой клавишу Shift, завершите работу.
А потом включите компьютер.
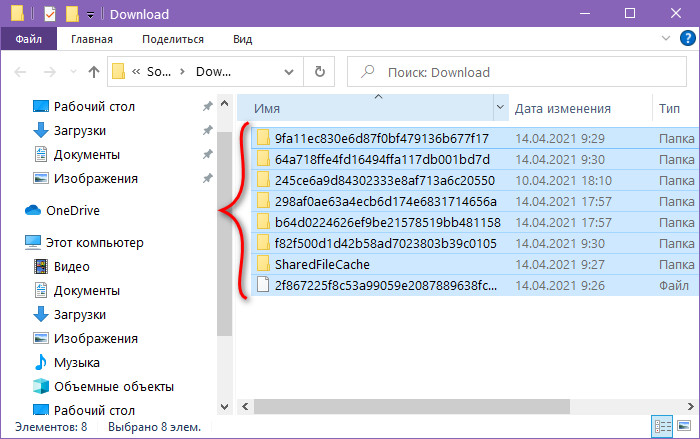
И ещё попробуйте очистить папку хранения установочных файлов обновлений. Идём по пути:
C:\Windows\SoftwareDistribution\Download
И удаляем всё содержимое папки SoftwareDistribution (содержимое, но не саму папку).
Если у вас проблемы с Microsoft Store, попробуйте очистить кэш магазина. Закройте магазин, если он открыт. Клавишами Wi+R запустите диалоговое окно «Выполнить», введите команду:
Эта команда, собственно, и очищает кэш магазина Microsoft Store. Далее появится пустое тёмное окно, связанное с работой этой команды.

Не закрываем его, дожидаемся, пока оно закроется само и откроется магазин. Это будет уже очищенный магазин.
Друзья, универсальная причина многих проблем с компьютером – вирусы. Их действие в операционной системе может причинять разные проблемы с симптоматикой в виде разного сбоя функционала Windows 10. Если ничего из перечисленного выше не помогает, проверьте компьютер на вирусы. А затем повторно выполните восстановление целостности системных файлов по отсылке в третьем пункте этой статьи.
Ошибка 0x80070422 может быть следствием применения в Windows 10 утилит-твикеров, блокирующих системные обновления и прочие функции. Средства устранения неполадок часто не могут исправить изменения, внесённые твикерами. В таком случае желательно решить проблему с помощью обратного действия того же твикера, который и проводил вмешательство в системный функционал. Ну и, соответственно, для этого необходимо установить, что за твикеры применялись на компьютере.
Если ничего из перечисленного не помогает, друзья, пробуйте загрузиться в режиме чистой загрузки Windows 10 и порешать свои дела в этом режиме.