
Ошибка 0x80070006 — довольно старая проблема, которая начала появляется у пользователей Windows 10 еще со времен установки этой операционной системы, т.е. пару лет назад.
К счастью, баг был исправлен и люди могут устанавливать свои «десятки» без получения данной ошибки. В противоположность только что сказанному, ошибка 0x80070006 все еще может появляться у многих пользователей во время поиска обновлений или попыткой их установки.
В обычном случае, ошибки Центра обновлений Windows возникают из-за некорректной работы служб этого сервиса или из-за антивирусного программного обеспечения. Как раз исправлением этого мы сейчас и займемся.
Заметка: некоторые люди уведомляют, что ошибка 0x80070006 отбирает у них возможность загружать приложения через Windows Store и сохранять их на карты Micro SD, установленные в Windows Phone. Если ваша ситуация обстоит именно так, то попробуйте сохранить их на внутреннее хранилище. Большинству людей с этим багом помогает именно этот шаг.
Решения для ошибки 0x80070006
Метод №1 Запуск Поиска и исправления проблем для Центра обновления Windows
- Нажмите комбинацию клавиш Win+X и выберите пункт «Панель управления».
- Выберите «Просмотра — Категории».
- Под пунктом «Система и безопасность», нажмите на «Поиск и исправление проблем».
- Затем нажмите на ссылку «Устранение неполадок с помощью Центра обновления Windows».
Дождитесь окончания процесса исправления проблем, а затем проверьте наличие ошибки 0x80070006 в Центре обновления Windows.
Метод №2 Отключение Антивируса и проверка настроек Брандмауэра Windows
Антивирусное программное обеспечение, особенно то, которое является разработкой сторонних разработчиков, довольно часто создает конфликты с внутренними программами Windows, что приводит к невозможности загрузок обновления с Центра обновления Windows. В связи с этим, мы рекомендуем вам временно отключить ваш Антивирус и проверить корректность настроек Брандмауэра Windows.
- Нажмите комбинацию клавиш Win+R, впишите Firewall.cpl и нажмите Enter.
- Выберите опцию «Включение или отключение брандмауэра Windows».
- Выставьте следующие настройки:
- «Параметры для частной сети — Отключить брандмауэр Windows(не рекомендуется)»
- «Параметры для общественной сети — Отключить брандмауэр Windows(не рекомендуется)»
- Затем нажмите «ОК» и проверьте наличие ошибки 0x80070006 в Центре обновления Windows.
Метод №3 Сброс компонентов Центра обновления Windows
Мы рекомендуем вам создать бэкап своего Реестра Windows, прежде чем выполнять следующие действия:
- Нажмите правой кнопкой мыши на «Пуск» и выберите «Командная строка(администратор)».
- Введите следующие команды для приостановки служб BITS, Центра обновления Windows, Криптографии, Установщика Windows:
- net stop bits
- net stop wuauserv
- net stop appidsvc
- net stop cryptsvc
- Затем впишите команду Del “%ALLUSERSPROFILE%\Application Data\Microsoft\Network\Downloader\qmgr* и нажмите Enter.
- После введения предыдущей команды, введите cd /d %windir%\system32 и нажмите Enter.
- Теперь вам нужно выполнить повторную регистрацию файлов Центра обновления и BITS. Вписывайте следующие команды и нажимайте Enter после каждой из них:
- regsvr32.exe atl.dll
- regsvr32.exe urlmon.dll
- regsvr32.exe mshtml.dll
- regsvr32.exe shdocvw.dll
- regsvr32.exe browseui.dll
- regsvr32.exe jscript.dll
- regsvr32.exe vbscript.dll
- regsvr32.exe scrrun.dll
- regsvr32.exe msxml.dll
- regsvr32.exe msxml3.dll
- regsvr32.exe msxml6.dll
- regsvr32.exe actxprxy.dll
- regsvr32.exe softpub.dll
- regsvr32.exe wintrust.dll
- regsvr32.exe dssenh.dll
- regsvr32.exe rsaenh.dll
- regsvr32.exe gpkcsp.dll
- regsvr32.exe sccbase.dll
- regsvr32.exe slbcsp.dll
- regsvr32.exe cryptdlg.dll
- regsvr32.exe oleaut32.dll
- regsvr32.exe ole32.dll
- regsvr32.exe shell32.dll
- regsvr32.exe initpki.dll
- regsvr32.exe wuapi.dll
- regsvr32.exe wuaueng.dll
- regsvr32.exe wuaueng1.dll
- regsvr32.exe wucltui.dll
- regsvr32.exe wups.dll
- regsvr32.exe wups2.dll
- regsvr32.exe wuweb.dll
- regsvr32.exe qmgr.dll
- regsvr32.exe qmgrprxy.dll
- regsvr32.exe wucltux.dll
- regsvr32.exe muweb.dll
- regsvr32.exe wuwebv.dll
- Теперь вам нужно сбросить каталог Winsock. Впишите команду netsh winsock reset, а затем команду netsh winhttp reset proxy.
- И напоследок, вам нужно заново запустить службы BITS, Центра обновления Windows, Криптографии, Установщика Windows:
- net start bits
- net start wuauserv
- net start appidsvc
- net start cryptsvc
После этих многочисленных операций в Командной строке, проверьте, были ли наконец-то исправлена ошибка 0x80070006, которая беспокоила вас во время установки обновлений в Центре обновления Windows.
,
This tutorial contains instructions to fix the following Windows 10 installation error: «Windows cannot install required files. Network problems may be preventing Windows from accessing the file. Error code: 0x80070006»

The Windows setup problem «Windows cannot install required files. Network problems may be preventing Windows from accessing the file» appears at the first phase of Windows 10 installation (from a USB drive) and the full error message was: «The installation was canceled. Any changes made to your computer won’t be saved» followed by the message «Windows cannot install required files. Network problems may be preventing Windows from accessing the file. Make sure the computer is connected to the network and restart the installation. Error code: 0x80070006.»
How To FIX Windows 10 Setup Error 0x80070006: Network problems may be preventing Windows from accessing the file. Error: 0x80070006
Method 1. Install Windows from DVD.
Method 2. Use a different USB Port.
Method 3. Create a Windows 10 USB Media for Legacy (MBR) System.
Method 1. Install Windows from DVD.
I write this solution first, because in most cases, the Windows installation errors (problems) don’t appear when the installation is performed from a DVD installation media. So, proceed and by using the Media Creation Tool, download and burn Windows 10 to a DVD media and then install Windows from that DVD media. *
* Note: If you don’t have a DVD device on your system, then create a new USB bootable media by using another USB flash drive (to make sure that the drive is not damaged).
Method 2. Use a different USB Port.
The second solution to bypass the «Windows cannot install required files. Network problems may be preventing Windows from accessing the file» during Windows 10 Setup, is to plug the USB Media on another USB port and better on a USB v2.0 port (if your PC has a USB v.2.0 port).
Method 3. Create a Windows 10 USB Media for Legacy (MBR) System.
Step 1. Download Windows 10 in ISO format.
1. Download and run the Media Creation Tool.
2. Accept the license agreement when prompted.
3. Choose Create installation media (USB, DVD or ISO) for another PC.
4. At the next screen, uncheck the «Use the recommended options for this PC» option and select the desired Windows 10 version & language to download. When done, click Next.

Select
5. Click ISO file and click Next.

6. Save the ‘Windows.iso’ file to your computer.
7. Now wait until the download is completed.
Step 2. Download Rufus Utility.
1. Go to the official Rufus download page and download the latest version of RUFUS USB Bootable Creator Utility.
Step 3. Create a Windows 10 installation media using RUFUS.
1. Remove all USB storage drives from your computer and plug an EMPTY* USB stick (minimum 4GB) to an empty USB port.
* Attention: DO NOT leave your files on the USB stick, because all files will be erased during this operation.
2. Now double-click to run “rufus” application.
3. At Rufus application, apply the following settings:
1. Choose the empty USB stick that you plugged in your computer.
2. Click Select and choose the «Windows.iso» image you have downloaded at step-1.
3. At Partition scheme, choose: MBR
4. At Target system, choose: BIOS (or UEFI-CSM)
5. At Volume label, you can enter any volume name for the USB disk (e.g. «Win10»)
6. At File system, choose: NTFS.
7. At Cluster size, leave the default size: 4096 bytes.
8. Finally click Start.

4. Then click OK at the warning message.

5. Wait until RUFUS creates the USB installation media.
6. When done, use the created USB drive, to install Windows. *
* Note: If you cannot boot from the USB drive, then:
1. Enter BIOS (CMOS) Setup settings.
2. Set the Boot configuration Mode to Legacy.
3. Disable the Secure Boot.
4. Set as First boot device the USB flash drive.
5. Save and exit from BIOS Setup.
That’s it! Let me know if this guide has helped you by leaving your comment about which method is worked for you. Please like and share this guide to help others.
If this article was useful for you, please consider supporting us by making a donation. Even $1 can a make a huge difference for us in our effort to continue to help others while keeping this site free:
- Author
- Recent Posts
Konstantinos is the founder and administrator of Wintips.org. Since 1995 he works and provides IT support as a computer and network expert to individuals and large companies. He is specialized in solving problems related to Windows or other Microsoft products (Windows Server, Office, Microsoft 365, etc.).
When Windows 10 was released, people began upgrading to the new Operating System en masse. Unfortunately, the Windows 10 upgrade produced an array of errors. Windows users faced numerous recorded errors while trying to upgrade to Windows 10. One of the most common errors encountered by Windows users attempting to upgrade was error 0x80070006 – 0x2000C. This error was accompanied by a message stating, “We couldn’t install Windows 10. We’ve returned your PC to the state it was in just before we began the Windows 10 installation. The installation failed in the SAFE_OS phase, with an error during the APPLY_IMAGE operation: 0x80070006-0x2000c.
However, if you are trying to upgrade to Windows 10 and are being greeted with error 0x80070006 – 0x2000C, you should not fret. Fortunately, there are some solutions that have proven to be successful at eliminating this error. The following are the three solutions that you can use to try to fix the error 0x80070006 – 0x2000C when trying to install Windows 10.
Solution 1: Delete all previous System Restore Points and create a new one,
If you are using Windows 7, open the Start Menu, right-click on ‘Computer,’ then click on ‘Properties’. If you are using Windows 8, move the cursor to the bottom-left corner of your screen, right-click on ‘Metro Preview’ when it opens, and then click on ‘System’. Alternatively, if you are using Windows 8.1, right-click on the Start button in the bottom left corner of your screen, and then click on ‘System’.
Click on ‘Advanced System Settings,’ which is located on the left. Navigate to ‘System Protection.’
Click on ‘Configure’, then ‘Delete’ at the bottom. Confirm the action by clicking ‘Continue’ in the pop-up. This will successfully delete all your previously created System Restore and Shadow Copy points.
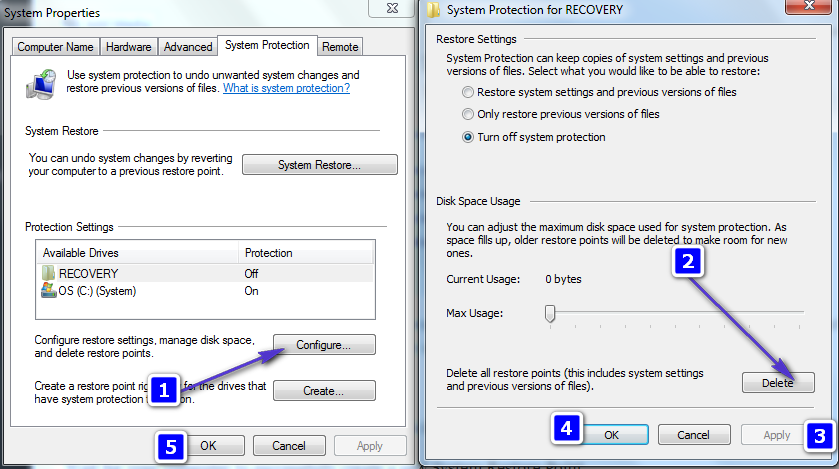
Return to the System Protection tab, then click on ‘name your new system restore point’, and subsequently, select ‘Create’. At this point, you should name the restore point. After doing so, click ‘OK’ and wait for your computer to successfully create a new system restore point.
“Now try upgrading to Windows 10.
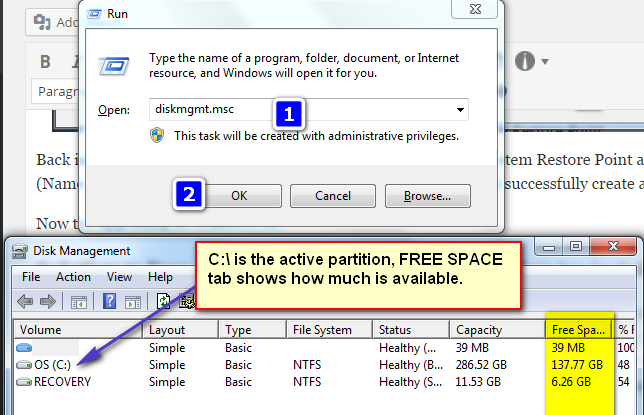
Solution 2: Free up space on your hard drive and then try installing Windows 10
In some cases, the Windows 10 upgrade process fails and produces error 0x80070006 – 0x2000C due to a lack of disk space. If this is the case, freeing up some space on your hard drive (roughly 25-50 gigabytes) should solve the issue, ensuring that your next attempt to upgrade your computer to Windows 10 is successful. You can check the disk space on the active partition by holding the Windows key and pressing R, then typing diskmgmt.msc in the run dialog.
Solution 3: Disconnect all hardware and devices and then try again
Last, but certainly not the least, another solution to error 0x80070006 – 0x2000C that has worked for many people is to disconnect all hardware and USB devices (except for the mouse and the keyboard) from the computer and then try upgrading to Windows 10.
Hardware and USB devices such as printers, scanners, speakers and headphones should definitely be removed from the computer. Also make sure that you update all antivirus and firewall programs and system drivers to their latest versions to increase your chances of getting rid of error 0x80070006 – 0x2000C.
Completing all the aforementioned tasks before upgrading to Windows 10 should ensure a successful upgrade.
Kevin Arrows
Kevin Arrows is a highly experienced and knowledgeable technology specialist with over a decade of industry experience. He holds a Microsoft Certified Technology Specialist (MCTS) certification and has a deep passion for staying up-to-date on the latest tech developments. Kevin has written extensively on a wide range of tech-related topics, showcasing his expertise and knowledge in areas such as software development, cybersecurity, and cloud computing. His contributions to the tech field have been widely recognized and respected by his peers, and he is highly regarded for his ability to explain complex technical concepts in a clear and concise manner.
The error code 0x80070006 is quite a general error and may appear while updating Windows, opening Microsoft Store, or sometimes when you are entering your PIN. As each process differs from others quite certainly, you can’t apply the solutions in general. Instead, what you can do is go to a particular section where you are facing difficulty and apply the available fixes.
As of now, we are aware of three different types of this error code and they are as follows –
- PIN isn’t available, code: 0x80070006
- Windows Update Error 0x80070006
- Microsoft Store Error 0x80070006
Check where your problem lies, reach out to the most probable section out there, and apply the enlisted solutions. I hope you are able to resolve this error code on Windows 11 or 10 PC.

PIN isn’t available, Error code: 0x80070006
Several users reported this problem when they were trying to log into their PC using their PINs. The system forces them to use their passwords again and again. Even in cases where you reset your PIN, the error code returns. When it occurs, you may get the following error message –
Something went wrong and your PIN isn’t available (code: 0x80070006)
To overcome this issue, you may apply the below fixes and check if they help in addressing this problem. The known fixes to this problem are as follows.
1] Delete the NGC folder
Several users reported that they were able to solve this error code simply by deleting the NGC folder. So, try this as your first workaround and see if this works in your case as well. Here’s how to perform this task –
- Press Win + E to launch File Explorer and navigate to the below path –
C:\Windows\ServiceProfiles\LocalService\AppData\Local\Microsoft\
- Reaching out to the LocalService in the above path is easy as the patch is clearly visible. However, beyond that, you can’t find any relevant terms as all of them are hidden. Unhide them first, and reach out to the Microsoft folder.
- When you are there, locate and select NGC. Press the delete button next.
- Restart your PC and check if the problem resolves after the next login.
Note:
- To unhide a folder, go to View > Show on File Explorer and select Hidden items. All hidden files and folders will start displaying on the display screen.
- Deleting NGC: NGC is basically a system built-in app, so you can’t delete this folder normally. You need to first take ownership of this folder and then delete it.
2] Remove third-party antivirus
As you are not able to log into your device even after resetting your PIN, this is not a PIN-related issue. This must be occurring due to some third-party apps running in the background like antivirus. Check the same over Task Manager and locate the ones that are consuming huge spaces and RAM. Right-click on each one of them and hit End task.
If there is an external security app running on your device like Kaspersky or Avast, uninstall or at least disable them temporarily. Reboot your PC and check if the PIN starts working.
3] Run SFC/DISM tools
Due to the presence of an interacting software, the system files or folders may also become corrupted. If that’s the case, you must repair them using the System File Checker Utility program. Here’s how to do this –
- Launch CMD as administrator.
- On the elevated console, type the following and press Enter –
sfc /scannow

- Usually, this takes 10-15 minutes to find and repair the underlying causes, so wait patiently.
- After the SFC scan completes, execute the DISM health restore code. The code is provided below –
DISM /Online /Cleanup-Image /RestoreHealth
Just like SFC, DISM will also take 10-15 minutes to find and repair any corruption inside your System Image. Once this is over, restart your PC and check if the problem resolves.
As stated above, the error code 0x80070006 also appears when you are trying to update Windows or install pending updates on your computer. In case you are getting this error code while installing Windows updates, consider applying the below fixes in the same order as they were put in.
1] Run Windows Update Troubleshooter
The first solution to this problem is via troubleshooting Windows Update. Doing this will force the system to find the actual culprits and auto-correct them. Here’s how to run this utility program in Windows 11 –
- Launch Settings (Win + I), and reach out to the below path –
System (left navigation) > Troubleshoot (right pane) > Other troubleshooters
- Under Most frequent, you may find Windows Update.
- Click the Run button available on it and wait while the troubleshooting completes.

- You might need to press Next and follow some other instructions in the subsequent window. Do the same and the error 0x80070006 will resolve in no time.
Windows 10 users can’t troubleshoot Windows Update by following the above guide. Instead, they can follow their old ways to troubleshoot update-related issues and have this problem resolved. For the sake of our user’s convenience, we are putting the old steps below –
- Go to Settings > Update & Security first.
- Click Troubleshoot on the left navigation and select Additional troubleshooters.
- The system will redirect you to the troubleshooting window.
- Locate Windows Update under the section – “Most frequent”, and click on it.
- When it expands, hit the button – Run the troubleshooter.

- Click Next on the upcoming troubleshooting window and follow the on-screen instructions,
By the time, this tool finishes doing the troubleshooting, the error 0x80070006 will definitely resolve. If not, you may follow the next set of solutions.
2] Reset Windows Update Components
Troubleshooting Windows Update doesn’t work only when there is some corruption inside the Update Components. This means disabling and then re-enabling update-related services and purging the two cache folders on Windows 11 or 10 PC. The two folders that require cleaning are as follows –
- SoftwareDistribution: C:\Windows\
- Catroot2: C:\Windows\System32\
Make a note that you can’t simply go to the above destinations and delete all the contents inside SoftwareDistribution or Catroot2. Before you do so, you must ensure disabling all update services. Re-enable them only when you have purged the above-said folders. Here’s a quick guide on how to reset the Update components in Windows 11/10.
3] Manually install pending updates
If for any reason, the update error 0x80070006 is still persisting, you may go for the manual method. In this, you need to visit the Microsoft Update Catalog site and search for the update that is continuously failing on your PC.
When the searched-in query pops up, choose your setup file based on your system architecture and hit the Download button next to it. Click the top link on the subsequent window, and the standalone package (.msu file format) will start downloading. Once the download completes, you may double-click on the setup file to begin its installation. Here’s a quick guide on how to download and install pending updates manually on the following versions of Windows –
- Windows 11
- Windows 10
Microsoft Store Error 0x80070006
This error may also appear when you are trying to open Microsoft Store or installing apps from it. Sometimes, this may occur when you are upgrading the existing apps on Windows Store. To overcome this error in Windows 11/10, go through the below solutions and apply them –
1] Run Windows Store Apps troubleshooter
The first way to resolve Store error code 0x80070006 is by running the in-built troubleshooter. Follow the steps below to locate this tool and run it on Windows 11 or 10 PC –
Windows 11:
- First of all, reach out to the below path in Windows 11 –
Settings (Win + I) > System > Troubleshoot
- When the troubleshoot setting expands, click Other troubleshooters.
- Scroll down to the bottom next and hit the Run button available beside Windows Store Apps.

- Now, follow the on-screen instructions to complete troubleshooting Microsoft Store.
Windows 10:
- First of all, navigate to the below path –
Settings (Win + I) > Update & Security > Troubleshoot (left navigation pane)
- Head over to the right panel and click Additional troubleshooters.
- Scroll down to the bottom and locate Windows Store Apps.
- When located, click on it and hit Run the troubleshooter.

- Now, follow the on-screen instructions and the error 0x80070006 will resolve automatically.
2] Clear stored cache on Microsoft Store via WSReset
The stored cache inside Microsoft Store, when not cleared, may also trigger an error code 0x80070006 in Windows 11/10. If you haven’t cleared any data on it for a long time, consider doing so using WSReset. Follow the steps below on how to clear the accumulated cache in Windows Store –
- Press Win + R to launch Run.
- Type “WSReset.exe” and hit Ctrl + Shift + Enter keys altogether.

- Using the three keys hotkey will launch CMD as administrator and execute the typed-in code.
- After this is over, Microsoft Store will launch automatically.
3] Reinstall Microsoft Store
If for any reason, the error 0x80070006 is still occurring, your Store app must have been corrupted beyond repair. In such cases, you should definitely reinstall Microsoft Store.
However, as there is no direct way to remove built-in apps on Windows 11/10, you may launch Windows PowerShell (Admin) and run the below code –
Get-AppxPackage *windowsstore* | Remove-AppxPackage
- After this code runs successfully, copy/paste the below cmdlet and press Enter –
Get-AppxPackage -allusers Microsoft.WindowsStore | Foreach {Add-AppxPackage -DisableDevelopmentMode -Register "$($_.InstallLocation)\AppXManifest.xml"}
- Your Store app will uninstall and then reinstall successfully on your Windows 11/10 PC.
- Restart your PC and check if the Store app is now functioning properly.
Hopefully, you find this article useful and easy to follow. Let’s know in the comment section if you face any difficulty following any fix discussed in it.
,
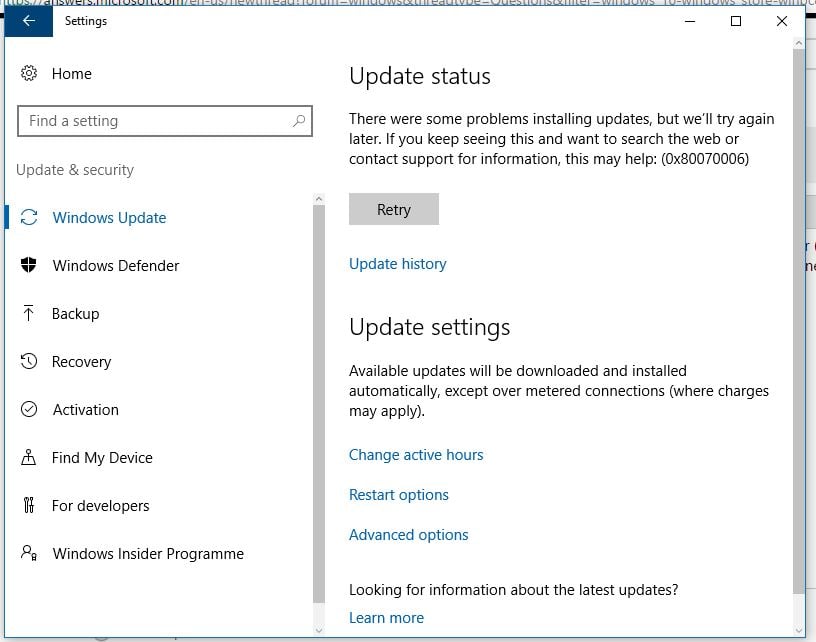
On a Windows 10-based computer, you receive the following error message when you try to check for new updates: «There were some problems installing updates, but we «ll try again later. If you keep seeing this and want to search the web or contact support for information, this may help: (0x80070006)».

This tutorial contains instructions to resolve the error 0x80070006 in Windows 10 Update: «There were some problems installing updates, but we «ll try again later. If you keep seeing this and want to search the web or contact support for information, this may help: (0x80070006)».
How to Solve Error 0x80070006 in Windows 10 Update.
Step 1. Scan your computer for viruses.
Important: Many viruses or malicious programs can cause problems with Windows update. So before you continue to the troubleshooting steps below, use this Malware Scan and Removal Guide to check and remove viruses or/and malicious programs that may be running on your computer.
Step 2. Check if the Windows Update Service is Running.
1. Open Windows Services control panel: To do that:
- Press Windows + R keys to open the run command box.
- In the Search box, type: services.msc & click OK.
- (Accept the UAC warning if appears).
2. At the right-pane make sure that the ‘Status’ of following services is Running. *
- Background Intelligent Transfer Service (BITS)
- DCOM Server Process Launcher
- Remote Procedure Call (RPC)
- Windows Defender Firewall
- Windows Update
![image_thumb[11]](https://www.repairwin.com/wp-content/uploads/2019/05/image_thumb11_thumb.png "image_thumb[11]")
* Note: If any of the above services is not running then:
a. Right-click on the service and choose Properties.
b. At General tab, set the Startup type to Automatic.
c. At Log On tab make sure that the Local System Account is checked.
d. Hit OK to apply changes.
3. Restart your computer.
8. After restart, check that the above mentioned services are up and running.
8. Proceed and Check for Updates. If you still receive the error 0x80070006 on Windows Update, then continue to the next step.
Step 3. Run the Windows Update Troubleshooter.
1. Navigate to Windows Control Panel, set the ‘View By’ to Small icons and open Troubleshooting.

2. In Troubleshooting options, click Fix problems with Windows Update.

3. Click Next to troubleshoot Windows update problems.

5. When the troubleshooting process is complete, close the troubleshooter and restart your PC.
6. Check for updates.
Step 4. Fix Windows Update Service in Registry.
1. Open Notepad application.
2. Select and copy the below text (in green letters) and paste it into the notepad:
Windows Registry Editor Version 5.00
[HKEY_LOCAL_MACHINE\SYSTEM\CurrentControlSet\Services\wuauserv]
«DependOnService»=hex(7):72,00,70,00,63,00,73,00,73,00,00,00,00,00
«Description»=»@%systemroot%\\system32\\wuaueng.dll,-106»
«DisplayName»=»@%systemroot%\\system32\\wuaueng.dll,-105»
«ErrorControl»=dword:00000001
«FailureActions»=hex:80,51,01,00,00,00,00,00,00,00,00,00,03,00,00,00,14,00,00,\
00,01,00,00,00,60,ea,00,00,00,00,00,00,00,00,00,00,00,00,00,00,00,00,00,00
«ImagePath»=hex(2):25,00,73,00,79,00,73,00,74,00,65,00,6d,00,72,00,6f,00,6f,00,\
74,00,25,00,5c,00,73,00,79,00,73,00,74,00,65,00,6d,00,33,00,32,00,5c,00,73,\
00,76,00,63,00,68,00,6f,00,73,00,74,00,2e,00,65,00,78,00,65,00,20,00,2d,00,\
6b,00,20,00,6e,00,65,00,74,00,73,00,76,00,63,00,73,00,20,00,2d,00,70,00,00,\
00
«ObjectName»=»LocalSystem»
«RequiredPrivileges»=hex(7):53,00,65,00,41,00,75,00,64,00,69,00,74,00,50,00,72,\
00,69,00,76,00,69,00,6c,00,65,00,67,00,65,00,00,00,53,00,65,00,43,00,72,00,\
65,00,61,00,74,00,65,00,47,00,6c,00,6f,00,62,00,61,00,6c,00,50,00,72,00,69,\
00,76,00,69,00,6c,00,65,00,67,00,65,00,00,00,53,00,65,00,43,00,72,00,65,00,\
61,00,74,00,65,00,50,00,61,00,67,00,65,00,46,00,69,00,6c,00,65,00,50,00,72,\
00,69,00,76,00,69,00,6c,00,65,00,67,00,65,00,00,00,53,00,65,00,54,00,63,00,\
62,00,50,00,72,00,69,00,76,00,69,00,6c,00,65,00,67,00,65,00,00,00,53,00,65,\
00,41,00,73,00,73,00,69,00,67,00,6e,00,50,00,72,00,69,00,6d,00,61,00,72,00,\
79,00,54,00,6f,00,6b,00,65,00,6e,00,50,00,72,00,69,00,76,00,69,00,6c,00,65,\
00,67,00,65,00,00,00,53,00,65,00,49,00,6d,00,70,00,65,00,72,00,73,00,6f,00,\
6e,00,61,00,74,00,65,00,50,00,72,00,69,00,76,00,69,00,6c,00,65,00,67,00,65,\
00,00,00,53,00,65,00,49,00,6e,00,63,00,72,00,65,00,61,00,73,00,65,00,51,00,\
75,00,6f,00,74,00,61,00,50,00,72,00,69,00,76,00,69,00,6c,00,65,00,67,00,65,\
00,00,00,53,00,65,00,53,00,68,00,75,00,74,00,64,00,6f,00,77,00,6e,00,50,00,\
72,00,69,00,76,00,69,00,6c,00,65,00,67,00,65,00,00,00,53,00,65,00,44,00,65,\
00,62,00,75,00,67,00,50,00,72,00,69,00,76,00,69,00,6c,00,65,00,67,00,65,00,\
00,00,53,00,65,00,42,00,61,00,63,00,6b,00,75,00,70,00,50,00,72,00,69,00,76,\
00,69,00,6c,00,65,00,67,00,65,00,00,00,53,00,65,00,52,00,65,00,73,00,74,00,\
6f,00,72,00,65,00,50,00,72,00,69,00,76,00,69,00,6c,00,65,00,67,00,65,00,00,\
00,53,00,65,00,53,00,65,00,63,00,75,00,72,00,69,00,74,00,79,00,50,00,72,00,\
69,00,76,00,69,00,6c,00,65,00,67,00,65,00,00,00,53,00,65,00,54,00,61,00,6b,\
00,65,00,4f,00,77,00,6e,00,65,00,72,00,73,00,68,00,69,00,70,00,50,00,72,00,\
69,00,76,00,69,00,6c,00,65,00,67,00,65,00,00,00,53,00,65,00,4c,00,6f,00,61,\
00,64,00,44,00,72,00,69,00,76,00,65,00,72,00,50,00,72,00,69,00,76,00,69,00,\
6c,00,65,00,67,00,65,00,00,00,53,00,65,00,4d,00,61,00,6e,00,61,00,67,00,65,\
00,56,00,6f,00,6c,00,75,00,6d,00,65,00,50,00,72,00,69,00,76,00,69,00,6c,00,\
65,00,67,00,65,00,00,00,00,00
«ServiceSidType»=dword:00000001
«Start»=dword:00000003
«SvcHostSplitDisable»=dword:00000001
«SvcMemHardLimitInMB»=dword:000000f6
«SvcMemMidLimitInMB»=dword:000000a7
«SvcMemSoftLimitInMB»=dword:00000058
«Type»=dword:00000020
[HKEY_LOCAL_MACHINE\SYSTEM\CurrentControlSet\Services\wuauserv\Parameters]
«ServiceDll»=hex(2):25,00,73,00,79,00,73,00,74,00,65,00,6d,00,72,00,6f,00,6f,\
00,74,00,25,00,5c,00,73,00,79,00,73,00,74,00,65,00,6d,00,33,00,32,00,5c,00,\
77,00,75,00,61,00,75,00,65,00,6e,00,67,00,2e,00,64,00,6c,00,6c,00,00,00
«ServiceDllUnloadOnStop»=dword:00000001
«ServiceMain»=»WUServiceMain»
[HKEY_LOCAL_MACHINE\SYSTEM\CurrentControlSet\Services\wuauserv\Security]
«Security»=hex:01,00,14,80,78,00,00,00,84,00,00,00,14,00,00,00,30,00,00,00,02,\
00,1c,00,01,00,00,00,02,80,14,00,ff,00,0f,00,01,01,00,00,00,00,00,01,00,00,\
00,00,02,00,48,00,03,00,00,00,00,00,14,00,9d,00,02,00,01,01,00,00,00,00,00,\
05,0b,00,00,00,00,00,18,00,ff,01,0f,00,01,02,00,00,00,00,00,05,20,00,00,00,\
20,02,00,00,00,00,14,00,ff,01,0f,00,01,01,00,00,00,00,00,05,12,00,00,00,01,\
01,00,00,00,00,00,05,12,00,00,00,01,01,00,00,00,00,00,05,12,00,00,00
[HKEY_LOCAL_MACHINE\SYSTEM\CurrentControlSet\Services\wuauserv\TriggerInfo]
[HKEY_LOCAL_MACHINE\SYSTEM\CurrentControlSet\Services\wuauserv\TriggerInfo\0]
«Type»=dword:00000005
«Action»=dword:00000001
«Guid»=hex:e6,ca,9f,65,db,5b,a9,4d,b1,ff,ca,2a,17,8d,46,e0
[HKEY_LOCAL_MACHINE\SYSTEM\CurrentControlSet\Services\wuauserv\TriggerInfo\1]
«Type»=dword:00000005
«Action»=dword:00000001
«Guid»=hex:c8,46,fb,54,89,f0,4c,46,b1,fd,59,d1,b6,2c,3b,50
3. When done, go to File > Save as and save the file at your Desktop with the name: FixWin10Update.reg

4. Close Notepad.
5. Double click at FixWin10Update.reg, accept the UAC warning message and click Yes.

6. Reboot your computer and check for Updates.
That’s all folks! Did it work for you?
Please leave a comment in the comment section below or even better: like and share this blog post in the social networks to help spread the word about this solution.
If this article was useful for you, please consider supporting us by making a donation. Even $1 can a make a huge difference for us.
- Author
- Recent Posts
Konstantinos is the founder and administrator of Repairwin.com. Since 1995 he works and provides IT support as a computer and network expert to individuals and large companies. He is specialized in solving problems related to Windows or other Microsoft products (Windows Server, Office, Microsoft 365, etc.).