
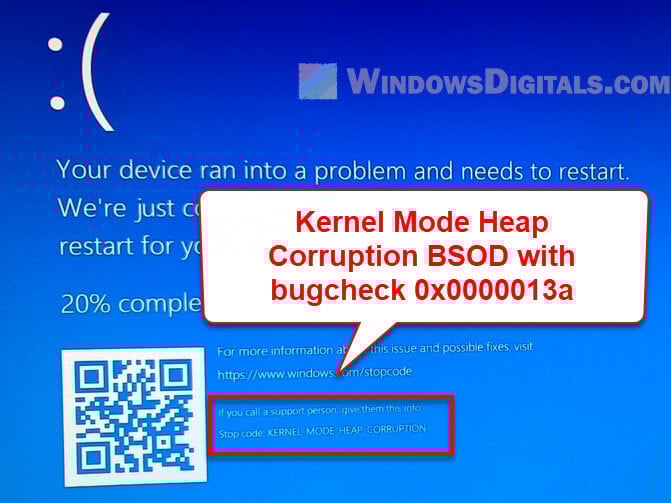
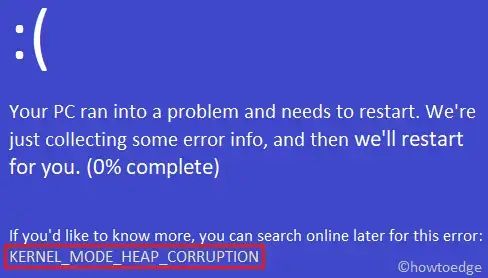
Few things make you worry like seeing a “Blue Screen of Death” (BSOD) pop up, especially on a Windows computer. It gets more confusing when the screen is filled with complicated error codes. A common blue screen STOP code that you might encounter is the 0x0000013a: Kernel_Mode_Heap_Corruption.
This tells us there’s a big problem with the memory because something’s gone wrong in a specific area where the operating system and some drivers go to grab memory. In this guide, we’re going to talk about what Kernel_Mode_Heap_Corruption and its error code 0x0000013a mean, why they happen, and how you can fix it.
Also see: Stop Code Kernel_Data_Inpage_Error BSOD in Windows 11/10
What is the 0x0000013a Kernel Mode Heap Corruption BSOD error?
Let’s first get a clear picture of what this error actually means.
What’s the Kernel-Mode Heap?
The kernel-mode heap is a special memory spot for the operating system’s brain and some drivers. It’s very important and works at a high security level, which means if something goes wrong here, it’s going to be a big problem. Think of the heap as a memory pool where the system picks up memory for important tasks.
Learn more: What does a Blue Screen with Sad Face mean on Windows 10/11
Why is corruption a problem?
When the kernel-mode heap gets messed up, it means someone or something messed with the memory in a bad way. This can make your computer crash or show the dreaded BSOD. Because this heap is so crucial, even a small mistake can cause big problems.
What actually causes the 0x0000013a error?
- Problems with RAM or other parts can mess up the memory. This is a common reason for these errors.
- Drivers that don’t play nice can accidentally wreck the heap.
- Bad software might attack this area, causing trouble.
- Some programs, especially those that need special access, might have issues that lead to corruption.
- Pushing your computer too hard (overclocking) can cause all sorts of chaos, including memory problems.
Linked issue: Windows 11/10 Computer Blue Screen When Idle (Fix)
How to fix the bugcheck 0x0000013a blue screen error
If you’re facing the 0x0000013a: Kernel_Mode_Heap_Corruption error, here are some steps to help you figure out and fix the problem.
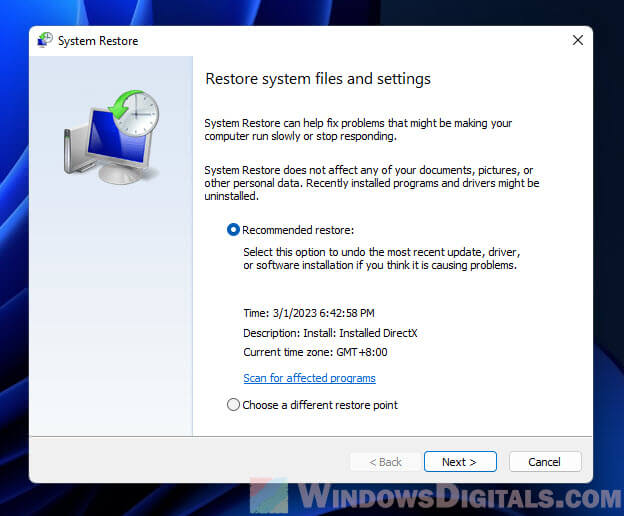
System Restore
If you’ve just added new software, drivers, or updates, going back to how things were using System Restore before might fix it.
- Hit the “Start” button.
- Type “System Restore” and pick a date you want to restore your PC back to.
- Follow the the rest of the on-screen instructions to complete the process.
Check for hardware issues
Memory problems are often to blame. Try using a tool like “Windows Memory Diagnostic” to check your memory.
- Click on the “Start” button.
- Type “Windows Memory Diagnostic” and click on what shows up.

- Pick “Restart now and check for problems” to have your computer look for memory issues.


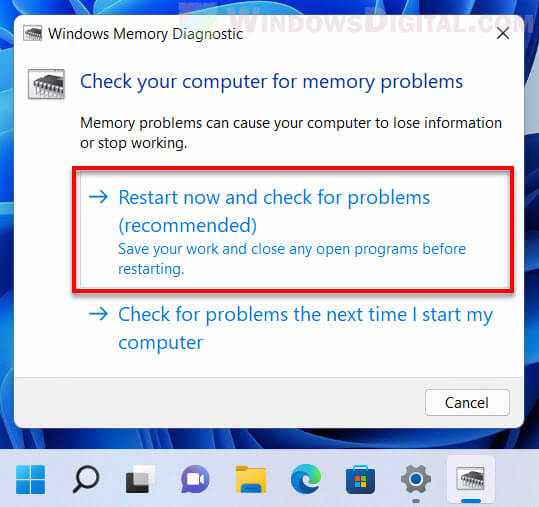
If it finds issues, you might need to replace the bad RAM stick.
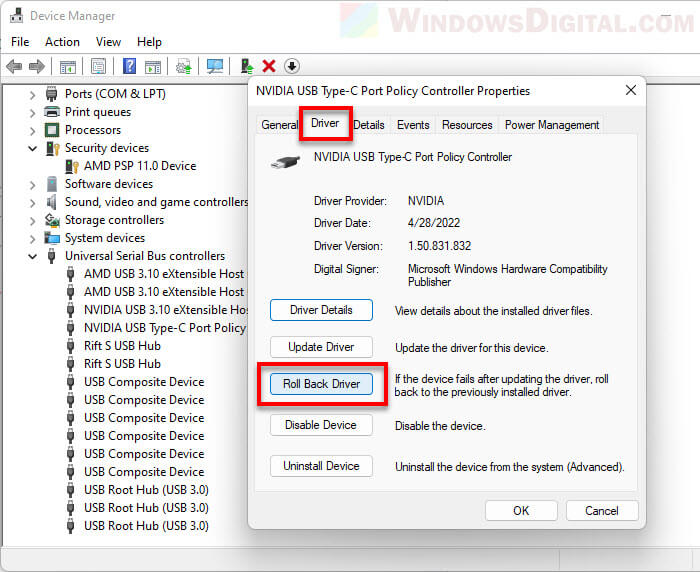
Update or roll back drivers
Bad drivers can also be the root of the problem.
- Right-click the “Start” button and go to “Device Manager”.
- Look for any devices marked with a yellow triangle.
- Right-click the troublemaker and either update or roll back its driver, depending on when the problem started.

Scan for malware
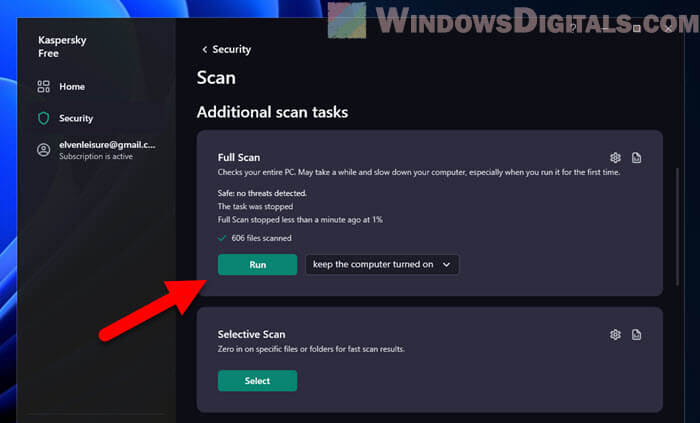
Make sure no viruses are messing things up. Try to run a full system scan with a good antivirus software or just Windows Defender.
- Open your antivirus.
- Do a “Full Scan” or “Complete System Scan”.
- Get rid of any bad stuff it finds and reboot your computer.
Pro tip: How to Scan an .exe File for Viruses to Check If It’s Safe
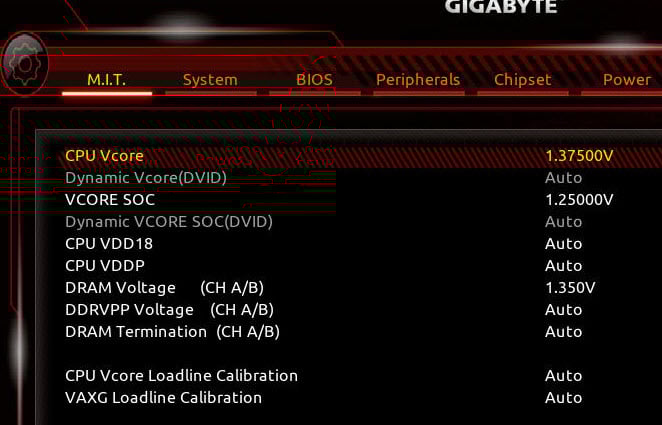
Avoid overclocking
If you’ve been pushing your computer’s speed beyond its normal limits by what we call overclocking (usually the CPU, RAM and GPU), it might be time to try setting them back to stock (default) clocks to avoid crashes and errors.
Further reading: Why is my CPU Overheating and How to Fix it
Update Windows
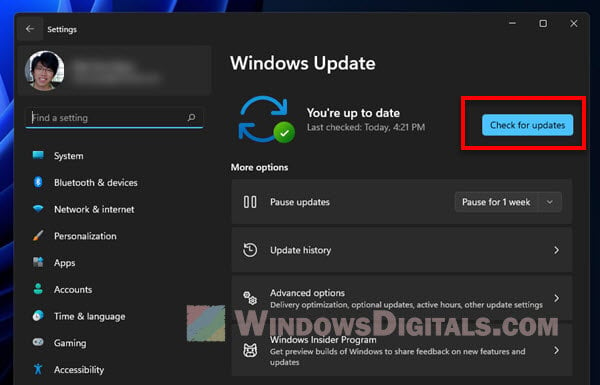
Keeping Windows up to date can fix a bunch of issues when there are any known bugs in the OS, including this one.
- Click the “Start” button.
- Go to “Settings”.
- Hit “Windows Update”.
- Check for any updates.
Try these fixes and see if the blue screen stops popping up. If it keeps happening, you might need to dig deeper with some expert help or consider a fresh Windows install.
Figure out the cause with the dump file
One of the best ways to find out why you’re seeing the 0x0000013a: Kernel_Mode_Heap_Corruption error is by looking at the dump file. This file captures what was going on when the crash happened and can give clues to what actually caused it.
See also: Windows 11 Dump File Location
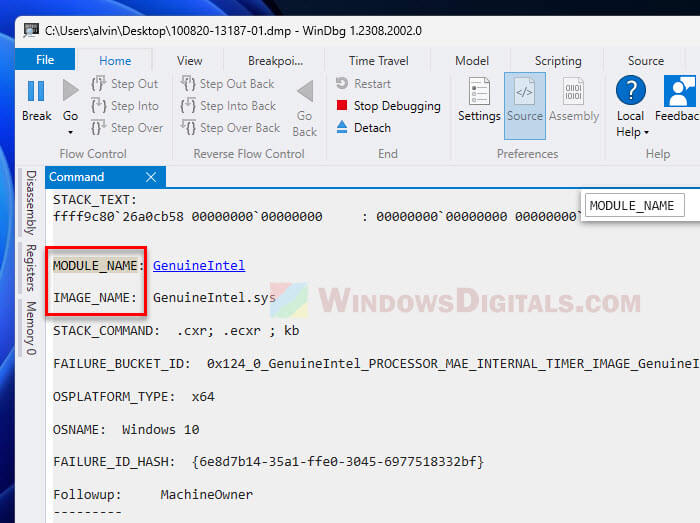
How to use WinDbg to check the dump file
WinDbg is a tool from Microsoft for figuring out problems with Windows. Below is how to use it:
- Download WinDbg from Microsoft’s site.
- Install it on your computer.

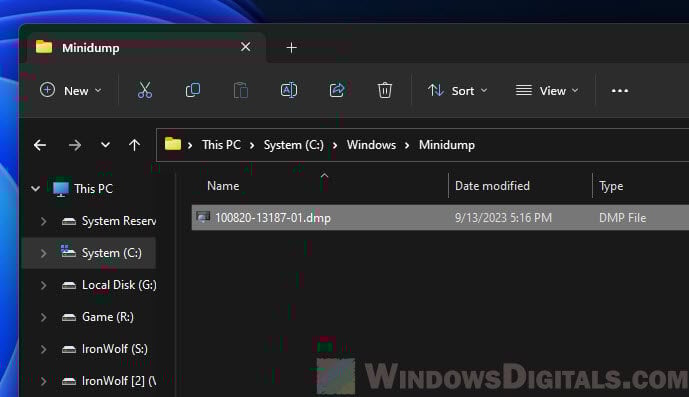
- Windows usually keeps dump files at
C:\Windows\Minidump. - Remember this location because you’ll need it in WinDbg.

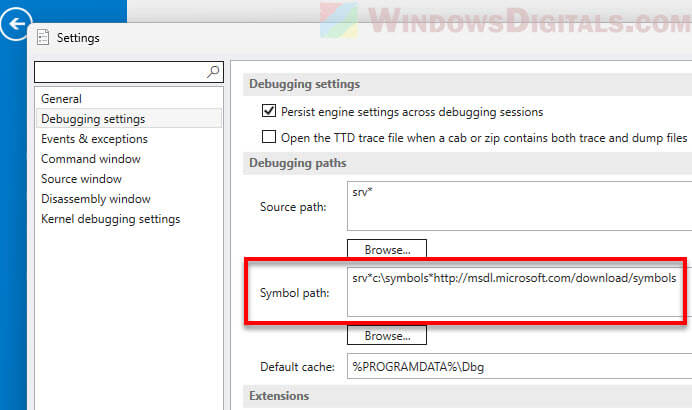
- Symbols help make sense of the dump file’s code. Open WinDbg and go to the settings to set the symbol path to get symbols from Microsoft and save them locally.

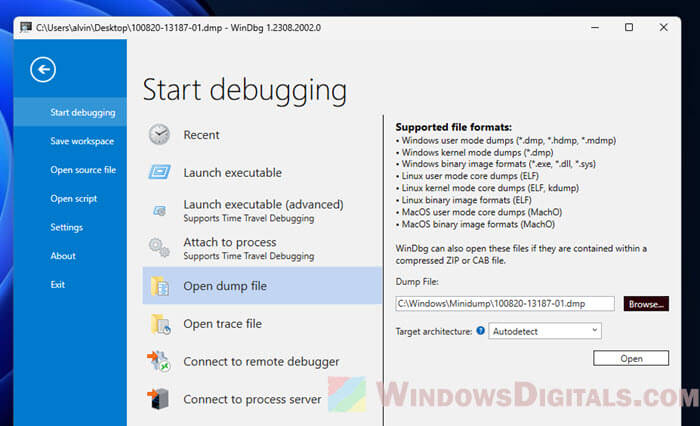
- In WinDbg, open the dump file from
C:\Windows\Minidump.
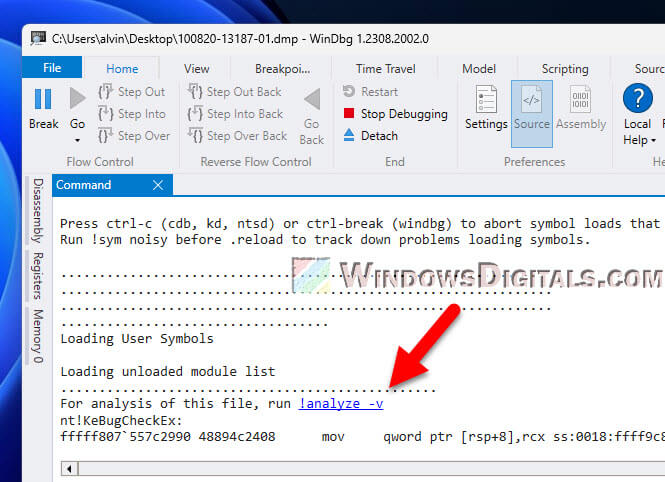
- Type
!analyze -vin WinDbg to start the analysis. It might take a few minutes.

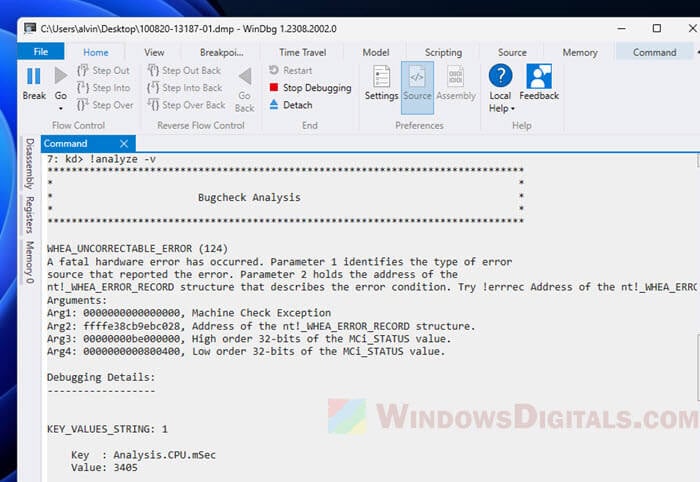
- WinDbg will show details about the error, like which driver or software might be at fault.

- If you find a culprit, try updating, reinstalling, or getting rid of it to see if that fixes the problem.
- If you’re still stuck, asking for help from a pro or checking online forums might give you more ideas.

Related resource: Dump file creation failed due to error in Windows 11
Analyzing dump files can be quite difficult and complicated, but with some practice, you can figure out the cause of any blue screen errors you might encounter in the future.
Kernel Mode heap corruption is a BSOD-type error with bug check value 0x0000013A. This blue screen error usually occurs due to corrupted device drivers, obsolete graphics cards, memory issues, or malfunctioning hardware. A few users recently encounter this bug after performing an in-place upgrade on their devices.
Well, in this guide, we present detailed information on how the Stop Error 0x13A occurs in the first place. Besides, we also discussed eight solutions that help in getting rid of the KERNEL_MODE_HEAP_CORRUPTION bug. Let’s explore the workarounds in detail –
How to Fix BSOD Error 0x13A in Windows 10
To solve the KERNEL_MODE_HEAP_CORRUPTION Error 0x0000013A, try the following suggestions –
Boot Windows 10 into Safe Mode
Since you are getting the Blue Screen, you won’t be able to log into Windows normally. So, you need to first boot into Safe Mode and then perform the below workarounds. Only a handful of Windows 10 programs and services run on this mode preventing any kind of conflicts from third-party apps.
Here are the essential steps to enter Safe Mode –
- Press the Power button for 5 seconds and wait till it shuts down successfully.
- Repeat this process 2-3 times until the Preparing Automatic Repair screen comes into view.
- Let the system diagnoses this error for a few seconds thereafter click Advanced options.
- On the Windows Recovery Environment (WinRE), go to – Troubleshoot > Advanced options.
- Hit Startup Settings on the next screen followed by the Restart button.
When Windows reboots, press F5 to boot into Safe Mode with Networking.
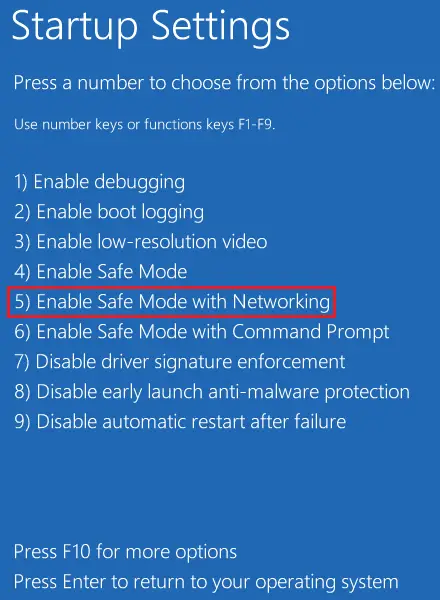
Note: Selecting “Safe Mode with Networking” is essential to fix black or blue screen issues. If not, this won’t connect to the Internet causing problems in troubleshooting the actual problem.
Check Event Viewer
Knowing the reasons that might have led to the bug at hand provides an opportunity to solve the BSOD error correctly. Interestingly, the system contains a log of all bugs and errors that ever occur on Windows 10. One can access the Windows log at Event Viewer containing information like Source and Event ID.
Now that you are already inside the Safe boot, use the below guideline to get the Windows log file –
- Use Win + S shortcut to start the Search UI.
- Type “event viewer” in the text field, and click the top result.
- Select Windows Logs > System from the left column.
- In the mid-section, scroll down and locate the log titled “Kernel Mode Heap corruption“.
- Once you find this file, double-click the same to read the description.
The log enlists the exact cause that might have caused this BSOD Error 0x13A. Usually, this error arises because of these three reasons –
- Corrupted Graphics Driver
- Software/Hardware Error
- Memory Issues
1] Check Graphics Drivers for issues
If you encounter the BSOD error 0x13A just after starting a heavy game, this problem might lie inside the graphics driver. A corrupted or obsolete graphics driver often causes the KERNEL_MODE_HEAP-CORRUPTION error on Windows 10. To fix this, you must try updating the existing graphics card driver.
Note: In case the update process fails, you may use the rollback feature. If this method fails as well, uninstall the graphics driver, restart the device, then reinstall the graphics card back.
- Right-click on the Windows icon and select Device Manager.
- Click “>” next to the display adapters and right-click again on the available graphics card.
- Now, select the correct option depending on what are you trying to do with this.
For Example:
- Update: Hit update driver option then choose “Search automatically for updated driver software“.
- Roll Back: Click Properties, switch to the Driver tab, and hit Roll back driver.
- Reinstall a New Driver: Click uninstall device then visit the manufacturer’s Site to download the latest version of the uninstalled graphics card. When the download completes, double-click the setup file to start the installation.
2] Run Driver Verifier Manager
Driver Verifier Manager is a great tool to discover the problematic drivers on Windows 10. So, if you are still getting the Kernel Mode Heap Corruption 0x0000013A error, you should run this tool to check the obsolete device drivers. Here’s how to perform this task –
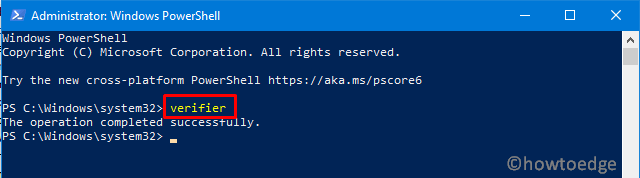
- Launch Windows PowerShell (Admin).
- On the elevated console, type “
verifier“, and hit Enter.
- Subsequently, mark the “Create Standard Settings” checkbox followed by Next.

- Now, mark “Automatically select all drivers installed on this computer” and hit Finish.

- The system prompts to “Restart PC” so as to start scanning for any corrupted or damaged drivers.
- After the reboot, Windows will display a list of drivers that are found to have some errors.
You may now re-follow method #2 to update, rollback, or uninstall-reinstall the above-displayed device drivers.
3] Run Blue Screen Troubleshooter
This is another interesting tool designed to help users fix BSOD-type errors on Windows 10. Isn’t it great that one can address the blue screen issue possibly by running a simple troubleshooter? Indeed, this is an easy way to resolve different Stop Error codes on Windows 10 PC. Here’s how to use this tool –
- First of all, navigate to the below path –
Win + I > Update & Security > Troubleshoot
- Click to reveal the Blue Screen box and hit Run the troubleshooter.

4] Perform Disk Cleanup
The presence of unnecessarily stored cache, log files, Windows Prior Installation files, and other irrelevant data may also cause the 0x0000013A error. To solve this, perform a disk Cleanup on Windows 10.
5] Run CHKDSK Utility
If the BSOD error 0x0000013A still persists, this must be due to hardware-related issues. To check whether this indeed is the case or not, run the CHKDSK command line on the Windows Console. All you need is to follow these easy steps –
- Get access to the Command Prompt with administrative privileges.
- Near the blinking cursor, type the command –
chkdsk C: /f /r /x - Hit the Enter key on your keyboard to initiate a disk check.
- This probably won’t run and prompts doing this when the system reboots.
- Type “Y” and press Enter again.

- Now, restart Windows 10 to finally initiate the disk check.
When this completes scanning, Windows 10 OS loads containing a list of bugs and errors that it encountered.
For Desktop Users Only
In case running the CHKDSK command doesn’t reveal any issue, we suggest doing the following –
- Unplug all the HDD cables and wires, clean them for possible dirt, attach the connecting wires back, and then restart Windows.
Many a time, following this simple procedure, fixes BSOD Errors on Windows 10 PC.
6] Repair Missing or Damaged System Files
The presence of corrupted data inside Windows 10 may also lead to different bugs and errors. Kernel Mode Heap Corruption Error 0x0000013A is one such bug. System File Checker is an in-built tool by Microsoft that can replace corrupted, lost, or missing DLL files. One can use this utility program even when you are not able to boot into Windows normally. Here’s how to proceed –
Case 1: When you can’t enter Windows or Safe Mode
- Enter WinRE then follow
Troubleshoot > Advanced Options > Command Prompt.
Case 2: When you can enter Windows or Safe Mode
- Use Win + R to start Run, type cmd, and jointly press Ctrl + Shift + Enter keys.
- Now that you have entered Windows Console, type “
sfc/scannow” and hit Enter.

- Wait for the SFC to find and repair corrupted DLL files. Usually, this takes 10-15 minutes.
- Once over, Restart PC to incorporate the above changes.
Sign back into Windows and check whether you still encounter the BSOD Error 0x0000013A or if it has already been fixed.
7] Look for Memory Issues
Having a bad RAM slot is another faulty reason that may erupt the KERNEL_MODE_HEAP_CORRUPTION error. This situation may arise due to sudden power surges, excessive heating, or simply motherboard issues. So, you must consider the “Memory issues” as a possibility and try fixing them (if possible). Here’s how to check for bad memory issues on Windows 10 –
- Hit the Start Menu and start typing “memory” in the search box.
- Click the well-matching result to enter Windows Memory Diagnostic.
- Choose to Restart now and check for problems.

Note: Make sure to save any ongoing process on the computer.
- The system reboots and checks for any memory issues on the computer.
- After scanning for memory problems successfully, the device restarts with a list of all “detected issues”.
Tip: You may also use the Event viewer to view the complete diagnosis report.
- Use the Filter current log available on the right side inside the Event Viewer.

- Scroll down and Select MemoryDiagnostics-Results using the Event sources drop-down menu.

- Hit OK to view all result logs of the recently performed memory test.
- Now, double-click the latest result to see whether the diagnosis passed or not.
In case, the diagnosis doesn’t pass, you need to take appropriate measures to solve the persisting memory issues.
8] Use System Restore Points
If none of the above solutions work to resolve the 0x0000013A error, use restore points to revert back your system to an earlier state when everything was working fine. In case, you don’t have a restore point or haven’t created any system backup, perform a clean installation of Windows 10.
That’s it, if you have any queries or suggestions related to this article, ping us in the comment section.
Kernel Mode Heap Corruption error (commonly noted as STOP 0x0000013A), although relatively uncommon, can be the source of nightmares for Windows 10 users. This error usually crashes your computer and displays the infamous blue screen of death (BSOD). That’s like the ultimate party pooper if you are in the middle of something critical.
Don’t fret! We have curated an exhaustive list of 8 solutions for you to resolve this problem once and for all. Whether you’re a tech geek or someone who barely knows how to restart their PC, this guide is designed to be accessible to everyone.
Fix 1: Update Windows 10 to the Latest Version
Why Does This Help?
Updating your Windows 10 operating system not only brings in new features but also incorporates bug fixes, including those that may resolve Kernel Mode Heap Corruption errors. It’s essential to keep your Windows 10 updated to ensure smooth performance and enhanced security features.
How to Update:
- Go to Settings (Win + I)
- Click on Update & Security
- Tap on Check for updates, and follow the on-screen instructions.
What if the Update Fails?
If the update process fails, you can manually download the necessary files from the Microsoft website and install them. Make sure to download files that are compatible with your system configuration.
After the Update:
Once you complete the update, restart your computer. This will help to apply the changes effectively, hopefully resolving the error you were facing.
Fix 2: Update Graphics Card Drivers
Why Does This Help?
The graphics card driver plays a pivotal role in rendering graphics, and outdated or corrupt drivers can lead to Kernel Mode Heap Corruption errors. Thus, keeping these drivers updated is crucial.
Steps to Update:
- Right-click on Windows Start Menu and choose Device Manager.
- Locate Display Adapters and expand it.
- Right-click on your graphics card driver and choose Update driver.
Automated Tools:
Several third-party utilities can automatically update your drivers for you. Tools like Driver Easy or Driver Booster are popular choices, but use them at your own risk.
After Updating:
Reboot your computer after the update is complete. This will ensure that the newly installed driver is initialized correctly, potentially resolving the error.
Fix 3: Run Windows Memory Diagnostic Tool
Why Does This Help?
Heap corruption errors are often linked to issues with your computer’s RAM. Running the built-in Windows Memory Diagnostic tool can help detect these issues.
Steps to Run the Diagnostic Tool:
- Press Win + R to open the Run dialog.
- Type mdsched.exe and press Enter.
- Choose between ‘Restart now and check for problems’ or ‘Check for problems the next time I start my computer.’
Interpreting Results:
After your computer restarts, you’ll see a status indicating any issues with your RAM. If any issues are found, consider replacing your RAM or consulting a professional for repairs.
Alternative Methods:
You can also use third-party applications like MemTest86 to perform a more thorough check.
Fix 4: Check for Disk Errors
Why Does This Help?
Disk errors can also contribute to heap corruption issues. The CHKDSK tool in Windows checks for and attempts to resolve errors on your hard disk.
Steps to Run CHKDSK:
- Open Command Prompt as an administrator.
- Type chkdsk /f and press Enter.
- You might be asked to restart your computer; if so, confirm to proceed.
What Happens Next?
Once the scan and fix are done, a summary will appear showing what has been repaired. If significant errors were found and repaired, this might solve your Kernel Mode Heap Corruption problem.
Advanced Users:
For a more detailed examination, you can use the /r parameter (chkdsk /r) to locate bad sectors and recover readable information.
Fix 5: Disable Hardware Acceleration in Web Browsers
Why Does This Help?
Hardware acceleration offloads tasks from your CPU to your GPU. However, if your GPU is already stressed, it may lead to the Kernel Mode Heap Corruption error.
For Chrome Users:
- Go to Settings
- Scroll down to Advanced
- Under System, toggle off Use hardware acceleration when available
For Firefox Users:
- Go to Settings
- Under General, scroll down to Performance
- Uncheck Use recommended performance settings and then uncheck Use hardware acceleration when available
Testing:
After disabling hardware acceleration, restart your computer and observe if the error recurs.
Fix 6: Reinstall Windows 10

Why Does This Help?
As a last resort, reinstalling Windows 10 can fix any underlying issues that are too difficult to identify. It’s the nuclear option but often effective.
How to Reinstall:
Back up all your important data before proceeding. You can either use a USB recovery drive or directly reinstall Windows from the settings menu.
After Reinstallation:
You will need to reinstall all your applications and restore your backed-up data. However, the Kernel Mode Heap Corruption error should be resolved.
Fix 7: Roll Back Recent Software Installations
Why Does This Help?
Recently installed software could be incompatible with your system, causing the heap corruption error.
Steps to Roll Back:
- Go to Control Panel
- Click on Programs and Features
- Sort the list by the installation date and uninstall recent installations.
Further Testing:
After each uninstallation, restart your computer to see if the issue persists. If the error goes away, the last uninstalled program was the likely culprit.
Fix 8: Consult a Professional

If you’ve tried all the above methods and still haven’t had any success, it’s time to consult a professional. Computer issues can be complicated, and some problems might require a hands-on approach from someone experienced in the field.
Bonus: Preventative Measures
While the above fixes are tailored to solve the Kernel Mode Heap Corruption error after it has occurred, prevention is better than cure. So, what can you do to make sure you don’t run into this error again?
Keep Software Updated
Regularly update all software applications and the Windows operating system itself. Software developers frequently release updates that fix bugs and improve security, potentially fending off this nasty error.
Regular System Checks
Perform routine checks on your hardware, especially your RAM and hard disk, to preemptively catch issues that might escalate into a heap corruption error. Tools like Windows Memory Diagnostic and CHKDSK are excellent for this purpose.
Avoid Unreliable Software
Stay away from pirated or dubious software, as they may not adhere to programming best practices, thereby causing system errors like Kernel Mode Heap Corruption.
FAQs
What is the significance of the STOP code in Kernel Mode Heap Corruption error?
The STOP code, often seen as STOP 0x0000013A, is a specific identifier for the error you are encountering. This code can be helpful for technical experts or when you’re seeking online assistance because it pinpoints the exact nature of the issue. It makes troubleshooting much more straightforward and targeted.
How do I know if my hardware components are causing this error?
If you’ve ruled out software issues and driver incompatibilities, hardware could be the next suspect. Physical indicators can include overheating, odd noises, or even the age of the hardware components.
Running hardware diagnostics tools for CPU, GPU, and RAM can give you more concrete data on this. Some third-party software tools provide comprehensive hardware scans.
Can overheating cause Kernel Mode Heap Corruption errors?
Yes, overheating can contribute to a range of issues, including Kernel Mode Heap Corruption. Overheating may cause hardware components like RAM or GPU to malfunction, which can trigger the error.
Make sure your computer is well-ventilated, and consider using hardware monitoring software to keep track of temperatures.
Can third-party antivirus software cause this error?
In rare cases, third-party antivirus software might cause Kernel Mode Heap Corruption errors due to conflicts with system files or processes. If you recently installed or updated an antivirus program and then started experiencing this error, consider temporarily disabling the antivirus to see if that solves the problem.
Are there specific applications known to trigger this error frequently?
There are no universally agreed-upon applications that cause this error, as it usually varies from system to system based on hardware and software configurations. However, heavy-duty applications that use a lot of system resources are generally more likely to trigger such errors if there’s an underlying issue.
Is there a way to automatically recover my work if Kernel Mode Heap Corruption occurs?
Unfortunately, automatic recovery largely depends on the application you are using. Software like Microsoft Word and some web browsers have built-in recovery features that can restore your data if they were running during the crash.
However, it’s good practice to frequently save your work and use backup solutions to minimize data loss in case of a sudden error like Kernel Mode Heap Corruption.
Final Words
The Kernel Mode Heap Corruption error can be a challenging problem to solve, but these fixes offer a comprehensive approach to resolving it. From simple updates to more advanced solutions like reinstalling Windows 10, one of these methods is likely to solve your issue. If all else fails, seeking professional help is always a viable option.
Related Posts:
- Why Does My Mic Keep Cutting Out in Windows 10/11? -…
- How to Fix «No Internet Secured Error» in Windows 10…
- Does Your Phone Charge Faster on Low Power Mode?
- Spotify Can’t Play Current Song: 10 Simple Fixes
- Why is Alexa Not Responding to Voice Commands? 8 Easy Fixes
- How to Fix CPU Fan Error on Boot Time? — Quick Fix Tutorial
Все способы:
- Вход в «Безопасный режим»
- Способ 1: Откат графического драйвера
- Способ 2: Обновление драйверов
- Способ 3: Удаление конфликтного ПО
- Способ 4: Проверка целостности системных файлов
- Способ 5: Увеличение объема файла подкачки
- Способ 6: Возвращение Windows 10 до заводских настроек
- Вопросы и ответы: 0
Вход в «Безопасный режим»
Практически все методы, описанные в рамках данной статьи, осуществляются непосредственно через интерфейс Windows, поэтому важно обеспечить стабильную работу операционной системы хотя бы на несколько минут. Если синий экран смерти с ошибкой «KERNEL_MODE_HEAP_CORRUPTION» появляется довольно быстро или сразу же при запуске, попробуйте запустить Виндовс 10 в «Безопасном режиме». Для этого можно использовать переход через «Параметры» или специальное окно конфигурации системы.
Подробнее: Переход в безопасный режим в Windows 10

В тех случаях, когда действия внутри ОС вообще недоступны, из-за чего не получается зайти и в «Безопасный режим», нужно использовать альтернативные методы его активации. Например, если под рукой есть загрузочный диск с Windows 10, можно применить именно его, чтобы добиться реализации данной задачи.
Читайте также: Входим в «Безопасный режим» через BIOS
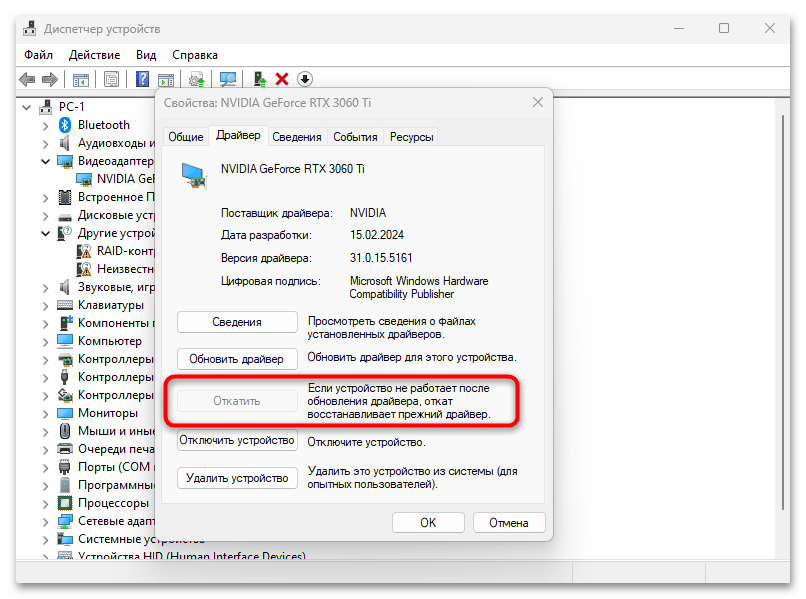
Способ 1: Откат графического драйвера
Синий экран «KERNEL_MODE_HEAP_CORRUPTION» мог появиться сразу после установки драйвера видеокарты. В большинстве случаев это означает, что выбранная версия несовместима с железом. Если как раз недавно вы инсталлировали или обновляли графический драйвер, сейчас стоит откатить его до прежней версии или удалить. Для всех моделей это осуществляется одинаково, поэтому трудностей возникнуть не должно.
Подробнее: Как откатить драйвер видеокарты
Для предотвращения подобных ошибок в дальнейшем рекомендуем правильно подбирать обновление драйвера видеокарты. В большинстве ситуаций подойдет загрузка ПО с официального сайта, а в некоторых случаях можно обратиться к сторонним программам. Если у вас возникают проблемы при выборе или выполнении подходящего метода, ознакомьтесь с инструкциями по данной теме в другой статье на нашем сайте, перейдя по ссылке ниже.
Читайте также: Способы обновления драйвера видеокарты в Windows 10
Способ 2: Обновление драйверов
Если выше мы говорили исключительно о программных компонентах видеокарты, то сейчас затронем тему общего обновления драйверов в Windows 10. Ошибка «KERNEL_MODE_HEAP_CORRUPTION» как раз может появляться из-за того, что не все комплектующие функционируют корректно в связи с устаревшими или отсутствующими драйверами. При использовании данного решения лучше всего обратиться к официальному сайту производителя материнской платы, чтобы подобрать последние версии основных драйверов. Однако можно воспользоваться и другими подходящими методами, если вам они покажутся удобнее.
Подробнее: Обновляем драйверы в Windows 10

Способ 3: Удаление конфликтного ПО
В начале статьи вы были ознакомлены с информацией по загрузке Виндовс 10 в «Безопасном режиме». Если вы сделали это и синий экран смерти не появляется уже какое-то время, возможно, причиной сбоев являются установленные сторонние программы. Сюда относится софт для разгона комплектующих, различные оптимизаторы, работающие в режиме реального времени, или любые приложения, вносящие даже визуальные изменения в операционную систему. Все, что может вызывать подозрения, нужно удалить, и для этого можно не выходить из «Безопасного режима».
Подробнее: Установка и удаление программ в Windows 10
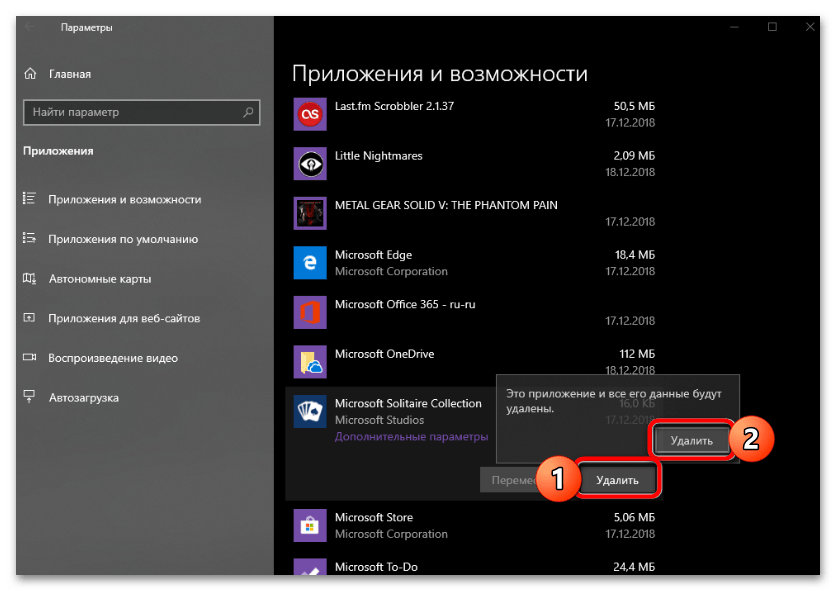
Иногда можно заметить, что при удалении какой-либо сторонней программы появляются ошибки. Это значит, что стандартные методы деинсталляции в данном случае не подходят. Придется прибегнуть к принудительному удалению, что осуществляется как в ручном режиме, так и через специальный софт от сторонних разработчиков.
Читайте также: Методы принудительного удаления программ в Windows 10
Способ 4: Проверка целостности системных файлов
Многие ошибки, сопровождающиеся синим экраном смерти, могут появляться при сбоях в работе системных файлов Windows. Обычно они повреждаются или удаляются, что и приводит к нестабильной работе Windows 10. Самостоятельно проверить это невозможно, поэтому и были разработаны системные утилиты, отвечающие за сканирование всех системных файлов и дальнейшее их восстановление. Вам необходимо прочитать инструкции по следующей ссылке, чтобы понять, как взаимодействовать с этими утилитами и к какой обращаться в разных ситуациях.
Подробнее: Как проверить целостность системных файлов в Windows 10
Способ 5: Увеличение объема файла подкачки
Одна из нераспространенных причин появления синего экрана смерти «KERNEL_MODE_HEAP_CORRUPTION» в Виндовс 10 — недостаток оперативной памяти. Соответственно, сбой появляется исключительно в тот момент, когда на операционную систему оказывается большая нагрузка. В качестве решения можно включить виртуальную память или выделить для нее немного больше объема, отталкиваясь от изначального размера физической памяти. Далее можете проследить за динамикой потребления ресурсов через тот же «Диспетчер задач» и проверить, не будет ли снова сбоев при больших нагрузках.
Подробнее: Увеличение файла подкачки в Windows 10
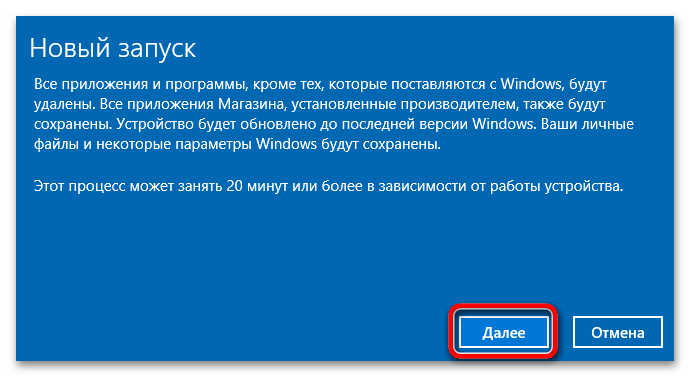
Способ 6: Возвращение Windows 10 до заводских настроек
Остается разобрать только самый радикальный метод — переустановку операционной системы. Однако вместо этого мы рекомендуем вернуть ее в исходное состояние. Процесс похож, но займет меньше времени и не требует носителя с установщиком. Вы можете получить все инструкции по данной теме, кликнув по следующему заголовку. Однако учитывайте, что прибегать к такому решению стоит в том случае, если все предыдущие уже были испробованы и не принесли должного результата.
Подробнее: Возвращаем Windows 10 к заводскому состоянию
Сохранение ошибки «KERNEL_MODE_HEAP_CORRUPTION» даже после переустановки ОС свидетельствует о сбоях в работе железа. В первую очередь вытащите и снова вставьте оперативную память или поменяйте слоты. Произведите проверку жесткого диска и убедитесь в том, что мощности блока питания хватает для корректной работы при пиковых нагрузках.
Читайте также: Как проверить на работоспособность: процессор, оперативную память, видеокарту, жесткий диск
Наша группа в TelegramПолезные советы и помощь
BSoD or Blue screen of death are dreaded error screens that are generated when there is a critical failure. The Kernel Mode Heap Corruption is one such error that causes the system to crash unexpectedly. It displays a stop code – KERNEL_MODE_HEAP_CORRUPTION and a bug check value of 0x0000013A.
This error occurs due to reasons, such as memory leaks, outdated or malfunctioning drivers, or hardware issues like faulty RAM module/s. Software conflicts are also said to generate this BSoD, which is rare, however. Let’s look at this error in detail.
What is the Kernel Mode Heap Corruption BSoD Error?
The KERNEL_MODE_HEAP_CORRUPTION BSoD error indicates corruption in the heap or a specific data structure. This error screen is displayed when the computer detects an issue with the system memory or encounters missing or damaged system files. Other reasons could also cause your computer to show this error. These are –
- Insufficient page file size/ virtual memory
- Outdated or malfunctioning drivers
- Corrupt or missing system files
- Faulty hardware (mostly RAM)
- Conflicting software
Methods to Resolve the Kernel Mode Heap Corruption BSoD Error
It’s not easy to find the root cause behind a BSoD. The same is true with the fixes, as there is no ‘one fit for all’ solution. Hence, we will use various methods to try and eliminate the Kernel mode heap corruption error screen.
Methods –
Method 1: Check for Malware
Method 2: Update Device Drivers
Method 3: Fix Corrupt System Files and System Image using SFC & DISM Commands
Method 4: Check RAM Modules for any issues
Method 5: Increase Virtual Memory Limits/Page File Size
Pre-check –
Before we move on to the methods, let’s try and identify the root cause behind the KERNEL_MODE_HEAP_CORRUPTION BSoD screen. We will use the Event Viewer, a built-in Windows utility to check logs and details related to various significant events like this BSoD error. Here’s how you can use it –
- Press WINDOWS + X and click on Event Viewer from the list.
- Expand the Windows Logs entry and click on System under it.
- Locate the ‘Kernel mode heap corruption’ log on the left side.
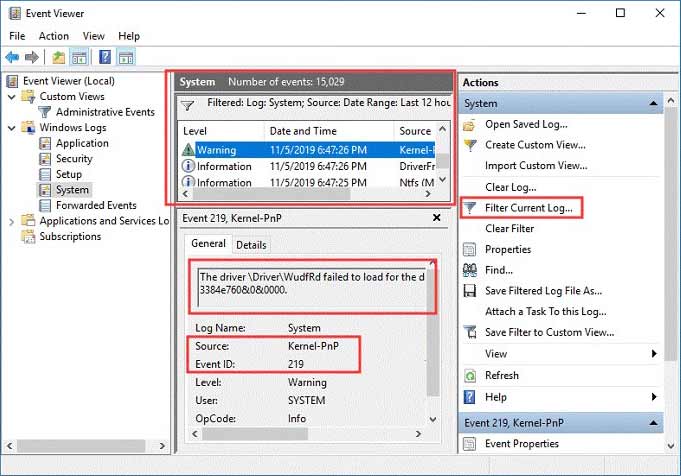
- Double-click on it to open it and read more about it.
- Note down the Event ID and Source for better understanding.
Once you have the information related to the BSoD, you will be better equipped to identify the cause/s behind this BSoD and deal with it. Now, move on to the methods to get rid of the KERNEL_MODE_HEAP_CORRUPTION blue screen error.
Method 1: Check for Malware
Malware infections are one of the root causes behind the KERNEL_MODE_HEAP_CORRUPTION error. If you have encountered this BSoD, the first thing you should do is run a full system scan. Use a reliable antivirus or Windows Defender to eliminate any system infections.
Method 2: Update Device Drivers
Outdated or corrupted device drivers can cause system-wide instability, causing devices or components to malfunction. This can lead to various errors like the KERNEL_MODE_HEAP_CORRUPTION blue screen error message. To resolve this, you can go to the Device Manager and update the outdated device drivers. Here are the steps for this –
- Press WINDOWS + X and click on Device Manager.
- Locate the device that you want to update and expand it.
- Right-click on the device with a yellow exclamation mark and click on Update driver.
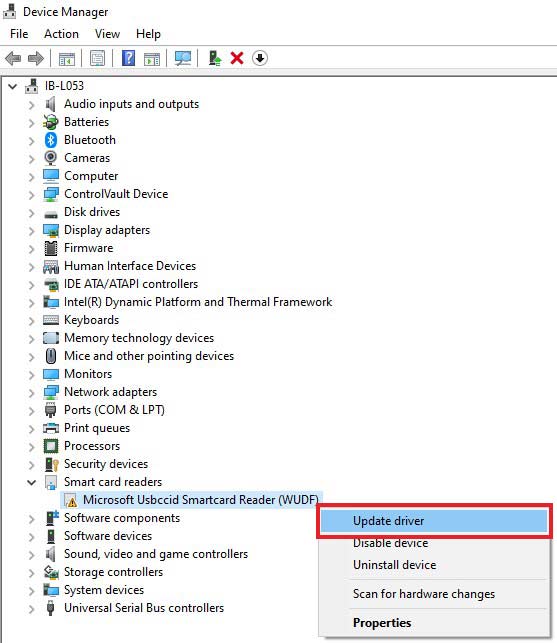
- Select the Search automatically for updated driver software option and wait for the process to finish.

- Once the latest driver is installed, restart your computer.
Note – Some users were able to fix the KERNEL_MODE_HEAP_CORRUPTION blue screen error by updating the GPU driver. For that, you can go to your GPU manufacturer’s website to download the latest driver.
Method 3: Fix Corrupt System Files and System Image Using SFC & DISM Commands
If your computer is generating the KERNEL_MODE_HEAP_CORRUPTION BSoD, there are high chances of corrupt, missing, or damaged system files. It could also be a case of bad system image. You can execute SFC and DISM commands in the command prompt to rule out these possibilities.
To perform DISM scan –
- Open the Command Prompt with administrator privileges.
- Execute the following command – DISM /Online /Cleanup-image /Scanhealth.
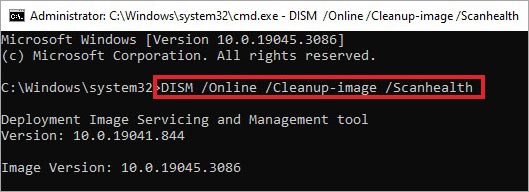
- Then, execute this command – DISM /Online /Cleanup-image /Restorehealth.
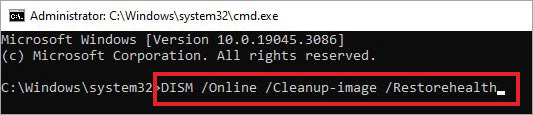
- Let the process complete.
The DISM is a built-in disk image repairing tool which repairs any damage to the Windows OS image. Once this is done, perform the SFC command in the same CMD window.
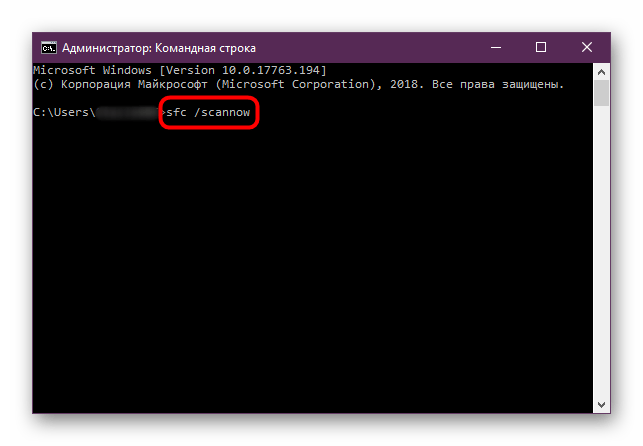
To perform the SFC scan –
- Type the following command – SFC /scannow.
- Press Enter to execute it.
Wait for the scan to complete. It will repair or replace any damaged or corrupt system files.
Method 4: Check RAM Modules for Any Issues
An improperly seated or faulty RAM module can sometimes cause the KERNEL_MODE_HEAP_CORRUPTION BSoD error on your computer. To check the RAM modules in your PC, you can use either of the two methods explained below –
- Using the built-in troubleshooter in Windows 10/11
- Using MemTest86, a memory testing freeware.
Let’s see how you can use these methods to fix blue screen errors like the Kernel mode heap corruption on your windows PC.
To use the Windows Memory Diagnostic tool –
- Press WINDOWS + Q
- Search for the Windows Memory Diagnostic
- Click on Run as administrator.
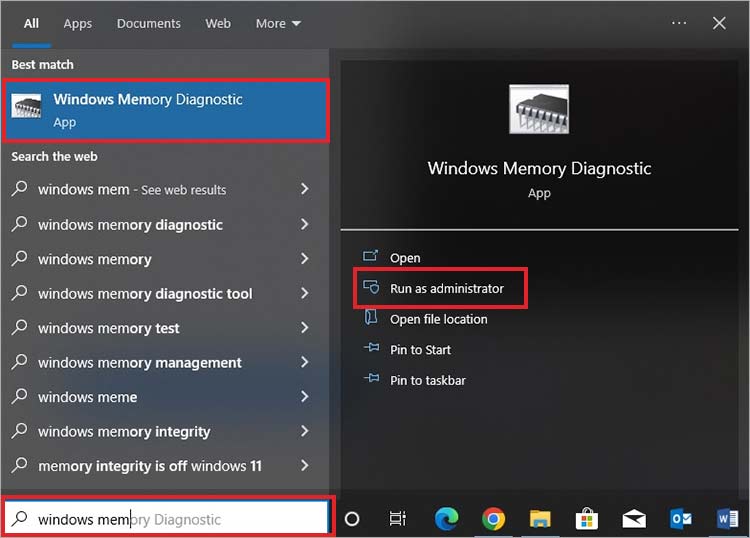
- Click the Restart now and check for problems (recommended)
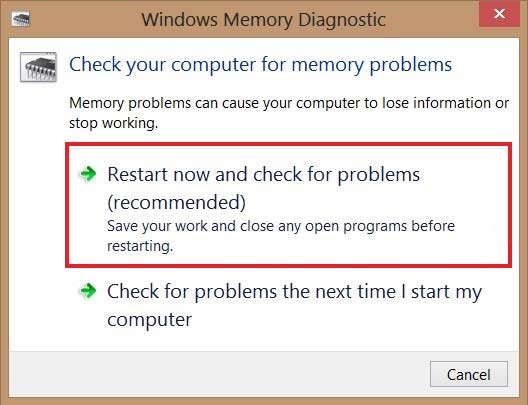
Let the wizard perform the action. If the test shows any errors upon completion, run the auto-troubleshooter and resolve them. Once done, restart the system to check if this has resolved the BSoD error screen.
Using MemTest86 –
- Open your web browser and download MemTest86.
- Follow the instructions to create a media creation tool.
- Run Memtest86 by following the instruction as per the manual.
Method 5: Increase Virtual Memory Limits/Page File Size
Players playing a popular title, ‘Escape From Tarkov,’ reported encountering the KERNEL_MODE_HEAP_CORRUPTION BSoD error. Even with a top-notch system configuration, their computers became sluggish and crashed, followed by this BSoD error.
As per the players, while playing on high graphics settings or during offline raid mode, the game uses more than 16 GB of RAM. This causes the RAM to reach almost 100% usage, leading to system crashes and unexpected BSoD screens. A Reddit user reported getting rid of this issue by increasing the virtual memory limits to accommodate graphic and asset rendering by the game.
Increasing virtual memory is a great way to address your computer’s memory issues.
To increase virtual memory or paging file size, you can choose from the following two methods – using Settings and Command prompt. We will look at both of the ways one by one.
To increase virtual memory using Settings –
- Press WINDOWS + I to open the Settings
- Click on System.
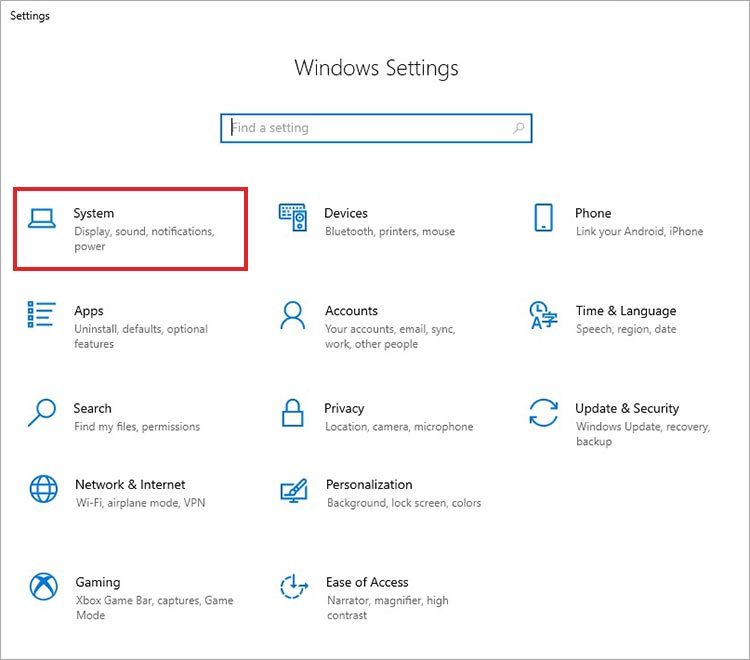
- Scroll down to find About in the left pane. Click on it.
- On the right pane, locate the Related settings and click on Advanced system settings under it.
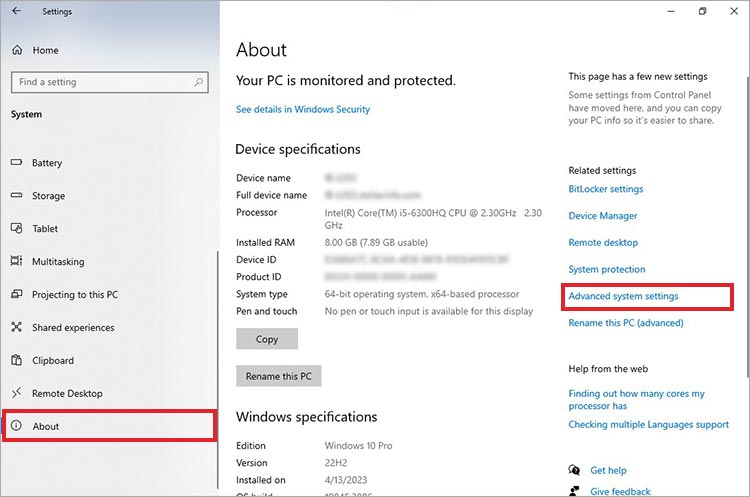
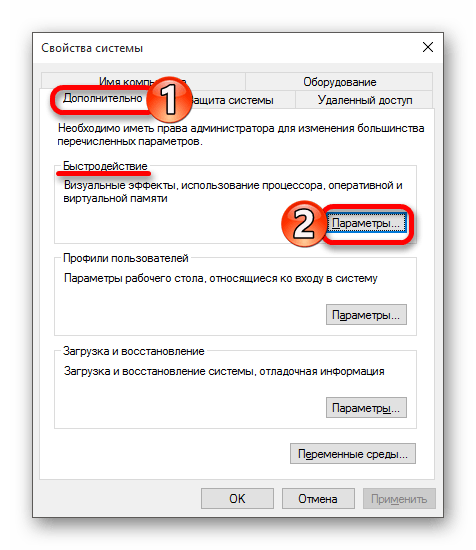
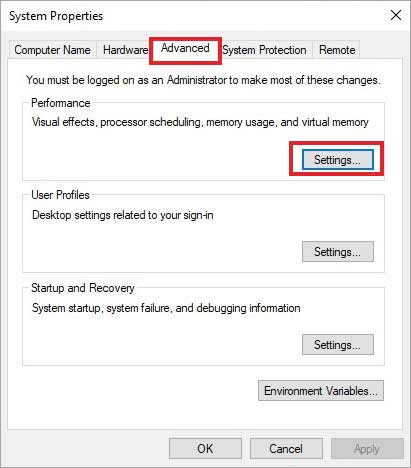
- In the System Properties window, click on the Advanced
- Navigate to the Performance section and click on Settings.
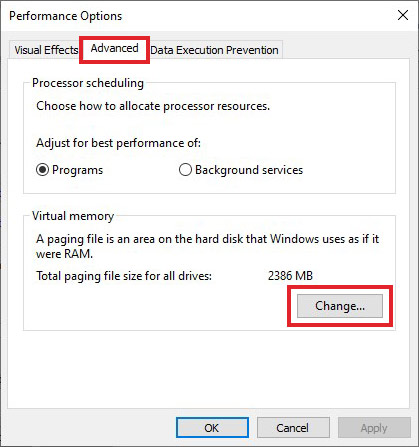
- In the new window, click on the Advanced
- In the Virtual memory section, click on Change.
- Uncheck the Automatically manage paging file size for all drives
- Select the Custom size
- Specify the Initial and the Maximum size. Generally, a number that is 1.5 times the total available memory should be used as the Initial size value, and a number 3 times the available memory should be used for the Maximum size (if possible).
- Once you’ve entered the values, click on Set.
- Click on OK.
- Click on OK
- Restart your computer.
Using Command Prompt to modify the paging file size –
- Press WINDOWS + R and type CMD.
- Press CTRL + SHIFT + ENTER to open it as an administrator.
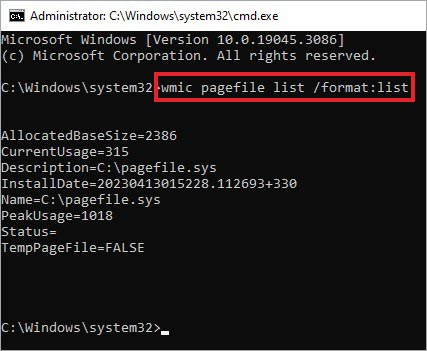
- Execute the following command — wmic pagefile list /format:list
- Now execute the following command — wmic computersystem where name=»%computername%» set AutomaticManagedPagefile=false

- Now execute the following command to set the initial and the maximum size of the virtual memory — wmic pagefileset where name=»C:\\pagefile.sys» set InitialSize=YOUR-INIT-SIZE,MaximumSize=YOUR-MAX-SIZE
Note – Here, replace the YOUR-INIT-SIZE with a number 1.5 times the total available memory as the Initial size value. Similarly, replace YOUR-MAX-SIZE with a number 3 times the available memory for the maximum size. For e.g., — wmic pagefileset where name=»C:\\pagefile.sys» set InitialSize=9216,MaximumSize=12288
- Once the command is executed, restart your computer for the changes to take effect.
After rebooting, your PC will use the new paging file limits.
Changing the virtual memory size should improve the gaming experience and resolve the Kernel mode heap corruption BSoD error.
Recover Lost Data Due to BSoD Error
Blue screen errors like the KERNEL_MODE_HEAP_CORRUPTION are annoying and hamper our work in numerous ways. While most of the time, they are easily resolved, sometimes they cause frequent crashes, causing subsequent damage to the system or its components. This leads to data loss, file corruption, bad sectors in the drive, and other issues.
In a typical situation where the system has been rendered unbootable or is frequently crashing, recovering data in one piece becomes essential. This is where you need a professional data recovery software like Stellar Data Recovery Professional.
This handy software recovers inaccessible or lost data present in the storage drive of an unbootable or crashed computer. Thanks to its powerful algorithms, you get to do a bit-by-bit search and bring out everything that can be recovered.
Its intuitive UI empowers all kinds of users to use it without much hassle and retrieve their data in a matter of a few clicks. Follow this detailed guide to learn how to use Stellar Data Recovery Professional to recover data from your unbootable/crashed PC.
Some Handy Tips
As the KERNEL_MODE_HEAP_CORRUPTION blue screen error is a memory-related issue, the methods mentioned earlier in this post should help you resolve it. However, there are some handy tips you can use to troubleshoot this BSoD error –
- To avoid overheating of your computer and its components, keep it in a well-ventilated area.
- Switch RAM slots
- Switch from dual channel to single channel RAM configuration.
- Try disabling startup items.
BSoD Terminated
The KERNEL_MODE_HEAP_CORRUPTION BSoD error in Windows PCs is an irritating issue that usually happens due to insufficient page memory or RAM. Many users have faced this pesky issue, and if you are one of those, the methods mentioned here should help you fix this BSoD error easily.
P.S. – The KERNEL_MODE_HEAP_CORRUPTION blue screen error could also occur due to overclocked components. Try disabling overclocking to get rid of this error.