
The 0x00000119 is a common issue that can occur in Windows and can lead to a blue screen of death (BSOD) with system crashes. This error is related to graphics drivers and can be caused by a variety of factors such as outdated applications, faulty hardware, or corrupted system files.
If you are experiencing the 0x00000119 on your Windows PC, there are several methods you can use to fix the issue. In this article, we will explore the most effective solutions to this problem. See: Fix: Video Scheduler Internal Error in Windows 10.
0x00000119 Blue Screen in Windows
Here is how to fix Error Code 0x00000119 Blue Screen in Windows –
Way-1: Update Graphics Drivers
The most common cause of 0x00000119 error is outdated or corrupt graphics drivers, therefore, the first step in fixing this bug check BSOD is to update them. You can do this manually by following the steps:
- Press Windows key + X.
- Select “Device Manager” from the list of options.
- Expand the Display Adapters category by clicking on the arrow mark or by a double click.
- Right-click on your graphics card.
- Select Update Driver from the context menu.
- Then, choose “Search automatically for updated driver software” and head to the on-screen guide to complete the process.
Note: Usually, for error 0x00000119 NVIDIA is found faulty and the Geoforce company releases hotfixes from time to time. So keep track of the company’s hotfix page. Once any patch is rolled out, download and install it.
If there is no updated driver available, you can download the latest one from the manufacturer’s website and install it manually.
See: Dump File Location Windows 11 or 10 and How to Configure System to Collect Memory Dump Files in Windows 11 or 10.
Way-2: Install Pending Windows updates
Windows update might rescue Video_scheduler_internal_error blue screen error if it is started because of buggy software or other updates. So check for and install if any pending is available:
- Hold down the Winkey.
- Type updates and hit Enter.
- When Settings open, click on – Check for updates.
- Once the system completes scanning, select – Download and Install.
- When asked, click on Restart now.
Way-3: Check for Hardware Issues
If the previous method did not resolve the issue, it’s possible that the 0x00000119 BSOD is caused by faulty hardware. In this case, you should check your hardware components, such as your graphics card, RAM, and hard drive, for any issues.
To check, follow these steps:
- Right-click on Start and select Device Manager.
- Double click the categories of the hardware components you want to check, such as Display Adapters, Memory technology devices, and Disk drives.
- Then, right-click on each device and select Properties from the context menu.
- Check the status of each device to see if it’s working properly. If there are any issues, such as yellow exclamation marks or error messages, try updating the drivers for that device or replacing the hardware component if necessary.
You can also use built-in Windows tools such as the Memory Diagnostic tool and the Disk Check tool to check your RAM and hard drive for any issues.
Way-4: Run dism tool and System File Checker
In case, video_scheduler_internal_error (119) is caused by corrupted system files, you can use the SFC tool to scan and repair any corrupted files. Furthermore, The Deployment Image Servicing and Management (DISM) tool is another built-in Windows tool that can help you fix the “Video Scheduler Internal Error” by repairing corrupted system files. To run them, follow these steps:
- Click on – Start.
- Type – cmd.exe.
- Select – Run as administrator.
- On the User account control dialog, click – Yes.
- Type “sfc /scannow” (without quotes) and press Enter.
- Wait for the scan to complete and once you see “Windows Resource Protection did not find any integrity violations.”, restart your PC.
- Check if 0x00000119 error code is fixed.
- In case, the issue still persists, start the Command prompt with administrative privileges again and run the below command:
dism /online /cleanup-image /checkhealth
dism /online /cleanup-image /scanhealth
dism /online /cleanup-image /restorehealth- Once completed, reboot the system.
Way-5: Disable overclocking
Overclocking is the process of increasing the clock rate or frequency of a computer component, such as the CPU, GPU, or RAM, to achieve higher performance than the manufacturer’s recommended specifications. This can cause increased heat production, which can damage or shorten the lifespan of computer components. Therefore, for 0x00000119 Video Scheduler Internal error, overclock might be a culprit.
Disabling Overclocking might help fix this Blue Screen error in Windows so move forward with the steps:
- Restart your computer and access the BIOS settings by pressing the appropriate key during boot-up. The key may vary depending on your computer manufacturer and model, but it is usually one of the following: F2, F10, F12, Esc, or Delete. You can consult your computer’s documentation or manufacturer’s website for the specific key.
- Once you are in the BIOS settings, look for an option to reset the settings to their default values. The option may be labeled as “Load Setup Defaults”, “Reset to Default”, or similar.
- Select the option and confirm the action.
- Save the changes and exit the BIOS settings.
- Once your computer has restarted, the overclocking should be disabled, and your computer should be running at the manufacturer’s recommended clock rate or frequency.
Way-6: Perform a Clean Boot
Performing a clean boot on your Windows PC can help you troubleshoot 0x00000119 Video scheduler internal error (sometimes occurring due to AMD graphics) by disabling all non-essential startup programs and services.
This allows you to identify and isolate the cause of any issues with your system. Here are the steps to perform a clean boot in Windows:
- Click on – Search.
- Type – msconfig.
- Press – Enter.
- In the System Configuration window that opens, select the Services tab.
- Check the box next to “Hide all Microsoft services” at the left bottom of the window.
- Then, click on the “Disable all” button.
- Next, select the Startup tab.
- Click on the “Open Task Manager” link.
- In the Task Manager window, select each startup item and click the “Disable” button.
- Close the Task Manager window and return to the System Configuration window.
- Click on the OK button to save the changes.
- Restart your computer for the changes to take effect.
Once your computer restarts, it will boot with a minimal basic set of services and programs. Now, you can then perform any necessary troubleshooting steps to identify the cause of the problem. To return to your normal startup configuration, follow the same steps and click the “Enable all” button in the System Configuration window, then restart your computer again.
Way-7: Use System Restore
System Restore is a built-in feature in Windows that allows you to revert your computer’s system files and settings to an earlier point in time when 0x00000119 was not triggered. This way after restoration, you should no longer find the BSOD. Therefore, follow the method –
- Press Winkey+R.
- Type rstrui.exe in the Run dialog box.
- Hit Enter.
- In the System Restore window, check the option Choose a different restore point.
- Click on Next.
- From the list of available restore points select the one when the blue screen was not generated
- Click on “Next” to continue.
- Review the details of the selected restore point and click on “Finish” to start the process.
- Confirm that you want to proceed with the restore by clicking “Yes.”
- Wait for the restore process to complete. This may take several minutes or more, depending on the size of the point.
- Once the system restore process is complete, the computer will reboot.
Hope these 6 methods will solve the Error Code 0x00000119 blue screen in Windows.
Methods:
Way-1: Update Graphics Drivers
Way-2: Install Pending Windows updates
Way-3: Check for Hardware Issues
Way-4: Run dism tool and System File Checker
Way-5: Disable overclocking
Way-6: Perform a Clean Boot
Way-7: Use System Restore
That’s all!!
Сам BSOD возникает только после вывода ПК из спящего режима, но при этом не каждый раз, так что какую-либо иную причину/зависимость установить пока не удалось. Пробовал смотреть дамп через BlueScreenViewer — ссылается ошибку в двух файлах: dxgmms2.sys и watchdog.sys. Гуглил эту ошибку, но в основном находит ситуации ~10-летней давности ещё на Windows 7 и с другими сценариями возникновения (у кого-то в скайпе возникал, у кого-то во время игры), поэтому решил спросить здесь, возможно, кто-то уже сталкивался с подобной проблемой и/или знает, в каком направлении лучше копать, т.к. обычно грешат на видеокарту, но я сомневаюсь, что она может некорректно работать при выходе ПК из сна и при этом корректно работать под нагрузкой в играх.
Конфигурация ПК:
Матплата: Gigabyte B550M DS3H
Видеокарта: MSI NVIDIA RTX 3060
Процессор: AMD Ryzen 5 5600X
Оперативная память: NETAC DDR4 16Gb (2x8Gb) 3200MHz
БП: Deepcool DQ750ST Quanta 750W ATX Gold
Некоторые пользователи могут столкнуться с синим экраном VIDEO_SCHEDULER_INTERNAL_ERROR — обычно во время игры, но иногда и при более простых задачах, например, во время просмотра видео в браузере. Обычно ошибка имеет отношение к работе видеоадаптера или его драйверов, но возможны и иные варианты.
В этой инструкции подробно о способах исправить ошибку VIDEO SCHEDULER INTERNAL ERROR в Windows 11 и Windows 10, один из которых, вероятно, сможет помочь в решении проблемы.
Основные способы решения проблемы

В большинстве случаев синий экран VIDEO SCHEDULER INTERNAL ERROR бывает вызвана сбоями драйвера видеокарты, причиной которых может быть:
- Неправильная работа драйвера
- Неправильные вызовы команд со стороны конкретной программы или игры
- Сбои при определенных режимах работы: например, игра в оконном режиме с одновременным просмотром видео в браузере
- Редко — проблемы с видеокартой, иногда — оперативной памятью
Независимо от ситуации, первые простые действия, которые следует попробовать в случае, если вы регулярно стали сталкиваться с рассматриваемой ошибкой (на однократный сбой можно не обращать внимания):
- Если недавно выполнялось обновление драйверов видеокарты (как интегрированной, так и дискретной), попробуйте использовать диспетчер устройств для отката драйвера на предыдущую версию: откройте диспетчер устройств (можно нажать правой кнопкой мыши по кнопке «Пуск» и выбрать нужный пункт меню), дважды нажмите по видеоадаптеру и проверьте, доступна ли кнопка «Откатить». Если да — попробуйте выполнить откат.

- Попробуйте скачать (пока не устанавливать) установщики драйверов видеокарты с официального сайта NVIDIA, AMD, Intel или сайта производителя вашего ноутбука (но там будут старые версии драйверов), полностью удалить драйверы видеокарты (обычно достаточно дискретной) с помощью утилиты Display Driver Uninstaller — делать это следует в безопасном режиме (как зайти в безопасный режим), а после удаления установить драйверы из скачанных установщиков.

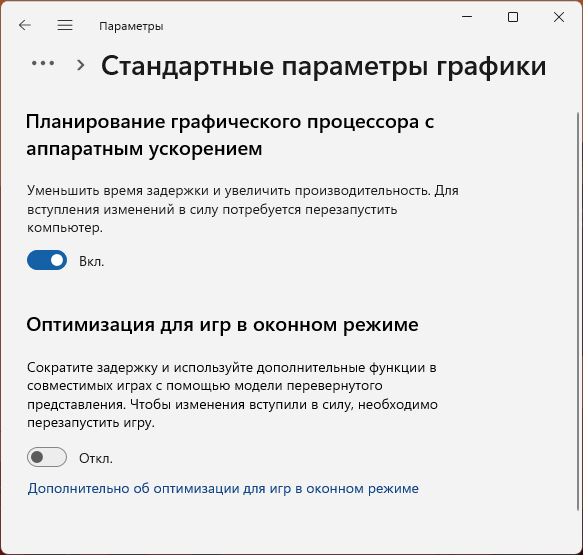
- Проверьте, изменяется ли ситуация с ошибкой VIDEO SCHEDULER INTERNAL ERROR в зависимости от того, включена или отключена функция Планирование графического процессора с аппаратным ускорением — подробно о включении и отключении в Windows 11/10. В том же разделе настроек можно поэкспериментировать с параметром оптимизации для игр в оконном режиме, если ошибка появляется именно в нём.

- Если ошибка возникает при работе в браузере, попробуйте отключить аппаратное ускорение в нём.


Во многих случаях описанных шагов бывает достаточно, чтобы ошибка в дальнейшем не появлялась.
Анализ дампа памяти
По умолчанию при ошибках на синем экране Windows создает дамп памяти в папке C:\Windows\Minidump с информацией о сбое (функция может быть отключена, в этом случае можно включить сохранение дампов памяти). Их можно использовать для поиска причин ошибки с помощью специальных программ для анализа дампов памяти.
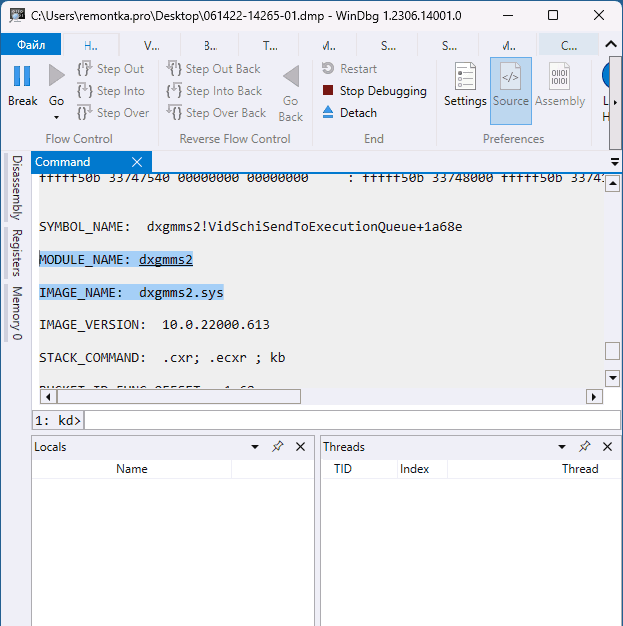
Например, в случае с ошибкой VIDEO SCHEDULER INTERNAL ERROR при использовании WinDbg (можно установить из Microsoft Store) шаги будут следующими:
- Запустить WinDbg, открыть файл дампа памяти через меню Файл — Open — Start Debugging — Open Dump File.
- Нажать по ссылке
!analyze -v
в окне или вручную ввести эту команду и нажать Enter.
- После завершения анализа дампа памяти обратить внимание на значение аргумента 1 (Arg1) с пояснением о причинах ошибки (для VIDEO SCHEDULER INTERNAL ERROR только этот аргумент является важным для анализа, подробнее на официальном сайте Майкрософт )

- Посмотреть, какой модуль вызывает сбой — обычно это файла драйвера .sys, в нашем случае это может быть файл драйвера видеокарты или какой-либо системный драйвер. Если назначение драйвера вам неизвестно, его обычно можно найти в Интернете.


Полученная информация может помочь разобраться, в каких драйверах, оборудовании или ПО продолжить искать проблему.
В завершение — дополнительная информация и возможные способы исправить ошибку, если предыдущие не сработали:
- В некоторых случаях может помочь простая установка обновлений Windows 11/10, а если ошибка стала появляться после их установки, то использование точек восстановления системы или удаление последних обновлений.
- Если ошибка появляется только в одной конкретной игре, можно попробовать поэкспериментировать с настройками графики в ней, использовать другую версию игры или другой источник для её загрузки.
- Одновременная работа нескольких приложений, интенсивно использующих возможности видеокарты, может приводить к рассматриваемой ошибке. В некоторых случаях вторым таким приложением может оказаться майнер на компьютере — имеет смысл выполнить проверку на наличие вирусов и других вредоносных программ.
- Если вы используете разгон видеокарты, следует проверить, решится ли проблема, если его отключить, а для изначально разогнанных видеокарт (аббревиатура OC в названии) — попробовать снизить частоту ядра.
И, наконец, ошибка VIDEO SCHEDULER INTERNAL ERROR может говорить об аппаратных проблемах видеокарты: от плохого подключения или окисленных контактов и недостатка питания до выхода из строя. Один из частых сопутствующих симптомов в данном случае — артефакты на изображении.
Blue Screen of Death error codes is quite annoying as it doesn’t let you boot into your device normally. In this post, we are going to discuss one such blue screen error 0x00000119, the reasons triggering it on Windows, and the seven fixes that might help you to overcome this issue.
Blue Screen Error 0x00000119 Fixed – 7 Ways
If you are unable to boot into your device because of an error code 0x00000119 and remain stuck on the Blue Screen for a long time, we suggest following these fixes and having this issue sorted out. Here’s a list of solutions that might help you with addressing this error code –
- Update your Graphics Card
- Use Reset this PC
- Disable OverClocking
- Diagnose Memory (RAM)
- Inspect the Hard Disk
- Perform a System Restore
1] Update your Graphics Card
The presence of a faulty graphics card is the prime reason why such an error occurs in Windows. If you haven’t updated your graphics card drivers for a long time, follow these steps to update your graphics card, and a few other associated device drivers –
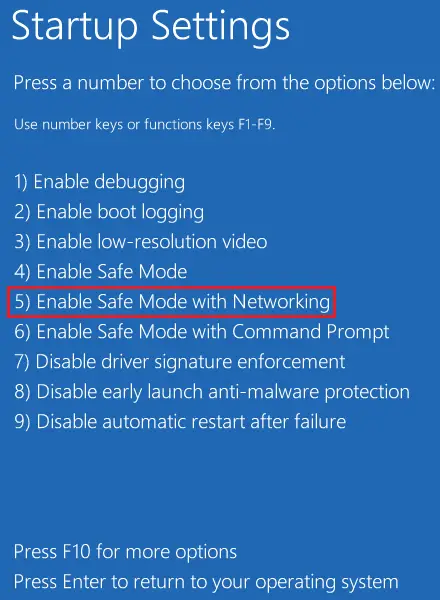
- Boot into Safe Mode with networking first as you can’t apply any solution while remaining on the Blue Screen.
- After you successfully boot into Safe mode on your device, open Settings by pressing Windows + I.
- Go to Windows Update > Advanced options > Optional updates, and check if there are any driver updates pending for your computer.
- Tick all the checkboxes under “Driver updates” and then hit “Download & install“.

- Wait for all the updates to install successfully on your computer and when this is over, restart your computer.
Hopefully, you are now able to boot into your Windows PC normally. If not, follow the next set of solutions discussed below.
2] Use Reset this PC
The recovery environment in Windows lets you fix such errors by either opting for Automatic Repair or via the “Reset this PC” option. When your device first stuck into this blue screen issue, it must have already tried the Automatic Repair option. So, here in this fix, we will discuss how to utilize the Reset this PC option.
- Power On and off your device 2-3 times using the power key, and you will see “Choose an option” appearing on your display screen. Select Troubleshoot on this window.

- From the next screen, select Reset this PC, and follow the on-screen instructions that appear moving forward.
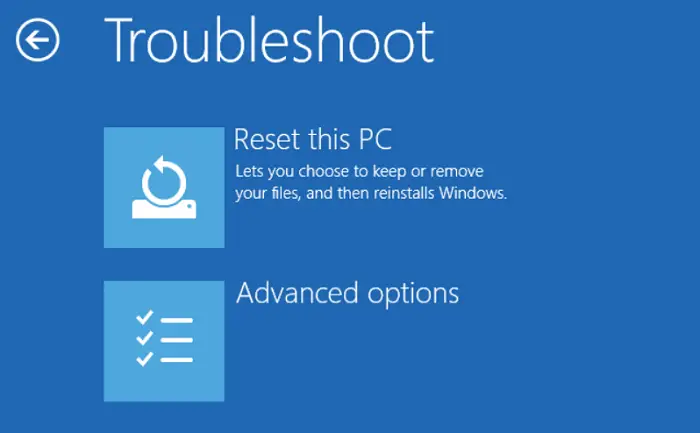
- By the end of this fix, you will be able to resolve the Blue Screen Error 0x00000119 on your Windows PC.
3] Disable OverClocking
Though overclocking on a device increases its proficiency by increasing the clock rate or frequency, it may at times result in some error codes on your PC. A perfect example of this is receiving the Video Scheduler Internal Error, 0x00000119 on your computer. If that’s the case, you should disable overclocking by following these easy steps –
- Restart your PC using the power button and while it is loading, press and hold the BIOS menu key. This could be any key varying on your PC’s manufacturer. But it mostly belongs to one of these – F2, F10, F12, Esc, and Delete.
- Now that you are inside the BIOS Settings, look up options like “Load Setup Defaults”, “Reset to Default”, or something similar.
- When found, click on the same. If this asks for any confirmation, do the needful.
- In the end, press F10 to save the recent changes and exit the BIOS mode.
- Doing so will bring back the default values on your computer and disable overclocking as well (default state).
As you have disabled overclocking successfully, there’s a possibility that you may boot into your device normally now.
4] Diagnose Memory (RAM)
A Blue Screen of death error typically occurs on a corrupted RAM (Memory) or the hard disk (HDD). Here’s the guideline to check if your Memory is all okay or if it requires a replacement –
- First of all, boot into Safe Mode on your computer.
- Press Windows + R, and type “
mdsched” in the Run dialog box, and hit OK. - Windows Memory Diagnostic tool will open up next.
- Choose the first option i.e. Restart now and check for problems.

- Wait for the next 2-3 minutes, while the system is scanning for any corruption within your Memory (RAM).
- If none are found, you should definitely replace the old RAM with a new one. Else, head over to the next solution.
5] Inspect the Hard Disk
As stated earlier, BSOD errors mostly occur because of some corruption within either the Memory or the hard drive (HDD). Assuming that you have already checked your RAM and didn’t find that faulty, here’s a way how to inspect your hard disk in Windows while being on the blue screen –
- Turn On and off your device repetitively 2-3 times using the power button.
- Doing so will invoke the WinRE screen. Go to Troubleshoot > Advanced options, and select Command Prompt.

- When the CMD launches, copy/paste the below command near the blinking cursor, and press Enter –
chkdsk c: \f \x \r
- If this prompts a question on whether you would like to initiate a disk checkup when your device restarts, type “Y” without quotes, and press the Enter key again.
- Wait for the CHKDSK tool to complete its scan and if this reports bad sectors inside your hard drive, you better replace the same with an SSD.
However, if this reports no issues with the hard disk, you may go ahead and apply the last workaround.
6] Perform a System Restore
If none of the above solutions help to resolve this BSOD Error 0x00000119, you may go for reverting your PC back to its previous stable state. You may use a restore point only if you had enabled the system protection on the root drive. Or, else you simply perform a clean installation of Windows as this method is not going to help you at all.
Follow the below steps on how to use a system restore point while being on the blue screen –
- Power On and Off your device 2-3 times using the power button and your device will automatically boot into Windows Recovery Environment.
- When the “Choose an option” window appears, select Troubleshoot. Moving forward, select Advanced options.

- Locate and click on the “System Restore” option next.

- The system will check if there are any restore points available on your computer. If the system presents you with some options to choose from, choose the latest backup, and click Next.
- Follow the on-screen instructions moving forward and at the end, hit Finish.
Note: This whole reverting of your system back to its previous state will take some time, so wait accordingly.
- After this is over, you may restart your Windows PC and continue logging into it as usual.
I hope this article indeed helps you to find and resolve the underlying causes behind the Blue Screen Error 0x00000119 on your Windows PC. Let us know in the comment section if you are still encountering the same error code again. Most probably, you aren’t, right?
As discussed before Normally Blue Screen of Death error occurs whenever your computer encounters something it doesn’t understand how to process — so it turns itself along and lets you know what that problem was to save itself. And the BSOD Error Video Scheduler Internal Error indicates that the video scheduler has detected a fatal violation. The error is mostly caused because of the Graphics card which is either disabled or outdated and its drivers issue and has a stop code 0x00000119.
This Video Scheduler Internal Error can occur any time while working on your pc, playing the game, start from sleep mode or while startup windows Restart frequently with a Blue screen. Like Other BSOD Errors, this Video Scheduler Internal Error mostly encounter after update a recent display driver update, and new application installation, due to corrupt system files.
Contents
- 1 How To Fix Video Scheduler Internal Error
- 1.1 Check for Hardware issue
- 2 Start windows into safe mode
- 2.1 Update or Roll Back Video Driver
- 2.1.1 Update Graphic Driver
- 2.1.2 Rollback Driver
- 2.1.3 Turn Off Fast Startup
- 2.2 Disable or Remove Security Software
- 2.3 Clean Out the System Junk File
- 2.4 Make sure windows and Drivers are updated
- 2.5 Fix corrupted Registry
- 2.6 Repair Corrupted System Files
- 2.1 Update or Roll Back Video Driver
This Video Scheduler Internal Error Suddenly appears with BSOD error code and restarts the PC, Also While playing a game, Windows stuck at any stage frequently also PC performance may become worst. If you are also suffering from this problem, Here apply the below solutions to fix this Video Scheduler Internal Error on Windows 10 computer. But before apply solutions first understand the reason behind the Video Scheduler Internal Error. Mainly This Error occurs due to damaged or corrupted video driver, Corrupted Windows system files, Viruses or Malware infection or Third-party security software or services. Now, let’s move to the part of the solutions.
Check for Hardware issue
Start with a basic solution first restart windows and check windows start normally. Next unplug all external devices( printer, scanner, audio jack etc ) include power cable, VGA cable and keyboard&mouse. Now press and hold the power button for 30sec, then only attach the power cable, VGA cable and start windows and check windows start normally. If yes then attach the keyboard & mouse and restart windows and check,( If not move to the next solution). Windows start normally then attach external devices one by one and restarts every time to find out any external device causing the issue. If found any problematic device then check the device with another system if causing the same problem then contact the manufacturer.
Start windows into safe mode
If due to this blue screen error windows restart frequently, don’t allow to start windows normally. Then you need to Access windows Advanced Startup options. Where you can perform startup repair, Access safe mode so that you can perform troubleshooting steps to fix Video Scheduler Internal Error. Check How to Boot into safe mode with networking on Windows 10. Note: If you are able to start windows normally then no need to access safe mode you can directly apply the below solutions.
Update or Roll Back Video Driver
As discussed Before the main reason behind this Video Scheduler Internal Error is the corrupted, outdated or incompatible Graphics Driver then we need to focus on the Display driver, and update or roll back the Video Graphic Driver. Are you confused with Update or rollback?
First, clear the concept if the blue screen Started a recent update of your PC as well as the video driver, You can try to roll back the update. Because, If the latest driver update fails to install or if it is problematic, You may face any video driver-related problems.
If you have an incompatible or outdated video driver. In that case, You have to update it to the latest version. Let’s know how to update or roll back video drivers.
Update Graphic Driver
First of all, Press the Windows key + R then type devmgmt.msc and hit the enter key to open Device Manager. Here You will see all installed driver list or your PC. Here Expand Display Adapters, then Right click on your video driver and select Update Driver.
Now select Search automatically for updated driver software, It will automatically update your display driver. Otherwise, if you have downloaded the latest Graphics driver from the manufacturer’s website then select the option Browse my computer for driver software and set the driver path and follow instructions to install it. After that restart windows and check the blue screen error is gone.
Rollback Driver
If you face Video Scheduler Internal Error After a windows update or install the latest updates for your graphic Driver then the Rollback driver is the recommended solution. To perform the Rollback option again open Device manager -> expand Display Adapters -> select and right-click on your installed display driver ( graphic driver ) and click properties.
Now move to the Driver tab, Then click on Rollback. (Note: rollback Driver option only available if you recently update your graphic driver) And follow the on-screen instructions to roll back the display driver, and install the previous driver version which worked before without any problem. Now Restart windows and check the BSOD problem gone, If you still need help follow the next solution.
Turn Off Fast Startup
With Windows 10 Microsoft Added Fast startup option to reduce the system startup time and make windows faster startup. (Fast Startup is a combination of the normal shutdown and Hibernate function. You can read more about fast startup here. ) A number of windows users report Due to this Hybrid shutdown feature they face startup problems, Different BSOD Errors include Video Scheduler Internal Error On Windows 10. And Disable this feature will help to fix these startup problems.
To disable fast startup open control panel -> small icon view -. power options -> choose what the power buttons do -.> change settings that are currently unavailable -> then uncheck Turn on fast startup ( recommended ).
After that click on save changes then simply restart windows then check windows start normally without any BSOD Error.
Disable or Remove Security Software
Also, Some security software may create a BSOD problem. For example, AVG Internet Security may create DPC watchdog violation or video scheduler internal error. So, I would like to suggest you disable your antivirus and restart your PC. Then see what happens. If it solves BSOD, You should uninstall your antivirus software.
Clean Out the System Junk File
Some Times Accumulated junk files can result in Windows OS to respond slowly or even the VIDEO_SCHEDULER_INTERNAL_ERROR problem. And Cleaning up these temporary files with Disk Cleanup might possibly solve this BSOD error Also it can help to speed up the performance of your PC.
To run the disk cleanup Tool Click the Start button and on the search bar type cleanmgr then hit the enter key. This will open the disk cleanup here select the system installed drive ( Normally C: drive ) then click OK.
Then Disk Cleanup will begin to calculate the disk space you can reclaim. Select and check the categories you want to clean from the Disk Cleanup dialog box and then click OK. Generally, the “Temporary Files” category occupies the most disk space. Then after restart, the windows computer normally and check there is no more BSOD errors.
Make sure windows and Drivers are updated
Microsoft Drop updates regularly to fix different bugs, system issues, and driver incompatibility issues. This means Windows update solves many issues on your PC. With Windows 10 Updates are set to install automatically but if for any reason your system didn’t have the latest updates we strongly recommend to install the latest updates on your window s10 computer from
Settings -> update & security – Check for updates.
Again Drivers are the critical part of your computer. All your installed driver are must be updated to run Windows 10 smoothly. Outdated/incompatible drivers can cause different problems. Again we recommend to check and update your install device drivers, especially The display driver, Network adapter and Windows audio driver.
To update Drivers press win + R then type devmgmt.msc and hit the enter key. This will display all installed driver lists here find any yellow tingle under the installed driver. if found then remove this, visit the manufacturer’s website download the latest available driver for that device and install it. you can also right-click on it and select update driver -> then select update drivers automatically to install the latest driver from the windows server.
Fix corrupted Registry
Also, Invalid, damaged or corrupted registries may create a different problem on your Windows PC. And Sometimes, It may become responsible for Video Scheduler Internal Error blue screen problem. So, Run registry scan and fix it. You can use third-party trusted programs to do it. One of the most popular programs in CCleaner. It has options to fix problematic registries.
Repair Corrupted System Files
As we discussed before Corrupted system files can cause different windows problems include Different Blue screen errors and may this Video Scheduler Internal Error is one of them. For that, we recommend to Check your windows computer for corrupted system files using SFC Utility. ( system file checker ( SFC /scannow ) is a system utility help to find and restore corrupted system files on Windows computers. you can read more about SFC Utility here.
To run SFC Utility Open Command prompt as administrator and type command SFC /scannow then hit enter key to execute the command.
This will scan windows for corrupted missing system files if found anything it will restore itself. Wait until 100% complete the scanning process then after restart windows and check windows BSOD error is fixed.
If your system files are corrupted, You will have more chances to face so many issues including BSOD. It is possible to repair them. I have already written an article on it.
If all the above methods fail to fix Video Scheduler Internal Error then it’s time to utilize the system restore feature. Which revert back your windows computer to a previous working state where windows work smoothly without any problem. Check How to perform a system restore on windows computer.
conclusion
These are some best working solutions to fix Different Windows 10 BSOD Errors include Video Scheduler Internal errors on windows computers. I hope after apply these solutions your problem Video Scheduler Internal Error will get solved and windows didn’t show any BSOD Error. Still have any query suggestions about this post feel free to comment below. also read from our blog :
- 7 Best Video Editing Software for Windows 10 (Free And Paid)
- Solved: Driver_power_state_failure Blue Screen Error on Windows 10
- Fix Internal Power Error BSOD on Windows 10 version 20H2
- 3 Ways to Fix your Dead Windows 10 Start Menu problems
- Windows 10 Search not working after windows update? Apply these solutions