
Table of contents
- 1. Set your time zone
- 2. Uninstall and then reinstall problematic updates
- Windows 7
- Windows 8 /8.1
- Windows 10
- 3. Configure your Windows Update settings (for Windows 8.1 only)
- 4. Employ Windows Update Troubleshooter
- 5. Temporarily disable your anti-virus software
- 6. Turn off your firewall
- 7. Add Microsoft servers to the Trusted sites list
- 8. Disable your VPN and proxy
- 9. Troubleshoot your network
- 10. Switch to a different network connection
- 11. Update your network adapter driver
- Use a special tool
- Make use of Device Manager
- Update your driver manually
- 12. Run an SFC scan
- 13. Reset your Windows Update components
- 14. Check your system registry
- 15. Configure your system to an earlier state
‘Progress cannot be generated
when we are satisfied with existing situations’
Taiichi Ohno
Keeping your Microsoft operating system, whether Windows 10, 8, 8.1, or 7, up to date enables you to make best use of system resources and get the most out of your computer. Indeed, by embracing the latest developments and improvements by Microsoft, you can keep numerous problems, such as bugs, crashes, glitches, security issues, and malware attacks, at bay.
Due to the reasons mentioned above, it is vital that you make sure your OS keeps up with advances in software technology. In theory, that is quite easy – Microsoft has paved the way towards the effective implementation of this rule with the Windows Update feature. Thanks to that, your OS can be on the cutting edge.
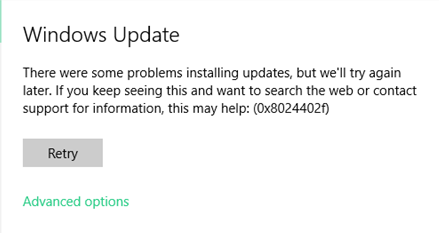
With that said, in practice, things rarely go smoothly. For instance, what are you supposed to do if you encounter ‘Windows Update ran into a problem 8024402f’? Obviously, this issue might seem quite a disaster since it prevents you from getting the much-needed updates aimed at refining your system. However, there is no need to despair: you are not the first to face this nuisance, and we have already collected an exhaustive list of proven tips on how to fix Windows 10 update error 8024402f and the same error on Windows 7, 8, or 8.1. So, here are our methods:
1. Set your time zone
Probably the easiest way to iron out the issue in question would be to properly configure your time zone settings. To do that, use the instructions below:
- Open your Start menu and click on Control Panel.
- Locate Time and Date (or something like that). Click on it.
- Navigate to the Time Zone settings.
- Select the Change time zone option.
- Select your time zone from the list of available options.

- Make sure to confirm your choice for the changes to take effect.

Restart your PC. When your system comes on, check if the manoeuvre above has resolved your update issue.
2. Uninstall and then reinstall problematic updates
Although updates are designed to enhance your user experience, sometimes they do not fit, and that causes your OS to malfunction. Besides, updates may fail to land on your PC properly: as a result, those that have been installed incorrectly can trigger multiple problems.
Anyway, now it is time to check your system for problematic updates and undo them in
Windows 7
- Press F8 during the bootup process to enter Safe Mode.
- Launch your start menu. Locate Control Panel and enter it.
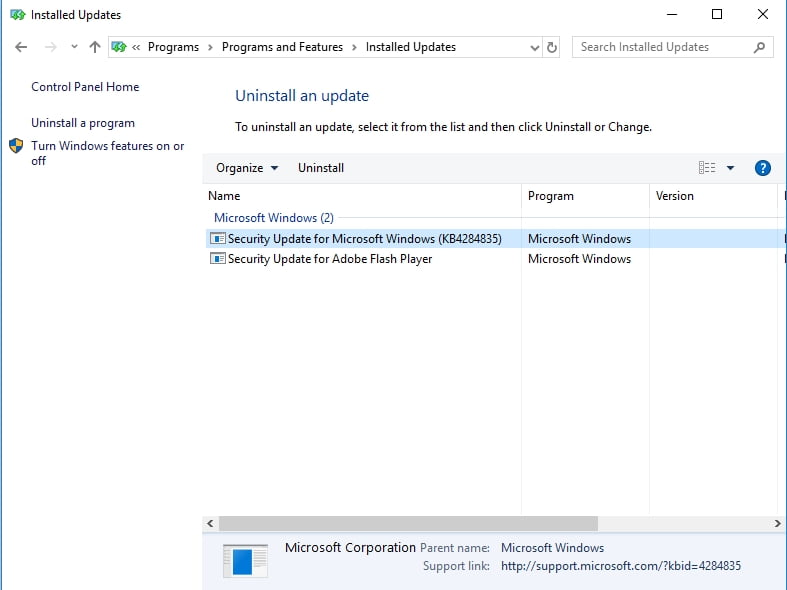
- Go to Programs and Features. Click on the View Installed Updates link.
- Locate the problematic update. Right-click to uninstall it.
Windows 8 /8.1
- Hold the Shift key while restarting your computer or press Shift + F8 or just F8 at startup to be taken to the advanced startup screen.
- Once in it, press Troubleshoot and select Advanced options.
- Press Startup settings. Then click Restart.
- Your PC will restart. Then you will be presented with the list of startup settings. Select Safe Mode.
- Your PC will restart again. In the Advanced Boot Options window, select Safe Mode. Hit Enter.
- Once in Safe Mode, open your start menu and proceed to Control Panel.
- Select Programs and Features and click on View Installed Updates.
- Locate the updates you wish to undo. Right-click and uninstall an undesirable update.
Windows 10
- Press the Windows logo + I keyboard shortcut to invoke the Settings app.
- Click Update & security. Select Windows Update.
- Click View installed update history.
- Select Uninstall updates.
- Double-click on an update to uninstall it.

Restart your PC and see if the issue persists.
3. Configure your Windows Update settings (for Windows 8.1 only)
If the 8024402f issue keeps showing up in Windows 8.1, you can make use of the following workaround:
- Open your Start menu. Proceed to Control Panel.
- Navigate to Windows Updates.
- Left-click on Never check for updates.
- Make sure to uncheck “Give me recommended updates the same way I receive important updates” and “Give me updates for other Microsoft products when I update Windows”.
After performing these troubleshooting steps, check for the necessary updates manually and install them on your computer.
4. Employ Windows Update Troubleshooter
Luckily, Microsoft engineers have developed quite a handy tool to tackle Windows Update issues. To use it, google Windows Update Troubleshooter and click on the link that leads to the Microsoft Support website. Download the troubleshooter for your version of Windows and run it on your computer. The program’s wizard will walk you through the troubleshooting process. All you need to do is follow the on-screen instructions.
5. Temporarily disable your anti-virus software
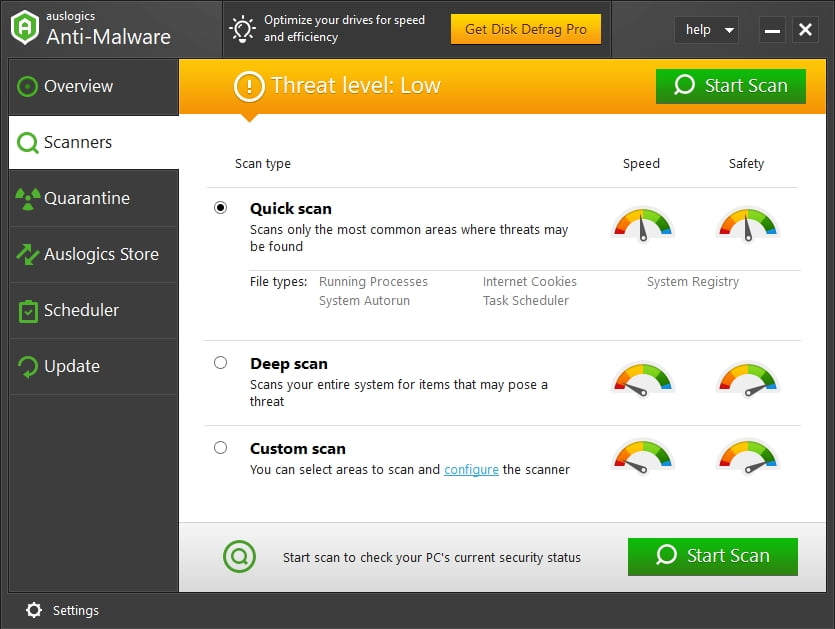
According to many reports, some anti-virus tools can interfere with Windows Update, causing it to throw up red flags and struggle to work the way it is supposed to. In a situation like this, turn off your anti-virus tool and check if that has fixed the problem. If it has, report the issue to the support team of the tool’s vendor. You might even need to switch to another solution. The good news, there is a wide range of PC protection tools available on the market these days. For example, you can opt for Auslogics Anti-Malware: this program will run smoothly on your device, maintaining a superb level of protection against those nefarious entities the modern-day Internet swarms with.
6. Turn off your firewall
The chances are Windows Firewall is behind the persisting error 8024402f on your computer. With that in mind, let’s disable the solution in question so that you can check if it is the culprit:
- Locate the Search area and type Control Panel.
- Select Control Panel from the list of results.
- Click System and Security, then proceed to Windows Defender Firewall.
- Click Turn Windows Defender Firewall On or Off.
- Select Turn off Windows Firewall (not recommended).

- Click OK to save your changes.
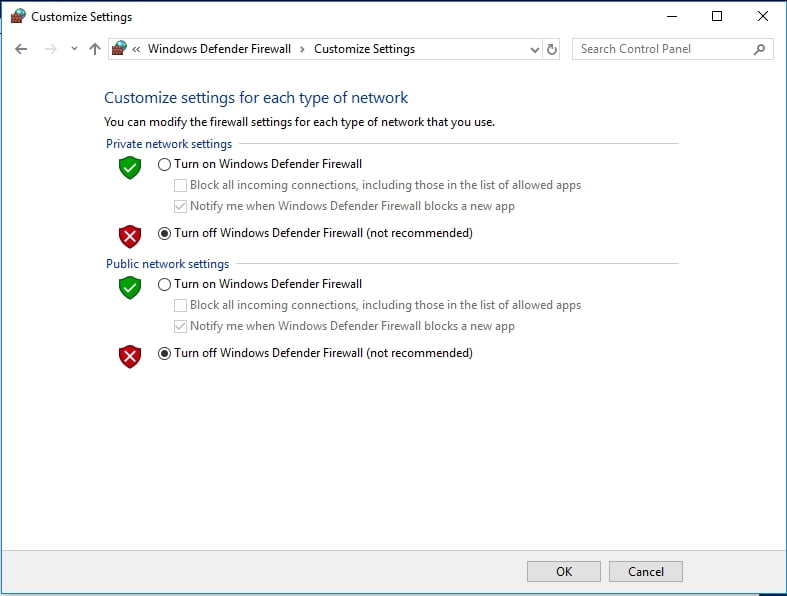
Now check your Windows Update. If it is up and running, update your system, using Windows Update, then turn your firewall on, and move to the following fix. The point is, you need to whitelist certain Microsoft servers so that you will not have to disable your Windows Firewall every time you wish to update your system.
7. Add Microsoft servers to the Trusted sites list
To keep the Windows Update error 8024402f at bay, you should add the following URLs to the trusted zone:
- Download.windowsupdate.com
- Windowsupdate.microsoft.com
- Update.microsoft.com
Here is how to do that:
- Press the Windows logo key and the S key simultaneously.
- In the Search area, input ‘internet options’ (no quotes).
- Select Internet Options from the list of search results.
- Proceed to the Security tab. Select Trusted sites.
- Click on the Sites button.
- Proceed to Add this website to the zone area. Enter the address you wish to whitelist.
- Click Add and Close.
Finally, reboot your PC. The issue 8024402f should bother you no more.
8. Disable your VPN and proxy
No luck so far? Then you should disable your VPN or proxy if you use any. Although, VPNs and proxies allow you to roam freely in the Internet, they might be tampering with your Windows Update. As such, turn them off and try to update your system.
To disable your proxy connection, do the following:
- Open your Start menu and navigate to the Search area.
- Type Internet Options. Select it from the list of search results.
- Now proceed to the Connections tab and click on LAN settings.
- Uncheck Use a proxy server for your LAN.
- Click on OK to save the changes.
If you use a VPN connection, take the steps below:
- Go to your Start menu and search for Control Panel.
- Once in Control Panel, click Network and Sharing Center.
- In the left pane, select Change adapter settings.
- Locate your VPN connection. Right-click on it to remove it.
If the issue is still present, proceed to the following fix.
9. Troubleshoot your network
If you see the ‘Windows Update ran into a problem’ 8024402f error, you might be having network issues. In such a case, use the instructions below to fix your network connection
in Windows 7:
- Open the Start menu. Then go to Control Panel.
- Navigate to Network and Internet.
- Open Network and Sharing Center.
- Click Fix a Network Problem and follow the on-screen instructions to troubleshoot your network problems.
in Windows 8/8.1:
- Enter the Start menu and click Control Panel.
- Go to Network and Internet and proceed to View network status and tasks.
- Select Troubleshoot problems to open the built-in Network and Internet Troubleshooter. It will repair your network problems.
in Windows 10:
- Press the Windows logo key + S shortcut on our keyboard to launch Search.
- Type Network troubleshooter.
- Select Identify and repair network problems.
- The troubleshooter will start. Use it to fix your problems.
Hopefully, your connection issues have been resolved.
10. Switch to a different network connection
If troubleshooting your current network connection has been to no avail, you can migrate to another network connection. Do that and check if this trick has worked.
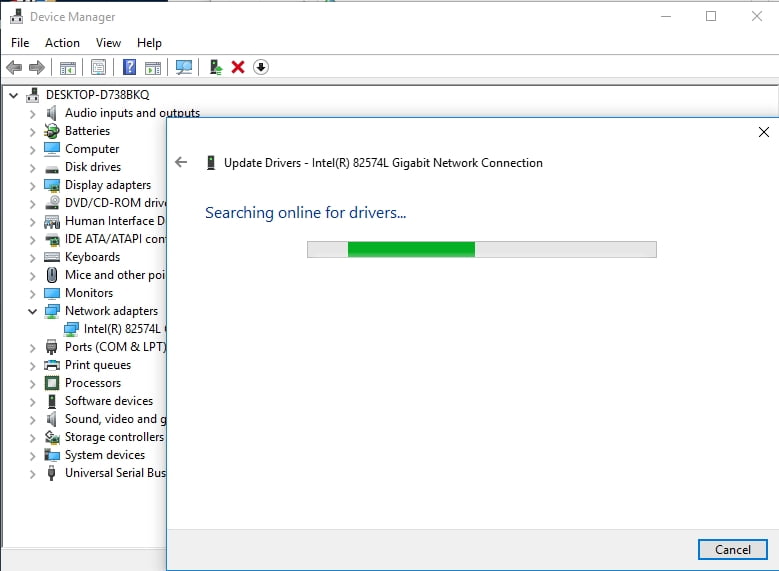
11. Update your network adapter driver
Network issues that lead to Windows Update failures often stem from out-of-date or faulty network adapter drivers. The good news is, this problem can be easily solved.
There are no fewer than 3 methods you can employ to get your drivers back on track:
Use a special tool
That is by all accounts the easiest and the most convenient one. These days you can delegate burdensome tasks and use software to get the job done. For instance, Auslogics Driver Updater will update all your drivers – not only those related to you network adapter driver – and bring your system in noticeably better shape.
Please bear in mind that you should keep all your drivers updated to prevent problems with your Windows OS.
Make use of Device Manager
Although updating your drivers in bulk is much easier, you might as well wish to use the built-in Windows Device Manager feature.
Here are the instructions for
Windows 7
- Click on the Windows logo icon to invoke the Start menu.
- Right-click on Computer and select Manage from the menu.
- Now you are in the Computer Management screen. Click Device Manager.
- Locate your network adapter. Right-click on it. Select to update its driver.
Windows 8
- Invoke the Quick Access menu by clicking on the Start icon.
- Select Device Manager from the list of options.
- Navigate to your network adapter.
- Right-click on your network adapter and select Update driver software.
Windows 10
- Press the Windows logo key and the letter X key simultaneously.
- Opt for Device Manager and move to your network adapter.
- Right-click on it and select the option necessary for updating the driver software of the device.
Still no success? Then keep working your way down – you might need to fix your system issues.
Update your driver manually
That is another popular solution, and yet it is extremely time-consuming and even risky. Do make sure you know exactly what driver is needed, since installing something inappropriate may bring about even more problems. Search the Internet for the latest driver version for your network adapter and install it only after you have found out that it is safe and comes from a reputable source.
12. Run an SFC scan
If Windows Update fails with the error 8024402F, some of your system files might be missing or corrupt. Although this may sound rather dispiriting, you have no need to worry – you can repair them quite easily. For this purpose, run System File Checker and let it scan your Windows for problematic system files and replace them at boot. Here are the necessary guidelines:
- Go to the Search field and type cmd.
- Select Command Prompt (Admin) or right-click Command Prompt and select Run as admin (or something like that).
- Type ‘sfc /scannow’ (without quotes) and hit Enter.
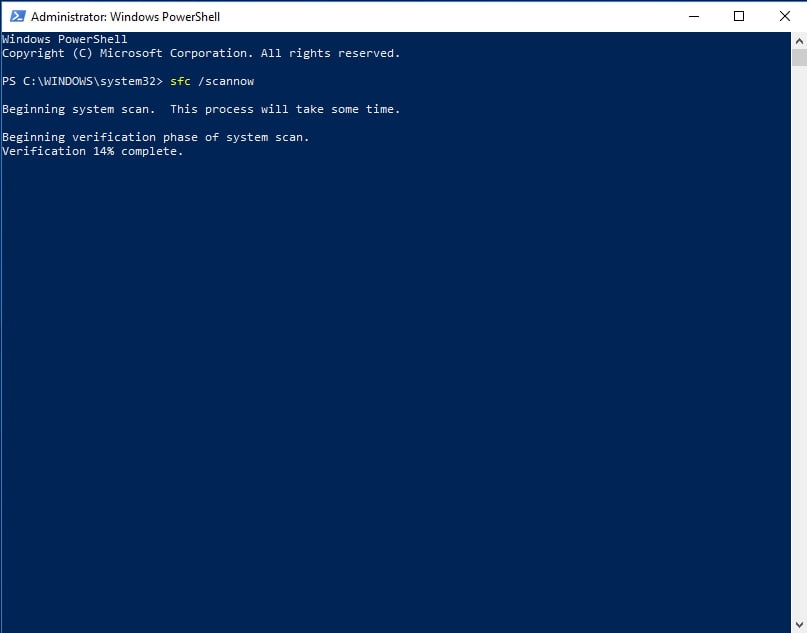
Wait for the scan to finish and restart your computer. Your Windows Update should work smoothly now.
13. Reset your Windows Update components
If you have made this far, your Windows Update itself might be having issues. In this case, we advise resetting Windows Update components the following way:
- Run Command Prompt as an administrator (see the instructions in the previous fix).
- Type the commands stated below (make sure to press Enter after each of them):
net stop bits
net stop wuauserv
net stop appidsvc
net stop cryptsvc
Del “%ALLUSERSPROFILE%\Application Data\Microsoft\Network\Downloader\qmgr*.dat”
cd /d %windir%\system32
regsvr32.exe atl.dll
regsvr32.exe urlmon.dll

regsvr32.exe mshtml.dll

regsvr32.exe shdocvw.dll

regsvr32.exe browseui.dll

regsvr32.exe jscript.dll

regsvr32.exe vbscript.dll

regsvr32.exe scrrun.dll

regsvr32.exe msxml.dll

regsvr32.exe msxml3.dll

regsvr32.exe msxml6.dll

regsvr32.exe actxprxy.dll

regsvr32.exe softpub.dll

regsvr32.exe wintrust.dll

regsvr32.exe dssenh.dll

regsvr32.exe rsaenh.dll

regsvr32.exe gpkcsp.dll

regsvr32.exe sccbase.dll

regsvr32.exe slbcsp.dll

regsvr32.exe cryptdlg.dll

regsvr32.exe oleaut32.dll

regsvr32.exe ole32.dll

regsvr32.exe shell32.dll

regsvr32.exe initpki.dll

regsvr32.exe wuapi.dll

regsvr32.exe wuaueng.dll

regsvr32.exe wuaueng1.dll

regsvr32.exe wucltui.dll

regsvr32.exe wups.dll

regsvr32.exe wups2.dll

regsvr32.exe wuweb.dll

regsvr32.exe qmgr.dll

regsvr32.exe qmgrprxy.dll

regsvr32.exe wucltux.dll

regsvr32.exe muweb.dll

regsvr32.exe wuwebv.dll
netsh winsock reset
netsh winhttp reset proxy
net start bits
net start wuauserv
net start appidsvc
net start cryptsvc
Finally, visit Microsoft’s support website and download the latest version of Windows Update agent. Install it on your PC. Then reboot your machine and enjoy an error-free computer.
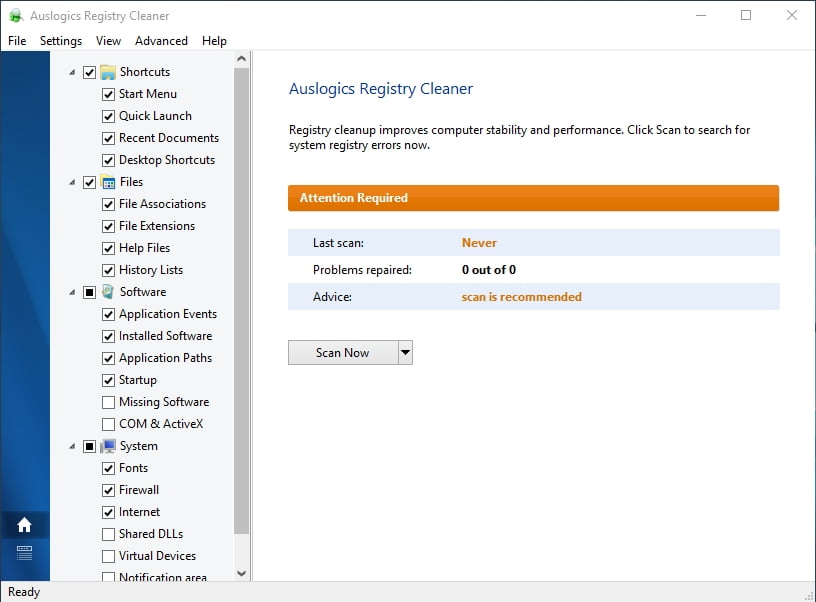
14. Check your system registry
Your update issues can relate to your registry. That said, we advise against rushing to edit this sensitive component of your Windows operating system. The truth is, you can easily damage the registry beyond repair by making a tiny mistake. So, there is no room for error at all.
Thankfully, there are some tools that can operate on your registry with surgical precision. Auslogics Registry Cleaner is a case in point: this freeware can tune your registry to its best without exposing your system to any risk.
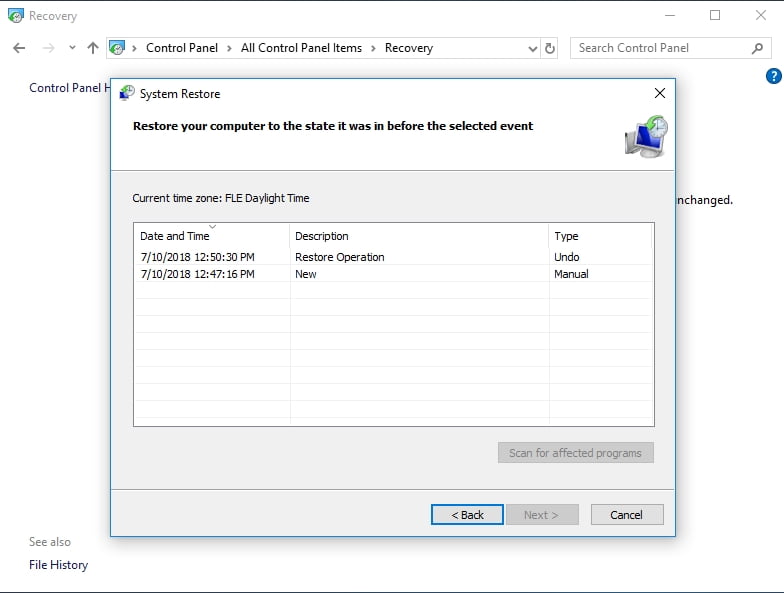
15. Configure your system to an earlier state
We have to admit that some issues are actually beyond one’s grasp. If none of the solutions above has helped you, your problem might lie too deep. Fortunately, the Windows operating system has quite a nice feature designed to deal with such mysteries. It is called System Restore. You are free to use it to literally travel back in time: you can get your PC to the good old days when the persistent Windows Update error 8024402f was not here.
What you should keep in mind is that you can use System Restore only if restore points have been generated on your PC. You can create them yourself, but your system often does that automatically when something important is about to occur on your PC.
Here is how you can restore your PC to an earlier date in
Windows 7:
- Open your Start menu and find the Search box.
- Type System Restore.
- Select System Restore and then click on Restore system files and settings.
- Click Next to proceed.
- Select the restore point you wish to restore your Windows to and confirm it.
Windows 8 (8.1):
- Locate the Search area in your Start menu and type ‘Recovery’ (without quotes).
- Click Settings. Then select Recovery and click Open System Restore.
- You will be shown the most recent working restore point. Nonetheless, you can click Choose a different restore point and opt for the one that suits you most.
- Confirm your choice.
Windows 10:
- Open your Start menu. Navigate to Control Panel.
- Open System and Security. Then click File History.
- Proceed to Recovery. Click Open System Restore and Next.
- Choose the desirable restore point.

- Click Next and Finish and provide your confirmation.
Hopefully, our tips have proved useful.
Do you know other solutions to the Windows Update error 8024402f?
You are welcome to share your knowledge in the comment section.
Обновление операционной системы Windows 10 — это чрезвычайно важный процесс, с помощью которого пользователи получают доступ ко множеству различных улучшений, исправлений и функций, но вот ошибка 8024402f в Центре обновления может встать у вас на пути выполнения этого процесса.
Ошибка 8024402f проявляется исключительно в Центре обновления, когда пользователь предпримет попытку проверить наличие новый обновлений от Майкрософт или же когда попытается их установить. К сожалению, в сообщении ошибки не указывается какой-то полезной информации о произошедшем:
С установкой некоторых обновлений возникли проблемы, но позднее будет предпринята еще одна попытка. Если вы продолжаете видеть это сообщение и хотите поискать дополнительные сведения в Интернете или обратиться в службу поддержки, вам может помочь следующая информация: (0x8024402f)
Как вы могли убедиться, никакой важной информации из этого сообщения вы не сможете извлечь. Однако, код 0x8024402f не является новой проблемой: его можно было видеть еще на таких операционных системах, как Windows 7 и Windows 8, но там она представала в виде ошибки обновления 8024402f(не хватает нуля и икса). Однако, по своей сути — это две одинаковые ошибки.
Как исправить ошибку 0x8024402f на Windows 10? Для этого мы и составили данную статью, в которой будут изложены множество различных способов исправления проблемы. Способов чрезвычайно много, и мы попытаемся описать в нашем материале самые эффективные из них. Мы рекомендуем вам попробовать их все, и желательно в том порядке, в котором они расположены ниже. Итак, давайте начнем.
Как исправить код 0x8024402f при обновлении Windows 10
Способ №1 Обычная перезагрузка компьютера
Вы наверняка начали искать способы решения ошибки 0x8024402f в Центре обновления сразу же, как только та появилась перед вами. Однако, у нас один небольшой, совет, который, возможно, избавит вас от возникшей проблемы в кратчайшие сроки. Попробуйте попросту перезагрузить свой компьютер.
Как мы все знаем, операционная система Windows(и любая другая ОС) является чрезвычайно непростым «организмом», в котором зачастую могут возникать какие-то ошибки, баги, сбои и прочие неприятности. Тем не менее решаются они практически всегда с помощью обычной перезагрузки компьютера. Попробуйте и вы поступить так, а затем вернитесь в Центр обновления Windows, чтобы проверить наличие ошибки 0x8024402f.
Способ №2 Перейти на кабель
Следующий способ практически точно такой же по сложности, как и предыдущий. Некоторые пользователи отмечают, что ошибка 0x8024402f в Центре обновления может возникать из-за беспроводного типа подключения. Если вы применяете маршрутизатор для создания сети Wi-Fi в своем жилом помещении, то мы рекомендуем вам попробовать подключить свой компьютер к сети с помощью проводного подключения. Также можете попробовать перезапустить свой роутер: тот мог начать работать со сбоями. Как только измените тип подключения, снова зайдите в Центр обновления и проверьте, присутствует ли ошибка 0x8024402f.
Способ №3 Обновления для других продуктов Майкрософт
В дополнительных настройках Центра обновления Windows находится особая опция, включение которой может избавить вас от кода 0x8024402f при обновлении системы. Данный способ зарекомендовал себя достаточно эффективным среди многих пользователей, так что и вам он тоже, возможно, сможет помочь.
Итак, вам потребуется сделать следующий ряд действий:
- Нажмите ЛКМ на Пуск, а затем кликните на пункт Параметры(он выполнен в виде значка шестеренки).
- Кликните на «Обновление и безопасность».
- Перейдите в «Центр обновления Windows».
- Кликните на «Дополнительные параметры».
- Поставьте галочку напротив «При обновлении Windows предоставлять обновления для других продуктов Майкрософт».
- Сохраните изменения и перезагрузите свой компьютер.
Просто поставить галочку — это все, что от вас потребуется. Откройте Центр обновления Windows и попробуйте проверить наличие новых обновления и установите их. Ошибка обновления 0x8024402f все еще тревожит вас? Если да, то давайте двигаться дальше.
Способ №4 Отключение антивируса и Брандмауэра Windows
Антивирусное программное обеспечение предоставляет пользователям незаменимый функционал, который обеспечивает безопасность вашей операционной системе от всяческих вирусных атак. Брандмауэр, в свою очередь, регулирует создаваемые в системе сетевые подключения, как исходящие, так и входящие.
Однако, именно эти утилиты и могли вызвать появление ошибки 0x8024402f в Центре обновления Windows. Каким образом? Антивирус мог заблокировать некоторые файлы обновления, загружаемые с серверов Майкрософт, или системные файлы, вследствие чего в Центре обновления Windows возник сбой, который привел к невозможности установки обновлений. Брандмауэр, в свою очередь, мог заблокировать сетевое соединение, которое необходимо для связи и загрузки обновлений с серверов Майкрософт, что точно также могло вызвать ошибку обновления 0x8024402f.
Вам нужно отключить антивирус и брандмауэр в своей системе, а затем попробовать установить обновления с помощью Центра обновления Windows. Возможно, ошибка 0x8024402f заключалась именно в них. Так как не каждый пользователь пользуется этими аспектами ОС Windows, давайте очень кратко рассмотрим, как же отключить антивирус и Брандмауэр Windows.
Как отключить Брандмауэр Windows
- Нажмите Win+S.
- Впишите «Брандмауэр Windows» и кликните на соответствующий результат.
- Нажмите на ссылку «Включение и отключение брандмауэра Windows».
- Поставьте две галочки напротив пунктов «Отключение брандмауэра Windows(не рекомендуется)».
Брандмауэр Windows отключить довольно просто, как вы уже могли убедиться. Зайдите в Центр обновления Windows и попробуйте установить обновления. Если ошибка 0x8024402f, то дело действительно заключалось в Брандмауэре, который почему-то заблокировал подключение с серверами Майкрософт. Если же она все еще присутствует, то давайте перейдем к отключению антивируса.
Если у вас в системе не установлен сторонний антивирус, то вам понадобится отключить функционал Защитника Windows, системного антивируса, который всегда находится в активном состоянии, если в ОС не установлено стороннее решение. Давайте посмотрим, как можно отключить Защитник Windows.
Как отключить Защитник Windows
- Перейдите в Параметры вашей Windows, как это уже было показано в предыдущих пунктах этой статьи.
- Нажмите на раздел «Обновление и безопасность».
- Перейдите во вкладку «Защитник Windows».
- Нажмите на кнопку «Перейти в Центр безопасности Защитника Windows».
- Кликните на раздел «Защита от вирусов и угроз».
- Нажмите на пункт «Параметры защиты от вирусов и других угроз».
- Найдите «Защита в режиме реального времени».
- Передвиньте ползунок в положение «Откл.».
Все предельно просто, собственно, как и в предыдущем случае. Если же у вас в системе находится сторонний антивирус, то его точно также необходимо отключить. Точные шаги для этого мы описать не можем, но вы вполне сможете применить вышеуказанную инструкцию к Защитнику Windws для своего антивируса.
Зайдите в Центр обновления Windows. Присутствует ли ошибка 0x8024402f при проверке наличия или установки обновлений? Если да, то продолжаем идти по способам для решения ошибки 0x8024402f.
Способ №5 Запуск службы Центра обновления
Центр обновления Windows будет работать корректно только в том случае, если его служба запущена и не была остановлена в случае какого-то события в операционной системе. Ошибка 0x8024402f может быть сигналом, что служба Центра обновления Windows была деактивирована или ее работа была приостановлена.
Вы должны пройти в свойства службы Центра обновления и запустить ее, если она была выключена. Процесс невероятно прост, и мы сейчас покажем вам, как это выполнить. Следуйте нижеуказанным шагам:
- Нажмите Windows+S.
- Впишите services.msc и нажмите Enter.
- Найдите в списке службу под названием «Центр обновления Windows» и дважды кликните на нее ЛКМ.
- Выберите Автоматический тип запуска и нажмите на кнопку «Запустить», если служба была остановлена.
Если вы увидели, что служба Центра обновления Windows действительно была остановлена, то ошибка 0x8024402f определенно появилась из-за этого. Зайдите в Центр обновления и убедитесь, что проблема была устранена. Если же служба была активна все это время, то ошибку вызывает что-то другое.
Способ №6 Использование утилиты Powershell
В этом способе мы с вами удалим загруженные ранее файлы обновлений в папке SoftwareDistribution\Download\ с помощью средства Powershell. Загруженные файлы обновления могли быть повреждены, вследствие чего возникли конфликты во время установки других обновлений.
Для очистки этой папки вам понадобится прибегнуть к выполнению следующих шагов:
- Нажмите Windows+S.
- Впишите Powershell.
- Нажмите ПКМ на результат и выберите «Запустить от имени Администратора».
- Впишите в Powershell следующие команды:
- Stop-Service wuauserv
- Remove-Item -Recurse -Force C:\Windows\SoftwareDistribution\Download\*
- Start-Service wuauserv
- Закройте окошко программы и перезагрузите свою систему.
Очистка данной папки является одним из самых эффективных способов по решению ошибки 0x8024402f в Центре обновления. Наверняка, проблема уже была решена. Однако, если же нет, то можно попробовать еще один способ, который определенно сможет исправить проблемы с Центром обновления.
Способ №7 Сброс компонентов Центра обновления Windows 10
Итак, если вы все еще испытываете ошибку 0x8024402f при обновлении Windows, мы рекомендуем вам воспользоваться процессом сброса компонентов Центра обновления. Процесс достаточно долгий, если выполнять его вручную, но, к счастью, вы можете воспользоваться файлом в формате .bat, который автоматически сбросит компоненты вашего Центра обновления.
В сети вы можете найти кучу различных «батников», которые содержат команды для сброса. Сейчас мы предоставим вам ряд команд для создания .bat-файла. Все, что вам понадобится сделать — это вставить нижеуказанные команды в самый обычный текстовый файл, изменить расширение на .bat и запустить его, после чего начнется автоматический сброс Центра обновления.
А вот и те самые команды:
Выполнив сброс Центра обновления Windows, перезагрузите свой компьютер, а затем снова зайдите в Центр, чтобы проверить наличие ошибки обновления 0x8024402f. На этот раз, ошибка должна быть решена, и вы сможете спокойно выполнять обновление системы.
Заметка: если же и это не помогло(что довольно странно), то мы можем вам только порекомендовать воспользоваться средствами восстановления системы: точка восстановления, возврат системы в исходное состояние, восстановление с помощью установочного диска и т.д.
-
Home
-
News
- How to Fix Windows Update Error 0x8024402f? Try These Methods
By Sonya |
Last Updated
It is common to meet different errors when you use the Windows system. And if you want to find some methods to deal with the error code 0x8024402f when you try to update your Windows system, then this post from MiniTool is what you need. You can find 4 useful methods here.
Microsoft keeps releasing updates to improve its operating system, but sometimes, you may meet some Windows update errors, such as 0x80240017 and 0x800703f1. And this post will tell you how to get rid of Windows update error 0x8024402f.
And there is one thing you need to know: Windows update 0x8024402f error may appear on different Windows system versions such as Windows 7 and Windows 10.
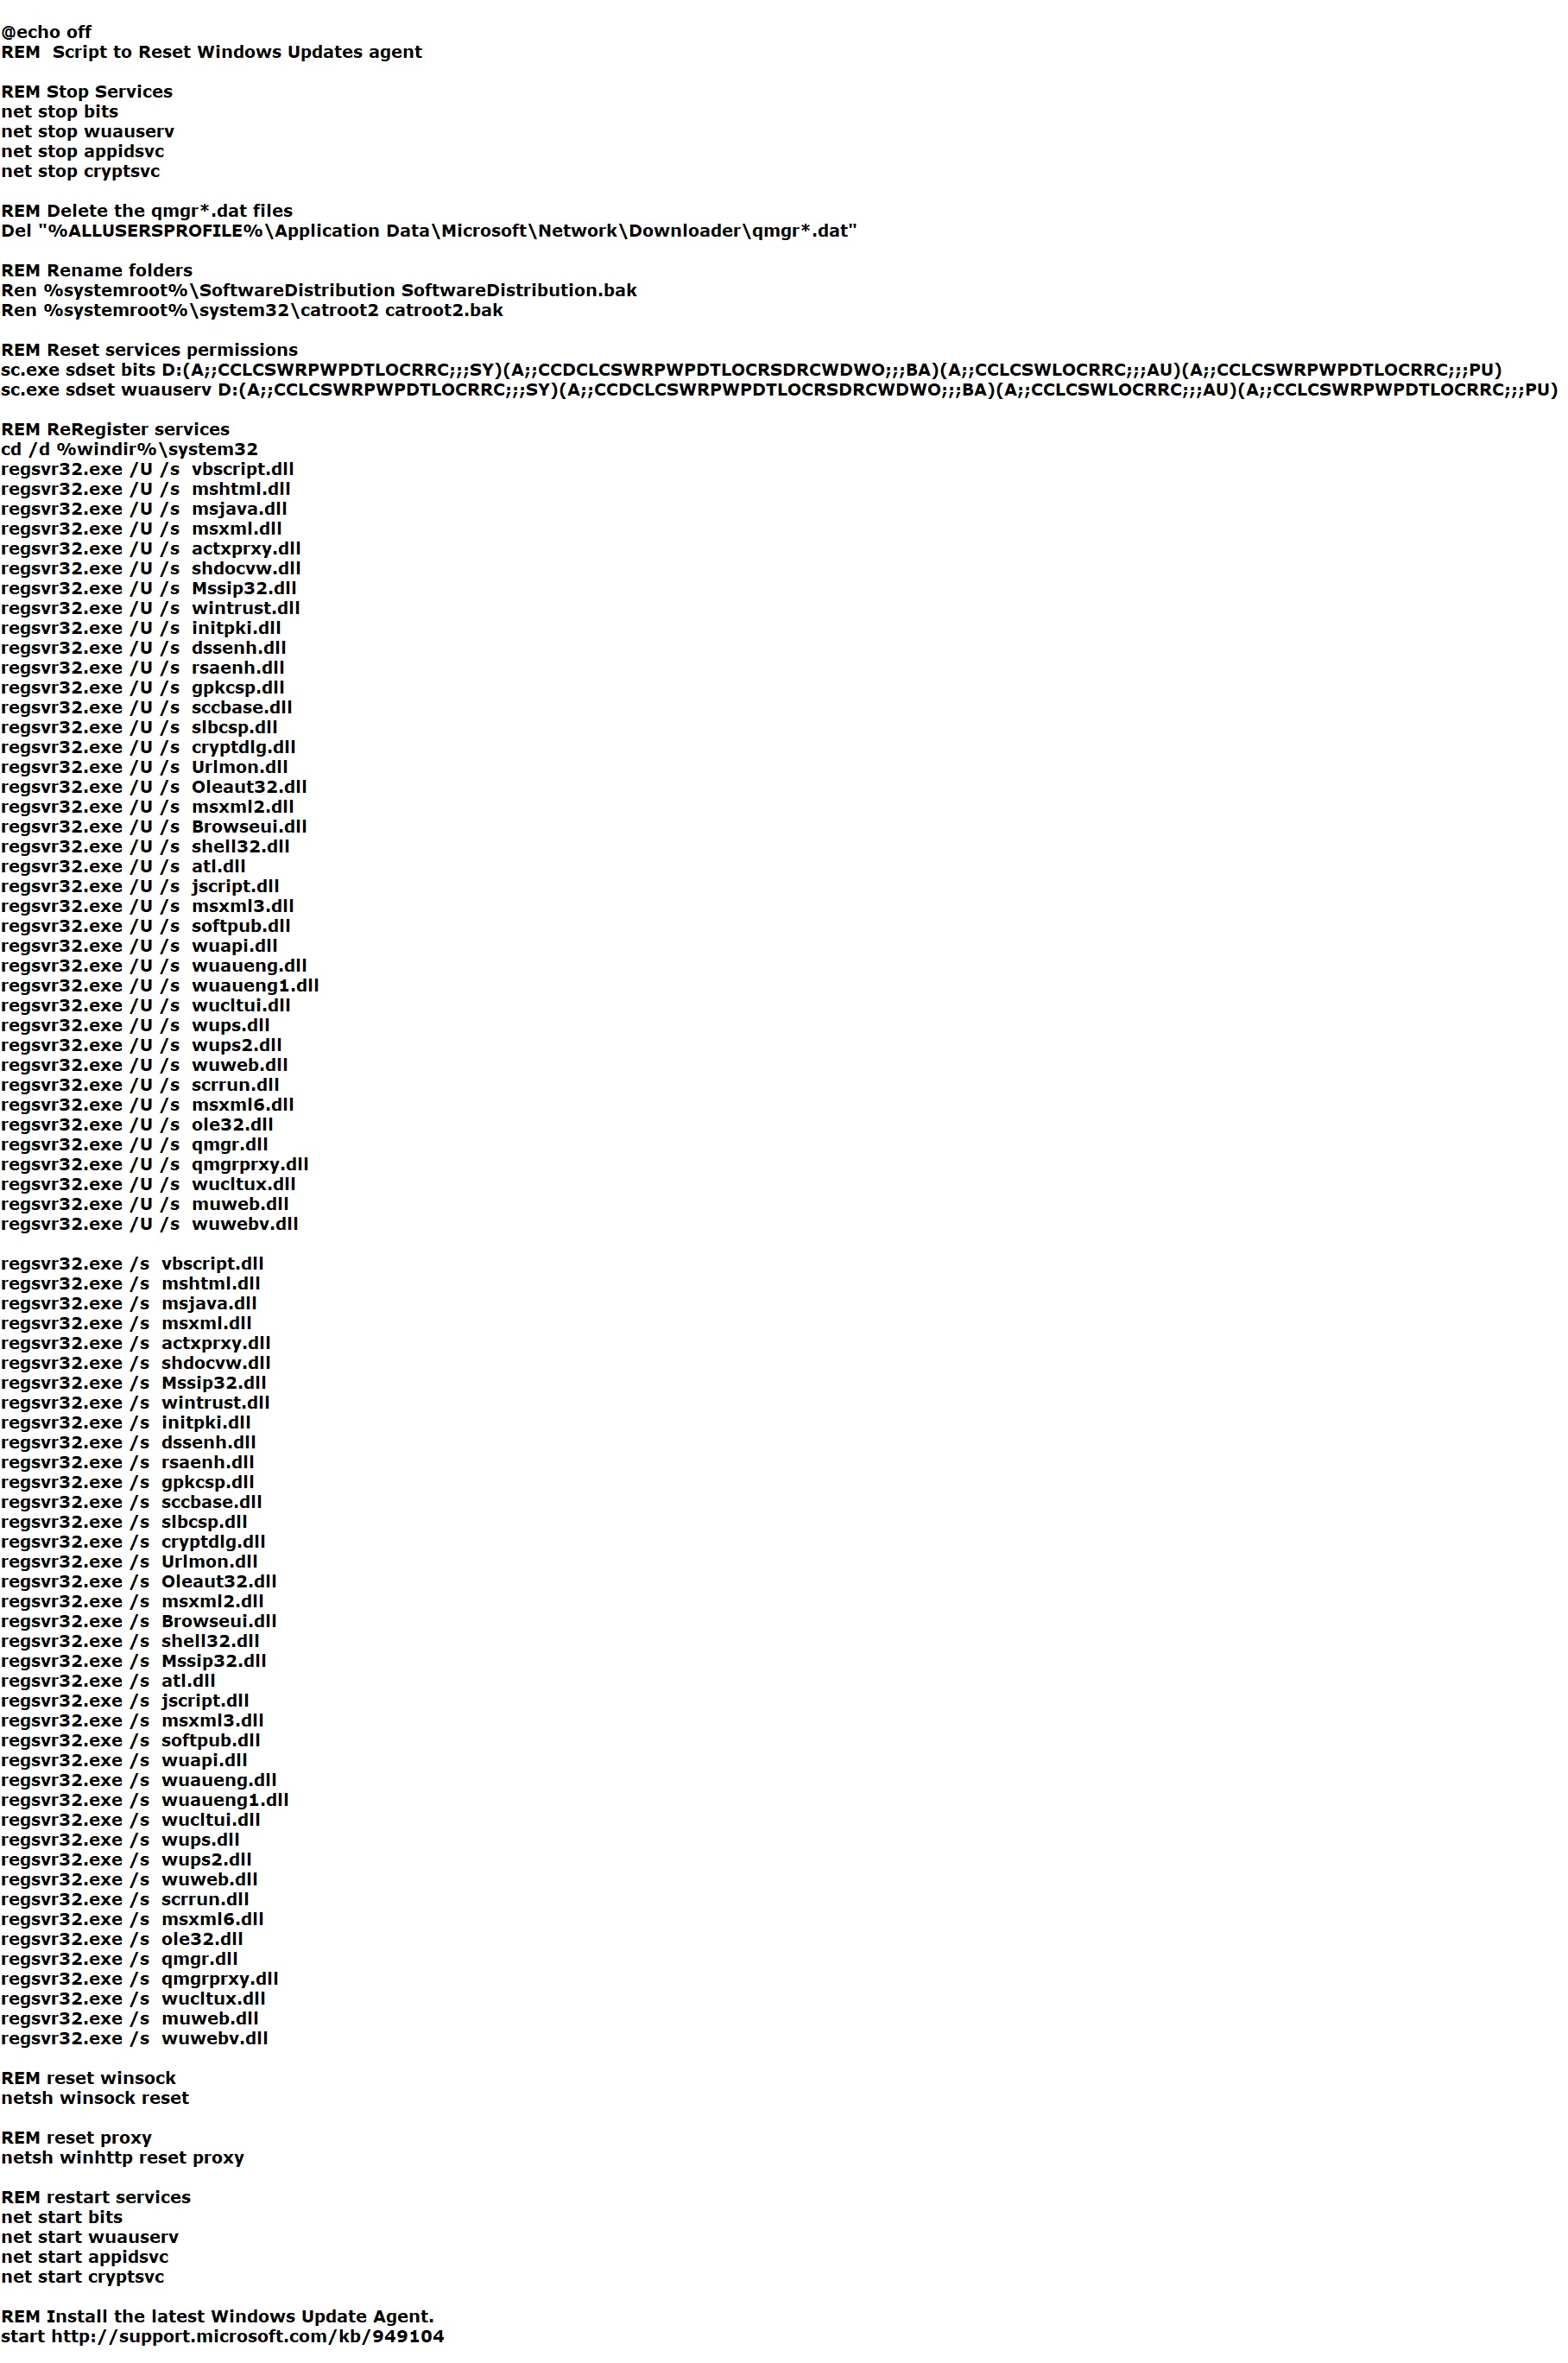
Method 1: Run Windows Update Troubleshooter
When you meet Windows update errors, no matter what the error code is, you can try to run Windows Update Troubleshooter to fix them. Then how to run Windows Update Troubleshooter? Here is a quick guide:
Step 1: Press the Win + I keys at the same time to open Settings.
Step 2: Select Update & Security and then go to the Troubleshoot tab.
Step 3: Find Windows Update in the right panel and then click it to select Run the troubleshooter.
Step 4: Wait for the process to complete, and then apply the fix. Check if the Windows update error 0x8024402f is fixed.
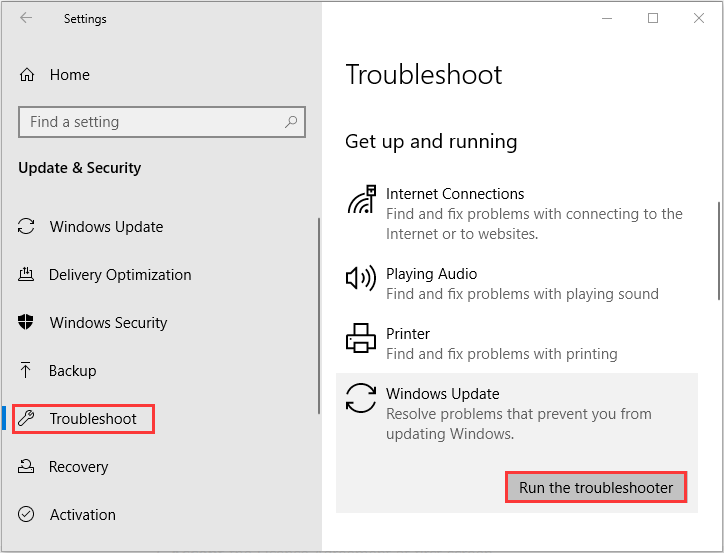
Method 2: Uninstall Problematic Updates
If you still keep receiving the 0x8024402f error, then there may be a problematic update. Therefore, in order to fix the error, you can uninstall problematic updates. To do this, follow the instructions below:
Step 1: Open Settings and then choose Update & Security. Go to the Windows Update tab.
Step 2: Click View update history and then choose Uninstall updates.
Step 3: Find the recent update and then click it to choose Uninstall.
Step 4: After uninstalling the recent updates, you need to restart your computer and then check if the Windows update error 0x8024402f is gone.
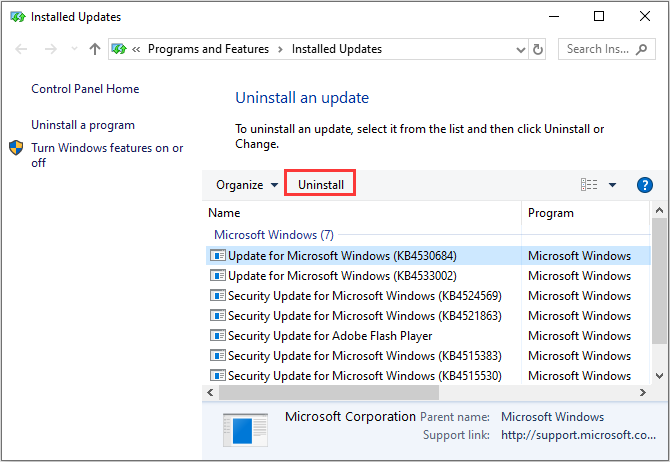
Method 3: Change Your DNS
Sometimes, the culprit of the error code 0x8024402f is your DNS. Thus, you need to change your DNS server to fix the error. You can follow the instructions below to do that:
Step 1: Open Settings and then choose Network & Internet.
Step 2: Go to the Ethernet tab and then choose Change adapter options in the right panel.
Step 3: Locate your network connection, right-click it to choose Properties.
Step 4: In the Properties window, choose Internet Protocol Version 4 (TCP/IPv4) and then click Properties.
Step 5: A new window will pop out, then choose Use the following DNS server addresses and set the following:
Preferred DNS server: 8.8.8.8
Alternate DNS server: 8.8.4.4
Click OK to save changes.

Step 6: Restart your computer to check if the 0x8024402f error still persists.
Method 4: Delete the SoftwareDistribution Folder
You can also get rid of the 0x8024402f error by deleting the SoftwareDistribution folder. To do this, follow the steps below:
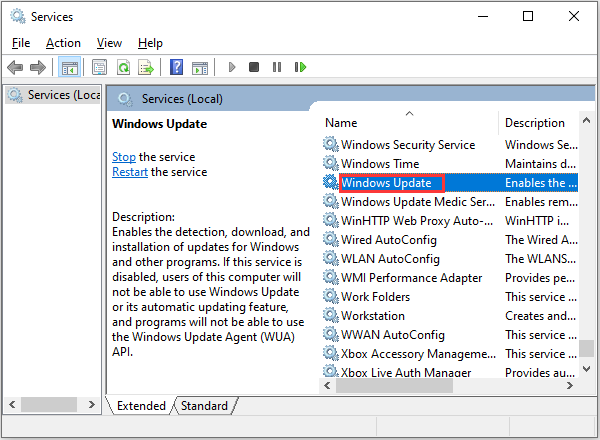
Step 1: Press the Win + R keys at the same time to open the Run box, type services.msc in the box and then click OK.
Step 2: In the Services window, right-click Windows Update on the list to choose Stop.
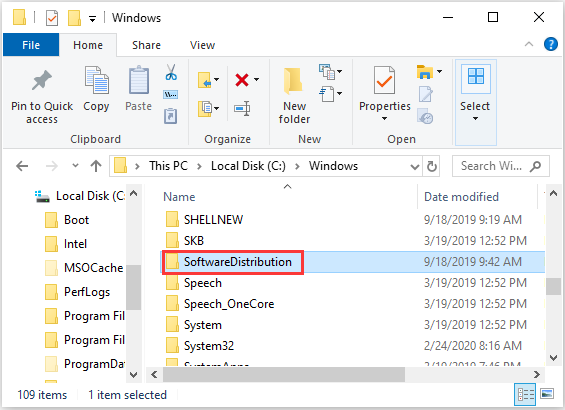
Step 3: Press the Win + E keys at the same time to open File Explorer and then navigate to C:\Windows folder.
Step 4: Right-click the SoftwareDistribution folder to choose Delete.
Step 5: Go back to Services and then right-click the Windows Update service to choose Start.
Step 6: Restart your computer to see if the error is fixed.
Bottom Line
To sum up, this post has gathered 4 efficient methods for you to deal with the 0x8024402f error. So if you still meet the error, try these methods mentioned above.
About The Author
Position: Columnist
Author Sonya has been engaged in editing for a long time and likes to share useful methods to get rid of the common problems of Windows computers, such as Windows Update error. And she aims to help more people to protect their data. What’s more, she offers some useful ways to convert audio and video file formats. By the way, she likes to travel, watch movies and listen to music.
Microsoft releases Windows updates quite frequently. Most of these updates contain fixes and the latest features. However, sometimes you might see an error while trying to install/download Windows Updates. The error message that you’ll see will be something like this
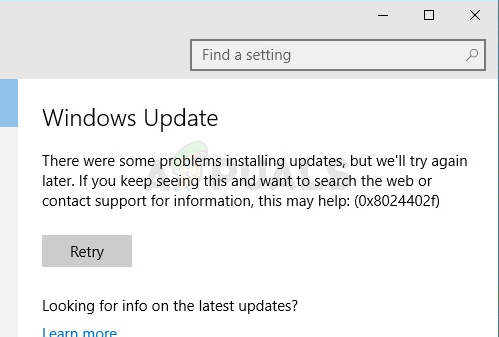
This error message will prevent the user from updating Windows.
This error occurs when some of the CAB files get corrupted. There can be multiple reasons for corruption but most likely one is that your ISP has cached the Microsoft Updates (so it doesn’t have to download it over and over) and some of those files got corrupted.
Make sure your Antivirus application is turned off or disabled. Every antivirus application has a disable option in its main panel or settings. Antivirus applications have known to cause issues with the Windows Updates.
Windows on Troubleshooter has worked for a few users. Since it is a lot easier to use the Windows Troubleshooter tool, we will suggest you try this tool first. If it does solve your issue then there is no need to go through the complicated steps given below. Click here and download the Windows Troubleshooter. Once the file is downloaded, run it and follow the on-screen instructions. If this doesn’t solve your issue then keep going.
But before moving on with the solutions, make sure the date and time setting of your system is correct. Also, if you are using more than one network card, then disable the card which is managing internal traffic and leave the other one on, which connects the system to the Internet. If you are using .NET Framework, then either uninstall it or update it. Also, try to disable IPV6 of your system.
Method 1: Reset Windows Update Components
The first thing that you should do is reset your Windows Update Components. This has worked for a lot of users and it fixes the issue 99% of the time.
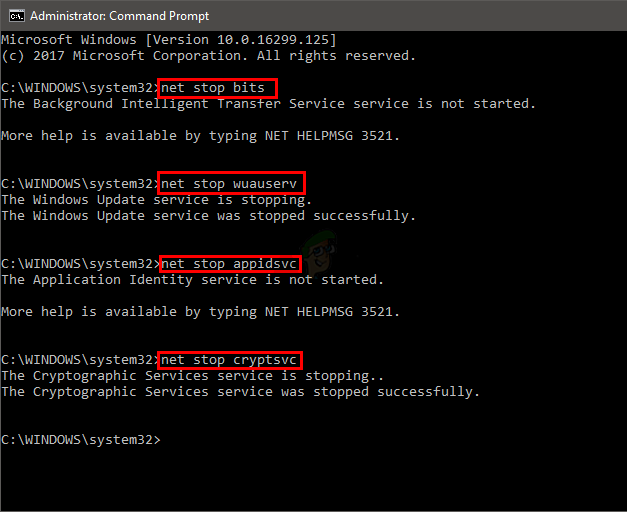
The very first thing you need to do is stop BITS, Windows Update, and Cryptographic services. Follow the steps given below to stop these services.
- Press Windows key, type command prompt in the Windows Search box.
- Right-click command prompt from the search results and select Run as administrator.
Open Command Prompt as Administrator - Type net stop bits and press Enter
- Type net stop wuauserv and press Enter
- Type net stop appidsvc and press Enter
- Type net stop cryptsvc and press Enter

Run Commands in Command Prompt - Now navigate and delete the contents of the following folder:
C:\Windows\SoftwareDistribution\Download
- Now, you have to delete a .dat file. To delete this file, type
Del "%ALLUSERSPROFILE%\Application Data\Microsoft\Network\Downloader\qmgr*.dat"
and press Enter
- Type
cd /d %windir%\system32
and press Enter. This will change your directory. We are doing this because we have to re-register a lot of BITS and Windows files.
- Type regsvr32.exe atl.dll and press Enter.

DllRegisterServer Succeeded - Now, you have to register a lot of files. We will give you a list of commands. Simply type them one by one and press Enter after typing every single command. Note: If you see an error after running a command then simply ignore the error and move to the next command. Type each of the commands given below and press Enter after each of them.
regsvr32.exe urlmon.dll regsvr32.exe mshtml.dll regsvr32.exe shdocvw.dll regsvr32.exe browseui.dll regsvr32.exe jscript.dll regsvr32.exe vbscript.dll regsvr32.exe scrrun.dll regsvr32.exe msxml.dll regsvr32.exe msxml3.dll regsvr32.exe msxml6.dll regsvr32.exe actxprxy.dll regsvr32.exe softpub.dll regsvr32.exe wintrust.dll regsvr32.exe dssenh.dll regsvr32.exe rsaenh.dll regsvr32.exe gpkcsp.dll regsvr32.exe sccbase.dll regsvr32.exe slbcsp.dll regsvr32.exe cryptdlg.dll regsvr32.exe oleaut32.dll regsvr32.exe ole32.dll regsvr32.exe shell32.dll regsvr32.exe initpki.dll regsvr32.exe wuapi.dll regsvr32.exe wuaueng.dll regsvr32.exe wuaueng1.dll regsvr32.exe wucltui.dll regsvr32.exe wups.dll regsvr32.exe wups2.dll regsvr32.exe wuweb.dll regsvr32.exe qmgr.dll regsvr32.exe qmgrprxy.dll regsvr32.exe wucltux.dll regsvr32.exe muweb.dll regsvr32.exe wuwebv.dll
- Once done, you have to reset the Winsock. Type netsh winsock reset and press Enter
- Type netsh winhttp reset proxy and press Enter
- Now, we have to restart all the services that we stopped at the beginning of this section.
- Type net start bits and press Enter
- Type net start wuauserv and press Enter
- Type net start appidsvc and press Enter
- Type net start cryptsvc and press Enter

Now, restart and try to install the Windows Updates again
Method 2: Change Windows Update Settings
Although we aren’t sure why changing some specific settings from the Windows Settings panel solves this issue but it seems to work for plenty of users. So, follow the steps given below to change the update settings from Windows Update.
- Hold the Windows key and press I to open the Settings app.
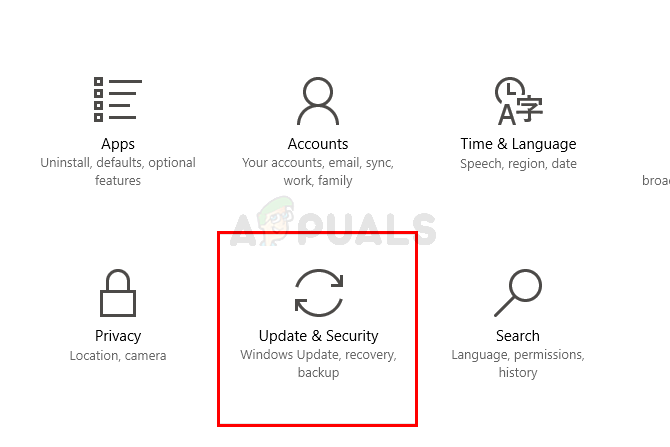
- Click Update & Security

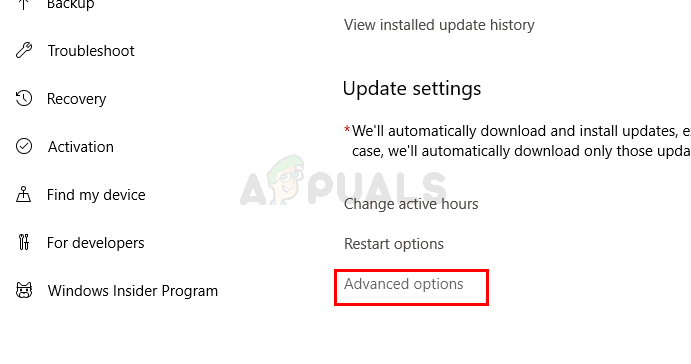
Open Update & Security - Click Advanced Options

Open Advanced Options - Uncheck the option Give me updates for other Microsoft Products when I update Windows
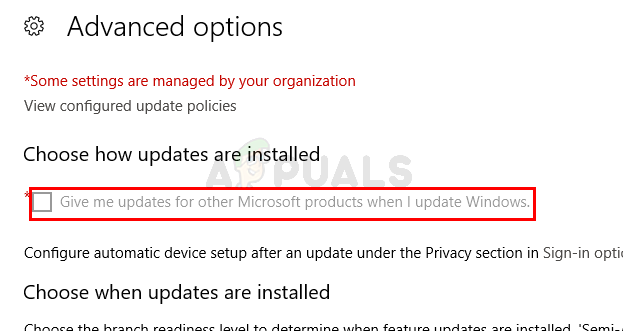
Note: In some cases, you might not be able to change this setting (as you can see it is disabled for me). You should just skip to the next method if that’s the case
That’s it. Once done, your problem should be solved.
Method 3: Change Proxy Settings
Changing the proxy settings has worked for a lot of users. Since the problem can be caused by ISP’s corrupt cache, changing the proxy settings works. Although the usual way of changing the proxy is to change it via the Windows Settings page. But that page doesn’t work for every user. A lot of users mentioned that it doesn’t update the Proxy settings. However, you can still try to change the settings via the Windows Settings. If that doesn’t work then move to the next section within this method. The second section requires command prompt so that might be a bit technical for a lot of users. So, we will advise you to use the Windows Settings first because there’s no need to deep into the command prompt if you can solve the issue with just a few licks.
Follow the steps given below to change the proxy settings via the Windows Settings
- Hold the Windows key and press I to open the Settings app.
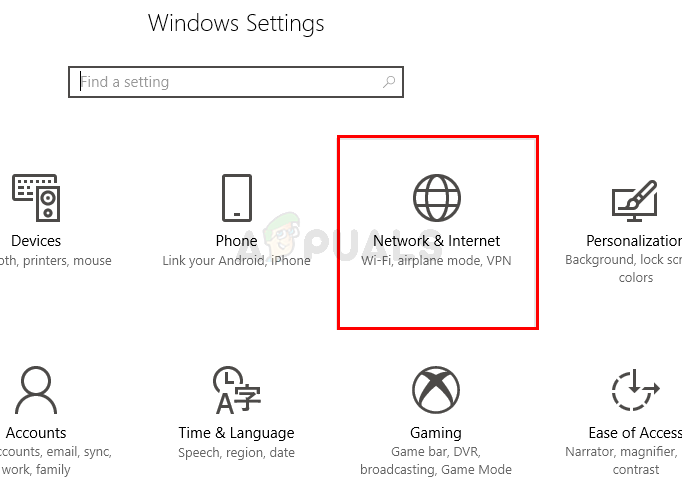
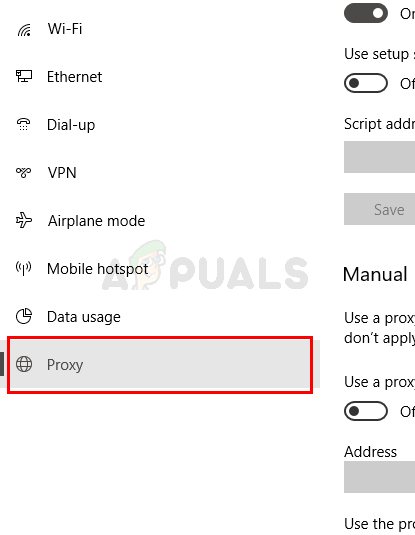
- Select Network & Security

Open Network & Internet Settings - Click Proxy from the left pane.

Open the Proxy Settings
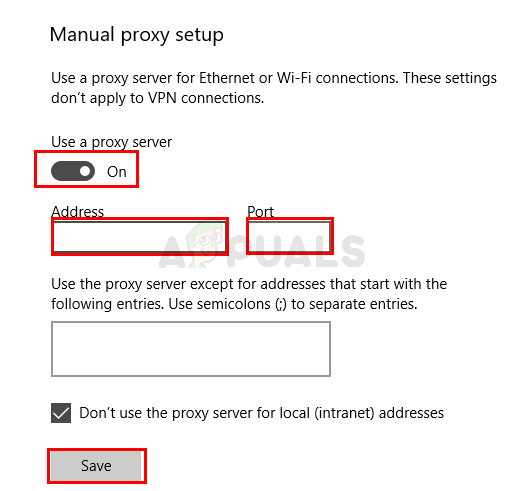
- Turn On the option Use a proxy server
- Type the Proxy Server IP Address and Port number
- Click Save and try again.
If the above steps didn’t solve the issue then do the following:
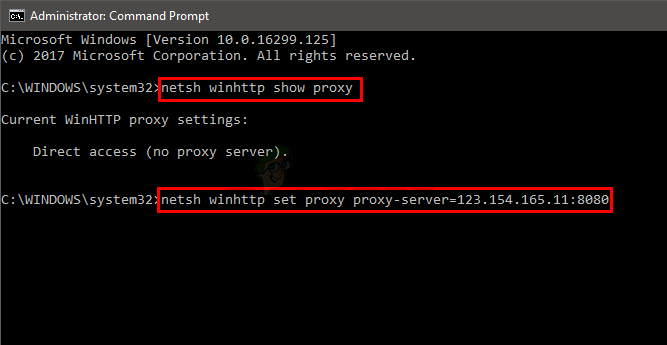
- Press the Windows key, type command prompt in the Windows Search box.
- Right-click command prompt from the search results and select Run as administrator
Open Run Command Prompt as Administrator - Type netsh winhttp show proxy and press Enter
- This will show you the current proxy settings

Run netsh Commands in Command Prompt - Now, you have to change the proxy settings via command prompt
- Type
netsh winhttp set proxy proxy-server=”your address”:”port number”
and press Enter. Type the Proxy server IP address in your address part and type the port number in the port number part. Don’t forget to remove the quotes as well. In the end, it should look like this
netsh winhttp set proxy proxy-server=123.154.165.11:8080
This should change your proxy settings and your Windows updates should work fine.
Method 4: Change Windows Update Service
Setting the Windows Update Service to Delayed Startup has been fruitful for a lot of users as well. So, if nothing else works then you should give this a go as well.
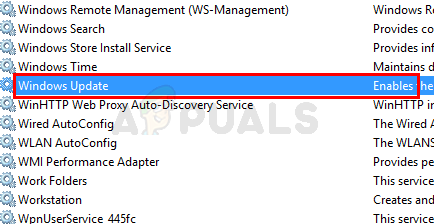
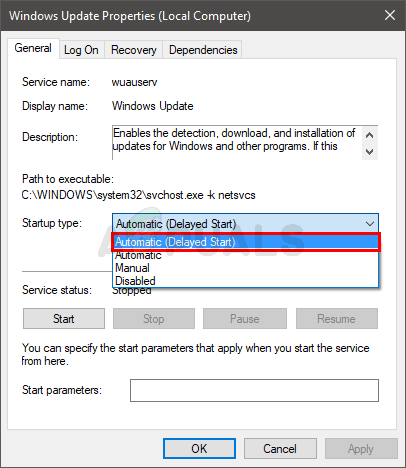
- Hold Windows key and press R to open Run box command
- Type services.msc and press Enter
Run services.msc Command - Locate and double click the Windows Update service.

- Select Delayed Start from the drop-down menu in Startup Type

Select Automatic (Delayed Start) for the Service - Click Start if the Service Status is stopped
- Click Apply then select Ok
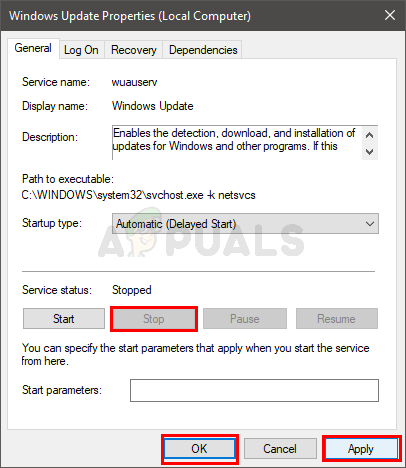
Once done, try to update the Windows. It should work fine now.
Method 5: Remove Temporary files
If any of the updates got corrupted while in the downloading phase, then your system may show the Windows Update error 0x8024402f. This usually happens when new updates, which are being installed either get corrupt or are interrupted either manually by the user or because of network problems. In this case, we will try to remove the temporary files in your system. When the system notices that these files are missing, it will automatically replace the files.
- Delete the temporary files of your system.
- Now run the updates to check if you can update the system without any issue.
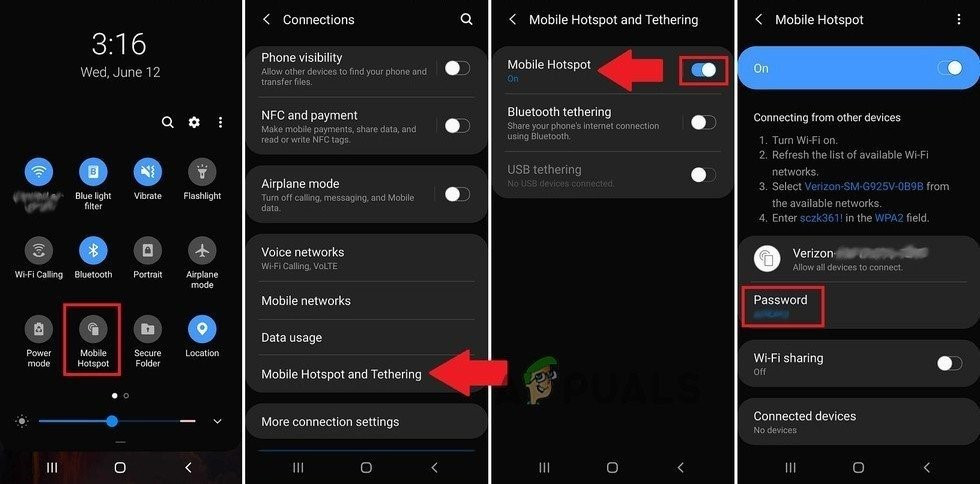
Method 6: Try Another Network or Use VPN
ISPs use different techniques to control web traffic and safeguard their users. Also, they create a cache for the webpages/files visited/downloaded by users again and again. If your ISP is creating the problem, then trying another network may solve the problem. You can also use a VPN. Moreover, you can use your mobile phone’s hotspot to connect your system to the Internet.
- Connect to another network or Use VPN (not recommended). If you are going to use your mobile phone’s hotspot, then keep an eye on the size of the update to be downloaded.

Turn On Mobile Phone Hotspot - Now run the Windows update to check if it can be completed without any issue.
Method 7: Change DNS of Your System
Your network’s DNS values can cause errors with Windows Update. Domain Name System is the main component when connecting with remote addresses. It resolves the said URL to a specific IP address which is then forwarded to different ports for the establishment of the connection. Here, we can try changing to a public DNS server like Google DNS may solve the problem.
- Change the DNS server for your network.
Changing the DNS Server settings - Now check if you can update your system without any issue.
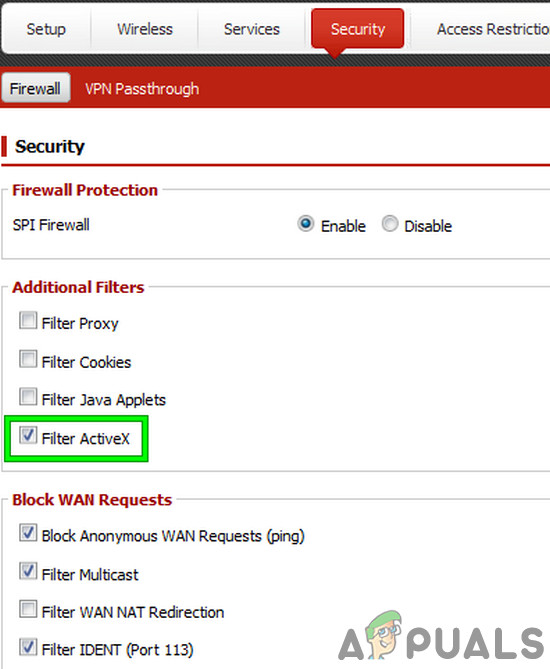
Method 8: Check Your Hardware/Router Firewall
If nothing has helped you so far, then it is time to check your router’s/hardware firewall as these are known to apply different techniques to safeguard and route traffic. These settings can cause the Windows update 0x8024402f error.
As there are a lot of makes and models of the routers/hardware firewalls, it is practically impossible to give guidelines relating to every piece of hardware. But general guidelines are as under (you can find details in the manual of your device):
- Disable AMP service of Meraki Firewall.
- Disable ActiveX blocking/filtering feature of your router.

Disable ActiveX - Add microsoft.com and microsoftupdate.com to the whitelist of your router/hardware firewall.
- Update firmware of your device to the latest.
- Reset your modem/router/gateway/router to their default settings.
If none of the above methods work, you can try installing a fresh version of Windows altogether. This will remove all the corrupt files present. If you install an older version of Windows, consider checking for updates immediately.