
Table of contents
- 1. Set your time zone
- 2. Uninstall and then reinstall problematic updates
- Windows 7
- Windows 8 /8.1
- Windows 10
- 3. Configure your Windows Update settings (for Windows 8.1 only)
- 4. Employ Windows Update Troubleshooter
- 5. Temporarily disable your anti-virus software
- 6. Turn off your firewall
- 7. Add Microsoft servers to the Trusted sites list
- 8. Disable your VPN and proxy
- 9. Troubleshoot your network
- 10. Switch to a different network connection
- 11. Update your network adapter driver
- Use a special tool
- Make use of Device Manager
- Update your driver manually
- 12. Run an SFC scan
- 13. Reset your Windows Update components
- 14. Check your system registry
- 15. Configure your system to an earlier state
‘Progress cannot be generated
when we are satisfied with existing situations’
Taiichi Ohno
Keeping your Microsoft operating system, whether Windows 10, 8, 8.1, or 7, up to date enables you to make best use of system resources and get the most out of your computer. Indeed, by embracing the latest developments and improvements by Microsoft, you can keep numerous problems, such as bugs, crashes, glitches, security issues, and malware attacks, at bay.
Due to the reasons mentioned above, it is vital that you make sure your OS keeps up with advances in software technology. In theory, that is quite easy – Microsoft has paved the way towards the effective implementation of this rule with the Windows Update feature. Thanks to that, your OS can be on the cutting edge.
With that said, in practice, things rarely go smoothly. For instance, what are you supposed to do if you encounter ‘Windows Update ran into a problem 8024402f’? Obviously, this issue might seem quite a disaster since it prevents you from getting the much-needed updates aimed at refining your system. However, there is no need to despair: you are not the first to face this nuisance, and we have already collected an exhaustive list of proven tips on how to fix Windows 10 update error 8024402f and the same error on Windows 7, 8, or 8.1. So, here are our methods:
1. Set your time zone
Probably the easiest way to iron out the issue in question would be to properly configure your time zone settings. To do that, use the instructions below:
- Open your Start menu and click on Control Panel.
- Locate Time and Date (or something like that). Click on it.
- Navigate to the Time Zone settings.
- Select the Change time zone option.
- Select your time zone from the list of available options.

- Make sure to confirm your choice for the changes to take effect.

Restart your PC. When your system comes on, check if the manoeuvre above has resolved your update issue.
2. Uninstall and then reinstall problematic updates
Although updates are designed to enhance your user experience, sometimes they do not fit, and that causes your OS to malfunction. Besides, updates may fail to land on your PC properly: as a result, those that have been installed incorrectly can trigger multiple problems.
Anyway, now it is time to check your system for problematic updates and undo them in
Windows 7
- Press F8 during the bootup process to enter Safe Mode.
- Launch your start menu. Locate Control Panel and enter it.
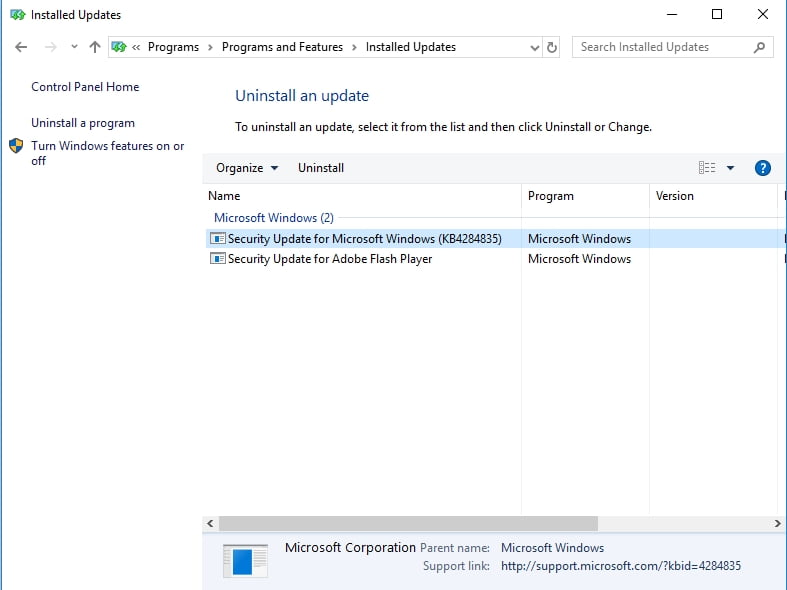
- Go to Programs and Features. Click on the View Installed Updates link.
- Locate the problematic update. Right-click to uninstall it.
Windows 8 /8.1
- Hold the Shift key while restarting your computer or press Shift + F8 or just F8 at startup to be taken to the advanced startup screen.
- Once in it, press Troubleshoot and select Advanced options.
- Press Startup settings. Then click Restart.
- Your PC will restart. Then you will be presented with the list of startup settings. Select Safe Mode.
- Your PC will restart again. In the Advanced Boot Options window, select Safe Mode. Hit Enter.
- Once in Safe Mode, open your start menu and proceed to Control Panel.
- Select Programs and Features and click on View Installed Updates.
- Locate the updates you wish to undo. Right-click and uninstall an undesirable update.
Windows 10
- Press the Windows logo + I keyboard shortcut to invoke the Settings app.
- Click Update & security. Select Windows Update.
- Click View installed update history.
- Select Uninstall updates.
- Double-click on an update to uninstall it.

Restart your PC and see if the issue persists.
3. Configure your Windows Update settings (for Windows 8.1 only)
If the 8024402f issue keeps showing up in Windows 8.1, you can make use of the following workaround:
- Open your Start menu. Proceed to Control Panel.
- Navigate to Windows Updates.
- Left-click on Never check for updates.
- Make sure to uncheck “Give me recommended updates the same way I receive important updates” and “Give me updates for other Microsoft products when I update Windows”.
After performing these troubleshooting steps, check for the necessary updates manually and install them on your computer.
4. Employ Windows Update Troubleshooter
Luckily, Microsoft engineers have developed quite a handy tool to tackle Windows Update issues. To use it, google Windows Update Troubleshooter and click on the link that leads to the Microsoft Support website. Download the troubleshooter for your version of Windows and run it on your computer. The program’s wizard will walk you through the troubleshooting process. All you need to do is follow the on-screen instructions.
5. Temporarily disable your anti-virus software
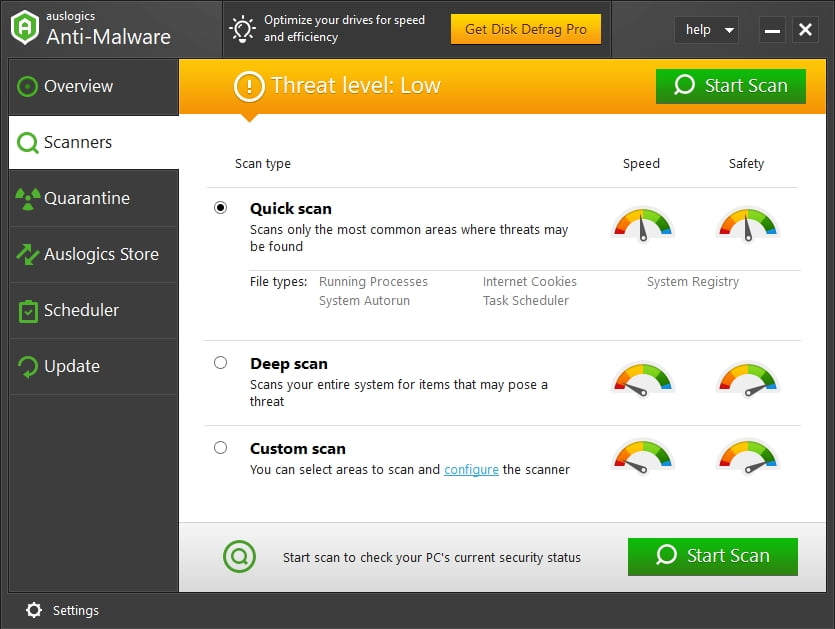
According to many reports, some anti-virus tools can interfere with Windows Update, causing it to throw up red flags and struggle to work the way it is supposed to. In a situation like this, turn off your anti-virus tool and check if that has fixed the problem. If it has, report the issue to the support team of the tool’s vendor. You might even need to switch to another solution. The good news, there is a wide range of PC protection tools available on the market these days. For example, you can opt for Auslogics Anti-Malware: this program will run smoothly on your device, maintaining a superb level of protection against those nefarious entities the modern-day Internet swarms with.
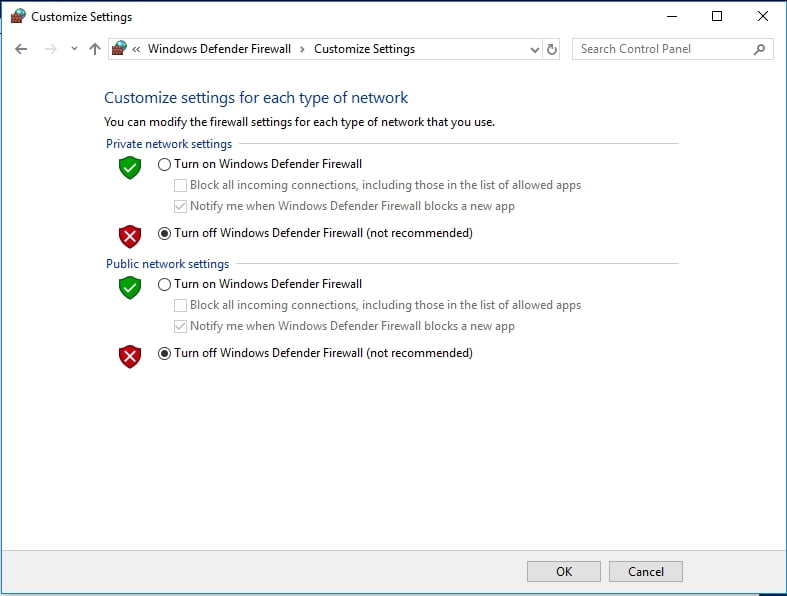
6. Turn off your firewall
The chances are Windows Firewall is behind the persisting error 8024402f on your computer. With that in mind, let’s disable the solution in question so that you can check if it is the culprit:
- Locate the Search area and type Control Panel.
- Select Control Panel from the list of results.
- Click System and Security, then proceed to Windows Defender Firewall.
- Click Turn Windows Defender Firewall On or Off.
- Select Turn off Windows Firewall (not recommended).

- Click OK to save your changes.
Now check your Windows Update. If it is up and running, update your system, using Windows Update, then turn your firewall on, and move to the following fix. The point is, you need to whitelist certain Microsoft servers so that you will not have to disable your Windows Firewall every time you wish to update your system.
7. Add Microsoft servers to the Trusted sites list
To keep the Windows Update error 8024402f at bay, you should add the following URLs to the trusted zone:
- Download.windowsupdate.com
- Windowsupdate.microsoft.com
- Update.microsoft.com
Here is how to do that:
- Press the Windows logo key and the S key simultaneously.
- In the Search area, input ‘internet options’ (no quotes).
- Select Internet Options from the list of search results.
- Proceed to the Security tab. Select Trusted sites.
- Click on the Sites button.
- Proceed to Add this website to the zone area. Enter the address you wish to whitelist.
- Click Add and Close.
Finally, reboot your PC. The issue 8024402f should bother you no more.
8. Disable your VPN and proxy
No luck so far? Then you should disable your VPN or proxy if you use any. Although, VPNs and proxies allow you to roam freely in the Internet, they might be tampering with your Windows Update. As such, turn them off and try to update your system.
To disable your proxy connection, do the following:
- Open your Start menu and navigate to the Search area.
- Type Internet Options. Select it from the list of search results.
- Now proceed to the Connections tab and click on LAN settings.
- Uncheck Use a proxy server for your LAN.
- Click on OK to save the changes.
If you use a VPN connection, take the steps below:
- Go to your Start menu and search for Control Panel.
- Once in Control Panel, click Network and Sharing Center.
- In the left pane, select Change adapter settings.
- Locate your VPN connection. Right-click on it to remove it.
If the issue is still present, proceed to the following fix.
9. Troubleshoot your network
If you see the ‘Windows Update ran into a problem’ 8024402f error, you might be having network issues. In such a case, use the instructions below to fix your network connection
in Windows 7:
- Open the Start menu. Then go to Control Panel.
- Navigate to Network and Internet.
- Open Network and Sharing Center.
- Click Fix a Network Problem and follow the on-screen instructions to troubleshoot your network problems.
in Windows 8/8.1:
- Enter the Start menu and click Control Panel.
- Go to Network and Internet and proceed to View network status and tasks.
- Select Troubleshoot problems to open the built-in Network and Internet Troubleshooter. It will repair your network problems.
in Windows 10:
- Press the Windows logo key + S shortcut on our keyboard to launch Search.
- Type Network troubleshooter.
- Select Identify and repair network problems.
- The troubleshooter will start. Use it to fix your problems.
Hopefully, your connection issues have been resolved.
10. Switch to a different network connection
If troubleshooting your current network connection has been to no avail, you can migrate to another network connection. Do that and check if this trick has worked.
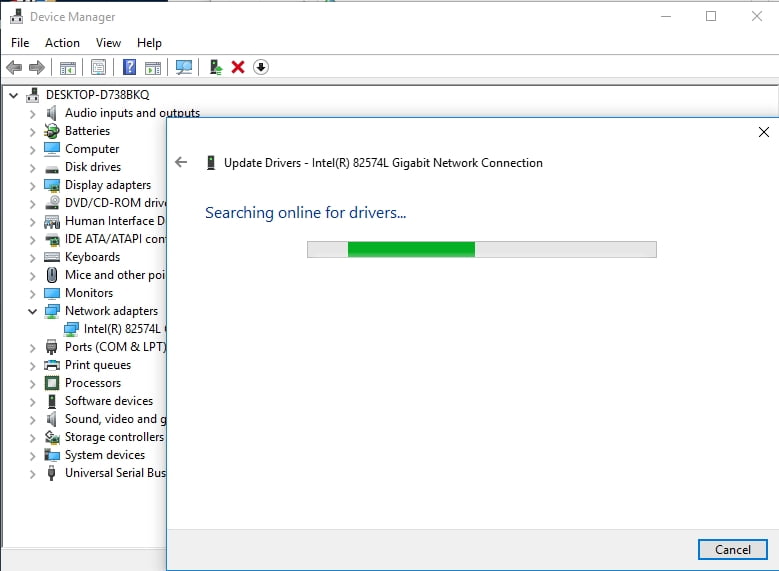
11. Update your network adapter driver
Network issues that lead to Windows Update failures often stem from out-of-date or faulty network adapter drivers. The good news is, this problem can be easily solved.
There are no fewer than 3 methods you can employ to get your drivers back on track:
Use a special tool
That is by all accounts the easiest and the most convenient one. These days you can delegate burdensome tasks and use software to get the job done. For instance, Auslogics Driver Updater will update all your drivers – not only those related to you network adapter driver – and bring your system in noticeably better shape.
Please bear in mind that you should keep all your drivers updated to prevent problems with your Windows OS.
Make use of Device Manager
Although updating your drivers in bulk is much easier, you might as well wish to use the built-in Windows Device Manager feature.
Here are the instructions for
Windows 7
- Click on the Windows logo icon to invoke the Start menu.
- Right-click on Computer and select Manage from the menu.
- Now you are in the Computer Management screen. Click Device Manager.
- Locate your network adapter. Right-click on it. Select to update its driver.
Windows 8
- Invoke the Quick Access menu by clicking on the Start icon.
- Select Device Manager from the list of options.
- Navigate to your network adapter.
- Right-click on your network adapter and select Update driver software.
Windows 10
- Press the Windows logo key and the letter X key simultaneously.
- Opt for Device Manager and move to your network adapter.
- Right-click on it and select the option necessary for updating the driver software of the device.
Still no success? Then keep working your way down – you might need to fix your system issues.
Update your driver manually
That is another popular solution, and yet it is extremely time-consuming and even risky. Do make sure you know exactly what driver is needed, since installing something inappropriate may bring about even more problems. Search the Internet for the latest driver version for your network adapter and install it only after you have found out that it is safe and comes from a reputable source.
12. Run an SFC scan
If Windows Update fails with the error 8024402F, some of your system files might be missing or corrupt. Although this may sound rather dispiriting, you have no need to worry – you can repair them quite easily. For this purpose, run System File Checker and let it scan your Windows for problematic system files and replace them at boot. Here are the necessary guidelines:
- Go to the Search field and type cmd.
- Select Command Prompt (Admin) or right-click Command Prompt and select Run as admin (or something like that).
- Type ‘sfc /scannow’ (without quotes) and hit Enter.
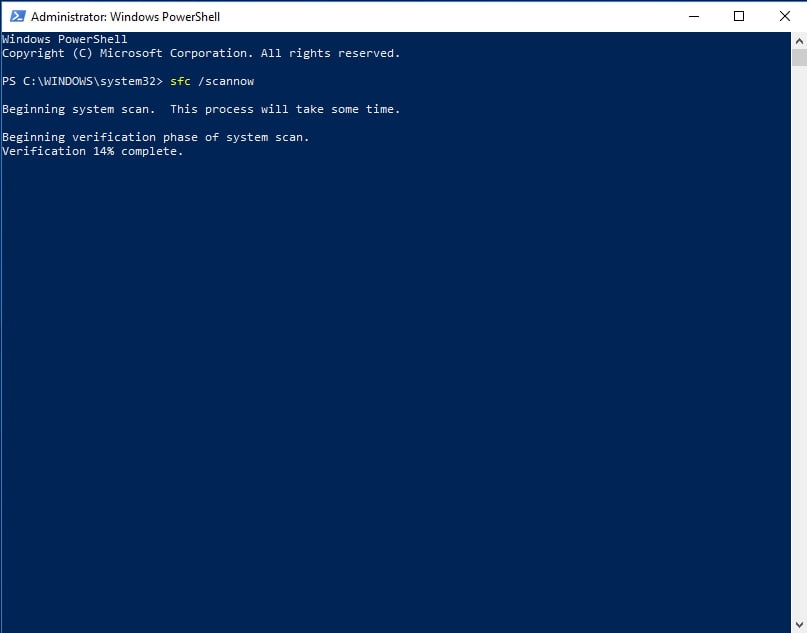
Wait for the scan to finish and restart your computer. Your Windows Update should work smoothly now.
13. Reset your Windows Update components
If you have made this far, your Windows Update itself might be having issues. In this case, we advise resetting Windows Update components the following way:
- Run Command Prompt as an administrator (see the instructions in the previous fix).
- Type the commands stated below (make sure to press Enter after each of them):
net stop bits
net stop wuauserv
net stop appidsvc
net stop cryptsvc
Del “%ALLUSERSPROFILE%\Application Data\Microsoft\Network\Downloader\qmgr*.dat”
cd /d %windir%\system32
regsvr32.exe atl.dll
regsvr32.exe urlmon.dll
regsvr32.exe mshtml.dll
regsvr32.exe shdocvw.dll
regsvr32.exe browseui.dll
regsvr32.exe jscript.dll
regsvr32.exe vbscript.dll
regsvr32.exe scrrun.dll
regsvr32.exe msxml.dll
regsvr32.exe msxml3.dll
regsvr32.exe msxml6.dll
regsvr32.exe actxprxy.dll
regsvr32.exe softpub.dll
regsvr32.exe wintrust.dll
regsvr32.exe dssenh.dll
regsvr32.exe rsaenh.dll
regsvr32.exe gpkcsp.dll
regsvr32.exe sccbase.dll
regsvr32.exe slbcsp.dll
regsvr32.exe cryptdlg.dll
regsvr32.exe oleaut32.dll
regsvr32.exe ole32.dll
regsvr32.exe shell32.dll
regsvr32.exe initpki.dll
regsvr32.exe wuapi.dll
regsvr32.exe wuaueng.dll
regsvr32.exe wuaueng1.dll
regsvr32.exe wucltui.dll
regsvr32.exe wups.dll
regsvr32.exe wups2.dll
regsvr32.exe wuweb.dll
regsvr32.exe qmgr.dll
regsvr32.exe qmgrprxy.dll
regsvr32.exe wucltux.dll
regsvr32.exe muweb.dll
regsvr32.exe wuwebv.dll
netsh winsock reset
netsh winhttp reset proxy
net start bits
net start wuauserv
net start appidsvc
net start cryptsvc
Finally, visit Microsoft’s support website and download the latest version of Windows Update agent. Install it on your PC. Then reboot your machine and enjoy an error-free computer.
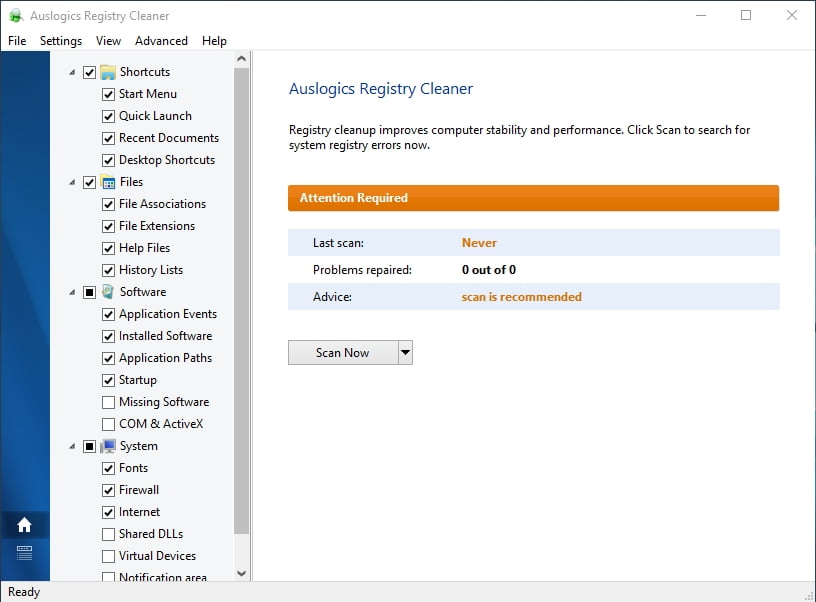
14. Check your system registry
Your update issues can relate to your registry. That said, we advise against rushing to edit this sensitive component of your Windows operating system. The truth is, you can easily damage the registry beyond repair by making a tiny mistake. So, there is no room for error at all.
Thankfully, there are some tools that can operate on your registry with surgical precision. Auslogics Registry Cleaner is a case in point: this freeware can tune your registry to its best without exposing your system to any risk.
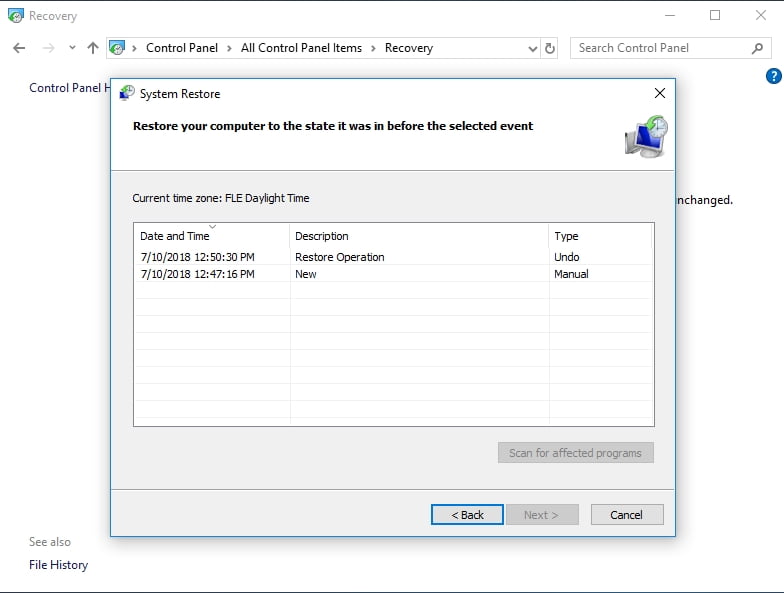
15. Configure your system to an earlier state
We have to admit that some issues are actually beyond one’s grasp. If none of the solutions above has helped you, your problem might lie too deep. Fortunately, the Windows operating system has quite a nice feature designed to deal with such mysteries. It is called System Restore. You are free to use it to literally travel back in time: you can get your PC to the good old days when the persistent Windows Update error 8024402f was not here.
What you should keep in mind is that you can use System Restore only if restore points have been generated on your PC. You can create them yourself, but your system often does that automatically when something important is about to occur on your PC.
Here is how you can restore your PC to an earlier date in
Windows 7:
- Open your Start menu and find the Search box.
- Type System Restore.
- Select System Restore and then click on Restore system files and settings.
- Click Next to proceed.
- Select the restore point you wish to restore your Windows to and confirm it.
Windows 8 (8.1):
- Locate the Search area in your Start menu and type ‘Recovery’ (without quotes).
- Click Settings. Then select Recovery and click Open System Restore.
- You will be shown the most recent working restore point. Nonetheless, you can click Choose a different restore point and opt for the one that suits you most.
- Confirm your choice.
Windows 10:
- Open your Start menu. Navigate to Control Panel.
- Open System and Security. Then click File History.
- Proceed to Recovery. Click Open System Restore and Next.
- Choose the desirable restore point.

- Click Next and Finish and provide your confirmation.
Hopefully, our tips have proved useful.
Do you know other solutions to the Windows Update error 8024402f?
You are welcome to share your knowledge in the comment section.
,
The Windows Update error 8024402F (Windows Update There were some problems installing updates, but we’ll try again again later. If you keep seeing this and want to search the web or contact support for information, this may help: (ox8024402f)), is faced while trying to search and install the latest updates on a Windows 10, 8, 7 or Vista computer.
The 0x8024402F Update error, commonly is caused due to poor Internet connection or if the Windows Update store folder (aka «SoftwareDistribution») becomes corrupted.

This tutorial contains detailed instructions on how to resolve the Windows Update error 0x8024402f in Windows 10, 8, 7 or Vista.
How to fix Windows Update Error 0x8024402F (Windows 7, 8, 8.1 or 10).
Solution 1. Check your Date and Time Settings.
First make sure that your date and time settings are correct.
1. Open «Date and time settings».
2. Press the Change date and time button and make sure that you have set the correct (current) date and time. Click OK when done.

3. Press the Change time zone button and set the Time Zone of your location. Click OK when done.

4. Finally select the Internet Time tab.

5. Click the Change settings button.

6. Click Update now.

7. Click OK twice, to exit all windows.
8. Try to check for updates again.
Solution 2. Run the Windows Update Troubleshooter.
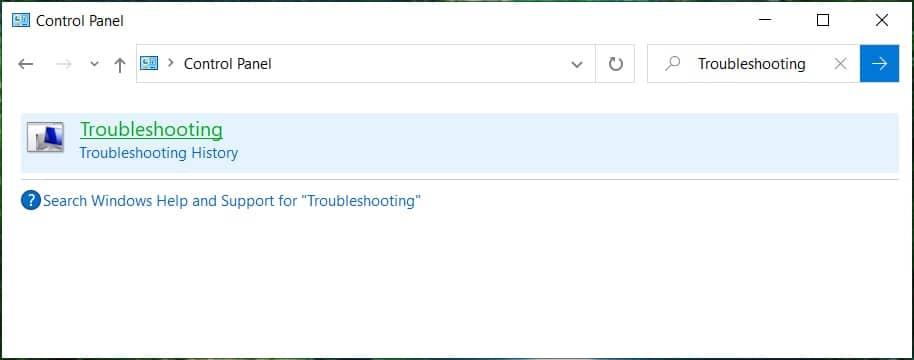
1. Navigate to Windows Control Panel, set the ‘View By’ to Small icons and open Troubleshooting.

2. In Troubleshooting options, click View all.
3. Open the Windows Update.

4. Click Next to troubleshoot Windows update problems.
5. When the troubleshooting process is complete, close the troubleshooter and restart your PC.
6. After restart check if the Update Error 0x8024402f has been resolved.
Solution 3. Change the DNS servers.
Some IPS causes errors with Windows Update. So try to manually add a public DNS server (e.g. Google DNS) on your network connection.
1. Press Windows + R keys to open the run command box.
2. Type ncpa.cpl and press Enter.

3. Double click at your active Network Adapter.
4. Click Properties.
5. Open ‘Internet Protocol Version 4 (TCP/IPv4)’ Properties.
6. Select «Use the following DNS server addresses:» and type the following Google’s public DNS server addresses:
- 8.8.8.8
- 8.8.4.4

7. Press OK twice to exit Network settings.
8. Restart your computer and check for updates again.
Solution 4. Delete the SoftwareDistribution Folder.
The “C:\Windows\SoftwareDistribution“, is the location where Windows store the Windows Updates. Many times this folder becomes corrupted and you must re-create it in order to download updates and install from scratch. To rebuild (re-create) the “SoftwareDistribution” folder follow the steps below:
Step 1: Stop Windows Update Service.
1. Open Windows Services control panel: To do that:
- Press Windows + R keys to open the run command box.
- In the Search box, type: services.msc & click OK.
- (Accept the UAC warning if appears).

2. In Services control panel locate the Windows Update service.
3. Right-click on Windows Update service and select “Stop”.

Step 2: Delete the SoftwareDistribution folder.
1. Open Windows Explorer and navigate to: C:\Windows folder.
2. Find and Delete the “SoftwareDistribution” folder (or rename it. e.g. to “SoftwareDistributionOLD”) .

Step 3: Start the Windows Update Service.
1. Now go back to Windows Services control panel:
2. Right-click on Windows Update service and select “Start”.

3. Try to check for Updates again.
That’s all folks! Did it work for you?
Please leave a comment in the comment section below or even better: like and share this blog post in the social networks to help spread the word about this solution.
If this article was useful for you, please consider supporting us by making a donation. Even $1 can a make a huge difference for us.
- Author
- Recent Posts
Konstantinos is the founder and administrator of Repairwin.com. Since 1995 he works and provides IT support as a computer and network expert to individuals and large companies. He is specialized in solving problems related to Windows or other Microsoft products (Windows Server, Office, Microsoft 365, etc.).
Updated May 2025: Stop error messages and fix your computer problem with this tool. Get it now at this link
- Download and install the software.
- It will scan your computer for problems.
- The tool will then fix the issues that were found.
The error code 8024402f occurs due to an issue within the Windows Update Service. This article explains how to resolve it.
You can run the command prompt as an administrator and type “net stop wuauserver”. Then you can type “wusa /uninstall/kb:8024402F”. Press ENTER to complete uninstallation.
The error code 8024402f indicates that there is an issue during the installation of Windows 10. This could mean that your computer does not meet certain requirements needed to install Windows 10. In some cases, you might even receive a blue screen of death while installing Windows 10. To resolve this problem, download the latest version of Windows.
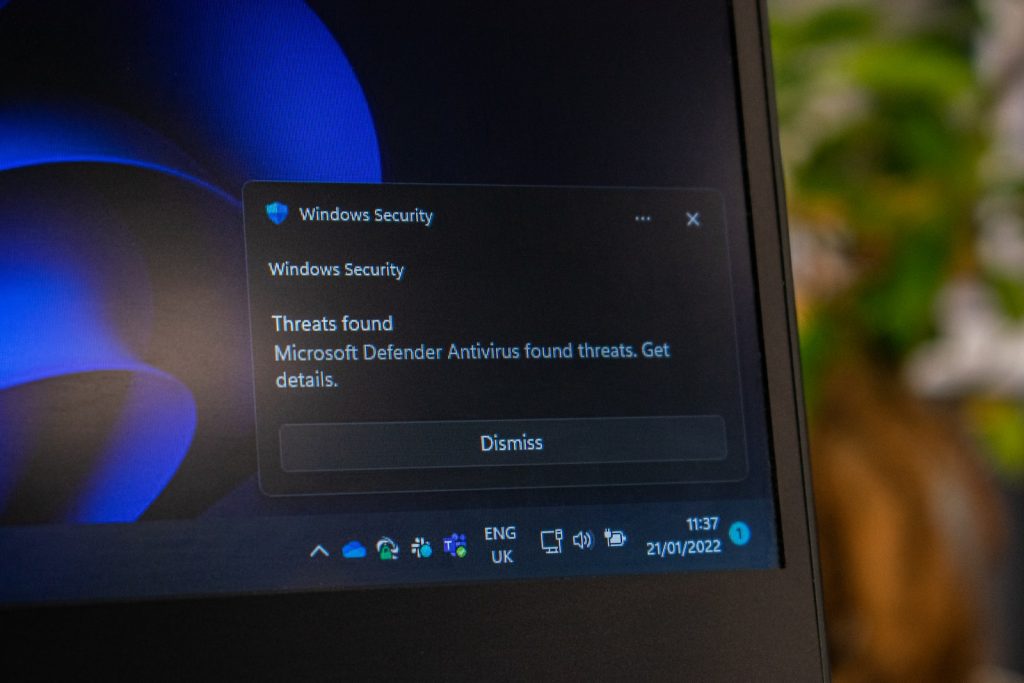
Method 1: Turn off the antivirus and firewall for now
Sometimes the Antivirus program creates errors and disabling the Antibot temporarily helps to resolve the problem. If your PC is infected with malware, it might cause problems while accessing the Internet. You can disable the Antivirus temporarily to solve this issue. To do this, follow the steps mentioned below:
1. Open Control Panel.
2. Click Programs & Features.
3. Select Windows Defender, select Uninstall button.
4. A window will open where you can see the list of installed applications. Find out the name of the application and uninstall it.
5. Type regedit and press Enter.
6. In Registry Editor, go to HKEY_LOCAL_MACHINE\SOFTWARE\Microsoft\Windows NT\CurrentVersion\Winlogon\Shell.
Method 2: Update Windows Date/Time
To fix Windows Update error 80 24402f, follow these steps: Rightclick on the name
of the job and choose Properties. Then change the following properties : Change the schedule type to Manua l. Set the Start In option t o Af ter logon. Make sure that the Run whe n user is logged on or n ot box is unchecked. Check the box next to E enable autiomatic failur e recovery. Choose the act ion to run under the A ction tab. Under the Recovery options s ec tion, set the M aximum retries val ue to 0. Finally, click Ap ply and then OK.
Updated: May 2025
We highly recommend that you use this tool for your error. Furthermore, this tool detects and removes common computer errors, protects you from loss of files, malware, and hardware failures, and optimizes your device for maximum performance. This software will help you fix your PC problems and prevent others from happening again:
- Step 1 : Install PC Repair & Optimizer Tool (Windows 11, 10, 8, 7, XP, Vista).
- Step 2 : Click Start Scan to find out what issues are causing PC problems.
- Step 3 : Click on Repair All to correct all issues.
Method 3: Check Update Logs
Windows 10 is one of the most popular operating systems out there. However, it does come with some issues. One of those problems is that many users cannot update to the latest version because of a bug. Microsoft has addressed this problem with a few solutions. If you’re experiencing similar issues, here’s how to check your logs and find out why.
1. Start up your computer. You’ll want to do this while logged into your account.
2. This will open your system information window. Scroll down to “Update history.” Look for any entries under the heading “Installed Updates.”
3. Click on the entry that says “KBxxxxxxx,” where KB stands for “Kernel Base.” This will take you to a list of updates installed. There might be multiple updates listed.
4. Find the update that corresponds to the date/time that you noticed the problem. For example, if you see something like “KB2919355 – Security Update for.NET Framework 4.6.1 on xxx-yyy-zzz, dated April 13, 2016,” look for the number 2919355.
5. Enter the product key that came with your PC. Then hit Search. If you don’t remember the product key, just enter 0000.
6. When you’ve found the correct update, scroll down to “Details” and read the description. This will tell you exactly what went wrong.
Method 4: Make sure Windows Update Services is running.
Make sure Windows Update Services ( WUS ) are running. If you’re having trouble getting Windows 10 to update, it could be because WUS isn’t working properly. To fix this problem, follow these steps:
1. Click Start, type windowsupdate into the Search box, and press Enter. 2. In the left pane, select Check for Updates. 3. Wait while Windows checks for updates. When finished, restart your PC.
4. Restart your PC again.
6. If there aren’t any updates available, try installing KB3035583. 8. If you still don’t see any updates available, uninstall KB3035583. 9. Finally, reboot your PC one final time.
10. Follow the prompts to troubleshoot any issues you might encounter. 12. Reboot your PC once more. 13. Try updating again. 14. If you still haven’t seen any updates available, try uninstalling KB3035583. 15. Reboot your PC
Method 5: Run System File Checker and DISM Tool
Microsoft Windows 7/8/10 64bit – Method 5: Run System File.
1. Open Command Prompt window as administrator. 2. Type “dism /online /cleanup-image /restorehealth”. 3. Wait until it finishes. 4. Reboot computer. 5. After reboot, type “systeminfo | findstr /i “ntldr”” in command prompt. If you see something like “NTLDR missing”, then you are good to go. 6. You can now log into Windows normally.
Method 6: Use the Windows Update Troubleshooter tool.
If you’re having trouble installing Windows 10 updates, we’ve got a few tricks up our sleeves. One way to try and resolve the problem is to run Microsoft’s Windows Update Troubleshooters. This tool scans your computer and tries to identify what might be causing the problem.
Here are the steps to use it:
1. 2. Select “Windows Update” under “Troubleshooting Options”.
3. Click Next.
4. In the next window, select “Check for solutions”, and then click Next again.
5. Wait while the program runs. When it finishes, look for a list of problems.
Method 7: Uncheck Proxy
I am trying to use Method 7, but it doesn’t seem to work. When I go into “Network Settings”, there are no proxy settings. There is a setting called “Automatically detect settings”. But even though I unchecked this box, my Internet connection still isn’t working. What else do I need to do? Thanks.
You don’t need to set up any proxies or anything like that. If your ISP is blocking traffic, you’ll just see a blank screen. You can try using a different browser such as Firefox or Chrome.
Method 8: Rename SoftwareDistribution Folder
In order to resolve this problem, you must rename the software distribution folder. This folder contains the updates that are downloaded automatically by Windows Update. If you do not know how to find it, here are some tips.
1. Scroll down to see the version number. You will notice a folder named “SoftwareDistribution”.
2. Right-click on the folder and select Properties.
3. Go to the tab labeled Location.
4. Find out where the folder is located and make sure it matches what you want. For example, I am assuming that you want to move it somewhere else. So, go ahead and type the location into the box.
5. Click OK.
Method 9: Change the way Windows Update works.
This method works well for most problems. If it doesn’t work, try Method 10.
1. Type regedit into the box and press Enter
2. In Registry Editor, locate HKEY_LOCAL_MACHINE\SOFTWARE\Microsoft\Windows\CurrentVersion\WindowsUpdate
3. Right-click WindowsUpdate and select Delete
4. Restart your PC
5. Check again for updates.
RECOMMENATION: Click here for help with Windows errors.
Frequently Asked Questions
Why does Windows 11 get the error 8024402f when it tries to update the security definitions?
This article explains what causes the Windows Security definition upgrade failure error code 8024402F on Windows 10/8/7/Vista/XP computers.
The Windows Security definition upgrade process is triggered automatically whenever you install a security patch or hotfix. However, some problems might occur during the process. In such cases, you are asked to either restart or skip the update. If you choose to skip the update, you will receive the following error code: 0x8024402F. To resolve this problem, follow the steps given below.
1. Restart your PC.
2. Press the F8 key repeatedly while booting up your system.
3. Select Safe Mode.
4. Click Yes to confirm the changes.
5. Reboot your PC normally.
How to Fix Windows 11 Error 8024402f on Windows Security Definition Update
Windows Security Definition Update Error 80 24 402 F occurs due to some issues while installing Windows Updates. In such cases, it becomes necessary to perform a clean install of Windows OS. However, there could be situations where you might face some problems while performing a clean install. So, here we have listed out few steps that can help you fix the issue.
Error 8024402F is a Windows update error. Usually, it is not noticeable, and most users notice it when they try to install or run Windows updates manually.
You must know that in production environments, Windows updates should always be turned off. For home and personal use, they are fine, but not if you have important data without a backup.
Techs like us prefer keeping the updates off unless we test them on staging systems. If all goes well, then we perform the update. The reason why I am writing this is to make you aware that updates are not always successful and do not always go with the flow.
The update error 8024402F is quite common among Windows users. This error prevents you from updating your Windows and can occur on Windows 7, 8, 8.1, and 10.
Method 1: Checking Update Logs
In order to fix this issue, we need to check the update logs file. To open the logs file, the easiest way is to press and hold the CTRL key and press R (this works on almost all versions of Windows, including Windows 10).
In the Run dialog, type “windowsupdate.log” and click OK.
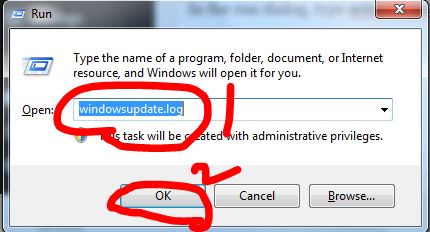
After you click ‘OK,’ a Notepad file will open. The first column/field represents the date; scroll down to the bottom to see the latest entries in the log file. Each time you run Windows Update, a record/entry is added to the log file.
See the sample log below, and locate the line in bold in your Windows Update logs.
WARNING: Send failed with hr = 80072efe.
WARNING: SendRequest failed with hr = 80072efe. Proxy List used: <(null)> Bypass List used : <(null)> Auth Schemes used : <>
WARNING: WinHttp: SendRequestUsingProxy failed for <http://download.windowsupdate.com/msdownload/update/common/2009/06/2803268_2cf7737e73bd31ae709b14a95c8d2ecb7eccfbf3.cab>. error 0x80072efe
WARNING: WinHttp: SendRequestToServerForFileInformation MakeRequest failed. error 0x80072efe
WARNING: WinHttp: SendRequestToServerForFileInformation failed with 0x80072efe
WARNING: WinHttp: ShouldFileBeDownloaded failed with 0x80072efe
Notice the URL/link above, which I copied as
2803268_2cf7737e73bd31ae709b14a95c8d2ecb7eccfbf3.cab>. error 0x80072efe
And it indicates that the update has failed. Now, we’re going to begin troubleshooting this. A general idea here is that your firewall, router, antivirus, or malware on your PC could be blocking this file from being downloaded.
To test, copy and paste the URL of the update into your browser, attempt to download it, and see if it works.
If it does, you can install the update manually by opening the command prompt in administrator mode.
A) Click Start.
b) Type “CMD.
c) Right-click “CMD” and select “Run as Administrator.
In the black command prompt, execute the following command:
dism /online /add-package /packagepath:C:\update\myupdate.cab
Where ‘C:\update\myupdate.cab‘ is the location of your file. If it was downloaded in the Downloads folder, then it should be ‘C:\Users\Username\Downloads\updatefile.cab‘.
When you execute the above command in command prompt, the update will be installed. You can then re-run windows updates.
If it doesn’t work, perform these general checks, then try the following:
a) Turn off the anti-virus
a) Turn off the firewall.
c) Disable router firewall, make sure no activex filters are setup.
d) Make sure you can access the internet (if not, check the router, modem, and DNS settings). I have another article on setting up public DNS servers, which you can search on Google by typing ‘dns_probe_finished_nxdomain Appuals‘.
e) Reset Internet Explorer (Win Key + R -> type inetcpl.cpl -> Advanced Tab -> Reset -> Delete Personal Settings)
f) Try a different web browser.
If it still doesn’t work, then “.
- Click “Start” -> and type “Services.msc”.
- Locate and stop the ‘Background Intelligent Transfer‘ and ‘Windows Update‘ services.
- Then, click ‘Start‘ and open ‘CMD’ as an administrator.
- Type rd %systemroot%\softwaredistribution /s
Method 2: Update Time Settings.
- Hold the Windows key and press X, then select Control Panel on Windows 10, 8, and 8.1. For Windows 7, click Start and select Control Panel.
- Click Clock, Language and Region > Click Set the time and date > Select Internet Time tab > Click Change settings > Click Update Now > Click ok > Click apply then select ok
Now, try to update your Windows.
Method 3: Changing Windows Update Settings.
For Windows 8 and 8.1.
- Move your mouse to the bottom right corner of your desktop screen, then move your mouse upwards. Click ‘Settings‘ from the newly appeared options.
- Click ‘Change PC Settings‘ > Click ‘Update and Recovery‘ > Click ‘Choose How Updates Get Installed‘.
- Uncheck ‘Give me recommended updates the same way I receive important updates,’ and check ‘Give me updates for other Microsoft products when I update Windows.’ You can select or deselect an option by clicking it once.
For Windows 7.
- Click “Start,” and then type “Windows Update” in the “Start Search.” Click on “Windows Update” from the program list.
- Click ‘Change Settings‘.
- Uncheck ‘Give me recommended updates the same way I receive important updates‘ and check ‘Give me updates for other Microsoft products when I update Windows.’ You can select or deselect an option by clicking it once.
If there is no ‘Give me updates for other Microsoft products when I update Windows‘ option, then simply uncheck the ‘Give me recommended updates the same way I receive important updates‘ option.
Method 4: Disabling Windows Firewall and Third-Party Applications
If you have any antivirus software or other applications related to boosting internet speed, please shut down or disable them.
- Hold the Windows key and press X, then select Control Panel on Windows 10, 8, and 8.1. For Windows 7, click Start and select Control Panel.
- Select “System and Security” > Click “Windows Firewall” > Click “Turn Windows Firewall On or Off.
- Select the ‘Turn off Windows Firewall (not recommended)‘ option in both the Private Network Settings and Public Network Settings sections, and click ‘OK’.
Method 5: Checking Windows Update Services.
- Hold the Windows key and press R.
- Type “msc” and press Enter.
- Locate Windows Update and double-click it.
- Select the General tab and choose Automatic from the Startup Type dropdown list.
- Click the Start button in the Service Status section.
- Repeat the same method for the Background Intelligent Transfer Service in the Services Window.
Method 6: Renaming the SoftwareDistribution Folder.
- Hold the Windows key and press X, then select Command Prompt (Admin) in Windows 10 and 8. For Windows 7, click Start, type ‘cmd‘ in the Start Search box, and simultaneously press Ctrl, Shift, and Enter (Ctrl + Shift + Enter).
- Type “net stop WuAuServ” and press Enter. Wait until it says “successfully stopped,” but do not close the command prompt window.
- Hold the Windows key and press R. Type %windir% and then press Enter in Windows 10 and 8. For Windows 7, click Start, type %windir% in the Start Search box, and press Enter.
- Locate the SoftwareDistribution folder, right-click it, and select ‘Rename.’ Then, type ‘SoftwareDistribution.old‘ and press ‘Enter.’
- Type “net start WuAuServ” and press Enter in the command prompt window. Wait until it says “successfully started.
Method 7: Resetting Windows Update Components
Go to this link, https://support.microsoft.com/en-us/kb/971058, and download the Windows Update Troubleshooter for your Windows version. After the download is complete, run the downloaded file and click ‘Nex
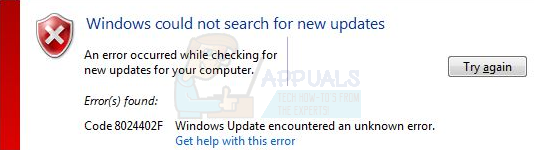
If you are trying to update Windows and facing the error code 8024402F Windows Update encountered an unknown error then you are at the right place as today we are going to discuss on how to fix this issue. Windows updates are essential for Windows Security and ensuring proper functioning of Windows. But if you are not able to update Windows then your system is vulnerable to exploit and its advised you should fix the issue as soon as possible and run Windows Update.
Windows could not search for new updates:
An error occurred while checking for new updates for your computer.
Error(s) found: Code 8024402F Windows Update encountered an unknown error.

Even if you use Windows Update troubleshooter the error will not resolve and even reinstalling Windows won’t fix the issue. All these steps didn’t prevail anything because the main issue is with Firewall and turning it off seems to help in many cases. Anyway, without wasting any time let’s see how to actually Fix Windows Update Error 8024402F with the help of below-listed troubleshooting steps.
Table of Contents
Make sure to create a restore point just in case something goes wrong.
Method 1: Temporarily Disable Antivirus and Firewall
Sometimes the Antivirus program can cause error and in order to verify this is not the case here, you need to disable your antivirus for a limited time so that you can check if the error still appears when the antivirus is off.
1. Right-click on the Antivirus Program icon from the system tray and select Disable.
2. Next, select the time frame for which the Antivirus will remain disabled.

Note: Choose the smallest amount of time possible for example 15 minutes or 30 minutes.
3. Once done, again try to connect to open Google Chrome and check if the error resolves or not.
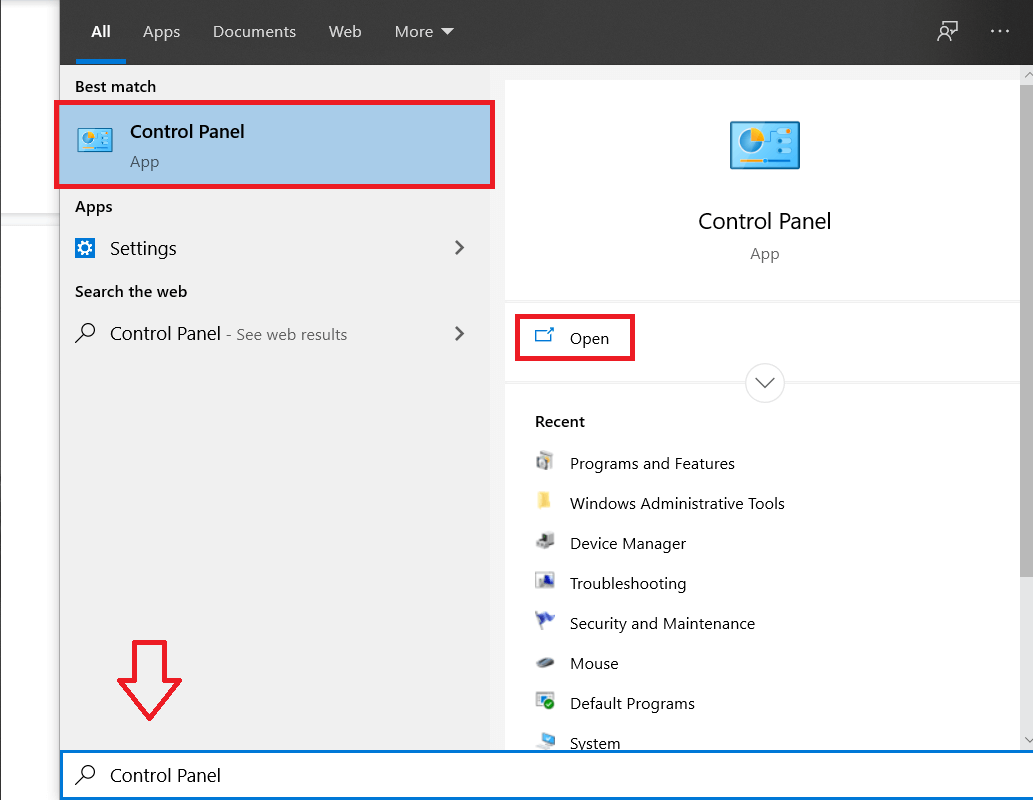
4. Search for the control panel from the Start Menu search bar and click on it to open the Control Panel.
5. Next, click on System and Security then click on Windows Firewall.

6. Now from the left window pane click on Turn Windows Firewall on or off.

7. Select Turn off Windows Firewall and restart your PC.

Again try to open Google Chrome and visit the web page which was earlier showing the error. If the above method doesn’t work make sure to follow the exact same steps to turn on your Firewall again.
Method 2: Update Windows Date/Time
1. Click on the date and time on the taskbar and then select “Date and time settings.”
2. If on Windows 10, make “Set Time Automatically” to “on.”

3. For others, click on “Internet Time” and tick mark on “Automatically synchronize with Internet time server.”

4. Select Server “time.windows.com” and click update and “OK”. You don’t need to complete update. Just click OK.
Again check if you are able to Fix Windows Update Error 8024402F or not, if not then continue with the next method.
Method 3: Check Update Logs
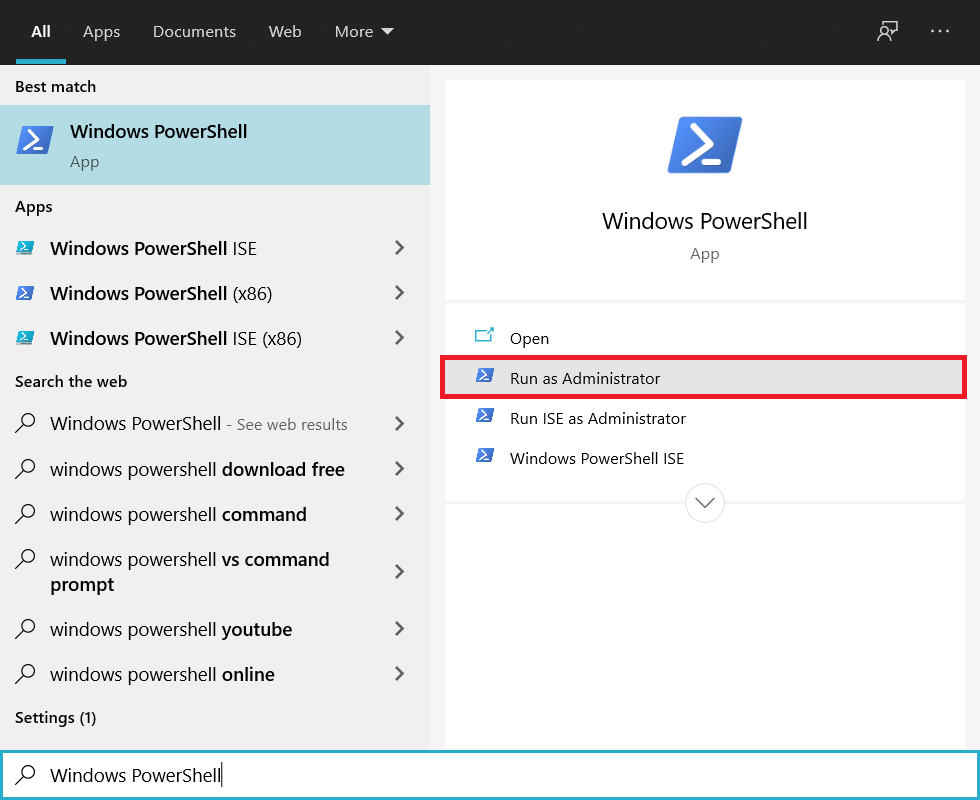
1. Type powershell into Windows Search and then right-click on PowerShell and select Run as Administrator.
2. Now type the following command into powershell and hit Enter:
Get-WindowsUpdateLog

3. This will save a copy of Windows log on your desktop, double-click to open the file.
4. Now Scroll down to date and time when you tried the update and it failed.

5. Go here to understand How to read the Windowsupdate.log file.
6. Once you have deduced the cause of the error make sure to rectify the problem and see if you’re able to Fix Windows Update Error 8024402F.
Method 4: Make sure Windows Update Services are running
1. Press Windows Key + R then type services.msc and hit Enter.
2. Find the following services and make sure they are running:
Windows Update
BITS
Remote Procedure Call (RPC)
COM+ Event System
DCOM Server Process Launcher
3. Double-click on each of them, then make sure the Startup type is set to Automatic and click Start if the services are not already running.

4. Click Apply followed by OK.
5. Reboot your PC to save changes and again try to run Windows Update.
Method 5: Run System File Checker and DISM Tool
1. Open Command Prompt. The user can perform this step by searching for ‘cmd’ and then press Enter.

2. Now type the following in the cmd and hit enter:
Sfc /scannow
sfc /scannow /offbootdir=c:\ /offwindir=c:\windows (If above fails then try this one)

3. Wait for the above process to finish and once done restart your PC.
4. Again open cmd and type the following command and hit enter after each one:
Dism /Online /Cleanup-Image /CheckHealth
Dism /Online /Cleanup-Image /ScanHealth
Dism /Online /Cleanup-Image /RestoreHealth

5. Let the DISM command run and wait for it to finish.
6. If the above command doesn’t work then try on the below:
Dism /Image:C:\offline /Cleanup-Image /RestoreHealth /Source:c:\test\mount\windows
Dism /Online /Cleanup-Image /RestoreHealth /Source:c:\test\mount\windows /LimitAccess
Note: Replace the C:\RepairSource\Windows with the location of your repair source (Windows Installation or Recovery Disc).
7. Reboot your PC to save changes and see if you’re able to Fix Windows Update Error 0x800705b3 or 8024402F.
Method 6: Run Windows Update Troubleshooter
If nothing works till now then you should definitely try running Windows Update Troubleshooter from Microsoft Website itself and see if you’re able to Fix Windows Update Error 8024402F.
1. Open control and search Troubleshooting in the Search Bar on the top right side and click on Troubleshooting.
2. Next, from the left window pane select View all.
3. Then from the Troubleshoot computer problems list select Windows Update.

4. Follow on-screen instruction and let the Windows Update Troubleshoot run.
5. Restart your PC and you may be able to Fix Windows Update Error 8024402F in Windows 10.
Method 7: Uncheck Proxy
1. Press Windows Key + R then type inetcpl.cpl and hit enter to open Internet Properties.
2 .Next, Go to Connections tab and select LAN settings.

3. Uncheck Use a Proxy Server for your LAN and make sure “Automatically detect settings” is checked.
4. Click Ok then Apply and reboot your PC.
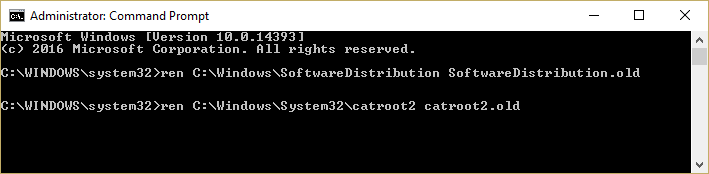
Method 8: Rename SoftwareDistribution Folder
1. Open Command Prompt. The user can perform this step by searching for ‘cmd’ and then press Enter.
2. Now type the following commands to stop Windows Update Services and then hit Enter after each one:
net stop wuauserv
net stop cryptSvc
net stop bits
net stop msiserver

3. Next, type the following command to rename SoftwareDistribution Folder and then hit Enter:
ren C:\Windows\SoftwareDistribution SoftwareDistribution.old
ren C:\Windows\System32\catroot2 catroot2.old
4. Finally, type the following command to start Windows Update Services and hit Enter after each one:
net start wuauserv
net start cryptSvc
net start bits
net start msiserver

5. Reboot your PC to save changes and check if you are able to Fix Windows Update Error 8024402F.
Method 9: Reset Windows Update Component
1. Open Command Prompt. The user can perform this step by searching for ‘cmd’ and then press Enter.
2. Type the following command into cmd and hit Enter after each one:
net stop bits
net stop wuauserv
net stop appidsvc
net stop cryptsvc
3. Delete the qmgr*.dat files, to do this again open cmd and type:
Del “%ALLUSERSPROFILE%\Application Data\Microsoft\Network\Downloader\qmgr*.dat”
4. Type the following into cmd and hit Enter:
cd /d %windir%\system32

5. Reregister the BITS files and the Windows Update files. Type each of the following commands individually in cmd and hit Enter after each one:
regsvr32.exe atl.dll
regsvr32.exe urlmon.dll
regsvr32.exe mshtml.dll
regsvr32.exe shdocvw.dll
regsvr32.exe browseui.dll
regsvr32.exe jscript.dll
regsvr32.exe vbscript.dll
regsvr32.exe scrrun.dll
regsvr32.exe msxml.dll
regsvr32.exe msxml3.dll
regsvr32.exe msxml6.dll
regsvr32.exe actxprxy.dll
regsvr32.exe softpub.dll
regsvr32.exe wintrust.dll
regsvr32.exe dssenh.dll
regsvr32.exe rsaenh.dll
regsvr32.exe gpkcsp.dll
regsvr32.exe sccbase.dll
regsvr32.exe slbcsp.dll
regsvr32.exe cryptdlg.dll
regsvr32.exe oleaut32.dll
regsvr32.exe ole32.dll
regsvr32.exe shell32.dll
regsvr32.exe initpki.dll
regsvr32.exe wuapi.dll
regsvr32.exe wuaueng.dll
regsvr32.exe wuaueng1.dll
regsvr32.exe wucltui.dll
regsvr32.exe wups.dll
regsvr32.exe wups2.dll
regsvr32.exe wuweb.dll
regsvr32.exe qmgr.dll
regsvr32.exe qmgrprxy.dll
regsvr32.exe wucltux.dll
regsvr32.exe muweb.dll
regsvr32.exe wuwebv.dll
6. To reset Winsock:
netsh winsock reset

7. Reset the BITS service and the Windows Update service to the default security descriptor:
sc.exe sdset bits D:(A;;CCLCSWRPWPDTLOCRRC;;;SY)(A;;CCDCLCSWRPWPDTLOCRSDRCWDWO;;;BA)(A;;CCLCSWLOCRRC;;;AU)(A;;CCLCSWRPWPDTLOCRRC;;;PU)
sc.exe sdset wuauserv D:(A;;CCLCSWRPWPDTLOCRRC;;;SY)(A;;CCDCLCSWRPWPDTLOCRSDRCWDWO;;;BA)(A;;CCLCSWLOCRRC;;;AU)(A;;CCLCSWRPWPDTLOCRRC;;;PU)
8. Again start the Windows update services:
net start bits
net start wuauserv
net start appidsvc
net start cryptsvc
9. Install the latest Windows Update Agent.
10. Reboot your PC and see if you’re able to fix the issue.
Recommended:
- Fix Printer Installation Error 0x000003eb
- Fix The Installation Failed In The First Boot Phase Error
- How To Fix Windows Settings won’t open
- Fix Google Chrome error He’s Dead, Jim!
That’s it you have successfully Fix Windows Update Error 8024402F but if you still have any queries regarding this guide then feel free to ask them in the comment’s section.