
-
Home
-
Partition Magic
- How to Fix Windows Update Error 8007000E
By Sherry |
Last Updated
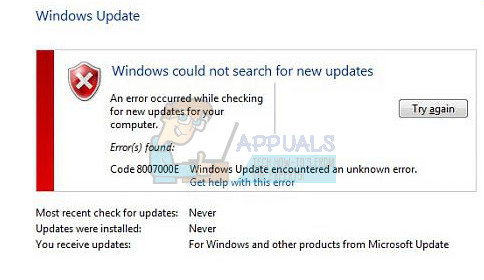
Are you facing Windows update error 8007000E? If this error appears, you will fail to search, download or install the Windows update, which is really annoying. Don’t be worried. MiniTool Solution offers you 5 solutions to the problem. You are free to try them one by one.
While trying to update Windows, you might receive the error 8007000E. Error 8007000E often comes with a message that “Windows could not search for new updates”, “Windows Update failed to install some updates for your computer”, or “Windows Update encountered an unknown error”.
Keep reading to get the ways to fix the problem.
Solution 1: Disable Third-party Security Programs
Sometimes, third-party antivirus and anti-malware applications may clash with Windows update and lead to error 8007000E.
In this case, you need to disable or even uninstall all third-party security programs installed on your computer.
Then check whether you get rid of this problem. If not, try the next solution.
Solution 2: Rename the SoftwareDistribution Folder
When you are facing Windows update error 8007000E, there may be any corrupted or damaged files/folders in SoftwareDisrtibution folder. You can rename the folder with Command Prompt to fix the issue.
Step 1: Press Win + R to pen Run window. Then type cmd and press Shift + Ctrl + Enter to run Command Prompt as administrator.
Step 2: Input the following command and press Enter to rename the SoftwareDisrtibution folder to SoftwareDistribution.old: ren %systemroot%SoftwareDistribution softwaredistribution.old.
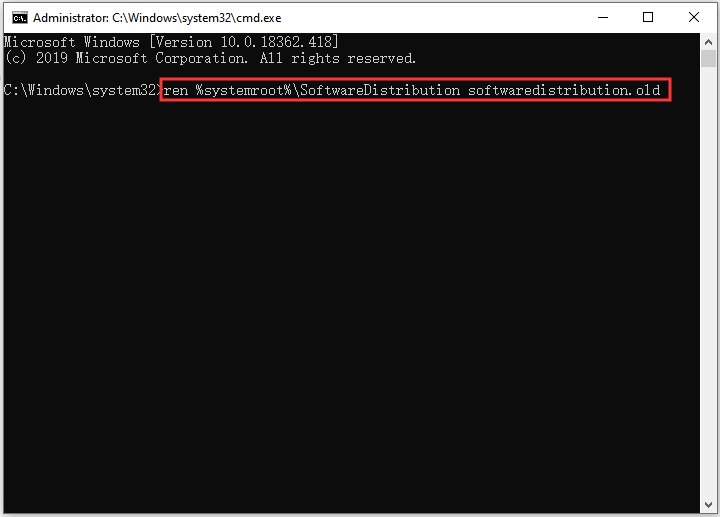
Step 3: Once the command has been executed, type Exit and hit Enter to close Command Prompt.
Then restart your computer and try updating Windows again to see if the error 8007000E has been removed.
Solution 3: Rename Spupdsvc.exe to Spupdsvc.old
Similar to Solution 2, some users have fixed Windows update error 8007000E by renaming Spupdsvc.exe. You can also have a try.
In Run dialog, input the following command and press Enter: cmd /c ren %systemroot%System32Spupdsvc.exe Spupdsvc.old.
Then restart your PC and check for Windows update. If this solution doesn’t work, keep trying the next one.
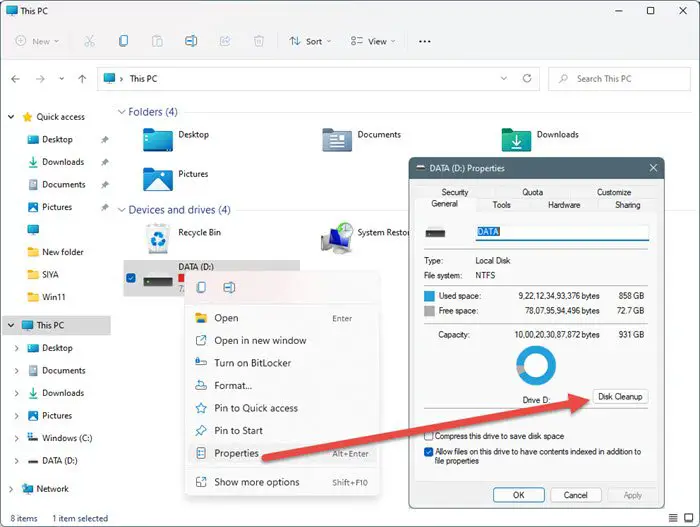
Solution 4: Remove Junk Files from Your Computer
To solve 8007000E, you can also remove junk files with Disk Cleanup, a built-in tool that deletes temporary and unimportant files.
Step 1: Run Command Prompt with administrative privileges.
Step 2: Input cleanmgr into the prompt and press Enter.
Step 3: In Disk Cleanup: Drive Selection, select C drive and click OK.
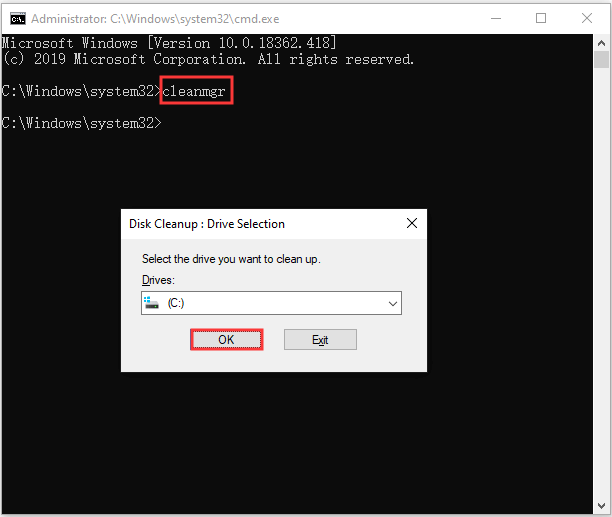
Tip: After you run the command, Disk Cleanup will calculate how much space you will be able to free on the disk. It may take a few minutes to complete. Please be patient.
Step 4: In Disk Cleanup for C:, check all the items and then click OK to delete the junk files and free up the disk space.
Solution 5: Run SFC Scan
SCF refers to System File Checker, which is a utility designed to analyze Windows operating system for corrupted or damaged system files and then repair or replace them.
If error 8007000E happens due to corrupted system files, running SFC scan will be a nice solution.
You just need to run Command Prompt as administrator. Then type sfc /scannow and hit Enter to run the command.
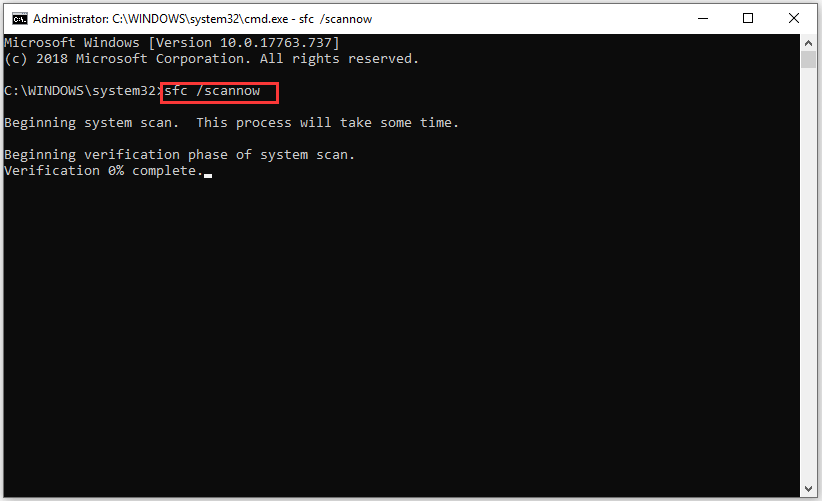
The process may take you much time so you have to wait patiently.
Once it’s 100% completed, you can restart your computer and see if the error has been removed.
About The Author
Position: Columnist
Sherry has been a staff editor of MiniTool for a year. She has received rigorous training about computer and digital data in company. Her articles focus on solutions to various problems that many Windows users might encounter and she is excellent at disk partitioning. She has a wide range of hobbies, including listening to music, playing video games, roller skating, reading, and so on. By the way, she is patient and serious.
Из-за ошибки 0x8007000e не заканчивается обновление Windows. Это вызвано:
- повреждением системных файлов — сервис апдейта не может их заменить или модифицировать;
- недостаточностью ресурсов компьютера;
- внутренними сбоями сервиса обновления.
Есть несколько способов исправления проблемы.
Как исправить ошибку 0x8007000e?

№1: проверить целостность файлов ОС
Запустите запрос sfc /scannow в командной строке, открытой с правами администратора. При выполнении команды могут появляться сообщения о нахождении поврежденных файлов. Хорошо, если при этом такие файлы будут восстановлены. В ином случае создастся лог, где будет указано, какие файлы испорчены — их следует восстановить или заменить на оригинальные в ручном режиме. Если проверка sfc не обнаружит проблем — переходите к следующему способу.
№2: ручная установка обновлений
Скачайте и установите апдейт KB3050265. Еще попробуйте обновление KB3112343.
№3: убедитесь в достаточности памяти
Иногда на проблемном ПК недостаточно места для обновлений. Проверьте, что на системном диске имеется от 5 гигабайт свободного пространства. Если апдейты грузятся не напрямую с серверов Microsoft, а из хранилища рабочей сети, то обратитесь к его администратору. Пусть он проверит, что на сервере выделено не менее 1 гигабайта оперативной памяти для нужд сервиса обновлений клиентских компьютеров. Это должно устранить ошибку 0x8007000e.
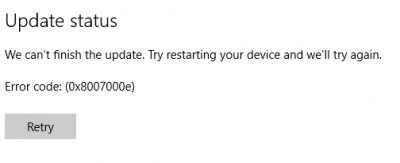
Struggling with Windows update Error 0x8007000E on your quest to install the latest Windows 11 or 10 update? Fret not, as your solution might be closer than you think. Recently, users have explicitly complained about facing this message which states, “Updates failed. We can’t finish the update. Try restarting your device and we’ll try again”.
0x8007000E might occur due to corrupted system files or incompatible device drivers or software. In this blog, we’ve distilled the essential steps to tackle this issue head-on. From running the Windows Update troubleshooter, which often holds the key to resolution to addressing potential driver and software conflicts, we’ve got you covered. By following our straightforward instructions, you can bid farewell to the concerned error code and pave the way for a successful update installation. See: Fix Windows Update Error “0xC1900101 – 0x30018” (Solved!).
Windows update Error 0x8007000E
Here is how to fix Windows update Error 0x8007000E:
Run SFC Scan and DISM Commands
To tackle the pesky Windows update error 0x8007000E, as a first step, we will use the SFC Scan and DISM command line tools. Moreover, SFC Scan (System File Checker) is known to handle corrupted files, while DISM ( Deployment Image Servicing and Management) jumps in to sort out any hiccups in the Windows image itself.
After running these particular commands you can easily encounter and clear the hindrances which are stopping the Windows update.
- Click on Search.
- Type CMD.EXE.
- Select – Run as administrator.
- Give permission by clicking Yes on the UAC dialog box.
- Type the below command and press Enter –
SFC /SCANNOW. - Wait for completion. When you see, “Verification 100% complete. Windows Resource Protection did not find any integrity violations” restart your computer.
- Try to install the Windows update and see if it is installed successfully.
- If the issue still persists, again launch Command Prompt as administrator.
- Execute the following command lines sequentially.
DISM /Online /Cleanup-Image /CheckHealth
DISM /Online /Cleanup-Image /ScanHealth
DISM /Online /Cleanup-Image /RestoreHealth- Wait for the process to finish.
- Restart your PC.
Reference: SFC /Scannow, DISM.Exe, CHKDSK Windows 11 or 10.
Rename SoftwareDistribution Folder
Ever wondered how a simple folder rename could support fixing the Windows update error 0x8007000E? Well, for those who don’t know SoftwareDistribution folder is where Windows stores temporary files for updates.
Sometimes, these files can get a little tangled and cause update errors therefore, by giving this folder a new name, you’re essentially clearing all the glitches.
- Open Command Prompt (Admin) as you have done in the previous method.
- Enter the command and press Enter.
net stop wuauserv
net stop bits
net stop msiserver
net stop CryptSvc- Now run the following command:
ren %systemroot%SoftwareDistribution softwaredistribution.old- After then, start the Windows update-related services using the below command:
net start wuauserv
net start bits
net start msiserver
net start CryptSvc- Close Command Prompt.
- Restart your PC.
Read: Remove Items From C:\Windows\SoftwareDistribution\Download Windows 10.
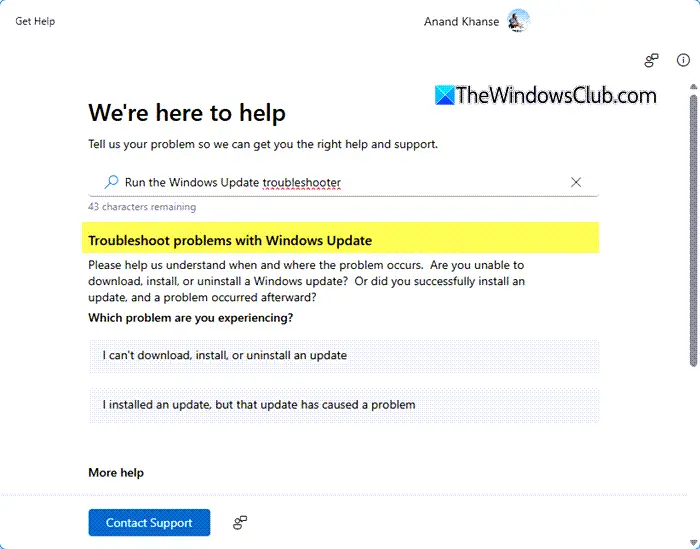
Run Windows Update Troubleshooter
Another possible and most suitable way of clearing out the concerned error is by using the Windows Update Troubleshooter. It’s your system’s built-in fix-it tool that identifies issues causing the aforementioned problem.
- Press Windows key + Q.
- Search troubleshoot.
- Hit Enter to open Troubleshoot settings.
- Select Other troubleshooters.
- Navigate to Windows Update and click on Run.
- Follow suggested resolutions.
See: Use Common Windows Update Troubleshooter on Windows 11, 10, 8.1, 7
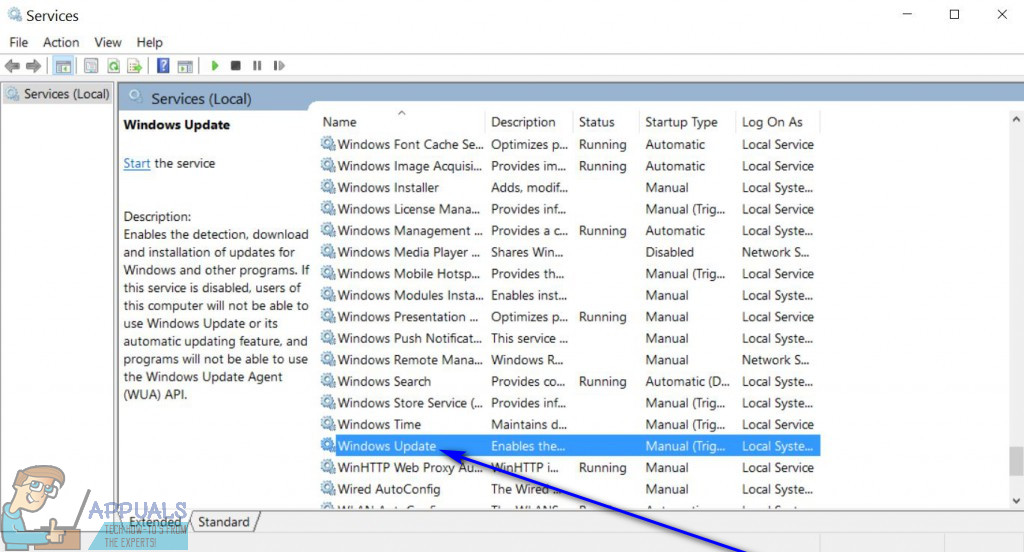
Check Windows Update Service
If you are yet to find an appropriate solution, then, we suggest you check your Windows Update Service. When this service in your PC is not running, updates can stall, leading to errors like 0x8007000E. By ensuring the service is enabled, you’re essentially allowing seamless updates.
- Press Win + R.
- Type services.msc and click OK.
- Double-click on Windows Update.
- If not selected, pick Automatic from the Startup type.
- Click on Start in the Running status field.
- Apply and click OK.
Clean Windows Download Path
Cluttering of your Windows download path with old files can be another significant reason for you to face the concerned update error by clearing it you will be creating a clean slate for your updates. This means Windows can download fresh update files without stumbling over old files, thus, potentially solving the error.
- Press Windows key + R.
- Type regedit and Enter.
- Navigate to the path:
HKEY_LOCAL_MACHINE\SOFTWARE\Policies\Microsoft\Windows\WindowsUpdate- Find WUServer and WIStatusServer on the right panel.
- Delete both if listed.
- Restart your computer.
Try installing the Windows update through Catalog
Microsoft Update Catalog is a special store where you can find and download important updates and fixes for Windows. Apart from this, the website also hosts hotfixes and drivers of OEM manufacturers.
If you encounter Windows update error 0x8007000E when trying to install a patch or build through automatic mode you have an option to find the same in the catalog. The additional method you will have to perform is to install that manually rather. So follow the steps:
- Copy the KB number of the Windows update which troubled you.
- Go to Microsoft Update Catalog.
- Paste the KB number in the Search box and press Enter.
- From result, find the update file suitable for your computer (x64, x86, or ARM64).
- Click on Download.
- You can see a lone link on a separately popped-up page; click on it.
- When the patch is downloaded, double-click on it and select Yes to confirm.
Follow the method: How to Download and Install Update from Microsoft update catalog on Windows 11/10
Execute In-place upgrade
An in-place upgrade is like giving your current device a software makeover. You update or replace the old software with the new one while keeping all your files, settings, and apps intact using this method. Therefore, move forward with the steps to install the update successfully:
- First of all, navigate to the Microsoft website for the official download page of Windows 11.
- Advance to the section “Download Windows 11 Disk Image (ISO)“.
- Once reached, click on Download Now.
- Click on Choose one and select the proper product languages.
- Then, click on Confirm.
- When 64-bit Download starts showing click on it.
- After downloading is completed, open File Explorer (Winkey+E) and head to the Downloads folder.
- Now, right-click on the ISO and choose Mount.
- Select “Open” on the Open file security warning dialog.
- Then, right-click on “Setup.exe” and select Yes on the verification prompt.
- Click on “Yes” UAC popup.
- You will see “Windows 11 Setup” wizard; click on Next.
- After the “Applicable notices and license term” window is shown, select – Accept.
- In a short while, the update will be installed.
We hope with these 6 ways you will be able to fix Windows update Error 0x8007000e in your system.
Methods:
Run SFC Scan and DISM Commands
Rename SoftwareDistribution Folder
Run Windows Update Troubleshooter
Check Windows Update Service
Clean Windows Download Path
Try installing the Windows update through Catalog
Execute In-place upgrade
That’s all!!
While trying to download and install Windows Updates for your computer via Windows Update – Windows’ resident update utility, there are quite a few different things that can go wrong. One of the many problems users have reported running into when using Windows Update to get the latest updates for their Windows computer is error code 0x8007000E. Error code 0x8007000E is just one of the many different error codes Windows Update can throw at you if it fails to retrieve, download or install updates for your Windows computer. Error code 0x8007000E is always accompanied by an error message which usually states that Windows could not search for new updates, Windows Update failed to install some updates for your computer, or Windows Update encountered an unknown error.
Error code 0x8007000E has been known to affect every currently supported iteration of the Windows Operating System. The cause of error code 0x8007000E varies from one affected computer to the other – it can be anything from a third-party antivirus or anti-malware program interfering with Windows Update or accumulated junk files to corrupt system files or corrupt files/folders in the SoftwareDistribution folder. Since there are so many possible causes of error code 0x8007000E, there are also quite a few possible solutions to the problem. The following are some of the most effective solutions that you can use to try and get rid of error code 0x8007000E:
Solution 1: Disable or uninstall any and all third-party security programs
Third-party antivirus, anti-malware and firewall applications can sometimes clash with Windows Update and lead to problems such as error code 0x8007000E. If a third-party security program is the cause of your sorrows, simply disable (or better yet, uninstall) any and all third-party security programs installed on your computer. Once that’s done, check to see whether or not the fix worked.
Solution 2: Remove junk files from your computer
- Press the Windows Logo key + X to open the WinX Menu.
- Click on Command Prompt (Admin) to launch an elevated Command Prompt with administrative privileges.
- Type cleanmgr into the elevated Command Prompt and press Enter.
- Allow the utility to do its thing.
- When presented with a list of all the junk files you can delete from your computer, check all the boxes, especially the box beside Temporary files.
- Click on OK, confirm the action if asked to do so, and wait for the selected files to be deleted.
- Once done, launch Windows Update and check to see whether or not the issue has been resolved.
Solution 3: Run an SFC scan
SFC (System File Checker) is a utility designed to analyze the Windows Operating System for corrupt or otherwise damaged system files and either repair them or replace them with cached copies. If you are seeing error code 0x8007000E because of corrupted or otherwise damaged system files, running an SFC scan is as good a possible solution as any.
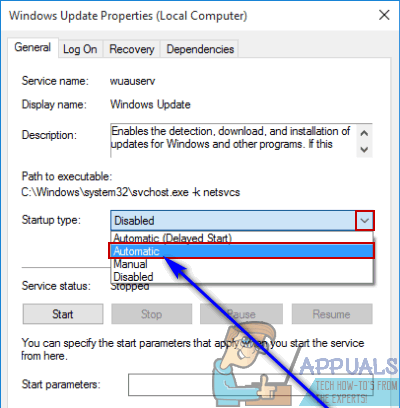
Solution 4: Ensure the Windows Update service is running and set to Automatic
- Press the Windows Logo key + R to open a Run dialog.
- Type services.msc into the Run dialog and press Enter to launch the Services manager.
- Scroll down the list of services, locate the Windows Update service and double-click on it to access its properties.

- Open the dropdown menu directly in front of Startup type and click on Automatic to select it.

- If the Windows Update service is stopped, click on Start to start it. If the service is already running, ignore this step.
- Click on Apply.
- Click on OK.
- Launch Windows Update and see whether or not it still throws error code 0x8007000E at you.
Note: Make sure to follow the same conditions for the following services “Background Intelligent Transfer services, Cryptographic, Windows Installer,”.
Solution 5: Rename the SoftwareDistribution folder to SoftwareDistribution.old
- Press the Windows Logo key + X to open the WinX Menu.
- Click on Command Prompt (Admin) to launch an elevated Command Prompt with administrative privileges.
- Type the following command into the elevated Command Prompt and press Enter:
ren %systemroot%\SoftwareDistribution softwaredistribution.old
- Renaming the SoftwareDistribution folder to old will cause your computer to completely disregard that folder and its contents and create a new SoftwareDistribution folder, negating the effects of any corrupted or damaged files/folders that may have been residing in your computer’s SoftwareDistribution folder. Once the command has been executed, close the elevated Command Prompt.
- Restart your computer and check to see whether or not the problem still persists once it boots up.
Solution 6: Rename Spupdsvc.exe to Spupdsvc.old
- Press the Windows Logo key + R to open a Run dialog.
- Type the following into the Run dialog and press Enter:
cmd /c ren %systemroot%\System32\Spupdsvc.exe Spupdsvc.old
- Once the command has been successfully executed, launch Windows Update and check to see whether the utility successfully searches for, downloads and installs updates or still spits out error code 0x8007000E.
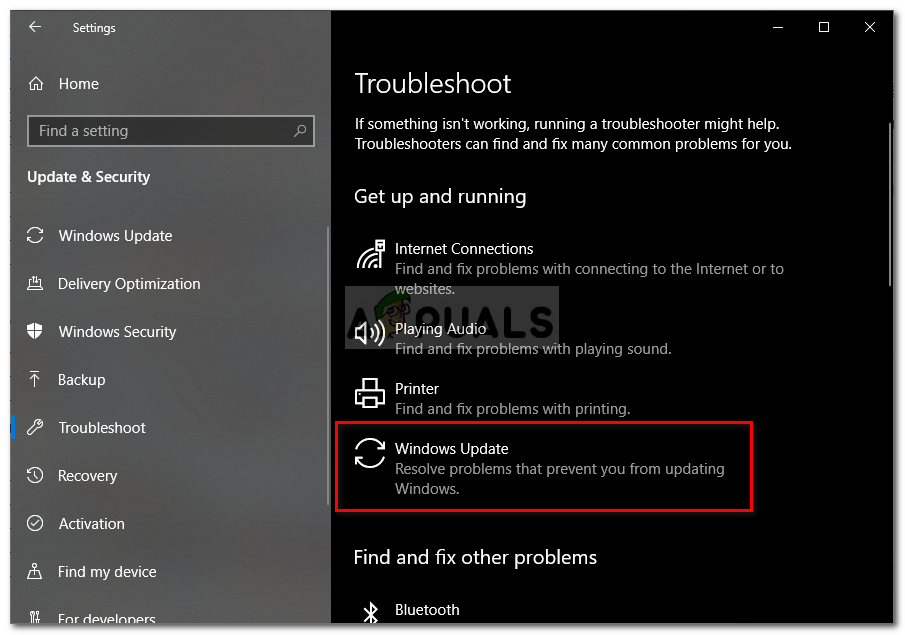
Solution 7: Running Windows Update Troubleshooter
In some cases, the Windows Update Troubleshooter can fix this particular glitch with Windows Update and fix any issues with it by scanning and clearing any errors with configuration.
- Press “Windows” + “I” to open settings.
- Click on the “Update & Security” option and select “Troubleshoot” from the left column.
- Select the “Windows Update” option and click on the “Run the Troubleshooter” button.

Running Windows Update Troubleshooter - Wait for the troubleshooter to run and then follow the on-screen prompts to initialize the process.
- After the process ends, check to see if the Windows Update runs now.
Solution 8: Running Commands
In some cases, certain components of the Windows Update might have cached some corrupt data or they might not be running properly. Therefore, in this step, we will be running some commands from the command prompt to get them back to working again.
- Press “Windows” + “R” to open the run prompt.
- Type in “cmd” and press “Shift” + “Ctrl” + “Enter” to provide administrative privileges.
Running the Command Prompt - Type in the following commands one by one and press “Enter” after each one.
net stop wuauserv
net stop cryptSvc
net stop bits
net stop msiserver
ren C:\Windows\SoftwareDistribution SoftwareDistribution.old
ren C:\Windows\System32\catroot2 catroot2.old
net start wuauserv
net start cryptSvc
net start bits
net start msiserver
pause
Exit
- Check to see if Windows Update works now.
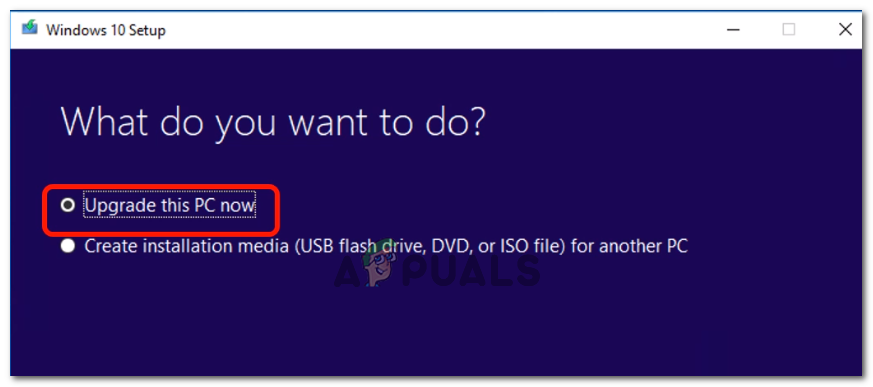
Solution 9: In-Place Upgrade (Workaround)
In some cases, the only workaround might be to actually perform an in-place upgrade that won’t delete any of your files but it will update your computer to the latest version of Windows around. In order to do so, follow the steps below.
- Use this link to download the Windows Media Creation Tool.
- Accept the prompts and check the “Upgrade this PC Now” option.

Checking the “Upgrade this PC Now” option - Check the “Keep Personal Files” option in the next prompt and select the “Install” option.
- Wait for the setup to complete and check to see if the issue persists.
Solution 10: Settings Internet Explorer as the Default Browser
In some cases, the error might be triggered if the Internet Explorer isn’t set as the default browser on the computer. Therefore, in this step, we will be setting it as default. For that:
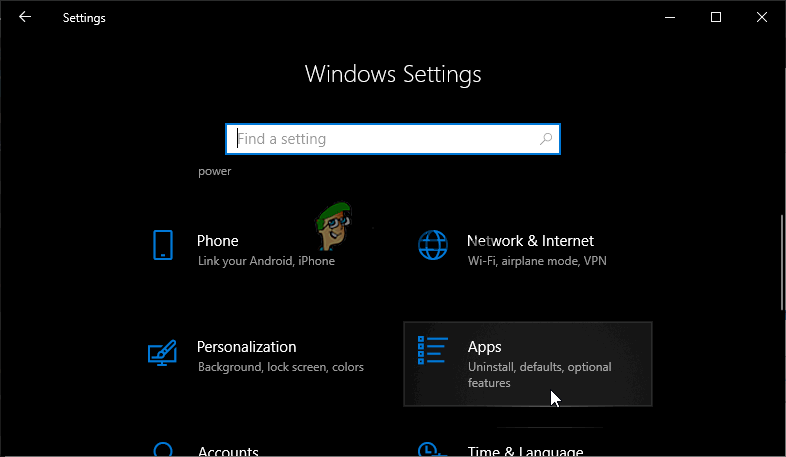
- Press “Windows” + “I” to open settings.
- Click on the “Apps” button and select “Default Apps” from the left pane.

Apps section in Settings - Select “Web Browser” and then click on “Internet Explorer” to set it as default.
- Check to see if the issue persists.
Kevin Arrows
Kevin Arrows is a highly experienced and knowledgeable technology specialist with over a decade of industry experience. He holds a Microsoft Certified Technology Specialist (MCTS) certification and has a deep passion for staying up-to-date on the latest tech developments. Kevin has written extensively on a wide range of tech-related topics, showcasing his expertise and knowledge in areas such as software development, cybersecurity, and cloud computing. His contributions to the tech field have been widely recognized and respected by his peers, and he is highly regarded for his ability to explain complex technical concepts in a clear and concise manner.
Download Windows Speedup Tool to fix errors and make PC run faster
Windows 11/10 has a number of errors that it can encounter when several tasks are being carried out. One such error is the error code 0x8007000e for Windows Updates. This update is reported to occur a lot when downloading and installing a Feature update using Windows Updates.
Most recently, it has been reported that this occurred a number of times for Windows 10 1903 May 2019 Update. The main cause for this error is the lack of memory or disk space or issues in the Windows Update mechanism. Troubleshooting this error code is fairly simple. In this article, we will be discussing potential troubleshooting methods.
This error could occur if the update process ran out of memory or disk space – but there could be other reasons too. Here are some working methods to resolve the error code 0x8007000e for Windows Update:
- Clear up disk space
- Reset the folders related to Windows Update
- Use Windows Update Troubleshooter.
- Use the Media Creation Tool.
1] Clear up disk space
As mentioned above, the lack of Disk space can also be a major factor in the occurrence of this error. You can try to use Disk Cleanup or third-party utilities like CCleaner to clear up some disk space for the update to be processed.
2] Reset the folders related to Windows Update
The contents of the SoftwareDistribution folder & reset the Catroot2 folder are needed to be deleted for the Windows Update mechanism to recreate all these fresh files without any errors.
3] Use Windows Update Troubleshooter
There are two Windows Update troubleshooters. The first one is inbuilt into the system, while the second is Microsoft’s Online Windows Update Troubleshooter. You should try running both.
In order to run the inbuilt Windows Update Troubleshooter, open the Settings app and navigate to the following location – Update & Security > Troubleshooter.
From the right side panel, select Windows Update. Click on Run Troubleshooter.
To run the online version, check out our post on Online Windows Update Troubleshooter. Once done, check if it fixed the issue.
4] Use the Media Creation Tool
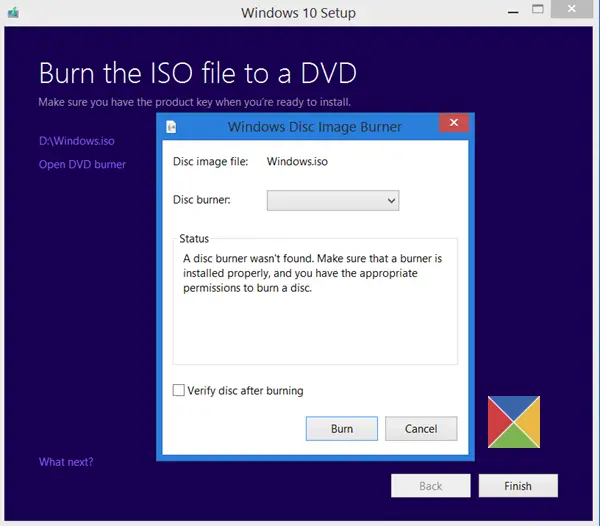
If the above steps do not work, then use the Standalone Installer for regular Updates – or the Media Creation Tool. The Media Creation Tool uses the latest version of the downloaded ISO file to upgrade to the latest feature update.
All the best!
Ayush has been a Windows enthusiast since the day he got his first PC with Windows 98SE. He is an active Windows Insider since Day 1 and has been a Windows Insider MVP.