
Applies ToWindows XP Windows Vista Windows 7 Windows 8.1
An unsupported version of Windows doesn’t receive software updates from Microsoft. These updates include security updates that protect your PC from harmful viruses, spyware, and other malicious software, which can steal your personal information. Windows Update also installs the latest software updates to improve the reliability of Windows, which includes new drivers for your hardware.
If you have devices running an unsupported version of Windows, we recommend upgrading them to a more current, in-service, and supported Windows release. If your devices don’t meet the technical requirements to run a more current release of Windows, we recommend that you replace the device with one that supports Windows 11. For more information, see Windows 11 system requirements.
When does support end for my version of Windows?
|
Windows version |
End of support date |
|---|---|
|
Windows 8.1 |
January 10, 2023 |
|
Windows 10 Mobile |
January 14, 2020 |
|
Windows 7 |
January 14, 2020 |
|
Windows Vista |
April 11, 2017 |
|
Windows 8 |
January 12, 2016 |
|
Windows XP |
April 08, 2014 |
To check the end-of-support dates for all versions of Windows, see the product lifecycle information for Windows.
If your version of Windows is still supported, you should always install the latest updates for Windows. To download and install these updates, use Windows Update in the Settings app.
Devices running an unsupported version of Windows will still function, but Microsoft doesn’t provide the following:
-
Technical support of any issue
-
Software updates
-
Security updates or fixes
While you could continue to use your PC, without continued software and security updates your PC is at greater risk for viruses and malware. We recommend upgrading to a version of Windows that’s still supported. A new device that can run Windows 11 makes for an easy transition and a great experience.
Yes. If you continue to use an unsupported version of Windows, your PC will still work, but it’s more vulnerable to security risks and viruses. Your PC will continue to start and run, but you won’t receive software updates, including security updates, from Microsoft.
For more information about the support policy, see the Microsoft support lifecycle policy FAQ.
There are a few options for using a supported version of Windows:
-
Recommended: New PC with Windows 11 — Windows 11 is the most current version of Windows. If you have an older PC, we recommend you move to Windows 11 by buying a new PC. Hardware and software have improved a lot, and today’s computers are faster, more powerful, and more secure. View Windows 11 PCs
-
Installing Windows 11 on your current PC — You can also see if your current PC meets the minimum system requirements for Windows 11. PCs that are running an unsupported version of Windows are unlikely to meet these requirements, but if yours does, you can purchase and download a full version of Windows 11 Home or Windows 11 Pro or buy from a retailer. If you do choose this path, you’ll need to reinstall your apps. In some cases, a newer version of the app may be required. You also need to transition files, data, and settings. The installation overwrites the contents of your existing hard drive. It may be easier for you to first upgrade to Windows 10 and then upgrade to Windows 11.
-
Installing Windows 10 on your current PC — Windows 10 is still available and will be supported until October 14, 2025. You can check if your current PC meets the minimum system requirements for Windows 10. If it does, you can check with retailers to see if they still offer Windows 10 for sale.
There are two ways you can get Windows 11:
-
Recommended: New PC with Windows 11 — Windows 11 is the most current version of Windows. If you have an older PC, we recommend you move to Windows 11 by buying a new PC. Hardware and software have improved a lot, and today’s computers are faster, more powerful, and more secure. View Windows 11 PCs
-
Installing Windows 11 on your current PC — You can also see if your current PC meets the minimum system requirements for Windows 11. If it does, you can purchase and download a full version of Windows 11 Home or Windows 11 Pro or buy from a retailer. If you do choose this path, you’ll need to reinstall your apps. In some cases, a newer version of the app may be required. You also need to transition files, data, and settings. The installation overwrites the contents of your existing hard drive. It may be easier for you to first upgrade to Windows 10 and then upgrade to Windows 11.
There currently aren’t free upgrade paths from unsupported versions of Windows to either Windows 10 or Windows 11. You can purchase Windows 11 from Microsoft or contact a retailer to learn about more options. You can upgrade from Windows 10 to Windows 11 for free.
It’s easy to bring your files and photos to a new PC using OneDrive, a cloud storage service. You can back up and protect your files online in the cloud and then sync onto a new PC. Syncing the files between your new PC and the cloud allows you to store the file locally for offline use when you don’t have internet access. They’re also stored on the OneDrive service in the cloud where you can restore them if something happens. OneDrive can automatically keep the two versions in sync as changes are made.
Learn how to move files with OneDrive
If OneDrive isn’t the best fit for you, you can also use an external hard drive or USB key to copy over files.
Need more help?
Want more options?
Explore subscription benefits, browse training courses, learn how to secure your device, and more.
Readers help support Windows Report. We may get a commission if you buy through our links.
Read our disclosure page to find out how can you help Windows Report sustain the editorial team. Read more
Some of our readers complain about Windows 7 Sleep Mode not working whenever they enable it. This problem can occur for many reasons, and it’s also common in other Windows versions. Also, some reports about Windows 11 Sleep Mode not working on their PC.
Why is the Sleep Mode not working in Windows 7?
The most common factor responsible for Windows 7 Sleep Mode not working is outdated drivers on your PC. When the devices connected to your computer run on outdated drivers, they may interfere with the Sleep Mode functionality.
Other factors that can cause the Sleep mode on Windows 7 not to work are:
- Issues with the Power Options settings – If the Power Options settings in your PC are not well configured, you may have difficulties using the Sleep Mode option.
- Virus and Malware – Many issues may occur with your computer if it becomes infected with malware or viruses. It can prevent it from performing tasks such as sleeping. Look at our recommended list of the best anti-malware software to combat this issue.
- Devices connected to the PC – Your PC may not be able to use the Sleep Mode option if a device connected to it is using it, causing it not to go to sleep. Also, the device can malfunction and affect how your computer works,
These causes may vary on different Windows 7 computers. Hence, we’ll walk you through some general fixes for the problem.
What can I do if Sleep Mode does not work on Windows 7?
Do not hesitate to go through the following preliminary checks:
- Disconnect any external devices from your PC.
- Turn off background apps running on your computer.
- Temporarily disable antivirus software.
If you’re still not able to put your PC to sleep, try the following solutions.
1. Check the Power Option settings
- Left-click the Start button, type power sleep in the text box, and click on Change when the computer sleeps.

- Go to Put the computer to sleep and select a new value, such as 15 minutes.

- Click Change advanced power settings, expand the Sleep tab, expand Allow wake timers, then select Disable.

- Click on Multimedia settings, expand When sharing media, and Allow the computer to sleep.


Read what to do if the sleep option is missing from the Power Options on your computer.
2. Update drivers to the latest version
- Go to the hardware maker’s website and download the latest hardware driver.
- Open File Explorer from the taskbar and find the downloaded zip folder.
- Right-click on the zip folder, select Extract All from the drop-down, and then follow the prompts.
- Right-click on Start and select Control Panel.

- Click on Device Manager to start it.

- Double-click on the device you want to update its driver and select Update Driver Software.
- On the next prompt, select Browse my Computer for driver software, then click Browse to find the extracted driver file.

- Select the driver file and click Open, then click Next on the Update window.


Follow the onscreen instructions to complete the update. Repeat these steps for all your device drivers. Updating your drivers will help their devices perform better and fix Windows 7 Sleep Mode not working.
As another possibility, you can let a third-party software help you update your drivers automatically. Outbyte Driver Updater is an excellent pick because it has a vast database where it can locate the latest updates in just a few minutes.
Outbyte Driver Updater
Worry less about searching for the right drivers and let Outbyte Driver Updater get the latest versions for you.
3. Disable devices from waking the computer
- Left-click Start, type command in the text box, and select Run as administrator from the drop-down.

- Run the following command to show the devices that can wake the computer:
Powercfg -devicequery wake_armed
- Find the app to disable from waking the computer, then run the following command:
Powercfg -devicedisablewake devicename


Check if the issue persists. If it’s not resolved, run the following command to enable the disabled device: Powercfg -deviceenablewake devicename
Disabling devices from waking the PC will fix any interference from the device, preventing the Sleep Mode from working.
4. Perform a Clean boot
- Left-click Start, type msconfig in the text box, and go to the Services tab.
- Check the box for Hide all Microsoft services and click the Disable all button.

- Go to the Startup tab, click the Disable all button, then click OK to save the changes.

- Restart your PC.


A clean boot will disable startup services that can cause Sleep Mode issues on your PC.
5. Run an SFC scan
- Left-click Start, type command in the text box, and select Run as Administrator from the drop-down.
- Click Yes on the User Account Control (UAC) prompt.
- Type the following and press Enter to open the System file checker:
SFC /scannow


After the process is complete, restart your PC. Performing an SFC scan will check and repair corrupt system files.
Alternatively, you can read about Windows 11 shutting down instead of sleeping and some fixes. Likewise, we have a detailed article about how to fix hibernation and sleep issues on Windows11.
If you have further questions, kindly drop them in the comments section below.
Henderson Jayden Harper
Windows Software Expert
Passionate about technology, Crypto, software, Windows, and everything computer-related, he spends most of his time developing new skills and learning more about the tech world.
He also enjoys gaming, writing, walking his dog, and reading and learning about new cultures. He also enjoys spending private time connecting with nature.
Внезапно стали неактивны кнопки сон, перезагрузка завершения работы. Точнее утром возникли какие-то проблемы с выходом из гибернации, не видел что именно, но произошло выключение и повторное включение, а не восстановление состояния, которое было при уходе в гибернацию, возможно после этого.
Даже при обновлении винды не работает предложение рестарта, тупо неактивна кнопка.
После завершения сеанса (при выборе пользователя) этот функционал работает.
gpedit.msc —> Конфигурация windows —> параметры безопасности —> локальные политики —> назначение прав пользователя стоит и всегда стояло Администратор и имя_юзера (собственно он один и администратор). Даже если там Все поставить или эти убрать, то тоже самое.
Конфигурация пользователя —> административные шаблоны —> пуск и панель задач —> Remove and prevent access to the Shut Down, Restart, Sleep выключено (при включении убирает эти неактивные пункты).
Все способы:
- Способы активации состояния сна
- Способ 1: меню «Пуск»
- Способ 2: инструмент «Выполнить»
- Способ 3: внесение изменений в дополнительные параметры
- Способ 4: немедленный переход в режим сна
- Вопросы и ответы: 40
Включение спящего режима позволяет экономить электроэнергию при бездействии ПК. Особенно данная функция актуальна на ноутбуках, которые питаются от встроенной батареи. По умолчанию данная функция включена на устройствах под управлением Windows 7. Но она может быть отключена вручную. Давайте узнаем, что же делать пользователю, который решил снова активировать состояние сна в Виндовс 7.
Читайте также: Как выключить режим сна в Windows 7
Способы активации состояния сна
В Windows 7 применяется гибридный режим сна. Он заключается в том, что при простое компьютера определенное время без выполнения в нем каких-либо действий, он переводится в состояние блокировки. Все процессы в нем замораживаются, а уровень потребление электроэнергии значительно сокращается, хотя полного отключения ПК, как при состоянии гибернации, не происходит. Вместе с тем, на случай непредвиденного обрыва электропитания состояние системы сохраняется в файл hiberfil.sys так же, как и при гибернации. В этом и заключается гибридность режима.
Существует несколько вариантов активации состояния сна в случае его отключения.
Способ 1: меню «Пуск»
Самый известный среди пользователей способ включения спящего режима осуществляется через меню «Пуск».
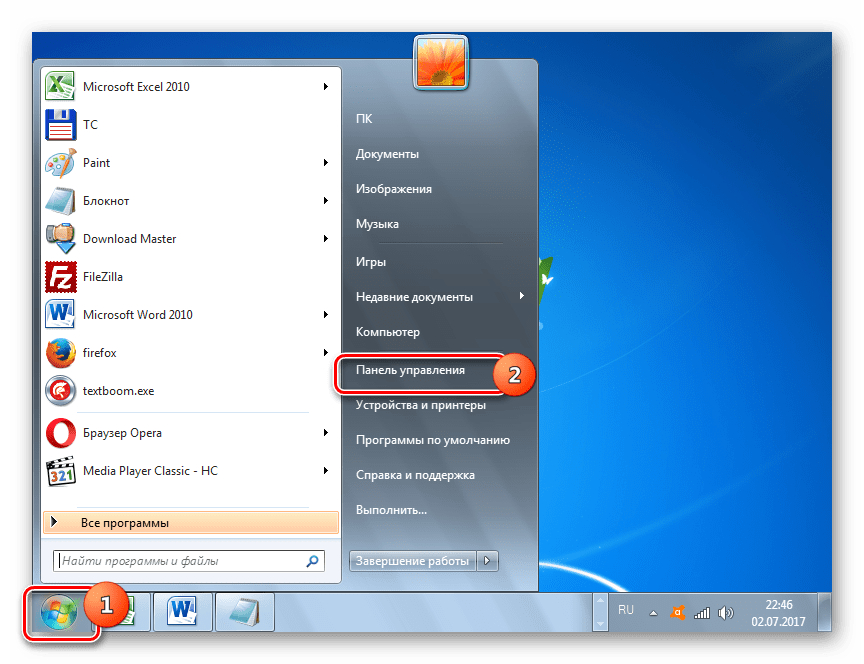
- Щелкните «Пуск». Нажмите в меню «Панель управления».
- После этого переместитесь по надписи «Оборудование и звук».
- Затем в группе «Электропитание» щелкните по наименованию «Настройка перехода в спящий режим».
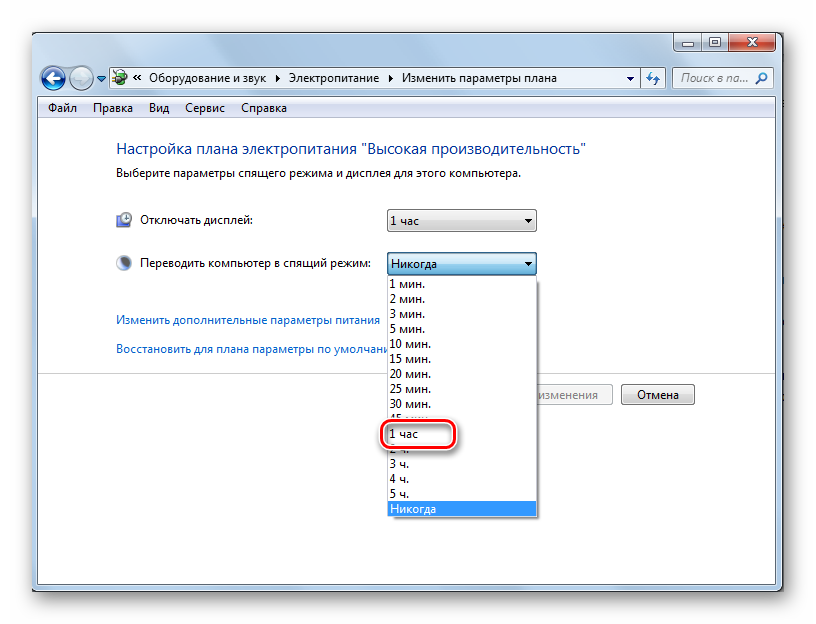
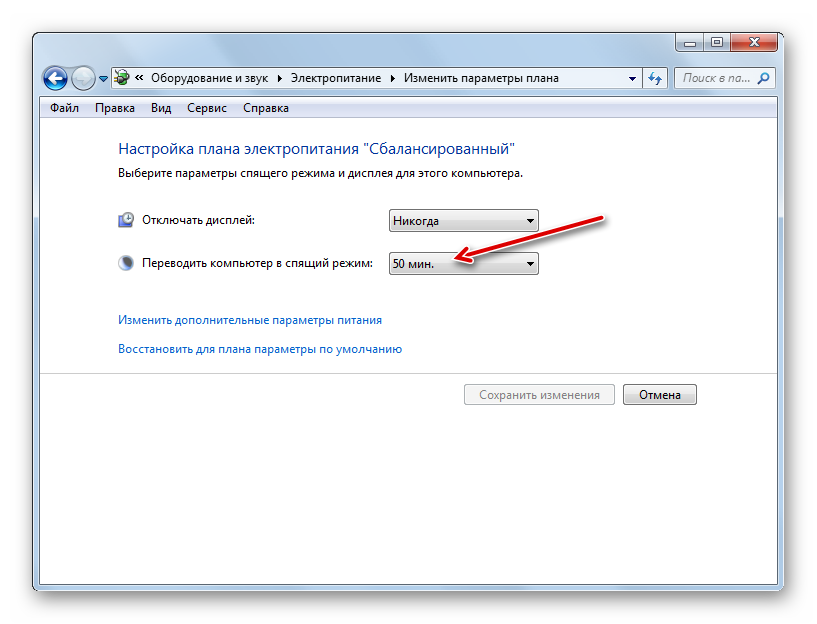
- После этого откроется окно настройки задействованного плана энергопитания. Если режим сна на вашем компьютере выключен, то в поле «Переводить компьютер в спящий режим» будет установлено значение «Никогда». Для включения указанной функции нужно, прежде всего, щелкнуть по данному полю.
- Открывается список, в котором вы можете выбрать вариант, через какое именно время бездействия компьютера будет включаться состояние сна. Диапазон выбора значений от 1 минуты до 5 часов.
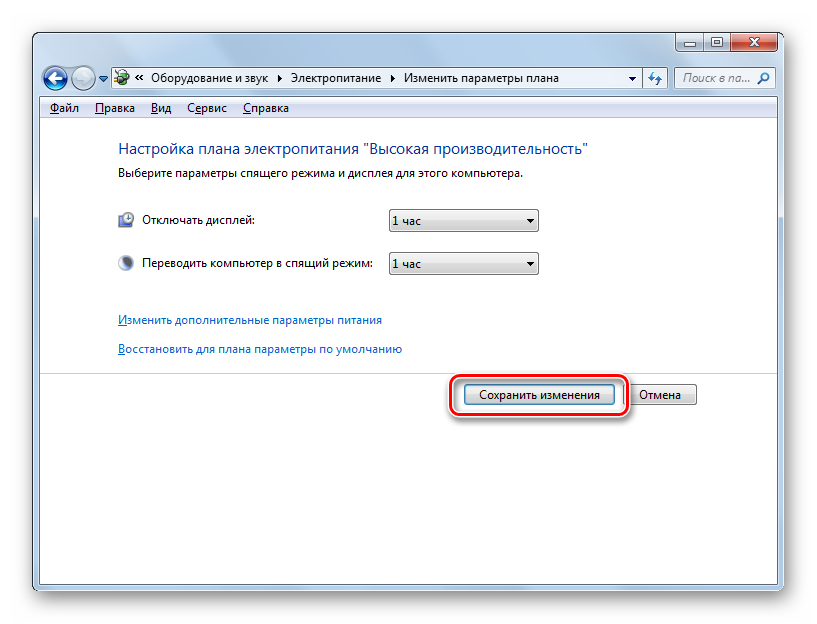
- После того, как период времени выбран, щелкните «Сохранить изменения». После этого режим сна будет активирован и ПК перейдет в него после указанного термина бездействия.


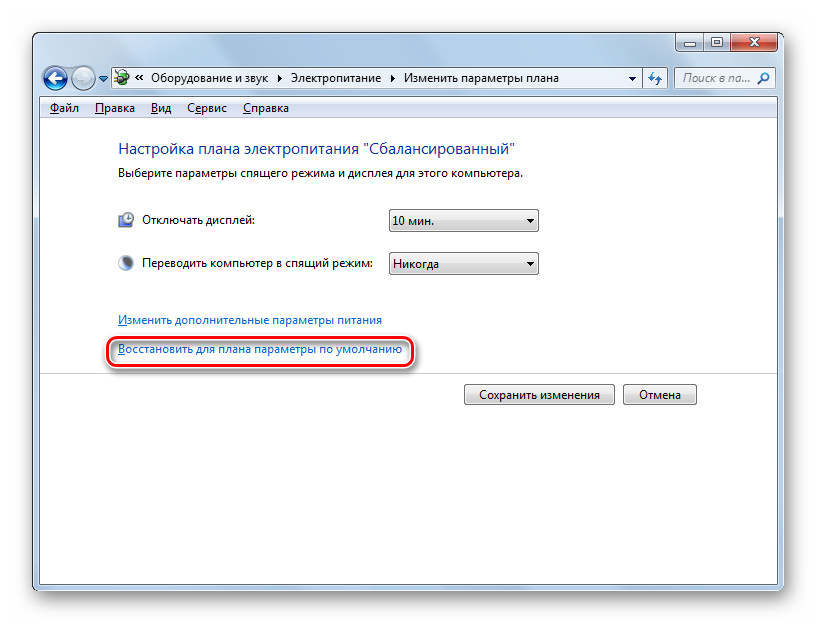
Также в этом же окне можно включить состояние сна, просто восстановив умолчания, если текущим планом электрического питания является «Сбалансированный» или «Экономия электроэнергии».
- Для этого следует кликнуть по надписи «Восстановить для плана параметры по умолчанию».
- После этого откроется диалоговое окно, которое потребует подтвердить свои намерения. Жмите «Да».

Дело в том, что в планах электропитания «Сбалансированный» и «Экономия электроэнергии» по умолчанию активировано включение состояния сна. Различается только период времени бездействия, через который осуществится переход ПК в спящий режим:
- Сбалансированный – 30 минут;
- Экономия электроэнергии – 15 минут.
А вот для плана высокой производительности включить таким способом спящий режим не получится, так как он по умолчанию в данном плане отключен.
Способ 2: инструмент «Выполнить»
Также активировать включение спящего режима можно, произведя переход в окно настроек плана электропитания путем ввода команды в окошко «Выполнить».
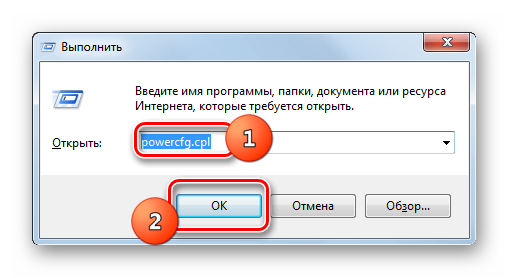
- Вызовите окно «Выполнить», набрав сочетание Win+R. Введите в поле:
powercfg.cplНажмите «OK».
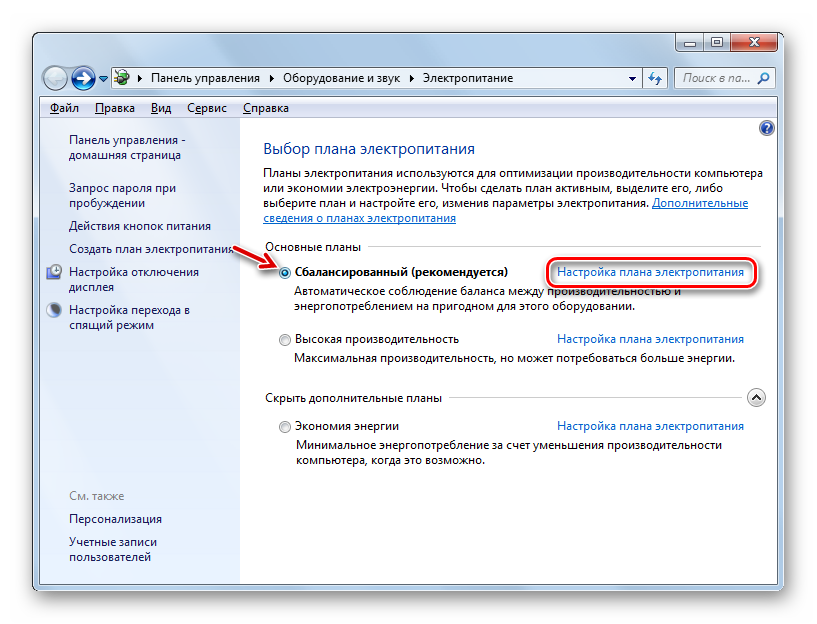
- Открывается окно выбора плана электропитания. В Windows 7 существует три плана электропитания:
- Высокая производительность;
- Сбалансированный (по умолчанию);
- Экономия энергии (дополнительный план, который отобразится в случае его неактивности только после щелчка по надписи «Показать дополнительные планы»).

Действующий в данный момент план обозначен активной радиокнопкой. При желании пользователь может её переставить, выбрав другой план. Если, например, настройки планов установлены по умолчанию, а у вас установлен вариант с высокой производительностью, то просто переключив на «Сбалансированный» или «Экономия энергии», вы тем самым активируете включение спящего режима.
Если же настройки по умолчанию изменены и спящий режим отключен во всех трех планах, то после его выбора жмите по надписи «Настройка плана электропитания».
- Запускается окно параметров текущего плана электрического питания. Как и при использовании предыдущего способа, в поле «Переводить компьютер в спящий режим» нужно установить конкретный термин, после которого произойдет смена режима. После этого нажмите «Сохранить изменения».

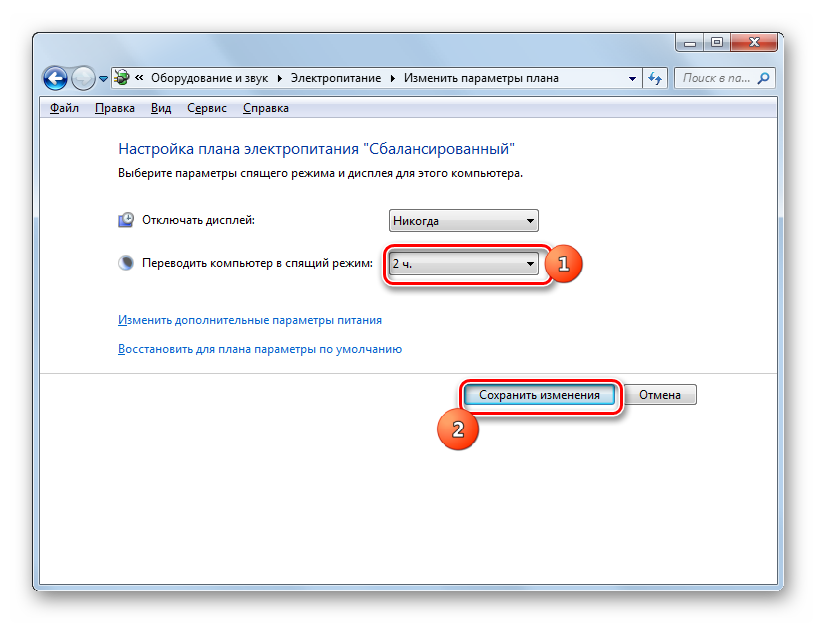
Для плана «Сбалансированный» или «Экономия электроэнергии» для активации включения режима сна можно также щелкнуть по надписи «Восстановить для плана параметры по умолчанию».

Способ 3: внесение изменений в дополнительные параметры
Также активацию включения спящего режима можно произвести путем изменений дополнительных параметров в окне настроек текущего плана электропитания.
- Откройте окно текущего плана электропитания любым из тех способов, которые были описаны выше. Щелкните «Изменить дополнительные параметры питания».
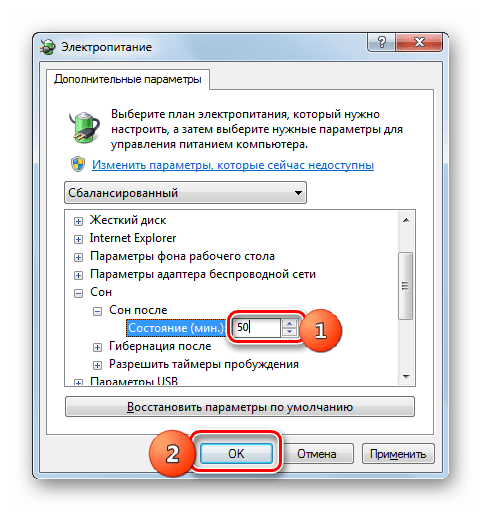
- Запускается окошко дополнительных параметров. Щелкните «Сон».
- В открывшемся списке из трех вариантов выберите «Сон после».
- Если режим сна на ПК отключен, то около параметра «Значение» должен стоять вариант «Никогда». Щелкните «Никогда».
- После этого откроется поле «Состояние (мин.)». В него вбейте то значение в минутах, по прошествии которого, в случае бездействия, компьютер будет входить в состояние сна. Жмите «OK».
- После того, как вы закроете окно параметров текущего плана электрического питания, а потом заново активируйте его. В нем будет отображен актуальный период времени, через который ПК перейдет в состояние сна в случае бездействия.


Способ 4: немедленный переход в режим сна
Также существует вариант, который позволит немедленно перевести ПК в состояние сна независимо от того, какие настройки были установлены в параметрах электропитания.
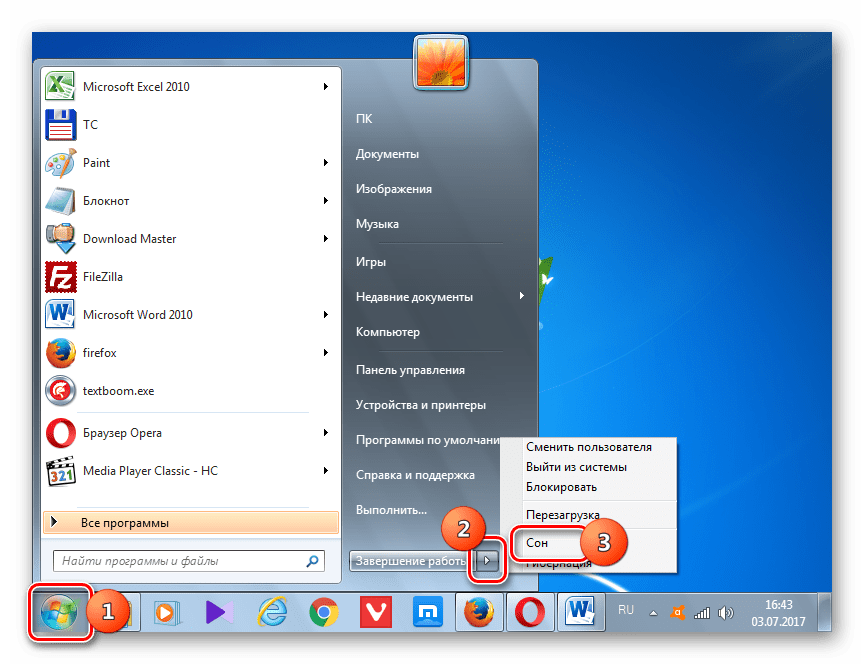
- Щелкните «Пуск». Справа от кнопки «Завершение работы» щелкните по пиктограмме в форме треугольника, направленного углом вправо. Из раскрывшегося списка выберите «Сон».
- После этого компьютер будет переведен в спящий режим.
Как видим, большинство способов установки спящего режима в Виндовс 7 связаны с изменением настроек электропитания. Но, кроме того, существует и вариант немедленного перехода в указанный режим через кнопку «Пуск», минуя данные настройки.
Наша группа в TelegramПолезные советы и помощь
Как перейти от Waterfall к Agile
EggHead 06.05.2025
Каскадная модель разработки Waterfall — классический пример того, как благие намерения превращаются в организационный кошмар. Изначально созданная для упорядочивания хаоса и внесения предсказуемости. . .
Оптимизация SQL запросов — Продвинутые техники
Codd 06.05.2025
Интересно наблюдать эволюцию подходов к оптимизации. Двадцать лет назад всё сводилось к нескольким простым правилам: «Избегайте SELECT *», «Используйте индексы», «Не джойните слишком много таблиц». . . .
Создание микросервисов с gRPC и Protobuf в C++
bytestream 06.05.2025
Монолитные приложения, которые ещё недавно считались стандартом индустрии, уступают место микросервисной архитектуре — подходу, при котором система разбивается на небольшие автономные сервисы, каждый. . .
Многопоточность и параллелизм в Python: потоки, процессы и гринлеты
py-thonny 06.05.2025
Параллелизм и конкурентность — две стороны многопоточной медали, которые постоянно путают даже бывалые разработчики.
Конкурентность (concurrency) — это когда ваша программа умеет жонглировать. . .
Распределенное обучение с TensorFlow и Python
AI_Generated 05.05.2025
В машинном обучении размер имеет значение. С ростом сложности моделей и объема данных одиночный процессор или даже мощная видеокарта уже не справляются с задачей обучения за разумное время. Когда. . .
CRUD API на C# и GraphQL
stackOverflow 05.05.2025
В бэкенд-разработке постоянно возникают новые технологии, призванные решить актуальные проблемы и упростить жизнь программистам. Одной из таких технологий стал GraphQL — язык запросов для API,. . .
Распознавание голоса и речи на C#
UnmanagedCoder 05.05.2025
Интеграция голосового управления в приложения на C# стала намного доступнее благодаря развитию специализированных библиотек и API. При этом многие разработчики до сих пор считают голосовое управление. . .
Реализация своих итераторов в C++
NullReferenced 05.05.2025
Итераторы в C++ — это абстракция, которая связывает весь экосистему Стандартной Библиотеки Шаблонов (STL) в единое целое, позволяя алгоритмам работать с разнородными структурами данных без знания их. . .
Разработка собственного фреймворка для тестирования в C#
UnmanagedCoder 04.05.2025
C# довольно богат готовыми решениями – NUnit, xUnit, MSTest уже давно стали своеобразными динозаврами индустрии. Однако, как и любой динозавр, они не всегда могут протиснуться в узкие коридоры. . .
Распределенная трассировка в Java с помощью OpenTelemetry
Javaican 04.05.2025
Микросервисная архитектура стала краеугольным камнем современной разработки, но вместе с ней пришла и головная боль, знакомая многим — отслеживание прохождения запросов через лабиринт взаимосвязанных. . .