
Kmode Exception Not Handled is a Blue Screen of Death error encountered on all recent iterations of the OS, including Windows 10.
Unlike other BSODs, this one may crash the PC on the login screen, making it challenging to troubleshoot things. Many users reported the error in Safe Mode, and some had KMODE EXCEPTION NOT HANDLED on startup.
Fret not! We have tested things and come up with a comprehensive list of solutions.
What causes KMODE_EXCEPTION_NOT_HANDLED?
Some of the reasons you may encounter the error are:
- Hardware issues – If you can’t boot Windows and receive the error instead, it’s likely the hardware to blame. Also, the situation may lead to Kmode Exception Not Handled while installing Windows 10.
- Outdated or corrupt driver – When encountering the error, it usually lists the problematic driver in brackets. Identify it and reinstall or update the driver.
- A bug in the installed version of the OS – In many cases, users encountered the error after installing a particular version of the OS and managed to fix things simply by reverting to the previous version, which points to a bug.
- Partial installation of Windows Updates – There’s also the possibility that an update was not installed properly, leading to the Kmode Exception Not Handled BSOD error.
The solutions we found may also work for other errors listed below:
- Kmode Exception Not Handled ntfs.sys/netio.sys/ ndis.sys/ syntp.sys/ wdf01000.sys/ etd.sys/ tcpip.sys/ tppwr32v.sys/ usbport.sys/ igdkmd64.sys/ intelppm.sys/ iastora.sys – The system identifies the file’s name that caused the error. You can use that information to find the problematic device or application.
- Kmode Exception Not Handled due to overclocking – This signals the voltage increase to the CPU behind the underlying cause.
- Kmode Exception Not Handled due to RAM – Usually, it is a faulty RAM module that periodically gives the errors. Try reseating it or run a few tests on the installed RAM.
- KMODE_EXCEPTION_NOT_HANDLED on USB – This message indicates a wrong driver or a faulty USB device.
- KMODE EXCEPTION NOT HANDLED during install – Once again, this error can be caused by corrupted drivers or an incompatible one. In this case, install the driver compatible with the iteration/version you are trying to install.
- Kmode Exception Not Handled loop – It indicates the computer’s incompatibility or old graphics card drivers.
- Kmode Exception Not Handled in Windows 10 on Dell – Dell users with Windows 10 are more often affected by this error.
How do I fix the Kmode exception not handled?
Before we head to the other slightly more time-consuming solutions, here are a few quick tricks that worked for many:
- If this is the first time you have encountered the error, force restart the computer. Users often encountered the error just once, and it didn’t reappear.
- Ensure all the connections are proper, including the ones to the RAM and storage drive. For example, one user fixed things simply by reconnecting the SSD, so check that the storage drive is connected correctly.
- Remove the RAM modules and re-insert them firmly into the slots.
- Disable any third-party antivirus installed on the computer. In case that works, you know what’s causing the error. Here we would recommend switching to more reliable antivirus software.
1. Update the problematic drivers
NOTE
The first two steps are necessary only if you can’t usually access Windows. Otherwise, you can start from the third step.
- While your computer boots, keep pressing F8 or Shift + F8.
- If the shortcut works, you should see a list of options available. Choose Safe Mode with Networking and wait until Windows boots into Safe Mode.
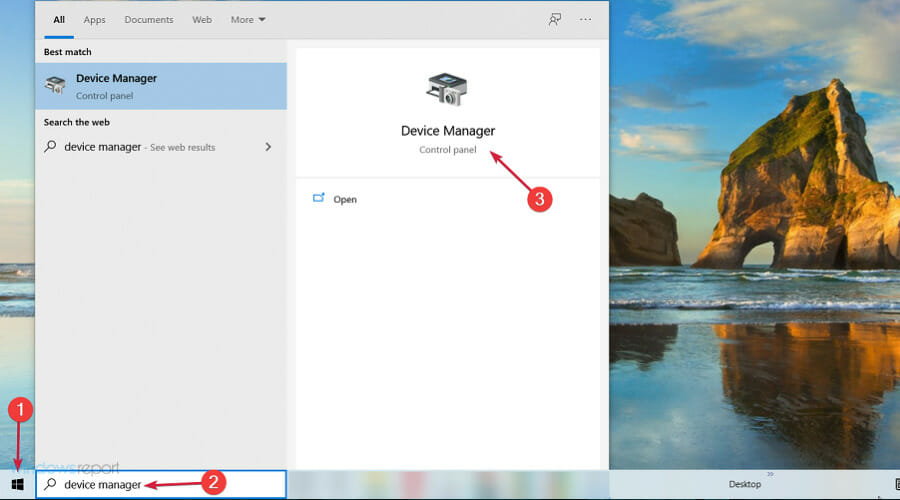
- Click on the Start button, type device manager, and choose the app from the results.

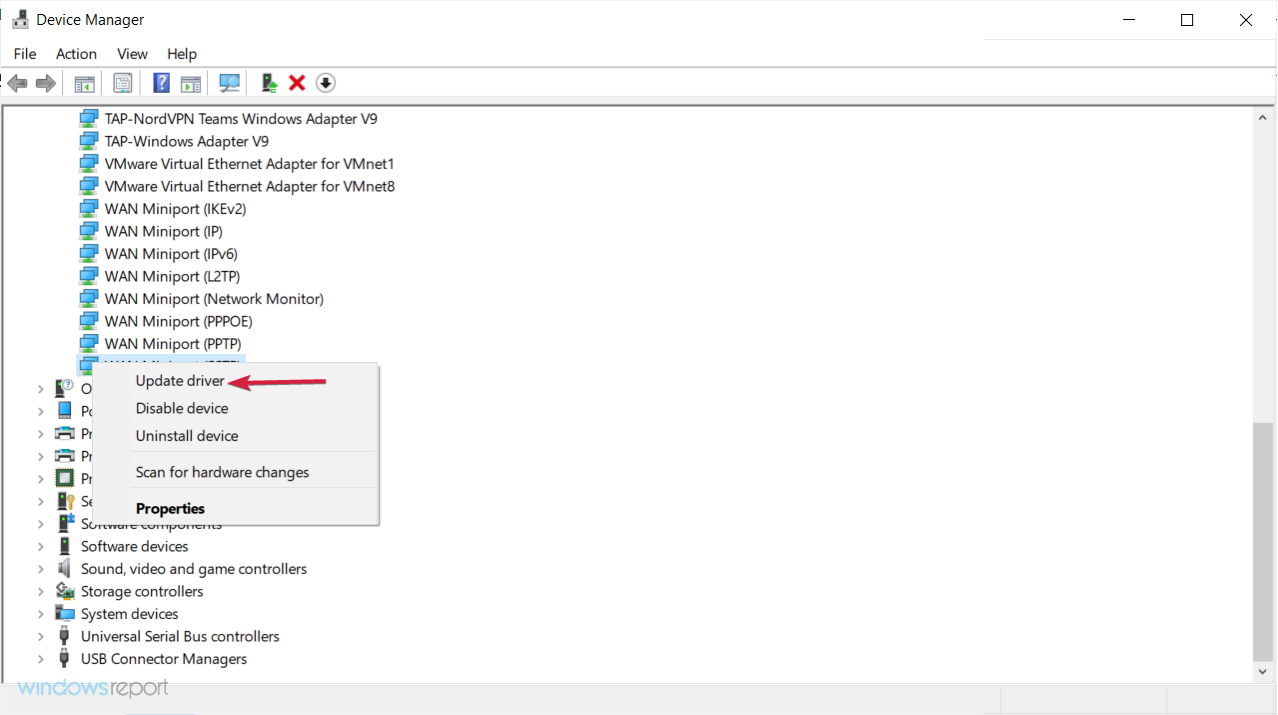
- Find any unknown devices, right-click on them, and select Update driver.

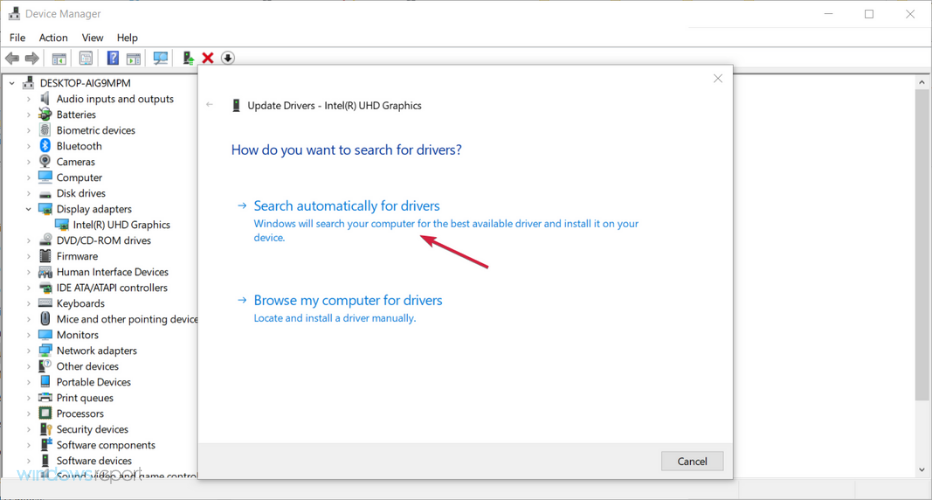
- Choose Search automatically for drivers.

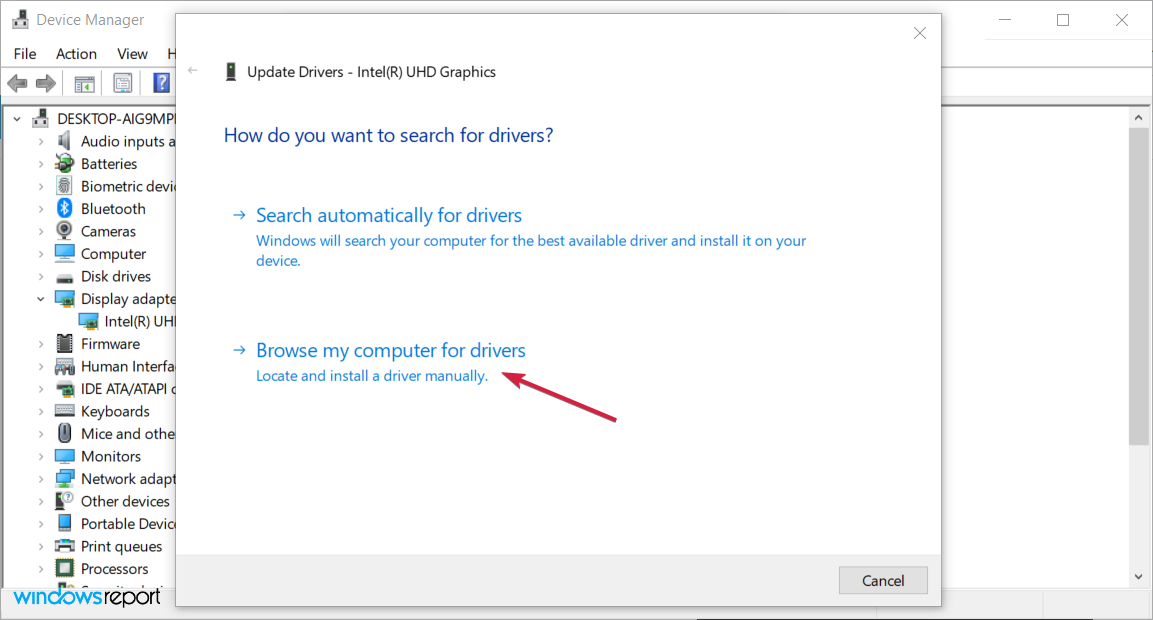
- If that doesn’t work, try the Browse my computer for drivers option instead, find the right driver, and install it.

- After you’ve installed all the missing drivers, exit Safe Mode and check if the issue is resolved.
Missing or corrupt drivers can sometimes cause a KMODE_EXCEPTION_NOT_HANDLED error in Windows 10. To fix this problem, updating the problematic one or installing the missing drivers is recommended.
This error is often related to your network adapter or the graphics driver, so start by updating those first. You can also visit your manufacturer’s website for the latest driver version.
If updating your drivers doesn’t work, or you do not have the necessary computer skills to update/fix the drivers manually, we strongly recommend you use a third-party repair tool.
The automatic driver updater Outbyte Driver Updater will quickly repair driver issues by scanning your PC for older, lost, or damaged drivers, then updating to the most recent compatible version.
Outbyte Driver Updater
Keep all your drivers up to date and fix most incompatibility issues with this simple tool.
2. Reinstall the corrupt driver
NOTE
If you can’t boot the PC normally, switch to Safe Mode by pressing the F8 or Shift + F8 key right after turning on the computer, choose Safe Mode, and then try the steps here. The same would apply throughout the guide.
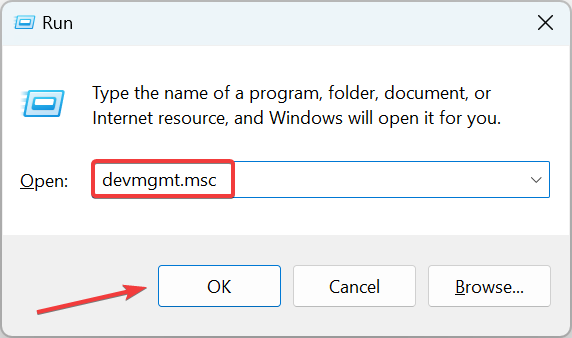
- Press Windows + R to open Run, type devmgmt.msc in the text field, and hit Enter.

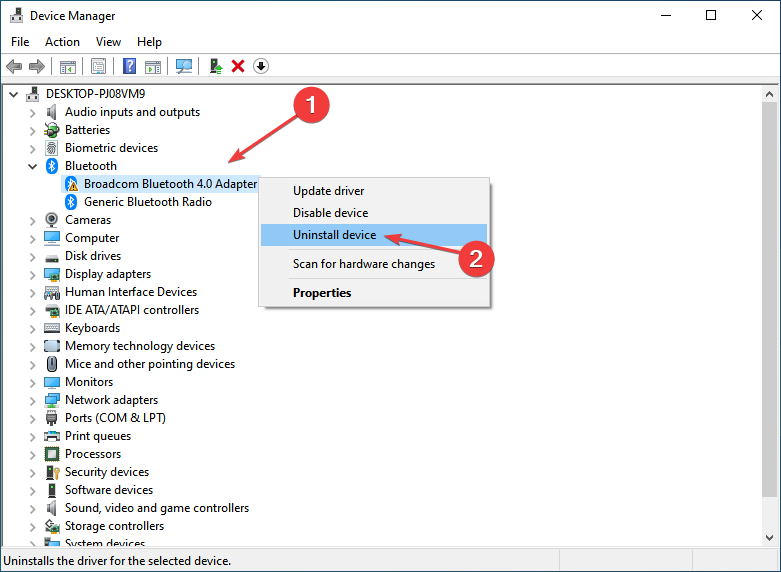
- Look for drivers with a warning sign (these show up automatically), right-click on them, and select Uninstall device.

- If available, check the Delete the driver software for this device option, then click on Uninstall.
- Once done, restart the computer, and Windows will automatically install a fresh copy of the driver as long as the concerned device is connected correctly.
Some users reported corrupt drivers as the underlying cause behind the Kmode Exception Not Handled error in Windows 10. So, make to check for these as well.
This method works when an updated version of the driver is not available. Otherwise, we recommend installing that instead of a fresh copy of the same performance.
3. Perform a System Restore
-
1. Press Windows + R to open Run.
-
2. In the Run dialog box, type rstrui.exe, and then click OK.
-
3. Choose the Create a different restore point option, and click Next.

-
4. Select a restore point from the list and then click on Next.
-
5. Now, review the restore details, and click Finish.
-
6. After the restore is complete and the system restarts, look for the latest version of Windows 10 and install it.


A trick that can help users fix the Kmode Exception Not Handled error when the previous update wasn’t properly installed is to perform a system restore.
4. Rename the problematic file
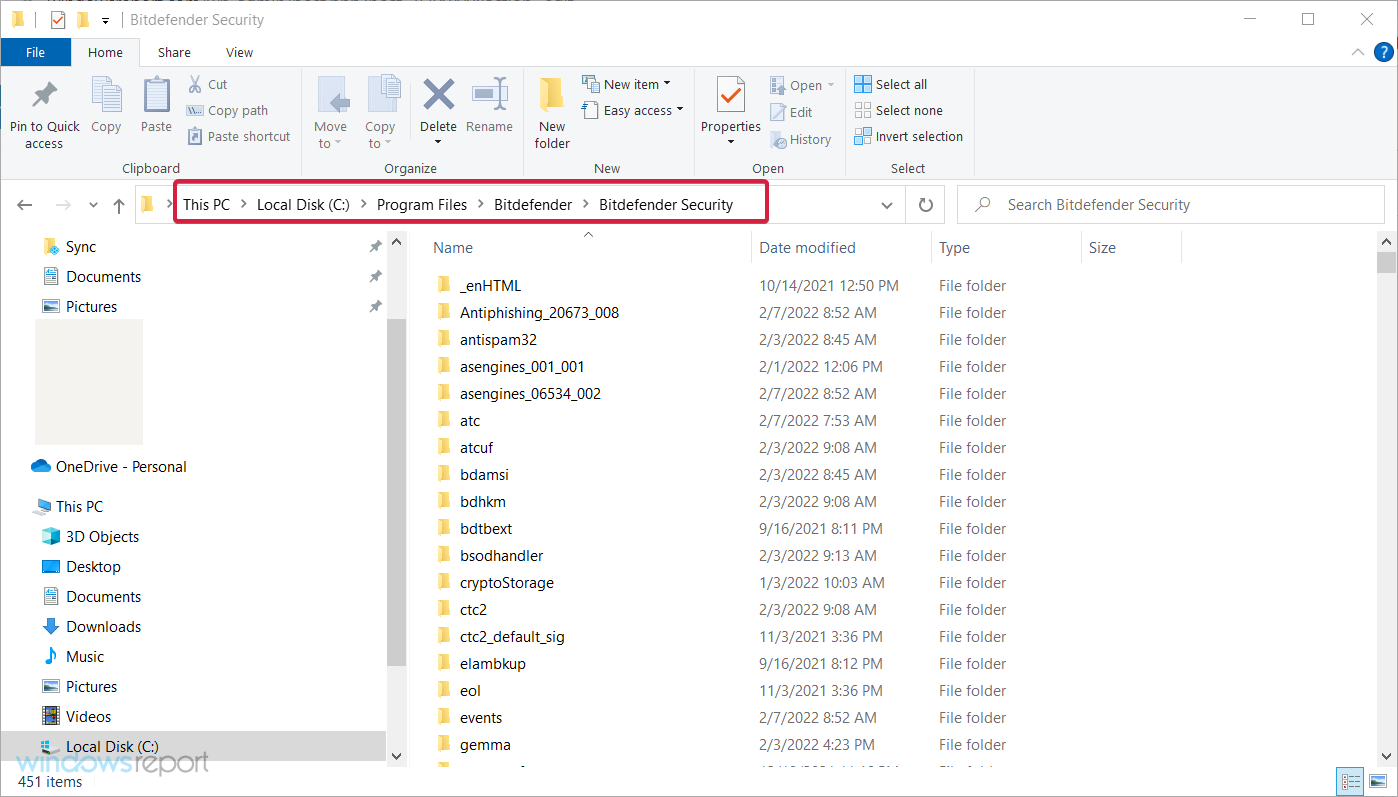
- Press Windows + E to start File Explorer, and navigate to the folder where the problematic file is installed.

- Locate the file that triggers the error, and rename it. For instance, for Bitdefender, locate bdselfpr.sys and rename it to bdselfpr.s__.

As previously mentioned, a specific software can cause the Kmode Exception Not Handled BSOD error on Windows 10.
Other programs that led to the error include:
- Esportal (EspoDriver.sys)
- Riot Games (vgk.sys)
Some users also fixed things by uninstalling these apps or related ones. For instance, if you have any games published by Riot Games, remove them or change the file’s name.
Remember that changing the name of these files isn’t always the best solution because it can lead to even more system instability.
Another way to quickly and efficiently solve the Kmode Exception Not Handled BSOD error is to use a repair tool.
5. Update the BIOS
NOTE
Bear in mind that BIOS update is an advanced procedure, and if not performed correctly, it can cause permanent damage to your PC.
- Go to your motherboard manufacturer’s website, download the latest BIOS version for your device, and load the files on a USB memory stick.
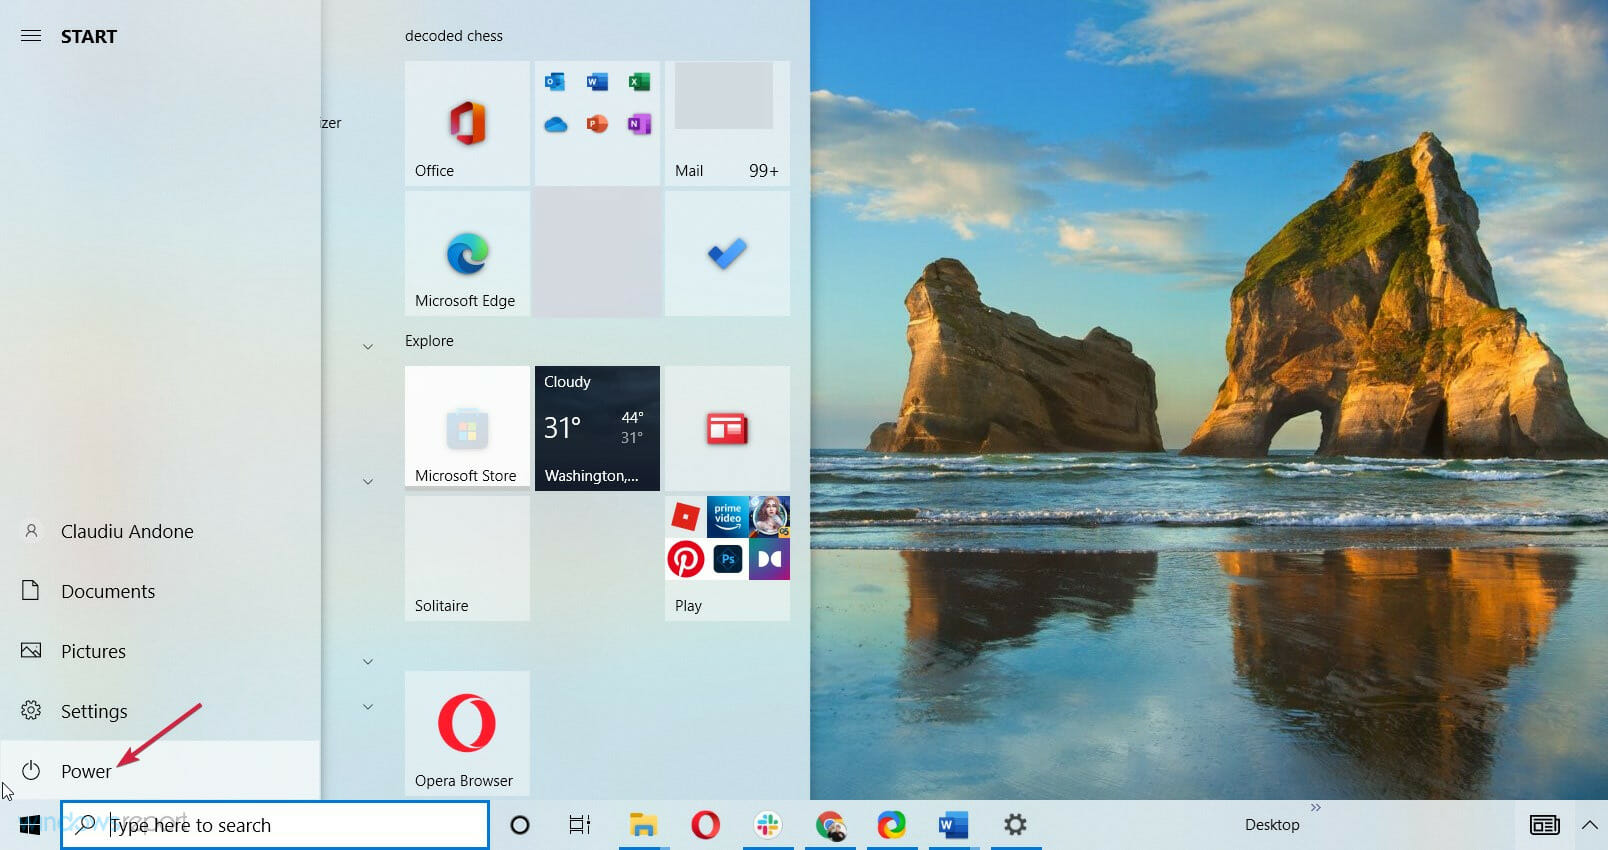
- Press Windows to open the Start Menu and click the Power button.

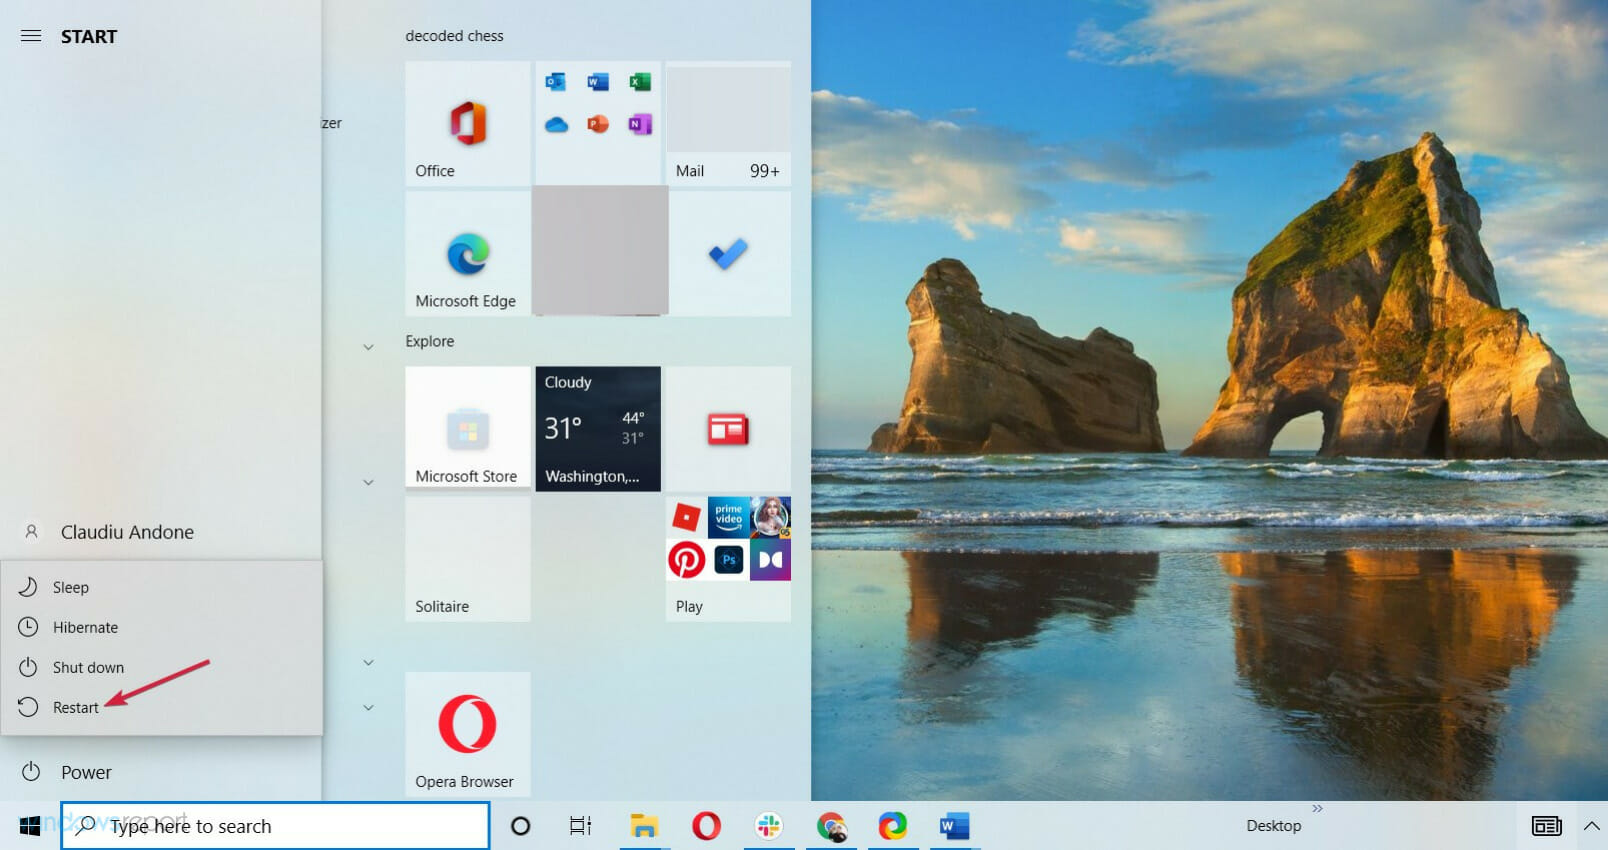
- Hold the Shift key and choose the Restart option.
- You should see several options available. Choose Troubleshoot.
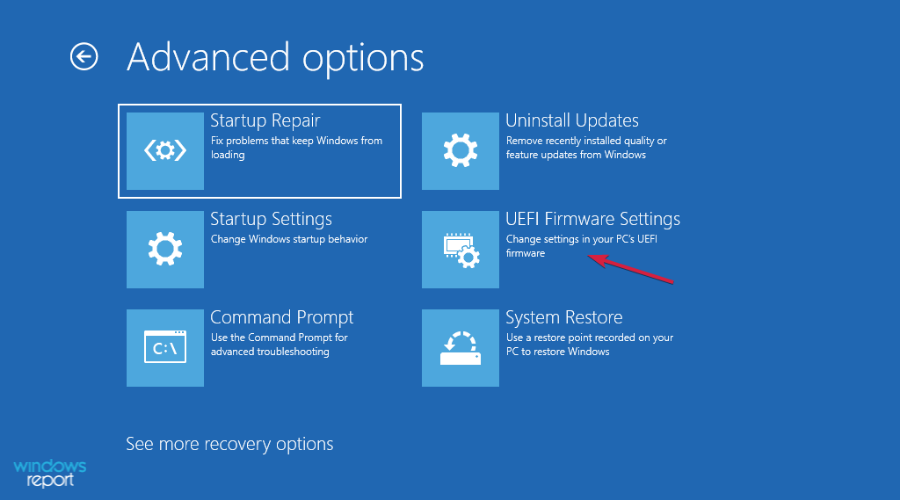
- Now select Advanced options and select UEFI Firmware Settings.
- Click the Restart button, and your computer should now boot to BIOS.
- Look for the update feature of your BIOS and load the new version from your USB stick.

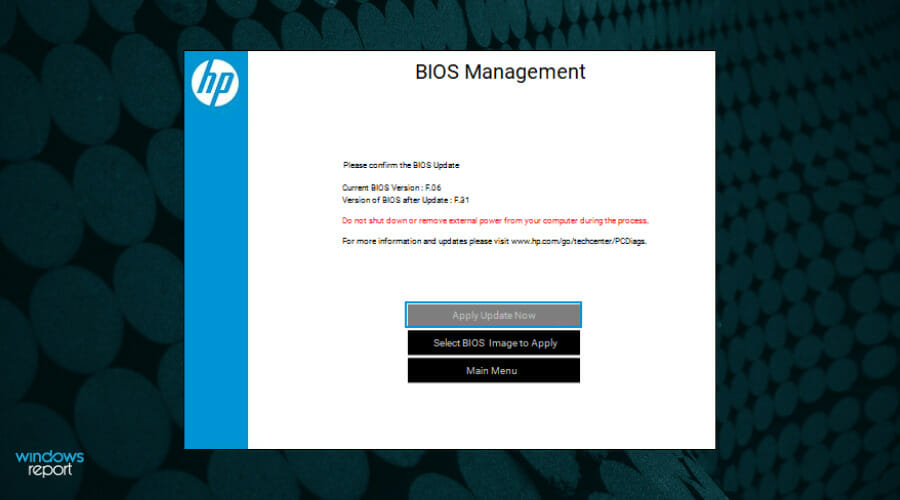
In some cases, the Kmode Exception Not Handled error can be caused due to an outdated version of BIOS. We recommend checking the computer manual to find the exact process to update the BIOS.
Also, read all about how to update your BIOS; it may come in handy if you’re looking for more information on the process.
- Fix: Unexpected Store Exception error in Windows 10/11
- Fix: ndu.sys BSoD error in Windows 10/11
- Full Fix: Unhandled exception error in Windows 10/11
- Fix: Thread Stuck in Device Driver error in Windows 10/11
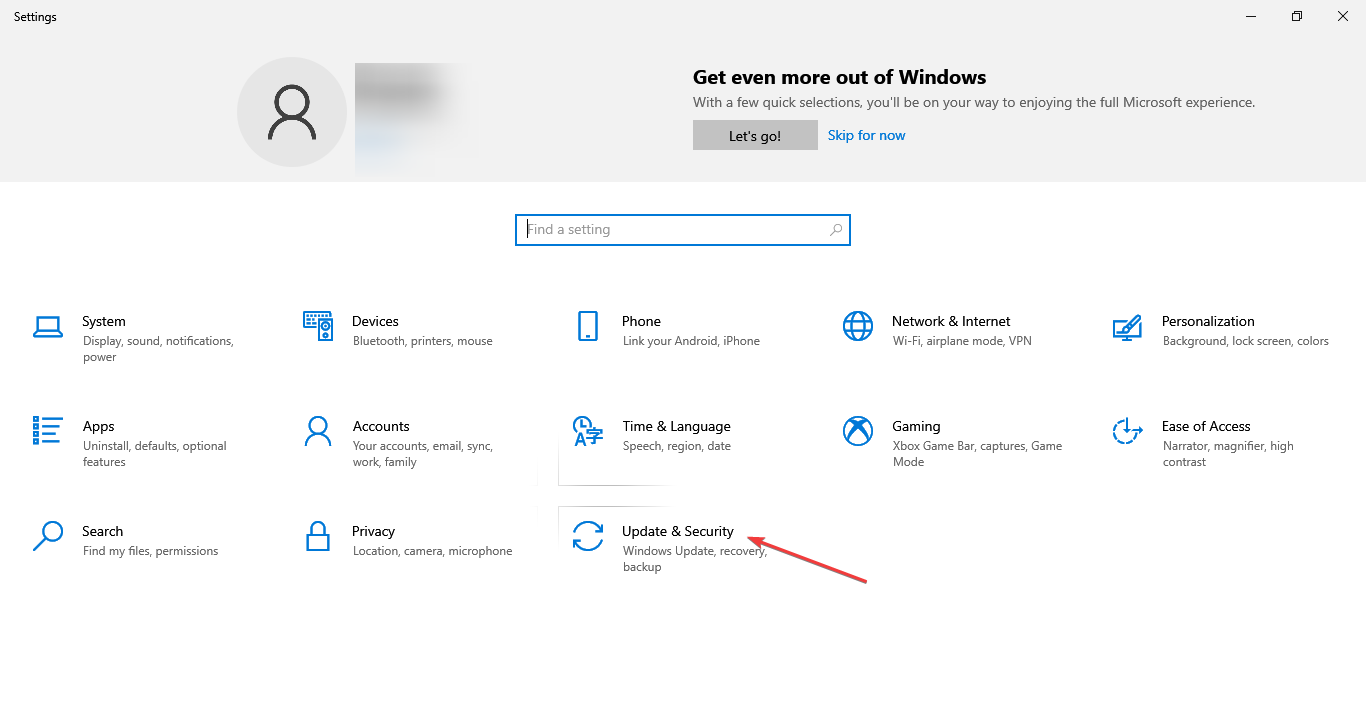
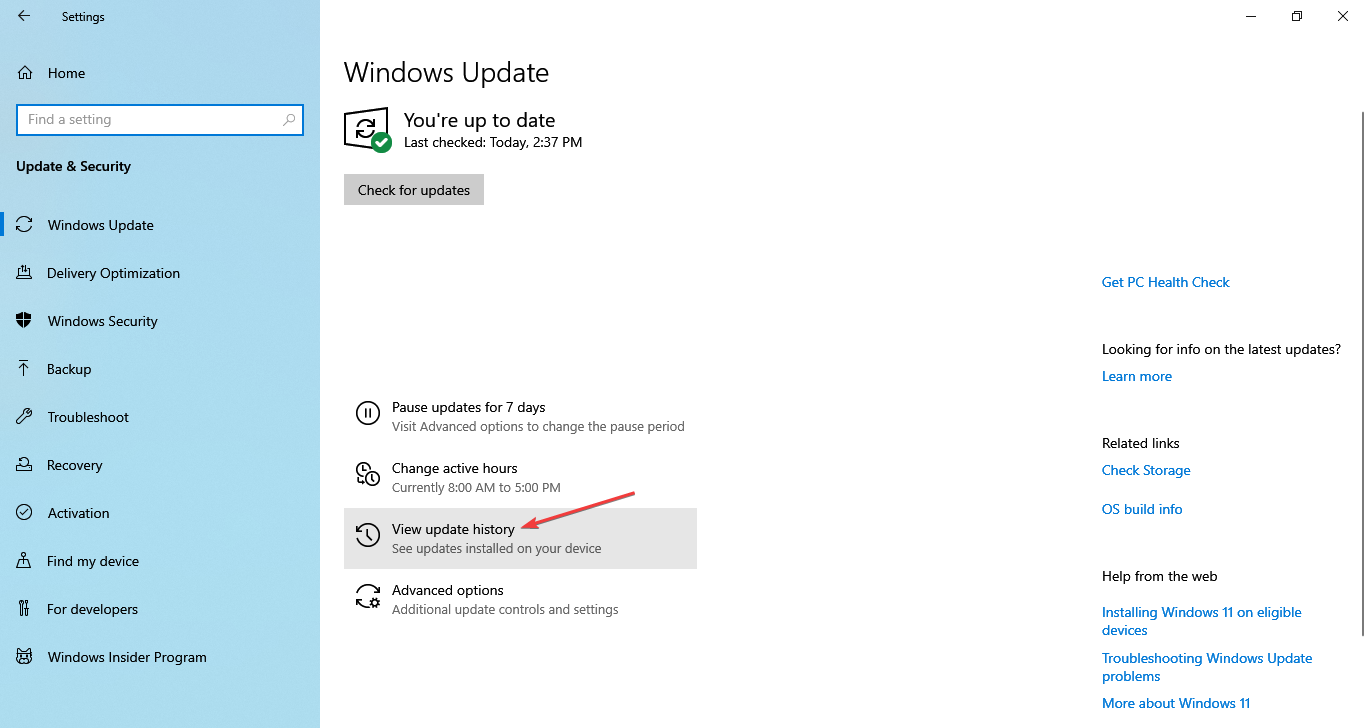
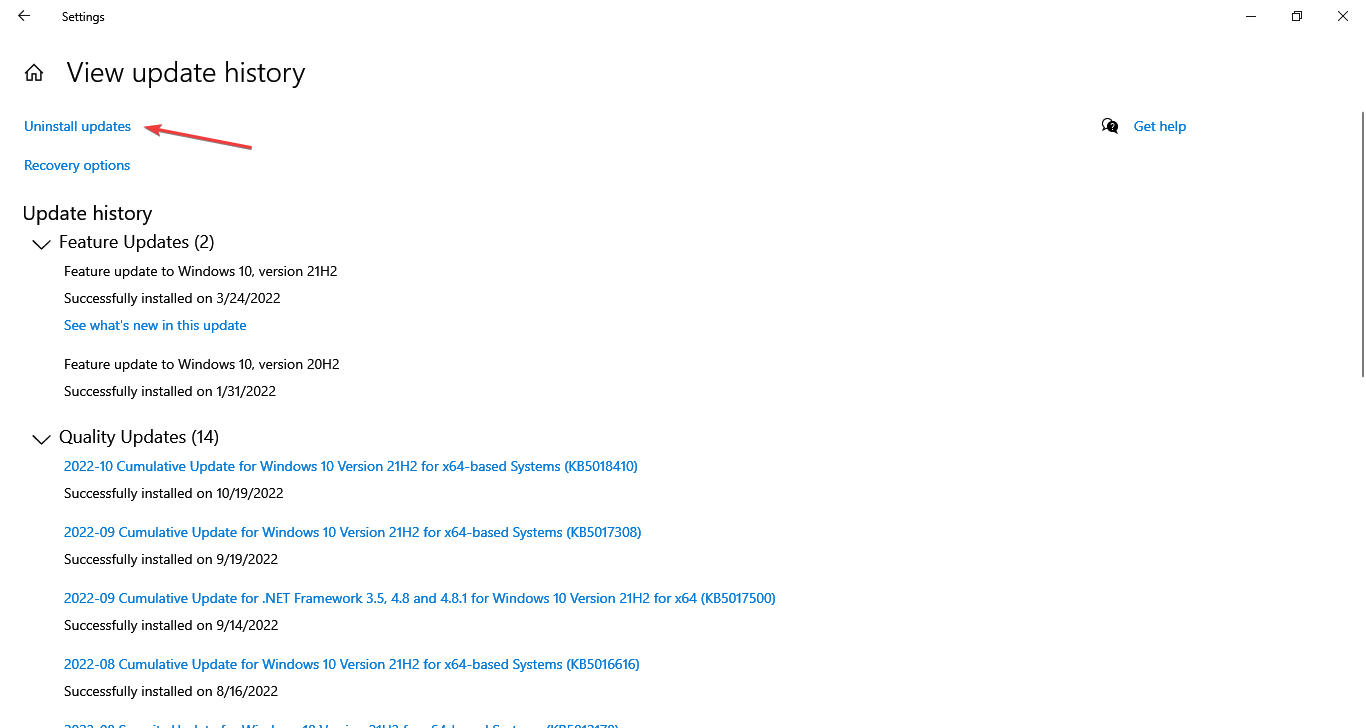
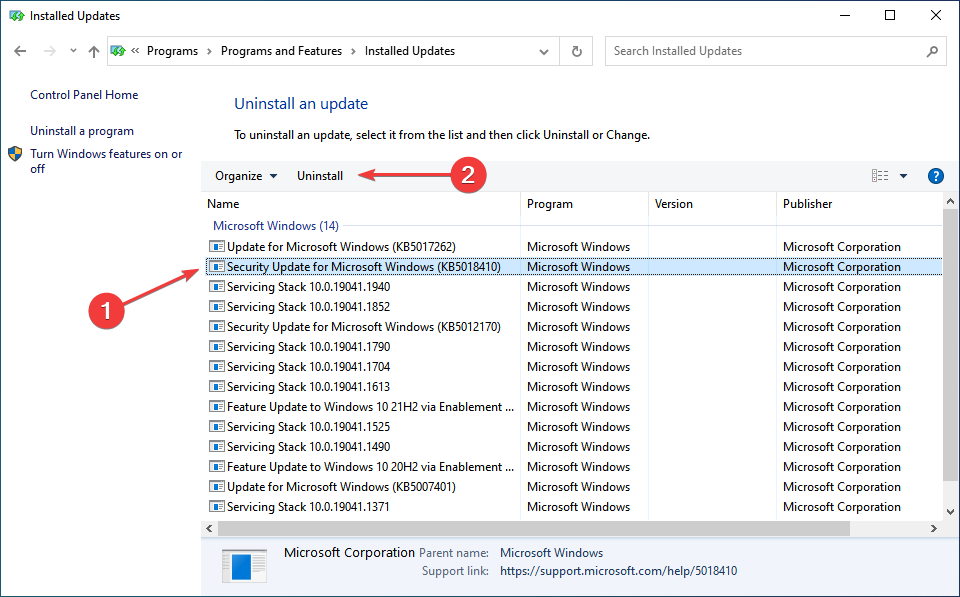
6. Uninstall recent Windows updates
- Press Windows + I to open Settings, and click on Update & Security.

- Click on View update history.
- Now, click on Uninstall updates.
- Select the update installed last, and click on Uninstall.

- Finally, click Yes in the confirmation prompt.
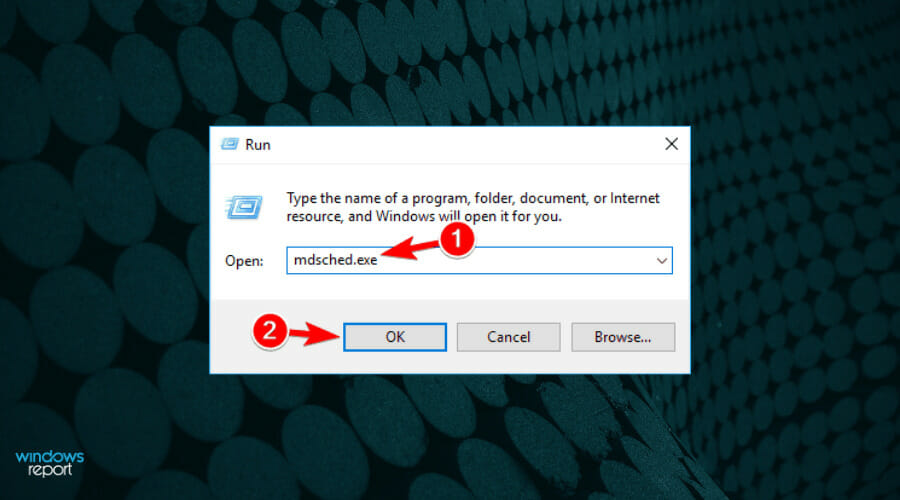
7. Test the RAM for issues
- Press Windows key + R, and type mdsched.exe, then press Enter or click OK.
- In the Windows Memory Diagnostic window, choose one of the two options and follow the instructions.
- The tool will now detect and fix issues with the RAM.

In case the built-in utility doesn’t work, you can try MemTest86+, an open-source memory repair tool that runs extensive tests to find out the minutest of the issues with the RAM and eliminate them.
If issues are detected and can’t be repaired by the tool, we recommend you replace the RAM module. Or, if you have multiple sticks installed, remove the problematic one. This should, in all likelihood, fix the Kmode Exception Not Handled error.
These were the best fixes for Kmode Exception Not Handled BSOD error and have helped most users get things up and running.
Alternatively, you could prepare beforehand for such events and install a dedicated tool to repair BSoD errors and never have to worry about them again.
If you have any other suggestions or solutions that worked for you, leave us a note in the comments section below.
Milan Stanojevic
Windows Toubleshooting Expert
Milan has been enthusiastic about technology ever since his childhood days, and this led him to take interest in all PC-related technologies. He’s a PC enthusiast and he spends most of his time learning about computers and technology.
Before joining WindowsReport, he worked as a front-end web developer. Now, he’s one of the Troubleshooting experts in our worldwide team, specializing in Windows errors & software issues.
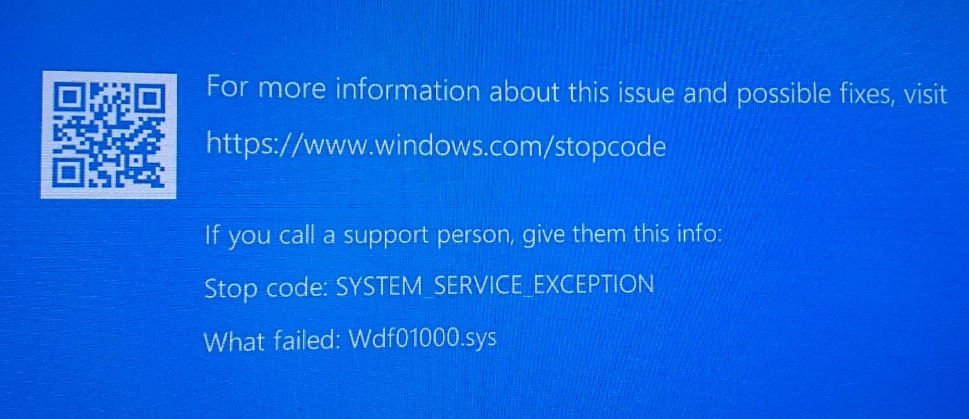
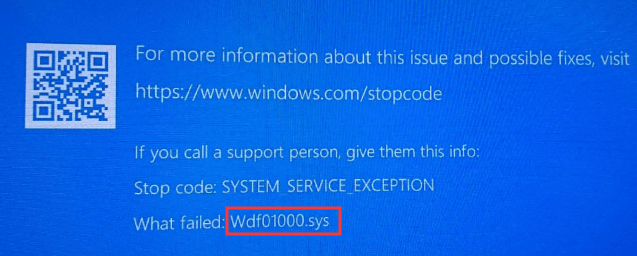
Wdf01000.sys bsod is a file associated with the Windows Driver Framework, which, in turn, handles system drivers. Damage to this file / process means that the drivers will start to create problems, which will eventually lead to the “Blue Screen of Death” error.
Description of the errors associated with this code that you may encounter:
SYSTEM_THREAD_EXCEPTION_NOT_HANDLED
PAGE_FAULT_IN_NONPAGED_AREA
System_Service_Exception
KMODE_EXCEPTION_NOT_HANDLED
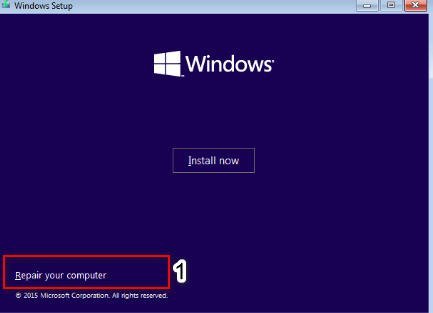
If you cannot get to the desktop or start safe mode, then create an installation flash drive to launch advanced settings. Run the installation of Windows and when you get to the “Install”, then click on the bottom of the “Repair your computer.” You can then run the command prompt and start troubleshooting. If you can get into safe mode and desktop, then follow the solutions below.
1. Run the DISM tool to fix wdf01000.sys BSOD
Run the DISM tool to restore a potentially damaged system image. If the Windows image becomes inoperable, you can use the Image Deployment Management and Maintenance Tool (DISM) to update the files and fix the problem. Run the command prompt and enter the command. If you run the command line from the desktop, then you need to open cmd as administrator.
DISM / ONLINE / CLEANUP-IMAGE / RESTOREHEALTH
2. Start SFC Scan
SFC checks for corrupted system files and attempts to automatically repair them. It may help to replace Wdf01000.sys or any associated file if it is missing or damaged. Run a command prompt and enter
sfc / scannow
3. Update Device Drivers
Updating drivers can help fix this blue screen error. You can also consider rolling back any recently updated driver.
Here is the procedure for updating and rolling back drivers in Windows 10.
4. Run the blue screen troubleshooter to fix wdf01000.sys BSOD
Blue Screen Troubleshooting is a general troubleshooting tool that detects and fix common causes of BSOD errors. Go to Settings> Updates and Security> Troubleshooting. From the list of troubleshooting tools, run the Blue Screen troubleshooter.
5. Replacing the file wdf01000.sys
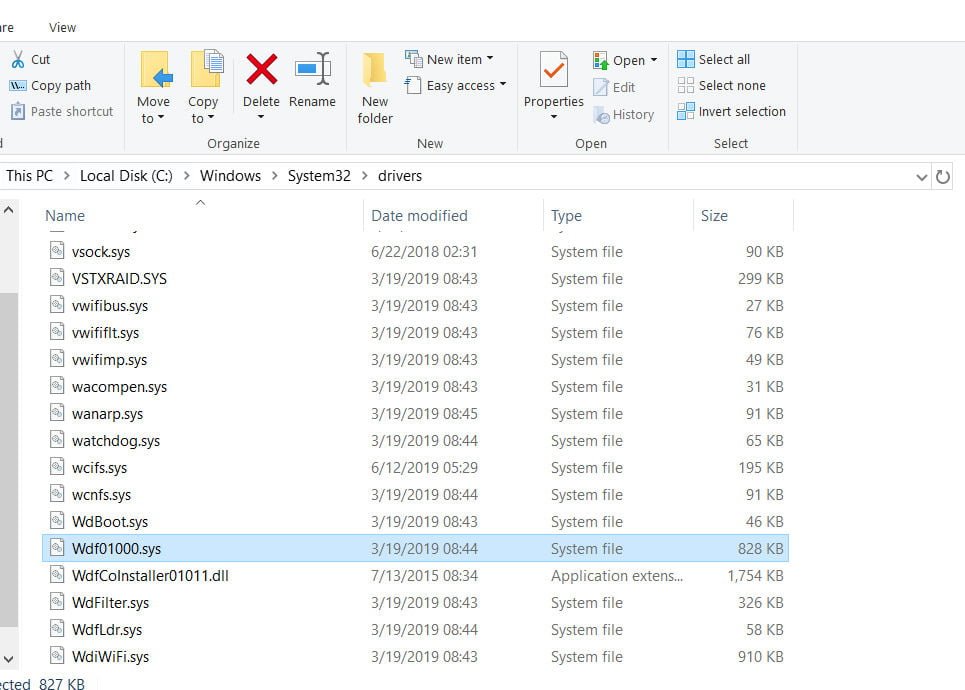
You can try to replace the file wdf01000.sys with exactly the same, but from another desktop PC, laptop. I do not recommend downloading files from the Internet, only if there is another PC. Go better to a neighbor with a flash drive. The file wdf01000.sys is located under the path C: \ Windows \ System32 \ drivers \.
Are you bothered by wdf01000.sys BSOD? Are you seeking for good ways to fix wdf01000.sys blue screen error in Windows 10? Come and read this post. MiniTool offers 9 easy and effective fixes for this problem.
You may ask: what is wdf01000.sys? Wdf01000.sys is a driver associated with the Windows Driver Framework that allows communication between hardware and connected devices. It is completely safe for your computer.
However, you might encounter wdf01000.sys blue screen error after you have installed new hardware or software or when you are running a specific program.
There are various error messages accompanying wdf01000.sys BSOD. The description related to this error can be:
- DRIVER_IRQL_NOT_LESS_OR_EQUAL
- SYSTEM_THREAD_EXCEPTION_NOT_HANDLED
- PAGE_FAULT_IN_NONPAGED_AREA
- SYSTEM_SERVICE_EXCEPTION
- KMODE_EXCEPTION_NOT_HANDLED
- DRIVER_VERIFIER_DETECTED_VIOLATION
If you are facing the BOSD about wdf01000.sys Windows 10, this post is what you need. Here are 9 solutions for you and you can fix the issue using them one by one.
Note: If you cannot log into your Windows at all, you should boot your computer in Safe Mode and then try the following solutions. Also, to avoid any data loss, you had better back up your computer and there is a tutorial for you: How to Back up Computer to External Hard Drive in Windows 10/8/7.
Fix 1: Update Your System
As I have mentioned before, wdf01000.sys is a system driver. So, you can try updating your system to remove this error. The steps of performing Windows update are provided below.
Step 1: Right-click Start button and click Settings to open Windows Settings.
Step 2: Choose Update & Security in the Settings window.
Step 3: In Windows Update section, hit Check for updates from the right pane.

If there are any updates identified, they will be installed automatically. After that, you just need to restart your computer to check if the wdf01000.sys BSOD problem is removed. If not, you can try the next method.
Fix 2: Check for Device Driver Errors
Errors related to the .sys files might be caused by corrupted driver files. Thus, to resolve this wdf01000.sys error, reinstalling or updating your corrupted device drivers is another way.
Step 1: Press Windows +X and choose Device Manager from the menu to launch Device Manager.
Step 2: Expand all the device categories to look for yellow exclamation marks. If a certain device driver is displayed with a yellow exclamation marks, there must be something wrong with it.
Step 3: Right-click the device driver with the mark and choose Uninstall from the drop-down menu. Then, reboot your computer to reinstall the driver automatically.
Step 4: If reinstalling the corrupted device driver fails to fix the issue, then try updating it. Just choose Update Driver Software after right-clicking the driver and follow the onscreen prompt to complete update. Restart your PC to see if the error is removed.
Note: If Windows doesn’t find a new driver, try looking for one on the device manufacturer’s website and follow their instructions.
If the error still exists or there’s no driver with yellow exclamation mark, please move to Fix 3.
Fix 3: Reinstall the Problematic Software
Wdf01000.sys blue screen error might occur while you are launching or running a specific application. In this case, you can try uninstalling or reinstalling the problematic software. This will replace all its files and registry entries.
Step 1: Launch Control Panel.
Step 2: Navigate to Programs > Programs and Features.
Step 3: Locate and select the problematic software among the list, and then click Uninstall.
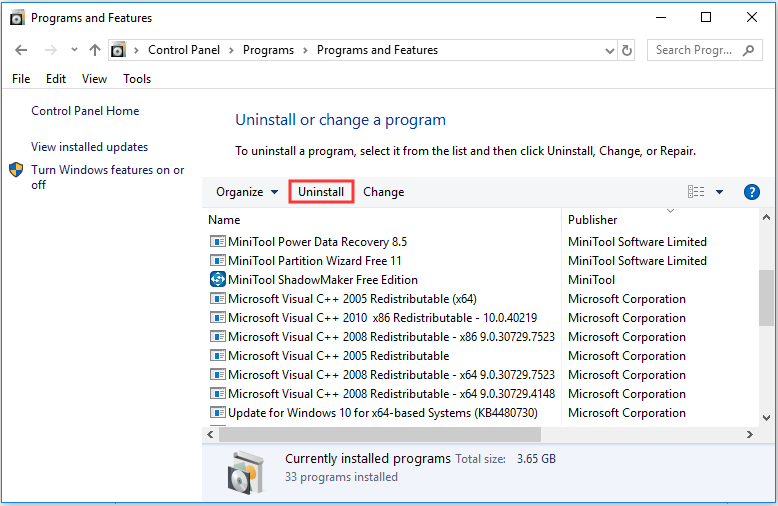
Step 4: There will be a pop-up window, click Yes to confirm the operation.
Now, restart your computer, and the problem should be removed if it is caused by the program. You can also download an update version of the software from the official website to reinstall it.
Sometimes you may encounter Control Panel not opening, you can read this simple guide to avoid the problem.
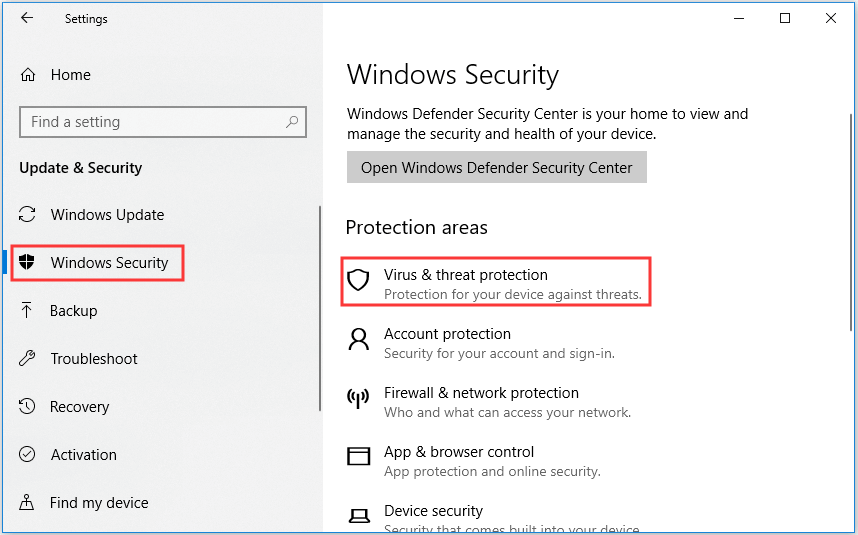
Fix 4: Scan for Viruses and Malware
Viruses and malware can lead to various blue screen errors, including this wdf01000.sys issue. Thus, it is a wise action to scan for viruses and malware.
You can download and use your preferred antivirus program. Besides, Windows Defender is a great built-in antivirus tool in Windows 10.
Step 1: Open Windows Settings and navigate to Update & Security > Windows Security.
Step 2: Click Virus & threat protection to open Windows Defender Security Center.
Step 3: Hit Run a new advanced scan in the pop-up window.
Step 4: In the new page, choose Full scan and click Scan now.
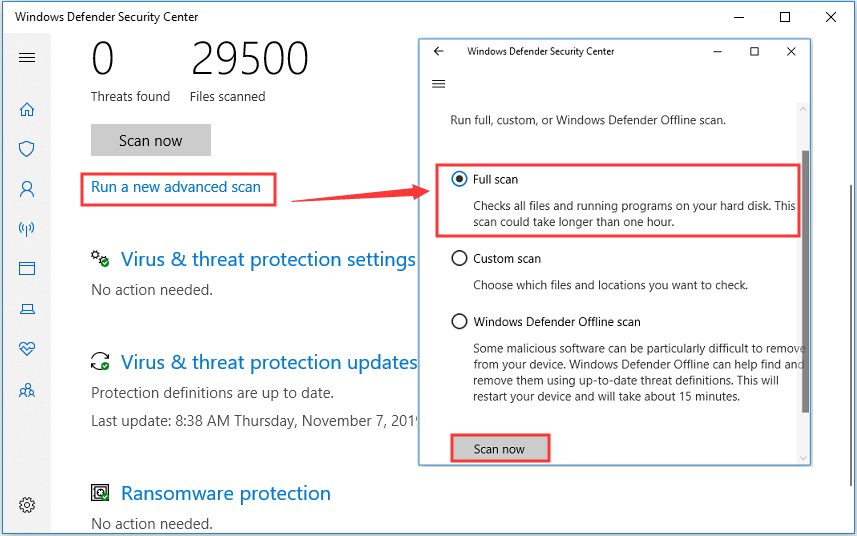
Once the process of scanning is completed, your computer will require a restart. After restarting the PC, you can check whether the issue is fixed. If this fails to work unluckily, just jump to the next solution.
Fix 5: Run Check Disk
Another reason for wdf01000.sys blue screen error is hard drive corruption. To fix the problem in this case, you can run 2 utilities (CHKDSK command and MiniTool Partition Wizard) to check and repair existing errors on your disk.
#1 Using CHKDSK Command
The check disk utility program, also known as CHKDSK, is a Windows built-in tool that lists and corrects errors on the disk to verify the file system integrity. Just follow the steps below to check disk now.
Step 1: Type cmd in the search bar. Right-click the search result and click Run as administrator to open Command Prompt as administrator.
Step 2: Type the command chkdsk /f /r and press Enter. This will check the current drive and repair the errors on it.
Tip: You can also choose to scan a specific drive. Just add the drive letter to the command, like chkdsk d:/f/r.
Step 3: There will be a message asking to check the volume the next time the system restarts. Just type Y and press Enter to confirm the schedule.
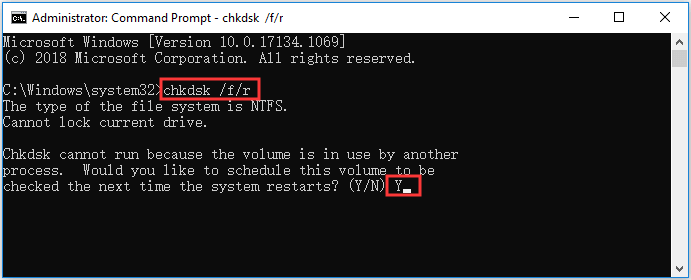
Step 4: Now, save your work and restart your computer. The scanning will start automatically during the process.
If the scan process gets stuck or you have waited for long time, you can take a closer look at this post to get feasible solutions.
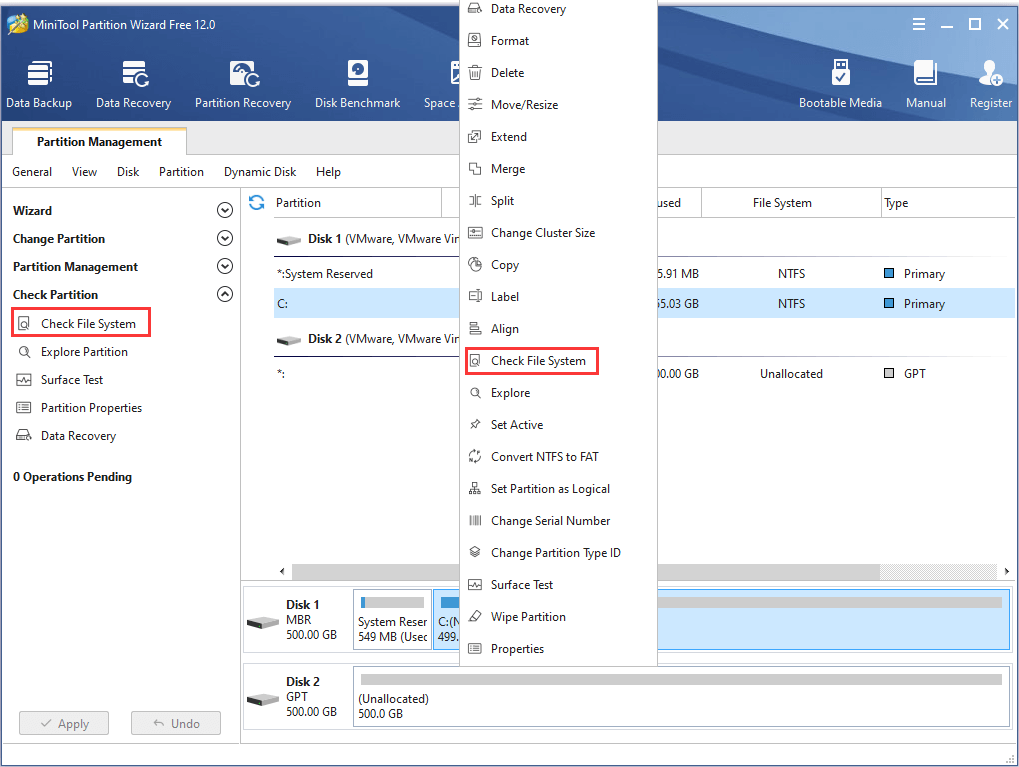
#2 Using MiniTool Partition Wizard
As an alternative tool of checking disk, MiniTool Partition Wizard makes things much easier.
It is also an effective solution to certain problems related hard drive. If wdf01000.sys BOSD is due to corrupted hard drive, you can fix the error with the feature Check File System built in MiniTool Partition Wizard.
It is also a powerful partition manager that enables you to better manage your partitions and disks. For example, you can use this program to migrate your Windows 10 to SSD or larger HDD without reinstalling OS or losing data.
Now, let’s try activating the Check File System feature to fix this BSOD error.
Attention: Rather than entering Safe Mode, you can create a bootable disc using bootable edition of MiniTool Partition Wizard if you cannot get the desktop. Then, boot your computer from it and use Check File System to fix the problem.
If you can run the computer normally, just click the following button to download a free edition to complete the action.
MiniTool Partition Wizard FreeClick to Download100%Clean & Safe
The detailed steps of performing Check File System of MiniTool Partition Wizard are the same even you are using different editions. The screenshots below are from a free edition.
Step 1: Launch the program to get its main interface.
Step 2: Select the partition for which you want to perform checking disk, and then choose Check File System from the left pane to activate the feature. Also, you can right-click the feature and choose the feature from the context menu.
Note: This feature only works for a drive with drive letter, so make sure the selected drive have one.
Step 3: There are two options in the pop-up window. Please choose Check & fix detected errors and click Start button.
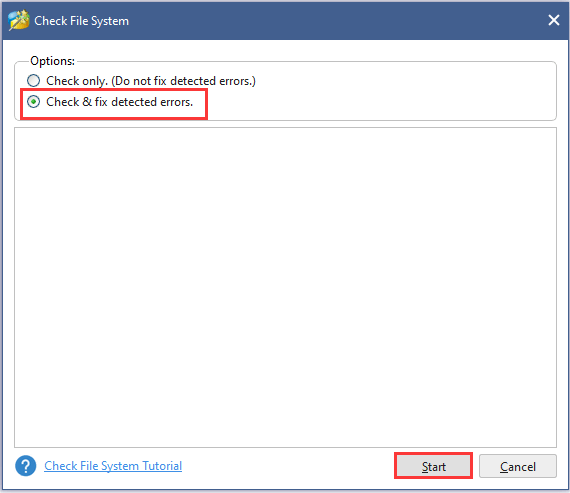
Step 4: If the selected partition is a Non system-related drive, the scanning will start immediately.
If the selected partition is your system drive, there will be another window prompting to schedule the partition to be checked next time you restart the system. Click Yes and restart your computer.

After you perform checking disk, the wdf01000.sys error should be fixed if it caused by corrupted file system.
I learnt about how to check my disk using CHKDSK and MiniTool Partition Wizard. Both ways are simple and effective!Click to Tweet
Fix 6: Run SFC Scan
Corrupted or missing system files can also lead to wdf01000.sys error. You can run a System File Checker (SFC) scan to restore corrupted system files.
Here is how to run SFC scan in Windows 10.
Step 1: Run Command Prompt as administrator.
Step 2: Input sfc /scannow and press Enter key to start scanning.
Step 3: Please wait patiently until the scan is 100% completed. If you get the prompt Windows Resource Protection found corrupt files and successfully repaired them, restart your computer to check whether the wdf01000.sys problem is resolved.
Step 4: If no files are repaired, try DISM scan then. Input DISM.exe /Online /Cleanup-image /Restorehealth and press Enter. Then, run SFC scan again.
Restart your computer, and the error should be removed.
Fix 7: Run the Blue Screen Troubleshooter
For various blue screen problems, Windows Troubleshooter is a great and convenient tool. Let’s see how to run blue screen troubleshooter.
Step 1: Open Settings and navigate to Update & Security section.
Step 2: In the left pane, choose Troubleshoot.
Step 3: In the right pane of the section, scroll down to locate Blue Screen. Click it and hit Run the troubleshooter.
Then, it will start detecting problems. Wait until it finishes, and then follow the instructions on screen to complete the troubleshooter.
Fix 8: Re-Register the Wdf01000.Sys File
Sometimes, the wdf01000.sys error occurs if wdf01000.sys file is not correctly registered in Registry. Fortunately, you can re-register the file with Command Prompt.
This is a rather simple operation. You just need to run Command Prompt as administrator. Then, enter the command regsvr32 C:Windowssystem32driverswdf01000.sys and press Enter.
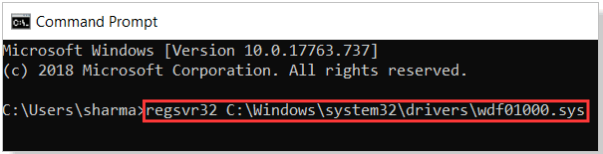
After that, reboot the system to check whether the wdf01000.sys problem is solved.
Fix 9: Perform System Restore
Have the solutions above solved the problem? If not, you can consider performing system restore. If the wdf01000.sys blue screen occurs recently, system restore is without doubt a great way to get rid of the problem.
It can bring your system files and settings back to a date before the error appeared. Well, it is safe for your data as the operation won’t involve your personal files.
Step 1: Press Windows + R shortcut to invoke Run window.
Step 2: Enter rstrui.exe in the empty box and click OK.
Step 3: There will be a pop-up window. Just click Next button to continue.
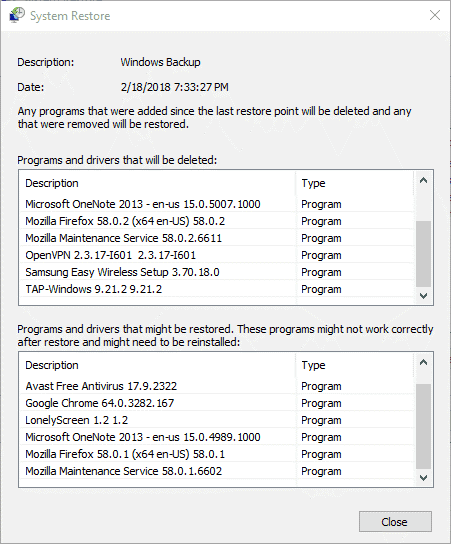
Step 4: The restore points will be listed here. To see other previous points, just check Show more restore points. Choose one that predates the wdf01000.sys problem, and then click Next.
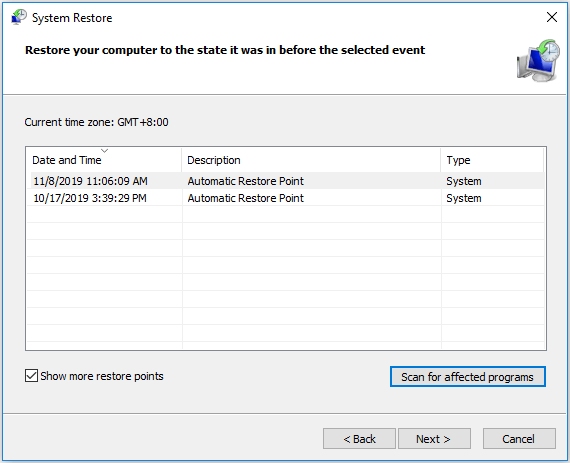
As this action will remove the programs installed after the point, you can click Scan for affected programs to check the programs you need to reinstall later.
Step 5: Click Finish in the next page. Then a window with warning message will appear, just click Yes to confirm the operation.
Here are 9 solutions to wdf01000.sys blue screen error. I have fixed the problem using one of them. Share with you all and hope these solutions could be helpful for you.Click to Tweet
For other common blue screens of death, you can find solutions in this post: Windows 10 Blue Screen of Death – You Can Quickly Fix It.
Bottom Line
If you have any problems in using the fixes above, just let us know. We will give you timely feedback.
You can also share with us if you get other better methods to fix wdf01000.sys error. Leave a message on the following comment zone or send e-mail to [email protected].
Wdf01000.sys FAQ
What is wdf01000.sys?
Wdf01000.sys file is a Windows system file and it’s a software component of Windows Driver Framework supported by Microsoft. The wdf01000.sys allows your hardware and the connected devices communicate with each other. It is an important factor for your Windows PC.
Can I delete wdf01000.sys?
You can delete wds01000.sys but you are not recommended to do that. Because it is an important Windows components on your computer, responsible for the communication between hardware and connected devices. There might be some errors if you delete it.
Wdf01000.sys causing high DPC Latency issues, how do I remove?
Wdf01000.sys is just the representation of drivers running inside of it and it is not the culprit but the victim. Instead of removing wdf01000.sys or other Windows components, you should update your Nvidia driver and check your network connection.
How do I fix System Service Exception?
To fix System Service Exception BSOD in your Windows, you can try the following solutions:
- Perform a virus check.
- Uninstall problematic program.
- Update your drivers.
- Run SFC scan.
- Check your hard drive.
- Use Windows troubleshooter.
- Run Windows Memory Diagnostic tool.
- Run startup repair.
Kmode_exception_not_handled is an error that shows on a blue screen on Windows 10 and 11. It is a fatal error and many critical conditions of a system are indicated by this error.
If you are a Windows user who has faced this error, then your computer must continuously restart in a loop after showing this error. Also, you may not have access to your Windows anymore. But don’t worry you are not alone at all. Many users have faced the problem and we have some solutions to fix this problem according to the success rate of the users.

Reasons for ‘KMode Exception Not Handled Boot Loop’ Error
There are several reasons behind the ‘Kmode_exception_not_handled boot loop’ error. It can be a very problematic error s it will prevent you from accessing your computer. There are possibilities that the issue is caused by the drivers of the system. So, you have to update your drivers.
As mainly the driver is the culprit here, you have to identify the exact driver who is causing this problem. Then you need to update or reinstall the driver. In some cases, you may have to install the previous version of that driver.
However, it is also possible that this blue screen error is occurring on your computer because of some configuration faults in your BIOS. So, the BIOS will also be needed to reconfigure or reset to the default to fix this error.
Therefore, as you have no access to your Windows because of this error, you need to fix it from the Safe Mode on your computer.
Other Similar Errors to KMode Exception Not Handled
The solution given in this article may also work for the other similar errors which are given in the table below:
| Errors | Reasons |
| Kmode exception not handled ntfs.sys/netio.sys/ ndis.sys/ syntp.sys/ wdf01000.sys/ etd.sys/ tcpip.sys/ tppwr32v.sys/ usbport.sys/ igdkmd64.sys/ intelppm.sys/ iastora.sys | The error identifies the problematic file in this way. You can navigate yourself to this path to find the corrupted driver or application by this error. |
| Kmode exception not handled overclock | The increasing voltage to the CPU causes this error. |
| Kmode exception not handled RAM | This error can be occurred due to the faulty module of RAM. |
| Kmode_exception_not_handled USB | A faulty USB device is the main culprit in this case, but the driver also can be the reason for this error sometimes. |
| Kmode exception not handled during install | This error also indicates the faulty driver that is not compatible with your PC. |
| Kmode exception not handled loop | The old or incompatible graphics driver is the reason for this error. |
These errors are mostly reported by many users and the virtualization software such as the Virtual Box or VMware have also transcribed these errors as these are the common errors that mostly appeared on PCs.
How to Fix ‘KMode Exception Not Handled Boot Loop’ Error
As there are several reasons behind this error, there are several methods also to fix this error. Here are all the effective methods mentioned below.
NOTE: Apply the first two methods (Fix-1 and Fix-2) only if you can’t access Windows otherwise, you can start applying from the third method (Fix-3)
Fix-1: Installing the Missing Drivers
- Keep pressing F8 or Shift + F8 while your computer boots.
- After this, an option will appear on your screen and you have to select Safe Mode with Networking to take your computer to the Safe Mode.
- From the search bar, search for the Device Manager app and open it.

- From the Device manager app, right-click on unknown devices and select Update Driver.

- Then, click on →Search automatically for drivers.

- If it failed to search for the driver automatically, then you can download the driver on your PC from your web browser, then click on the Browse my computer for driver option and choose the downloaded file.
After installing the driver, exit save mode and check if the error has vanished or not.
As the Kmode_exception_not_handled error can occur due to outdated or missing drivers, you are recommended to install the missing drivers manually on your computer. However, it can also cause by your network adapter. So, it is also worth updating the network adapter to fix this error.
Fix-2: Renaming the Defective File
As we previously mentioned that the Kmode_exception_not_handled error can occur because of some external software, Bitdefender is one of them. Many users have reported that they fixed the error by renaming the bdselfpr.sys file. If you are also a user of this software, then this method is just for you.
- Go to File Explorer by pressing and holding the Windows key + E simultaneously.
- Then, navigate to Local Disk (C:)\Program Files\ Bitdefender\ Bitdefender Security and find bdselfpr.sys file.

- Rename the file according to your choice. For example, bdselfpr.s__.
Fix-3: Uninstalling Certain Apps
As you already know that certain apps can cause errors on your computer, ON/OFF Gigabyte is one of them. It is an application that is used in USB power stations. Many users have reported that it is incompatible with Windows 10 which occurs the Kmode_exception_not_handled error. Uninstalling this app can be a cure to this problem.
- Open Settings by pressing and holding the Windows key + I simultaneously.
- Then, click on Apps and find ON/OFF Gigabyte software.

- Click on it and click Uninstall.

After the uninstalling process, reboot your computer to see if the issue is remaining or not.
Fix-4: Uninstalling Your Antivirus Software
It is also reported by many users that they faced the Kmode_exception_not_handled error because of the antivirus software they were using. They have fixed this error by uninstalling their antivirus. So, you may also face this issue because of your antivirus. Uninstall the software and check if the error is gone or not.
- Press and hold the Windows key + I simultaneously to open Settings.
- Go to the Apps and click on your antivirus software.
- Click on Uninstall to remove this app from your computer.
Fix-5: Updating Your BIOS
Keep in mind that updating BIOS is a critical process. Make one mistake here and you will end up damaging your PC permanently. So, do it very carefully.
- Download the latest version of BIOS from the website of your motherboard manufacturer and copy it to your USB drive.
- From the Start menu and click on the Power button.
- Press and hold the Shift key and click Restart.
- There will be three options on your screen and you have to choose Troubleshoot option.

- Then, from the Advanced options, select UEFI Firmware Settings.

- Your computer should boot to the BIOS setup page after clicking the Restart button.

- From the BIOS Management page, choose the BIOS from your USB drive and update the BIOS.
Fix-6: Disabling Fast Start-Up
Fast startup is enabled in all the computers by default that are using Windows 10. It allows you to boot the computer fast. But during this fast boot, your Windows may not able to boot properly and cause the previous error. Disabling the fast startup can be a solution to this error.
- Right-click on the Start button and click Power Options.
- Then, click on the Additional power settings.

- Now, click on Choose what power buttons do from the left menu bar.

- After that, go to the Shutdown settings and click on Change settings that are currently unavailable

- Now, untick the Turn on fast startup option.

- Click on the Save button.
Fix-7: Diagnosing the RAM
A few users confirmed that the previously mentioned error occurs by faulty RAM. You are recommended to diagnose the RAM to check if it has any flaws which caused the error.
- Open the Run dialogue box by pressing and holding the Windows key + R simultaneously.
- Type mdsched.exe under Open: and click the OK button.
- You will see two options on the Windows Memory Diagnostic and you need to click Restart now and check for problems (recommended)
- Follow the further procedure to detect and fix any problem with your RAM.
You can also try replacing the RAM to check if the error is caused by the RAM or not.
Frequently Asked Questions
How Do I Get Rid of the Blue Screen Error On Windows 10?
If you face a blue screen error on your Windows 10, then you need to update your Windows to fix that problem. For updating windows, navigate to Settings > Update & security > Windows Update and apply all the pending updates. You should also update your drivers to fix the blue screen error.
How Do I Check My Drivers for Errors On Windows 10?
Any driver can cause an error on Windows 10. So, you need to keep your drivers up to date. You can also reinstall drivers to get a better result. The instructions to update drivers are given in the first method in this article. You can follow the steps to update your drivers to fix errors on your Windows 10.
What Causes Blue Screen Error?
The Blue Screen of Death (BSOD) error is caused by driver fault or sometimes issues with the hardware. However, some apps may crash, have flaws, or be incompatible with Windows which are also can be the reason for BSOD. When an application, driver, or Windows crashes, it informs users on the blue screen and saves a minidump file to the disk.
Conclusion
Kmode_exception_not_handled error is one of the most common blue screen errors or BSOD in Windows 10. There are several reasons behind occurring this error as mentioned above. All the best solutions to fix this error are explained in this article.
Hopefully, you will be able to fix this problem with these solutions. But if you failed to fix using these solutions, then the final option is in your hand. You have to reset your Windows 10 to fix this problem.
Feel free to share your opinion in the comment section and please mention the solution by which you will have fixed the BSOD error.
BSOD or blue screen of death error is a common problem on Windows 10. But the problem becomes worse if you get the kmode_exception_not_handled error. As a user, you will face the most challenging situation while powering the computer and getting the error message shown on display.
Usually, the problem occurs while the software or apps overwrite memory of each other. It can crash the software, due to which you can face a blue screen error. You can face the error on your device’s display for multiple reasons. Many of us know how to make the error correction. However, those who don’t know should go through the article properly to fix the problem. The solutions don’t rely on Windows 10 or any older version. If you cannot get rid of the error to boot the windows, then it is advised to begin your windows in safe mode, and then you should perform the solutions.
What is KMODE_EXCEPTION_NOT _HANDLED Error?
The Kmode Exception not handled error is a consequence of memory-related conflicts between two apps or more. This bug check comes with a value of 0x0000001E. It means that a kernel-mode program created an exception that this error handler could not catch. As a result, it couldn’t search for the problem. As a result, you can experience the error of the faulty driver. There are a few users who have experienced the whole system fails.
Bug Check 0x1E Parameters:
Parameters are as follows:
- The exception code that was not handled.
- The address at which the exception occurred.
- Parameter 0 of the exception.
- Parameter 1 of the exception.
Examples Of Bug Check 0x1E: kmode_exception_not_handled Error:
These are some error messages found on the display that people reported, such as:
Kmode exception not handled ntfs.sys/netio.sys/ ndis.sys/ syntp.sys/ wdf01000.sys/ etd.sys/ tcpip.sys/ tppwr32v.sys/ usbport.sys/ igdkmd64.sys/ intelppm.sys/ iastora.sys – The error says how your windows system points out to the name of the file causing the error. In this case, you need to use the information to look for the device or app causing the problem.
Kmode exception not handled overclock –
It appears when the CPU voltage has been increased.
Kmode exception not handled RAM: The message indicates that a faulty RAM module gives the error periodically.
Kmode_exception_not_handled USB: It means a wrong driver or a faulty USB device.
Kmode exception not handled during install: If you face the error during installation, ensure that a corrupted driver is causing the issue. The driver must not support your computer.
Kmode exception not handled loop – The error message means that the computer doesn’t allow you to use a graphics card or the cards are old.
How to Fix The kmode_exception_not_handled Error in Windows 10?
The problem can be solved easily like other BSOD or blue screen of death errors. We have given here the essential methods that you are required to follow. You should try the solutions to get rid of the error like resetting windows, going into Safe mode, etc. It relies on the severity of the problem.
Way 1. Disable Fast Startup:
We have let you know here how to disable a fast Startup.
1) Your first task is to tap on Windows Logo Key + Rand, then you should navigate to the box and type Control panel there.
2) Then, you have to turn the view to big icons. After that, tap on the Power Options.
3) Go to the right plane after that, and then you should tap on Choose what the power buttons do.
4) Now, you need to choose Change settings, the currently unavailable option, appearing on display.
5) It is recommended to unselect the Turn on Fast Startup box. You have to hit save Changes to save and then exist from the window.
6) Finally, check if the problem is gone.
Way 2. Update The Faulty Driver:
If you find a driver causing the issue, you must update the driver. Sometimes, you can experience problems due to outdated drivers as it can affect the function of the PC. Therefore, it is essential to check the updates, and after checking, you should perform the required task as soon as possible. You may think of the drivers that are causing issues. The Windows indicates the driver’s name on display.
As soon as you get the problem, you will see the driver’s name appearing in the bracket with the error. When you get the driver’s name, you have to perform the task to update it.
- You need to tap on the Windows key + S first. After that, you must write device manager in the search box. Next, hit the enter key.
- After that, your job is to look for the hardware connected to the corresponding driver error. Then, you need to tap on the hardware and choose Update driver software.
- After that, you should choose the Search Automatically option for the updated driver software. You need to wait for a few minutes till the update is finished.
- If it doesn’t work, you need to navigate to the manufacturer’s website, and then you should look for the respective driver. Then, you can get the update of the driver available on it. The process may take a little time, but your driver will be updated in the end.
Way 3. Uninstall The Faulty Software/Driver:
Drivers or software can cause the error also in your device currently. It indicates that you are required to remove or unplug the software or hardware. Whether you have installed software or any app before facing the error, you have to uninstall it. If you have connected your device, you must remove the device.
People who have already installed hardware need to remove it entirely and check if the error is solved. You can uninstall a recently added program by performing these steps.
- Your first task is to tap on the Windows Logo Key + R button to open the Run window. Then, your job is to write the control panel by going to the run command box. Then, you have to tap on the enter key.
- After that, your task is to tap on the view by option and choose a category from the list. Now, you have to select the Uninstall program option available under the title Programs.
- Next, you have to choose the program or highlight the one you are willing to uninstall. Now, you need to tap on the Uninstall button.
- As soon as you uninstall the program, your job is to reboot the PC. Then, you should check if the error exists on the PC.
Way 4. Repair Problem Using Windows:
Your Windows can repair its problems itself, and it performs an SFC scan to figure out the issue and fix it. In addition, this app helps to check all the files available on the PC and let you know if these are working correctly.
The following steps let you know how you can fix the error.
- First, you need to move to the command prompt window. To do this, you need to write cmd in the search box.
- After that, you must write the command sfc/scannow and hit the enter key.
- The process can take a while, and therefore, you must wait for a while till the process is not ending.
- At last, your task is to reboot the PC and find if the error is fixed.
Way 5. Run Windows Memory Diagnostics:
It is a system memory test that enables you to check the computer’s RAM for problems. While testing, you can see a status bar displaying if any issues have been detected. With the help of Windows Memory Diagnostics, you can check the problem.
- First, you should go to the Windows memory diagnostics and open it. To do this, you need to search it from the search box of Windows 10.
- Then, your task is to tap on Restart now option, and then it is recommended to check the errors.
- After running the tool, if you find the issue on memory, you need to exchange the physical RAM and check it.
Way 6. Installing Missing or Corrupt Drivers:
Drivers are essential for the operating system because it uses drivers to work with your hardware. Whether you find a driver outdated or corrupted, it can cause the issue. For example, you can face the incompatibility issue when updating the operating system to Windows 10. Besides, you might face the drivers corrupted without any specific reason.
If you are willing to check whether the issue is caused due to a faulty drive or not, you need to run an automatic driver update. Besides, you can update the drivers manually to their recent available versions. You can install the current drivers for a recently installed hardware device. Whether you have not installed any new hardware, ensure that you have the recent drivers for these devices.
- Video card
- Network card or router (if it is available to you)
- Any removable or external disk drive
- First, you have to tap on the Windows + R, and then you need to type devmgmt.msc. Finally, tap on ok to open your device manager. It will showcase a list containing all the installed device drivers.
- Now, you are required to look for the device that is marked in yellow.
- Tap on the device again, and then you should choose update driver software. After that, your task is to follow the steps to get driver updates.
- If you’re unable to find any update for the driver, you have to uninstall this from here.
- Make sure that you download the best driver for your specific device from the manufacturer’s website. Then, you need to install this.
Way 7. Rename The Problematic File:
- If you are willing to rename the file, your first job is to tap on the Windows key + E to begin File Explorer.
- After that, your job is to move to the Bitdefender folder from Program Files. Then, you should find bdselfpr.sys and rename the file after that. Again, you can take bdselfpr.s__ as an example.
- As we have said before, a few specific software could create the blue screen of death error on Windows 10. However, you should remember that you can always solve the issue by changing the name of these files, and the reason is that it can cause more system instability.
- Take the help of a repair tool that can help you get rid of the error sometimes. The specialist tests the problem, and you can solve the issue in no time.
Way 8. Uninstall ON/OFF Gigabyte:
- Your first task is to hit the Start button, and then you should choose Settings.
- After that, your job is to choose the Apps section.
- Then, you need to look for the ON/OFF Gigabyte app available from the apps list on the right pane. Next, you need to tap on it and choose Uninstall.
- You need to continue doing the uninstalling process and then reboot the PC.
You should know that ON/OFF Gigabyte is a specific program compatible with USB power stations. However, according to the users, the driver for the software is corrupted and doesn’t support Windows 10.
Are you using any software like this on your device? If yes, then ensure to remove the software. If you face any problems, a list appears containing the best uninstaller programs helpful in this case.
Way 9. Uninstall Your Antivirus Software:
- First, your task is to hit the Windows icon button, and then you have to choose Settings.
- Next, you have to choose the Apps section.
- Look for the antivirus app from the list of apps and then tap on it. After that, you should choose Uninstall option.
- You have to continue doing the method and then restart the computer.
A few times, you can face an issue with your antivirus software. According to a few readers, the McAfee antivirus software can cause the problem. Therefore, removing the software from the PC is recommended to solve the issue.
If you are willing, then disable the antivirus first. In this case, you need to use its menu settings and then check if the issue is fixed.
Hence, it is recommended to take the help of a professional uninstaller tool to remove any files and registry items related to the faulty antivirus. When you complete the uninstallation of the initial antivirus, you need to install a different protection software on the Windows PC.
Way 10. Update Your BIOS:
You should remember that BIOS update is an updated process. If you have not performed it correctly, it may permanently damage your computer.
- First, navigate to the motherboard manufacturer’s website. Then, you need to download the upgraded version for the device. Finally, you need to load your files on a USB memory stick.
- Then, you have to navigate to the Start Menu and open it. Now, hit the Power button.
- After that, your job is to hold the Shift button and choose the Restart option.
- You can see here multiple options available. Then, your task is to select Troubleshoot option.
- Next, you have to choose Advanced Options, and then you should select the UEFI Firmware Settings.
- Hit the Restart button, and after that, you should boot to the BIOS.
- Next, find the update feature of the BIOS, and then you need to load the recent version from the USB stick.
An outdated version of bios can cause an error sometimes. Based on every device, the BIOS or UEFI can be different. Therefore, checking the motherboard instruction manual is essential to know the proper procedure for updating the bios.
Way 11. Uninstall the Program or Software Not Running Properly:
If you are willing, go through the system to detect the program or software not running accurately. Whether you want to know how to uninstall a program or software from your operating system, you should follow the steps.
- Move to the Start menu first.
- After opening the Start menu, you need to head towards the Control Panel option.
- After that, your job is to select the Program option.
- Next, your task is to tap on the Uninstall a program option.
- Now, you can see a program list appearing on display.
- You should choose the specific program or software you are willing to uninstall.
- Then, tap on the Uninstall option.
Continue performing the steps to uninstall any program or software. You can uninstall the program manually to leave the junk files a few times. We recommend you uninstall any program with taking help of the third-party Uninstaller tool. You can uninstall software or program entirely without leaving any traces behind using the tool.
Way 12. Check the Hardware Compatibility:
Whether you have updated the Windows 10 OS recently and face the issue quite often, the hardware compatibility may be the reason.
Therefore, you are required to check the official documentation that the Windows 10 OS offers to see if the computer hardware enables you to run Windows 10.
Way 13. Windows 10 Blue Screen Troubleshooter:
If you are willing to solve the error, you should follow the steps.
- First, your task is to head towards the Start menu.
- Move to the Start menu, and then you need to head towards the Settings option. After that, your job is to choose the Update & Security option.
- Next, you have to select the Troubleshoot option and run it.
- As soon as the Troubleshoot method gets over, you should check if the error is fixed.
Way 14. Roll Back Windows 10:
You can experience the error for a Windows update. It is because a few drivers may exist that don’t support the recent Windows update. In this case, your job is to roll back the Windows 10 and check after that if the issue resolves.
- Before rolling back your windows 10, you should access the Safe mode.
- Your job is to head towards the Settings to roll back the driver.
- Then, you need to go to the Update & Security option and open it.
- Choose the Recovery option.
- Tap on the Get started option available under the Go back option to the earlier version of Windows 10. You can see a window appearing on display, and the process can take a while to load.
- Choose the option For another reason, and tap the Next option.
- Tap No, thanks; next, Next, Go back options to the previous building. Performing the process can take a while to finish. Finally, check if the error is fixed.
Way 15. Manually Set Your CPU Voltage:
An advanced process may damage seriously if the steps are not performed correctly. As a result, you should not attempt it if you don’t have essential skills.
According to a few users, the CPU may be a reason to cause the issue. Hence, you are required to set the CPU voltage manually. You have to use the advanced settings of the BIOS, or you can take the help of dedicated overclocking software. It helps to change the voltage of your CPU.
Ensure that you have checked your motherboard manual, and then you should consult with an expert.
Way 16. Check Your RAM:
If you are willing to check the RAM, your job is to tap on the Windows key + R buttons. Then, your task is to type the command mdsched.exe and tap Enter. You can hit the OK button also.
When the Windows Memory Diagnostic window appears, you should select one of the available two options. Next, you should follow the steps to identify and solve potential issues.
Way 17. Remove External Hardware:
While you will boot the PC, you should ensure that all the external hardware is disconnected. External hardware includes a keyboard, mouse, storage devices, and video game controllers. If necessary, then you can check for hiccups while booting.
If you find your PC working smoothly, it indicates that you have not installed the drivers related to the external devices correctly.
Way 18. Free Up Storage Space:
You can experience the issue for an entire hard drive also. Microsoft advises people to leave ample space in the C:\ drive because it has default files. A complete C:\ drive can cause issues while downloading and installing a Windows update.
If necessary, then you can remove any unwanted or unused files. After that, you need to uninstall the obsolete software, and after that, your task is to install video games in other partitions. Then, if you are willing, you can use cloud storage to store your files when you are running out of space frequently. Besides, if you are willing, you have to update the existing storage for a larger drive.
Way 19. Replace Your RAM:
- First, your job is to open the PC case, and then you need to find the RAM modules. Next, ensure that you are not voiding the device warranty by operating.
- You need to remove the component that is affected. First, however, you should ensure that you pull the hinges holding them in place to the sides. The process helps to dislodge the module.
- You should insert your new module properly in the socket, and then your job is to push back the side hinges. Unfortunately, according to a few users, faulty RAM can cause the error.
Way 20. Uninstall the VPN Client:
- Your first job here is to tap on the Windows Start icon, and then you need to select Settings.
- After that, your job is to hit the Apps option.
- You should now look for the VPN app from the list of apps available on the right pane. Then, you need to choose it and then tap on the Uninstall button.
- Continue the uninstallation method, and after that, your job is to reboot the device.
- You can experience the error for VPN clients like BitDefender and Cisco.
- Try to uninstall the VPN client to get rid of the error. Using a VPN is suitable for the overall online activity, for which we recommend pausing the client and seeing if it can help you.
Way 21. Clean Boot Windows 10:
Performing clean boot helps to disable all the third-party software in Windows. In addition, the process is used to diagnose plenty of common problems that Windows users face.
- Go to the Start Menu Search Bar, and then write msconfig there. After that, you need to choose System Configuration in the search results.
- Move to the Services tab in the window.
- After that, your job is to check your Hide all Microsoft services box.
- Next, you should check the services and tap on the Disable all option.
- You should open the Task Manager and head towards the Startup tab.
- You can choose the services one by one, and next, you need to tap on the Disable button on the lower right.
- Finally, your work is to restart the PC and check if the issue remains. If you find the issue fixed, it indicates that the BSOD problem was occurred by interference from third-party software.
The Bottom Line:
The kmode_exception_not_handled problem is common in Windows 10. You can easily eliminate the error as it has plenty of solutions. We have given here plenty of methods suitable to handle the error. If you can’t solve the problem, the error may be in the RAM. Therefore, it is recommended to visit the vendor or contact the manufacturer to check and replace your RAM. Multiple problems are there that are hard for the ordinary person to handle.
Frequently Asked Questions:
- What is a KMode exception not handled?
The problem is a BSOD error triggered by a system crash. Kernel Mode Program is the main reason behind the issue that can cause an exception that could not be identified.
- What is a faulty driver?
A faulty driver is something that has been corrupted already due to which you are unable to use it. If you find a driver corrupted, the corresponding device relying on it becomes inoperable also.
- How do you check your drivers for errors on Windows 10?
You can use multiple ways to find and fix driver problems like updating drivers, backing up drivers, and auto-detecting drivers.