
Table of contents
- Causes of the tcpip.sys Blue Screen Error
- Common tcpip.sys Error Description That Could Appear on Your Screen
- 1. “Windows unexpectedly shutdown due to a problem with tcpip.sys”
- 2. “0x050 – tcpip.sys: PAGE_FAULT_IN_NONPAGED_AREA – tcpip.sys”
- 3. “:-( An error from tcpip.sys has caused a problem, and your PC must restart.”
- 4. “0x0000001E STOP: KMODE_EXCEPTION_NOT_HANDLED – tcpip.sys”
- 5. “STOP 0x0000000A: IRQL_NOT_LESS_OR_EQUAL – tcpip.sys”
- How to Fix the tcpip.sys BSOD in Windows 10/7/8
- Fix 1: Reset the TCP/IP
- Fix 2: Update the network card drivers
- Fix 3: Use the blue screen troubleshooter
- Fix 4: Uninstall recent updates.
- Fix 5: Disable web protection.
- Conclusion
- FAQ
Thetcpip.sys is a necessary driver file associated with the Transmission Control Protocol over Internet Protocol (TCP/IP) in Windows operating systems in Windows functions. This file is crucial. So any damage or corruption to it can lead to serious system errors, such as the tcpip.sys Blue Screen of Death (BSOD) error.
That’s why backing up your data regularly is advisable to avoid this issue. That said, this guide will show you how to fix the tcpip.sys blue screen error.
Let’s begin.
Causes of the tcpip.sys Blue Screen Error
There are numerous reasons why the tcpip.sys BSOD error occurs. Some of the common reasons are:
1. Improper software installation. An incomplete or interrupted software installation can cause the tcpip.sys error. Reinstalling the application usually fixes this issue.
2. Corrupt or outdated network drivers. Network drivers that are corrupted or outdated can also cause a BSOD error. Updating your drivers can fix this issue.
3. Antivirus settings that conflict. The BSOD issue may occur if you have an installed third-party antivirus application and its incompatible settings. You can usually resolve this issue by disabling or adjusting the antivirus settings.
Related: How to Find Out the Causes of Your BSOD on Windows 10, 8, 8.1?
Common tcpip.sys Error Description That Could Appear on Your Screen
Several tcpip.sys BSOD errors can appear on your screen. Some of them are:
1. “Windows unexpectedly shutdown due to a problem with tcpip.sys”
This error message shows that Windows had an unexpected shutdown due to a problem with the tcpip.sys file. The main cause of the problem can vary. However, it usually comes from a conflict with or corruption in the tcpip.sys driver or related components.
Related: [FIXED] How to Fix “Windows 10 Won’t Boot” Problem Easily
2. “0x050 – tcpip.sys: PAGE_FAULT_IN_NONPAGED_AREA – tcpip.sys”
This error code directly relates to the tcpip.sys driver and shows a page fault in a non-paged area. It indicates that Windows tried to access an unavailable or invalid memory address. The possible causes could be hardware, driver compatibility, or memory corruption.
Also Read: Page Fault in Nonpaged Area: Expert Tips and Tricks for Windows Users
3. “:-( An error from tcpip.sys has caused a problem, and your PC must restart.”
This error message means that a tcpip.sys file error caused a critical system problem. In this case, you should restart your Windows to avoid further instability or potential data loss. The root cause may be software compatibility problems, other driver incompatibilities, or damaged system files.
4. “0x0000001E STOP: KMODE_EXCEPTION_NOT_HANDLED – tcpip.sys”
This error message shows a “kernel mode exception not handled” error related to the tcpip.sys driver. It means that a program running in kernel mode ran into an exception that it couldn’t manage. The cause could be hardware malfunctions, software problems, or outdated or incompatible drivers.
5. “STOP 0x0000000A: IRQL_NOT_LESS_OR_EQUAL – tcpip.sys”
This error shows an “IRQL not less or equal” error connected to the tcpip.sys file. It means that a process or driver attempts to access a memory address at an improper interrupt request level (IRQL). The error can occur because of incompatible hardware, bad drivers, or conflicts between various software components.
Related: BSOD Error FAT FILE SYSTEM on Windows 10
How to Fix the tcpip.sys BSOD in Windows 10/7/8
If your tcpip.sys file has failed, you’ll find several proven ways to fix the issue below:
Fix 1: Reset the TCP/IP
In some cases, the tcpip.sys error on Windows 10 happens when different processors receive the TCP segments. As such, the first thing you should try to do is to reset the TCP/IP driver. Simply follow the steps below:
- Press the
Windows Key + Son your keyboard. - Inside the search box, type
cmd. - In the results, right-click Command Prompt and select Run as Administrator.
- Inside the Command Prompt, paste the following command:
netsh int ip reset c:\resetlog.txt

Note
You can paste the command netsh int ip reset if you don’t prefer to assign a directory path for the log file.
- Once you’ve pasted your chosen command, press
Enter. - After making the change, restart your computer.
- Return to what you were doing and check if you’ve removed the tcpip.sys blue screen error.
Fix 2: Update the network card drivers

If you’ve tried the previous solution, and it still hasn’t fixed the error, you can try updating your network card drivers. You can manually do this or use a one-click solution like Auslogics Driver Updater.
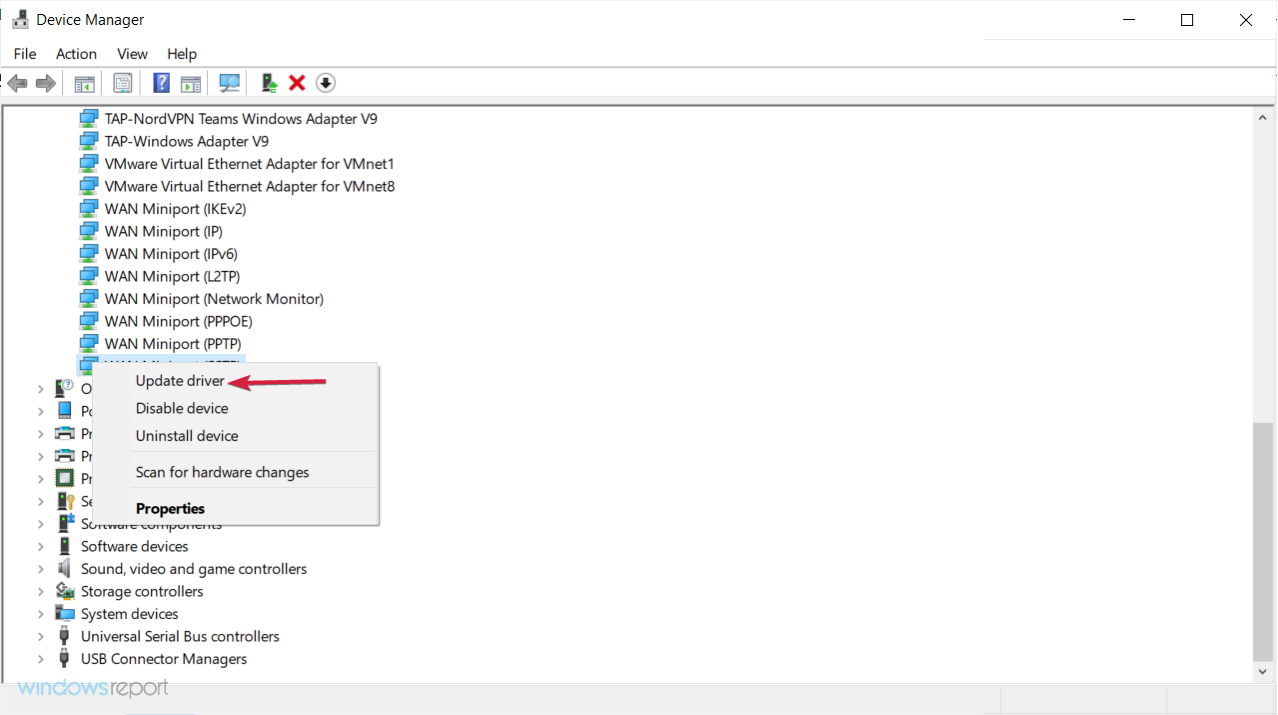
To manually update your card drivers, go to Device Manager and search for Network Adapter. Then, right-click on each driver to update them. This can take a lot of your time.
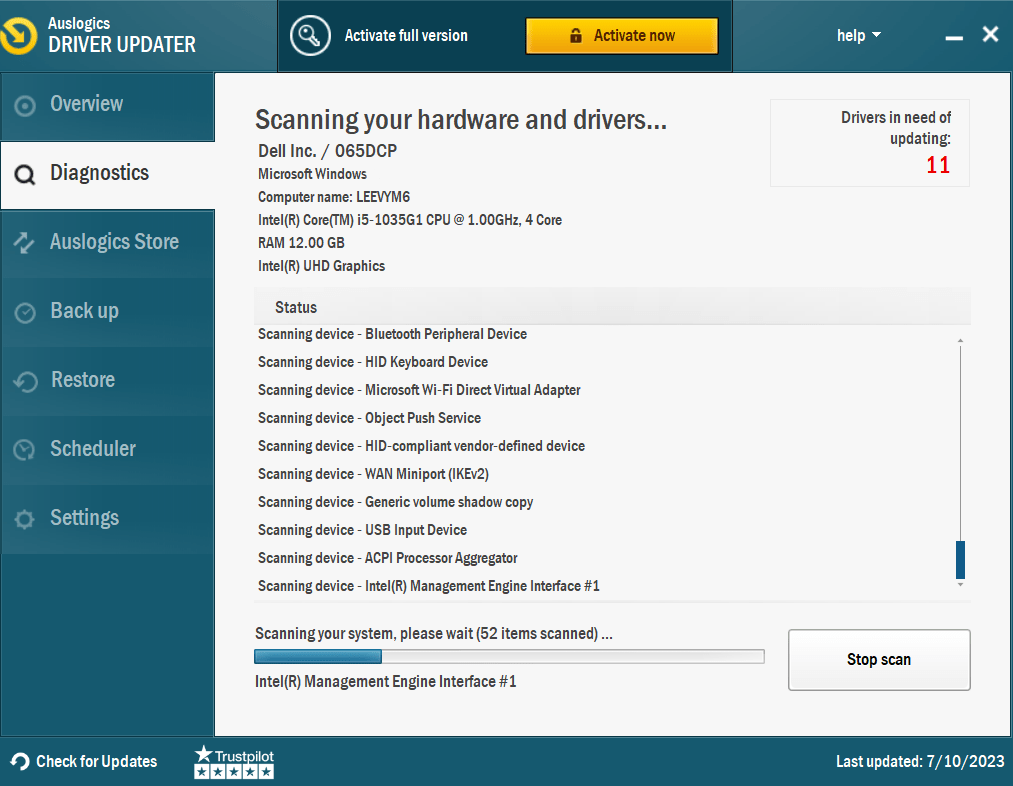
That’s why you should consider Auslogics Driver Updater. This software will automatically detect your operating system, search for the right driver, and automatically install them.
You can update your network card drivers to their latest manufacturer-recommended versions by clicking a button. This can help you fix the tcpip.sys error.
Related: Auslogics Driver Updater: New Drivers in One Click!
Fix 3: Use the blue screen troubleshooter
You can also use the blue screen troubleshooter to fix the tcpip.sys BSOD error. This tool aims to find and fix the root causes of blue screen issues. Follow these steps to use the blue screen troubleshooter:
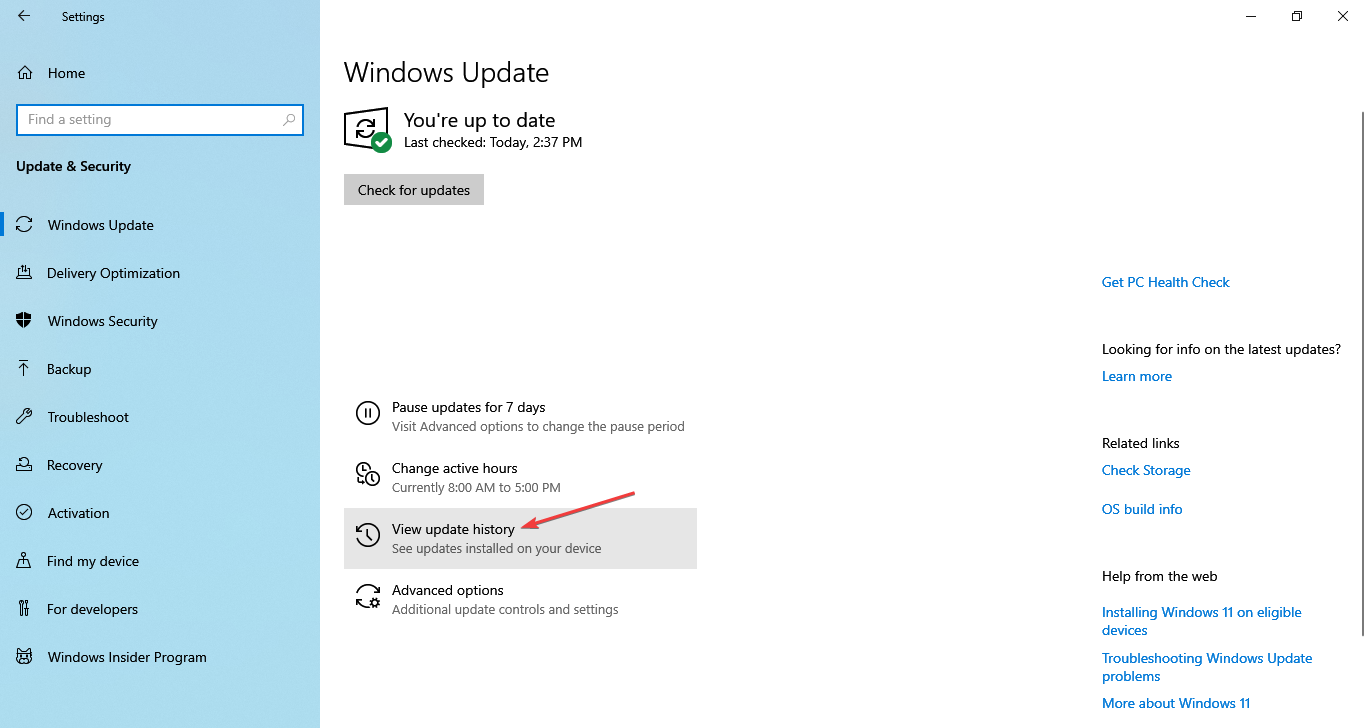
- Click Start and choose Settings from the available options.
- Select Updates and Security and then click Troubleshoot.
- Click Blue Screen Troubleshooter from the available lists and run it.
- The troubleshooter will look for problems and immediately fix them if any are found. When the troubleshooter completes, restart your computer.
Fix this issue quickly
You can try using a safe and totally free tool developed by the Auslogics team of experts.
A few simple steps to troubleshoot the issue:
Download the tiny Auslogics TroubleShooter tool.
Run the application (no installation is needed).
The app will check for the issue mentioned in the article. When the scan is done, check that this is the issue you were looking to solve and click ‘Apply now’ to apply the recommended fix.
You can use the app to troubleshoot other malfunctions for free by simply typing in a brief description of the issue your PC is experiencing. Or you can scan your PC for performance issues using the My Scanner tab.
Related: How to Troubleshoot Blue Screen Error 0x00000109?
Fix 4: Uninstall recent updates.
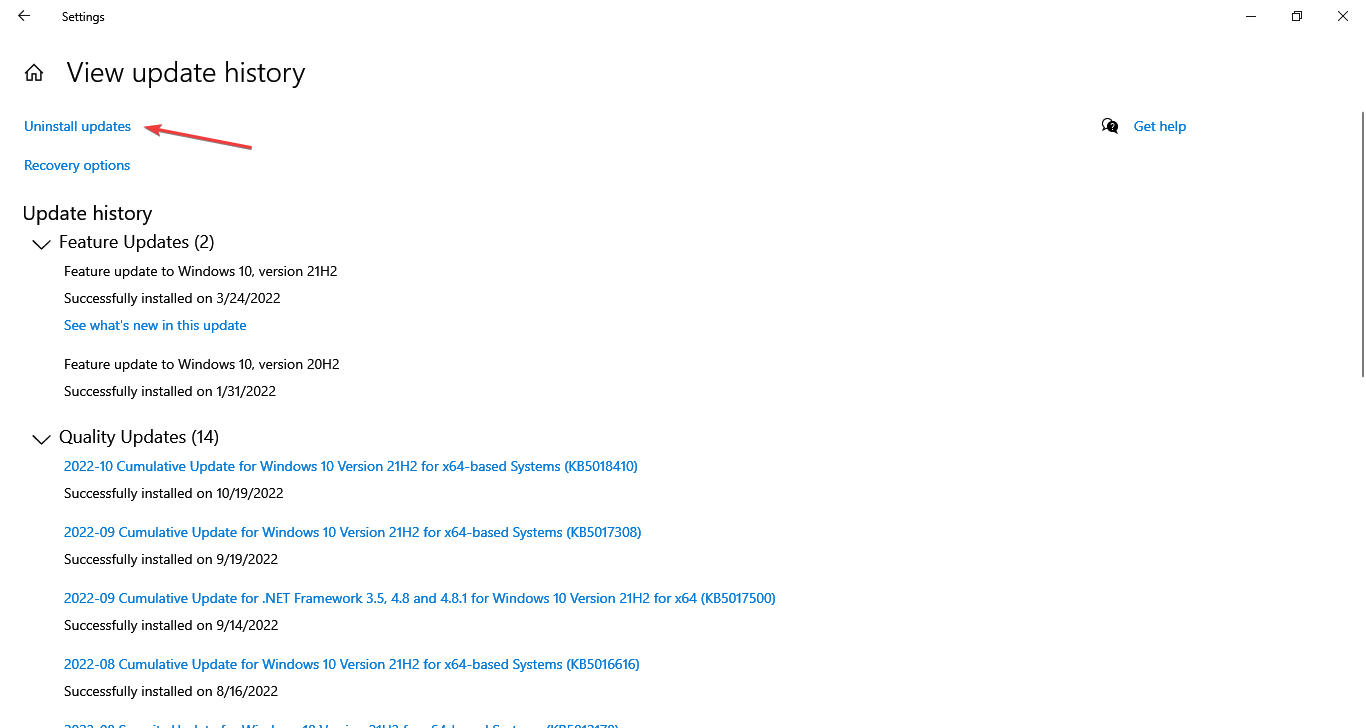
- Click on
Windows + Rto start the Run. Then, typeappwiz.cpland click Enter. - Click on View installed updates in the Programs and Features window.
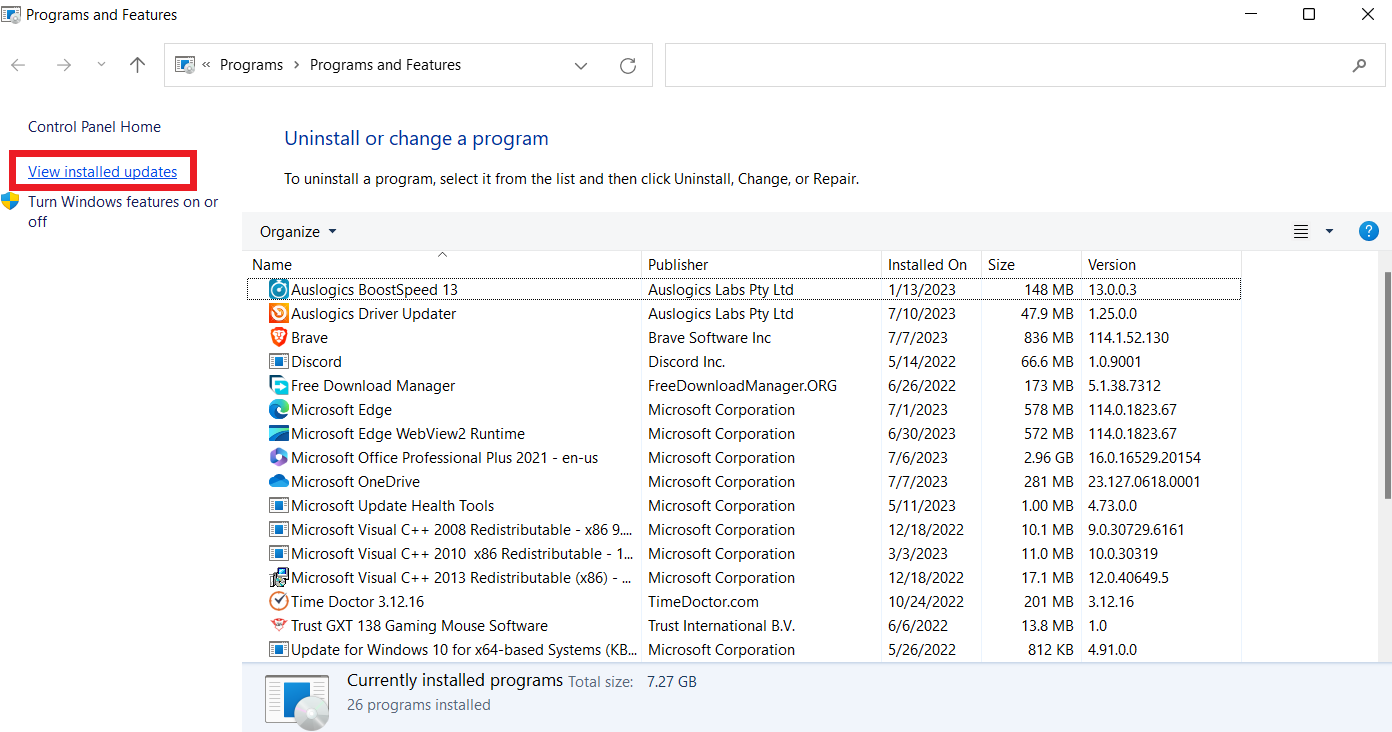
- Right-click on the update with an issue and click Uninstall under Uninstall an update.
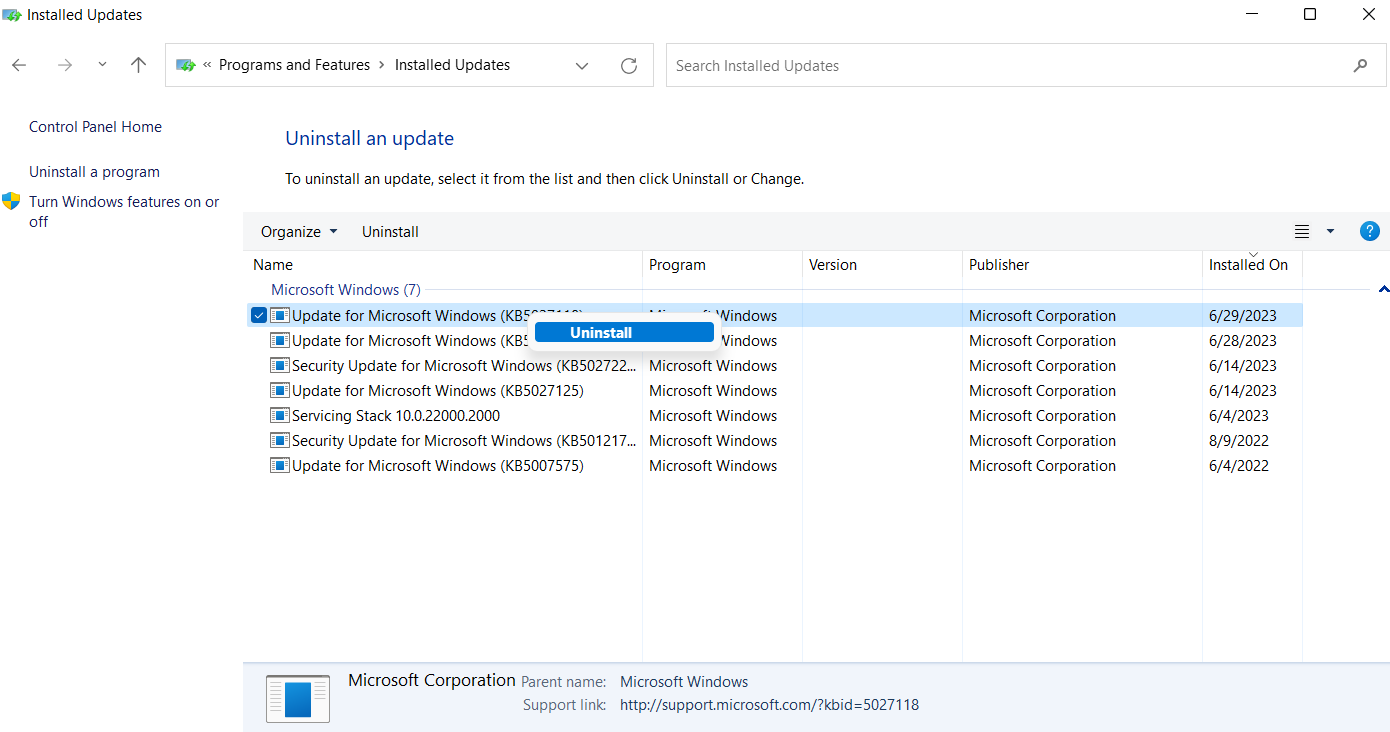
- After uninstalling, restart your computer and check if the problem is resolved.
Fix 5: Disable web protection.
Several user accounts say deactivating web protection has worked well to fix the tcpip.sys blue screen errors, even though it sounds counterintuitive. You can ask for help from the antivirus manufacturer.
Look for instructions specific to your software on the antivirus software’s official website. Follow the guidelines to disable site protection appropriately.
Conclusion
The tcpip.sys BSOD error on Windows 10/7/8 systems can be frustrating. It can happen for several reasons, including poor program installation, outdated or corrupt network drivers, clashing antivirus settings, etc.
You can resolve these issues by resetting the TCP/IP driver using Command Prompt. Another good alternative is manually updating network card drivers or using a trustworthy driver updater program like Auslogics Driver Updater.
You can fix the tcpip.sys BSOD error by implementing these solutions.
FAQ
What is TCP/IP?
TCP/IP stands for Transmission Control Protocol/Internet Protocol. It’s a collection of networking protocols that enables online communication and data exchange between devices.
Email, web browsing, file transfers, and other services are possible through TCP/IP, the backbone of modern Internet communication.
What can cause the Blue Screen of Death (BSOD)?
Windows will display the Blue Screen of Death (BSOD) when a system issue can’t be recovered. A BSOD may occur for several reasons, such as hardware issues, driver problems, software conflicts, etc.
Windows 10: Kmode exception not handled tcpip.sys Windows 10 BSOD
Discus and support Kmode exception not handled tcpip.sys Windows 10 BSOD in Windows 10 Software and Apps to solve the problem; I recently within the last 4 weeks built a new computer and I’m now running into the title error multiple times a day, seemingly randomly. sfc /scannow…
Discussion in ‘Windows 10 Software and Apps’ started by Astor Thorne, Sep 11, 2024.
-
Kmode exception not handled tcpip.sys Windows 10 BSOD
I recently within the last 4 weeks built a new computer and I’m now running into the title error multiple times a day, seemingly randomly. sfc /scannow and memtest report no issues, I’ve reset the tcpip and updated all my drivers, as well as reinstalled my RAM, so I’m not sure what I’m missing. The dump files is here: 090924-12234-01.dmpHere’s the system info:CPU: AMD Ryzen 7 7800X3D 4.2 GHz 8-Core Processor Motherboard: MSI MAG B650 TOMAHAWK WIFI ATX AM5 Motherboard Memory: Corsair Vengeance RGB 32 GB 2 x 16 GB DDR5-6000 CL36 Memory Video Card: EVGA GAMING GeForce GTX 1070 Ti 8 GB Video C

-
Windows 10 — BSOD: KMODE EXCEPTION NOT HANDLED (cng.sys)
Hi,
We suggest that you try the workaround suggested on DonchakVS‘s reply on August 5, 2015 and check if it resolves the issue:
Windows 10 — BSOD: KMODE EXCEPTION NOT HANDLED (cng.sys).
-
KMode Exception Not Handled
Hello, today I got the BSOD, «KMode Exception Not Handled» what failed: «e1d68x64.sys», here is the dump file:
Microsoft OneDrive
Thanks!
-
Kmode exception not handled tcpip.sys Windows 10 BSOD
BSOD KMODE EXCEPTION NOT HANDLED
Newly updated to Windows 10 Pro and now getting BSOD KMODE EXCEPTION NOT HANDLED. System in rebooting shortly after starting up. Any help appreciated.

Kmode exception not handled tcpip.sys Windows 10 BSOD
-
Kmode exception not handled tcpip.sys Windows 10 BSOD — Similar Threads — Kmode exception handled
-
kmode exception not handled BSOD
in Windows 10 Gaming
kmode exception not handled BSOD: Hi!I am having a constant BSOD with KMODE_EXCEPTION_NOT_HANDLED.I have no idea why is this happening so I am enclosing a .zip file with 3 memory dumps for analysis.https://1drv.ms/u/s!Alpojz1yCUiJgjc2IDn-hpqWesSL?e=ZaIidSThanks in advance… -
KMODE EXCEPTION NOT HANDLED BSOD
in Windows 10 BSOD Crashes and Debugging
KMODE EXCEPTION NOT HANDLED BSOD: It happens when playing Valorant, Warframe, GTA 5 or any demanding game. I have used an automatic driver utility to detect and update drivers. Its called Driver Booster 11.SPECS:Processor: AMD Ryzen 9 7900X 12-Core Processor, 4701 Mhz, 12 Cores, 24 Logical Processors GPU:… -
KMODE EXCEPTION NOT HANDLED BSOD
in Windows 10 Gaming
KMODE EXCEPTION NOT HANDLED BSOD: It happens when playing Valorant, Warframe, GTA 5 or any demanding game. I have used an automatic driver utility to detect and update drivers. Its called Driver Booster 11.SPECS:Processor: AMD Ryzen 9 7900X 12-Core Processor, 4701 Mhz, 12 Cores, 24 Logical Processors GPU:… -
BSOD — KMODE EXCEPTION NOT HANDLED
in Windows 10 Drivers and Hardware
BSOD — KMODE EXCEPTION NOT HANDLED: Got a random BSOD today.Memory dump file is hereCan you help?************* Preparing the environment for Debugger Extensions Gallery repositories ************** ExtensionRepository : Implicit UseExperimentalFeatureForNugetShare : true AllowNugetExeUpdate : true… -
KMODE EXCEPTION NOT HANDLED BSOD
in Windows 10 Installation and Upgrade
KMODE EXCEPTION NOT HANDLED BSOD: Hi,After update to 20H2 I’m getting BSOD with the error KMODE EXCEPTION NOT HANDLED in random intervals. Drivers seems to be ok and there’s no errors or any other failure message.Windows versionEdición Windows 10 ProVersión 20H2Instalado el 03/05/2021Compilación del… -
KMODE/SYSTEM EXCEPTION NOT HANDLED- igdk64md64.sys
in Windows 10 BSOD Crashes and Debugging
KMODE/SYSTEM EXCEPTION NOT HANDLED- igdk64md64.sys: I’ve been having BSOD problems for a little while and the cause is always igdkmd64.sys
My laptop is an Acer Predator 17 inch running Windows 10×64I attached the W7F zipped folder.
Thank you for your help. -
BSOD KMODE EXCEPTION NOT HANDLED
in Windows 10 Installation and Upgrade
BSOD KMODE EXCEPTION NOT HANDLED: Newly updated to Windows 10 Pro and now getting BSOD KMODE EXCEPTION NOT HANDLED. System in rebooting shortly after starting up. Any help appreciated.https://answers.microsoft.com/en-us/windows/forum/all/bsod-kmode-exception-not-handled/216bbe33-e5b0-4579-a2ab-a504abb6b632
-
Kmode exception not handled BSOD
in Windows 10 BSOD Crashes and Debugging
Kmode exception not handled BSOD: Hi,
I’ve been receiving multiple BSODs since recently upgrading to Windows 10 from Windows 7.I’ve tried running sfc /scannow and have updated all the drivers I could find but nothing has worked so far.
Have attached the V2 Log, any help would be much appreciated.
161151
-
KMODE Exception not handle BSOD
in Windows 10 BSOD Crashes and Debugging
KMODE Exception not handle BSOD: So my laptop just experienced BSOD KMODE_Exception_not_handle. I just replaced my old HDD. My old HDD’s status was «caution», it had something to do with reallocated sectors count, and I searched it up online then read that it cannot be fixed, replacement of HDD was the only…
Kmode Exception Not Handled is a Blue Screen of Death error encountered on all recent iterations of the OS, including Windows 10.
Unlike other BSODs, this one may crash the PC on the login screen, making it challenging to troubleshoot things. Many users reported the error in Safe Mode, and some had KMODE EXCEPTION NOT HANDLED on startup.
Fret not! We have tested things and come up with a comprehensive list of solutions.
What causes KMODE_EXCEPTION_NOT_HANDLED?
Some of the reasons you may encounter the error are:
- Hardware issues – If you can’t boot Windows and receive the error instead, it’s likely the hardware to blame. Also, the situation may lead to Kmode Exception Not Handled while installing Windows 10.
- Outdated or corrupt driver – When encountering the error, it usually lists the problematic driver in brackets. Identify it and reinstall or update the driver.
- A bug in the installed version of the OS – In many cases, users encountered the error after installing a particular version of the OS and managed to fix things simply by reverting to the previous version, which points to a bug.
- Partial installation of Windows Updates – There’s also the possibility that an update was not installed properly, leading to the Kmode Exception Not Handled BSOD error.
The solutions we found may also work for other errors listed below:
- Kmode Exception Not Handled ntfs.sys/netio.sys/ ndis.sys/ syntp.sys/ wdf01000.sys/ etd.sys/ tcpip.sys/ tppwr32v.sys/ usbport.sys/ igdkmd64.sys/ intelppm.sys/ iastora.sys – The system identifies the file’s name that caused the error. You can use that information to find the problematic device or application.
- Kmode Exception Not Handled due to overclocking – This signals the voltage increase to the CPU behind the underlying cause.
- Kmode Exception Not Handled due to RAM – Usually, it is a faulty RAM module that periodically gives the errors. Try reseating it or run a few tests on the installed RAM.
- KMODE_EXCEPTION_NOT_HANDLED on USB – This message indicates a wrong driver or a faulty USB device.
- KMODE EXCEPTION NOT HANDLED during install – Once again, this error can be caused by corrupted drivers or an incompatible one. In this case, install the driver compatible with the iteration/version you are trying to install.
- Kmode Exception Not Handled loop – It indicates the computer’s incompatibility or old graphics card drivers.
- Kmode Exception Not Handled in Windows 10 on Dell – Dell users with Windows 10 are more often affected by this error.
How do I fix the Kmode exception not handled?
Before we head to the other slightly more time-consuming solutions, here are a few quick tricks that worked for many:
- If this is the first time you have encountered the error, force restart the computer. Users often encountered the error just once, and it didn’t reappear.
- Ensure all the connections are proper, including the ones to the RAM and storage drive. For example, one user fixed things simply by reconnecting the SSD, so check that the storage drive is connected correctly.
- Remove the RAM modules and re-insert them firmly into the slots.
- Disable any third-party antivirus installed on the computer. In case that works, you know what’s causing the error. Here we would recommend switching to more reliable antivirus software.
1. Update the problematic drivers
NOTE
The first two steps are necessary only if you can’t usually access Windows. Otherwise, you can start from the third step.
- While your computer boots, keep pressing F8 or Shift + F8.
- If the shortcut works, you should see a list of options available. Choose Safe Mode with Networking and wait until Windows boots into Safe Mode.
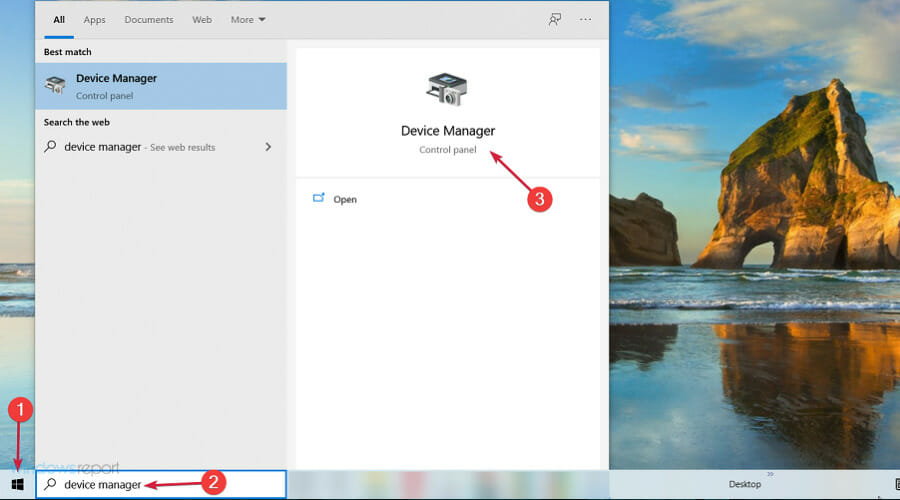
- Click on the Start button, type device manager, and choose the app from the results.

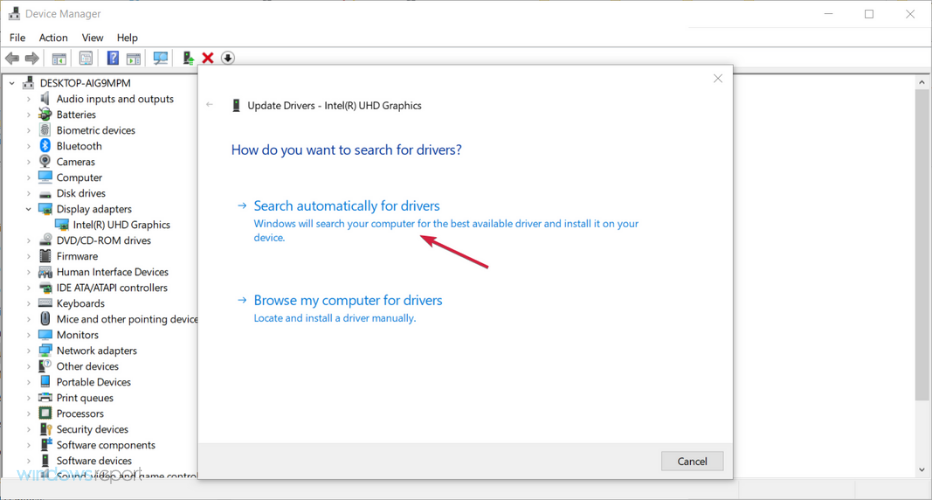
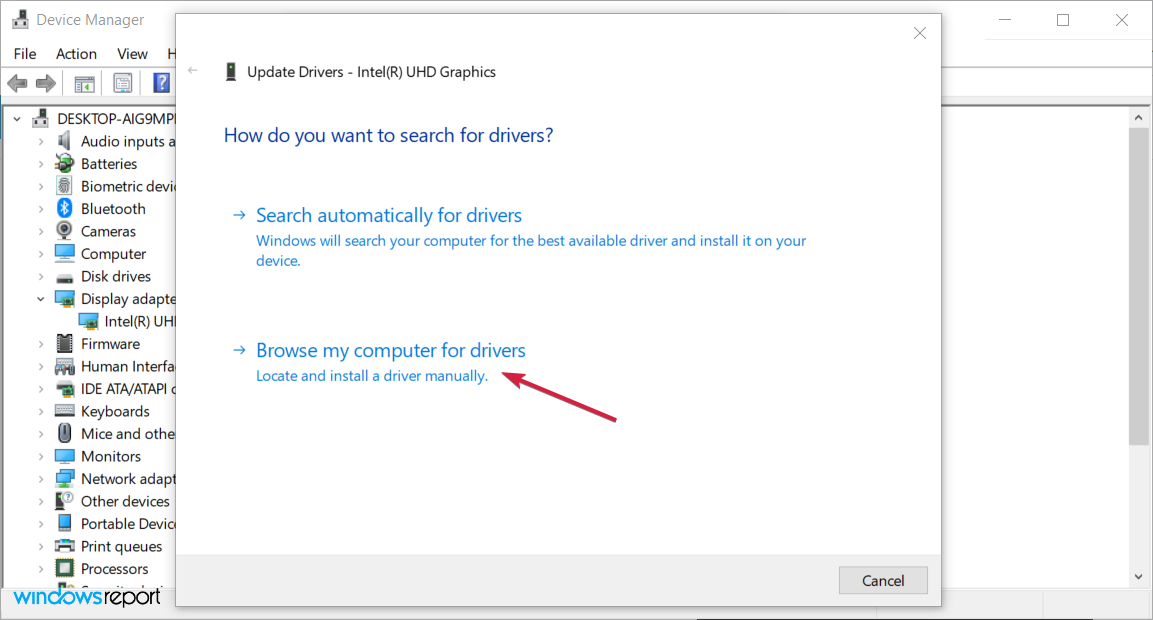
- Find any unknown devices, right-click on them, and select Update driver.

- Choose Search automatically for drivers.

- If that doesn’t work, try the Browse my computer for drivers option instead, find the right driver, and install it.

- After you’ve installed all the missing drivers, exit Safe Mode and check if the issue is resolved.
Missing or corrupt drivers can sometimes cause a KMODE_EXCEPTION_NOT_HANDLED error in Windows 10. To fix this problem, updating the problematic one or installing the missing drivers is recommended.
This error is often related to your network adapter or the graphics driver, so start by updating those first. You can also visit your manufacturer’s website for the latest driver version.
If updating your drivers doesn’t work, or you do not have the necessary computer skills to update/fix the drivers manually, we strongly recommend you use a third-party repair tool.
The automatic driver updater Outbyte Driver Updater will quickly repair driver issues by scanning your PC for older, lost, or damaged drivers, then updating to the most recent compatible version.
Outbyte Driver Updater
Keep all your drivers up to date and fix most incompatibility issues with this simple tool.
2. Reinstall the corrupt driver
NOTE
If you can’t boot the PC normally, switch to Safe Mode by pressing the F8 or Shift + F8 key right after turning on the computer, choose Safe Mode, and then try the steps here. The same would apply throughout the guide.
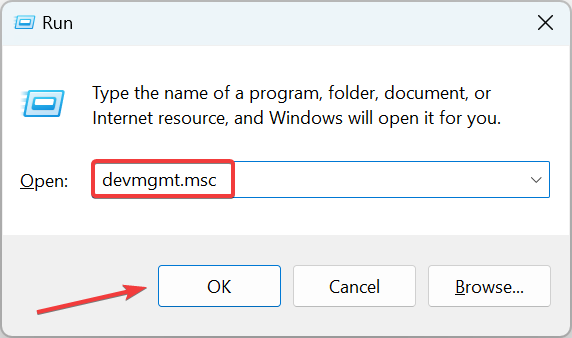
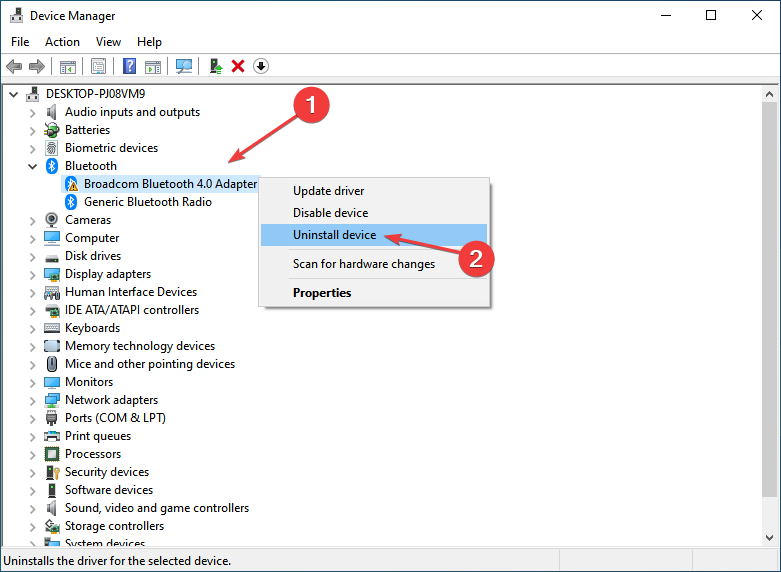
- Press Windows + R to open Run, type devmgmt.msc in the text field, and hit Enter.

- Look for drivers with a warning sign (these show up automatically), right-click on them, and select Uninstall device.

- If available, check the Delete the driver software for this device option, then click on Uninstall.
- Once done, restart the computer, and Windows will automatically install a fresh copy of the driver as long as the concerned device is connected correctly.
Some users reported corrupt drivers as the underlying cause behind the Kmode Exception Not Handled error in Windows 10. So, make to check for these as well.
This method works when an updated version of the driver is not available. Otherwise, we recommend installing that instead of a fresh copy of the same performance.
3. Perform a System Restore
-
1. Press Windows + R to open Run.
-
2. In the Run dialog box, type rstrui.exe, and then click OK.
-
3. Choose the Create a different restore point option, and click Next.

-
4. Select a restore point from the list and then click on Next.
-
5. Now, review the restore details, and click Finish.
-
6. After the restore is complete and the system restarts, look for the latest version of Windows 10 and install it.


A trick that can help users fix the Kmode Exception Not Handled error when the previous update wasn’t properly installed is to perform a system restore.
4. Rename the problematic file
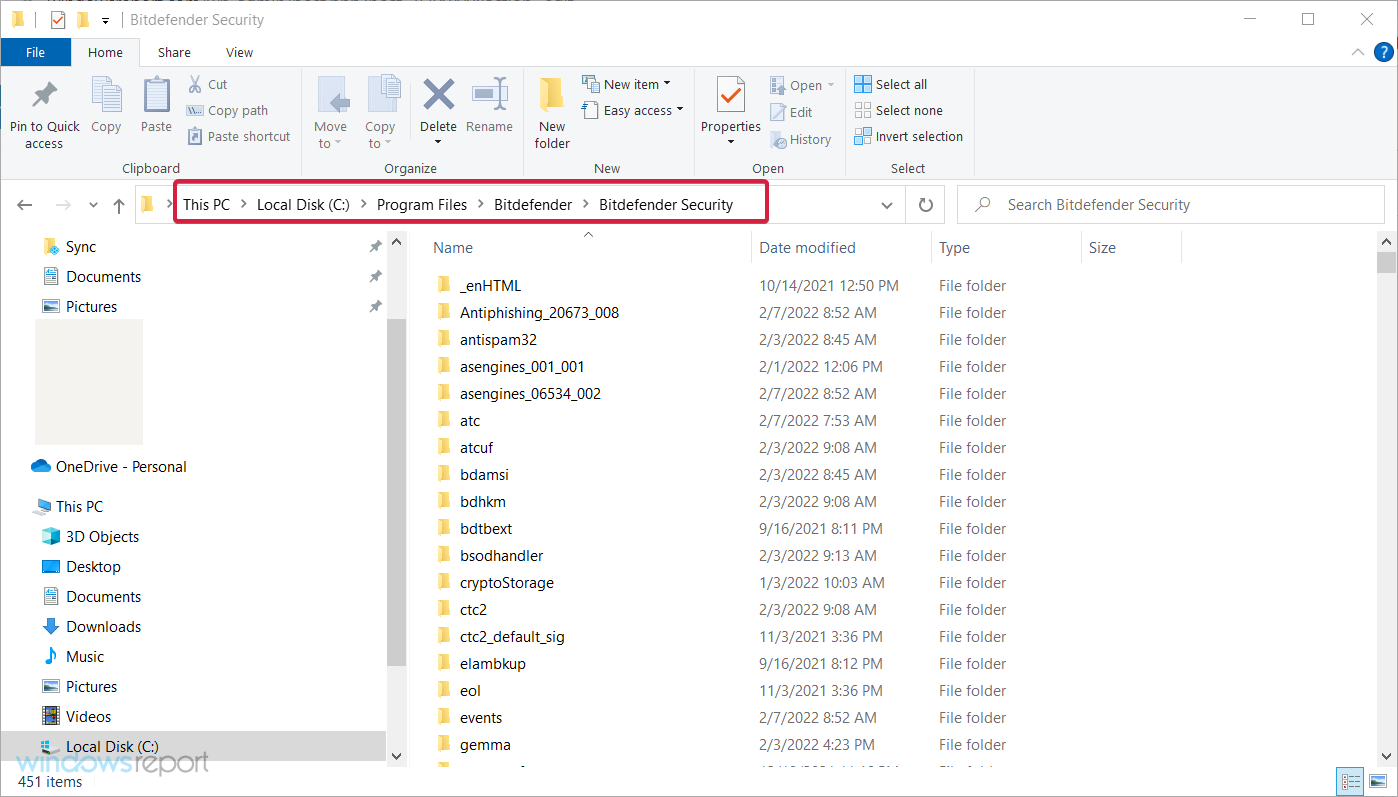
- Press Windows + E to start File Explorer, and navigate to the folder where the problematic file is installed.

- Locate the file that triggers the error, and rename it. For instance, for Bitdefender, locate bdselfpr.sys and rename it to bdselfpr.s__.

As previously mentioned, a specific software can cause the Kmode Exception Not Handled BSOD error on Windows 10.
Other programs that led to the error include:
- Esportal (EspoDriver.sys)
- Riot Games (vgk.sys)
Some users also fixed things by uninstalling these apps or related ones. For instance, if you have any games published by Riot Games, remove them or change the file’s name.
Remember that changing the name of these files isn’t always the best solution because it can lead to even more system instability.
Another way to quickly and efficiently solve the Kmode Exception Not Handled BSOD error is to use a repair tool.
5. Update the BIOS
NOTE
Bear in mind that BIOS update is an advanced procedure, and if not performed correctly, it can cause permanent damage to your PC.
- Go to your motherboard manufacturer’s website, download the latest BIOS version for your device, and load the files on a USB memory stick.
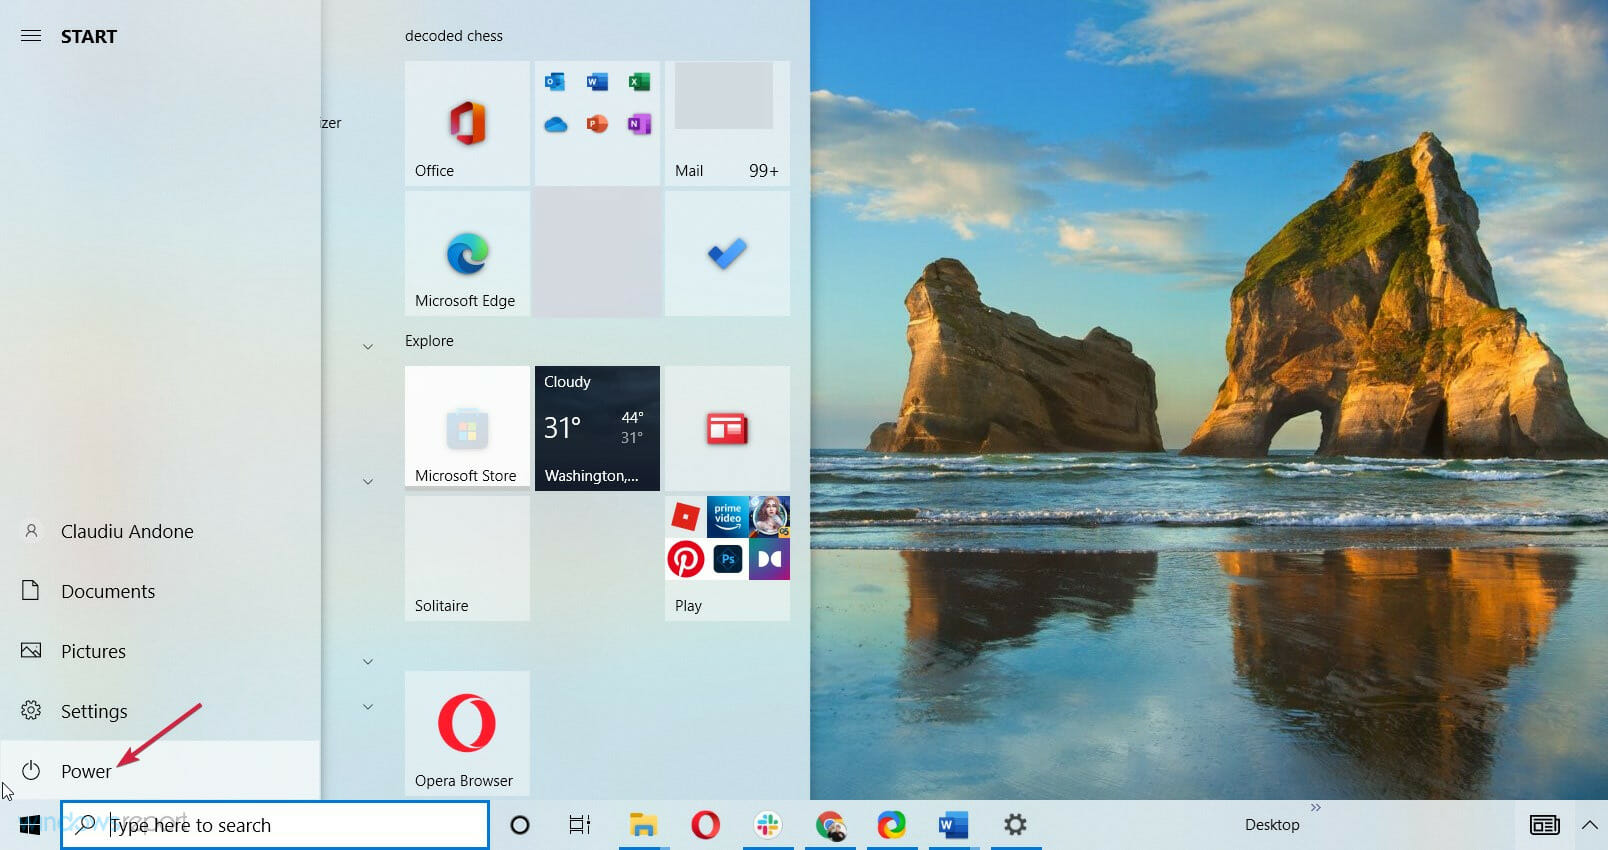
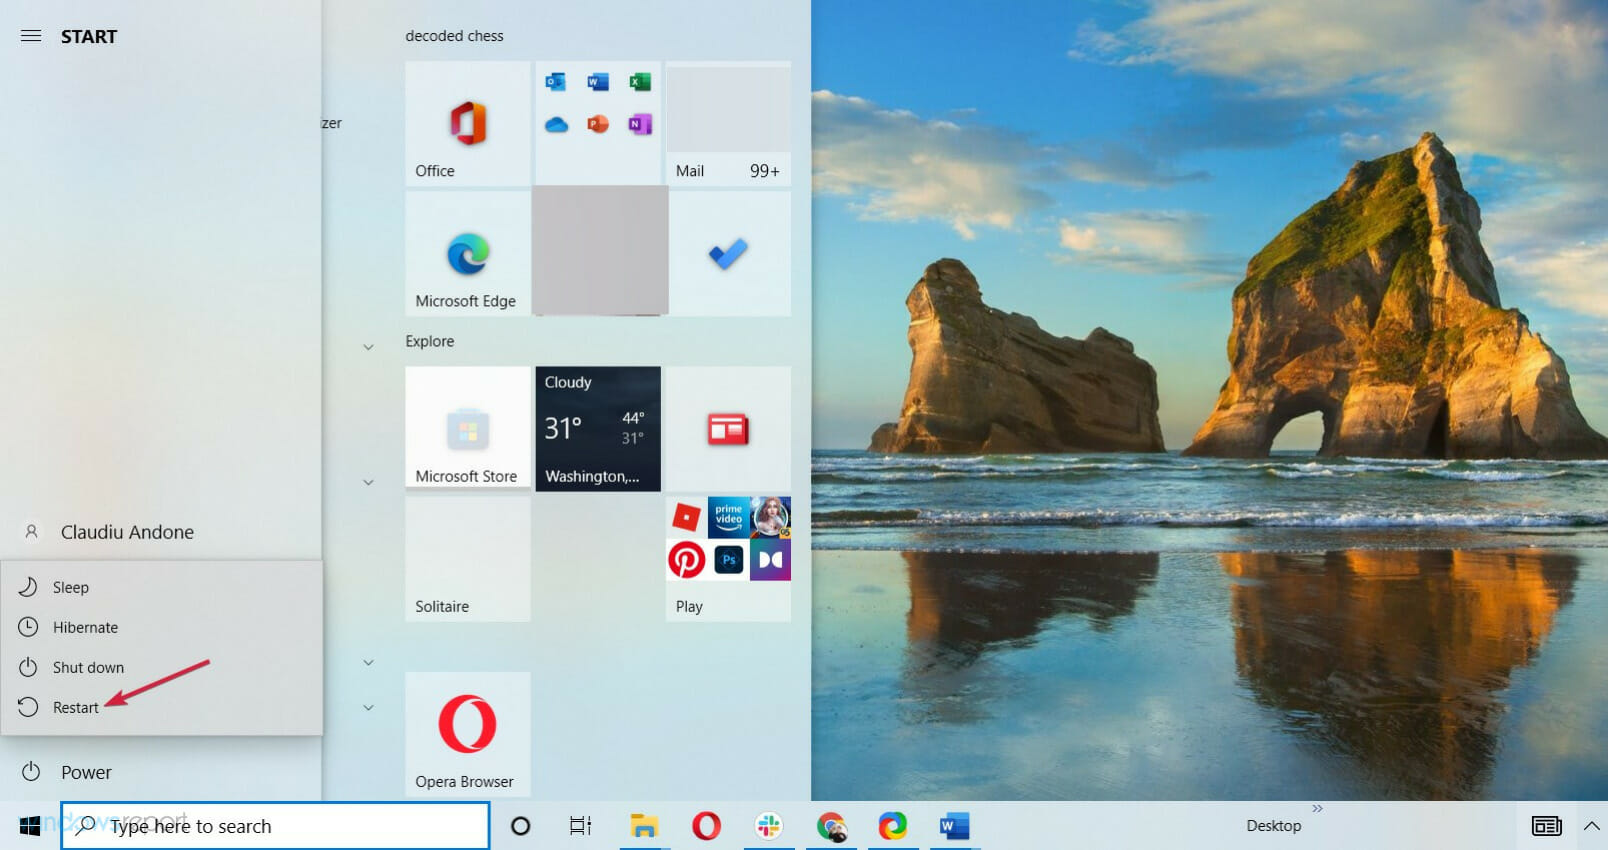
- Press Windows to open the Start Menu and click the Power button.

- Hold the Shift key and choose the Restart option.
- You should see several options available. Choose Troubleshoot.
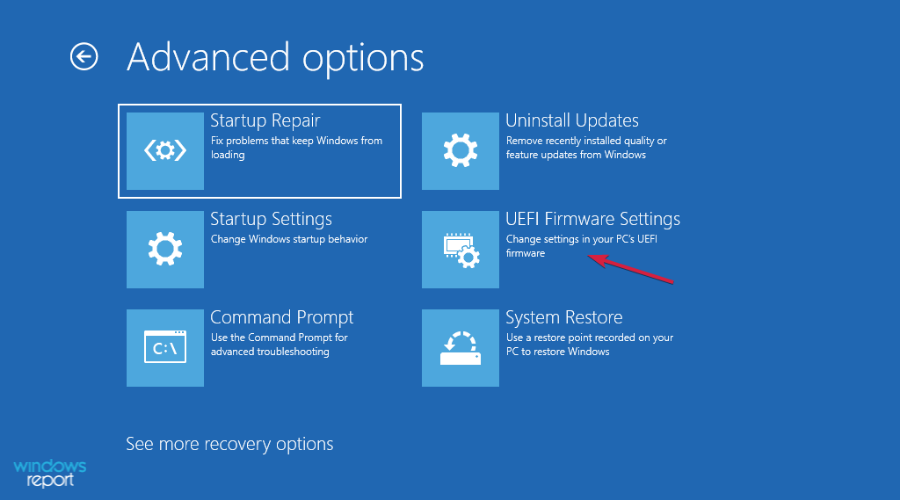
- Now select Advanced options and select UEFI Firmware Settings.
- Click the Restart button, and your computer should now boot to BIOS.
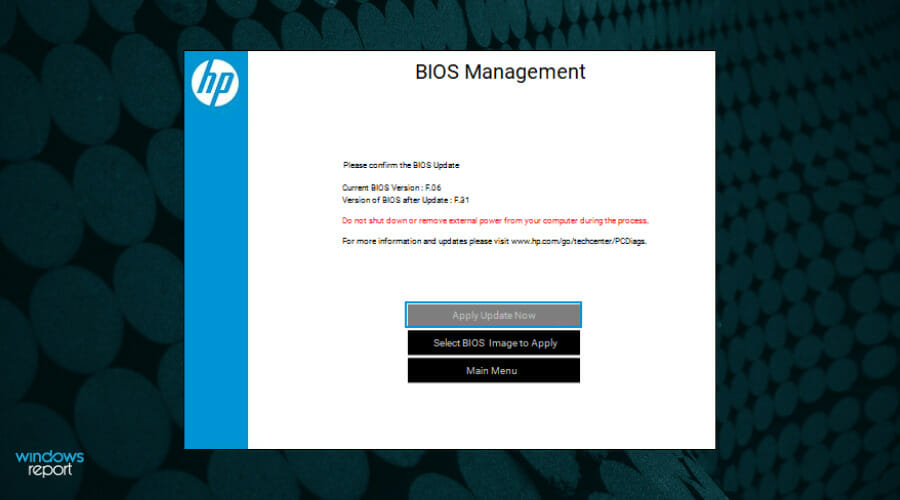
- Look for the update feature of your BIOS and load the new version from your USB stick.

In some cases, the Kmode Exception Not Handled error can be caused due to an outdated version of BIOS. We recommend checking the computer manual to find the exact process to update the BIOS.
Also, read all about how to update your BIOS; it may come in handy if you’re looking for more information on the process.
- Fix: Unexpected Store Exception error in Windows 10/11
- Fix: ndu.sys BSoD error in Windows 10/11
- Full Fix: Unhandled exception error in Windows 10/11
- Fix: Thread Stuck in Device Driver error in Windows 10/11
6. Uninstall recent Windows updates
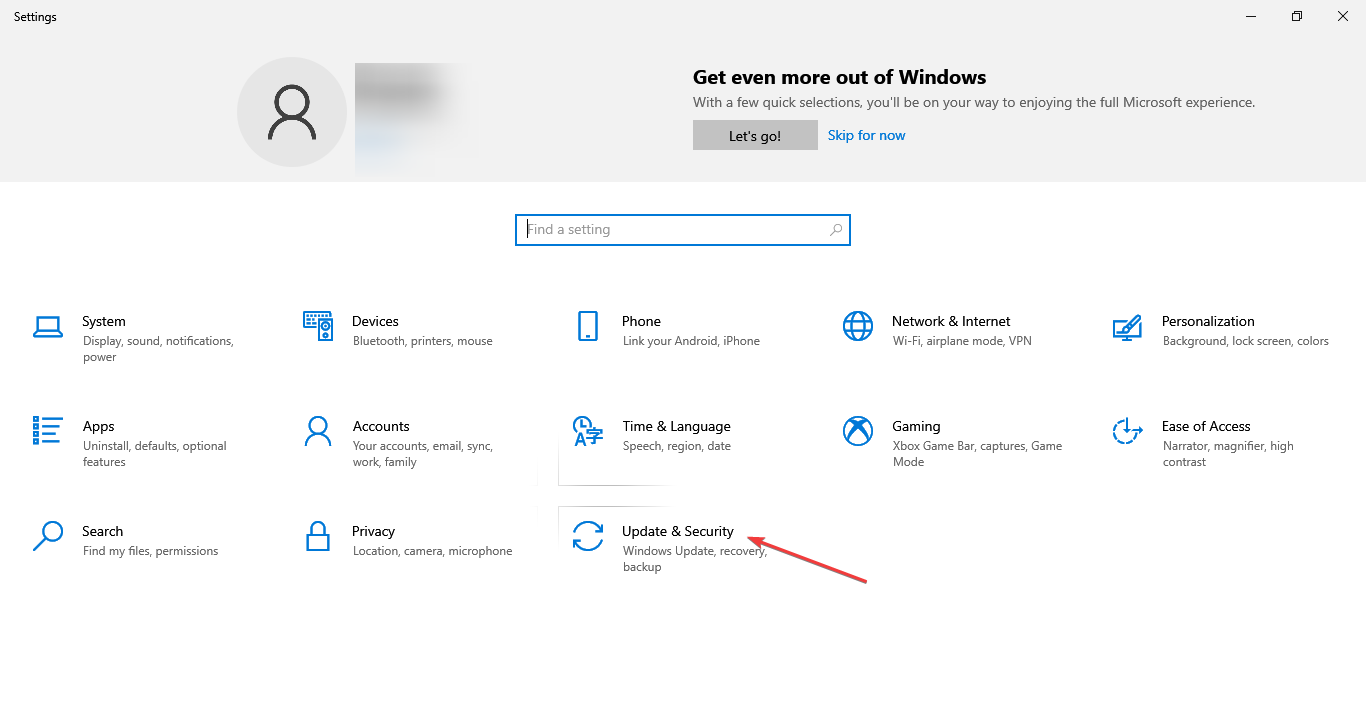
- Press Windows + I to open Settings, and click on Update & Security.

- Click on View update history.
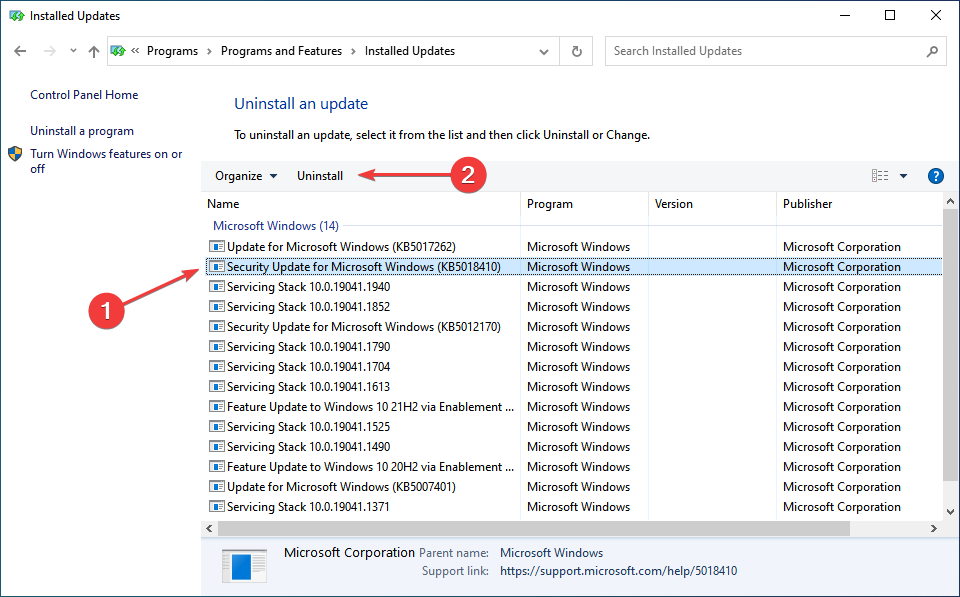
- Now, click on Uninstall updates.
- Select the update installed last, and click on Uninstall.

- Finally, click Yes in the confirmation prompt.
7. Test the RAM for issues
- Press Windows key + R, and type mdsched.exe, then press Enter or click OK.
- In the Windows Memory Diagnostic window, choose one of the two options and follow the instructions.
- The tool will now detect and fix issues with the RAM.
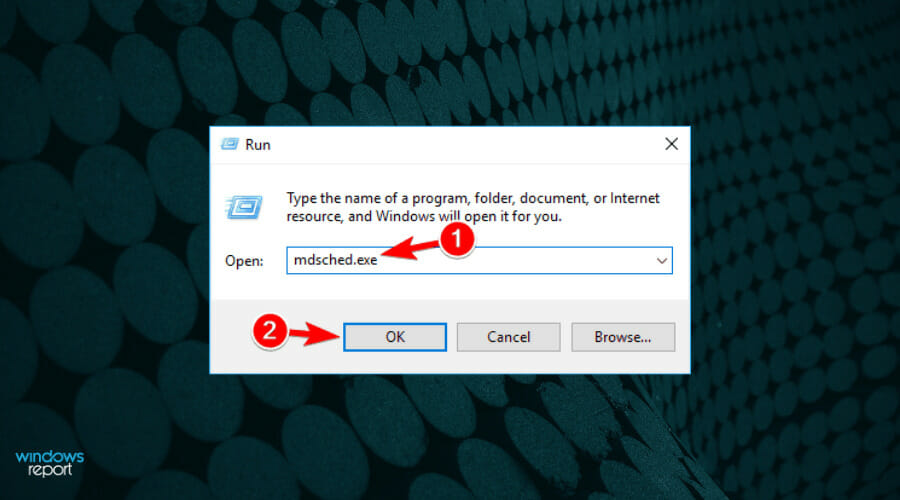

In case the built-in utility doesn’t work, you can try MemTest86+, an open-source memory repair tool that runs extensive tests to find out the minutest of the issues with the RAM and eliminate them.
If issues are detected and can’t be repaired by the tool, we recommend you replace the RAM module. Or, if you have multiple sticks installed, remove the problematic one. This should, in all likelihood, fix the Kmode Exception Not Handled error.
These were the best fixes for Kmode Exception Not Handled BSOD error and have helped most users get things up and running.
Alternatively, you could prepare beforehand for such events and install a dedicated tool to repair BSoD errors and never have to worry about them again.
If you have any other suggestions or solutions that worked for you, leave us a note in the comments section below.
Milan Stanojevic
Windows Toubleshooting Expert
Milan has been enthusiastic about technology ever since his childhood days, and this led him to take interest in all PC-related technologies. He’s a PC enthusiast and he spends most of his time learning about computers and technology.
Before joining WindowsReport, he worked as a front-end web developer. Now, he’s one of the Troubleshooting experts in our worldwide team, specializing in Windows errors & software issues.
Tcpip.sys is one of the most basic Blue Screen issues that you can experience on your windows. It is a driver file associated with the Transmission Control Protocol over IP or Internet Protocol. The issue can appear if any file goes corrupted. Never panic if you face a problem on your Windows 10 or any other OS. Multiple people are there who have experienced the issue. However, we have given here a lot of solutions to help you. Go through our article correctly and follow the steps as shown.
Tcpip.sys is an SYS file available when downloading the Windows security updates. Microsoft released it in April 2011. While any SYS file is experiencing any problem, it is most likely corrupted drivers or faulty hardware due to which you are facing the issue. You should know one thing is that this file plays a major role in different Windows functions (like the April 2011 Security Release ISO Image). Therefore, if your SYS file is damaged, you can experience errors such as the blue screen of death (BSOD).
What are the Error Codes Related to the tcpip.sys BSoD?
If you face the error, you can find a few messages like:
- IRQL_NOT_LESS_EQUAL;
- KMODE_EXCEPTION_NOT_HANDLED.
- PAGE_FAULT_IN_NONPAGED_AREA.
You are advised to back up the data daily to keep your data secured and safe. These are the messages seen on display also.
- tcpip.sys could not be found.
- tcpip.sys failed to load.
- The file Tcpip.sys is missing or corrupt.
- Windows failed to start – tcpip.sys.
What Causes a TCPIP.SYS BSoD Error?
Generally, the TCPIP.SYS BSoD Error appears for the corrupted or failed Network drivers. However, a corrupted driver is not a single reason. It can be seen if your device comes with an antivirus system. The reason is that the system can interfere with your network, so that an error can happen. On the other hand, doing a new and wrong installation or configuration of hardware or software may be a reason for the problem.
We have given here noticeably three main reasons that are:
- Corrupted network drivers.
- Antivirus or Web protection.
- Improper installation or configuration of new software or hardware.
TCPIP.SYS BSoD Error Messages:
A problem has been detected, and Windows has been shut down to prevent damage to your computer. The problem seems to be caused by the following file: Tcpip.sys.
🙁 Your PC ran into a problem that it couldn’t handle and now needs to restart. You can search for the error online: [BSOD] (Tcpip.sys).
1. STOP 0x0000000A: IRQL NOT LESS EQUAL (tcpip.sys)
2. STOP 0x0000003B: SYSTEM SERVICE EXCEPTION (tcpip.sys)
3. STOP 0x00000050: PAGE FAULT IN A NONPAGED AREA (tcpip.sys)
4. STOP 0x0000001E: KMODE EXCEPTION NOT HANDLED (tcpip.sys)
5. STOP 0×0000007A: KERNEL DATA INPAGE (tcpip.sys)
6. STOP 0x0000007E: SYSTEM THREAD EXCEPTION NOT HANDLED (tcpip.sys)
Third-party drivers can be the reason for the issue. For instance, your computer may have Asus drivers like AsInsHelp64.sys, ASUSFILTER.sys, AsIO.sys. Quite often, etc. The extra features are not essential for the PC operation, which can conflict with such files. It is why we recommend uninstalling the additional components of this type. Ensure that you do not remove necessary programs that you can run on Windows.
Blue Screen of Death happens while any system file is malfunctioning. Windows turns off itself to prevent damage to the system. When the Restart completes, your PC is trying to gain regular operation.
How to Fix Tcpip.sys BSoD Error:
Fix 1) Reset TCP/IP:
The sys file is associated with TCP/IP. Therefore, you must try to reset the TCP/IP.
Step 1: You need to write Command Prompt first in the search bar of Cortona. After that, your job is to tap on the result that matches the best to choose Run as administrator.
Step 2: Then, you should hit the Yes option at the UAC prompt.
Step 3: When you are on the Command Prompt window, you have to write netsh int ip reset. After that, you should tap the Enter key to run it.
Step 4: As soon as the method is finished, you need to reboot the PC. Now, check if the error persists.
Fix 2) Update Network Card Drivers:
Corrupted drivers can cause the problem. Therefore, you need to try to update network card drivers to solve the issue.
Step 1) First, you need to open the Device Manager. In this case, your task is to tap the Windows + R button to call out the Run window. When the Run window appears, you need to write devmgmt.msc. After that, you are required to hit the OK button.
Step 2) When the Device Manager window is open, you need to expand the Network adapter. After that, you must tap the listed drive, and then you should choose the Update driver. You have to perform the operations again until updating all network card drivers is finished.
Step 3) After you complete updating all drivers, you need to restart the PC.
Whether you updated your driver before some days and then began to run into the issue, then try to roll back the driver.
If you are willing to roll back the driver, you have to go through the steps.
- You have to tap the driver again and then choose the Properties option by going to the right-click menu.
- When you open the Properties window, you must move to the Driver tab. After that, you need to tap the Roll Back Driver.
- Now, hit the OK for making the change. Thus, you can uninstall the updated driver and roll back the configuration to the previous version.
Fix 3) Disable Web Protection:
Try to disable web protection to check the issue. However, it may seem a little odd, but according to a few people, it helps to solve the issue.
If you are willing to turn off the web protection in your antivirus program, then it is better to get your antivirus manufacturers’ help.
If necessary, go to their sites and look for the steps accordingly.
Fix 4) Run the Blue Screen Troubleshooter:
- Run the blue screen troubleshooter if no method works. You can take the help of the feature for detecting and solving the issues.
- When you are going to run the troubleshooter, you need to move to the Start button. Then, head towards the Settings option.
- After that, your task is to tap on the update and security option. Next, you should go to these options— Troubleshoot, Blue Screen, and Run the troubleshooter, respectively.
- As soon as you finish the method, it would be best to restart the PC.
Fix 5) Disable Antivirus Program:
Antivirus is designed so that it can offer protection to your device. To do this, you have to monitor each action of your operating system. You can see multiple cases where the antivirus software has given a false positive and turned off a module, although there is no harm. Antivirus software developers fix the problems in an update. Malwarebytes, Symantec, etc., are examples of a few notable software that cause issues.
- Hit the Start button first, and then you are required to select the Run option from the menu.
- After that, the Run Command will open, where you should write cmd for opening the Command Prompt window.
- When you open the Command Prompt, you must type the wscui.CPL command. Next, hit the Enter key.
- While the Windows Security window is opened, you must select the Malware protection option. However, do this whether you use Windows Vista. If you have Windows XP, then you should choose the Virus Protection option.
- Now, you should tap the Start button and choose the All Programs option.
- After that, look for the antivirus program and then disable it temporarily.
- Next, you can access the Windows update on the computer or laptop.
- Ensure that you have turned on the antivirus program after completing the update process.
Fix 6) Perform Full System Scan:
- It would be nice if you tried to repair the damaged registries by performing a full system scan.
- Some online tools are helpful that you can use to repair these registries and enhance the system’s performance.
- If you are willing to perform a full scan with the help of the online tool, then follow the steps.
- First, download the software by navigating to the official site. Then, you need to install the software.
- When you have finished the installation process, your job is to run the Restoro for performing a full system scan.
- As soon as the system scan has been completed, tap on the Start Repair button.
Fix 7) Check for Incompatible Programs:
- To check the unsupported programs, you must restart the PC first.
- After that, ensure that you type the F8 button before displaying the Windows logo.
- Next, choose the Safe Mode option, and then you have to tap the Enter key.
- After that, you should move to the Start option and then type the “msconfig” message in the Search box. Now, you should tap on the Enter button.
- After tapping on the button, you can see the System Configuration window appearing. Here, you are required to select the Startup option that is available in the general tab. Next, you should hit the “Load Start Up item.”
- Then, tap on the “Services” tab and hit the “Hide all Microsoft Services” option. Next, you should select the “Disable All” option.
- Finally, you have to shut down the Window and then Restart the PC.
Fix Clear & Repair the Registry:
 Clear & Repair the Registry:
In this case, your task is to download a registry cleaner first and then install it after that.
- When you complete downloading the registry cleaner tool, your job is to tap on the Scan for Issues button.
- After that, wait for a while until you cannot complete the scanning process.
- When it is completed, a list of corrupted registry entries appears.
- After that, your task is to hit the Fix Issue button to solve the problem.
- Next, you should Restart the system.
- Finally, when you complete performing the above steps, we hope that the issue is resolved.
Fix 9) Replace the SYS File:
If you are an expert or an advanced user, you also can try to download the file and replace it with the right version. The steps for downloading the replacing the files are as follows:
- First, your task is to find the Windows operating system that you can see available in the list of “Download tcpip.sys Files”.
- Tap on the right “Download Now” button, and after that, you should try to download the Windows file version.
- Now, you have to try to copy the file to the right Microsoft Office Access 2010 folder location.
1. Windows 10: C:\Windows\System32\drivers\
2. Windows 10: C:\Windows\Temp\527D94AF-D053-4381-B105-0D815D53791E\amd64_microsoft-windows-tcpip-driver_31bf3856ad364e35_10.0.16299.1087_none_df7524aee8d9d74f\
3. Windows 10: C:\Windows\WinSxS\amd64_microsoft-windows-tcpip-driver_31bf3856ad364e35_10.0.16299.1087_none_df7524aee8d9d74f\
4. Windows 10: C:\Windows\WinSxS\amd64_microsoft-windows-tcpip-driver_31bf3856ad364e35_10.0.16299.15_none_fae4b1a428530d41\
5.Windows 10: C:\Windows\System32\drivers\
6. Windows 8.1: C:\Windows\System32\drivers\
7. Windows 8: C:\Windows\System32\drivers\
8. Windows 7: C:\Windows\System32\drivers\
9. Windows Vista: C:\Windows\System32\drivers\
10. Windows XP: C:\WINDOWS\system32\dllcache\
11. Windows XP: C:\Windows\System32\drivers\
Now, try to reboot the PC.
Fix 10) Perform a Windows Update:
If you cannot solve the problem yet, update your windows. Multiple error messages are appearing due to an outdated Windows Operating System.
If you are willing to perform a Windows Update, you should do these steps.
- First, you should tap the Windows Start button.
- Then, navigate to the search box and write “Update” there. Next, you should tap on the “ENTER” option.
- Move to the Windows Update dialog box after the and then hit the “Check for Updates” option. You can find a similar button that relies on the type of windows version you use.
- If you find the updates, tap on the “Install Updates” option to download them.
- After completing the update, you should perform Restart to the computer or laptop.
- If you cannot fix the issue, you have to try another solution.
Fix 11) Perform System Restore:
Try this process in Windows XP, Vista, 7, 8, and 10.
- First, your task is to tap on the Windows Start button.
- As soon as you find the search box, you must write “System Restore” in the box. Then, you have to tap on the “ENTER” button.
- When you go to the search results, you have to look for the System Restore option and then tap on it after that.
- Then, you have to type the administrator password if you can apply.
- Now, your job is to follow the steps available in the System Restore Wizard to select a relevant restore point.
- Finally, you have to restore the PC.
Fix 12) Reinstall Microsoft Office Access 2010 software (Windows XP, Vista, 7, 8, and 10):
- First, your task is to tap on the Windows Start button.
- Then, move to the search box and write the “Uninstall” button. Now, you should tap the “ENTER” button.
- When you see the search results, you have to look for the “Add or Remove Programs” option. After finding the option, you should tap on it.
- Next, you have to look for the entry for the Microsoft Office Access 2010. Then, it would be best if you tapped on the “Uninstall” option.
- Now, you should look for the prompts for uninstallation.
- As soon as you uninstall the software completely, you have to restart the computer. Then, you have to install Microsoft Office Access 2010 software again.
Fix 13) Fix Corrupted Operating System Files:
In case you are unable to solve the problem, it may happen that your system files have become corrupted. Steps that you have to follow are as follows:
- First, your job is to head towards the start menu and tap on this. Then, you have to write the command prompt there. After that, you must tap on the app and then choose Run as administrator.
- Whether any user account control prompt appears on display, you must tap on the Yes option.
- After that, a black window appears where you need to write chkdsk C: /f /r and then tap the enter button.
- Now, you can see a message prompting, “Would you like to schedule this volume to be checked the next time the system restarts?”. In this case, you have to write Y and tap on the enter.
- Restart the system now. Using the scan, you can check your device for corrupted files. This scanning process can take 10 minutes to an hour.
- If you have faced the problem till now, then try another solution.
Fix 14) Run DISM Tool:
Defective Windows image files may be a reason for the problem in Windows 10. These are actually the snapshots of ISO files released before any major Windows Upgrade. A few malware infections or third-party programs are there, due to which the components can also be corrupted.
The tool is preloaded and used to repair these image files when you activate this in Elevated Command Prompt. If you are willing to scan the tool, you have to follow the steps:
- First, you need to take access to the elevated command prompt.
- After that, your job is to insert the command.
DISM /Online /Cleanup-Image /RestoreHealth
- Then, you have to tap the Enter button to allow the DISM tool.
- It can take some time, so it is better to schedule the task accordingly.
- After the completion, you have to restart your PC and check if the issue exists.
Fix 15) Check the Hardware Components and Fix Their Issues:
The problem can happen whether there is an issue on the hardware and software sides. Defective issues in hard disk, malfunctions on Power Supply Unit,
Problematic RAM sticks etc., can cause the issue. Besides, devices attached via USB ports such as a mouse, keyboard, speaker, or printer can also cause issues. Removing the devices can help you to fix the issue.
If the issue is not resolved, then you have to run the Windows Hardware Troubleshooter. Follow the steps if you are willing to run.
- First, tap on the Windows key to open the Start menu.
- Then, you have to tap the Power icon.
- Choose the Restart option, and then you should hold the Shift key at a time. In this case, Windows boots your system to Automatic Repair.
- When you open the blue screen, you should choose the Troubleshoot option.
- After that, you must select the Advanced options and then Command Prompt.
- As soon as the Elevated Command Prompt window appears, you should type the message.
msdt.exe -id DeviceDiagnostic - Hit the Enter button.
- Next, the Hardware and Devices Troubleshooter page is available on display immediately.
- Tap on the Next.
Fix 16) Replace Defective RAM:
We have repeatedly seen that a defective RAM unit is causing the issue.
Sometimes, your RAM can contain issues from manufacturing. On the flip side, it may have external damage that eventually affects this.
- If you are going to change the whole RAM, replace the entire unit that is costly. As a result, a confirmed diagnosis is essential before purchasing a new one. Windows Memory Diagnostic tool can be used in this case. When you complete checking your device with the help of the memory diagnostic tool, replace it if necessary.
- Now, you should tap on the taskbar search box Type memory, and after that, you should hit the Enter button.
- When using the Windows Memory Diagnostic Tool, you have to tap on the
- c, – “Restart now and check for problems (Recommended)” option.
- You will see a blue display. It helps to identify memory problems.
- As soon as the process finishes, your system will reboot again.
- In this case, an alert appears on the system tray from Windows Memory Diagnostic Tool.
- At last, chick if the error persists.
Conclusion:
In this article, we have given here a few solutions to solve the Tcpip.sys Blue Screen Error. I hope you find it helpful.
Kmode_exception_not_handled is an error that shows on a blue screen on Windows 10 and 11. It is a fatal error and many critical conditions of a system are indicated by this error.
If you are a Windows user who has faced this error, then your computer must continuously restart in a loop after showing this error. Also, you may not have access to your Windows anymore. But don’t worry you are not alone at all. Many users have faced the problem and we have some solutions to fix this problem according to the success rate of the users.

Reasons for ‘KMode Exception Not Handled Boot Loop’ Error
There are several reasons behind the ‘Kmode_exception_not_handled boot loop’ error. It can be a very problematic error s it will prevent you from accessing your computer. There are possibilities that the issue is caused by the drivers of the system. So, you have to update your drivers.
As mainly the driver is the culprit here, you have to identify the exact driver who is causing this problem. Then you need to update or reinstall the driver. In some cases, you may have to install the previous version of that driver.
However, it is also possible that this blue screen error is occurring on your computer because of some configuration faults in your BIOS. So, the BIOS will also be needed to reconfigure or reset to the default to fix this error.
Therefore, as you have no access to your Windows because of this error, you need to fix it from the Safe Mode on your computer.
Other Similar Errors to KMode Exception Not Handled
The solution given in this article may also work for the other similar errors which are given in the table below:
| Errors | Reasons |
| Kmode exception not handled ntfs.sys/netio.sys/ ndis.sys/ syntp.sys/ wdf01000.sys/ etd.sys/ tcpip.sys/ tppwr32v.sys/ usbport.sys/ igdkmd64.sys/ intelppm.sys/ iastora.sys | The error identifies the problematic file in this way. You can navigate yourself to this path to find the corrupted driver or application by this error. |
| Kmode exception not handled overclock | The increasing voltage to the CPU causes this error. |
| Kmode exception not handled RAM | This error can be occurred due to the faulty module of RAM. |
| Kmode_exception_not_handled USB | A faulty USB device is the main culprit in this case, but the driver also can be the reason for this error sometimes. |
| Kmode exception not handled during install | This error also indicates the faulty driver that is not compatible with your PC. |
| Kmode exception not handled loop | The old or incompatible graphics driver is the reason for this error. |
These errors are mostly reported by many users and the virtualization software such as the Virtual Box or VMware have also transcribed these errors as these are the common errors that mostly appeared on PCs.
How to Fix ‘KMode Exception Not Handled Boot Loop’ Error
As there are several reasons behind this error, there are several methods also to fix this error. Here are all the effective methods mentioned below.
NOTE: Apply the first two methods (Fix-1 and Fix-2) only if you can’t access Windows otherwise, you can start applying from the third method (Fix-3)
Fix-1: Installing the Missing Drivers
- Keep pressing F8 or Shift + F8 while your computer boots.
- After this, an option will appear on your screen and you have to select Safe Mode with Networking to take your computer to the Safe Mode.
- From the search bar, search for the Device Manager app and open it.

- From the Device manager app, right-click on unknown devices and select Update Driver.

- Then, click on →Search automatically for drivers.

- If it failed to search for the driver automatically, then you can download the driver on your PC from your web browser, then click on the Browse my computer for driver option and choose the downloaded file.
After installing the driver, exit save mode and check if the error has vanished or not.
As the Kmode_exception_not_handled error can occur due to outdated or missing drivers, you are recommended to install the missing drivers manually on your computer. However, it can also cause by your network adapter. So, it is also worth updating the network adapter to fix this error.
Fix-2: Renaming the Defective File
As we previously mentioned that the Kmode_exception_not_handled error can occur because of some external software, Bitdefender is one of them. Many users have reported that they fixed the error by renaming the bdselfpr.sys file. If you are also a user of this software, then this method is just for you.
- Go to File Explorer by pressing and holding the Windows key + E simultaneously.
- Then, navigate to Local Disk (C:)\Program Files\ Bitdefender\ Bitdefender Security and find bdselfpr.sys file.

- Rename the file according to your choice. For example, bdselfpr.s__.
Fix-3: Uninstalling Certain Apps
As you already know that certain apps can cause errors on your computer, ON/OFF Gigabyte is one of them. It is an application that is used in USB power stations. Many users have reported that it is incompatible with Windows 10 which occurs the Kmode_exception_not_handled error. Uninstalling this app can be a cure to this problem.
- Open Settings by pressing and holding the Windows key + I simultaneously.
- Then, click on Apps and find ON/OFF Gigabyte software.

- Click on it and click Uninstall.

After the uninstalling process, reboot your computer to see if the issue is remaining or not.
Fix-4: Uninstalling Your Antivirus Software
It is also reported by many users that they faced the Kmode_exception_not_handled error because of the antivirus software they were using. They have fixed this error by uninstalling their antivirus. So, you may also face this issue because of your antivirus. Uninstall the software and check if the error is gone or not.
- Press and hold the Windows key + I simultaneously to open Settings.
- Go to the Apps and click on your antivirus software.
- Click on Uninstall to remove this app from your computer.
Fix-5: Updating Your BIOS
Keep in mind that updating BIOS is a critical process. Make one mistake here and you will end up damaging your PC permanently. So, do it very carefully.
- Download the latest version of BIOS from the website of your motherboard manufacturer and copy it to your USB drive.
- From the Start menu and click on the Power button.
- Press and hold the Shift key and click Restart.
- There will be three options on your screen and you have to choose Troubleshoot option.

- Then, from the Advanced options, select UEFI Firmware Settings.

- Your computer should boot to the BIOS setup page after clicking the Restart button.

- From the BIOS Management page, choose the BIOS from your USB drive and update the BIOS.
Fix-6: Disabling Fast Start-Up
Fast startup is enabled in all the computers by default that are using Windows 10. It allows you to boot the computer fast. But during this fast boot, your Windows may not able to boot properly and cause the previous error. Disabling the fast startup can be a solution to this error.
- Right-click on the Start button and click Power Options.
- Then, click on the Additional power settings.

- Now, click on Choose what power buttons do from the left menu bar.

- After that, go to the Shutdown settings and click on Change settings that are currently unavailable

- Now, untick the Turn on fast startup option.

- Click on the Save button.
Fix-7: Diagnosing the RAM
A few users confirmed that the previously mentioned error occurs by faulty RAM. You are recommended to diagnose the RAM to check if it has any flaws which caused the error.
- Open the Run dialogue box by pressing and holding the Windows key + R simultaneously.
- Type mdsched.exe under Open: and click the OK button.
- You will see two options on the Windows Memory Diagnostic and you need to click Restart now and check for problems (recommended)
- Follow the further procedure to detect and fix any problem with your RAM.
You can also try replacing the RAM to check if the error is caused by the RAM or not.
Frequently Asked Questions
How Do I Get Rid of the Blue Screen Error On Windows 10?
If you face a blue screen error on your Windows 10, then you need to update your Windows to fix that problem. For updating windows, navigate to Settings > Update & security > Windows Update and apply all the pending updates. You should also update your drivers to fix the blue screen error.
How Do I Check My Drivers for Errors On Windows 10?
Any driver can cause an error on Windows 10. So, you need to keep your drivers up to date. You can also reinstall drivers to get a better result. The instructions to update drivers are given in the first method in this article. You can follow the steps to update your drivers to fix errors on your Windows 10.
What Causes Blue Screen Error?
The Blue Screen of Death (BSOD) error is caused by driver fault or sometimes issues with the hardware. However, some apps may crash, have flaws, or be incompatible with Windows which are also can be the reason for BSOD. When an application, driver, or Windows crashes, it informs users on the blue screen and saves a minidump file to the disk.
Conclusion
Kmode_exception_not_handled error is one of the most common blue screen errors or BSOD in Windows 10. There are several reasons behind occurring this error as mentioned above. All the best solutions to fix this error are explained in this article.
Hopefully, you will be able to fix this problem with these solutions. But if you failed to fix using these solutions, then the final option is in your hand. You have to reset your Windows 10 to fix this problem.
Feel free to share your opinion in the comment section and please mention the solution by which you will have fixed the BSOD error.