
Синий экран (BSoD) с кодом KMODE EXCEPTION NOT HANDLED — один из самых сложных в диагностике, особенно в случае, если на экране не сообщается о каких-либо сбойных модулях (.sys), его вызвавших. Однако, попробовать разобраться и решить проблему можно.
В этой инструкции подробно о возможных способах исправить ошибку на синем экране KMODE EXCEPTION NOT HANDLED в Windows 10 в зависимости от ситуации и сопутствующих появлению проблемы нюансов.
- Причины ошибки KMODE EXCEPTION NOT HANDLED
- Исправление в случае, когда возможен вход в Windows 10 или доступен экран входа в систему
- Что делать, если синий экран появляется до появления входа в систему
- Ошибка появляется через некоторое время после чистой установки системы
Причины ошибки KMODE EXCEPTION NOT HANDLED
Самая частая причина появления синего экрана KMODE EXCEPTION NOT HANDLED в Windows 10 — сбои драйверов. Но, здесь есть очень важный нюанс: часто речь идёт не о драйвере какого-то физического устройства, а о драйверах, устанавливаемых сторонними программами для своей работы. Среди таких программ можно выделить:
- Антивирусы, средства автоматической очистки системы, файрволлы, средства VPN и прокси.
- Некоторое ПО, модифицирующее систему.
- Программы, устанавливающие драйверы виртуальных устройств (приводов, сетевых адаптеров для раздачи Wi-Fi и подобные).
- Средства криптографии.
Не обязательно дело в них: причина вполне может крыться и в драйвере реального физического устройства, но стоит помнить и о такой возможности.
Ещё одна возможность — какие-либо проблемы с оборудованием, не обязательно его неисправность. К примеру, плохо подключив жесткий диск или SSD (или подключив его неисправным кабелем), также можно получить рассматриваемую ошибку. Поэтому, если вы что-то делали с оборудованием компьютера (или перевозили его с место на место, что тоже иногда ведет к проблемам из-за тряски), учитывайте этот момент.
И ещё одна важная деталь: если синий экран KMODE EXCEPTION NOT HANDLED указывает на какой-либо файл .sys (в скобках после кода ошибки), обязательно попробуйте найти в Интернете, что это за файл и к какому драйверу или программе он относится (поиск на английском обычно более результативен), возможно это даст необходимую информацию о том, что именно вызывает проблему.
Исправление ошибки в случае, когда Windows 10 запускается или отображается экран входа в систему
Внимание: если ошибка появляется после завершения работы Windows 10 и последующего включения компьютера или ноутбука, но не появляется после перезагрузки, попробуйте отключить быстрый запуск Windows 10.
Относительно простой случай — появление ошибки уже после входа в Windows 10 или хотя бы доступность экрана входа в систему, с которого мы тоже можем выполнить некоторые действия. В этой ситуации рекомендую использовать следующие шаги:
- До очередного появления синего экрана перезагрузите компьютер или ноутбук в безопасном режиме. Если система загружается, для этого вы можете нажать клавиши Win+R, ввести msconfig и нажать Enter, после этого на вкладке «Загрузка» включить безопасный режим, сохранить параметры и выполнить перезагрузку. Если вам доступен только экран блокировки, нажмите по изображенной справа внизу кнопке питания, затем, удерживая Shift, нажмите «Перезагрузка». На синем экране перейдите в «Поиск и устранение неисправностей» — «Параметры загрузки», а в параметрах загрузки нажмите клавишу 4 для входа в безопасный режим. Подробнее: Как зайти в безопасный режим Windows 10.
- Если непосредственно перед появлением проблемы вы обновляли какие-то драйверы, откатите их в диспетчере устройств, удалите, или установите другой драйвер в безопасном режиме.
- Если вам известно, какая программа вызвала сбой, удалите её в безопасном режиме (лучше всего через Панель управления — Программы и компоненты).
- Если вам неизвестно, что вызывает сбой, но синий экран появляется через некоторое время после появления рабочего стола: попробуйте убрать все программы (особенно установленные в последнее время) из автозагрузки. Как это сделать: Автозагрузка в Windows 10 — как убрать программы или добавить их.
- Если недавно проблема не появлялась, а что-либо на компьютере не устанавливалось, попробуйте использовать точки восстановления (Панель управления — Восстановление). Подробнее: Точки восстановления Windows 10.
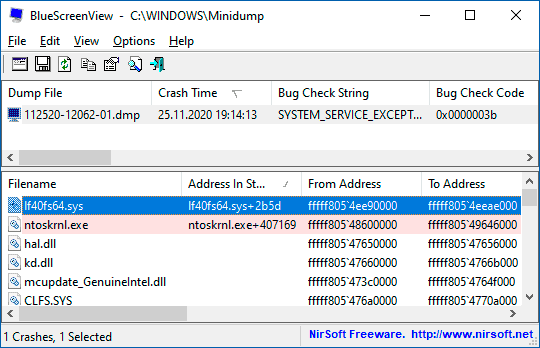
- Если имя сбойного файла .sys не отображается на экране с ошибкой, попробуйте использовать программу BlueScreenView, доступную на сайте https://www.nirsoft.net/utils/blue_screen_view.html. Она может показать подробную информацию о том, что вызвало (какой файл) ошибку. Например, для написания этой статьи я использовал старую программу Lock Folder, так как точно знал, что драйвер из неё может вызвать указанный синий экран в Windows Синий экран я получил (но с другим кодом) и в BlueScreenView видно, что виноват файл lf40fs64.sys — как раз от этой программы.

Если синий экран KMODE EXCEPTION NOT HANDLED появляется до входа в систему
Случай, когда сбой происходит до входа в систему сложнее, но проблему иногда можно решить, не прибегая к переустановке системы:
- Вам потребуется загрузочная флешка Windows 10 в той же разрядности, которая установлена на вашем компьютере или ноутбуке. Сделать её можно и на другом устройстве. Флешку UEFI можно записать даже на телефоне Android.
- Загрузите проблемный компьютер с этой флешки, выберите язык на первом экране, а затем нажмите «Восстановление системы» слева внизу на следующем экране и выберите «Поиск и устранение неисправностей».

- Далее вы можете попробовать использовать точки восстановления системы или удалить последние обновления Windows 10.

- Запустив командную строку в средствах восстановления, вы можете включить безопасный режим для системы, уже установленной на компьютере, используя команду
bcdedit /set {default} safeboot minimalс последующей перезагрузкой компьютера уже с основного HDD или SSD.


Ошибка появляется через некоторое время после чистой установки системы
Если ошибка KMODE EXCEPTION NOT HANDLED появляется всегда через какое-то время после установки/переустановки Windows 10, возможно, причина в том, что система сама загружает драйверы для оборудования и какие-то из них работают неправильно в вашей системе.
Возможное решение для такой ситуации: заранее разместить скачанные вручную драйверы оборудования с официальных сайтов производителя материнской платы ПК или ноутбука, произвести установку без подключения к Интернету, а затем вручную установить заранее подготовленные драйверы. При желании также можно отключить автоматическое обновление драйверов в Windows 10.
В случае, если всё ещё нужна помощь, постарайтесь подробно описать в комментариях все детали, которые вам известны о появлении ошибки на вашем компьютере: после чего стал появляться синий экран, в какие именно моменты он появляется и любые дополнительные детали. Возможно, решение найдётся.
Ntfs.sys Blue Screen error in Windows 11/10 is a critical issue that can lead to system crashes. This error is generally accompanied by System Service Exception, NTFS_FILE_SYSTEM, or Kmode_Exception_File_Not_Handled. This problem is specifically associated with the Ntfs.sys file which is a crucial component responsible for NTFS file system operations. When this file encounters problems, it triggers a Blue Screen of Death (BSOD) error and hampers the overall operations. Potential reasons for this error include corrupted Ntfs.sys file, driver conflicts, hardware issues, or problems with the storage device. You may encounter this error during system start-up or while performing disk-related operations on your computer.
Here, we will focus on all the possible methods of fixing this critical What failed: Ntfs.sys Blue Screen error in Windows 11 and 10. It will cover a number of solutions such as checking for disk errors, updating drivers, scanning for malware, and other troubleshooting measures to resolve the issue and ensure stable system performance. Let’s get to the solutions to address this challenging problem and restore the integrity of the NTFS file system of your Windows.
Ntfs.sys Blue Screen error in Windows 11/10
Here is how to fix What failed: Ntfs.sys Blue Screen error in Windows 11/10:
Perform SFC and DISM Scanning
SFC (System File Checker) and DISM (Deployment Image Service and Management Tool) can contribute to NTFS Blue Screen error if they detect or encounter corrupted system files. These tools can be used effectively to scan the affected files and help resolve the issue by restoring the integrity of critical system components. Here is the process for the scanning:
- Open the Windows Search menu with “Windows+S”, type “cmd”, and Run it as an administrator.
- Then, copy-paste this command and press Enter (without quotes):
“DISM.exe /Online /Cleanup-image /Restorehealth”.
- After the completion of the DISM scan, input and Enter:
sfc /scannow. - Wait a bit to allow the System File Checker to complete the scanning process.
- Restart the device and see if the error is fixed.
Run Memory Check
Running a memory check in Windows can also resolve Ntfs.sys Blue Screen error by identifying and addressing potential issues with the computer’s RAM. This process can ensure the stability of your system by detecting and correcting memory-related flaws to prevent the recurrence of NTFS Blue Screen error. You can run memory checks through these steps:
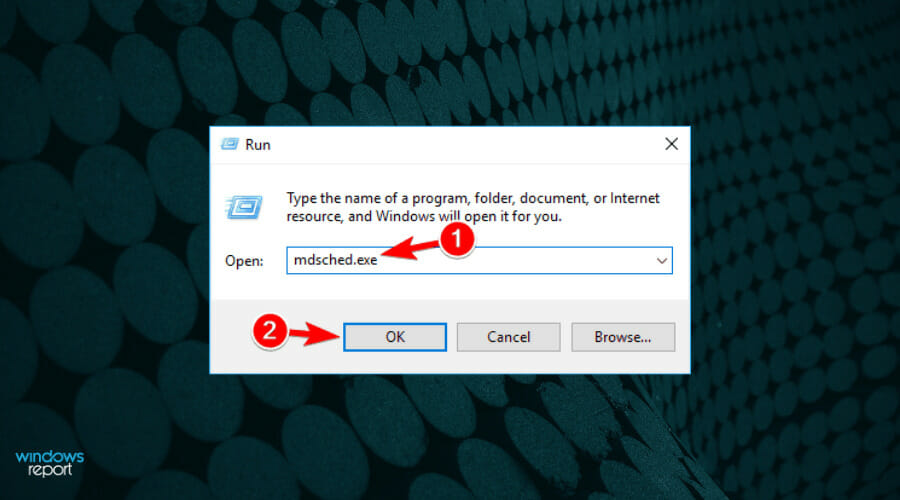
- Press “Win+R” to open the Run dialog.
- Type “mdsched.exe” and press “Enter” or click OK.
- Then, select “Restart now and check for problems (recommended)”. It will automatically scan the memory of your computer and solve the error.
Use the CHKDSK Disk Checking
CHKDSK (Check Disk) may help to fix NTFS.SYS Blue Screen errors if it finds file system or disk issues. Scanning and repairing with CHKDSK can solve this problem by fixing file system inconsistencies and ensuring the integrity of the NTFS file system. Here is the process to run it:
- Use “Windows+R” to open Run, type “cmd”, and press “Ctrl+Shift+Enter”.
- Then, type
chkdsk /f c:and hit Enter. - Type “Y” and “Enter”.
- In the end, open “Start”, select “Power”, and click on “Restart” to begin the scan.
Check if the NTFS error on your computer is resolved after the computer restarts.
Go for an Antivirus Scan
Sometimes, viruses can attack and trigger this Ntfs.sys Blue Screen error by infecting your PC’s critical system files. Conducting an antivirus scan can effectively help to overcome the issue by identifying and eliminating malicious software while restoring the NTFS files.
- Type “Windows Security” in the search bar and open the app.
- Choose “Virus and threat protection”.
- Now, click “Scan options”.
- Then, select “Full Scan”.
- In the end, press “Scan now”.
- Follow the recommendations after the scanning is completed.
Run the Blue Screen Troubleshooter
The Blue Screen Troubleshooter in Windows is a diagnostic tool designed to identify and resolve system crashes which include the Ntfs.sys Blue Screen error as well. It can analyze crash dumps, identify potential causes like driver issues or hardware problems, and offer guidance for you to solve the issue.
- Open Windows Search bar and type “Get Help”.
- Click on the “Get Help” app from the results.
- Then, enter keywords like “troubleshoot BSOD error” or “fix blue screen error” and hit Enter.
- You will see a Blue Screen Troubleshooting wizard. Follow the instructions to get things done.
It will track the reason for this blue screen error and help you troubleshoot it. If it does not come in handy, move to the next methods one by one.
Conduct Startup Repair
Startup Repair in Windows 11 and 10 may help rescue NTFS Blue Screen error if any issue occurs during the boot process. Running Startup Repair can resolve the problem by addressing startup-related issues and ensuring a smooth boot sequence on your computer. Follow these to run the repair:
- Open Settings with “Windows+I”.
- Now, go to “Recovery”.
- Click “Restart now” from the “Advanced startup”.
- Choose “Troubleshoot”, then “Advanced options”.
- Then, select “Startup Repair” and run the tool to resolve startup-related issues on your Windows 11 or 10.
Rebuild Your Boot Manager
Boot manager or BOOTMGR issues in Windows can also lead to the aforementioned error during startup. Rebuilding the boot manager can effectively solve this problem by correcting any errors or corruption in the boot configuration to ensure a stable system operation.
- Right-click on “Start” and choose “Run”.
- Enter or paste “cmd” in the Run box.
- Press “Ctrl+Shift+Enter”.
- Type each command separately and hit “Enter” after each:
bootrec.exe /fixmbr
bootrec.exe /fixboot
bootrec.exe /rebuildbcd
bootrec /scanos
See: How to Skip Boot Manager During Windows 10 Startup
Run Your Driver Verifier
Driver Verifier can, as well, resolve Ntfs.sys Blue Screen errors by identifying faulty drivers on your Windows. Here is the process:
- First, enter Safe Mode on your Windows using the above method (shown in the above section).
- Now, press “Windows+R” to launch the run window.
- Then, type “verifier” and hit “Enter”.
- Navigate to “Driver Verifier Manager”, choose “Create standard settings,” and select “Next”.
- Follow the instructions provided on your screen to get the results.
Reset Windows 10/11
Occasionally, resetting Windows 11 or 10 can resolve the NTFS Blue Screen error by restoring the operating system to its default state. This process removes potential system configuration issues, software conflicts, or corrupted files to provide a clean slate for you. Here is the process:
- Go to the “Start” menu and click on “Settings”.
- Choose “Recovery” to access more options.
- Now, click “Reset PC” from Recovery.
- A window will be opened, select “Keep my files” from here.
- Then, go for the “Cloud download” or “Local reinstall” based on your preference.
- Click “Next” and “Finish”.
- Restart your PC.
Consider a Disk Scan under Safe mode
Conducting a disk scan in Safe Mode on your Windows may also effectively resolve the Ntfs.sys Blue Screen error. Operating in Safe Mode with minimal processes ensures a comprehensive examination of Windows to identify and correct potential issues.
First, enable safe mode by following these steps:
- Shut down your computer system.
- Then, power your PC ON and force shutdown immediately after seeing the brand logo during the turning-on process.
- Start your PC again; repeat 3 times to access the Recovery Environment.
- When your PC is in a recovery environment, click “Advanced options”.
- Now, click “Troubleshoot” and then “Advanced options”.
- Select “Startup Settings”.
- Click on “Restart”.
- After the restart, hit the “F5” button for “Enable Safe Mode with Networking.”
Now, follow these for the disk scanning:
- Press “Windows key+E” to open “File Explorer”.
- Navigate to “This PC”.
- Right-click on the driver where the Windows has been installed and select “Properties.”
- Now, go to “Tools”.
- Then, move to Error checking and click “Check” to initiate the disk scanning in safe mode.
Replace Your Hard Drive
If all the above methods have gone down, here is the final solution for you. It is possible that your hard drive has disk-related or other complex issues which is creating this Ntfs.sys Blue Screen error. Replacing this problematic hard drive with a new and reliable one can effectively resolve the issue. Here is how you can replace it:
- Turn off the computer.
- Remove the side panel of your PC and disconnect the old hard drive.
- Replace this hard drive with a new one.
- Recover the case and restart your computer system. Make sure that you are aware of entering the BIOS for the new hard drive.
Note: Replacing a hard drive requires expert-level knowledge. So, you have to be 100% sure of what you are doing!
Methods:
Perform SFC and DISM Scanning
Run Memory Check
Use the CHKDSK Disk Checking
Go for an Antivirus Scan
Run the Blue Screen Troubleshooter
Conduct Startup Repair
Rebuild Your Boot Manager
Run Your Driver Verifier
Reset Windows 10/11
Consider a Disk Scan under Safe mode
Replace Your Hard Drive
That’s all!!
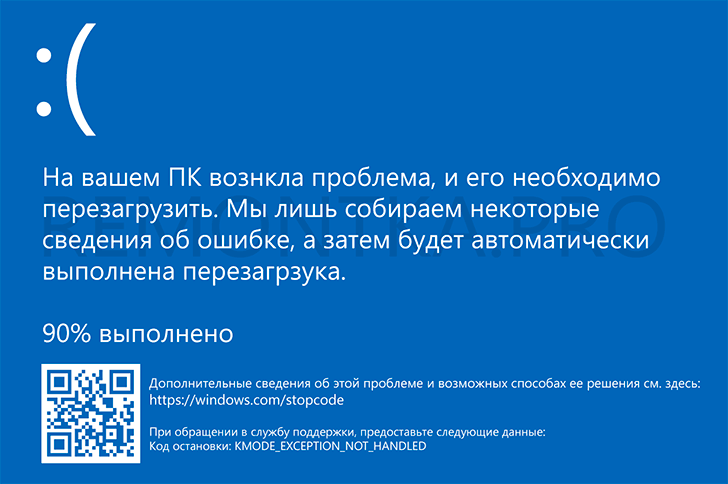
Kmode Exception Not Handled is a Blue Screen of Death (BSOD) error, which generally appears with a bug check value of 0x0000001E. This BSOD error is more likely to occur due to hardware incompatibility, faulty device driver or system service, outdated BIOS, problematic third-party antivirus program, or faulty RAM. Once occurred, irrespective of the reason, this error can make your system restart unexpectedly or not boot at all.
(See Image 1)
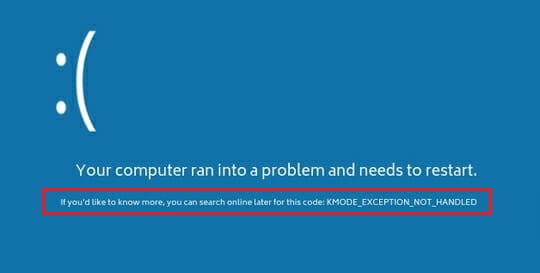
Image 1: KMODE EXCEPTION NOT HANDLED BSOD Error
We’ve come across several queries reported by Windows 10 users about encountering KMODE error with different variations, including:
- KMODE Exception Not Handled Boot Loop
- KMODE Exception Not Handled RAM
- KMODE Exception Not Handled NTFS.Sys
- KMODE Exception_Not_Handled Ntoskrnl.Exe
These stop codes may appear in different circumstances, as mentioned in the queries below.
-Source
“I was using my computer when it showed a blue screen, flashing the Stop Code: ‘KMODE EXCEPTION NOT HANDLED’ and it kept happening again and again. Then I turned off my PC and waited 3 hours before turning it on, it showed a blue screen after loading, but now I can’t log in.”
-Source
“I recently built a new pc. When I try to install Windows 10, it keeps giving me the message – “Sorry your PC ran into some problem – KMODE Exception Not Handled.” Does this mean there is something wrong with my hardware? Kindly help me fix the error.”
–Source
Prime Reasons for ‘KMODE EXCEPTION NOT HANDLED’ Windows 10 Error
The scenarios of KMODE BSOD errors could be different. However, there are a few primary reasons behind this blue screen error, including:
- Hardware incompatibility
- A faulty device driver or system service
- Missing/corrupt system files
- Corrupt third-party antivirus program
- Problematic Windows update
- Outdated BIOS
- Faulty RAM
Now that you know the reason, you can move on to fixing the error. However, you may not be able to boot into your system due to this blue screen error.
So, we suggest you try to boot into the Safe Mode and then perform the below-mentioned troubleshooting methods.
To Boot into Safe Mode, follow the given steps:
- Reboot your system and when you get to see the Windows logo on the screen, turn your system again.
- Repeat this step three times, and then you’ll most probably enter the Automatic Repair environment.
- There, click ‘Advanced options’. (See Image 2)
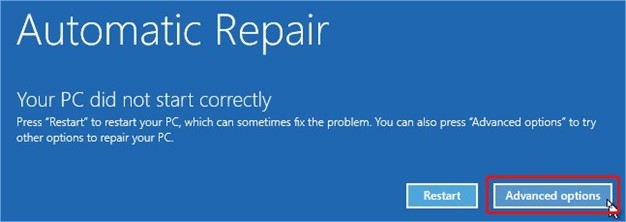
Image 2: In the Automatic Repair environment, select Advanced options
- Follow Troubleshoot > Startup Settings > Restart.
- Once the system gets restarted, press F4 to enable the Safe Mode. (See Image 3)
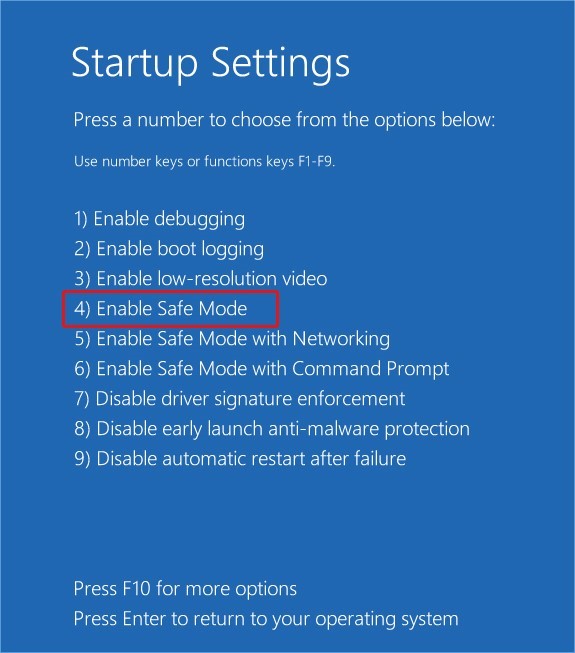
Image 3: Enable Safe Mode by pressing F4
Simple Methods to Fix KMODE_EXCEPTION_NOT_HANDLED Error
Method 1: Disable Fast Startup
Fast Startup is a feature in Windows 10, which helps to reduce your system’s boot time. It may also prevent your system from executing a regular shutdown and create compatibility problems with the connected hardware devices. Disabling this feature may help you boot your system normally and fix the issue. To do so, follow the given instructions:
- Open Control Panel and change View by to ‘Large icons. (See Image 4)
Image 4: Change View by to Large icons in the Control Panel
- Go to Power Options. (See Image 5)
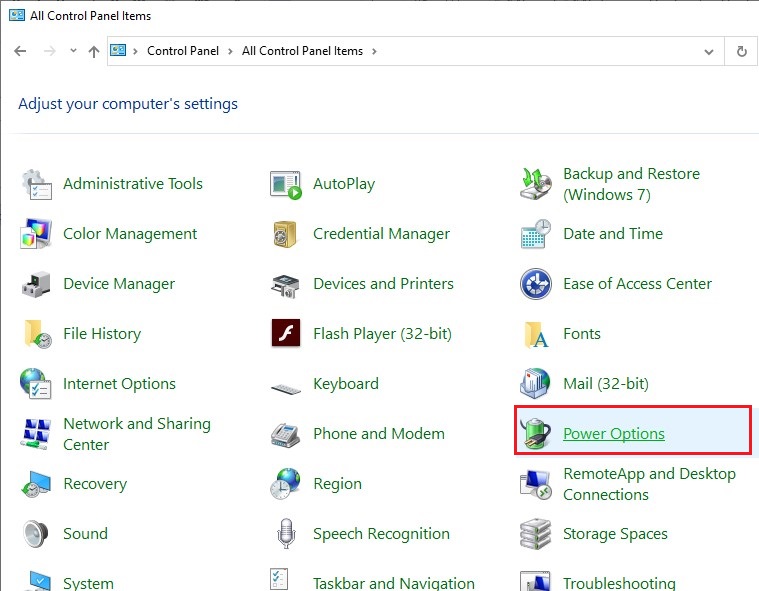
Image 6: Navigate to Power Options
- Next, click on ‘Change what the power buttons do. (See Images 7)
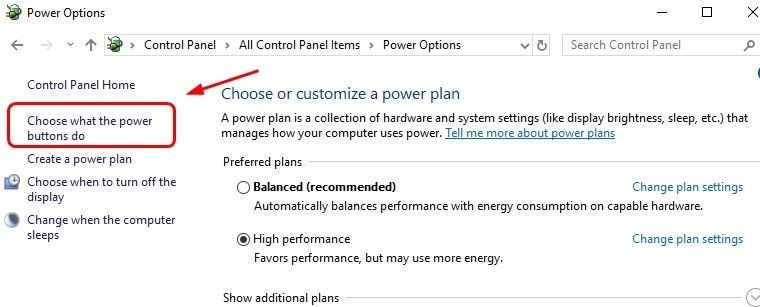
Image 7: Change what power button does
- On the next screen, deselect ‘Turn on fast startup (recommended)’ and click Save Changes. (See Image


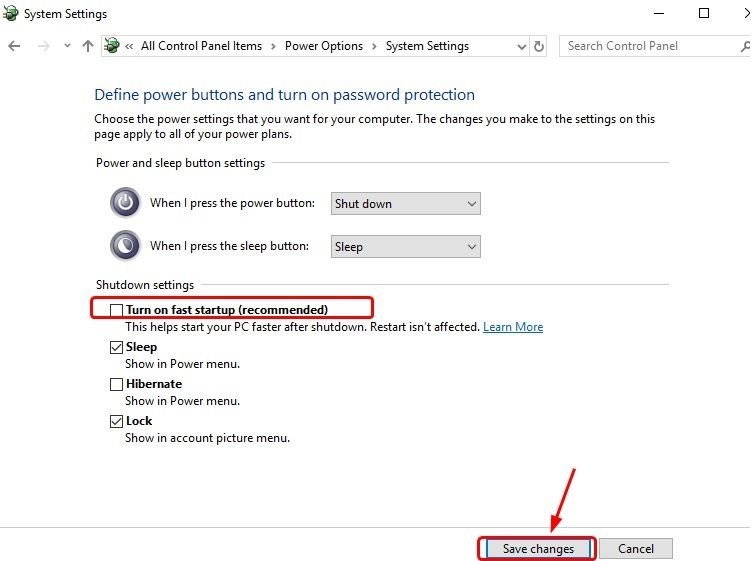
Image 8: Deselect Turn on fast startup (recommended) > Save changes
- Now, check if the error is fixed.
Method 2: Run BSOD Troubleshooter
If there’s faulty or corrupt hardware installed on your system, you may encounter the ‘KMODE EXCEPTION NOT HANDLED’ error on Windows 10. To resolve this error, you can also run the BSOD troubleshooter, Windows built-in troubleshooting utility. Follow the given steps:
- Open System Settings by pressing Windows + I and navigate to Update & Security. (See Image 9)
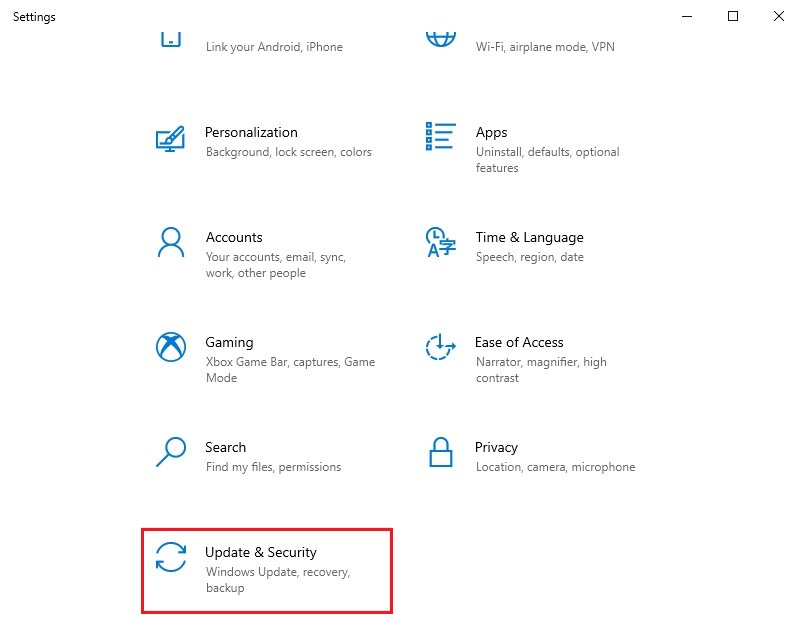
Image 9: Select Update & Security in System Setting
- Click Troubleshoot > Find and fix other problems > Run the troubleshooter (mentioned below Blue Screen). (See Image 10)
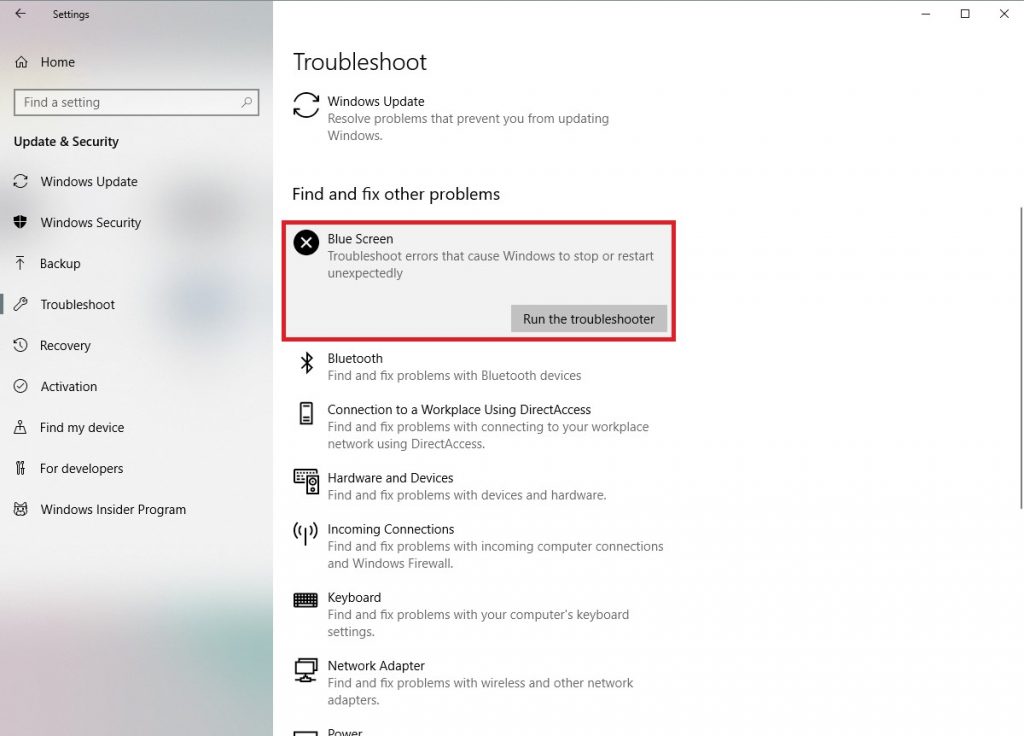
Image 11: Run the BSOD Troubleshooter
- Follow the on-screen instructions (if any). Let the process end, close the window, and restart your system to check if the problem is solved.
Method 3: Update the Device Driver
Incompatible, outdated, or corrupt device drivers may also cause this error to occur. You can try updating the device driver to get rid of this blue screen error. Follow the given instructions:
- Type Device Manager in the Windows search box and open it.
- Expand the device category for which you want to update the driver.
- Right-click on the device driver and click Update driver. (See Image 12)
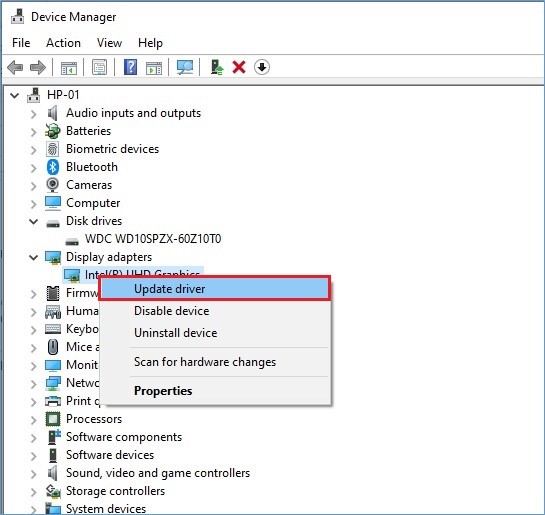
Image 13: Select the driver to update
- In the following Update Drivers wizard, click ‘Search automatically for drivers.’ (See Image 14)

Image 14: Search automatically for drivers
- Windows will start showing you the latest driver to install. Update driver with the latest ones and check if the error is fixed.
- In case Windows doesn’t seem to show you any latest driver software available, proceed with the ‘Search for updated drivers on Windows Update’ option. (See Image 15)
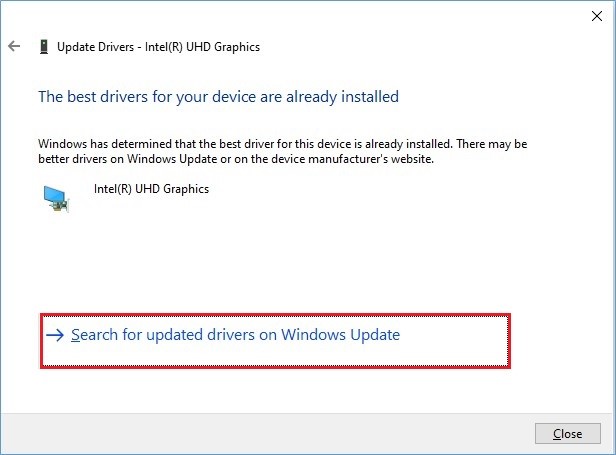
Image 15: Search for updated drivers on Windows Update
- Afterward, you’ll see the available updates on the screen. Click Install Now to install the latest driver software on your system. (See Image 16)
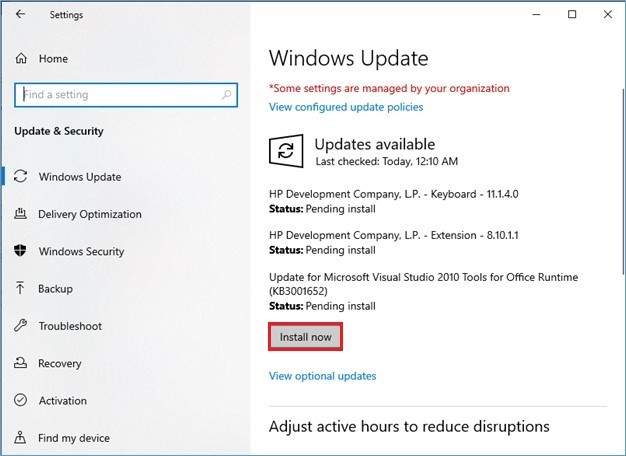
Image 16: Install the latest driver software
- Once done, restart your system and check if the KMODE_EXCEPTION_NOT_HANDLED error is solved.
Method 4: Run DISM & SFC Scan to repair system files
As discussed above, the corrupt or missing system files or services may also be the reason behind this error, which could further lead your system to a complete crash.
To prevent any further damage to your system, you may run DISM and System File Checker to check for the problems with system files and fix the problem. To do so, follow the given steps:
- Open Command Prompt and run it as administrator.
- Next, type DISM.exe /Online /Cleanup-image /Restorehealth and press Enter. (See image 17)
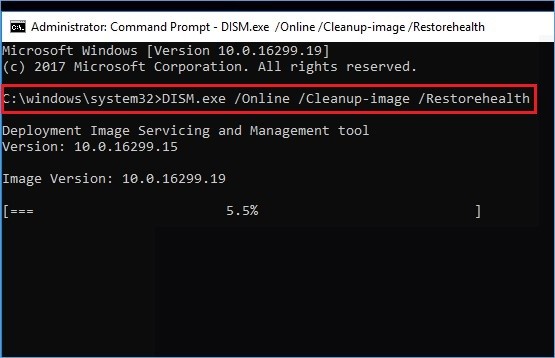
Image 17: Run DISM Restore health command
- Afterward, type SFC/scannow and hit Enter. (See Image 18)
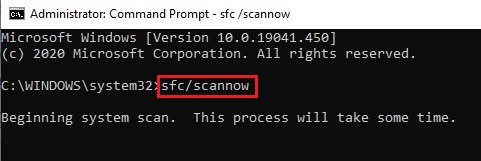
Image 18: Run SFC/Scannow command
- Let the process end. It may take some time, so don’t close the window until its done.
- Follow the instructions given on the screens (if any). Once done, reboot your system and see if the error is fixed.
Method 5: Uninstall third-party antivirus software
Malicious or corrupt third-party antivirus software installed on your system may cause this blue screen of death error (BSOD) on your Windows PC. You can try uninstalling the antivirus software to get rid of the error. To do so, follow the given steps:
- Press Windows + I to open System Settings and go to Apps.
- Then, navigate to Apps & features and select the third-party antivirus software installed, which seems to be causing the error.
- Right-click on the antivirus and choose to Uninstall it. (See Image 19)
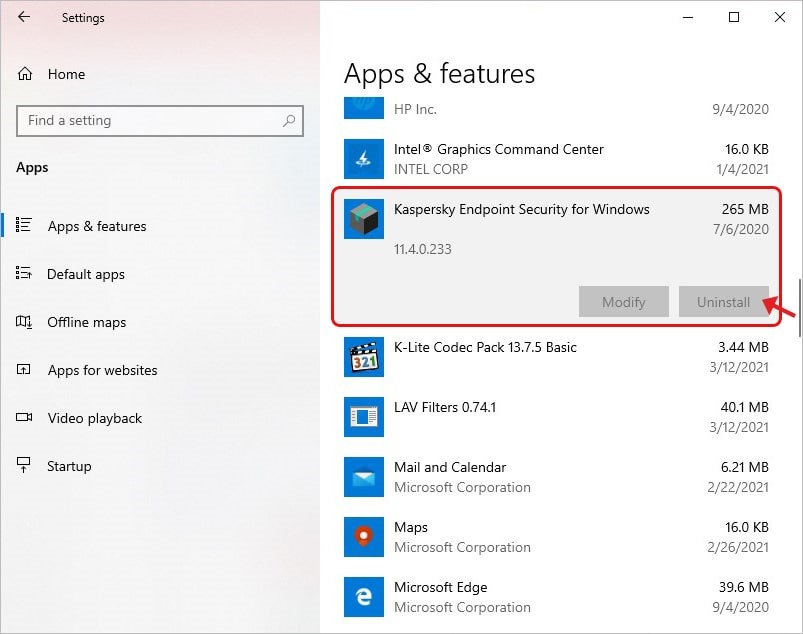
Image 19: Select the software to Uninstall
- Once done, reboot your system, and try to upgrade to Windows 10.
Method 6: Uninstall Problematic Windows Update
Some users even reported getting KMODE BSOD error after Windows 10 update. There could be some buggy Windows update installed on your system, causing a problem for your system. In such a case, you can uninstall the update to solve the issue.
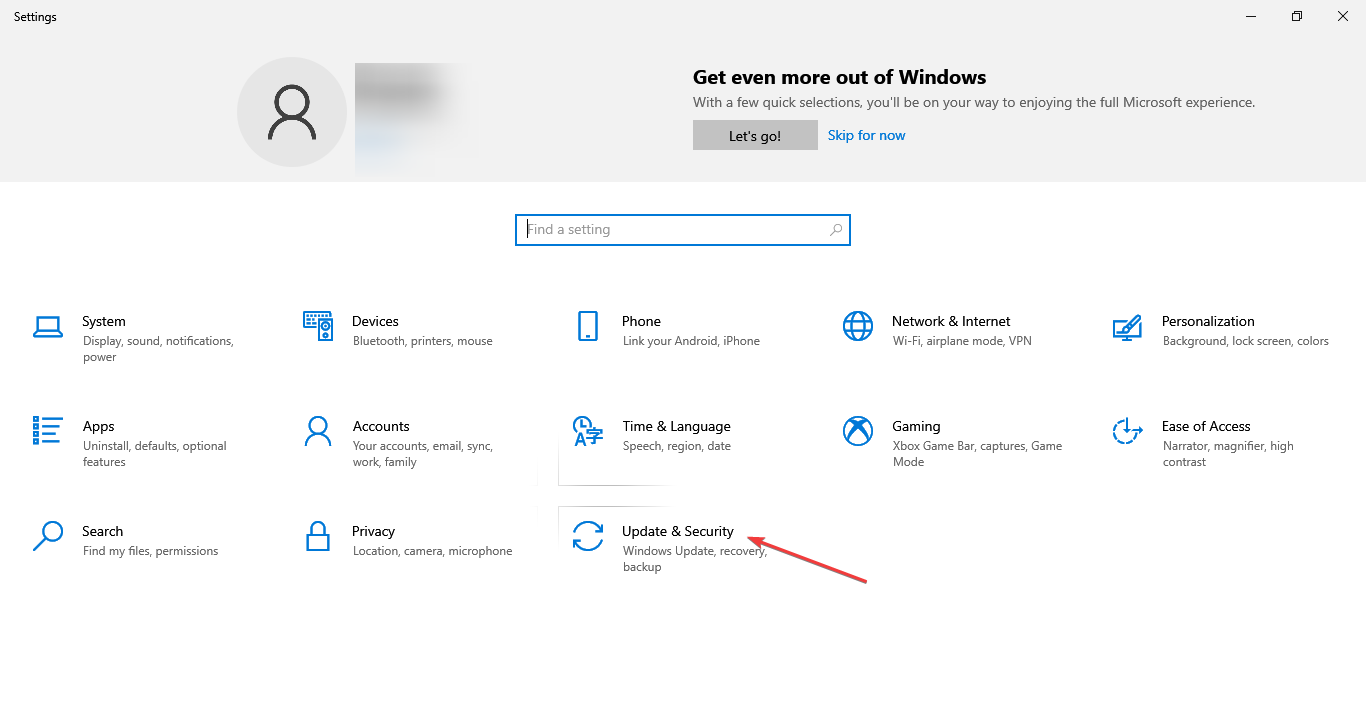
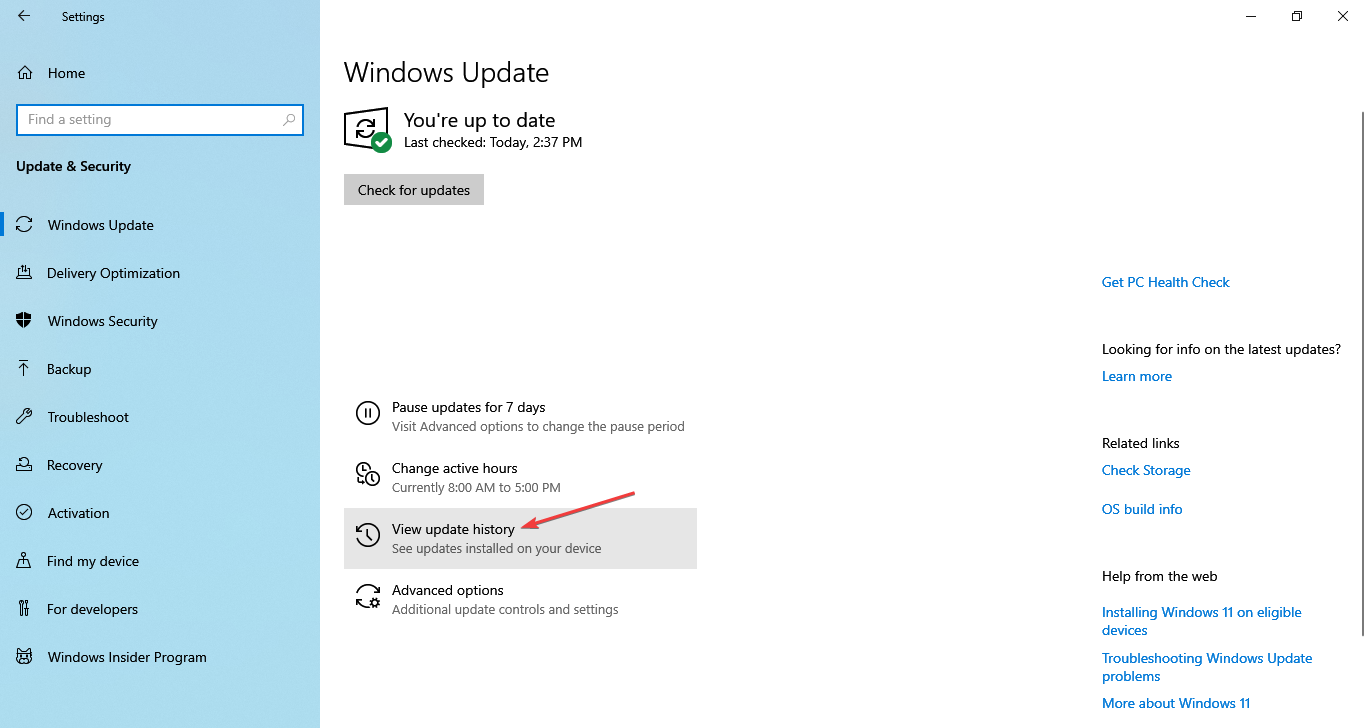
- Go to System Settings, navigate to Update & Security and then select View update history. (See Image 20)
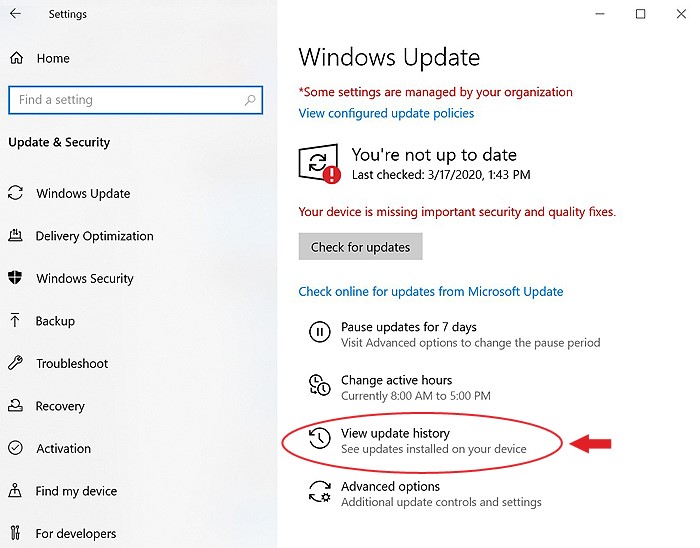
Image 20: Open System Settings and go to Update & Security > View update history
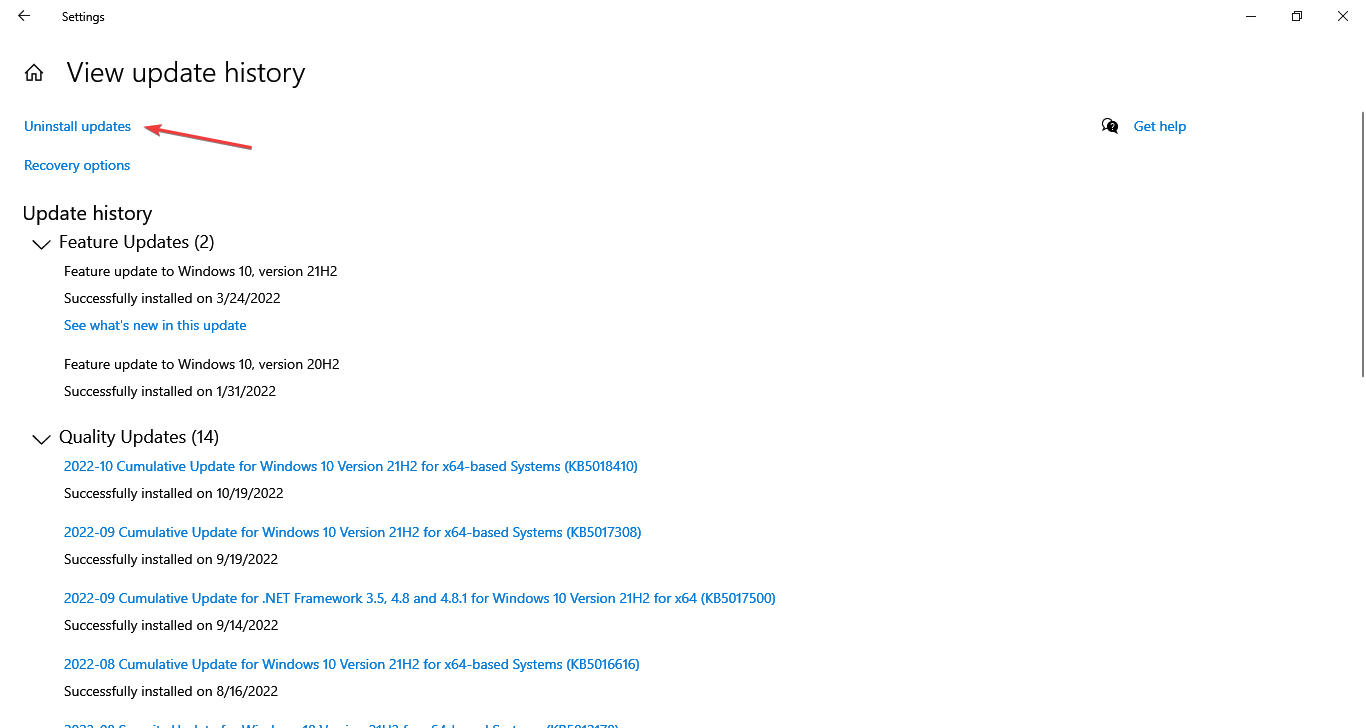
- On the next window, find the recently installed update and click Uninstall updates.
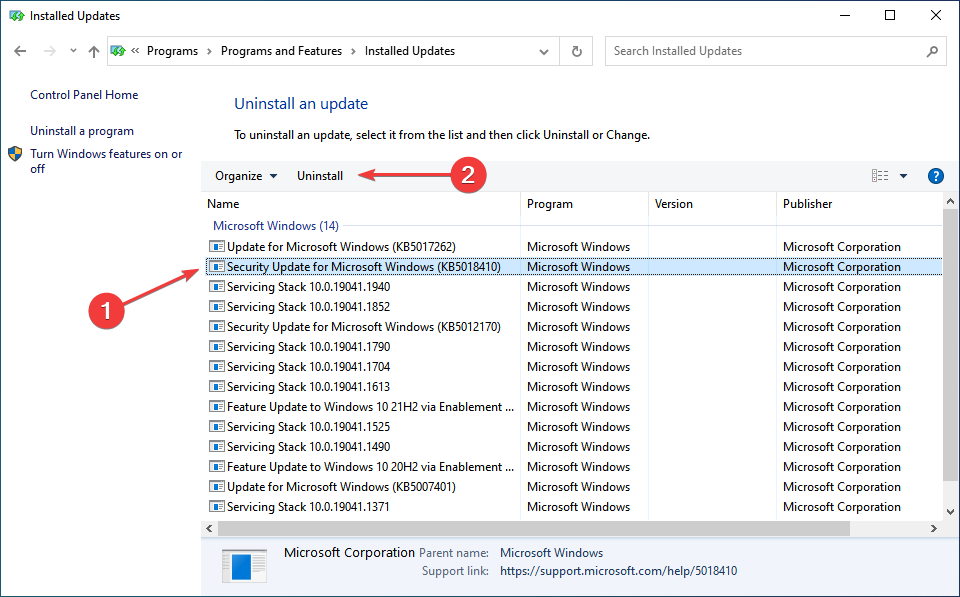
- Right-click on the Windows update and click Uninstall. (See Image 21)
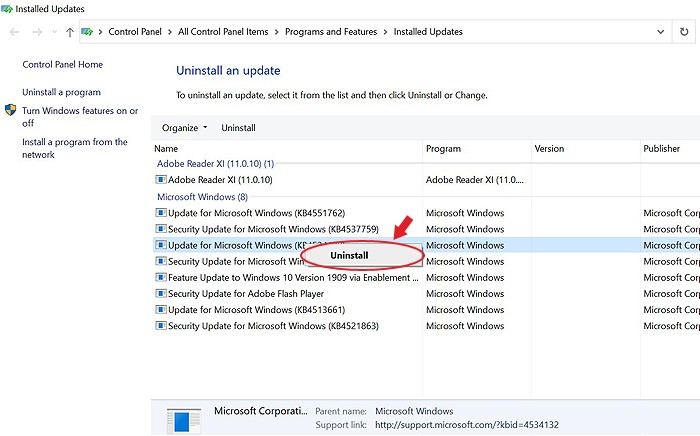
Image 21: Right-click the update to uninstall
- Once done, restart your system to check if the KMODE EXCEPTION NOT HANDLED error persists.
Method 7: Run Windows Memory Diagnostics
Some people reported that this error occurred due to a faulty RAM. To verify if there is RAM causing this BSOD error on your Windows 10, you may run the Windows Memory Diagnostics tool with the help of the steps given below:
- Type ‘memory diagnostic’ in the Windows search box to open Windows Memory Diagnostic. (See Image 23)
Image 23: Open Windows Memory Diagnostic using Windows search box
- Next, select ‘Restart now and cart now and check for problems (recommended).’ (See Image 24)
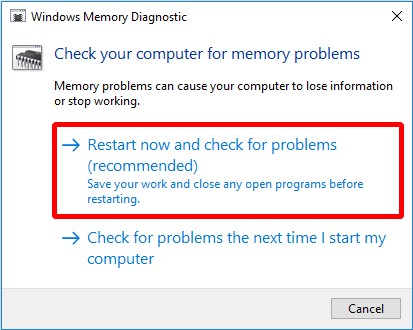
Image 24: Select Restart now and check for problems (recommended)
- A test to check the problems with RAM will start. Wait until the process is done; you will be able to see the results on the screen.
- Wait for the process to end. Once the search is completed, the computer will show all the detected problems on the screen.
Method 8: Update BIOS
In some cases, KMODE_Exception_Not_Handled error can occur due to an outdated version of BIOS on your Windows 10 PC. You can visit the official site of your system’s motherboard manufacturer to download the latest BIOS version. Follow the instructions given on the site to update BIOS.
Remember, updating BIOS is an advanced process. If the steps are not followed correctly, it can cause enduring damage to your system, and you may lose all of your data permanently.
Hence, it’s always suggested to take the backup of your data regularly. However, if you didn’t have the chance to back up your system data, you still have the chance to get back your system data.
You can use powerful Windows data recovery software, such as Stellar Data Recovery Professional. This DIY software also comes with a feature called ‘Create a recovery drive,’ enabling you to build a bootable recovery media that lets you restore data from a crashed or unbootable Windows 10 PC. You can check out the given video to learn more:
Final Thoughts
KMODE EXCEPTION NOT HANDLED error can lead your system to malfunction, crash, or even stuck at a booting loop. This error may appear with different stop codes, as explained in this blog. Irrespective of the reason, you can fix the error with effective methods, such as disabling fast startups, running BSOD troubleshooter, running SFC, uninstalling outdated/corrupt device drivers, etc. Additionally, to recover data from this BSOD affected system, you can use a Windows data recovery software, such as Stellar Data Recovery Professional. This DIY data recovery tool can retrieve data even from a non-bootable or crashed Windows 10 PC.
Was this article helpful?
YES1
NO
Kmode Exception Not Handled is a Blue Screen of Death error encountered on all recent iterations of the OS, including Windows 10.
Unlike other BSODs, this one may crash the PC on the login screen, making it challenging to troubleshoot things. Many users reported the error in Safe Mode, and some had KMODE EXCEPTION NOT HANDLED on startup.
Fret not! We have tested things and come up with a comprehensive list of solutions.
What causes KMODE_EXCEPTION_NOT_HANDLED?
Some of the reasons you may encounter the error are:
- Hardware issues – If you can’t boot Windows and receive the error instead, it’s likely the hardware to blame. Also, the situation may lead to Kmode Exception Not Handled while installing Windows 10.
- Outdated or corrupt driver – When encountering the error, it usually lists the problematic driver in brackets. Identify it and reinstall or update the driver.
- A bug in the installed version of the OS – In many cases, users encountered the error after installing a particular version of the OS and managed to fix things simply by reverting to the previous version, which points to a bug.
- Partial installation of Windows Updates – There’s also the possibility that an update was not installed properly, leading to the Kmode Exception Not Handled BSOD error.
The solutions we found may also work for other errors listed below:
- Kmode Exception Not Handled ntfs.sys/netio.sys/ ndis.sys/ syntp.sys/ wdf01000.sys/ etd.sys/ tcpip.sys/ tppwr32v.sys/ usbport.sys/ igdkmd64.sys/ intelppm.sys/ iastora.sys – The system identifies the file’s name that caused the error. You can use that information to find the problematic device or application.
- Kmode Exception Not Handled due to overclocking – This signals the voltage increase to the CPU behind the underlying cause.
- Kmode Exception Not Handled due to RAM – Usually, it is a faulty RAM module that periodically gives the errors. Try reseating it or run a few tests on the installed RAM.
- KMODE_EXCEPTION_NOT_HANDLED on USB – This message indicates a wrong driver or a faulty USB device.
- KMODE EXCEPTION NOT HANDLED during install – Once again, this error can be caused by corrupted drivers or an incompatible one. In this case, install the driver compatible with the iteration/version you are trying to install.
- Kmode Exception Not Handled loop – It indicates the computer’s incompatibility or old graphics card drivers.
- Kmode Exception Not Handled in Windows 10 on Dell – Dell users with Windows 10 are more often affected by this error.
How do I fix the Kmode exception not handled?
Before we head to the other slightly more time-consuming solutions, here are a few quick tricks that worked for many:
- If this is the first time you have encountered the error, force restart the computer. Users often encountered the error just once, and it didn’t reappear.
- Ensure all the connections are proper, including the ones to the RAM and storage drive. For example, one user fixed things simply by reconnecting the SSD, so check that the storage drive is connected correctly.
- Remove the RAM modules and re-insert them firmly into the slots.
- Disable any third-party antivirus installed on the computer. In case that works, you know what’s causing the error. Here we would recommend switching to more reliable antivirus software.
1. Update the problematic drivers
NOTE
The first two steps are necessary only if you can’t usually access Windows. Otherwise, you can start from the third step.
- While your computer boots, keep pressing F8 or Shift + F8.
- If the shortcut works, you should see a list of options available. Choose Safe Mode with Networking and wait until Windows boots into Safe Mode.
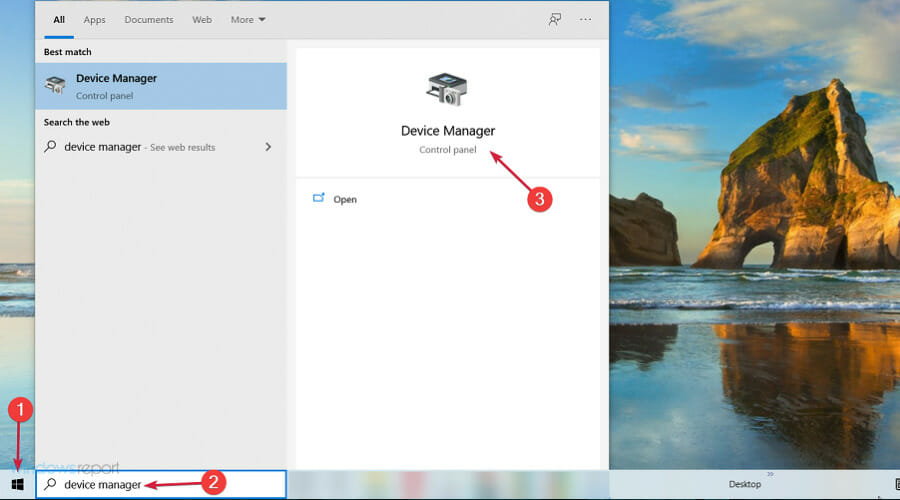
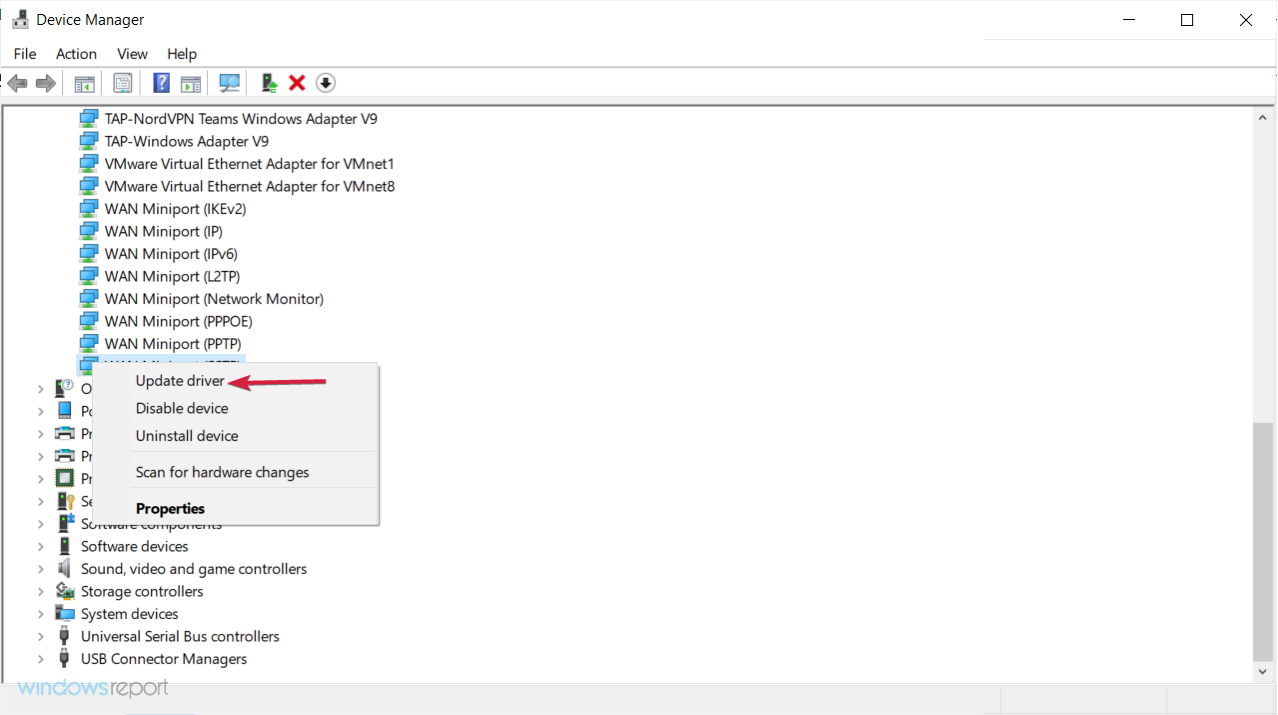
- Click on the Start button, type device manager, and choose the app from the results.

- Find any unknown devices, right-click on them, and select Update driver.

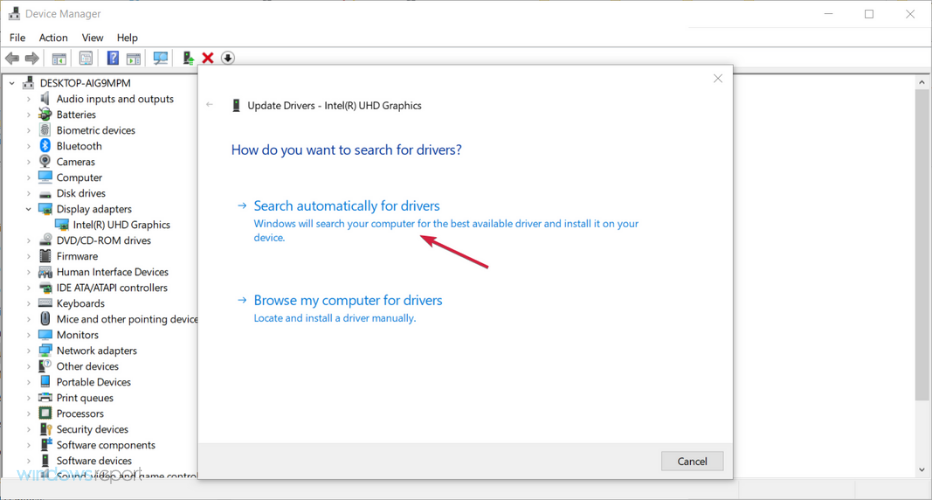
- Choose Search automatically for drivers.

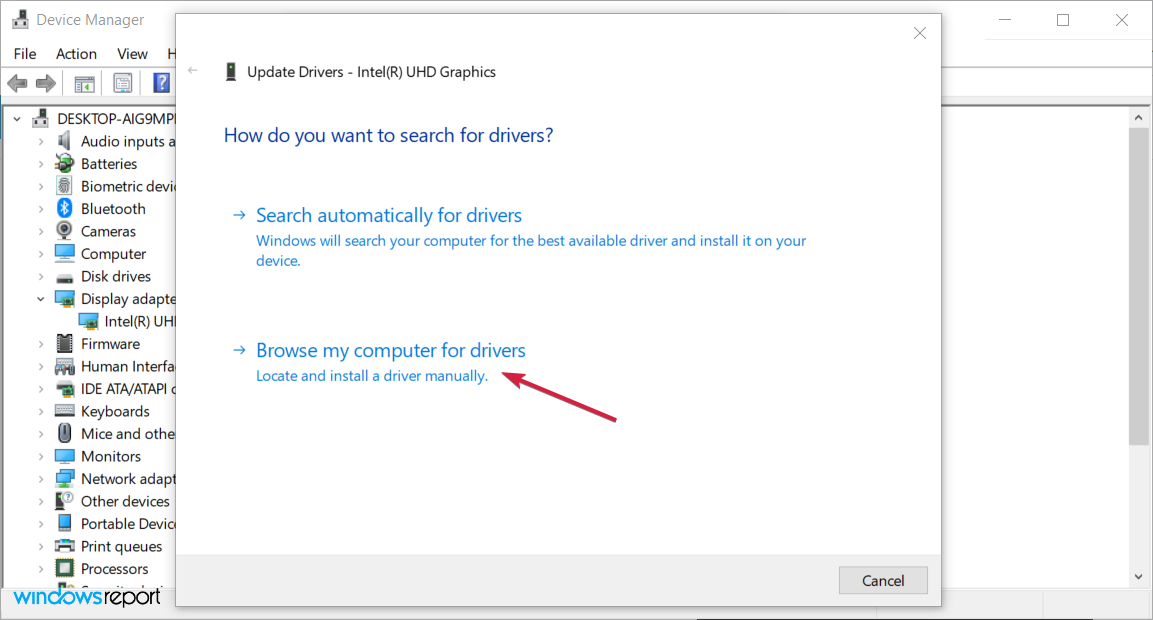
- If that doesn’t work, try the Browse my computer for drivers option instead, find the right driver, and install it.

- After you’ve installed all the missing drivers, exit Safe Mode and check if the issue is resolved.
Missing or corrupt drivers can sometimes cause a KMODE_EXCEPTION_NOT_HANDLED error in Windows 10. To fix this problem, updating the problematic one or installing the missing drivers is recommended.
This error is often related to your network adapter or the graphics driver, so start by updating those first. You can also visit your manufacturer’s website for the latest driver version.
If updating your drivers doesn’t work, or you do not have the necessary computer skills to update/fix the drivers manually, we strongly recommend you use a third-party repair tool.
The automatic driver updater Outbyte Driver Updater will quickly repair driver issues by scanning your PC for older, lost, or damaged drivers, then updating to the most recent compatible version.
Outbyte Driver Updater
Keep all your drivers up to date and fix most incompatibility issues with this simple tool.
2. Reinstall the corrupt driver
NOTE
If you can’t boot the PC normally, switch to Safe Mode by pressing the F8 or Shift + F8 key right after turning on the computer, choose Safe Mode, and then try the steps here. The same would apply throughout the guide.
- Press Windows + R to open Run, type devmgmt.msc in the text field, and hit Enter.

- Look for drivers with a warning sign (these show up automatically), right-click on them, and select Uninstall device.

- If available, check the Delete the driver software for this device option, then click on Uninstall.
- Once done, restart the computer, and Windows will automatically install a fresh copy of the driver as long as the concerned device is connected correctly.
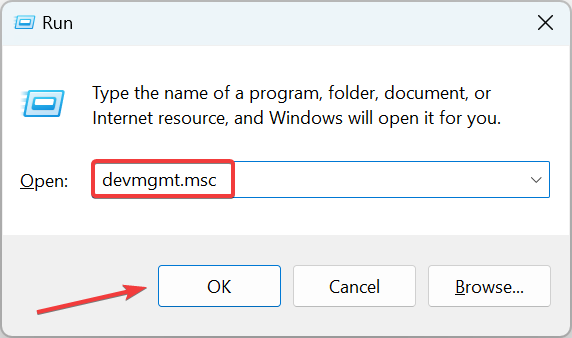
Some users reported corrupt drivers as the underlying cause behind the Kmode Exception Not Handled error in Windows 10. So, make to check for these as well.
This method works when an updated version of the driver is not available. Otherwise, we recommend installing that instead of a fresh copy of the same performance.
3. Perform a System Restore
-
1. Press Windows + R to open Run.
-
2. In the Run dialog box, type rstrui.exe, and then click OK.
-
3. Choose the Create a different restore point option, and click Next.

-
4. Select a restore point from the list and then click on Next.
-
5. Now, review the restore details, and click Finish.
-
6. After the restore is complete and the system restarts, look for the latest version of Windows 10 and install it.


A trick that can help users fix the Kmode Exception Not Handled error when the previous update wasn’t properly installed is to perform a system restore.
4. Rename the problematic file
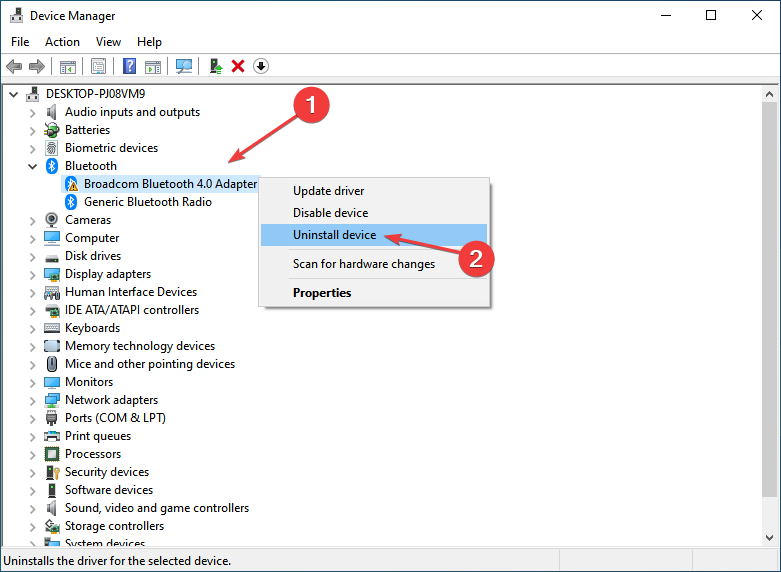
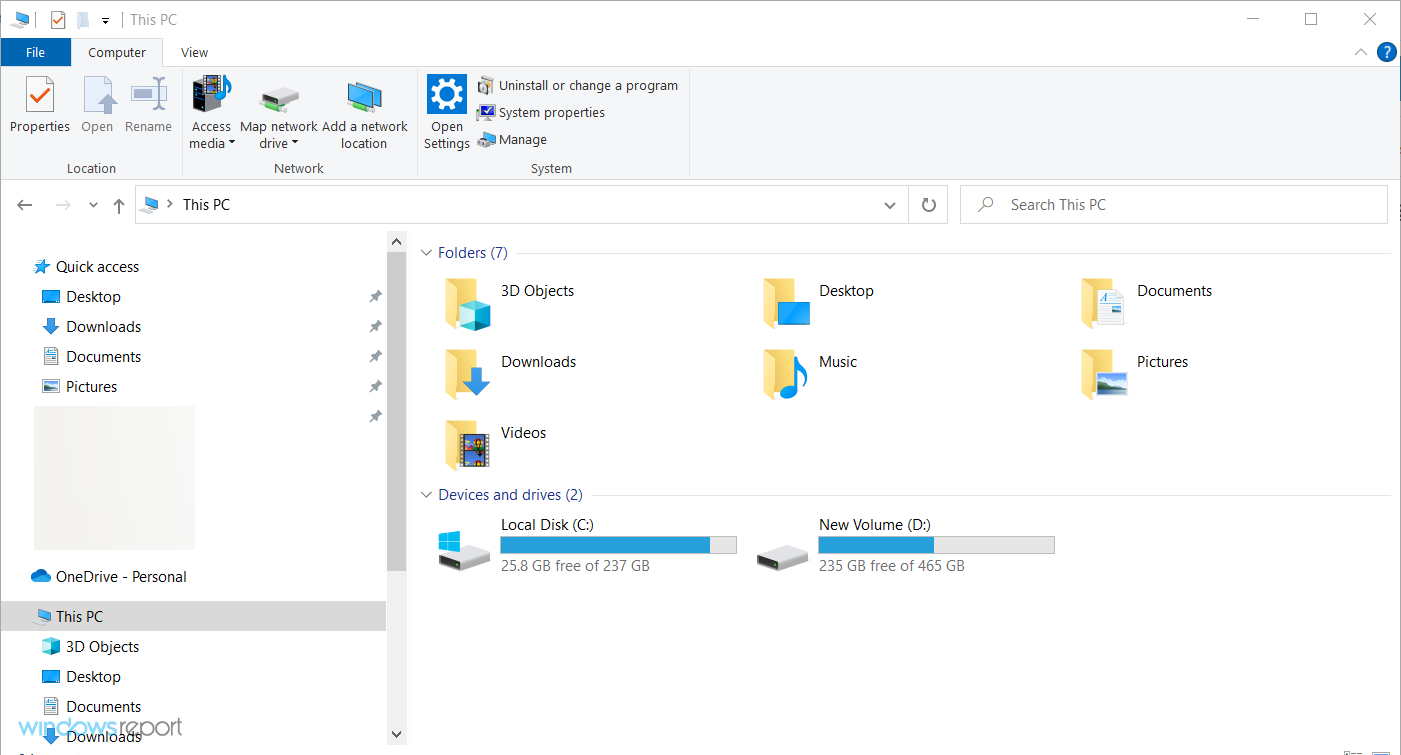
- Press Windows + E to start File Explorer, and navigate to the folder where the problematic file is installed.

- Locate the file that triggers the error, and rename it. For instance, for Bitdefender, locate bdselfpr.sys and rename it to bdselfpr.s__.

As previously mentioned, a specific software can cause the Kmode Exception Not Handled BSOD error on Windows 10.
Other programs that led to the error include:
- Esportal (EspoDriver.sys)
- Riot Games (vgk.sys)
Some users also fixed things by uninstalling these apps or related ones. For instance, if you have any games published by Riot Games, remove them or change the file’s name.
Remember that changing the name of these files isn’t always the best solution because it can lead to even more system instability.
Another way to quickly and efficiently solve the Kmode Exception Not Handled BSOD error is to use a repair tool.
5. Update the BIOS
NOTE
Bear in mind that BIOS update is an advanced procedure, and if not performed correctly, it can cause permanent damage to your PC.
- Go to your motherboard manufacturer’s website, download the latest BIOS version for your device, and load the files on a USB memory stick.
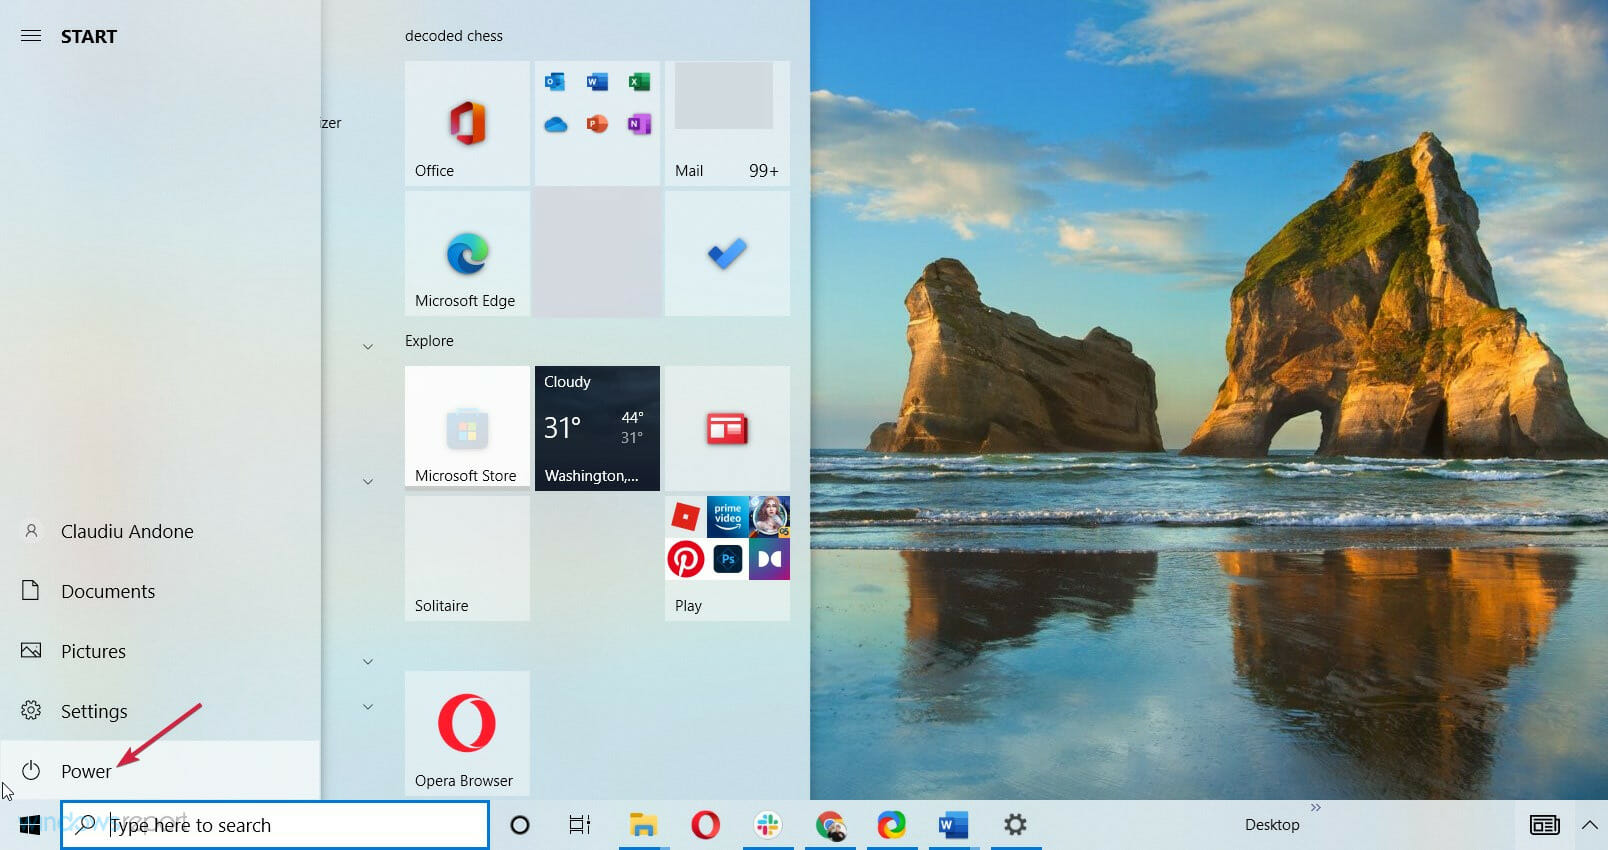
- Press Windows to open the Start Menu and click the Power button.

- Hold the Shift key and choose the Restart option.
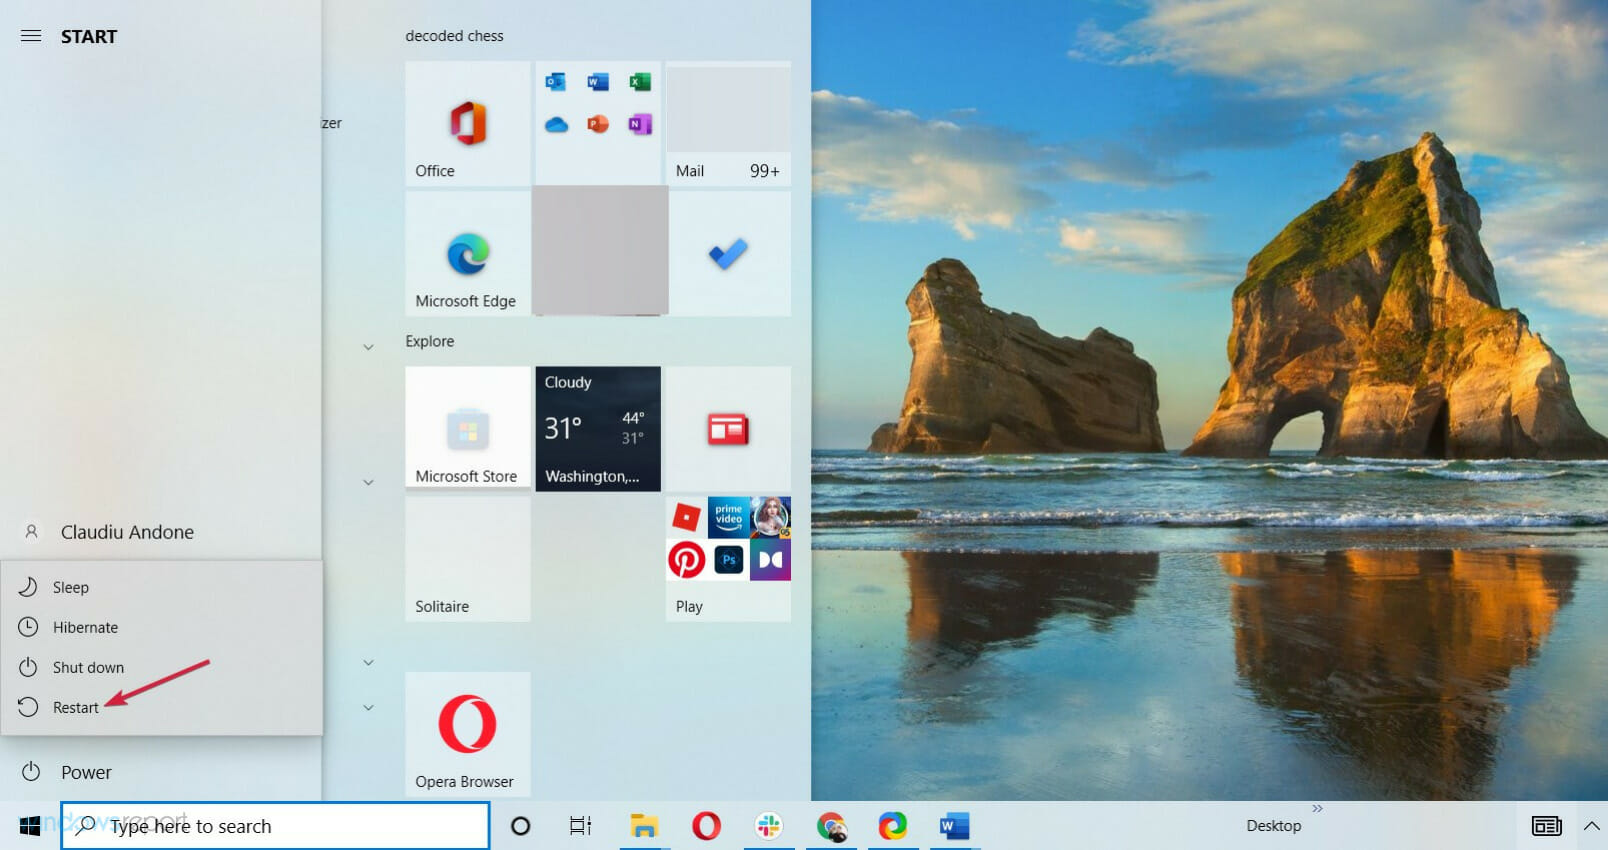
- You should see several options available. Choose Troubleshoot.
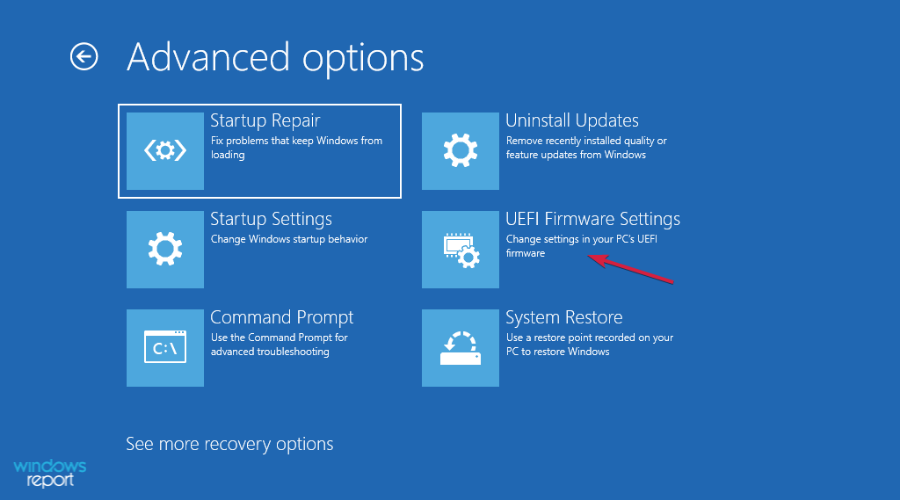
- Now select Advanced options and select UEFI Firmware Settings.
- Click the Restart button, and your computer should now boot to BIOS.
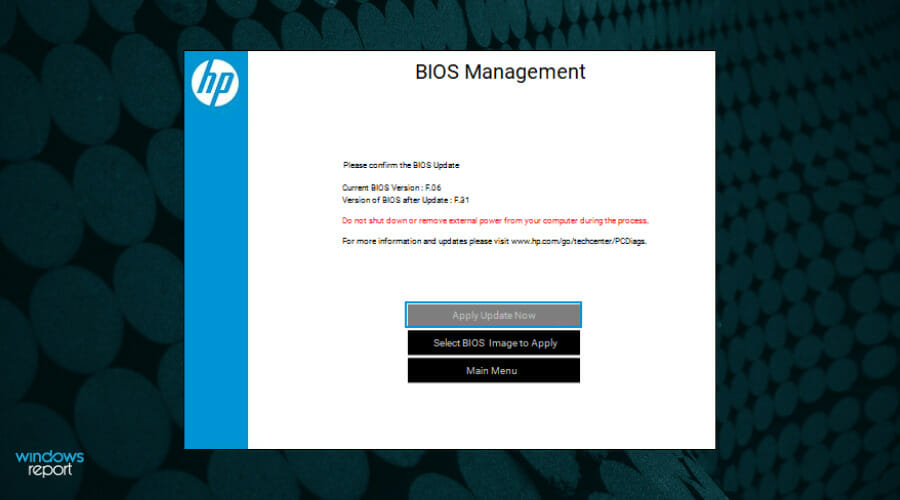
- Look for the update feature of your BIOS and load the new version from your USB stick.

In some cases, the Kmode Exception Not Handled error can be caused due to an outdated version of BIOS. We recommend checking the computer manual to find the exact process to update the BIOS.
Also, read all about how to update your BIOS; it may come in handy if you’re looking for more information on the process.
- Fix: Unexpected Store Exception error in Windows 10/11
- Fix: ndu.sys BSoD error in Windows 10/11
- Full Fix: Unhandled exception error in Windows 10/11
- Fix: Thread Stuck in Device Driver error in Windows 10/11
6. Uninstall recent Windows updates
- Press Windows + I to open Settings, and click on Update & Security.

- Click on View update history.
- Now, click on Uninstall updates.
- Select the update installed last, and click on Uninstall.

- Finally, click Yes in the confirmation prompt.
7. Test the RAM for issues
- Press Windows key + R, and type mdsched.exe, then press Enter or click OK.
- In the Windows Memory Diagnostic window, choose one of the two options and follow the instructions.
- The tool will now detect and fix issues with the RAM.

In case the built-in utility doesn’t work, you can try MemTest86+, an open-source memory repair tool that runs extensive tests to find out the minutest of the issues with the RAM and eliminate them.
If issues are detected and can’t be repaired by the tool, we recommend you replace the RAM module. Or, if you have multiple sticks installed, remove the problematic one. This should, in all likelihood, fix the Kmode Exception Not Handled error.
These were the best fixes for Kmode Exception Not Handled BSOD error and have helped most users get things up and running.
Alternatively, you could prepare beforehand for such events and install a dedicated tool to repair BSoD errors and never have to worry about them again.
If you have any other suggestions or solutions that worked for you, leave us a note in the comments section below.
Milan Stanojevic
Windows Toubleshooting Expert
Milan has been enthusiastic about technology ever since his childhood days, and this led him to take interest in all PC-related technologies. He’s a PC enthusiast and he spends most of his time learning about computers and technology.
Before joining WindowsReport, he worked as a front-end web developer. Now, he’s one of the Troubleshooting experts in our worldwide team, specializing in Windows errors & software issues.
BSOD or blue screen of death error is a common problem on Windows 10. But the problem becomes worse if you get the kmode_exception_not_handled error. As a user, you will face the most challenging situation while powering the computer and getting the error message shown on display.
Usually, the problem occurs while the software or apps overwrite memory of each other. It can crash the software, due to which you can face a blue screen error. You can face the error on your device’s display for multiple reasons. Many of us know how to make the error correction. However, those who don’t know should go through the article properly to fix the problem. The solutions don’t rely on Windows 10 or any older version. If you cannot get rid of the error to boot the windows, then it is advised to begin your windows in safe mode, and then you should perform the solutions.
What is KMODE_EXCEPTION_NOT _HANDLED Error?
The Kmode Exception not handled error is a consequence of memory-related conflicts between two apps or more. This bug check comes with a value of 0x0000001E. It means that a kernel-mode program created an exception that this error handler could not catch. As a result, it couldn’t search for the problem. As a result, you can experience the error of the faulty driver. There are a few users who have experienced the whole system fails.
Bug Check 0x1E Parameters:
Parameters are as follows:
- The exception code that was not handled.
- The address at which the exception occurred.
- Parameter 0 of the exception.
- Parameter 1 of the exception.
Examples Of Bug Check 0x1E: kmode_exception_not_handled Error:
These are some error messages found on the display that people reported, such as:
Kmode exception not handled ntfs.sys/netio.sys/ ndis.sys/ syntp.sys/ wdf01000.sys/ etd.sys/ tcpip.sys/ tppwr32v.sys/ usbport.sys/ igdkmd64.sys/ intelppm.sys/ iastora.sys – The error says how your windows system points out to the name of the file causing the error. In this case, you need to use the information to look for the device or app causing the problem.
Kmode exception not handled overclock –
It appears when the CPU voltage has been increased.
Kmode exception not handled RAM: The message indicates that a faulty RAM module gives the error periodically.
Kmode_exception_not_handled USB: It means a wrong driver or a faulty USB device.
Kmode exception not handled during install: If you face the error during installation, ensure that a corrupted driver is causing the issue. The driver must not support your computer.
Kmode exception not handled loop – The error message means that the computer doesn’t allow you to use a graphics card or the cards are old.
How to Fix The kmode_exception_not_handled Error in Windows 10?
The problem can be solved easily like other BSOD or blue screen of death errors. We have given here the essential methods that you are required to follow. You should try the solutions to get rid of the error like resetting windows, going into Safe mode, etc. It relies on the severity of the problem.
Way 1. Disable Fast Startup:
We have let you know here how to disable a fast Startup.
1) Your first task is to tap on Windows Logo Key + Rand, then you should navigate to the box and type Control panel there.
2) Then, you have to turn the view to big icons. After that, tap on the Power Options.
3) Go to the right plane after that, and then you should tap on Choose what the power buttons do.
4) Now, you need to choose Change settings, the currently unavailable option, appearing on display.
5) It is recommended to unselect the Turn on Fast Startup box. You have to hit save Changes to save and then exist from the window.
6) Finally, check if the problem is gone.
Way 2. Update The Faulty Driver:
If you find a driver causing the issue, you must update the driver. Sometimes, you can experience problems due to outdated drivers as it can affect the function of the PC. Therefore, it is essential to check the updates, and after checking, you should perform the required task as soon as possible. You may think of the drivers that are causing issues. The Windows indicates the driver’s name on display.
As soon as you get the problem, you will see the driver’s name appearing in the bracket with the error. When you get the driver’s name, you have to perform the task to update it.
- You need to tap on the Windows key + S first. After that, you must write device manager in the search box. Next, hit the enter key.
- After that, your job is to look for the hardware connected to the corresponding driver error. Then, you need to tap on the hardware and choose Update driver software.
- After that, you should choose the Search Automatically option for the updated driver software. You need to wait for a few minutes till the update is finished.
- If it doesn’t work, you need to navigate to the manufacturer’s website, and then you should look for the respective driver. Then, you can get the update of the driver available on it. The process may take a little time, but your driver will be updated in the end.
Way 3. Uninstall The Faulty Software/Driver:
Drivers or software can cause the error also in your device currently. It indicates that you are required to remove or unplug the software or hardware. Whether you have installed software or any app before facing the error, you have to uninstall it. If you have connected your device, you must remove the device.
People who have already installed hardware need to remove it entirely and check if the error is solved. You can uninstall a recently added program by performing these steps.
- Your first task is to tap on the Windows Logo Key + R button to open the Run window. Then, your job is to write the control panel by going to the run command box. Then, you have to tap on the enter key.
- After that, your task is to tap on the view by option and choose a category from the list. Now, you have to select the Uninstall program option available under the title Programs.
- Next, you have to choose the program or highlight the one you are willing to uninstall. Now, you need to tap on the Uninstall button.
- As soon as you uninstall the program, your job is to reboot the PC. Then, you should check if the error exists on the PC.
Way 4. Repair Problem Using Windows:
Your Windows can repair its problems itself, and it performs an SFC scan to figure out the issue and fix it. In addition, this app helps to check all the files available on the PC and let you know if these are working correctly.
The following steps let you know how you can fix the error.
- First, you need to move to the command prompt window. To do this, you need to write cmd in the search box.
- After that, you must write the command sfc/scannow and hit the enter key.
- The process can take a while, and therefore, you must wait for a while till the process is not ending.
- At last, your task is to reboot the PC and find if the error is fixed.
Way 5. Run Windows Memory Diagnostics:
It is a system memory test that enables you to check the computer’s RAM for problems. While testing, you can see a status bar displaying if any issues have been detected. With the help of Windows Memory Diagnostics, you can check the problem.
- First, you should go to the Windows memory diagnostics and open it. To do this, you need to search it from the search box of Windows 10.
- Then, your task is to tap on Restart now option, and then it is recommended to check the errors.
- After running the tool, if you find the issue on memory, you need to exchange the physical RAM and check it.
Way 6. Installing Missing or Corrupt Drivers:
Drivers are essential for the operating system because it uses drivers to work with your hardware. Whether you find a driver outdated or corrupted, it can cause the issue. For example, you can face the incompatibility issue when updating the operating system to Windows 10. Besides, you might face the drivers corrupted without any specific reason.
If you are willing to check whether the issue is caused due to a faulty drive or not, you need to run an automatic driver update. Besides, you can update the drivers manually to their recent available versions. You can install the current drivers for a recently installed hardware device. Whether you have not installed any new hardware, ensure that you have the recent drivers for these devices.
- Video card
- Network card or router (if it is available to you)
- Any removable or external disk drive
- First, you have to tap on the Windows + R, and then you need to type devmgmt.msc. Finally, tap on ok to open your device manager. It will showcase a list containing all the installed device drivers.
- Now, you are required to look for the device that is marked in yellow.
- Tap on the device again, and then you should choose update driver software. After that, your task is to follow the steps to get driver updates.
- If you’re unable to find any update for the driver, you have to uninstall this from here.
- Make sure that you download the best driver for your specific device from the manufacturer’s website. Then, you need to install this.
Way 7. Rename The Problematic File:
- If you are willing to rename the file, your first job is to tap on the Windows key + E to begin File Explorer.
- After that, your job is to move to the Bitdefender folder from Program Files. Then, you should find bdselfpr.sys and rename the file after that. Again, you can take bdselfpr.s__ as an example.
- As we have said before, a few specific software could create the blue screen of death error on Windows 10. However, you should remember that you can always solve the issue by changing the name of these files, and the reason is that it can cause more system instability.
- Take the help of a repair tool that can help you get rid of the error sometimes. The specialist tests the problem, and you can solve the issue in no time.
Way 8. Uninstall ON/OFF Gigabyte:
- Your first task is to hit the Start button, and then you should choose Settings.
- After that, your job is to choose the Apps section.
- Then, you need to look for the ON/OFF Gigabyte app available from the apps list on the right pane. Next, you need to tap on it and choose Uninstall.
- You need to continue doing the uninstalling process and then reboot the PC.
You should know that ON/OFF Gigabyte is a specific program compatible with USB power stations. However, according to the users, the driver for the software is corrupted and doesn’t support Windows 10.
Are you using any software like this on your device? If yes, then ensure to remove the software. If you face any problems, a list appears containing the best uninstaller programs helpful in this case.
Way 9. Uninstall Your Antivirus Software:
- First, your task is to hit the Windows icon button, and then you have to choose Settings.
- Next, you have to choose the Apps section.
- Look for the antivirus app from the list of apps and then tap on it. After that, you should choose Uninstall option.
- You have to continue doing the method and then restart the computer.
A few times, you can face an issue with your antivirus software. According to a few readers, the McAfee antivirus software can cause the problem. Therefore, removing the software from the PC is recommended to solve the issue.
If you are willing, then disable the antivirus first. In this case, you need to use its menu settings and then check if the issue is fixed.
Hence, it is recommended to take the help of a professional uninstaller tool to remove any files and registry items related to the faulty antivirus. When you complete the uninstallation of the initial antivirus, you need to install a different protection software on the Windows PC.
Way 10. Update Your BIOS:
You should remember that BIOS update is an updated process. If you have not performed it correctly, it may permanently damage your computer.
- First, navigate to the motherboard manufacturer’s website. Then, you need to download the upgraded version for the device. Finally, you need to load your files on a USB memory stick.
- Then, you have to navigate to the Start Menu and open it. Now, hit the Power button.
- After that, your job is to hold the Shift button and choose the Restart option.
- You can see here multiple options available. Then, your task is to select Troubleshoot option.
- Next, you have to choose Advanced Options, and then you should select the UEFI Firmware Settings.
- Hit the Restart button, and after that, you should boot to the BIOS.
- Next, find the update feature of the BIOS, and then you need to load the recent version from the USB stick.
An outdated version of bios can cause an error sometimes. Based on every device, the BIOS or UEFI can be different. Therefore, checking the motherboard instruction manual is essential to know the proper procedure for updating the bios.
Way 11. Uninstall the Program or Software Not Running Properly:
If you are willing, go through the system to detect the program or software not running accurately. Whether you want to know how to uninstall a program or software from your operating system, you should follow the steps.
- Move to the Start menu first.
- After opening the Start menu, you need to head towards the Control Panel option.
- After that, your job is to select the Program option.
- Next, your task is to tap on the Uninstall a program option.
- Now, you can see a program list appearing on display.
- You should choose the specific program or software you are willing to uninstall.
- Then, tap on the Uninstall option.
Continue performing the steps to uninstall any program or software. You can uninstall the program manually to leave the junk files a few times. We recommend you uninstall any program with taking help of the third-party Uninstaller tool. You can uninstall software or program entirely without leaving any traces behind using the tool.
Way 12. Check the Hardware Compatibility:
Whether you have updated the Windows 10 OS recently and face the issue quite often, the hardware compatibility may be the reason.
Therefore, you are required to check the official documentation that the Windows 10 OS offers to see if the computer hardware enables you to run Windows 10.
Way 13. Windows 10 Blue Screen Troubleshooter:
If you are willing to solve the error, you should follow the steps.
- First, your task is to head towards the Start menu.
- Move to the Start menu, and then you need to head towards the Settings option. After that, your job is to choose the Update & Security option.
- Next, you have to select the Troubleshoot option and run it.
- As soon as the Troubleshoot method gets over, you should check if the error is fixed.
Way 14. Roll Back Windows 10:
You can experience the error for a Windows update. It is because a few drivers may exist that don’t support the recent Windows update. In this case, your job is to roll back the Windows 10 and check after that if the issue resolves.
- Before rolling back your windows 10, you should access the Safe mode.
- Your job is to head towards the Settings to roll back the driver.
- Then, you need to go to the Update & Security option and open it.
- Choose the Recovery option.
- Tap on the Get started option available under the Go back option to the earlier version of Windows 10. You can see a window appearing on display, and the process can take a while to load.
- Choose the option For another reason, and tap the Next option.
- Tap No, thanks; next, Next, Go back options to the previous building. Performing the process can take a while to finish. Finally, check if the error is fixed.
Way 15. Manually Set Your CPU Voltage:
An advanced process may damage seriously if the steps are not performed correctly. As a result, you should not attempt it if you don’t have essential skills.
According to a few users, the CPU may be a reason to cause the issue. Hence, you are required to set the CPU voltage manually. You have to use the advanced settings of the BIOS, or you can take the help of dedicated overclocking software. It helps to change the voltage of your CPU.
Ensure that you have checked your motherboard manual, and then you should consult with an expert.
Way 16. Check Your RAM:
If you are willing to check the RAM, your job is to tap on the Windows key + R buttons. Then, your task is to type the command mdsched.exe and tap Enter. You can hit the OK button also.
When the Windows Memory Diagnostic window appears, you should select one of the available two options. Next, you should follow the steps to identify and solve potential issues.
Way 17. Remove External Hardware:
While you will boot the PC, you should ensure that all the external hardware is disconnected. External hardware includes a keyboard, mouse, storage devices, and video game controllers. If necessary, then you can check for hiccups while booting.
If you find your PC working smoothly, it indicates that you have not installed the drivers related to the external devices correctly.
Way 18. Free Up Storage Space:
You can experience the issue for an entire hard drive also. Microsoft advises people to leave ample space in the C:\ drive because it has default files. A complete C:\ drive can cause issues while downloading and installing a Windows update.
If necessary, then you can remove any unwanted or unused files. After that, you need to uninstall the obsolete software, and after that, your task is to install video games in other partitions. Then, if you are willing, you can use cloud storage to store your files when you are running out of space frequently. Besides, if you are willing, you have to update the existing storage for a larger drive.
Way 19. Replace Your RAM:
- First, your job is to open the PC case, and then you need to find the RAM modules. Next, ensure that you are not voiding the device warranty by operating.
- You need to remove the component that is affected. First, however, you should ensure that you pull the hinges holding them in place to the sides. The process helps to dislodge the module.
- You should insert your new module properly in the socket, and then your job is to push back the side hinges. Unfortunately, according to a few users, faulty RAM can cause the error.
Way 20. Uninstall the VPN Client:
- Your first job here is to tap on the Windows Start icon, and then you need to select Settings.
- After that, your job is to hit the Apps option.
- You should now look for the VPN app from the list of apps available on the right pane. Then, you need to choose it and then tap on the Uninstall button.
- Continue the uninstallation method, and after that, your job is to reboot the device.
- You can experience the error for VPN clients like BitDefender and Cisco.
- Try to uninstall the VPN client to get rid of the error. Using a VPN is suitable for the overall online activity, for which we recommend pausing the client and seeing if it can help you.
Way 21. Clean Boot Windows 10:
Performing clean boot helps to disable all the third-party software in Windows. In addition, the process is used to diagnose plenty of common problems that Windows users face.
- Go to the Start Menu Search Bar, and then write msconfig there. After that, you need to choose System Configuration in the search results.
- Move to the Services tab in the window.
- After that, your job is to check your Hide all Microsoft services box.
- Next, you should check the services and tap on the Disable all option.
- You should open the Task Manager and head towards the Startup tab.
- You can choose the services one by one, and next, you need to tap on the Disable button on the lower right.
- Finally, your work is to restart the PC and check if the issue remains. If you find the issue fixed, it indicates that the BSOD problem was occurred by interference from third-party software.
The Bottom Line:
The kmode_exception_not_handled problem is common in Windows 10. You can easily eliminate the error as it has plenty of solutions. We have given here plenty of methods suitable to handle the error. If you can’t solve the problem, the error may be in the RAM. Therefore, it is recommended to visit the vendor or contact the manufacturer to check and replace your RAM. Multiple problems are there that are hard for the ordinary person to handle.
Frequently Asked Questions:
- What is a KMode exception not handled?
The problem is a BSOD error triggered by a system crash. Kernel Mode Program is the main reason behind the issue that can cause an exception that could not be identified.
- What is a faulty driver?
A faulty driver is something that has been corrupted already due to which you are unable to use it. If you find a driver corrupted, the corresponding device relying on it becomes inoperable also.
- How do you check your drivers for errors on Windows 10?
You can use multiple ways to find and fix driver problems like updating drivers, backing up drivers, and auto-detecting drivers.