
Джон, дата публикации: 2024 월 12 일 2 г.
Многим администраторам серверов необходимо клонировать разделы дисков. Некоторые хотят заменить свои диски на более крупные, в то время как другие хотят перенести операционную систему и программы на другое оборудование. На рынке существует множество вариантов программного обеспечения для клонирования дисков, и восстановление резервной копии образа также является методом защиты и миграции данных. Итак, что выбрать: резервное копирование образа или клонирование диска? И какое конкретно программное обеспечение следует использовать при выборе клонирования диска? В этой статье будут даны ответы на эти вопросы и подробные инструкции по клонированию Windows Server 2025 разделы диска.
Содержание:
- Преимущества клонирования диска по сравнению с резервным копированием образа
- Преимущества клонирования диска с NIUBI Partition Editor
- Как клонировать Windows Server 2025 диск
Преимущества клонирования диска по сравнению с резервным копированием образа
Клонирование диска и выполнение резервного копирования образа — это два разных подхода к защите данных. По сравнению с резервным копированием образа, клонирование диска имеет много преимуществ:
- Немедленный загрузочный диск
Клонированный диск — это точная загрузочная копия вашего оригинального диска, то есть вы можете немедленно вставить его в свою систему и загрузиться с него без необходимости что-либо восстанавливать или переустанавливать. Это идеально подходит для быстрого восстановления в случае сбоя оборудования. - Более быстрое восстановление
Восстановление с клонированным диском происходит практически мгновенно. Вы просто заменяете неисправный или старый диск клонированным и продолжаете работу без значительного простоя. - Упрощенный процесс
Процесс клонирования диска прост. Обычно вы просто подключаете новый диск, запускаете инструмент клонирования, а программное обеспечение делает все остальное. Нет необходимости в сложных шагах или дополнительном программном обеспечении для восстановления образа. - Замена диска без перенастройки
При клонировании диска новый диск является точной копией оригинала. Это означает, что все операционные системы, приложения, настройки и конфигурации переносятся без проблем. Вам не нужно переустанавливать программное обеспечение или перенастраивать параметры. - Целостность данных
Клонирование создает точную копию всего диска, гарантируя копирование всех файлов, системных файлов и скрытых файлов, включая загрузочные разделы и конфигурации системы. - Нет необходимости в переустановке
При клонировании новый диск можно использовать немедленно, без необходимости переустановки каких-либо приложений, настроек или операционных систем. Это решение типа «plug-and-play». - Хорошо подходит для обновления дисков
Если вы обновляетесь до большего или более быстрого диска (например, переходите с HDD на SSD), клонирование является наиболее эффективным методом. Оно позволяет вам перенести все на новый диск и продолжить работу без каких-либо сбоев. - Лучше для миграции системы
Если вы переходите на новое оборудование или меняете конфигурацию дисков, клонирование часто является лучшим вариантом. Оно гарантирует, что все, включая загрузочные разделы и настройки ОС, будет перенесено на новый диск как есть.
Преимущества клонирования диска с NIUBI Partition Editor
1. Гораздо быстрее
Этот инструмент клонирует разделы диска на уровне файловой системы, что делает его намного быстрее, чем клонирование по секторам. Кроме того, его усовершенствованный алгоритм перемещения файлов позволяет клонировать разделы диска на 30–300 % быстрее, чем аналогичные альтернативы.
2. Размер целевого диска может варьироваться.
При клонировании диска на Windows Server 2025 и другие версии с NIUBI Partition Editor, целевой диск может быть равен, больше или даже меньше исходного диска. При клонировании на меньший диск размер целевого диска должен быть больше общего используемого пространства исходного диска.
3. Изменение размера разделов во время клонирования диска
В большинстве случаев размеры исходного и целевого дисков различаются. NIUBI Partition Editor позволяет изменять размер разделов во время процесса клонирования. Это обеспечивает большую гибкость и удобство. Кроме того, это позволяет расширять диск C: и другие разделы, что особенно полезно, когда исходный диск почти заполнен.
4. Различные функции управления разделами диска
Клонирование дисков — это лишь одна из возможностей NIUBI Partition Editor. Как комплексный набор инструментов для управления дисками, он позволяет вам сжимать, расширять, перемещать и объединять разделы без потери данных. Вы также можете преобразовывать типы разделов диска, создавать, удалять, форматировать, стирать и оптимизировать разделы, среди многих других функций.
Как клонировать Windows Server 2025 диск
Скачать NIUBI Partition Editor, и вы увидите все устройства хранения вместе с их схемами разделов и подробной информацией в главном окне. Щелкните правой кнопкой мыши раздел или переднюю часть диска, и вы увидите доступные параметры.


Действия по клонированию диска на Windows Server 2025/2022 и другие версии:
- Нажмите на переднюю часть исходного диска и выберите «Копировать диск» или нажмите «Мастер клонирования дисков» в левом верхнем углу.
- Выберите целевой диск во всплывающем окне. Если на целевом диске есть разделы, вам будет предложено выбрать, следует ли удалить эти разделы. Вы сможете продолжить процесс клонирования, только если выберете опцию удаления разделов.
- Измените размер и расположение разделов на целевом диске, начиная с последнего. Чтобы изменить размер раздела, перетащите либо границу, чтобы сжать или расширить его. Чтобы переместить раздел, перетащите его середину и расположите его с соседним нераспределенным пространством.
- Нажмите «Далее» и подтвердите в следующем окне. Наконец, нажмите «Применить» вверху слева, чтобы выполнить.
Посмотрите видео как клонировать Windows Server 2025 на SSD/HDD или RAID массив:

В дополнение к клонированию разделов диска на Windows Server 2025/2022/2019/2016/2012/2008, NIUBI Partition Editor предлагает множество других операций по управлению разделами диска, таких как сжатие, расширение, перемещение, преобразование, дефрагментация, скрытие, очистка и сканирование на наличие поврежденных секторов.
Скачать
Содержание
- How to Clone Windows Server 2012 (R2) to SSD or HDD?
- Scenario
- How to solve the question in the Scenario?
- The cloning software for Windows Server 2012 (R2)
- Steps to clone Windows Server 2012 (R2) to another HDD/SSD
- Preparations:
- Conclusion
- Перенос (клонирование) Windows на другой SSD/HDD диск
- 8 лучших программ для клонирования жесткого диска
- Что такое клонирование диска
- Подготовка к клонированию
- Утилиты клонирования
- Renee Becca
- AOMEI Backupper
- Macrium Reflect
- Handy Backup
- HDClone
- Acronis True Image
- EASEUS Disk Copy
- Norton Ghost
- 7 лучших программ клонирование жесткого диска и SSD для Windows
- Плюсы
- Минусы
- 1. Acronis Disk Director
- 2. Clonezilla
- 3. EaseUS Todo Backup
- 4. Paragon Drive Copy
- 5. Macrium Reflect
- 6. AOMEI Backupper
- 7. Iperius Backup
- Заключение
How to Clone Windows Server 2012 (R2) to SSD or HDD?
To clone Windows Server 2012 (R2) hard drive to SSD or HDD, you can get detailed steps from this post.
By Cherry / Last Updated April 2, 2021
Scenario
How to clone Windows Server 2012?
I have a Windows Server 2012 Machine with 1 physical hard drive. I worked with it well. But recently, I found there is nearly no free space on the hard drive. I’m planing to switch my hard drive to a larger one, how can I switch the hard drive while keeping the old Server 2012 and other data?”
— Question from microsoft.com
How to solve the question in the Scenario?
To solve the problem in the Scenario, here provides you two ways: 1>. You can migrate OS to HDD/SSD only and left the hard drive as the data storage drive. This way, you do not need to spend large money to purchase a big drive. 2>. If you do not care about how much you will spend, you can upgrade hard drive to a larger HDD/SSD, and migrate all data from the old hard drive to the new HDD/SSD.
Actually, there are many other things that you can solve through cloning Windows Server 2012. For example, cloning Windows Server 2012 to another hard drive can protect data loss. Thus, when it fails, you’ll just swap it with the latest clone. Well, how to clone Windows Server 2012 (R2) disk to another HDD/SSD?
The cloning software for Windows Server 2012 (R2)
Speaking of cloning Windows Server 2012, you may need Server cloning software. The AOMEI Partition Assistant Server should be the greatest one. It allows you to copy Windows Server 2012 (R2) disk to another HDD/SSD with a few simple steps.
With this software, you can clone your Windows Server 2012 (R2) flexibly.В В No matter the entire Windows Server 2012 hard drive, or a specific partition, it will operate well. Even if you only want to migrate OS to SSD/HDD, you can use its Migrate OS to SSD function.
Steps to clone Windows Server 2012 (R2) to another HDD/SSD
Next, you can download the demo version and follow the steps below to clone the entire Windows Server disk to another HDD or SSD.
Preparations:
в–Є A hard drive that is larger than the original hard drive on your Windows Server 2012 (R2) machine. If you only want to clone a part of data to the new hard drive, the drive should be as large enough to store the data. Connect the hard drive to the machine and make sure it can be detected.
в–Є Install AOMEI Partition Assistant Server on your Windows Server machine. You can also download AOMEI Partition Assistant Lite, the free edition for Windows Server users to copy hard drive and to do other jobs.
After all the preparations, you can start to copy the old disk on Windows Server 2012 (R).
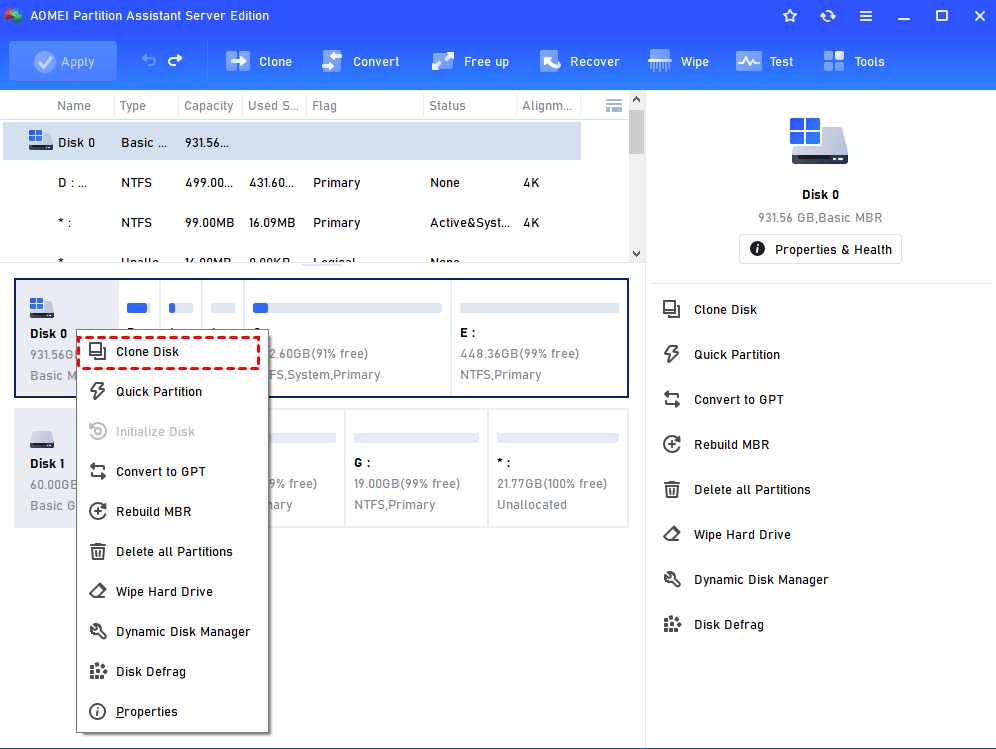
Step 1. Launch AOMEI Partition Assistant Server. It will show you the basic environment of your hard drives on your machine. Here, right click on the Server disk and choose «Clone Disk«.
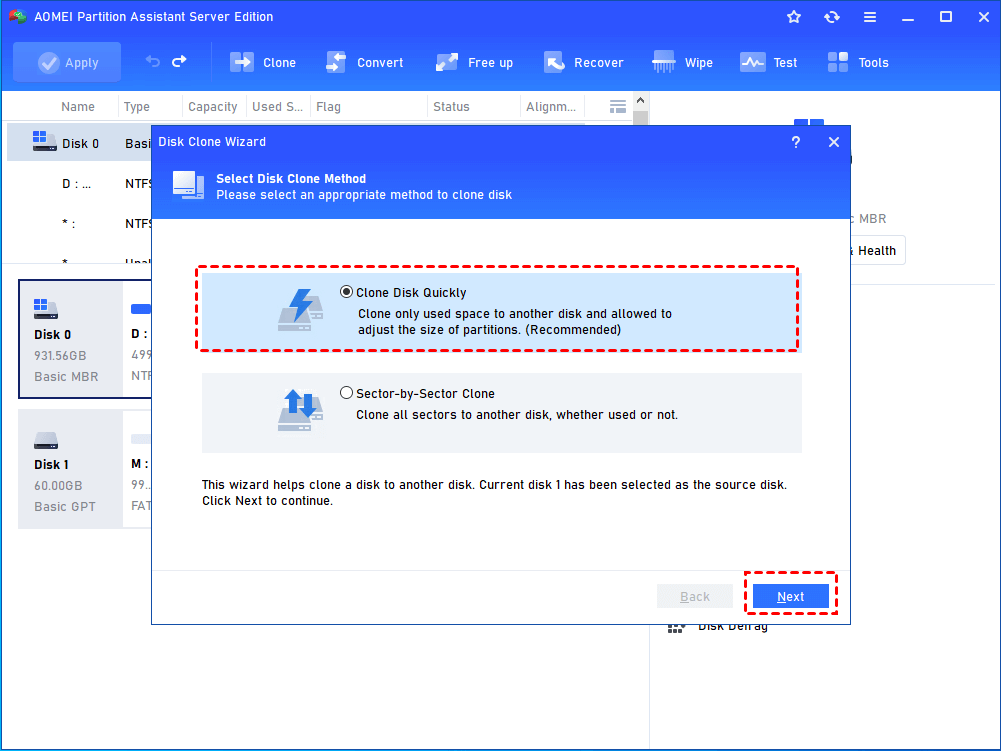
Step 2. Here you can select the way to clone Windows Server 2012 (R2) disk, *Clone Disk Quickly» or «Sector-by-Sector Clone«.
вњЌNote:
* Clone Disk Quickly is highly recommended because it only clone the used space on the source disk, which means it allows you to clone disk to smaller drive, and it allows you to edit partition size as you like
*The Sector-by-Sector Clone would clone every byte on the source disk no matter it used or not. Thus, you do not be allowed to adjust the partitions’ size during cloning. Plus, it will take more times and need larger target disk.
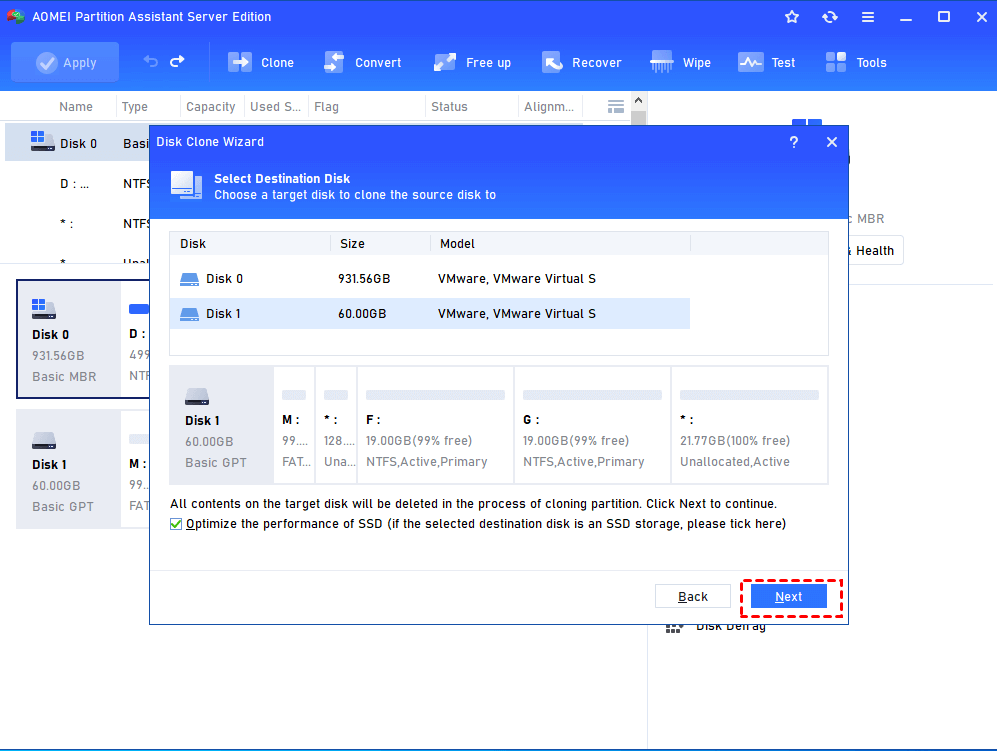
Step 4. Here you can edit partitions. Or you can resize Windows Server 2012 partition with AOMEI Partition Assistant Server after clone.
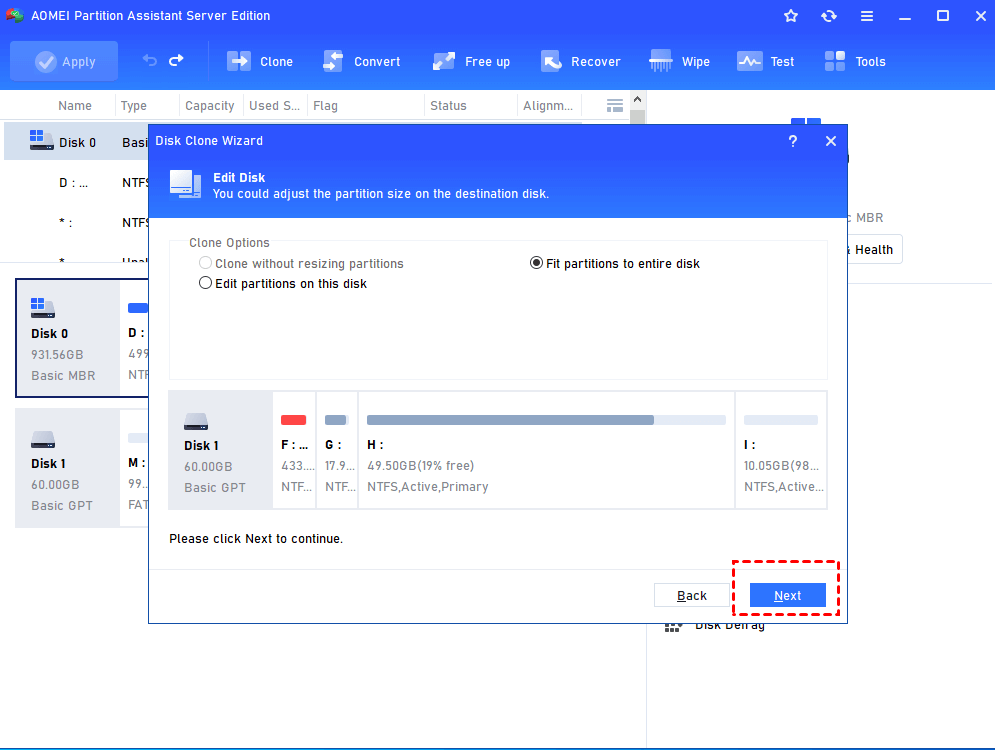
Step 5. It will show you a Note about how to boot from the cloned drive after cloning. Read it and remember it. Click Finish.
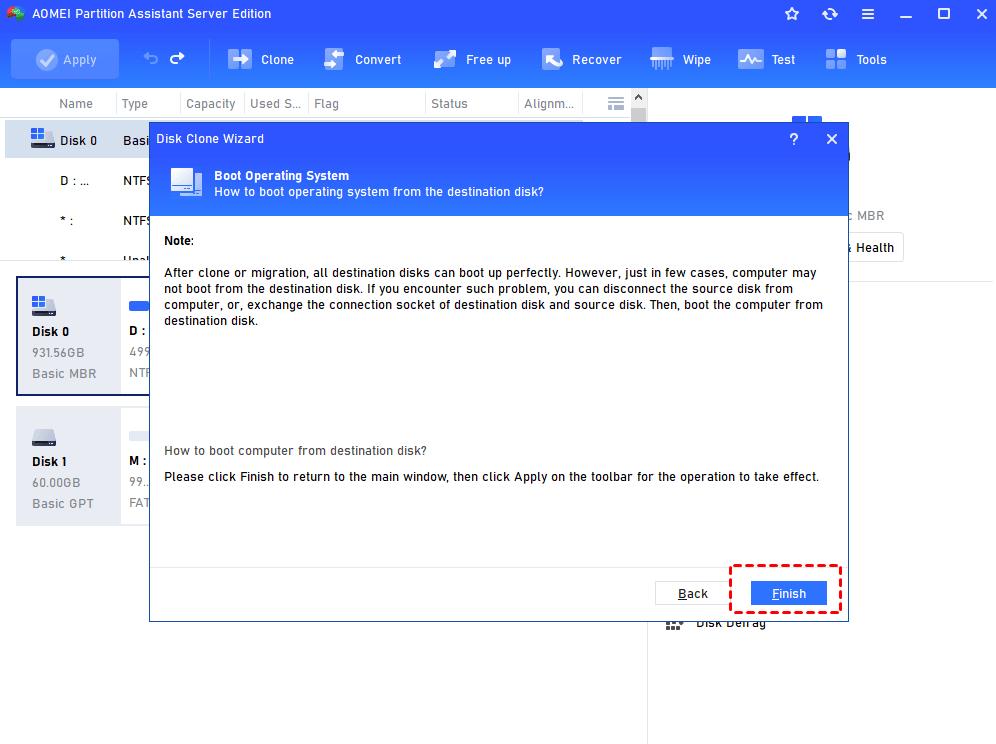
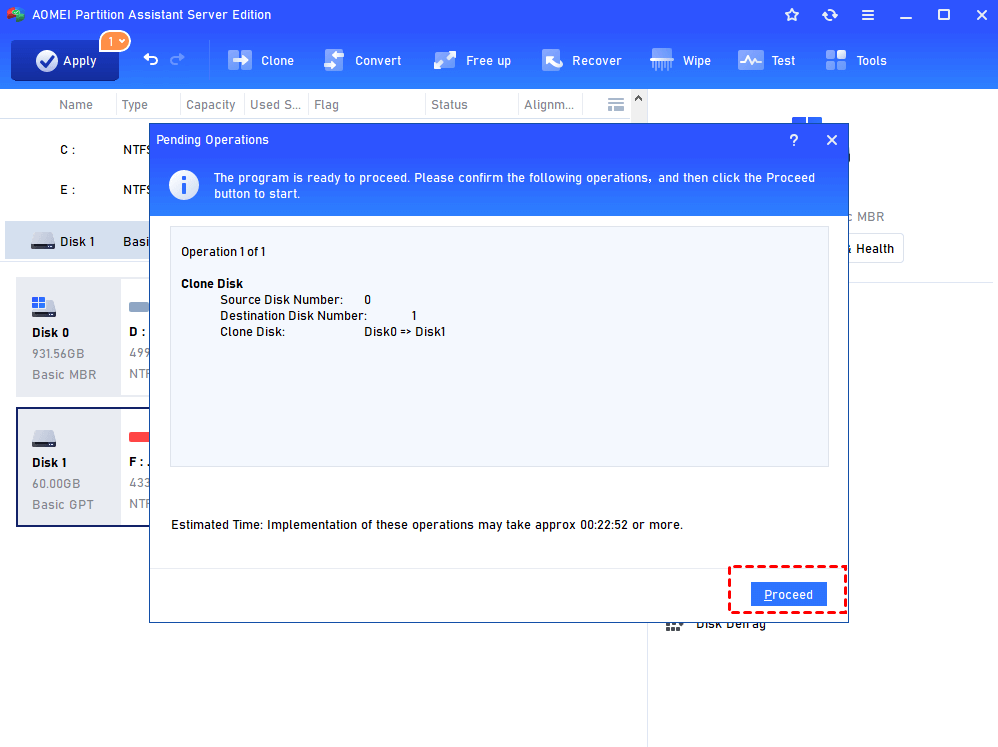
Step 6. You will back to the main interface, click Apply to submit the whole progress.
This progress will execute under PreOS mode. When it finish, you can change the boot order to boot from the new drive. Or you can switch the old drive out with the new drive, and boot from it directly.
Conclusion
Clone Windows Server 2012 (R2) disk with AOMEI Partition Assistant Server seems a very easy thing. Actually, it does a really good job on this task. Besides Disk Clone, it also provides you Partition Clone, which you can clone a specific partition instead of the whole partition.
If you only want to move OS to a new hard drive, its Migrate OS to SSD function will achieve that goal. It should be the greatest server cloning software that meet your multiple requirements. What’s more, it is also a partition magic for Windows Server 2012, and Windows Server 2003, 2008, 2016, 2019. In a word, it is worth to use.
Источник
Перенос (клонирование) Windows на другой SSD/HDD диск
В этой статье мы рассмотрим, как перенести установленную Windows с одного жесткого диска на другой только с помощью встроенных средств без использования сторонних программ (таких, как Paragon, AOMEI или Acronis). Эта инструкция поможет вам, например, перенести Windows с HDD на новый SSD диск, или склонировать установленную и настроенную Windows на другой компьютер (есть нюансы) или новый жесткий диск большего размера.
В качестве примера мы склонируем установленную Windows 10 на новый диск с помощью загрузочной USB флешки, командной строки и встроенной утилиты robocopy.
Вы сможете склонировать жесткий диск на новый диск меньшего размера, если место, занятое на системном диске текущей Windows меньше, чем емкость нового диска. Если это не так, придется удалить/переместить часть файлов с диска. Чаще всего такой вопрос возникает при переносе на SSD диск меньшей емкости, чем обычный HDD.
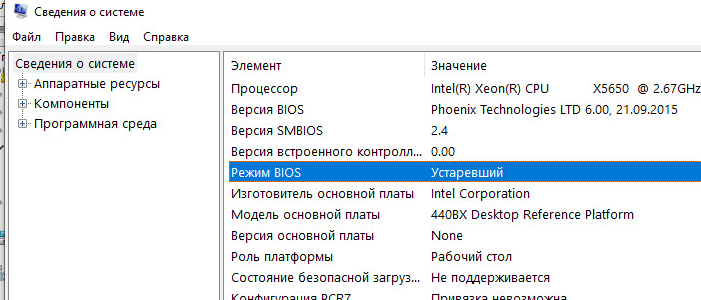
Процедура переноса Windows на другой диск зависит от, того, в каком режиме работает ваш компьютер: BIOS или UEFI. Выполните команду:
Если в строке BIOS mode (режим BIOS) указано Legacy (Устаревший), у вас компьютер с BIOS (или UEFI работает в режиме Legacy/CSM). Если указано UEFI – у вас современных компьютер и Windows установлена в UEFI режиме.
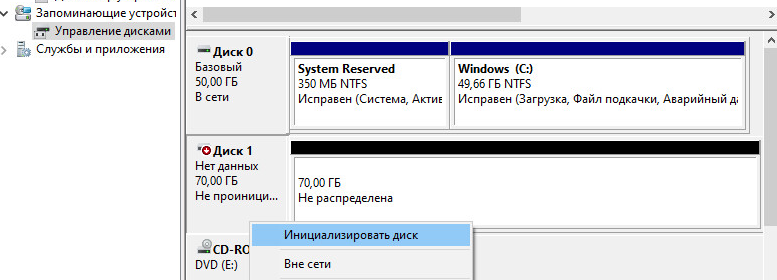
В первую очередь нужно создать таблицы разделов на новом диске. Это можно сделать непосредственно из запущенной Windows 10 с помощью diskpart. Если диск новый, инициализируйте его с помощью консоли diskmgmt.msc или PoweShell команды Initialize-Disk:
Get-Disk | Where-Object PartitionStyle –Eq ‘RAW’ | Initialize-Disk
Теперь создадим таблицу разделов на диске. Откройте командную строку с правами администратора и выполните команду:
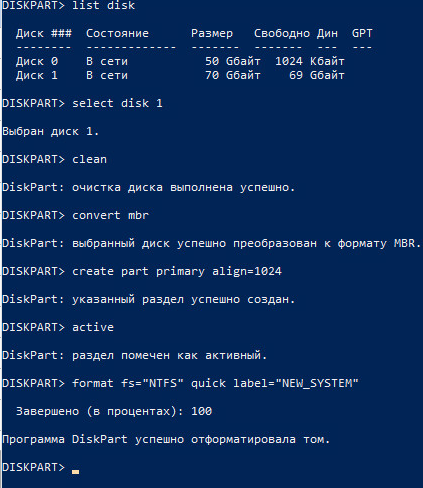
В контексте diskpart выполните следующие команды.
list disk
select disk 1 (в зависимости от номера вашего нового диска, который выдала предудущая команда)
clean
Далее команды отличаются в зависимости от типа вашей платформы.
Для UEFI GPT :
convert gpt
create partition efi size=100
format fs=»FAT32″ quick label=»EFI»
create partition msr size=16
create partition primary
format fs=»NTFS» quick label=»NEW_SYSTEM»
exit
Мы создали на новом диске таблицу разделов GPT, два небольших служебных раздела (EFI и MSR), на оставшемся месте создан один большой раздел (см. подробнее о структуре GPT разделов для EFI).
Для BIOS MBR следующие команды:
convert mbr
create partition primary align=1024
active
format fs=»NTFS» quick label=»NEW_SYSTEM»
exit
Для клонирования Windows на новый диск вам понадобится загрузочная USB флешка с установочным образом Windows 10 (проще всего создать такую флешку с помощью MediaCreationTool).
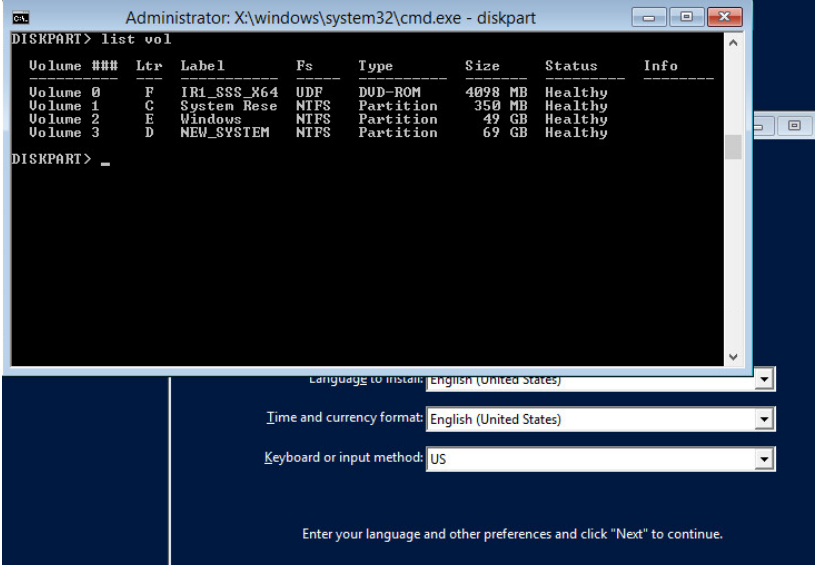
Перезагрузите ваш компьютер и загрузитесь с установочного диска. При появлении окна установки Windows нажмите Shift+F10 чтобы открыть командую строку. В открывшемся окне выполните команды
На скриншоте ниже видно, что оригинальному разделу Windows на старом диске присвоена буква диска E:, а большому разделу на новом диске (с меткой NEW_SYSTEM) назначена буква D:.
Теперь нужно скопировать файлы со старого диска с установленной Windows на новый. Проще всего это сделать с помощью robocopy. Следующая команда robocopy скопирует все символические ссылки, файлы и папки с атрибутами, NTFS правами и timestamp. При этом лог копирования будет сохранен в корень целевого диска:
robocopy E:\ D:\ /E /COPYALL /SL /XJ /R:3 /W:3 /UNILOG:»D:\rcopy.log» /TEE
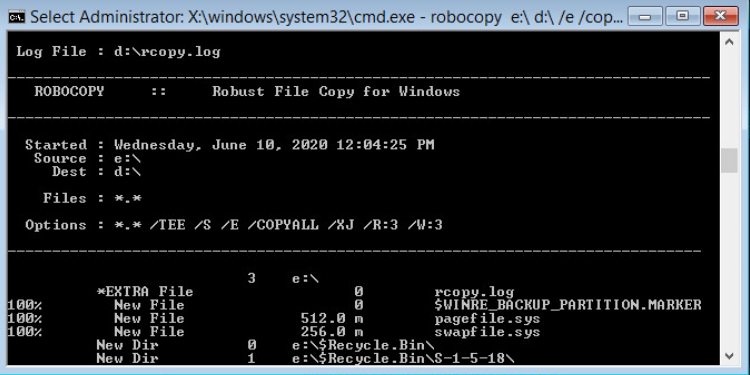
Копирование может занять продолжительно время в зависимости от размер старого диска (в моем случае копирование 60 Гб диска заняло около часа).
Теперь можно выключить компьютер и отключить старый жесткий диск.
Следующий шаг, настройка загрузчика Windows на новом диске.
Опять загрузите компьютер в среде установки Windows и запустите командную строку ( Shift+F10 ).
Восстановление BIOS MBR загрузчика.
Проверьте букву диска, назначенную новому большому разделу на диске:
Диску назначена буква C:
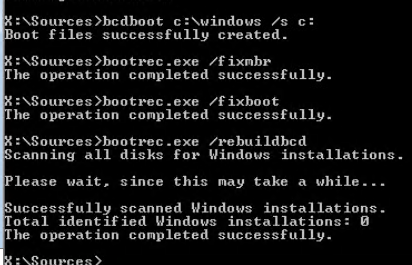
Восстановите BCD загрузчик на диске C:
bcdboot C:\Windows /S C:
Исправьте MBR запись и записи в BCD загрузчике:
bootrec.exe /FixMbr
bootrec.exe /FixBoot
bootrec.exe /RebuildBcd
Восстановление загрузчика на UEFI GPT компьютере (подробно эта процедура описана в статье восстановление загрузчика Windows 10 на UEFI компьютере).
Нужно определить букву системного диска и назначить букву диска разделу с EFI.
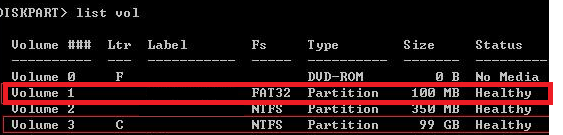
В данном примере системному разделу назначена буква диска C. Вам нужно назначить букву разделу EFI (размер 100 мб и файловая система FAT32) следующими командами (в командах измените номера разделов в соответствии с вашей конфигурацией):
select volume 1
assign letter M:
exit
Теперь нужно пересоздать конфигурацию BCD загрузчика:
cd /d m:\efi\microsoft\boot\
ren BCD BCD.bak
bcdboot С:\Windows /l en-us /s M: /f ALL
Перезагрузите компьютер и отключите загрузочную флешку. Убедитесь, что Windows корректно загрузилась с нового диска.
Все установленные приложения, документы и настройки остались на месте. Вы успешно скопировали установленную Windows 10 на новый диск.
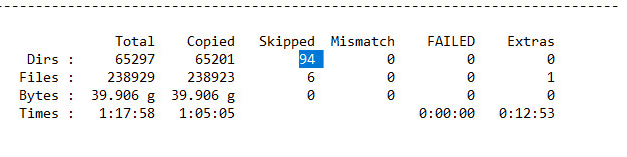
При копировании файлов на новый диск с помощью robocopy могут встречаться ошибки. Откройте на новом диске файл rcopy.log и посмотрите какие файлы не были скопированы. В моем случае не было скопировано 94 файла (в моем случае не скопировать только мусорные файлы).
Не очень понятно здесь:
«Вам нужно назначить букву разделу EFI (размер 100 мб и файловая система FAT32) следующими командами (в командах измените номера разделов в соответствии с вашей конфигурацией):
на скриншоте 100 MB — это volume 1.
Нет?
Да, здесь ошибка. Поправил текст.
Прикольно. Сохраню. Обычно это делаю через Acronis 🙂
rem == These commands deploy a specified Windows
rem image file to the Windows partition, and configure
rem the system partition.
rem Usage: ApplyImage WimFileName
rem Example: ApplyImage E:\Images\ThinImage.wim ==
rem == Set high-performance power scheme to speed deployment ==
call powercfg /s 8c5e7fda-e8bf-4a96-9a85-a6e23a8c635c
rem == Apply the image to the Windows partition ==
dism /Apply-Image /ImageFile:%1 /Index:1 /ApplyDir:W:\
rem == Copy boot files to the System partition ==
W:\Windows\System32\bcdboot W:\Windows /s S:
:rem == Copy the Windows RE image to the
:rem Windows RE Tools partition ==
md R:\Recovery\WindowsRE
xcopy /h W:\Windows\System32\Recovery\Winre.wim R:\Recovery\WindowsRE\
:rem == Register the location of the recovery tools ==
W:\Windows\System32\Reagentc /Setreimage /Path R:\Recovery\WindowsRE /Target W:\Windows
:rem == Verify the configuration status of the images. ==
W:\Windows\System32\Reagentc /Info /Target W:\Windows
:rem == Delete OneDrive
del w:\Windows\SysWOW64\OneDriveSetup.exe
:rem == Reboot
rem Wpeutil reboot
Благодарю за идею. через wim образ наверно даже надежнее будет.
Источник
8 лучших программ для клонирования жесткого диска
Главная проблема во время смены жесткого диска – необходимость установки и настройки операционной системы и программ с нуля. Это занимает много времени и сил.
Решение проблемы – автоматическое клонирование диска (HDD, SSD) с использованием специального софта.
Что такое клонирование диска
Клонирование – это процесс посекторного переноса операционной системы, программного обеспечения и личных файлов пользователя с одного диска на другой. В отличие от резервного копирования или создания образа диска (ISO), клонирование создает 100% копию исходного носителя: сохраняются основные разделы, структуру и программное обеспечение.
Новый клонированный диск получается почти идентичным старому. Это значит, вам не придется заново настраивать рабочую среду, активировать систему и восстанавливать лицензии ПО. Различие между ним и оригинальным носителем заключается в том, что с операционной системы снимается привязка к железу компьютера, но также становится недоступным откат системы до первоначальных настроек с сохранением пользовательских данных и переустановка в режиме обновления.
Подготовка к клонированию
Перед началом клонирования убедитесь, что процессу ничего не помешает:
Также желательно сделать резервные копии важных данных.
Подключите диск-приемник по любому доступному интерфейсу. Процесс пойдет быстрее, если оба носителя подсоединены к разъемам SATA 6 Gb или более скоростным, но если такой возможности нет, используйте, например, USB (адаптеры USB-SATA продаются в компьютерных магазинах).
Время клонирования жесткого диска зависит от следующих факторов:
Утилиты клонирования
Представляем вашему вниманию лучшие, на наш взгляд, утилиты для клонирования жестких дисков.
Renee Becca
Renee Becca – удобный инструмент для простого клонирования дисков, папок и отдельных разделов системы. Ее главное преимущество – простота использования. Перенести информацию с одного физического накопителя на другой можно за несколько простых шагов:
Это позволяет создать 100% клон диска, правда, увеличится время выполнения задачи.
AOMEI Backupper
Чтобы воспользоваться инструментом клонирования:
Macrium Reflect
Основное преимущество Macrium Reflect – простой и удобный интерфейс. Также программа бесплатна для домашнего использования.
Во время работы утилиты отключите тяжелые приложения, так как программа требовательна к ресурсам компьютера.
Чтобы сделать клон носителя информации, нужно:
Handy Backup
Handy Backup – простая в использования программа для создания физических и логических копий дисков. Утилита создает точную копию HDD полностью сохраняя его структуру.
Клонирование выполняется в автоматическом режиме: вам не нужно вручную чистить мусор, переносить файлы, устранять сбои реестра.
Для постоянной работы с этим ПО нужно приобрести лицензию. 30-дневная пробная версия доступна бесплатно. Ее достаточно для выполнения основных функций. Интерфейс переведен на русский язык.
Как пользоваться Handy Backup:
HDClone
HDClone – еще один универсальный инструмент для клонирования жесткого диска, который позволяет работать с накопителями объемом от 130 ГБ и более.
Бесплатная версия приложения (free) имеет некоторые ограничения. Например, с ее помощью вы не сможете перенести данные на диск меньшей емкости, чем исходный. Чтобы получить возможность клонировать любые данные на любые накопители от 130 ГБ, придется приобрести как минимум базовую версию HdClone за €19.90.
Acronis True Image
Особенностью Acronis True Image является то, что созданные в ней копии можно хранить не только на своем компьютере, а также в облачном хранилище Acronis Cloud. При сохранении данных в облаке доступ к копии диска возможен с любого устройства, подключенного к Интернету. Для защиты данных программа использует шифрование AES-256.
Чтобы пользоваться всеми возможностями утилиты, нужно оформить годовую подписку по цене от €49,99 или купить постоянную лицензию за €59,99. Имеется ознакомительная версия на 30 дней.
EASEUS Disk Copy
Norton Ghost
Norton Ghost – популярная утилита для клонирования и создания бэкапов, но, к сожалению, она перестала поддерживаться разработчиками еще в 2009 году. Из-за этого загрузить ее можно только со сторонних сайтов.
Источник
7 лучших программ клонирование жесткого диска и SSD для Windows
Клонирование накопителя в основном используется для двух целей: для создания точной резервной копии данных или миграции на новый накопитель. Если что-то случится с данными на вашем первом диске, вы можете загрузиться с другого диска и продолжить, пока ничего не произошло.
Что касается клонирования, запоминающее устройство создает точную копию диска; вы можете использовать его для перехода на другой диск. Например, если у вас медленный жесткий диск и вы хотите перейти на твердотельный накопитель, программное обеспечение для клонирования упростит перенос всего с жесткого диска на твердотельный накопитель.
Плюсы
Минусы
Теперь, когда вы знаете, почему вам следует использовать программное обеспечение для клонирования, давайте посмотрим на программы для клонирования Windows.
1. Acronis Disk Director
В то время как клонирование дает вам полный контроль над тем, какие данные вы хотите клонировать, и даже управлять разделами прямо из интерфейса. Вы можете создавать новые разделы, разделять / объединять их без использования какого-либо другого программного обеспечения.
Его также можно использовать в качестве инструмента восстановления случайно удаленных или поврежденных томов. С его помощью можно сделать гораздо больше, например, создать единый том из нескольких дисков, преобразовать диск из базового в динамический, создать загрузочный носитель, оптимизировать пространство на диске и многое другое.
А за 49,99 долларов за одну лицензию, я считаю, Acronis Disk Director предлагает намного больше по сравнению с другими платными инструментами. Но, конечно, если вам не понадобятся другие функции управления дисками, это будет лишним.
Если вам интересно, вы можете попробовать демо-версию Acronis Disk Director. Это полнофункциональная версия, но она поддерживает только диск объемом до 10 ГБ.
2. Clonezilla
Я не могу сказать, что это лучшее программное обеспечение для клонирования в этом списке, но это определенно наиболее полное программное обеспечение для клонирования, которое вы можете получить бесплатно.
Программа поддерживает почти все файловые системы, что позволяет клонировать Windows, Linux, Mac OS X и даже Chrome OS. Он также не ограничен типом раздела, поэтому вы можете клонировать раздел MBR или GPT, используя устаревший BIOS или UEFI. При необходимости данные могут быть защищены с помощью шифрования AES-256.
Его интерфейс может быть не очень интуитивно понятным, но если вам нужно клонировать только один диск, процесс прост. Хотя клонирование на несколько компьютеров или использование многоадресной рассылки может быть немного сложным для начинающих пользователей.
3. EaseUS Todo Backup
У EaseUS Todo Backup есть надежная бесплатная версия, но, к сожалению, она ограничена только созданием образов резервных копий; с ним нельзя клонировать накопитель. Однако платная версия отлично справляется с клонированием и позволяет клонировать ОС, раздел или весь диск. У него есть специальные опции для перемещения системного диска на новый накопитель и загрузки с него, что отлично, если вам нужно перенести ОС с жесткого диска на SSD.
Вы также можете клонировать свою текущую ОС, чтобы создать загрузочный USB-накопитель и использовать свою систему из любого места. Помимо клонирования, его решения для резервного копирования также довольно обширны. Вы можете создавать резервные копии файлов или всего образа системы и зашифровать данные для защиты. Резервные копии могут быть сохранены онлайн и офлайн на одном диске, внешнем диске, FTP-сервере, NAS или облачном хранилище.
Программное обеспечение также поставляется с очень функциональной 30-дневной бесплатной пробной версией, которая предлагает большинство дополнительных функций, но с более медленной скоростью резервного копирования / восстановления.
4. Paragon Drive Copy
Paragon Drive Copy позволяет создать клон полного диска, клон раздела или просто клон операционной системы. Этот инструмент на самом деле всего лишь крошечная функция основного Paragon Hard Disk Manager. К счастью, оно доступно как отдельное программное обеспечение, которое можно приобрести за половину цены, поэтому вам не придется покупать полную версию программного обеспечения, если вам нужна только функция клонирования.
Drive Copy дает вам полный контроль над тем, какие данные вы хотите клонировать, а какие оставить. Он работает как с разделами MBT, так и с GPT и поставляется с некоторыми базовыми функциями разделения для выполнения основных задач, таких как слияние или разделение разделов.
5. Macrium Reflect
Возможно, он не такой мощный, как Clonezilla, но бесплатная версия Macrium Reflect очень обширна, но при этом удобна для пользователя. Бесплатная версия доступна для личного и коммерческого использования и позволяет создавать резервные копии или полные клоны диска. Вы также можете запланировать резервное копирование с помощью различных шаблонов расписания.
6. AOMEI Backupper
AOMEI Backupper также предлагает надежную бесплатную версию, которая может обрабатывать как резервное копирование, так и клонирование. Что касается клонирования, вы можете либо создать полный клон диска, либо клон раздела в бесплатной версии. Для создания клона операционной системы вам необходимо перейти на профессиональную версию.
Бесплатная версия также содержит почти все необходимые функции резервного копирования и восстановления. Вы можете создать резервную копию системы, резервную копию раздела, резервную копию файлов, инкрементную / дифференциальную резервную копию, посекторное резервное копирование и многое другое.
Большинство других функций профессиональной версии не влияют на функциональность клонирования, поэтому бесплатная версия подойдет, если вам не нужно клонировать только операционную систему. Хотя, если вам нужен больший контроль над образами резервных копий, тогда профессиональная версия позволяет вам разделять / объединять резервные копии, данные синхронизации в реальном времени, зеркальную синхронизацию, создавать резервные копии, запускаемые по событию, фильтровать типы файлов, шифровать резервные образы и резервировать / восстанавливать динамические диски.
7. Iperius Backup
Платная версия Iperius Backup отлично справляется с клонированием, позволяя создавать настраиваемые клоны как на накопителях, так и на виртуальных машинах. Вы можете создать клон всего диска, клон раздела или клон системы; есть также специальные опции для клонирования и запуска системы виртуальной машины.
Помимо клонирования, программа позволяет создавать резервные копии и обновлять их с помощью системы дифференциального и инкрементного резервного копирования. Резервную копию можно сохранить как в интерактивном, так и в автономном режиме, а также при необходимости сжать и зашифровать резервную копию.
Заключение
Источник
- Applies to: Upgrading or cloning a Windows Server disk to a larger, newer, faster HDD/SSD without data loss.
- Duration: 30 minutes — 1 hour.
- Supported: Windows Server 2022, 2019, 2016, 2012/2012 R2, 2008/2008 R2, and more.
Can you clone a server hard drive? This article will walk you through the complete guide to clone disk to a larger or new HDD/SSD on your Windows server computer without losing data or reinstalling the server OS.
If you have the same need, follow these instructions to begin your disk upgrade.
Before you begin: Prepare a new hard drive or SSD
When your Windows server disk encounters the above issues, it’s time to clone and upgrade the server disk:
- The data or system drive is full.
- A Windows Server computer runs slowly as the disk space is running out.
- The System C drive on Windows Server is full, and you can’t extend available space any more.
How to clone a disk and upgrade to a larger or faster new HDD or SSD in Windows Server? Before you start, you need to prepare the new disk for the disk upgrade cloning.
Here are some quick guidelines to help you prepare a new disk:
- • Get a new larger HDD or an HDD-SSD hybrid drive for upgrading the data disk of your Windows Server.
• If you aim to migrate the system disk of a Windows Server, prepare a faster and larger SSD.
• After getting the new hard drive, install and initialize it in your Windows Server.
So, how to initialize a new disk in Windows Server? Firstly, you can directly install the new disk to your Windows Server and then open Disk Management to initialize the new drive.
Here’s a comprehensive guide you can follow to proceed:
Complete Guide: Initialize SSD/HDD for Free
If you’ve added a brand new disk to your computer but it doesn’t show up in File Explorer, you might need to assign a drive letter or initialize it before use. There’re 3 ways to initialize an SSD or HDD in Windows and Windows Server.
How to Clone Windows Server Disk? Here Are 2 Reliable Ways
Here, we have compiled two reliable methods to upgrade disks on a Windows server. You can choose either one:
- #1. Clone Disk on Windows Server with Third-Party Disk Cloning Software
- #2. Back Up and Restore to New Disk with Microsoft Windows Server Backup
Which disk cloning tool should you choose? Here are the ones recommended by our editors:
- For a simpler method, third-party disk cloning software like tools Partition Master Enterprise is more suitable for Windows Server administrators of all levels.
Please provide the English content you would like translated, and I will do my best to translate it into Chinese.
- You can try using Windows Server Backup, which is free and allows you to migrate your Windows Server disk data to another drive. The process is a bit more complicated than Method 1.
- If you want to clone the entire server operating system disk to a new drive, this solution will do the job and ensure that Windows programs and installed software will run after cloning.
Now, let’s start cloning the disk in Windows Server.
#1. Clone a Windows Server Disk with Disk Cloning Software
- Tool: Third-party disk cloning software — AOMEI Backupper Technician Plus with its Disk Clone feature.
- Supported: Windows Server 2022, 2019, 2016, 2012, 2008, and more.
The most efficient way to upgrade and clone disks on a Windows Server computer is by using reliable Windows Server disk cloning software. AOMEI Partition Assistant Server with its Disk Clone feature can help any Windows Server user successfully clone and upgrade their disk.
24/7 Technical Chat
Free Consultation
Here’s your complete guide to cloning a Windows Server disk to a new, larger SSD or HDD:
Step 1: Select the source disk.
- • In the left menu, click «Clone.» Choose «Clone System Disk» or «Clone Data Disk,» then click «Next.»
• Select the source disk, then click «Next.»
Step 2: Select the target disk.
- Select your desired HDD/SSD as the destination location, then click “Next” to proceed.
Read the warning message and confirm by clicking the “Yes” button.
Step 3: Review the disk layout and edit the target disk partition sizes if needed.
When prompted that all data on the target disk will be erased, click “Continue” (make sure to back up any important data on the target disk beforehand).
You can choose to “Autofit to disk,” “Clone as source,” or “Edit disk layout.” (Choose the last option if you want to allocate more space for the C drive.)
Step 4: Click “Start” to begin cloning the hard drive.
Then, you can restart your computer, and your data will be completely cloned to the new disk in Windows Server.
If some of you clone the Windows Server operating system disk to a new drive but the computer fails to boot after the cloning, stay calm. There could be two issues preventing you from accessing and running the Windows Server system:
- 1. You didn’t set the newly cloned disk as the boot drive. Please read: How to set a cloned drive as the boot drive.
- 2. You need to configure the boot mode for your OS disk: MBR — Legacy, GPT — UEFI. Please read: How to disable/enable UEFI mode.
In addition to cloning disks in Windows Server, the Partition Master Enterprise tool can also help you manage disk partition space better with the following features:
- Fix «Cannot Extend Volume» error in Windows Server
- Extend C drive or resize partitions
- Convert GPT to MBR or change MBR to GPT without data loss
- Erase or wipe hard disk partitions in Windows Server
24/7 Technical Chat
Free Consultation
#2. Backing Up Server Data with Windows Server Backup and Restoring to a New Disk
- Tool: Microsoft Windows Server Backup.
- Supported: Windows Server 2022, 2019, 2016, 2012, 2008, and more.
Windows Server users might want to turn to Windows Server Backup, a free disk imaging solution. Although Windows Server Backup is a backup tool for disk volumes, it can serve as a perfect alternative to Windows Server disk cloning.
Experienced Windows Server users might want to try this method. Here’s the full process for backing up your hard disk data to another drive:
First, back up the Windows server hard drive.
- • Launch “Server Manager,” go to “Manage,” click “Add Roles and Features.”

- In Server Manager, click on “Tools,” then select “Windows Server Backup.” Click on “Backup Once…” or “Backup Schedule…” – for this example, we’ll choose “Backup Once…”

- • In the left pane, click Select backup items. Most users will want to choose the default Bare Metal Recovery option, as it provides the most recovery options.
• Click Add Items > Backup to begin backing up the disk.

Next, restore the contents of a disk backup to another drive.
- 1. Launch «Windows Server Backup,» click on «Local Backup» and select «Recover.»
2. In the «Get Started» window, choose «This server,» then click «Next» to initiate the disk backup recovery process.

- Choose the backup date, restore point, and items to restore, then put the backup on a new disk that you’ve added to your computer. Click “Restore” to begin.
Then, all you have to do is wait for the process to complete.
Additional Tip: What to Do with the Old Hard Drive after Cloning
After successfully cloning or moving all disk data to the new drive, what do you plan to do with the old one? It’s essential to clean the old drive. But some may want to reuse the disk. So, how to manage the old drive?
«Disk Management tool — Partition Master Enterprise provides a complete solution to clean up and repartition your old hard drive with just a few simple steps.»
24/7 Technical Chat
Free Consultation
1. Wipe old hard drive
We have two options for clearing your data. Please choose the one you need.
Option 1: Erase Partition
- — Right-click the partition you want to wipe and select “Erase.”
— In the new window, set how you want to erase the partition, then click “OK.”
— Click “Execute 1 Task” in the bottom-right corner to review your changes, then click “Apply.”
Option 2: Erase the disk
- Select HDD/SSD, then right-click «Erase Disk.»
Choose the number of times you want to overwrite the data (up to 10 times). Then click «OK.»
Click «Perform 1 Task» and then «Apply.»
2. Drive that has been partitioned and formatted
Step 1: Run AOMEI Partition Assistant and enter the «Partition Management» interface. Click «Allocate this hard disk» in the popped up «New Disk Wizard» window.

Step 2. Set the number of partitions you want to create, as well as the disk partition style – MBR or GPT.
Alternatively, you can accept the default settings offered by Partition Master. When ready, click Proceed.

Click “Execute 1 Task” and “Apply” to partition the new HDD/SSD or external drive.

It’s incredibly easy to clone a disk in Windows Server with a reliable disk cloning software.
On this page, we provide a complete guide to help Windows Server users easily clone and upgrade their server computer disks to larger, newer drives.
As long as you have the new hard drive ready, you can choose any of the methods provided on this page to successfully perform a disk upgrade. To make things easier, don’t miss the free disk cloning software — AOMEI Partition Assistant Professional, and select the appropriate version to upgrade your hard drive right away.
24/7 Technical Chat
Free Consultation
Frequently Asked Questions About Cloning Windows Server Disks in UTF-8 Format
If you have other questions about cloning a Windows server disk, check the following FAQs and get your issues solved quickly.
**1. Can you clone a Windows Server?**
Yes, you can clone a Windows Server disk to another drive using a reliable disk cloning tool. On this page, we offer two methods:
1. **Partition Master Enterprise Tool** — Suitable for Windows Server owners at all levels, IT service providers, and business owners.
2. **Windows Server Backup** — Utilize the built-in server tool to upgrade the disk.
For detailed steps on both methods, please follow the instructions provided.
How can I clone a physical Windows Server?
When cloning a physical Windows Server, you need to decide whether you want to clone the entire Windows Server disk to a new drive or just clone and migrate the Windows Server system to a new disk.
If you simply want to clone a Windows server disk to another drive, refer to the guide above; you have two disk cloning methods to choose from.
If you want to migrate Windows Server to another disk, you can refer to this tutorial page: Migrate Windows Server OS to a New Drive.
How to clone Windows Server 2016 to another disk?
To clone a Windows Server 2016 disk to another drive, follow the instructions on this page.
Here’s a guide on how to clone the Windows Server 2016 operating system to another drive:
- Connect a new hard drive to your Windows Server 2016 or install a new one.
- Initialize the new hard drive with the same partition style as the OS disk of Windows Server 2016 — MBR or GPT.
- Run tools Partition Master Enterprise and choose «Clone», then click «Clone System».
- Select the target new hard drive, and then click «Execute 1 Task».
- Click «Apply» to start cloning and migrate Windows Server 2016 to the new hard drive.
Can you clone a server? How to clone server hard drive to another disk? You can easily clone your Windows Server 2022/2019/2016 to an SSD to migrate all the disk data using professional software. In this post, MiniTool lists top 5 server cloning software for data protection or migration.
About Windows Server Disk Cloning
Windows Server 2022/2019/2016 are common server operating systems that are widely used for enterprise environments to handle databases, enterprise-scale messaging, Internet/intranet hosting, etc. Compared to a Windows desktop version, the configurations in a server are complicated, laborious, and time-consuming. This is why you clone Windows Server in case of involving changing a server.
Speaking of server cloning, it often means creating an exact copy of the entire hard drive, including all the disk data and system files required for Windows Server to run. Cloning can easily help you achieve the following purposes:
Fast disaster recovery: In the event of Windows Server failures, you won’t need to perform a recovery process but directly use the cloned hard drive as the system disk, greatly reducing the loss caused by server downtime.
Upgrade or migrate the server OS: Whether you want more storage space or better PC performance, you can clone server hard drive to another hard disk without reinstalling Windows Server and apps and setting up the operating system.
In short, whether you upgrade a disk, migrate the operating system, or protect your data, cloning will be a good solution. However, Windows Server doesn’t come with a cloning feature but a backup utility called Windows Server Backup. Hence, resort to reliable server cloning software from third parties to simplify the operation.
What to Focus on When Choosing Server Cloning Software
Today, there are a myriad of Windows Server cloning software. And it is challenging to distinguish and choose the best one that suits you. Before selecting the disk cloning software for Windows Server, consider 6 aspects, as shown below:
Compatibility: The server cloning software should be compatible with your operating system such as Windows Server 2022/2019/2016 and support a variety of storage types including SSDs, HDDs, USB external hard drives, and more.
Versatility: Your cloning utility should meet multiple cloning requirements, such as cloning the entire disk or migrating the entire operating system.
Reliability: The cloning tool you use should be reliable and help easily copy all the disk data, without missing any data areas. After cloning, the target disk can directly boot Windows successfully.
Speed and Efficiency: You should look for a piece of Windows Server cloning software that implements cloning quickly, without affecting productivity too much.
User Interface Friendliness: The best server cloning software should have a clean and intuitive user interface that shows the necessary options to simplify the cloning process.
Price: Most disk cloning software offers a free edition or trial edition for several days. Just choose a cost-effective one for cloning Windows Server to SSDs or other hard drives.
Taking these points into account, we list some solutions for businesses below, and let’s read them through.
At the first face, MiniTool ShadowMaker is a professional Windows backup software as it allows you to run file backup, disk backup, partition backup, and system backup, as well as recovery in case of data loss or system crashes.
Besides, it is a powerful disk cloning software that works well in Windows 11/10/8.1/8/7 and Windows Server 2022/2019/2016, etc. With the simple and clean user interface, the backup and cloning process becomes very simple, preventing making mistakes. It facilitates cloning HDD/SSD to a new PC, making it easy to transfer all disk data and the operating system from the hard drive of an old PC to a new one.
In detail, this free server cloning software has some highlights:
- Clones a hard drive, USB drive, SD card, etc. to another one within a few clicks.
- Supports cloning HDD to SSD, moving Windows to another drive, cloning SSD to a larger SSD, and so on.
- Enables you to clone a larger disk to a smaller disk as long as the target disk can hold all the contents of the original disk.
- Also helps easily perform sector by sector cloning besides cloning the used sectors.
- Offers a friendly user interface to make the cloning process simpler. Although you don’t have many computer skills, you can use it as easy as pie.
- Easily recognizes all the hard drives from multiple brands including Samsung, Toshiba, WD, Crucial, Seagate, SanDisk, and so on as long as the disks are detected in Windows Disk Management.
- Allows you to create a bootable USB drive using Media Builder to boot the PC when it fails to start and then execute backup, recovery, and clone tasks.
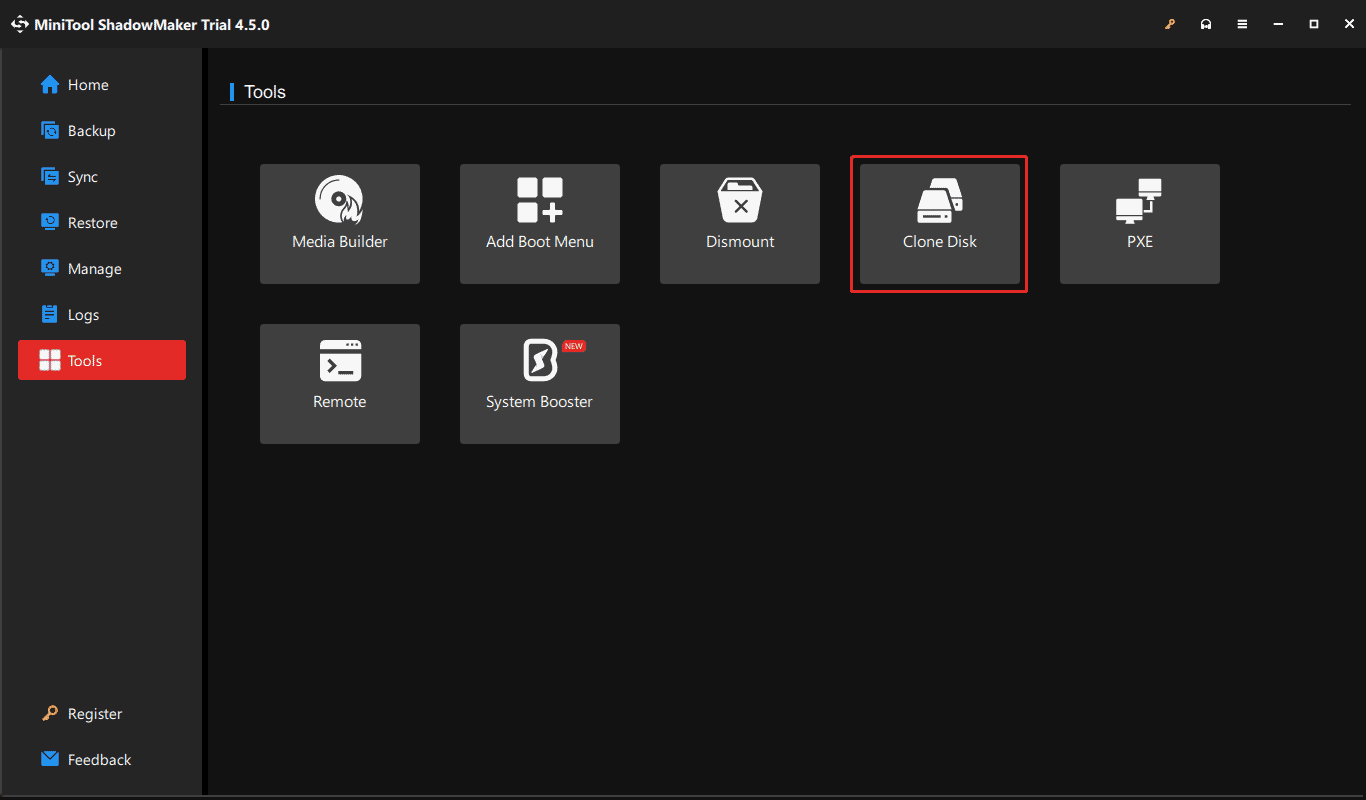
Then, how to clone server hard drive with MiniTool ShadowMaker? Take the simple operations:
Step 1: Download and install MiniTool ShadowMaker Trial Edition on Windows Server 2022/2019/2016.
MiniTool ShadowMaker TrialClick to Download100%Clean & Safe
Step 2: Connect an SSD to the PC and launch this cloning tool.
Step 3: Go to Tools and hit Clone Disk.
Step 4: Choose the source disk and target disk, register this software using a license key of Business Standard or Business Deluxe as you deal with a system disk, and then begin the cloning process.
Pros:
- Offers comprehensive and rich features
- Has a clean user interface
- Clones a hard drive while Windows is running
- Gives a reliable and stable cloning process
- Creates bootable clone (target disk can be used to boot the PC)
- Trial Edition supports Windows 11/10/8/7 and Server 2022/2019/2016
Cons:
- Only supports disk clone but partition clone and system clone
- Requires you to pay money when cloning a system disk
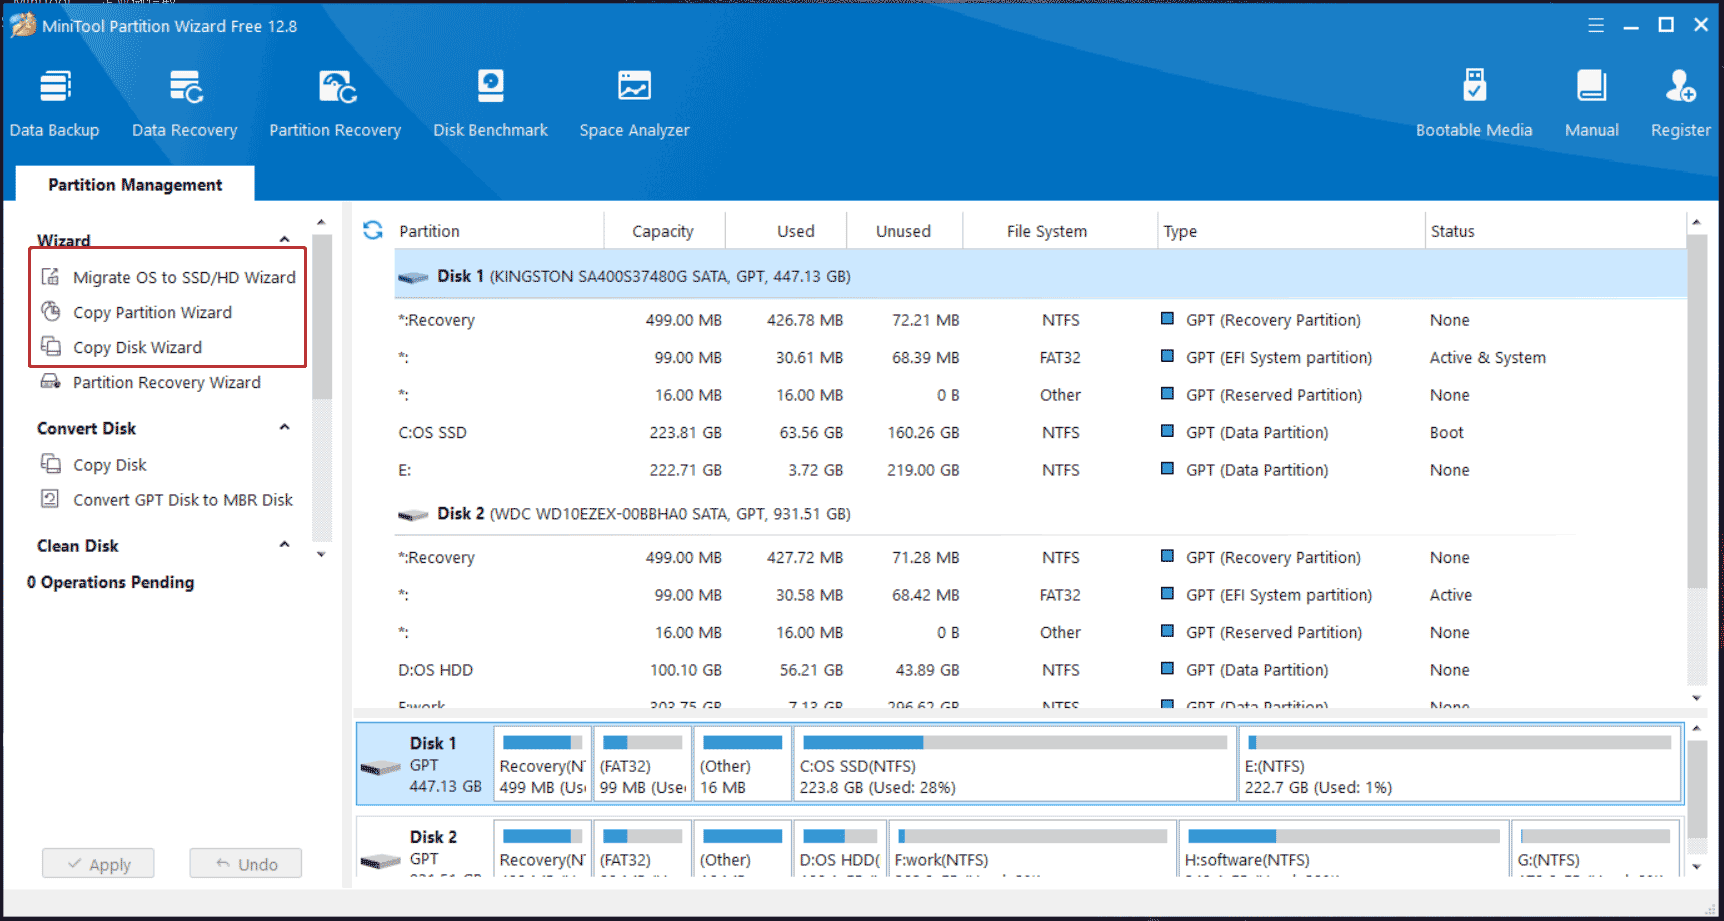
As a powerful partition manager for Windows 11/10/8.1/8/7 and Windows Server 2022/2019/2016, MiniTool Partition Wizard has a huge following due to its rich features.
With it, some disk and partition management is just a breeze, for example, shrink/extend/resize/move/slit/merge/format/delete/wipe/align a partition, wipe a hard drive, perform disk benchmark, run space analyzer, convert a disk between MBR and GPT, convert a file system between FAT32 and NTFS, and so on.
Also, MiniTool Partition Wizard can be a powerful server cloning software that offers three features:
- Migrate OS to SSD/HD Wizard: Enables you to only migrate the entire Windows operating system to an HDD or SSD or clone the entire system disk to another hard drive.
- Copy Partition Wizard: Only copies a single partition to an unallocated space for data backup.
- Copy Disk Wizard: Helps to clone a data disk or a system disk to another hard drive for disk upgrade or disk backup.
Talking about disk cloning or migration, MiniTool Partition Wizard lets you choose a copy option as per your needs – fit partitions to the entire disk or copy partitions without resizing, allows you to clone MBR to GPT (requiring you to tick the box of Use GUID Partition Table for the target disk after choosing a copy option) and helps align partitions to 1MB.
In short, this cloning software for Windows Server and Windows desktop systems facilitates quick and easy hard drive upgrades and efficient data migration, without a tedious reinstallation. Also, you can run MiniTool Partition Wizard to create a bootable media for managing your disks or partitions in case the PC fails to start up.
Pros:
- Offers rich cloning features including system cloning, disk cloning, and partition cloning
- Makes advanced settings for cloning, such as choosing a copy partition, using GPT for the target disk, etc.
- Gives an intuitive user interface
Cons:
- Sector-by-sector cloning is not supported
- System cloning or migration is paid
#3. Macrium Reflect
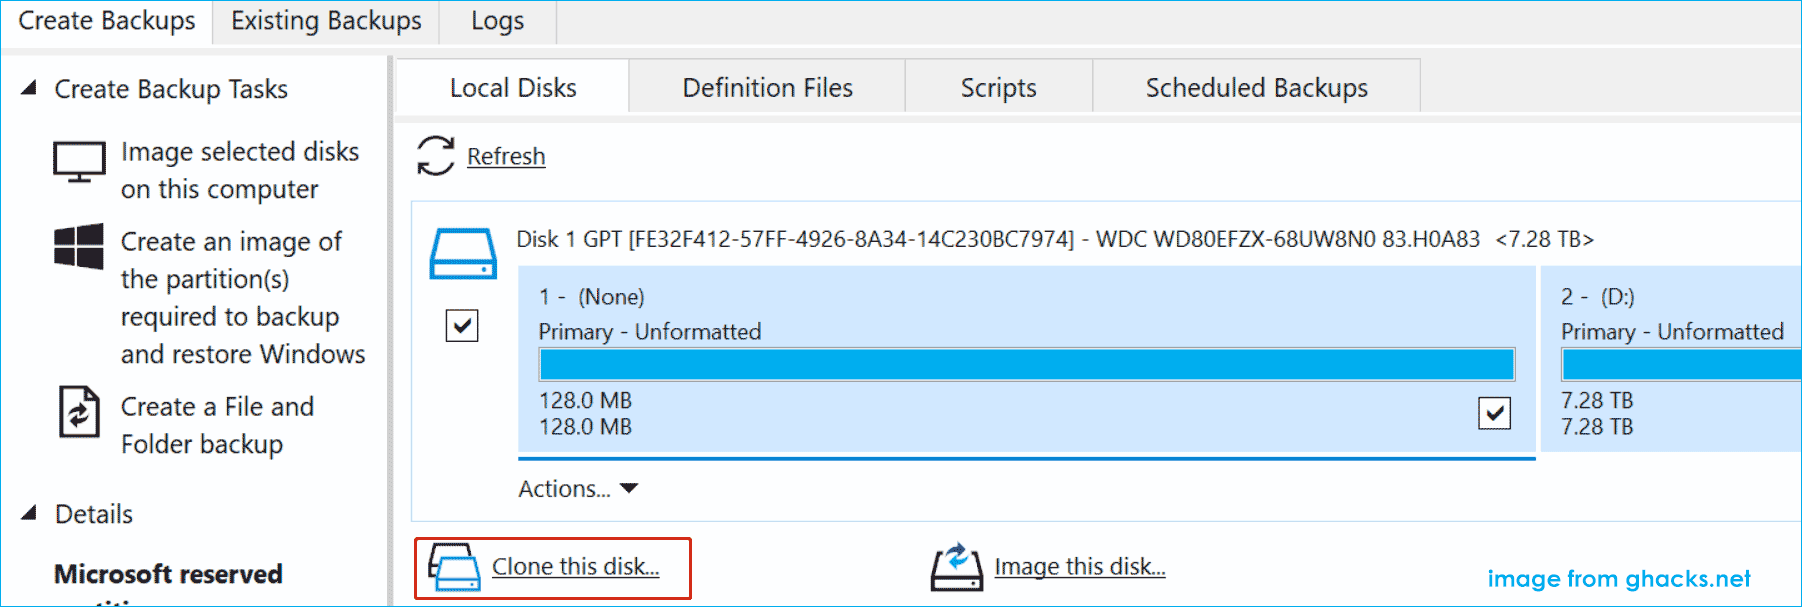
Macrium Reflect, a fully featured and sophisticated tool for disk image backup and disk cloning, is known in the industry. Its Server Plus Edition is designed to back up SQL databases and most servers that run applications such as Microsoft Exchange email. In backup and recovery, you can use this tool to perform instant virtual booting of backup images, recover your images in minutes, etc.
Besides, it is also a reliable disk cloning solution that supports all current Windows Server platforms and Windows desktop systems. Macrium Reflect has two highlights in cloning:
- You are allowed to shrink or extend the partitions you need to clone to fill the target hard drive.
- It lets you set an automatic disk cloning task by editing the schedule plan as per your situation.
However, the Windows Server cloning software also has some demerits, including:
- Frequent prompts ask you to upgrade to premium if you use its trial edition
- Only clones a disk rather than a single partition or system
- Clone failed error 9 always appears
To run Macrium Reflect for disk cloning, go to Create Backup Tasks, choose a source disk, hit Clone this disk, select a target disk, choose the clone method, and begin cloning.
#4. Paragon Hard Disk Manager
Paragon Hard Disk Manager is a feature-packed solution that goes beyond offering the cloning capability. Also, it provides a multitude of tools including backup & recovery, partition manager, and disk wiper.
With this server cloning software, you can migrate a Windows Workstation or Server operating system quickly by cloning the entire hard drive, providing fast disaster recovery when needed or accommodating a permanent disk migration scenario. Hard Disk Manager supports copying a partition or migrating OS.
This tool has an uncluttered interface that is easy to navigate with intuitively-placed buttons. Moreover, it supports excluding some files and folders during the cloning process.
Paragon Hard Disk Manager is reliable and is a worthwhile investment. But, it also has some cons:
- Sometimes it doesn’t estimate the time to completion properly
- It takes a long time to boot from a CD
- It gives ungrammatical messages
#5. Clonezilla
If you are looking for a full free server cloning software, Clonezilla will be your good choice. It is an excellent disk imaging and cloning software based on a Linux distro, helping make metal backup and recovery, do system deployment, and clone a hard drive.
Clonezilla lite server allows you to use Clonezilla Live to do massively cloning while Clonezilla SE is included in DRBL that must be set up first for mass cloning.
As an open-source program with rich features, Clonezilla also supports many file systems (ext2, ext3, ext4, exFAT, FAT32, NTFS, HFS+, APFS, and more) and operating systems (Linux, Windows, macOS, FreeBSD, NetBSD, OpenBSD, ChromeOS, etc.), making it popular with many system administrators and IT technicians. This cloning software uses Partclone as the primary cloning method, as well, ntfsclone is optional.
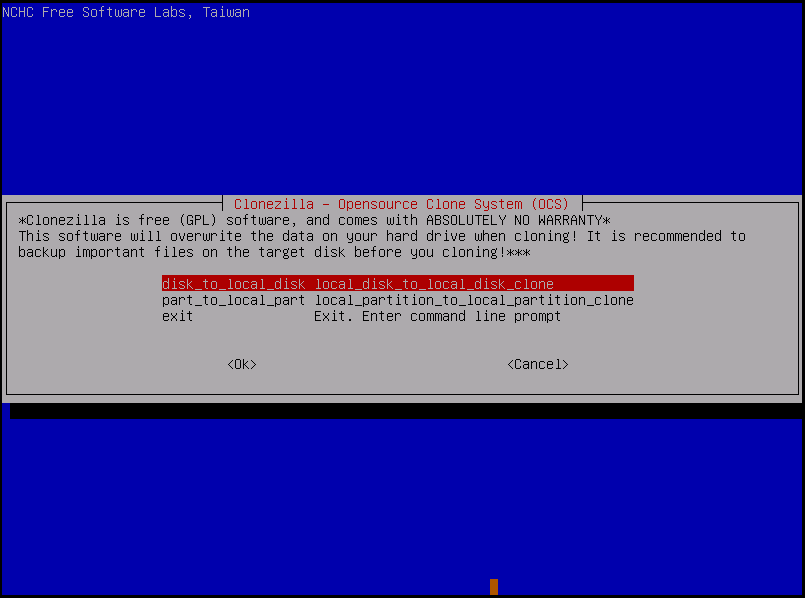
To run Clonezilla for disk cloning, you can refer to this post – How to Use Clonezilla in Windows 10/11 to know details.
Pros:
- Has a great compatibility
- Supports mass cloning
- Offers unparalleled features
- Absolutely free and open-source
Cons:
- No graphics user interface
- Cannot clone to a small disk
Bottom Line
How to clone server hard drives for a disk upgrade or sever replacement? Use professional cloning software for Windows Server that should consider compatibility, versatility, reliability, efficiency, friendliness, and price. Here are 5 best server cloning software to help clone Windows Server to SSD. Choose one as per your needs and then perform the cloning operation.
Suppose you have some suggestions or questions about our MiniTool software. Just send an email to [email protected]. Much appreciate!
How long does system clone take?
The cloning time varies from different situations (from 10 minutes to an hour), which is decided by the speed and health of the source drive and target drive, the amount of data being moved, as well as the software you use.
Can you use your computer while cloning?
This depends on the cloning software you use. MiniTool ShadowMaker can perform the cloning process while you use the machine, without rebooting Windows.