
Автор: Джон, Обновлено: 4 сентября 2024 г.
Когда системный диск заполняется, если вы делаете резервную копию всего и затем восстанавливаете на новый диск, это стоит в два раза больше. Кроме того, иногда операционная система не может загрузиться из новой среды. Гораздо проще и быстрее клонировать диск непосредственно к большему. Клонировать диск в Windows Server 2016, есть 2 пути «сектор в сектор» клонировать и «уровень файловой системы» копирование. Секторное копирование выполняется очень медленно, и для большинства серверов нет необходимости делать такое клонирование. В этой статье представлен метод быстрого копирования на уровне файловой системы. Вы можете клонировать Windows Server 2016 на SSD, HDD или оборудование RAID массив быстро и легко.
Содержание:
- Как клонировать Windows Server 2016 на SSD/HDD
- Как скопировать раздел в Windows Server 2016
- Как клонировать RAID раздел в Windows 2016 сервер
Как клонировать Windows Server 2016 на SSD/HDD
Существует множество инструментов, помогающих клонировать Windows Server 2016 диск на SSD или больший жесткий диск, шаги похожи. Но по сравнению с другими инструментами, NIUBI Partition Editor имеет больше преимуществ:
- Чрезвычайно быстро — помимо метода копирования на уровне файловой системы, NIUBI имеет усовершенствованный алгоритм перемещения файлов, помогающий копировать разделы диска 30% — 300% быстрее.
- Горячий клон — он может клонировать раздел диска в Windows без перезагрузки прерывания, так что ваш сервер может продолжать работать, пока клонируется системный диск. Если ваш исходный сервер выходит из строя, вам просто нужно изменить BIOS и загрузиться с клонированного диска. Вам не придется тратить много времени на восстановление из резервной копии образа.
- Изменить размер раздела — при копировании раздела диска вы можете изменить размер раздела на целевом диске.
3 момента, которые вы должны знать перед клонированием диска в Windows Server 2016:
- Там должен быть нет разделы на целевом диске, если они есть, программа попросит вас удалить.
- Целевой диск может быть больше или меньше исходного диска, но при копировании на меньший диск его размер должен быть больше, чем Используемое пространство всех разделов на исходном диске.
- Исходным и целевым диском может быть SSD, HDD или любой другой тип оборудования. RAID массив.
Шаги для клонирования Windows Server 2016 диск на SSD/HDD/RAID:
- Скачать NIUBI Partition Editor, Щелкните правой кнопкой мыши фронт исходного диска (Диск 0) и выберите Клонировать диск, или нажмите Мастер клонирования диска ниже Инструменты вверху слева напрямую.
- Выберите назначение диск во всплывающем окне и нажмите Далее.
- Выберите первый возможность удалить все разделы на целевом диске. (Нет такого шага, если нет разделов.)
- Редактировать Размер и расположение разделов один за другим с дополнительным дисковым пространством. (Начните с последнего раздела справа.)
- Нажмите Далее и вернитесь в главное окно, нажмите Применить вверху слева, чтобы выполнить. (Любые операции перед этим шагом работают только в виртуальном режиме.)
Видео инструкция по копированию Server 2016 диск:

Как скопировать раздел в Windows Server 2016
Если Вы хотите скопировать системный раздел C on Server 2016, вам следует скопировать весь системный диск, в противном случае операционная система не сможет загрузиться с целевого диска.
Для переноса файлов в томах данных можно копировать и вставлять в File Explorer. Зачем копировать раздел с помощью программного обеспечения? 3 распространенных причины:
- Если вы скопируете и вставите большое количество файлов за один раз, будет использоваться гораздо больше ресурсов ЦП и ОЗУ, что может привести к зависанию сервера. Очень медленно копировать и вставлять большое количество маленьких файлов.
- Процесс копирования может быть прекращен по многим причинам.
- Для некоторых специальных разделов целостность не может быть гарантирована простым копированием и вставкой.
Перед клонированием Server 2016 раздел:
- Должно быть Нераспределенный пространство на целевом диске, если его нет, уменьшите большой раздел для создания.
- Размер нераспределенного пространства должен быть больше, чем использовал пространство исходного раздела, который вы хотите скопировать.
- Для разделов, которые должны сохранить исходную букву диска, например D: (с программами), измените буквы диска по одной. Для других томов данных этот шаг необязателен.
Шаги по копированию раздела в Windows Server 2016 NIUBI:
- (По желанию) Щелкните правой кнопкой мыши большой раздел на целевом диске и выберите «Изменить размер / переместить объем«перетащите бур в другую сторону во всплывающем окне, чтобы освободить место.
- Щелкните правой кнопкой мыши исходный раздел, например D :, и выберите «Копировать том«.
- Выберите нераспределенное пространство на целевом диске и нажмите Следующая.
- Издание размер раздела, расположение и тип.
- (По желанию) Щелкните правой кнопкой мыши исходный диск (D:) и выберите «Изменить букву диска«выберите любую букву во всплывающем окне.
- (По желанию) Щелкните правой кнопкой мыши целевой раздел, снова запустите «Изменить букву диска» и выберите D: во всплывающем окне.
- Нажмите Применить вверху слева, чтобы выполнить.
Видео инструкция по копированию Server 2016 раздел:
Как скопировать RAID раздел в Windows 2016 сервер
Для операционной системы и NIUBI Partition Editor, нет никакой разницы, используете ли вы физический жесткий диск SSD и механический HDD или любые другие типы оборудования RAID массив. Поэтому шаги те же самые, если вы копируете с или на SSD/HDD/RAID массив.
RAID 1 обычно используется для операционной системы и программ, RAID 5 обычно используется как для ОС, так и для данных. Если вы хотите клонировать и расширить RAID 1 д Windows 2016, есть 2 варианта:
- Копия оригинала RAID 1 на один из больших дисков, расширьте разделы, чтобы использовать все дисковое пространство.
- Перестраивать RAID 1 с другим диском большего размера.
- Построить новый RAID 1 с дисками большего размера.
- Копия оригинала RAID 1 к новому RAID 1 с NIUBI Partition Editor.
Кроме клонирования диска/раздела в Windows Server 2016/2019/2022/ 2012 / 2008 / 2003, NIUBI Partition Editor помогает вам конвертировать тип диска/раздела. Сжимайте, расширяйте, перемещайте, объединяйте разделы для оптимизации использования пространства и выполняйте множество других операций по управлению разделами диска.
Скачать
Dave Patrick Do you know if it would include the recovery & related partitions? Do you have to reenter licensing information if you restore this way? From what I was reading it seemed like you need to use sysprep to strip away licensing and other info before making the backup, then put re-enter everything when you restore to a new drive?
Do you know if it would include the recovery & related partitions?
It depends on what you selected to include in the backup. Should be no need to sysprep. As far as activation it might trigger, but you can simply do
slmgr /ipk xxxxx-xxxxx-xxxxx-xxxxx-xxxxx
slmgr /ato- Applies to: Upgrading or cloning a Windows Server disk to a larger, newer, faster HDD/SSD without data loss.
- Duration: 30 minutes — 1 hour.
- Supported: Windows Server 2022, 2019, 2016, 2012/2012 R2, 2008/2008 R2, and more.
Can you clone a server hard drive? This article will walk you through the complete guide to clone disk to a larger or new HDD/SSD on your Windows server computer without losing data or reinstalling the server OS.
If you have the same need, follow these instructions to begin your disk upgrade.
Before you begin: Prepare a new hard drive or SSD
When your Windows server disk encounters the above issues, it’s time to clone and upgrade the server disk:
- The data or system drive is full.
- A Windows Server computer runs slowly as the disk space is running out.
- The System C drive on Windows Server is full, and you can’t extend available space any more.
How to clone a disk and upgrade to a larger or faster new HDD or SSD in Windows Server? Before you start, you need to prepare the new disk for the disk upgrade cloning.
Here are some quick guidelines to help you prepare a new disk:
- • Get a new larger HDD or an HDD-SSD hybrid drive for upgrading the data disk of your Windows Server.
• If you aim to migrate the system disk of a Windows Server, prepare a faster and larger SSD.
• After getting the new hard drive, install and initialize it in your Windows Server.
So, how to initialize a new disk in Windows Server? Firstly, you can directly install the new disk to your Windows Server and then open Disk Management to initialize the new drive.
Here’s a comprehensive guide you can follow to proceed:
Complete Guide: Initialize SSD/HDD for Free
If you’ve added a brand new disk to your computer but it doesn’t show up in File Explorer, you might need to assign a drive letter or initialize it before use. There’re 3 ways to initialize an SSD or HDD in Windows and Windows Server.
How to Clone Windows Server Disk? Here Are 2 Reliable Ways
Here, we have compiled two reliable methods to upgrade disks on a Windows server. You can choose either one:
- #1. Clone Disk on Windows Server with Third-Party Disk Cloning Software
- #2. Back Up and Restore to New Disk with Microsoft Windows Server Backup
Which disk cloning tool should you choose? Here are the ones recommended by our editors:
- For a simpler method, third-party disk cloning software like tools Partition Master Enterprise is more suitable for Windows Server administrators of all levels.
Please provide the English content you would like translated, and I will do my best to translate it into Chinese.
- You can try using Windows Server Backup, which is free and allows you to migrate your Windows Server disk data to another drive. The process is a bit more complicated than Method 1.
- If you want to clone the entire server operating system disk to a new drive, this solution will do the job and ensure that Windows programs and installed software will run after cloning.
Now, let’s start cloning the disk in Windows Server.
#1. Clone a Windows Server Disk with Disk Cloning Software
- Tool: Third-party disk cloning software — AOMEI Backupper Technician Plus with its Disk Clone feature.
- Supported: Windows Server 2022, 2019, 2016, 2012, 2008, and more.
The most efficient way to upgrade and clone disks on a Windows Server computer is by using reliable Windows Server disk cloning software. AOMEI Partition Assistant Server with its Disk Clone feature can help any Windows Server user successfully clone and upgrade their disk.
24/7 Technical Chat
Free Consultation
Here’s your complete guide to cloning a Windows Server disk to a new, larger SSD or HDD:
Step 1: Select the source disk.
- • In the left menu, click «Clone.» Choose «Clone System Disk» or «Clone Data Disk,» then click «Next.»
• Select the source disk, then click «Next.»
Step 2: Select the target disk.
- Select your desired HDD/SSD as the destination location, then click “Next” to proceed.
Read the warning message and confirm by clicking the “Yes” button.
Step 3: Review the disk layout and edit the target disk partition sizes if needed.
When prompted that all data on the target disk will be erased, click “Continue” (make sure to back up any important data on the target disk beforehand).
You can choose to “Autofit to disk,” “Clone as source,” or “Edit disk layout.” (Choose the last option if you want to allocate more space for the C drive.)
Step 4: Click “Start” to begin cloning the hard drive.
Then, you can restart your computer, and your data will be completely cloned to the new disk in Windows Server.
If some of you clone the Windows Server operating system disk to a new drive but the computer fails to boot after the cloning, stay calm. There could be two issues preventing you from accessing and running the Windows Server system:
- 1. You didn’t set the newly cloned disk as the boot drive. Please read: How to set a cloned drive as the boot drive.
- 2. You need to configure the boot mode for your OS disk: MBR — Legacy, GPT — UEFI. Please read: How to disable/enable UEFI mode.
In addition to cloning disks in Windows Server, the Partition Master Enterprise tool can also help you manage disk partition space better with the following features:
- Fix «Cannot Extend Volume» error in Windows Server
- Extend C drive or resize partitions
- Convert GPT to MBR or change MBR to GPT without data loss
- Erase or wipe hard disk partitions in Windows Server
24/7 Technical Chat
Free Consultation
#2. Backing Up Server Data with Windows Server Backup and Restoring to a New Disk
- Tool: Microsoft Windows Server Backup.
- Supported: Windows Server 2022, 2019, 2016, 2012, 2008, and more.
Windows Server users might want to turn to Windows Server Backup, a free disk imaging solution. Although Windows Server Backup is a backup tool for disk volumes, it can serve as a perfect alternative to Windows Server disk cloning.
Experienced Windows Server users might want to try this method. Here’s the full process for backing up your hard disk data to another drive:
First, back up the Windows server hard drive.
- • Launch “Server Manager,” go to “Manage,” click “Add Roles and Features.”

- In Server Manager, click on “Tools,” then select “Windows Server Backup.” Click on “Backup Once…” or “Backup Schedule…” – for this example, we’ll choose “Backup Once…”

- • In the left pane, click Select backup items. Most users will want to choose the default Bare Metal Recovery option, as it provides the most recovery options.
• Click Add Items > Backup to begin backing up the disk.

Next, restore the contents of a disk backup to another drive.
- 1. Launch «Windows Server Backup,» click on «Local Backup» and select «Recover.»
2. In the «Get Started» window, choose «This server,» then click «Next» to initiate the disk backup recovery process.

- Choose the backup date, restore point, and items to restore, then put the backup on a new disk that you’ve added to your computer. Click “Restore” to begin.
Then, all you have to do is wait for the process to complete.
Additional Tip: What to Do with the Old Hard Drive after Cloning
After successfully cloning or moving all disk data to the new drive, what do you plan to do with the old one? It’s essential to clean the old drive. But some may want to reuse the disk. So, how to manage the old drive?
«Disk Management tool — Partition Master Enterprise provides a complete solution to clean up and repartition your old hard drive with just a few simple steps.»
24/7 Technical Chat
Free Consultation
1. Wipe old hard drive
We have two options for clearing your data. Please choose the one you need.
Option 1: Erase Partition
- — Right-click the partition you want to wipe and select “Erase.”
— In the new window, set how you want to erase the partition, then click “OK.”
— Click “Execute 1 Task” in the bottom-right corner to review your changes, then click “Apply.”
Option 2: Erase the disk
- Select HDD/SSD, then right-click «Erase Disk.»
Choose the number of times you want to overwrite the data (up to 10 times). Then click «OK.»
Click «Perform 1 Task» and then «Apply.»
2. Drive that has been partitioned and formatted
Step 1: Run AOMEI Partition Assistant and enter the «Partition Management» interface. Click «Allocate this hard disk» in the popped up «New Disk Wizard» window.

Step 2. Set the number of partitions you want to create, as well as the disk partition style – MBR or GPT.
Alternatively, you can accept the default settings offered by Partition Master. When ready, click Proceed.

Click “Execute 1 Task” and “Apply” to partition the new HDD/SSD or external drive.

It’s incredibly easy to clone a disk in Windows Server with a reliable disk cloning software.
On this page, we provide a complete guide to help Windows Server users easily clone and upgrade their server computer disks to larger, newer drives.
As long as you have the new hard drive ready, you can choose any of the methods provided on this page to successfully perform a disk upgrade. To make things easier, don’t miss the free disk cloning software — AOMEI Partition Assistant Professional, and select the appropriate version to upgrade your hard drive right away.
24/7 Technical Chat
Free Consultation
Frequently Asked Questions About Cloning Windows Server Disks in UTF-8 Format
If you have other questions about cloning a Windows server disk, check the following FAQs and get your issues solved quickly.
**1. Can you clone a Windows Server?**
Yes, you can clone a Windows Server disk to another drive using a reliable disk cloning tool. On this page, we offer two methods:
1. **Partition Master Enterprise Tool** — Suitable for Windows Server owners at all levels, IT service providers, and business owners.
2. **Windows Server Backup** — Utilize the built-in server tool to upgrade the disk.
For detailed steps on both methods, please follow the instructions provided.
How can I clone a physical Windows Server?
When cloning a physical Windows Server, you need to decide whether you want to clone the entire Windows Server disk to a new drive or just clone and migrate the Windows Server system to a new disk.
If you simply want to clone a Windows server disk to another drive, refer to the guide above; you have two disk cloning methods to choose from.
If you want to migrate Windows Server to another disk, you can refer to this tutorial page: Migrate Windows Server OS to a New Drive.
How to clone Windows Server 2016 to another disk?
To clone a Windows Server 2016 disk to another drive, follow the instructions on this page.
Here’s a guide on how to clone the Windows Server 2016 operating system to another drive:
- Connect a new hard drive to your Windows Server 2016 or install a new one.
- Initialize the new hard drive with the same partition style as the OS disk of Windows Server 2016 — MBR or GPT.
- Run tools Partition Master Enterprise and choose «Clone», then click «Clone System».
- Select the target new hard drive, and then click «Execute 1 Task».
- Click «Apply» to start cloning and migrate Windows Server 2016 to the new hard drive.
Can you clone a server? How to clone server hard drive to another disk? You can easily clone your Windows Server 2022/2019/2016 to an SSD to migrate all the disk data using professional software. In this post, MiniTool lists top 5 server cloning software for data protection or migration.
About Windows Server Disk Cloning
Windows Server 2022/2019/2016 are common server operating systems that are widely used for enterprise environments to handle databases, enterprise-scale messaging, Internet/intranet hosting, etc. Compared to a Windows desktop version, the configurations in a server are complicated, laborious, and time-consuming. This is why you clone Windows Server in case of involving changing a server.
Speaking of server cloning, it often means creating an exact copy of the entire hard drive, including all the disk data and system files required for Windows Server to run. Cloning can easily help you achieve the following purposes:
Fast disaster recovery: In the event of Windows Server failures, you won’t need to perform a recovery process but directly use the cloned hard drive as the system disk, greatly reducing the loss caused by server downtime.
Upgrade or migrate the server OS: Whether you want more storage space or better PC performance, you can clone server hard drive to another hard disk without reinstalling Windows Server and apps and setting up the operating system.
In short, whether you upgrade a disk, migrate the operating system, or protect your data, cloning will be a good solution. However, Windows Server doesn’t come with a cloning feature but a backup utility called Windows Server Backup. Hence, resort to reliable server cloning software from third parties to simplify the operation.
What to Focus on When Choosing Server Cloning Software
Today, there are a myriad of Windows Server cloning software. And it is challenging to distinguish and choose the best one that suits you. Before selecting the disk cloning software for Windows Server, consider 6 aspects, as shown below:
Compatibility: The server cloning software should be compatible with your operating system such as Windows Server 2022/2019/2016 and support a variety of storage types including SSDs, HDDs, USB external hard drives, and more.
Versatility: Your cloning utility should meet multiple cloning requirements, such as cloning the entire disk or migrating the entire operating system.
Reliability: The cloning tool you use should be reliable and help easily copy all the disk data, without missing any data areas. After cloning, the target disk can directly boot Windows successfully.
Speed and Efficiency: You should look for a piece of Windows Server cloning software that implements cloning quickly, without affecting productivity too much.
User Interface Friendliness: The best server cloning software should have a clean and intuitive user interface that shows the necessary options to simplify the cloning process.
Price: Most disk cloning software offers a free edition or trial edition for several days. Just choose a cost-effective one for cloning Windows Server to SSDs or other hard drives.
Taking these points into account, we list some solutions for businesses below, and let’s read them through.
At the first face, MiniTool ShadowMaker is a professional Windows backup software as it allows you to run file backup, disk backup, partition backup, and system backup, as well as recovery in case of data loss or system crashes.
Besides, it is a powerful disk cloning software that works well in Windows 11/10/8.1/8/7 and Windows Server 2022/2019/2016, etc. With the simple and clean user interface, the backup and cloning process becomes very simple, preventing making mistakes. It facilitates cloning HDD/SSD to a new PC, making it easy to transfer all disk data and the operating system from the hard drive of an old PC to a new one.
In detail, this free server cloning software has some highlights:
- Clones a hard drive, USB drive, SD card, etc. to another one within a few clicks.
- Supports cloning HDD to SSD, moving Windows to another drive, cloning SSD to a larger SSD, and so on.
- Enables you to clone a larger disk to a smaller disk as long as the target disk can hold all the contents of the original disk.
- Also helps easily perform sector by sector cloning besides cloning the used sectors.
- Offers a friendly user interface to make the cloning process simpler. Although you don’t have many computer skills, you can use it as easy as pie.
- Easily recognizes all the hard drives from multiple brands including Samsung, Toshiba, WD, Crucial, Seagate, SanDisk, and so on as long as the disks are detected in Windows Disk Management.
- Allows you to create a bootable USB drive using Media Builder to boot the PC when it fails to start and then execute backup, recovery, and clone tasks.
Then, how to clone server hard drive with MiniTool ShadowMaker? Take the simple operations:
Step 1: Download and install MiniTool ShadowMaker Trial Edition on Windows Server 2022/2019/2016.
MiniTool ShadowMaker TrialClick to Download100%Clean & Safe
Step 2: Connect an SSD to the PC and launch this cloning tool.
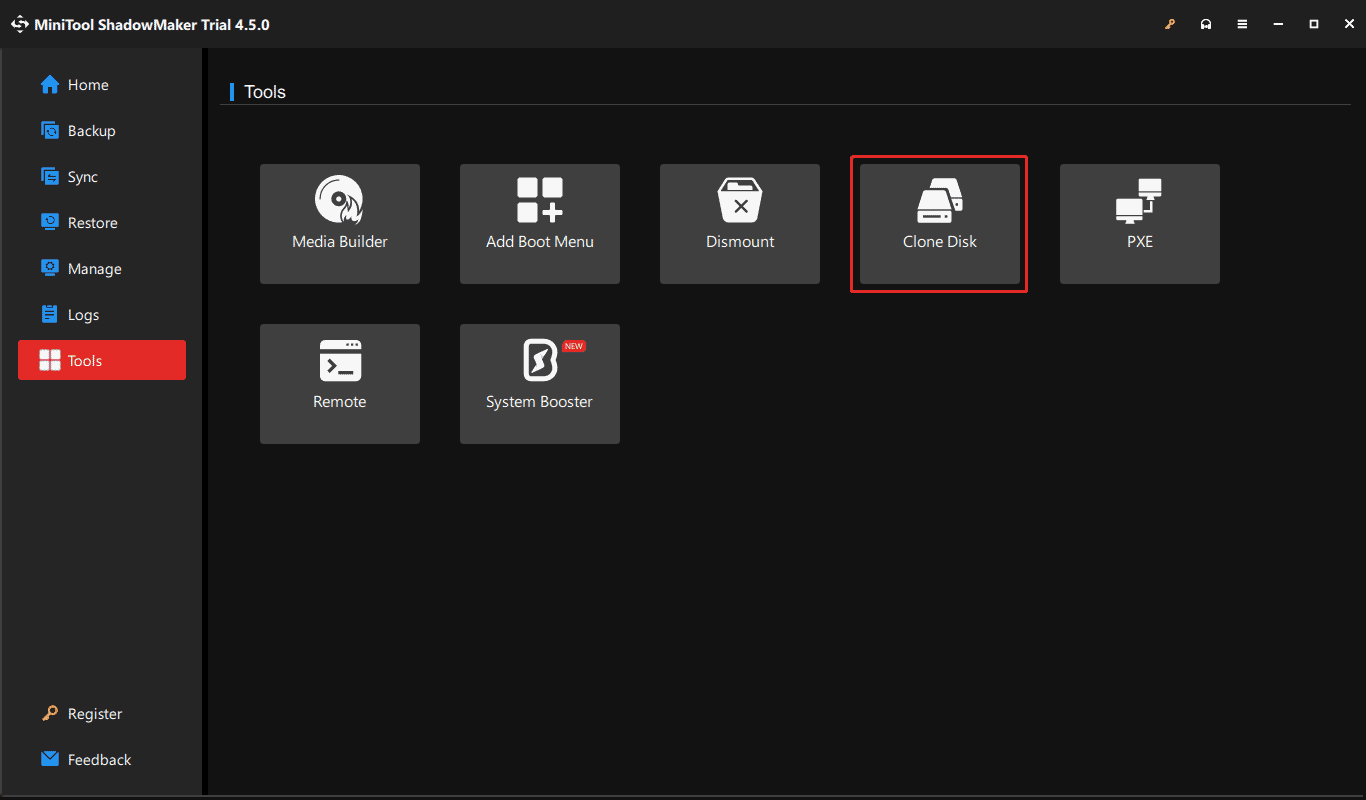
Step 3: Go to Tools and hit Clone Disk.
Step 4: Choose the source disk and target disk, register this software using a license key of Business Standard or Business Deluxe as you deal with a system disk, and then begin the cloning process.
Pros:
- Offers comprehensive and rich features
- Has a clean user interface
- Clones a hard drive while Windows is running
- Gives a reliable and stable cloning process
- Creates bootable clone (target disk can be used to boot the PC)
- Trial Edition supports Windows 11/10/8/7 and Server 2022/2019/2016
Cons:
- Only supports disk clone but partition clone and system clone
- Requires you to pay money when cloning a system disk
As a powerful partition manager for Windows 11/10/8.1/8/7 and Windows Server 2022/2019/2016, MiniTool Partition Wizard has a huge following due to its rich features.
With it, some disk and partition management is just a breeze, for example, shrink/extend/resize/move/slit/merge/format/delete/wipe/align a partition, wipe a hard drive, perform disk benchmark, run space analyzer, convert a disk between MBR and GPT, convert a file system between FAT32 and NTFS, and so on.
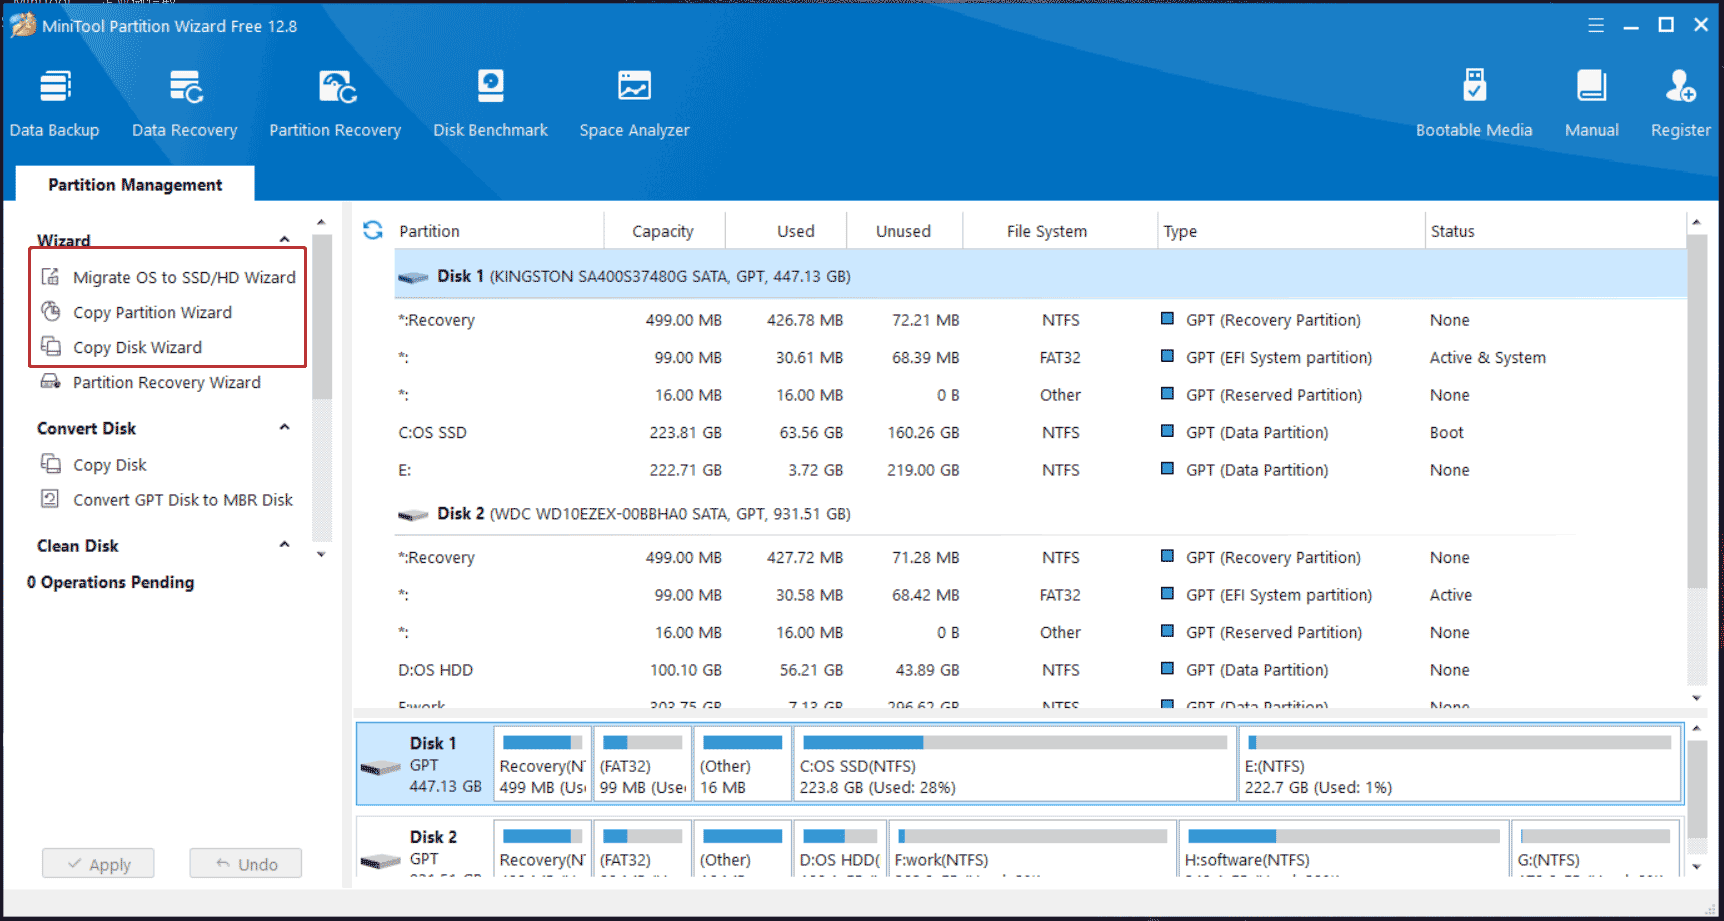
Also, MiniTool Partition Wizard can be a powerful server cloning software that offers three features:
- Migrate OS to SSD/HD Wizard: Enables you to only migrate the entire Windows operating system to an HDD or SSD or clone the entire system disk to another hard drive.
- Copy Partition Wizard: Only copies a single partition to an unallocated space for data backup.
- Copy Disk Wizard: Helps to clone a data disk or a system disk to another hard drive for disk upgrade or disk backup.
Talking about disk cloning or migration, MiniTool Partition Wizard lets you choose a copy option as per your needs – fit partitions to the entire disk or copy partitions without resizing, allows you to clone MBR to GPT (requiring you to tick the box of Use GUID Partition Table for the target disk after choosing a copy option) and helps align partitions to 1MB.
In short, this cloning software for Windows Server and Windows desktop systems facilitates quick and easy hard drive upgrades and efficient data migration, without a tedious reinstallation. Also, you can run MiniTool Partition Wizard to create a bootable media for managing your disks or partitions in case the PC fails to start up.
Pros:
- Offers rich cloning features including system cloning, disk cloning, and partition cloning
- Makes advanced settings for cloning, such as choosing a copy partition, using GPT for the target disk, etc.
- Gives an intuitive user interface
Cons:
- Sector-by-sector cloning is not supported
- System cloning or migration is paid
#3. Macrium Reflect
Macrium Reflect, a fully featured and sophisticated tool for disk image backup and disk cloning, is known in the industry. Its Server Plus Edition is designed to back up SQL databases and most servers that run applications such as Microsoft Exchange email. In backup and recovery, you can use this tool to perform instant virtual booting of backup images, recover your images in minutes, etc.
Besides, it is also a reliable disk cloning solution that supports all current Windows Server platforms and Windows desktop systems. Macrium Reflect has two highlights in cloning:
- You are allowed to shrink or extend the partitions you need to clone to fill the target hard drive.
- It lets you set an automatic disk cloning task by editing the schedule plan as per your situation.
However, the Windows Server cloning software also has some demerits, including:
- Frequent prompts ask you to upgrade to premium if you use its trial edition
- Only clones a disk rather than a single partition or system
- Clone failed error 9 always appears
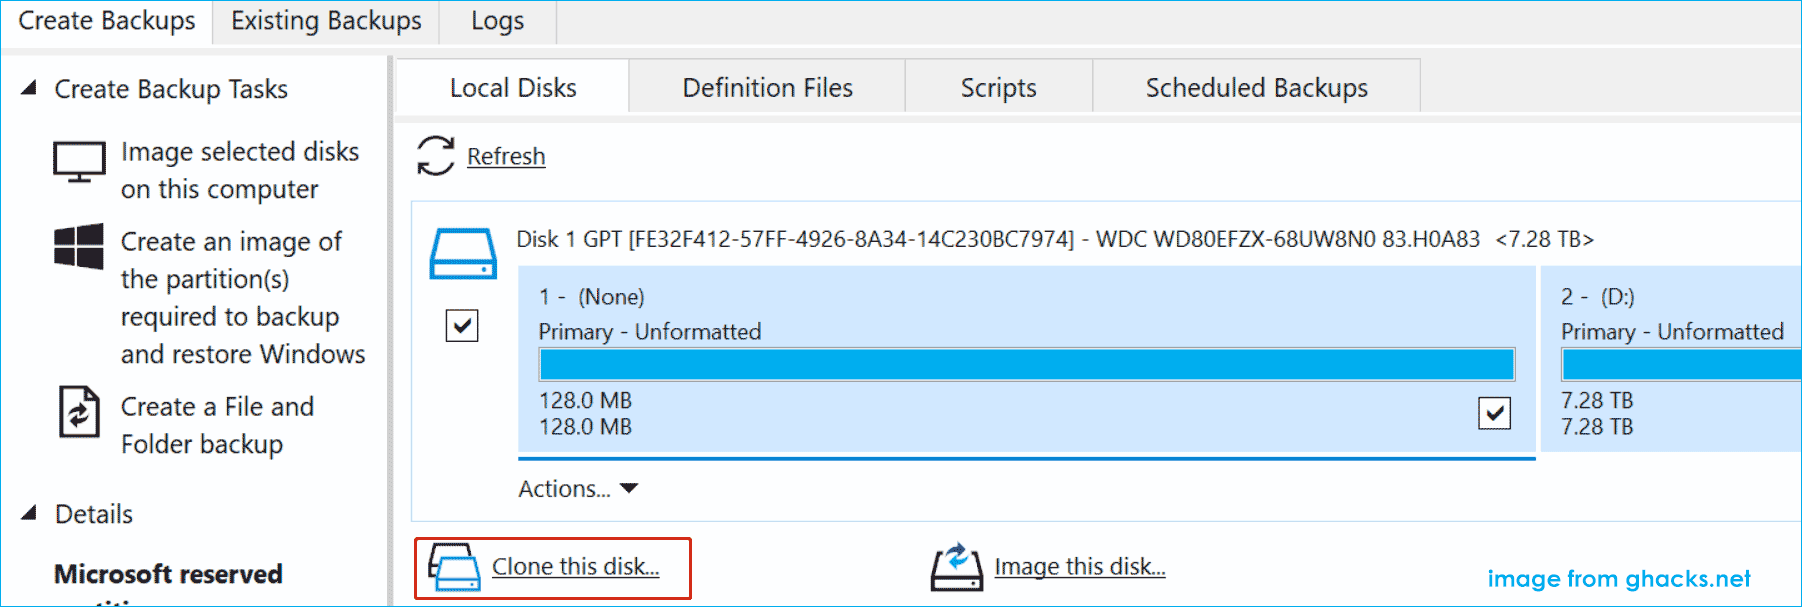
To run Macrium Reflect for disk cloning, go to Create Backup Tasks, choose a source disk, hit Clone this disk, select a target disk, choose the clone method, and begin cloning.
#4. Paragon Hard Disk Manager
Paragon Hard Disk Manager is a feature-packed solution that goes beyond offering the cloning capability. Also, it provides a multitude of tools including backup & recovery, partition manager, and disk wiper.
With this server cloning software, you can migrate a Windows Workstation or Server operating system quickly by cloning the entire hard drive, providing fast disaster recovery when needed or accommodating a permanent disk migration scenario. Hard Disk Manager supports copying a partition or migrating OS.
This tool has an uncluttered interface that is easy to navigate with intuitively-placed buttons. Moreover, it supports excluding some files and folders during the cloning process.
Paragon Hard Disk Manager is reliable and is a worthwhile investment. But, it also has some cons:
- Sometimes it doesn’t estimate the time to completion properly
- It takes a long time to boot from a CD
- It gives ungrammatical messages
#5. Clonezilla
If you are looking for a full free server cloning software, Clonezilla will be your good choice. It is an excellent disk imaging and cloning software based on a Linux distro, helping make metal backup and recovery, do system deployment, and clone a hard drive.
Clonezilla lite server allows you to use Clonezilla Live to do massively cloning while Clonezilla SE is included in DRBL that must be set up first for mass cloning.
As an open-source program with rich features, Clonezilla also supports many file systems (ext2, ext3, ext4, exFAT, FAT32, NTFS, HFS+, APFS, and more) and operating systems (Linux, Windows, macOS, FreeBSD, NetBSD, OpenBSD, ChromeOS, etc.), making it popular with many system administrators and IT technicians. This cloning software uses Partclone as the primary cloning method, as well, ntfsclone is optional.
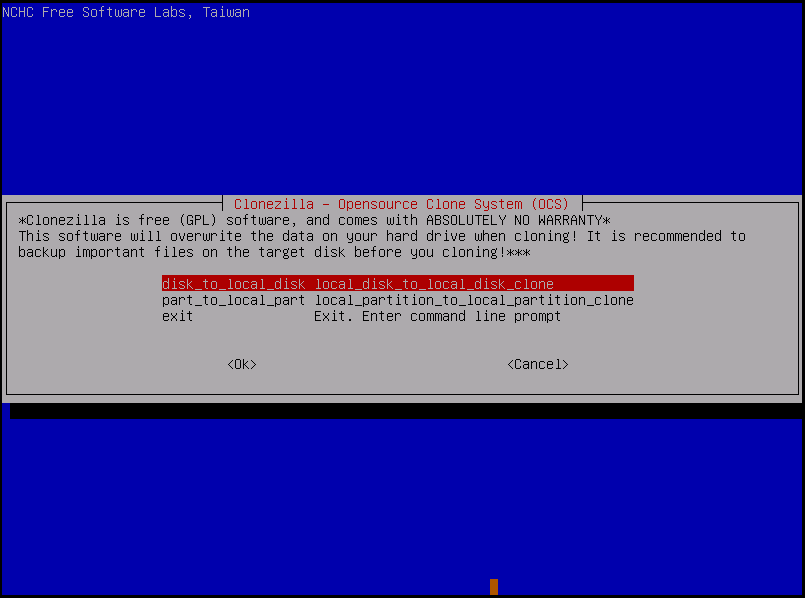
To run Clonezilla for disk cloning, you can refer to this post – How to Use Clonezilla in Windows 10/11 to know details.
Pros:
- Has a great compatibility
- Supports mass cloning
- Offers unparalleled features
- Absolutely free and open-source
Cons:
- No graphics user interface
- Cannot clone to a small disk
Bottom Line
How to clone server hard drives for a disk upgrade or sever replacement? Use professional cloning software for Windows Server that should consider compatibility, versatility, reliability, efficiency, friendliness, and price. Here are 5 best server cloning software to help clone Windows Server to SSD. Choose one as per your needs and then perform the cloning operation.
Suppose you have some suggestions or questions about our MiniTool software. Just send an email to [email protected]. Much appreciate!
How long does system clone take?
The cloning time varies from different situations (from 10 minutes to an hour), which is decided by the speed and health of the source drive and target drive, the amount of data being moved, as well as the software you use.
Can you use your computer while cloning?
This depends on the cloning software you use. MiniTool ShadowMaker can perform the cloning process while you use the machine, without rebooting Windows.