
Для работы проектов iXBT.com нужны файлы cookie и сервисы аналитики.
Продолжая посещать сайты проектов вы соглашаетесь с нашей
Политикой в отношении файлов cookie
Установка и настройка Windows — это дело не простое, требующее много сил и времени. И довольно обидно, когда из-за вируса или банальной случайности операционная система вдруг перестаёт работать. В этой небольшой инструкции вы узнаете, как сделать копию установленной Windows с сохранением всех пользовательских данных для быстрого её восстановления.
На самом деле, чтобы сделать копию Windows, не нужно устанавливать десятки сторонних программ или быть заядлым хакером. Достаточно иметь при себе USB-флешку или внешний диск размером в 30-120 Гб (Зависит от редакции Windows и размера личных файлов) и последовательно соблюдать инструкцию.
1. Подключаем наш носитель к ПК.
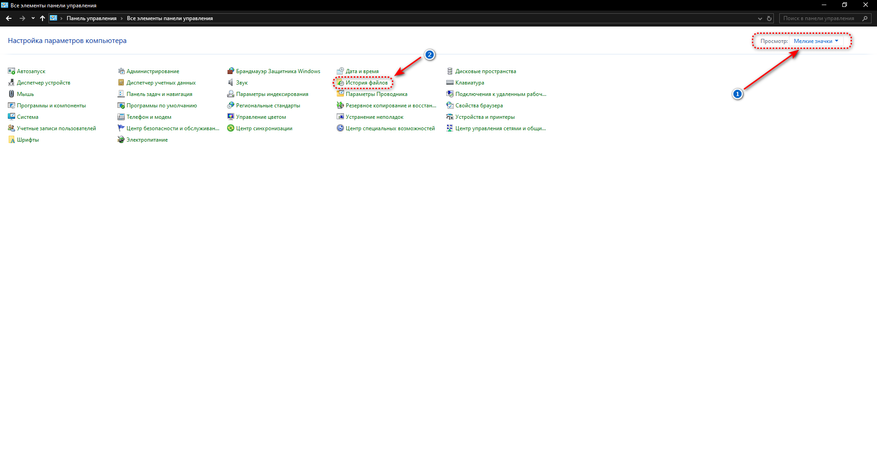
2. Нажимаем Win+R и вводим команду Control.
3. Выставляем в старой панели управления отображение мелких значков и переходим в раздел «История файлов».
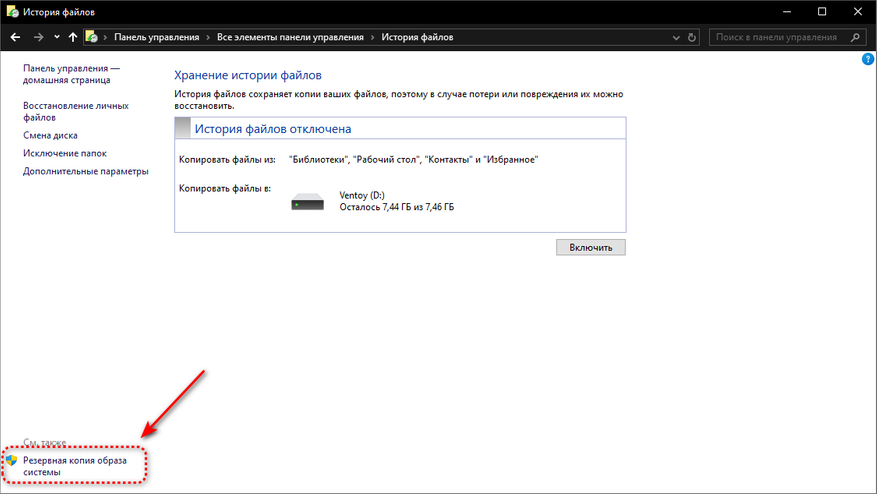
4. В появившемся окне нажимаем на пункт «Резервная копия образа системы».
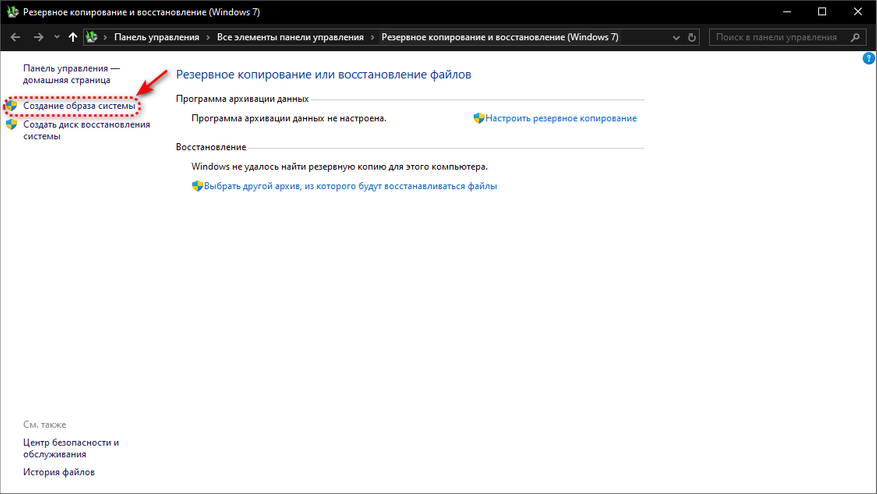
5. Запускаем программу создания образа системы.
6. Если всё было сделано правильно, то автоматически запустится архиватор ОС. В интерфейсе программы выбираем наш заранее подготовленный носитель и смело запускаем архивацию. В зависимости от мощности железа и размера личных файлов процесс создания образа системы может занять от 5 минут до 3 часов реального времени. Наберитесь терпения.
Вот, собственно, и всё! Теперь, если что-то случится с вашей Windows, вы смело, используя созданный образ системы, сможете её восстановить или быстро установить заново с сохранением всех личных файлов и настроек. Просто выберите носитель с созданным образом ОС в виде загрузочного и следуйте подсказкам установщика.
Отрадно видеть, что корпорация Microsoft не забывает заботиться о простых пользователях, встраивая столь полезные решения в Windows. И хотя инструкция получилась немного сумбурной, я искренне надеюсь, что сумел вам помочь. Уважайте свободу, используйте только проверенное ПО и ни в коем случае не позволяйте компаниям диктовать вам свои условия. С вами был Павел. Ещё увидимся!
Want to transfer Windows 10 to a USB drive
«I bought a laptop recently with Windows 10 installed. I’m wondering if it is possible to move Windows to a USB drive as a backup or something like that. There might be BSOD or system crash due to unknown reasons, and I hope the USB drive can come to the rescue then. Do I need to download a Windows 10 installer or ISO? Do you have any easy solutions online to copy Windows 10 to an external HDD?»
Copying Windows 10 to a USB drive enables you to carry the system with you all the time. With a portable Windows 10, you can access it anywhere you like as long as there is a computer at hand. Moreover, it can also help you deal with unbootable computers easily. When you want to run the system from USB drive, you can simply connect it to computer and configure boot sequence.
When it comes to the way of transferring Windows 10 to USB drives, many online guides suggest using Windows To Go. However, Windows To Go feature is only available in Windows 10 Enterprise and Windows 10 Education, and it is removed in Windows 10, version 2004 and later operating system. It does not provide any updates, and thus you cannot stay current. What’s more, you need to prepare a specific type of USB in order to make use of this function. For this reason, it is recommended to use an alternative solution which needs simpler steps and less time. The following content explains how to clone existing Windows 10 to a USB disk and make the USB disk bootable using a third-party system migration tool.
Free disk cloning software to transfer OS to USB external drive
If Windows To Go feature is not available for your Windows operating system, or there is not a certified USB drive at hand, you can totally choose an alternative solution, the third-party software, to fulfill the task. Using third-party software makes the task easier. DiskGenius Free Edition is free and effective disk cloning software as well as system migration tool. It enables users to migrate Windows 10/8/7 to new or smaller SSD, hard drive, external HDD and USB flash drive. DiskGenius provides an option which can make the USB drive bootable during system migration if it detects that the target disk is connected via USB. In addition to migrating Windows, DiskGenius provides many other useful features:
- Clone hard drive that has bad sectors so that you can recover data from target disk without being affected by bad sectors. You can configure the way to skip bad sectors.
- Clone hard drive to smaller SSD/HDD. Disk cloning function support to select smaller disk as destination disk.
- Clone partition: Transfer all data from one partition to another and provide three different methods to clone data.
- Migrate current Windows system into VMware virtual machine and make the system bootable in VMware.
- Backup any partition such as system partition, ESP partition, MSR partition or non-system partition to an image file, supporting full backup and incremental backup.
- Backup partition table and help to protect partitions from getting lost.
The step-by-step guide of copying Windows 10 to USB external drive with DiskGenius Free Edition
The entire process of migrating Windows to USB disk performed by DiskGenius Free Edition is quite intuitive, making the system migration task trouble-free. You will not find any difficulty in using the software. Moreover, current system won’t be affected by the system copying process, which means your computer can either boot from current disk or the USB drive after DiskGenius finishes copying OS to USB.
Preparations
- DiskGenius Free Edition.
- A USB drive which is large enough to hold the operating system.
- Make sure you’ve backed up all important files stored on the USB drive to somewhere else. The system migration process will remove and overwrite data on the USB drive.
Step 1: Launch DiskGenius Free Edition and check if the USB drive is recognized by the software.
Step 2: Click «Tools» menu and choose «System Migration» option from appeared menu. This will open the system migration wizard.
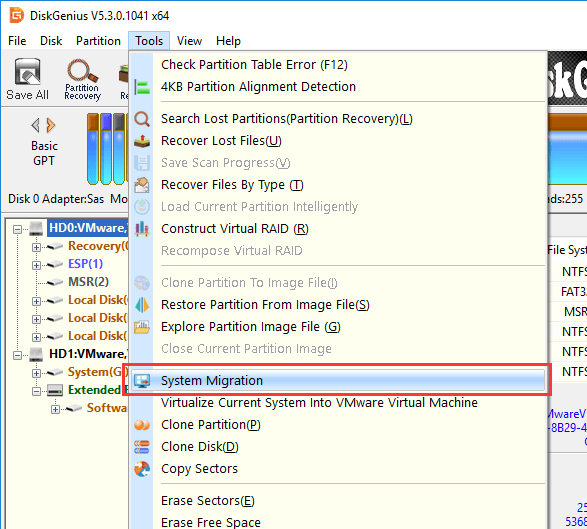
Step 3: Select the USB drive as the target disk and click OK button.
On the pop-up window, you can see all disk attached to the computer except the system disk. Make sure you select the correct disk as the destination disk.

Step 4: Select the option «Set target disk to boot system via USB» and click Start button.
This option is going to make the USB drive bootable, which means your computer can boot system from the USB drive after you change boot sequence properly in BIOS; In addition, you can also modify the partition size for target disk. Place your mouse on the edge of partition and drag it to change its size.

After clicking Start button, DiskGenius will warn you that all data on the target disk will be removed. Click OK button to continue if you’ve backed up important data.
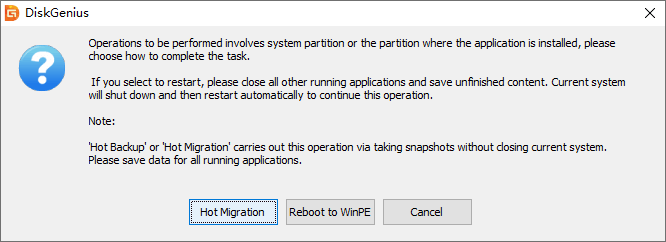
Step 5: Click Hot Migration button to start copying Windows.
By way of hot migration, DiskGenius will transfer current Windows operating system to target disk without shutting down computer. The migration task will be performed in the background, and you can use the computer to do other work at the same time.
Wait for the process the complete.

Bonus tip: How to boot Windows 10 from the USB drive?
After DiskGenius finishes copying Windows to your USB drive, you can try booting computer from the USB.
Step 1: Restart computer and repeatedly press certain key to enter BIOS.
At the start of booting process, you need to press a required key shown on the screen such as Del, F2, F1, etc. to access BIOS. Press the key as soon as you see it.
Step 2: Select the USB drive as the boot device, save changes and exit. After that, your computer will restart and boot system from the USB drive.

It may take longer time to boot from the USB drive, as it is the first time to boot from the USB drive and USB drive usually does not have a faster read/write speed as internal hard drives and SSDs.
After computer boots from the USB drive successfully, you will receive a message saying «Keep the USB drive plugged in. Only remove it after you PC has shut down completely. Otherwise, your Windows To Go workspace might crash and you could lose data.»
This USB drive can also be used to boot other computers after changing boot sequence. However, your license key for Windows might not be valid on other computers since hardware gets changed.
You may also ask
1. Can I copy my operating system to a USB?
Yes, you can copy Windows operating system to a USB disk and then access system from it anywhere you want. With the help of a portable Windows, you can easily copy with unbootable computer. It is recommended to use free and reliable third-party system migration tool like DiskGenius Free Edition to copy OS.
2. Can I save Windows 10 to USB?
Yes. Saving Windows to USB drive is possible, which can be achieved with the help of DiskGenius. You just need to make sure the USB drive is large enough to store the operating system and the USB drive is converted to HDD mode.
3. How do I copy Windows 10 to a flash drive?
There are two methods you can try when you want to copy Windows 10 to a USB flash drive, use the Windows To Go feature or a third-party program. Windows To Go feature is available for Windows 10 Enterprise and Windows 10 Education, and it requires a specific USB drive. In addition, you can also use DiskGenius Free edition to do the job, whose «System Migration» function supports to transfer Windows to a USB disk.
4. How do I transfer Windows 10 from HDD to SSD for free?
DiskGenius Free Edition is a free OS migration tool that can help you move Windows 10/8/7 from hard drive to new or even SSD/HDD free of charge, including migrate GPT to MBR/GPT and transfer MBR to MBR/GPT. Thus, there is no need to reinstall system and applications. You can refer to this page to learn detailed steps: How to Migrate Windows OS to New SSD /Hard Drive for FREE?
Sum up
Copying Windows 10 to a USB disk enables you to carry operating system on a portable disk anywhere you like and easily deal with computers which won’t boot. DiskGenius Free Edition is the best alternative to Windows To Go, and it can transfer Windows OS to external hard drive or USB flash drive easily and quickly and make the USB drive bootable. In addition, DiskGenius Free Edition also supports to migrate current Windows into VMware virtual machine. For more information, free download DiskGenius and test it now.
Read Next
- How to Migrate Windows 10 to SSD/HDD with Freeware?
- How to Clone Laptop Hard Drive to Smaller SSD in Windows 10/8/7?
- How to Clone BitLocker Drive Using Freeware in Windows 10/8/7?
- How to Backup Computer to External Hard Drive in Windows 10?
Are you trying to back up Windows 10 to USB so that you can perform a system restore, data recovery or even factory reset Windows 10 to a previous healthy state? On this page, you’ll get 3 methods to back up your computer to a USB drive.
| Workable Solutions | Step-by-step Troubleshooting |
|---|---|
| 1. Backup with EaseUS Software |
1. Backup Windows 10 to USB…Full steps 2. Backup Windows 10 data to USB…Full steps 3. Restore Windows 10 system from…Full steps |
| 2. Backup System Image to USB | Connect the USB drive (bigger than the…Full steps |
| 3. Create Recovery Drive to USB | Try every USB port available; Determine…Full steps |
3 Ways to Back Up Windows 10 to USB External Drive
Here, we collected and listed the reasons that can explain why do Windows users want to back up their computer to an external USB drive:
- 1. Back up OS and restore to a previous state from virus, hard drive failure, or human error.
- 2. Back up computer data to prevent file loss.
- 3. Create a system image to perform a factory reset anytime.
So how to back up Windows 10 or the entire computer to a USB drive? Here, we collected 3 ways to help you out. Pick the right method based on your need and follow to back up Windows 10 on your own now:
SO how do I back up my Windows 10 computer to an external USB drive? Follow the desired guide and start backing up your Windows 10 now.
Method 1. Backup Windows 10 to USB with EaseUS Software
It’s a smart choice that you turn to reliable backup software to create a backup of your Windows 10 data. Here, we would recommend you try EaseUS file backup software which is designed for System Backup and File backup on Windows 7, 8, 8.1, 10, Vista, and Windows XP.
You can apply it to fully back up Windows 10, including the OS and data, to your external USB drive on your own:
#1. Backup Windows 10 to USB
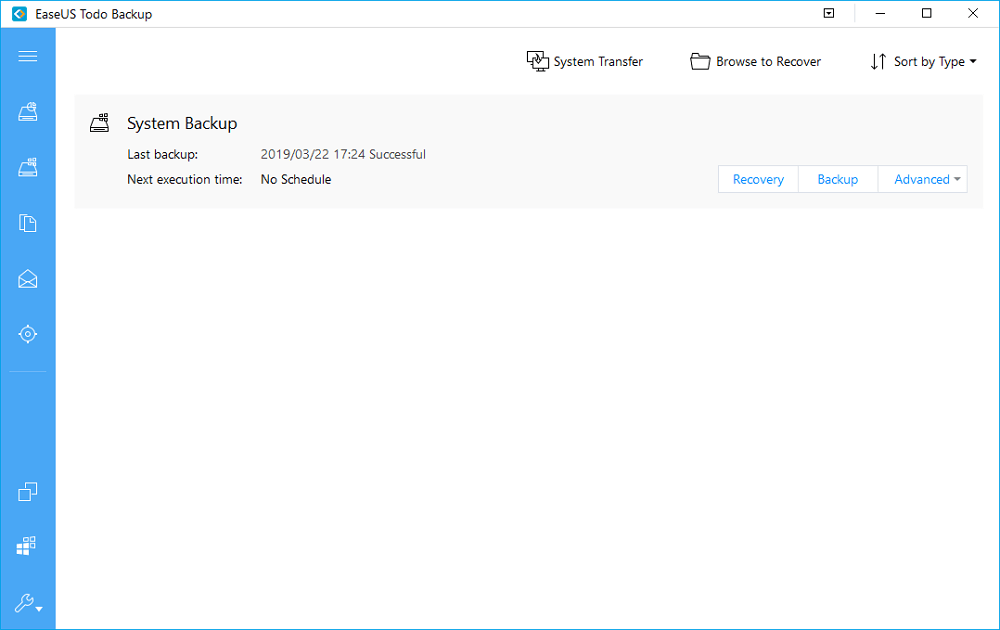
Step 1. Launch EaseUS Todo Backup on your computer, and click Create Backup on the home screen and then hit the big question mark to select backup contents.

Step 2. To back up your Windows operating system, click «OS» to begin the backup task.

Step 3. Your Windows operating system information and all system related files and partitions will be automatically selected so you don’t need to do any manual selection at this step. Next, you’ll need to choose a location to save the system image backup by clicking the illustrated area.

Step 4. The backup location can be another local drive on your computer, an external hard drive, network, cloud or NAS. Generally, we recommend you use an external physical drive or cloud to preserve the system backup files.

Step 5. Customiztion settings like enabling an automatic backup schedule in daily, weekly, monthly, or upon an event, and making a differential and incremental backup are available in the Options button if you’re interested. Click «Backup Now«, and the Windows system backup process will begin. The completed backup task will display on the left side in a card style.

#2. Backup Windows 10 Data to USB
Step 1. For the first time you use EaseUS Todo Backup to back up files, click Create backup on the home screen and then mouse click the big question mark to select backup contents.
Step 2. Since you’re going to back up files and folders on your computer, go on with the «File» backup mode, where you can select pictures, videos, documents and all other types of files to back up.
Step 3. Follow the paths to locate the files, folders or directories you want to back up, select them all and click «OK«.

Step 4. Now you need to select a backup location to save and retain the backup.

Step 5. EaseUS Todo Backup allows users to save the backup files to every device that is handy for you, like a local hard drive, external USB drive, SD card, network drive, or a NAS drive, plus a cloud drive of the EaseUS brand. We personally recommend users to choose the cloud drive prior to a physical drive to save important backups due to the greater accessibility, flexibility and safety.
To be able to access to EaseUS cloud, all you need is an email registration and login.

Step 6. If you’re interested in an automatic and intelligent backup schedule for the next file backup task, go on with the «Options» setting. There you can encrypt a confidential file backup, compress the backup image size, or customize a backup scheme to tell the software in what time to start the next backup.
Customize an advanced and automatic backup task here:

Step 7. Click «Backup Now» to start the file backup process. Your completed backup files are visible on the left area in a card style.

Note that EaseUS Todo Backup also contains a schedule backup feature so that you can automatically backup files to an external usb.
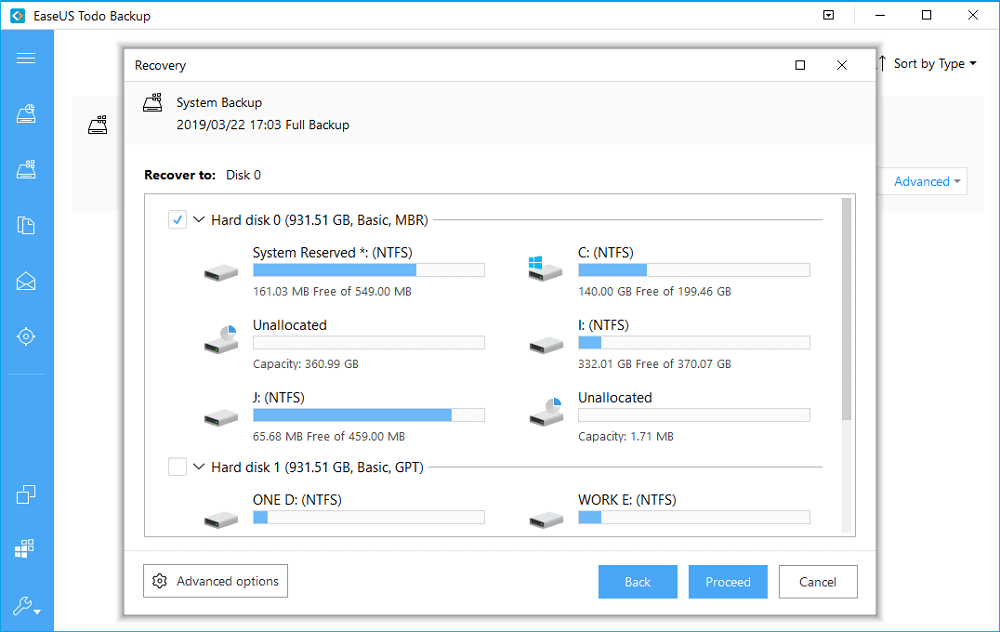
#3. Restore Windows 10 System from USB Backup
After a successful backup, you may also need to know how to restore Windows 10 backup from the USB drive. If you can boot into Windows, open EaseUS Todo Backup and jump to Step 2 below to restore the system image.
If Windows won’t boot, follow the details below:
Step 1. Connect USB with Windows 10 OS backup to PC and restart it.
When you see a Windows boot menu, select EaseUS Todo Backup.
Step 2. Select the image file you want to recover and click «Recovery».
Step 3. Select the destination location which you will recover the system and save it. Then click Proceed to restore Windows 10 backup.
Method 2. Backup Windows 10 System Image to USB
The other efficient way of backing up Windows 10 is to create a system image to USB. If you don’t want to use software creating system image backup, you may try this method (source from Microsoft).
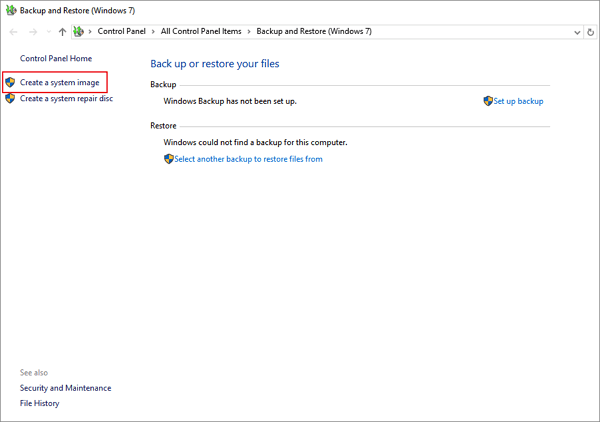
It’s based on Windows built-in Backup and Restore tool. Let’s see how to back up Windows 10 system to a USB drive:
Step 1. Connect the USB drive (bigger than the C drive) to your PC and format it to NTFS.
Step 2. Right-click on the Windows icon, select «Search» and type: Control Panel. Open it and click «Backup and Restore (Windows 7).
Step 3. Click «Create a system image».
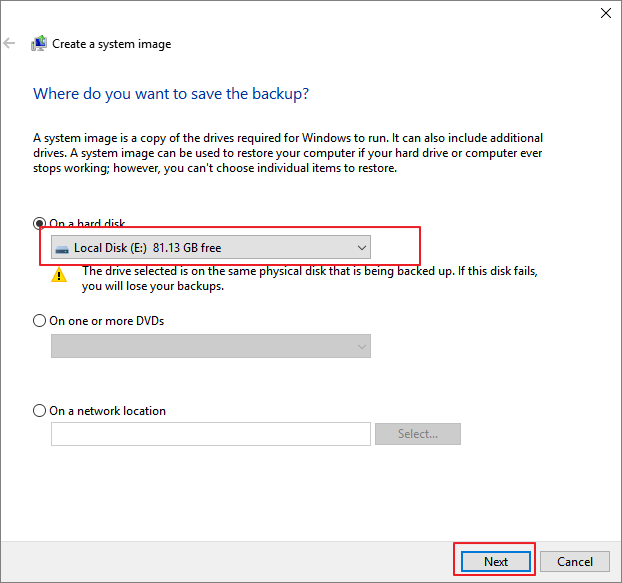
Step 4. Under the On a hard disk section, select the external USB drive as destination, and click «Next» to continue.
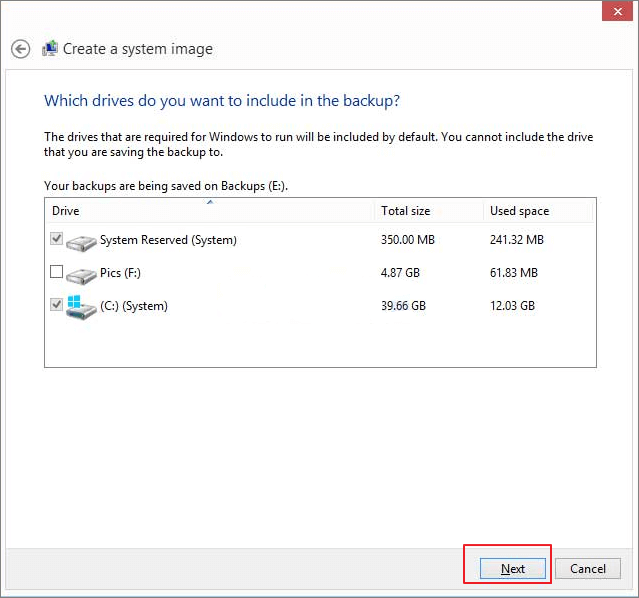
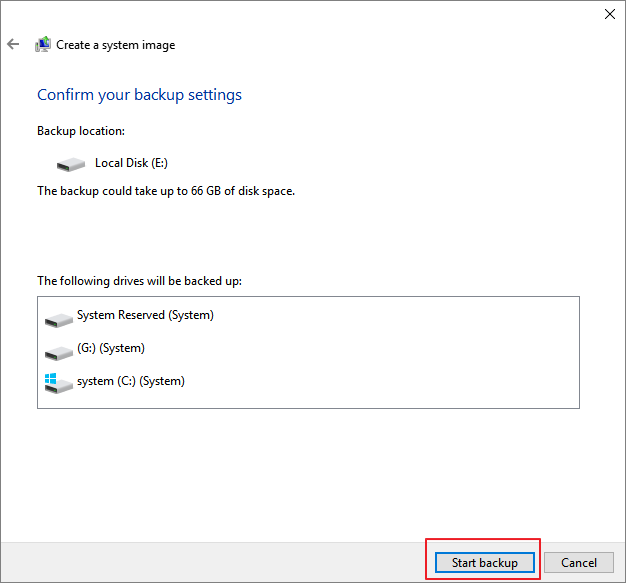
Step 5. Check the System and System Reserved partitions, click «Next» to continue.
Step 6. Click «Start backup» to begin creating your current system image to the USB drive.
Wait for the process to complete, you’ve successfully created the system image of Windows 10 to your USB drive.
When you have an OS boot issue or system failure error, you can restore a system image backup of Windows 10 on your USB anytime.
Method 3. Create a Windows 10 Recovery Drive to USB
The last way that you can try is to create a Windows 10 recovery drive to USB. With it, you can restore Windows 10 by performing a factory reset on your computer anytime when the computer or OS goes wrong.
The Windows built-in tool also supports creating a Windows 10 recovery drive. But it will take much time. Let’s see.
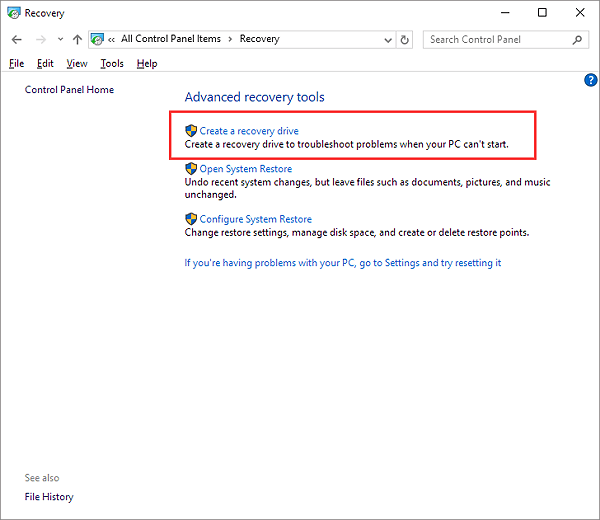
Step 1. Insert the USB drive into your computer. In Windows 10 Control Panel, click «Recovery».
Step 2. Click «Create a recovery drive».
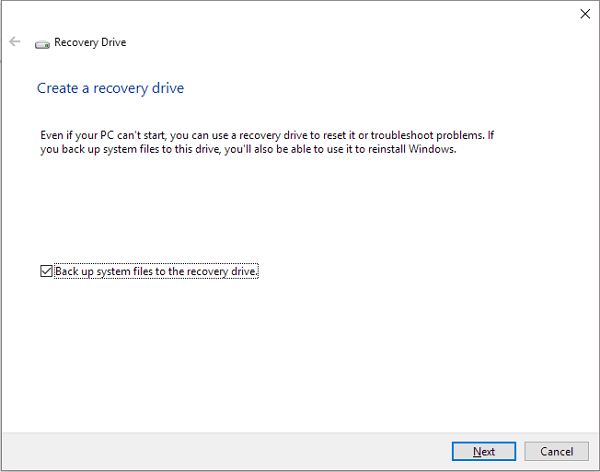
Step 3. Check «Back up system files to the recovery drive» to use the drive to reinstall or restore a previous version of Windows. Click «Next».
Wait until the wizard prepares to copy files to your flash drive.
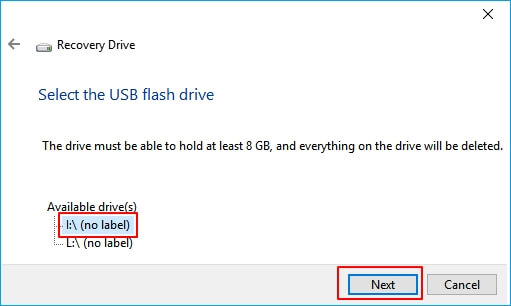
Step 4. Select your USB flash drive as the recovery drive and click «Next».
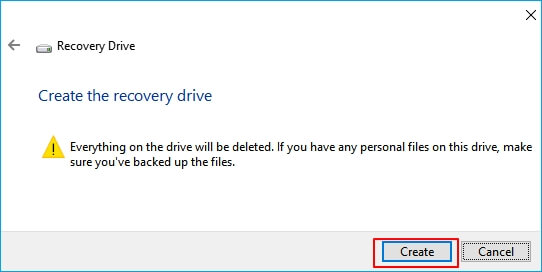
Step 6. Confirm the warning message that «everything on the drive will be deleted. If you have any personal files on this drive, make sure you’ve backed up the files» and click «Create».
Step 7. When the message «The recovery drive is ready» appears, click «Finish».
The backup may take a few hours, wait patiently. After this, you can use the Windows 10 recovery drive to troubleshoot OS failure or PC boot issues on your computer. For more details, follow this link and check out: Download Windows 10 Recovery Tool for 32/64 Bit.
Pick a Right Way and Backup Your Windows 10 to USB Now
This page covers 3 different but effective Windows 10 backup to USB solutions to help you fully protect Windows 10 and data from any unexpected OS issues.
Among these, you can pick EaseUS backup software — Todo Backup to back up your entire computer, including Windows 10 and the data in an easy and handy way.
If you only want to back up Windows 10 OS to USB, either Method 2 or Method 3 can help. Though a bit complex, but still worth a try. It’s not too late, take action to go and backup your Windows 10 and data now.
FAQ on Back Up Windows 10 to USB Drive
What is the best way to back up a Windows 10 computer?
Using a third-party tool, EaseUS Todo Backup is one of the best and easiest ways to back up a Windows 10 computer. This software provides users with complete and effective solutions to backup systems, disks, partitions, files & folders, and emails. With its user-friendly interface, even the most novice user can easily perform the backup operation with just a few clicks.
How big of a flash drive do I need to back up Windows 10?
The size of the flash drive you need depends on the amount of data you want to back up. For example, if you want to back up your entire hard drive, you will need a flash drive that is at least as big as your hard drive. If you only want to back up specific files or folders, you will need a flash drive that is big enough to hold those files.
В этой статье мы рассмотрим, как перенести установленную Windows с одного жесткого диска на другой только с помощью встроенных средств без использования сторонних программ (таких, как Paragon, AOMEI или Acronis). Эта инструкция поможет вам, например, перенести Windows с HDD на новый SSD диск, или склонировать установленную и настроенную Windows на другой компьютер (есть нюансы) или новый жесткий диск большего размера.
В качестве примера мы склонируем установленную Windows 10 на новый диск с помощью загрузочной USB флешки, командной строки и встроенной утилиты robocopy.
Обратите внимание, что перенос операционной системы копированием на новый диск будет гарантированно работать только при переносе в рамках одного и того же компьютера (или сходных по аппаратному обеспечению), когда вы клонируете вашу Windows на другой жесткий диск того же компьютера. Если вы хотите скопировать установленную Windows на диск для другого компьютера, то для его запуска на новом железе придется повозиться с драйверами контроллеров дисков, чипсета, видеокарты.
Вы сможете склонировать жесткий диск на новый диск меньшего размера, если место, занятое на системном диске текущей Windows меньше, чем емкость нового диска. Если это не так, придется удалить/переместить часть файлов с диска. Чаще всего такой вопрос возникает при переносе на SSD диск меньшей емкости, чем обычный HDD.
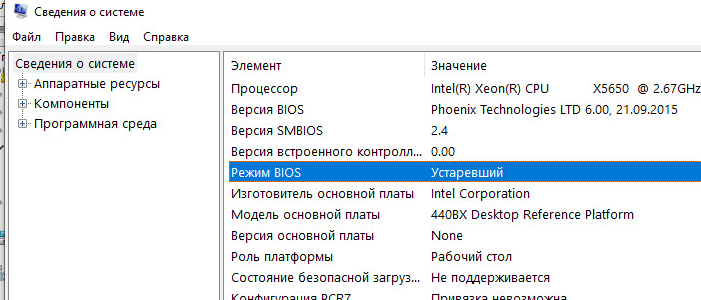
Процедура переноса Windows на другой диск зависит от, того, в каком режиме работает ваш компьютер: BIOS или UEFI. Выполните команду:
msinfo32
Если в строке BIOS mode (режим BIOS) указано Legacy (Устаревший), у вас компьютер с BIOS (или UEFI работает в режиме Legacy/CSM). Если указано UEFI – у вас современных компьютер и Windows установлена в UEFI режиме.
- Если компьютер работает в нативном UEFI режиме и имеет таблицу разделов GPT, я буду помечать команды для таких компьютеров
UEFI GPT
; - Если у вас старый компьютер с BIOS или с UEFI но в Legacy режиме, а таблица разделом MBR – команды будут помечены меткой
BIOS MBR
.
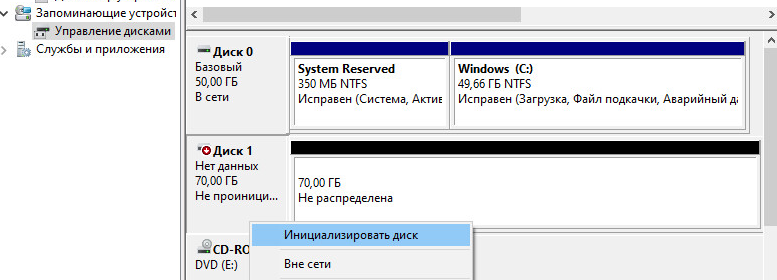
В первую очередь нужно создать таблицы разделов на новом диске. Это можно сделать непосредственно из запущенной Windows 10 с помощью diskpart. Если диск новый, инициализируйте его с помощью консоли
diskmgmt.msc
или PoweShell команды Initialize-Disk:
Get-Disk | Where-Object PartitionStyle –Eq 'RAW' | Initialize-Disk
Теперь создадим таблицу разделов на диске. Откройте командную строку с правами администратора и выполните команду:
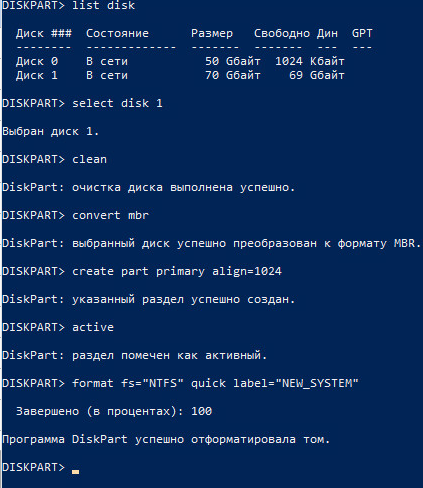
diskpart
В контексте
diskpart
выполните следующие команды.
list disk
select disk 1
(в зависимости от номера вашего нового диска, который выдала предудущая команда)
clean
Далее команды отличаются в зависимости от типа вашей платформы.
Для
UEFI GPT
:
convert gpt
create partition efi size=100
format fs="FAT32" quick label="EFI"
create partition msr size=16
create partition primary
format fs="NTFS" quick label="NEW_SYSTEM"
exit
Мы создали на новом диске таблицу разделов GPT, два небольших служебных раздела (EFI и MSR), на оставшемся месте создан один большой раздел (см. подробнее о структуре GPT разделов для EFI).
Если на диске уже есть разделы, вы можете изменить тип таблицы разделов с MBR на GPT без потери данных с помощью встроенной утилиты mbr2gpt.exe.
Для
BIOS MBR
следующие команды:
convert mbr
 create partition primary align=1024
active
format fs="NTFS" quick label="NEW_SYSTEM"
exit
Для клонирования Windows на новый диск вам понадобится загрузочная USB флешка с установочным образом Windows 10 (проще всего создать такую флешку с помощью MediaCreationTool).
Перезагрузите ваш компьютер и загрузитесь с установочного диска. При появлении окна установки Windows нажмите Shift+F10 чтобы открыть командую строку. В открывшемся окне выполните команды
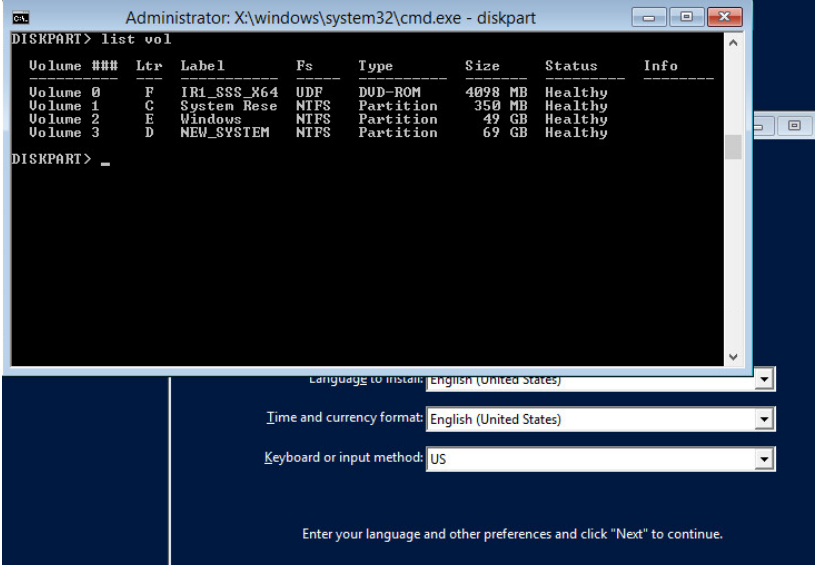
diskpart
list vol
exit
На скриншоте ниже видно, что оригинальному разделу Windows на старом диске присвоена буква диска E:, а большому разделу на новом диске (с меткой NEW_SYSTEM) назначена буква D:.
Если буквы диска не назначены, вы можете назначить их из diskpart следующим образом:
select disk 1
list part
select part 1
assign
list volume
Теперь нужно скопировать файлы со старого диска с установленной Windows на новый. Проще всего это сделать с помощью robocopy. Следующая команда robocopy скопирует все символические ссылки, файлы и папки с атрибутами, NTFS правами и timestamp. При этом лог копирования будет сохранен в корень целевого диска:
robocopy E:\ D:\ /E /COPYALL /SL /XJ /R:3 /W:3 /UNILOG:"D:\rcopy.log" /TEE
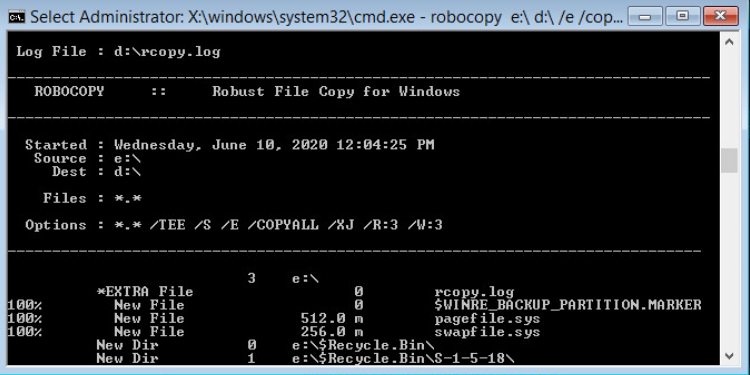
Копирование может занять продолжительно время в зависимости от размер старого диска (в моем случае копирование 60 Гб диска заняло около часа).
Теперь можно выключить компьютер и отключить старый жесткий диск.
Следующий шаг, настройка загрузчика Windows на новом диске.
Опять загрузите компьютер в среде установки Windows и запустите командную строку (
Shift+F10
).
Восстановление
BIOS MBR
загрузчика.
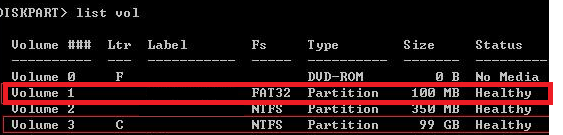
Проверьте букву диска, назначенную новому большому разделу на диске:
diskpart
list vol
Диску назначена буква C:
Восстановите BCD загрузчик на диске C:
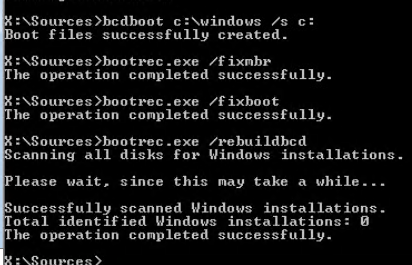
bcdboot C:\Windows /S C:
Исправьте MBR запись и записи в BCD загрузчике:
bootrec.exe /FixMbr
bootrec.exe /FixBoot
bootrec.exe /RebuildBcd
Восстановление загрузчика на
UEFI GPT
компьютере (подробно эта процедура описана в статье восстановление загрузчика Windows 10 на UEFI компьютере).
Нужно определить букву системного диска и назначить букву диска разделу с EFI.
Diskpart
List vol
В данном примере системному разделу назначена буква диска C. Вам нужно назначить букву разделу EFI (размер 100 мб и файловая система FAT32) следующими командами (в командах измените номера разделов в соответствии с вашей конфигурацией):
select volume 1
assign letter M:
exit
Теперь нужно пересоздать конфигурацию BCD загрузчика:
cd /d m:\efi\microsoft\boot\
ren BCD BCD.bak
bcdboot С:\Windows /l en-us /s M: /f ALL
Перезагрузите компьютер и отключите загрузочную флешку. Убедитесь, что Windows корректно загрузилась с нового диска.

Все установленные приложения, документы и настройки остались на месте. Вы успешно скопировали установленную Windows 10 на новый диск.
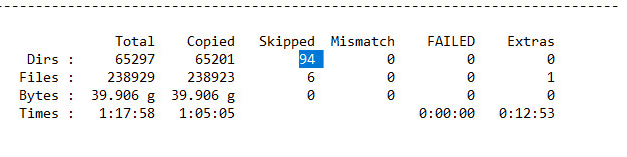
При копировании файлов на новый диск с помощью robocopy могут встречаться ошибки. Откройте на новом диске файл
rcopy.log
и посмотрите какие файлы не были скопированы. В моем случае не было скопировано 94 файла (в моем случае не скопировать только мусорные файлы).
В статье опущена процедура создания загрузочной записи для среды восстановления Windows. Обычно она находится на отдельном разделе System Reserved. Если вы хотите настроить работу среду Windows Recovery Environment (WinRE) , следуйте инструкциям в статье.