
Telnet — это один из старейших протоколов для удаленного управления компьютерами и сетевыми устройствами. Несмотря на свою древность, Telnet все еще используется для диагностики, тестирования сетевых сервисов и управления устройствами. В этой статье мы подробно рассмотрим, что такое Telnet, как его установить и настроить в Windows 10 и Windows 11, а также как использовать эту утилиту для диагностики сети и подключения к удаленным устройствам.
Данная информация предназначена для услуг: VPS хостинг
1. Что такое Telnet и для чего он нужен
Telnet (от «Telecommunication Network») — это сетевой протокол для удаленного доступа и управления сервером или устройством через текстовый интерфейс. Telnet использует стандартный порт 23 для установления соединения и может работать как в режиме текстовых команд, так и в виде удаленной сессии.
Основные возможности Telnet:
- Удаленное управление устройствами: Telnet используется для подключения к различным устройствам, включая серверы, маршрутизаторы, коммутаторы и другие сетевые устройства, для выполнения команд или настройки параметров.
- Тестирование подключения: Telnet позволяет проверить доступность определенного порта на сервере. Это полезно для диагностики проблем с соединением и проверкой доступности сервисов.
- Диагностика и мониторинг: С помощью Telnet можно подключаться к различным портам для проверки работы сервисов, таких как HTTP (порт 80), SMTP (порт 25), FTP (порт 21) и других.
Несмотря на то, что Telnet был широко использован в 90-х годах, в современных сетях его часто заменяют более безопасные протоколы, такие как SSH (Secure Shell). Тем не менее, Telnet все еще используется для внутренних задач и тестирования, поскольку его конфигурация проста, а утилита доступна на большинстве операционных систем.
2. Установка Telnet на Windows 10 и Windows 11
2.1. Как включить Telnet в Windows 10
В последних версиях Windows, включая Windows 10, Telnet по умолчанию не установлен, однако его можно легко добавить с помощью нескольких шагов. Для этого:
-
Откройте Панель управления:
- Нажмите Пуск, введите «Панель управления» и выберите соответствующий пункт из результатов поиска.
-
Перейдите в раздел «Программы»:
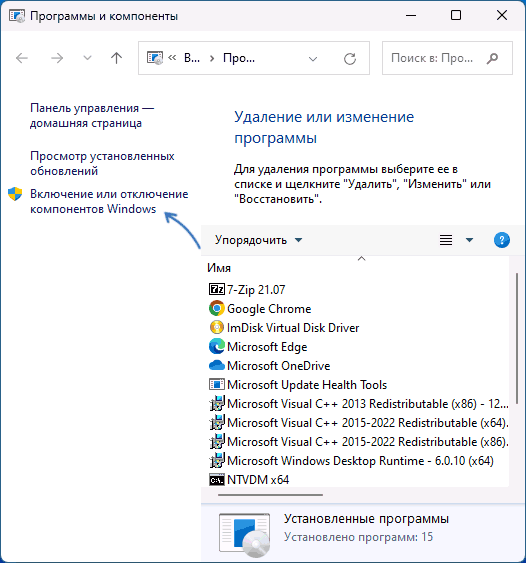
- В Панели управления выберите Программы, затем Включение или отключение компонентов Windows.
-
Включите Telnet:
- Найдите в списке Telnet Client и поставьте галочку напротив этой опции. Нажмите ОК, чтобы начать установку.
-
Ожидайте завершения установки:
- Windows установит Telnet, и после завершения вы сможете использовать команду telnet через командную строку (CMD).
-
Проверьте установку:
- Откройте Командную строку (CMD) и выполните команду:
telnet
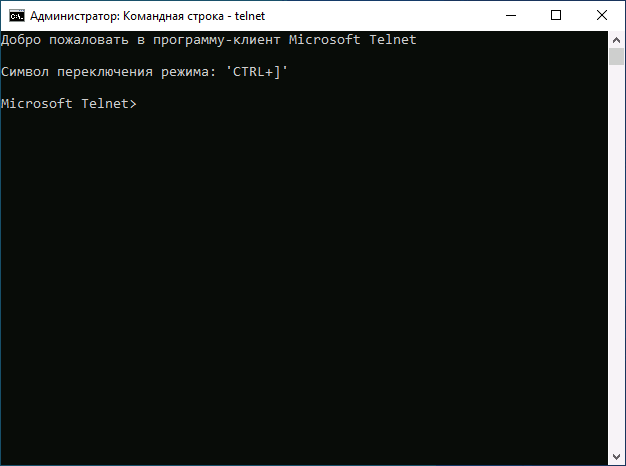
Если Telnet был успешно установлен, вы увидите командную оболочку Telnet.
- Откройте Командную строку (CMD) и выполните команду:
2.2. Как включить Telnet в Windows 11
В Windows 11 процесс установки Telnet почти идентичен Windows 10. Вот как это сделать:
- Нажмите Пуск и выберите Параметры.
- Перейдите в раздел Программы.
- Выберите Дополнительные функции.
- Прокрутите вниз и выберите Добавить функцию.
- Введите «Telnet» в поисковую строку и отметьте Telnet Client, затем нажмите Установить.
После этого вы сможете использовать Telnet в командной строке.
3. Как использовать Telnet в Windows
Теперь, когда Telnet установлен, вы можете использовать его для различных задач, таких как подключение к серверу или проверка доступности порта.
3.1. Проверка доступности порта с помощью Telnet
Одна из самых популярных функций Telnet — это тестирование доступности определенных портов на удаленных серверах. Например, чтобы проверить, доступен ли веб-сервер на порту 80, выполните команду:telnet example.com 80
Где:
- example.com — это доменное имя или IP-адрес сервера.
- 80 — это номер порта (в данном случае HTTP).
Если соединение удастся, вы увидите пустой экран или приветственное сообщение от сервера. Если порт закрыт, вы получите сообщение Connection refused или Unable to connect.
3.2. Подключение к серверу через Telnet
Telnet также позволяет подключаться к серверам и взаимодействовать с ними через командный интерфейс. Например, для подключения к удаленному серверу на порту 23 (по умолчанию Telnet использует этот порт) используйте команду:telnet example.com 23
После подключения вы попадете в консоль сервера, где сможете вводить команды в зависимости от настроек сервера.
3.3. Проверка работы других сервисов через Telnet
Кроме проверки стандартных портов, Telnet можно использовать для тестирования других сервисов. Например, для проверки работы почтового сервера (SMTP) можно подключиться к порту 25:telnet mail.example.com 25
Если сервер доступен, Telnet покажет приветственное сообщение от почтового сервера.
3.4. Использование Telnet для диагностики сетевых проблем
Telnet может помочь при диагностике сетевых проблем. Если вы подозреваете, что определенный сервис не работает, вы можете подключиться к соответствующему порту на сервере и увидеть, есть ли отклик.
Для примера, чтобы проверить, работает ли FTP-сервер, выполните команду:telnet ftp.example.com 21
Если сервер работает, вы получите сообщение приветствия, иначе — сообщение о невозможности подключения.
4. Проблемы при использовании Telnet
4.1. Что такое «Connection Refused» при подключении через Telnet?
Ошибка «Connection Refused» обычно означает, что соединение не может быть установлено. Причины могут быть следующими:
- Указанный порт закрыт или сервис не работает.
- Фаерволл блокирует доступ.
- Указанный сервер недоступен по сети.
- Неверно настроено подключение или сервер не принимает входящие соединения на указанном порту.
Для устранения этой проблемы проверьте конфигурацию фаервола и убедитесь, что нужный сервис работает на сервере.
4.2. «Telnet Connection Refused» при подключении к localhost
Если при подключении к localhost (127.0.0.1) возникает ошибка «Connection Refused», это может означать, что на локальном компьютере не настроен соответствующий сервис. Убедитесь, что нужный сервис работает на локальном хосте и прослушивает правильный порт.
4.3. Telnet и безопасность
Стоит отметить, что Telnet является небезопасным протоколом, поскольку передает данные, включая логины и пароли, в открытом виде. Это делает его уязвимым для атак «man-in-the-middle». Поэтому в современных системах Telnet часто заменяется на SSH, который использует шифрование для безопасного соединения.
5. Альтернативы Telnet
- SSH (Secure Shell) — безопасная альтернатива Telnet, которая шифрует данные и обеспечивает более высокий уровень безопасности при удаленном доступе.
- PuTTY — популярная утилита для Windows, которая поддерживает как Telnet, так и SSH для подключения к удаленным серверам.
- Netcat — инструмент для работы с сетевыми соединениями, используемый для диагностики и тестирования.
Заключение
Telnet — это старый, но полезный инструмент для диагностики сети и удаленного управления серверами. Несмотря на свою уязвимость по сравнению с более современными протоколами, такими как SSH, Telnet все еще остается востребованным для тестирования портов и проверки доступности сервисов. В этой статье мы рассмотрели, как установить и использовать Telnet в Windows 10 и 11, а также как решать типичные проблемы при его использовании.
Помните, что для работы с более важными и конфиденциальными системами рекомендуется использовать более безопасные протоколы, такие как SSH.
Несмотря на то, что Telnet протокол уже редко используется, что связано с отсутствием шифрования и проверки подлинности данных, у некоторых пользователей могут возникать задачи, требующие подключения с использованием клиента Telnet.
В Windows 11 и Windows 10 клиент для Telnet протокола присутствует, но отключен по умолчанию. При необходимости его можно включить одним из способов, описанных далее.
Компоненты Windows
Клиент Telnet — один из дополнительных компонентов Windows, который может быть включен, как и другие такие компоненты:
- Нажмите клавиши Win+R на клавиатуре (либо нажмите правой кнопкой мыши по кнопке «Пуск» и выберите пункт «Выполнить»), введите appwiz.cpl и нажмите Enter.
- В открывшемся окне в панели слева нажмите по пункту «Включение или отключение компонентов Windows».

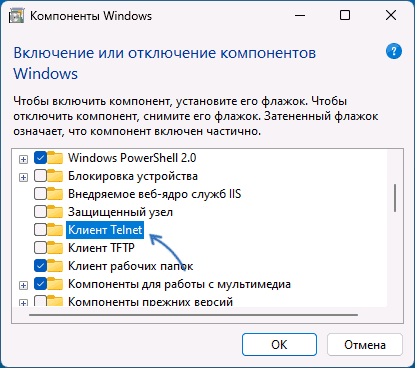
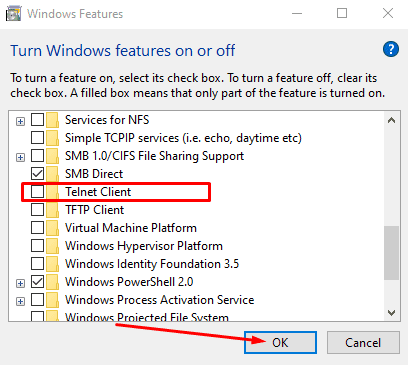
- Отметьте «Клиент Telnet» в списке доступных компонентов и нажмите «Ок».

Останется дождаться, когда клиент Telnet будет установлен.
Для начала использования достаточно будет запустить командную строку, ввести команду telnet и нажать Enter.
Командная строка
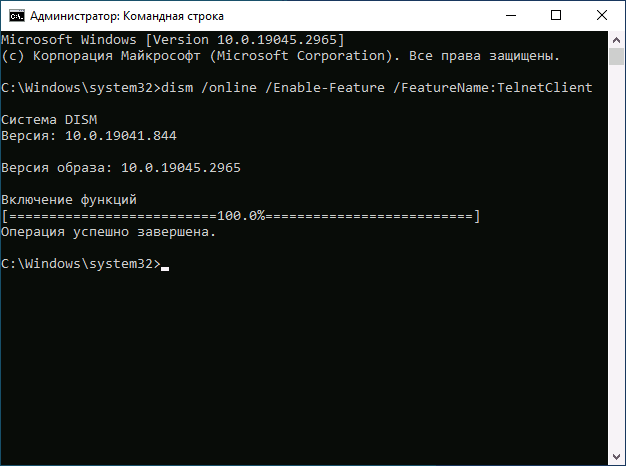
Вы можете включить Telnet в командной строке, установив компонент с помощью DISM:
- Запустите командную строку от имени администратора.
- Введите команду
dism /online /Enable-Feature /FeatureName:TelnetClient
и нажмите Enter.

- Дождитесь завершения установки компонента.
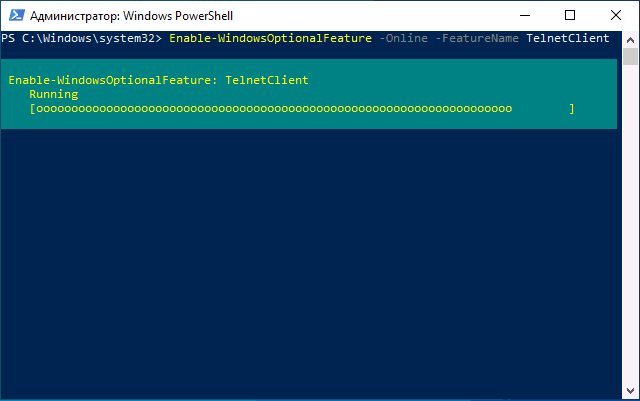
Windows PowerShell
Включить компонент можно и в PowerShell: запустите Windows PowerShell или Терминал Windows от имени администратора, сделать это можно в контекстном меню кнопки «Пуск», после чего введите команду:
Enable-WindowsOptionalFeature -Online -FeatureName TelnetClient
и нажмите Enter. Через короткое время клиент Telnet будет установлен на вашем компьютере.
Завершая статью, поинтересуюсь: для какой цели вам потребовался именно Telnet клиент в наше время SSH, шифрования и защищенных протоколов? Будет отлично, если вы сможете поделиться этим в комментариях.
Windows 10 is a feature-rich operating system that’s willing to get as complex as you want it to be. One such instance where only power users are probably experienced revolves around the Telnet client, a substantial constituent of the operating system’s technical functionality. We’re talking about a network protocol here that provides communication with other devices.
Other than that, Telnet’s functionality stretches to other domains as well. This article will cover everything you need to know about this network-based client, including the method you can use to enable it and utilize it efficiently. Be sure to read until the end for favorable results.
What is the Telnet client?
At its very core, Telnet is an internet protocol that establishes communication between a client and a server. It usually employs a TCP (Transmission Control Protocol) or a simple IP (Internet Protocol) connection to allow two ends of a domain to connect under the condition that an identical network is being used. Chiefly, this platform is utilized for remote connections.
As for the working mechanism of Telnet, it’s mainly incorporated with the help of a Command-Line Interface (CLI) similar to the Command Prompt in Windows 10. However, the Telnet client is much more lightweight and speedy and allows a variety of uses to be taken up by power users from all across the globe.
Some of these high-class use cases involve troubleshooting servers, authenticating the number of ports forwarded, gaining remote access to dedicated servers, and optimizing dedicated networks on hardware. There are even more benefits to using the Telnet client in 2022 on a Windows PC, so we see eye to eye with you if this functionality has piqued your interest in recent times.
Now, the thing is, Telnet doesn’t arrive pre-enabled on Windows 10 PCs. This is because it used to be readily available on older iterations of Microsoft Windows, such as Windows XP and Windows 98, which we’re sure only a couple of people in the whole world are still using. Therefore, to use the Telnet client in Windows 10, you will first have to enable it on your operating system.
Thankfully, there is a quick and easy way to do it. By the time you’re finished, you’ll be able to start using Telnet painlessly afterward. The following section will go over just that, so keep reading for more details.
Using Telnet client in Windows 10
Using Telnet client in Windows 10 requires you to enable it first. That is why this section will comprise two distinct sections. One will teach you how to turn it on, while the other will go over its working mechanism. Let’s get started right away.
How to enable the Telnet client in Windows 10
To enable the Telnet client in Windows 10, you must follow the steps given ahead.
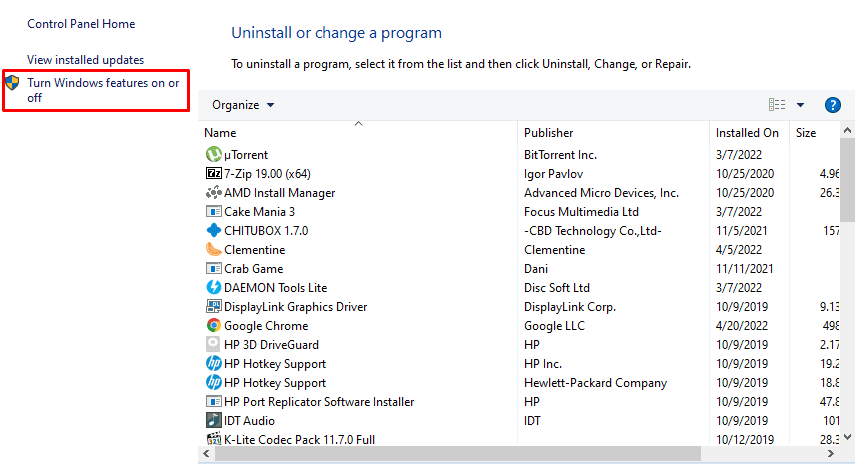
1. The first step is to open the Control Panel system app on your Windows PC. This can be done quickly from the Windows Start menu. Type in “Control Panel” and see the application appearing on the screen. Click on it afterward to continue to the next step.
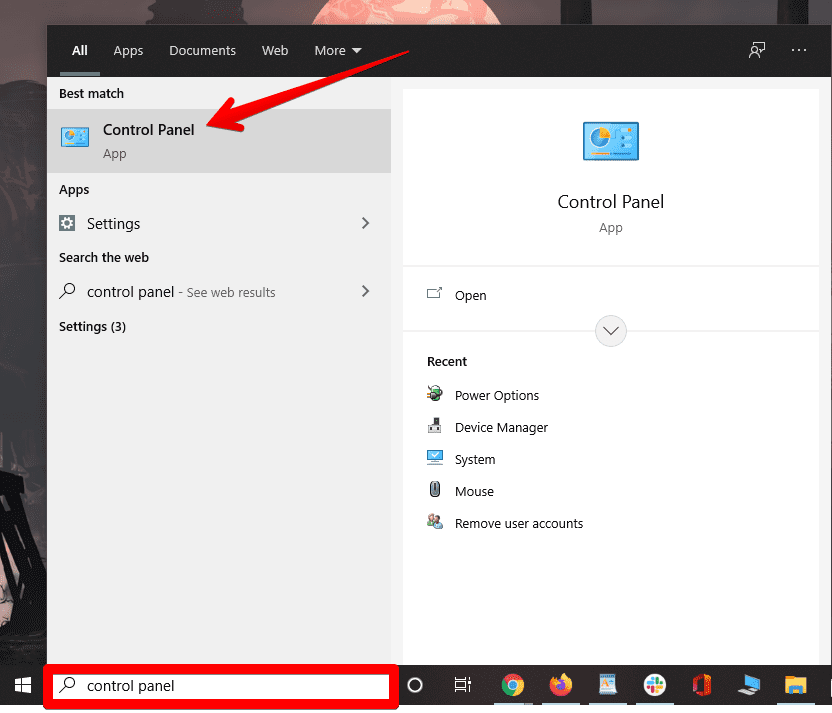
Searching and opening the Control Panel
2. Click on “Programs.”
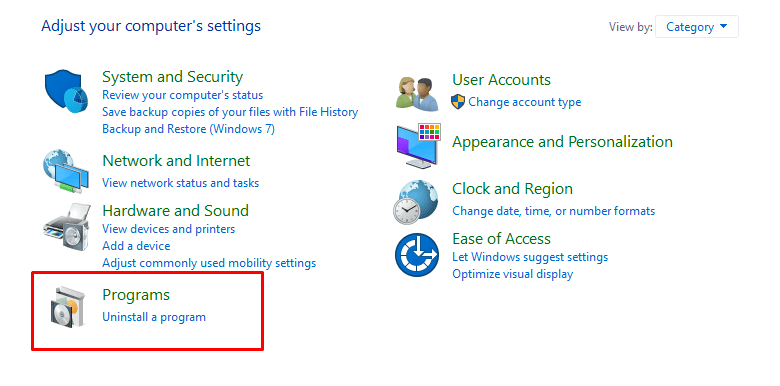
Selecting “Programs”
3. Next, click on “Programs and features.”
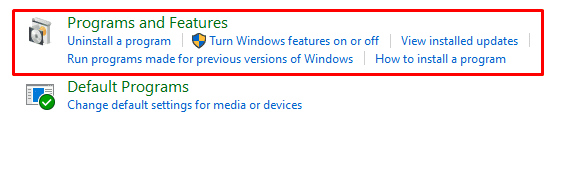
Selecting “Programs and Features”
4. Choose “Turn Windows features on or off” to get to the next step.
Selecting the relevant option
5. Scroll down the list of options until you see “Telnet client.” Click on the checkbox beside this option once you find it. To finalize, click on the “OK” button.
Selecting the “Telnet client” option
6. Click on “Close” after it’s done to finalize the process.
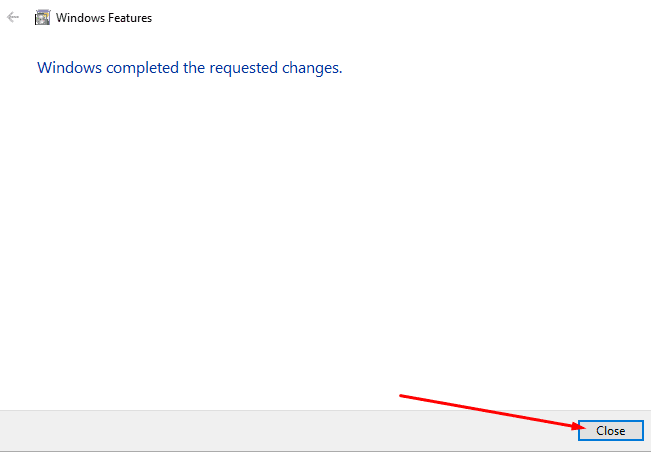
Closing the prompt window
Great going so far! You have successfully enabled the Telnet client in Windows 10, You can now ckly start using Telnet on the operating system.
How to use the Telnet client in Windows 10
The Telnet client in Windows 10 will always be utilized from the Command Prompt, although there are other complex ways to approach it. However, we won’t be getting into any complexity like that in this guide. The Command Prompt will serve as the perfect vessel for running Telnet in Windows 10, so let’s take a brief look at how you can tap into said client and unlock its true potential.
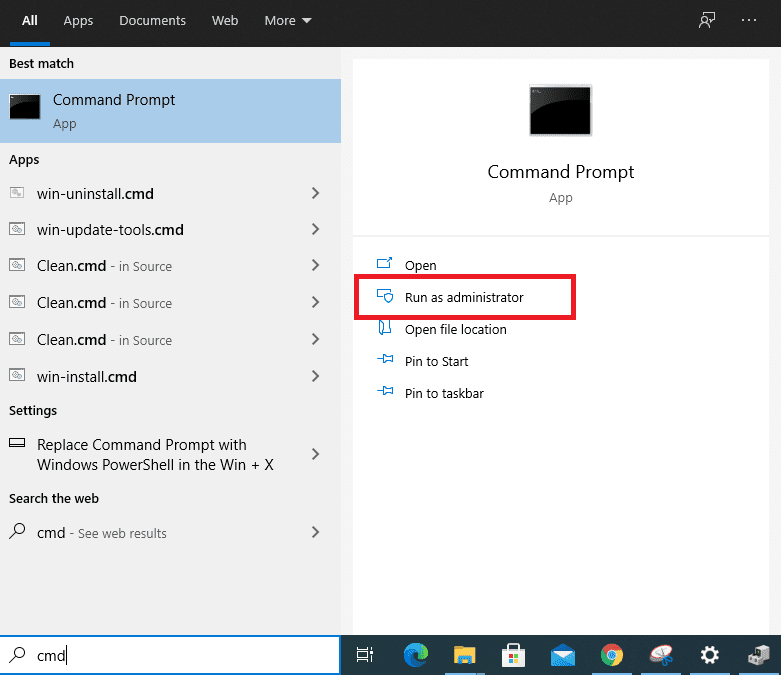
The first step is quite obvious: you have to open the Command Prompt application on your Windows PC. Type “cmd” into the Windows Search bar and click on the relevant application. Ensure that you’re running the software with administrator privileges for the best results.
Opening the Command Prompt as an administrator
Type in the following and press the “Enter” key. Doing so will help us activate the Telnet client.
telnet

Tapping into the Telnet client in Windows 10
You’re not entirely done yet. If you want to use the Telnet client in Windows 10 at its full, you have to unlock its features first. For this purpose, you’ll use the following command. Make sure you use the command outside of the Telnet client. Use the “quit” command to exit Telnet and go back to the main command-line interface of the Command Prompt.
dism /online /Enable-Feature /FeatureName:TelnetClient
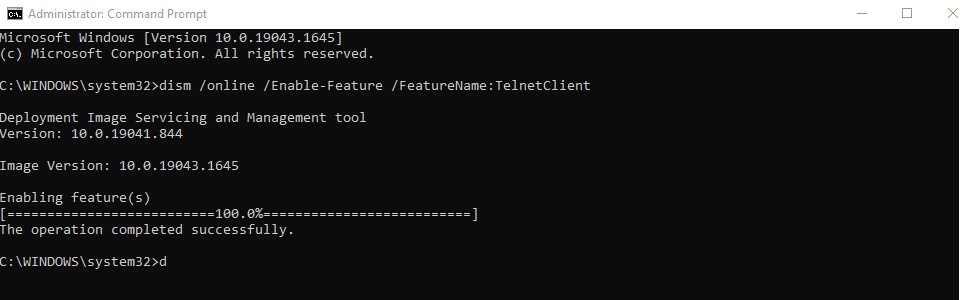
Unlocking the Telnet client
Now, as for the actual commands that permit effective utilization of Telnet on Microsoft Windows, you’ll have to refer to this handy guide created by the developers themselves. Doing so will help you get to grips with the major Telnet commands around and how to implement them in the Telnet command-line interface (CLI) on your Windows PC.
For example, the “display” command in Telnet returns you the following in the Telnet CLI. This command is effective if you want to know all the different parameters running in real-time when you connect to a Telnet server.
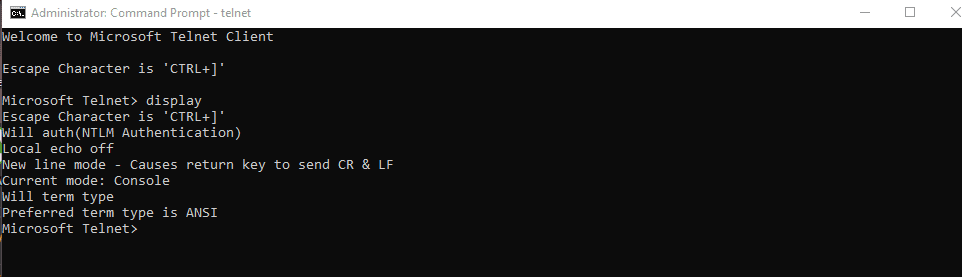
The “display” command in Telnet
Lastly, suppose you want to start connecting to a specific port using Telnet remotely, which is one of the important use cases of this feature. In that case, you can use the “open” command and follow it up by specifying the server’s name that you’re looking to manage. This will take your working experience to the next level.

Using the open command
That’s about it for using the Telnet client in Windows 10.
Conclusion
In this guide, we have discussed an easy way to enable the Telnet client if you’re on Windows 10 and using the feature on your PC. The guidelines were implemented in simple language, so you should be able to get going with this feature right away. Please let us know down in the comments section if this guide proved to help you.
Introduction
Telnet serves as a protocol that enables users to remotely access and manage other computer systems over the internet or a local network. It has been around for many decades. Also, it is still employed by some systems administrators and network engineers for troubleshooting & configuring network devices.
Telnet is not enabled by default on Windows OS 10 or 11. However, it can easily be enabled by following a few straightforward steps. Under this tutorial, you will get insights into how to enable and install Telnet Windows 10 or 11. Continue reading and get all the details.
What is Telnet and How Does it Work?

As mentioned in the beginning, Telnet refers to a network protocol that permits users to connect to remote computers and devices over the internet or local network. It is employed for remote administration, troubleshooting, and testing of devices & services.
When you begin a Telnet session, the Telnet client application on your computer system designates a connection to the Telnet to Windows server application on the remote device. This connection is typically established over TCP/IP (Transmission Control Protocol/Internet Protocol), which is the standard protocol employed for communication over the Internet.
Once the connection is established, you can communicate with the remote device utilizing a command-line interface provided by the Telnet client application. You can send Telnet commands as well as receive responses from the remote device.
Further, these Telnet commands in Windows can be utilized to perform a variety of tasks like checking the status of services, configuring network settings, or executing commands on the remote device. Also, you must be aware of the fact that Telnet is not a secure protocol & transmits data, including usernames and passwords, in clear text. As a consequence, it is recommended to employ more secure protocols such as SSH (Secure Shell) for remote administration & access.

The below-mentioned are the three different ways with which you can readily enable or install Telnet on Windows. Let’s quickly get a glance at them!
Install Telnet in Windows using Command Prompt
Step 1: Press the Windows key and type “cmd” in the search box.
Step 2: Then, you need to right-click on “Command Prompt” and select “Run as administrator.”
Step 3: In the Command Prompt window, type
"dism /online /Enable-Feature /FeatureName:TelnetClient" and press Enter.
Step 4: The Telnet client will now get installed on your Windows system.
Install Telnet on Windows Using Control Panel
Step 1: Press the Windows key and type “Control Panel” in the search box.
Step 2: Then, you have to search and click on “Control Panel” from the search results.
Step 3: Next, you must click on “Programs” in the Control Panel window.
Step 4: Click on “Turn Windows features on or off.”
Step 5: In the “Windows Features” window, scroll down and locate “Telnet Client.”
Step 6: Check the box next to “Telnet Client” and click “OK.”
Step 7: Now, by this step, you can enable Telnet on Windows.
Install Telnet with Windows Using Powershell
Step 1: Press the Windows key and type “powershell” in the search box.
Step 2: Then, you have to right-click on “Windows PowerShell” and select “Run as administrator.”
Step 3: In the PowerShell window, type
"Enable-WindowsOptionalFeature -Online -FeatureName TelnetClient" and press Enter.
Step 4: By this step, you will get to enable windows install telnet.
Execute Telnet Command in Windows
To execute the Telnet install command in Windows, you can follow the below-mentioned easy steps:
Step 1: Open the Command Prompt or PowerShell as an administrator.
Step 2: Type “telnet” followed by the IP address or hostname of the remote device you wish to connect to, and then press Enter. For instance, in case you need to connect to a device with IP address 192.168.1.1, you would type “telnet 192.168.1.1” and press Enter.
Step 3: If the connection is successful, you will witness a message that says “Microsoft Telnet>”.
Step 4: You can now type Telnet commands to communicate with the remote device. For instance, if you wish to check the status of a service, you can type “status” followed by the name of the service.
Step 5: To exit the Telnet command in Windows, type “exit” and press Enter.
Check Telnet Client Status on Windows

For checking the Telnet client status on Windows, you can follow these steps:
Step 1: Open the Command Prompt or PowerShell as an administrator.
Step 2: Type “telnet” and then, press Enter.
Step 3: In case the Telnet client is installed and running, you will witness a message that says “Welcome to Microsoft Telnet Client” along with the version number.
Step 4: In case the Telnet client is not installed or running, you will witness a message that says “‘Telnet is not recognized as an internal or external command, operable program, or batch file.”
Step 5: You can also inspect the status of the Telnet client by entering the following command in PowerShell.
"Get-WindowsCapability -Name Telnet.Client*" If the Telnet client is installed as well as enabled, you will see “State : Installed.” If it is not yet installed, you will witness “State : NotPresent.” Moreover, if it is installed but disabled, you will see “State : InstalledPendingReboot.”
Summing Up
Enable Telnet Windows 10 or 11 is a simple and quick procedure. It can be done in just a few steps. While Telnet is not utilized as much as it once was, it can still be an extremely helpful tool for managing network devices as well as troubleshooting connectivity issues.
By following the steps outlined in this tutorial, you can quickly enable or install Telnet for Windows and start employing it to administer your network infrastructure. However, you must note that Telnet is an unencrypted protocol. So, it can potentially disclose sensitive information to eavesdropping. Thus, you must take suitable security standards when utilizing it over a network.
telnet.exe: The Windows Telnet Client
Introduction
telnet.exe is the command-line Telnet client included with some versions of Microsoft Windows. Telnet is a network protocol used to provide a bidirectional interactive text-oriented communication facility using a virtual terminal connection. In simpler terms, it allows you to connect to a remote computer and interact with it as if you were sitting directly in front of it (using a command-line interface). Crucially, Telnet transmits data, including usernames and passwords, in plain text, making it highly insecure for modern use.
Origin and History
Telnet dates back to the early days of the internet (1969 with RFC 15, later standardized as RFC 854 and RFC 855). telnet.exe is Microsoft’s implementation of a client for this protocol. It was a standard component of many Windows versions, enabling remote administration and access to network devices. However, due to its inherent security vulnerabilities, it’s increasingly less common and disabled by default in recent Windows releases.
Functionality and Purpose
telnet.exe allows users to connect to a remote server running a Telnet server. It establishes a connection on a specific port (port 23 by default) and provides a command-line interface to interact with the remote system. Typical uses (historically) included:
- Remote Server Administration: Managing servers remotely before more secure methods like SSH became widely available.
- Network Device Configuration: Configuring routers, switches, and other network devices that offered a Telnet interface.
- Testing Network Services: Checking if a server is listening on a specific port and responding to connections. This can be used to troubleshoot connectivity issues.
- Accessing MUDs (Multi-User Dungeons): Text-based multiplayer games, a popular early use of Telnet.
- Access to Bulletin Board Systems (BBSes): Interacting with Bulletin Board systems.
Is it a Virus?
No, telnet.exe itself is not a virus. It is a legitimate component of Windows (in versions where it’s included). However, its use is extremely dangerous in most modern environments.
Can it Become a Virus?
telnet.exe itself cannot «become» a virus. It’s an executable file, not a self-replicating program. However, the vulnerabilities inherent in the Telnet protocol can be exploited by attackers:
- Man-in-the-Middle (MitM) Attacks: Because Telnet transmits data in plain text, an attacker on the same network can intercept the communication, capturing usernames, passwords, and any other data exchanged.
- Brute-Force Attacks: Attackers can attempt to guess usernames and passwords by repeatedly trying different combinations. Since there’s no encryption, these attempts are easily captured.
- Session Hijacking: If an attacker compromises a Telnet session, they can gain full control of the connected system.
How to Use (with a strong warning)
WARNING: Using Telnet over an untrusted network (like the internet) is extremely risky and strongly discouraged. Data sent via Telnet is unencrypted and vulnerable to interception. Only use Telnet if you fully understand the risks and are on a trusted, private network, or if you are interacting with a non-sensitive service (like a text-based game on a local network). Modern secure alternatives like SSH should be used instead whenever possible.
-
Check if Telnet Client is Installed (and Enable It):
In modern Windows (Windows 10, Windows 11, and recent Server versions), the Telnet client is typically not installed by default. To check and enable it:
- Open Control Panel.
- Go to Programs -> Turn Windows features on or off.
- Scroll down and find Telnet Client.
- Check the box next to Telnet Client and click OK. Windows will install the feature. You may need to restart your computer.
-
Open Command Prompt:
- Press the Windows key, type
cmd, and press Enter.
- Press the Windows key, type
-
Use the
telnetCommand:The basic syntax is:
telnet <hostname or IP address> <port><hostname or IP address>: The address of the remote server you want to connect to.<port>: The port number the Telnet server is listening on (default is 23). If you omit the port, Telnet will try port 23.
Examples:
telnet 192.168.1.100(Connects to the IP address 192.168.1.100 on the default port 23)telnet example.com 80(Connects to example.com on port 80 – this would not be a typical Telnet connection, but can be used for testing if port 80 is open)telnet towel.blinkenlights.nl(a famous example; connects to a service that displays an ASCII art version of Star Wars).
-
Interacting with the Remote System:
Once connected, you’ll likely see a login prompt. Enter the username and password for the remote system (remember, these are transmitted in plain text!). After successful login, you’ll be presented with a command-line interface on the remote system. The commands you can use depend entirely on the remote server and its configuration.
-
Exiting Telnet:
- Often, you can type
exitorlogoutto close the connection. - You can also use
Ctrl + ]to escape to the Telnet client prompt. Then, typequitand press Enter.
- Often, you can type
Telnet Commands (within the Telnet client prompt):
Once you’ve escaped to the Telnet client prompt (using Ctrl + ]), you can use several commands, including:
closeorc: Closes the current connection.openoro: Opens a connection to a host. You can use it like this:open <hostname> <port>.quitorq: Exits Telnet.set: Sets various Telnet options. For example,set localechotoggles local echo (whether you see the characters you type).unset: Unsets Telnet options.status: Displays the current status of the Telnet connection.?orhelp: Displays help information.
Alternatives (Secure Options)
Due to the security risks of Telnet, the following alternatives are strongly recommended:
- SSH (Secure Shell): The industry-standard replacement for Telnet. SSH provides strong encryption and authentication, protecting data from interception and unauthorized access.
ssh.exeis included with modern Windows. - PowerShell Remoting: A Windows-specific solution for remote management, using WS-Management and offering secure communication.
- RDP (Remote Desktop Protocol): Provides a graphical interface to a remote Windows machine, with encryption and authentication.
- Third-party SSH Clients: PuTTY is a popular, free, and open-source SSH client for Windows.
Conclusion
While telnet.exe played a role in the history of networking, its inherent insecurity makes it unsuitable for most modern uses. The Telnet protocol should be avoided whenever possible, and secure alternatives like SSH should be used instead. Understanding the risks associated with Telnet is crucial for maintaining the security of your systems and data. Only in very specific, controlled, and non-sensitive environments should Telnet ever be considered. Even then, it should be done with extreme caution.