
- Skip to content
- Accessibility Policy
Oracle Instant Client Downloads for Microsoft Windows (x64) 64-bit
See the Instant Client Home Page for more information about Instant Client.
The installation instructions are at the foot of the page.
Oracle Client-to-Oracle Database version interoperability is detailed in Doc ID 207303.1. For example, applications using Oracle Call Interface 19 can connect to Oracle Database 11.2 or later. Some tools may have other restrictions.
Permanent links to the latest packages are: Basic, Basic Light, SQL*Plus, Tools, SDK, JDBC Supplement , ODBC
Open all
Close all
-
-
Version 23.7.0.25.01
Base — one of these packages is required
Tools — optional packages
Development and Runtime — optional packages
-
Version 21.17.0.0.0
Base — one of these packages is required
Tools — optional packages
Development and Runtime — optional packages
-
Version 19.26.0.0.0
Base — one of these packages is required
Tools — optional packages
Development and Runtime — optional packages
-
Version 18.5.0.0.0
Tools — optional packages
Development and Runtime — optional packages
-
Version 12.2.0.1.0
Base — one of these packages is required
Tools — optional packages
Development and Runtime — optional packages
-
Version 12.1.0.2.0
-
Version 11.2.0.4.0
-
Version 11.1.0.7.0
-
Version 10.2.0.5
-
Instant Client Installation for Microsoft Windows 64-bit
See the Instant Client Home Page for more information about Instant Client packages.
Client-server version interoperability is detailed in Doc ID 207303.1. For example, Oracle Call Interface 19, 18 and 12.2 can connect to Oracle Database 11.2 or later. Some tools may have other restrictions.
- Download the appropriate Instant Client packages for your platform. All installations require the Basic or Basic Light package.
- Unzip the packages into a single directory such as
C:\oracle\instantclient_19_3 - Add this directory to the
PATHenvironment variable. If you have multiple versions of Oracle libraries installed, make sure the new directory occurs first in the path. Restart any terminal windows or otherwise make sure the new PATH is used by your applications. - Download and install the correct Visual Studio Redistributable from Microsoft. Instant Client 23, 21 and 19 requires the latest Microsoft Visual C++ Redistributable package common for Visual Studio 2015, 2017, 2019, and 2022. Instant Client 18 and 12.2 require the Visual Studio 2013 redistributable. Instant Client 12.1 requires the Visual Studio 2010 redistributable.
- If you intend to co-locate optional Oracle configuration files such as tnsnames.ora, sqlnet.ora, ldap.ora, or oraaccess.xml with Instant Client, then create a subdirectory such as
C:\oracle\instantclient_19_3\network\admin - Start your application.
This is the default Oracle client configuration directory for applications linked with this Instant Client.
Alternatively, Oracle client configuration files can be put in another, accessible directory. Then set the environment variable TNS_ADMIN to that directory name.
ODBC users should follow the ODBC Installation Instructions.
-
- Skip to content
- Accessibility Policy
Search Oracle.com
- QUICK LINKS
- Oracle Cloud Infrastructure
- Oracle Fusion Cloud Applications
- Oracle Database
- Download Java
- Careers at Oracle
Country
Cloud Account
Sign in to Cloud
Sign Up for Free Cloud Tier
Oracle Account
- Sign-In
- Create an Account
- Help
- Sign Out
Contact Sales
Menu
Menu
Oracle Instant Client Downloads
Instant Client for Microsoft Windows
-
Instant Client for Microsoft Windows (x64)
-
Instant Client for Microsoft Windows (32-bit)
Instant Client for macOS
-
Instant Client for macOS (ARM64)
-
Instant Client for macOS (Intel x86)
Instant Client for Linux
-
Instant Client for Linux x86-64
-
Instant Client for Linux x86
-
Instant Client for Linux ARM (aarch64)
-
Instant Client for z/Linux (64-bit)
Instant Client for Solaris
-
Instant Client for Solaris Operating System (SPARC) (64-bit)
-
Instant Client for Solaris Operating System (SPARC) (32-bit)
-
Instant Client for Solaris x86-64
-
Instant Client for Solaris x86
Instant Client for HP
-
Instant Client for HP-UX Itanium (64-bit)
-
Instant Client for HP-UX Itanium (32-bit)
Instant Client for AIX
-
Instant Client for AIX (PPC64)
-
Instant Client for AIX (PPC32)
Other Platforms

In the following article, I am going to show you how to install the latest Oracle instant client 19.5 on Windows 10. As you know, Oracle Instant Client is a set of tools you need to connect and manage the Oracle database server. With this tool, we can connect to both local or remote Oracle database. Not like many other software, it needs extra steps in order to install the instant client. But don’t worry, we will cover it shortly.
Steps to Install Oracle Instant Client on Windows 10
Step 1. Install Microsoft Visual Studio 2017 Redistributable
The Oracle Instant Client 19.5 requires the installation of the Microsoft Visual Studio 2017 Redistributable. Make sure you have this software installed on Windows 10.
Step 2. Create a new directory for the instant client
Create a new folder under C:/ or any other folder. This new folder will be used to store the oracle instant client files. In this example, I will create a new folder called C:\oracle
Step 3. Download the Oracle Instant Client
Now download the latest version of Oracle Instant Client. Choose the correct architecture that match your system. Or, if you are using Windows 10 64 bit, you can use the link below to directly download it. Choose one of these below
Basic Package
https://download.oracle.com/otn_software/nt/instantclient/19500/instantclient-basic-windows.x64-19.5.0.0.0dbru.zip
Basic Light Package
https://download.oracle.com/otn_software/nt/instantclient/19500/instantclient-basiclite-windows.x64-19.5.0.0.0dbru.zip
You will also need to download the Instant Client SDK Package below
https://download.oracle.com/otn_software/nt/instantclient/19500/instantclient-sdk-windows.x64-19.5.0.0.0dbru.zip
Save these two files inside the folder we created earlier.
Step 4. Extract the package
I assume you have two files below:
- instantclient-basic-windows.x64-19.5.0.0.0dbru.zip
- instantclient-sdk-windows.x64-19.5.0.0.0dbru.zip
First, extract the file instantclient-basic-windows.x64-19.5.0.0.0dbru.zip. It will produce a new subfolder called instantclient_19_5. Next, extract the file instantclient-sdk-windows.x64-19.5.0.0.0dbru.zip. The second file should be extracted into the instantclient_19_5 directory. Here are the folder content result

Step 5. Modify the Environment Variable
In this section, we are going to edit the Environment Variable. We will include the Oracle Instant Client path into the environment variable. To do this, follow these steps:
- Open Control Panel >> Settings
- Click Advanced System Settings
- On the Advanced tab, click Environment variables
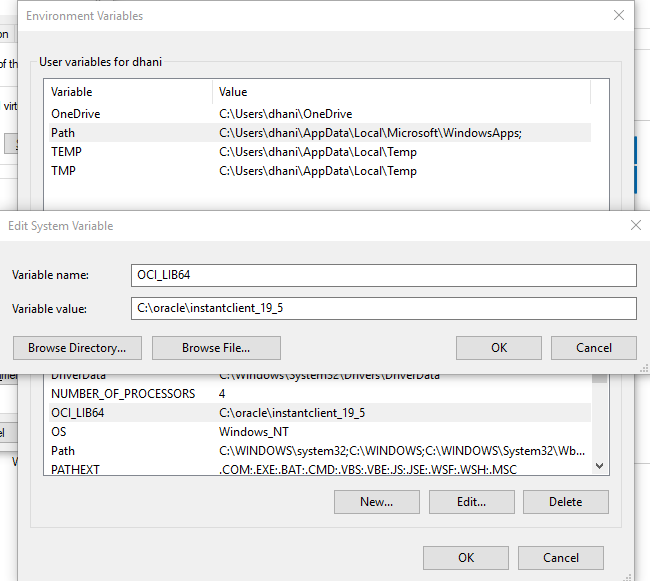
- Under System Variables, create OCI_LIB64 if it does not exist. Set the value OCI_LIB64 to C:\oracle\instantclient_19_5
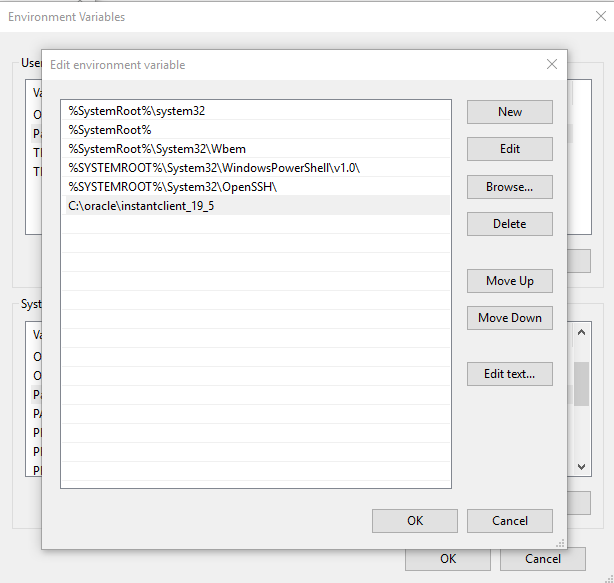
- Under System Variables, edit PATH and include C:\oracle\instantclient_19_5
How do I install Oracle Client Installer?
The Oracle Instant Client is lightweight software, Which is freely distributable implementation. The advantage of the Oracle Instant Client is it does not need a formal installation. Instead, just unzip the instant client software and used it without any fuss. How to install Oracle instant Client step-by-step guide.
Read for 12c: How to install Oracle Client step by step
Download Oracle Instant Client
Click here to download ORACLE Instant Client for Windows as listed below.
ExamSnap Microsoft Certification
How do I download Oracle Client for Windows?


How do I download Oracle Instant Client on Linux?
Click here to download ORACLE Instant Client for Linux as listed below.


After downloading the desired Oracle instant client software, unzip the software in the desired location. The directory is the default considered as Oracle home directory.

After unzipping these files, it will create a folder instantclient_21_3 folder inside the C drive.
Step 1 : Set environment variables
1. Set environment variables inside widows properties.

2. Select Advanced system settings.

3. Click on the Environment Variables.

4. Select Path and click on the Edit button.

5. Inside the environment variable add a new variable.

Step 2 : Network Files
Add tnsnames.ora and sqlnet.ora file inside network/admin folder, if the folder is not available in your case then you can create bot folders manually.

Step 3 : Make a connection with Database
Now finally try to login into your database server using the CMD prompt, and you will be successfully logged in to the database.

How do I install instant client on Linux?
Using the same step you can install 21c instant client on Linux I’ll be uploading the video soon.
To administer your Oracle Database remotely, you will need to connect to the database instance, especially from an SQL*Plus terminal. To be able to do that, you may install the Oracle Database Client and configure it correctly.
The Oracle Client is a software suite allowing you to administer your database remotely, perform basic network configurations, write PL/SQL applications, connect your database to Java, Python type applications, etc.
This guide provides instructions about installing and configuring Oracle Database Client on Windows. The installation process is identical on Linux.
You can also download my ebook which details the whole installation process.
Oracle Database Client requirements
You can easily install the Oracle Client on a 64-bit Windows PC with a modern processor (AMD or Intel), 2GB of RAM and 2GB of free disk space. Oracle Database Client for Windows x64 is supported on the major x64 distributions (Windows 7, Windows 8, Windows 10, Windows Server 2012 and Windows Server 2016). We recommend you update Windows before starting the client installation.
You also need to connect the client machine to a network and ensure it is able to communicate with the database server. In some cases, you may add exceptions to your firewall on the server side to allow network traffic between the server and the client.
Moreover, we will make sure that the database server is running correctly and is able to serve remote connections. Apart from network connectivity, a listener must be configured on the database server.
Oracle also recommends creating a standard non-administrative user account on the client machine to run the Windows services for the Oracle home. In this tutorial, we’ll call this user Client.
Oracle Database Client Download
You can download the Oracle Database Client for Windows for free from Oracle’s Technology Network website. We will focus here on version 19c. Oracle recommends using an Oracle Client version that matches the highest Oracle database version that you need to connect to. Using older clients to connect to newer database versions can cause issues.
The Oracle Client is available in 32-bit and 64-bit versions. The choice of which version to install depends on the architecture of your OS.
Downloading the Oracle Client requires an Oracle account. This account will allow you to download other Oracle products and access Oracle Cloud services.
Once you have created your account, select the right version for your needs and accept the Oracle License Agreement to start the download.
Related: Configure & Connect SQL Developer to Oracle Database (19c, 18c, 12c)
After checking the hardware and software prerequisites and downloading the Oracle Database Client software, you can install it by following the simple steps below. Note that the installation process is almost similar for versions 12c and 18c of Oracle Database Client. So, let’s get started.
1. Navigate to the installation folder and launch the setup file
After downloading the Oracle Client, you can unzip it to a directory of your choice, then run the setup.exe file.
2. Provide Oracle Home user account details
In this step, enter the Oracle Home user credentials (username and password) you create earlier. You can also create a new account or use a built-in Windows account (for example, the one you use to launch setup.exe).
3. Select a location for Oracle base directory
In this step, you can provide the Oracle base directory which contains the Oracle Client software and related configuration files, then click “Next” to perform prerequisite checks.
After the prerequisite checks, you should have a summary of your installation configuration. If there is no error, then click on “Install” to install the product. Otherwise, go back to section 1 to audit your environment.
Then wait a few minutes for the installation wizard to copy the files, perform setup and basic configuration and finish the installation. You can close the window once the installation is complete.
In the next section, we will configure the Oracle Client to connect with the Oracle Database server.
Configuring and testing Oracle Database Client
After installing the Oracle Client, you can use it to access and administer your Oracle database remotely but you will need to configure it first. This configuration can be done with tools available immediately after the client installation. We’ll use Oracle Network Manager to create a database service linked to the remote Oracle Database instance.
1. Launch Oracle Net Manager from Windows Start menu
2. Add a new database service
Select “Service Naming” and click on the “+” button.
3. Give a name to the remote database service name
Select a name (identifier) for the database service name and click on “Next”.4. Configure the network access protocol
In this step, provide the Oracle Database hostname or IP address and a port number to access the database instance. The port number must be the same as the one configured in the listener at the server side.5. Specify database instance name
Enter the global database name of the remote database (eg. db.ept.sn) and optionally the connection mode. The database name might be ORCL if the database server is installed with default configurations.
6. Perform a connectivity test to the remote database
Before finishing the service name configuration, you can run a test to check if you can access the remote database with the parameters you provided. The wizard will try to connect to the server with a default user account, namely Scott.
Depending on the database creation options on the server side, Scott account might not exit or is locked.
You can change the user account you want to use for the test by clicking on “Change Login”. If the test runs successfully, then you can close the windows and finish the service name configuration.
7. Save the network configuration
Connecting to the remote database using SQL*Plus
You can now access your Oracle Database server from the Client using tools like SQL*Plus or Oracle SQL Developer. For example, you can open a command prompt and connect to the Oracle Database instance with the following command:
sqlplus username/password@service_nameFor example
sqlplus hr/hr@client_accessStill having questions on how to install the Oracle Client? Leave a comment below or let me do it for you.
You might also like: Oracle Database Network configuration