
11.12.22
Содержание:
- Отказоустойчивый кластер Windows Server 2019
- Преимущества и особенности отказоустойчивого кластера
- Необходимое оборудование и требования к системе
- Шаги по установке и настройке кластера
- Настройка сети и хранения данных
- Тестирование и мониторинг кластера
- Рекомендации по поддержке и обновлению кластера
- Вопрос-ответ

В современном мире, где информационные технологии играют ключевую роль, обеспечение бесперебойной работы систем становится все более актуальным. Для крупных организаций и предприятий крайне важно минимизировать риски, связанные с отказами и сбоями оборудования. Это особенно актуально в условиях высокой конкуренции и необходимости круглосуточного предоставления услуг.
В данной статье мы рассмотрим, как построить устойчивую к сбоям архитектуру с помощью инструментов и технологий Microsoft. Особое внимание будет уделено возможностям, представленным в последней версии серверного программного обеспечения, выпущенной в 2018 году. Вы узнаете, как правильно организовать работу нескольких узлов для обеспечения непрерывности бизнеса и защиты данных.
Процесс создания такой системы требует тщательного планирования и понимания всех этапов внедрения. Мы обсудим ключевые шаги, начиная от первоначальной настройки и заканчивая мониторингом и управлением уже функционирующей структуры. Также рассмотрим преимущества и особенности использования новых функций и улучшений, представленных в этом программном решении.
Присоединяйтесь к нам в этом увлекательном путешествии по миру надежных и высокопроизводительных вычислительных систем. Узнайте, как новейшие разработки от Microsoft могут помочь вашему бизнесу оставаться на высоте, обеспечивая стабильную и эффективную работу всех критически важных приложений и сервисов.
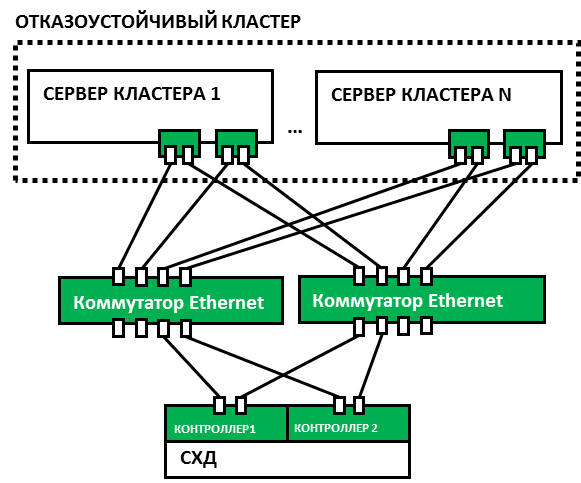
Отказоустойчивый кластер Windows Server 2019
Использование данной технологии позволяет объединить несколько физических машин в единую систему, которая продолжает функционировать даже при выходе из строя отдельных компонентов. Это решение подходит как для крупных компаний, так и для средних предприятий, стремящихся обеспечить высокую доступность своих сервисов и приложений. Развертывание такого комплекса требует определенных знаний и навыков, о которых мы подробно расскажем ниже.
|
Преимущества |
Описание |
|
Высокая надежность |
Системы продолжают работать даже при отказе одного из узлов, обеспечивая минимальное время простоя. |
|
Гибкость |
Легкость в масштабировании и управлении ресурсами, что позволяет адаптировать систему под изменяющиеся потребности бизнеса. |
|
Централизованное управление |
Упрощение административных задач благодаря единой консоли управления и интеграции с другими продуктами Microsoft. |
|
Экономия ресурсов |
Эффективное использование оборудования и снижение затрат на обслуживание благодаря оптимизации ресурсов. |
Далее мы более подробно остановимся на этапах настройки и требованиях к аппаратному и программному обеспечению, необходимых для создания устойчивой к сбоям инфраструктуры. Понимание этих аспектов поможет вам эффективно использовать возможности новой операционной системы, обеспечивая бесперебойную работу ваших критически важных сервисов.
Преимущества и особенности отказоустойчивого кластера
Основные достоинства внедрения таких решений включают:
|
Преимущество |
Описание |
|
Повышенная доступность |
Группировка ресурсов позволяет значительно снизить время простоя и повысить общую производительность систем. |
|
Легкость управления |
Использование централизованных инструментов администрирования упрощает управление и мониторинг состояния компонентов. |
|
Масштабируемость |
Возможность добавления новых узлов без значительных затрат времени и ресурсов обеспечивает гибкость и рост инфраструктуры в зависимости от потребностей. |
|
Безопасность данных |
Механизмы репликации и синхронизации данных помогают защитить информацию от потерь при сбоях и других непредвиденных ситуациях. |
Особенности таких конфигураций включают:
|
Особенность |
Описание |
|
Резервирование |
Использование дублирующих компонентов, которые могут автоматически заменять вышедшие из строя узлы, обеспечивает непрерывность работы. |
|
Автоматическое восстановление |
Системы способны самостоятельно обнаруживать и устранять неисправности, что снижает необходимость вмешательства администратора. |
|
Гибкость конфигурации |
Поддержка различных сценариев развертывания и настройки позволяет адаптировать решения под специфические требования организации. |
|
Интеграция с другими технологиями |
Поддержка работы с различными системами и приложениями упрощает интеграцию и расширение функциональности. |
Таким образом, создание и использование современных решений для управления ресурсами позволяет обеспечить высокую надежность, производительность и гибкость IT-инфраструктуры, что особенно актуально в условиях постоянно растущих требований к качеству и непрерывности предоставляемых услуг.
Необходимое оборудование и требования к системе
Для создания надежной и эффективной IT-инфраструктуры важно правильно подобрать оборудование и учесть все системные требования. Это поможет обеспечить стабильную работу и максимальную производительность вашей системы. В данном разделе рассмотрим основные компоненты и параметры, которые необходимо учитывать при проектировании и развертывании вашей сети.
Основные элементы, которые понадобятся для организации такой инфраструктуры, включают в себя: высокопроизводительные серверы, системы хранения данных, сетевое оборудование и программное обеспечение. Каждое из этих устройств должно соответствовать определенным стандартам и требованиям, чтобы обеспечить корректное функционирование и интеграцию в общую структуру.
|
Компонент |
Требования |
|
Серверы |
Процессоры с высокой тактовой частотой, не менее 64 ГБ оперативной памяти, поддержка технологий виртуализации |
|
Системы хранения |
Высокоскоростные диски SSD, RAID-массивы для обеспечения безопасности данных, ёмкость от 1 ТБ и выше |
|
Сетевое оборудование |
Коммутаторы с поддержкой высоких скоростей передачи данных, резервные каналы связи, поддержка VLAN |
|
Программное обеспечение |
Лицензии на операционные системы и средства управления, актуальные версии ПО для мониторинга и администрирования |
Помимо технических характеристик, важным аспектом является совместимость оборудования между собой, а также с используемыми программными решениями. Правильная настройка и оптимизация всех компонентов позволит добиться высокой производительности и бесперебойной работы вашего IT-ландшафта.
Шаги по установке и настройке кластера
- Подготовка окружения:
- Убедитесь, что все серверы имеют необходимые обновления и патчи.
- Проверьте совместимость оборудования и программного обеспечения.
- Настройте сеть, обеспечив стабильное и быстрое соединение между всеми узлами.

- Настройка хранилища:
- Создайте общий пул дисков для хранения данных.
- Настройте резервирование данных для повышения надежности.
- Установка компонентов:
- Установите необходимые роли и функции на каждом узле.
- Настройте службы и приложения, которые будут обеспечивать работу инфраструктуры.
- Конфигурация сети:
- Настройте виртуальные коммутаторы для оптимизации трафика.
- Обеспечьте резервирование сетевых подключений для повышения отказоустойчивости.
- Создание и настройка кластера:
- Объедините серверы в единый комплекс, используя специализированные инструменты.
- Настройте мониторинг и управление, чтобы обеспечить контроль над работой всей системы.
- Проверка и тестирование:
- Проведите тесты на отказоустойчивость, имитируя различные сбои и проверяя реакцию системы.
- Убедитесь в правильной работе всех компонентов и устраните выявленные проблемы.
Следуя этим шагам, вы сможете создать надежную и стабильную серверную инфраструктуру, обеспечивающую непрерывную работу ваших критически важных приложений и сервисов.
Настройка сети и хранения данных
В данном разделе рассмотрим ключевые аспекты, связанные с конфигурацией сетевой инфраструктуры и системы хранения для обеспечения непрерывности работы. Эти элементы играют важную роль в поддержке стабильности и доступности всех ресурсов, а также в минимизации простоев.
Настройка сетевой инфраструктуры
Эффективная сетевая настройка включает в себя несколько важных шагов, которые обеспечивают бесперебойное взаимодействие между узлами и доступ к ресурсам. Рассмотрим основные этапы:
- Выбор сетевых адаптеров: Использование надежных и производительных сетевых карт, обеспечивающих высокую скорость передачи данных и низкую задержку.
- Разделение сетевых трафиков: Настройка отдельных сетевых каналов для различных типов данных, таких как трафик управления, данные приложений и синхронизация данных.
- Настройка VLAN: Виртуальные локальные сети позволяют сегментировать сеть, увеличивая её безопасность и управляемость.
- Использование LACP: Протокол агрегации каналов позволяет объединять несколько сетевых подключений для увеличения пропускной способности и обеспечения резервирования.
- Мониторинг и диагностика: Постоянный мониторинг состояния сетевых подключений и использование инструментов для диагностики проблем помогают быстро выявлять и устранять неполадки.

Организация системы хранения данных
Правильная настройка системы хранения данных обеспечивает высокую доступность и целостность информации. Рассмотрим основные моменты:
- Выбор хранилища: использование надежных и производительных систем хранения, таких как SAN (Storage Area Network) или NAS (Network Attached Storage), в зависимости от потребностей.
- Настройка RAID: использование различных уровней RAID для обеспечения избыточности и повышения производительности хранилища.
- Репликация данных: настройка репликации данных между узлами для обеспечения их доступности в случае сбоя одного из них.
- Резервное копирование: регулярное создание резервных копий данных и проверка их целостности для быстрого восстановления в случае необходимости.
Следуя данным рекомендациям, можно значительно повысить стабильность и доступность системы, минимизировать время простоя и обеспечить надежное хранение всех необходимых данных.
Тестирование и мониторинг кластера
Основные этапы тестирования
Для обеспечения корректной работы необходимо проводить регулярные тесты. Эти проверки позволяют выявить слабые места и убедиться в готовности системы к нагрузкам. Вот основные шаги:
- Подготовка тестовой среды. Создайте изолированное окружение, максимально приближенное к рабочему.
- Проведение стресс-тестов. Оцените, как система справляется с пиковыми нагрузками.
- Тестирование отказов. Проверьте, как система реагирует на различные сбои, включая отключение отдельных узлов.
- Восстановление данных. Убедитесь, что механизмы резервного копирования и восстановления работают корректно.
- Анализ результатов. Соберите и проанализируйте данные, чтобы выявить потенциальные проблемы и возможности для улучшения.
Инструменты для мониторинга
Для эффективного наблюдения за состоянием вашего кластера существует множество инструментов. Эти программы помогают в реальном времени отслеживать производительность и выявлять аномалии. Рассмотрим основные из них:
- Performance Monitor (PerfMon)– стандартный инструмент для отслеживания производительности. Позволяет мониторить ключевые показатели, такие как использование ЦП, оперативной памяти и дисковой подсистемы.
- System Center Operations Manager (SCOM) – мощное средство для мониторинга и управления, которое предоставляет подробные отчеты и уведомления о состоянии системы.
- Event Viewer– средство для анализа системных журналов. Помогает отслеживать и анализировать события, которые могут указывать на проблемы в работе системы.
- Windows Admin Center – интегрированная платформа для управления и мониторинга, которая позволяет контролировать состояние системы через удобный веб-интерфейс.
Практические советы по мониторингу
Чтобы обеспечить максимальную эффективность мониторинга, следуйте следующим рекомендациям:
- Настройте оповещения для критических событий, чтобы оперативно реагировать на проблемы.
- Регулярно анализируйте данные мониторинга для выявления тенденций и потенциальных узких мест.
- Используйте различные инструменты в комплексе, чтобы получить максимально полную картину состояния вашей системы.
- Обучите персонал работе с инструментами мониторинга, чтобы все члены команды могли оперативно реагировать на возникающие проблемы.
- Документируйте все процедуры и результаты тестирования и мониторинга для дальнейшего анализа и улучшения процессов.
Эффективное тестирование и мониторинг являются важными аспектами поддержания работоспособности вашего кластера. Своевременное выявление и устранение проблем поможет обеспечить стабильную и надежную работу всех системных компонентов.
Рекомендации по поддержке и обновлению кластера
Организация системы резервного копирования и восстановления – один из краеугольных камней поддержки кластера. Важно иметь надёжные механизмы создания резервных копий данных, а также проводить регулярные проверки и испытания процедур восстановления. Это обеспечит не только защиту от потери данных, но и минимальное время восстановления после возможного сбоя.
Обновление программного обеспечения – непременная часть поддержки кластера. Регулярные обновления операционной системы и прикладных программ помогут не только исправить уязвимости безопасности, но и повысят производительность и стабильность работы системы. Важно следить за релизами обновлений и вовремя их устанавливать, при этом учитывая возможные совместимости и зависимости между компонентами кластера.
Мониторинг и анализ состояния системы – ключевой элемент обновления и поддержки кластера. Важно иметь систему мониторинга, способную оперативно обнаруживать и реагировать на возможные проблемы в работе системы. Анализ данных, собранных в процессе мониторинга, позволит выявить узкие места и проблемные зоны, а также оптимизировать процессы поддержки и обновления кластера.
Вопрос-ответ
Какие преимущества предоставляет отказоустойчивый кластер Windows Server 2019?
Отказоустойчивый кластер Windows Server 2019 обеспечивает повышенную надежность и доступность вашего приложения или сервиса. Это достигается за счет автоматического переноса нагрузки с вышедшего из строя узла на работоспособные, что минимизирует простои и обеспечивает бесперебойную работу.
Как создать отказоустойчивый кластер на базе Windows Server 2019?
Для создания отказоустойчивого кластера на базе Windows Server 2019 необходимо выполнить ряд шагов. Во-первых, убедитесь, что серверы, которые вы планируете использовать в качестве узлов кластера, соответствуют требованиям по аппаратным характеристикам. Затем установите роли Failover Clustering и Hyper-V (если необходимо) на каждом узле. После этого используйте мастер создания кластера для настройки кластера и добавления узлов в него.
Какие компоненты необходимы для создания отказоустойчивого кластера Windows Server 2019?
Для создания отказоустойчивого кластера на базе Windows Server 2019 необходимо наличие нескольких компонентов. Это включает в себя несколько физических или виртуальных серверов, которые будут работать в качестве узлов кластера. Также потребуются диски для хранения данных, сеть с низкой задержкой и достаточной пропускной способностью для обмена данными между узлами, и конечно же, лицензии на Windows Server 2019 для каждого узла кластера.
Какие методы обеспечения отказоустойчивости используются в кластере Windows Server 2019?
В кластере Windows Server 2019 используются различные методы обеспечения отказоустойчивости. Один из основных методов – механизм автоматического переключения ресурсов с вышедшего из строя узла на работающий узел. Это может быть достигнуто с помощью технологии Failover Clustering, которая обеспечивает мониторинг состояния узлов и автоматический перенос служб или приложений в случае сбоя. Кроме того, используются дублированные и резервные компоненты, репликация данных и резервные источники питания для обеспечения непрерывной работы кластера.
Какие лучшие практики рекомендуется следовать при создании отказоустойчивого кластера Windows Server 2019?
При создании отказоустойчивого кластера Windows Server 2019 важно придерживаться нескольких лучших практик. Во-первых, перед началом установки убедитесь, что все узлы кластера находятся в сети одного домена Active Directory. Также рекомендуется использовать выделенные сетевые адаптеры для кластерной связи и управления. Важно также настроить правильную конфигурацию брандмауэра для обеспечения связности между узлами кластера. И, конечно, регулярно выполняйте обновления и резервное копирование конфигурации кластера для предотвращения потери данных и обеспечения безопасности.
Каковы основные преимущества отказоустойчивого кластера на Windows Server 2019?
Отказоустойчивый кластер на Windows Server 2019 предоставляет ряд значительных преимуществ, таких как непрерывная доступность сервисов и данных благодаря автоматическому переключению на резервные узлы в случае отказа основного, а также увеличение производительности и масштабируемости за счет распределения нагрузки между узлами кластера.
Читайте также:
- Создание отказоустойчивого кластера в 1С:Предприятие
- Отказоустойчивый кластер Windows для повышения надежности систем
- Как построить отказоустойчивый кластер для максимальной надежности
- Отказоустойчивый кластер Hyper V для повышения надежности систем
- Создание отказоустойчивого кластера MS SQL для обеспечения надежности и доступности данных
- Файловый отказоустойчивый кластер для повышения надежности и доступности данных
- Отказоустойчивые системы: ключевой элемент безопасности и надежности
- Currently 5/5
- 1
- 2
- 3
- 4
- 5
Оценка: 5/5 (Проголосовало: 2)
Спасибо за ваш отзыв!
Как можно улучшить эту статью?
Failover clustering will enable you to make you Windows Server services highly available. In this guide we will go just through simple setup of failover clustering on Windows Server 2019 without setting up any services.
Before we begin
These are the resources you will need if you are completely new to Failover Clustering – https://docs.microsoft.com/en-us/windows-server/failover-clustering/create-failover-cluster
Prerequisites
I assume you know basic things about Windows Server before you attempt to do this.
DC
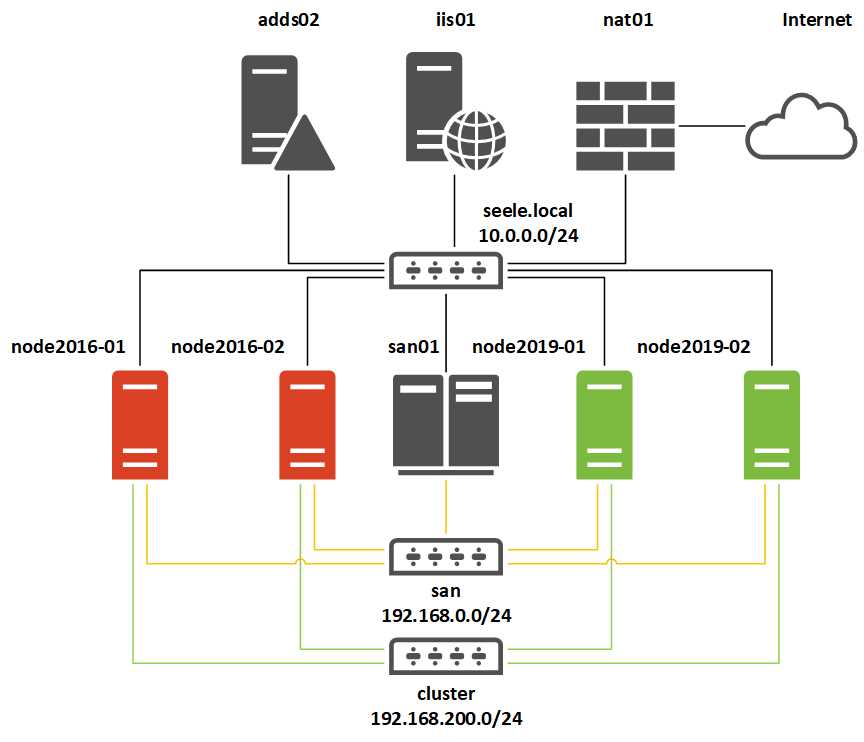
LAB for this guide consists of following:
Domain: informatiker.local
Domain Controller named DC1 – 10.0.0.31
ISCSI
One Windows Server ISCSI Target server named ISCSI1 (if you don’t know how to make ISCSI target server, here is the guide)
ISCSI1 – 10.0.0.50
That machine has one additional disk of 40GBs that will be assigned to ISCSI Target.
Optionally, you don’t have to bring up iscsi target server and configure iscsi for failover cluster – you can also bring up failover cluster without storage.
Failover cluster
We will have two nodes that will have failover clustering installed. These machines will have two network cards – one for communication with network, and another one for clustering communication.
Failover1 – NIC1 10.0.0.52 NIC2 192.168.4.2
Failover2 – NIC1 10.0.0.53 NIC2 192.168.4.3
192.168.4.xx network is only for internal cluster configuration (heartbeat). On netowrk cards that will serve you as heartbeat and internal cluster communication – Control Panel | Network and Sharing Center | Change Adapter Settings | right click on network adapter that will serve for cluster communication – Properties | under Networking tab select IPv4 – Properties | click on Advanced button | under DNS tab deselect Register this connection’s addresses in DNS | WINS tab – select Disable NetBIOS over TCP/IP. Do this ONLY ON network adapters that will server for internal cluster communication!
All of these machines should be part of domain.
Be sure to enable MPIO Feature and iSCSI Initiator on both Failover1 and Failover2 machines. Be sure to follow my guide I posted above for creating ISCSI target, it has all the details in it.
MPIO is very important when you use shared storage.
Connect one 40GB disk you defined as ISCSI target to both Failover1 and Failover2, leave it offline at failover2 node.
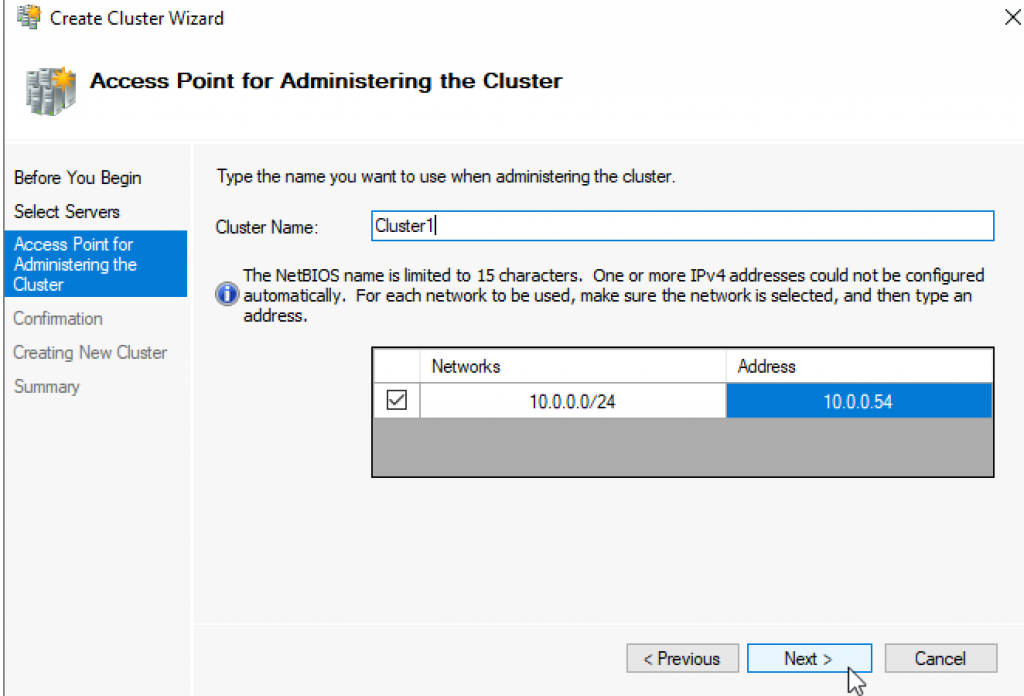
Cluster is going to be named Cluster1
Cluster1 – 10.0.0.54
Cluster Witness. We need additional VM that will hold file share that ill be available to our cluster – Witness1
Witness1 – 10.0.0.55
Install Failover Clustering
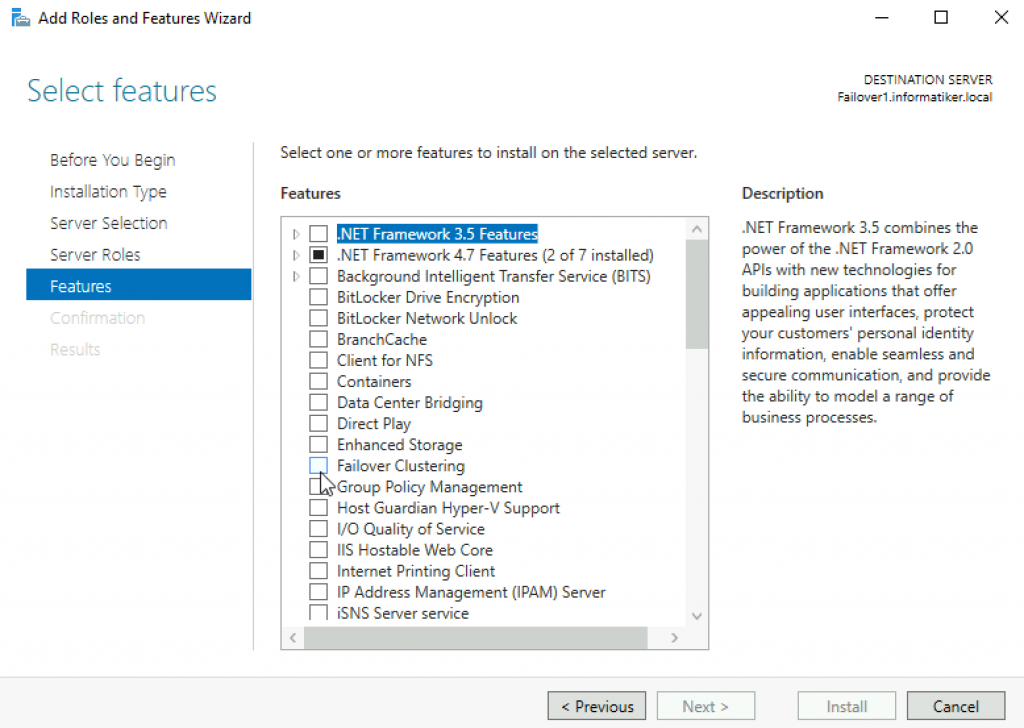
We will go through the process on Failover1 node, you will repeat the process on Failover2 node. I will show you only important parts, I assume you know how to use Server Manager.
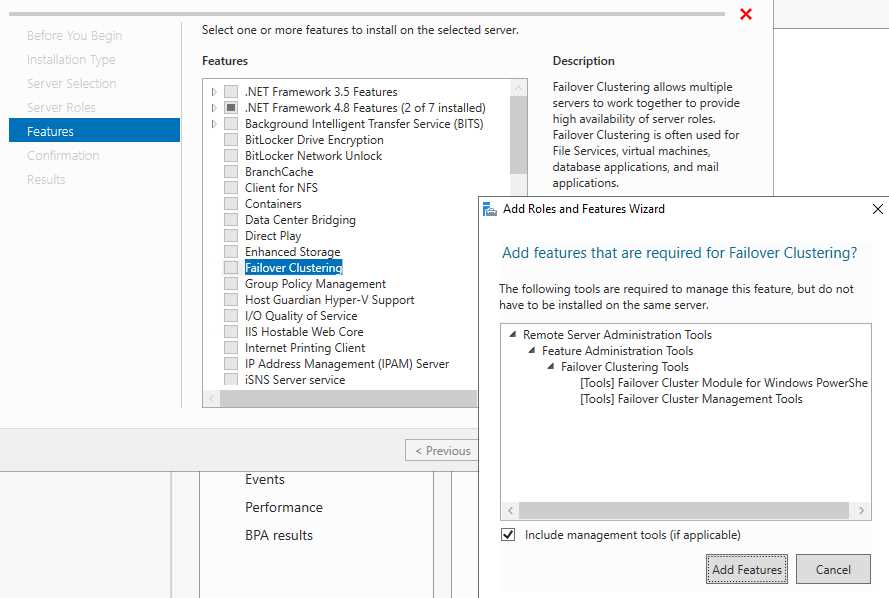
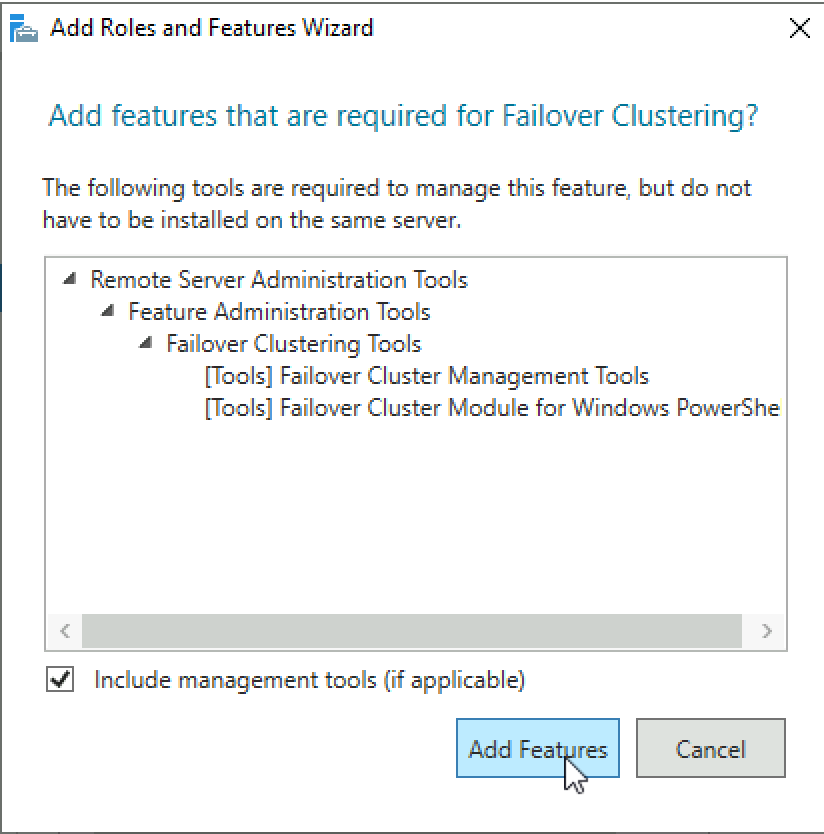
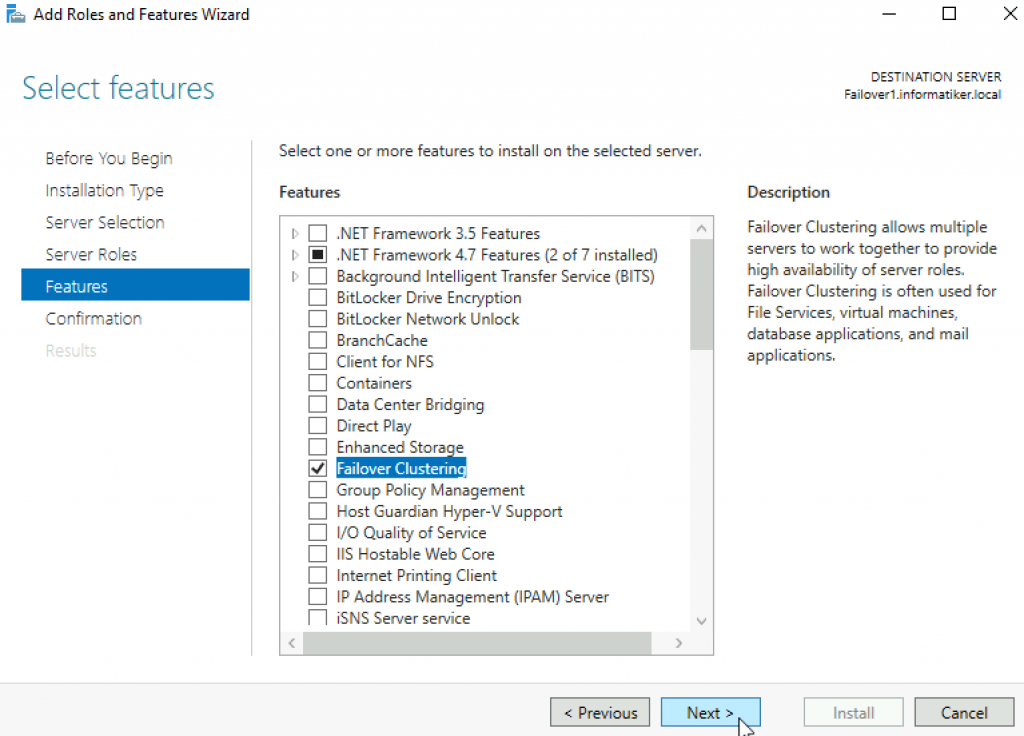
Open Server Manager | click on Manage | Add Roles And Features | on Features screen select Failover Clustering
Additional pop-up will appear, click on Add Features
Next
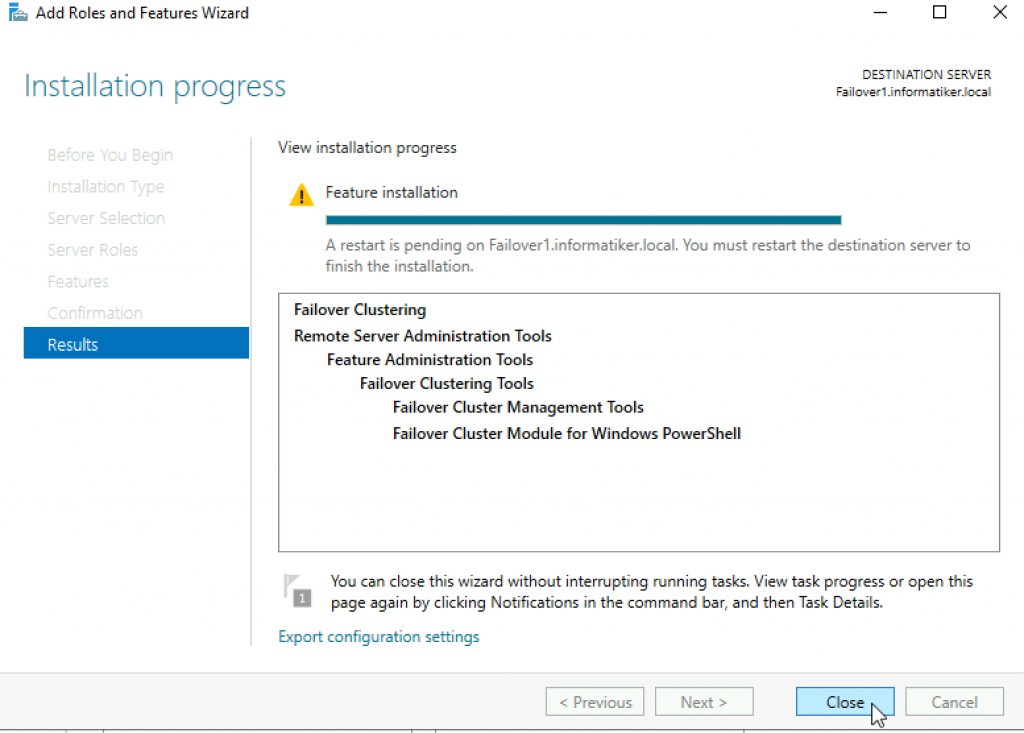
Install
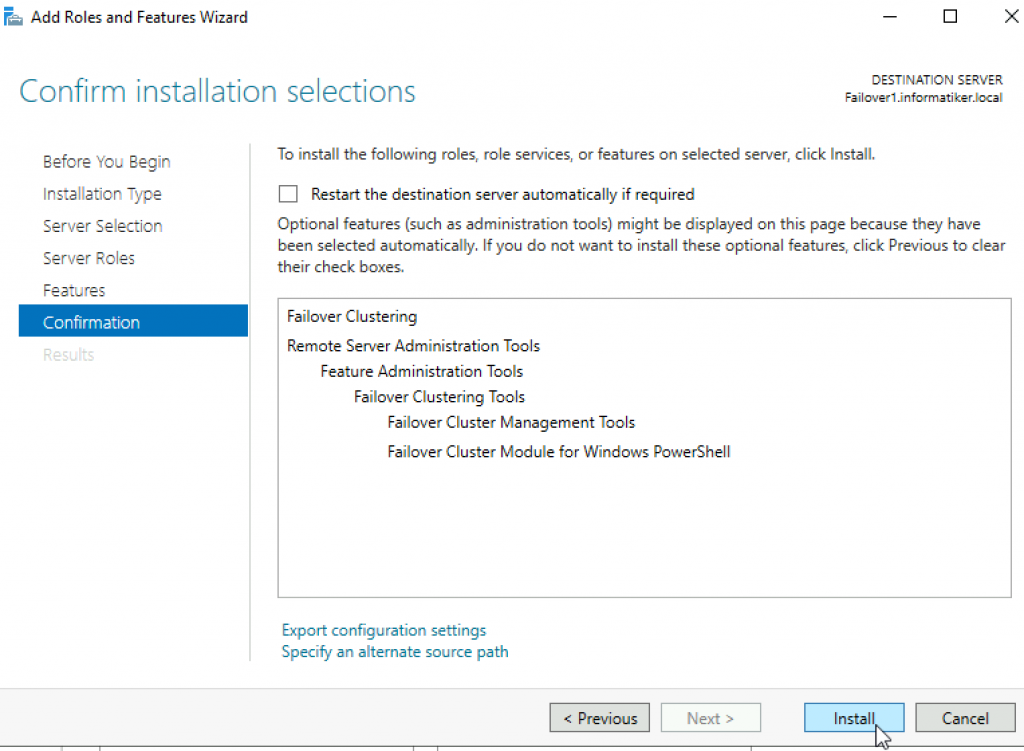
Close wizard and reboot server.
Repeat this process on Failover2 node.
Validate Cluster Configuration
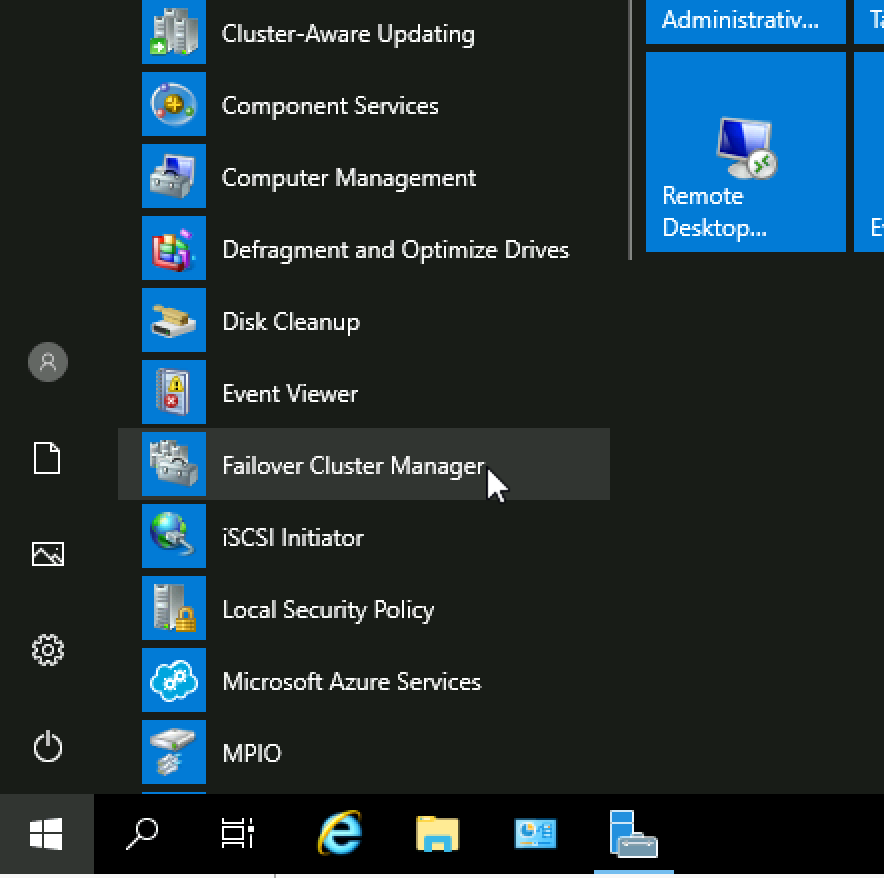
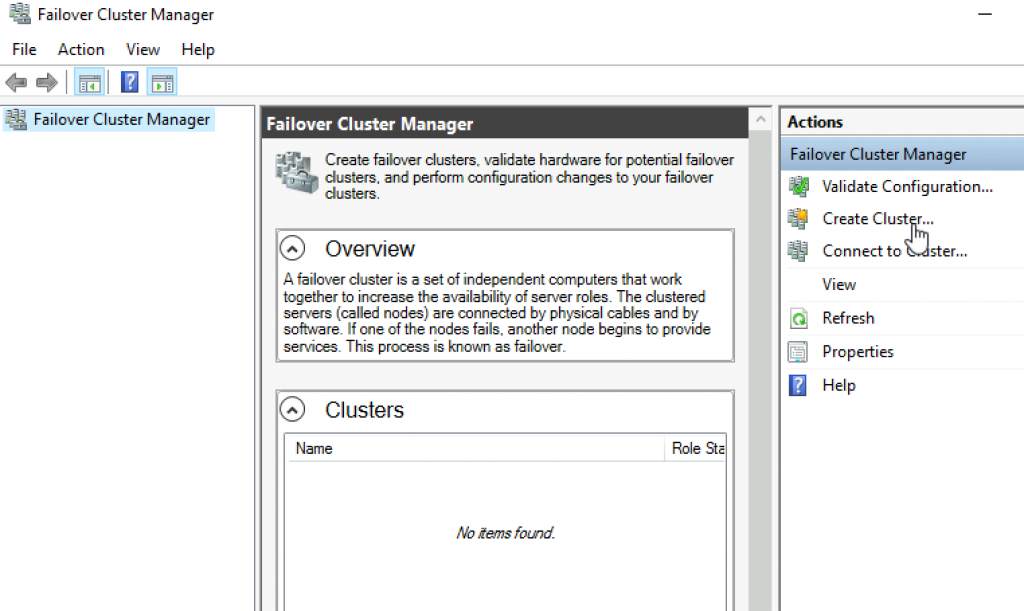
After you installed Failover Clustering on both nodes, login to Failover1 node, click on Start | Windows Administrative Tools | select Failover Cluster Manager
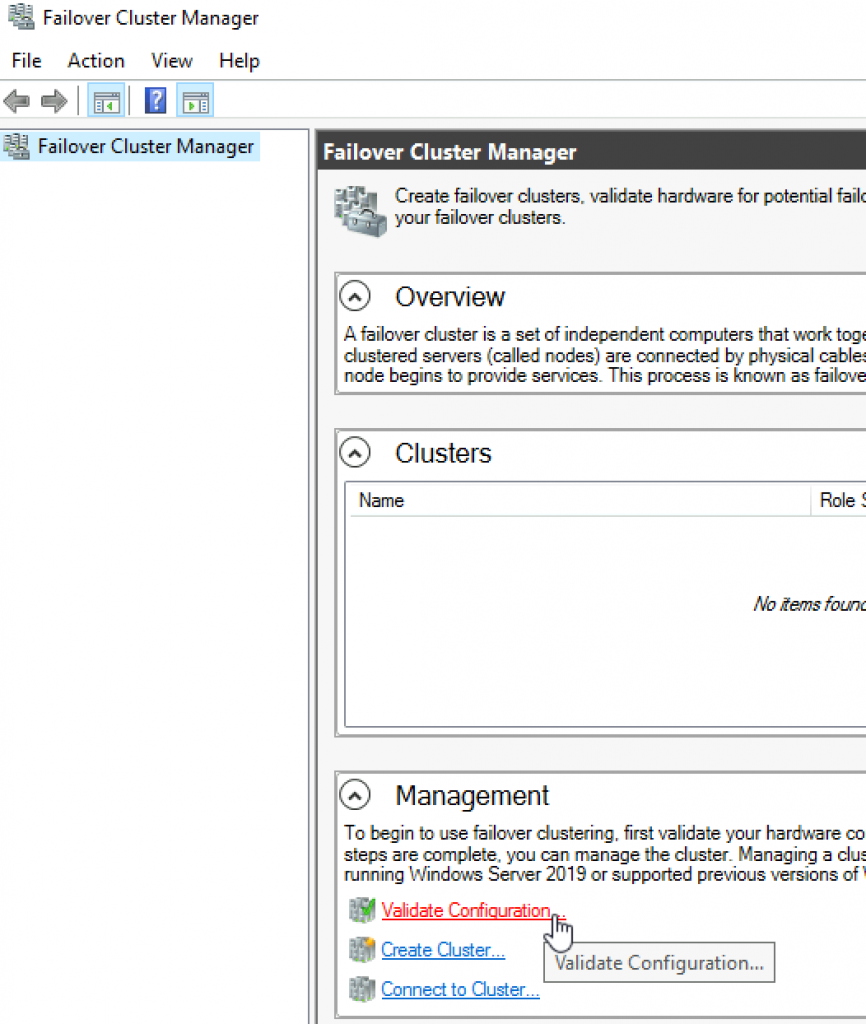
Click on Failover Cluster Manager, and from the middle screen select Validate Configuration…
Next
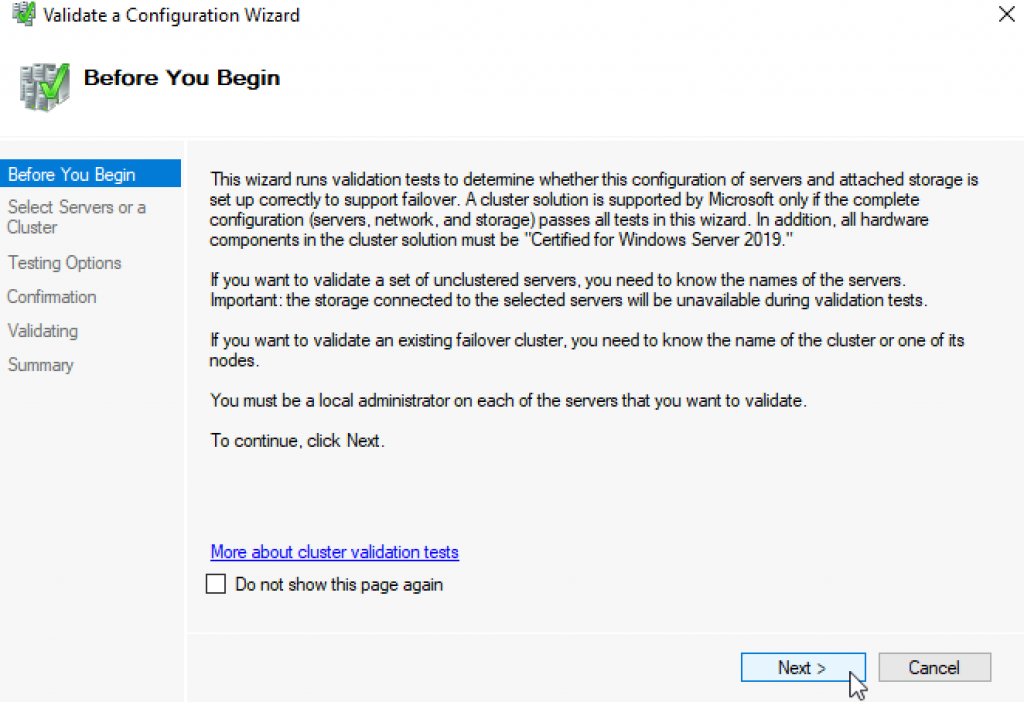
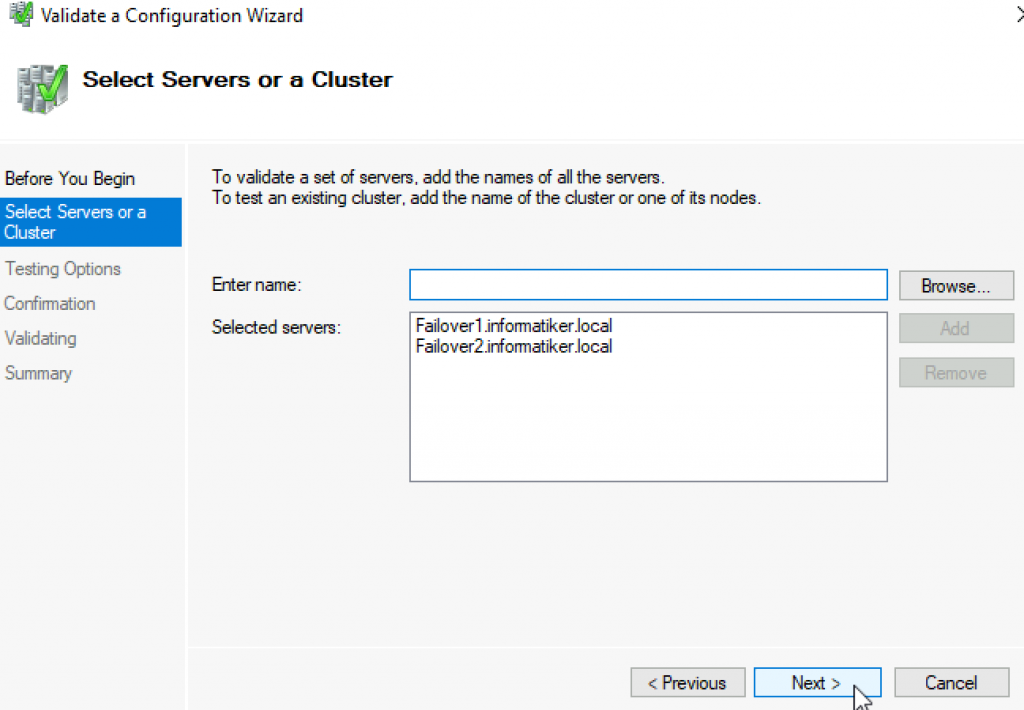
Select both servers (in my case Failover1 and Failover2) and select Next
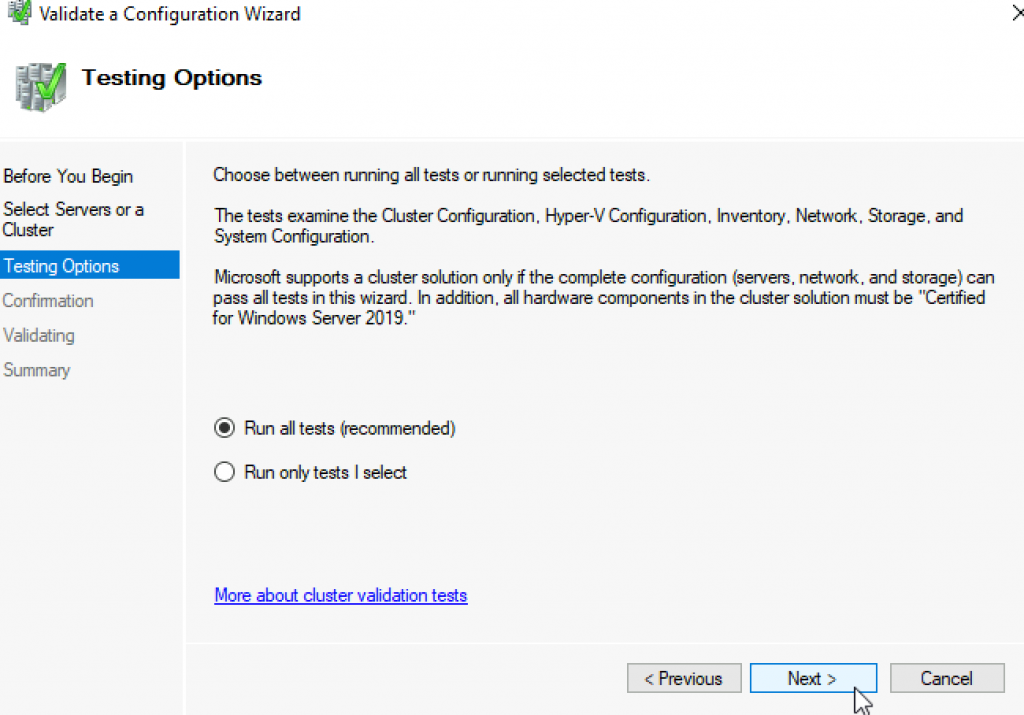
Run all tests | Next
Next
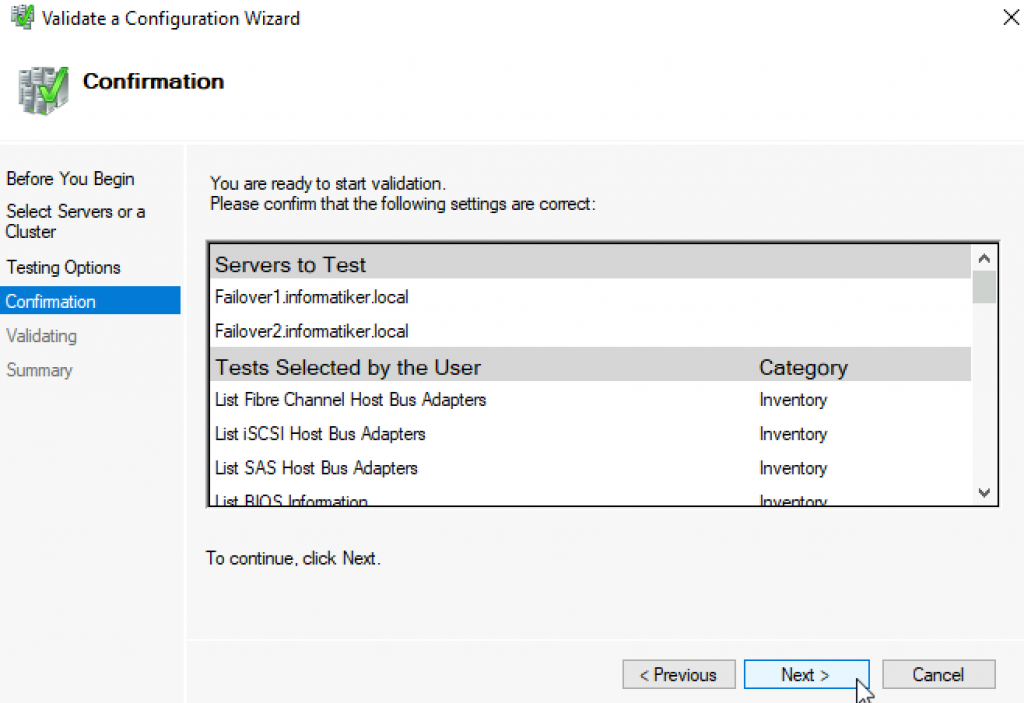
…
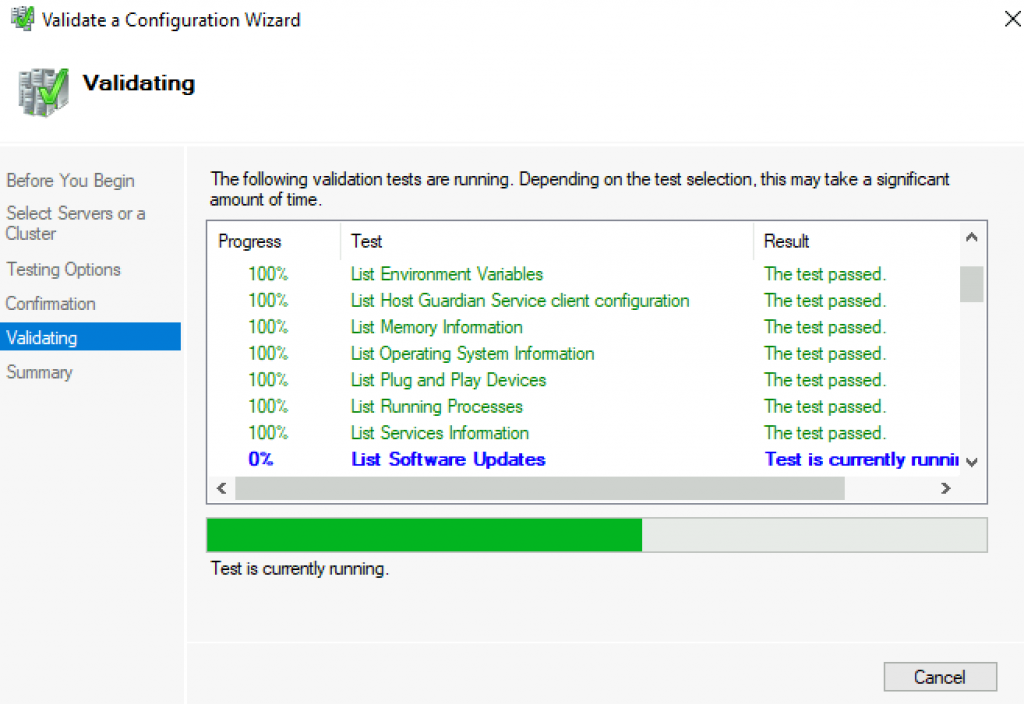
All test were success | Finish
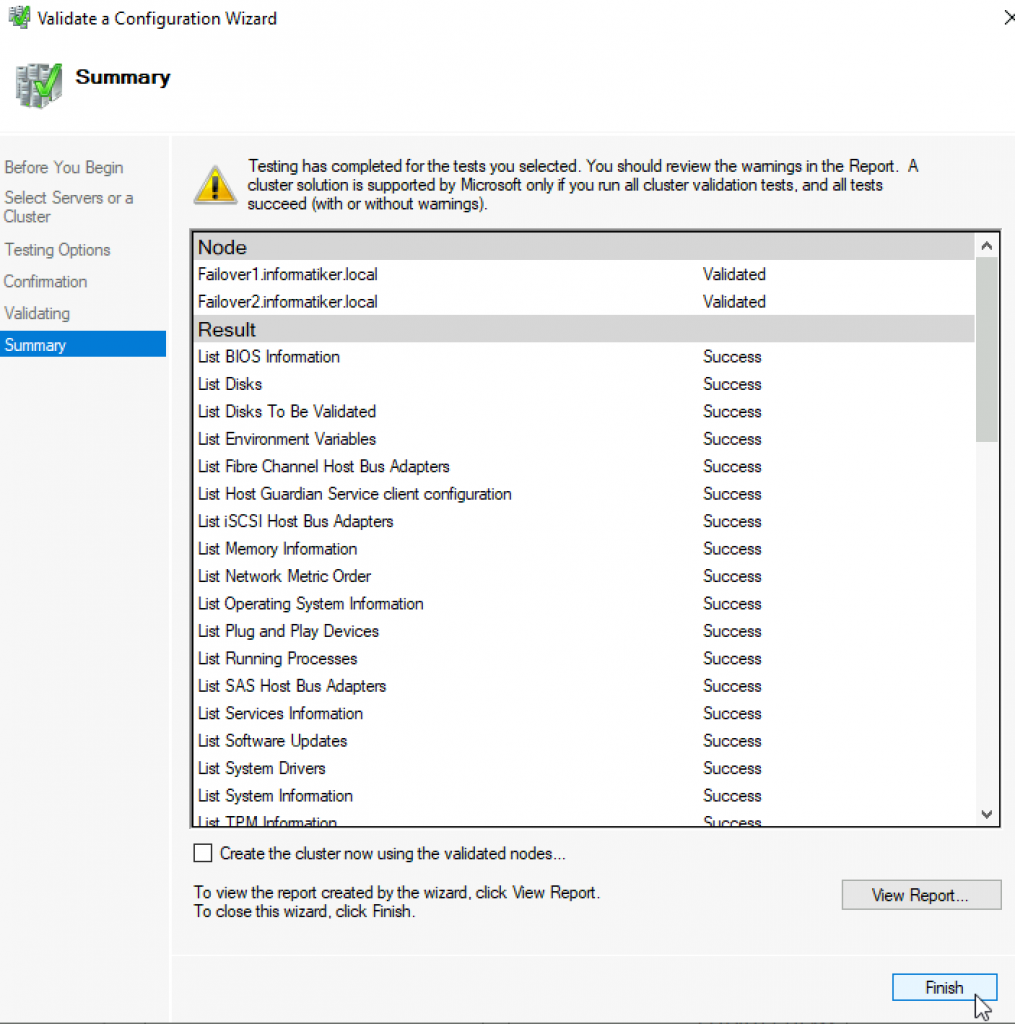
We can proceed to creating cluster
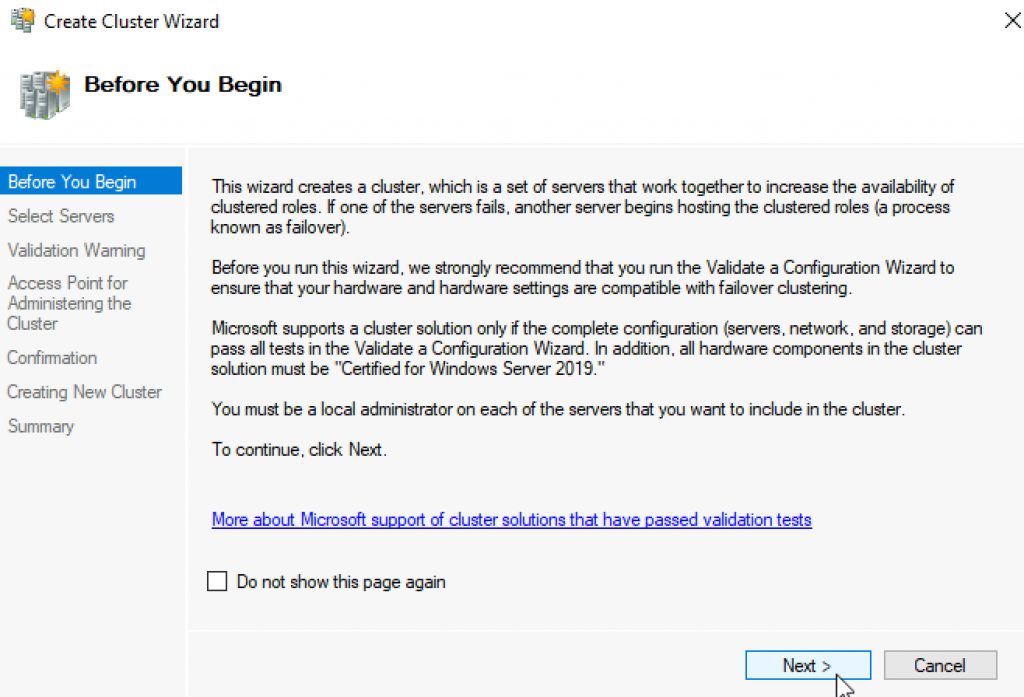
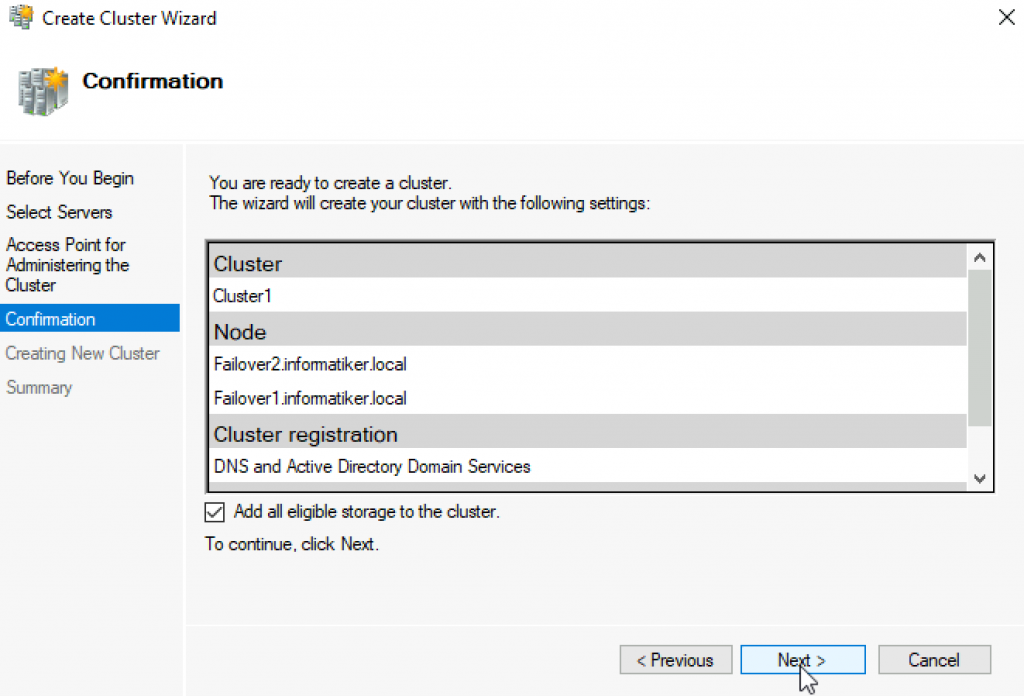
Failover Cluster Manager | from Action screen, select Create Cluster
Next
Again select both servers that will be part of the cluster | Next
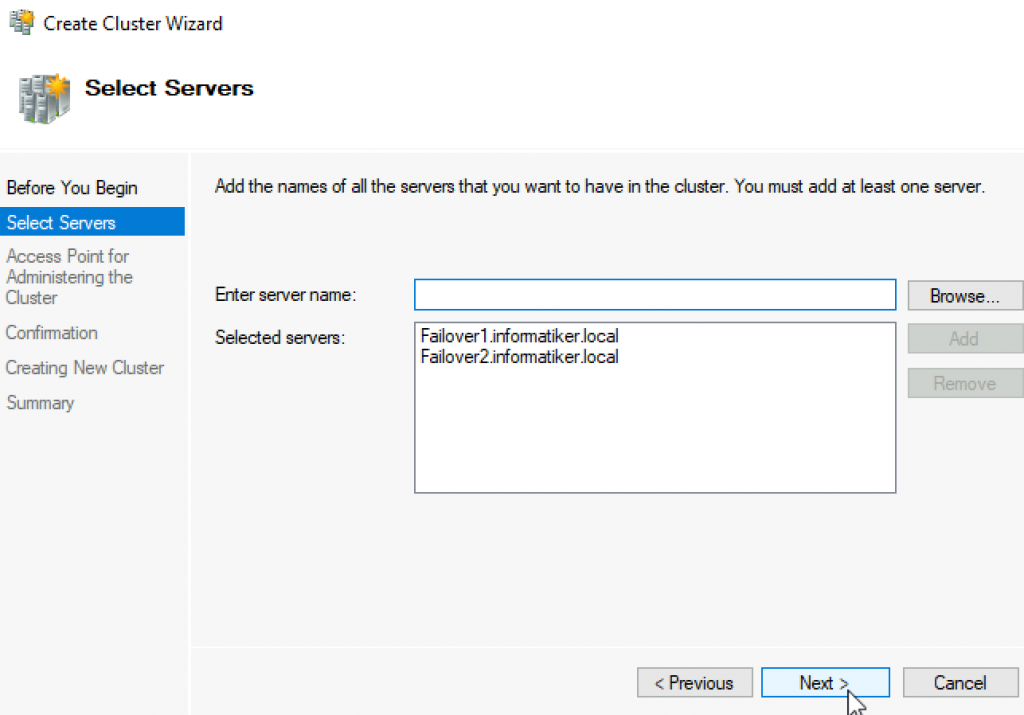
I will name cluster – Cluster1 and give it IP 10.0.54 | Next
Next
…
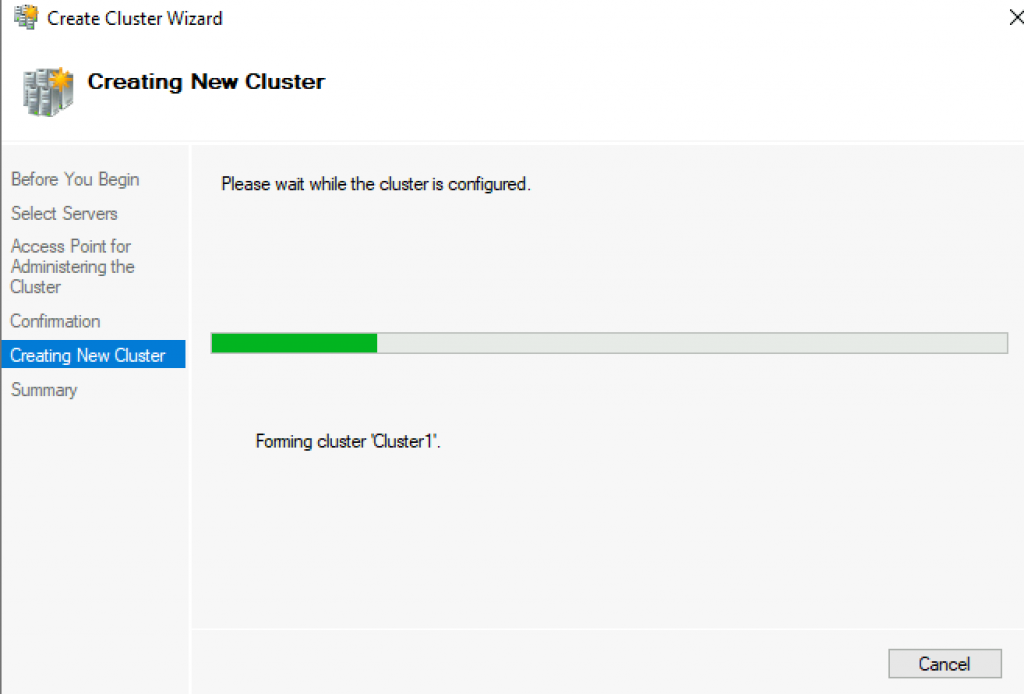
Success! Finish
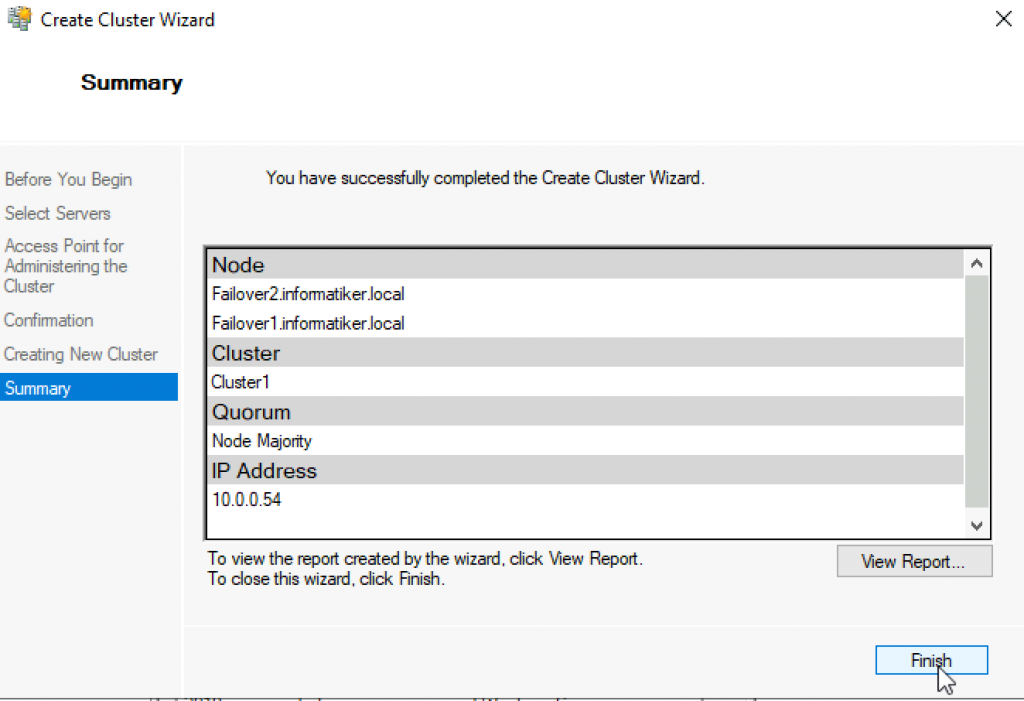
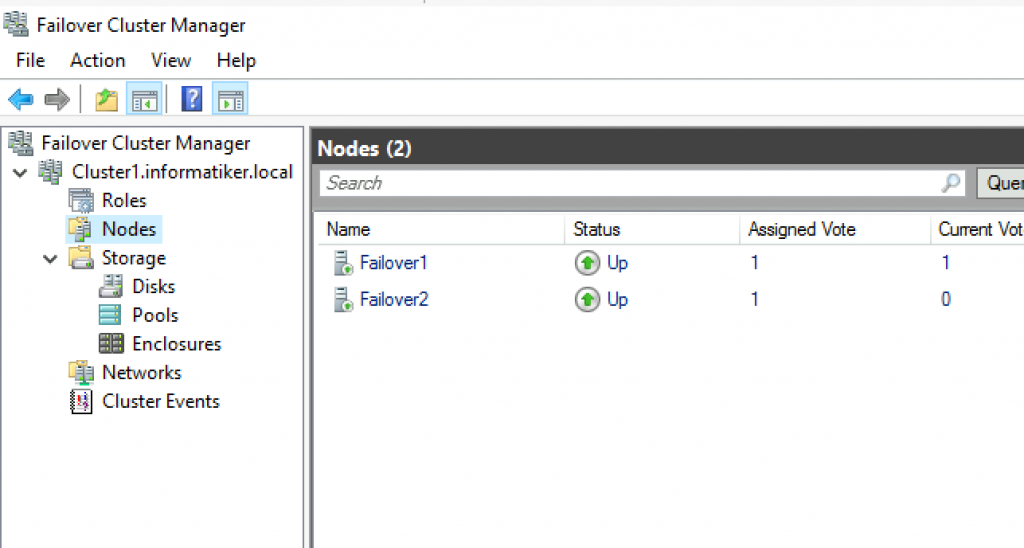
We can now see created cluster1 and two nodes as part of it.
Add Cluster Quorum Witness
Cluster Quorum Witness will enhance your Failover Cluster Availability. I will not go into detail about witness role, you can find many more details here – https://docs.microsoft.com/en-us/windows-server/failover-clustering/manage-cluster-quorum
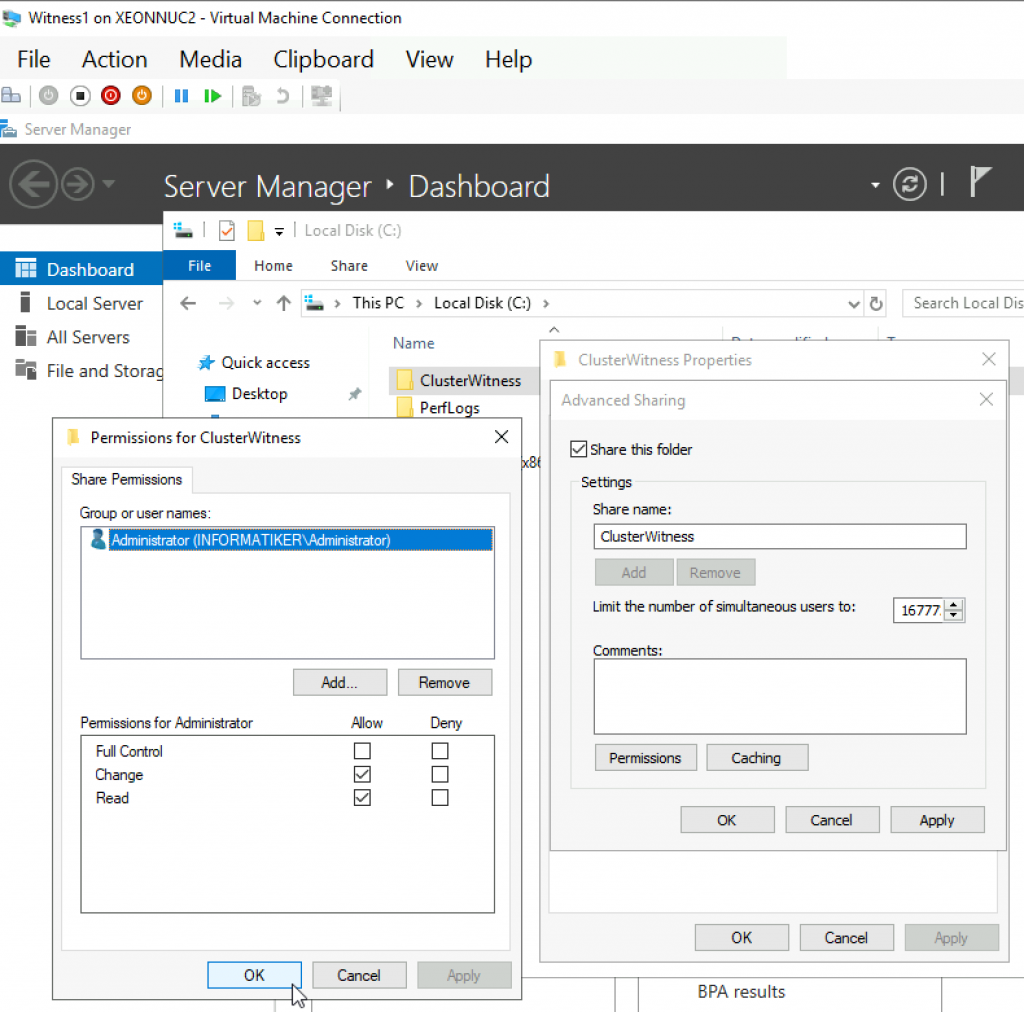
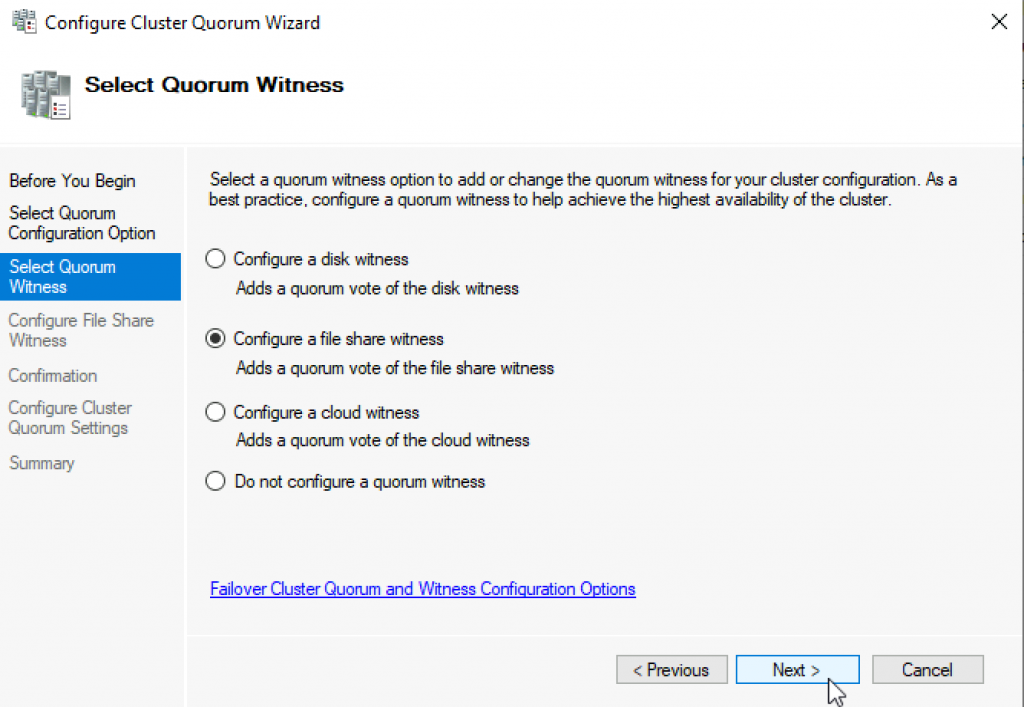
In our scenario, we will add File Share as Witness. since we have only two nodes, witness and one node will always have to be up, for cluster to be valid. So, make sure you plan you outages and patching so that you always have two nodes up.
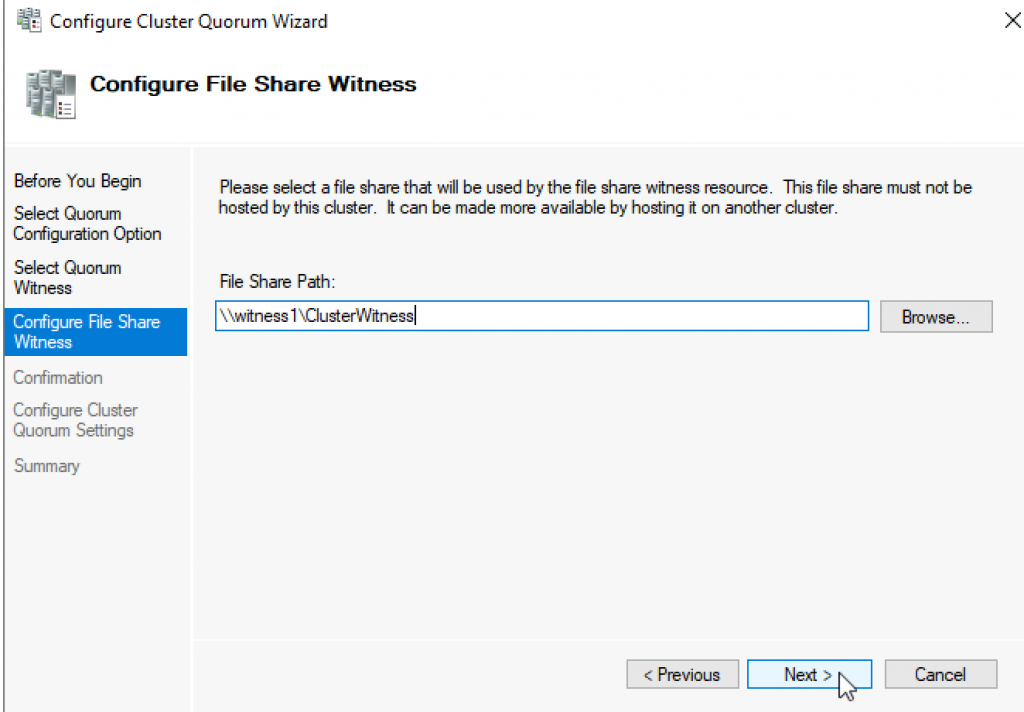
On Witness1 machine, I added folder named ClusterWitness and shared it. In the screenshot below – three things are MISSING – you should also add Failover1, Failover2 and Cluster1 computers to this fileshare with full rights. Also, visit security tab of the shared folder and repeat procedure there!!
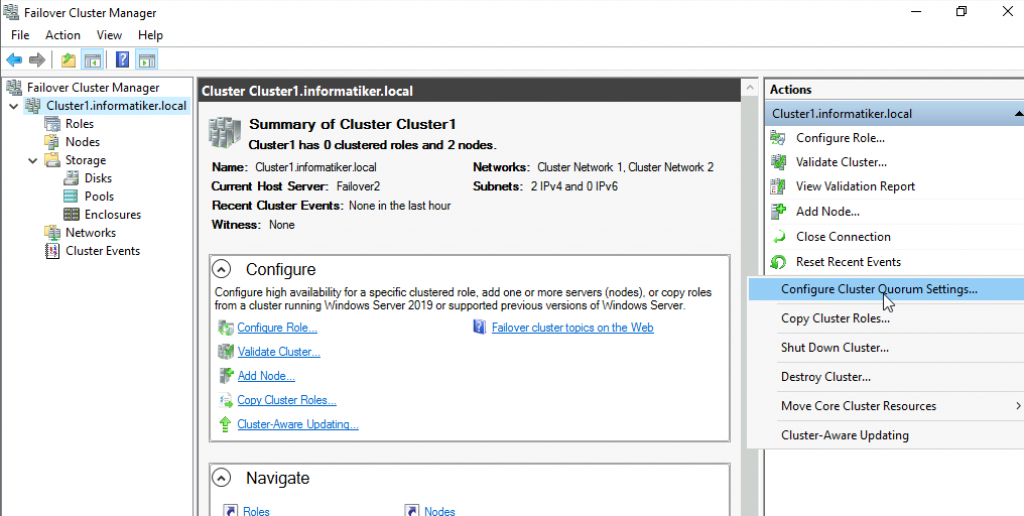
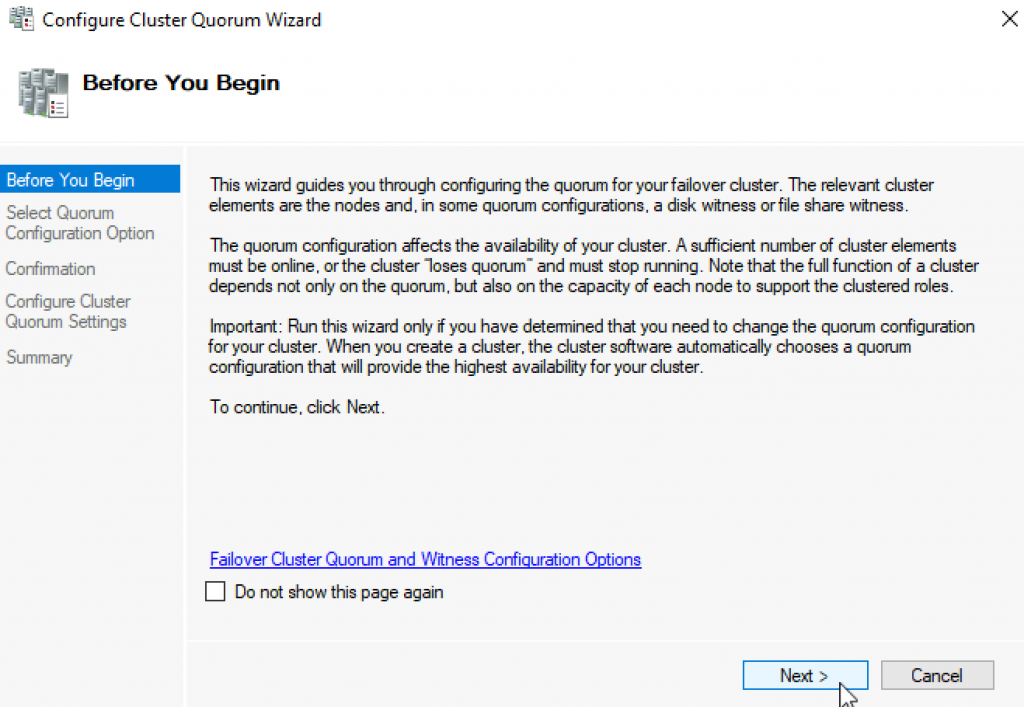
Back to Failover1 node – Open Failover Cluster Manager | select Actions | More Actions | Configure Cluster Quorum Settings
Next
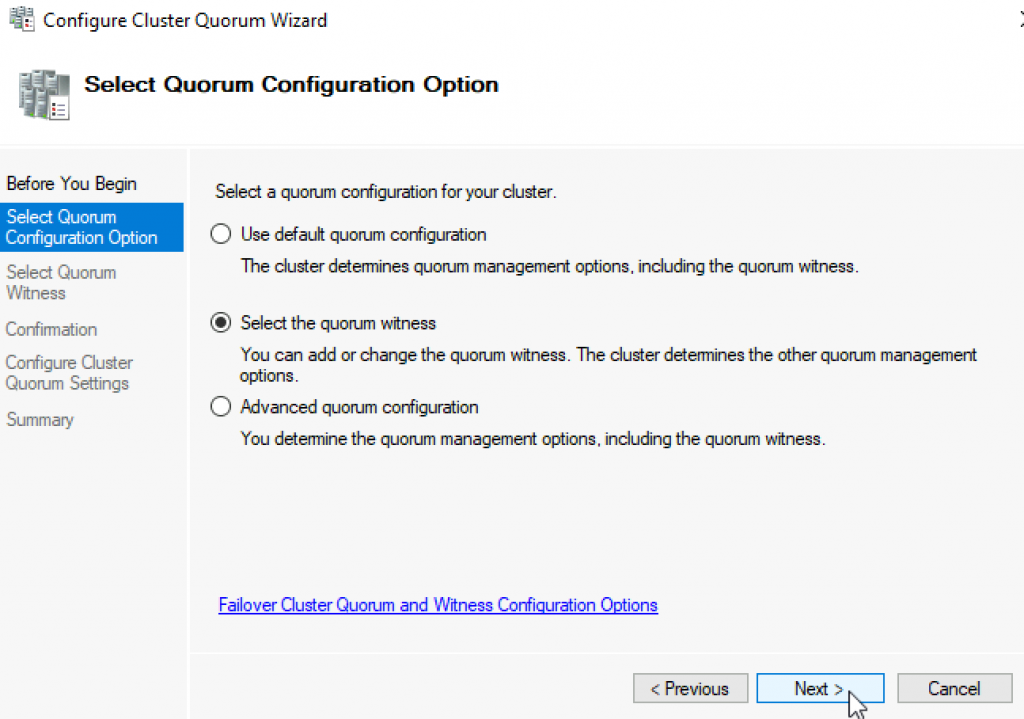
Select the quorum witness | Next
You have many options, today we will select “Configure a file share witness” Next
Enter FQDN to your file share on witness1. In my case it is \witness1\ClusterWitness | Next
Review and click Next
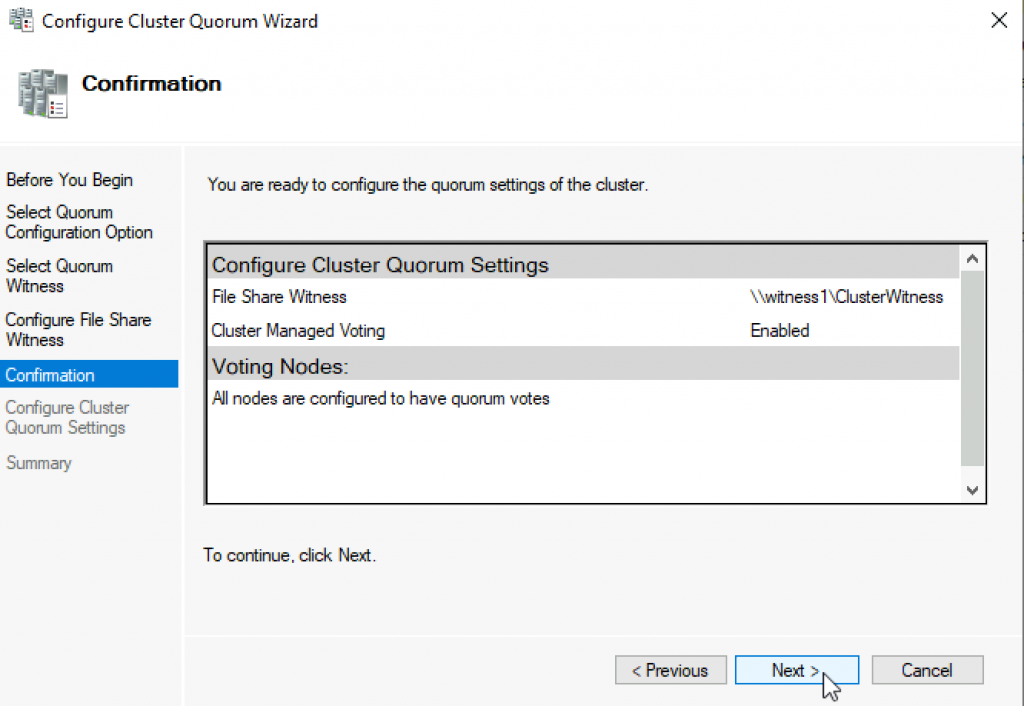
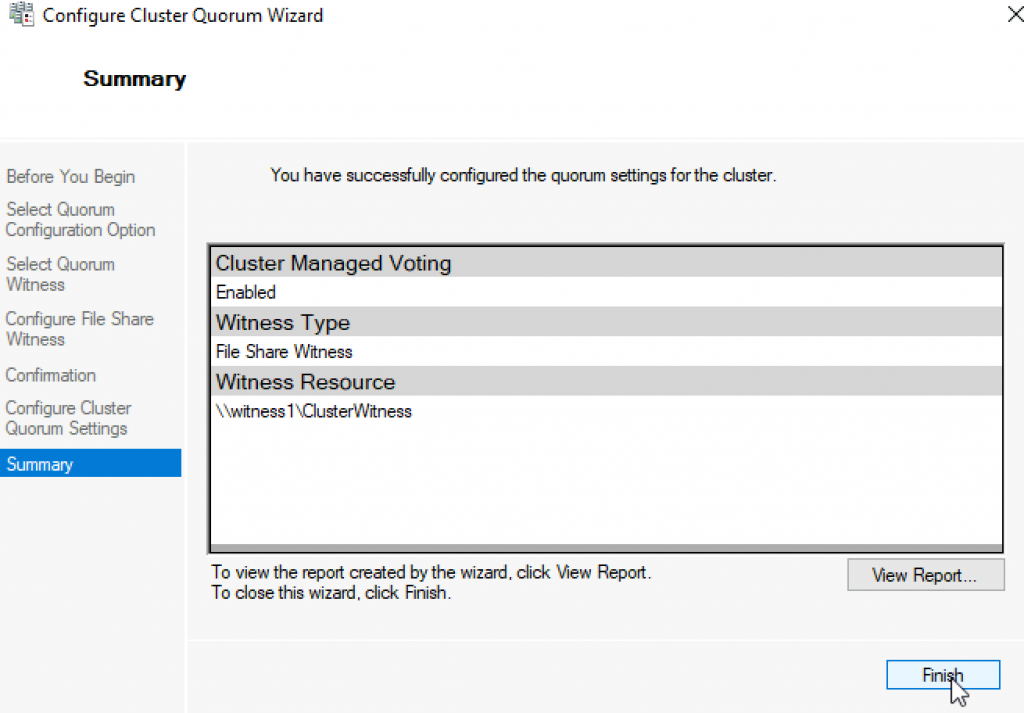
Success! Finish
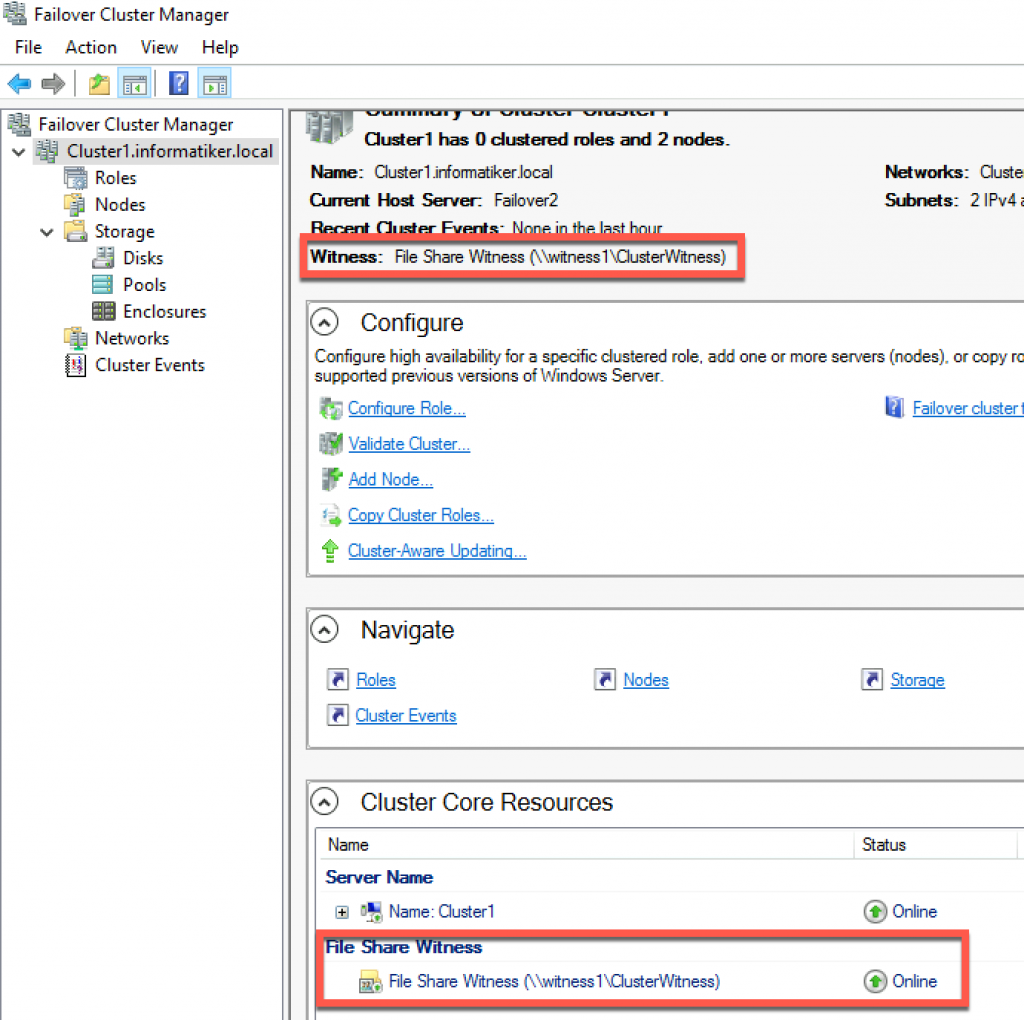
Now, we can see in Failover Cluster Manager that Witness is available.
That is it, we covered the basics and we can now start deploying various services in our clustered scenario.
Disclaimer
In this tutorial, we would learn how to install and setup Failover cluster in Windows Server 2019 step by step. In the previous tutorial, we configures an iSCSI storage server and created three virtual disk.
To install and configure a failover cluster, let’s look at our network setup, then we follow some steps
- Our Network Environment
- Determine the Cluster Disks
- Add Failover Clustering Role
- Create the Failover Cluster
- Add Disks to the Cluster
1. Our Network Environment
Our lab network is set up using VirtualBox and consists of 4 computers:.
How to set up a domain network is explained here.
DC (192.168.1.90) – This is our domain controller.
Node1 (192.168.1.91) – This is one of the failover cluster nodes and a iSCSI initiator.
Node2 (192.168.1.92) – This is the second failover cluster nodes and an iSCSI initiator.
Node3 (192.168.1.93) – This is out iSCSI target server. It hosts the virtual disks
2. Determine the Cluster Disks
Before you start creating the failover cluster, you need to determine the disk that hold the cluster data. This is so that if a member of the cluster fails, then the data would still be available. In our setup, we have decided to host the disks in another computer (Node3). This is configured as iSCSI target server and contain 3 virtual disk.
The figure below shows Node3 with the 3 iSCSI disks configured.
How to configure iSCSI target server and disks
Note: Ensure that the disks are iSCSI virtual disks are initialized on one of the failover nodes
3. Add the Failover Clustering Role
Now we have to install the Failover cluster role in Node1 and Node2. Follow the steps below to do that.
Step 1 – In Node1, click on Add Roles and Feature. This will launch the Add Roles and Features wizard. Follow the steps and select Failover Clustering as shown below. Then complete the installation.

Step 2 – Repeat the process for Node2
4. Create the Failover Cluster
We would now use the Failover cluster manager to create a cluster. Follow the steps below:
Step 1 – In Node1, click on Manager and select Failover Cluster Manager. The window is shown below

Step 2 – Click on Validate Configuration and follow the wizard steps to do the validation (this is done only in Node1). The wizard will ask you to specify the Servers you want to participate in the clustering. You will use AD to find Node1 and Node2 and select them.
At the end of the validation, you may have warning relating to unsigned drivers. Ignore these warnings because they come from VirtualBox Guest Additions.
Step 3 – Click on Create Cluster. You will have to select the Node1 and Node1. Then you need to specify the cluster name. The complete the cluster creation. The figure below shows the final screen indicating the cluster creation was successful.

5. Add Disks to the Cluster
Failover clusters require disks and in this case we would used virtual disks from the iSCSI target server.
Step 1– Add storage to the cluster. To do that open the Failover Cluster manager as shown below.

Step 2 – Click on Add Disk. The three iSCSI disks would be listed. Ensure that they are selected.

Click on OK.
At this point, the disks are added to the cluster and they are online as well. See the figure below

In subsequent tutorials, I discuss the concept of Witness in failover cluster and how to configure Quorum witness and Disk witness.
I also recommend you watch the video in my Youtube Channel.
Skip to content
Implementing Failover Cluster in Windows Server 2019
Today’s “always-on” and “always available” IT environments require a highly available infrastructure design. Simply put in other words- you don’t want to have a single point of failure in your business-critical infrastructure. If so, it quickly becomes apparent that you are only as good as your weakest link. Redundancy needs to exist throughout the environment, including your physical infrastructure and applications.
When it comes to your hosts that run applications and services, you want to ensure you have multiple hosts that can provide redundancy when one of your hosts fails. This is true when you have hosts running applications like MS SQL Server or if you have hosts that are serving as virtual hosts for your virtualized environments.
Protect Your Data with BDRSuite
In the world of Microsoft Windows, Windows Server Failover Cluster is the mechanism used for hosting applications and hypervisors in a highly available way so as to provide minimum disruptions when there is a failure in the environment.
Windows Server 2019 provides the most advanced Windows Server to date; as it provides the most advanced features in terms of Windows Failover capabilities. In this article let’s take a look at Windows Failover Clustering in general, What is it? What is Hyper-V Failover Cluster?, How do they work? What is new in Windows Server 2019 Failover Cluster along with all its use cases? as well as the implementation of the Windows Failover Cluster in Windows Server 2019.
What is Windows Failover Clustering?
In order to increase high-availability for your business-critical data using Windows Server, you need Failover Clustering in Windows Server to achieve it.

What is a failover cluster?
The failover cluster in Windows Server is a group of independent nodes that work together as a single logical unit to increase the availability and scalability of the roles and services that run on top of the failover cluster; this can be a well-known application like MS SQL Server or virtualization specific roles like Hyper-V.
A failover cluster is generally connected together via physical means as well as via software or at the application layer. The general advantage of running these applications on top of a failover cluster is if one or more cluster nodes fail, other nodes are there to pick up the application, service, or role of the failed node. This process is referred to as failover and hence it is named as “failover cluster”.
Hyper-V Failover Cluster
To put it in a simple way, A group of similar Hyper-V Servers/ Windows Servers enabled with Hyper-V roles connected and working together in order to balance the situation when one of the connected servers running any application, service or role goes down or fails; the hyper-v servers are referred as nodes in tech terms.
Working Mechanism of Failover Cluster
Failover clusters have an internal monitoring mechanism that constantly queries the nodes that are members of the failover clusters to ensure they are healthy, alive, and are functioning properly; this is referred to as “heartbeat”. Sometimes if a node becomes unhealthy, the clustered service or application that exists on the unhealthy node may be restarted to resolve the issue or completely fail over as mentioned above.
Failover Clusters provide another extremely powerful storage mechanism called Cluster Shared Volume (CSV). CSV allows providing shared storage between cluster nodes so that a consistent, distributed namespace is provided to access shared storage from all nodes. This provides the necessary multi-connected storage functionality for Hyper-V machines also.
Quorum in a failover clustering configuration is a special voting mechanism that helps to prevent a situation called split-brain.
What is split-brain? – A split-brain situation can develop in the case of a failure or impairment of any one of the cluster nodes. As mentioned above, there is a special type of communication that is maintained between the nodes of a Windows Server Failover Cluster. If anything happens then the nodes in the failover cluster are separated from one another, then the nodes may assume they need to take ownership of cluster resources.
Read more: Understanding Quorum in a Failover cluster
What is new in Windows Server 2019 Failover Cluster?
With each new release of Windows Server, Microsoft generally adds features and functionalities to the Failover Cluster feature. Windows Server 2019 is no exception; there have been some really great feature improvements with Windows Server 2019 that make the Failover Cluster feature even more powerful than previous releases.
Let’s check that out:
- Cluster sets – One of the great new features of the Windows Server 2019 software-defined data center solution is the ability to form cluster sets.
- Azure-aware clusters – Microsoft is making it easier and easier to run workloads inside the Azure IaaS environment. With Azure-aware clusters, Windows Failover Clusters can now detect while they are running inside Azure. When they are running in the Azure IaaS environment, they automatically optimize themselves to provide proactive failover and logging of Azure planned maintenance events, etc. Additionally, you no longer have to configure the load balancer with a dynamic network name.
- Cross-domain cluster migration – Windows Failover Clusters that are running on top of Windows Server 2019 can now be moved between different Active Directory domains. This is a long-requested feature for Windows Failover Clusters that opens many possibilities and eases the pains of domain consolidations, mergers, etc.
- USB witness – With the USB witness configuration, the two-node Windows Failover Cluster, you can use a simple USB device that is attached to a commodity network device such as a router, etc to provide the witness component for a quorum, this is called true two-node.
- Cluster infrastructure improvements – With Windows Server 2019, the CSV cache is enabled by default to boost the performance of virtual machines running on Cluster Shared Volumes. Additionally, there have been enhancements to allow the Windows Failover Cluster to have more ability and logic to detect problems with the cluster and to automatically repair it. This includes partitioned nodes and the use of network route detection also.
- Cluster Aware Updating supports Storage Spaces Direct – A great improvement to Windows Failover Clusters in Windows Server 2012 was the Cluster Aware Updating feature. This automates the process of applying software updates on clustered servers while maintaining the availability of the roles that are housed on the cluster. This feature has been improved with each release of Windows Server. Now with Windows Server 2019, the CAU feature recognizes and is integrated with Storage Spaces Direct (S2D). The feature orchestrates restarts of all servers in the cluster for maintenance operations including updates.
- File share witness enhancements – New enhancements, improvements, and failsafe with the file share witness have been implemented with Windows Server 2019. This includes using the file share witness in poor internet-connected remote locations, lack of shared drives, lack of a domain controller such as in a DMZ, workgroup or cross-domain clusters, as well as blocking DFS file shares.
- Cluster hardening – Communication within the cluster over SMB for CSV volumes and S2D leverages certificates to make the communication as secure as possible and eliminates the dependencies on New Technology LAN Manager (NTLM).
- Failover cluster no longer uses NTLM authentication – NTLM has gone by the way-side with Windows Server 2019 Failover Cluster authentication. With Windows Server 2019, failover clusters use Kerberos and certificate-based authentication exclusively.
What is a cluster set? – A loosely-coupled grouping of multiple failover clusters including compute, storage, and hyper-converged infrastructure that enables you to move virtual machines between clusters and different cluster sets.
With this newest version of Failover Clustering available in Windows Server 2019, there are many new enhancements to make note of. Perhaps one of the most common roles that are hosted on a Windows Server Failover Cluster is Hyper-V. This allows running virtual machines in a highly-available way; specific to Hyper-V.
Prerequisites for Installing the Windows Failover Clustering
Before installing the Windows feature component, you need to verify the prerequisites. What are those? The following are generally noted by Microsoft as the prerequisites of installing the Windows Failover Clustering feature and those specific to Hyper-V:
- Install the same version of Windows Server for all Failover Cluster nodes
- Have servers with the same or similar hardware configurations
- Make sure storage and network components are adequate for connections, etc
- Shared storage – Failover clustering requires shared storage, either in the form of Storage Spaces Direct (S2D) or shared storage. The shared storage can be traditional shared storage via SAN devices with iSCSI and NFS targets as well as with new software-defined approaches such as Storage Spaces Direct.
- Attached storage should contain multiple physical disks that are configured in a way that provides redundancy. Some configurations may utilize a disk or logical storage as a disk witness
- Basic, not dynamic disks are supported
- With Cluster Shared Volumes, use NTFS- with S2D, it is recommended to use ReFS
- Especially for software-defined Windows Failover Cluster solutions (i.e. Storage Spaces Direct, etc), use WSSD certified hardware solutions
- https://www.microsoft.com/en-us/cloud-platform/software-defined-datacenter
- If you are running specialized Windows Failover Clusters such as Storage Spaces Direct (S2D), you have to pay close attention to the hardware requirements as S2D has very specific requirements
- For Hyper-V specific clusters, the cluster servers must support the hardware requirements for the Hyper-V role which includes having processors with hardware-assisted virtualization. This includes Intel Virtualization Technology (Intel VT) or AMD Virtualization (AMD-V) technology. Additionally, Hardware-enforced DEP must also be enabled.
How to Implement Failover Clustering in Windows Server?
In the following walkthrough, let’s take a look at the implementation of failover clustering in Windows Server 2019. This involves a few steps as that of the following:
- Installing the same version of Windows Server and patches on at least two failover cluster nodes.
- Deciding on domain-joined, multi-domain, or workgroup clusters.
- Configuring shared storage between the failover cluster nodes.
- Installing the Failover Cluster feature and Role services you want to cluster (Hyper-V, etc…).
- Testing the cluster configuration.
- Creating the Failover Cluster.
- Configuring quorum.
You can find brief explanations for the above-said steps in the following sections:
-
Install Windows Server 2019 and Patches
Let’s skip past the point of installing Windows Server as we have already installed Windows Server 2019 on two failover cluster hosts. One important point to note is that you want to make sure your failover cluster hosts are running the same version of Windows Server and also are at the same patch level. This ensures that everything between the hosts operates consistently and there is no unexpected behavior or variance between your nodes.

Ensure your failover cluster hosts are running the same Windows version and patch level.
-
Active Directory Domain Join?
With Windows Server 2016, Microsoft opened up some new and very exciting capabilities with Windows Server Failover Clusters in the realm of providing domain join flexibility.
Starting with Windows Server 2016 and extended to 2019, you can have clusters that are domain-joined, cross-domain joined (multi-domain), or workgroup clusters. For the lab walkthrough, we are using the typical domain-joined cluster configuration. Just note the other options that are now available.
Both cluster hosts are joined to the domain.
-
Shared Storage
Below, there are two shared drives that are mounted via iSCSI connections to SAN storage. As you can see, there is a volume mounted for quorum purposes and a larger volume that will be used to actually store data for Hyper-V virtual machines.
You will want to ensure all cluster hosts have connectivity to the shared volumes so that cluster failover, quorum, and other processes function as needed.
When the cluster is created, the cluster wizard is generally effective at choosing the disk you want to use for quorum purposes (smallest disk, etc). However, you can manually assign the disk for a quorum as well in the Configure Cluster Quorum Wizard found in the Failover Cluster Manager.
Right-click on the Failover Cluster name in the Failover Cluster Manager > More Actions > Configure Cluster Quorum Settings.
Manually assigning quorum
Mounting two volumes for failover cluster shared storage.
-
Install Hyper-V and Other Roles to Cluster
Since these two nodes will serve as Hyper-V hosts, we will install the Hyper-V Role on each host to get ready to add both to the failover cluster for hosting virtual machines. You can use Server Manager to install Roles/Features, however, PowerShell is a great way to quickly and easily install Windows Server components such as roles and features. To install Hyper-V, use the following one-liner.
- Install-WindowsFeature -Name Hyper-V -IncludeAllSubFeature-IncludeManagementTools -Restart
Installing the Hyper-V role on the failover cluster hosts
-
Install Failover Clustering Feature
Let’s now install the Failover Clustering feature as well as the management tools (Failover Cluster Manager) to manage the failover clustering feature. Again, PowerShell is a great way to do this. Use the following PowerShell one-liner:
- Install-WindowsFeature –Name Failover-Clustering –IncludeManagementTools
Install the Failover Clustering feature.
-
Testing the Failover Cluster Configuration
One of the tools provided by Microsoft that is helpful when configuring a Windows Server Failover Cluster is the Validate Configuration tool that can be found in the Failover Cluster Manager. This helps to shed light on any issues with the configuration before creating the cluster.
The validation runs extensive tests on very common problem areas of cluster configurations, including network configuration as well as storage configuration. It ensures that the shared storage configured meets the requirements needed by Windows Server failover clustering, including iSCSI Persistent reservations.
Using the Validate Cluster tool to validate the failover cluster configuration,
you can also use PowerShell to run the validation against the prospective failover cluster hosts.- Test-Cluster < node1 >,< node2 >
Running the Test-Cluster cmdlet against your cluster hosts before creating the failover cluster.
The Validation process creates a report located on the cluster host it was running from, The Validation report is created in the C:\Windows\Cluster\Reports directory on the failover cluster host.
Viewing the Validation report created
The validation process creates a very detailed report divided up into the major sections of validation. This includes the Hyper-V configuration, inventory, network, storage, system configuration, etc. You will want to make note of any errors or warnings in the report to make sure these are corrected before proceeding with the failover cluster configuration.
Viewing the failover cluster validation report
-
Creating the Failover Cluster
Once you have verified the cluster configuration and resolved any issues found, you are ready to create the failover cluster. Creating the Windows Server Failover Cluster is easily accomplished in PowerShell:
- New-Cluster -Name HyperVCluster -node < node1 >,< node2 > -staticAddress < IP Address >
Creating a new Windows Server Failover Cluster
After the cluster is created, you can verify that the Active Directory object was created and that you see the cluster in the Failover Cluster Manager.
Thus, a New Failover Cluster computer object is created in Active Directory.


Concluding Thoughts
Windows Server Failover Clusters provide a very robust and resilient platform to run business-critical applications and services. With each release of the Windows Server platform, failover clustering has continued to be enhanced. And in the release of Windows Server 2019 has the most feature-rich failover clustering platform to date.
No matter how resilient your platform from a high-availability perspective, you must ensure your data is protected. This means you should have effective backups of your mission-critical data running on your Windows Server Failover Clusters, including Hyper-V virtual machines.
Once such an effective backup solution in the market is the Vembu BDR Suite which allows you to ensure complete data-availability for your Hyper-V environments that include standalone Hyper-V hosts to multiple Windows Server Failover Clusters hosting the Hyper-V role.
In Vembu BDR Suite, even when your virtual machines are moved to another Hyper-V host, the backups will continue to function without interruptions. Used in conjunction with the native high availability features within Hyper-V, the Vembu Backup for Microsoft Hyper-V ensures data availability for your Hyper-V production workloads even at times of disasters.
Vembu BDR Suite provides a very robust backup solution with the enterprise-class features for protecting your Hyper-V clusters effectively at a surprising price range. Download a free, fully-featured trial of Vembu BDR Suite.
Follow our Twitter and Facebook feeds for new releases, updates, insightful posts and more.
Try BDRSuite for Free!
Schedule a live demo with one of our product experts
Start your full-featured 30-day free trial
Explore detailed pricing, editions & features
Installing the Cluster is easy now days. But just this I post a little blog on how to do this, In my blog stats it shows that the 2012 post is still very active , so time for an update to Windows Server 2019. in the creation there isn’t much changed, it gets only easier. but If you still not in PowerShell you got more clicks to do an less Coffee. And Windows Admin Center is also a great addition to manage a cluster. This blog post is also usable in Azure Only you need to add Storagespacesdirect and a CSV file share.
Just install a bare metal (VM) windows Server 2019 and do a domain join and the fun can start.
Installing the Cluster Feature in powershell
Install-WindowsFeature –Name Failover-Clustering –IncludeManagementTools

#Create cluster validation report
Test-Cluster -Node MVP19-01,MVP19-02

#Create new Cluster
New-Cluster -Name MVP1911-27 -Node MVP19-01,MVP19-02 -NoStorage -StaticAddress "10.255.255.45"

#place witness file on USB device from my router

Set-ClusterQuorum -FileShareWitness SERVERSHARE -Credential $(Get-Credential)
Now that the basic cluster is ready we start with the HA share

File share witness enhancements We enabled the use of a file share witness in the following scenarios:
- Absent or extremely poor Internet access because of a remote location, preventing the use of a cloud witness.
- Lack of shared drives for a disk witness. This could be a Storage Spaces Direct hyperconverged configuration, a SQL Server Always On Availability Groups (AG), or an * Exchange Database Availability Group (DAG), none of which use shared disks.
- Lack of a domain controller connection due to the cluster being behind a DMZ.
- A workgroup or cross-domain cluster for which there is no Active Directory cluster name object (CNO). Find out more about these enhancements in the following post in Server & Management Blogs: Failover Cluster File Share Witness and DFS.We now also explicitly block the use of a DFS Namespaces share as a location. Adding a file share witness to a DFS share can cause stability issues for your cluster, and this configuration has never been supported. We added logic to detect if a share uses DFS Namespaces, and if DFS Namespaces is detected, Failover Cluster Manager blocks creation of the witness and displays an error message about not being supported.
that’s it the cluster is created, we can start with the File server
Next is installation of the file server role

A restart is needed! After the restart we can build the cluster with the HA file share
$servers = ("MVP19-01", "MVP19-02")
foreach ($server in $servers) {Install-WindowsFeature -Name file-services -ComputerName $server}
Now that the File Server Role is added we can add the Disk. Or use a disk that you already added before.
First we need to add a disk this can be done in the Failover Cluster manager or with PowerShell

Get-ClusterAvailableDisk | Add-ClusterDisk

The Roles are there and the Disk is added

Next step is adding the File server Role to the Cluster and add the HA File Share.
In this case I have a fail over disk and I use the File Server for general use.


So when adding the Disk it is not showing the disk. This is The disk is added to the cluster but the disk isn’t formatted!
Keep in mind that formating the cluster disk while it is online is not possible. You need to set the disk in maintenance mode else the format will fail.


So after the disk format we will see the Disk appear and can be added to the File server

After this the File server is up and running. As you can see the setup is screen intense, building this with PowerShell is a lot faster.
Powershell
add-ClusterFileServerRole -Storage "Cluster Disk 1" -Name MyFiles

New-SmbShare -Name "Data" -Path "J:Data" -EncryptData $True
Quick steps with powershell and even the share is created and encrypted

Next step is adding the file share.

go for the Quick setup


Pick the disk and select the folder with the data on the disk, if there is no data then create a folder that will hold the data later.

as you can see the UNC path from the File Server.


As you can see the settings can be adjusted for you needs and also set the right access, and keep in mind this needs to be don on the Cluster Level!

All Done

So creating a File Server and 2 file shares is Click intensive if you don’t use PowerShell.
But What about Windows Admin Center ? yes that would be an option also except here you can’t create a cluster role.


You can create a new role but no file server /share etc.
But when the share is created and running like now you can use Windows Admin Center for migration the data to the file share.

But more and more options are coming in Windows Admin Center below are some links that you can use to add your request to the UserVoice
https://docs.microsoft.com/en-us/windows-server/manage/windows-admin-center/use/manage-failover-clusters
More Coming
Failover cluster management in Windows Admin Center is actively under development and new features will be added in the near future. You can view the status and vote for features in UserVoice:
Feature Request
Show more clustered disk info
Support additional cluster actions
Support converged clusters running Hyper-V and Scale-Out File Server on different clusters
View CSV block cache
See all or propose new feature
+++++++++++++++
Follow Me on Twitter @ClusterMVP
Follow My blog https://robertsmit.wordpress.com
Linkedin Profile Robert Smit MVP Linkedin profile
Google : Robert Smit MVP profile
Tags: Active Directory, Authentication, Azure Management, Cluster, Encryption, How To, Hyper-Converged, Hyper-V, SQL Server, Step-by-Step, Storage, Virtual Machine [VM], Windows Server